- Welcome to the Kancolle Wiki!
- If you have any questions regarding site content, account registration, etc., please visit the KanColle Wiki Discord
Summer 2023 Event/E-7
 
| |||||||||
|---|---|---|---|---|---|---|---|---|---|
 
Time remaining until Event ends [1]:
The Summer 2023 Event has ended!
| |||||||||
ノルマンディー上陸作戦


| Information | ||||
|---|---|---|---|---|
| Event Tag | ||||
| Boss Gauges | Hard (甲): 650TP+8000HP+9600HP+840TP+7700HP | |||
| Medium (乙): 550TP+5000HP+6000HP+720TP+6860HP | ||||
| Easy (丙): 450TP+5000HP+6000HP+600TP+6300HP | ||||
| Casual (丁): 350TP+900HP+1680HP+480TP+5850HP | ||||
| Map Bosses | Fortified Pillbox Princess
| |||
| Fortified Pillbox Princess
| ||||
| Fortified Pillbox Princess
| ||||
Fortified Pillbox Princess Damaged
| ||||
European Little Sister Princess
| ||||
| Rewards[edit] | ||||
|---|---|---|---|---|
| Ship |  Rodney | |||
| Choice | 丁 Casual |
丙 Easy |
乙 Medium |
甲 Hard |
New Model Aerial Armament Material |
3 | 4 | ||
| OR | ||||
Development Material |
30 | 50 | ||
| THEN | ||||
Improvement Material |
4 | 6 | 10 | |
| OR | ||||
Development Material |
20 | 30 | 50 | |
| Reward | 丁 Casual |
丙 Easy |
乙 Medium |
甲 Hard |
|---|---|---|---|---|
Medal |
1 | 2 | 3 | |
Action Report |
1 | 1 | 1 | |
First Class Medal |
1 | |||
 Sea Otter |
1 | 1 (★3) | ||
 Me 262 A-1a/R1 |
1 |

The event guides are to be constructed through the respective Event map page guide sandbox and reviewed by editors before being approved here.
- Do not update the guides through this page unless it is a minor fix. Please only update guides through their respective sandbox pages.
Branching Table
| E-7 Branching Rules (Start Points) ▼/▲ | ||
|---|---|---|
| Nodes | Rules | |
| Start | 1 |
|
2 |
| |
3 |
| |
| E-7 Branching Rules (Part 1) ▼/▲ | ||
|---|---|---|
| Nodes | Rules | |
1 |
A |
|
C |
| |
A |
A1 |
|
A2 |
| |
A1 |
A2 |
|
B |
| |
A2 |
A3 |
Active Branching |
B | ||
A3 |
A4 |
|
A5 |
| |
B |
B1 |
|
B2 |
| |
B2 |
B3 |
Active Branching |
B4 | ||
C |
A3 |
Active Branching |
C1 | ||
C2 |
C3 |
|
D |
| |
L |
| |
D |
E |
|
F |
| |
F |
G |
|
H |
| |
| E-7 Branching Rules (Part 2) ▼/▲ | ||
|---|---|---|
| Nodes | Rules | |
J |
K |
Active Branching |
L | ||
K |
M |
|
N |
| |
L |
N |
|
T |
| |
U |
| |
V |
| |
X |
| |
N |
O |
|
T |
| |
O |
P |
|
R |
| |
Q |
N |
|
O |
| |
U |
V |
??? |
X |
??? | |
X |
W |
|
Y |
| |
Z |
| |
Branching compositions were reported over the course of the event. (NGA and KCNav)
Historical Bonuses
Ship Bonuses
| Ship Damage Bonuses Stack with each other | |||||||||||||||||
|---|---|---|---|---|---|---|---|---|---|---|---|---|---|---|---|---|---|
| Ships [Toggle Names] |
Multipliers | ||||||||||||||||
| Mapwide | Node H/P/U/X | Node Z | |||||||||||||||
| Coastal Defense Ships (DE) | 1.12x | - | - | ||||||||||||||
| Destroyers (DD) | 1.03x | 1.09x | |||||||||||||||
| Light Cruisers (CL) NOT CLT |
1.04x | 1.08x | |||||||||||||||
| Seaplane Tenders (AV) | 1.08x | - | |||||||||||||||
| Light Carriers (CVL) | 1.05x | 1.03 | |||||||||||||||
| Standard Carriers (CV(B)) | - | ||||||||||||||||
| Heavy Cruisers (CA(V)) | 1.04x | 1.07x | |||||||||||||||
|
1.12x | 1.06x | 1.06x | ||||||||||||||
Ark Royal Kai |
1.05x [1.176x] | - | - | ||||||||||||||
Warspite Kai |
1.07x [1.1984x] | 1.15x | |||||||||||||||
Jervis Kai |
1.04x [1.2x] | ||||||||||||||||
Nelson Kai Rodney Kai Javelin Kai |
- | ||||||||||||||||
|
1.09x | - | |||||||||||||||
|
1.07x | 1.04x | |||||||||||||||
Nevada Kai Mod.2 |
- | - | 1.15x | ||||||||||||||
Tuscaloosa Kai | |||||||||||||||||
|
1.06x | - | |||||||||||||||
|
1.06x | ||||||||||||||||
Gotland Andra |
1.07x [1.1128x] | ||||||||||||||||
Perth Kai |
1.05x [1.092x] | ||||||||||||||||
De Ruyter Kai | |||||||||||||||||
Souya (AGB) |
1.28x | ||||||||||||||||
| Ships [Toggle Names] |
Damage against CV Summer Princess  BB Summer Princess 
|
|---|---|
Ark Royal Kai Bismarck Drei Nelson Kai Prinz Eugen Kai Gotland Andra |
1.1x |
Equipment Bonuses
- For Group 1 and Group 2 bonuses, having one equipment from the group is enough to have the bonus. Having a second one do nothing.
- Do not confuse the balloon mechanic that buff the whole fleet with this event bonus that only buff ships equip with it.
The bonus from each group is stackable.
| Equipment | Node A5 | Nodes H/P/U | Node Z | Against CV Summer Princess
|
Against BB Summer Princess
| |
|---|---|---|---|---|---|---|
|
- | 1.03x each (stackable) |
- | - | ||
|
1.06x each (stackable with bellow) | |||||
Group 1
|
|
1.05x | 1.05x | 1.04x | ||
Group 2
|
  
|
1.09x | 1.09x | 1.07x | ||
Group 3
|
|
1.13x | 1.13x | 1.11x | ||
Group A
|
|
- | 1.05x each (stackable) |
1.05x each (stackable) | ||
Group B
|
|
1.08x each (stackable) |
1.08x each (stackable) | |||
|
- | 1.1x | 1.2x | |||
| 1.1x | ||||||
|
1 = 1.10x 2 = 1.32x | |||||
| 1 = 1.10x 2 = 1.21x |
- | |||||
Planes Bonuses
Plane bonuses similar to the Summer 2021 & 2022 events have returned and should be examined when planning equipment setups. The following bonuses are applied:
- Ships using planes get bonuses based on the numbers 1, 2, and 3,
- Land-bases using planes get bonuses applied to all bombers in the individual base, based on the letters A and B.
- Notes
- Those bonuses work for all ships and for all attack types, including LBAS, airstrikes, air/surface shellings, and night attacks.
- Bonuses from a same line do not stack.
| Historical Plane Damage Bonuses | |||||
|---|---|---|---|---|---|
| Group | Multipliers | ||||
| Mapwide | Nodes H/P/U/X | Nodes Z | |||
| 0 | - | ||||
| LBAS | A | 1.06x | 1.02x [1.081x] | 1.??x [1.??x] | |
| B | 1.08x | 1.04x [1.123x] | 1.??x [1.??x] | ||
| 1.2x | 1.22x | ?? | |||
| Ships | 1 | 1.03x | 1.04x [1.071x] | 1.05x [1.082x] | |
| 2 | 1.04x | 1.05x [1.093x] | 1.07x [1.113x] | ||
| 3 | 1.05x | 1.06x [1.113x] | 1.08x [1.134x] | ||
| Ship Effects | |||||||
|---|---|---|---|---|---|---|---|
| Group | Carrier Bombers | Carrier Fighters | Misc | ||||
| 0 |
|
| |||||
| 1 |
|
|
| ||||
| 2 |
|
|
| ||||
| 3 |
|
|
| ||||


| Land-Based Effects | |||||||||||
|---|---|---|---|---|---|---|---|---|---|---|---|
| Group | LB Bombers | LB Fighters/Recons | Carrier Bombers | Carrier Fighters | Misc | ||||||
| 0 |
|
|
| ||||||||
| A |
|
|
|
| |||||||
| B |
|
|
|
|
| ||||||


Debuff
| Ships | Node Z |
|---|---|
| -59 | |
| -39 |
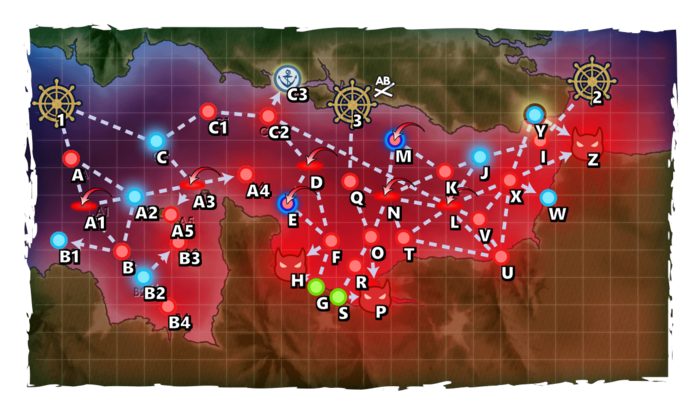
Map overview
E7 is a Combined fleet three-phase map consisting of two transport and three boss phases.
- 3 LBAS are available on this map.
- This map uses 5 locks:
 2nd Fleet (from on E-1 & E-3),
 1st Fleet (from on E-4 & E-6),
 British Fleet Main Force (from on E-6),
 British D-Day Landing Force (from on E-6),
 American D-Day Landing Force.

- An Emergency Anchorage Repair node is present on Y
- An "Airstrike Supported Battle" node is present on M
 Barrage Balloons can be deployed on nodes A5 H P U Z
Phase 0.5 - Unlock the Boss Node
"The Channel Islands and Securing the flank for Operation Neptune"
To unlock the first phase, the following steps have to be performed:
| A4 | A5 | B3 | B4 | C3 | |
|---|---|---|---|---|---|
| Hard | S? x2 | A+ x2 | A+ | S? x2 | Reach |
| Medium | A+ | A+ x2? | A+ | A+ | Reach |
| Easy | A+ | A+ | A+ | A+ | Reach |
| Casual | A+ | A+ | A+ | A+ | Reach |
- Single Fleet/Striking Force Fleet: 0-1(F)BB(V), 0-1CVL, 1CL, 3-5DD


- Route: 1 A A2 A3 A4
- LBAS range: 3
- Route: 1 A A2 B B2 B3
- LBAS range: 6
- Route: 1 A A2 B B2 B4
- LBAS range: 7
- Bringing ASW setups is required, and/or use ASW Node Support or ASW LBAS as needed
Phase 1 - TP
"Engineers Landing at Utah, Omaha & Pointe du Hoc"
Phase 1 is a "Transport Operation":
- STF:
- Main: 2(F)BB(V), 1-2CVL, 0-1CL, 1-3DD
- Escort: 0-1CA(V), 1CL, 4-5DD
- Route: 1 C C1 C2 D F G H
- LBAS range: 5
- The boss is an hard skin Installation (Pillboxes) and requires specialized gears to be defeated.
Phase 2 - Boss
"Saving Private Fairy at Utah, Omaha & Pointe du Hoc Landing Operation"
The same boss node as of #Phase 1 - TP is faced here, sharing most characteristics, notably the locks ![]()
![]() .
.
- LBAS range: 5
- The boss is an hard skin Installation (Pillboxes) and requires specialized gears to be defeated.
Phase 3 - Boss
"Boss Showdown against the Atlantic Wall at Gold, Sword, and Juno Beach"
- CTF:


- Main: 2(F)BB(V), 2CV(B), 0-1CVL/CAV, 1-2CL
- Escort: 1CA(V)/CLT, 1CL, 4DD
- Route: 2 I J K N O P
- LBAS range: 5
- The boss is an hard skin Installation (Pillboxes) and requires specialized gears to be defeated.
Phase 4 - TP
"Reinforcing the Beachheads at Gold, Sword, and Juno Beach"
Phase 4 is a "Transport Operation":
- The same boss node as of #Phase 3 - Boss is faced here, sharing most characteristics, however, the previous phase's fleet cannot be reused.
- TCF:
- Main: 1-2BBV, 0-1AV/LHA, 0-1CL, 4DD
- Escort: 0-1CA(V), 1-2CL, 3-4DD

- Route: 3 Q O R S P
- LBAS range: 5
- The boss is an hard skin Installation (Pillboxes) and requires specialized gears to be defeated.
- ASW Node Support/ASW LBAS on node Q
- Send 1 LBAS which contains 4 Land Based Bombers to O and R each.
- Both O and R have 4 LBAS range.
- The use of the
 FCF FCF is advised to reach the boss.
 - The use of the
 Smoke Generators is advised on node R.
 - Node Support is recommended, being very effective against node R.
- Node R and the boss have PT boats and they will require specific set-ups to be defeated:
| Anti-PT boat | |||||||||||||||||||||||||||||||||||||||||||||||||||||||||||||||||||||||||||||||||||||||||||||||||||||||||||||||||||||||||||||||||||||||||||
|---|---|---|---|---|---|---|---|---|---|---|---|---|---|---|---|---|---|---|---|---|---|---|---|---|---|---|---|---|---|---|---|---|---|---|---|---|---|---|---|---|---|---|---|---|---|---|---|---|---|---|---|---|---|---|---|---|---|---|---|---|---|---|---|---|---|---|---|---|---|---|---|---|---|---|---|---|---|---|---|---|---|---|---|---|---|---|---|---|---|---|---|---|---|---|---|---|---|---|---|---|---|---|---|---|---|---|---|---|---|---|---|---|---|---|---|---|---|---|---|---|---|---|---|---|---|---|---|---|---|---|---|---|---|---|---|---|---|---|---|
Unlike most standard Abyssals, "PT boats" (PT Imp Pack & Schnellboot Imp Pack & Schnellboot Imp Pack ) are "very small and fast". ) are "very small and fast".
During Events, some special bonuses may be added, with "historical" ships and equipment gaining some accuracy bonuses[10].
| |||||||||||||||||||||||||||||||||||||||||||||||||||||||||||||||||||||||||||||||||||||||||||||||||||||||||||||||||||||||||||||||||||||||||||
| [edit] | |||||||||||||||||||||||||||||||||||||||||||||||||||||||||||||||||||||||||||||||||||||||||||||||||||||||||||||||||||||||||||||||||||||||||||


Phase 4.5 - Unlock the Boss Node
| W | U | X | |
|---|---|---|---|
| Hard | Reach x2 | A+ x2 | S |
| Medium | Reach x1 | A+ x2 | S |
| Easy | Reach | A+ x2 | S |
| Casual | Reach | A+ | S |
- STF: 3(F)BB(V), 1CV, 1CAV/CL, 1AV/LHA + 1CAV, 1CL, 4DD
- Same Fleet as Phase 5 - Boss Chipping
- All the nodes can be reached with 1 sortie.
- Route: 2 I J L T U X W
- LBAS range: 6/5
- On U, the enemy are hard skin Installations (Pillboxes) and requires specialized gears to be defeated.
- Using some ASW will help increase the passing rate on nodes I T.
- Using 1 ASW LBAS or using 1-2 OASW ships can also be considered.
Phase 5 - Boss Chipping
"Operation Fortitude South at Calais"
See #Phase 6 - Boss LD for the improved comps to use in Last Dance.
- STF: SLOW
- Main: 3(F)BB(V), 1CV(B), 1CAV/AV, 1CL
- Escort: 1CA(V)/AO, 1CL, 4DD
- Route: 2 I J L U X Y Z
- Any AO must be Kai
- LBAS range: 6
- The use of a Special Attack is highly advised.
- It is highly recommended for Bringing and Using at least 3 Smoke Generators at U.
- Specifically for Chipping, there are installation enemies in addition to the Boss
- It is highly recommended to have some ships fitted for anti-installation combat to take care of the secondary threats.
- Y is an Emergency Anchorage Repair node.
Phase 5.5 - Unlock the Shortcuts + Debuff
Once LD has been reached, the following steps have to be performed to debuff the boss and additionally unlock the shortcuts to better reach it:
| P | D | H | B4 | L | N | A5 | S | U | LBAS | |
|---|---|---|---|---|---|---|---|---|---|---|
| Hard | A+ x2 | AS | A+ x2 | S x2 | AS | AS | S x2 | Reach | A+ x2 | AS x3 |
| Medium | A+ x2 | AS | A+ x2 | S | AS | AS | S x2 | Reach | A+ x2 | ? |
| Easy | ? | ? | ? | ? | ? | ? | ? | ? | ? | ? |
| Casual | ? | ? | ? | ? | ? | ? | ? | ? | ? | ? |
- STF:
- Main: 4(F)BB(V), 1CV(B/L), 0-1XX
- Escort: 1CL, 2DD, 0-3XX
- Route: 1 C A3 A5
- Similar to #Phase 0.5 - Unlock the Boss Node, but now requires 4(F)BB(V) to start from start point 1.
Once Debuff is complete the CG will change to the following:
| European Little Sister Princess |
|---|
|


| Fortified Pillbox Princess |
|---|
|


Phase 6 - Boss LD
"Operation Neptune"
#Phase 5 - Boss Chipping's fleets are still viable here.
- STF: FAST
- Main: 3(F)BB(V), 1CV(B), 1CAV, 1CL
- Escort: 1CA(V), 1CL, 0-1CLT, 3-4DD
- Route: 2 I J L V X Z
- LBAS range: 6
- Y is an Emergency Anchorage Repair node
- PT boats are present on the boss node, and require specific set-ups to be defeated:
| Anti-PT boat | |||||||||||||||||||||||||||||||||||||||||||||||||||||||||||||||||||||||||||||||||||||||||||||||||||||||||||||||||||||||||||||||||||||||||||
|---|---|---|---|---|---|---|---|---|---|---|---|---|---|---|---|---|---|---|---|---|---|---|---|---|---|---|---|---|---|---|---|---|---|---|---|---|---|---|---|---|---|---|---|---|---|---|---|---|---|---|---|---|---|---|---|---|---|---|---|---|---|---|---|---|---|---|---|---|---|---|---|---|---|---|---|---|---|---|---|---|---|---|---|---|---|---|---|---|---|---|---|---|---|---|---|---|---|---|---|---|---|---|---|---|---|---|---|---|---|---|---|---|---|---|---|---|---|---|---|---|---|---|---|---|---|---|---|---|---|---|---|---|---|---|---|---|---|---|---|
Unlike most standard Abyssals, "PT boats" (PT Imp Pack & Schnellboot Imp Pack) are "very small and fast".
During Events, some special bonuses may be added, with "historical" ships and equipment gaining some accuracy bonuses[10].
| |||||||||||||||||||||||||||||||||||||||||||||||||||||||||||||||||||||||||||||||||||||||||||||||||||||||||||||||||||||||||||||||||||||||||||
| [edit] | |||||||||||||||||||||||||||||||||||||||||||||||||||||||||||||||||||||||||||||||||||||||||||||||||||||||||||||||||||||||||||||||||||||||||||
Enemy Compositions
Resource Nodes
C3 is a "Special Resource Node" rewarding ammo ![]() .
.
- Type A craft bring +9

- Drums bring +3.5
- See here for more details.
| Normal Resource Nodes Gain Modifiers | ||||
|---|---|---|---|---|
| Equipment / Ship | Bonus Gains (per DLC / Ship)[1] | |||
| Type | Name | (& 7-3 O |
||
| A | Toku Daihatsu Landing Craft Daihatsu Landing Craft  Armed Daihatsu  DLC + T89 Tank  DLC + Panzer II Soukoutei  Toku DLC + Ho-Ni Tank
|
3.0 | 2.0 | |
| Ka-Mi Tank Ka-Tsu Tank  Ka-Tsu Tank Kai 
| ||||
| B | Drums
|
2.0 | 1.5 | |
| C | Toku DLC + 11th Reg M4A1 DD Toku DLC + Panzer III Toku DLC + Chi-Ha Toku DLC + Chi-Ha Kai Toku DLC + Panzer III J
|
0.0 | ||
| All ships | 0.0 | |||
| Resource Cap | N/A | |||
| Random Resource Increments | 5 | |||
Notes:
| ||||
| Type | Ships |
|---|---|
| DD |
| Type | Ships |
|---|---|
| DD |
| Type | Ships |
|---|---|
| DD |
| Type | Ships |
|---|---|
| DD |
| Type | Ships |
|---|---|
| DD | |
| CA | |
| FBB | |
| BB | |
| CV | |
| SS |
| Type | Ships |
|---|---|
| DD |
| Type | Ships |
|---|---|
| DD | |
| CA | |
| BB | |
| CV | |
| SS |
| Type | Ships |
|---|---|
| DD | |
| CL | |
| CA | |
| BB | |
| CV | |
| SSV | |
| LHA | |
| CVB |
| # | Formation | Normal Battle Node | AD/AP AS/AS+ |
|---|---|---|---|
| A | Echelon Line Abreast |
0/0 0/0 | |
| Echelon Line Abreast |
0/0 0/0 | ||
| Echelon Line Abreast |
0/0 0/0 | ||
| # | Formation | Normal Battle Node | AD/AP AS/AS+ |
| # | Formation | Air Defense Node | AD/AP AS/AS+ |
|---|---|---|---|
| A1 | Diamond | 55/110 246/492 | |
| Diamond | 60/119 267/534 | ||
| Diamond | 74/147 330/660 | ||
| Diamond | 61/122 273/546 | ||
| Diamond | 81/161 360/720 | ||
| Diamond | 99/198 444/888 | ||
| Diamond | 105/209 468/936 | ||
| # | Formation | Air Defense Node | AD/AP AS/AS+ |
| # | Selection Node | ||
|---|---|---|---|
| A2 | 艦隊の針路を選択できます。提督、どちらの針路をとられますか? You can decide the fleet's course. Admiral, which heading should we take? | ||
| # | Selection Node | ||
| # | Formation | Air Defense Node | AD/AP AS/AS+ |
|---|---|---|---|
| A3 | Diamond | 55/110 246/492 | |
| Diamond | 60/119 267/534 | ||
| Diamond | 74/147 330/660 | ||
| Diamond | 61/122 273/546 | ||
| Diamond | 81/161 360/720 | ||
| Diamond | 99/198 444/888 | ||
| Diamond | 105/209 468/936 | ||
| # | Formation | Air Defense Node | AD/AP AS/AS+ |
| # | Formation | Normal Battle Node | AD/AP AS/AS+ |
|---|---|---|---|
| A4 | Echelon | 0/0 0/0 | |
| Echelon | 0/0 0/0 | ||
| Echelon | 0/0 0/0 | ||
| # | Formation | Normal Battle Node | AD/AP AS/AS+ |
| # | Formation | Normal Battle Node | AD/AP AS/AS+ |
|---|---|---|---|
| A5 | Diamond | 0/0 0/0 | |
| Diamond | 0/0 0/0 | ||
| Diamond | 0/0 0/0 | ||
| # | Formation | Normal Battle Node | AD/AP AS/AS+ |
| # | Formation | Normal Battle Node | AD/AP AS/AS+ |
|---|---|---|---|
| B | Echelon Vanguard |
0/0 0/0 | |
| Vanguard | 0/0 0/0 | ||
| # | Formation | Normal Battle Node | AD/AP AS/AS+ |
| # | Empty Node | ||
|---|---|---|---|
| B1 | 敵影を見ず。 No enemy spotted. | ||
| # | Empty Node | ||
| # | Selection Node | ||
|---|---|---|---|
| B2 | 艦隊の針路を選択できます。提督、どちらの針路をとられますか? You can decide the fleet's course. Admiral, which heading should we take? | ||
| # | Selection Node | ||
| # | Formation | Normal Battle Node | AD/AP AS/AS+ |
|---|---|---|---|
| B3 | Echelon | 0/0 0/0 | |
| Echelon | 0/0 0/0 | ||
| Echelon | 0/0 0/0 | ||
| # | Formation | Normal Battle Node | AD/AP AS/AS+ |
| # | Formation | Normal Battle Node | AD/AP AS/AS+ |
|---|---|---|---|
| B4 | Echelon | 0/0 0/0 | |
| Echelon | 0/0 0/0 | ||
| Echelon | 0/0 0/0 | ||
| # | Formation | Normal Battle Node | AD/AP AS/AS+ |
| # | Selection Node | ||
|---|---|---|---|
| C | 艦隊の針路を選択できます。提督、どちらの針路をとられますか? You can decide the fleet's course. Admiral, which heading should we take? | ||
| # | Selection Node | ||
| # | Formation | Normal Battle Node | AD/AP AS/AS+ |
|---|---|---|---|
| C1 | Line Ahead Double Line Vanguard |
0/0 0/0 | |
| # | Formation | Normal Battle Node | AD/AP AS/AS+ |
| # | Formation | Normal Battle Node | AD/AP AS/AS+ |
|---|---|---|---|
| C2 | Echelon Line Abreast |
0/0 0/0 | |
| Echelon Line Abreast |
0/0 0/0 | ||
| # | Formation | Normal Battle Node | AD/AP AS/AS+ |
| # | Resource Node | ||
|---|---|---|---|
| C3 | Gained 100 | ||
| # | Resource Node | ||
| # | Formation | Air Defense Node | AD/AP AS/AS+ |
|---|---|---|---|
| D | Diamond | 46/91 204/408 | |
| Diamond | 55/110 246/492 | ||
| Diamond | 60/119 267/534 | ||
| Diamond | 74/147 330/660 | ||
| Diamond | 61/122 273/546 | ||
| Diamond | 81/161 360/720 | ||
| Diamond | 99/198 444/888 | ||
| Diamond | 105/209 468/936 | ||
| # | Formation | Air Defense Node | AD/AP AS/AS+ |
| # | Formation | Supported Battle Node | AD/AP AS/AS+ |
|---|---|---|---|
| E | Echelon | 24/47 105/210 | |
| Echelon | 37/73 162/324 | ||
| Echelon | 37/73 162/324 | ||
| Echelon | 60/119 267/534 | ||
| # | Formation | Supported Battle Node | AD/AP AS/AS+ |
| # | Formation | Normal Battle Node | AD/AP AS/AS+ |
|---|---|---|---|
| F | Diamond | 36/71 159/318 | |
| Diamond | 85/169 378/756 | ||
| Diamond | 78/155 348/696 | ||
| # | Formation | Normal Battle Node | AD/AP AS/AS+ |
| # | Landing Node | ||
|---|---|---|---|
| G | 輸送物資の揚陸地点に到達しました。本海域の輸送作戦は無事完了しています。 The landing point of the convoy has been reached. The transport operation here has already been completed successfully. | ||
| # | Landing Node | ||
| # | Formation | Boss Battle Node | AD/AP AS/AS+ |
|---|---|---|---|
| H | Double Line | 0/0 0/0 | |
| Double Line | 0/0 0/0 | ||
| Double Line | 0/0 0/0 | ||
| Double Line | 0/0 0/0 | ||
| Double Line | 0/0 0/0 | ||
| Double Line (Final)
|
0/0 0/0 | ||
| # | Formation | Boss Battle Node | AD/AP AS/AS+ |
| # | Formation | Normal Battle Node | AD/AP AS/AS+ |
|---|---|---|---|
| I | Echelon Line Abreast |
0/0 0/0 | |
| Echelon Line Abreast |
0/0 0/0 | ||
| Echelon Line Abreast |
0/0 0/0 | ||
| # | Formation | Normal Battle Node | AD/AP AS/AS+ |
| # | Selection Node | ||
|---|---|---|---|
| J | 艦隊の針路を選択できます。提督、どちらの針路をとられますか? You can decide the fleet's course. Admiral, which heading should we take? | ||
| # | Selection Node | ||
| # | Formation | Normal Battle Node | AD/AP AS/AS+ |
|---|---|---|---|
| K | Line Ahead Double Line Vanguard |
32/63 140/279 | |
| # | Formation | Normal Battle Node | AD/AP AS/AS+ |
| # | Formation | Air Defense Node | AD/AP AS/AS+ |
|---|---|---|---|
| L | Diamond | 55/110 246/492 | |
| Diamond | 60/119 267/534 | ||
| Diamond | 74/147 330/660 | ||
| Diamond | 61/122 273/546 | ||
| Diamond | 81/161 360/720 | ||
| Diamond | 99/198 444/888 | ||
| Diamond | 105/209 468/936 | ||
| # | Formation | Air Defense Node | AD/AP AS/AS+ |
| # | Formation | Supported Battle Node | AD/AP AS/AS+ |
|---|---|---|---|
| M | Echelon | 37/73 162/324 | |
| Echelon | 37/73 162/324 | ||
| # | Formation | Supported Battle Node | AD/AP AS/AS+ |
| # | Formation | Air Defense Node | AD/AP AS/AS+ |
|---|---|---|---|
| N | Diamond | 55/110 246/492 | |
| Diamond | 60/119 267/534 | ||
| Diamond | 74/147 330/660 | ||
| Diamond | 61/122 273/546 | ||
| Diamond | 81/161 360/720 | ||
| Diamond | 99/198 444/888 | ||
| Diamond | 105/209 468/936 | ||
| # | Formation | Air Defense Node | AD/AP AS/AS+ |
| # | Formation | Normal Battle Node | AD/AP AS/AS+ |
|---|---|---|---|
| O | Vanguard | 0/0 0/0 | |
| Vanguard | 0/0 0/0 | ||
| Vanguard | 0/0 0/0 | ||
| # | Formation | Normal Battle Node | AD/AP AS/AS+ |
| # | Formation | Boss Battle Node | AD/AP AS/AS+ |
|---|---|---|---|
| P | Cruising Formation 3 | 0/0 0/0 | |
| Cruising Formation 3 | 0/0 0/0 | ||
| Cruising Formation 3 | 0/0 0/0 | ||
| Cruising Formation 3 (Final)
|
0/0 0/0 | ||
| # | Formation | Boss Battle Node | AD/AP AS/AS+ |
| # | Formation | Normal Battle Node | AD/AP AS/AS+ |
|---|---|---|---|
| Q | Echelon Line Abreast |
0/0 0/0 | |
| Echelon Line Abreast |
0/0 0/0 | ||
| Echelon Line Abreast |
0/0 0/0 | ||
| # | Formation | Normal Battle Node | AD/AP AS/AS+ |
| # | Formation | Normal Battle Node | AD/AP AS/AS+ |
|---|---|---|---|
| R | Echelon | 0/0 0/0 | |
| Vanguard | 0/0 0/0 | ||
| Vanguard | 0/0 0/0 | ||
| # | Formation | Normal Battle Node | AD/AP AS/AS+ |
| # | Landing Node | ||
|---|---|---|---|
| S | 輸送物資の揚陸地点に到達しました。本海域の輸送作戦は無事完了しています。 The landing point of the convoy has been reached. The transport operation here has already been completed successfully. | ||
| # | Landing Node | ||
| # | Formation | Normal Battle Node | AD/AP AS/AS+ |
|---|---|---|---|
| T | Echelon Line Abreast |
0/0 0/0 | |
| Echelon Line Abreast |
0/0 0/0 | ||
| Echelon Line Abreast |
0/0 0/0 | ||
| # | Formation | Normal Battle Node | AD/AP AS/AS+ |
| # | Formation | Normal Battle Node | AD/AP AS/AS+ |
|---|---|---|---|
| U | Diamond | 0/0 0/0 | |
| Diamond | 0/0 0/0 | ||
| Diamond | 0/0 0/0 | ||
| # | Formation | Normal Battle Node | AD/AP AS/AS+ |
| # | Formation | Normal Battle Node | AD/AP AS/AS+ |
|---|---|---|---|
| V | Echelon | 0/0 0/0 | |
| Echelon | 0/0 0/0 | ||
| Echelon | 0/0 0/0 | ||
| Echelon | 0/0 0/0 | ||
| # | Formation | Normal Battle Node | AD/AP AS/AS+ |
| # | Empty Node | ||
|---|---|---|---|
| W | 敵影を見ず。 No enemy spotted. | ||
| # | Empty Node | ||
| # | Formation | Normal Battle Node | AD/AP AS/AS+ |
|---|---|---|---|
| X | Line Ahead Double Line Echelon |
0/0 0/0 | |
| # | Formation | Normal Battle Node | AD/AP AS/AS+ |
| # | Repair Node | ||
|---|---|---|---|
| # | Repair Node | ||
| # | Formation | Boss Battle Node | AD/AP AS/AS+ |
|---|---|---|---|
| Z | Cruising Formation 4 | 31/61 135/270 | |
| Cruising Formation 4 (Final)
|
111/221 495/990 | ||
| # | Formation | Boss Battle Node | AD/AP AS/AS+ |
Ship Drops
| Ship drops | |||||||||||||||||||||||||||||||||||||||||||||||||||||||||||||||||||||||||||||||||||||||||||||||||||
|---|---|---|---|---|---|---|---|---|---|---|---|---|---|---|---|---|---|---|---|---|---|---|---|---|---|---|---|---|---|---|---|---|---|---|---|---|---|---|---|---|---|---|---|---|---|---|---|---|---|---|---|---|---|---|---|---|---|---|---|---|---|---|---|---|---|---|---|---|---|---|---|---|---|---|---|---|---|---|---|---|---|---|---|---|---|---|---|---|---|---|---|---|---|---|---|---|---|---|---|
| Type | Ship? | C1 | F | K | O | P | R | X | Z | ||||||||||||||||||||||||||||||||||||||||||||||||||||||||||||||||||||||||||||||||||||||||||
| DD | Tamanami | Casual+ | |||||||||||||||||||||||||||||||||||||||||||||||||||||||||||||||||||||||||||||||||||||||||||||||||
| DD | Ume | Casual+ | Casual+ | Casual+ | |||||||||||||||||||||||||||||||||||||||||||||||||||||||||||||||||||||||||||||||||||||||||||||||
| DD | Arashi | Medium+ | Casual+ | Hard+ | Casual+ | ||||||||||||||||||||||||||||||||||||||||||||||||||||||||||||||||||||||||||||||||||||||||||||||
| DD | Hagikaze | Easy+ | Casual+ | Casual+ | |||||||||||||||||||||||||||||||||||||||||||||||||||||||||||||||||||||||||||||||||||||||||||||||
| DD | Makinami | Casual+ | |||||||||||||||||||||||||||||||||||||||||||||||||||||||||||||||||||||||||||||||||||||||||||||||||
| DD | Fujinami | Casual+ | |||||||||||||||||||||||||||||||||||||||||||||||||||||||||||||||||||||||||||||||||||||||||||||||||
| DD | Hayanami | Casual+ | |||||||||||||||||||||||||||||||||||||||||||||||||||||||||||||||||||||||||||||||||||||||||||||||||
| DD | Hamanami | Casual+ | |||||||||||||||||||||||||||||||||||||||||||||||||||||||||||||||||||||||||||||||||||||||||||||||||
| DD | Kishinami | Hard+ | Casual+ | Medium+ | Casual+ | Casual+ | Easy+ | Casual+ | |||||||||||||||||||||||||||||||||||||||||||||||||||||||||||||||||||||||||||||||||||||||||||
| DD | Akishimo | Medium+ | Casual+ | Medium+ | Casual+ | Casual+ | Casual+ | ||||||||||||||||||||||||||||||||||||||||||||||||||||||||||||||||||||||||||||||||||||||||||||
| DD | Momo | Hard+ | Casual+ | Casual+ | Casual+ | ||||||||||||||||||||||||||||||||||||||||||||||||||||||||||||||||||||||||||||||||||||||||||||||
| DD | Z1 | Easy+ | Easy+ | Casual+ | Casual+ | ||||||||||||||||||||||||||||||||||||||||||||||||||||||||||||||||||||||||||||||||||||||||||||||
| DD | Z3 | Casual+ | Casual+ | Casual+ | Casual+ | ||||||||||||||||||||||||||||||||||||||||||||||||||||||||||||||||||||||||||||||||||||||||||||||
| DD | Fletcher | Casual+ | |||||||||||||||||||||||||||||||||||||||||||||||||||||||||||||||||||||||||||||||||||||||||||||||||
| CL | Agano | Casual+ | |||||||||||||||||||||||||||||||||||||||||||||||||||||||||||||||||||||||||||||||||||||||||||||||||
| CL | Noshiro | Casual+ | |||||||||||||||||||||||||||||||||||||||||||||||||||||||||||||||||||||||||||||||||||||||||||||||||
| CL | Yahagi | Casual+ | |||||||||||||||||||||||||||||||||||||||||||||||||||||||||||||||||||||||||||||||||||||||||||||||||
| CL | Sakawa | Casual+ | |||||||||||||||||||||||||||||||||||||||||||||||||||||||||||||||||||||||||||||||||||||||||||||||||
| CL | Ooyodo | Casual+ | |||||||||||||||||||||||||||||||||||||||||||||||||||||||||||||||||||||||||||||||||||||||||||||||||
| CL | Honolulu | Casual+ | |||||||||||||||||||||||||||||||||||||||||||||||||||||||||||||||||||||||||||||||||||||||||||||||||
| CA | Tuscaloosa | Casual+ | |||||||||||||||||||||||||||||||||||||||||||||||||||||||||||||||||||||||||||||||||||||||||||||||||
| CA | Mikuma | Casual+ | |||||||||||||||||||||||||||||||||||||||||||||||||||||||||||||||||||||||||||||||||||||||||||||||||
| CA | Zara | Casual+ | Medium+ | ||||||||||||||||||||||||||||||||||||||||||||||||||||||||||||||||||||||||||||||||||||||||||||||||
| CA | Pola | Easy+ | Casual+ | ||||||||||||||||||||||||||||||||||||||||||||||||||||||||||||||||||||||||||||||||||||||||||||||||
| FBB | Jean Bart | Casual+ | |||||||||||||||||||||||||||||||||||||||||||||||||||||||||||||||||||||||||||||||||||||||||||||||||
| BB | Nevada | Casual+ | |||||||||||||||||||||||||||||||||||||||||||||||||||||||||||||||||||||||||||||||||||||||||||||||||
| BB | Warspite | Casual+ | Hard+ | Casual+ | |||||||||||||||||||||||||||||||||||||||||||||||||||||||||||||||||||||||||||||||||||||||||||||||
| BB | Nelson | Casual+ | |||||||||||||||||||||||||||||||||||||||||||||||||||||||||||||||||||||||||||||||||||||||||||||||||
| CV | Graf Zeppelin | Casual+ | |||||||||||||||||||||||||||||||||||||||||||||||||||||||||||||||||||||||||||||||||||||||||||||||||
| CV | Aquila | Casual+ | |||||||||||||||||||||||||||||||||||||||||||||||||||||||||||||||||||||||||||||||||||||||||||||||||
| CV | Ark Royal | Casual+ | Easy+ | ||||||||||||||||||||||||||||||||||||||||||||||||||||||||||||||||||||||||||||||||||||||||||||||||
| SS | I-26 | Casual+ | Casual+ | ||||||||||||||||||||||||||||||||||||||||||||||||||||||||||||||||||||||||||||||||||||||||||||||||
| SSV | I-401 | Casual+ | |||||||||||||||||||||||||||||||||||||||||||||||||||||||||||||||||||||||||||||||||||||||||||||||||
| LHA | No.101 Transport Ship | Casual+ | |||||||||||||||||||||||||||||||||||||||||||||||||||||||||||||||||||||||||||||||||||||||||||||||||
| CVB | Victorious | Casual+ | |||||||||||||||||||||||||||||||||||||||||||||||||||||||||||||||||||||||||||||||||||||||||||||||||
| CL | Kitakami | Easy+ | Casual+ | Easy+ | Casual+ | Casual+ | Casual+ | ||||||||||||||||||||||||||||||||||||||||||||||||||||||||||||||||||||||||||||||||||||||||||||
| CL | Ooi | Casual+ | Casual+ | Casual+ | Casual+ | ||||||||||||||||||||||||||||||||||||||||||||||||||||||||||||||||||||||||||||||||||||||||||||||
| CL | Nagara | Casual+ | |||||||||||||||||||||||||||||||||||||||||||||||||||||||||||||||||||||||||||||||||||||||||||||||||
| CL | Kinu | Casual+ | |||||||||||||||||||||||||||||||||||||||||||||||||||||||||||||||||||||||||||||||||||||||||||||||||
| CL | Abukuma | Casual+ | |||||||||||||||||||||||||||||||||||||||||||||||||||||||||||||||||||||||||||||||||||||||||||||||||
| CL | Sendai | Casual+ | |||||||||||||||||||||||||||||||||||||||||||||||||||||||||||||||||||||||||||||||||||||||||||||||||
| CL | Yuubari | Casual+ | |||||||||||||||||||||||||||||||||||||||||||||||||||||||||||||||||||||||||||||||||||||||||||||||||
| CA | Kinugasa | Casual+ | Casual+ | Casual+ | Hard+ | Casual+ | |||||||||||||||||||||||||||||||||||||||||||||||||||||||||||||||||||||||||||||||||||||||||||||
| CA | Myoukou | Casual+ | Casual+ | Casual+ | Casual+ | Casual+ | Medium+ | Casual+ | |||||||||||||||||||||||||||||||||||||||||||||||||||||||||||||||||||||||||||||||||||||||||||
| CA | Takao | Casual+ | Casual+ | Casual+ | Casual+ | Casual+ | Casual+ | Casual+ | |||||||||||||||||||||||||||||||||||||||||||||||||||||||||||||||||||||||||||||||||||||||||||
| CA | Atago | Casual+ | Casual+ | Casual+ | Casual+ | Casual+ | Casual+ | Casual+ | |||||||||||||||||||||||||||||||||||||||||||||||||||||||||||||||||||||||||||||||||||||||||||
| CA | Mogami | Casual+ | |||||||||||||||||||||||||||||||||||||||||||||||||||||||||||||||||||||||||||||||||||||||||||||||||
| CA | Suzuya | Casual+ | |||||||||||||||||||||||||||||||||||||||||||||||||||||||||||||||||||||||||||||||||||||||||||||||||
| CA | Kumano | Casual+ | |||||||||||||||||||||||||||||||||||||||||||||||||||||||||||||||||||||||||||||||||||||||||||||||||
| CA | Tone | Casual+ | Medium+ | Casual+ | |||||||||||||||||||||||||||||||||||||||||||||||||||||||||||||||||||||||||||||||||||||||||||||||
| CA | Chikuma | Casual+ | Casual+ | ||||||||||||||||||||||||||||||||||||||||||||||||||||||||||||||||||||||||||||||||||||||||||||||||
| CVL | Shouhou | Casual+ | Casual+ | Casual+ | Casual+ | ||||||||||||||||||||||||||||||||||||||||||||||||||||||||||||||||||||||||||||||||||||||||||||||
| CVL | Zuihou | Casual+ | |||||||||||||||||||||||||||||||||||||||||||||||||||||||||||||||||||||||||||||||||||||||||||||||||
| FBB | Kongou | Casual+ | Hard+ | Casual+ | |||||||||||||||||||||||||||||||||||||||||||||||||||||||||||||||||||||||||||||||||||||||||||||||
| FBB | Hiei | Easy+ | Casual+ | Casual+ | Casual+ | Casual+ | |||||||||||||||||||||||||||||||||||||||||||||||||||||||||||||||||||||||||||||||||||||||||||||
| FBB | Haruna | Casual+ | Easy+ | Casual+ | |||||||||||||||||||||||||||||||||||||||||||||||||||||||||||||||||||||||||||||||||||||||||||||||
| FBB | Kirishima | Casual+ | Casual+ | Casual+ | Easy+ | Casual+ | Casual+ | ||||||||||||||||||||||||||||||||||||||||||||||||||||||||||||||||||||||||||||||||||||||||||||
| BB | Fusou | Casual+ | |||||||||||||||||||||||||||||||||||||||||||||||||||||||||||||||||||||||||||||||||||||||||||||||||
| BB | Yamashiro | Casual+ | |||||||||||||||||||||||||||||||||||||||||||||||||||||||||||||||||||||||||||||||||||||||||||||||||
| BB | Ise | Casual+ | |||||||||||||||||||||||||||||||||||||||||||||||||||||||||||||||||||||||||||||||||||||||||||||||||
| BB | Hyuuga | Casual+ | |||||||||||||||||||||||||||||||||||||||||||||||||||||||||||||||||||||||||||||||||||||||||||||||||
| BB | Nagato | Casual+ | |||||||||||||||||||||||||||||||||||||||||||||||||||||||||||||||||||||||||||||||||||||||||||||||||
| BB | Mutsu | Casual+ | |||||||||||||||||||||||||||||||||||||||||||||||||||||||||||||||||||||||||||||||||||||||||||||||||
| CV | Shoukaku | Casual+ | |||||||||||||||||||||||||||||||||||||||||||||||||||||||||||||||||||||||||||||||||||||||||||||||||
| CV | Zuikaku | Casual+ | |||||||||||||||||||||||||||||||||||||||||||||||||||||||||||||||||||||||||||||||||||||||||||||||||
|
| |||||||||
|---|---|---|---|---|---|---|---|---|---|
|
Time remaining until Event ends [4]:
The Summer 2023 Event has ended!
| |||||||||
Trivia
This map involves many references to the real operation Neptune:
- Node A5
- This is an anti-installation/landing operation on the island of Guernsey; a strategic location on the Channel Islands. This operation occurred simultaneously with the D-Day Invasion
- Nodes B3 & B4
- This is ASW Sweep around Jersey Island and Saint Malo's Fort de la Conchée; both of which were occupied by Germans and then liberated during the Invasion of Normandy
- Node C3
- Node C3 is in Poole located in Southern England. Poole is the 3rd Largest Embarkation Point during the D-Day Landings. Ships and munition ships came here to resupply and head to the Beaches
- Phase 1
- The reason why a TP phase is the first phase is based on the fact that during the Omaha landings, the first wave was made up of mostly Combat Engineers tasked with clearing the beaches for the landing crafts, Sherman DD's, and LSTs. Sadly most of these units suffered heavy casualties but it is thanks to their sacrifice in clearing the beaches and barbed wires that the succeeding waves were able to land and push in.
- Phase 2
- The 2nd phase being an HP phase might be a reference to the fact that it was via the Second Wave and succeeding waves of landings that the American Elements were able to damage and take over the installations and bunkers at Omaha and Pointe du Hoc
- Phase 4
- Is a reference to the joint effort to secure and land more transports and armored units on the 3 beaches as they were secured much earlier compared to the difficult fight at Omaha. Some armored divisions managed to reach close to Caen on the first day alone.
- Node U
- Is near Dieppe which was the site of a major Allied landing on mainland Europe during WW2. Sadly it was a military disaster and the landing forces (mainly Canadian) were all defeated.
- Phase 5
- The Boss fight is located at Calais which is the shortest crossing from the UK to Mainland Europe as well as what the Germans suspected as the landing site for the Allied invasion of Europe. This is the location of the diversion and part of Operation Fortitude which was an Allied effort to confuse the Germans.
- LBAS
- The land base is in the Dorchester Area, which during WW2 was where was RAF Warmwell. It was originally an RAF Base but was then relegated to USAAF mainly from March 1944 and then returned to RAF use in 1946.
- Startpoint 3
- This is Portsmouth which was one of the launch points for the fleet.
- Startpoint 1
- Off the coast of Plymouth, this was the main marshaling point/rally point of the South West Divisions heading into Normandy, Channel Islands, and South West France.
- Startpoint 2
- This is around the area of Dover, Ramsgate, and St. Margaret's Bay. St. Margaret's Bay was part of Operation Fortitude which encompassed the deception plan to make the Germans think it was a launch point for the invasion of Calais. Ramsgate is another D-Day launch point on the Southeastern tip of England.