- Welcome to the Kancolle Wiki!
- If you have any questions regarding site content, account registration, etc., please visit the KanColle Wiki Discord
Summer 2023 Event/E-6
 
| |||||||||
|---|---|---|---|---|---|---|---|---|---|
 
Time remaining until Event ends [1]:
The Summer 2023 Event has ended!
| |||||||||
タイガー演習
![]()

![]()
![]()


| Information | ||||
|---|---|---|---|---|
| Event Tag | ||||
| Boss Gauges | Hard (甲): 2200 HP + 8000 HP + 6480 HP | |||
| Medium (乙): 2200 HP + 5000 HP + 5880 HP | ||||
| Easy (丙): 2200 HP + 5000 HP + 5280 HP | ||||
| Casual (丁): 2200 HP + 5000 HP + 5280 HP | ||||
| Map Bosses | Aircraft Carrier Summer Demon
| |||
Fortified Pillbox Princess
| ||||
Abyssal Stranded Landing Princess
| ||||
| Rewards[edit] | ||||
|---|---|---|---|---|
| Choice | 丁 Casual |
丙 Easy |
乙 Medium |
甲 Hard |
Food Supply Ship Mamiya |
2 | 3 | 5 | 7 |
| OR | ||||
Emergency Repair Goddess |
1 | 2 | 3 | 4 |
| THEN | ||||
 Walrus |
1 | 1 (★2) | 1 (★3) | |
| OR | ||||
 Mosquito FB Mk.VI |
1 | 1 (★2) | 1 (★3) | |
| THEN | ||||
Emergency Repair Material |
6 | |||
| OR | ||||
 Underway Replenishment |
10 | |||
| THEN | ||||
Food Supply Ship Irako |
8 | |||
| OR | ||||
New Model Armament Material |
2 | |||
| THEN | ||||
 Barrage Balloon |
1 | 1 | 1 | 2 |
| OR | ||||
 Shipborne Model Type 4 20cm Anti-ground Rocket Launcher |
1 | 1 | 1 | |
 Type 4 20cm Anti-ground Rocket Launcher (Concentrated Deployment) |
1 | |||
| THEN | ||||
 Daihatsu Landing Craft |
1 | |||
| OR | ||||
 Type 3 Shell |
1 | |||
| Reward | 丁 Casual |
丙 Easy |
乙 Medium |
甲 Hard |
|---|---|---|---|---|
Medal |
1 | 2 | ||
 Toku Daihatsu Landing Craft + Chi-Ha |
1 | 1 | ||
 Toku Daihatsu Landing Craft + Panzer III Ausf J |
1 | 1 (★2) | ||
 Toku Daihatsu Landing Craft + Chi-Ha Kai |
1 (★1) |

The event guides are to be constructed through the respective Event map page guide sandbox and reviewed by editors before being approved here.
- Do not update the guides through this page unless it is a minor fix. Please only update guides through their respective sandbox pages.
Branching Table
| E-6 Branching Rules (Start Points) ▼/▲ |
|---|
| E-6 Branching Rules (Start Point 1) ▼/▲ |
|---|
| E-6 Branching Rules (Start Point 2) ▼/▲ |
|---|
| E-6 Branching Rules (Start Point 3) ▼/▲ |
|---|
Branching compositions were reported over the course of the event. (NGA and KCNav)
Historical Bonuses
DISCLAIMER: This information is based on user-submitted data and is subject to revisions as more data is gathered. Any version of the ship receives the bonus regardless of remodel.
Ship Bonuses
| Ship Damage Bonuses Stack with each other | |||||
|---|---|---|---|---|---|
| Ships [Toggle Names] |
Multipliers | ||||
| Mapwide | Node H/U/W/X(?) | Node Q | Node Z | ||
| Coastal Defense Ships (DE) | 1.12x | - | - | - | |
| Destroyers (DD) | 1.03x | ||||
| Light Cruisers (CL) NOT CLT |
1.04x | ||||
| Seaplane Tenders (AV) | 1.08x | ||||
| Light Carriers (CVL) | 1.05x | 1.03x | |||
| Standard Carriers (CV(B)) | - | 1.03x | |||
| Battleships ((F)BB(V)) | |||||
| Heavy Cruisers (CA(V)) | |||||
| Submarine Tenders (AS) | 1.07x | - | |||
|
1.12x | 1.06x [1.1872x] | 1.23 [1.3776x] | 1.06x [1.1872x] | |
| 1.05x [1.176x] | [1.2465x] | [1.4899x] | [1.2466x] | ||
| - | - | 1.15x [1.6318x] | 1.15x [1.3653x] | ||
| 1.07x [1.1984x] | [1.2703x] | 1.15x [1.746x] | 1.15x [1.4608x] | ||
| 1.04x [1.2x] | [1.2717x] | 1.15x[1.697x] | 1.15x[1.4625x] | ||
| - | - | - | 1.15x[1.406x] | ||
|
1.09x | - | - | - | |
|
1.07x | 1.09x [1.1663x] | |||
| - | 1.15x [1.3815x] | 1.15x [1.2305x] | |||
|
1.06x | - | |||
|
1.06x | ||||
| 1.07x [1.1128x] | |||||
| 1.05x [1.092x] | |||||
| 1.28x | |||||
| Ships [Toggle Names] |
Damage against CV Summer Demon BB Summer Princess 
|
|---|---|
| 1.1x |
Equipment Bonuses
- For Group 1 & Group 2 bonuses, having one equipment from the group is enough to have the bonus. Having a second one does nothing.
- Do not confuse the balloon mechanic that buff the whole fleet with this event bonus that only buff ships equip with it.
The bonus from each group is stackable.
| Equipment | Damage C2/Q | Against CV Summer Demon
|
Against BB Summer Princess
| |
|---|---|---|---|---|
|
1.06x each (stackable with below) |
- | ||
Group 1
|
 Template:LandingC raftToku DLC + 11th      
|
1.05x | ||
Group 2
|
  
|
1.08x | ||
|
- | 1.1x | 1.2x | |
| 1.1x | ||||
|
1 = 1.10x 2 = 1.32x | |||
| Template:Dive Bombe Dive Bombers | 1 = 1.10x 2 = 1.21x |
- | ||
Planes Bonuses
Plane bonuses similar to the Summer 2021 & 2022 events have returned and should be examined when planning equipment setups. The following bonuses are applied:
- Ships using planes get bonuses based on the numbers 1, 2, and 3,
- Land-bases using planes get bonuses applied to all bombers in the individual base, based on the letters A and B.
- Notes
- Those bonuses work for all ships and for all attack types, including LBAS, airstrikes, air/surface shellings, and night attacks.
- Bonuses from a same line do not stack.
| Historical Plane Damage Bonuses | |||||
|---|---|---|---|---|---|
| Group | Multipliers | ||||
| Mapwide | Nodes C2/Q | ||||
| 0 | - | ||||
| LBAS | A | 1.06x | 1.04x [1.102x] | ||
| B | 1.08x | 1.06x [1.145x] | |||
| 1.2 | 1.25 | ||||
| Ships | |||||
| Mapwide | Nodes H/U/W/X | Nodes Q/Z | |||
| 1 | 1.03x | 1.04x [1.071x] | 1.05x [1.082x] | ||
| 2 | 1.04x | 1.05x [1.093x] | 1.06x [1.102x] | ||
| 3 | 1.05x | 1.06x [1.113x] | 1.07x [1.124x] | ||
| Ship Effects | |||||
|---|---|---|---|---|---|
| Group | Carrier Bombers | Carrier Fighters | Misc | ||
| 0 |
|
| |||
| 1 |
|
|
| ||
| 2 |
|
|
| ||
| 3 |
|
|
| ||


| Land-Based Effects | ||||||||
|---|---|---|---|---|---|---|---|---|
| Group | LB Bombers | LB Fighters/Recons | Carrier Bombers | Carrier Fighters | Misc | |||
| 0 |
|
|
| |||||
| A |
|
|
|
| ||||
| B |
|
|
|
|
| |||


Debuff
| Ships | Node Z |
|---|---|
| -52 | |
|
-39 |
- Note
- The resulting ship armor cannot go below 1 (+equipment armor).
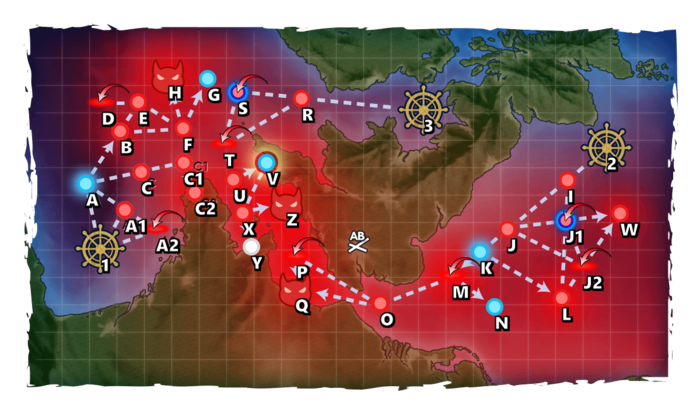
Map overview
E6 is a Combined fleet three-phase map consisting of two transport and three boss phases.
- 3 LBAS are available on this map, only 2 can be set on Sortie, the other being limited to Defense.
- This map uses 4 locks:
 1st Fleet (from on E-4, reused on E-7),
 European Expedition Advance Force (from on E-5),
 British Fleet Main Force (reused on E-7),
 British D-Day Landing Force (reused on E-7).
- An Emergency Anchorage Repair node is present on V
- "Airstrike Supported Battle" nodes are present on J1 S
 Barrage Balloons can be deployed on nodes C2 Q
Phase 0.5 - Unlock the Boss Node
| B | C2 | |
|---|---|---|
| Hard | S x2 | A+ x3 |
| Medium | A+ x2 | A+ x2 |
| Easy | A+ x2 | A+ x2 |
| Casual | A+ x2 | A+ x2 |
- Refer to #Phase 1 - Boss's fleet for composition and routing.
- ASW power is required.
Phase 1 - Boss
- Striking Force Fleet: 1(F)BB(V), 1CV(B/L), 0-1CA(V), 1CL, 3-4DD

- Route: 1 A B F H
- Can consider using 1 ASW LBAS to B to increase the passing rate.
- Only 1 LBAS is needed for H
- LBAS Range = 7 to boss AP/AS = 234/516
Phase 1.5 - Unlock the Boss Node
| L | M | |
|---|---|---|
| Hard | S x2 | AS x2 |
| Medium | A+ x2 | AS x2 |
| Easy | A+ x2 | AS x2 |
| Casual | A+ x2 | AS x2 |
- Refer to #Phase 2 - Boss's fleet for composition.
- Route: 2 I J K L
- ASW power is required.
Phase 2 - Boss
- STF:


- Main: 3(F)BB(V), 1CV(B), 1CAV/CL/AV, 1CL
- Escort: 1CA(V)/AV/LHA, 1CL, 0-1CLT, 4-5DD
- Route: 2 I J K M O Q
- The use of a Special Attack is recommended.
- If no CL is used in the main fleet, will pass through an air node at P.
- The boss is a hard skin Installation (Pillbox) and requires specialized equipment to defeat.
Phase 2.5 - Unlock the Boss Node
| V | |
|---|---|
| Hard | Reach |
| Medium | Reach |
| Easy | Reach |
| Casual | Reach |
Node V:
- TCF:

- Main: 1AV/CAV/CL, 0-1 CL, 4DD
- Escort: 1CA(V)/CL, 1CL, 2-4DD
- Route: 3 R T U V
- It is possible to only use 8 ships
- Here, the additional DD that will be locked should be Landing Equipment capable so as to reuse them on E-7 Phase 4
Phase 3 - Boss
- CTF:
- Main: 2(F)BB(V), 2CV(B), 1AV/LHA, 1LHA
- Escort: 1CL, 0-1CLT/1CA(V), 2-3DD, 2AV/AO/LHA
- Route: 3 R S T U V Z
- This is the most recommended fleet
- LBAS range: 3
- The use of a Special Attack is highly advised.
- It is possible to force the U V routing by using 4 "Aux" (AS/AV/AO/LHA) at Kai+, with at least any 1 of Akitsushima Kai/AR/AS/AO amongst them.
- While an AR will count for the repair ship type requirement, it will not count toward the number of Aux ships requirement.
- V is an Emergency Anchorage Repair node.
- PT boats are present on the boss node, and require specific set-ups to be defeated:
| ExpandAnti-PT boat |
|---|


- Using a
 Smoke on node S can help in surviving it.
Phase 3.5 - Debuff
Once LD has been reached, the following steps have to be performed to debuff the boss
| H | C2 | Q | W | P | LBAS | |
|---|---|---|---|---|---|---|
| Hard | A+ | A+ | A+ | A+ x2 | AS | AS x3 |
| Medium | A+ | - | A+ | A+ x2 | AS | AS |
| Easy | A+ | - | A+ | A+ | - | - |
| Casual | ? | - | A+ | A+ | - | - |
- Refer to #Phase 1 - Boss's fleet for composition and routing.
Once Debuff is complete the CG will change to the following:
| Abyssal Stranded Landing Princess |
|---|
|


| Fortified Pillbox Princess |
|---|
|


Enemy Compositions
| Type | Ships |
|---|---|
| DD | |
| CL |
| Type | Ships |
|---|---|
| DD | |
| CL | |
| CA | |
| BB | |
| SS | |
| AS |
| Type | Ships |
|---|---|
| DD | |
| CL |
| Type | Ships |
|---|---|
| DD | |
| CL | |
| CA | |
| AS |
| Type | Ships |
|---|---|
| DD | |
| CL | |
| CA | |
| BB | |
| SS | |
| AS |
| Type | Ships |
|---|---|
| DD | |
| CL |
| Type | Ships |
|---|---|
| DD | |
| CL | |
| CA | |
| SS | |
| AS |
| Type | Ships |
|---|---|
| DD | |
| CA | |
| FBB | |
| SS | |
| AV | |
| AS |
| # | Selection Node | ||
|---|---|---|---|
| A | 艦隊の針路を選択できます。提督、どちらの針路をとられますか? You can decide the fleet's course. Admiral, which heading should we take? | ||
| # | Selection Node | ||
| # | Formation | Normal Battle Node | AD/AP AS/AS+ |
|---|---|---|---|
| A1 | Echelon Line Abreast |
0/0 0/0 | |
| Echelon Line Abreast |
0/0 0/0 | ||
| # | Formation | Normal Battle Node | AD/AP AS/AS+ |
| # | Formation | Air Defense Node | AD/AP AS/AS+ |
|---|---|---|---|
| A2 | Diamond | 55/110 246/492 | |
| Diamond | 60/119 267/534 | ||
| Diamond | 74/147 330/660 | ||
| Diamond | 61/122 273/546 | ||
| # | Formation | Air Defense Node | AD/AP AS/AS+ |
| # | Formation | Normal Battle Node | AD/AP AS/AS+ |
|---|---|---|---|
| B | Echelon | 0/0 0/0 | |
| Echelon | 0/0 0/0 | ||
| Echelon | 0/0 0/0 | ||
| # | Formation | Normal Battle Node | AD/AP AS/AS+ |
| # | Formation | Normal Battle Node | AD/AP AS/AS+ |
|---|---|---|---|
| C | Echelon Line Abreast |
0/0 0/0 | |
| Echelon Line Abreast |
0/0 0/0 | ||
| # | Formation | Normal Battle Node | AD/AP AS/AS+ |
| # | Formation | Normal Battle Node | AD/AP AS/AS+ |
|---|---|---|---|
| C1 | Vanguard | 0/0 0/0 | |
| Vanguard | 0/0 0/0 | ||
| Vanguard | 0/0 0/0 | ||
| # | Formation | Normal Battle Node | AD/AP AS/AS+ |
| # | Formation | Normal Battle Node | AD/AP AS/AS+ |
|---|---|---|---|
| C2 | Diamond | 33/65 144/288 | |
| Diamond | 33/65 144/288 | ||
| Diamond | 33/65 144/288 | ||
| # | Formation | Normal Battle Node | AD/AP AS/AS+ |
| # | Formation | Normal Battle Node | AD/AP AS/AS+ |
|---|---|---|---|
| E | Line Ahead Vanguard |
0/0 0/0 | |
| Line Ahead | 0/0 0/0 | ||
| # | Formation | Normal Battle Node | AD/AP AS/AS+ |
| # | Formation | Normal Battle Node | AD/AP AS/AS+ |
|---|---|---|---|
| F | Line Ahead Double Line Vanguard |
0/0 0/0 | |
| # | Formation | Normal Battle Node | AD/AP AS/AS+ |
| # | Empty Node | ||
|---|---|---|---|
| G | 敵影を見ず。 No enemy spotted. | ||
| # | Empty Node | ||
| # | Formation | Boss Battle Node | AD/AP AS/AS+ |
|---|---|---|---|
| H | Diamond | 115/230 516/1032 | |
| Diamond | 115/230 516/1032 | ||
| Diamond (Final)
|
109/217 486/972 | ||
| # | Formation | Boss Battle Node | AD/AP AS/AS+ |
| # | Formation | Normal Battle Node | AD/AP AS/AS+ |
|---|---|---|---|
| I | Echelon Line Abreast |
0/0 0/0 | |
| Echelon Line Abreast |
0/0 0/0 | ||
| # | Formation | Normal Battle Node | AD/AP AS/AS+ |
| # | Formation | Normal Battle Node | AD/AP AS/AS+ |
|---|---|---|---|
| J | Diamond | 55/109 243/486 | |
| Diamond | 63/125 279/558 | ||
| Diamond | 67/134 300/600 | ||
| # | Formation | Normal Battle Node | AD/AP AS/AS+ |
| # | Formation | Supported Battle Node | AD/AP AS/AS+ |
|---|---|---|---|
| J1 | Echelon | 43/85 189/378 | |
| Echelon | 43/85 189/378 | ||
| Echelon | 43/85 189/378 | ||
| Echelon | 85/169 378/756 | ||
| # | Formation | Supported Battle Node | AD/AP AS/AS+ |
| # | Formation | Air Defense Node | AD/AP AS/AS+ |
|---|---|---|---|
| J2 | Diamond | 124/248 557/1113 | |
| Diamond | 118/235 527/1053 | ||
| Diamond | 124/248 557/1113 | ||
| # | Formation | Air Defense Node | AD/AP AS/AS+ |
| # | Selection Node | ||
|---|---|---|---|
| K | 艦隊の針路を選択できます。提督、どちらの針路をとられますか? You can decide the fleet's course. Admiral, which heading should we take? | ||
| # | Selection Node | ||
| # | Formation | Normal Battle Node | AD/AP AS/AS+ |
|---|---|---|---|
| L | Echelon | 0/0 0/0 | |
| Echelon | 0/0 0/0 | ||
| Echelon | 0/0 0/0 | ||
| # | Formation | Normal Battle Node | AD/AP AS/AS+ |
| # | Formation | Air Defense Node | AD/AP AS/AS+ |
|---|---|---|---|
| M | Diamond | 43/86 192/384 | |
| Diamond | 48/95 213/426 | ||
| Diamond | 54/107 240/480 | ||
| Diamond | 49/98 219/438 | ||
| Diamond | 61/121 270/540 | ||
| Diamond | 70/139 312/624 | ||
| Diamond | 75/150 336/672 | ||
| # | Formation | Air Defense Node | AD/AP AS/AS+ |
| # | Empty Node | ||
|---|---|---|---|
| N | 敵影を見ず。 No enemy spotted. | ||
| # | Empty Node | ||
| # | Formation | Normal Battle Node | AD/AP AS/AS+ |
|---|---|---|---|
| O | Line Ahead | 0/0 0/0 | |
| Line Ahead | 0/0 0/0 | ||
| Line Ahead | 0/0 0/0 | ||
| # | Formation | Normal Battle Node | AD/AP AS/AS+ |
| # | Formation | Air Defense Node | AD/AP AS/AS+ |
|---|---|---|---|
| P | Diamond | 43/86 192/384 | |
| Diamond | 48/95 213/426 | ||
| Diamond | 54/107 240/480 | ||
| Diamond | 49/98 219/438 | ||
| # | Formation | Air Defense Node | AD/AP AS/AS+ |
| # | Formation | Boss Battle Node | AD/AP AS/AS+ |
|---|---|---|---|
| Q | Cruising Formation 3 | 0/0 0/0 | |
| Cruising Formation 3 (Final)
|
36/72 161/321 | ||
| # | Formation | Boss Battle Node | AD/AP AS/AS+ |
| # | Formation | Normal Battle Node | AD/AP AS/AS+ |
|---|---|---|---|
| R | Echelon Line Abreast |
0/0 0/0 | |
| Echelon Line Abreast |
0/0 0/0 | ||
| Echelon Line Abreast |
0/0 0/0 | ||
| # | Formation | Normal Battle Node | AD/AP AS/AS+ |
| # | Formation | Supported Battle Node | AD/AP AS/AS+ |
|---|---|---|---|
| S | Echelon | 43/85 189/378 | |
| Echelon | 43/85 189/378 | ||
| Echelon | 43/85 189/378 | ||
| Echelon | 85/169 378/756 | ||
| Echelon | 85/169 378/756 | ||
| Echelon | 85/169 378/756 | ||
| # | Formation | Supported Battle Node | AD/AP AS/AS+ |
| # | Formation | Air Defense Node | AD/AP AS/AS+ |
|---|---|---|---|
| T | Diamond | 55/110 246/492 | |
| Diamond | 60/119 267/534 | ||
| Diamond | 74/147 330/660 | ||
| Diamond | 61/122 273/546 | ||
| Diamond | 81/161 360/720 | ||
| Diamond | 99/198 444/888 | ||
| Diamond | 105/209 468/936 | ||
| # | Formation | Air Defense Node | AD/AP AS/AS+ |
| # | Formation | Normal Battle Node | AD/AP AS/AS+ |
|---|---|---|---|
| U | Double Line Diamond |
85/169 378/756 | |
| Diamond | 120/239 537/1074 | ||
| # | Formation | Normal Battle Node | AD/AP AS/AS+ |
| # | Repair Node | ||
|---|---|---|---|
| # | Repair Node | ||
| # | Formation | Normal Battle Node | AD/AP AS/AS+ |
|---|---|---|---|
| W | Diamond | 124/248 557/1113 | |
| Diamond | 118/235 527/1053 | ||
| Diamond | 124/248 557/1113 | ||
| # | Formation | Normal Battle Node | AD/AP AS/AS+ |
| # | Formation | Normal Battle Node | AD/AP AS/AS+ |
|---|---|---|---|
| X | Echelon | 0/0 0/0 | |
| Vanguard | 0/0 0/0 | ||
| Vanguard | 36/72 161/321 | ||
| # | Formation | Normal Battle Node | AD/AP AS/AS+ |
| # | Formation | Boss Battle Node | AD/AP AS/AS+ |
|---|---|---|---|
| Z | Cruising Formation 4 | 80/159 356/711 | |
| Cruising Formation 4 (Final)
|
97/194 435/870 | ||
| # | Formation | Boss Battle Node | AD/AP AS/AS+ |
Ship Drops
| ExpandShip drops |
|---|
|
| |||||||||
|---|---|---|---|---|---|---|---|---|---|
|
Time remaining until Event ends [4]:
The Summer 2023 Event has ended!
| |||||||||
Trivia
This map involves many references to the real Exercise Tiger: