- Welcome to the Kancolle Wiki!
- If you have any questions regarding site content, account registration, etc., please visit the KanColle Wiki Discord
Spring 2021 Event/Main Operation
| ||||||||||
|---|---|---|---|---|---|---|---|---|---|---|

Spring 2021 Main Operation Maps
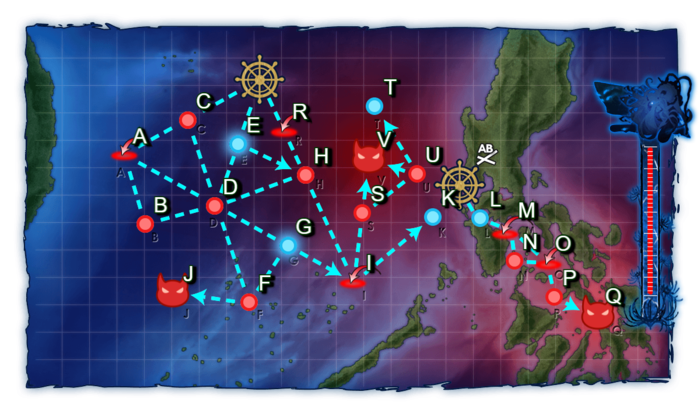
E-1
第三十一戦隊、展開せよ!
![]()


| Information | ||||
|---|---|---|---|---|
| Event Tag | 31st Squadron | |||
| Boss Gauges | Hard (甲): 520 HP, 3960 HP, 1950 HP | |||
| Medium (乙): 392 HP, 2640 HP, 950 HP | ||||
| Easy (丙): 360 HP, 1800 HP, 545 HP | ||||
| Casual (丁): 360 HP, 1800 HP, 395 HP | ||||
| Map Bosses | ||||
| Rewards | ||||
|---|---|---|---|---|
| All | ||||

| ||||
| Equipment/Item | 丁 Casual |
丙 Easy |
乙 Medium |
甲 Hard |
Food Supply Ship Mamiya |
1 | 1 | 2 | |
Food Supply Ship Irako |
1 | 2 | 2 | |
Furniture Fairy |
1 | |||
 Torpedo Squadron Skilled Lookouts |
1 | 1 (★4) | ||
Submarine Supply Material |
2 | 4 | 5 | 8 |

| E-1 Branching Rules | ||
|---|---|---|
| Nodes | Rules | |
| Start | 1 |
|
2 |
Does not meet the requirements for start point 1 | |
1 |
C |
|
E |
||
R |
| |
C |
A |
|
D |
| |
E |
D |
|
H | ||
A |
B |
|
D |
| |
D |
F |
|
G |
| |
G |
F |
|
I | ||
H |
D |
|
I |
| |
I |
K |
|
S |
| |
M |
N |
|
O |
| |
S |
U |
|
V |
| |
U |
T |
|
V |
| |
Branching compositions were reported over the course of the event. (NGA and Piro)
The event guides are to be constructed through the respective Event map page guide and reviewed by editor staff / collaboration committee before being approved here. Do not under any circumstance update the guides through this page or attempt to fix them through this page. Please only update guides through their respective sandbox pages.
Ship Bonuses (Tentative)
DISCLAIMER: This information is based on user submitted data and is subject to revisions as more data is gathered. Any version of the ship receives the bonus regardless of remodel.
| Ships | Nodes D/F | Nodes J | Nodes N/P/Q | Nodes S/V | ||
|---|---|---|---|---|---|---|
| - | 1.25x | 1.575x | 1.375x | |||
| - | 1.25x | |||||
| Any Destroyer Escort (DE) | 1.15x | 1.265x | ||||
| - | - | 1.25x | ||||
| 1.15x | ||||||
| - | - | |||||
| 1.25x | ||||||
| - | ||||||
| - | 1.1x | 1.23x | 1.1x | |||
General Guidelines
E-1 is a 3.5 Phase Map with the 31st Squadron Lock Tag (Green) consisting of three HP Phases and a minimal Unlock. One base of Land Based Aerial Support (LBAS) is available to sortie on this Map. Due to the span of different combat types on this map (Surface, ASW, Anti-Installation) it is recommended to take ships that are good at multiple of these categories to avoid locking too many ships to this map.
Phase 1: Defeat the Ru-Class Patrol at Node J
The goal of this phase is to deplete the HP Bar and defeat the Ru Class Battleship at J. There is a submarine node and light surface squadron on the way, while the boss itself consists of only surface ships.
- Recommended Fleet: 1CL 0-1AV 4-5DD (Fast Fleet)
- Route: E D G F J
- LBAS: Range 7, no Airpower
- Additional Notes: Vanguard Formation can be utilized to help with preboss sub node. Support Expeditions are not needed
Phase 1.5: Unlocking the Path to the Second Boss
To unlock the path to the second Boss, you simply have to reach K once.
- Recommended Fleet: 1CL 0-1AV 4-5DD (Fast Fleet)
- Route: E D G I K
- LBAS: Range 7, no Airpower
- Additional Notes: There is no surface combat on route, only ASW and Anti-Air Combat. If you get critically damaged at I you can still proceed the sortie as the Route to the non-combat node K is fixed.
Phase 2: The Benchmarkening (Defeat Supply Depot Hime)
To complete this Phase, you need to deplete the HP Bar of the Second Boss Q, consisting of a mix of Installations and PT Boats. Set up your Ships with the according equipment to deal with them as outlined here. PT Imps are weak to AA Guns + Skilled Lookouts on your DDs. There are PT Imps and two pretty powerful airstrike on the way.
| ExpandShips that can equip Landing Craft / Amphibious Vehicles | |||||
|---|---|---|---|---|---|
| Type | Landing Craft |
Both |
Amphibious Vehicle | ||
| DD | |||||
| CL | |||||
| CAV | |||||
| (F)BB(V) | |||||
| CVL | |||||
| AV | |||||
| AO | |||||
| LHA | |||||
| SS(V) | All | ||||
| RE |
| ||||
| [edit] | |||||


| ExpandAnti-PT boat | |||||||||||||||||||||||||||||||||||||||||||||||||||||||||||||||||||||||||||||||||||||||||||||||||||||||||||||||||||||||||||||||||||||||||||
|---|---|---|---|---|---|---|---|---|---|---|---|---|---|---|---|---|---|---|---|---|---|---|---|---|---|---|---|---|---|---|---|---|---|---|---|---|---|---|---|---|---|---|---|---|---|---|---|---|---|---|---|---|---|---|---|---|---|---|---|---|---|---|---|---|---|---|---|---|---|---|---|---|---|---|---|---|---|---|---|---|---|---|---|---|---|---|---|---|---|---|---|---|---|---|---|---|---|---|---|---|---|---|---|---|---|---|---|---|---|---|---|---|---|---|---|---|---|---|---|---|---|---|---|---|---|---|---|---|---|---|---|---|---|---|---|---|---|---|---|
Unlike most standard Abyssals, "PT boats" (PT Imp Pack & Schnellboot Imp Pack & Schnellboot Imp Pack ) are "very small and fast". ) are "very small and fast".
During Events, some special bonuses may be added, with "historical" ships and equipment gaining some accuracy bonuses[10].
| |||||||||||||||||||||||||||||||||||||||||||||||||||||||||||||||||||||||||||||||||||||||||||||||||||||||||||||||||||||||||||||||||||||||||||
| [edit] | |||||||||||||||||||||||||||||||||||||||||||||||||||||||||||||||||||||||||||||||||||||||||||||||||||||||||||||||||||||||||||||||||||||||||||


- Recommended Fleet: 1AV/CL 4-5DD (Fast Fleet) (On Hard, only a 5 ship fleet takes the shortest route)
- Route: L M O P Q
- LBAS: Range 5, (29/69/79/121) Airpower for AP at Last Dance (C/E/M/H)
- Additional Notes: Support fleets can be taken due to the presence of PT Imps.
Phase 3: Defeat the Enemy Submarine Force!
The goal of this phase is to sink the New Old Submarine Princess found at V to deplete the HP Bar and clear the map. There is a surface engagement S, a Submarine Node H and high airpower air raid I on route, but the Boss itself is an Anti-Submarine operation. AACI is highly recommended for this route, the surface Nodes can be passed using Vanguard formation as to not sacrifice too many equipment slots that should be occupied with ASW equipment.
- Recommended Fleet: 0-1 AV 0-1CLT 1-2CL 4DD (Fast Fleet)
- Route: E H I S V
- LBAS: Range 2, no Airpower present at the Boss. I has (138/144/149/229) AP for (C/E/M/H)
- Additional Notes:
- 1 Regular CL is required within the fleet composition
- LBAS can be Toukai sent to the Boss, Bombers to the Preboss Surface Nodes or a fighter sweep to Node I, depending on your surface fleet setup.
- The required LoS to reach the boss is Cn3 48+/38+/29+/29+ on Hard/Medium/Easy/Casual
- 3/2/1/1 historical ships are required on Hard/Medium/Easy/Casual
Enemy Compositions
| # | Formation | Air Defense Node | AD/AP AS/AS+ |
|---|---|---|---|
| A | Diamond Phases: 1, 2, 3 |
75/149 335/669 | |
| Diamond Phases: 1, 2, 3 |
78/155 347/693 | ||
| Diamond Phases: 1, 2, 3 |
88/175 392/783 | ||
| Diamond Phases: 1, 2, 3 |
98/195 437/873 | ||
| Diamond Phases: 1, 2, 3 |
108/215 482/963 | ||
| # | Formation | Air Defense Node | AD/AP AS/AS+ |
| # | Formation | Normal Battle Node | AD/AP AS/AS+ |
|---|---|---|---|
| B | Line Ahead Double Line Phases: 1, 2, 3 |
0/0 0/0 | |
| Line Ahead Double Line Phases: 1, 2, 3 |
0/0 0/0 | ||
| # | Formation | Normal Battle Node | AD/AP AS/AS+ |
| # | Formation | Normal Battle Node | AD/AP AS/AS+ |
|---|---|---|---|
| C | Echelon Line Abreast Phases: 1, 2, 3 |
0/0 0/0 | |
| Echelon Line Abreast Phases: 1, 2, 3 |
0/0 0/0 | ||
| # | Formation | Normal Battle Node | AD/AP AS/AS+ |
| # | Formation | Normal Battle Node | AD/AP AS/AS+ |
|---|---|---|---|
| D | Echelon Line Abreast Phases: 1, 2, 3 |
0/0 0/0 | |
| Echelon Line Abreast Phases: 1, 2, 3 |
0/0 0/0 | ||
| # | Formation | Normal Battle Node | AD/AP AS/AS+ |
| # | Selection Node | ||
|---|---|---|---|
| E | 艦隊の針路を選択できます。提督、どちらの針路をとられますか? You can decide the fleet's course. Admiral, which heading should we take? | ||
| # | Selection Node | ||
| # | Formation | Normal Battle Node | AD/AP AS/AS+ |
|---|---|---|---|
| F | Line Ahead Double Line Echelon Phases: 1, 2, 3 |
0/0 0/0 | |
| # | Formation | Normal Battle Node | AD/AP AS/AS+ |
| # | Selection Node | ||
|---|---|---|---|
| G | 艦隊の針路を選択できます。提督、どちらの針路をとられますか? You can decide the fleet's course. Admiral, which heading should we take? | ||
| # | Selection Node | ||
| # | Formation | Normal Battle Node | AD/AP AS/AS+ |
|---|---|---|---|
| H | Echelon Line Abreast Phases: 1, 2, 3 |
0/0 0/0 | |
| Echelon Line Abreast Phases: 2, 3 |
0/0 0/0 | ||
| # | Formation | Normal Battle Node | AD/AP AS/AS+ |
| # | Formation | Air Defense Node | AD/AP AS/AS+ |
|---|---|---|---|
| I | Diamond Phases: 2, 3 |
75/149 335/669 | |
| Diamond Phases: 1, 2, 3 |
78/155 347/693 | ||
| Diamond Phases: 1, 2, 3 |
88/175 392/783 | ||
| Diamond Phases: 3 |
95/189 425/849 | ||
| Diamond Phases: 3 |
115/229 515/1029 | ||
| # | Formation | Air Defense Node | AD/AP AS/AS+ |
| # | Formation | Boss Battle Node | AD/AP AS/AS+ |
|---|---|---|---|
| J | Line Ahead Double Line Phases: 1, 2, 3 |
0/0 0/0 | |
| Line Ahead Phases: 1 (Final)
|
0/0 0/0 | ||
| # | Formation | Boss Battle Node | AD/AP AS/AS+ |
| # | Empty Node | ||
|---|---|---|---|
| K | 気のせいだった。 第三十一戦隊、これよりマニラに入港す。 Must be my imagination. 31st Squadron, entering the Port of Manila! | ||
| # | Empty Node | ||
| # | Empty Node | ||
|---|---|---|---|
| L | 気のせいだった。 第三十一戦隊、これよりマニラを抜錨、ルソン方面に出撃す! Must be my imagination. 31st Squadron, setting sail from Manilla, sortieing to the Luzon front! | ||
| # | Empty Node | ||
| # | Formation | Air Defense Node | AD/AP AS/AS+ |
|---|---|---|---|
| M | Diamond Phases: 2, 3 |
49/98 219/438 | |
| Diamond Phases: 2, 3 |
70/139 311/621 | ||
| Diamond Phases: 2, 3 |
72/144 323/645 | ||
| Diamond Phases: 2, 3 |
75/149 335/669 | ||
| Diamond Phases: 2 |
78/155 347/693 | ||
| # | Formation | Air Defense Node | AD/AP AS/AS+ |
| # | Formation | Normal Battle Node | AD/AP AS/AS+ |
|---|---|---|---|
| N | Line Ahead Echelon Phases: 2, 3 |
0/0 0/0 | |
| Line Ahead Echelon Phases: 2, 3 |
0/0 0/0 | ||
| # | Formation | Normal Battle Node | AD/AP AS/AS+ |
| # | Formation | Air Defense Node | AD/AP AS/AS+ |
|---|---|---|---|
| O | Diamond Phases: 2, 3 |
49/98 219/438 | |
| Diamond Phases: 2, 3 |
67/133 297/594 | ||
| Diamond Phases: 2, 3 |
90/179 401/801 | ||
| Diamond Phases: 2, 3 |
92/184 413/825 | ||
| Diamond Phases: 2 |
95/189 425/849 | ||
| # | Formation | Air Defense Node | AD/AP AS/AS+ |
| # | Formation | Normal Battle Node | AD/AP AS/AS+ |
|---|---|---|---|
| P | Line Ahead Echelon Phases: 2, 3 |
0/0 0/0 | |
| Line Ahead Echelon Phases: 2, 3 |
0/0 0/0 | ||
| # | Formation | Normal Battle Node | AD/AP AS/AS+ |
| # | Formation | Boss Battle Node | AD/AP AS/AS+ |
|---|---|---|---|
| Q | Line Ahead Phases: 2 |
50/99 222/444 | |
| Double Line Phases: 3 |
31/61 135/270 | ||
| Line Ahead Phases: 2 (Final)
|
61/121 270/540 | ||
| # | Formation | Boss Battle Node | AD/AP AS/AS+ |
| # | Formation | Air Defense Node | AD/AP AS/AS+ |
|---|---|---|---|
| R | Diamond Phases: 3 |
72/144 323/645 | |
| Diamond Phases: 3 |
75/149 335/669 | ||
| Diamond Phases: 3 |
78/155 347/693 | ||
| Diamond Phases: 3 |
88/175 392/783 | ||
| Diamond Phases: 3 |
98/195 437/873 | ||
| # | Formation | Air Defense Node | AD/AP AS/AS+ |
| # | Formation | Normal Battle Node | AD/AP AS/AS+ |
|---|---|---|---|
| S | Line Ahead Double Line Echelon Phases: 3 |
0/0 0/0 | |
| # | Formation | Normal Battle Node | AD/AP AS/AS+ |
| # | Empty Node | ||
|---|---|---|---|
| T | 敵影を見ず。 No enemy spotted. | ||
| # | Empty Node | ||
| # | Formation | Normal Battle Node | AD/AP AS/AS+ |
|---|---|---|---|
| U | Echelon Line Abreast Phases: 3 |
0/0 0/0 | |
| Echelon Line Abreast Phases: 3 |
0/0 0/0 | ||
| # | Formation | Normal Battle Node | AD/AP AS/AS+ |
| # | Formation | Boss Battle Node | AD/AP AS/AS+ |
|---|---|---|---|
| V | Echelon Phases: 3 |
0/0 0/0 | |
| Line Ahead Phases: 3 |
0/0 0/0 | ||
| Line Ahead Phases: 3 (Final)
|
0/0 0/0 | ||
| # | Formation | Boss Battle Node | AD/AP AS/AS+ |
| # | Formation | Air Defense Node | AD/AP AS/AS+ |
|---|---|---|---|
| A | Diamond Phases: 1, 3 |
47/93 207/414 | |
| Diamond Phases: 1, 2, 3 |
70/139 311/621 | ||
| Diamond Phases: 1, 2 |
72/144 323/645 | ||
| Diamond Phases: 1, 2, 3 |
75/149 335/669 | ||
| Diamond Phases: 1, 2 |
78/155 347/693 | ||
| # | Formation | Air Defense Node | AD/AP AS/AS+ |
| # | Formation | Normal Battle Node | AD/AP AS/AS+ |
|---|---|---|---|
| B | Line Ahead Double Line Phases: 1, 2, 3 |
0/0 0/0 | |
| Line Ahead Double Line Phases: 1, 2, 3 |
0/0 0/0 | ||
| # | Formation | Normal Battle Node | AD/AP AS/AS+ |
| # | Formation | Normal Battle Node | AD/AP AS/AS+ |
|---|---|---|---|
| C | Echelon Line Abreast Phases: 1, 2, 3 |
0/0 0/0 | |
| Echelon Line Abreast Phases: 1, 2, 3 |
0/0 0/0 | ||
| Echelon Line Abreast Phases: 1, 2, 3 |
0/0 0/0 | ||
| Echelon Line Abreast Phases: 1, 2, 3 |
0/0 0/0 | ||
| # | Formation | Normal Battle Node | AD/AP AS/AS+ |
| # | Formation | Normal Battle Node | AD/AP AS/AS+ |
|---|---|---|---|
| D | Echelon Line Abreast Phases: 1, 2, 3 |
0/0 0/0 | |
| Echelon Line Abreast Phases: 1, 2, 3 |
0/0 0/0 | ||
| Echelon Line Abreast Phases: 1, 2, 3 |
0/0 0/0 | ||
| Echelon Line Abreast Phases: 1, 2, 3 |
0/0 0/0 | ||
| # | Formation | Normal Battle Node | AD/AP AS/AS+ |
| # | Selection Node | ||
|---|---|---|---|
| E | 艦隊の針路を選択できます。提督、どちらの針路をとられますか? You can decide the fleet's course. Admiral, which heading should we take? | ||
| # | Selection Node | ||
| # | Formation | Normal Battle Node | AD/AP AS/AS+ |
|---|---|---|---|
| F | Line Ahead Double Line Echelon Phases: 1, 2, 3 |
0/0 0/0 | |
| # | Formation | Normal Battle Node | AD/AP AS/AS+ |
| # | Selection Node | ||
|---|---|---|---|
| G | 艦隊の針路を選択できます。提督、どちらの針路をとられますか? You can decide the fleet's course. Admiral, which heading should we take? | ||
| # | Selection Node | ||
| # | Formation | Normal Battle Node | AD/AP AS/AS+ |
|---|---|---|---|
| H | Echelon Line Abreast Phases: 1, 2, 3 |
0/0 0/0 | |
| Echelon Line Abreast Phases: 1, 2, 3 |
0/0 0/0 | ||
| Echelon Line Abreast Phases: 1, 2, 3 |
0/0 0/0 | ||
| Echelon Line Abreast Phases: 2, 3 |
0/0 0/0 | ||
| # | Formation | Normal Battle Node | AD/AP AS/AS+ |
| # | Formation | Air Defense Node | AD/AP AS/AS+ |
|---|---|---|---|
| I | Diamond Phases: 2, 3 |
47/93 207/414 | |
| Diamond Phases: 2, 3 |
70/139 311/621 | ||
| Diamond Phases: 2, 3 |
72/144 323/645 | ||
| Diamond Phases: 2, 3 |
75/149 335/669 | ||
| Diamond Phases: 2, 3 |
78/155 347/693 | ||
| # | Formation | Air Defense Node | AD/AP AS/AS+ |
| # | Formation | Boss Battle Node | AD/AP AS/AS+ |
|---|---|---|---|
| J | Line Ahead Double Line Phases: 1, 2, 3 |
0/0 0/0 | |
| Line Ahead Phases: 1 (Final)
|
0/0 0/0 | ||
| # | Formation | Boss Battle Node | AD/AP AS/AS+ |
| # | Empty Node | ||
|---|---|---|---|
| K | 気のせいだった。 第三十一戦隊、これよりマニラに入港す。 Must be my imagination. 31st Squadron, entering the Port of Manila! | ||
| # | Empty Node | ||
| # | Empty Node | ||
|---|---|---|---|
| L | 気のせいだった。 第三十一戦隊、これよりマニラを抜錨、ルソン方面に出撃す! Must be my imagination. 31st Squadron, setting sail from Manilla, sortieing to the Luzon front! | ||
| # | Empty Node | ||
| # | Formation | Air Defense Node | AD/AP AS/AS+ |
|---|---|---|---|
| M | Diamond Phases: 2, 3 |
17/33 72/144 | |
| Diamond Phases: 2, 3 |
32/63 140/279 | ||
| Diamond Phases: 2, 3 |
47/93 207/414 | ||
| Diamond Phases: 2, 3 |
49/98 219/438 | ||
| # | Formation | Air Defense Node | AD/AP AS/AS+ |
| # | Formation | Normal Battle Node | AD/AP AS/AS+ |
|---|---|---|---|
| N | Line Ahead Echelon Phases: 2 |
0/0 0/0 | |
| Line Ahead Echelon Phases: 2 |
0/0 0/0 | ||
| Line Ahead Echelon Phases: 2 |
0/0 0/0 | ||
| Line Ahead Echelon Phases: 2 |
0/0 0/0 | ||
| # | Formation | Normal Battle Node | AD/AP AS/AS+ |
| # | Formation | Air Defense Node | AD/AP AS/AS+ |
|---|---|---|---|
| O | Diamond Phases: 2, 3 |
32/63 140/279 | |
| Diamond Phases: 2, 3 |
47/93 207/414 | ||
| Diamond Phases: 2, 3 |
49/98 219/438 | ||
| Diamond Phases: 2 |
67/133 297/594 | ||
| Diamond Phases: 2 |
90/179 401/801 | ||
| # | Formation | Air Defense Node | AD/AP AS/AS+ |
| # | Formation | Normal Battle Node | AD/AP AS/AS+ |
|---|---|---|---|
| P | Line Ahead Echelon Phases: 2, 3 |
0/0 0/0 | |
| Line Ahead Echelon Phases: 2, 3 |
0/0 0/0 | ||
| Line Ahead Echelon Phases: 2, 3 |
0/0 0/0 | ||
| Line Ahead Echelon Phases: 2, 3 |
0/0 0/0 | ||
| # | Formation | Normal Battle Node | AD/AP AS/AS+ |
| # | Formation | Boss Battle Node | AD/AP AS/AS+ |
|---|---|---|---|
| Q | Line Ahead Phases: 2 |
28/56 125/249 | |
| Double Line Phases: 3 |
23/45 99/198 | ||
| Line Ahead Phases: 2 (Final)
|
40/79 176/351 | ||
| # | Formation | Boss Battle Node | AD/AP AS/AS+ |
| # | Formation | Air Defense Node | AD/AP AS/AS+ |
|---|---|---|---|
| R | Diamond Phases: 3 |
24/47 104/207 | |
| Diamond Phases: 3 |
47/93 207/414 | ||
| Diamond Phases: 3 |
70/139 311/621 | ||
| Diamond Phases: 3 |
72/144 323/645 | ||
| Diamond Phases: 3 |
75/149 335/669 | ||
| # | Formation | Air Defense Node | AD/AP AS/AS+ |
| # | Formation | Normal Battle Node | AD/AP AS/AS+ |
|---|---|---|---|
| S | Line Ahead Double Line Echelon Phases: 3 |
0/0 0/0 | |
| # | Formation | Normal Battle Node | AD/AP AS/AS+ |
| # | Empty Node | ||
|---|---|---|---|
| T | 敵影を見ず。 No enemy spotted. | ||
| # | Empty Node | ||
| # | Formation | Normal Battle Node | AD/AP AS/AS+ |
|---|---|---|---|
| U | Echelon Line Abreast Phases: 3 |
0/0 0/0 | |
| Echelon Line Abreast Phases: 3 |
0/0 0/0 | ||
| Echelon Line Abreast Phases: 3 |
0/0 0/0 | ||
| Echelon Line Abreast Phases: 3 |
0/0 0/0 | ||
| # | Formation | Normal Battle Node | AD/AP AS/AS+ |
| # | Formation | Boss Battle Node | AD/AP AS/AS+ |
|---|---|---|---|
| V | Line Ahead Echelon Phases: 3 |
0/0 0/0 | |
| Line Ahead Phases: 3 (Final)
|
0/0 0/0 | ||
| # | Formation | Boss Battle Node | AD/AP AS/AS+ |
| # | Formation | Air Defense Node | AD/AP AS/AS+ |
|---|---|---|---|
| A | Diamond Phases: 2 |
24/47 104/207 | |
| Diamond Phases: 1, 2 |
47/93 207/414 | ||
| Diamond Phases: 1, 2 |
70/139 311/621 | ||
| Diamond Phases: 1, 2 |
72/144 323/645 | ||
| # | Formation | Air Defense Node | AD/AP AS/AS+ |
| # | Formation | Normal Battle Node | AD/AP AS/AS+ |
|---|---|---|---|
| B | Line Ahead Double Line Phases: 1, 2 |
0/0 0/0 | |
| Line Ahead Double Line Phases: 1 |
0/0 0/0 | ||
| Line Ahead Double Line Phases: 1, 2 |
0/0 0/0 | ||
| Line Ahead Double Line Phases: 2 |
0/0 0/0 | ||
| # | Formation | Normal Battle Node | AD/AP AS/AS+ |
| # | Formation | Normal Battle Node | AD/AP AS/AS+ |
|---|---|---|---|
| C | Echelon Line Abreast Phases: 2, 3 |
0/0 0/0 | |
| Echelon Line Abreast Phases: 1, 2, 3 |
0/0 0/0 | ||
| Echelon Line Abreast Phases: 1, 2, 3 |
0/0 0/0 | ||
| Echelon Line Abreast Phases: 1, 2 |
0/0 0/0 | ||
| # | Formation | Normal Battle Node | AD/AP AS/AS+ |
| # | Formation | Normal Battle Node | AD/AP AS/AS+ |
|---|---|---|---|
| D | Echelon Line Abreast Phases: 1, 2, 3 |
0/0 0/0 | |
| Echelon Line Abreast Phases: 1, 2, 3 |
0/0 0/0 | ||
| Echelon Line Abreast Phases: 1, 2, 3 |
0/0 0/0 | ||
| Echelon Line Abreast Phases: 1, 2, 3 |
0/0 0/0 | ||
| # | Formation | Normal Battle Node | AD/AP AS/AS+ |
| # | Selection Node | ||
|---|---|---|---|
| E | 艦隊の針路を選択できます。提督、どちらの針路をとられますか? You can decide the fleet's course. Admiral, which heading should we take? | ||
| # | Selection Node | ||
| # | Formation | Normal Battle Node | AD/AP AS/AS+ |
|---|---|---|---|
| F | Line Ahead Double Line Echelon Phases: 1, 2, 3 |
0/0 0/0 | |
| # | Formation | Normal Battle Node | AD/AP AS/AS+ |
| # | Selection Node | ||
|---|---|---|---|
| G | 艦隊の針路を選択できます。提督、どちらの針路をとられますか? You can decide the fleet's course. Admiral, which heading should we take? | ||
| # | Selection Node | ||
| # | Formation | Normal Battle Node | AD/AP AS/AS+ |
|---|---|---|---|
| H | Echelon Line Abreast Phases: 2, 3 |
0/0 0/0 | |
| Echelon Line Abreast Phases: 1, 2, 3 |
0/0 0/0 | ||
| Echelon Line Abreast Phases: 1, 3 |
0/0 0/0 | ||
| Echelon Line Abreast Phases: 2, 3 |
0/0 0/0 | ||
| # | Formation | Normal Battle Node | AD/AP AS/AS+ |
| # | Formation | Air Defense Node | AD/AP AS/AS+ |
|---|---|---|---|
| I | Diamond Phases: 2, 3 |
24/47 104/207 | |
| Diamond Phases: 1, 2, 3 |
47/93 207/414 | ||
| Diamond Phases: 2, 3 |
70/139 311/621 | ||
| Diamond Phases: 2, 3 |
72/144 323/645 | ||
| # | Formation | Air Defense Node | AD/AP AS/AS+ |
| # | Formation | Boss Battle Node | AD/AP AS/AS+ |
|---|---|---|---|
| J | Line Ahead Double Line Phases: 1, 2, 3 |
0/0 0/0 | |
| Line Ahead Phases: 1 (Final)
|
0/0 0/0 | ||
| # | Formation | Boss Battle Node | AD/AP AS/AS+ |
| # | Empty Node | ||
|---|---|---|---|
| K | 気のせいだった。 第三十一戦隊、これよりマニラに入港す。 Must be my imagination. 31st Squadron, entering the Port of Manila! | ||
| # | Empty Node | ||
| # | Empty Node | ||
|---|---|---|---|
| L | 気のせいだった。 第三十一戦隊、これよりマニラを抜錨、ルソン方面に出撃す! Must be my imagination. 31st Squadron, setting sail from Manilla, sortieing to the Luzon front! | ||
| # | Empty Node | ||
| # | Formation | Air Defense Node | AD/AP AS/AS+ |
|---|---|---|---|
| M | Diamond Phases: 2, 3 |
9/17 36/72 | |
| Diamond Phases: 2, 3 |
17/33 72/144 | ||
| Diamond Phases: 2, 3 |
32/63 140/279 | ||
| Diamond Phases: 2, 3 |
47/93 207/414 | ||
| # | Formation | Air Defense Node | AD/AP AS/AS+ |
| # | Formation | Normal Battle Node | AD/AP AS/AS+ |
|---|---|---|---|
| # | Formation | Normal Battle Node | AD/AP AS/AS+ |
| # | Formation | Air Defense Node | AD/AP AS/AS+ |
|---|---|---|---|
| O | Diamond Phases: 2, 3 |
9/17 36/72 | |
| Diamond Phases: 2, 3 |
17/33 72/144 | ||
| Diamond Phases: 2, 3 |
32/63 140/279 | ||
| Diamond Phases: 2, 3 |
47/93 207/414 | ||
| # | Formation | Air Defense Node | AD/AP AS/AS+ |
| # | Formation | Normal Battle Node | AD/AP AS/AS+ |
|---|---|---|---|
| P | Line Ahead Echelon Phases: 2, 3 |
0/0 0/0 | |
| Line Ahead Echelon Phases: 2, 3 |
0/0 0/0 | ||
| Line Ahead Echelon Phases: 2, 3 |
0/0 0/0 | ||
| Line Ahead Echelon Phases: 2, 3 |
0/0 0/0 | ||
| # | Formation | Normal Battle Node | AD/AP AS/AS+ |
| # | Formation | Boss Battle Node | AD/AP AS/AS+ |
|---|---|---|---|
| Q | Line Ahead Phases: 2 |
25/49 108/216 | |
| Double Line Phases: 3 |
18/35 77/153 | ||
| Line Ahead Phases: 2 (Final)
|
35/69 153/306 | ||
| # | Formation | Boss Battle Node | AD/AP AS/AS+ |
| # | Formation | Air Defense Node | AD/AP AS/AS+ |
|---|---|---|---|
| R | Diamond Phases: 3 |
9/17 36/72 | |
| Diamond Phases: 3 |
24/47 104/207 | ||
| Diamond Phases: 3 |
47/93 207/414 | ||
| Diamond Phases: 3 |
70/139 311/621 | ||
| # | Formation | Air Defense Node | AD/AP AS/AS+ |
| # | Formation | Normal Battle Node | AD/AP AS/AS+ |
|---|---|---|---|
| S | Line Ahead Double Line Echelon Phases: 3 |
0/0 0/0 | |
| # | Formation | Normal Battle Node | AD/AP AS/AS+ |
| # | Empty Node | ||
|---|---|---|---|
| T | 敵影を見ず。 No enemy spotted. | ||
| # | Empty Node | ||
| # | Formation | Normal Battle Node | AD/AP AS/AS+ |
|---|---|---|---|
| U | Echelon Line Abreast Phases: 3 |
0/0 0/0 | |
| Echelon Line Abreast Phases: 3 |
0/0 0/0 | ||
| Echelon Line Abreast Phases: 3 |
0/0 0/0 | ||
| Echelon Line Abreast Phases: 3 |
0/0 0/0 | ||
| # | Formation | Normal Battle Node | AD/AP AS/AS+ |
| # | Formation | Boss Battle Node | AD/AP AS/AS+ |
|---|---|---|---|
| V | Line Ahead Echelon Phases: 3 |
0/0 0/0 | |
| Line Ahead Phases: 3 (Final)
|
0/0 0/0 | ||
| # | Formation | Boss Battle Node | AD/AP AS/AS+ |
| # | Formation | Air Defense Node | AD/AP AS/AS+ |
|---|---|---|---|
| A | Diamond Phases: 1, 2, 3 |
24/47 104/207 | |
| Diamond Phases: 1, 2, 3 |
47/93 207/414 | ||
| Diamond Phases: 1, 2 |
70/139 311/621 | ||
| # | Formation | Air Defense Node | AD/AP AS/AS+ |
| # | Formation | Normal Battle Node | AD/AP AS/AS+ |
|---|---|---|---|
| B | Line Ahead Double Line Phases: 1, 2, 3 |
0/0 0/0 | |
| Line Ahead Double Line Phases: 1, 2, 3 |
0/0 0/0 | ||
| # | Formation | Normal Battle Node | AD/AP AS/AS+ |
| # | Formation | Normal Battle Node | AD/AP AS/AS+ |
|---|---|---|---|
| C | Echelon Line Abreast Phases: 1, 2, 3 |
0/0 0/0 | |
| Echelon Line Abreast Phases: 1, 2, 3 |
0/0 0/0 | ||
| # | Formation | Normal Battle Node | AD/AP AS/AS+ |
| # | Formation | Normal Battle Node | AD/AP AS/AS+ |
|---|---|---|---|
| D | Echelon Line Abreast Phases: 1, 2, 3 |
0/0 0/0 | |
| Echelon Line Abreast Phases: 1, 2, 3 |
0/0 0/0 | ||
| # | Formation | Normal Battle Node | AD/AP AS/AS+ |
| # | Selection Node | ||
|---|---|---|---|
| E | 艦隊の針路を選択できます。提督、どちらの針路をとられますか? You can decide the fleet's course. Admiral, which heading should we take? | ||
| # | Selection Node | ||
| # | Formation | Normal Battle Node | AD/AP AS/AS+ |
|---|---|---|---|
| F | Line Ahead Double Line Echelon Phases: 1, 2, 3 |
0/0 0/0 | |
| # | Formation | Normal Battle Node | AD/AP AS/AS+ |
| # | Selection Node | ||
|---|---|---|---|
| G | 艦隊の針路を選択できます。提督、どちらの針路をとられますか? You can decide the fleet's course. Admiral, which heading should we take? | ||
| # | Selection Node | ||
| # | Formation | Normal Battle Node | AD/AP AS/AS+ |
|---|---|---|---|
| H | Echelon Line Abreast Phases: 1, 2, 3 |
0/0 0/0 | |
| Echelon Line Abreast Phases: 1, 2, 3 |
0/0 0/0 | ||
| # | Formation | Normal Battle Node | AD/AP AS/AS+ |
| # | Formation | Air Defense Node | AD/AP AS/AS+ |
|---|---|---|---|
| I | Diamond Phases: 1, 2, 3 |
24/47 104/207 | |
| Diamond Phases: 1, 2, 3 |
47/93 207/414 | ||
| Diamond Phases: 1, 2, 3 |
70/139 311/621 | ||
| # | Formation | Air Defense Node | AD/AP AS/AS+ |
| # | Formation | Boss Battle Node | AD/AP AS/AS+ |
|---|---|---|---|
| J | Line Ahead Double Line Phases: 1, 2, 3 |
0/0 0/0 | |
| Line Ahead Phases: 1 (Final)
|
0/0 0/0 | ||
| # | Formation | Boss Battle Node | AD/AP AS/AS+ |
| # | Empty Node | ||
|---|---|---|---|
| K | 気のせいだった。 第三十一戦隊、これよりマニラに入港す。 Must be my imagination. 31st Squadron, entering the Port of Manila! | ||
| # | Empty Node | ||
| # | Empty Node | ||
|---|---|---|---|
| L | 気のせいだった。 第三十一戦隊、これよりマニラを抜錨、ルソン方面に出撃す! Must be my imagination. 31st Squadron, setting sail from Manilla, sortieing to the Luzon front! | ||
| # | Empty Node | ||
| # | Formation | Air Defense Node | AD/AP AS/AS+ |
|---|---|---|---|
| M | Diamond Phases: 2, 3 |
9/17 36/72 | |
| Diamond Phases: 2, 3 |
17/33 72/144 | ||
| Diamond Phases: 2, 3 |
32/63 140/279 | ||
| # | Formation | Air Defense Node | AD/AP AS/AS+ |
| # | Formation | Normal Battle Node | AD/AP AS/AS+ |
|---|---|---|---|
| # | Formation | Normal Battle Node | AD/AP AS/AS+ |
| # | Formation | Air Defense Node | AD/AP AS/AS+ |
|---|---|---|---|
| O | Diamond Phases: 2, 3 |
9/17 36/72 | |
| Diamond Phases: 2, 3 |
17/33 72/144 | ||
| Diamond Phases: 2, 3 |
32/63 140/279 | ||
| # | Formation | Air Defense Node | AD/AP AS/AS+ |
| # | Formation | Normal Battle Node | AD/AP AS/AS+ |
|---|---|---|---|
| P | Line Ahead Echelon Phases: 2, 3 |
0/0 0/0 | |
| Line Ahead Echelon Phases: 2, 3 |
0/0 0/0 | ||
| # | Formation | Normal Battle Node | AD/AP AS/AS+ |
| # | Formation | Boss Battle Node | AD/AP AS/AS+ |
|---|---|---|---|
| Q | Line Ahead Phases: 2 |
11/22 48/96 | |
| Double Line Phases: 3 |
15/29 63/126 | ||
| Line Ahead Phases: 2 (Final)
|
15/29 63/126 | ||
| # | Formation | Boss Battle Node | AD/AP AS/AS+ |
| # | Formation | Air Defense Node | AD/AP AS/AS+ |
|---|---|---|---|
| # | Formation | Air Defense Node | AD/AP AS/AS+ |
| # | Formation | Normal Battle Node | AD/AP AS/AS+ |
|---|---|---|---|
| S | Line Ahead Double Line Echelon Phases: 3 |
0/0 0/0 | |
| # | Formation | Normal Battle Node | AD/AP AS/AS+ |
| # | Empty Node | ||
|---|---|---|---|
| T | 敵影を見ず。 No enemy spotted. | ||
| # | Empty Node | ||
| # | Formation | Normal Battle Node | AD/AP AS/AS+ |
|---|---|---|---|
| U | Echelon Line Abreast Phases: 3 |
0/0 0/0 | |
| Echelon Line Abreast Phases: 3 |
0/0 0/0 | ||
| # | Formation | Normal Battle Node | AD/AP AS/AS+ |
| # | Formation | Boss Battle Node | AD/AP AS/AS+ |
|---|---|---|---|
| V | Line Ahead Echelon Phases: 3 |
0/0 0/0 | |
| Line Ahead Phases: 3 (Final)
|
0/0 0/0 | ||
| # | Formation | Boss Battle Node | AD/AP AS/AS+ |
Ship Drops:
| ExpandShip drops | |||||||||||||||||||||||||||||||||||||||||||||||||||||||||||||||||||||||||||||||||||||||||||||||||||
|---|---|---|---|---|---|---|---|---|---|---|---|---|---|---|---|---|---|---|---|---|---|---|---|---|---|---|---|---|---|---|---|---|---|---|---|---|---|---|---|---|---|---|---|---|---|---|---|---|---|---|---|---|---|---|---|---|---|---|---|---|---|---|---|---|---|---|---|---|---|---|---|---|---|---|---|---|---|---|---|---|---|---|---|---|---|---|---|---|---|---|---|---|---|---|---|---|---|---|---|
| Type | Ship? | F | J | Q | S | V | |||||||||||||||||||||||||||||||||||||||||||||||||||||||||||||||||||||||||||||||||||||||||||||
| DE | Matsuwa | Casual+ | Casual+ | ||||||||||||||||||||||||||||||||||||||||||||||||||||||||||||||||||||||||||||||||||||||||||||||||
| DE | Sado | Casual+ | Casual+ | ||||||||||||||||||||||||||||||||||||||||||||||||||||||||||||||||||||||||||||||||||||||||||||||||
| DE | Tsushima | Casual+ | Casual+ | ||||||||||||||||||||||||||||||||||||||||||||||||||||||||||||||||||||||||||||||||||||||||||||||||
| DE | Hiburi | Casual+ | |||||||||||||||||||||||||||||||||||||||||||||||||||||||||||||||||||||||||||||||||||||||||||||||||
| DE | Daitou | Casual+ | |||||||||||||||||||||||||||||||||||||||||||||||||||||||||||||||||||||||||||||||||||||||||||||||||
| DE | Kaiboukan No.4 | Casual+ | |||||||||||||||||||||||||||||||||||||||||||||||||||||||||||||||||||||||||||||||||||||||||||||||||
| DD | Asakaze | Hard+ | Casual+ | ||||||||||||||||||||||||||||||||||||||||||||||||||||||||||||||||||||||||||||||||||||||||||||||||
| DD | Harukaze | Medium+ | |||||||||||||||||||||||||||||||||||||||||||||||||||||||||||||||||||||||||||||||||||||||||||||||||
| DD | Matsukaze | Casual+ | Casual+ | ||||||||||||||||||||||||||||||||||||||||||||||||||||||||||||||||||||||||||||||||||||||||||||||||
| DD | Hatakaze | Easy+ | |||||||||||||||||||||||||||||||||||||||||||||||||||||||||||||||||||||||||||||||||||||||||||||||||
| DD | Uzuki | Easy+ | Casual+ | ||||||||||||||||||||||||||||||||||||||||||||||||||||||||||||||||||||||||||||||||||||||||||||||||
| DD | Uranami | Medium+ | Casual+ | Casual+ | Medium+ | ||||||||||||||||||||||||||||||||||||||||||||||||||||||||||||||||||||||||||||||||||||||||||||||
| DD | Fujinami | Casual+ | |||||||||||||||||||||||||||||||||||||||||||||||||||||||||||||||||||||||||||||||||||||||||||||||||
| DD | Hayanami | Casual+ | |||||||||||||||||||||||||||||||||||||||||||||||||||||||||||||||||||||||||||||||||||||||||||||||||
| DD | Hamanami | Casual+ | Casual+ | Casual+ | |||||||||||||||||||||||||||||||||||||||||||||||||||||||||||||||||||||||||||||||||||||||||||||||
| DD | Okinami | Casual+ | Casual+ | ||||||||||||||||||||||||||||||||||||||||||||||||||||||||||||||||||||||||||||||||||||||||||||||||
| DD | Asashimo | Casual+ | |||||||||||||||||||||||||||||||||||||||||||||||||||||||||||||||||||||||||||||||||||||||||||||||||
| DD | Hayashimo | Casual+ | Casual+ | ||||||||||||||||||||||||||||||||||||||||||||||||||||||||||||||||||||||||||||||||||||||||||||||||
| DD | Kiyoshimo | Casual+ | Casual+ | ||||||||||||||||||||||||||||||||||||||||||||||||||||||||||||||||||||||||||||||||||||||||||||||||
| DD | Suzutsuki | Easy+ | Casual+ | ||||||||||||||||||||||||||||||||||||||||||||||||||||||||||||||||||||||||||||||||||||||||||||||||
| DD | Hatsuzuki | Casual+ | |||||||||||||||||||||||||||||||||||||||||||||||||||||||||||||||||||||||||||||||||||||||||||||||||
| DD | Fletcher | Casual+ | |||||||||||||||||||||||||||||||||||||||||||||||||||||||||||||||||||||||||||||||||||||||||||||||||
| CL | Noshiro | Casual+ | |||||||||||||||||||||||||||||||||||||||||||||||||||||||||||||||||||||||||||||||||||||||||||||||||
| CL | Ooyodo | Casual+ | Casual+ | ||||||||||||||||||||||||||||||||||||||||||||||||||||||||||||||||||||||||||||||||||||||||||||||||
| CA | Houston | Casual+ | |||||||||||||||||||||||||||||||||||||||||||||||||||||||||||||||||||||||||||||||||||||||||||||||||
| CVL | Kasuga Maru | Medium+ | |||||||||||||||||||||||||||||||||||||||||||||||||||||||||||||||||||||||||||||||||||||||||||||||||
| SS | I-26 | Casual+ | |||||||||||||||||||||||||||||||||||||||||||||||||||||||||||||||||||||||||||||||||||||||||||||||||
| SS | I-47 | Casual+ | |||||||||||||||||||||||||||||||||||||||||||||||||||||||||||||||||||||||||||||||||||||||||||||||||
| SS | Maruyu | Casual+ | |||||||||||||||||||||||||||||||||||||||||||||||||||||||||||||||||||||||||||||||||||||||||||||||||
| LHA | Shinshuu Maru | Casual+ | |||||||||||||||||||||||||||||||||||||||||||||||||||||||||||||||||||||||||||||||||||||||||||||||||
| AS | Jingei | Casual+ | |||||||||||||||||||||||||||||||||||||||||||||||||||||||||||||||||||||||||||||||||||||||||||||||||
| AS | Taigei | Casual+ | |||||||||||||||||||||||||||||||||||||||||||||||||||||||||||||||||||||||||||||||||||||||||||||||||
| AO | Hayasui | Casual+ | |||||||||||||||||||||||||||||||||||||||||||||||||||||||||||||||||||||||||||||||||||||||||||||||||
| DD | Yayoi | Casual+ | Casual+ | ||||||||||||||||||||||||||||||||||||||||||||||||||||||||||||||||||||||||||||||||||||||||||||||||
| DD | Naganami | Casual+ | Casual+ | Casual+ | |||||||||||||||||||||||||||||||||||||||||||||||||||||||||||||||||||||||||||||||||||||||||||||||
| CL | Ooi | Medium+ | Casual+ | Casual+ | Medium+ | ||||||||||||||||||||||||||||||||||||||||||||||||||||||||||||||||||||||||||||||||||||||||||||||
| CL | Nagara | Casual+ | Casual+ | Casual+ | Casual+ | Casual+ | |||||||||||||||||||||||||||||||||||||||||||||||||||||||||||||||||||||||||||||||||||||||||||||
| CL | Kinu | Hard+ | Casual+ | Casual+ | Hard+ | ||||||||||||||||||||||||||||||||||||||||||||||||||||||||||||||||||||||||||||||||||||||||||||||
| CL | Abukuma | Casual+ | Casual+ | ||||||||||||||||||||||||||||||||||||||||||||||||||||||||||||||||||||||||||||||||||||||||||||||||
| CL | Sendai | Easy+ | Casual+ | Casual+ | Easy+ | Casual+ | |||||||||||||||||||||||||||||||||||||||||||||||||||||||||||||||||||||||||||||||||||||||||||||
| CA | Myoukou | Casual+ | |||||||||||||||||||||||||||||||||||||||||||||||||||||||||||||||||||||||||||||||||||||||||||||||||
| CA | Atago | Casual+ | |||||||||||||||||||||||||||||||||||||||||||||||||||||||||||||||||||||||||||||||||||||||||||||||||
| CA | Suzuya | Casual+ | |||||||||||||||||||||||||||||||||||||||||||||||||||||||||||||||||||||||||||||||||||||||||||||||||
| CA | Kumano | Casual+ | |||||||||||||||||||||||||||||||||||||||||||||||||||||||||||||||||||||||||||||||||||||||||||||||||
| CA | Chikuma | Casual+ | |||||||||||||||||||||||||||||||||||||||||||||||||||||||||||||||||||||||||||||||||||||||||||||||||
| FBB | Kongou | Casual+ | |||||||||||||||||||||||||||||||||||||||||||||||||||||||||||||||||||||||||||||||||||||||||||||||||
| FBB | Haruna | Casual+ | |||||||||||||||||||||||||||||||||||||||||||||||||||||||||||||||||||||||||||||||||||||||||||||||||
| BB | Fusou | Casual+ | |||||||||||||||||||||||||||||||||||||||||||||||||||||||||||||||||||||||||||||||||||||||||||||||||
| BB | Yamashiro | Casual+ | |||||||||||||||||||||||||||||||||||||||||||||||||||||||||||||||||||||||||||||||||||||||||||||||||
| BB | Ise | Casual+ | |||||||||||||||||||||||||||||||||||||||||||||||||||||||||||||||||||||||||||||||||||||||||||||||||
| BB | Hyuuga | Casual+ | |||||||||||||||||||||||||||||||||||||||||||||||||||||||||||||||||||||||||||||||||||||||||||||||||
| SS | I-8 | Casual+ | |||||||||||||||||||||||||||||||||||||||||||||||||||||||||||||||||||||||||||||||||||||||||||||||||
| SS | I-19 | Casual+ | |||||||||||||||||||||||||||||||||||||||||||||||||||||||||||||||||||||||||||||||||||||||||||||||||
| SS | I-58 | Easy+ | Casual+ | ||||||||||||||||||||||||||||||||||||||||||||||||||||||||||||||||||||||||||||||||||||||||||||||||
| ExpandE-1 Clear Message |
|---|
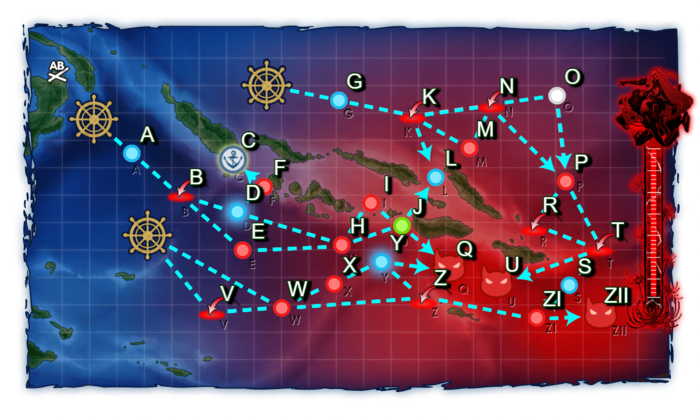
E-2
第六艦隊の戦い
![]()
![]()


| Information | ||||
|---|---|---|---|---|
| Event Tag | ||||
| Boss Gauges | Hard (甲): 500 TP, 1950 HP, 1750 HP | |||
| Medium (乙): 400 TP, 1850 HP, 1750 HP | ||||
| Easy (丙): 280 TP, 1750 HP, 1750 HP | ||||
| Casual (丁): 280 TP, 1750 HP, 1750 HP | ||||
| Map Bosses | ||||
| Rewards | ||||
|---|---|---|---|---|
| All | ||||
| Equipment/Item | 丁 Casual |
丙 Easy |
乙 Medium |
甲 Hard |
Medal |
1 | |||
Reinforcement Expansion |
1 | 1 | 1 | |
 Emergency Repair Goddess |
1 | 2 | 2 | |
Submarine Supply Material |
1 | 2 | 3 | 4 |
 SOC Seagull |
1 (★5) | 1 (★8) | ||
 Elite Torpedo Squadron Command Facility |
1 | 1 | 1 (★2) | 1 (★4) |

| E-2 Branching Rules | ||
|---|---|---|
| Nodes | Rules | |
| Start | 1 |
|
2 |
| |
3 |
| |
3 |
V |
|
W |
| |
B |
D |
|
E |
| |
D |
F |
|
H | ||
H |
I |
|
J | ||
J |
L |
|
Q |
| |
K |
L |
|
M | ||
N | ||
N |
O |
|
P |
| |
P |
R |
|
T |
| |
T |
S |
|
U |
| |
W |
X |
|
Z |
| |
Y |
Q |
|
Z | ||
ZI |
S |
|
ZII |
| |
Branching compositions were reported over the course of the event.
The event guides are to be constructed through the respective Event map page guide and reviewed by editor staff / collaboration committee before being approved here. Do not under any circumstance update the guides through this page or attempt to fix them through this page. Please only update guides through their respective sandbox pages.
Ship Bonuses (Tentative)
DISCLAIMER: This information is based on user submitted data and is subject to revisions as more data is gathered. Any version of the ship receives the bonus regardless of remodel.
| Ships | Nodes E/H/I/Q | |
|---|---|---|
| 1.35x (1.6875x) | ||
| Submarines (SS/SSV) | 1.35x | |
| IJN Light Cruisers (CL) | 1.25x | |
| IJN Destroyers (DD) | 1.15x | |
| Ships | Nodes M/P/U | ||
|---|---|---|---|
| 1.35x | |||
| 1.2x | |||
| - | - | ||
| - | |||
| Ships | Nodes Z1/Z2 | ||
|---|---|---|---|
| 1.35x | |||
| 1.15x | |||
| - | - | ||
| Submarines (SS/SSV) Multiplicative with below |
1.35x | ||
| 1.25x (1.6875x) | |||
| 1.15x (1.5525x) | |||
General Information
- There is 2 Land Bases available for you to use within the map.
- There are 2 different tags for this map:
 Blue Tag: 3rd Fleet (Requirement: Combined Fleet or Single Fleet with CV) (Northern Start)
 Purple Tag: 6th Fleet (Requirements: Single Fleet with no CV) (2 Southern Starts)
Phase 1: TP Phase
This phase will require you to run a Single Fleet to deplete the TP bar at Q, consisting of a Ne-Class Kai and light escorts There are currently two known compositions to complete this phase:
- Recommended Fleet:[Purple Tag]6th Fleet 1 CL 1 CAV/AV 4 DD (FAST)
- Route: A B E H J Q
- LBAS: Q 5 Range (no Airpower)
- Notes: Support expeditions are optional. You can use vanguard formation to pass the surface nodes
- LoS: About 44+/34+/27+/23+ Cn3 on Hard/Medium/Easy/Casual is required to route from J to Q with this comp.
- Will deplete the TP Gauge fast compared to the Submarine Composition.
- May result in extra bucket being spent while doing the runs.
- Will also result in additional ship being locked the map.
- Recommended Fleet:[Purple Tag]6th Fleet 6SS(V)
- Route: A B D H J Q
- LBAS: H 4 Range (no Airpower), Q 5 Range (no Airpower)
- Notes: Only recommended if you have some Type 2 Ka-Mi Tanks and Drum Canister carrying Subs (Luigi Torelli Kai or higher).
- Sub Fleet will be almost safe from any harm through the map as long as a land base is placed in Node H and Q.
- However, the amount of TP drain per run will be very low, requiring more runs to be taken (Around 40-50 runs depending on the equipment you have).
- This can be ideal if you plan to conserve ships for tagging in later sections of the event.
- This can also be helpful in conserving buckets that would otherwise be spent in this map using a surface related composition.
- LoS: The LoS check from J to Q is ignored if using a full fleet of 6 SS(V).
- Based on current data, using less than 3-4 SS(V) in a fleet may result in off-routing to L regardless.
Phase 1.5: Unlock the route to Node U
Unlocking U has two requirements:
| Node | C | P |
|---|---|---|
| Hard | Reach | S x2 |
| Medium | Reach | S |
| Easy | Reach | - |
| Casual | - | - |
- Composition:[Purple Tag]6th Fleet 1SS (You can equip a damage control fairy on your submarine in case of taiha on F)
- Route: A B D F C
- LBAS: N/A
- Composition:
- Composition:[Blue Tag]3rd Fleet Carrier Task Force (CTF): 2 FBB 2 CV 2 CA + 1 CL 5 DD (Fast)
- Route: G K M N P
- Alternatively, you can use a single fleet comprised of 3 CV(L), 2 (FBB or CA(V)), and a DD with a maximum of 2 CV to route G K N P
- LBAS: Range 7, AP/AS on Hard: 124/279
- Composition:
Phase 2: Defeat CA Hime at Node U
You can use the same fleet you used in the previous unlocking phase
- Composition:[Blue Tag]3rd Fleet Carrier Task Force (CTF): 2 FBB 2 CV 2 CA + 1 CL 5 DD (Fast)
- Route: G K M N P T U
- Alternatively, you can use a single fleet comprised of 3 CV(L), 2 (FBB or CA(V)), and a DD with a maximum of 2 CV to route G K N P T U
- LBAS: Range 6, no Air Power
- Notes: AACI is heavily recommended due to three airstrikes on route. Support Expeditions are optional
Phase 3: Defeat CV Hime at Node ZII
In this phase, you will need to take out an Aircraft Carrier Princess. There are several compositions availabe depending on selected difficulty:
- Composition:[Purple Tag]6th Fleet 6 SS(V)
- The recommended composition for all difficulties
- Route: W Z ZI ZII
- LBAS Range: 8 Range, AP/AS on Hard 103/231
- Notes: Node Support is recommended to help you pass through the 2 surface battle nodes. Boss Support Expedition is optional if you send LBAS to the Boss.
- LoS: 29+/23+/21+/18+ Cn3 on Hard/Medium/Easy/Casual is required to route from ZI to ZII.
- Composition:[Purple Tag]6th Fleet CL, AV/CAV, DD, 3 SS(V)
- Only should be considered if you lack submarines
- Route: V W X Y Z ZI ZII
- LBAS Range: 8 Range, AP/AS on Hard 103/231
- Notes: Node Support is recommended. Boss Support is also recommended.
- LoS: 29+/23+/21+/18+ Cn3 on Hard/Medium/Easy/Casual is required to route from ZI to ZII.
- Composition:[Purple Tag]6th Fleet AS, BBV, 2CLT, 2 SS(V)
- Easy and Casual Difficulty Only (Use this Composition in case of a lack of Submarines)
- Route: V W X Y Z ZI ZII
- LBAS Range: 8 Range, AP/AS on Easy/Casual 88/197
- Notes: Node Support is recommended. Boss Support is also recommended.
- LoS: 29+/23+/21+/18+ Cn3 on Hard/Medium/Easy/Casual is required to route from ZI to ZII.
- Composition:[Purple Tag]6th Fleet 2CL, 4DD
- Casual Only (Use this Composition in case of a lack of Submarines)
- Route: W X Y Z ZI ZII
- LBAS Range: 8 Range, AP/AS on Easy 88/197
- Notes: Vanguard formation can be utilized to help with passing rate. Boss Support is optional but recommended.
- LoS: 29+/23+/21+/18+ Cn3 on Hard/Medium/Easy/Casual is required to route from ZI to ZII.
Enemy Compositions
| # | Empty Node | ||
|---|---|---|---|
| A | 気のせいだった。 ソロモン最前線へ、鼠輸送を敢行する! Must be my imagination. To the front lines of the Solomons, carrying out a Rat Transport Operation! | ||
| # | Empty Node | ||
| # | Formation | Air Defense Node | AD/AP AS/AS+ |
|---|---|---|---|
| B | Diamond Phases: 1, 2, 3 |
55/110 246/492 | |
| Diamond Phases: 1, 2, 3 |
60/119 267/534 | ||
| Diamond Phases: 1, 2, 3 |
67/133 297/594 | ||
| Diamond Phases: 1, 2, 3 |
76/151 338/675 | ||
| Diamond Phases: 1, 2, 3 |
80/160 359/717 | ||
| # | Formation | Air Defense Node | AD/AP AS/AS+ |
| # | Resource Node | ||
|---|---|---|---|
| # | Resource Node | ||
| # | Selection Node | ||
|---|---|---|---|
| D | ソロモン最前線へ、鼠輸送を敢行する! To the front lines of the Solomons, carrying out a Rat Transport Operation! | ||
| # | Selection Node | ||
| # | Formation | Normal Battle Node | AD/AP AS/AS+ |
|---|---|---|---|
| E | Line Ahead Phases: 1, 2 |
0/0 0/0 | |
| Line Ahead Echelon Phases: 1, 2, 3 |
0/0 0/0 | ||
| # | Formation | Normal Battle Node | AD/AP AS/AS+ |
| # | Formation | Normal Battle Node | AD/AP AS/AS+ |
|---|---|---|---|
| F | Echelon Phases: 1, 2 |
0/0 0/0 | |
| Line Ahead Phases: 1, 2 |
0/0 0/0 | ||
| Echelon Phases: 1, 2 |
0/0 0/0 | ||
| # | Formation | Normal Battle Node | AD/AP AS/AS+ |
| # | Empty Node | ||
|---|---|---|---|
| G | 気のせいだった。 第三艦隊、出撃する!対空警戒を厳に! Must be my imagination. 3rd Fleet, sortieing! Maintain high anti-aircraft alert! | ||
| # | Empty Node | ||
| # | Formation | Normal Battle Node | AD/AP AS/AS+ |
|---|---|---|---|
| H | Line Ahead Phases: 1, 2 |
0/0 0/0 | |
| Line Ahead Phases: 1, 2 |
0/0 0/0 | ||
| Line Ahead Phases: 1, 2 |
0/0 0/0 | ||
| # | Formation | Normal Battle Node | AD/AP AS/AS+ |
| # | Formation | Normal Battle Node | AD/AP AS/AS+ |
|---|---|---|---|
| I | Line Ahead Phases: 1 |
0/0 0/0 | |
| Line Ahead Phases: 1 |
0/0 0/0 | ||
| Line Ahead Phases: 1 |
0/0 0/0 | ||
| # | Formation | Normal Battle Node | AD/AP AS/AS+ |
| # | Landing Node | ||
|---|---|---|---|
| # | Landing Node | ||
| # | Formation | Air Defense Node | AD/AP AS/AS+ |
|---|---|---|---|
| K | Diamond Phases: 1, 2, 3 |
55/110 246/492 | |
| Diamond Phases: 1, 2, 3 |
60/119 267/534 | ||
| Diamond Phases: 1, 2, 3 |
67/133 297/594 | ||
| Diamond Phases: 1, 2, 3 |
76/151 338/675 | ||
| Diamond Phases: 1, 2, 3 |
80/160 359/717 | ||
| # | Formation | Air Defense Node | AD/AP AS/AS+ |
| # | Empty Node | ||
|---|---|---|---|
| L | 敵影を見ず。 第三艦隊、出撃する!対空警戒を厳に! No enemy spotted. 3rd Fleet, sortieing! Maintain high anti-aircraft alert! | ||
| # | Empty Node | ||
| # | Formation | Normal Battle Node | AD/AP AS/AS+ |
|---|---|---|---|
| M | Echelon Line Abreast Phases: 2, 3 |
0/0 0/0 | |
| Echelon Line Abreast Phases: 2, 3 |
0/0 0/0 | ||
| # | Formation | Normal Battle Node | AD/AP AS/AS+ |
| # | Formation | Air Defense Node | AD/AP AS/AS+ |
|---|---|---|---|
| N | Diamond Phases: 1, 2, 3 |
98/195 438/876 | |
| Diamond Phases: 1, 2, 3 |
98/195 438/876 | ||
| Diamond Phases: 1, 2, 3 |
101/201 450/900 | ||
| Diamond Phases: 1, 2, 3 |
103/206 462/924 | ||
| Diamond Phases: 2 |
124/247 554/1107 | ||
| # | Formation | Air Defense Node | AD/AP AS/AS+ |
| # | Formation | Normal Battle Node | AD/AP AS/AS+ |
|---|---|---|---|
| O | Echelon Phases: 2 |
0/0 0/0 | |
| Line Abreast | 0/0 0/0 | ||
| # | Formation | Normal Battle Node | AD/AP AS/AS+ |
| # | Formation | Normal Battle Node | AD/AP AS/AS+ |
|---|---|---|---|
| P | Diamond Phases: 1, 2 |
52/103 231/462 | |
| Diamond Phases: 1, 2, 3 |
57/114 255/510 | ||
| Diamond Phases: 1, 2, 3 |
63/125 279/558 | ||
| # | Formation | Normal Battle Node | AD/AP AS/AS+ |
| # | Formation | Boss Battle Node | AD/AP AS/AS+ |
|---|---|---|---|
| Q | Line Ahead Phases: 3 |
0/0 0/0 | |
| Line Ahead Phases: 1 |
0/0 0/0 | ||
| Line Ahead Phases: 1 (Final)
|
0/0 0/0 | ||
| # | Formation | Boss Battle Node | AD/AP AS/AS+ |
| # | Formation | Air Defense Node | AD/AP AS/AS+ |
|---|---|---|---|
| R | Diamond Phases: 2 |
98/195 438/876 | |
| Diamond Phases: 2 |
98/195 438/876 | ||
| Diamond Phases: 2 |
101/201 450/900 | ||
| Diamond Phases: 2 |
103/206 462/924 | ||
| Diamond Phases: 2 |
124/247 554/1107 | ||
| # | Formation | Air Defense Node | AD/AP AS/AS+ |
| # | Empty Node | ||
|---|---|---|---|
| S | 敵影を見ず。 第三艦隊、出撃する!対空警戒を厳に! No enemy spotted. 3rd Fleet, sortieing! Maintain high anti-aircraft alert! | ||
| # | Empty Node | ||
| # | Formation | Air Defense Node | AD/AP AS/AS+ |
|---|---|---|---|
| T | Diamond Phases: 2, 3 |
98/195 438/876 | |
| Diamond Phases: 2, 3 |
98/195 438/876 | ||
| Diamond Phases: 2, 3 |
101/201 450/900 | ||
| Diamond Phases: 2 |
103/206 462/924 | ||
| Diamond Phases: 2, 3 |
124/247 554/1107 | ||
| # | Formation | Air Defense Node | AD/AP AS/AS+ |
| # | Formation | Boss Battle Node | AD/AP AS/AS+ |
|---|---|---|---|
| U | Line Ahead Phases: 3 |
0/0 0/0 | |
| Line Ahead Phases: 2 |
0/0 0/0 | ||
| Line Ahead Phases: 2 (Final)
|
0/0 0/0 | ||
| # | Formation | Boss Battle Node | AD/AP AS/AS+ |
| # | Formation | Air Defense Node | AD/AP AS/AS+ |
|---|---|---|---|
| V | Diamond Phases: 3 |
60/119 267/534 | |
| Diamond Phases: 3 |
67/133 297/594 | ||
| Diamond Phases: 3 |
76/151 338/675 | ||
| Diamond Phases: 3 |
80/160 359/717 | ||
| # | Formation | Air Defense Node | AD/AP AS/AS+ |
| # | Formation | Normal Battle Node | AD/AP AS/AS+ |
|---|---|---|---|
| W | Double Line Phases: 3 |
0/0 0/0 | |
| Double Line Phases: 3 |
0/0 0/0 | ||
| Double Line Phases: 3 |
0/0 0/0 | ||
| # | Formation | Normal Battle Node | AD/AP AS/AS+ |
| # | Formation | Normal Battle Node | AD/AP AS/AS+ |
|---|---|---|---|
| X | Line Ahead Vanguard Phases: 3 |
0/0 0/0 | |
| Line Ahead Phases: 3 |
0/0 0/0 | ||
| # | Formation | Normal Battle Node | AD/AP AS/AS+ |
| # | Selection Node | ||
|---|---|---|---|
| Y | 艦隊の針路を選択できます。提督、どちらの針路をとられますか? You can decide the fleet's course. Admiral, which heading should we take? | ||
| # | Selection Node | ||
| # | Formation | Air Defense Node | AD/AP AS/AS+ |
|---|---|---|---|
| Z | Diamond Phases: 3 |
55/110 246/492 | |
| Diamond Phases: 3 |
60/119 267/534 | ||
| Diamond Phases: 3 |
67/133 297/594 | ||
| Diamond Phases: 3 |
76/151 338/675 | ||
| Diamond Phases: 3 |
80/160 359/717 | ||
| # | Formation | Air Defense Node | AD/AP AS/AS+ |
| # | Formation | Normal Battle Node | AD/AP AS/AS+ |
|---|---|---|---|
| ZI | Line Ahead Phases: 3 |
0/0 0/0 | |
| Line Ahead Phases: 3 |
0/0 0/0 | ||
| Line Ahead Phases: 3 |
0/0 0/0 | ||
| # | Formation | Normal Battle Node | AD/AP AS/AS+ |
| # | Formation | Boss Battle Node | AD/AP AS/AS+ |
|---|---|---|---|
| ZII | Diamond Phases: 3 |
52/103 231/462 | |
| Diamond Phases: 3 |
52/103 231/462 | ||
| Diamond Phases: 3 (Final)
|
52/103 231/462 | ||
| # | Formation | Boss Battle Node | AD/AP AS/AS+ |
| # | Empty Node | ||
|---|---|---|---|
| A | 気のせいだった。 ソロモン最前線へ、鼠輸送を敢行する! Must be my imagination. To the front lines of the Solomons, carrying out a Rat Transport Operation! | ||
| # | Empty Node | ||
| # | Formation | Air Defense Node | AD/AP AS/AS+ |
|---|---|---|---|
| B | Diamond Phases: 1, 2, 3 |
44/87 195/390 | |
| Diamond Phases: 1, 2, 3 |
55/110 246/492 | ||
| Diamond Phases: 1, 2, 3 |
60/119 267/534 | ||
| Diamond Phases: 1, 2, 3 |
23/46 102/204 | ||
| # | Formation | Air Defense Node | AD/AP AS/AS+ |
| # | Resource Node | ||
|---|---|---|---|
| # | Resource Node | ||
| # | Selection Node | ||
|---|---|---|---|
| D | ソロモン最前線へ、鼠輸送を敢行する! To the front lines of the Solomons, carrying out a Rat Transport Operation! | ||
| # | Selection Node | ||
| # | Formation | Normal Battle Node | AD/AP AS/AS+ |
|---|---|---|---|
| E | Line Ahead Phases: 1, 3 |
0/0 0/0 | |
| Line Ahead Echelon Phases: 1 |
0/0 0/0 | ||
| # | Formation | Normal Battle Node | AD/AP AS/AS+ |
| # | Formation | Normal Battle Node | AD/AP AS/AS+ |
|---|---|---|---|
| F | Line Ahead Phases: 2 |
0/0 0/0 | |
| Echelon Phases: 1, 2 |
0/0 0/0 | ||
| Echelon Phases: 1, 2 |
0/0 0/0 | ||
| # | Formation | Normal Battle Node | AD/AP AS/AS+ |
| # | Empty Node | ||
|---|---|---|---|
| G | 気のせいだった。 第三艦隊、出撃する!対空警戒を厳に! Must be my imagination. 3rd Fleet, sortieing! Maintain high anti-aircraft alert! | ||
| # | Empty Node | ||
| # | Formation | Normal Battle Node | AD/AP AS/AS+ |
|---|---|---|---|
| H | Line Ahead Phases: 1, 3 |
0/0 0/0 | |
| Line Ahead Phases: 1, 2 |
0/0 0/0 | ||
| Line Ahead Phases: 1, 2, 3 |
0/0 0/0 | ||
| # | Formation | Normal Battle Node | AD/AP AS/AS+ |
| # | Formation | Normal Battle Node | AD/AP AS/AS+ |
|---|---|---|---|
| I | Line Ahead Phases: 1 |
0/0 0/0 | |
| Line Ahead Phases: 1 |
0/0 0/0 | ||
| Line Ahead Phases: 1 |
0/0 0/0 | ||
| # | Formation | Normal Battle Node | AD/AP AS/AS+ |
| # | Landing Node | ||
|---|---|---|---|
| # | Landing Node | ||
| # | Formation | Air Defense Node | AD/AP AS/AS+ |
|---|---|---|---|
| K | Diamond Phases: 2, 3 |
44/87 195/390 | |
| Diamond Phases: 2, 3 |
55/110 246/492 | ||
| Diamond Phases: 2, 3 |
60/119 267/534 | ||
| Diamond Phases: 1, 2, 3 |
23/46 102/204 | ||
| # | Formation | Air Defense Node | AD/AP AS/AS+ |
| # | Empty Node | ||
|---|---|---|---|
| L | 敵影を見ず。 第三艦隊、出撃する!対空警戒を厳に! No enemy spotted. 3rd Fleet, sortieing! Maintain high anti-aircraft alert! | ||
| # | Empty Node | ||
| # | Formation | Normal Battle Node | AD/AP AS/AS+ |
|---|---|---|---|
| M | Echelon Line Abreast Phases: 2 |
0/0 0/0 | |
| Echelon Line Abreast Phases: 2 |
0/0 0/0 | ||
| Echelon Line Abreast Phases: 2 |
0/0 0/0 | ||
| Echelon Line Abreast Phases: 2, 3 |
0/0 0/0 | ||
| # | Formation | Normal Battle Node | AD/AP AS/AS+ |
| # | Formation | Air Defense Node | AD/AP AS/AS+ |
|---|---|---|---|
| N | Diamond Phases: 2, 3 |
44/87 194/387 | |
| Diamond Phases: 1, 2, 3 |
67/133 297/594 | ||
| Diamond Phases: 2, 3 |
75/149 335/669 | ||
| Diamond Phases: 2, 3 |
98/195 438/876 | ||
| Diamond Phases: 2 |
98/195 438/876 | ||
| # | Formation | Air Defense Node | AD/AP AS/AS+ |
| # | Formation | Normal Battle Node | AD/AP AS/AS+ |
|---|---|---|---|
| # | Formation | Normal Battle Node | AD/AP AS/AS+ |
| # | Formation | Normal Battle Node | AD/AP AS/AS+ |
|---|---|---|---|
| P | Diamond Phases: 2, 3 |
47/93 207/414 | |
| Diamond Phases: 1, 2, 3 |
49/98 219/438 | ||
| Diamond Phases: 2, 3 |
52/103 231/462 | ||
| # | Formation | Normal Battle Node | AD/AP AS/AS+ |
| # | Formation | Boss Battle Node | AD/AP AS/AS+ |
|---|---|---|---|
| Q | Line Ahead Phases: 2, 3 |
0/0 0/0 | |
| Line Ahead Phases: 1, 3 |
0/0 0/0 | ||
| Line Ahead Phases: 1 (Final)
|
0/0 0/0 | ||
| # | Formation | Boss Battle Node | AD/AP AS/AS+ |
| # | Formation | Air Defense Node | AD/AP AS/AS+ |
|---|---|---|---|
| R | Diamond Phases: 2 |
44/87 194/387 | |
| Diamond Phases: 2 |
67/133 297/594 | ||
| Diamond Phases: 2 |
75/149 335/669 | ||
| Diamond Phases: 2 |
98/195 438/876 | ||
| Diamond Phases: 2 |
98/195 438/876 | ||
| # | Formation | Air Defense Node | AD/AP AS/AS+ |
| # | Empty Node | ||
|---|---|---|---|
| S | 敵影を見ず。 第三艦隊、出撃する!対空警戒を厳に! No enemy spotted. 3rd Fleet, sortieing! Maintain high anti-aircraft alert! | ||
| # | Empty Node | ||
| # | Formation | Air Defense Node | AD/AP AS/AS+ |
|---|---|---|---|
| T | Diamond Phases: 2, 3 |
44/87 194/387 | |
| Diamond Phases: 2, 3 |
67/133 297/594 | ||
| Diamond Phases: 2, 3 |
75/149 335/669 | ||
| Diamond Phases: 2, 3 |
98/195 438/876 | ||
| Diamond Phases: 2, 3 |
98/195 438/876 | ||
| # | Formation | Air Defense Node | AD/AP AS/AS+ |
| # | Formation | Boss Battle Node | AD/AP AS/AS+ |
|---|---|---|---|
| U | Line Ahead Phases: 3 |
0/0 0/0 | |
| Line Ahead Phases: 2 |
0/0 0/0 | ||
| Line Ahead Phases: 2 (Final)
|
0/0 0/0 | ||
| # | Formation | Boss Battle Node | AD/AP AS/AS+ |
| # | Formation | Air Defense Node | AD/AP AS/AS+ |
|---|---|---|---|
| V | Diamond Phases: 3 |
44/87 195/390 | |
| Diamond Phases: 3 |
55/110 246/492 | ||
| Diamond Phases: 3 |
60/119 267/534 | ||
| Diamond Phases: 3 |
23/46 102/204 | ||
| # | Formation | Air Defense Node | AD/AP AS/AS+ |
| # | Formation | Normal Battle Node | AD/AP AS/AS+ |
|---|---|---|---|
| W | Double Line Phases: 3 |
0/0 0/0 | |
| Double Line Phases: 3 |
0/0 0/0 | ||
| Double Line Phases: 3 |
0/0 0/0 | ||
| # | Formation | Normal Battle Node | AD/AP AS/AS+ |
| # | Formation | Normal Battle Node | AD/AP AS/AS+ |
|---|---|---|---|
| X | Line Ahead Vanguard Phases: 3 |
0/0 0/0 | |
| Line Ahead Phases: 3 |
0/0 0/0 | ||
| # | Formation | Normal Battle Node | AD/AP AS/AS+ |
| # | Selection Node | ||
|---|---|---|---|
| Y | 艦隊の針路を選択できます。提督、どちらの針路をとられますか? You can decide the fleet's course. Admiral, which heading should we take? | ||
| # | Selection Node | ||
| # | Formation | Air Defense Node | AD/AP AS/AS+ |
|---|---|---|---|
| Z | Diamond Phases: 3 |
44/87 195/390 | |
| Diamond Phases: 3 |
55/110 246/492 | ||
| Diamond Phases: 3 |
60/119 267/534 | ||
| Diamond Phases: 3 |
23/46 102/204 | ||
| # | Formation | Air Defense Node | AD/AP AS/AS+ |
| # | Formation | Normal Battle Node | AD/AP AS/AS+ |
|---|---|---|---|
| ZI | Line Ahead Phases: 3 |
0/0 0/0 | |
| Line Ahead Phases: 3 |
0/0 0/0 | ||
| Line Ahead Phases: 3 |
0/0 0/0 | ||
| # | Formation | Normal Battle Node | AD/AP AS/AS+ |
| # | Formation | Boss Battle Node | AD/AP AS/AS+ |
|---|---|---|---|
| ZII | Diamond Phases: 3 |
52/103 231/462 | |
| Diamond Phases: 3 |
52/103 231/462 | ||
| Diamond Phases: 3 (Final)
|
52/103 231/462 | ||
| # | Formation | Boss Battle Node | AD/AP AS/AS+ |
| # | Empty Node | ||
|---|---|---|---|
| A | 気のせいだった。 ソロモン最前線へ、鼠輸送を敢行する! Must be my imagination. To the front lines of the Solomons, carrying out a Rat Transport Operation! | ||
| # | Empty Node | ||
| # | Formation | Air Defense Node | AD/AP AS/AS+ |
|---|---|---|---|
| B | Diamond Phases: 1, 2, 3 |
44/87 195/390 | |
| Diamond Phases: 1, 2, 3 |
12/23 51/102 | ||
| Diamond Phases: 1, 2, 3 |
17/33 72/144 | ||
| Diamond Phases: 1, 2, 3 |
55/110 246/492 | ||
| Diamond Phases: 1, 2, 3 |
23/46 102/204 | ||
| # | Formation | Air Defense Node | AD/AP AS/AS+ |
| # | Resource Node | ||
|---|---|---|---|
| # | Resource Node | ||
| # | Selection Node | ||
|---|---|---|---|
| D | ソロモン最前線へ、鼠輸送を敢行する! To the front lines of the Solomons, carrying out a Rat Transport Operation! | ||
| # | Selection Node | ||
| # | Formation | Normal Battle Node | AD/AP AS/AS+ |
|---|---|---|---|
| E | Line Ahead Phases: 1, 2, 3 |
0/0 0/0 | |
| Line Ahead Echelon Phases: 1, 2, 3 |
0/0 0/0 | ||
| # | Formation | Normal Battle Node | AD/AP AS/AS+ |
| # | Formation | Normal Battle Node | AD/AP AS/AS+ |
|---|---|---|---|
| F | Echelon Phases: 2 |
0/0 0/0 | |
| Line Ahead Phases: 1, 2 |
0/0 0/0 | ||
| Echelon Phases: 1, 2 |
0/0 0/0 | ||
| # | Formation | Normal Battle Node | AD/AP AS/AS+ |
| # | Empty Node | ||
|---|---|---|---|
| G | 気のせいだった。 第三艦隊、出撃する!対空警戒を厳に! Must be my imagination. 3rd Fleet, sortieing! Maintain high anti-aircraft alert! | ||
| # | Empty Node | ||
| # | Formation | Normal Battle Node | AD/AP AS/AS+ |
|---|---|---|---|
| H | Line Ahead Phases: 1, 2, 3 |
0/0 0/0 | |
| Line Ahead Phases: 1, 2, 3 |
0/0 0/0 | ||
| Line Ahead Phases: 1, 2, 3 |
0/0 0/0 | ||
| Line Ahead Phases: 1, 2, 3 |
0/0 0/0 | ||
| # | Formation | Normal Battle Node | AD/AP AS/AS+ |
| # | Formation | Normal Battle Node | AD/AP AS/AS+ |
|---|---|---|---|
| I | Line Ahead Phases: 1 |
0/0 0/0 | |
| Line Ahead Phases: 1 |
0/0 0/0 | ||
| Line Ahead Phases: 1, 3 |
0/0 0/0 | ||
| # | Formation | Normal Battle Node | AD/AP AS/AS+ |
| # | Landing Node | ||
|---|---|---|---|
| # | Landing Node | ||
| # | Formation | Air Defense Node | AD/AP AS/AS+ |
|---|---|---|---|
| K | Diamond Phases: 2, 3 |
44/87 195/390 | |
| Diamond Phases: 2, 3 |
12/23 51/102 | ||
| Diamond Phases: 1, 2, 3 |
17/33 72/144 | ||
| Diamond Phases: 1, 2, 3 |
55/110 246/492 | ||
| Diamond Phases: 2, 3 |
23/46 102/204 | ||
| # | Formation | Air Defense Node | AD/AP AS/AS+ |
| # | Empty Node | ||
|---|---|---|---|
| L | 敵影を見ず。 第三艦隊、出撃する!対空警戒を厳に! No enemy spotted. 3rd Fleet, sortieing! Maintain high anti-aircraft alert! | ||
| # | Empty Node | ||
| # | Formation | Normal Battle Node | AD/AP AS/AS+ |
|---|---|---|---|
| M | Echelon Line Abreast Phases: 2 |
0/0 0/0 | |
| Echelon Line Abreast Phases: 2 |
0/0 0/0 | ||
| Echelon Line Abreast Phases: 2, 3 |
0/0 0/0 | ||
| Echelon Line Abreast Phases: 2 |
0/0 0/0 | ||
| # | Formation | Normal Battle Node | AD/AP AS/AS+ |
| # | Formation | Air Defense Node | AD/AP AS/AS+ |
|---|---|---|---|
| N | Diamond Phases: 2, 3 |
24/47 104/207 | |
| Diamond Phases: 2, 3 |
44/87 194/387 | ||
| Diamond Phases: 1, 2, 3 |
67/133 297/594 | ||
| Diamond Phases: 2, 3 |
75/149 335/669 | ||
| # | Formation | Air Defense Node | AD/AP AS/AS+ |
| # | Formation | Normal Battle Node | AD/AP AS/AS+ |
|---|---|---|---|
| O | Echelon Line Abreast Phases: 2 |
0/0 0/0 | |
| Echelon Line Abreast |
0/0 0/0 | ||
| # | Formation | Normal Battle Node | AD/AP AS/AS+ |
| # | Formation | Normal Battle Node | AD/AP AS/AS+ |
|---|---|---|---|
| P | Diamond Phases: 1, 2, 3 |
32/63 140/279 | |
| Diamond Phases: 2, 3 |
47/93 207/414 | ||
| Diamond Phases: 2, 3 |
47/93 207/414 | ||
| # | Formation | Normal Battle Node | AD/AP AS/AS+ |
| # | Formation | Boss Battle Node | AD/AP AS/AS+ |
|---|---|---|---|
| Q | Line Ahead Phases: 2, 3 |
0/0 0/0 | |
| Line Ahead Phases: 1 |
0/0 0/0 | ||
| Line Ahead Phases: 1 (Final)
|
0/0 0/0 | ||
| # | Formation | Boss Battle Node | AD/AP AS/AS+ |
| # | Formation | Air Defense Node | AD/AP AS/AS+ |
|---|---|---|---|
| R | Diamond | 24/47 104/207 | |
| Diamond Phases: 2 |
44/87 194/387 | ||
| Diamond Phases: 2 |
67/133 297/594 | ||
| Diamond Phases: 2 |
75/149 335/669 | ||
| # | Formation | Air Defense Node | AD/AP AS/AS+ |
| # | Empty Node | ||
|---|---|---|---|
| S | 敵影を見ず。 第三艦隊、出撃する!対空警戒を厳に! No enemy spotted. 3rd Fleet, sortieing! Maintain high anti-aircraft alert! | ||
| # | Empty Node | ||
| # | Formation | Air Defense Node | AD/AP AS/AS+ |
|---|---|---|---|
| T | Diamond Phases: 2, 3 |
24/47 104/207 | |
| Diamond Phases: 2, 3 |
44/87 194/387 | ||
| Diamond Phases: 2, 3 |
67/133 297/594 | ||
| Diamond Phases: 2, 3 |
75/149 335/669 | ||
| # | Formation | Air Defense Node | AD/AP AS/AS+ |
| # | Formation | Boss Battle Node | AD/AP AS/AS+ |
|---|---|---|---|
| U | Line Ahead Phases: 2 |
0/0 0/0 | |
| Line Ahead Phases: 3 |
0/0 0/0 | ||
| Line Ahead Phases: 2 (Final)
|
0/0 0/0 | ||
| # | Formation | Boss Battle Node | AD/AP AS/AS+ |
| # | Formation | Air Defense Node | AD/AP AS/AS+ |
|---|---|---|---|
| V | Diamond Phases: 3 |
44/87 195/390 | |
| Diamond Phases: 3 |
12/23 51/102 | ||
| Diamond Phases: 3 |
17/33 72/144 | ||
| Diamond Phases: 3 |
55/110 246/492 | ||
| Diamond Phases: 3 |
23/46 102/204 | ||
| # | Formation | Air Defense Node | AD/AP AS/AS+ |
| # | Formation | Normal Battle Node | AD/AP AS/AS+ |
|---|---|---|---|
| W | Double Line Phases: 3 |
0/0 0/0 | |
| Double Line Phases: 3 |
0/0 0/0 | ||
| Double Line Phases: 3 |
0/0 0/0 | ||
| # | Formation | Normal Battle Node | AD/AP AS/AS+ |
| # | Formation | Normal Battle Node | AD/AP AS/AS+ |
|---|---|---|---|
| X | Line Ahead Vanguard Phases: 3 |
0/0 0/0 | |
| Line Ahead Vanguard Phases: 3 |
0/0 0/0 | ||
| # | Formation | Normal Battle Node | AD/AP AS/AS+ |
| # | Selection Node | ||
|---|---|---|---|
| Y | 艦隊の針路を選択できます。提督、どちらの針路をとられますか? You can decide the fleet's course. Admiral, which heading should we take? | ||
| # | Selection Node | ||
| # | Formation | Air Defense Node | AD/AP AS/AS+ |
|---|---|---|---|
| Z | Diamond Phases: 3 |
44/87 195/390 | |
| Diamond Phases: 3 |
12/23 51/102 | ||
| Diamond Phases: 3 |
17/33 72/144 | ||
| Diamond Phases: 3 |
55/110 246/492 | ||
| Diamond Phases: 3 |
23/46 102/204 | ||
| # | Formation | Air Defense Node | AD/AP AS/AS+ |
| # | Formation | Normal Battle Node | AD/AP AS/AS+ |
|---|---|---|---|
| ZI | Line Ahead Phases: 3 |
0/0 0/0 | |
| Line Ahead Phases: 3 |
0/0 0/0 | ||
| Line Ahead Phases: 3 |
0/0 0/0 | ||
| # | Formation | Normal Battle Node | AD/AP AS/AS+ |
| # | Formation | Boss Battle Node | AD/AP AS/AS+ |
|---|---|---|---|
| ZII | Diamond Phases: 3 |
44/87 194/387 | |
| Diamond Phases: 3 |
44/87 194/387 | ||
| Diamond Phases: 3 (Final)
|
44/87 194/387 | ||
| # | Formation | Boss Battle Node | AD/AP AS/AS+ |
| # | Empty Node | ||
|---|---|---|---|
| A | 気のせいだった。 ソロモン最前線へ、鼠輸送を敢行する! Must be my imagination. To the front lines of the Solomons, carrying out a Rat Transport Operation! | ||
| # | Empty Node | ||
| # | Formation | Air Defense Node | AD/AP AS/AS+ |
|---|---|---|---|
| B | Diamond Phases: 1, 2, 3 |
44/87 195/390 | |
| Diamond Phases: 1, 2, 3 |
12/23 51/102 | ||
| Diamond Phases: 1, 2, 3 |
17/33 72/144 | ||
| # | Formation | Air Defense Node | AD/AP AS/AS+ |
| # | Resource Node | ||
|---|---|---|---|
| # | Resource Node | ||
| # | Selection Node | ||
|---|---|---|---|
| D | ソロモン最前線へ、鼠輸送を敢行する! To the front lines of the Solomons, carrying out a Rat Transport Operation! | ||
| # | Selection Node | ||
| # | Formation | Normal Battle Node | AD/AP AS/AS+ |
|---|---|---|---|
| E | Line Ahead Phases: 1, 3 |
0/0 0/0 | |
| Line Ahead Echelon Phases: 1, 2 |
0/0 0/0 | ||
| # | Formation | Normal Battle Node | AD/AP AS/AS+ |
| # | Formation | Normal Battle Node | AD/AP AS/AS+ |
|---|---|---|---|
| F | Line Ahead Phases: 1, 2, 3 |
0/0 0/0 | |
| Echelon Phases: 1, 2, 3 |
0/0 0/0 | ||
| Echelon Phases: 1, 2 |
0/0 0/0 | ||
| # | Formation | Normal Battle Node | AD/AP AS/AS+ |
| # | Empty Node | ||
|---|---|---|---|
| G | 気のせいだった。 第三艦隊、出撃する!対空警戒を厳に! Must be my imagination. 3rd Fleet, sortieing! Maintain high anti-aircraft alert! | ||
| # | Empty Node | ||
| # | Formation | Normal Battle Node | AD/AP AS/AS+ |
|---|---|---|---|
| H | Line Ahead Phases: 1 |
0/0 0/0 | |
| Line Ahead Phases: 1 |
0/0 0/0 | ||
| Line Ahead Phases: 1 |
0/0 0/0 | ||
| Line Ahead Phases: 1 |
0/0 0/0 | ||
| # | Formation | Normal Battle Node | AD/AP AS/AS+ |
| # | Formation | Normal Battle Node | AD/AP AS/AS+ |
|---|---|---|---|
| I | Line Ahead Phases: 1 |
0/0 0/0 | |
| Line Ahead Phases: 1 |
0/0 0/0 | ||
| Line Ahead Phases: 1 |
0/0 0/0 | ||
| # | Formation | Normal Battle Node | AD/AP AS/AS+ |
| # | Landing Node | ||
|---|---|---|---|
| # | Landing Node | ||
| # | Formation | Air Defense Node | AD/AP AS/AS+ |
|---|---|---|---|
| K | Diamond Phases: 1, 2, 3 |
44/87 195/390 | |
| Diamond Phases: 2 |
12/23 51/102 | ||
| Diamond Phases: 2, 3 |
17/33 72/144 | ||
| # | Formation | Air Defense Node | AD/AP AS/AS+ |
| # | Empty Node | ||
|---|---|---|---|
| L | 敵影を見ず。 第三艦隊、出撃する!対空警戒を厳に! No enemy spotted. 3rd Fleet, sortieing! Maintain high anti-aircraft alert! | ||
| # | Empty Node | ||
| # | Formation | Normal Battle Node | AD/AP AS/AS+ |
|---|---|---|---|
| M | Echelon Line Abreast Phases: 2 |
0/0 0/0 | |
| Echelon Line Abreast Phases: 2 |
0/0 0/0 | ||
| # | Formation | Normal Battle Node | AD/AP AS/AS+ |
| # | Formation | Air Defense Node | AD/AP AS/AS+ |
|---|---|---|---|
| N | Diamond Phases: 2, 3 |
24/47 104/207 | |
| Diamond Phases: 2 |
44/87 194/387 | ||
| Diamond Phases: 2 |
67/133 297/594 | ||
| # | Formation | Air Defense Node | AD/AP AS/AS+ |
| # | Formation | Normal Battle Node | AD/AP AS/AS+ |
|---|---|---|---|
| O | Echelon Line Abreast Phases: 2, 3 |
0/0 0/0 | |
| Echelon Line Abreast Phases: 2 |
0/0 0/0 | ||
| # | Formation | Normal Battle Node | AD/AP AS/AS+ |
| # | Formation | Normal Battle Node | AD/AP AS/AS+ |
|---|---|---|---|
| P | Diamond Phases: 2 |
24/47 104/207 | |
| Diamond Phases: 2 |
26/52 116/231 | ||
| Diamond Phases: 2 |
32/63 140/279 | ||
| # | Formation | Normal Battle Node | AD/AP AS/AS+ |
| # | Formation | Boss Battle Node | AD/AP AS/AS+ |
|---|---|---|---|
| Q | Line Ahead | 0/0 0/0 | |
| Line Ahead Phases: 1 |
0/0 0/0 | ||
| Line Ahead Phases: 1 (Final)
|
0/0 0/0 | ||
| # | Formation | Boss Battle Node | AD/AP AS/AS+ |
| # | Formation | Air Defense Node | AD/AP AS/AS+ |
|---|---|---|---|
| R | Diamond Phases: 2 |
24/47 104/207 | |
| Diamond Phases: 2 |
44/87 194/387 | ||
| Diamond Phases: 2 |
67/133 297/594 | ||
| # | Formation | Air Defense Node | AD/AP AS/AS+ |
| # | Empty Node | ||
|---|---|---|---|
| S | 敵影を見ず。 第三艦隊、出撃する!対空警戒を厳に! No enemy spotted. 3rd Fleet, sortieing! Maintain high anti-aircraft alert! | ||
| # | Empty Node | ||
| # | Formation | Air Defense Node | AD/AP AS/AS+ |
|---|---|---|---|
| T | Diamond Phases: 2 |
24/47 104/207 | |
| Diamond Phases: 2 |
44/87 194/387 | ||
| Diamond Phases: 2 |
67/133 297/594 | ||
| # | Formation | Air Defense Node | AD/AP AS/AS+ |
| # | Formation | Boss Battle Node | AD/AP AS/AS+ |
|---|---|---|---|
| U | Line Ahead Phases: 2 |
0/0 0/0 | |
| Line Ahead | 0/0 0/0 | ||
| Line Ahead Phases: 2 (Final)
|
0/0 0/0 | ||
| # | Formation | Boss Battle Node | AD/AP AS/AS+ |
| # | Formation | Air Defense Node | AD/AP AS/AS+ |
|---|---|---|---|
| V | Diamond Phases: 3 |
44/87 195/390 | |
| Diamond Phases: 3 |
12/23 51/102 | ||
| Diamond Phases: 3 |
17/33 72/144 | ||
| # | Formation | Air Defense Node | AD/AP AS/AS+ |
| # | Formation | Normal Battle Node | AD/AP AS/AS+ |
|---|---|---|---|
| W | Double Line Phases: 3 |
0/0 0/0 | |
| Double Line Phases: 3 |
0/0 0/0 | ||
| Double Line Phases: 3 |
0/0 0/0 | ||
| # | Formation | Normal Battle Node | AD/AP AS/AS+ |
| # | Formation | Normal Battle Node | AD/AP AS/AS+ |
|---|---|---|---|
| X | Line Ahead Vanguard Phases: 3 |
0/0 0/0 | |
| Line Ahead Vanguard Phases: 3 |
0/0 0/0 | ||
| # | Formation | Normal Battle Node | AD/AP AS/AS+ |
| # | Selection Node | ||
|---|---|---|---|
| Y | 艦隊の針路を選択できます。提督、どちらの針路をとられますか? You can decide the fleet's course. Admiral, which heading should we take? | ||
| # | Selection Node | ||
| # | Formation | Air Defense Node | AD/AP AS/AS+ |
|---|---|---|---|
| Z | Diamond Phases: 3 |
44/87 195/390 | |
| Diamond Phases: 3 |
12/23 51/102 | ||
| Diamond Phases: 3 |
17/33 72/144 | ||
| # | Formation | Air Defense Node | AD/AP AS/AS+ |
| # | Formation | Normal Battle Node | AD/AP AS/AS+ |
|---|---|---|---|
| ZI | Line Ahead Phases: 3 |
0/0 0/0 | |
| Line Ahead Phases: 3 |
0/0 0/0 | ||
| Line Ahead Phases: 3 |
0/0 0/0 | ||
| # | Formation | Normal Battle Node | AD/AP AS/AS+ |
| # | Formation | Boss Battle Node | AD/AP AS/AS+ |
|---|---|---|---|
| ZII | Diamond Phases: 3 |
44/87 194/387 | |
| Diamond Phases: 3 |
44/87 194/387 | ||
| Diamond Phases: 3 (Final)
|
44/87 194/387 | ||
| # | Formation | Boss Battle Node | AD/AP AS/AS+ |
Ship Drops:
| ExpandShip drops | |||||||||||||||||||||||||||||||||||||||||||||||||||||||||||||||||||||||||||||||||||||||||||||||||||
|---|---|---|---|---|---|---|---|---|---|---|---|---|---|---|---|---|---|---|---|---|---|---|---|---|---|---|---|---|---|---|---|---|---|---|---|---|---|---|---|---|---|---|---|---|---|---|---|---|---|---|---|---|---|---|---|---|---|---|---|---|---|---|---|---|---|---|---|---|---|---|---|---|---|---|---|---|---|---|---|---|---|---|---|---|---|---|---|---|---|---|---|---|---|---|---|---|---|---|---|
| Type | Ship? | F | H | I | P | Q | U | ZI | ZII | ||||||||||||||||||||||||||||||||||||||||||||||||||||||||||||||||||||||||||||||||||||||||||
| DE | Hachijou | Casual+ | |||||||||||||||||||||||||||||||||||||||||||||||||||||||||||||||||||||||||||||||||||||||||||||||||
| DE | Ishigaki | Casual+ | |||||||||||||||||||||||||||||||||||||||||||||||||||||||||||||||||||||||||||||||||||||||||||||||||
| DE | Hirato | Hard+ | Casual+ | ||||||||||||||||||||||||||||||||||||||||||||||||||||||||||||||||||||||||||||||||||||||||||||||||
| DD | Amagiri | Hard+ | Casual+ | Casual+ | |||||||||||||||||||||||||||||||||||||||||||||||||||||||||||||||||||||||||||||||||||||||||||||||
| DD | Sagiri | Medium+ | Casual+ | Casual+ | |||||||||||||||||||||||||||||||||||||||||||||||||||||||||||||||||||||||||||||||||||||||||||||||
| DD | Ariake | Casual+ | |||||||||||||||||||||||||||||||||||||||||||||||||||||||||||||||||||||||||||||||||||||||||||||||||
| DD | Umikaze | Casual+ | |||||||||||||||||||||||||||||||||||||||||||||||||||||||||||||||||||||||||||||||||||||||||||||||||
| DD | Kawakaze | Medium+ | Casual+ | Casual+ | Casual+ | Casual+ | |||||||||||||||||||||||||||||||||||||||||||||||||||||||||||||||||||||||||||||||||||||||||||||
| DD | Minegumo | Casual+ | Casual+ | ||||||||||||||||||||||||||||||||||||||||||||||||||||||||||||||||||||||||||||||||||||||||||||||||
| DD | Oyashio | Hard+ | Medium+ | Casual+ | Casual+ | Casual+ | Hard+ | ||||||||||||||||||||||||||||||||||||||||||||||||||||||||||||||||||||||||||||||||||||||||||||
| DD | Takanami | Medium+ | Casual+ | Casual+ | Casual+ | Casual+ | |||||||||||||||||||||||||||||||||||||||||||||||||||||||||||||||||||||||||||||||||||||||||||||
| DD | Fujinami | Casual+ | |||||||||||||||||||||||||||||||||||||||||||||||||||||||||||||||||||||||||||||||||||||||||||||||||
| DD | Hayanami | Casual+ | |||||||||||||||||||||||||||||||||||||||||||||||||||||||||||||||||||||||||||||||||||||||||||||||||
| DD | Hamanami | Casual+ | |||||||||||||||||||||||||||||||||||||||||||||||||||||||||||||||||||||||||||||||||||||||||||||||||
| DD | Teruzuki | Easy+ | Casual+ | Casual+ | |||||||||||||||||||||||||||||||||||||||||||||||||||||||||||||||||||||||||||||||||||||||||||||||
| CL | Ooyodo | Easy+ | Hard+ | Casual+ | Casual+ | Casual+ | Casual+ | ||||||||||||||||||||||||||||||||||||||||||||||||||||||||||||||||||||||||||||||||||||||||||||
| CL | Helena | Casual+ | Casual+ | ||||||||||||||||||||||||||||||||||||||||||||||||||||||||||||||||||||||||||||||||||||||||||||||||
| FBB | South Dakota | Hard+ | Casual+ | ||||||||||||||||||||||||||||||||||||||||||||||||||||||||||||||||||||||||||||||||||||||||||||||||
| SS | I-26 | Casual+ | |||||||||||||||||||||||||||||||||||||||||||||||||||||||||||||||||||||||||||||||||||||||||||||||||
| SS | I-203 | Casual+ | |||||||||||||||||||||||||||||||||||||||||||||||||||||||||||||||||||||||||||||||||||||||||||||||||
| AV | Nisshin | Casual+ | |||||||||||||||||||||||||||||||||||||||||||||||||||||||||||||||||||||||||||||||||||||||||||||||||
| AR | Akashi | Hard+ | Casual+ | ||||||||||||||||||||||||||||||||||||||||||||||||||||||||||||||||||||||||||||||||||||||||||||||||
| DD | Naganami | Hard+ | Easy+ | Casual+ | Casual+ | Casual+ | |||||||||||||||||||||||||||||||||||||||||||||||||||||||||||||||||||||||||||||||||||||||||||||
| DD | Shimakaze | Casual+ | |||||||||||||||||||||||||||||||||||||||||||||||||||||||||||||||||||||||||||||||||||||||||||||||||
| CL | Nagara | Easy+ | Casual+ | Easy+ | Casual+ | Casual+ | Casual+ | Casual+ | Casual+ | ||||||||||||||||||||||||||||||||||||||||||||||||||||||||||||||||||||||||||||||||||||||||||
| CL | Kinu | Hard+ | Medium+ | Casual+ | Casual+ | Casual+ | Medium+ | ||||||||||||||||||||||||||||||||||||||||||||||||||||||||||||||||||||||||||||||||||||||||||||
| CL | Sendai | Easy+ | Casual+ | Easy+ | Casual+ | Casual+ | Casual+ | Casual+ | Casual+ | ||||||||||||||||||||||||||||||||||||||||||||||||||||||||||||||||||||||||||||||||||||||||||
| CA | Myoukou | Casual+ | |||||||||||||||||||||||||||||||||||||||||||||||||||||||||||||||||||||||||||||||||||||||||||||||||
| CA | Atago | Casual+ | |||||||||||||||||||||||||||||||||||||||||||||||||||||||||||||||||||||||||||||||||||||||||||||||||
| CA | Suzuya | Casual+ | |||||||||||||||||||||||||||||||||||||||||||||||||||||||||||||||||||||||||||||||||||||||||||||||||
| CA | Kumano | Casual+ | |||||||||||||||||||||||||||||||||||||||||||||||||||||||||||||||||||||||||||||||||||||||||||||||||
| CA | Chikuma | Casual+ | |||||||||||||||||||||||||||||||||||||||||||||||||||||||||||||||||||||||||||||||||||||||||||||||||
| FBB | Kongou | Hard+ | Casual+ | Casual+ | |||||||||||||||||||||||||||||||||||||||||||||||||||||||||||||||||||||||||||||||||||||||||||||||
| FBB | Hiei | Medium+ | Casual+ | Casual+ | |||||||||||||||||||||||||||||||||||||||||||||||||||||||||||||||||||||||||||||||||||||||||||||||
| FBB | Haruna | Medium+ | Casual+ | Casual+ | |||||||||||||||||||||||||||||||||||||||||||||||||||||||||||||||||||||||||||||||||||||||||||||||
| FBB | Kirishima | Casual+ | Casual+ | Casual+ | |||||||||||||||||||||||||||||||||||||||||||||||||||||||||||||||||||||||||||||||||||||||||||||||
| BB | Fusou | Casual+ | |||||||||||||||||||||||||||||||||||||||||||||||||||||||||||||||||||||||||||||||||||||||||||||||||
| BB | Yamashiro | Casual+ | |||||||||||||||||||||||||||||||||||||||||||||||||||||||||||||||||||||||||||||||||||||||||||||||||
| BB | Nagato | Casual+ | |||||||||||||||||||||||||||||||||||||||||||||||||||||||||||||||||||||||||||||||||||||||||||||||||
| BB | Mutsu | Casual+ | |||||||||||||||||||||||||||||||||||||||||||||||||||||||||||||||||||||||||||||||||||||||||||||||||
| SS | I-19 | Casual+ | |||||||||||||||||||||||||||||||||||||||||||||||||||||||||||||||||||||||||||||||||||||||||||||||||
| ExpandE-2 Clear Message |
|---|
E-3
off Lunga Point
ルンガ沖夜戦
![]()
![]()
![]()


| Information | ||||
|---|---|---|---|---|
| Event Tag | ||||
| Boss Gauges | Hard (甲): 750 TP, 800 HP, 5220 HP | |||
| Medium (乙): 500 TP, 800 HP, 4620 HP | ||||
| Easy (丙): 350 TP, 800 HP, 4020 HP | ||||
| Casual (丁): 350 TP, 800 HP, 4020 HP | ||||
| Map Bosses | ||||
| Rewards | ||||
|---|---|---|---|---|
| All | ||||

| ||||
| Equipment/Item | 丁 Casual |
丙 Easy |
乙 Medium |
甲 Hard |
Medal |
1 | 1 | 2 | |
Improvement Material |
5 | 8 | ||
Torpedo Squadron Skilled Lookouts |
1 | 1 (★4) | 1 (★8) | |
SOC Seagull |
1 (★8) | 1 (★10) | ||
 SO3C Seamew Kai |
1 | |||

| E-3 Branching Rules | ||
|---|---|---|
| Nodes | Rules | |
| Start | 1 |
|
2 |
| |
A |
B |
|
C | ||
B |
D |
|
O | ||
O1 | ||
C |
E |
|
G |
| |
F |
H |
|
I | ||
G |
F |
|
Q |
| |
I |
J |
|
X |
| |
M |
N |
|
Y |
| |
Z |
| |
Q |
R |
|
S | ||
R |
T |
|
V |
| |
U |
V |
|
W |
| |
W1 |
| |
V |
W |
|
W2 |
| |
X |
L |
|
M |
| |
Branching compositions were reported over the course of the event.
The event guides are to be constructed through the respective Event map page guide and reviewed by editor staff / collaboration committee before being approved here. Do not under any circumstance update the guides through this page or attempt to fix them through this page. Please only update guides through their respective sandbox pages.
Ship Bonuses (Tentative)
DISCLAIMER: This information is based on user submitted data and is subject to revisions as more data is gathered. Any version of the ship receives the bonus regardless of remodel.
| Ships | Nodes J/X/L | Nodes N | Nodes Z | ||
|---|---|---|---|---|---|
| 1.35x | 1.7x | 1.55x | |||
| - | - | 1.25x | |||
| 1.15x | 1.3225x | 1.3x | |||
| - | - | ||||
| IJN Light Cruisers/Destroyers (CL/DD) | - | 1.15x | |||
| Debuff Modifier (Only against Boss Flagship) | 1.12-1.14x | ||||
| Ships | Nodes R/V/W | ||
|---|---|---|---|
| 1.15x | |||
| - | - | ||
| - | - | 1.1x | |
| Ships | Nodes O/O1 | Nodes O3 | ||
|---|---|---|---|---|
| 1.2x | 1.38x | |||
| IJN Light Cruisers/Destroyers (CL/DD) | - | 1.15x | ||
General Information
This map has three ship locks:
 Orange Tag: 2nd Torpedo Squadron (Single Fleet)
 Grey Tag: 8th Fleet (Single Fleet, with CA(V) flagship)
- Starting point unlocks after Phase 1 is cleared
- Only really used for one unlocking gimmick
 Yellow Tag: Combined Fleet (Combined Fleet)
- Same starting point as Orange Tag, but tagged with Combined Fleet Tag when sortied as a Combined Fleet (STF or CTF)
- There are three LBAS Bases available to you, with 2 for offensive operations and one for base defense
Phase 1: TP Phase
Phase 1 is a TP Phase, with 350/350/500/750 points required on Casual/Easy/Medium/Hard at HQ 120
- Composition:[Orange Tag]2nd Torpedo Squadron 0-1 CL, 5-6 DD
- A fleet with CL will off-route to E
- Route: A C G F I J L M N with 0 CL
- A C E G F I J L M N with 1 CL
- A total of 0/2/3/4 drum-equipped ships are required on Casual/Easy/Medium/Hard for this route.
- LBAS:
- 2 LBAS with 4x LBAA each to boss (7 Range); OR
- 1 LBAS with 4x Toukai/ASW to C (2 Range), 1 LBAS with 4x LBAA to Boss; OR
- Fighter sweep E G
- Notes:
- Support expeditions are optional, vanguard formation can be used to increase passing rate. Generic AACI is sufficient for the Air Raids.
- S-Ranking the boss is not strictly necessary, but if desired, the new Torpedo/SLO+/Torpedo and/or Torpedo/SLO+/Drum cut-ins may be useful.
- With a Reinforcement Expansion unlocked, a Torpedo/Torpedo/Drum/[SLO+] set-up may be utilized.
- SLO+ refers to Torpedo Squadron Skilled Lookouts.
- This phase has no LoS check.
Phase 1.5: Unlock the 2nd Boss Node
Unlocking W has 4 total requirements. The dabber will show you a composition that you can use to complete multiple nodes in a single sortie.
| Node | B | O1 | O2 | O3 |
|---|---|---|---|---|
| Hard | AS | S | AS | S |
| Medium | AS | A+ | - | A+ |
| Easy | - | A+ | - | A+ |
| Casual | - | B+ | - | - |
- This is only required on MEDIUM+ only
- Composition:[Yellow Tag]Combined Fleet Carrier Task Force (CTF): 2 CV(L) + 1 CL, 2 DD
- Route: A B D O2
- LBAS: AP/AS O2 Hard: 169/380 @ 4Range; AP/AS B Hard: 160/359 @ Range 2
- Required for all difficulties
- Composition:[Grey Tag]8th Fleet Single Fleet: 1-2 CA(V), 1-2 CL, 2-3 DD
- A CA(V) must be flagship.
- Route: P B O1 O3
- LBAS: Range 3, no airpower O1; Range 4, no air power O3
- Note: O1 contains a New Submarine Princess along with 2 other submarines. Bring Toukai/ASW Aircraft as well as OASW. O3 is a surface combat node.
- Fleet must be FAST to avoid routing to the extra node: O
Phase 2: Defeat the Enemy Combined Fleet
The objective here is to take down the enemy combined fleet at Node W
- Composition:[Yellow Tag]Combined Fleet Surface Task Force (STF): 2 CVL, 2 FBB, 1-2 CA(V), 1-2 CL + 1 CA, 1 CL, 4 DD
- Route: A C E G Q R V W
- LBAS: Range 7. AD/AP/AS for Hard: 90/180/405. LD: 96/191/429.
Goes Q S instead of Q R
- Composition:[Yellow Tag]Combined Fleet Carrier Task Force (CTF): 2 CV, 1 FBB, 2 CA(V), CL + 1 CA, 1 CL, 4 DD
- Route: A C E G Q S U W
- LBAS: Range 7. AD/AP/AS for Hard: 90/180/405. LD: 96/191/429.
- Composition:[Yellow Tag]Combined Fleet Carrier Task Force (CTF): 2 CV, 2 CVL, 1 CAV, 1 CL + 1 CA, 1 CL, 4 DD
- Speed does not matter for this composition and route (i.e. use of Slow CVLs is acceptable).
- Route: A C E G Q R V W
- LBAS: Range 6 V & 7 W.
- AD/AP/AS for V Hard: 62/124/279.
- AD/AP/AS for W Hard: 90/180/405. LD: 96/191/429.
Phase 2.5: Unlock the Route to Node Z
To unlock Z, you will need to do the following requirements depending on your difficulty with the map.
| Node | E | G | H |
|---|---|---|---|
| Hard | AS | AS | AS |
| Medium | AS | AS | - |
| Easy | - | - | - |
| Casual | - | - | - |
- Composition:[Yellow Tag]Combined Fleet Transport Combined Fleet (TCF): 0-1 CVE, 1CAV/AV, 4-5 DD + 1 CL, 3 DD
- Route: A C E G F H
- Alternatively you can run[Orange Tag]2nd Torpedo Squadron 1 AV 5 DD in order to save locks as the fleet is similar to Phase 1 and 3.
- If using the single fleet method, you need to use a 4-slot AV like Commandant Teste or Nisshin. 3-slot girls will struggle to take AS against all but the weakest enemy composition.
- Route: A C E G F H
- LBAS: Range 5, AP/AS for Hard: 160/359
- Note: Set up your LBAS with fighters only and send them to Node H to help secure AS.
- 1 CVE and 1 CAV with full fighter & SPF set-ups can almost certainly attain AS without the need for LBAS swapping.
- Note: EASY/CASUAL will have node Z unlocked as soon as you beat phase 2 without doing these steps
Phase 3: Defeat Lunga Hime
This is the final phase for this map and the MO. The objective is to sink the Lunga princess at Z. There is a boss debuff available for unlocking once LD is reached, if so desired.
- Composition:[Orange Tag]2nd Torpedo Squadron Single Fleet: 6 DD OR 1 CL 5 DD (EASY AND CASUAL ONLY)
- A fleet with CL will off-route to E
- Route: A C G F I X M Z with 0 CL
- A C E G F I X M Z with 1 CL
- LBAS: Range 8, no Airpower
- Note: Fleet must have 0/3/4/5 drum-equipped ships on Casual/Easy/Medium/Hard.
- LoS Requirement: About Cn3 48+/38+/29+/23+ is required on Hard/Medium/Easy/Casual to route from M to Z.
Lunga Hime Debuff Phase
You can do all these steps in any order. There are 6 requirements that must be met once Last Dance threshold has been reached:
- LBAS raid - AS x1
- O3 - S rank x1
- E - AS x1
- W - S rank x1
- K - S rank x1
- N - S rank x1 (use TCF to reach)
Enemy Compositions
| # | Formation | Air Raids | AD/AP AS/AS+ |
|---|---|---|---|
| AB | Diamond | 60/119 267/534 | |
| Diamond | 67/133 297/594 | ||
| Diamond | 76/151 338/675 | ||
| Diamond | 80/160 359/717 | ||
| Diamond | 85/169 380/759 | ||
| # | Formation | Air Raids | AD/AP AS/AS+ |
| # | Empty Node | ||
|---|---|---|---|
| A | 気のせいだった。 精鋭第二水雷戦隊、出撃! Must be my imagination. Elite 2nd Torpedo Squadron, sortie! | ||
| # | Empty Node | ||
| # | Formation | Air Defense Node | AD/AP AS/AS+ |
|---|---|---|---|
| B | Diamond Phases: 1, 2, 3 |
55/110 246/492 | |
| Diamond Phases: 1, 2, 3 |
60/119 267/534 | ||
| Diamond Phases: 1, 2, 3 |
67/133 297/594 | ||
| Diamond Phases: 1, 2, 3 |
76/151 338/675 | ||
| Diamond Phases: 1, 2, 3 |
80/160 359/717 | ||
| # | Formation | Air Defense Node | AD/AP AS/AS+ |
| # | Formation | Normal Battle Node | AD/AP AS/AS+ |
|---|---|---|---|
| C | Echelon Line Abreast Phases: 1, 2, 3 |
0/0 0/0 | |
| Echelon Line Abreast Phases: 1, 2, 3 |
0/0 0/0 | ||
| Echelon Line Abreast Phases: 1, 2, 3 |
0/0 0/0 | ||
| # | Formation | Normal Battle Node | AD/AP AS/AS+ |
| # | Empty Node | ||
|---|---|---|---|
| D | 敵影を見ず。 精鋭第二水雷戦隊、出撃! No enemy spotted. Elite 2nd Torpedo Squadron, sortie! | ||
| # | Empty Node | ||
| # | Formation | Air Defense Node | AD/AP AS/AS+ |
|---|---|---|---|
| E | Diamond Phases: 1, 2, 3 |
55/110 246/492 | |
| Diamond Phases: 1, 2, 3 |
60/119 267/534 | ||
| Diamond Phases: 1, 2, 3 |
67/133 297/594 | ||
| Diamond Phases: 1, 2, 3 |
76/151 338/675 | ||
| Diamond Phases: 1, 2, 3 |
80/160 359/717 | ||
| # | Formation | Air Defense Node | AD/AP AS/AS+ |
| # | Selection Node | ||
|---|---|---|---|
| F | 精鋭第二水雷戦隊、出撃! Elite 2nd Torpedo Squadron, sortie! | ||
| # | Selection Node | ||
| # | Formation | Air Defense Node | AD/AP AS/AS+ |
|---|---|---|---|
| G | Diamond Phases: 1, 2, 3 |
55/110 246/492 | |
| Diamond Phases: 1, 2, 3 |
60/119 267/534 | ||
| Diamond Phases: 1, 2, 3 |
67/133 297/594 | ||
| Diamond Phases: 1, 2, 3 |
76/151 338/675 | ||
| Diamond Phases: 1, 2, 3 |
80/160 359/717 | ||
| # | Formation | Air Defense Node | AD/AP AS/AS+ |
| # | Formation | Air Defense Node | AD/AP AS/AS+ |
|---|---|---|---|
| H | Diamond Phases: 1, 2, 3 |
55/110 246/492 | |
| Diamond Phases: 3 |
60/119 267/534 | ||
| Diamond Phases: 3 |
67/133 297/594 | ||
| Diamond Phases: 1, 2, 3 |
76/151 338/675 | ||
| Diamond Phases: 1, 3 |
80/160 359/717 | ||
| # | Formation | Air Defense Node | AD/AP AS/AS+ |
| # | Empty Node | ||
|---|---|---|---|
| I | 気のせいだった。 二水戦、鉄底海峡に突入する!合戦用意! Must be my imagination. DesRon2, entering Iron Bottom Strait! Battle stations! | ||
| # | Empty Node | ||
| # | Formation | Normal Battle Node | AD/AP AS/AS+ |
|---|---|---|---|
| J | Line Ahead Double Line Echelon Phases: 1, 3 |
0/0 0/0 | |
| # | Formation | Normal Battle Node | AD/AP AS/AS+ |
| # | Formation | Normal Battle Node | AD/AP AS/AS+ |
|---|---|---|---|
| K | Line Ahead Echelon Line Abreast Phases: 1, 2, 3 |
0/0 0/0 | |
| # | Formation | Normal Battle Node | AD/AP AS/AS+ |
| # | Formation | Night Battle Node | AD/AP AS/AS+ |
|---|---|---|---|
| L | Line Ahead Echelon Phases: 1, 2, 3 |
0/0 0/0 | |
| Line Ahead Phases: 3 |
0/0 0/0 | ||
| # | Formation | Night Battle Node | AD/AP AS/AS+ |
| # | Empty Node | ||
|---|---|---|---|
| M | 気のせいだった。 敵巡洋艦部隊、発見!揚陸止め!全軍、戦闘準備!突撃せよ! Must be my imagination. Enemy cruiser force spotted! Stop the landing! All troops, prepare for battle! Charge! | ||
| # | Empty Node | ||
| # | Formation | Boss Battle Node | AD/AP AS/AS+ |
|---|---|---|---|
| N | Line Ahead Phases: 3 |
0/0 0/0 | |
| Line Ahead Phases: 1 |
0/0 0/0 | ||
| Line Ahead Phases: 1 |
0/0 0/0 | ||
| # | Formation | Boss Battle Node | AD/AP AS/AS+ |
| # | Formation | Normal Battle Node | AD/AP AS/AS+ |
|---|---|---|---|
| O | Echelon Line Abreast Phases: 2, 3 |
0/0 0/0 | |
| Echelon Line Abreast Phases: 2, 3 |
0/0 0/0 | ||
| Echelon Line Abreast Phases: 2, 3 |
0/0 0/0 | ||
| # | Formation | Normal Battle Node | AD/AP AS/AS+ |
| # | Formation | Normal Battle Node | AD/AP AS/AS+ |
|---|---|---|---|
| O1 | Echelon Line Abreast Phases: 2, 3 |
0/0 0/0 | |
| Echelon Line Abreast Phases: 2, 3 |
0/0 0/0 | ||
| # | Formation | Normal Battle Node | AD/AP AS/AS+ |
| # | Formation | Air Defense Node | AD/AP AS/AS+ |
|---|---|---|---|
| O2 | Diamond Phases: 2, 3 |
60/119 267/534 | |
| Diamond Phases: 2, 3 |
67/133 297/594 | ||
| Diamond Phases: 2, 3 |
76/151 338/675 | ||
| Diamond Phases: 2, 3 |
80/160 359/717 | ||
| Diamond Phases: 2, 3 |
85/169 380/759 | ||
| # | Formation | Air Defense Node | AD/AP AS/AS+ |
| # | Formation | Normal Battle Node | AD/AP AS/AS+ |
|---|---|---|---|
| O3 | Line Ahead Echelon Vanguard Phases: 2, 3 |
0/0 0/0 | |
| # | Formation | Normal Battle Node | AD/AP AS/AS+ |
| # | Empty Node | ||
|---|---|---|---|
| P | 気のせいだった。 第八艦隊、抜錨!出撃する! Must be my imagination. 8th Fleet, weigh anchors! Sortie! | ||
| # | Empty Node | ||
| # | Selection Node | ||
|---|---|---|---|
| Q | 精鋭第二水雷戦隊、出撃! Elite 2nd Torpedo Squadron, sortie! | ||
| # | Selection Node | ||
| # | Formation | Normal Battle Node | AD/AP AS/AS+ |
|---|---|---|---|
| R | Echelon Line Abreast Phases: 2, 3 |
0/0 0/0 | |
| Echelon Line Abreast Phases: 2, 3 |
0/0 0/0 | ||
| Echelon Line Abreast Phases: 2, 3 |
0/0 0/0 | ||
| # | Formation | Normal Battle Node | AD/AP AS/AS+ |
| # | Formation | Normal Battle Node | AD/AP AS/AS+ |
|---|---|---|---|
| S | Line Ahead Echelon Vanguard Phases: 2, 3 |
0/0 0/0 | |
| # | Formation | Normal Battle Node | AD/AP AS/AS+ |
| # | Formation | Air Defense Node | AD/AP AS/AS+ |
|---|---|---|---|
| T | Diamond Phases: 2 |
91/181 405/810 | |
| Diamond Phases: 2 |
96/191 429/858 | ||
| Diamond Phases: 2 |
116/232 521/1041 | ||
| # | Formation | Air Defense Node | AD/AP AS/AS+ |
| # | Formation | Air Defense Node | AD/AP AS/AS+ |
|---|---|---|---|
| U | Diamond Phases: 2, 3 |
91/181 405/810 | |
| Diamond Phases: 2, 3 |
96/191 429/858 | ||
| Diamond Phases: 2 |
116/232 521/1041 | ||
| # | Formation | Air Defense Node | AD/AP AS/AS+ |
| # | Formation | Normal Battle Node | AD/AP AS/AS+ |
|---|---|---|---|
| V | Diamond Phases: 2, 3 |
47/93 207/414 | |
| Diamond Phases: 2, 3 |
55/109 243/486 | ||
| Diamond Phases: 2, 3 |
63/125 279/558 | ||
| # | Formation | Normal Battle Node | AD/AP AS/AS+ |
| # | Formation | Boss Battle Node | AD/AP AS/AS+ |
|---|---|---|---|
| W | Cruising Formation 4 Phases: 2, 3 |
91/181 405/810 | |
| Cruising Formation 4 Phases: 2 (Final)
|
96/191 429/858 | ||
| # | Formation | Boss Battle Node | AD/AP AS/AS+ |
| # | Empty Node | ||
|---|---|---|---|
| W1 | 敵影を見ず。 精鋭第二水雷戦隊、出撃! No enemy spotted. Elite 2nd Torpedo Squadron, sortie! | ||
| # | Empty Node | ||
| # | Empty Node | ||
|---|---|---|---|
| W2 | 敵影を見ず。 精鋭第二水雷戦隊、出撃! No enemy spotted. Elite 2nd Torpedo Squadron, sortie! | ||
| # | Empty Node | ||
| # | Formation | Normal Battle Node | AD/AP AS/AS+ |
|---|---|---|---|
| X | Line Ahead Echelon Line Abreast Phases: 3 |
0/0 0/0 | |
| # | Formation | Normal Battle Node | AD/AP AS/AS+ |
| # | Empty Node | ||
|---|---|---|---|
| Y | 敵影を見ず。 敵巡洋艦部隊、発見!揚陸止め!全軍、戦闘準備!突撃せよ! No enemy spotted. Enemy cruiser force spotted! Stop the landing! All troops, prepare for battle! Charge! | ||
| # | Empty Node | ||
| # | Formation | Boss Battle Node | AD/AP AS/AS+ |
|---|---|---|---|
| Z | Line Ahead Phases: 3 |
0/0 0/0 | |
| Line Ahead Phases: 3 |
0/0 0/0 | ||
| Line Ahead Phases: 3 (Final)
|
0/0 0/0 | ||
| # | Formation | Boss Battle Node | AD/AP AS/AS+ |
| # | Formation | Air Raids | AD/AP AS/AS+ |
|---|---|---|---|
| AB | Diamond | 55/110 246/492 | |
| Diamond | 60/119 267/534 | ||
| Diamond | 23/46 102/204 | ||
| Diamond | 67/133 297/594 | ||
| # | Formation | Air Raids | AD/AP AS/AS+ |
| # | Empty Node | ||
|---|---|---|---|
| A | 気のせいだった。 精鋭第二水雷戦隊、出撃! Must be my imagination. Elite 2nd Torpedo Squadron, sortie! | ||
| # | Empty Node | ||
| # | Formation | Air Defense Node | AD/AP AS/AS+ |
|---|---|---|---|
| B | Diamond Phases: 1, 2, 3 |
44/87 195/390 | |
| Diamond Phases: 1, 2, 3 |
55/110 246/492 | ||
| Diamond Phases: 1, 2, 3 |
60/119 267/534 | ||
| Diamond Phases: 1, 2, 3 |
23/46 102/204 | ||
| # | Formation | Air Defense Node | AD/AP AS/AS+ |
| # | Formation | Normal Battle Node | AD/AP AS/AS+ |
|---|---|---|---|
| C | Echelon Line Abreast Phases: 1, 2, 3 |
0/0 0/0 | |
| Echelon Line Abreast Phases: 1, 2, 3 |
0/0 0/0 | ||
| Echelon Line Abreast Phases: 1, 2, 3 |
0/0 0/0 | ||
| # | Formation | Normal Battle Node | AD/AP AS/AS+ |
| # | Empty Node | ||
|---|---|---|---|
| D | 敵影を見ず。 精鋭第二水雷戦隊、出撃! No enemy spotted. Elite 2nd Torpedo Squadron, sortie! | ||
| # | Empty Node | ||
| # | Formation | Air Defense Node | AD/AP AS/AS+ |
|---|---|---|---|
| E | Diamond Phases: 1, 2, 3 |
44/87 195/390 | |
| Diamond Phases: 1, 2, 3 |
55/110 246/492 | ||
| Diamond Phases: 1, 2, 3 |
60/119 267/534 | ||
| Diamond Phases: 1, 2, 3 |
23/46 102/204 | ||
| # | Formation | Air Defense Node | AD/AP AS/AS+ |
| # | Selection Node | ||
|---|---|---|---|
| F | 精鋭第二水雷戦隊、出撃! Elite 2nd Torpedo Squadron, sortie! | ||
| # | Selection Node | ||
| # | Formation | Air Defense Node | AD/AP AS/AS+ |
|---|---|---|---|
| G | Diamond Phases: 1, 2, 3 |
44/87 195/390 | |
| Diamond Phases: 1, 2, 3 |
55/110 246/492 | ||
| Diamond Phases: 1, 2, 3 |
60/119 267/534 | ||
| Diamond Phases: 1, 2, 3 |
23/46 102/204 | ||
| # | Formation | Air Defense Node | AD/AP AS/AS+ |
| # | Formation | Air Defense Node | AD/AP AS/AS+ |
|---|---|---|---|
| H | Diamond Phases: 1, 3 |
44/87 195/390 | |
| Diamond Phases: 1, 3 |
55/110 246/492 | ||
| Diamond Phases: 1, 3 |
60/119 267/534 | ||
| Diamond Phases: 1, 3 |
23/46 102/204 | ||
| # | Formation | Air Defense Node | AD/AP AS/AS+ |
| # | Empty Node | ||
|---|---|---|---|
| I | 気のせいだった。 二水戦、鉄底海峡に突入する!合戦用意! Must be my imagination. DesRon2, entering Iron Bottom Strait! Battle stations! | ||
| # | Empty Node | ||
| # | Formation | Normal Battle Node | AD/AP AS/AS+ |
|---|---|---|---|
| J | Line Ahead Double Line Echelon Phases: 1, 3 |
0/0 0/0 | |
| # | Formation | Normal Battle Node | AD/AP AS/AS+ |
| # | Formation | Normal Battle Node | AD/AP AS/AS+ |
|---|---|---|---|
| K | Line Ahead Echelon Line Abreast Phases: 1, 3 |
0/0 0/0 | |
| # | Formation | Normal Battle Node | AD/AP AS/AS+ |
| # | Formation | Night Battle Node | AD/AP AS/AS+ |
|---|---|---|---|
| L | Line Ahead Echelon Phases: 1, 3 |
0/0 0/0 | |
| Line Ahead Phases: 3 |
0/0 0/0 | ||
| # | Formation | Night Battle Node | AD/AP AS/AS+ |
| # | Empty Node | ||
|---|---|---|---|
| M | 気のせいだった。 敵巡洋艦部隊、発見!揚陸止め!全軍、戦闘準備!突撃せよ! Must be my imagination. Enemy cruiser force spotted! Stop the landing! All troops, prepare for battle! Charge! | ||
| # | Empty Node | ||
| # | Formation | Boss Battle Node | AD/AP AS/AS+ |
|---|---|---|---|
| N | Line Ahead Phases: 3 |
0/0 0/0 | |
| Line Ahead Phases: 1 |
0/0 0/0 | ||
| Line Ahead Phases: 1 |
0/0 0/0 | ||
| # | Formation | Boss Battle Node | AD/AP AS/AS+ |
| # | Formation | Normal Battle Node | AD/AP AS/AS+ |
|---|---|---|---|
| O | Echelon Line Abreast Phases: 2 |
0/0 0/0 | |
| Echelon Line Abreast Phases: 2, 3 |
0/0 0/0 | ||
| Echelon Line Abreast Phases: 2 |
0/0 0/0 | ||
| # | Formation | Normal Battle Node | AD/AP AS/AS+ |
| # | Formation | Normal Battle Node | AD/AP AS/AS+ |
|---|---|---|---|
| O1 | Echelon Line Abreast Phases: 2, 3 |
0/0 0/0 | |
| Echelon Line Abreast Phases: 2, 3 |
0/0 0/0 | ||
| Echelon Line Abreast Phases: 2, 3 |
0/0 0/0 | ||
| # | Formation | Normal Battle Node | AD/AP AS/AS+ |
| # | Formation | Air Defense Node | AD/AP AS/AS+ |
|---|---|---|---|
| O2 | Diamond Phases: 2 |
55/110 246/492 | |
| Diamond Phases: 2, 3 |
60/119 267/534 | ||
| Diamond Phases: 2, 3 |
23/46 102/204 | ||
| Diamond Phases: 2, 3 |
67/133 297/594 | ||
| # | Formation | Air Defense Node | AD/AP AS/AS+ |
| # | Formation | Normal Battle Node | AD/AP AS/AS+ |
|---|---|---|---|
| O3 | Line Ahead Echelon Vanguard Phases: 2, 3 |
0/0 0/0 | |
| # | Formation | Normal Battle Node | AD/AP AS/AS+ |
| # | Empty Node | ||
|---|---|---|---|
| P | 気のせいだった。 第八艦隊、抜錨!出撃する! Must be my imagination. 8th Fleet, weigh anchors! Sortie! | ||
| # | Empty Node | ||
| # | Selection Node | ||
|---|---|---|---|
| Q | 精鋭第二水雷戦隊、出撃! Elite 2nd Torpedo Squadron, sortie! | ||
| # | Selection Node | ||
| # | Formation | Normal Battle Node | AD/AP AS/AS+ |
|---|---|---|---|
| R | Echelon Line Abreast Phases: 2 |
0/0 0/0 | |
| Echelon Line Abreast Phases: 2 |
0/0 0/0 | ||
| Echelon Line Abreast Phases: 2, 3 |
0/0 0/0 | ||
| # | Formation | Normal Battle Node | AD/AP AS/AS+ |
| # | Formation | Normal Battle Node | AD/AP AS/AS+ |
|---|---|---|---|
| S | Line Ahead Echelon Vanguard Phases: 2, 3 |
0/0 0/0 | |
| # | Formation | Normal Battle Node | AD/AP AS/AS+ |
| # | Formation | Air Defense Node | AD/AP AS/AS+ |
|---|---|---|---|
| T | Diamond | 66/131 293/585 | |
| Diamond | 89/177 396/792 | ||
| Diamond | 112/223 500/999 | ||
| # | Formation | Air Defense Node | AD/AP AS/AS+ |
| # | Formation | Air Defense Node | AD/AP AS/AS+ |
|---|---|---|---|
| U | Diamond Phases: 2, 3 |
66/131 293/585 | |
| Diamond Phases: 2 |
89/177 396/792 | ||
| Diamond Phases: 2 |
112/223 500/999 | ||
| # | Formation | Air Defense Node | AD/AP AS/AS+ |
| # | Formation | Normal Battle Node | AD/AP AS/AS+ |
|---|---|---|---|
| V | Diamond Phases: 2, 3 |
24/47 104/207 | |
| Diamond Phases: 2 |
32/63 140/279 | ||
| Diamond Phases: 2 |
47/93 207/414 | ||
| # | Formation | Normal Battle Node | AD/AP AS/AS+ |
| # | Formation | Boss Battle Node | AD/AP AS/AS+ |
|---|---|---|---|
| W | Cruising Formation 4 Phases: 2, 3 |
66/131 293/585 | |
| Cruising Formation 4 Phases: 2 (Final)
|
89/177 396/792 | ||
| # | Formation | Boss Battle Node | AD/AP AS/AS+ |
| # | Empty Node | ||
|---|---|---|---|
| W1 | 敵影を見ず。 精鋭第二水雷戦隊、出撃! No enemy spotted. Elite 2nd Torpedo Squadron, sortie! | ||
| # | Empty Node | ||
| # | Empty Node | ||
|---|---|---|---|
| W2 | 敵影を見ず。 精鋭第二水雷戦隊、出撃! No enemy spotted. Elite 2nd Torpedo Squadron, sortie! | ||
| # | Empty Node | ||
| # | Formation | Normal Battle Node | AD/AP AS/AS+ |
|---|---|---|---|
| X | Line Ahead Echelon Line Abreast Phases: 3 |
0/0 0/0 | |
| # | Formation | Normal Battle Node | AD/AP AS/AS+ |
| # | Empty Node | ||
|---|---|---|---|
| Y | 敵影を見ず。 敵巡洋艦部隊、発見!揚陸止め!全軍、戦闘準備!突撃せよ! No enemy spotted. Enemy cruiser force spotted! Stop the landing! All troops, prepare for battle! Charge! | ||
| # | Empty Node | ||
| # | Formation | Boss Battle Node | AD/AP AS/AS+ |
|---|---|---|---|
| Z | Line Ahead Phases: 3 |
0/0 0/0 | |
| Line Ahead Phases: 3 |
0/0 0/0 | ||
| Line Ahead Phases: 3 (Final)
|
0/0 0/0 | ||
| # | Formation | Boss Battle Node | AD/AP AS/AS+ |
| # | Formation | Air Raids | AD/AP AS/AS+ |
|---|---|---|---|
| AB | Diamond | 44/87 195/390 | |
| Diamond | 17/33 72/144 | ||
| Diamond | 55/110 246/492 | ||
| Diamond | 60/119 267/534 | ||
| Diamond | 23/46 102/204 | ||
| # | Formation | Air Raids | AD/AP AS/AS+ |
| # | Empty Node | ||
|---|---|---|---|
| A | 気のせいだった。 精鋭第二水雷戦隊、出撃! Must be my imagination. Elite 2nd Torpedo Squadron, sortie! | ||
| # | Empty Node | ||
| # | Formation | Air Defense Node | AD/AP AS/AS+ |
|---|---|---|---|
| B | Diamond Phases: 1, 2, 3 |
44/87 195/390 | |
| Diamond Phases: 1, 2, 3 |
12/23 51/102 | ||
| Diamond Phases: 1, 2, 3 |
17/33 72/144 | ||
| Diamond Phases: 1, 2, 3 |
55/110 246/492 | ||
| Diamond Phases: 1, 2, 3 |
23/46 102/204 | ||
| # | Formation | Air Defense Node | AD/AP AS/AS+ |
| # | Formation | Normal Battle Node | AD/AP AS/AS+ |
|---|---|---|---|
| C | Echelon Line Abreast Phases: 1, 2, 3 |
0/0 0/0 | |
| Echelon Line Abreast Phases: 1, 2, 3 |
0/0 0/0 | ||
| Echelon Line Abreast Phases: 1, 2, 3 |
0/0 0/0 | ||
| # | Formation | Normal Battle Node | AD/AP AS/AS+ |
| # | Empty Node | ||
|---|---|---|---|
| D | 敵影を見ず。 精鋭第二水雷戦隊、出撃! No enemy spotted. Elite 2nd Torpedo Squadron, sortie! | ||
| # | Empty Node | ||
| # | Formation | Air Defense Node | AD/AP AS/AS+ |
|---|---|---|---|
| E | Diamond Phases: 1, 2, 3 |
44/87 195/390 | |
| Diamond Phases: 1, 2, 3 |
12/23 51/102 | ||
| Diamond Phases: 1, 2, 3 |
17/33 72/144 | ||
| Diamond Phases: 1, 2, 3 |
55/110 246/492 | ||
| Diamond Phases: 1, 2, 3 |
23/46 102/204 | ||
| # | Formation | Air Defense Node | AD/AP AS/AS+ |
| # | Selection Node | ||
|---|---|---|---|
| F | 精鋭第二水雷戦隊、出撃! Elite 2nd Torpedo Squadron, sortie! | ||
| # | Selection Node | ||
| # | Formation | Air Defense Node | AD/AP AS/AS+ |
|---|---|---|---|
| G | Diamond Phases: 1, 2, 3 |
44/87 195/390 | |
| Diamond Phases: 1, 2, 3 |
12/23 51/102 | ||
| Diamond Phases: 1, 2, 3 |
17/33 72/144 | ||
| Diamond Phases: 1, 2, 3 |
55/110 246/492 | ||
| Diamond Phases: 1, 2, 3 |
23/46 102/204 | ||
| # | Formation | Air Defense Node | AD/AP AS/AS+ |
| # | Formation | Air Defense Node | AD/AP AS/AS+ |
|---|---|---|---|
| H | Diamond Phases: 1, 3 |
44/87 195/390 | |
| Diamond Phases: 3 |
12/23 51/102 | ||
| Diamond Phases: 1, 3 |
17/33 72/144 | ||
| Diamond Phases: 1, 2, 3 |
55/110 246/492 | ||
| Diamond Phases: 1, 3 |
23/46 102/204 | ||
| # | Formation | Air Defense Node | AD/AP AS/AS+ |
| # | Empty Node | ||
|---|---|---|---|
| I | 気のせいだった。 二水戦、鉄底海峡に突入する!合戦用意! Must be my imagination. DesRon2, entering Iron Bottom Strait! Battle stations! | ||
| # | Empty Node | ||
| # | Formation | Normal Battle Node | AD/AP AS/AS+ |
|---|---|---|---|
| J | Line Ahead Echelon Phases: 1, 2, 3 |
0/0 0/0 | |
| # | Formation | Normal Battle Node | AD/AP AS/AS+ |
| # | Formation | Normal Battle Node | AD/AP AS/AS+ |
|---|---|---|---|
| K | Line Ahead Echelon Line Abreast Phases: 1, 2, 3 |
0/0 0/0 | |
| # | Formation | Normal Battle Node | AD/AP AS/AS+ |
| # | Formation | Night Battle Node | AD/AP AS/AS+ |
|---|---|---|---|
| L | Line Ahead Echelon Phases: 1, 3 |
0/0 0/0 | |
| Line Ahead Phases: 3 |
0/0 0/0 | ||
| # | Formation | Night Battle Node | AD/AP AS/AS+ |
| # | Empty Node | ||
|---|---|---|---|
| M | 気のせいだった。 敵巡洋艦部隊、発見!揚陸止め!全軍、戦闘準備!突撃せよ! Must be my imagination. Enemy cruiser force spotted! Stop the landing! All troops, prepare for battle! Charge! | ||
| # | Empty Node | ||
| # | Formation | Boss Battle Node | AD/AP AS/AS+ |
|---|---|---|---|
| N | Line Ahead Phases: 3 |
0/0 0/0 | |
| Line Ahead Phases: 1 |
0/0 0/0 | ||
| Line Ahead Phases: 1 |
0/0 0/0 | ||
| # | Formation | Boss Battle Node | AD/AP AS/AS+ |
| # | Formation | Normal Battle Node | AD/AP AS/AS+ |
|---|---|---|---|
| O | Echelon Line Abreast Phases: 2 |
0/0 0/0 | |
| Echelon Line Abreast Phases: 2 |
0/0 0/0 | ||
| Echelon Line Abreast Phases: 2 |
0/0 0/0 | ||
| # | Formation | Normal Battle Node | AD/AP AS/AS+ |
| # | Formation | Normal Battle Node | AD/AP AS/AS+ |
|---|---|---|---|
| O1 | Echelon Line Abreast Phases: 2, 3 |
0/0 0/0 | |
| Echelon Line Abreast Phases: 2, 3 |
0/0 0/0 | ||
| Echelon Line Abreast Phases: 2, 3 |
0/0 0/0 | ||
| # | Formation | Normal Battle Node | AD/AP AS/AS+ |
| # | Formation | Air Defense Node | AD/AP AS/AS+ |
|---|---|---|---|
| O2 | Diamond Phases: 2, 3 |
44/87 195/390 | |
| Diamond Phases: 2, 3 |
17/33 72/144 | ||
| Diamond Phases: 2, 3 |
55/110 246/492 | ||
| Diamond Phases: 2, 3 |
60/119 267/534 | ||
| Diamond Phases: 2, 3 |
23/46 102/204 | ||
| # | Formation | Air Defense Node | AD/AP AS/AS+ |
| # | Formation | Normal Battle Node | AD/AP AS/AS+ |
|---|---|---|---|
| O3 | Line Ahead Echelon Vanguard Phases: 2, 3 |
0/0 0/0 | |
| # | Formation | Normal Battle Node | AD/AP AS/AS+ |
| # | Empty Node | ||
|---|---|---|---|
| P | 気のせいだった。 第八艦隊、抜錨!出撃する! Must be my imagination. 8th Fleet, weigh anchors! Sortie! | ||
| # | Empty Node | ||
| # | Selection Node | ||
|---|---|---|---|
| Q | 精鋭第二水雷戦隊、出撃! Elite 2nd Torpedo Squadron, sortie! | ||
| # | Selection Node | ||
| # | Formation | Normal Battle Node | AD/AP AS/AS+ |
|---|---|---|---|
| R | Echelon Line Abreast Phases: 2, 3 |
0/0 0/0 | |
| Echelon Line Abreast Phases: 2, 3 |
0/0 0/0 | ||
| Echelon Line Abreast Phases: 2, 3 |
0/0 0/0 | ||
| # | Formation | Normal Battle Node | AD/AP AS/AS+ |
| # | Formation | Normal Battle Node | AD/AP AS/AS+ |
|---|---|---|---|
| S | Line Ahead Echelon Vanguard Phases: 2, 3 |
0/0 0/0 | |
| # | Formation | Normal Battle Node | AD/AP AS/AS+ |
| # | Formation | Air Defense Node | AD/AP AS/AS+ |
|---|---|---|---|
| T | Diamond | 37/73 162/324 | |
| Diamond | 60/119 266/531 | ||
| Diamond | 66/131 293/585 | ||
| Diamond | 83/165 369/738 | ||
| # | Formation | Air Defense Node | AD/AP AS/AS+ |
| # | Formation | Air Defense Node | AD/AP AS/AS+ |
|---|---|---|---|
| U | Diamond Phases: 2, 3 |
37/73 162/324 | |
| Diamond Phases: 2, 3 |
60/119 266/531 | ||
| Diamond Phases: 2, 3 |
66/131 293/585 | ||
| Diamond Phases: 2, 3 |
83/165 369/738 | ||
| # | Formation | Air Defense Node | AD/AP AS/AS+ |
| # | Formation | Normal Battle Node | AD/AP AS/AS+ |
|---|---|---|---|
| V | Diamond Phases: 2, 3 |
24/47 104/207 | |
| Diamond Phases: 2, 3 |
32/63 140/279 | ||
| Diamond Phases: 2, 3 |
32/63 140/279 | ||
| # | Formation | Normal Battle Node | AD/AP AS/AS+ |
| # | Formation | Boss Battle Node | AD/AP AS/AS+ |
|---|---|---|---|
| W | Cruising Formation 4 Phases: 2, 3 |
45/89 198/396 | |
| Cruising Formation 4 Phases: 2 (Final)
|
68/135 302/603 | ||
| # | Formation | Boss Battle Node | AD/AP AS/AS+ |
| # | Empty Node | ||
|---|---|---|---|
| W1 | 敵影を見ず。 精鋭第二水雷戦隊、出撃! No enemy spotted. Elite 2nd Torpedo Squadron, sortie! | ||
| # | Empty Node | ||
| # | Empty Node | ||
|---|---|---|---|
| W2 | 敵影を見ず。 精鋭第二水雷戦隊、出撃! No enemy spotted. Elite 2nd Torpedo Squadron, sortie! | ||
| # | Empty Node | ||
| # | Formation | Normal Battle Node | AD/AP AS/AS+ |
|---|---|---|---|
| X | Line Ahead Echelon Line Abreast Phases: 3 |
0/0 0/0 | |
| # | Formation | Normal Battle Node | AD/AP AS/AS+ |
| # | Empty Node | ||
|---|---|---|---|
| Y | 敵影を見ず。 敵巡洋艦部隊、発見!揚陸止め!全軍、戦闘準備!突撃せよ! No enemy spotted. Enemy cruiser force spotted! Stop the landing! All troops, prepare for battle! Charge! | ||
| # | Empty Node | ||
| # | Formation | Boss Battle Node | AD/AP AS/AS+ |
|---|---|---|---|
| Z | Line Ahead Phases: 3 |
0/0 0/0 | |
| Line Ahead Phases: 3 |
0/0 0/0 | ||
| Line Ahead Phases: 3 (Final)
|
0/0 0/0 | ||
| # | Formation | Boss Battle Node | AD/AP AS/AS+ |
| # | Formation | Air Raids | AD/AP AS/AS+ |
|---|---|---|---|
| AB | Diamond | 44/87 195/390 | |
| Diamond | 17/33 72/144 | ||
| Diamond | 23/46 102/204 | ||
| # | Formation | Air Raids | AD/AP AS/AS+ |
| # | Empty Node | ||
|---|---|---|---|
| A | 気のせいだった。 精鋭第二水雷戦隊、出撃! Must be my imagination. Elite 2nd Torpedo Squadron, sortie! | ||
| # | Empty Node | ||
| # | Formation | Air Defense Node | AD/AP AS/AS+ |
|---|---|---|---|
| B | Diamond Phases: 1, 2, 3 |
44/87 195/390 | |
| Diamond Phases: 1, 2 |
12/23 51/102 | ||
| Diamond Phases: 1, 2 |
17/33 72/144 | ||
| # | Formation | Air Defense Node | AD/AP AS/AS+ |
| # | Formation | Normal Battle Node | AD/AP AS/AS+ |
|---|---|---|---|
| C | Echelon Line Abreast Phases: 1, 2, 3 |
0/0 0/0 | |
| Echelon Line Abreast Phases: 1, 2, 3 |
0/0 0/0 | ||
| # | Formation | Normal Battle Node | AD/AP AS/AS+ |
| # | Empty Node | ||
|---|---|---|---|
| D | 敵影を見ず。 精鋭第二水雷戦隊、出撃! No enemy spotted. Elite 2nd Torpedo Squadron, sortie! | ||
| # | Empty Node | ||
| # | Formation | Air Defense Node | AD/AP AS/AS+ |
|---|---|---|---|
| E | Diamond Phases: 1, 2, 3 |
44/87 195/390 | |
| Diamond Phases: 1, 2, 3 |
12/23 51/102 | ||
| Diamond Phases: 1, 2, 3 |
17/33 72/144 | ||
| # | Formation | Air Defense Node | AD/AP AS/AS+ |
| # | Selection Node | ||
|---|---|---|---|
| F | 精鋭第二水雷戦隊、出撃! Elite 2nd Torpedo Squadron, sortie! | ||
| # | Selection Node | ||
| # | Formation | Air Defense Node | AD/AP AS/AS+ |
|---|---|---|---|
| G | Diamond Phases: 1, 2, 3 |
44/87 195/390 | |
| Diamond Phases: 1, 2, 3 |
12/23 51/102 | ||
| Diamond Phases: 1, 2, 3 |
17/33 72/144 | ||
| # | Formation | Air Defense Node | AD/AP AS/AS+ |
| # | Formation | Air Defense Node | AD/AP AS/AS+ |
|---|---|---|---|
| H | Diamond Phases: 1, 3 |
44/87 195/390 | |
| Diamond Phases: 1, 3 |
12/23 51/102 | ||
| Diamond Phases: 1, 3 |
17/33 72/144 | ||
| # | Formation | Air Defense Node | AD/AP AS/AS+ |
| # | Empty Node | ||
|---|---|---|---|
| I | 気のせいだった。 二水戦、鉄底海峡に突入する!合戦用意! Must be my imagination. DesRon2, entering Iron Bottom Strait! Battle stations! | ||
| # | Empty Node | ||
| # | Formation | Normal Battle Node | AD/AP AS/AS+ |
|---|---|---|---|
| J | Line Ahead Echelon Phases: 1 |
0/0 0/0 | |
| # | Formation | Normal Battle Node | AD/AP AS/AS+ |
| # | Formation | Normal Battle Node | AD/AP AS/AS+ |
|---|---|---|---|
| K | Line Ahead Echelon Line Abreast Phases: 1, 3 |
0/0 0/0 | |
| # | Formation | Normal Battle Node | AD/AP AS/AS+ |
| # | Formation | Night Battle Node | AD/AP AS/AS+ |
|---|---|---|---|
| L | Line Ahead Echelon Phases: 1, 3 |
0/0 0/0 | |
| Line Ahead Phases: 3 |
0/0 0/0 | ||
| # | Formation | Night Battle Node | AD/AP AS/AS+ |
| # | Empty Node | ||
|---|---|---|---|
| M | 気のせいだった。 敵巡洋艦部隊、発見!揚陸止め!全軍、戦闘準備!突撃せよ! Must be my imagination. Enemy cruiser force spotted! Stop the landing! All troops, prepare for battle! Charge! | ||
| # | Empty Node | ||
| # | Formation | Boss Battle Node | AD/AP AS/AS+ |
|---|---|---|---|
| N | Line Ahead Phases: 3 |
0/0 0/0 | |
| Line Ahead Phases: 1 |
0/0 0/0 | ||
| Line Ahead Phases: 1 |
0/0 0/0 | ||
| # | Formation | Boss Battle Node | AD/AP AS/AS+ |
| # | Formation | Normal Battle Node | AD/AP AS/AS+ |
|---|---|---|---|
| O | Echelon Line Abreast Phases: 2 |
0/0 0/0 | |
| Echelon Line Abreast Phases: 2 |
0/0 0/0 | ||
| Echelon Line Abreast Phases: 2 |
0/0 0/0 | ||
| # | Formation | Normal Battle Node | AD/AP AS/AS+ |
| # | Formation | Normal Battle Node | AD/AP AS/AS+ |
|---|---|---|---|
| O1 | Echelon Line Abreast Phases: 2 |
0/0 0/0 | |
| Echelon Line Abreast Phases: 2 |
0/0 0/0 | ||
| # | Formation | Normal Battle Node | AD/AP AS/AS+ |
| # | Formation | Air Defense Node | AD/AP AS/AS+ |
|---|---|---|---|
| O2 | Diamond Phases: 2 |
44/87 195/390 | |
| Diamond Phases: 2 |
17/33 72/144 | ||
| Diamond Phases: 2 |
23/46 102/204 | ||
| # | Formation | Air Defense Node | AD/AP AS/AS+ |
| # | Formation | Normal Battle Node | AD/AP AS/AS+ |
|---|---|---|---|
| O3 | Line Ahead Echelon Vanguard Phases: 2 |
0/0 0/0 | |
| # | Formation | Normal Battle Node | AD/AP AS/AS+ |
| # | Empty Node | ||
|---|---|---|---|
| P | 気のせいだった。 第八艦隊、抜錨!出撃する! Must be my imagination. 8th Fleet, weigh anchors! Sortie! | ||
| # | Empty Node | ||
| # | Selection Node | ||
|---|---|---|---|
| Q | 精鋭第二水雷戦隊、出撃! Elite 2nd Torpedo Squadron, sortie! | ||
| # | Selection Node | ||
| # | Formation | Normal Battle Node | AD/AP AS/AS+ |
|---|---|---|---|
| R | Echelon Line Abreast Phases: 2 |
0/0 0/0 | |
| Echelon Line Abreast Phases: 2 |
0/0 0/0 | ||
| # | Formation | Normal Battle Node | AD/AP AS/AS+ |
| # | Formation | Normal Battle Node | AD/AP AS/AS+ |
|---|---|---|---|
| S | Line Ahead Echelon Vanguard Phases: 2 |
0/0 0/0 | |
| # | Formation | Normal Battle Node | AD/AP AS/AS+ |
| # | Formation | Air Defense Node | AD/AP AS/AS+ |
|---|---|---|---|
| T | Diamond Phases: 2 |
37/73 162/324 | |
| Diamond Phases: 2 |
60/119 266/531 | ||
| Diamond Phases: 2 |
83/165 369/738 | ||
| # | Formation | Air Defense Node | AD/AP AS/AS+ |
| # | Formation | Air Defense Node | AD/AP AS/AS+ |
|---|---|---|---|
| U | Diamond Phases: 2 |
37/73 162/324 | |
| Diamond Phases: 2 |
60/119 266/531 | ||
| Diamond Phases: 2 |
83/165 369/738 | ||
| # | Formation | Air Defense Node | AD/AP AS/AS+ |
| # | Formation | Normal Battle Node | AD/AP AS/AS+ |
|---|---|---|---|
| V | Diamond Phases: 2 |
9/17 36/72 | |
| Diamond Phases: 2 |
24/47 104/207 | ||
| Diamond Phases: 2 |
32/63 140/279 | ||
| # | Formation | Normal Battle Node | AD/AP AS/AS+ |
| # | Formation | Boss Battle Node | AD/AP AS/AS+ |
|---|---|---|---|
| W | Cruising Formation 4 Phases: 2 |
37/73 162/324 | |
| Cruising Formation 4 Phases: 2 (Final)
|
45/89 198/396 | ||
| # | Formation | Boss Battle Node | AD/AP AS/AS+ |
| # | Empty Node | ||
|---|---|---|---|
| W1 | 敵影を見ず。 精鋭第二水雷戦隊、出撃! No enemy spotted. Elite 2nd Torpedo Squadron, sortie! | ||
| # | Empty Node | ||
| # | Empty Node | ||
|---|---|---|---|
| W2 | 敵影を見ず。 精鋭第二水雷戦隊、出撃! No enemy spotted. Elite 2nd Torpedo Squadron, sortie! | ||
| # | Empty Node | ||
| # | Formation | Normal Battle Node | AD/AP AS/AS+ |
|---|---|---|---|
| X | Line Ahead Echelon Line Abreast Phases: 3 |
0/0 0/0 | |
| # | Formation | Normal Battle Node | AD/AP AS/AS+ |
| # | Empty Node | ||
|---|---|---|---|
| Y | 敵影を見ず。 敵巡洋艦部隊、発見!揚陸止め!全軍、戦闘準備!突撃せよ! No enemy spotted. Enemy cruiser force spotted! Stop the landing! All troops, prepare for battle! Charge! | ||
| # | Empty Node | ||
| # | Formation | Boss Battle Node | AD/AP AS/AS+ |
|---|---|---|---|
| Z | Line Ahead Phases: 3 |
0/0 0/0 | |
| Line Ahead Phases: 3 |
0/0 0/0 | ||
| Line Ahead Phases: 3 (Final)
|
0/0 0/0 | ||
| # | Formation | Boss Battle Node | AD/AP AS/AS+ |
Ship Drops:
| ExpandShip drops | |||||||||||||||||||||||||||||||||||||||||||||||||||||||||||||||||||||||||||||||||||||||||||||||||||
|---|---|---|---|---|---|---|---|---|---|---|---|---|---|---|---|---|---|---|---|---|---|---|---|---|---|---|---|---|---|---|---|---|---|---|---|---|---|---|---|---|---|---|---|---|---|---|---|---|---|---|---|---|---|---|---|---|---|---|---|---|---|---|---|---|---|---|---|---|---|---|---|---|---|---|---|---|---|---|---|---|---|---|---|---|---|---|---|---|---|---|---|---|---|---|---|---|---|---|---|
| Type | Ship? | N | O3 | V | W | Z | |||||||||||||||||||||||||||||||||||||||||||||||||||||||||||||||||||||||||||||||||||||||||||||
| DE | Shimushu | Casual+ | |||||||||||||||||||||||||||||||||||||||||||||||||||||||||||||||||||||||||||||||||||||||||||||||||
| DE | Kunashiri | Casual+ | |||||||||||||||||||||||||||||||||||||||||||||||||||||||||||||||||||||||||||||||||||||||||||||||||
| DE | Etorofu | Easy+ | Easy+ | Casual+ | |||||||||||||||||||||||||||||||||||||||||||||||||||||||||||||||||||||||||||||||||||||||||||||||
| DD | Minazuki | Casual+ | |||||||||||||||||||||||||||||||||||||||||||||||||||||||||||||||||||||||||||||||||||||||||||||||||
| DD | Harusame | Casual+ | Easy+ | Casual+ | Casual+ | ||||||||||||||||||||||||||||||||||||||||||||||||||||||||||||||||||||||||||||||||||||||||||||||
| DD | Umikaze | Casual+ | Casual+ | ||||||||||||||||||||||||||||||||||||||||||||||||||||||||||||||||||||||||||||||||||||||||||||||||
| DD | Kawakaze | Casual+ | Casual+ | Casual+ | Casual+ | ||||||||||||||||||||||||||||||||||||||||||||||||||||||||||||||||||||||||||||||||||||||||||||||
| DD | Oyashio | Casual+ | Easy+ | Medium+ | Casual+ | ||||||||||||||||||||||||||||||||||||||||||||||||||||||||||||||||||||||||||||||||||||||||||||||
| DD | Hatsukaze | Casual+ | |||||||||||||||||||||||||||||||||||||||||||||||||||||||||||||||||||||||||||||||||||||||||||||||||
| DD | Arashi | Medium+ | Casual+ | ||||||||||||||||||||||||||||||||||||||||||||||||||||||||||||||||||||||||||||||||||||||||||||||||
| DD | Hagikaze | Hard+ | Medium+ | Casual+ | |||||||||||||||||||||||||||||||||||||||||||||||||||||||||||||||||||||||||||||||||||||||||||||||
| DD | Makinami | Casual+ | |||||||||||||||||||||||||||||||||||||||||||||||||||||||||||||||||||||||||||||||||||||||||||||||||
| DD | Takanami | Casual+ | Easy+ | Casual+ | Casual+ | ||||||||||||||||||||||||||||||||||||||||||||||||||||||||||||||||||||||||||||||||||||||||||||||
| DD | Fujinami | Casual+ | |||||||||||||||||||||||||||||||||||||||||||||||||||||||||||||||||||||||||||||||||||||||||||||||||
| DD | Hayanami | Casual+ | |||||||||||||||||||||||||||||||||||||||||||||||||||||||||||||||||||||||||||||||||||||||||||||||||
| DD | Akishimo | Hard+ | Casual+ | ||||||||||||||||||||||||||||||||||||||||||||||||||||||||||||||||||||||||||||||||||||||||||||||||
| CL | Noshiro | Casual+ | |||||||||||||||||||||||||||||||||||||||||||||||||||||||||||||||||||||||||||||||||||||||||||||||||
| CL | Yahagi | Casual+ | |||||||||||||||||||||||||||||||||||||||||||||||||||||||||||||||||||||||||||||||||||||||||||||||||
| CL | Ooyodo | Casual+ | Easy+ | Casual+ | Casual+ | ||||||||||||||||||||||||||||||||||||||||||||||||||||||||||||||||||||||||||||||||||||||||||||||
| CL | Perth | Casual+ | |||||||||||||||||||||||||||||||||||||||||||||||||||||||||||||||||||||||||||||||||||||||||||||||||
| FBB | Washington | Casual+ | |||||||||||||||||||||||||||||||||||||||||||||||||||||||||||||||||||||||||||||||||||||||||||||||||
| BB | Colorado | Casual+ | |||||||||||||||||||||||||||||||||||||||||||||||||||||||||||||||||||||||||||||||||||||||||||||||||
| CV | Hornet | Medium+ | Casual+ | ||||||||||||||||||||||||||||||||||||||||||||||||||||||||||||||||||||||||||||||||||||||||||||||||
| DD | Yukikaze | Casual+ | |||||||||||||||||||||||||||||||||||||||||||||||||||||||||||||||||||||||||||||||||||||||||||||||||
| DD | Yuugumo | Casual+ | |||||||||||||||||||||||||||||||||||||||||||||||||||||||||||||||||||||||||||||||||||||||||||||||||
| DD | Makigumo | Casual+ | |||||||||||||||||||||||||||||||||||||||||||||||||||||||||||||||||||||||||||||||||||||||||||||||||
| DD | Naganami | Casual+ | Easy+ | Casual+ | Casual+ | ||||||||||||||||||||||||||||||||||||||||||||||||||||||||||||||||||||||||||||||||||||||||||||||
| CL | Kitakami | Casual+ | |||||||||||||||||||||||||||||||||||||||||||||||||||||||||||||||||||||||||||||||||||||||||||||||||
| CL | Ooi | Casual+ | |||||||||||||||||||||||||||||||||||||||||||||||||||||||||||||||||||||||||||||||||||||||||||||||||
| CL | Nagara | Casual+ | Easy+ | Casual+ | Casual+ | Casual+ | |||||||||||||||||||||||||||||||||||||||||||||||||||||||||||||||||||||||||||||||||||||||||||||
| CL | Sendai | Casual+ | Easy+ | Casual+ | Casual+ | Casual+ | |||||||||||||||||||||||||||||||||||||||||||||||||||||||||||||||||||||||||||||||||||||||||||||
| CA | Myoukou | Casual+ | |||||||||||||||||||||||||||||||||||||||||||||||||||||||||||||||||||||||||||||||||||||||||||||||||
| CA | Atago | Casual+ | |||||||||||||||||||||||||||||||||||||||||||||||||||||||||||||||||||||||||||||||||||||||||||||||||
| CA | Suzuya | Casual+ | |||||||||||||||||||||||||||||||||||||||||||||||||||||||||||||||||||||||||||||||||||||||||||||||||
| CA | Kumano | Casual+ | |||||||||||||||||||||||||||||||||||||||||||||||||||||||||||||||||||||||||||||||||||||||||||||||||
| CA | Chikuma | Casual+ | |||||||||||||||||||||||||||||||||||||||||||||||||||||||||||||||||||||||||||||||||||||||||||||||||
| CVL | Ryuujou | Casual+ | Casual+ | Casual+ | Casual+ | ||||||||||||||||||||||||||||||||||||||||||||||||||||||||||||||||||||||||||||||||||||||||||||||
| CVL | Shouhou | Casual+ | Easy+ | Easy+ | Casual+ | ||||||||||||||||||||||||||||||||||||||||||||||||||||||||||||||||||||||||||||||||||||||||||||||
| CVL | Zuihou | Easy+ | Casual+ | ||||||||||||||||||||||||||||||||||||||||||||||||||||||||||||||||||||||||||||||||||||||||||||||||
| CVL | Junyou | Casual+ | Easy+ | Casual+ | Casual+ | ||||||||||||||||||||||||||||||||||||||||||||||||||||||||||||||||||||||||||||||||||||||||||||||
| FBB | Hiei | Casual+ | |||||||||||||||||||||||||||||||||||||||||||||||||||||||||||||||||||||||||||||||||||||||||||||||||
| FBB | Kirishima | Easy+ | |||||||||||||||||||||||||||||||||||||||||||||||||||||||||||||||||||||||||||||||||||||||||||||||||
| BB | Fusou | Casual+ | |||||||||||||||||||||||||||||||||||||||||||||||||||||||||||||||||||||||||||||||||||||||||||||||||
| BB | Yamashiro | Casual+ | |||||||||||||||||||||||||||||||||||||||||||||||||||||||||||||||||||||||||||||||||||||||||||||||||
| BB | Nagato | Casual+ | |||||||||||||||||||||||||||||||||||||||||||||||||||||||||||||||||||||||||||||||||||||||||||||||||
| BB | Mutsu | Casual+ | |||||||||||||||||||||||||||||||||||||||||||||||||||||||||||||||||||||||||||||||||||||||||||||||||
| CV | Shoukaku | Medium+ | Casual+ | ||||||||||||||||||||||||||||||||||||||||||||||||||||||||||||||||||||||||||||||||||||||||||||||||
| CV | Zuikaku | Hard+ | |||||||||||||||||||||||||||||||||||||||||||||||||||||||||||||||||||||||||||||||||||||||||||||||||
| ExpandE-3 Clear Message |
|---|
| ||||||||||
|---|---|---|---|---|---|---|---|---|---|---|