- Welcome to the Kancolle Wiki!
- If you have any questions regarding site content, account registration, etc., please visit the KanColle Wiki Discord
Difference between revisions of "Summer 2024 Event/E-2"
Wanteitoku (talk | contribs) m (→Phase 3 - Boss) |
Jigaraphale (talk | contribs) |
||
| Line 242: | Line 242: | ||
* Refer to [[#Phase 1.5 - Gimmick]]'s fleet for composition and routing. | * Refer to [[#Phase 1.5 - Gimmick]]'s fleet for composition and routing. | ||
|-|Node U= | |-|Node U= | ||
| − | * Refer to [[#Phase 2 - Boss]]'s fleet for composition and routing. | + | * Refer to [[#Phase 2 - Harbour Princess Holiday Mode Boss]]'s fleet for composition and routing. |
</tabber> | </tabber> | ||
Revision as of 15:28, 6 August 2024
 
| |||||||||
|---|---|---|---|---|---|---|---|---|---|
 
2nd wave of Friendly Fleets has been released!
Time until event's end:
The event has ended!
| |||||||||
メルセルケビール海戦
![]()
![]()


| Information | ||||
|---|---|---|---|---|
| Event Tag | ||||
| Boss Gauges | Hard (甲): 520 TP + 8500 HP + 4840 HP | |||
| Medium (乙): 440 TP + 2850 HP + 4840 HP | ||||
| Easy (丙): 380 TP + 2850 HP + 4840 HP | ||||
| Casual (丁): 360 TP + 2850 HP + 4840 HP | ||||
| Map Bosses | Abyssal Mediterranean Princess Vacation Mode
| |||
Harbour Princess Holiday Mode
| ||||
European Princess
| ||||
| Rewards[edit] | ||||
|---|---|---|---|---|
| Choice | 丁 Casual |
丙 Easy |
乙 Medium |
甲 Hard |
Fuel |
1200 | 1600 | 2000 | 4000 |
| OR | ||||
Emergency Repair Goddess |
1 | 1 | 1 | 2 |
| Reward | 丁 Casual |
丙 Easy |
乙 Medium |
甲 Hard |
|---|---|---|---|---|
Food Supply Ship Irako |
1 | 2 | 3 | 4 |
Latest Overseas Warship Technology |
1 | 1 | 1 | 1 |
Remodel Blueprint |
1 | 1 | 1 | |
Medal |
1 | 2 | ||
 Fleet Communication Antenna |
1 | 1 | ||
 13.8cm Twin Gun Mount Kai |
1 (★2) | |||
 Type 274 Fire Control Radar |
1 |

The event guides are to be constructed through the respective Event map page guide sandbox and reviewed by editors before being approved here.
- Do not update the guides through this page unless it is a minor fix. Please only update guides through their respective sandbox pages.
Branching Table
| E-2 Branching Rules (Start Points) ▼/▲ |
|---|
| E-2 Branching Rules (Start Point 1) ▼/▲ |
|---|
| E-2 Branching Rules (Start Point 2) ▼/▲ |
|---|
* = Rule under review
? = Ship type/amount under review
Branching compositions are reported over the course of the event.
- Please refer to KCNav for up to date map content (fleets used, LoS/speed requirements/drops/LBAS ranges, ...)
Historical Bonuses
| Ship Damage Bonuses Stack with each other | ||||
|---|---|---|---|---|
| Ships [Toggle Names] |
Multipliers | |||
| Mapwide | Node U | Node W | ||
| Coastal Defense Ships (DE) | 1.12x | - | ||
| Destroyers (DD) | 1.03x | 1.14x | ||
| Light Cruisers (CL) NOT CLT |
1.04x | |||
| Heavy Cruisers (CA(V)) | - | 1.12x | ||
| Seaplane Tenders (AV) | 1.08x | |||
| Light Carriers (CVL) | 1.04x | - | 1.18x | |
| Standard Carriers (CV(B)) | - | |||
| Battleships ((F)BB(V)) | - | 1.18x | 1.12x | |
|
1.15x | 1.12x | 1.21x | |
|
1.15x | 1.24x | ||
|
1.12x | - | ||
|
1.03x | |||
| ||||
| 1.07x | ||||
| 1.18x | ||||
| 1.15-1.16x(?) | ||||
| 1.32x | ||||
| 1.21-1.26x(?) | ||||


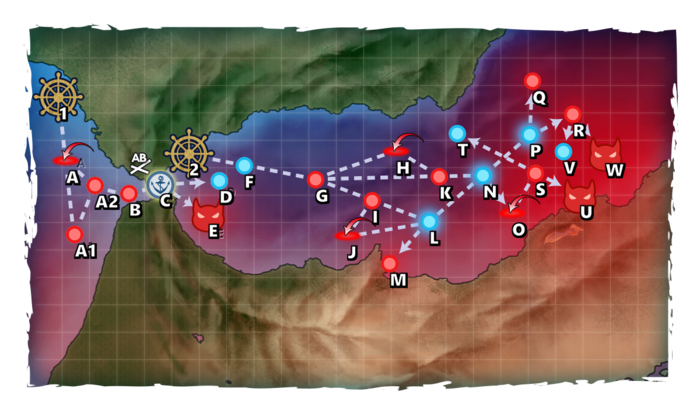
Map Overview
E2 is a single and combined fleet three-phase map, consisting of one transport and two boss phases.
- 2 LBAS are available to sortie on this map
- Initially, no LBAS is available,
- After Phase 1, both can be set on Sortie.
- This map uses 2 locks:
 Home Fleet, Starting point 1 (reused from E-1)
 Force H, Starting point 2
 Barrage Balloons can be deployed on installation nodes M U.
Phase 1 - TP
Phase 1 is a "Transport Operation":
- Single Fleet: 1 XX, 1 CL, 4-5 DD

- Route: 1 A A2 B C E
- LoS check: 45 (Cn3 Hard)
- Bringing ASW and AACI is recommended.
- The "XX" is any ship already locked from E-1.
- Boss Support Expedition is recommended to guarantee an A rank at the boss for TP Depletion.
Phase 1.5 - Gimmick
To unlock the second boss, the following steps have to be performed:
| M | Q | R | |
|---|---|---|---|
| Hard | S x2 | S | S |
| Medium | S x2 | S | S |
| Easy | A+ | S | S |
| Casual | A+ | S | S |
- TCF:

- Main: 1 BBV/CAV/CL, 1 CAV/CL/AV, 4DD
- Escort: 2 CL, 4 DD
- STF:
- Main: 3 (F)BB(V), 1 CV, 1 CL, 1 DD
- Escort: 1 CL, 5 DD
- Route: 2 F G I L M
- The node contains several installations and PT boats.
| ExpandAnti-PT boat |
|---|


Phase 2 - Harbour Princess Holiday Mode Boss
The main boss is the new Harbour Princess Holiday Mode, a soft skin Installation.
- Bringing basic anti-installation gears is recommended, notably
 /
/ Shells.
- STF:
- Main: 3 (F)BB(V), 1 CV, 1 CL, 1DD
- Escort: 0-1 CA(V), 1 CL, 4-5 DD
- Route: 2 G I L N O S U
- LoS check: 100 (Cn3 Hard)
- LBAS range: 8
| Harbour Princess Holiday Mode |
|---|
|


Phase 3 - European Princess Boss
- STF:
- Main: 3 (F)BB(V), 1 CV, 1 CL, 1 DD
- Escort: 0-1 CA(V), 1 CL, 4-5 DD
- Route: 2 F G I L N P R W
- The basic fleet recommended for most people, having both powerful and allowing for 3 ship touches.
- LoS check: ??
- LBAS range: 9
- Bringing an AACI ship is recommended.
- Using
 Smokes can help bit to pass through node R, but is not recommended.
 - Using a Special Attack is highly recommended, notably the Nelson-class one.
Phase 3.5 - Debuff
Once LD has been reached, the following steps have to be performed to debuff the boss
| Q | M | U | |
|---|---|---|---|
| Hard | S | S x2 | A+ |
| Medium | - | A+ x2 | A+ |
| Easy | - | A+ x2 | A+ |
| Casual | - | A+ | A+ |
- Note : Node U gimmick is bugged, and might not "ping" in port once cleared.
- Refer to #Phase 1.5 - Gimmick's fleet for composition and routing.
Once on LD, the CG will change to the following:
| European Princess |
|---|
|


Enemy Compositions
| Type | Ships |
|---|---|
| DD |
| Type | Ships |
|---|---|
| DD |
| Type | Ships |
|---|---|
| DD |
| Type | Ships |
|---|---|
| DD | |
| BB | |
| CV | |
| CVB |
| Type | Ships |
|---|---|
| DD | |
| BB | |
| CV | |
| CVB |
| Type | Ships |
|---|---|
| DD | |
| BB | |
| CV | |
| CVB |
| Type | Ships |
|---|---|
| DD | |
| BB | |
| CV | |
| CVB |
| Type | Ships |
|---|---|
| DD | |
| CA | |
| BB | |
| CV | |
| CVB |
| Type | Ships |
|---|---|
| DD | |
| CA | |
| FBB | |
| BB | |
| CV | |
| AR | |
| AS |
| # | Formation | Air Defense Node | AD/AP AS/AS+ |
|---|---|---|---|
| A | Diamond | 27/54 120/240 | |
| Diamond | 34/67 149/297 | ||
| Diamond | 33/65 146/291 | ||
| Diamond | 45/89 198/396 | ||
| Diamond | 44/88 197/393 | ||
| Diamond | 61/121 270/540 | ||
| # | Formation | Air Defense Node | AD/AP AS/AS+ |
| # | Formation | Normal Battle Node | AD/AP AS/AS+ |
|---|---|---|---|
| A1 | Echelon Line Abreast |
0/0 0/0 | |
| Echelon Line Abreast |
0/0 0/0 | ||
| Echelon Line Abreast |
0/0 0/0 | ||
| # | Formation | Normal Battle Node | AD/AP AS/AS+ |
| # | Formation | Normal Battle Node | AD/AP AS/AS+ |
|---|---|---|---|
| A2 | Echelon Line Abreast |
0/0 0/0 | |
| Echelon Line Abreast |
0/0 0/0 | ||
| Echelon Line Abreast |
0/0 0/0 | ||
| # | Formation | Normal Battle Node | AD/AP AS/AS+ |
| # | Formation | Normal Battle Node | AD/AP AS/AS+ |
|---|---|---|---|
| B | Line Ahead Double Line Vanguard |
0/0 0/0 | |
| # | Formation | Normal Battle Node | AD/AP AS/AS+ |
| # | Landing Node | ||
|---|---|---|---|
| C | 輸送物資の揚陸地点に到達しました。本海域の輸送作戦は無事完了しています。 The landing point of the convoy has been reached. The transport operation here has already been completed successfully. | ||
| # | Landing Node | ||
| # | Empty Node | ||
|---|---|---|---|
| D | 敵影を見ず。 No enemy spotted. | ||
| # | Empty Node | ||
| # | Formation | Boss Battle Node | AD/AP AS/AS+ |
|---|---|---|---|
| E | Line Ahead | 0/0 0/0 | |
| Line Ahead | 0/0 0/0 | ||
| Line Ahead (Final)
|
0/0 0/0 | ||
| # | Formation | Boss Battle Node | AD/AP AS/AS+ |
| # | Empty Node | ||
|---|---|---|---|
| F | 気のせいだった。 Must be my imagination. | ||
| # | Empty Node | ||
| # | Formation | Normal Battle Node | AD/AP AS/AS+ |
|---|---|---|---|
| G | Echelon Line Abreast |
0/0 0/0 | |
| Echelon Line Abreast |
0/0 0/0 | ||
| Echelon Line Abreast |
0/0 0/0 | ||
| # | Formation | Normal Battle Node | AD/AP AS/AS+ |
| # | Formation | Air Defense Node | AD/AP AS/AS+ |
|---|---|---|---|
| H | Diamond | 45/89 198/396 | |
| Diamond | 42/83 186/372 | ||
| Diamond | 48/96 215/429 | ||
| Diamond | 55/109 243/486 | ||
| Diamond | 60/119 267/534 | ||
| Diamond | 66/132 296/591 | ||
| # | Formation | Air Defense Node | AD/AP AS/AS+ |
| # | Formation | Normal Battle Node | AD/AP AS/AS+ |
|---|---|---|---|
| I | Line Ahead Double Line Vanguard |
0/0 0/0 | |
| # | Formation | Normal Battle Node | AD/AP AS/AS+ |
| # | Formation | Air Defense Node | AD/AP AS/AS+ |
|---|---|---|---|
| J | Diamond | 34/67 149/297 | |
| Diamond | 33/65 146/291 | ||
| Diamond | 45/90 201/402 | ||
| Diamond | 45/89 198/396 | ||
| Diamond | 44/88 197/393 | ||
| Diamond | 61/121 270/540 | ||
| # | Formation | Air Defense Node | AD/AP AS/AS+ |
| # | Formation | Normal Battle Node | AD/AP AS/AS+ |
|---|---|---|---|
| K | Line Ahead Double Line Vanguard |
0/0 0/0 | |
| # | Formation | Normal Battle Node | AD/AP AS/AS+ |
| # | Selection Node | ||
|---|---|---|---|
| L | 艦隊の針路を選択できます。提督、どちらの針路をとられますか? You can decide the fleet's course. Admiral, which heading should we take? | ||
| # | Selection Node | ||
| # | Formation | Normal Battle Node | AD/AP AS/AS+ |
|---|---|---|---|
| M | Double Line | 33/66 147/294 | |
| Double Line | 67/133 297/594 | ||
| Double Line | 0/0 0/0 | ||
| # | Formation | Normal Battle Node | AD/AP AS/AS+ |
| # | Selection Node | ||
|---|---|---|---|
| N | 艦隊の針路を選択できます。提督、どちらの針路をとられますか? You can decide the fleet's course. Admiral, which heading should we take? | ||
| # | Selection Node | ||
| # | Formation | Air Defense Node | AD/AP AS/AS+ |
|---|---|---|---|
| O | Diamond | 96/191 429/858 | |
| Diamond | 81/161 360/720 | ||
| Diamond | 128/255 573/1146 | ||
| # | Formation | Air Defense Node | AD/AP AS/AS+ |
| # | Selection Node | ||
|---|---|---|---|
| P | 艦隊の針路を選択できます。提督、どちらの針路をとられますか? You can decide the fleet's course. Admiral, which heading should we take? | ||
| # | Selection Node | ||
| # | Formation | Normal Battle Node | AD/AP AS/AS+ |
|---|---|---|---|
| Q | Line Ahead | 36/72 161/321 | |
| Line Ahead Diamond |
36/72 161/321 | ||
| # | Formation | Normal Battle Node | AD/AP AS/AS+ |
| # | Formation | Normal Battle Node | AD/AP AS/AS+ |
|---|---|---|---|
| R | Line Ahead Double Line |
0/0 0/0 | |
| Line Ahead | 72/143 321/642 | ||
| # | Formation | Normal Battle Node | AD/AP AS/AS+ |
| # | Formation | Normal Battle Node | AD/AP AS/AS+ |
|---|---|---|---|
| S | Line Ahead | 0/0 0/0 | |
| Line Ahead | 0/0 0/0 | ||
| Line Ahead | 36/72 161/321 | ||
| # | Formation | Normal Battle Node | AD/AP AS/AS+ |
| # | Empty Node | ||
|---|---|---|---|
| T | 敵影を見ず。 No enemy spotted. | ||
| # | Empty Node | ||
| # | Formation | Boss Battle Node | AD/AP AS/AS+ |
|---|---|---|---|
| U | Cruising Formation 4 | 81/161 360/720 | |
| Cruising Formation 4 (Final)
|
95/189 423/846 | ||
| # | Formation | Boss Battle Node | AD/AP AS/AS+ |
| # | Empty Node | ||
|---|---|---|---|
| V | 敵影を見ず。 No enemy spotted. | ||
| # | Empty Node | ||
| # | Formation | Boss Battle Node | AD/AP AS/AS+ |
|---|---|---|---|
| W | Cruising Formation 4 | 82/163 366/732 | |
| Cruising Formation 4 (Final)
|
96/191 429/858 | ||
| # | Formation | Boss Battle Node | AD/AP AS/AS+ |
Ship Drops
| ExpandShip drops |
|---|
|
| |||||||||
|---|---|---|---|---|---|---|---|---|---|
|
2nd wave of Friendly Fleets has been released!
Time until event's end:
The event has ended!
| |||||||||
Trivia
- Node C is Gibraltar
- Node A, A1, and A2 are in the Atlantic. These could represent the possible threats to ships going through the Straits of Gibraltar which includes patrols, submarines, and air raids.
- Node E is at the Tip of Morrocco just past the Strait of Gibraltar
- Node G, Node I, and Node J are in the area of the Alboran Sea. The submarine nodes could be a reference to the Vichy French Submarine force that sortied to engage Royal Navy Forces including HMS Hood. These engagements were on the area of Alboran Sea and around the Alboran Island.
- Node M is in Nador, this location could be Port of Nador.
- Node U is the area of Oran and Mers El Kebir. This was the site of the Battle of Mers El Kebir where the Royal Navy Force H engaged the Vichy French Force de Raid moored in the port. The Abyssals are possibly a representation of the French Fleet.
- Node W is a possible representation of an Abyssal Force H. This could also represent the closing engagements wherein the French tried to engage the Royal Navy fleet.
- The Airbase is probably RAF Gibraltar but is also visually located at Moron Airfield, which is in Spain and is still in use. Moron Airbase is under NATO and is home to a US Air Force detachment as well as a Spanish Eurofighter Typhoon Squadron. The use of Moron Air Base could fit considering KanColle is set in modern times.