- Welcome to the Kancolle Wiki!
- If you have any questions regarding site content, account registration, etc., please visit the KanColle Wiki Discord
Summer 2024 Event/E-5
 
| |||||||||
|---|---|---|---|---|---|---|---|---|---|
 
2nd wave of Friendly Fleets has been released!
Time until event's end:
The event has ended!
| |||||||||
第二次珊瑚海海戦
![]()
![]()
![]()


| Information | ||||
|---|---|---|---|---|
| Event Tag | ||||
| Boss Gauges | Hard (甲): 750 TP + 2250 HP + 4600 HP + 47300 HP + 8775 HP | |||
| Medium (乙): 650 TP + 1710 HP + 3600 HP + 28600 HP + 6825 HP | ||||
| Easy (丙): 575 TP + 1710 HP + 3600 HP + 28600 HP + 6825 HP | ||||
| Casual (丁): 525 TP + 1710 HP + 3100 HP + 12650 HP + 5525 HP | ||||
| Map Bosses | Southern War Princess
| |||
Standard Carrier Wo-Class Kai B Flagship II
| ||||
Prototype Carrier Princess Vacation Mode
| ||||
Supply Depot Princess E Vacation Mode
| ||||
Abyssal Coral Sea Water Demon
| ||||
| Rewards[edit] | ||||
|---|---|---|---|---|
| Ship |  Lexington | |||
| Choice | 丁 Casual |
丙 Easy |
乙 Medium |
甲 Hard |
Bauxite |
3600 | 4800 | ||
| OR | ||||
 Communication Equipment & Personnel |
1 | 1 | ||
| Reward | 丁 Casual |
丙 Easy |
乙 Medium |
甲 Hard |
|---|---|---|---|---|
Improvement Material |
6 | 8 | 10 | |
Medal |
1 | 2 | 3 | |
Latest Overseas Warship Technology |
1 | 1 | 1 | |
Action Report |
1 | |||
First Class Medal |
1 | |||
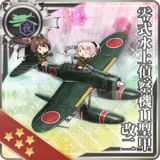
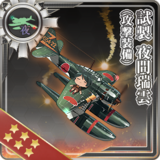
 SBD VB-2 (Bomber Squadron) |
1 (★7) | 1 (★10) | ||
 SBD VS-2 (Reconnaissance Squadron) |
1 (★10) |

The event guides are to be constructed through the respective Event map page guide sandbox and reviewed by editors before being approved here.
- Do not update the guides through this page unless it is a minor fix. Please only update guides through their respective sandbox pages.
Branching Table
| E-5 Branching Rules (Start Points) ▼/▲ |
|---|
| E-5 Branching Rules (Start Point 1) ▼/▲ |
|---|
| E-5 Branching Rules (Start Point 2) ▼/▲ |
|---|
| E-5 Branching Rules (Start Point 3) ▼/▲ |
|---|
* = Rule under review
? = Ship type/amount under review
Branching compositions are reported over the course of the event.
- Please refer to KCNav for up to date map content (fleets used, LoS/speed requirements/drops/LBAS ranges, ...)
Historical Bonuses
| Ships [1] [Toggle Names] |
Map-wide (stacks with nodes) |
|||||||||
|---|---|---|---|---|---|---|---|---|---|---|
| Coastal Defense Ships (DE) | 1.12x | - | - | |||||||
| Destroyers (DD) | 1.03x | 1.08x | - | 1.08x | 1.16x | 1.12x | ||||
| Light Cruisers (CL) NOT CLT | 1.04x | - | ||||||||
| Torpedo Cruisers (CLT) | - | - | ||||||||
| Seaplane Tenders (AV) Submarine Tenders (AS) |
1.08x | - | - | 1.24x | - | |||||
| Light Carriers (CVL) | 1.04x | - | ||||||||
| Heavy Cruisers CA(V) | - | 1.08x | 1.2204x1.08 x 1.13 | - | 1.2656x1.12 x 1.13 | |||||
| Battleships ((F)BB(V)) | - | 1.08x | 1.16x | 1.12x | ||||||
| Amphibious Assault Ships (LHA) | - | 1.24x | - | |||||||
| Japanese Ship | 1.04x | - | ||||||||
|
1.04x | |||||||||
|
- | 1.16x | - | |||||||
|
- | - | 1.16x | 1.22x | - | 1.31x | - | |||
| 1.13x | ||||||||||
| - | 1.18x | - | ||||||||
|
- | - | 1.18x | 1.23x | - | 1.26x | ||||
| 1.12x~1.14x(?) | ||||||||||
- Note
- Type bonus, nation bonus, group bonus and ship bonus stacks.
Map Overview
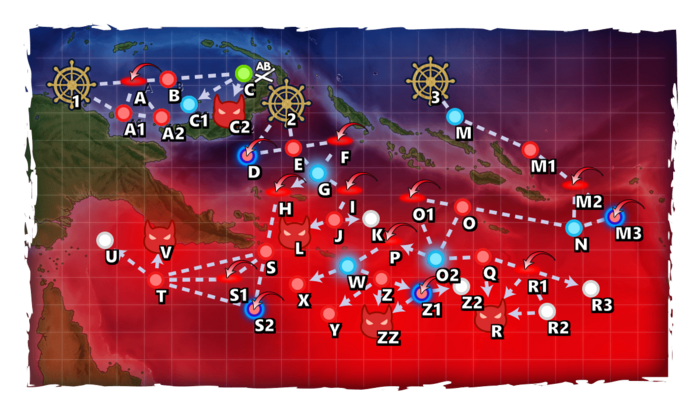
E5 is a striking force, and combined fleet five-phase map, consisting of one transport and four boss phases.
- 3 LBAS are available to sortie on this map.
- Initially, no LBAS is available,
- After Phase 1, all can be set on Sortie,
- After Phase 3, the LBAS is relocated closer to the final boss.
- This map uses 2 locks:
 Rabaul Support, Starting point 1 (striking),
 MO Invasion Fleet, Starting point 2 (combined).
 MO Mobile Fleet, Starting point 3 (combined).
- Bug: Despite having many installations, node V is not an installation node and
 Barrage Balloons cannot be deployed here.
Phase 1 - TP
Phase 1 is a "Transport Operation":
- LoS check: Casual/Easy/Med/Hard = Cn3 30/35/40/50Approximate, actual value may be higher
- LBAS range: 2 (post clear)

After clearing this phase, the LBAS becomes available.
Phase 2 - Boss
- LoS check: ?
- LBAS range: 5
- Bringing ASW and AACI is recommended.
- Using
 Smokes is recommended to pass through node J.
 - Using the
 FCF FCF
 can help increase the reach rate.
Phase 3 - Boss
- CTF: Fast+

- Main: 2 (F)BB(V), 4 CV
- Escort: 1-2 CA(V), 1 CL, 3-4 DD
- Route: 3 M M1 M2 N O O2 Q R
- Shortest route
- This fleet must be Fast+ when using both Yamato-class (see Speed).
- LoS check: ?
- LBAS range: 8
- Bringing ASW and AACI is recommended.
- Using Smokes is recommended to pass through node Q.
- Using the FCF FCF can help increase the reach rate.
| Prototype Carrier Princess Vacation Mode |
|---|
|


After clearing this phase, the LBAS is relocated closer to the final boss.
Phase 4 - Boss
- STF:

- Main: 1 BB, 0-1 CVL, 2 CL, 1-3 LHA/AV/CA(V), 0-1 DD
- Escort: 0-2 LHA/AV/CA(V), 1 CL, 3-4 DD
- Route: 2 E F G H S S1 T V
- Required Totals: 4 DD, 3 CL
- 4 DD to avoid D
- 3 CL to avoid S2
- Longer route, but allows for a strong slow fleet.
- LoS check: ?
- LBAS range: 7
- The boss contains up to 8 strong Installations and requires adequate equipment.
- Using several Nuke Setups is mandatory to defeat the boss.
- Bug: Despite having many installations, node V is not an installation node and Barrage Balloons cannot be deployed here.
- Bringing ASW and AACI is recommended.
- It is recommended to bring a Nelson-class Touch.
- If T is an issue, consider sending an LBAS there to help with the pass rate.
- Send LBAS to boss on LD and employ other strategies to help pass through T
- Using Smokes can help to pass through nodes S T.
- Using the FCF FCF can help increase the reach rate.
- Node S contains several PT boats:
| ExpandAnti-PT boat |
|---|


| Supply Depot Princess E Vacation Mode |
|---|
|


Phase 4.5 - Gimmick
To unlock the last boss, the following steps have to be performed:
| R | V | X | Y | |
|---|---|---|---|---|
| Hard | S | A+ x2 | A+ x2 | A+ x2 |
| Medium | - | - | A+ x2 | A+ x2 |
| Easy | - | - | A+ x2 | A+ x2 |
| Casual | - | - | A+ | A+ |
- Refer to #Phase 3 - Boss's fleet for composition and routing.
Phase 5 - Boss
CTF fleets usually bring the best firepower against the boss. However, the Fast+ STF advantageous shelling order makes it a better choice in most cases, especially to pass node Z.
- Bug: The LD comps for Medium and Easy are inverted.
- Their enemy stats are still the correct ones for each difficulty, meaning that the final kill is on par on Medium and Easy.
- STF: Fast+
- Main: 3 (F)BB(V), 1 CV, 1 CA(V), 0-1 CL/DD/AV
- Escort: 1-2 CA(V), 1 CL, 2-4 DD, 0-1 AV
- Route: 3 M M1 M2 N O O2 P W Z ZZ
- Is more effective against pre-boss nodes thanks to the shelling sequence/order when using a STF.
- Achieving air superiority on higher difficulties is harder without appropriate equipment.
- Fast/Slow STF can be used but will go through additional nodes such as M3 O1 Z1.
- LoS check: ? (rather high: reached at 91.3 and 87.7 on easy, failed at 70.8) for Cn1 HQ x0.4
- LBAS range: 6
- Fleets that include any Yamato-class and are not Fast+:
- Will route through O1
- Limited to 1 Yamato-Class to avoid Z1
- Must include 2 CA(V), 2 CL, 4 DD, and ≤2 (F)BB(V) to avoid Z1
- Bringing AACI is strongly recommended.
- Using a Special Attack is highly recommended.
- It is recommended to send 1 LBAS on submarine node M1, and 2 LBAS on the boss.
- Node Z is extremely tough to pass, and may require to either use:
Phase 5.5 - Debuff
Once LD has been reached, the following steps have to be performed to debuff the boss.
| O1 | R | V | X | Y | LBAS | |
|---|---|---|---|---|---|---|
| Hard | AS | S | A+ | S | S x2 | AS x2 |
| Medium | AS | A+ | - | S | S | AS |
| Easy | AS | A+ | - | S | S | AS |
| Casual | - | A+ | - | A+ | S? | - |
- Refer to #Phase 4.5 - Gimmick's fleet for composition and routing.
| O1 | AS |
|---|---|
| Hard | 524 |
| Medium | 497 |
| Easy | 497 |
Once on LD, the CG will change to the following:
| Abyssal Coral Sea Water Demon |
|---|
|


Enemy Compositions
| # | Formation | Air Defense Node | AD/AP AS/AS+ |
|---|---|---|---|
| A | Diamond | 109/217 486/972 | |
| Diamond | 109/217 488/975 | ||
| Diamond | 123/246 552/1104 | ||
| Diamond | 138/275 617/1233 | ||
| Diamond | 146/291 654/1308 | ||
| Diamond | 154/308 692/1383 | ||
| Diamond | 163/325 729/1458 | ||
| # | Formation | Air Defense Node | AD/AP AS/AS+ |
| # | Formation | Normal Battle Node | AD/AP AS/AS+ |
|---|---|---|---|
| A1 | Echelon Line Abreast |
0/0 0/0 | |
| Line Abreast | 0/0 0/0 | ||
| Echelon | 0/0 0/0 | ||
| # | Formation | Normal Battle Node | AD/AP AS/AS+ |
| # | Formation | Normal Battle Node | AD/AP AS/AS+ |
|---|---|---|---|
| A2 | Line Ahead Echelon Vanguard |
0/0 0/0 | |
| # | Formation | Normal Battle Node | AD/AP AS/AS+ |
| # | Formation | Normal Battle Node | AD/AP AS/AS+ |
|---|---|---|---|
| B | Line Ahead | 0/0 0/0 | |
| Line Ahead | 0/0 0/0 | ||
| Line Ahead | 0/0 0/0 | ||
| # | Formation | Normal Battle Node | AD/AP AS/AS+ |
| # | Landing Node | ||
|---|---|---|---|
| C | 輸送物資の揚陸地点に到達しました。本海域の輸送作戦は無事完了しています。 The landing point of the convoy has been reached. The transport operation here has already been completed successfully. | ||
| # | Landing Node | ||
| # | Empty Node | ||
|---|---|---|---|
| C1 | 敵影を見ず。 No enemy spotted. | ||
| # | Empty Node | ||
| # | Formation | Boss Battle Node | AD/AP AS/AS+ |
|---|---|---|---|
| C2 | Line Ahead Double Line Diamond |
104/208 467/933 | |
| # | Formation | Boss Battle Node | AD/AP AS/AS+ |
| # | Formation | Supported Battle Node | AD/AP AS/AS+ |
|---|---|---|---|
| D | Echelon Line Abreast |
46/92 206/411 | |
| Echelon Line Abreast |
55/109 243/486 | ||
| Echelon | 55/109 243/486 | ||
| # | Formation | Supported Battle Node | AD/AP AS/AS+ |
| # | Formation | Normal Battle Node | AD/AP AS/AS+ |
|---|---|---|---|
| E | Echelon Line Abreast |
0/0 0/0 | |
| Echelon Line Abreast |
0/0 0/0 | ||
| Echelon Line Abreast |
0/0 0/0 | ||
| # | Formation | Normal Battle Node | AD/AP AS/AS+ |
| # | Formation | Air Defense Node | AD/AP AS/AS+ |
|---|---|---|---|
| F | Diamond | 66/132 296/591 | |
| Diamond | 110/220 494/987 | ||
| Diamond | 132/263 591/1182 | ||
| # | Formation | Air Defense Node | AD/AP AS/AS+ |
| # | Selection Node | ||
|---|---|---|---|
| G | 艦隊の針路を選択できます。提督、どちらの針路をとられますか? You can decide the fleet's course. Admiral, which heading should we take? | ||
| # | Selection Node | ||
| # | Formation | Air Defense Node | AD/AP AS/AS+ |
|---|---|---|---|
| H | Diamond | 109/217 486/972 | |
| Diamond | 109/217 488/975 | ||
| Diamond | 123/246 552/1104 | ||
| Diamond | 138/275 617/1233 | ||
| Diamond | 146/291 654/1308 | ||
| Diamond | 154/308 692/1383 | ||
| Diamond | 163/325 729/1458 | ||
| # | Formation | Air Defense Node | AD/AP AS/AS+ |
| # | Formation | Air Defense Node | AD/AP AS/AS+ |
|---|---|---|---|
| I | Diamond | 66/132 296/591 | |
| Diamond | 110/220 494/987 | ||
| Diamond | 132/263 591/1182 | ||
| # | Formation | Air Defense Node | AD/AP AS/AS+ |
| # | Formation | Normal Battle Node | AD/AP AS/AS+ |
|---|---|---|---|
| J | Line Ahead | 0/0 0/0 | |
| Line Ahead | 0/0 0/0 | ||
| # | Formation | Normal Battle Node | AD/AP AS/AS+ |
| # | Empty Node | ||
|---|---|---|---|
| K | 敵影を見ず。 No enemy spotted. | ||
| # | Empty Node | ||
| # | Formation | Boss Battle Node | AD/AP AS/AS+ |
|---|---|---|---|
| L | Cruising Formation 3 | 66/132 296/591 | |
| Cruising Formation 4 (Final)
|
132/263 591/1182 | ||
| # | Formation | Boss Battle Node | AD/AP AS/AS+ |
| # | Empty Node | ||
|---|---|---|---|
| M | 気のせいだった。 Must be my imagination. | ||
| # | Empty Node | ||
| # | Formation | Normal Battle Node | AD/AP AS/AS+ |
|---|---|---|---|
| M1 | Echelon Line Abreast |
0/0 0/0 | |
| Echelon Line Abreast |
0/0 0/0 | ||
| Echelon Line Abreast |
0/0 0/0 | ||
| # | Formation | Normal Battle Node | AD/AP AS/AS+ |
| # | Formation | Air Defense Node | AD/AP AS/AS+ |
|---|---|---|---|
| M2 | Diamond | 139/277 623/1245 | |
| Diamond | 112/223 501/1002 | ||
| Diamond | 146/291 653/1305 | ||
| Diamond | 117/233 524/1047 | ||
| # | Formation | Air Defense Node | AD/AP AS/AS+ |
| # | Formation | Supported Battle Node | AD/AP AS/AS+ |
|---|---|---|---|
| M3 | Echelon | 73/146 327/654 | |
| Echelon | 42/83 186/372 | ||
| Echelon | 47/93 209/417 | ||
| # | Formation | Supported Battle Node | AD/AP AS/AS+ |
| # | Empty Node | ||
|---|---|---|---|
| N | 気のせいだった。 Must be my imagination. | ||
| # | Empty Node | ||
| # | Formation | Normal Battle Node | AD/AP AS/AS+ |
|---|---|---|---|
| O | Diamond | 110/220 494/987 | |
| Diamond | 154/308 692/1383 | ||
| Diamond | 176/351 789/1578 | ||
| # | Formation | Normal Battle Node | AD/AP AS/AS+ |
| # | Formation | Air Defense Node | AD/AP AS/AS+ |
|---|---|---|---|
| O1 | Diamond | 139/277 623/1245 | |
| Diamond | 112/223 501/1002 | ||
| Diamond | 146/291 653/1305 | ||
| Diamond | 117/233 524/1047 | ||
| # | Formation | Air Defense Node | AD/AP AS/AS+ |
| # | Selection Node | ||
|---|---|---|---|
| O2 | 艦隊の針路を選択できます。提督、どちらの針路をとられますか? You can decide the fleet's course. Admiral, which heading should we take? | ||
| # | Selection Node | ||
| # | Formation | Air Defense Node | AD/AP AS/AS+ |
|---|---|---|---|
| P | Diamond | 112/223 501/1002 | |
| Diamond | 79/157 353/705 | ||
| Diamond | 187/373 839/1677 | ||
| # | Formation | Air Defense Node | AD/AP AS/AS+ |
| # | Formation | Normal Battle Node | AD/AP AS/AS+ |
|---|---|---|---|
| Q | Line Ahead Double Line Vanguard |
108/215 482/963 | |
| # | Formation | Normal Battle Node | AD/AP AS/AS+ |
| # | Formation | Boss Battle Node | AD/AP AS/AS+ |
|---|---|---|---|
| R | Cruising Formation 3 | 139/277 623/1245 | |
| Cruising Formation 4 (Final)
|
211/422 948/1896 | ||
| # | Formation | Boss Battle Node | AD/AP AS/AS+ |
| # | Formation | Air Defense Node | AD/AP AS/AS+ |
|---|---|---|---|
| R1 | Diamond | 110/220 494/987 | |
| Diamond | 139/277 623/1245 | ||
| Diamond | 211/422 948/1896 | ||
| # | Formation | Air Defense Node | AD/AP AS/AS+ |
| # | Formation | Air Defense Node | AD/AP AS/AS+ |
|---|---|---|---|
| R2 | Diamond | 110/220 494/987 | |
| Diamond | 139/277 623/1245 | ||
| Diamond | 211/422 948/1896 | ||
| # | Formation | Air Defense Node | AD/AP AS/AS+ |
| # | Empty Node | ||
|---|---|---|---|
| R3 | 敵影を見ず。 No enemy spotted. | ||
| # | Empty Node | ||
| # | Formation | Normal Battle Node | AD/AP AS/AS+ |
|---|---|---|---|
| S | Line Ahead Double Line Echelon |
0/0 0/0 | |
| # | Formation | Normal Battle Node | AD/AP AS/AS+ |
| # | Formation | Air Defense Node | AD/AP AS/AS+ |
|---|---|---|---|
| S1 | Diamond | 109/217 486/972 | |
| Diamond | 109/217 488/975 | ||
| Diamond | 123/246 552/1104 | ||
| Diamond | 138/275 617/1233 | ||
| Diamond | 146/291 654/1308 | ||
| Diamond | 154/308 692/1383 | ||
| Diamond | 163/325 729/1458 | ||
| # | Formation | Air Defense Node | AD/AP AS/AS+ |
| # | Formation | Supported Battle Node | AD/AP AS/AS+ |
|---|---|---|---|
| S2 | Echelon Line Abreast |
63/126 282/564 | |
| Echelon Line Abreast |
78/155 347/693 | ||
| Echelon Line Abreast |
86/171 384/768 | ||
| # | Formation | Supported Battle Node | AD/AP AS/AS+ |
| # | Formation | Normal Battle Node | AD/AP AS/AS+ |
|---|---|---|---|
| T | Line Ahead Double Line |
0/0 0/0 | |
| Line Ahead | 0/0 0/0 | ||
| # | Formation | Normal Battle Node | AD/AP AS/AS+ |
| # | Empty Node | ||
|---|---|---|---|
| U | 敵影を見ず。 No enemy spotted. | ||
| # | Empty Node | ||
| # | Formation | Boss Battle Node | AD/AP AS/AS+ |
|---|---|---|---|
| V | Cruising Formation 4 | 160/319 716/1431 | |
| Cruising Formation 4 (Final)
|
180/359 806/1611 | ||
| # | Formation | Boss Battle Node | AD/AP AS/AS+ |
| # | Selection Node | ||
|---|---|---|---|
| W | 艦隊の針路を選択できます。提督、どちらの針路をとられますか? You can decide the fleet's course. Admiral, which heading should we take? | ||
| # | Selection Node | ||
| # | Formation | Normal Battle Node | AD/AP AS/AS+ |
|---|---|---|---|
| X | Line Ahead Diamond Vanguard |
106/212 476/951 | |
| # | Formation | Normal Battle Node | AD/AP AS/AS+ |
| # | Formation | Normal Battle Node | AD/AP AS/AS+ |
|---|---|---|---|
| Y | Line Ahead Double Line Diamond |
0/0 0/0 | |
| # | Formation | Normal Battle Node | AD/AP AS/AS+ |
| # | Formation | Normal Battle Node | AD/AP AS/AS+ |
|---|---|---|---|
| Z | Line Ahead Double Line Vanguard |
0/0 0/0 | |
| # | Formation | Normal Battle Node | AD/AP AS/AS+ |
| # | Formation | Supported Battle Node | AD/AP AS/AS+ |
|---|---|---|---|
| Z1 | Echelon Line Abreast |
42/83 186/372 | |
| Echelon | 47/93 209/417 | ||
| # | Formation | Supported Battle Node | AD/AP AS/AS+ |
| # | Empty Node | ||
|---|---|---|---|
| Z2 | 敵影を見ず。 No enemy spotted. | ||
| # | Empty Node | ||
| # | Formation | Boss Battle Node | AD/AP AS/AS+ |
|---|---|---|---|
| ZZ | Cruising Formation 4 | 112/223 501/1002 | |
| Cruising Formation 4 (Final)
|
187/373 839/1677 | ||
| # | Formation | Boss Battle Node | AD/AP AS/AS+ |
Ship Drops
| ExpandShip drops |
|---|
|
| |||||||||
|---|---|---|---|---|---|---|---|---|---|
|
2nd wave of Friendly Fleets has been released!
Time until event's end:
The event has ended!
| |||||||||
Trivia
- Node V is Port Moresby.
- Node ZZ is the site of the Battle of the Coral Sea.
- The title (Second Battle of the Coral Sea/第二次珊瑚海海戦) for the map is a likely nod to the theme of KanColle events focusing on returning to previous battlefields and putting to rest ghosts from the past.