- Welcome to the Kancolle Wiki!
- If you have any questions regarding site content, account registration, etc., please visit the KanColle Wiki Discord
Summer 2024 Event/E-3
 
| |||||||||
|---|---|---|---|---|---|---|---|---|---|
 
2nd wave of Friendly Fleets has been released!
Time until event's end:
The event has ended!
| |||||||||
激突!ダカール沖海戦
![]()
![]()
![]()


| Information | ||||
|---|---|---|---|---|
| Event Tag | ||||
| Boss Gauges | Hard (甲): 3960 HP + 585 TP + 850 TP + 5460 HP | |||
| Medium (乙): 2880 HP + 495 TP + 750 TP + 4980 HP | ||||
| Easy (丙): 2160 HP + 450 TP + 650 TP + 4980 HP | ||||
| Casual (丁): 1760 HP + 405 TP + 600 TP + 4560 HP | ||||
| Map Bosses | Aircraft Carrier Summer Princess B
| |||
Heavy Cruiser Summer Princess
| ||||
French Battleship Princess Vacation Mode
| ||||
French Light Cruiser Princess
| ||||
| Rewards[edit] | ||||
|---|---|---|---|---|
| Ship |  Gloire | |||
| Choice | 丁 Casual |
丙 Easy |
乙 Medium |
甲 Hard |
 Communication Equipment & Personnel |
1 | 1 | ||
| OR | ||||
New Model Armament Material |
3 | |||
| Reward | 丁 Casual |
丙 Easy |
乙 Medium |
甲 Hard |
|---|---|---|---|---|
Medal |
1 | 2 | 3 | |
Latest Overseas Warship Technology |
1 | 1 | 2 | |
Prototype Flight Deck Catapult |
1 | |||
 15.2cm Triple Main Gun Mount |
1 (★1) | 1 (★2) | ||
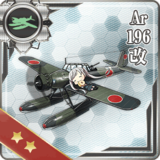
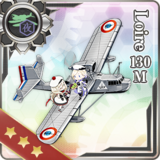
 Loire 130M Kai (Skilled) |
1 | 1 (★1) | ||
 15.2cm Triple Main Gun Mount Kai |
1 (★2) | |||
Communication Equipment & Personnel |
1 |

The event guides are to be constructed through the respective Event map page guide sandbox and reviewed by editors before being approved here.
- Do not update the guides through this page unless it is a minor fix. Please only update guides through their respective sandbox pages.
Branching Table
| E-3 Branching Rules (Start Points) ▼/▲ | ||
|---|---|---|
| Nodes | Rules | |
| Start | 1 |
|
2 |
| |
3 |
| |
| E-3 Branching Rules (Start Point 1) ▼/▲ Single Fleet | ||
|---|---|---|
| Nodes | Rules | |
1 |
A |
|
B |
B1 |
|
B2 |
| |
C |
| |
B1 |
C |
|
B2 |
H1 |
|
C |
C1 |
Active Branching |
C2 | ||
C3 |
D |
|
E |
| |
F |
| |
| E-3 Branching Rules (Start Point 1) ▼/▲ Combined Fleet | ||
|---|---|---|
| Nodes | Rules | |
1 |
L |
|
B1 |
N |
|
P |
| |
N |
O |
|
P |
| |
P |
Q |
|
Q |
R |
|
S |
| |
| E-3 Branching Rules (Start Point 2) ▼/▲ | ||
|---|---|---|
| Nodes | Rules | |
2 |
G |
|
H |
| |
H |
B2 |
|
H1 |
| |
H2 |
| |
I |
J |
|
K |
| |
| E-3 Branching Rules (Start Point 3) ▼/▲ | ||
|---|---|---|
| Nodes | Rules | |
P |
T |
|
U |
| |
V |
V1 |
|
V2 |
| |
V3 |
| |
X |
| |
V3 |
W |
|
X |
| |
* = Rule under review
? = Ship type/amount under review
Branching compositions are reported over the course of the event.
- Please refer to KCNav for up to date map content (fleets used, LoS/speed requirements/drops/LBAS ranges, ...)
Historical Bonuses
| Ship Damage Bonuses Stack with each other | |||||||||||||||||||
|---|---|---|---|---|---|---|---|---|---|---|---|---|---|---|---|---|---|---|---|
| Ships [Toggle Names] |
Multipliers | ||||||||||||||||||
| Mapwide | Node F | Node K | Node S | Node V1 | Node X | ||||||||||||||
| Destroyers (DD) | 1.03x | - | - | - | 1.13x | ||||||||||||||
| Light Cruisers (CL) NOT CLT |
1.04x | ||||||||||||||||||
| Heavy Cruisers (CA(V)) | - | 1.09x | |||||||||||||||||
| Seaplane Tenders (AV) | 1.08x | 1.07~1.09x(?) | |||||||||||||||||
| Light Carriers (CVL) | 1.04x | 1.07x | |||||||||||||||||
| Standard Carriers (CV(B)) | - | ||||||||||||||||||
| Battleships ((F)BB(V)) | - | 1.15x | 1.09x | ||||||||||||||||
|
1.15x | 1.08x | 1.11x | 1.12x | 1.18x | ||||||||||||||
|
1.19x | - | 1.18x | 1.16x | 1.22x | ||||||||||||||
|
1.05x | - | |||||||||||||||||
| |||||||||||||||||||
| |||||||||||||||||||
Sheffield Kai |
1.12x | - | - | - | |||||||||||||||
Victorious Kai | |||||||||||||||||||
Warspite Kai |
1.15x | ||||||||||||||||||
Ark Royal Kai |
1.27x | ||||||||||||||||||
Gloire Kai |
1.18x | ||||||||||||||||||
Jean Bart Kai |
1.24x | 1.12x(?) | |||||||||||||||||
Richelieu Deux |
1.32x | 1.12x(?) | |||||||||||||||||


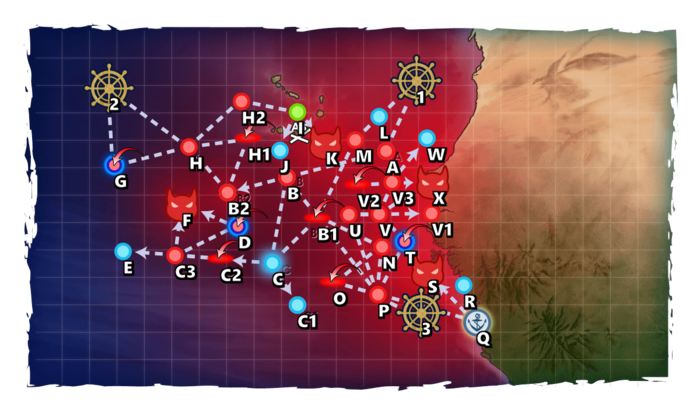
Map Overview
E3 is a single, striking force, and combined fleet four-phase map, consisting of two transport and two boss phases.
- 3 LBAS are available to sortie on this map
- Initially, no LBAS is available,
- After Phase 2, all can be set on Sortie.
- This map uses 2 locks:
 Home Fleet, Starting point 2 (reused from E-1),
 Force M Advance Squadron, Starting point 1 & 3 (single),
 Force M, Starting point 1 & 3 (combined).
- Note : It is possible to mix both
 &
&  in all difficulties on the last phase once Phase 3 is cleared.
 Barrage Balloons can be deployed on installation nodes V1 X.
Phase 0.5 - Gimmick
To unlock the first boss, the following steps have to be performed:
| B2 | C2 | |
|---|---|---|
| Hard | S x2 | AS x2 |
| Medium | S x2 | AS |
| Easy | S x2 | AS |
| Casual | S | AS |
Phase 1 - Boss
"Eliminate the Carrier Princess"
- Single Fleet: 1-2 (F)BB(V), 1-2 CV, 3 DD
- Route: 1 A B C C2 C3 F
- Shortest route to the boss.
- LoS check: Cn3 = H/M/E/C = 80/60/60/?
- Bringing ASW and AACI is recommended.
- In the case 2 (F)BB are used, it is recommended to use a 2 ship Special Attack.
- This would eventually be reused on the final phase.
- CV can utilize CVNCI to deal night damage.
- As the tag is reused on the final phase, it is recommended to plan all the ships used in the phase as to be reused later.
- Notably, using the French Touch with strong bonus CV is recommended if possible.
Phase 2 - TP
Phase 2 is a "Transport Operation": "Transport Supply to Cape Verde and Establish an air base"
- Striking Force: 0-1 CV/CA(V), 1 CL, 4-5 DD, 0-1 AV, Fast

- Route: 2 H H2 I K
- LoS check: Cn3 = H/M/E/C 65/55/50/?
- Slow fleets pass through node H1.
- Using a Support Fleet on the boss is recommended guarantee an A+ rank at the boss node.
- Bringing ASW is recommended.
After clearing this phase, the LBAS becomes available.
Phase 3 - TP
Phase 3 is a "Transport Operation": "Decoy Operation for the Assault on Dakar: Amphibious landing on Conakry"
- TCF:
- Main: 1 CVE, 1-4 DD, 0-3 DE, 1 AV
- Escort: 0-1 CA(V), 1-2 CL, 4 DD
- Route: 1 L M B1 P Q S
- It is recommended to send the full LBAS on the boss.
- LoS check: 90 (Cn3 Hard)
- LBAS range: 7
Note : Once this phase cleared, it becomes possible to mix both ![]() &
& ![]() in all difficulties.
in all difficulties.
Note : Once this phase cleared, only the TCF can be used to go back to those routes.
Phase 3.5 - Shortcut
Once phase 3 is cleared and phase 4 unlocked, the following steps have to be performed to unlock a shortcut for fast fleets.
- This gimmick is optional but highly recommended.
| S | V1 | V3 | |
|---|---|---|---|
| Hard | S | A+ x3 | S |
| Medium | S | A+ x2 | S |
| Easy | A+ | A+ x2 | S |
| Casual | A+ | A+ x2 | S |
- Refer to #Phase 3 - TP's fleet for composition and routing.
- Only TCF fleets can be used.


Phase 4 - Boss
"Operation Menace: Defeat the enemy Combined Fleet at Dakar"
- Note : It is possible to mix both & in all difficulties on this phase once Phase 3 is cleared.
- CTF: Fast
- Main: 2 FBB, 2 CV, 1 CVL, 1 CL/AV
- Escort: 1 CA(V), 1 CL, 4 DD
- Route: 3 P U V X
- Requires the shortcut.
- The best fleet that allows for a touch and great air power.
- LoS check: 120? (Cn3 Hard)
- LBAS range: 5
- To use the shortcut, at least 4 DD must be present within the fleet to route through the shortcut.
- Bringing an AACI ship is recommended.
- Bringing some Anti-Installation gears might be required to deal with the Harbour Princess Holiday Mode, but
 /
/ Shells should be enough.
 - Using a Special Attack is highly recommended, notably the French Touch.
- The boss node contains several PT boats:
| Anti-PT boat | |||||||||||||||||||||||||||||||||||||||||||||||||||||||||||||||||||||||||||||||||||||||||||||||||||||||||||||||||||||||||||||||||||||||||||
|---|---|---|---|---|---|---|---|---|---|---|---|---|---|---|---|---|---|---|---|---|---|---|---|---|---|---|---|---|---|---|---|---|---|---|---|---|---|---|---|---|---|---|---|---|---|---|---|---|---|---|---|---|---|---|---|---|---|---|---|---|---|---|---|---|---|---|---|---|---|---|---|---|---|---|---|---|---|---|---|---|---|---|---|---|---|---|---|---|---|---|---|---|---|---|---|---|---|---|---|---|---|---|---|---|---|---|---|---|---|---|---|---|---|---|---|---|---|---|---|---|---|---|---|---|---|---|---|---|---|---|---|---|---|---|---|---|---|---|---|
Unlike most standard Abyssals, "PT boats" (PT Imp Pack & Schnellboot Imp Pack & Schnellboot Imp Pack ) are "very small and fast". ) are "very small and fast".
During Events, some special bonuses may be added, with "historical" ships and equipment gaining some accuracy bonuses[10].
| |||||||||||||||||||||||||||||||||||||||||||||||||||||||||||||||||||||||||||||||||||||||||||||||||||||||||||||||||||||||||||||||||||||||||||
| [edit] | |||||||||||||||||||||||||||||||||||||||||||||||||||||||||||||||||||||||||||||||||||||||||||||||||||||||||||||||||||||||||||||||||||||||||||
Phase 4.5 - Debuff
Once LD has been reached, the following steps have to be performed to debuff the boss.
| F | K | S | V1 | |
|---|---|---|---|---|
| Hard | S | S | A+ | A+ x3 |
| Medium | - | A+ | A+ | A+ x3 |
| Easy | - | A+ | A+ | A+ x3 |
| Casual | - | A+ | A+ | A+ x2 |
- Refer to #Phase 1 - Boss's fleet for composition and routing.
Once on LD, the CG will change to the following:
| French Light Cruiser Princess |
|---|
|


Enemy Compositions
| Type | Ships |
|---|---|
| DD | |
| CV | |
| SS |
| Type | Ships |
|---|---|
| DD | |
| CV | |
| SS |
| Type | Ships |
|---|---|
| DD | |
| CA | |
| BB | |
| CV | |
| SS |
| Type | Ships |
|---|---|
| DD | |
| CV |
| Type | Ships |
|---|---|
| DD | |
| CA | |
| BB | |
| CV | |
| SS |
| Type | Ships |
|---|---|
| DD | |
| CA | |
| BB | |
| CV | |
| SS |
| Type | Ships |
|---|---|
| DD | |
| CA | |
| CV | |
| SS |
| Type | Ships |
|---|---|
| DD | |
| CV | |
| SS |
| Type | Ships |
|---|---|
| DE | |
| CA | |
| FBB | |
| BB | |
| CV | |
| SSV | |
| AV | |
| LHA |
| # | Formation | Normal Battle Node | AD/AP AS/AS+ |
|---|---|---|---|
| A | Line Ahead Double Line Vanguard |
0/0 0/0 | |
| # | Formation | Normal Battle Node | AD/AP AS/AS+ |
| # | Formation | Normal Battle Node | AD/AP AS/AS+ |
|---|---|---|---|
| B | Echelon Line Abreast |
0/0 0/0 | |
| Echelon Line Abreast |
0/0 0/0 | ||
| Echelon Line Abreast |
0/0 0/0 | ||
| # | Formation | Normal Battle Node | AD/AP AS/AS+ |
| # | Formation | Air Defense Node | AD/AP AS/AS+ |
|---|---|---|---|
| B1 | Diamond | 34/67 149/297 | |
| Diamond | 33/65 146/291 | ||
| Diamond | 45/90 201/402 | ||
| Diamond | 45/89 198/396 | ||
| Diamond | 44/88 197/393 | ||
| Diamond | 61/121 270/540 | ||
| # | Formation | Air Defense Node | AD/AP AS/AS+ |
| # | Formation | Normal Battle Node | AD/AP AS/AS+ |
|---|---|---|---|
| B2 | Line Ahead Double Line Echelon |
0/0 0/0 | |
| # | Formation | Normal Battle Node | AD/AP AS/AS+ |
| # | Selection Node | ||
|---|---|---|---|
| C | 艦隊の針路を選択できます。提督、どちらの針路をとられますか? You can decide the fleet's course. Admiral, which heading should we take? | ||
| # | Selection Node | ||
| # | Empty Node | ||
|---|---|---|---|
| C1 | 敵影を見ず。 No enemy spotted. | ||
| # | Empty Node | ||
| # | Formation | Air Defense Node | AD/AP AS/AS+ |
|---|---|---|---|
| C2 | Diamond | 43/85 189/378 | |
| Diamond | 85/169 378/756 | ||
| Diamond | 78/155 348/696 | ||
| # | Formation | Air Defense Node | AD/AP AS/AS+ |
| # | Formation | Normal Battle Node | AD/AP AS/AS+ |
|---|---|---|---|
| C3 | Line Ahead Double Line Echelon |
0/0 0/0 | |
| # | Formation | Normal Battle Node | AD/AP AS/AS+ |
| # | Formation | Supported Battle Node | AD/AP AS/AS+ |
|---|---|---|---|
| D | Echelon Line Abreast |
24/47 104/207 | |
| Line Abreast | 24/47 104/207 | ||
| Echelon Line Abreast |
24/47 104/207 | ||
| # | Formation | Supported Battle Node | AD/AP AS/AS+ |
| # | Empty Node | ||
|---|---|---|---|
| E | 敵影を見ず。 No enemy spotted. | ||
| # | Empty Node | ||
| # | Formation | Boss Battle Node | AD/AP AS/AS+ |
|---|---|---|---|
| F | Diamond | 82/163 366/732 | |
| Diamond | 89/177 396/792 | ||
| Diamond (Final)
|
82/163 366/732 | ||
| # | Formation | Boss Battle Node | AD/AP AS/AS+ |
| # | Formation | Supported Battle Node | AD/AP AS/AS+ |
|---|---|---|---|
| G | Echelon | 24/47 104/207 | |
| Echelon Line Abreast |
24/47 104/207 | ||
| Echelon Line Abreast |
24/47 104/207 | ||
| # | Formation | Supported Battle Node | AD/AP AS/AS+ |
| # | Formation | Normal Battle Node | AD/AP AS/AS+ |
|---|---|---|---|
| H | Echelon Line Abreast |
0/0 0/0 | |
| Echelon Line Abreast |
0/0 0/0 | ||
| Echelon Line Abreast |
0/0 0/0 | ||
| # | Formation | Normal Battle Node | AD/AP AS/AS+ |
| # | Formation | Air Defense Node | AD/AP AS/AS+ |
|---|---|---|---|
| H1 | Diamond | 63/125 279/558 | |
| Diamond | 49/98 219/438 | ||
| Diamond | 67/134 300/600 | ||
| # | Formation | Air Defense Node | AD/AP AS/AS+ |
| # | Formation | Normal Battle Node | AD/AP AS/AS+ |
|---|---|---|---|
| H2 | Line Ahead Double Line Echelon |
0/0 0/0 | |
| # | Formation | Normal Battle Node | AD/AP AS/AS+ |
| # | Landing Node | ||
|---|---|---|---|
| I | 輸送物資の揚陸地点に到達しました。本海域の輸送作戦は無事完了しています。 The landing point of the convoy has been reached. The transport operation here has already been completed successfully. | ||
| # | Landing Node | ||
| # | Empty Node | ||
|---|---|---|---|
| J | 敵影を見ず。 No enemy spotted. | ||
| # | Empty Node | ||
| # | Formation | Boss Battle Node | AD/AP AS/AS+ |
|---|---|---|---|
| K | Line Ahead Double Line Vanguard |
32/63 140/279 | |
| # | Formation | Boss Battle Node | AD/AP AS/AS+ |
| # | Empty Node | ||
|---|---|---|---|
| L | 気のせいだった。 Must be my imagination. | ||
| # | Empty Node | ||
| # | Formation | Normal Battle Node | AD/AP AS/AS+ |
|---|---|---|---|
| M | Line Ahead Echelon Vanguard |
0/0 0/0 | |
| # | Formation | Normal Battle Node | AD/AP AS/AS+ |
| # | Formation | Normal Battle Node | AD/AP AS/AS+ |
|---|---|---|---|
| N | Echelon Line Abreast |
0/0 0/0 | |
| Echelon Line Abreast |
0/0 0/0 | ||
| Echelon Line Abreast |
0/0 0/0 | ||
| # | Formation | Normal Battle Node | AD/AP AS/AS+ |
| # | Formation | Air Defense Node | AD/AP AS/AS+ |
|---|---|---|---|
| O | Diamond | 34/67 149/297 | |
| Diamond | 33/65 146/291 | ||
| Diamond | 45/90 201/402 | ||
| Diamond | 45/89 198/396 | ||
| Diamond | 44/88 197/393 | ||
| Diamond | 61/121 270/540 | ||
| # | Formation | Air Defense Node | AD/AP AS/AS+ |
| # | Formation | Normal Battle Node | AD/AP AS/AS+ |
|---|---|---|---|
| P | Line Ahead Line Abreast Vanguard |
0/0 0/0 | |
| # | Formation | Normal Battle Node | AD/AP AS/AS+ |
| # | Landing Node | ||
|---|---|---|---|
| Q | 輸送物資の揚陸地点に到達しました。本海域の輸送作戦は無事完了しています。 The landing point of the convoy has been reached. The transport operation here has already been completed successfully. | ||
| # | Landing Node | ||
| # | Empty Node | ||
|---|---|---|---|
| R | 敵影を見ず。 No enemy spotted. | ||
| # | Empty Node | ||
| # | Formation | Boss Battle Node | AD/AP AS/AS+ |
|---|---|---|---|
| S | Line Ahead | 25/49 108/216 | |
| Line Ahead | 25/49 108/216 | ||
| Line Ahead (Final)
|
27/53 117/234 | ||
| # | Formation | Boss Battle Node | AD/AP AS/AS+ |
| # | Formation | Supported Battle Node | AD/AP AS/AS+ |
|---|---|---|---|
| T | Echelon Line Abreast |
22/44 98/195 | |
| Echelon Line Abreast |
34/67 150/300 | ||
| Echelon Line Abreast |
34/67 150/300 | ||
| # | Formation | Supported Battle Node | AD/AP AS/AS+ |
| # | Formation | Normal Battle Node | AD/AP AS/AS+ |
|---|---|---|---|
| U | Echelon Line Abreast |
0/0 0/0 | |
| Echelon Line Abreast |
0/0 0/0 | ||
| Echelon Line Abreast |
0/0 0/0 | ||
| # | Formation | Normal Battle Node | AD/AP AS/AS+ |
| # | Formation | Normal Battle Node | AD/AP AS/AS+ |
|---|---|---|---|
| V | Line Ahead Double Line Echelon |
0/0 0/0 | |
| # | Formation | Normal Battle Node | AD/AP AS/AS+ |
| # | Formation | Normal Battle Node | AD/AP AS/AS+ |
|---|---|---|---|
| V1 | Double Line | 17/33 74/147 | |
| Double Line | 50/100 224/447 | ||
| Double Line | 0/0 0/0 | ||
| # | Formation | Normal Battle Node | AD/AP AS/AS+ |
| # | Formation | Air Defense Node | AD/AP AS/AS+ |
|---|---|---|---|
| V2 | Diamond | 46/91 203/405 | |
| Diamond | 56/112 251/501 | ||
| Diamond | 78/156 350/699 | ||
| Diamond | 68/135 303/606 | ||
| Diamond | 90/179 402/804 | ||
| Diamond | 105/209 468/936 | ||
| # | Formation | Air Defense Node | AD/AP AS/AS+ |
| # | Formation | Normal Battle Node | AD/AP AS/AS+ |
|---|---|---|---|
| V3 | Diamond | 63/125 279/558 | |
| Diamond | 52/103 231/462 | ||
| Diamond | 67/134 300/600 | ||
| # | Formation | Normal Battle Node | AD/AP AS/AS+ |
| # | Empty Node | ||
|---|---|---|---|
| W | 敵影を見ず。 No enemy spotted. | ||
| # | Empty Node | ||
| # | Formation | Boss Battle Node | AD/AP AS/AS+ |
|---|---|---|---|
| X | Cruising Formation 4 | 68/136 305/609 | |
| Cruising Formation 4 (Final)
|
88/176 395/789 | ||
| # | Formation | Boss Battle Node | AD/AP AS/AS+ |
Ship Drops
| Ship drops | |||||||||||||||||||||||||||||||||||||||||||||||||||||||||||||||||||||||||||||||||||||||||||||||||||
|---|---|---|---|---|---|---|---|---|---|---|---|---|---|---|---|---|---|---|---|---|---|---|---|---|---|---|---|---|---|---|---|---|---|---|---|---|---|---|---|---|---|---|---|---|---|---|---|---|---|---|---|---|---|---|---|---|---|---|---|---|---|---|---|---|---|---|---|---|---|---|---|---|---|---|---|---|---|---|---|---|---|---|---|---|---|---|---|---|---|---|---|---|---|---|---|---|---|---|---|
| Type | Ship? | B2 | C3 | F | H2 | K | S | V | V3 | X | |||||||||||||||||||||||||||||||||||||||||||||||||||||||||||||||||||||||||||||||||||||||||
| DE | Inagi | Casual+ | |||||||||||||||||||||||||||||||||||||||||||||||||||||||||||||||||||||||||||||||||||||||||||||||||
| DE | Ukuru | Casual+ | |||||||||||||||||||||||||||||||||||||||||||||||||||||||||||||||||||||||||||||||||||||||||||||||||
| DD | Javelin | Casual+ | Easy+ | Casual+ | Easy+ | ||||||||||||||||||||||||||||||||||||||||||||||||||||||||||||||||||||||||||||||||||||||||||||||
| DD | Hatsukaze | Easy+ | Casual+ | Casual+ | Casual+ | Casual+ | Casual+ | Casual+ | Casual+ | ||||||||||||||||||||||||||||||||||||||||||||||||||||||||||||||||||||||||||||||||||||||||||
| DD | Maikaze | Casual+ | Casual+ | Casual+ | Easy+ | Casual+ | Casual+ | Casual+ | Casual+ | ||||||||||||||||||||||||||||||||||||||||||||||||||||||||||||||||||||||||||||||||||||||||||
| DD | Jervis | Hard+ | Casual+ | ||||||||||||||||||||||||||||||||||||||||||||||||||||||||||||||||||||||||||||||||||||||||||||||||
| DD | Janus | Easy+ | Medium+ | Casual+ | Hard+ | ||||||||||||||||||||||||||||||||||||||||||||||||||||||||||||||||||||||||||||||||||||||||||||||
| CA | Mikuma | Easy+ | Hard+ | Casual+ | Medium+ | Casual+ | |||||||||||||||||||||||||||||||||||||||||||||||||||||||||||||||||||||||||||||||||||||||||||||
| CA | Prinz Eugen | Casual+ | Medium+ | Casual+ | Medium+ | ||||||||||||||||||||||||||||||||||||||||||||||||||||||||||||||||||||||||||||||||||||||||||||||
| FBB | Jean Bart | Casual+ | |||||||||||||||||||||||||||||||||||||||||||||||||||||||||||||||||||||||||||||||||||||||||||||||||
| FBB | Richelieu | Casual+ | |||||||||||||||||||||||||||||||||||||||||||||||||||||||||||||||||||||||||||||||||||||||||||||||||
| BB | Rodney | Casual+ | |||||||||||||||||||||||||||||||||||||||||||||||||||||||||||||||||||||||||||||||||||||||||||||||||
| BB | Valiant | Hard+ | Hard+ | Casual+ | |||||||||||||||||||||||||||||||||||||||||||||||||||||||||||||||||||||||||||||||||||||||||||||||
| BB | Warspite | Casual+ | |||||||||||||||||||||||||||||||||||||||||||||||||||||||||||||||||||||||||||||||||||||||||||||||||
| BB | Nelson | Casual+ | |||||||||||||||||||||||||||||||||||||||||||||||||||||||||||||||||||||||||||||||||||||||||||||||||
| CV | Ark Royal | Casual+ | Casual+ | Casual+ | Easy+ | Casual+ | Casual+ | Casual+ | Casual+ | Casual+ | |||||||||||||||||||||||||||||||||||||||||||||||||||||||||||||||||||||||||||||||||||||||||
| SS | C.Cappellini | Casual+ | Casual+ | Easy+ | Casual+ | Casual+ | Casual+ | Casual+ | Casual+ | ||||||||||||||||||||||||||||||||||||||||||||||||||||||||||||||||||||||||||||||||||||||||||
| SS | U-511 | Easy+ | Casual+ | Casual+ | Casual+ | Casual+ | Casual+ | Casual+ | Casual+ | ||||||||||||||||||||||||||||||||||||||||||||||||||||||||||||||||||||||||||||||||||||||||||
| SSV | I-400 | Casual+ | |||||||||||||||||||||||||||||||||||||||||||||||||||||||||||||||||||||||||||||||||||||||||||||||||
| SSV | I-401 | Casual+ | |||||||||||||||||||||||||||||||||||||||||||||||||||||||||||||||||||||||||||||||||||||||||||||||||
| AV | Akitsushima | Casual+ | |||||||||||||||||||||||||||||||||||||||||||||||||||||||||||||||||||||||||||||||||||||||||||||||||
| LHA | Shinshuu Maru | Casual+ | |||||||||||||||||||||||||||||||||||||||||||||||||||||||||||||||||||||||||||||||||||||||||||||||||
| DD | Akigumo | Easy+ | |||||||||||||||||||||||||||||||||||||||||||||||||||||||||||||||||||||||||||||||||||||||||||||||||
| DD | Yuugumo | Easy+ | |||||||||||||||||||||||||||||||||||||||||||||||||||||||||||||||||||||||||||||||||||||||||||||||||
| CL | Kitakami | Casual+ | |||||||||||||||||||||||||||||||||||||||||||||||||||||||||||||||||||||||||||||||||||||||||||||||||
| CL | Ooi | Casual+ | |||||||||||||||||||||||||||||||||||||||||||||||||||||||||||||||||||||||||||||||||||||||||||||||||
| CL | Nagara | Easy+ | Casual+ | Casual+ | Casual+ | Casual+ | Casual+ | Casual+ | Casual+ | Casual+ | |||||||||||||||||||||||||||||||||||||||||||||||||||||||||||||||||||||||||||||||||||||||||
| CL | Kinu | Casual+ | Casual+ | Casual+ | Casual+ | Casual+ | Casual+ | Casual+ | Casual+ | ||||||||||||||||||||||||||||||||||||||||||||||||||||||||||||||||||||||||||||||||||||||||||
| CL | Abukuma | Casual+ | Casual+ | Casual+ | Hard+ | Casual+ | Casual+ | Casual+ | Casual+ | ||||||||||||||||||||||||||||||||||||||||||||||||||||||||||||||||||||||||||||||||||||||||||
| CL | Sendai | Hard+ | Casual+ | ||||||||||||||||||||||||||||||||||||||||||||||||||||||||||||||||||||||||||||||||||||||||||||||||
| CL | Yuubari | Casual+ | |||||||||||||||||||||||||||||||||||||||||||||||||||||||||||||||||||||||||||||||||||||||||||||||||
| CA | Kinugasa | Easy+ | Casual+ | Casual+ | Medium+ | Casual+ | Casual+ | Casual+ | Casual+ | Casual+ | |||||||||||||||||||||||||||||||||||||||||||||||||||||||||||||||||||||||||||||||||||||||||
| CA | Mogami | Casual+ | Casual+ | Casual+ | Casual+ | Casual+ | Casual+ | Casual+ | Casual+ | Casual+ | |||||||||||||||||||||||||||||||||||||||||||||||||||||||||||||||||||||||||||||||||||||||||
| CA | Suzuya | Casual+ | Casual+ | Casual+ | Hard+ | Casual+ | Casual+ | ||||||||||||||||||||||||||||||||||||||||||||||||||||||||||||||||||||||||||||||||||||||||||||
| CA | Kumano | Casual+ | Easy+ | Casual+ | Medium+ | Casual+ | Casual+ | ||||||||||||||||||||||||||||||||||||||||||||||||||||||||||||||||||||||||||||||||||||||||||||
| CA | Tone | Casual+ | |||||||||||||||||||||||||||||||||||||||||||||||||||||||||||||||||||||||||||||||||||||||||||||||||
| CA | Chikuma | Casual+ | |||||||||||||||||||||||||||||||||||||||||||||||||||||||||||||||||||||||||||||||||||||||||||||||||
| FBB | Kongou | Easy+ | Casual+ | ||||||||||||||||||||||||||||||||||||||||||||||||||||||||||||||||||||||||||||||||||||||||||||||||
| FBB | Hiei | Medium+ | Medium+ | Casual+ | Easy+ | Easy+ | Easy+ | Casual+ | Casual+ | ||||||||||||||||||||||||||||||||||||||||||||||||||||||||||||||||||||||||||||||||||||||||||
| FBB | Haruna | Medium+ | Hard+ | Casual+ | Casual+ | ||||||||||||||||||||||||||||||||||||||||||||||||||||||||||||||||||||||||||||||||||||||||||||||
| FBB | Kirishima | Easy+ | Easy+ | Casual+ | Casual+ | Casual+ | Easy+ | Casual+ | Casual+ | ||||||||||||||||||||||||||||||||||||||||||||||||||||||||||||||||||||||||||||||||||||||||||
| BB | Fusou | Casual+ | |||||||||||||||||||||||||||||||||||||||||||||||||||||||||||||||||||||||||||||||||||||||||||||||||
| BB | Yamashiro | Casual+ | |||||||||||||||||||||||||||||||||||||||||||||||||||||||||||||||||||||||||||||||||||||||||||||||||
| BB | Ise | Casual+ | |||||||||||||||||||||||||||||||||||||||||||||||||||||||||||||||||||||||||||||||||||||||||||||||||
| BB | Hyuuga | Casual+ | |||||||||||||||||||||||||||||||||||||||||||||||||||||||||||||||||||||||||||||||||||||||||||||||||
| BB | Nagato | Casual+ | |||||||||||||||||||||||||||||||||||||||||||||||||||||||||||||||||||||||||||||||||||||||||||||||||
| BB | Mutsu | Casual+ | |||||||||||||||||||||||||||||||||||||||||||||||||||||||||||||||||||||||||||||||||||||||||||||||||
| CV | Souryuu | Easy+ | Easy+ | Casual+ | Casual+ | Casual+ | Casual+ | Casual+ | Casual+ | Casual+ | |||||||||||||||||||||||||||||||||||||||||||||||||||||||||||||||||||||||||||||||||||||||||
| CV | Hiryuu | Hard+ | Hard+ | Casual+ | Casual+ | Casual+ | Medium+ | Casual+ | Casual+ | ||||||||||||||||||||||||||||||||||||||||||||||||||||||||||||||||||||||||||||||||||||||||||
|
| |||||||||
|---|---|---|---|---|---|---|---|---|---|
|
2nd wave of Friendly Fleets has been released!
Time until event's end:
The event has ended!
| |||||||||
Trivia
- The Air Base is in Cabo Verde (Cape Verde). This was a strategic location during WW2 and is still one today.
- Node Q is on the area of Conakry of the former French Guinea (now Guinea). The Transport/Landing Operation here is in possible reference to the suggested landing operation of Charles de Gaulle in order to conduct an overland campaign in French West Africa. This plan was later overruled by the British Command.
- S Node is off the coast of Bolama, Gineau Bissau which could represent the possibilities of a naval battle wherein Vichy French forces may have deployed to engage the hypothetical landing operations at Conakry.
- Node X is in Dakar, and the site of Battle of Dakar where the Allied Forces staged an unsuccessful operation to take the Port of Dakar.