• Welcome to the Kancolle Wiki!
  • If you have any questions regarding site content, account registration, etc., please visit the KanColle Wiki Discord

Summer 2024 Event/E-4

From Kancolle Wiki
Jump to navigation Jump to search
Summer 2024 EventSummer 2024 Event Banner.png
Summer 2024 EventSummer 2024 Event Banner EO.png
2nd wave of Friendly Fleets has been released!
Time until event's end:

The event has ended!

Summer 2024 Event Hub Overview
Introduction & Overview 1st Stage Operations 2nd Stage Operations
E-1 | E-2 | E-3 E-4 | E-5
Information
Event Tag Summer 2024 Event Tag 5.png Operation Kon Fleet
Summer 2024 Event Tag 6.png Operation Kon Reinforcement
Boss Gauges Hard (): 4750 HP + 700 TP + 5880 HP
Medium (): 4750 HP + 600 TP + 5880 HP
Easy (): 4750 HP + 550 TP + 5390 HP
Casual (): 4750 HP + 500 TP + 5390 HP
Map Bosses New Southern Battleship PrincessNew Southern Battleship Princess
Abyssal Stranded Landing PrincessAbyssal Stranded Landing Princess
New Battleship PrincessNew Battleship Princess
Rewards[edit]
Choice
Casual

Easy

Medium

Hard
Item Icon Emergency Repair Material.png
Emergency Repair Material
3 4 5 6
OR
Equipment Card Underway Replenishment.png
Underway Replenishment
4 6 8 10
THEN
Item Icon Improvement Material.png
Improvement Material
3 4 5 6
OR
Item Icon Submarine Supply Material.png
Submarine Supply Material
3 4 5 6
THEN
Item Icon Equipment Slots.png
Equipment Slots
3 4 5
OR
Item Icon Development Material.png
Development Material
12 16 20
Reward
Casual

Easy

Medium

Hard
Item Icon Medal.png
Medal
1 1 2
Item Icon Night Skilled Crew Member.png
Night Skilled Crew Member
1 2
Item Icon Reinforcement Expansion.png
Reinforcement Expansion
1
Item Icon White Tasuki.png
White Tasuki
1
Equipment Card SOC Seagull.png
SOC Seagull
1 (★3) 1 (★5) 1 (★7) 1 (★10)
Rewards
All
Equipment/Item
Casual

Easy

Medium

Hard
Summer 2024 Event E-4 Ooyodo.png

The event guides are to be constructed through the respective Event map page guide sandbox and reviewed by editors before being approved here.

  • Do not update the guides through this page unless it is a minor fix. Please only update guides through their respective sandbox pages.

Branching Table

E-4 Branching Rules (Start Points) ▼/▲


E-4 Branching Rules (Start Point 1) ▼/▲


E-4 Branching Rules (Start Point 2) ▼/▲

* = Rule under review

? = Ship type/amount under review

Branching compositions are reported over the course of the event.

  • Please refer to KCNav for up to date map content (fleets used, LoS/speed requirements/drops/LBAS ranges, ...)

Historical Bonuses

Ships [1]
[Toggle Names]
Map-wide
(stacks with nodes)
Operation Kon Fleet Phase 1 prebossNodes A/A1/B/C/E/F1/J Operation Kon Fleet Nodes H Operation Kon Fleet Nodes L Operation Kon Fleet Nodes P/N? Operation Kon Fleet Nodes S Operation Kon Reinforcement Nodes T1/T2/U Operation Kon Reinforcement Nodes V Operation Kon Reinforcement Nodes W/Y Operation Kon Reinforcement Nodes Z
Coastal Defense Ships (DE) 1.12x - - - -
Destroyers (DD) 1.03x 1.11x 1.06x
Light Cruisers (CL) NOT CLT 1.04x -
Torpedo Cruisers (CLT) -
Seaplane Tenders (AV) 1.08x -
Light Carriers (CVL) 1.04x
Heavy Cruisers CA(V) - 1.04x
Battleships ((F)BB(V))
Submarine Tenders (AS) 1.08x -
Japanese Ship 1.03x -
United States Navy Vessels
(F)BB
Ship Banner Nevada Kai Mod.2.png
Nevada Kai Mod.2
Ship Banner Colorado Kai.png
Colorado Kai
Ship Banner Maryland Kai.png
Maryland Kai

Ship Banner Washington Kai.png
Washington Kai
Ship Banner South Dakota Kai.png
South Dakota Kai
Ship Banner Massachusetts Kai.png
Massachusetts Kai

Ship Banner Iowa Kai.png
Iowa Kai
CV(B)
Ship Banner Lexington Kai.png
Lexington Kai
Ship Banner Saratoga Mk.II Mod.2.png
Saratoga Mk.II Mod.2
Ship Banner Ranger Kai.png
Ranger Kai

Ship Banner Hornet Kai.png
Hornet Kai
Ship Banner Intrepid Kai.png
Intrepid Kai
CVL
Ship Banner Gambier Bay Mk.II.png
Gambier Bay Mk.II
Ship Banner Langley Kai.png
Langley Kai
CA
Ship Banner Northampton Kai.png
Northampton Kai
Ship Banner Houston Kai.png
Houston Kai

Ship Banner Minneapolis Kai.png
Minneapolis Kai
Ship Banner Tuscaloosa Kai.png
Tuscaloosa Kai
CL
Ship Banner Atlanta Kai.png
Atlanta Kai

Ship Banner Brooklyn Kai.png
Brooklyn Kai
Ship Banner Phoenix Kai.png
Phoenix/General Belgrano
Ship Banner Honolulu Kai.png
Honolulu Kai

Ship Banner Helena Kai.png
Helena Kai
DD
Ship Banner Samuel B. Roberts Mk.II.png
Samuel B. Roberts Mk.II

Ship Banner Fletcher Mk.II.png
Fletcher Mk.II
Ship Banner Johnston Kai.png
Johnston Kai
Ship Banner Heywood L. Edwards Kai.png
Heywood L. Edwards Kai
SS
Ship Banner Salmon Kai.png
Salmon Kai

Ship Banner Drum Kai.png
Drum Kai
Ship Banner Wahoo Kai.png
Wahoo Kai
Ship Banner Scamp Kai.png
Scamp Kai
1.05x
Ship Banner Fusou Kai Ni.png
- 1.08x 1.11x 1.12x 1.08x 1.09x -
Group A
CA
Ship Banner Aoba Kai.png
Ship Banner Myoukou Kai Ni.png
Ship Banner Haguro Kai Ni.png
CL
Ship Banner Kinu Kai Ni.png
DD
Ship Banner Shiratsuyu Kai Ni.png
Ship Banner Shigure Kai San.png
Ship Banner Samidare Kai.png
Ship Banner Shikinami Kai Ni.png
Ship Banner Uranami Kai Ni.png
Ship Banner Kazagumo Kai Ni.png
Ship Banner Asagumo Kai.png
Ship Banner Harusame Kai Ni.png
1.07x 1.07x 1.09x 1.13x
Group B
(F)BB(V)
Ship Banner Yamato Kai Ni Juu.png
Ship Banner Musashi Kai Ni.png
CL
Ship Banner Noshiro Kai Ni.png
DD
Ship Banner Okinami Kai Ni.png
Ship Banner Shimakaze Kai.png
Ship Banner Michishio Kai Ni.png
Ship Banner Nowaki Kai.png
Ship Banner Yamagumo Kai.png
- - - - -
Ship Banner Souya (AGB).png
1.16x - - - -
Ship Banner Fletcher Mk.II.png
- 1.14x 1.15x 1.11x 1.11x 1.13x 1.15x
Ship Banner Harusame Kai Ni.png
- - - 1.09x - 1.08x
Note
  • Type bonus, nation bonus, group bonus and ship bonus stacks.
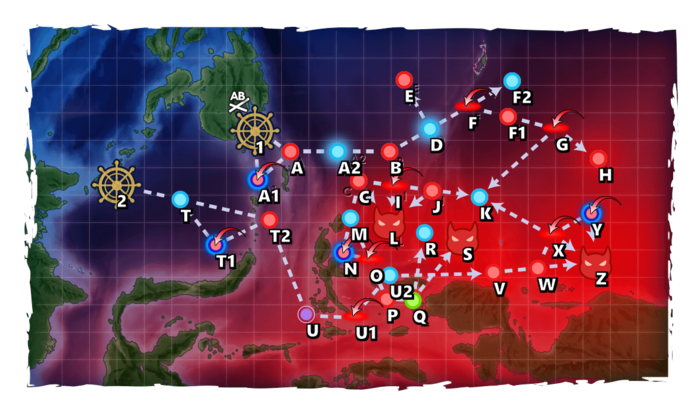
Map Overview

E4 is a striking force, and combined fleet three-phase map, consisting of one transport and two boss phases.

  • 3 LBAS are available to sortie on this map.
    • After Phase 2, the LBAS is relocated closer to the final boss.
  • This map uses 2 locks:
    • Summer 2024 Event Tag 5.png Operation Kon Fleet, Starting point 1 (striking),
    • Summer 2024 Event Tag 6.png Operation Kon Reinforcement, Starting point 2 (combined).

Phase 1 - Boss

"Eliminate the Enemy off the coast of Morotai"

  • Striking Force: 1 FBB, 1 CV, 0-1 CA(V)/CLT, 1 CL, 3-4 DD, Fast Summer 2024 Event Tag 5.png
  • Route: 1 A A2 C L

  • LoS check: Casual/Easy/Med/Hard = Cn3 34/45/60/50
  • LBAS range: 4
  • Bringing 1 or 2 OASW is recommended to clear the SS on LD.
  • The use of several Night Cut-ins is required to kill the boss.
  • Bringing AACI may help in the case the LBAS does not reliably clear the CVL.
  • Boss Support is recommended to help finish the boss off, especially on LD.
New Southern Battleship Princess

Phase 2 - TP

Phase 2 is a "Transport Operation": "Supply Transport to Sorong"

  • Striking Force: 1 CL, 4-6 DD, 0-1 AV Summer 2024 Event Tag 5.png
  • Route: 1 A A2 C M O P Q S

  • LoS check: ?
  • LBAS range: 6
  • Using the Command FacilitySFFCF SFFCFStriking Force Fleet Command Facility can help increase the reach rate.
  • Bringing ASW and AACI is recommended.
  • The pre-boss node contains several PT boats:
Anti-PT boat
Unlike most standard Abyssals, "PT boats" (PT Imp PackPT Imp Pack & Schnellboot Imp PackSchnellboot Imp Pack) are "very small and fast".
  • All ship types suffer a severe Accuracy accuracy and Firepower firepower penalty against PT boats.
  • Attacking them with larger guns is not very effective, smaller guns being recommended instead.
  • Support Expeditions are not affect by any of the following[1].
Attack formula against PT boats
The Attack formula against PT boats:[2][3]
Jet Assault & Airstrike
  • [math]\displaystyle{ \text{Damage}_\text{PT}= \text{Atk}_\text{post-cap} \times \text{Rand} [0.5 ; 0.8] }[/math]


LBAS[4]
  • [math]\displaystyle{ \text{Damage}_\text{PT}= \text{Atk}_\text{post-cap} \times \text{Rand} [0.4 ; 0.7] }[/math]


Shelling
  • [math]\displaystyle{ \text{Damage}_\text{PT}= ( 0.3 \times \text{Atk}_\text{post-cap} + \sqrt{\text{Atk}_\text{post-cap}} + 10 ) \times \prod^{All Equipment}{\text{Mod}_\text{EquipmentAtk}} }[/math]


Opening & Closing Torpedo Salvos
  • [math]\displaystyle{ \text{Damage}_\text{PT}= 0.3 \times \text{Atk}_\text{post-cap} + \sqrt{\text{Atk}_\text{post-cap}} + 10 }[/math]


Night Battle
  • Night Battle data are unclear yet.


With
  • [math]\displaystyle{ \text{Atk}_\text{post-cap} }[/math] the post cap attack power defined here,
  • [math]\displaystyle{ \text{Mod}_\text{EquipmentAtk} }[/math] the bonuses given by equipment, described below.
Accuracy formula against PT boats
The Accuracy formula against PT boats:[5][6][7][8]
[math]\displaystyle{ \text{Hit Rate}_\text{vs.PT} \text{%} = \Big\lfloor ( 0.3 \times \text{Accuracy}_\text{Atk} + \sqrt{\text{Accuracy}_\text{Atk}} + 15 ) \times 1.2 \times \text{Mod}_\text{Ship} \times \Big( \prod^{All Equipment}{\text{Mod}_\text{EquipmentAcc}} \Big) \times \text{Mod}_\text{Night} \Big\rfloor - \text{EVA}_\text{PT} + 1 }[/math]
With
  • [math]\displaystyle{ \text{Acc}_\text{Atk} }[/math] the standard accuracy described here
    • PT boats are "DDs" in the game, so the [math]\displaystyle{ \text{Mod}_\text{formation} }[/math] for vanguard is 1.1 during shelling, and 1.2 during the torpedo phase.
    • Historical accuracy bonuses during Events are included in the Standard Accuracy Term, i.e. it is affected by the [math]\displaystyle{ \text{Mod}_\text{PT} }[/math] modifier.
  • [math]\displaystyle{ \text{EVA}_\text{PT} }[/math] the PT estimated evasion Evasion described bellow,
PT boats stats
Type Luck Luck Eva Evasion [math]\displaystyle{ \text{EVA}_\text{PT} }[/math]
Line AheadLineAhead.png EchelonEchelon.png Line AbreastLineAbreast.png
PT Imp PackPT Imp Pack ? ? 81? 87? ?
PT Imp Pack IIPT Imp Pack II 60 220 80 87 85
PT Imp Pack IIIPT Imp Pack III 60 250 82 89 88
PT Imp Pack IVPT Imp Pack IV ? ? ? 84? ?
Schnellboot Imp PackSchnellboot Imp Pack ? ? ? ? ?
Schnellboot Imp Pack IISchnellboot Imp Pack II ? ? ? ? ?
Schnellboot Imp Pack EliteSchnellboot Imp Pack Elite ? ? ? ? ?


The main Accuracy modifiers are
  • [math]\displaystyle{ \text{Mod}_\text{Amagiri} }[/math] being include in [math]\displaystyle{ \text{Acc}_\text{Atk} }[/math]:
  • [math]\displaystyle{ \text{Mod}_\text{Ship} }[/math] the bonus given by ship types, described below,
  • [math]\displaystyle{ \text{Mod}_\text{EquipmentAcc} }[/math] the bonuses given by equipment, described below,
  • [math]\displaystyle{ \text{Mod}_\text{Night} }[/math] being 0.7 during night battle, 1 during day battle.


Amagiri Kai Ni/DAmagiri Kai Ni
Amagiri Kai Ni D
has the ability to prioritize focusing on attacking PT imps with significantly increased accuracy if any are present.

  • DD placed in the composition slots above and below her will gain a noticeable accuracy boost and will prioritize attacking PT boats if any are present.
  • The PT boat targeting rate is 100% for all affected ships [9].

During Events, some special bonuses may be added, with "historical" ships and equipment gaining some accuracy bonuses[10].

Ship Type [math]\displaystyle{ \text{Mod}_\text{Ship} }[/math]
DD & DE 1.0
CL, CLT, & CT 0.82
All other types 0.7
Equipment [math]\displaystyle{ \text{Mod}_\text{EquipmentAcc} }[/math] [math]\displaystyle{ \text{Mod}_\text{EquipmentAtk} }[/math]
1st equipped 2nd equipped 1st equipped 2nd equipped
Small Caliber Main GunSmall Caliber Main High-angle GunSmall Small Caliber Main Guns[11] 1.3 1.15 1.5 2.11.5×1.4
Secondary GunSecondary High-angle GunSec Secondary Guns[12] 1.55 1 1.3
Anti-Aircraft Gun Anti-Aircraft Guns 1.45 1.35 1.2 1.441.2×1.2
Lookout Skilled LookoutsSkilled Lookouts
Torpedo Squadron Skilled Lookouts
1.75 1 1.1
Landing CraftArmed Soukoutei (Armored Boat Class)Soukoutei (Armored Boat Class) 1.45 1.3 1.2 1.1
Armed DaihatsuArmed Daihatsu 1.45 1.3 1.2 1.1
Amphibious Vehicle Ka-Tsu TanksSpecial Type 4 Amphibious Tank
Special Type 4 Amphibious Tank Kai
[13][14]
1 1.3 1 1.1
Seaplane BomberBomberSeaplane Fighter Seaplane Bombers & Seaplane Fighters 1.5 1 1.2
Dive BomberJetFighterBomber1.pngJetFighterBomber2.png Dive Bombers & JetsKikka Kai
Jet Keiun Kai
1.375 1.2 1.4 1.821.4×1.3
All other equipment 1 1
Notes
  • It is recommended to use anti-PT setups on DDs only, such setups compromising overall combat effectiveness.
  • Having a Reinforcement Expansion is important because it can save a ship slot by containing a machine gun or skilled lookouts.
  • Combining equipment is recommended to see significant boosts to accuracy.
  • The Amphibious Vehicle Ka-Tsu TanksSpecial Type 4 Amphibious Tank
    Special Type 4 Amphibious Tank Kai
    bonus does not stack with the Landing Craft Armed BoatsSoukoutei (Armored Boat Class)
    Armed Daihatsu
    ones.
  • Using other setups improving accuracy is also advisable:
References:
[edit]


After clearing this phase, the LBAS is relocated closer to the final boss.

Phase 2.5 - Gimmick

"Unlock the Boss Node at Biak"

To unlock the last boss, the following steps have to be performed:

E H V
Hard S S x2 S x3
Medium - A+ x2 A+ x3
Easy - A+ x2 A+ x2
Casual - A+ x2 A+ x2

  • Striking Force: 1-2 FBB, 0-1 CV, 1-2 CVL, 1 CL, 2-3 DD Summer 2024 Event Tag 5.png
  • Route: 1 A A2 B D E
  • LoS check: ?
  • LBAS range: 6
  • To secure the win condition for each difficulty, it is recommended that you run 2 FBB/CVL and 1-2 historical DD.
  • Bringing Node Support is recommended to ensure S rank, especially on Hard.
  • Using the Command FacilitySFFCF SFFCFStriking Force Fleet Command Facility can help increase the reach rate.
  • Using the vanguard formation will help pass through the on-route nodes.

Phase 3 - Boss

"Biak Island Engagement"

Note : This phase is incredibly hard and there is no known reliable way to defeat it.

  • The following recommended fleets require advanced equipment, ships, and the use of as many historical ships as possible.
  • The use of Special Attacks is mandatory.
  • Using an STF is recommended over the CTF.
  • Doing the debuff is highly recommended.

  • STF: Summer 2024 Event Tag 6.png
    • Main: 2 (F)BB(V), 1 CV, 1 CAV, 1 CL, 1 AO/LHA
    • Escort: 1 CA(V)/CLT, 1 CL, 4 DD
  • Route: 2 T T2 U U1 U2 V W X Y Z
  • Longest route, but strongest fleet.
    • Passes through the Y ASS node.
  • This fleet can be slow, even when using both Yamato-class.
  • It is recommended to try to reach AS on the boss.
  • It is recommended to use an Supplies Underway ReplenishmentUnderway Replenishment to reduce penalties.
  • The 1 CV + 1 CAV can be replaced with 2 CVL.
  • It is possible to replace the CAV with a BB(V) (notably for fighter mule), but this will pass through an extra air raid T1

  • LoS check: Casual/Easy/Medium/Hard = Cn3 ~90/85/95/110
  • LBAS range: 6
  • Bringing several OASW is recommended.
    • Bringing an AACI is recommended if possible, but of a lesser significance if unavailable.
  • Using CV(L)/CAV/AO/LHA as fighter mules to reach AS on the boss is recommended.
  • Usage of both Node and Boss Support is needed to kill off smaller ships allowing your fleet to target bigger ships.
  • Node U is a night battle filled with PT boats, requiring anti-PT setups for escort fleet,
Anti-PT boat
Unlike most standard Abyssals, "PT boats" (PT Imp PackPT Imp Pack & Schnellboot Imp PackSchnellboot Imp Pack) are "very small and fast".
  • All ship types suffer a severe Accuracy accuracy and Firepower firepower penalty against PT boats.
  • Attacking them with larger guns is not very effective, smaller guns being recommended instead.
  • Support Expeditions are not affect by any of the following[1].
Attack formula against PT boats
The Attack formula against PT boats:[2][3]
Jet Assault & Airstrike
  • [math]\displaystyle{ \text{Damage}_\text{PT}= \text{Atk}_\text{post-cap} \times \text{Rand} [0.5 ; 0.8] }[/math]


LBAS[4]
  • [math]\displaystyle{ \text{Damage}_\text{PT}= \text{Atk}_\text{post-cap} \times \text{Rand} [0.4 ; 0.7] }[/math]


Shelling
  • [math]\displaystyle{ \text{Damage}_\text{PT}= ( 0.3 \times \text{Atk}_\text{post-cap} + \sqrt{\text{Atk}_\text{post-cap}} + 10 ) \times \prod^{All Equipment}{\text{Mod}_\text{EquipmentAtk}} }[/math]


Opening & Closing Torpedo Salvos
  • [math]\displaystyle{ \text{Damage}_\text{PT}= 0.3 \times \text{Atk}_\text{post-cap} + \sqrt{\text{Atk}_\text{post-cap}} + 10 }[/math]


Night Battle
  • Night Battle data are unclear yet.


With
  • [math]\displaystyle{ \text{Atk}_\text{post-cap} }[/math] the post cap attack power defined here,
  • [math]\displaystyle{ \text{Mod}_\text{EquipmentAtk} }[/math] the bonuses given by equipment, described below.
Accuracy formula against PT boats
The Accuracy formula against PT boats:[5][6][7][8]
[math]\displaystyle{ \text{Hit Rate}_\text{vs.PT} \text{%} = \Big\lfloor ( 0.3 \times \text{Accuracy}_\text{Atk} + \sqrt{\text{Accuracy}_\text{Atk}} + 15 ) \times 1.2 \times \text{Mod}_\text{Ship} \times \Big( \prod^{All Equipment}{\text{Mod}_\text{EquipmentAcc}} \Big) \times \text{Mod}_\text{Night} \Big\rfloor - \text{EVA}_\text{PT} + 1 }[/math]
With
  • [math]\displaystyle{ \text{Acc}_\text{Atk} }[/math] the standard accuracy described here
    • PT boats are "DDs" in the game, so the [math]\displaystyle{ \text{Mod}_\text{formation} }[/math] for vanguard is 1.1 during shelling, and 1.2 during the torpedo phase.
    • Historical accuracy bonuses during Events are included in the Standard Accuracy Term, i.e. it is affected by the [math]\displaystyle{ \text{Mod}_\text{PT} }[/math] modifier.
  • [math]\displaystyle{ \text{EVA}_\text{PT} }[/math] the PT estimated evasion Evasion described bellow,
PT boats stats
Type Luck Luck Eva Evasion [math]\displaystyle{ \text{EVA}_\text{PT} }[/math]
Line AheadLineAhead.png EchelonEchelon.png Line AbreastLineAbreast.png
PT Imp PackPT Imp Pack ? ? 81? 87? ?
PT Imp Pack IIPT Imp Pack II 60 220 80 87 85
PT Imp Pack IIIPT Imp Pack III 60 250 82 89 88
PT Imp Pack IVPT Imp Pack IV ? ? ? 84? ?
Schnellboot Imp PackSchnellboot Imp Pack ? ? ? ? ?
Schnellboot Imp Pack IISchnellboot Imp Pack II ? ? ? ? ?
Schnellboot Imp Pack EliteSchnellboot Imp Pack Elite ? ? ? ? ?


The main Accuracy modifiers are
  • [math]\displaystyle{ \text{Mod}_\text{Amagiri} }[/math] being include in [math]\displaystyle{ \text{Acc}_\text{Atk} }[/math]:
  • [math]\displaystyle{ \text{Mod}_\text{Ship} }[/math] the bonus given by ship types, described below,
  • [math]\displaystyle{ \text{Mod}_\text{EquipmentAcc} }[/math] the bonuses given by equipment, described below,
  • [math]\displaystyle{ \text{Mod}_\text{Night} }[/math] being 0.7 during night battle, 1 during day battle.


Amagiri Kai Ni/DAmagiri Kai Ni
Amagiri Kai Ni D
has the ability to prioritize focusing on attacking PT imps with significantly increased accuracy if any are present.

  • DD placed in the composition slots above and below her will gain a noticeable accuracy boost and will prioritize attacking PT boats if any are present.
  • The PT boat targeting rate is 100% for all affected ships [9].

During Events, some special bonuses may be added, with "historical" ships and equipment gaining some accuracy bonuses[10].

Ship Type [math]\displaystyle{ \text{Mod}_\text{Ship} }[/math]
DD & DE 1.0
CL, CLT, & CT 0.82
All other types 0.7
Equipment [math]\displaystyle{ \text{Mod}_\text{EquipmentAcc} }[/math] [math]\displaystyle{ \text{Mod}_\text{EquipmentAtk} }[/math]
1st equipped 2nd equipped 1st equipped 2nd equipped
Small Caliber Main GunSmall Caliber Main High-angle GunSmall Small Caliber Main Guns[11] 1.3 1.15 1.5 2.11.5×1.4
Secondary GunSecondary High-angle GunSec Secondary Guns[12] 1.55 1 1.3
Anti-Aircraft Gun Anti-Aircraft Guns 1.45 1.35 1.2 1.441.2×1.2
Lookout Skilled LookoutsSkilled Lookouts
Torpedo Squadron Skilled Lookouts
1.75 1 1.1
Landing CraftArmed Soukoutei (Armored Boat Class)Soukoutei (Armored Boat Class) 1.45 1.3 1.2 1.1
Armed DaihatsuArmed Daihatsu 1.45 1.3 1.2 1.1
Amphibious Vehicle Ka-Tsu TanksSpecial Type 4 Amphibious Tank
Special Type 4 Amphibious Tank Kai
[13][14]
1 1.3 1 1.1
Seaplane BomberBomberSeaplane Fighter Seaplane Bombers & Seaplane Fighters 1.5 1 1.2
Dive BomberJetFighterBomber1.pngJetFighterBomber2.png Dive Bombers & JetsKikka Kai
Jet Keiun Kai
1.375 1.2 1.4 1.821.4×1.3
All other equipment 1 1
Notes
  • It is recommended to use anti-PT setups on DDs only, such setups compromising overall combat effectiveness.
  • Having a Reinforcement Expansion is important because it can save a ship slot by containing a machine gun or skilled lookouts.
  • Combining equipment is recommended to see significant boosts to accuracy.
  • The Amphibious Vehicle Ka-Tsu TanksSpecial Type 4 Amphibious Tank
    Special Type 4 Amphibious Tank Kai
    bonus does not stack with the Landing Craft Armed BoatsSoukoutei (Armored Boat Class)
    Armed Daihatsu
    ones.
  • Using other setups improving accuracy is also advisable:
References:
[edit]
  • Using high level Smoke Generator Smokes is recommended to pass through node Y.
  • The Yamato Touch is the best recommended special attack.
  • Including an SS in most fleets is recommended to take advantage of sub-tanking.
  • It is recommended to send an ASW LBAS on node T2, and sending each of the other LBAS on nodes V W.

Phase 3.5 - Debuff

Once LD has been reached, the following steps have to be performed to debuff the boss.

  • Doing the debuff is extremely recommended.
  • Do note that for the first time, debuff effects are different between difficulties, being greater in Hard notably.
L H S X LBAS
Hard S S S AS x2 AS x2
Medium S A+ A+ - AS x2
Easy A+ A+ A+ - AS
Casual A+ A+ A+ - -

  • Refer to #Phase 1 - Boss's fleet for composition and routing.
  • LBAS range: 4

Once on LD, the CG will change to the following:

New Battleship Princess

Enemy Compositions

Summer 2024 Event E-4 Map.png
TypeShips
DDShip Banner Tanikaze.png
TypeShips
DDShip Banner Tanikaze.png
TypeShips
DEShip Banner Mikura.pngShip Banner Noumi.pngShip Banner Yashiro.png
DDShip Banner Ariake.pngShip Banner Fujinami.pngShip Banner Hamanami.png
Ship Banner Harusame.pngShip Banner Hayanami.pngShip Banner Nowaki.png
Ship Banner Tanikaze.pngShip Banner Yuugure.png
TypeShips
DEShip Banner Noumi.png
TypeShips
DEShip Banner Kurahashi.pngShip Banner Mikura.pngShip Banner Noumi.png
Ship Banner Yashiro.png
DDShip Banner Ariake.pngShip Banner Asagumo.pngShip Banner Fujinami.png
Ship Banner Hamanami.pngShip Banner Harusame.pngShip Banner Hayanami.png
Ship Banner Nowaki.pngShip Banner Tanikaze.pngShip Banner Yuugure.png
LHAShip Banner No.101 Transport Ship.png
TypeShips
DDShip Banner Harusame.png
TypeShips
DEShip Banner Kurahashi.pngShip Banner Mikura.pngShip Banner Noumi.png
Ship Banner Yashiro.png
DDShip Banner Ariake.pngShip Banner Asagumo.pngShip Banner Fujinami.png
Ship Banner Hamanami.pngShip Banner Harusame.pngShip Banner Hayanami.png
Ship Banner Nowaki.pngShip Banner Tanikaze.pngShip Banner Yuugure.png
CLShip Banner Noshiro.png
LHAShip Banner No.101 Transport Ship.png
TypeShips
DDShip Banner Fujinami.pngShip Banner Harusame.pngShip Banner Tanikaze.png
TypeShips
DEShip Banner Mikura.pngShip Banner Yashiro.png
DDShip Banner Akizuki.pngShip Banner Ariake.pngShip Banner Asagumo.png
Ship Banner Fujinami.pngShip Banner Fuyutsuki.pngShip Banner Hamanami.png
Ship Banner Harusame.pngShip Banner Hayanami.pngShip Banner Nowaki.png
Ship Banner Tanikaze.pngShip Banner Yuugure.png
TypeShips
DEShip Banner Kurahashi.pngShip Banner Mikura.pngShip Banner Noumi.png
Ship Banner Yashiro.png
DDShip Banner Akizuki.pngShip Banner Asagumo.pngShip Banner Fujinami.png
Ship Banner Fuyutsuki.pngShip Banner Hamanami.pngShip Banner Harusame.png
Ship Banner Hayanami.pngShip Banner Nowaki.pngShip Banner Tanikaze.png
Ship Banner Yuugure.png
CLShip Banner Noshiro.png
TypeShips
DEShip Banner Kurahashi.pngShip Banner Mikura.pngShip Banner Noumi.png
Ship Banner Yashiro.png
DDShip Banner Akizuki.pngShip Banner Ariake.pngShip Banner Asagumo.png
Ship Banner Fujinami.pngShip Banner Fuyutsuki.pngShip Banner Hamanami.png
Ship Banner Harusame.pngShip Banner Hayanami.pngShip Banner Nowaki.png
Ship Banner Tanikaze.pngShip Banner Yuugure.png
CLShip Banner Noshiro.png
TypeShips
DEShip Banner Kurahashi.pngShip Banner Mikura.pngShip Banner Noumi.png
Ship Banner Yashiro.png
DDShip Banner Kazagumo.pngShip Banner Okinami.png
CLShip Banner Phoenix.png
CVShip Banner Ranger.png
E-4 Hard A: 深海太平洋艦隊 Dabaw哨戒 I群 (PoiDB)
# Formation Normal Battle Node AD/AP
AS/AS+
A Echelon
Line Abreast
Submarine So-Class Flagship (1572): 42 Armor, 48 HPBattle Card Flagship Icon.png Submarine So-Class Elite (1571): 30 Armor, 45 HP Submarine So-Class Elite (1571): 30 Armor, 45 HP 0/0
0/0
Echelon
Line Abreast
Submarine So-Class Flagship (1572): 42 Armor, 48 HPBattle Card Flagship Icon.png Submarine So-Class Flagship (1572): 42 Armor, 48 HP Submarine So-Class Elite (1571): 30 Armor, 45 HP 0/0
0/0
Echelon
Line Abreast
Submarine So-Class Flagship (1572): 42 Armor, 48 HPBattle Card Flagship Icon.png Submarine So-Class Flagship (1572): 42 Armor, 48 HP Submarine So-Class Flagship (1572): 42 Armor, 48 HP 0/0
0/0
# Formation Normal Battle Node AD/AP
AS/AS+
E-4 Hard A1: 深海太平洋艦隊 Dabaw哨戒 II群 (PoiDB)
# Formation Supported Battle Node AD/AP
AS/AS+
A1 Echelon
Line Abreast
Submarine So-Class Elite (1571): 30 Armor, 45 HPBattle Card Flagship Icon.png Submarine So-Class Elite (1571): 30 Armor, 45 HP Light Carrier Nu-Class Elite III (1776): 35 Armor, 70 HP, 126 APHell plane 1.pngAbyssal Patrolling Attack Hawk 574 Equipment.png 43/85
189/378
Echelon
Line Abreast
Submarine So-Class Elite (1571): 30 Armor, 45 HPBattle Card Flagship Icon.png Submarine So-Class Elite (1571): 30 Armor, 45 HP Submarine So-Class Elite (1571): 30 Armor, 45 HP Light Carrier Nu-Class Elite III (1776): 35 Armor, 70 HP, 126 APHell plane 1.pngAbyssal Patrolling Attack Hawk 574 Equipment.png 43/85
189/378
Echelon
Line Abreast
Submarine So-Class Flagship (1572): 42 Armor, 48 HPBattle Card Flagship Icon.png Submarine So-Class Elite (1571): 30 Armor, 45 HP Submarine So-Class Elite (1571): 30 Armor, 45 HP Light Carrier Nu-Class Elite III (1776): 35 Armor, 70 HP, 126 APHell plane 1.pngAbyssal Patrolling Attack Hawk 574 Equipment.png 43/85
189/378
# Formation Supported Battle Node AD/AP
AS/AS+
E-4 Hard A2
# Selection Node
A2 艦隊の針路を選択できます。提督、どちらの針路をとられますか?
You can decide the fleet's course. Admiral, which heading should we take?
# Selection Node
E-4 Hard B: 深海太平洋艦隊 前衛偵察隊 B群 (PoiDB)
# Formation Normal Battle Node AD/AP
AS/AS+
B Line Ahead
Vanguard
Heavy Cruiser Ne-Class Elite (1595): 89 Armor, 88 HPBattle Card Flagship Icon.png Light Cruiser Tsu-Class Elite (1592): 68 Armor, 66 HP Destroyer Ha-Class Late Model (1577): 29 Armor, 38 HP Destroyer Ha-Class Late Model (1577): 29 Armor, 38 HP Destroyer Ha-Class Late Model (1577): 29 Armor, 38 HP Submarine So-Class Elite (1571): 30 Armor, 45 HP
0/0
0/0
Line Ahead
Vanguard
Heavy Cruiser Ne-Class Elite (1595): 89 Armor, 88 HPBattle Card Flagship Icon.png Heavy Cruiser Ne-Class Elite (1595): 89 Armor, 88 HP Light Cruiser Tsu-Class Elite (1592): 68 Armor, 66 HP Destroyer Ha-Class Late Model (1577): 29 Armor, 38 HP Destroyer Ha-Class Late Model (1577): 29 Armor, 38 HP Submarine So-Class Elite (1571): 30 Armor, 45 HP
0/0
0/0
# Formation Normal Battle Node AD/AP
AS/AS+
E-4 Hard C: 深海太平洋艦隊 前衛偵察隊 A群 (PoiDB)
# Formation Normal Battle Node AD/AP
AS/AS+
C Line Ahead
Vanguard
Heavy Cruiser Ne-Class Elite (1595): 89 Armor, 88 HPBattle Card Flagship Icon.png Light Cruiser Tsu-Class Elite (1592): 68 Armor, 66 HP Destroyer Ha-Class Late Model (1577): 29 Armor, 38 HP Destroyer Ha-Class Late Model (1577): 29 Armor, 38 HP Destroyer Ha-Class Late Model (1577): 29 Armor, 38 HP Submarine So-Class Elite (1571): 30 Armor, 45 HP
0/0
0/0
Line Ahead
Vanguard
Heavy Cruiser Ne-Class Elite (1595): 89 Armor, 88 HPBattle Card Flagship Icon.png Heavy Cruiser Ne-Class Elite (1595): 89 Armor, 88 HP Light Cruiser Tsu-Class Elite (1592): 68 Armor, 66 HP Destroyer Ha-Class Late Model (1577): 29 Armor, 38 HP Destroyer Ha-Class Late Model (1577): 29 Armor, 38 HP Submarine So-Class Elite (1571): 30 Armor, 45 HP
0/0
0/0
# Formation Normal Battle Node AD/AP
AS/AS+
E-4 Hard D
# Selection Node
D 艦隊の針路を選択できます。提督、どちらの針路をとられますか?
You can decide the fleet's course. Admiral, which heading should we take?
# Selection Node
E-4 Hard E: 深海太平洋艦隊 前衛任務部隊 (PoiDB)
# Formation Normal Battle Node AD/AP
AS/AS+
E Double Line
Diamond
Vanguard
Aircraft Carrier Summer Princess B (1964): 239 Armor, 880 HP, 138 APBattle Card Flagship Icon.png Light Carrier Nu-Class Kai Flagship III (1779): 93 Armor, 118 HP, 107 APAbyssal Hell Dive Bomber Kai.pngAbyssal Revenge Torpedo Bomber Kai.png Light Cruiser Tsu-Class Elite (1592): 68 Armor, 66 HP Destroyer Ha-Class Late Model (1577): 29 Armor, 38 HP Destroyer Ha-Class Late Model (1577): 29 Armor, 38 HP Destroyer Ha-Class Late Model (1577): 29 Armor, 38 HP
82/164
368/735
# Formation Normal Battle Node AD/AP
AS/AS+
E-4 Hard F: 深海太平洋艦隊 空母艦載機群 (PoiDB)
# Formation Air Defense Node AD/AP
AS/AS+
F Diamond Light Carrier Nu-Class Kai Flagship II (1766): 93 Armor, 118 HP, 132 APAbyssal Patrolling Attack Hawk 574 Equipment.pngAbyssal Cat Fighter Kai 556 Equipment.pngBattle Card Flagship Icon.png Light Carrier Nu-Class Kai Flagship II (1766): 93 Armor, 118 HP, 132 APAbyssal Patrolling Attack Hawk 574 Equipment.pngAbyssal Cat Fighter Kai 556 Equipment.png Light Cruiser Tsu-Class Elite (1592): 68 Armor, 66 HP Destroyer Ha-Class Late Model (1577): 29 Armor, 38 HP Destroyer Ha-Class Late Model (1577): 29 Armor, 38 HP Destroyer Ha-Class Late Model (1577): 29 Armor, 38 HP
89/177
396/792
Diamond Light Carrier Nu-Class Kai Flagship II (1766): 93 Armor, 118 HP, 132 APAbyssal Patrolling Attack Hawk 574 Equipment.pngAbyssal Cat Fighter Kai 556 Equipment.pngBattle Card Flagship Icon.png Light Carrier Nu-Class Elite III (1776): 35 Armor, 70 HP, 126 APHell plane 1.pngAbyssal Patrolling Attack Hawk 574 Equipment.png Light Cruiser Tsu-Class Elite (1592): 68 Armor, 66 HP Destroyer Ha-Class Late Model (1577): 29 Armor, 38 HP Destroyer Ha-Class Late Model (1577): 29 Armor, 38 HP Destroyer Ha-Class Late Model (1577): 29 Armor, 38 HP
87/173
387/774
Diamond Light Carrier Nu-Class Elite III (1776): 35 Armor, 70 HP, 126 APHell plane 1.pngAbyssal Patrolling Attack Hawk 574 Equipment.pngBattle Card Flagship Icon.png Light Carrier Nu-Class Elite III (1776): 35 Armor, 70 HP, 126 APHell plane 1.pngAbyssal Patrolling Attack Hawk 574 Equipment.png Light Cruiser Tsu-Class Elite (1592): 68 Armor, 66 HP Destroyer Ha-Class Late Model (1577): 29 Armor, 38 HP Destroyer Ha-Class Late Model (1577): 29 Armor, 38 HP Destroyer Ha-Class Late Model (1577): 29 Armor, 38 HP
85/169
378/756
# Formation Air Defense Node AD/AP
AS/AS+
E-4 Hard F1: 深海太平洋艦隊 重巡洋艦戦隊 (PoiDB)
# Formation Normal Battle Node AD/AP
AS/AS+
F1 Line Ahead
Double Line
Heavy Cruiser Ne-Class Kai Summer Mode II (1954): 133 Armor, 360 HPBattle Card Flagship Icon.png Heavy Cruiser Ne-Class Kai Summer Mode II (1954): 133 Armor, 360 HP Light Cruiser He-Class Flagship (1555): 39 Armor, 57 HP Light Cruiser Tsu-Class Elite (1592): 68 Armor, 66 HP Destroyer Ha-Class Late Model (1577): 29 Armor, 38 HP Destroyer Ha-Class Late Model (1577): 29 Armor, 38 HP
0/0
0/0
Line Ahead
Double Line
Heavy Cruiser Ne-Class Kai Summer Mode III (1955): 211 Armor, 390 HPBattle Card Flagship Icon.png Heavy Cruiser Ne-Class Kai Summer Mode III (1955): 211 Armor, 390 HP Heavy Cruiser Ri-Class Flagship (1527): 70 Armor, 76 HP Light Cruiser Tsu-Class Elite (1592): 68 Armor, 66 HP Destroyer Ha-Class Late Model (1577): 29 Armor, 38 HP Destroyer Ha-Class Late Model (1577): 29 Armor, 38 HP
0/0
0/0
# Formation Normal Battle Node AD/AP
AS/AS+
E-4 Hard F2
# Empty Node
F2 敵影を見ず。
No enemy spotted.
# Empty Node
E-4 Hard G: 深海太平洋艦隊 空母艦載機群 (PoiDB)
# Formation Air Defense Node AD/AP
AS/AS+
G Diamond Aircraft Carrier Summer Princess B (1964): 239 Armor, 880 HP, 138 APBattle Card Flagship Icon.png Light Carrier Nu-Class Flagship III (1764): 70 Armor, 84 HP, 93 APAbyssal Cat Fighter Kai 556 Equipment.png Light Carrier Nu-Class Kai Elite II (1765): 73 Armor, 88 HP, 106 APAbyssal Patrolling Attack Hawk 574 Equipment.pngHell plane 1.png Light Cruiser Tsu-Class Elite (1592): 68 Armor, 66 HP Destroyer Ha-Class Late Model (1577): 29 Armor, 38 HP Destroyer Ha-Class Late Model (1577): 29 Armor, 38 HP
113/225
506/1011
Diamond Aircraft Carrier Summer Princess B (1964): 239 Armor, 880 HP, 138 APBattle Card Flagship Icon.png Light Carrier Nu-Class Kai Flagship III (1779): 93 Armor, 118 HP, 107 APAbyssal Hell Dive Bomber Kai.pngAbyssal Revenge Torpedo Bomber Kai.png Light Carrier Nu-Class Kai Elite II (1765): 73 Armor, 88 HP, 106 APAbyssal Patrolling Attack Hawk 574 Equipment.pngHell plane 1.png Light Cruiser Tsu-Class Elite (1592): 68 Armor, 66 HP Destroyer Ha-Class Late Model (1577): 29 Armor, 38 HP Destroyer Ha-Class Late Model (1577): 29 Armor, 38 HP
118/235
527/1053
Diamond Aircraft Carrier Summer Princess B (1964): 239 Armor, 880 HP, 138 APBattle Card Flagship Icon.png Light Carrier Nu-Class Kai Flagship III (1779): 93 Armor, 118 HP, 107 APAbyssal Hell Dive Bomber Kai.pngAbyssal Revenge Torpedo Bomber Kai.png Light Carrier Nu-Class Kai Flagship II (1766): 93 Armor, 118 HP, 132 APAbyssal Patrolling Attack Hawk 574 Equipment.pngAbyssal Cat Fighter Kai 556 Equipment.png Light Cruiser Tsu-Class Elite (1592): 68 Armor, 66 HP Destroyer Ha-Class Late Model (1577): 29 Armor, 38 HP Destroyer Ha-Class Late Model (1577): 29 Armor, 38 HP
126/252
566/1131
# Formation Air Defense Node AD/AP
AS/AS+
E-4 Hard H: 深海太平洋艦隊 先遣任務部隊 (PoiDB)
# Formation Normal Battle Node AD/AP
AS/AS+
H Double Line
Diamond
Vanguard
Aircraft Carrier Summer Princess B (1964): 239 Armor, 880 HP, 138 APBattle Card Flagship Icon.png Light Carrier Nu-Class Kai Flagship III (1779): 93 Armor, 118 HP, 107 APAbyssal Hell Dive Bomber Kai.pngAbyssal Revenge Torpedo Bomber Kai.png Light Carrier Nu-Class Kai Flagship II (1766): 93 Armor, 118 HP, 132 APAbyssal Patrolling Attack Hawk 574 Equipment.pngAbyssal Cat Fighter Kai 556 Equipment.png Light Cruiser Tsu-Class Elite (1592): 68 Armor, 66 HP Destroyer Ha-Class Late Model (1577): 29 Armor, 38 HP Destroyer Ha-Class Late Model (1577): 29 Armor, 38 HP
126/252
566/1131
# Formation Normal Battle Node AD/AP
AS/AS+
E-4 Hard I: 深海太平洋艦隊 空母艦載機群 (PoiDB)
# Formation Air Defense Node AD/AP
AS/AS+
I Diamond New Southern Battleship Princess II (1966): 260 Armor, 950 HPBattle Card Flagship Icon.png Light Carrier Nu-Class Flagship III (1764): 70 Armor, 84 HP, 93 APAbyssal Cat Fighter Kai 556 Equipment.png Light Carrier Nu-Class Kai Flagship II (1766): 93 Armor, 118 HP, 132 APAbyssal Patrolling Attack Hawk 574 Equipment.pngAbyssal Cat Fighter Kai 556 Equipment.png Light Cruiser Tsu-Class Elite (1592): 68 Armor, 66 HP Destroyer Ha-Class Late Model (1577): 29 Armor, 38 HP Destroyer Ha-Class Late Model (1577): 29 Armor, 38 HP
76/151
338/675
Diamond New Southern Battleship Princess Damaged II (1969): 310 Armor, 950 HPBattle Card Flagship Icon.png Light Carrier Nu-Class Flagship III (1764): 70 Armor, 84 HP, 93 APAbyssal Cat Fighter Kai 556 Equipment.png Light Carrier Nu-Class Kai Flagship II (1766): 93 Armor, 118 HP, 132 APAbyssal Patrolling Attack Hawk 574 Equipment.pngAbyssal Cat Fighter Kai 556 Equipment.png Light Cruiser Tsu-Class Elite (1592): 68 Armor, 66 HP Destroyer Ha-Class Late Model (1577): 29 Armor, 38 HP Destroyer Ha-Class Late Model (1577): 29 Armor, 38 HP
76/151
338/675
Diamond New Southern Battleship Princess Damaged II (1969): 310 Armor, 950 HPBattle Card Flagship Icon.png Light Carrier Nu-Class Kai Flagship III (1779): 93 Armor, 118 HP, 107 APAbyssal Hell Dive Bomber Kai.pngAbyssal Revenge Torpedo Bomber Kai.png Light Carrier Nu-Class Kai Flagship II (1766): 93 Armor, 118 HP, 132 APAbyssal Patrolling Attack Hawk 574 Equipment.pngAbyssal Cat Fighter Kai 556 Equipment.png Light Cruiser Tsu-Class Elite (1592): 68 Armor, 66 HP Destroyer Na-Class Mass-Produced Model IIe Elite (2051): 67 Armor, 66 HP Submarine Summer Princess B Flagship II (1978): 39 Armor, 198 HP
80/160
359/717
# Formation Air Defense Node AD/AP
AS/AS+
E-4 Hard J: 深海太平洋艦隊 油槽艦部隊 (PoiDB)
# Formation Normal Battle Node AD/AP
AS/AS+
J Line Ahead
Double Line
Diamond
Transport Ship Wa-Class Flagship (1558): 65 Armor, 130 HPBattle Card Flagship Icon.png Transport Ship Wa-Class Flagship (1558): 65 Armor, 130 HP Light Cruiser Ho-Class Flagship (1554): 36 Armor, 53 HP Light Cruiser Tsu-Class (1591): 55 Armor, 48 HP Destroyer Ha-Class Late Model (1577): 29 Armor, 38 HP Destroyer Ha-Class Late Model (1577): 29 Armor, 38 HP
0/0
0/0
# Formation Normal Battle Node AD/AP
AS/AS+
E-4 Hard K
# Empty Node
K 敵影を見ず。
No enemy spotted.
# Empty Node
E-4 Hard L: 深海太平洋艦隊 前衛戦闘集団 (PoiDB)
# Formation Boss Battle Node AD/AP
AS/AS+
L Line Ahead New Southern Battleship Princess II (1966): 260 Armor, 950 HPBattle Card Flagship Icon.png Light Carrier Nu-Class Flagship III (1764): 70 Armor, 84 HP, 93 APAbyssal Cat Fighter Kai 556 Equipment.png Light Carrier Nu-Class Kai Flagship II (1766): 93 Armor, 118 HP, 132 APAbyssal Patrolling Attack Hawk 574 Equipment.pngAbyssal Cat Fighter Kai 556 Equipment.png Light Cruiser Tsu-Class Elite (1592): 68 Armor, 66 HP Destroyer Ha-Class Late Model (1577): 29 Armor, 38 HP Destroyer Ha-Class Late Model (1577): 29 Armor, 38 HP
76/151
338/675
Line Ahead New Southern Battleship Princess Damaged II (1969): 310 Armor, 950 HPBattle Card Flagship Icon.png Light Carrier Nu-Class Flagship III (1764): 70 Armor, 84 HP, 93 APAbyssal Cat Fighter Kai 556 Equipment.png Light Carrier Nu-Class Kai Flagship II (1766): 93 Armor, 118 HP, 132 APAbyssal Patrolling Attack Hawk 574 Equipment.pngAbyssal Cat Fighter Kai 556 Equipment.png Light Cruiser Tsu-Class Elite (1592): 68 Armor, 66 HP Destroyer Ha-Class Late Model (1577): 29 Armor, 38 HP Destroyer Ha-Class Late Model (1577): 29 Armor, 38 HP
76/151
338/675
Line Ahead
(Final)
New Southern Battleship Princess Damaged II (1969): 310 Armor, 950 HPBattle Card Flagship Icon.png Light Carrier Nu-Class Kai Flagship III (1779): 93 Armor, 118 HP, 107 APAbyssal Hell Dive Bomber Kai.pngAbyssal Revenge Torpedo Bomber Kai.png Light Carrier Nu-Class Kai Flagship II (1766): 93 Armor, 118 HP, 132 APAbyssal Patrolling Attack Hawk 574 Equipment.pngAbyssal Cat Fighter Kai 556 Equipment.png Light Cruiser Tsu-Class Elite (1592): 68 Armor, 66 HP Destroyer Na-Class Mass-Produced Model IIe Elite (2051): 67 Armor, 66 HP Submarine Summer Princess B Flagship II (1978): 39 Armor, 198 HP
80/160
359/717
# Formation Boss Battle Node AD/AP
AS/AS+
E-4 Hard M
# Empty Node
M 気のせいだった。
Must be my imagination.
# Empty Node
E-4 Hard N: 深海太平洋艦隊 Halmahera哨戒 (PoiDB)
# Formation Supported Battle Node AD/AP
AS/AS+
N Echelon
Line Abreast
Submarine So-Class Elite (1571): 30 Armor, 45 HPBattle Card Flagship Icon.png Submarine So-Class Elite (1571): 30 Armor, 45 HP Pacific Airfield Princess II (2248): 66 Armor, 400 HP, 137 AP 46/92
206/411
Echelon
Line Abreast
Submarine So-Class Elite (1571): 30 Armor, 45 HPBattle Card Flagship Icon.png Submarine So-Class Elite (1571): 30 Armor, 45 HP Submarine So-Class Elite (1571): 30 Armor, 45 HP Pacific Airfield Princess III (2249): 88 Armor, 500 HP, 162 AP 55/109
243/486
Echelon Submarine So-Class Flagship (1572): 42 Armor, 48 HPBattle Card Flagship Icon.png Submarine So-Class Elite (1571): 30 Armor, 45 HP Submarine So-Class Elite (1571): 30 Armor, 45 HP Pacific Airfield Princess III (2249): 88 Armor, 500 HP, 162 AP 55/109
243/486
# Formation Supported Battle Node AD/AP
AS/AS+
E-4 Hard O: 深海太平洋方面 基地航空隊 (PoiDB)
# Formation Air Defense Node AD/AP
AS/AS+
O Diamond Pacific Airfield Princess III (2249): 88 Armor, 500 HP, 162 APBattle Card Flagship Icon.png Pacific Airfield Princess III (2249): 88 Armor, 500 HP, 162 AP 109/217
486/972
Diamond Pacific Airfield Princess II (2248): 66 Armor, 400 HP, 137 APBattle Card Flagship Icon.png Pacific Airfield Princess II (2248): 66 Armor, 400 HP, 137 AP Pacific Airfield Princess (2247): 44 Armor, 300 HP, 94 AP 123/246
552/1104
Diamond Pacific Airfield Princess II (2248): 66 Armor, 400 HP, 137 APBattle Card Flagship Icon.png Pacific Airfield Princess II (2248): 66 Armor, 400 HP, 137 AP Pacific Airfield Princess II (2248): 66 Armor, 400 HP, 137 AP 138/275
617/1233
Diamond Pacific Airfield Princess III (2249): 88 Armor, 500 HP, 162 APBattle Card Flagship Icon.png Pacific Airfield Princess II (2248): 66 Armor, 400 HP, 137 AP Pacific Airfield Princess II (2248): 66 Armor, 400 HP, 137 AP 146/291
654/1308
Diamond Pacific Airfield Princess III (2249): 88 Armor, 500 HP, 162 APBattle Card Flagship Icon.png Pacific Airfield Princess III (2249): 88 Armor, 500 HP, 162 AP Pacific Airfield Princess II (2248): 66 Armor, 400 HP, 137 AP 154/308
692/1383
Diamond Pacific Airfield Princess III (2249): 88 Armor, 500 HP, 162 APBattle Card Flagship Icon.png Pacific Airfield Princess III (2249): 88 Armor, 500 HP, 162 AP Pacific Airfield Princess III (2249): 88 Armor, 500 HP, 162 AP 163/325
729/1458
# Formation Air Defense Node AD/AP
AS/AS+
E-4 Hard P: 深海太平洋艦隊 海峡警備部隊 (PoiDB)
# Formation Normal Battle Node AD/AP
AS/AS+
P Line Ahead
Echelon
Vanguard
Torpedo Cruiser Chi-Class Flagship (1559): 60 Armor, 70 HPBattle Card Flagship Icon.png Light Cruiser Tsu-Class Elite (1592): 68 Armor, 66 HP Destroyer Ha-Class Late Model (1577): 29 Armor, 38 HP Destroyer Ha-Class Late Model (1577): 29 Armor, 38 HP PT Imp Pack IV (1640): 39 Armor, 18 HP PT Imp Pack IV (1640): 39 Armor, 18 HP
0/0
0/0
# Formation Normal Battle Node AD/AP
AS/AS+
E-4 Hard Q
# Landing Node
Q 輸送物資の揚陸地点に到達しました。本海域の輸送作戦は無事完了しています。
The landing point of the convoy has been reached. The transport operation here has already been completed successfully.
# Landing Node
E-4 Hard R
# Empty Node
R 敵影を見ず。
No enemy spotted.
# Empty Node
E-4 Hard S: 深海太平洋艦隊 強攻輸送部隊 (PoiDB)
# Formation Boss Battle Node AD/AP
AS/AS+
S Line Ahead
Diamond
Abyssal Stranded Landing Princess III (2160): 303 Armor, 1080 HP, 69 APBattle Card Flagship Icon.png Light Carrier Nu-Class Kai Flagship III (1779): 93 Armor, 118 HP, 107 APAbyssal Hell Dive Bomber Kai.pngAbyssal Revenge Torpedo Bomber Kai.png Heavy Cruiser Ri-Class Flagship (1527): 70 Armor, 76 HP Light Cruiser Tsu-Class Elite (1592): 68 Armor, 66 HP Destroyer Ha-Class Late Model (1577): 29 Armor, 38 HP Destroyer Ha-Class Late Model (1577): 29 Armor, 38 HP
59/118
264/528
Line Ahead
(Final)
Abyssal Stranded Landing Princess Damaged III (2163): 383 Armor, 1080 HP, 80 APBattle Card Flagship Icon.png Light Carrier Nu-Class Flagship III (1764): 70 Armor, 84 HP, 93 APAbyssal Cat Fighter Kai 556 Equipment.png Heavy Cruiser Ri-Class Flagship (1527): 70 Armor, 76 HP Light Cruiser Tsu-Class Elite (1592): 68 Armor, 66 HP Destroyer Ha-Class Late Model (1577): 29 Armor, 38 HP Destroyer Ha-Class Late Model (1577): 29 Armor, 38 HP
58/116
260/519
# Formation Boss Battle Node AD/AP
AS/AS+
E-4 Hard T
# Empty Node
T 気のせいだった。
Must be my imagination.
# Empty Node
E-4 Hard T1: 深海潜水Tawi-Tawi警戒部隊 II群 (PoiDB)
# Formation Supported Battle Node AD/AP
AS/AS+
T1 Echelon
Line Abreast
Submarine So-Class Elite (1571): 30 Armor, 45 HPBattle Card Flagship Icon.png Submarine So-Class Elite (1571): 30 Armor, 45 HP Submarine So-Class Elite (1571): 30 Armor, 45 HP Light Carrier Nu-Class Elite III (1776): 35 Armor, 70 HP, 126 APHell plane 1.pngAbyssal Patrolling Attack Hawk 574 Equipment.png 43/85
189/378
Echelon
Line Abreast
Submarine So-Class Flagship (1572): 42 Armor, 48 HPBattle Card Flagship Icon.png Submarine So-Class Elite (1571): 30 Armor, 45 HP Submarine So-Class Elite (1571): 30 Armor, 45 HP Light Carrier Nu-Class Elite III (1776): 35 Armor, 70 HP, 126 APHell plane 1.pngAbyssal Patrolling Attack Hawk 574 Equipment.png 43/85
189/378
Echelon
Line Abreast
Submarine So-Class Flagship (1572): 42 Armor, 48 HPBattle Card Flagship Icon.png Submarine So-Class Flagship (1572): 42 Armor, 48 HP Submarine So-Class Elite (1571): 30 Armor, 45 HP Light Carrier Nu-Class Elite III (1776): 35 Armor, 70 HP, 126 APHell plane 1.pngAbyssal Patrolling Attack Hawk 574 Equipment.png 43/85
189/378
# Formation Supported Battle Node AD/AP
AS/AS+
E-4 Hard T2: 深海潜水Tawi-Tawi警戒部隊 I群 (PoiDB)
# Formation Normal Battle Node AD/AP
AS/AS+
T2 Echelon
Line Abreast
New Submarine Princess Vacation Mode Flagship III (1807): 42 Armor, 288 HPBattle Card Flagship Icon.png Submarine So-Class Flagship (1572): 42 Armor, 48 HP Submarine So-Class Elite (1571): 30 Armor, 45 HP Submarine So-Class Elite (1571): 30 Armor, 45 HP 0/0
0/0
Echelon
Line Abreast
New Submarine Princess Vacation Mode Flagship III (1807): 42 Armor, 288 HPBattle Card Flagship Icon.png Submarine So-Class Flagship (1572): 42 Armor, 48 HP Submarine So-Class Flagship (1572): 42 Armor, 48 HP Submarine So-Class Elite (1571): 30 Armor, 45 HP 0/0
0/0
Echelon
Line Abreast
New Submarine Princess Vacation Mode Flagship IV (1808): 54 Armor, 388 HPBattle Card Flagship Icon.png Submarine So-Class Flagship (1572): 42 Armor, 48 HP Submarine So-Class Flagship (1572): 42 Armor, 48 HP Submarine So-Class Flagship (1572): 42 Armor, 48 HP 0/0
0/0
# Formation Normal Battle Node AD/AP
AS/AS+
E-4 Hard U: 深海太平洋方面 水雷艇戦隊 (PoiDB)
# Formation Night Battle Node AD/AP
AS/AS+
U Line Ahead
Echelon
PT Imp Pack IV (1640): 39 Armor, 18 HPBattle Card Flagship Icon.png PT Imp Pack IV (1640): 39 Armor, 18 HP PT Imp Pack IV (1640): 39 Armor, 18 HP PT Imp Pack III (1639): 29 Armor, 15 HP PT Imp Pack II (1638): 29 Armor, 9 HP PT Imp Pack (1637): 19 Armor, 9 HP
0/0
0/0
Line Ahead
Echelon
PT Imp Pack IV (1640): 39 Armor, 18 HPBattle Card Flagship Icon.png PT Imp Pack IV (1640): 39 Armor, 18 HP PT Imp Pack IV (1640): 39 Armor, 18 HP PT Imp Pack IV (1640): 39 Armor, 18 HP PT Imp Pack III (1639): 29 Armor, 15 HP PT Imp Pack III (1639): 29 Armor, 15 HP
0/0
0/0
# Formation Night Battle Node AD/AP
AS/AS+
E-4 Hard U1: 深海太平洋方面 基地航空隊 (PoiDB)
# Formation Air Defense Node AD/AP
AS/AS+
U1 Diamond Pacific Airfield Princess III (2249): 88 Armor, 500 HP, 162 APBattle Card Flagship Icon.png Pacific Airfield Princess III (2249): 88 Armor, 500 HP, 162 AP 109/217
486/972
Diamond Pacific Airfield Princess II (2248): 66 Armor, 400 HP, 137 APBattle Card Flagship Icon.png Pacific Airfield Princess II (2248): 66 Armor, 400 HP, 137 AP Pacific Airfield Princess (2247): 44 Armor, 300 HP, 94 AP 123/246
552/1104
Diamond Pacific Airfield Princess II (2248): 66 Armor, 400 HP, 137 APBattle Card Flagship Icon.png Pacific Airfield Princess II (2248): 66 Armor, 400 HP, 137 AP Pacific Airfield Princess II (2248): 66 Armor, 400 HP, 137 AP 138/275
617/1233
Diamond Pacific Airfield Princess III (2249): 88 Armor, 500 HP, 162 APBattle Card Flagship Icon.png Pacific Airfield Princess II (2248): 66 Armor, 400 HP, 137 AP Pacific Airfield Princess II (2248): 66 Armor, 400 HP, 137 AP 146/291
654/1308
Diamond Pacific Airfield Princess III (2249): 88 Armor, 500 HP, 162 APBattle Card Flagship Icon.png Pacific Airfield Princess III (2249): 88 Armor, 500 HP, 162 AP Pacific Airfield Princess II (2248): 66 Armor, 400 HP, 137 AP 154/308
692/1383
Diamond Pacific Airfield Princess III (2249): 88 Armor, 500 HP, 162 APBattle Card Flagship Icon.png Pacific Airfield Princess III (2249): 88 Armor, 500 HP, 162 AP Pacific Airfield Princess III (2249): 88 Armor, 500 HP, 162 AP 163/325
729/1458
# Formation Air Defense Node AD/AP
AS/AS+
E-4 Hard U2
# Empty Node
U2 気のせいだった。
Must be my imagination.
# Empty Node
E-4 Hard V: 深海太平洋艦隊 Biak島沖駆逐隊 (PoiDB)
# Formation Normal Battle Node AD/AP
AS/AS+
V Line Ahead
Echelon
Vanguard
Destroyer Princess II (Final Form) (1598): 115 Armor, 190 HPBattle Card Flagship Icon.png Destroyer Na-Class Mass-Produced Model IIe Elite (2051): 67 Armor, 66 HP Destroyer Na-Class Mass-Produced Model IIe Elite (2051): 67 Armor, 66 HP Destroyer Ni-Class Late Model Elite (1624): 48 Armor, 49 HP Destroyer Ni-Class Late Model Elite (1624): 48 Armor, 49 HP Submarine So-Class Elite (1571): 30 Armor, 45 HP
0/0
0/0
# Formation Normal Battle Node AD/AP
AS/AS+
E-4 Hard W: 深海太平洋艦隊 高速水上打撃群 (PoiDB)
# Formation Normal Battle Node AD/AP
AS/AS+
W Line Ahead
Double Line
Battleship Ta-Class Flagship (1543): 96 Armor, 90 HPBattle Card Flagship Icon.png Battleship Ta-Class Flagship (1543): 96 Armor, 90 HP Heavy Cruiser Ne-Class Kai Summer Mode III (1955): 211 Armor, 390 HP Destroyer Ni-Class Late Model Elite (1624): 48 Armor, 49 HP Destroyer Ha-Class Late Model (1577): 29 Armor, 38 HP Destroyer Ha-Class Late Model (1577): 29 Armor, 38 HP
0/0
0/0
Line Ahead Battleship Ta-Class Flagship (1543): 96 Armor, 90 HPBattle Card Flagship Icon.png Battleship Ta-Class Flagship (1543): 96 Armor, 90 HP Heavy Cruiser Ne-Class Kai Summer Mode III (1955): 211 Armor, 390 HP Heavy Cruiser Ne-Class Kai Summer Mode III (1955): 211 Armor, 390 HP Destroyer Ni-Class Late Model Elite (1624): 48 Armor, 49 HP Destroyer Ni-Class Late Model Elite (1624): 48 Armor, 49 HP
0/0
0/0
# Formation Normal Battle Node AD/AP
AS/AS+
E-4 Hard X: 深海太平洋艦隊 空母艦載機群 (PoiDB)
# Formation Air Defense Node AD/AP
AS/AS+
X Diamond New Battleship Princess III (1981): 280 Armor, 980 HPBattle Card Flagship Icon.png New Light Cruiser Princess III (2008): 256 Armor, 960 HP New Light Cruiser Princess III (2008): 256 Armor, 960 HP Standard Carrier Wo-Class Kai B Flagship II (2116): 160 Armor, 500 HP, 197 AP Standard Carrier Wo-Class Kai B Flagship (2115): 120 Armor, 380 HP, 180 AP Heavy Cruiser Ne-Class Kai B Summer Mode (1956): 244 Armor, 470 HP
126/252
566/1131
Diamond New Battleship Princess III (1981): 280 Armor, 980 HPBattle Card Flagship Icon.png New Light Cruiser Princess III (2008): 256 Armor, 960 HP New Light Cruiser Princess III (2008): 256 Armor, 960 HP Standard Carrier Wo-Class Kai B Flagship II (2116): 160 Armor, 500 HP, 197 AP Standard Carrier Wo-Class Kai B Flagship II (2116): 160 Armor, 500 HP, 197 AP Heavy Cruiser Ne-Class Kai B Summer Mode (1956): 244 Armor, 470 HP
132/263
591/1182
Diamond New Battleship Princess Damaged III (1984): 350 Armor, 980 HPBattle Card Flagship Icon.png New Light Cruiser Princess Damaged III (2011): 376 Armor, 960 HP New Light Cruiser Princess Damaged III (2011): 376 Armor, 960 HP Aircraft Carrier Summer Princess B IV (2119): 229 Armor, 900 HP, 210 AP Aircraft Carrier Summer Princess B IV (2119): 229 Armor, 900 HP, 210 AP Heavy Cruiser Ne-Class Kai B Summer Mode (1956): 244 Armor, 470 HP
141/281
630/1260
# Formation Air Defense Node AD/AP
AS/AS+
E-4 Hard Y: 深海太平洋艦隊 Biak島沖哨戒群 (PoiDB)
# Formation Supported Battle Node AD/AP
AS/AS+
Y Echelon
Line Abreast
Submarine So-Class Elite (1571): 30 Armor, 45 HPBattle Card Flagship Icon.png Submarine So-Class Elite (1571): 30 Armor, 45 HP Submarine So-Class Elite (1571): 30 Armor, 45 HP Pacific Airfield Princess (2247): 44 Armor, 300 HP, 94 AP Pacific Airfield Princess (2247): 44 Armor, 300 HP, 94 AP 63/126
282/564
Echelon
Line Abreast
Submarine So-Class Flagship (1572): 42 Armor, 48 HPBattle Card Flagship Icon.png Submarine So-Class Elite (1571): 30 Armor, 45 HP Submarine So-Class Elite (1571): 30 Armor, 45 HP Pacific Airfield Princess II (2248): 66 Armor, 400 HP, 137 AP Pacific Airfield Princess (2247): 44 Armor, 300 HP, 94 AP 78/155
347/693
Echelon
Line Abreast
Submarine So-Class Flagship (1572): 42 Armor, 48 HPBattle Card Flagship Icon.png Submarine So-Class Flagship (1572): 42 Armor, 48 HP Submarine So-Class Elite (1571): 30 Armor, 45 HP Pacific Airfield Princess III (2249): 88 Armor, 500 HP, 162 AP Pacific Airfield Princess (2247): 44 Armor, 300 HP, 94 AP 86/171
384/768
# Formation Supported Battle Node AD/AP
AS/AS+
E-4 Hard Z: 深海太平洋艦隊 Biak島攻略主力 (PoiDB)
# Formation Boss Battle Node AD/AP
AS/AS+
Z Cruising Formation 4 New Battleship Princess III (1981): 280 Armor, 980 HPBattle Card Flagship Icon.png New Light Cruiser Princess III (2008): 256 Armor, 960 HP New Light Cruiser Princess III (2008): 256 Armor, 960 HP Standard Carrier Wo-Class Kai B Flagship II (2116): 160 Armor, 500 HP, 197 AP Standard Carrier Wo-Class Kai B Flagship II (2116): 160 Armor, 500 HP, 197 AP Heavy Cruiser Ne-Class Kai B Summer Mode (1956): 244 Armor, 470 HP
Light Cruiser Tsu-Class Elite (1592): 68 Armor, 66 HP Transport Ship Wa-Class B Flagship (2014): 77 Armor, 480 HP Transport Ship Wa-Class B Flagship (2014): 77 Armor, 480 HP Destroyer Na-Class Late Model Elite (1743): 63 Armor, 66 HP Destroyer Ni-Class Late Model (1578): 33 Armor, 40 HP Destroyer Ni-Class Late Model (1578): 33 Armor, 40 HP
132/263
591/1182
Cruising Formation 4
(Final)
New Battleship Princess Damaged III (1984): 350 Armor, 980 HPBattle Card Flagship Icon.png New Light Cruiser Princess Damaged III (2011): 376 Armor, 960 HP New Light Cruiser Princess Damaged III (2011): 376 Armor, 960 HP Aircraft Carrier Summer Princess B IV (2119): 229 Armor, 900 HP, 210 AP Aircraft Carrier Summer Princess B IV (2119): 229 Armor, 900 HP, 210 AP Heavy Cruiser Ne-Class Kai B Summer Mode (1956): 244 Armor, 470 HP
Light Cruiser Tsu-Class Flagship (1862): 108 Armor, 130 HP Transport Ship Wa-Class B Flagship (2014): 77 Armor, 480 HP Transport Ship Wa-Class B Flagship (2014): 77 Armor, 480 HP Destroyer Na-Class Late Model Elite (1743): 63 Armor, 66 HP Destroyer Na-Class Late Model Elite (1743): 63 Armor, 66 HP Destroyer Na-Class Late Model Elite (1743): 63 Armor, 66 HP
141/281
630/1260
# Formation Boss Battle Node AD/AP
AS/AS+

Ship Drops

Ship drops
Type Ship? B C E F1 H J L P S V W Z
DE Kurahashi Casual+ Casual+ Easy+ Casual+ Casual+ Casual+ Casual+ Casual+
DE Noumi Hard+ Medium+ Casual+ Casual+ Casual+ Casual+ Casual+ Casual+
DE Mikura Easy+ Easy+ Hard+ Casual+ Casual+ Casual+ Casual+ Casual+ Casual+
DE Yashiro Hard+ Easy+ Casual+ Casual+ Casual+ Casual+ Casual+ Casual+
DD Fuyutsuki Easy+ Casual+ Hard+ Medium+
DD Yuugure Medium+ Hard+ Casual+ Casual+ Medium+ Medium+
DD Amagiri Casual+
DD Ariake Hard+ Hard+ Easy+ Casual+ Hard+
DD Harusame Casual+ Casual+ Casual+ Hard+ Casual+ Easy+ Casual+ Casual+ Casual+
DD Asagumo Casual+ Casual+ Casual+ Casual+ Casual+ Casual+
DD Tanikaze Hard+ Medium+ Hard+ Casual+ Casual+ Casual+ Casual+ Casual+ Casual+
DD Nowaki Casual+ Casual+ Casual+ Casual+ Easy+ Casual+
DD Kazagumo Casual+
DD Fujinami Hard+ Easy+ Casual+ Casual+ Casual+ Casual+ Casual+ Casual+
DD Hayanami Hard+ Casual+ Easy+ Casual+ Casual+ Casual+ Casual+
DD Hamanami Hard+ Easy+ Casual+ Casual+ Casual+ Casual+ Casual+
DD Okinami Casual+
DD Akizuki Casual+ Casual+ Casual+ Hard+ Casual+
DD Fletcher Easy+ Casual+
CL Phoenix Casual+
CL Noshiro Casual+ Casual+ Casual+ Casual+ Casual+
CA Mikuma Casual+
BB Yamato Casual+
BB Musashi Medium+ Casual+
CV Ranger Casual+
CV Saratoga Casual+
CV Hornet Casual+
LHA No.101 Transport Ship Hard+ Medium+ Casual+
DD Yamagumo Hard+ Hard+ Casual+ Casual+ Casual+ Casual+
DD Akigumo Hard+ Casual+ Casual+ Casual+ Casual+ Casual+ Casual+
DD Shimakaze Casual+
CL Kitakami Casual+
CL Kinu Casual+ Casual+ Casual+ Casual+ Casual+ Casual+
CL Abukuma Hard+ Hard+ Casual+ Casual+
CL Yuubari Hard+ Medium+ Easy+ Casual+ Hard+ Hard+ Casual+
CA Kinugasa Casual+
CA Myoukou Hard+ Casual+ Casual+ Casual+ Casual+ Casual+ Casual+
CA Takao Casual+
CA Atago Casual+
CA Mogami Casual+
CVL Shouhou Casual+
CVL Zuihou Hard+ Hard+ Casual+
FBB Kongou Hard+ Medium+ Hard+ Hard+ Casual+ Casual+
FBB Hiei Casual+ Casual+ Casual+ Casual+
FBB Haruna Medium+ Hard+ Easy+ Hard+ Casual+ Casual+
FBB Kirishima Hard+ Casual+ Casual+
BB Fusou Hard+ Casual+
BB Yamashiro Casual+
BB Ise Casual+
BB Hyuuga Casual+
BB Mutsu Casual+
CV Shoukaku Casual+
CV Zuikaku Casual+
Summer 2024 EventSummer 2024 Event Banner.png
Summer 2024 EventSummer 2024 Event Banner EO.png
2nd wave of Friendly Fleets has been released!
Time until event's end:

The event has ended!

Summer 2024 Event Hub Overview
Introduction & Overview 1st Stage Operations 2nd Stage Operations
E-1 | E-2 | E-3 E-4 | E-5


Trivia

  • Starting Point 1 is from the Gulf of Davao. Davao was a major city and port in the southern island of Mindanao in the Philippines. It was one of the first cities to be attacked during the December 7, 1941 multi-target strike of the Japanese forces and one of the first major cities to fall to Japanese control in WW2. It became a staging ground for Japanese operations to Borneo, Philippine Sea, and the Marianas.
  • Starting Point 2 is from Tawi-Tawi. During WW2 it is the location of the Tawi-Tawi Naval Base of the Japanese Forces and was a major launch point for operations going into the Southern Pacific.
  • Node L is off the coast of Morotai
  • Node S is north of West Papua
  • Node Q is in Sorong. This was occupied by the Japanese in 1942 and was the staging ground of the Japanese forces for their Western New Guinea campaign.
  • Node Z is off the coast of Biak. This was also the site of the Battle of Biak during Operation Kon. This was a landing operation by the Japanese forces that was thwarted by the American defense forces.
  • The first Airbase in the Mindanao area was the location of the Matina Airfield in Davao del Sur, Mindanao, Philippines. This was used by the IJN and was home to both the 153th Kokutai and 901st Hikotai.