- Welcome to the Kancolle Wiki!
- If you have any questions regarding site content, account registration, etc., please visit the KanColle Wiki Discord
Difference between revisions of "Summer 2024 Event/E-3"
Jigaraphale (talk | contribs) m (→Phase 4 - Boss) |
Jigaraphale (talk | contribs) m (→Phase 1 - Boss) |
||
| Line 219: | Line 219: | ||
**This would eventually be reused on the final phase. | **This would eventually be reused on the final phase. | ||
*CV can utilize [[CVNCI]] to deal night damage. | *CV can utilize [[CVNCI]] to deal night damage. | ||
| + | |||
| + | *As the [[File:{{ROOTPAGENAME}} Tag 3.png|30px]] tag is reused on the final phase, it is recommended to plan all the ships used in the phase as to be reused later. | ||
| + | ** Notably, using the [[French Touch]] with strong bonus CV is recommended if possible. | ||
==Phase 2 - TP== | ==Phase 2 - TP== | ||
Revision as of 15:05, 5 August 2024
 
| |||||||||
|---|---|---|---|---|---|---|---|---|---|
 
2nd wave of Friendly Fleets has been released!
Time until event's end:
| |||||||||
激突!ダカール沖海戦
![]()
![]()
![]()


| Information | ||||
|---|---|---|---|---|
| Event Tag | ||||
| Boss Gauges | Hard (甲): 3960 HP + 585 TP + 850 TP + 5460 HP | |||
| Medium (乙): 2880 HP + 495 TP + 750 TP + 4980 HP | ||||
| Easy (丙): 2160 HP + 450 TP + 650 TP + 4980 HP | ||||
| Casual (丁): 1760 HP + 405 TP + 600 TP + 4560 HP | ||||
| Map Bosses | Aircraft Carrier Summer Princess B
| |||
Heavy Cruiser Summer Princess
| ||||
French Battleship Princess Vacation Mode
| ||||
French Light Cruiser Princess
| ||||
| Rewards[edit] | ||||
|---|---|---|---|---|
| Ship |  Gloire | |||
| Choice | 丁 Casual |
丙 Easy |
乙 Medium |
甲 Hard |
 Communication Equipment & Personnel |
1 | 1 | ||
| OR | ||||
New Model Armament Material |
3 | |||
| Reward | 丁 Casual |
丙 Easy |
乙 Medium |
甲 Hard |
|---|---|---|---|---|
Medal |
1 | 2 | 3 | |
Latest Overseas Warship Technology |
1 | 1 | 2 | |
Prototype Flight Deck Catapult |
1 | |||
 15.2cm Triple Main Gun Mount |
1 (★1) | 1 (★2) | ||
 Loire 130M Kai (Skilled) |
1 | 1 (★1) | ||
 15.2cm Triple Main Gun Mount Kai |
1 (★2) | |||
Communication Equipment & Personnel |
1 |

The event guides are to be constructed through the respective Event map page guide sandbox and reviewed by editors before being approved here.
- Do not update the guides through this page unless it is a minor fix. Please only update guides through their respective sandbox pages.
Branching Table
| E-3 Branching Rules (Start Points) ▼/▲ | ||
|---|---|---|
| Nodes | Rules | |
| Start | 1 |
|
2 |
| |
3 |
| |
| E-3 Branching Rules (Start Point 1) ▼/▲ Single Fleet | ||
|---|---|---|
| Nodes | Rules | |
1 |
A |
|
B |
B1 |
|
B2 |
| |
C |
| |
B1 |
C |
|
B2 |
H1 |
|
C |
C1 |
Active Branching |
C2 | ||
C3 |
D |
|
E |
| |
F |
| |
| E-3 Branching Rules (Start Point 1) ▼/▲ Combined Fleet | ||
|---|---|---|
| Nodes | Rules | |
1 |
L |
|
B1 |
N |
|
P |
| |
N |
O |
|
P |
| |
P |
Q |
|
Q |
R |
|
S |
| |
| E-3 Branching Rules (Start Point 2) ▼/▲ | ||
|---|---|---|
| Nodes | Rules | |
2 |
G |
|
H |
| |
H |
B2 |
|
H1 |
| |
H2 |
| |
I |
J |
|
K |
| |
| E-3 Branching Rules (Start Point 3) ▼/▲ | ||
|---|---|---|
| Nodes | Rules | |
P |
T |
|
U |
| |
V |
V1 |
|
V2 |
| |
V3 |
| |
X |
| |
V3 |
W |
|
X |
| |
* = Rule under review
? = Ship type/amount under review
Branching compositions are reported over the course of the event.
- Please refer to KCNav for up to date map content (fleets used, LoS/speed requirements/drops/LBAS ranges, ...)
Historical Bonuses
| Ship Damage Bonuses Stack with each other | |||||||||||||||||||
|---|---|---|---|---|---|---|---|---|---|---|---|---|---|---|---|---|---|---|---|
| Ships [Toggle Names] |
Multipliers | ||||||||||||||||||
| Mapwide | Node F | Node K | Node S | Node V1 | Node X | ||||||||||||||
| Destroyers (DD) | 1.03x | - | - | - | 1.13x | ||||||||||||||
| Light Cruisers (CL) NOT CLT |
1.04x | ||||||||||||||||||
| Heavy Cruisers (CA(V)) | - | 1.09x | |||||||||||||||||
| Seaplane Tenders (AV) | 1.08x | 1.07~1.09x(?) | |||||||||||||||||
| Light Carriers (CVL) | 1.04x | 1.07x | |||||||||||||||||
| Standard Carriers (CV(B)) | - | ||||||||||||||||||
| Battleships ((F)BB(V)) | - | 1.15x | 1.09x | ||||||||||||||||
|
1.15x | 1.08x | 1.11x | 1.12x | 1.18x | ||||||||||||||
|
1.19x | - | 1.18x | 1.16x | 1.22x | ||||||||||||||
|
1.05x | - | |||||||||||||||||
| |||||||||||||||||||
| |||||||||||||||||||
Sheffield Kai |
1.12x | - | - | - | |||||||||||||||
Victorious Kai | |||||||||||||||||||
Warspite Kai |
1.15x | ||||||||||||||||||
Ark Royal Kai |
1.27x | ||||||||||||||||||
Gloire Kai |
1.18x | ||||||||||||||||||
Jean Bart Kai |
1.24x | 1.12x(?) | |||||||||||||||||
Richelieu Deux |
1.32x | 1.12x(?) | |||||||||||||||||
Foreign Plane Bonuses have returned and should be examined when planning equipment setups. The following bonuses are applied:
- Ships using planes get bonuses based on the different categories of bonuses ɑ/β/γ, A, and B.
- The ɑ/β/γ groups are the general foreign plane bonuses, being divided into three "levels" (γ>β>ɑ) and being both map-wide and node-specific,
- Group A are French and British bonuses divided into three sub-categories:
- A1 are French seaplanes,
- A2 are British seaplanes,
- A3 are Swordfish.
- B# bonuses are primarily for LBAS (with ship-based & land-based planes), with the ship-based planes also providing the same bonuses to ships, and being divided into two "levels" (B2>B1)
 Heavy Bombers also have similar bonuses
- Notes
- These bonuses work for all ships and for all attack types, including: LBAS, jet assault, airstrikes, air/surface shelling, and night attacks.
- Bonuses from a same line or column do not stack.
- Map-wide bonuses and node-specific bonuses always stack.
- Bonuses still work for planes equipped in 0-slot for ships.
- Bonuses do not work on 0-slot for LBAS.
| Historical Plane Damage Bonuses | |||||||
|---|---|---|---|---|---|---|---|
| Group | Multipliers | ||||||
| Mapwide | Node F | Node K | Node S | Node V1 | Node X | ||
| ɑ | 1.06x | 1.03x | 1.02x | 1.03x | 1.02x | 1.05x | |
| β | 1.09x | 1.05x | 1.03x | 1.05x | 1.03x | 1.07x | |
| γ | 1.12x | 1.08x | 1.05x | 1.08x | 1.04x | 1.09x | |
| A | 1 | - | - | - | 1.05x | 1.04x | |
| 2 | 1.03x | 1.08x | |||||
| 3 | 1.08x | 1.15x | |||||
| B | 1 | 1.04x | |||||
| 2 | 1.06x | ||||||
| - | ? | ? | ? | - | 1.32x | ||
| Ship Effects Carrier Planes | |||
|---|---|---|---|
| ɑ | β | γ | |
| 0 |
|
|
|
| A3 |
|
|
|
| B1 |
|
|
|
| B2 | - |
|
|


| Ship Effects Seaplanes | |||
|---|---|---|---|
| ɑ | β | γ | |
| 0 |
|
- | - |
| A1 | - | 
|
|
| A2 | - | 
|

|
| A3 |
|
- | - |
| B1 | - |
|
- |
| B2 | - | - |
|


- The Ar196 Kai
 has no bonus.
 - The Loire 130M
 has both A1 and B2 bonus.
 - The Walrus
 has both A2 and B1 bonus.
 - The Sea Otter
 has both A2 and B2 bonus.
| Land-Based Effects | |||||||||||
|---|---|---|---|---|---|---|---|---|---|---|---|
| Group | LB Bombers | LB Fighters/Recons | Carrier Bombers | Carrier Fighters | Misc | ||||||
| 0 |
|
|
| ||||||||
| B1 |
|
|
|
| |||||||
| B2 |
|
|
|
|
| ||||||


- source: [2]
- On the 2024-07-31 update, the FR-1 Fireball
 /SB2C-5
 bug has been fixed and other bonuses have been added.
 - On the 2024-08-08 update, the new USN bonuses have been added on release.
- On the 2024-07-31 update, the FR-1 Fireball
- Tips
- Carriers:
- Try to equip one plane from each column and row
- For example: ɑ/A3 + β/B1 + γ/B2
- This also applies to ships that carry multiple plane types in normal setups.
- Other Ship Types:
- As only one seaplane is generally equipped on a ship, pick γ>β>ɑ and then the highest bonus among groups A or/and B depending on the node.
- For Group 1, Group 2, and Group 3 bonuses, having one equipment from the group is enough to have the bonus.
- Equipping a second gear from the same group will not provide any additional bonus.
- The bonus groups stack with each other.
- Do not confuse the balloon mechanic fleet-wide buff with this event bonus that only buffs the individual ship equipped with it.
| Equipment | Node V1 | Node X | ||
|---|---|---|---|---|
Group 1
|
Barrage Balloon Toku DLC + 11th  DLC + Panzer II  Toku DLC + Chi-Ha  Toku DLC + Chi-Ha Kai  Ka-Mi tank  Ka-Tsu  14inch/45 Twin Gun  14inch/45 Triple Gun 
|
1.08x | 1.04x | |
Group 2
|
Toku DLC + Ho-Ni tank Toku DLC + Panzer III  M4A1 DD  Ka-Tsu Kai 
|
1.12x | 1.08x | |
Group 3
|
Toku DLC + Panzer III J
|
1.18x | 1.12x | |
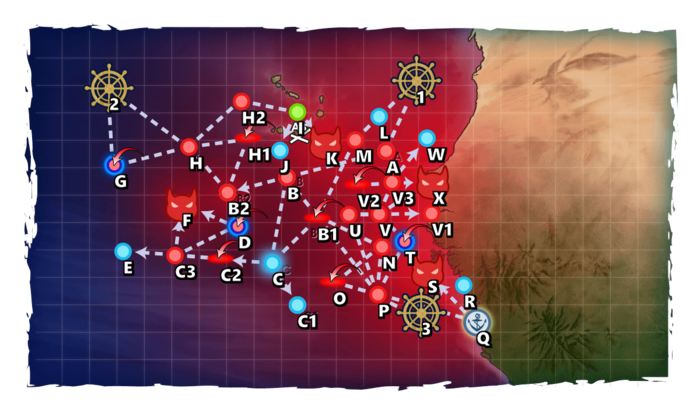
Map Overview
E3 is a single, striking force, and combined fleet four-phase map, consisting of two transport and two boss phases.
- 3 LBAS are available to sortie on this map
- Initially, no LBAS is available,
- After Phase 1, all can be set on Sortie.
- This map uses 2 locks:
 Home Fleet, Starting point 2 (reused from E-1),
 Force M Advance Squadron, Starting point 1 & 3 (single),
 Force M, Starting point 1 & 3 (combined).
- Note : It is possible to mix both
 &
&  in all difficulties on the last phase once Phase 3 is cleared.
 Barrage Balloons can be deployed on installation nodes V1 X.
Phase 0.5 - Gimmick
To unlock the second boss, the following steps have to be performed:
| B2 | C2 | |
|---|---|---|
| Hard | S x2 | AS x2 |
| Medium | S x2 | AS |
| Easy | S x2 | AS |
| Casual | S | AS |
- Single Fleet: 0-2 (F)BB(V), 3 CV, 1-3 DD
- Route: 1 A B B2
- Refer to #Phase 1 - TP's fleet for composition and routing.
| AS | |
|---|---|
| Hard | 378 |
| Medium | 378 |
| Easy | 225 |
| Casual | 201 |
Phase 1 - Boss
- Single Fleet: 1-2 (F)BB(V), 1-2 CV, 3 DD
- Route: 1 A B C C2 C3 F
- Shortest route to the boss.
- Single Fleet: 1-2 (F)BB(V), 1-2 CV, 1 CVL, 2 DD
- Route: 1 A B B1 C C2 C3 F
- Allows an additional CVL, but, passes through extra node B1.
- LoS check: Cn3 = H/M/E/C = 80/60/60/?
- Bringing ASW and AACI is recommended.
- In the case 2 (F)BB are used, it is recommended to use a 2 ship Special Attack.
- This would eventually be reused on the final phase.
- CV can utilize CVNCI to deal night damage.
- As the tag is reused on the final phase, it is recommended to plan all the ships used in the phase as to be reused later.
- Notably, using the French Touch with strong bonus CV is recommended if possible.
Phase 2 - TP
Phase 2 is a "Transport Operation":
- Striking Force: 0-1 CV/CA(V), 1 CL, 4-5 DD, 0-1 AV, Fast

- Route: 2 H H2 I K
- LoS check: Cn3 = H/M/E/C 65/55/50/?
- Slow fleets pass through node H1.
- Using a Support Fleet on the boss is recommended guarantee an A+ rank at the boss node.
- Bringing ASW is recommended.
- LBAS Range to K is 1.
Phase 3 - TP
Phase 3 is a "Transport Operation":
- TCF:
- Main: 1 CVL, 1-4 DD, 0-3 DE, 1 AV
- Escort: 0-1 CA(V), 1-2 CL, 4 DD
- Route: 1 L M B1 P Q S
- LoS check: 90 (Cn3 Hard)
- LBAS range: 7
Phase 3.5 - Shortcut
Once phase 3 is cleared and phase 4 unlocked, the following steps have to be performed to unlock a shortcut, and allow to bring mix tags.
- This gimmick is optional but highly recommended.
| S | V1 | V3 | |
|---|---|---|---|
| Hard | S | A+ x3 | S |
| Medium | S | A+ x3 | S |
| Easy | A+ | A+ x2 | S |
| Casual | A+ | A+ x2 | S |
- Refer to #Phase 3 - TP's fleet for composition and routing.
- CTF: Slow
- Main: 2 BB, 2 CV, 1DD, 2CVL/AV/LHA
- Escort: 0-1 CA(V)/LHA/AV, 1 CL, 4-5 DD
- Route: 3 P U V V1
- 1 LHA or 2 AV are required to reach the node.
- The node contains several installations and PT boats.
| Anti-PT boat | |||||||||||||||||||||||||||||||||||||||||||||||||||||||||||||||||||||||||||||||||||||||||||||||||||||||||||||||||||||||||||||||||||||||||||
|---|---|---|---|---|---|---|---|---|---|---|---|---|---|---|---|---|---|---|---|---|---|---|---|---|---|---|---|---|---|---|---|---|---|---|---|---|---|---|---|---|---|---|---|---|---|---|---|---|---|---|---|---|---|---|---|---|---|---|---|---|---|---|---|---|---|---|---|---|---|---|---|---|---|---|---|---|---|---|---|---|---|---|---|---|---|---|---|---|---|---|---|---|---|---|---|---|---|---|---|---|---|---|---|---|---|---|---|---|---|---|---|---|---|---|---|---|---|---|---|---|---|---|---|---|---|---|---|---|---|---|---|---|---|---|---|---|---|---|---|
Unlike most standard Abyssals, "PT boats" (PT Imp Pack & Schnellboot Imp Pack & Schnellboot Imp Pack ) are "very small and fast". ) are "very small and fast".
During Events, some special bonuses may be added, with "historical" ships and equipment gaining some accuracy bonuses[10].
| |||||||||||||||||||||||||||||||||||||||||||||||||||||||||||||||||||||||||||||||||||||||||||||||||||||||||||||||||||||||||||||||||||||||||||
| [edit] | |||||||||||||||||||||||||||||||||||||||||||||||||||||||||||||||||||||||||||||||||||||||||||||||||||||||||||||||||||||||||||||||||||||||||||


- Refer to #Phase 4 - Boss's fleet for composition and routing.
Phase 4 - Boss
- Note : It is possible to mix both & in all difficulties on this phase once Phase 3 is cleared.
- CTF: Fast
- Main: 2 FBB, 2 CV, 1 CVL, 1 CL/AV
- Escort: 1 CA(V), 1 CL, 4 DD
- Route: 3 P U V X
- Requires the shortcut.
- The best fleet that allows for a touch and great air power.
- STF: Fast
- Main: 2 FBB, 1 CV, 1-2 CA(V), 1 CL, 0-1 AV
- Escort: 1 CL, 5 DD
- Route: 3 P U V X
- Requires the shortcut.
- CTF:
- Main: 2 (F)BB(V), 2 CV, 1 CVL, 1 AV/AO
- Escort: 1 CA(V), 1 CL, 4 DD
- Route: 3 P U V V3 X
- Shortcutless comp.
- STF:
- Main: 3 (F)BB(V), 1 CV, 1-2 CA(V), 0-1 CL
- Escort: 0-2 CLT, 1 CL, 3-5 DD
- Route: 3 P U V V3 X
- Shortcutless comp.
- LoS check: 120? (Cn3 Hard)
- LBAS range: 5
- To use the shortcut, at least 4 DD must be present within the fleet to route through the shortcut.
- Bringing an AACI ship is recommended.
- Bringing some Anti-Installation gears might be required to deal with the Harbour Princess Holiday Mode, but
 /
/ Shells should be enough.
 - Using a Special Attack is highly recommended, notably the French Touch.
- The boss node contains several PT boats:
| Anti-PT boat | |||||||||||||||||||||||||||||||||||||||||||||||||||||||||||||||||||||||||||||||||||||||||||||||||||||||||||||||||||||||||||||||||||||||||||
|---|---|---|---|---|---|---|---|---|---|---|---|---|---|---|---|---|---|---|---|---|---|---|---|---|---|---|---|---|---|---|---|---|---|---|---|---|---|---|---|---|---|---|---|---|---|---|---|---|---|---|---|---|---|---|---|---|---|---|---|---|---|---|---|---|---|---|---|---|---|---|---|---|---|---|---|---|---|---|---|---|---|---|---|---|---|---|---|---|---|---|---|---|---|---|---|---|---|---|---|---|---|---|---|---|---|---|---|---|---|---|---|---|---|---|---|---|---|---|---|---|---|---|---|---|---|---|---|---|---|---|---|---|---|---|---|---|---|---|---|
Unlike most standard Abyssals, "PT boats" (PT Imp Pack & Schnellboot Imp Pack) are "very small and fast".
During Events, some special bonuses may be added, with "historical" ships and equipment gaining some accuracy bonuses[10].
| |||||||||||||||||||||||||||||||||||||||||||||||||||||||||||||||||||||||||||||||||||||||||||||||||||||||||||||||||||||||||||||||||||||||||||
| [edit] | |||||||||||||||||||||||||||||||||||||||||||||||||||||||||||||||||||||||||||||||||||||||||||||||||||||||||||||||||||||||||||||||||||||||||||
Phase 4.5 - Debuff
Once LD has been reached, the following steps have to be performed to debuff the boss.
| F | K | S | V1 | |
|---|---|---|---|---|
| Hard | S | S? | S | A+ x3 |
| Medium | S? | S? | S? | A+ x3? |
| Easy | S? | S? | S? | A+ x3? |
| Casual | S? | S? | S? | A+ x2 |
- Refer to #Phase 1 - Boss's fleet for composition and routing.
- Refer to #Phase 2 - TP's fleet for composition and routing.
- Refer to #Phase 3 - TP's fleet for composition and routing.
- Refer to #Phase 4.3 - Shortcut's fleet for composition and routing.
Once on LD, the CG will change to the following:
| French Light Cruiser Princess |
|---|
|


Enemy Compositions
| Type | Ships |
|---|---|
| DD | |
| CV | |
| SS |
| Type | Ships |
|---|---|
| DD | |
| CV | |
| SS |
| Type | Ships |
|---|---|
| DD | |
| CA | |
| BB | |
| CV | |
| SS |
| Type | Ships |
|---|---|
| DD | |
| CV |
| Type | Ships |
|---|---|
| DD | |
| CA | |
| BB | |
| CV | |
| SS |
| Type | Ships |
|---|---|
| DD | |
| CA | |
| BB | |
| CV | |
| SS |
| Type | Ships |
|---|---|
| DD | |
| CA | |
| CV | |
| SS |
| Type | Ships |
|---|---|
| DD | |
| CV | |
| SS |
| Type | Ships |
|---|---|
| DE | |
| CA | |
| FBB | |
| BB | |
| CV | |
| SSV | |
| AV | |
| LHA |
| # | Formation | Normal Battle Node | AD/AP AS/AS+ |
|---|---|---|---|
| A | Line Ahead Double Line Vanguard |
0/0 0/0 | |
| # | Formation | Normal Battle Node | AD/AP AS/AS+ |
| # | Formation | Normal Battle Node | AD/AP AS/AS+ |
|---|---|---|---|
| B | Echelon Line Abreast |
0/0 0/0 | |
| Echelon Line Abreast |
0/0 0/0 | ||
| Echelon Line Abreast |
0/0 0/0 | ||
| # | Formation | Normal Battle Node | AD/AP AS/AS+ |
| # | Formation | Air Defense Node | AD/AP AS/AS+ |
|---|---|---|---|
| B1 | Diamond | 34/67 149/297 | |
| Diamond | 33/65 146/291 | ||
| Diamond | 45/90 201/402 | ||
| Diamond | 45/89 198/396 | ||
| Diamond | 44/88 197/393 | ||
| Diamond | 61/121 270/540 | ||
| # | Formation | Air Defense Node | AD/AP AS/AS+ |
| # | Formation | Normal Battle Node | AD/AP AS/AS+ |
|---|---|---|---|
| B2 | Line Ahead Double Line Echelon |
0/0 0/0 | |
| # | Formation | Normal Battle Node | AD/AP AS/AS+ |
| # | Selection Node | ||
|---|---|---|---|
| C | 艦隊の針路を選択できます。提督、どちらの針路をとられますか? You can decide the fleet's course. Admiral, which heading should we take? | ||
| # | Selection Node | ||
| # | Empty Node | ||
|---|---|---|---|
| C1 | 敵影を見ず。 No enemy spotted. | ||
| # | Empty Node | ||
| # | Formation | Air Defense Node | AD/AP AS/AS+ |
|---|---|---|---|
| C2 | Diamond | 43/85 189/378 | |
| Diamond | 85/169 378/756 | ||
| Diamond | 78/155 348/696 | ||
| # | Formation | Air Defense Node | AD/AP AS/AS+ |
| # | Formation | Normal Battle Node | AD/AP AS/AS+ |
|---|---|---|---|
| C3 | Line Ahead Double Line Echelon |
0/0 0/0 | |
| # | Formation | Normal Battle Node | AD/AP AS/AS+ |
| # | Formation | Supported Battle Node | AD/AP AS/AS+ |
|---|---|---|---|
| D | Echelon Line Abreast |
24/47 104/207 | |
| Line Abreast | 24/47 104/207 | ||
| Echelon Line Abreast |
24/47 104/207 | ||
| # | Formation | Supported Battle Node | AD/AP AS/AS+ |
| # | Empty Node | ||
|---|---|---|---|
| E | 敵影を見ず。 No enemy spotted. | ||
| # | Empty Node | ||
| # | Formation | Boss Battle Node | AD/AP AS/AS+ |
|---|---|---|---|
| F | Diamond | 82/163 366/732 | |
| Diamond | 89/177 396/792 | ||
| Diamond (Final)
|
82/163 366/732 | ||
| # | Formation | Boss Battle Node | AD/AP AS/AS+ |
| # | Formation | Supported Battle Node | AD/AP AS/AS+ |
|---|---|---|---|
| G | Echelon | 24/47 104/207 | |
| Echelon Line Abreast |
24/47 104/207 | ||
| Echelon Line Abreast |
24/47 104/207 | ||
| # | Formation | Supported Battle Node | AD/AP AS/AS+ |
| # | Formation | Normal Battle Node | AD/AP AS/AS+ |
|---|---|---|---|
| H | Echelon Line Abreast |
0/0 0/0 | |
| Echelon Line Abreast |
0/0 0/0 | ||
| Echelon Line Abreast |
0/0 0/0 | ||
| # | Formation | Normal Battle Node | AD/AP AS/AS+ |
| # | Formation | Air Defense Node | AD/AP AS/AS+ |
|---|---|---|---|
| H1 | Diamond | 63/125 279/558 | |
| Diamond | 49/98 219/438 | ||
| Diamond | 67/134 300/600 | ||
| # | Formation | Air Defense Node | AD/AP AS/AS+ |
| # | Formation | Normal Battle Node | AD/AP AS/AS+ |
|---|---|---|---|
| H2 | Line Ahead Double Line Echelon |
0/0 0/0 | |
| # | Formation | Normal Battle Node | AD/AP AS/AS+ |
| # | Landing Node | ||
|---|---|---|---|
| I | 輸送物資の揚陸地点に到達しました。本海域の輸送作戦は無事完了しています。 The landing point of the convoy has been reached. The transport operation here has already been completed successfully. | ||
| # | Landing Node | ||
| # | Empty Node | ||
|---|---|---|---|
| J | 敵影を見ず。 No enemy spotted. | ||
| # | Empty Node | ||
| # | Formation | Boss Battle Node | AD/AP AS/AS+ |
|---|---|---|---|
| K | Line Ahead Double Line Vanguard |
32/63 140/279 | |
| # | Formation | Boss Battle Node | AD/AP AS/AS+ |
| # | Empty Node | ||
|---|---|---|---|
| L | 気のせいだった。 Must be my imagination. | ||
| # | Empty Node | ||
| # | Formation | Normal Battle Node | AD/AP AS/AS+ |
|---|---|---|---|
| M | Line Ahead Echelon Vanguard |
0/0 0/0 | |
| # | Formation | Normal Battle Node | AD/AP AS/AS+ |
| # | Formation | Normal Battle Node | AD/AP AS/AS+ |
|---|---|---|---|
| N | Echelon Line Abreast |
0/0 0/0 | |
| Echelon Line Abreast |
0/0 0/0 | ||
| Echelon Line Abreast |
0/0 0/0 | ||
| # | Formation | Normal Battle Node | AD/AP AS/AS+ |
| # | Formation | Air Defense Node | AD/AP AS/AS+ |
|---|---|---|---|
| O | Diamond | 34/67 149/297 | |
| Diamond | 33/65 146/291 | ||
| Diamond | 45/90 201/402 | ||
| Diamond | 45/89 198/396 | ||
| Diamond | 44/88 197/393 | ||
| Diamond | 61/121 270/540 | ||
| # | Formation | Air Defense Node | AD/AP AS/AS+ |
| # | Formation | Normal Battle Node | AD/AP AS/AS+ |
|---|---|---|---|
| P | Line Ahead Line Abreast Vanguard |
0/0 0/0 | |
| # | Formation | Normal Battle Node | AD/AP AS/AS+ |
| # | Landing Node | ||
|---|---|---|---|
| Q | 輸送物資の揚陸地点に到達しました。本海域の輸送作戦は無事完了しています。 The landing point of the convoy has been reached. The transport operation here has already been completed successfully. | ||
| # | Landing Node | ||
| # | Empty Node | ||
|---|---|---|---|
| R | 敵影を見ず。 No enemy spotted. | ||
| # | Empty Node | ||
| # | Formation | Boss Battle Node | AD/AP AS/AS+ |
|---|---|---|---|
| S | Line Ahead | 25/49 108/216 | |
| Line Ahead | 25/49 108/216 | ||
| Line Ahead (Final)
|
27/53 117/234 | ||
| # | Formation | Boss Battle Node | AD/AP AS/AS+ |
| # | Formation | Supported Battle Node | AD/AP AS/AS+ |
|---|---|---|---|
| T | Echelon Line Abreast |
22/44 98/195 | |
| Echelon Line Abreast |
34/67 150/300 | ||
| Echelon Line Abreast |
34/67 150/300 | ||
| # | Formation | Supported Battle Node | AD/AP AS/AS+ |
| # | Formation | Normal Battle Node | AD/AP AS/AS+ |
|---|---|---|---|
| U | Echelon Line Abreast |
0/0 0/0 | |
| Echelon Line Abreast |
0/0 0/0 | ||
| Echelon Line Abreast |
0/0 0/0 | ||
| # | Formation | Normal Battle Node | AD/AP AS/AS+ |
| # | Formation | Normal Battle Node | AD/AP AS/AS+ |
|---|---|---|---|
| V | Line Ahead Double Line Echelon |
0/0 0/0 | |
| # | Formation | Normal Battle Node | AD/AP AS/AS+ |
| # | Formation | Normal Battle Node | AD/AP AS/AS+ |
|---|---|---|---|
| V1 | Double Line | 17/33 74/147 | |
| Double Line | 50/100 224/447 | ||
| Double Line | 0/0 0/0 | ||
| # | Formation | Normal Battle Node | AD/AP AS/AS+ |
| # | Formation | Air Defense Node | AD/AP AS/AS+ |
|---|---|---|---|
| V2 | Diamond | 46/91 203/405 | |
| Diamond | 56/112 251/501 | ||
| Diamond | 78/156 350/699 | ||
| Diamond | 68/135 303/606 | ||
| Diamond | 90/179 402/804 | ||
| Diamond | 105/209 468/936 | ||
| # | Formation | Air Defense Node | AD/AP AS/AS+ |
| # | Formation | Normal Battle Node | AD/AP AS/AS+ |
|---|---|---|---|
| V3 | Diamond | 63/125 279/558 | |
| Diamond | 52/103 231/462 | ||
| Diamond | 67/134 300/600 | ||
| # | Formation | Normal Battle Node | AD/AP AS/AS+ |
| # | Empty Node | ||
|---|---|---|---|
| W | 敵影を見ず。 No enemy spotted. | ||
| # | Empty Node | ||
| # | Formation | Boss Battle Node | AD/AP AS/AS+ |
|---|---|---|---|
| X | Cruising Formation 4 | 68/136 305/609 | |
| Cruising Formation 4 (Final)
|
88/176 395/789 | ||
| # | Formation | Boss Battle Node | AD/AP AS/AS+ |
| Type | Ships |
|---|---|
| DD | |
| SS |
| Type | Ships |
|---|---|
| DD | |
| CV | |
| SS |
| Type | Ships |
|---|---|
| DD | |
| CA | |
| CV | |
| SS |
| Type | Ships |
|---|---|
| DD | |
| SS |
| Type | Ships |
|---|---|
| DD | |
| CA | |
| CV | |
| SS |
| Type | Ships |
|---|---|
| DD | |
| CA | |
| BB | |
| CV | |
| SS |
| Type | Ships |
|---|---|
| DD | |
| CA | |
| CV | |
| SS |
| Type | Ships |
|---|---|
| DD | |
| CV | |
| SS |
| Type | Ships |
|---|---|
| DE | |
| CA | |
| FBB | |
| BB | |
| CV | |
| SSV | |
| AV | |
| LHA |
| # | Formation | Normal Battle Node | AD/AP AS/AS+ |
|---|---|---|---|
| A | Line Ahead Double Line Vanguard |
0/0 0/0 | |
| # | Formation | Normal Battle Node | AD/AP AS/AS+ |
| # | Formation | Normal Battle Node | AD/AP AS/AS+ |
|---|---|---|---|
| B | Echelon Line Abreast |
0/0 0/0 | |
| Echelon Line Abreast |
0/0 0/0 | ||
| Echelon Line Abreast |
0/0 0/0 | ||
| Echelon Line Abreast |
0/0 0/0 | ||
| # | Formation | Normal Battle Node | AD/AP AS/AS+ |
| # | Formation | Air Defense Node | AD/AP AS/AS+ |
|---|---|---|---|
| B1 | Diamond | 34/67 150/300 | |
| Diamond | 27/54 120/240 | ||
| Diamond | 27/53 117/234 | ||
| Diamond | 34/67 149/297 | ||
| Diamond | 33/65 146/291 | ||
| Diamond | 44/88 197/393 | ||
| # | Formation | Air Defense Node | AD/AP AS/AS+ |
| # | Formation | Normal Battle Node | AD/AP AS/AS+ |
|---|---|---|---|
| B2 | Line Ahead Double Line Echelon |
0/0 0/0 | |
| # | Formation | Normal Battle Node | AD/AP AS/AS+ |
| # | Selection Node | ||
|---|---|---|---|
| C | 艦隊の針路を選択できます。提督、どちらの針路をとられますか? You can decide the fleet's course. Admiral, which heading should we take? | ||
| # | Selection Node | ||
| # | Empty Node | ||
|---|---|---|---|
| C1 | 敵影を見ず。 No enemy spotted. | ||
| # | Empty Node | ||
| # | Formation | Air Defense Node | AD/AP AS/AS+ |
|---|---|---|---|
| C2 | Diamond | 9/17 36/72 | |
| Diamond | 43/85 189/378 | ||
| Diamond | 85/169 378/756 | ||
| # | Formation | Air Defense Node | AD/AP AS/AS+ |
| # | Formation | Normal Battle Node | AD/AP AS/AS+ |
|---|---|---|---|
| C3 | Line Ahead Double Line Echelon |
0/0 0/0 | |
| # | Formation | Normal Battle Node | AD/AP AS/AS+ |
| # | Formation | Supported Battle Node | AD/AP AS/AS+ |
|---|---|---|---|
| D | Echelon | 9/17 36/72 | |
| Echelon Line Abreast |
24/47 104/207 | ||
| # | Formation | Supported Battle Node | AD/AP AS/AS+ |
| # | Empty Node | ||
|---|---|---|---|
| E | 敵影を見ず。 No enemy spotted. | ||
| # | Empty Node | ||
| # | Formation | Boss Battle Node | AD/AP AS/AS+ |
|---|---|---|---|
| F | Diamond | 48/96 215/429 | |
| Diamond | 82/164 368/735 | ||
| Diamond (Final)
|
82/164 368/735 | ||
| # | Formation | Boss Battle Node | AD/AP AS/AS+ |
| # | Formation | Supported Battle Node | AD/AP AS/AS+ |
|---|---|---|---|
| # | Formation | Supported Battle Node | AD/AP AS/AS+ |
| # | Formation | Normal Battle Node | AD/AP AS/AS+ |
|---|---|---|---|
| H | Echelon Line Abreast |
0/0 0/0 | |
| Echelon Line Abreast |
0/0 0/0 | ||
| Echelon Line Abreast |
0/0 0/0 | ||
| Echelon Line Abreast |
0/0 0/0 | ||
| # | Formation | Normal Battle Node | AD/AP AS/AS+ |
| # | Formation | Air Defense Node | AD/AP AS/AS+ |
|---|---|---|---|
| H1 | Diamond | 32/63 140/279 | |
| Diamond | 47/93 207/414 | ||
| Diamond | 55/109 243/486 | ||
| # | Formation | Air Defense Node | AD/AP AS/AS+ |
| # | Formation | Normal Battle Node | AD/AP AS/AS+ |
|---|---|---|---|
| H2 | Line Ahead Double Line Echelon |
0/0 0/0 | |
| # | Formation | Normal Battle Node | AD/AP AS/AS+ |
| # | Landing Node | ||
|---|---|---|---|
| I | 輸送物資の揚陸地点に到達しました。本海域の輸送作戦は無事完了しています。 The landing point of the convoy has been reached. The transport operation here has already been completed successfully. | ||
| # | Landing Node | ||
| # | Empty Node | ||
|---|---|---|---|
| J | 敵影を見ず。 No enemy spotted. | ||
| # | Empty Node | ||
| # | Formation | Boss Battle Node | AD/AP AS/AS+ |
|---|---|---|---|
| K | Line Ahead Double Line Vanguard |
26/52 116/231 | |
| # | Formation | Boss Battle Node | AD/AP AS/AS+ |
| # | Empty Node | ||
|---|---|---|---|
| L | 気のせいだった。 Must be my imagination. | ||
| # | Empty Node | ||
| # | Formation | Normal Battle Node | AD/AP AS/AS+ |
|---|---|---|---|
| M | Line Ahead Echelon Vanguard |
0/0 0/0 | |
| # | Formation | Normal Battle Node | AD/AP AS/AS+ |
| # | Formation | Normal Battle Node | AD/AP AS/AS+ |
|---|---|---|---|
| N | Echelon Line Abreast |
0/0 0/0 | |
| Echelon | 0/0 0/0 | ||
| Line Abreast | 0/0 0/0 | ||
| Echelon Line Abreast |
0/0 0/0 | ||
| # | Formation | Normal Battle Node | AD/AP AS/AS+ |
| # | Formation | Air Defense Node | AD/AP AS/AS+ |
|---|---|---|---|
| O | Diamond | 27/54 120/240 | |
| Diamond | 27/53 117/234 | ||
| Diamond | 34/67 149/297 | ||
| Diamond | 33/65 146/291 | ||
| Diamond | 44/88 197/393 | ||
| # | Formation | Air Defense Node | AD/AP AS/AS+ |
| # | Formation | Normal Battle Node | AD/AP AS/AS+ |
|---|---|---|---|
| P | Line Ahead Line Abreast Vanguard |
0/0 0/0 | |
| # | Formation | Normal Battle Node | AD/AP AS/AS+ |
| # | Landing Node | ||
|---|---|---|---|
| Q | 輸送物資の揚陸地点に到達しました。本海域の輸送作戦は無事完了しています。 The landing point of the convoy has been reached. The transport operation here has already been completed successfully. | ||
| # | Landing Node | ||
| # | Empty Node | ||
|---|---|---|---|
| R | 敵影を見ず。 No enemy spotted. | ||
| # | Empty Node | ||
| # | Formation | Boss Battle Node | AD/AP AS/AS+ |
|---|---|---|---|
| S | Line Ahead | 23/45 101/201 | |
| Line Ahead | 23/45 101/201 | ||
| Line Ahead (Final)
|
25/49 108/216 | ||
| # | Formation | Boss Battle Node | AD/AP AS/AS+ |
| # | Formation | Supported Battle Node | AD/AP AS/AS+ |
|---|---|---|---|
| T | Echelon Line Abreast |
16/31 69/138 | |
| Echelon Line Abreast |
22/44 98/195 | ||
| Echelon Line Abreast |
22/44 98/195 | ||
| Echelon Line Abreast |
34/67 150/300 | ||
| # | Formation | Supported Battle Node | AD/AP AS/AS+ |
| # | Formation | Normal Battle Node | AD/AP AS/AS+ |
|---|---|---|---|
| U | Echelon Line Abreast |
0/0 0/0 | |
| Echelon Line Abreast |
0/0 0/0 | ||
| Echelon Line Abreast |
0/0 0/0 | ||
| Echelon Line Abreast |
0/0 0/0 | ||
| # | Formation | Normal Battle Node | AD/AP AS/AS+ |
| # | Formation | Normal Battle Node | AD/AP AS/AS+ |
|---|---|---|---|
| V | Line Ahead Double Line Echelon |
0/0 0/0 | |
| # | Formation | Normal Battle Node | AD/AP AS/AS+ |
| # | Formation | Normal Battle Node | AD/AP AS/AS+ |
|---|---|---|---|
| V1 | Double Line | 16/31 69/138 | |
| Double Line | 38/75 167/333 | ||
| Double Line | 0/0 0/0 | ||
| # | Formation | Normal Battle Node | AD/AP AS/AS+ |
| # | Formation | Air Defense Node | AD/AP AS/AS+ |
|---|---|---|---|
| V2 | Diamond | 46/91 203/405 | |
| Diamond | 56/112 251/501 | ||
| # | Formation | Air Defense Node | AD/AP AS/AS+ |
| # | Formation | Normal Battle Node | AD/AP AS/AS+ |
|---|---|---|---|
| V3 | Diamond | 47/93 207/414 | |
| Diamond | 49/98 219/438 | ||
| Diamond | 55/109 243/486 | ||
| # | Formation | Normal Battle Node | AD/AP AS/AS+ |
| # | Empty Node | ||
|---|---|---|---|
| W | 敵影を見ず。 No enemy spotted. | ||
| # | Empty Node | ||
| # | Formation | Boss Battle Node | AD/AP AS/AS+ |
|---|---|---|---|
| X | Cruising Formation 4 | 46/91 204/408 | |
| Cruising Formation 4 (Final)
|
59/117 263/525 | ||
| # | Formation | Boss Battle Node | AD/AP AS/AS+ |
| Type | Ships |
|---|---|
| DD | |
| CV | |
| SS |
| Type | Ships |
|---|---|
| DD | |
| CV | |
| SS |
| Type | Ships |
|---|---|
| DD | |
| CA | |
| CV | |
| SS |
| Type | Ships |
|---|---|
| DD | |
| CV | |
| SS |
| Type | Ships |
|---|---|
| DD | |
| CV | |
| SS |
| Type | Ships |
|---|---|
| DD | |
| CA | |
| BB | |
| CV | |
| SS |
| Type | Ships |
|---|---|
| DD | |
| CV | |
| SS |
| Type | Ships |
|---|---|
| DD | |
| CV | |
| SS |
| Type | Ships |
|---|---|
| DE | |
| CA | |
| FBB | |
| BB | |
| CV | |
| SSV | |
| AV | |
| LHA |
| # | Formation | Normal Battle Node | AD/AP AS/AS+ |
|---|---|---|---|
| A | Line Ahead Double Line Vanguard |
0/0 0/0 | |
| # | Formation | Normal Battle Node | AD/AP AS/AS+ |
| # | Formation | Normal Battle Node | AD/AP AS/AS+ |
|---|---|---|---|
| B | Echelon Line Abreast |
0/0 0/0 | |
| Echelon Line Abreast |
0/0 0/0 | ||
| Echelon Line Abreast |
0/0 0/0 | ||
| # | Formation | Normal Battle Node | AD/AP AS/AS+ |
| # | Formation | Air Defense Node | AD/AP AS/AS+ |
|---|---|---|---|
| B1 | Diamond | 16/31 69/138 | |
| Diamond | 22/44 98/195 | ||
| Diamond | 34/67 150/300 | ||
| Diamond | 27/54 120/240 | ||
| Diamond | 27/53 117/234 | ||
| Diamond | 34/67 149/297 | ||
| # | Formation | Air Defense Node | AD/AP AS/AS+ |
| # | Formation | Normal Battle Node | AD/AP AS/AS+ |
|---|---|---|---|
| B2 | Line Ahead Double Line Echelon |
0/0 0/0 | |
| # | Formation | Normal Battle Node | AD/AP AS/AS+ |
| # | Selection Node | ||
|---|---|---|---|
| C | 艦隊の針路を選択できます。提督、どちらの針路をとられますか? You can decide the fleet's course. Admiral, which heading should we take? | ||
| # | Selection Node | ||
| # | Empty Node | ||
|---|---|---|---|
| C1 | 敵影を見ず。 No enemy spotted. | ||
| # | Empty Node | ||
| # | Formation | Air Defense Node | AD/AP AS/AS+ |
|---|---|---|---|
| C2 | Diamond | 9/17 36/72 | |
| Diamond | 43/85 189/378 | ||
| Diamond | 51/101 225/450 | ||
| # | Formation | Air Defense Node | AD/AP AS/AS+ |
| # | Formation | Normal Battle Node | AD/AP AS/AS+ |
|---|---|---|---|
| C3 | Line Ahead Double Line Echelon |
0/0 0/0 | |
| # | Formation | Normal Battle Node | AD/AP AS/AS+ |
| # | Formation | Supported Battle Node | AD/AP AS/AS+ |
|---|---|---|---|
| D | Echelon Line Abreast |
3/6 12/24 | |
| Echelon Line Abreast |
3/6 12/24 | ||
| Echelon Line Abreast |
9/17 36/72 | ||
| # | Formation | Supported Battle Node | AD/AP AS/AS+ |
| # | Empty Node | ||
|---|---|---|---|
| E | 敵影を見ず。 No enemy spotted. | ||
| # | Empty Node | ||
| # | Formation | Boss Battle Node | AD/AP AS/AS+ |
|---|---|---|---|
| F | Diamond | 48/95 212/423 | |
| Diamond | 82/163 365/729 | ||
| Diamond (Final)
|
82/163 365/729 | ||
| # | Formation | Boss Battle Node | AD/AP AS/AS+ |
| # | Formation | Supported Battle Node | AD/AP AS/AS+ |
|---|---|---|---|
| # | Formation | Supported Battle Node | AD/AP AS/AS+ |
| # | Formation | Normal Battle Node | AD/AP AS/AS+ |
|---|---|---|---|
| H | Echelon Line Abreast |
0/0 0/0 | |
| Echelon Line Abreast |
0/0 0/0 | ||
| Echelon Line Abreast |
0/0 0/0 | ||
| # | Formation | Normal Battle Node | AD/AP AS/AS+ |
| # | Formation | Air Defense Node | AD/AP AS/AS+ |
|---|---|---|---|
| H1 | Diamond | 26/52 116/231 | |
| Diamond | 32/63 140/279 | ||
| Diamond | 47/93 207/414 | ||
| # | Formation | Air Defense Node | AD/AP AS/AS+ |
| # | Formation | Normal Battle Node | AD/AP AS/AS+ |
|---|---|---|---|
| H2 | Line Ahead Double Line Echelon |
0/0 0/0 | |
| # | Formation | Normal Battle Node | AD/AP AS/AS+ |
| # | Landing Node | ||
|---|---|---|---|
| I | 輸送物資の揚陸地点に到達しました。本海域の輸送作戦は無事完了しています。 The landing point of the convoy has been reached. The transport operation here has already been completed successfully. | ||
| # | Landing Node | ||
| # | Empty Node | ||
|---|---|---|---|
| J | 敵影を見ず。 No enemy spotted. | ||
| # | Empty Node | ||
| # | Formation | Boss Battle Node | AD/AP AS/AS+ |
|---|---|---|---|
| K | Line Ahead Double Line Vanguard |
24/47 104/207 | |
| # | Formation | Boss Battle Node | AD/AP AS/AS+ |
| # | Empty Node | ||
|---|---|---|---|
| L | 気のせいだった。 Must be my imagination. | ||
| # | Empty Node | ||
| # | Formation | Normal Battle Node | AD/AP AS/AS+ |
|---|---|---|---|
| M | Line Ahead Echelon Vanguard |
0/0 0/0 | |
| # | Formation | Normal Battle Node | AD/AP AS/AS+ |
| # | Formation | Normal Battle Node | AD/AP AS/AS+ |
|---|---|---|---|
| N | Echelon | 0/0 0/0 | |
| Echelon Line Abreast |
0/0 0/0 | ||
| Echelon Line Abreast |
0/0 0/0 | ||
| # | Formation | Normal Battle Node | AD/AP AS/AS+ |
| # | Formation | Air Defense Node | AD/AP AS/AS+ |
|---|---|---|---|
| O | Diamond | 16/31 69/138 | |
| Diamond | 22/44 98/195 | ||
| Diamond | 34/67 150/300 | ||
| Diamond | 27/54 120/240 | ||
| Diamond | 27/53 117/234 | ||
| Diamond | 34/67 149/297 | ||
| # | Formation | Air Defense Node | AD/AP AS/AS+ |
| # | Formation | Normal Battle Node | AD/AP AS/AS+ |
|---|---|---|---|
| P | Line Ahead Line Abreast Vanguard |
0/0 0/0 | |
| # | Formation | Normal Battle Node | AD/AP AS/AS+ |
| # | Landing Node | ||
|---|---|---|---|
| Q | 輸送物資の揚陸地点に到達しました。本海域の輸送作戦は無事完了しています。 The landing point of the convoy has been reached. The transport operation here has already been completed successfully. | ||
| # | Landing Node | ||
| # | Empty Node | ||
|---|---|---|---|
| R | 敵影を見ず。 No enemy spotted. | ||
| # | Empty Node | ||
| # | Formation | Boss Battle Node | AD/AP AS/AS+ |
|---|---|---|---|
| S | Line Ahead | 23/45 101/201 | |
| Line Ahead | 23/45 101/201 | ||
| Line Ahead (Final)
|
25/49 108/216 | ||
| # | Formation | Boss Battle Node | AD/AP AS/AS+ |
| # | Formation | Supported Battle Node | AD/AP AS/AS+ |
|---|---|---|---|
| T | Echelon Line Abreast |
16/31 69/138 | |
| Echelon Line Abreast |
16/31 69/138 | ||
| Echelon Line Abreast |
22/44 98/195 | ||
| # | Formation | Supported Battle Node | AD/AP AS/AS+ |
| # | Formation | Normal Battle Node | AD/AP AS/AS+ |
|---|---|---|---|
| U | Echelon Line Abreast |
0/0 0/0 | |
| Echelon Line Abreast |
0/0 0/0 | ||
| Echelon Line Abreast |
0/0 0/0 | ||
| # | Formation | Normal Battle Node | AD/AP AS/AS+ |
| # | Formation | Normal Battle Node | AD/AP AS/AS+ |
|---|---|---|---|
| V | Line Ahead Double Line Echelon |
0/0 0/0 | |
| # | Formation | Normal Battle Node | AD/AP AS/AS+ |
| # | Formation | Normal Battle Node | AD/AP AS/AS+ |
|---|---|---|---|
| V1 | Double Line | 14/27 60/120 | |
| Double Line | 29/58 129/258 | ||
| Double Line | 0/0 0/0 | ||
| # | Formation | Normal Battle Node | AD/AP AS/AS+ |
| # | Formation | Air Defense Node | AD/AP AS/AS+ |
|---|---|---|---|
| V2 | Diamond | 22/44 98/195 | |
| Diamond | 39/78 174/348 | ||
| Diamond | 46/91 203/405 | ||
| Diamond | 50/99 222/444 | ||
| Diamond | 72/143 321/642 | ||
| Diamond | 56/112 251/501 | ||
| # | Formation | Air Defense Node | AD/AP AS/AS+ |
| # | Formation | Normal Battle Node | AD/AP AS/AS+ |
|---|---|---|---|
| V3 | Diamond | 24/47 104/207 | |
| Diamond | 32/63 140/279 | ||
| Diamond | 47/93 207/414 | ||
| # | Formation | Normal Battle Node | AD/AP AS/AS+ |
| # | Empty Node | ||
|---|---|---|---|
| W | 敵影を見ず。 No enemy spotted. | ||
| # | Empty Node | ||
| # | Formation | Boss Battle Node | AD/AP AS/AS+ |
|---|---|---|---|
| X | Cruising Formation 4 | 45/89 200/399 | |
| Cruising Formation 4 (Final)
|
57/114 255/510 | ||
| # | Formation | Boss Battle Node | AD/AP AS/AS+ |
| Type | Ships |
|---|---|
| DD | |
| CV | |
| SS |
| Type | Ships |
|---|---|
| DD | |
| CV | |
| SS |
| Type | Ships |
|---|---|
| DD | |
| CA | |
| CV | |
| SS |
| Type | Ships |
|---|---|
| DD | |
| SS |
| Type | Ships |
|---|---|
| DD | |
| CV | |
| SS |
| Type | Ships |
|---|---|
| DD | |
| CA | |
| BB | |
| CV | |
| SS |
| Type | Ships |
|---|---|
| DD | |
| CV | |
| SS |
| Type | Ships |
|---|---|
| DD | |
| CV | |
| SS |
| Type | Ships |
|---|---|
| DE | |
| CA | |
| FBB | |
| BB | |
| CV | |
| SSV | |
| AV | |
| LHA |
| # | Formation | Normal Battle Node | AD/AP AS/AS+ |
|---|---|---|---|
| A | Line Ahead Double Line Vanguard |
0/0 0/0 | |
| # | Formation | Normal Battle Node | AD/AP AS/AS+ |
| # | Formation | Normal Battle Node | AD/AP AS/AS+ |
|---|---|---|---|
| B | Echelon Line Abreast |
0/0 0/0 | |
| Echelon Line Abreast |
0/0 0/0 | ||
| # | Formation | Normal Battle Node | AD/AP AS/AS+ |
| # | Formation | Air Defense Node | AD/AP AS/AS+ |
|---|---|---|---|
| B1 | Diamond | 16/31 69/138 | |
| Diamond | 22/44 98/195 | ||
| Diamond | 34/67 150/300 | ||
| Diamond | 27/54 120/240 | ||
| # | Formation | Air Defense Node | AD/AP AS/AS+ |
| # | Formation | Normal Battle Node | AD/AP AS/AS+ |
|---|---|---|---|
| B2 | Line Ahead Double Line Echelon |
0/0 0/0 | |
| # | Formation | Normal Battle Node | AD/AP AS/AS+ |
| # | Selection Node | ||
|---|---|---|---|
| C | 艦隊の針路を選択できます。提督、どちらの針路をとられますか? You can decide the fleet's course. Admiral, which heading should we take? | ||
| # | Selection Node | ||
| # | Empty Node | ||
|---|---|---|---|
| C1 | 敵影を見ず。 No enemy spotted. | ||
| # | Empty Node | ||
| # | Formation | Air Defense Node | AD/AP AS/AS+ |
|---|---|---|---|
| C2 | Diamond | 3/6 12/24 | |
| Diamond | 43/85 189/378 | ||
| Diamond | 45/90 201/402 | ||
| # | Formation | Air Defense Node | AD/AP AS/AS+ |
| # | Formation | Normal Battle Node | AD/AP AS/AS+ |
|---|---|---|---|
| C3 | Line Ahead Double Line Echelon |
0/0 0/0 | |
| # | Formation | Normal Battle Node | AD/AP AS/AS+ |
| # | Formation | Supported Battle Node | AD/AP AS/AS+ |
|---|---|---|---|
| D | Echelon Line Abreast |
3/6 12/24 | |
| Echelon Line Abreast |
3/6 12/24 | ||
| # | Formation | Supported Battle Node | AD/AP AS/AS+ |
| # | Empty Node | ||
|---|---|---|---|
| E | 敵影を見ず。 No enemy spotted. | ||
| # | Empty Node | ||
| # | Formation | Boss Battle Node | AD/AP AS/AS+ |
|---|---|---|---|
| F | Diamond | 41/82 183/366 | |
| Diamond | 47/93 207/414 | ||
| Diamond (Final)
|
81/161 360/720 | ||
| # | Formation | Boss Battle Node | AD/AP AS/AS+ |
| # | Formation | Supported Battle Node | AD/AP AS/AS+ |
|---|---|---|---|
| # | Formation | Supported Battle Node | AD/AP AS/AS+ |
| # | Formation | Normal Battle Node | AD/AP AS/AS+ |
|---|---|---|---|
| H | Echelon Line Abreast |
0/0 0/0 | |
| Echelon Line Abreast |
0/0 0/0 | ||
| # | Formation | Normal Battle Node | AD/AP AS/AS+ |
| # | Formation | Air Defense Node | AD/AP AS/AS+ |
|---|---|---|---|
| H1 | Diamond | 24/47 104/207 | |
| Diamond | 26/52 116/231 | ||
| Diamond | 32/63 140/279 | ||
| # | Formation | Air Defense Node | AD/AP AS/AS+ |
| # | Formation | Normal Battle Node | AD/AP AS/AS+ |
|---|---|---|---|
| H2 | Line Ahead Double Line Echelon |
0/0 0/0 | |
| # | Formation | Normal Battle Node | AD/AP AS/AS+ |
| # | Landing Node | ||
|---|---|---|---|
| I | 輸送物資の揚陸地点に到達しました。本海域の輸送作戦は無事完了しています。 The landing point of the convoy has been reached. The transport operation here has already been completed successfully. | ||
| # | Landing Node | ||
| # | Empty Node | ||
|---|---|---|---|
| J | 敵影を見ず。 No enemy spotted. | ||
| # | Empty Node | ||
| # | Formation | Boss Battle Node | AD/AP AS/AS+ |
|---|---|---|---|
| K | Line Ahead Double Line Vanguard |
24/47 104/207 | |
| # | Formation | Boss Battle Node | AD/AP AS/AS+ |
| # | Empty Node | ||
|---|---|---|---|
| L | 気のせいだった。 Must be my imagination. | ||
| # | Empty Node | ||
| # | Formation | Normal Battle Node | AD/AP AS/AS+ |
|---|---|---|---|
| M | Line Ahead Echelon Vanguard |
0/0 0/0 | |
| # | Formation | Normal Battle Node | AD/AP AS/AS+ |
| # | Formation | Normal Battle Node | AD/AP AS/AS+ |
|---|---|---|---|
| N | Echelon Line Abreast |
0/0 0/0 | |
| Echelon Line Abreast |
0/0 0/0 | ||
| # | Formation | Normal Battle Node | AD/AP AS/AS+ |
| # | Formation | Air Defense Node | AD/AP AS/AS+ |
|---|---|---|---|
| O | Diamond | 16/31 69/138 | |
| Diamond | 22/44 98/195 | ||
| Diamond | 34/67 150/300 | ||
| Diamond | 27/54 120/240 | ||
| # | Formation | Air Defense Node | AD/AP AS/AS+ |
| # | Formation | Normal Battle Node | AD/AP AS/AS+ |
|---|---|---|---|
| P | Line Ahead Line Abreast Vanguard |
0/0 0/0 | |
| # | Formation | Normal Battle Node | AD/AP AS/AS+ |
| # | Landing Node | ||
|---|---|---|---|
| Q | 輸送物資の揚陸地点に到達しました。本海域の輸送作戦は無事完了しています。 The landing point of the convoy has been reached. The transport operation here has already been completed successfully. | ||
| # | Landing Node | ||
| # | Empty Node | ||
|---|---|---|---|
| R | 敵影を見ず。 No enemy spotted. | ||
| # | Empty Node | ||
| # | Formation | Boss Battle Node | AD/AP AS/AS+ |
|---|---|---|---|
| S | Line Ahead | 22/43 96/192 | |
| Line Ahead | 22/43 96/192 | ||
| Line Ahead (Final)
|
23/45 101/201 | ||
| # | Formation | Boss Battle Node | AD/AP AS/AS+ |
| # | Formation | Supported Battle Node | AD/AP AS/AS+ |
|---|---|---|---|
| T | Echelon Line Abreast |
16/31 69/138 | |
| Echelon Line Abreast |
16/31 69/138 | ||
| # | Formation | Supported Battle Node | AD/AP AS/AS+ |
| # | Formation | Normal Battle Node | AD/AP AS/AS+ |
|---|---|---|---|
| U | Echelon Line Abreast |
0/0 0/0 | |
| Echelon Line Abreast |
0/0 0/0 | ||
| # | Formation | Normal Battle Node | AD/AP AS/AS+ |
| # | Formation | Normal Battle Node | AD/AP AS/AS+ |
|---|---|---|---|
| V | Line Ahead Double Line Echelon |
0/0 0/0 | |
| # | Formation | Normal Battle Node | AD/AP AS/AS+ |
| # | Formation | Normal Battle Node | AD/AP AS/AS+ |
|---|---|---|---|
| V1 | Double Line | 6/11 24/48 | |
| Double Line | 0/0 0/0 | ||
| Double Line | 6/11 24/48 | ||
| # | Formation | Normal Battle Node | AD/AP AS/AS+ |
| # | Formation | Air Defense Node | AD/AP AS/AS+ |
|---|---|---|---|
| V2 | Diamond | 16/31 69/138 | |
| Diamond | 22/44 98/195 | ||
| Diamond | 39/78 174/348 | ||
| Diamond | 50/99 222/444 | ||
| # | Formation | Air Defense Node | AD/AP AS/AS+ |
| # | Formation | Normal Battle Node | AD/AP AS/AS+ |
|---|---|---|---|
| V3 | Diamond | 24/47 104/207 | |
| Diamond | 26/52 116/231 | ||
| Diamond | 32/63 140/279 | ||
| # | Formation | Normal Battle Node | AD/AP AS/AS+ |
| # | Empty Node | ||
|---|---|---|---|
| W | 敵影を見ず。 No enemy spotted. | ||
| # | Empty Node | ||
| # | Formation | Boss Battle Node | AD/AP AS/AS+ |
|---|---|---|---|
| X | Cruising Formation 4 | 40/79 176/351 | |
| Cruising Formation 4 (Final)
|
53/106 237/474 | ||
| # | Formation | Boss Battle Node | AD/AP AS/AS+ |
Ship Drops
| Ship drops | |||||||||||||||||||||||||||||||||||||||||||||||||||||||||||||||||||||||||||||||||||||||||||||||||||
|---|---|---|---|---|---|---|---|---|---|---|---|---|---|---|---|---|---|---|---|---|---|---|---|---|---|---|---|---|---|---|---|---|---|---|---|---|---|---|---|---|---|---|---|---|---|---|---|---|---|---|---|---|---|---|---|---|---|---|---|---|---|---|---|---|---|---|---|---|---|---|---|---|---|---|---|---|---|---|---|---|---|---|---|---|---|---|---|---|---|---|---|---|---|---|---|---|---|---|---|
| Type | Ship? | B2 | C3 | F | H2 | K | S | V | V3 | X | |||||||||||||||||||||||||||||||||||||||||||||||||||||||||||||||||||||||||||||||||||||||||
| DE | Inagi | Casual+ | |||||||||||||||||||||||||||||||||||||||||||||||||||||||||||||||||||||||||||||||||||||||||||||||||
| DE | Ukuru | Casual+ | |||||||||||||||||||||||||||||||||||||||||||||||||||||||||||||||||||||||||||||||||||||||||||||||||
| DD | Javelin | Casual+ | Easy+ | Casual+ | Easy+ | ||||||||||||||||||||||||||||||||||||||||||||||||||||||||||||||||||||||||||||||||||||||||||||||
| DD | Hatsukaze | Easy+ | Casual+ | Casual+ | Casual+ | Casual+ | Casual+ | Casual+ | Casual+ | ||||||||||||||||||||||||||||||||||||||||||||||||||||||||||||||||||||||||||||||||||||||||||
| DD | Maikaze | Casual+ | Casual+ | Casual+ | Easy+ | Casual+ | Casual+ | Casual+ | Casual+ | ||||||||||||||||||||||||||||||||||||||||||||||||||||||||||||||||||||||||||||||||||||||||||
| DD | Jervis | Hard+ | Casual+ | ||||||||||||||||||||||||||||||||||||||||||||||||||||||||||||||||||||||||||||||||||||||||||||||||
| DD | Janus | Easy+ | Medium+ | Casual+ | Hard+ | ||||||||||||||||||||||||||||||||||||||||||||||||||||||||||||||||||||||||||||||||||||||||||||||
| CA | Mikuma | Easy+ | Hard+ | Casual+ | Medium+ | Casual+ | |||||||||||||||||||||||||||||||||||||||||||||||||||||||||||||||||||||||||||||||||||||||||||||
| CA | Prinz Eugen | Casual+ | Medium+ | Casual+ | Medium+ | ||||||||||||||||||||||||||||||||||||||||||||||||||||||||||||||||||||||||||||||||||||||||||||||
| FBB | Jean Bart | Casual+ | |||||||||||||||||||||||||||||||||||||||||||||||||||||||||||||||||||||||||||||||||||||||||||||||||
| FBB | Richelieu | Casual+ | |||||||||||||||||||||||||||||||||||||||||||||||||||||||||||||||||||||||||||||||||||||||||||||||||
| BB | Rodney | Casual+ | |||||||||||||||||||||||||||||||||||||||||||||||||||||||||||||||||||||||||||||||||||||||||||||||||
| BB | Valiant | Hard+ | Hard+ | Casual+ | |||||||||||||||||||||||||||||||||||||||||||||||||||||||||||||||||||||||||||||||||||||||||||||||
| BB | Warspite | Casual+ | |||||||||||||||||||||||||||||||||||||||||||||||||||||||||||||||||||||||||||||||||||||||||||||||||
| BB | Nelson | Casual+ | |||||||||||||||||||||||||||||||||||||||||||||||||||||||||||||||||||||||||||||||||||||||||||||||||
| CV | Ark Royal | Casual+ | Casual+ | Casual+ | Easy+ | Casual+ | Casual+ | Casual+ | Casual+ | Casual+ | |||||||||||||||||||||||||||||||||||||||||||||||||||||||||||||||||||||||||||||||||||||||||
| SS | C.Cappellini | Casual+ | Casual+ | Easy+ | Casual+ | Casual+ | Casual+ | Casual+ | Casual+ | ||||||||||||||||||||||||||||||||||||||||||||||||||||||||||||||||||||||||||||||||||||||||||
| SS | U-511 | Easy+ | Casual+ | Casual+ | Casual+ | Casual+ | Casual+ | Casual+ | Casual+ | ||||||||||||||||||||||||||||||||||||||||||||||||||||||||||||||||||||||||||||||||||||||||||
| SSV | I-400 | Casual+ | |||||||||||||||||||||||||||||||||||||||||||||||||||||||||||||||||||||||||||||||||||||||||||||||||
| SSV | I-401 | Casual+ | |||||||||||||||||||||||||||||||||||||||||||||||||||||||||||||||||||||||||||||||||||||||||||||||||
| AV | Akitsushima | Casual+ | |||||||||||||||||||||||||||||||||||||||||||||||||||||||||||||||||||||||||||||||||||||||||||||||||
| LHA | Shinshuu Maru | Casual+ | |||||||||||||||||||||||||||||||||||||||||||||||||||||||||||||||||||||||||||||||||||||||||||||||||
| DD | Akigumo | Easy+ | |||||||||||||||||||||||||||||||||||||||||||||||||||||||||||||||||||||||||||||||||||||||||||||||||
| DD | Yuugumo | Easy+ | |||||||||||||||||||||||||||||||||||||||||||||||||||||||||||||||||||||||||||||||||||||||||||||||||
| CL | Kitakami | Casual+ | |||||||||||||||||||||||||||||||||||||||||||||||||||||||||||||||||||||||||||||||||||||||||||||||||
| CL | Ooi | Casual+ | |||||||||||||||||||||||||||||||||||||||||||||||||||||||||||||||||||||||||||||||||||||||||||||||||
| CL | Nagara | Easy+ | Casual+ | Casual+ | Casual+ | Casual+ | Casual+ | Casual+ | Casual+ | Casual+ | |||||||||||||||||||||||||||||||||||||||||||||||||||||||||||||||||||||||||||||||||||||||||
| CL | Kinu | Casual+ | Casual+ | Casual+ | Casual+ | Casual+ | Casual+ | Casual+ | Casual+ | ||||||||||||||||||||||||||||||||||||||||||||||||||||||||||||||||||||||||||||||||||||||||||
| CL | Abukuma | Casual+ | Casual+ | Casual+ | Hard+ | Casual+ | Casual+ | Casual+ | Casual+ | ||||||||||||||||||||||||||||||||||||||||||||||||||||||||||||||||||||||||||||||||||||||||||
| CL | Sendai | Hard+ | Casual+ | ||||||||||||||||||||||||||||||||||||||||||||||||||||||||||||||||||||||||||||||||||||||||||||||||
| CL | Yuubari | Casual+ | |||||||||||||||||||||||||||||||||||||||||||||||||||||||||||||||||||||||||||||||||||||||||||||||||
| CA | Kinugasa | Easy+ | Casual+ | Casual+ | Medium+ | Casual+ | Casual+ | Casual+ | Casual+ | Casual+ | |||||||||||||||||||||||||||||||||||||||||||||||||||||||||||||||||||||||||||||||||||||||||
| CA | Mogami | Casual+ | Casual+ | Casual+ | Casual+ | Casual+ | Casual+ | Casual+ | Casual+ | Casual+ | |||||||||||||||||||||||||||||||||||||||||||||||||||||||||||||||||||||||||||||||||||||||||
| CA | Suzuya | Casual+ | Casual+ | Casual+ | Hard+ | Casual+ | Casual+ | ||||||||||||||||||||||||||||||||||||||||||||||||||||||||||||||||||||||||||||||||||||||||||||
| CA | Kumano | Casual+ | Easy+ | Casual+ | Medium+ | Casual+ | Casual+ | ||||||||||||||||||||||||||||||||||||||||||||||||||||||||||||||||||||||||||||||||||||||||||||
| CA | Tone | Casual+ | |||||||||||||||||||||||||||||||||||||||||||||||||||||||||||||||||||||||||||||||||||||||||||||||||
| CA | Chikuma | Casual+ | |||||||||||||||||||||||||||||||||||||||||||||||||||||||||||||||||||||||||||||||||||||||||||||||||
| FBB | Kongou | Easy+ | Casual+ | ||||||||||||||||||||||||||||||||||||||||||||||||||||||||||||||||||||||||||||||||||||||||||||||||
| FBB | Hiei | Medium+ | Medium+ | Casual+ | Easy+ | Easy+ | Easy+ | Casual+ | Casual+ | ||||||||||||||||||||||||||||||||||||||||||||||||||||||||||||||||||||||||||||||||||||||||||
| FBB | Haruna | Medium+ | Hard+ | Casual+ | Casual+ | ||||||||||||||||||||||||||||||||||||||||||||||||||||||||||||||||||||||||||||||||||||||||||||||
| FBB | Kirishima | Easy+ | Easy+ | Casual+ | Casual+ | Casual+ | Easy+ | Casual+ | Casual+ | ||||||||||||||||||||||||||||||||||||||||||||||||||||||||||||||||||||||||||||||||||||||||||
| BB | Fusou | Casual+ | |||||||||||||||||||||||||||||||||||||||||||||||||||||||||||||||||||||||||||||||||||||||||||||||||
| BB | Yamashiro | Casual+ | |||||||||||||||||||||||||||||||||||||||||||||||||||||||||||||||||||||||||||||||||||||||||||||||||
| BB | Ise | Casual+ | |||||||||||||||||||||||||||||||||||||||||||||||||||||||||||||||||||||||||||||||||||||||||||||||||
| BB | Hyuuga | Casual+ | |||||||||||||||||||||||||||||||||||||||||||||||||||||||||||||||||||||||||||||||||||||||||||||||||
| BB | Nagato | Casual+ | |||||||||||||||||||||||||||||||||||||||||||||||||||||||||||||||||||||||||||||||||||||||||||||||||
| BB | Mutsu | Casual+ | |||||||||||||||||||||||||||||||||||||||||||||||||||||||||||||||||||||||||||||||||||||||||||||||||
| CV | Souryuu | Easy+ | Easy+ | Casual+ | Casual+ | Casual+ | Casual+ | Casual+ | Casual+ | Casual+ | |||||||||||||||||||||||||||||||||||||||||||||||||||||||||||||||||||||||||||||||||||||||||
| CV | Hiryuu | Hard+ | Hard+ | Casual+ | Casual+ | Casual+ | Medium+ | Casual+ | Casual+ | ||||||||||||||||||||||||||||||||||||||||||||||||||||||||||||||||||||||||||||||||||||||||||
|
| |||||||||
|---|---|---|---|---|---|---|---|---|---|
|
2nd wave of Friendly Fleets has been released!
Time until event's end:
| |||||||||
Trivia
- The Air Base is in Cabo Verde (Cape Verde). This was a strategic location during WW2 and is still one today.
- Node X is in Dakar, and the site of Battle of Dakar where the Allied Forces staged an unsuccessful operation to take the Port of Dakar.