- Welcome to the Kancolle Wiki!
- If you have any questions regarding site content, account registration, etc., please visit the KanColle Wiki Discord
Summer 2022 Event/E-5
 
| |||||||||
|---|---|---|---|---|---|---|---|---|---|
|
Time remaining until Event ends:
| |||||||||
反航上陸!トーチ作戦
![]()
![]()
![]()


| Information | ||||
|---|---|---|---|---|
| Event Tag | ||||
| Boss Gauges | Hard (甲): 555 TP + 615 TP + 21600 HP + 5060 HP | |||
| Medium (乙): 444 TP + 492 TP + 14400 HP + 3960 HP | ||||
| Easy (丙): 370 TP + 410 TP + 5400 HP + 3410 HP | ||||
| Casual (丁): 296 TP + 328 TP + 1980 HP + 3410 HP | ||||
| Map Bosses | Heavy Cruiser Ne-Class Kai B Summer Mode
| |||
Abyssal Mediterranean Princess Vacation Mode
| ||||
Supply Depot Princess B Vacation Mode
| ||||
Prototype Carrier Princess Vacation Mode
| ||||
| Rewards[edit] | ||||
|---|---|---|---|---|
| Ship |  Ranger | |||
| Choice | 丁 Casual |
丙 Easy |
乙 Medium |
甲 Hard |
Food Supply Ship Mamiya |
6 | 8 | 10 | |
| OR | ||||
 Skilled Deck Personnel |
1 | 2 | 3 | |
| Reward | 丁 Casual |
丙 Easy |
乙 Medium |
甲 Hard |
|---|---|---|---|---|
Action Report |
1 | 1 | 1 | |
Medal |
1 | 1 | 1 | |
Reinforcement Expansion |
1 | |||
 AU-1 |
1 | 1 | ||
 Skilled Deck Personnel + Aviation Maintenance Hands |
1 | 1 | ||
 Toku Daihatsu Landing Craft + Panzer III (North African Specification) |
1 |

The event guides are to be constructed through the respective Event map page guide sandbox and reviewed by editors before being approved here.
- Do not update the guides through this page unless it is a minor fix. Please only update guides through their respective sandbox pages.
Branching Table
| E-5 Branching Rules | ||
|---|---|---|
| Nodes | Rules | |
A |
B |
|
C |
| |
D |
E |
Choose your own adventure! |
F | ||
E |
G |
|
G1 |
| |
F |
G1 |
|
J |
| |
G |
G2 |
|
H |
| |
G1 |
E |
|
G |
| |
I |
| |
J |
K |
|
Q |
| |
K |
L |
Choose your own adventure! |
M | ||
N1 |
N2 |
|
O |
| |
Q |
R |
|
S |
| |
R |
S |
|
T |
| |
W |
| |
X |
| |
S |
V |
|
X |
| |
T |
U |
|
X |
| |
Branching compositions were reported over the course of the event. (NGA and KCNav)
Ship Bonuses
DISCLAIMER: This information is based on user submitted data and is subject to revisions as more data is gathered. Any version of the ship receives the bonus regardless of remodel.
Ship Bonuses
| Ship Damage Bonuses[1] | |||||||||||||||||
|---|---|---|---|---|---|---|---|---|---|---|---|---|---|---|---|---|---|
| Ships | Multipliers | ||||||||||||||||
| Mapwide | Node X (Does not stack) | ||||||||||||||||
|
1.07x | 1.1x | |||||||||||||||
|
1.07x | 1.13x ~ 1.18x | |||||||||||||||
|
1.07x | 1.1x | |||||||||||||||
|
1.02x | 1.1x | |||||||||||||||
|
1.02x | 1.02x | |||||||||||||||
| Node X Bonuses (Stacks with above) |
Debuff Bonus Against Princesses   Only |
|---|---|
| All Ships | 1.11x ~ 1.18x |
| Accuracy & Evasion Bonuses[2] | ||
|---|---|---|
| Ships | Acc / Eva Multipliers | |
| Mapwide | Node X | |
| Foreign Destroyers | 1.05x | 1.1x [1.155] |
| Other Foreign Ships | - | 1.1x |
| IJN Destroyers | 1.05x | 1.05x [1.1025x] |
| Other IJN Ships | - | 1.05x |
| LBAS with 1+ Foreign Aircraft | 1.05x (?) | - |
Equipment Bonuses
Plane bonuses similar to the Summer 2021 event have returned and should be examined when planning equipment setups. The following bonuses are applied:
- Carriers using planes get bonuses based on the numbers 1, 2, 3, and 4,
- Land-Bases using planes get bonuses applied to all bombers in the individual base, based on both the numbers 1, 2, 3, and 4 as well as the letters A, B, and C,
- In order to get the best out of carriers, it is needed to arm them with planes from different number categories (e.g.: C4 + B3 + B2 or C4 + B3 + A2 or C4 + B2 + A3 grants 2*3*4).
- In order to get high bonuses out of land-bases, it is needed to arm them with planes from different letter and number categories (e.g. B2 + B3 + C4 grants B*C*2*3*4), as allowed by range considerations
| Aircraft Damage Bonuses | |||||||
|---|---|---|---|---|---|---|---|
| Aircraft Groups[3] | Multipliers (Ships and Land-bases)[1] | ||||||
| A | B | C | Mapwide | Node X | |||
Aircraft Groups
|
1 | - |  PBY-5A Catalina |
 Spitfire Mk.I  Spitfire Mk.V  Spitfire Mk.IX (Skilled) |
- | - | |
| 2 |  B-25  Swordfish  TBF  TBM-3D  TBM-3W+3S  SBD  SBD-5  SB2C-3  FM-2  F4U-1D  F4F-3  F4F-4  F6F-3  F6F-5  F6F-3N  F6F-5N  XF5U |
 Fw 190 D-9  Bf 109T Kai  Fw 190T Kai  Fw 190 A-5 Kai (Skilled) |
1.03x | 1.08x | |||
| 3 |  SM.79  SM.79 bis  Swordfish Mk.II (Skilled)  Re.2001 G Kai  Re.2001 CB Kai  Skua  Ju 87C Kai  Ju 87C Kai Ni (w/ KMX)  Ju 87C Kai Ni (w/ KMX/Skilled)  FR-1 Fireball |
 Re.2001 OR Kai  Fulmar |
 F4U-4  AU-1  F4U-2 Night Corsair |
1.04x | 1.11x | ||
| 4 |  Do 217 E-5 + Hs293 Initial Model  SM.79 bis (Skilled)  Swordfish Mk.III (Skilled)  Barracuda Mk.II  Barracuda Mk.III |
 Do 217 K-2 + Fritz-X  Re.2005 Kai |
 Mosquito FB Mk.VI  Mosquito PR Mk.IV  Mosquito TR Mk.33  F4U-7  Seafire Mk.III Kai  Corsair Mk.II  Corsair Mk.II (Ace)  Fulmar (Reconnaissance Fighter/Skilled) |
1.05x | 1.14x | ||
| LBAS only Multipliers (Mapwide) |
- | 1.06x | 1.08x | ||||
| Historical Aircraft Damage Bonuses | ||||
|---|---|---|---|---|
| Group | Multipliers | |||
| Mapwide | Nodes X | |||
| LBAS A | 1x | 1x | ||
| LBAS B | 1.06x | 1.06x | ||
| LBAS C | 1.08x | 1.08x | ||
| 1 | 1x | 1x | ||
| 2 | 1.03x | 1.08x | ||
| 3 | 1.04x | 1.11x | ||
| 4 | 1.05x | 1.14x | ||
- ↑ 1.0 1.1 Dewy https://discord.gg/RtSadWM https://discord.com/channels/118339803660943369/1018254553340198922/1018408980982272033
- ↑ https://twitter.com/Divinity_123/status/1570702286829277185?cxt=HHwWgsDS5Y3aoMwrAAAA
- ↑ yuki_cacoon https://twitter.com/yukicacoon/status/1577674729808199680 https://docs.google.com/document/d/1TmsVRhmkqjH1bczdoBHtrdcYv7JYD95NVkMrAK5bpK4/edit#heading=h.vnksjlvm3xlo
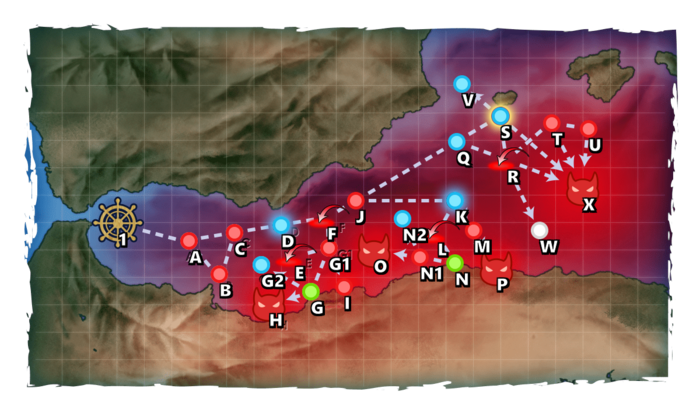
Map overview
- There are a total of 4 phases to clear the map with 2 Transport Phases and 2 Boss Killing Phases
- There are 3 LBAS to use in this map.
- 2 can be set on Offense and 1 be set on Defense.
- Refer to the Special locking guide for additional information on ship locks for this map.
Friend Fleets are available at boss node X
| E-5 X | ||||||||||
|---|---|---|---|---|---|---|---|---|---|---|
| E-5 X : Unassorted (Variant 1, 2022-09-30~) Powerful Play Play | ||||||||||
| Ship | Lv. | Equipment | ||||||||
Aquila Kai |
79 |      |
~/48 | 31 | 0 | 72 | 58 | |||
Duca degli Abruzzi Kai |
82 |     |
~/52 | 73 | 70 | 70 | 75 | |||
Giuseppe Garibaldi Kai |
81 |  |
52 | 72 | 70 | 70 | 75 | |||
Maestrale Kai |
85 |  |
~/29 | 54 | 72 | 63 | 50 | |||
Grecale Kai |
83 | |
29 | 55 | 68 | 80 | 51 | |||
| E-5 X : Unassorted (Variant 2, 2022-10-07~) Powerful Play Play Play | ||||||||||
| Ship | Lv. | Equipment | ||||||||
Aquila Kai |
79 | |
~/48 | 31 | 0 | 72 | 58 | |||
Roma Kai |
80 |  |
~/92 | 105 | 0 | 94 | 90 | |||
Duca degli Abruzzi Kai |
82 | |
~/52 | 73 | 70 | 70 | 75 | |||
Giuseppe Garibaldi Kai |
81 | |
52 | 72 | 70 | 70 | 75 | |||
Maestrale Kai |
85 | |
~/29 | 54 | 72 | 63 | 50 | |||
Grecale Kai |
83 | |
29 | 55 | 68 | 80 | 51 | |||
| E-5 X : Unassorted (Variant 3, 2022-09-30~) Powerful Play Play | ||||||||||
| Ship | Lv. | Equipment | ||||||||
Duca degli Abruzzi Kai |
82 | |
~/52 | 73 | 70 | 70 | 75 | |||
Giuseppe Garibaldi Kai |
81 | |
52 | 72 | 70 | 70 | 75 | |||
Maestrale Kai |
85 |  |
~/29 | 54 | 72 | 63 | 50 | |||
Grecale Kai |
83 | |
29 | 55 | 68 | 80 | 51 | |||
Scirocco Kai |
81 | |
~/28 | 55 | 72 | 63 | 50 | |||
| E-5 X : Unassorted (Variant 4, 2022-10-07~) Powerful Play Play | ||||||||||
| Ship | Lv. | Equipment | ||||||||
Duca degli Abruzzi Kai |
82 | |
~/52 | 73 | 70 | 70 | 75 | |||
Giuseppe Garibaldi Kai |
81 | |
52 | 72 | 70 | 70 | 75 | |||
Maestrale Kai |
85 | |
~/29 | 54 | 72 | 63 | 50 | |||
Grecale Kai |
83 | |
29 | 55 | 68 | 80 | 51 | |||
Scirocco Kai |
81 | |
~/28 | 55 | 72 | 63 | 50 | |||
| E-5 X : Unassorted (Variant 5, 2022-09-30~) Regular Powerful Play Play | ||||||||||
| Ship | Lv. | Equipment | ||||||||
Giuseppe Garibaldi Kai |
81 | |
52 | 72 | 70 | 70 | 75 | |||
Duca degli Abruzzi Kai |
82 | |
~/52 | 73 | 70 | 70 | 75 | |||
Maestrale Kai |
85 | |
~/29 | 54 | 72 | 63 | 50 | |||
Grecale Kai |
83 | |
29 | 55 | 68 | 80 | 51 | |||
| E-5 X : Unassorted (Variant 6, 2022-09-30~) Regular Powerful Play Play | ||||||||||
| Ship | Lv. | Equipment | ||||||||
Graf Zeppelin Kai |
66 |   |
~/78 | 52 | 0 | 80 | 81 | |||
Prinz Eugen Kai |
77 |    |
63 | 75 | 84 | 60 | 82 | |||
Z1 Zwei |
81 |  |
~/35 | 49 | 71 | 64 | 53 | |||
Z3 Zwei |
80 | |
~/35 | 47 | 71 | 68 | 53 | |||
| E-5 X : Unassorted (Variant 7, 2022-09-30~) Regular Powerful Play Play | ||||||||||
| Ship | Lv. | Equipment | ||||||||
Prinz Eugen Kai |
77 | |
63 | 75 | 84 | 60 | 82 | |||
Z1 Zwei |
81 | |
~/35 | 49 | 71 | 64 | 53 | |||
Z3 Zwei |
80 | |
~/35 | 47 | 71 | 68 | 53 | |||
| E-5 X : Unassorted (Variant 8, 2022-09-30~) Powerful Play Play | ||||||||||
| Ship | Lv. | Equipment | ||||||||
Ranger Kai |
88 | |
64 | 47 | 0 | 82 | 58 | |||
Washington Kai |
87 |   |
~/93 | 107 | 0 | 106 | 104 | |||
South Dakota Kai |
86 | |
~/91 | 109 | 0 | 108 | 108 | |||
Brooklyn Kai |
85 |   |
53 | 77 | 39 | 80 | 67 | |||
Johnston Kai |
80 | |
~/34 | 55 | 72 | 90 | 52 | |||
| E-5 X : Unassorted (Variant 9, 2022-10-07~) Powerful Play Play Play | ||||||||||
| Ship | Lv. | Equipment | ||||||||
Ranger Kai |
88 | |
64 | 47 | 0 | 82 | 58 | |||
Washington Kai |
87 | |
~/93 | 107 | 0 | 106 | 104 | |||
South Dakota Kai |
86 | |
~/91 | 109 | 0 | 108 | 108 | |||
Brooklyn Kai |
85 | |
53 | 77 | 39 | 80 | 67 | |||
Johnston Kai |
80 | |
~/34 | 55 | 72 | 90 | 52 | |||
Samuel B. Roberts Mk.II |
85 | |
29 | 52 | 69 | 68 | 47 | |||
| E-5 X : Unassorted (Variant 10, 2022-09-30~) Powerful Play Play | ||||||||||
| Ship | Lv. | Equipment | ||||||||
Richelieu Kai |
80 |    |
~/89 | 96 | 0 | 78 | 96 | |||
Commandant Teste Kai |
80 |   |
~/43 | 58 | 0 | 48 | 56 | |||
Bismarck Drei |
83 |  |
~/96 | 99 | 36 | 70 | 95 | |||
Z1 Zwei |
82 | |
~/35 | 49 | 71 | 64 | 53 | |||
Z3 Zwei |
81 | |
~/35 | 47 | 71 | 68 | 53 | |||
| E-5 X : Unassorted (Variant 11, 2022-09-30~) Regular Powerful Play Play | ||||||||||
| Ship | Lv. | Equipment | ||||||||
Washington Kai |
87 | |
~/93 | 107 | 0 | 106 | 104 | |||
South Dakota Kai |
86 | |
~/91 | 109 | 0 | 108 | 108 | |||
Brooklyn Kai |
85 | |
53 | 77 | 39 | 80 | 67 | |||
| E-5 X : Unassorted (Variant 12, 2022-09-30~) Regular Powerful Play | ||||||||||
| Ship | Lv. | Equipment | ||||||||
Z3 Zwei |
80 | |
35 | 47 | 71 | 68 | 53 | |||
Z1 Zwei |
81 | |
35 | 49 | 71 | 64 | 53 | |||
Special Locking Guide
Unlike previous event maps, ship locking works differently in this map.
- This new locking mechanic can prevent players from accidentally locking ships with the wrong tag.
- This special locking mechanic will only applies on Medium/Hard. Easy and Casual locks are not reinforced.
- If the fleet is a Combined Fleet, the tag will not apply to any ship unless the fleet reaches certain nodes.
 will be applied to Combined Fleets that reach G1 or E, or to Single Fleets immediately upon sortieing
 will be applied to Combined Fleets that reach K
 will be applied to Combined Fleets that reach Q
Phase 1: Transport Operation to Oran, Algeria
- SF: 0-1(F)BB(V), 0-2CV(L/B), 0-2CA(V), 0-3CL(T), 2-4DD (Fast)

- Route: A C D E G H
- A Fast fleet allows a heavier composition
- SF: 0-1(F)BB(V), 0-2CA(V), 1-2CL, 0-2LHA/AV, 3-4DD
- Route: A C D E G H
- There is an LoS check to enter node H (Cn2 = 40(?) on Hard)
- Using Boss Support Expedition may help to secure A ranks
| Anti-PT boat | |||||||||||||||||||||||||||||||||||||||||||||||||||||||||||||||||||||||||||||||||||||||||||||||||||||||||||||||||||||||||||||||||||||||||||
|---|---|---|---|---|---|---|---|---|---|---|---|---|---|---|---|---|---|---|---|---|---|---|---|---|---|---|---|---|---|---|---|---|---|---|---|---|---|---|---|---|---|---|---|---|---|---|---|---|---|---|---|---|---|---|---|---|---|---|---|---|---|---|---|---|---|---|---|---|---|---|---|---|---|---|---|---|---|---|---|---|---|---|---|---|---|---|---|---|---|---|---|---|---|---|---|---|---|---|---|---|---|---|---|---|---|---|---|---|---|---|---|---|---|---|---|---|---|---|---|---|---|---|---|---|---|---|---|---|---|---|---|---|---|---|---|---|---|---|---|
Unlike most standard Abyssals, "PT boats" (PT Imp Pack & Schnellboot Imp Pack & Schnellboot Imp Pack ) are "very small and fast". ) are "very small and fast".
During Events, some special bonuses may be added, with "historical" ships and equipment gaining some accuracy bonuses[10].
| |||||||||||||||||||||||||||||||||||||||||||||||||||||||||||||||||||||||||||||||||||||||||||||||||||||||||||||||||||||||||||||||||||||||||||
| [edit] | |||||||||||||||||||||||||||||||||||||||||||||||||||||||||||||||||||||||||||||||||||||||||||||||||||||||||||||||||||||||||||||||||||||||||||


Phase 1.5: Unlock Node O
Completing the following tasks will unlock the route to Phase 2 O
| I | F | |
|---|---|---|
| Hard | S x3 | AS |
| Medium | A+ x3 | AS |
| Easy | A+ x3 | AS |
| Casual | A+ x2 | AS |
- For the fleet used, refer to Phase 1 as it is the same fleet.
- However, the fleet must include CA(V) ≥ 2 and/or an LHA.
- Anti-Installation equipment is recommended
- Route: A C D F G1 I
- For the fleet used, refer to Phase 1 as it is the same fleet.
- A second CV may be included to help achieve Air Superiority. Alternatively, the node can be fightersweeped.
- Route: A C D F
Phase 2: Transport supply to the Coast of Algeria
- This phase will utilized the
 tag.
tag.
- On Normal/Hard, including any ship with the
 tag will result in an off-route to N2
 - The fleet will only be tagged once they reach node K
- On Normal/Hard, including any ship with the
- CTF: 0-2(F)BB(V), 2-3CV(B), 0-2CVL, 0-2CL, 0-3 DD, 0-2XX + 1CL, 3-5DD, 0-2XX
- Max of 4 CV(L/B)
- Highest airpower and opening strike possible
- STF: 1-3(F)BB(V), 0-1CV(B), 0-2CVL, 0-2CL, 0-3DD, 0-2XX + 1CL, 3-5DD, 0-2XX
- Strongest surface combat possible
- TCF: 4-6DD, 0-2XX + 1-2CL, 3-5DD, 0-2CA(V)
- Fastest TP Drain by using many Daihatsu equipped on DD.
- Node & Boss Support Expedition are recommended in order reduce the risk of retreats help to secure A rank at the boss
- All Fleet options must include CL/CT + DD/DE ≥ 5
- No SS(V) are allowed
- Route: A C D F J K L N N1 O
- There is an LoS check to reach node O (Cn2 = 60(?) on Hard)
- The fleet will face PT Imps on the way to the boss node
| Anti-PT boat | |||||||||||||||||||||||||||||||||||||||||||||||||||||||||||||||||||||||||||||||||||||||||||||||||||||||||||||||||||||||||||||||||||||||||||
|---|---|---|---|---|---|---|---|---|---|---|---|---|---|---|---|---|---|---|---|---|---|---|---|---|---|---|---|---|---|---|---|---|---|---|---|---|---|---|---|---|---|---|---|---|---|---|---|---|---|---|---|---|---|---|---|---|---|---|---|---|---|---|---|---|---|---|---|---|---|---|---|---|---|---|---|---|---|---|---|---|---|---|---|---|---|---|---|---|---|---|---|---|---|---|---|---|---|---|---|---|---|---|---|---|---|---|---|---|---|---|---|---|---|---|---|---|---|---|---|---|---|---|---|---|---|---|---|---|---|---|---|---|---|---|---|---|---|---|---|
Unlike most standard Abyssals, "PT boats" (PT Imp Pack & Schnellboot Imp Pack) are "very small and fast".
During Events, some special bonuses may be added, with "historical" ships and equipment gaining some accuracy bonuses[10].
| |||||||||||||||||||||||||||||||||||||||||||||||||||||||||||||||||||||||||||||||||||||||||||||||||||||||||||||||||||||||||||||||||||||||||||
| [edit] | |||||||||||||||||||||||||||||||||||||||||||||||||||||||||||||||||||||||||||||||||||||||||||||||||||||||||||||||||||||||||||||||||||||||||||
Phase 2.5: Unlock Node P
- This requirement is only required on Hard. Other difficulties skip this requirement.
- S rank M Once
- For the fleet used, refer to Phase 2 as it is the same fleet.
Phase 3: Destroy the Supply Depot Princess
- For the fleet used, refer to Phase 2 as it is the same fleet.
- Route: A C D F J K M P
- Either tag OR can be used for this phase, but tags cannot be mixed
- Caution: Any untagged ships that reach node K will be given the tag.
- This means that if the rest of the fleet contains the tag, the fleet will be unable to sortie again on higher difficulties as mixing tags is not allowed.
- This means that if the rest of the fleet contains the
- To prevent applying the wrong tag during this phase, it is highly recommended to tag any ship that is going to be used in Phase 4 or as part of any fleet using the tag by entering Summer 2022 Event/E-3 in a Combined Fleet before beginning this phase.
- Caution: Any untagged ships that reach node K will be given the
- If the fleet is reused from E3, using a Special Attack mechanic BB can help clear this phase more quickly and efficiently.
- Anti-Installation is required to clear this phase.
Phase 4: Eliminate The Prototype Carrier Hime
- CTF: 2(F)BB(V), 0-2CV(B) 1-4CVL, 1CL, 0-1XX + 1CL, 3DD, 2XX
- Max of 4 CV(L/B)
- 1 CVL be swapped for a third CV(B) at the cost of an extra Air node at R
- STF: 2(F)BB(V), 2CVL, 1CL, 0-1XX + 1CL, 3DD, 2XX
- 1CL, 1DD, and/or 1XX may be swapped for an additional 1-2(F)BB(V) at the cost of an extra Air node at R
- Route: A C D F J Q S X
- There are LoS checks to avoid dead ends at V W (Cn2 = 85(?) on Hard)
- Node S is an Anchorage Repair node.
- All fleets must contain Akashi Kai, Akitsushima Kai, or an AO Kai.
Phase 4.5: Debuff
The following steps have to be performed to debuff the boss
| I | P | T | U | LBAS | |
|---|---|---|---|---|---|
| Hard | A+ | A+ x3 | S | A+ | AS |
| Medium | A+? | A+ x3 | - | A+ | AS |
| Easy | A+? | A+ x3 | - | A+ | - |
| Casual | A+ | A+ x3 | - | A+ | - |
- For the fleet used, refer to Phase 1.5 as it is the same fleet.
- For the fleet used, refer to Phase 2 or Phase 3 as it is the same fleet.
- If using a fleet with , the routing becomes more complex, but the following ones are confirmed to work:
- STF: 2BB(V), 2CVL, 1CA(V), 1DD, + 1CL, 1CA(V), 1CLT, 3DD
- STF: 2BB(V), 1CV(B), 1CA(V), 2DD + 1CL, 1CLT, 1AV, 3DD
- STF: 2BB(V), 1CV(B), 2CA(V), 1AV + 1CL, 5DD
- If using a fleet with
- For the fleet used, refer to Phase 4 as it is the same fleet.
- However, Akitsushima Kai, Akashi Kai, and AO Kai must be removed from the fleet
- They may be either removed or safely replaced with a CA(V), CLT, or AV
- However, Akitsushima Kai, Akashi Kai, and AO Kai must be removed from the fleet
- For the fleet used, refer to Node T
- The maximum of DD included in the fleet is 2, therefore one of the required ones for the Phase 4 fleet needs to be replaced with a CLT/CA(V)
- LBAS: Air Defense
- This can be done passively since getting AS on the air raid requires an LBAS set on "defense" with a strong enough air-defense
Once Debuff is complete the CG will change to the following.
| Prototype Carrier Princess |
|---|
|


Enemy Compositions
| Type | Ships |
|---|---|
| DE | |
| DD |
| Type | Ships |
|---|---|
| DE | |
| DD | |
| CL | |
| CA |
| Type | Ships |
|---|---|
| DE | |
| DD |
| Type | Ships |
|---|---|
| DE | |
| DD | |
| CL |
| Type | Ships |
|---|---|
| DE | |
| DD | |
| CL | |
| CA |
| Type | Ships |
|---|---|
| DE | |
| DD | |
| CA |
| Type | Ships |
|---|---|
| DD | |
| CL | |
| CA | |
| CVL | |
| FBB | |
| BB | |
| LHA |
| # | Formation | Air Raids | AD/AP AS/AS+ |
|---|---|---|---|
| AB | Diamond | 39/78 174/348 | |
| Diamond | 51/101 225/450 | ||
| Diamond | 57/114 255/510 | ||
| Diamond | 62/123 276/552 | ||
| Diamond | 69/137 306/612 | ||
| # | Formation | Air Raids | AD/AP AS/AS+ |
| # | Formation | Normal Battle Node | AD/AP AS/AS+ |
|---|---|---|---|
| A | Echelon Line Abreast Phases: 1, 2, 3, 4 |
0/0 0/0 | |
| Echelon Line Abreast Phases: 1, 2, 3, 4 |
0/0 0/0 | ||
| Echelon Line Abreast Phases: 1, 2, 3, 4 |
0/0 0/0 | ||
| # | Formation | Normal Battle Node | AD/AP AS/AS+ |
| # | Formation | Normal Battle Node | AD/AP AS/AS+ |
|---|---|---|---|
| B | Echelon Phases: 2, 3, 4 |
0/0 0/0 | |
| Vanguard Phases: 1, 2, 3, 4 |
0/0 0/0 | ||
| Vanguard Phases: 4 |
0/0 0/0 | ||
| # | Formation | Normal Battle Node | AD/AP AS/AS+ |
| # | Formation | Normal Battle Node | AD/AP AS/AS+ |
|---|---|---|---|
| C | Echelon Vanguard Phases: 1, 2, 3, 4 |
0/0 0/0 | |
| Vanguard Phases: 3, 4 |
0/0 0/0 | ||
| # | Formation | Normal Battle Node | AD/AP AS/AS+ |
| # | Selection Node | ||
|---|---|---|---|
| D | 艦隊の針路を選択できます。提督、どちらの針路をとられますか? You can decide the fleet's course. Admiral, which heading should we take? | ||
| # | Selection Node | ||
| # | Formation | Air Defense Node | AD/AP AS/AS+ |
|---|---|---|---|
| E | Diamond Phases: 1, 2, 4 |
81/161 360/720 | |
| Diamond Phases: 1, 4 |
90/179 402/804 | ||
| Diamond Phases: 1, 2, 4 |
99/198 444/888 | ||
| Diamond Phases: 1 |
105/209 468/936 | ||
| # | Formation | Air Defense Node | AD/AP AS/AS+ |
| # | Formation | Air Defense Node | AD/AP AS/AS+ |
|---|---|---|---|
| F | Diamond Phases: 2, 3, 4 |
81/161 360/720 | |
| Diamond Phases: 2, 3, 4 |
90/179 402/804 | ||
| Diamond Phases: 2, 3, 4 |
99/198 444/888 | ||
| Diamond Phases: 2, 3 |
105/209 468/936 | ||
| # | Formation | Air Defense Node | AD/AP AS/AS+ |
| # | Landing Node | ||
|---|---|---|---|
| G | 輸送物資の揚陸地点に到達しました。本海域の輸送作戦は無事完了しています。 The landing point of the convoy has been reached. The transport operation here has already been completed successfully. | ||
| # | Landing Node | ||
| # | Formation | Normal Battle Node | AD/AP AS/AS+ |
|---|---|---|---|
| G1 | Line Ahead Double Line Phases: 1, 2, 4 |
50/100 224/447 | |
| Diamond Phases: 1, 2, 4 |
50/100 224/447 | ||
| # | Formation | Normal Battle Node | AD/AP AS/AS+ |
| # | Empty Node | ||
|---|---|---|---|
| G2 | 敵影を見ず。 No enemy spotted. | ||
| # | Empty Node | ||
| # | Formation | Boss Battle Node | AD/AP AS/AS+ |
|---|---|---|---|
| H | Line Ahead Double Line Diamond Phases: 1, 4 |
50/100 224/447 | |
| # | Formation | Boss Battle Node | AD/AP AS/AS+ |
| # | Formation | Normal Battle Node | AD/AP AS/AS+ |
|---|---|---|---|
| I | Double Line Phases: 2 |
62/124 278/555 | |
| Double Line Phases: 2 |
62/124 278/555 | ||
| Double Line Phases: 4 |
46/91 204/408 | ||
| # | Formation | Normal Battle Node | AD/AP AS/AS+ |
| # | Formation | Normal Battle Node | AD/AP AS/AS+ |
|---|---|---|---|
| J | Echelon Line Abreast Phases: 2, 3, 4 |
0/0 0/0 | |
| Echelon Line Abreast Phases: 2, 3, 4 |
0/0 0/0 | ||
| Echelon Line Abreast Phases: 2, 3, 4 |
0/0 0/0 | ||
| # | Formation | Normal Battle Node | AD/AP AS/AS+ |
| # | Selection Node | ||
|---|---|---|---|
| K | 艦隊の針路を選択できます。提督、どちらの針路をとられますか? You can decide the fleet's course. Admiral, which heading should we take? | ||
| # | Selection Node | ||
| # | Formation | Air Defense Node | AD/AP AS/AS+ |
|---|---|---|---|
| L | Diamond Phases: 2 |
81/161 360/720 | |
| Diamond Phases: 2, 4 |
90/179 402/804 | ||
| Diamond Phases: 2, 3, 4 |
99/198 444/888 | ||
| Diamond Phases: 2 |
105/209 468/936 | ||
| # | Formation | Air Defense Node | AD/AP AS/AS+ |
| # | Formation | Normal Battle Node | AD/AP AS/AS+ |
|---|---|---|---|
| M | Line Ahead Double Line Phases: 2, 3, 4 |
0/0 0/0 | |
| Line Ahead Phases: 3 |
0/0 0/0 | ||
| # | Formation | Normal Battle Node | AD/AP AS/AS+ |
| # | Landing Node | ||
|---|---|---|---|
| N | 輸送物資の揚陸地点に到達しました。本海域の輸送作戦は無事完了しています。 The landing point of the convoy has been reached. The transport operation here has already been completed successfully. | ||
| # | Landing Node | ||
| # | Formation | Normal Battle Node | AD/AP AS/AS+ |
|---|---|---|---|
| N1 | Line Ahead Echelon Phases: 2 |
0/0 0/0 | |
| # | Formation | Normal Battle Node | AD/AP AS/AS+ |
| # | Empty Node | ||
|---|---|---|---|
| N2 | 敵影を見ず。 No enemy spotted. | ||
| # | Empty Node | ||
| # | Formation | Boss Battle Node | AD/AP AS/AS+ |
|---|---|---|---|
| O | Cruising Formation 4 Phases: 2 |
113/225 504/1008 | |
| Cruising Formation 4 (Final)
|
57/113 252/504 | ||
| # | Formation | Boss Battle Node | AD/AP AS/AS+ |
| # | Formation | Boss Battle Node | AD/AP AS/AS+ |
|---|---|---|---|
| P | Double Line Phases: 3 |
90/179 401/801 | |
| Double Line Phases: 4 |
0/0 0/0 | ||
| Double Line Phases: 3 (Final)
|
82/163 365/729 | ||
| # | Formation | Boss Battle Node | AD/AP AS/AS+ |
| # | Empty Node | ||
|---|---|---|---|
| Q | 気のせいだった。 地中海連合艦隊、これより敵主力艦隊を捜索、発見次第、これを撃滅する! Must be my imagination. The Mediterranean Combined Fleet will now search for the main enemy fleet and destroy it on sight! | ||
| # | Empty Node | ||
| # | Formation | Air Defense Node | AD/AP AS/AS+ |
|---|---|---|---|
| R | Diamond Phases: 4 |
143/286 642/1284 | |
| Diamond Phases: 4 |
199/398 894/1788 | ||
| Diamond Phases: 4 |
276/551 1239/2478 | ||
| # | Formation | Air Defense Node | AD/AP AS/AS+ |
| # | Repair Node | ||
|---|---|---|---|
| # | Repair Node | ||
| # | Formation | Normal Battle Node | AD/AP AS/AS+ |
|---|---|---|---|
| T | Line Ahead Phases: 4 |
0/0 0/0 | |
| Line Ahead Phases: 4 |
0/0 0/0 | ||
| Line Ahead Phases: 4 |
0/0 0/0 | ||
| # | Formation | Normal Battle Node | AD/AP AS/AS+ |
| # | Formation | Normal Battle Node | AD/AP AS/AS+ |
|---|---|---|---|
| U | Line Abreast | 0/0 0/0 | |
| Echelon Line Abreast Phases: 4 |
0/0 0/0 | ||
| # | Formation | Normal Battle Node | AD/AP AS/AS+ |
| # | Empty Node | ||
|---|---|---|---|
| V | 敵影を見ず。 地中海連合艦隊、これより敵主力艦隊を捜索、発見次第、これを撃滅する! No enemy spotted. The Mediterranean Combined Fleet will now search for the main enemy fleet and destroy it on sight! | ||
| # | Empty Node | ||
| # | Empty Node | ||
|---|---|---|---|
| W | 敵影を見ず。 地中海連合艦隊、これより敵主力艦隊を捜索、発見次第、これを撃滅する! No enemy spotted. The Mediterranean Combined Fleet will now search for the main enemy fleet and destroy it on sight! | ||
| # | Empty Node | ||
| # | Formation | Boss Battle Node | AD/AP AS/AS+ |
|---|---|---|---|
| X | Cruising Formation 4 Phases: 4 |
199/398 894/1788 | |
| Cruising Formation 4 Phases: 4 (Final)
|
276/551 1239/2478 | ||
| # | Formation | Boss Battle Node | AD/AP AS/AS+ |
| Type | Ships |
|---|---|
| DE | |
| DD |
| Type | Ships |
|---|---|
| DE | |
| DD | |
| CL |
| Type | Ships |
|---|---|
| DE | |
| DD |
| Type | Ships |
|---|---|
| DE | |
| DD | |
| CL |
| Type | Ships |
|---|---|
| DE | |
| DD | |
| CL | |
| CA |
| Type | Ships |
|---|---|
| DE | |
| DD | |
| CA |
| Type | Ships |
|---|---|
| DD | |
| CL | |
| CA | |
| CVL | |
| FBB | |
| BB | |
| LHA |
| # | Formation | Air Raids | AD/AP AS/AS+ |
|---|---|---|---|
| AB | Diamond | 28/55 123/246 | |
| Diamond | 33/65 144/288 | ||
| Diamond | 39/78 174/348 | ||
| Diamond | 44/87 195/390 | ||
| # | Formation | Air Raids | AD/AP AS/AS+ |
| # | Formation | Normal Battle Node | AD/AP AS/AS+ |
|---|---|---|---|
| A | Echelon Line Abreast Phases: 1, 2, 3, 4 |
0/0 0/0 | |
| Echelon Line Abreast Phases: 1, 2, 3, 4 |
0/0 0/0 | ||
| Echelon Line Abreast Phases: 1, 2, 3, 4 |
0/0 0/0 | ||
| # | Formation | Normal Battle Node | AD/AP AS/AS+ |
| # | Formation | Normal Battle Node | AD/AP AS/AS+ |
|---|---|---|---|
| B | Echelon Phases: 1 |
0/0 0/0 | |
| Vanguard | 0/0 0/0 | ||
| Vanguard Phases: 4 |
0/0 0/0 | ||
| # | Formation | Normal Battle Node | AD/AP AS/AS+ |
| # | Formation | Normal Battle Node | AD/AP AS/AS+ |
|---|---|---|---|
| C | Echelon Vanguard Phases: 1, 2, 3, 4 |
0/0 0/0 | |
| Vanguard Phases: 3, 4 |
0/0 0/0 | ||
| # | Formation | Normal Battle Node | AD/AP AS/AS+ |
| # | Selection Node | ||
|---|---|---|---|
| D | 艦隊の針路を選択できます。提督、どちらの針路をとられますか? You can decide the fleet's course. Admiral, which heading should we take? | ||
| # | Selection Node | ||
| # | Formation | Air Defense Node | AD/AP AS/AS+ |
|---|---|---|---|
| E | Diamond Phases: 1, 4 |
55/110 246/492 | |
| Diamond Phases: 1, 4 |
60/119 267/534 | ||
| Diamond Phases: 1, 4 |
74/147 330/660 | ||
| Diamond Phases: 1 |
61/122 273/546 | ||
| Diamond Phases: 1 |
81/161 360/720 | ||
| # | Formation | Air Defense Node | AD/AP AS/AS+ |
| # | Formation | Air Defense Node | AD/AP AS/AS+ |
|---|---|---|---|
| F | Diamond Phases: 2, 3, 4 |
55/110 246/492 | |
| Diamond Phases: 2, 3, 4 |
60/119 267/534 | ||
| Diamond Phases: 2, 3, 4 |
74/147 330/660 | ||
| Diamond Phases: 2, 3, 4 |
61/122 273/546 | ||
| Diamond Phases: 3 |
81/161 360/720 | ||
| # | Formation | Air Defense Node | AD/AP AS/AS+ |
| # | Landing Node | ||
|---|---|---|---|
| G | 輸送物資の揚陸地点に到達しました。本海域の輸送作戦は無事完了しています。 The landing point of the convoy has been reached. The transport operation here has already been completed successfully. | ||
| # | Landing Node | ||
| # | Formation | Normal Battle Node | AD/AP AS/AS+ |
|---|---|---|---|
| G1 | Line Ahead Double Line Phases: 2, 4 |
46/91 204/408 | |
| Diamond Phases: 2, 4 |
46/91 204/408 | ||
| # | Formation | Normal Battle Node | AD/AP AS/AS+ |
| # | Empty Node | ||
|---|---|---|---|
| G2 | 敵影を見ず。 No enemy spotted. | ||
| # | Empty Node | ||
| # | Formation | Boss Battle Node | AD/AP AS/AS+ |
|---|---|---|---|
| H | Line Ahead Double Line Diamond Phases: 1, 2 |
41/81 180/360 | |
| # | Formation | Boss Battle Node | AD/AP AS/AS+ |
| # | Formation | Normal Battle Node | AD/AP AS/AS+ |
|---|---|---|---|
| I | Double Line Phases: 2 |
52/103 231/462 | |
| Double Line Phases: 2 |
52/103 231/462 | ||
| Double Line Phases: 4 |
37/73 162/324 | ||
| # | Formation | Normal Battle Node | AD/AP AS/AS+ |
| # | Formation | Normal Battle Node | AD/AP AS/AS+ |
|---|---|---|---|
| J | Echelon Line Abreast Phases: 2, 3, 4 |
0/0 0/0 | |
| Echelon Line Abreast Phases: 2, 3, 4 |
0/0 0/0 | ||
| Echelon Line Abreast Phases: 2, 3, 4 |
0/0 0/0 | ||
| # | Formation | Normal Battle Node | AD/AP AS/AS+ |
| # | Selection Node | ||
|---|---|---|---|
| K | 艦隊の針路を選択できます。提督、どちらの針路をとられますか? You can decide the fleet's course. Admiral, which heading should we take? | ||
| # | Selection Node | ||
| # | Formation | Air Defense Node | AD/AP AS/AS+ |
|---|---|---|---|
| L | Diamond Phases: 2 |
55/110 246/492 | |
| Diamond Phases: 2 |
60/119 267/534 | ||
| Diamond Phases: 2 |
74/147 330/660 | ||
| Diamond Phases: 2, 3 |
61/122 273/546 | ||
| Diamond Phases: 2 |
81/161 360/720 | ||
| # | Formation | Air Defense Node | AD/AP AS/AS+ |
| # | Formation | Normal Battle Node | AD/AP AS/AS+ |
|---|---|---|---|
| M | Line Ahead Double Line Phases: 3, 4 |
0/0 0/0 | |
| Line Ahead Phases: 3 |
0/0 0/0 | ||
| # | Formation | Normal Battle Node | AD/AP AS/AS+ |
| # | Landing Node | ||
|---|---|---|---|
| N | 輸送物資の揚陸地点に到達しました。本海域の輸送作戦は無事完了しています。 The landing point of the convoy has been reached. The transport operation here has already been completed successfully. | ||
| # | Landing Node | ||
| # | Formation | Normal Battle Node | AD/AP AS/AS+ |
|---|---|---|---|
| N1 | Line Ahead Echelon Phases: 2, 3 |
0/0 0/0 | |
| # | Formation | Normal Battle Node | AD/AP AS/AS+ |
| # | Empty Node | ||
|---|---|---|---|
| N2 | 敵影を見ず。 No enemy spotted. | ||
| # | Empty Node | ||
| # | Formation | Boss Battle Node | AD/AP AS/AS+ |
|---|---|---|---|
| O | Cruising Formation 4 Phases: 2 |
46/91 204/408 | |
| # | Formation | Boss Battle Node | AD/AP AS/AS+ |
| # | Formation | Boss Battle Node | AD/AP AS/AS+ |
|---|---|---|---|
| P | Double Line Phases: 3 |
76/151 339/678 | |
| Double Line Phases: 4 |
0/0 0/0 | ||
| Double Line Phases: 3 (Final)
|
68/135 303/606 | ||
| # | Formation | Boss Battle Node | AD/AP AS/AS+ |
| # | Empty Node | ||
|---|---|---|---|
| Q | 気のせいだった。 地中海連合艦隊、これより敵主力艦隊を捜索、発見次第、これを撃滅する! Must be my imagination. The Mediterranean Combined Fleet will now search for the main enemy fleet and destroy it on sight! | ||
| # | Empty Node | ||
| # | Formation | Air Defense Node | AD/AP AS/AS+ |
|---|---|---|---|
| R | Diamond Phases: 4 |
136/271 609/1218 | |
| Diamond Phases: 4 |
181/362 813/1626 | ||
| Diamond Phases: 4 |
191/382 858/1716 | ||
| # | Formation | Air Defense Node | AD/AP AS/AS+ |
| # | Repair Node | ||
|---|---|---|---|
| # | Repair Node | ||
| # | Formation | Normal Battle Node | AD/AP AS/AS+ |
|---|---|---|---|
| T | Line Ahead | 0/0 0/0 | |
| Line Ahead Phases: 4 |
0/0 0/0 | ||
| Line Ahead Phases: 4 |
0/0 0/0 | ||
| # | Formation | Normal Battle Node | AD/AP AS/AS+ |
| # | Formation | Normal Battle Node | AD/AP AS/AS+ |
|---|---|---|---|
| U | Line Abreast Phases: 4 |
0/0 0/0 | |
| Echelon Phases: 4 |
0/0 0/0 | ||
| # | Formation | Normal Battle Node | AD/AP AS/AS+ |
| # | Empty Node | ||
|---|---|---|---|
| V | 敵影を見ず。 地中海連合艦隊、これより敵主力艦隊を捜索、発見次第、これを撃滅する! No enemy spotted. The Mediterranean Combined Fleet will now search for the main enemy fleet and destroy it on sight! | ||
| # | Empty Node | ||
| # | Empty Node | ||
|---|---|---|---|
| W | 敵影を見ず。 地中海連合艦隊、これより敵主力艦隊を捜索、発見次第、これを撃滅する! No enemy spotted. The Mediterranean Combined Fleet will now search for the main enemy fleet and destroy it on sight! | ||
| # | Empty Node | ||
| # | Formation | Boss Battle Node | AD/AP AS/AS+ |
|---|---|---|---|
| X | Cruising Formation 4 Phases: 4 |
181/362 813/1626 | |
| Cruising Formation 4 Phases: 4 (Final)
|
191/382 858/1716 | ||
| # | Formation | Boss Battle Node | AD/AP AS/AS+ |
| Type | Ships |
|---|---|
| DE | |
| DD |
| Type | Ships |
|---|---|
| DE | |
| DD | |
| CA |
| Type | Ships |
|---|---|
| DE | |
| DD |
| Type | Ships |
|---|---|
| DE | |
| DD | |
| CL | |
| CA |
| Type | Ships |
|---|---|
| DE | |
| DD | |
| CL | |
| CA |
| Type | Ships |
|---|---|
| DE | |
| DD |
| Type | Ships |
|---|---|
| DD | |
| CL | |
| CA | |
| CVL | |
| FBB | |
| BB | |
| LHA |
| # | Formation | Air Raids | AD/AP AS/AS+ |
|---|---|---|---|
| AB | Diamond | 17/33 72/144 | |
| Diamond | 23/46 102/204 | ||
| Diamond | 28/55 123/246 | ||
| # | Formation | Air Raids | AD/AP AS/AS+ |
| # | Formation | Normal Battle Node | AD/AP AS/AS+ |
|---|---|---|---|
| A | Echelon Line Abreast Phases: 1, 2, 3, 4 |
0/0 0/0 | |
| Echelon Line Abreast Phases: 1, 2, 3, 4 |
0/0 0/0 | ||
| Echelon Line Abreast Phases: 1, 2, 3, 4 |
0/0 0/0 | ||
| # | Formation | Normal Battle Node | AD/AP AS/AS+ |
| # | Formation | Normal Battle Node | AD/AP AS/AS+ |
|---|---|---|---|
| B | Echelon Phases: 3, 4 |
0/0 0/0 | |
| Vanguard Phases: 2, 4 |
0/0 0/0 | ||
| Vanguard Phases: 3, 4 |
0/0 0/0 | ||
| # | Formation | Normal Battle Node | AD/AP AS/AS+ |
| # | Formation | Normal Battle Node | AD/AP AS/AS+ |
|---|---|---|---|
| C | Echelon Vanguard Phases: 1, 2, 3, 4 |
0/0 0/0 | |
| Vanguard Phases: 3, 4 |
0/0 0/0 | ||
| # | Formation | Normal Battle Node | AD/AP AS/AS+ |
| # | Selection Node | ||
|---|---|---|---|
| D | 艦隊の針路を選択できます。提督、どちらの針路をとられますか? You can decide the fleet's course. Admiral, which heading should we take? | ||
| # | Selection Node | ||
| # | Formation | Air Defense Node | AD/AP AS/AS+ |
|---|---|---|---|
| E | Diamond Phases: 1, 2 |
35/69 153/306 | |
| Diamond Phases: 1, 2 |
44/87 195/390 | ||
| Diamond Phases: 1, 2 |
46/91 204/408 | ||
| Diamond Phases: 1, 2, 4 |
55/110 246/492 | ||
| Diamond Phases: 1 |
60/119 267/534 | ||
| # | Formation | Air Defense Node | AD/AP AS/AS+ |
| # | Formation | Air Defense Node | AD/AP AS/AS+ |
|---|---|---|---|
| F | Diamond Phases: 2, 3, 4 |
35/69 153/306 | |
| Diamond Phases: 2, 3, 4 |
44/87 195/390 | ||
| Diamond Phases: 2, 3, 4 |
46/91 204/408 | ||
| Diamond Phases: 2, 3, 4 |
55/110 246/492 | ||
| Diamond Phases: 2, 3 |
60/119 267/534 | ||
| # | Formation | Air Defense Node | AD/AP AS/AS+ |
| # | Landing Node | ||
|---|---|---|---|
| G | 輸送物資の揚陸地点に到達しました。本海域の輸送作戦は無事完了しています。 The landing point of the convoy has been reached. The transport operation here has already been completed successfully. | ||
| # | Landing Node | ||
| # | Formation | Normal Battle Node | AD/AP AS/AS+ |
|---|---|---|---|
| G1 | Line Ahead Double Line Phases: 1, 2, 4 |
41/81 180/360 | |
| Diamond Phases: 1, 2, 4 |
41/81 180/360 | ||
| # | Formation | Normal Battle Node | AD/AP AS/AS+ |
| # | Empty Node | ||
|---|---|---|---|
| G2 | 敵影を見ず。 No enemy spotted. | ||
| # | Empty Node | ||
| # | Formation | Boss Battle Node | AD/AP AS/AS+ |
|---|---|---|---|
| H | Line Ahead Double Line Diamond Phases: 1, 2 |
43/85 189/378 | |
| # | Formation | Boss Battle Node | AD/AP AS/AS+ |
| # | Formation | Normal Battle Node | AD/AP AS/AS+ |
|---|---|---|---|
| I | Double Line Phases: 2 |
37/74 165/330 | |
| Double Line Phases: 2 |
37/74 165/330 | ||
| Double Line Phases: 4 |
24/47 105/210 | ||
| # | Formation | Normal Battle Node | AD/AP AS/AS+ |
| # | Formation | Normal Battle Node | AD/AP AS/AS+ |
|---|---|---|---|
| J | Echelon Line Abreast Phases: 2, 3, 4 |
0/0 0/0 | |
| Echelon Line Abreast Phases: 2, 3, 4 |
0/0 0/0 | ||
| Echelon Line Abreast Phases: 2, 3, 4 |
0/0 0/0 | ||
| # | Formation | Normal Battle Node | AD/AP AS/AS+ |
| # | Selection Node | ||
|---|---|---|---|
| K | 艦隊の針路を選択できます。提督、どちらの針路をとられますか? You can decide the fleet's course. Admiral, which heading should we take? | ||
| # | Selection Node | ||
| # | Formation | Air Defense Node | AD/AP AS/AS+ |
|---|---|---|---|
| L | Diamond Phases: 2 |
35/69 153/306 | |
| Diamond Phases: 2, 3, 4 |
44/87 195/390 | ||
| Diamond Phases: 2, 4 |
46/91 204/408 | ||
| Diamond Phases: 2 |
55/110 246/492 | ||
| Diamond Phases: 2 |
60/119 267/534 | ||
| # | Formation | Air Defense Node | AD/AP AS/AS+ |
| # | Formation | Normal Battle Node | AD/AP AS/AS+ |
|---|---|---|---|
| M | Line Ahead Double Line Phases: 3, 4 |
0/0 0/0 | |
| Line Ahead Phases: 3 |
0/0 0/0 | ||
| # | Formation | Normal Battle Node | AD/AP AS/AS+ |
| # | Landing Node | ||
|---|---|---|---|
| N | 輸送物資の揚陸地点に到達しました。本海域の輸送作戦は無事完了しています。 The landing point of the convoy has been reached. The transport operation here has already been completed successfully. | ||
| # | Landing Node | ||
| # | Formation | Normal Battle Node | AD/AP AS/AS+ |
|---|---|---|---|
| N1 | Line Ahead Echelon Phases: 2, 4 |
0/0 0/0 | |
| # | Formation | Normal Battle Node | AD/AP AS/AS+ |
| # | Empty Node | ||
|---|---|---|---|
| N2 | 敵影を見ず。 No enemy spotted. | ||
| # | Empty Node | ||
| # | Formation | Boss Battle Node | AD/AP AS/AS+ |
|---|---|---|---|
| O | Cruising Formation 4 Phases: 2 |
43/85 189/378 | |
| # | Formation | Boss Battle Node | AD/AP AS/AS+ |
| # | Formation | Boss Battle Node | AD/AP AS/AS+ |
|---|---|---|---|
| P | Double Line Phases: 3 |
37/74 165/330 | |
| Double Line Phases: 4 |
0/0 0/0 | ||
| Double Line Phases: 3 (Final)
|
55/110 246/492 | ||
| # | Formation | Boss Battle Node | AD/AP AS/AS+ |
| # | Empty Node | ||
|---|---|---|---|
| Q | 気のせいだった。 地中海連合艦隊、これより敵主力艦隊を捜索、発見次第、これを撃滅する! Must be my imagination. The Mediterranean Combined Fleet will now search for the main enemy fleet and destroy it on sight! | ||
| # | Empty Node | ||
| # | Formation | Air Defense Node | AD/AP AS/AS+ |
|---|---|---|---|
| R | Diamond Phases: 4 |
127/254 570/1140 | |
| Diamond Phases: 4 |
167/334 750/1500 | ||
| Diamond Phases: 4 |
180/359 806/1611 | ||
| # | Formation | Air Defense Node | AD/AP AS/AS+ |
| # | Repair Node | ||
|---|---|---|---|
| # | Repair Node | ||
| # | Formation | Normal Battle Node | AD/AP AS/AS+ |
|---|---|---|---|
| T | Line Ahead Phases: 4 |
0/0 0/0 | |
| Line Ahead Phases: 4 |
0/0 0/0 | ||
| Line Ahead Phases: 4 |
0/0 0/0 | ||
| # | Formation | Normal Battle Node | AD/AP AS/AS+ |
| # | Formation | Normal Battle Node | AD/AP AS/AS+ |
|---|---|---|---|
| U | Echelon Line Abreast |
0/0 0/0 | |
| Echelon Line Abreast Phases: 4 |
0/0 0/0 | ||
| Echelon Line Abreast Phases: 4 |
0/0 0/0 | ||
| # | Formation | Normal Battle Node | AD/AP AS/AS+ |
| # | Empty Node | ||
|---|---|---|---|
| V | 敵影を見ず。 地中海連合艦隊、これより敵主力艦隊を捜索、発見次第、これを撃滅する! No enemy spotted. The Mediterranean Combined Fleet will now search for the main enemy fleet and destroy it on sight! | ||
| # | Empty Node | ||
| # | Empty Node | ||
|---|---|---|---|
| W | 敵影を見ず。 地中海連合艦隊、これより敵主力艦隊を捜索、発見次第、これを撃滅する! No enemy spotted. The Mediterranean Combined Fleet will now search for the main enemy fleet and destroy it on sight! | ||
| # | Empty Node | ||
| # | Formation | Boss Battle Node | AD/AP AS/AS+ |
|---|---|---|---|
| X | Cruising Formation 4 Phases: 4 |
167/334 750/1500 | |
| Cruising Formation 4 Phases: 4 (Final)
|
180/359 806/1611 | ||
| # | Formation | Boss Battle Node | AD/AP AS/AS+ |
| Type | Ships |
|---|---|
| DE | |
| DD |
| Type | Ships |
|---|---|
| DE | |
| DD |
| Type | Ships |
|---|---|
| DE | |
| DD |
| Type | Ships |
|---|---|
| DE | |
| DD | |
| CA |
| Type | Ships |
|---|---|
| DE | |
| DD | |
| CL | |
| CA |
| Type | Ships |
|---|---|
| DE | |
| DD |
| Type | Ships |
|---|---|
| DD | |
| CL | |
| CA | |
| CVL | |
| FBB | |
| BB | |
| LHA |
| # | Formation | Air Raids | AD/AP AS/AS+ |
|---|---|---|---|
| AB | Diamond | 12/23 51/102 | |
| Diamond | 17/33 72/144 | ||
| Diamond | 23/46 102/204 | ||
| # | Formation | Air Raids | AD/AP AS/AS+ |
| # | Formation | Normal Battle Node | AD/AP AS/AS+ |
|---|---|---|---|
| A | Echelon Line Abreast Phases: 1, 2, 3, 4 |
0/0 0/0 | |
| Echelon Line Abreast Phases: 1, 2, 3, 4 |
0/0 0/0 | ||
| # | Formation | Normal Battle Node | AD/AP AS/AS+ |
| # | Formation | Normal Battle Node | AD/AP AS/AS+ |
|---|---|---|---|
| B | Echelon Phases: 2, 3, 4 |
0/0 0/0 | |
| Vanguard Phases: 1, 4 |
0/0 0/0 | ||
| Vanguard Phases: 4 |
0/0 0/0 | ||
| # | Formation | Normal Battle Node | AD/AP AS/AS+ |
| # | Formation | Normal Battle Node | AD/AP AS/AS+ |
|---|---|---|---|
| C | Echelon Vanguard Phases: 1, 2, 3, 4 |
0/0 0/0 | |
| Vanguard Phases: 3, 4 |
0/0 0/0 | ||
| # | Formation | Normal Battle Node | AD/AP AS/AS+ |
| # | Selection Node | ||
|---|---|---|---|
| D | 艦隊の針路を選択できます。提督、どちらの針路をとられますか? You can decide the fleet's course. Admiral, which heading should we take? | ||
| # | Selection Node | ||
| # | Formation | Air Defense Node | AD/AP AS/AS+ |
|---|---|---|---|
| E | Diamond Phases: 1, 4 |
24/47 105/210 | |
| Diamond Phases: 1 |
35/69 153/306 | ||
| Diamond Phases: 1, 2, 4 |
44/87 195/390 | ||
| Diamond Phases: 1 |
46/91 204/408 | ||
| # | Formation | Air Defense Node | AD/AP AS/AS+ |
| # | Formation | Air Defense Node | AD/AP AS/AS+ |
|---|---|---|---|
| F | Diamond Phases: 1, 2, 3, 4 |
24/47 105/210 | |
| Diamond Phases: 2, 3, 4 |
35/69 153/306 | ||
| Diamond Phases: 2, 3, 4 |
44/87 195/390 | ||
| Diamond Phases: 2, 3 |
46/91 204/408 | ||
| # | Formation | Air Defense Node | AD/AP AS/AS+ |
| # | Landing Node | ||
|---|---|---|---|
| G | 輸送物資の揚陸地点に到達しました。本海域の輸送作戦は無事完了しています。 The landing point of the convoy has been reached. The transport operation here has already been completed successfully. | ||
| # | Landing Node | ||
| # | Formation | Normal Battle Node | AD/AP AS/AS+ |
|---|---|---|---|
| G1 | Line Ahead Double Line Phases: 1, 2, 4 |
43/85 189/378 | |
| Diamond Phases: 1, 2, 4 |
43/85 189/378 | ||
| # | Formation | Normal Battle Node | AD/AP AS/AS+ |
| # | Empty Node | ||
|---|---|---|---|
| G2 | 敵影を見ず。 No enemy spotted. | ||
| # | Empty Node | ||
| # | Formation | Boss Battle Node | AD/AP AS/AS+ |
|---|---|---|---|
| H | Line Ahead Double Line Diamond Phases: 1, 2, 4 |
9/17 36/72 | |
| # | Formation | Boss Battle Node | AD/AP AS/AS+ |
| # | Formation | Normal Battle Node | AD/AP AS/AS+ |
|---|---|---|---|
| I | Double Line Phases: 2 |
29/58 129/258 | |
| Double Line Phases: 2 |
29/58 129/258 | ||
| Double Line Phases: 4 |
24/47 105/210 | ||
| # | Formation | Normal Battle Node | AD/AP AS/AS+ |
| # | Formation | Normal Battle Node | AD/AP AS/AS+ |
|---|---|---|---|
| J | Echelon Line Abreast Phases: 2, 3, 4 |
0/0 0/0 | |
| Echelon Line Abreast Phases: 2, 3, 4 |
0/0 0/0 | ||
| # | Formation | Normal Battle Node | AD/AP AS/AS+ |
| # | Selection Node | ||
|---|---|---|---|
| K | 艦隊の針路を選択できます。提督、どちらの針路をとられますか? You can decide the fleet's course. Admiral, which heading should we take? | ||
| # | Selection Node | ||
| # | Formation | Air Defense Node | AD/AP AS/AS+ |
|---|---|---|---|
| L | Diamond Phases: 2, 4 |
24/47 105/210 | |
| Diamond Phases: 2, 4 |
35/69 153/306 | ||
| Diamond Phases: 2, 4 |
44/87 195/390 | ||
| Diamond Phases: 2 |
46/91 204/408 | ||
| # | Formation | Air Defense Node | AD/AP AS/AS+ |
| # | Formation | Normal Battle Node | AD/AP AS/AS+ |
|---|---|---|---|
| M | Line Ahead Double Line Phases: 3, 4 |
0/0 0/0 | |
| Line Ahead Phases: 3 |
0/0 0/0 | ||
| # | Formation | Normal Battle Node | AD/AP AS/AS+ |
| # | Landing Node | ||
|---|---|---|---|
| N | 輸送物資の揚陸地点に到達しました。本海域の輸送作戦は無事完了しています。 The landing point of the convoy has been reached. The transport operation here has already been completed successfully. | ||
| # | Landing Node | ||
| # | Formation | Normal Battle Node | AD/AP AS/AS+ |
|---|---|---|---|
| N1 | Line Ahead Echelon Phases: 2, 4 |
0/0 0/0 | |
| # | Formation | Normal Battle Node | AD/AP AS/AS+ |
| # | Empty Node | ||
|---|---|---|---|
| N2 | 敵影を見ず。 No enemy spotted. | ||
| # | Empty Node | ||
| # | Formation | Boss Battle Node | AD/AP AS/AS+ |
|---|---|---|---|
| O | Cruising Formation 4 Phases: 2 |
0/0 0/0 | |
| Cruising Formation 4 Phases: 4 (Final)
|
0/0 0/0 | ||
| # | Formation | Boss Battle Node | AD/AP AS/AS+ |
| # | Formation | Boss Battle Node | AD/AP AS/AS+ |
|---|---|---|---|
| P | Double Line Phases: 3 |
29/58 129/258 | |
| Double Line Phases: 4 |
0/0 0/0 | ||
| Double Line Phases: 3 (Final)
|
0/0 0/0 | ||
| # | Formation | Boss Battle Node | AD/AP AS/AS+ |
| # | Empty Node | ||
|---|---|---|---|
| Q | 気のせいだった。 地中海連合艦隊、これより敵主力艦隊を捜索、発見次第、これを撃滅する! Must be my imagination. The Mediterranean Combined Fleet will now search for the main enemy fleet and destroy it on sight! | ||
| # | Empty Node | ||
| # | Formation | Air Defense Node | AD/AP AS/AS+ |
|---|---|---|---|
| R | Diamond Phases: 4 |
61/121 270/540 | |
| Diamond Phases: 4 |
70/139 311/621 | ||
| Diamond Phases: 4 |
110/219 491/981 | ||
| # | Formation | Air Defense Node | AD/AP AS/AS+ |
| # | Repair Node | ||
|---|---|---|---|
| # | Repair Node | ||
| # | Formation | Normal Battle Node | AD/AP AS/AS+ |
|---|---|---|---|
| T | Line Ahead Phases: 4 |
0/0 0/0 | |
| Line Ahead Phases: 4 |
0/0 0/0 | ||
| Line Ahead Phases: 4 |
0/0 0/0 | ||
| # | Formation | Normal Battle Node | AD/AP AS/AS+ |
| # | Formation | Normal Battle Node | AD/AP AS/AS+ |
|---|---|---|---|
| U | Echelon Line Abreast Phases: 4 |
0/0 0/0 | |
| Echelon Line Abreast Phases: 4 |
0/0 0/0 | ||
| # | Formation | Normal Battle Node | AD/AP AS/AS+ |
| # | Empty Node | ||
|---|---|---|---|
| V | 敵影を見ず。 地中海連合艦隊、これより敵主力艦隊を捜索、発見次第、これを撃滅する! No enemy spotted. The Mediterranean Combined Fleet will now search for the main enemy fleet and destroy it on sight! | ||
| # | Empty Node | ||
| # | Empty Node | ||
|---|---|---|---|
| W | 敵影を見ず。 地中海連合艦隊、これより敵主力艦隊を捜索、発見次第、これを撃滅する! No enemy spotted. The Mediterranean Combined Fleet will now search for the main enemy fleet and destroy it on sight! | ||
| # | Empty Node | ||
| # | Formation | Boss Battle Node | AD/AP AS/AS+ |
|---|---|---|---|
| X | Cruising Formation 4 Phases: 4 |
61/121 270/540 | |
| Cruising Formation 4 Phases: 4 (Final)
|
110/219 491/981 | ||
| # | Formation | Boss Battle Node | AD/AP AS/AS+ |
Ship Drops
| Ship drops | |||||||||||||||||||||||||||||||||||||||||||||||||||||||||||||||||||||||||||||||||||||||||||||||||||
|---|---|---|---|---|---|---|---|---|---|---|---|---|---|---|---|---|---|---|---|---|---|---|---|---|---|---|---|---|---|---|---|---|---|---|---|---|---|---|---|---|---|---|---|---|---|---|---|---|---|---|---|---|---|---|---|---|---|---|---|---|---|---|---|---|---|---|---|---|---|---|---|---|---|---|---|---|---|---|---|---|---|---|---|---|---|---|---|---|---|---|---|---|---|---|---|---|---|---|---|
| Type | Ship? | G1 | H | M | O | P | T | X | |||||||||||||||||||||||||||||||||||||||||||||||||||||||||||||||||||||||||||||||||||||||||||
| DE | Hachijou | Easy+ | Casual+ | Casual+ | Casual+ | Casual+ | Casual+ | ||||||||||||||||||||||||||||||||||||||||||||||||||||||||||||||||||||||||||||||||||||||||||||
| DE | Ishigaki | Casual+ | Casual+ | Casual+ | Casual+ | Casual+ | Casual+ | ||||||||||||||||||||||||||||||||||||||||||||||||||||||||||||||||||||||||||||||||||||||||||||
| DD | Usugumo | Casual+ | Medium+ | Casual+ | Casual+ | Casual+ | |||||||||||||||||||||||||||||||||||||||||||||||||||||||||||||||||||||||||||||||||||||||||||||
| DD | Uranami | Casual+ | Easy+ | Casual+ | Casual+ | Casual+ | |||||||||||||||||||||||||||||||||||||||||||||||||||||||||||||||||||||||||||||||||||||||||||||
| DD | Amagiri | Casual+ | Casual+ | Casual+ | Hard+ | ||||||||||||||||||||||||||||||||||||||||||||||||||||||||||||||||||||||||||||||||||||||||||||||
| DD | Harusame | Casual+ | Casual+ | Casual+ | Casual+ | Casual+ | Casual+ | ||||||||||||||||||||||||||||||||||||||||||||||||||||||||||||||||||||||||||||||||||||||||||||
| DD | Kawakaze | Casual+ | Casual+ | Casual+ | Casual+ | Casual+ | Casual+ | ||||||||||||||||||||||||||||||||||||||||||||||||||||||||||||||||||||||||||||||||||||||||||||
| DD | Oyashio | Hard+ | Hard+ | Casual+ | |||||||||||||||||||||||||||||||||||||||||||||||||||||||||||||||||||||||||||||||||||||||||||||||
| DD | Tanikaze | Casual+ | Casual+ | Casual+ | Casual+ | Medium+ | |||||||||||||||||||||||||||||||||||||||||||||||||||||||||||||||||||||||||||||||||||||||||||||
| DD | Suzunami | Casual+ | |||||||||||||||||||||||||||||||||||||||||||||||||||||||||||||||||||||||||||||||||||||||||||||||||
| DD | Hamanami | Casual+ | |||||||||||||||||||||||||||||||||||||||||||||||||||||||||||||||||||||||||||||||||||||||||||||||||
| DD | Grecale | Easy+ | Casual+ | Casual+ | |||||||||||||||||||||||||||||||||||||||||||||||||||||||||||||||||||||||||||||||||||||||||||||||
| DD | Scirocco | Casual+ | |||||||||||||||||||||||||||||||||||||||||||||||||||||||||||||||||||||||||||||||||||||||||||||||||
| DD | Johnston | Hard+ | Casual+ | ||||||||||||||||||||||||||||||||||||||||||||||||||||||||||||||||||||||||||||||||||||||||||||||||
| CL | Brooklyn | Hard+ | Easy+ | Casual+ | |||||||||||||||||||||||||||||||||||||||||||||||||||||||||||||||||||||||||||||||||||||||||||||||
| CL | Ooyodo | Casual+ | |||||||||||||||||||||||||||||||||||||||||||||||||||||||||||||||||||||||||||||||||||||||||||||||||
| CL | Duca degli Abruzzi | Casual+ | |||||||||||||||||||||||||||||||||||||||||||||||||||||||||||||||||||||||||||||||||||||||||||||||||
| CL | Giuseppe Garibaldi | Medium+ | Easy+ | Casual+ | |||||||||||||||||||||||||||||||||||||||||||||||||||||||||||||||||||||||||||||||||||||||||||||||
| CA | Zara | Casual+ | |||||||||||||||||||||||||||||||||||||||||||||||||||||||||||||||||||||||||||||||||||||||||||||||||
| CA | Pola | Easy+ | Casual+ | Casual+ | Medium+ | ||||||||||||||||||||||||||||||||||||||||||||||||||||||||||||||||||||||||||||||||||||||||||||||
| CVL | Gambier Bay | Casual+ | |||||||||||||||||||||||||||||||||||||||||||||||||||||||||||||||||||||||||||||||||||||||||||||||||
| FBB | Massachusetts | Casual+ | |||||||||||||||||||||||||||||||||||||||||||||||||||||||||||||||||||||||||||||||||||||||||||||||||
| FBB | Washington | Casual+ | |||||||||||||||||||||||||||||||||||||||||||||||||||||||||||||||||||||||||||||||||||||||||||||||||
| BB | Colorado | Casual+ | |||||||||||||||||||||||||||||||||||||||||||||||||||||||||||||||||||||||||||||||||||||||||||||||||
| LHA | Akitsu Maru | Casual+ | |||||||||||||||||||||||||||||||||||||||||||||||||||||||||||||||||||||||||||||||||||||||||||||||||
| DD | Hamakaze | Casual+ | Casual+ | Casual+ | Casual+ | Casual+ | |||||||||||||||||||||||||||||||||||||||||||||||||||||||||||||||||||||||||||||||||||||||||||||
| DD | Akigumo | Medium+ | Casual+ | Casual+ | Hard+ | ||||||||||||||||||||||||||||||||||||||||||||||||||||||||||||||||||||||||||||||||||||||||||||||
| DD | Yuugumo | Casual+ | |||||||||||||||||||||||||||||||||||||||||||||||||||||||||||||||||||||||||||||||||||||||||||||||||
| CL | Kitakami | Casual+ | Casual+ | Casual+ | Casual+ | Casual+ | |||||||||||||||||||||||||||||||||||||||||||||||||||||||||||||||||||||||||||||||||||||||||||||
| CL | Ooi | Hard+ | Hard+ | Hard+ | |||||||||||||||||||||||||||||||||||||||||||||||||||||||||||||||||||||||||||||||||||||||||||||||
| CL | Nagara | Casual+ | Casual+ | Casual+ | Casual+ | Easy+ | |||||||||||||||||||||||||||||||||||||||||||||||||||||||||||||||||||||||||||||||||||||||||||||
| CL | Kinu | Casual+ | |||||||||||||||||||||||||||||||||||||||||||||||||||||||||||||||||||||||||||||||||||||||||||||||||
| CL | Abukuma | Medium+ | Casual+ | Casual+ | Casual+ | Casual+ | Casual+ | Casual+ | |||||||||||||||||||||||||||||||||||||||||||||||||||||||||||||||||||||||||||||||||||||||||||
| CL | Sendai | Hard+ | Casual+ | Casual+ | Casual+ | Casual+ | Casual+ | ||||||||||||||||||||||||||||||||||||||||||||||||||||||||||||||||||||||||||||||||||||||||||||
| CL | Yuubari | Hard+ | Easy+ | Casual+ | |||||||||||||||||||||||||||||||||||||||||||||||||||||||||||||||||||||||||||||||||||||||||||||||
| CA | Kinugasa | Casual+ | |||||||||||||||||||||||||||||||||||||||||||||||||||||||||||||||||||||||||||||||||||||||||||||||||
| CA | Myoukou | Casual+ | |||||||||||||||||||||||||||||||||||||||||||||||||||||||||||||||||||||||||||||||||||||||||||||||||
| CA | Takao | Casual+ | |||||||||||||||||||||||||||||||||||||||||||||||||||||||||||||||||||||||||||||||||||||||||||||||||
| CA | Tone | Casual+ | |||||||||||||||||||||||||||||||||||||||||||||||||||||||||||||||||||||||||||||||||||||||||||||||||
| CA | Chikuma | Hard+ | Casual+ | Casual+ | Hard+ | ||||||||||||||||||||||||||||||||||||||||||||||||||||||||||||||||||||||||||||||||||||||||||||||
| CVL | Ryuujou | Casual+ | Casual+ | Casual+ | Casual+ | Casual+ | Casual+ | ||||||||||||||||||||||||||||||||||||||||||||||||||||||||||||||||||||||||||||||||||||||||||||
| CVL | Zuihou | Casual+ | |||||||||||||||||||||||||||||||||||||||||||||||||||||||||||||||||||||||||||||||||||||||||||||||||
| CVL | Hiyou | Casual+ | |||||||||||||||||||||||||||||||||||||||||||||||||||||||||||||||||||||||||||||||||||||||||||||||||
| FBB | Kongou | Casual+ | |||||||||||||||||||||||||||||||||||||||||||||||||||||||||||||||||||||||||||||||||||||||||||||||||
| FBB | Hiei | Casual+ | Hard+ | Casual+ | Casual+ | Casual+ | Casual+ | ||||||||||||||||||||||||||||||||||||||||||||||||||||||||||||||||||||||||||||||||||||||||||||
| FBB | Haruna | Casual+ | |||||||||||||||||||||||||||||||||||||||||||||||||||||||||||||||||||||||||||||||||||||||||||||||||
| FBB | Kirishima | Casual+ | Medium+ | Casual+ | Casual+ | Casual+ | Casual+ | ||||||||||||||||||||||||||||||||||||||||||||||||||||||||||||||||||||||||||||||||||||||||||||
| BB | Fusou | Casual+ | |||||||||||||||||||||||||||||||||||||||||||||||||||||||||||||||||||||||||||||||||||||||||||||||||
| BB | Yamashiro | Casual+ | |||||||||||||||||||||||||||||||||||||||||||||||||||||||||||||||||||||||||||||||||||||||||||||||||
| BB | Ise | Casual+ | |||||||||||||||||||||||||||||||||||||||||||||||||||||||||||||||||||||||||||||||||||||||||||||||||
| BB | Hyuuga | Casual+ | |||||||||||||||||||||||||||||||||||||||||||||||||||||||||||||||||||||||||||||||||||||||||||||||||
| BB | Nagato | Casual+ | |||||||||||||||||||||||||||||||||||||||||||||||||||||||||||||||||||||||||||||||||||||||||||||||||
| BB | Mutsu | Casual+ | |||||||||||||||||||||||||||||||||||||||||||||||||||||||||||||||||||||||||||||||||||||||||||||||||
| CV | Shoukaku | Casual+ | |||||||||||||||||||||||||||||||||||||||||||||||||||||||||||||||||||||||||||||||||||||||||||||||||
| CV | Zuikaku | Casual+ | |||||||||||||||||||||||||||||||||||||||||||||||||||||||||||||||||||||||||||||||||||||||||||||||||
|
| |||||||||
|---|---|---|---|---|---|---|---|---|---|
|
Time remaining until Event ends:
| |||||||||