- Welcome to the Kancolle Wiki!
- If you have any questions regarding site content, account registration, etc., please visit the KanColle Wiki Discord
Difference between revisions of "Land-Based Air Squadron"
m (Reppuu Kai rename) |
-a-nonymous (talk | contribs) (update table http://wikiwiki.jp/kancolle/?%B4%F0%C3%CF%B9%D2%B6%F5%C2%E2#AirSupremacy) |
||
| Line 710: | Line 710: | ||
! style="cellpadding:10px;width:6%;" | Range | ! style="cellpadding:10px;width:6%;" | Range | ||
! style="cellpadding:10px;width:6%;" | Net Sortie Coefficient <ref>AA + 1.5 (Interception)</ref> | ! style="cellpadding:10px;width:6%;" | Net Sortie Coefficient <ref>AA + 1.5 (Interception)</ref> | ||
| − | ! style="cellpadding:10px;width:6%;" | Sortie FP 18 Slots | + | ! style="cellpadding:10px;width:6%;" | Sortie FP (18 Slots, Veterancy) |
! style="cellpadding:10px;width:6%;" | Net Defense Coefficient <ref>AA + Interception + 2 (Anti-bomber)</ref> | ! style="cellpadding:10px;width:6%;" | Net Defense Coefficient <ref>AA + Interception + 2 (Anti-bomber)</ref> | ||
| − | ! style="cellpadding:10px;width:6%;" | Defense FP 18 Slots | + | ! style="cellpadding:10px;width:6%;" | Defense FP (18 Slots, Veterancy) |
|- | |- | ||
| align="center" height="35px" | Model 21 Skilled | | align="center" height="35px" | Model 21 Skilled | ||
| Line 930: | Line 930: | ||
| align="center" height="35px" style="background:#A5E6B5;" | 80 | | align="center" height="35px" style="background:#A5E6B5;" | 80 | ||
|- | |- | ||
| − | | align="center" height="35px" style="background:#A5E6B5;" | Hayabusa Model 3 Kai ( | + | | align="center" height="35px" style="background:#A5E6B5;" | Hayabusa Model 3 Kai (65th) <ref>Fighter-Bomber</ref> |
| − | | align="center" height="35px" style="background:#A5E6B5;" | | + | | align="center" height="35px" style="background:#A5E6B5;" | 爆装一式戦 隼III型改(65戦隊) |
| align="center" height="35px" style="background:#A5E6B5;" | 6 | | align="center" height="35px" style="background:#A5E6B5;" | 6 | ||
| align="center" height="35px" style="background:#A5E6B5;" | N/A | | align="center" height="35px" style="background:#A5E6B5;" | N/A | ||
| Line 1,017: | Line 1,017: | ||
| align="center" height="35px" style="background:#A5E6B5;" | 19 | | align="center" height="35px" style="background:#A5E6B5;" | 19 | ||
| align="center" height="35px" style="background:#A5E6B5;" | 106 | | align="center" height="35px" style="background:#A5E6B5;" | 106 | ||
| + | |- | ||
| + | | align="center" height="35px" style="background:#A5E6B5;" | Reppuu Kai | ||
| + | | align="center" height="35px" style="background:#A5E6B5;" | 烈風改 | ||
| + | | align="center" height="35px" style="background:#A5E6B5;" | 10 | ||
| + | | align="center" height="35px" style="background:#A5E6B5;" | 2 | ||
| + | | align="center" height="35px" style="background:#A5E6B5;" | 6 | ||
| + | | align="center" height="35px" style="background:#A5E6B5;" | 4 | ||
| + | | align="center" height="35px" style="background:#A5E6B5;" | 13 | ||
| + | | align="center" height="35px" style="background:#A5E6B5;" | 80 | ||
| + | | align="center" height="35px" style="background:#A5E6B5;" | 24 | ||
| + | | align="center" height="35px" style="background:#A5E6B5;" | 127 | ||
| + | |- | ||
| + | | align="center" height="35px" style="background:#A5E6B5;" | Reppuu Kai (352 Air Group/Skilled) | ||
| + | | align="center" height="35px" style="background:#A5E6B5;" | 烈風改(三五二空/熟練) | ||
| + | | align="center" height="35px" style="background:#A5E6B5;" | 11 | ||
| + | | align="center" height="35px" style="background:#A5E6B5;" | 3 | ||
| + | | align="center" height="35px" style="background:#A5E6B5;" | 7 | ||
| + | | align="center" height="35px" style="background:#A5E6B5;" | 4 | ||
| + | | align="center" height="35px" style="background:#A5E6B5;" | 15.5 | ||
| + | | align="center" height="35px" style="background:#A5E6B5;" | 91 | ||
| + | | align="center" height="35px" style="background:#A5E6B5;" | 28 | ||
| + | | align="center" height="35px" style="background:#A5E6B5;" | 144 | ||
| + | |- | ||
| + | | align="center" height="35px" style="background:#A5E6B5;" | Me163B | ||
| + | | align="center" height="35px" style="background:#A5E6B5;" | Me163B | ||
| + | | align="center" height="35px" style="background:#A5E6B5;" | 2 | ||
| + | | align="center" height="35px" style="background:#A5E6B5;" | N/A | ||
| + | | align="center" height="35px" style="background:#A5E6B5;" | 9 | ||
| + | | align="center" height="35px" style="background:#A5E6B5;" | 1 | ||
| + | | align="center" height="35px" style="background:#A5E6B5;" | 2 | ||
| + | | align="center" height="35px" style="background:#A5E6B5;" | 33 | ||
| + | | align="center" height="35px" style="background:#A5E6B5;" | 20 | ||
| + | | align="center" height="35px" style="background:#A5E6B5;" | 110 | ||
| + | |- | ||
| + | | align="center" height="35px" style="background:#A5E6B5;" | Prototype Shuusui | ||
| + | | align="center" height="35px" style="background:#A5E6B5;" | 試製 秋水 | ||
| + | | align="center" height="35px" style="background:#A5E6B5;" | 2 | ||
| + | | align="center" height="35px" style="background:#A5E6B5;" | N/A | ||
| + | | align="center" height="35px" style="background:#A5E6B5;" | 8 | ||
| + | | align="center" height="35px" style="background:#A5E6B5;" | 1 | ||
| + | | align="center" height="35px" style="background:#A5E6B5;" | 2 | ||
| + | | align="center" height="35px" style="background:#A5E6B5;" | 33 | ||
| + | | align="center" height="35px" style="background:#A5E6B5;" | 18 | ||
| + | | align="center" height="35px" style="background:#A5E6B5;" | 101 | ||
| + | |- | ||
| + | | align="center" height="35px" style="background:#A5E6B5;" | Shuusui | ||
| + | | align="center" height="35px" style="background:#A5E6B5;" | 秋水 | ||
| + | | align="center" height="35px" style="background:#A5E6B5;" | 3 | ||
| + | | align="center" height="35px" style="background:#A5E6B5;" | N/A | ||
| + | | align="center" height="35px" style="background:#A5E6B5;" | 9 | ||
| + | | align="center" height="35px" style="background:#A5E6B5;" | 1 | ||
| + | | align="center" height="35px" style="background:#A5E6B5;" | 3 | ||
| + | | align="center" height="35px" style="background:#A5E6B5;" | 37 | ||
| + | | align="center" height="35px" style="background:#A5E6B5;" | 21 | ||
| + | | align="center" height="35px" style="background:#A5E6B5;" | 114 | ||
| + | |- | ||
| + | | align="center" height="35px" style="background:#A5E6B5;" | Fw 190 D-9 | ||
| + | | align="center" height="35px" style="background:#A5E6B5;" | Fw190 D-9 | ||
| + | | align="center" height="35px" style="background:#A5E6B5;" | 12 | ||
| + | | align="center" height="35px" style="background:#A5E6B5;" | 3 | ||
| + | | align="center" height="35px" style="background:#A5E6B5;" | 3 | ||
| + | | align="center" height="35px" style="background:#A5E6B5;" | 3 | ||
| + | | align="center" height="35px" style="background:#A5E6B5;" | 16.5 | ||
| + | | align="center" height="35px" style="background:#A5E6B5;" | 95 | ||
| + | | align="center" height="35px" style="background:#A5E6B5;" | 21 | ||
| + | | align="center" height="35px" style="background:#A5E6B5;" | 114 | ||
|} | |} | ||
| Line 1,038: | Line 1,104: | ||
For example, a Raiden (6 AA, 2 Interception, 5 Anti-bomber) would have a defense coefficient of 6+2+2(5) = 18; it therefore contributes 18*4.25 = 76.5 FP before applying veterancy bonuses. | For example, a Raiden (6 AA, 2 Interception, 5 Anti-bomber) would have a defense coefficient of 6+2+2(5) = 18; it therefore contributes 18*4.25 = 76.5 FP before applying veterancy bonuses. | ||
| − | The best interceptor is therefore the | + | The best interceptor is therefore the Reppuu Kai (352 Air Group/Skilled), with a defense coefficient of 28, and its basic variant the Reppuu Kai (24). |
| − | The carrier-capable Shinden Kai has a defense coefficient of 15, and is technically better than the Hien, though using it on aerial defense would clearly be quite a waste of its capabilities. | + | The carrier-capable Shinden Kai has a defense coefficient of 15, and is technically better than the T3 Hien, though using it on aerial defense would clearly be quite a waste of its capabilities. |
====FP of an Air Group==== | ====FP of an Air Group==== | ||
Revision as of 08:50, 9 September 2019
Land-Based Air Squadron is a mechanic implemented during the May 3, 2016 update, as part of the Spring 2016 Event. It was also usable during the Summer 2016 Event. As of October 5th, 2016, land-based air squadrons will be implemented in the normal maps of the game, giving players access to them for World 6.
Outline
This mechanic allows aerial support to be launched from allied air bases. The attack will occur prior to the fleet's attack (after detection and before the fleet begins its aerial combat phase).
Usable Plane Classes
- Land Attackers
- Interceptors
- Carrier-based Fighters

- Carrier-based Bombers
 /
/
- Seaplane Bombers & Fighters

- Carrier-based Recon Planes, Recon Seaplanes & Flying Boat
 //
//
How to Use
Each Squadron consists of 4 flights. Each flight can be equipped with a different plane, and the amount differs depending on the type of plane it is: 4 for planes in class 6 above and 18 for all others.
When an equipped plane is removed, the removed plane will be temporarily marked as "Being Transferred" (配置転換中) and will not be usable during this time.
Clearing certain maps such as E-4 and E-5 of the Spring Event increased the number of squadrons that can be utilized.
Each plane has its own equip cost (in bauxite) that is immediately deducted when it is equipped; thus, changing the planes equipped to your squadrons multiple times will drain your bauxite quickly. The equip cost for each slot is calculated as follows: [math]\text{Equip Cost of Slot} = \text{# of planes allowed in slot(4 or 18, depending on what kind)} \times \text{Equip Cost of Plane}[/math]
As of May 5th, 2016, your airfields can be attacked by enemy planes, aircraft will be lost from the first slot sequentially down to the fourth slot should they sustain more than 50 damage in a single air raid
Veterancy
Veterancy does not have an impact on the airstrike power of dedicated land-based aircraft when used in LBAS, whereas carrier aircraft used in a land based will receive an additional 120% multiplier on top of the 150% critical firepower modifier. [1]
Tables of Usage Costs
Carrier-Based Fighters
| Carrier-Based Fighters | |||||
|---|---|---|---|---|---|
| Equip Dex Number |
Name of Plane | Statistics | Combat Radius | Equip Cost | |
| per plane | per slot | ||||
| 19 | Type 96 Fighter | 3 | 3 | 54 | |
| 20 | Zero Fighter Type 21 | 7 | 4 | 72 | |
| 21 | Zero Fighter Type 52 | 6 | 5 | 90 | |
| 22 | Reppuu | 5 | 7 | 126 | |
| 53 | Reppuu Model 11 | 5 | 8 | 144 | |
| 55 | Shiden Kai 2 | 3 | 6 | 108 | |
| 56 | Shinden Kai | 2 | 9 | 162 | |
| 96 | Zero Fighter Type 21 (Skilled) | 7 | 4 | 72 | |
| 109 | Zero Fighter Type 52 Model C (601 Air Group) | 6 | 5 | 90 | |
| 110 | Reppuu (601 Air Group) | 5 | 7 | 126 | |
| 152 | Zero Fighter Type 52 (Skilled) | 6 | 5 | 90 | |
| 153 | Zero Fighter Type 52 Model C (Iwai Squadron) | 6 | 5 | 90 | |
| 155 | Zero Fighter Type 21 (Iwamoto Squadron) | 7 | 4 | 72 | |
| 156 | Zero Fighter Type 52 Model A (Iwamoto Squadron) | 6 | 5 | 90 | |
| 157 | Zero Fighter Type 53 (Iwamoto Squadron) | 6 | 6 | 108 | |
| 158 | Bf109 T Kai | 2 | 6 | 108 | |
| 159 | Fw190 T Kai | 3 | 6 | 108 | |
| 184 | Re. 2001 OR Kai | 4 | |||
Carrier-Based Bombers
| Dive Bombers | |||||
|---|---|---|---|---|---|
| Equip Dex Number |
Name of Plane | Statistics | Combat Radius | Equip Cost | |
| per plane | per slot | ||||
| 23 | Type 99 Dive Bomber | 4 | 4 | 72 | |
| 24 | Suisei | 4 | 5 | 90 | |
| 57 | Suisei Model 12A | 5 | 6 | 108 | |
| 60 | Zero Fighter Type 62 (Fighter-bomber) | 4 | 5 | 90 | |
| 64 | Ju 87C Kai | 4 | 6 | 108 | |
| 97 | Type 99 Dive Bomber (Skilled) | 4 | 4 | 72 | |
| 99 | Type 99 Dive Bomber (Egusa Squadron) | 4 | 4 | 72 | |
| 100 | Suisei (Egusa Squadron) | 5 | 5 | 90 | |
| 111 | Suisei (601 Air Group) | 5 | 5 | 90 | |
| 148 | Prototype Nanzan | 5 | 9 | 162 | |
| 154 | Zero Fighter Type 62 (Fighter-bomber/Iwai Squadron) | 5 | 5 | 90 | |
| Torpedo Bombers | |||||
|---|---|---|---|---|---|
| Equip Dex Number |
Name of Plane | Statistics | Combat Radius | Equip Cost | |
| per plane | per slot | ||||
| 16 | Type 97 Torpedo Bomber | 4 | 5 | 90 | |
| 17 | Tenzan | 5 | 6 | 108 | |
| 18 | Ryuusei | 6 | 7 | 126 | |
| 52 | Ryuusei Kai | 6 | 8 | 144 | |
| 82 | Type 97 Torpedo Bomber (931 Air Group) | 4 | 5 | 90 | |
| 83 | Tenzan (931 Air Group) | 5 | 6 | 108 | |
| 93 | Type 97 Torpedo Bomber (Tomonaga Squadron) | 4 | 5 | 90 | |
| 94 | Tenzan Model 12 (Tomonaga Squadron) | 5 | 6 | 108 | |
| 98 | Type 97 Torpedo Bomber (Skilled) | 4 | 5 | 90 | |
| 112 | Tenzan (601 Air Group) | 5 | 6 | 108 | |
| 113 | Ryuusei (601 Air Group) | 6 | 7 | 126 | |
| 143 | Type 97 Torpedo Bomber (Murata Squadron) | 4 | 5 | 90 | |
| 144 | Tenzan Model 12 (Murata Squadron) | 5 | 6 | 108 | |
Seaplane Bombers & Fighters
| Seaplane Bombers | |||||
|---|---|---|---|---|---|
| Equip Dex Number |
Name of Plane | Statistics | Combat Radius | Equip Cost | |
| per plane | per slot | ||||
| 26 | Zuiun | 5 | 6 | 108 | |
| 62 | Prototype Seiran | 4 | 10 | 180 | |
| 79 | Zuiun (634 Air Group) | 5 | 6 | 108 | |
| 80 | Zuiun Model 12 | 5 | 7 | 126 | |
| 81 | Zuiun Model 12 (634 Air Group) | 5 | 7 | 126 | |
| Seaplane Fighters | |||||
|---|---|---|---|---|---|
| Equip Dex Number |
Name of Plane | Statistics | Combat Radius | Equip Cost | |
| per plane | per slot | ||||
| 164 | Ro.44 Seaplane Fighter | 3 | 4 | 72 | |
| 165 | Type 2 Seaplane Fighter Kai | 4 | 5 | 90 | |
Land Attackers & Interceptors
| Land Attackers | |||||
|---|---|---|---|---|---|
| Equip Dex Number |
Name of Plane | Statistics | Combat Radius | Equip Cost | |
| per plane | per slot | ||||
| 168 | Type 96 Land Attacker | 8 | 10 | 180 | |
| 169 | Type 1 Land Attacker | 9 | 12 | 216 | |
| 170 | Type 1 Land Attacker (Nonaka Squadron) | 9 | 12 | 216 | |
| Interceptors | |||||
|---|---|---|---|---|---|
| Equip Dex Number |
Name of Plane | Statistics | Combat Radius | Equip Cost | |
| per plane | per slot | ||||
| 175 | Raiden | 2 | 6 | 108 | |
| 176 | Type 3 Fighter Hien | 3 | 7 | 126 | |
| 177 | Type 3 Fighter Hien (244th Air Combat Group) | 4 | 7 | 126 | |
Recon Seaplanes, Carrier-based Recon Planes, Land-Based Recon Planes, & Flying Boats
| Recon Seaplanes | |||||
|---|---|---|---|---|---|
| Equip Dex Number |
Name of Plane | Statistics | Combat Radius | Equip Cost | |
| per plane | per slot | ||||
| 25 | Type 0 Recon Seaplane | 7 | 5 | 20 | |
| 59 | Type 0 Observation Seaplane | 3 | 6 | 24 | |
| 102 | Type 98 Recon Seaplane (Night Scout) | 6 | 8 | 32 | |
| 115 | Ar196 Kai | 3 | 5 | 20 | |
| 118 | Shiun | 4 | 9 | 36 | |
| 163 | Ro.43 Recon Seaplane | 3 | 4 | 16 | |
| Carrier-Based Recon Planes | ||||||
|---|---|---|---|---|---|---|
| Equip Dex Number |
Name of Plane | Statistics | Combat Radius | Equip Cost | Notes | |
| per plane | per slot | |||||
| 54 | Saiun | 8 | 9 | 36 | Gives a x1.3 bonus to Anti-Air and Anti-bomber stats | |
| 61 | Type 2 Recon Aircraft | 5 | 6 | 24 | ||
| 151 | Prototype Keiun | 8 | 12 | 48 | ||
| 212 | Saiun (East Caroline Air Group) | Avoid Crossing the T - Disadvantage |
8 | ?? | ?? | Gives a x1.3 bonus to Anti-Air and Anti-bomber stats |
| 273 | Saiun (4th Recon) | Avoid Crossing the T - Disadvantage |
7 | ?? | ?? | Gives a x1.3 bonus to Anti-Air and Anti-bomber stats |
| Land-Based Recon Planes[2][3] | ||||||
|---|---|---|---|---|---|---|
| Equip Dex Number |
Name of Plane | Statistics | Combat Radius | Equip Cost | Notes | |
| per plane | per slot | |||||
| 311 | Type 2 Land Based Reconnaissance Aircraft | 8 | 7 | 28 | 1.15x bonus to FP during Sortie 1.125x bonus to attack power against surface targets during Sortie Can trigger Contact during Sortie 1.18x bonus to FP during Defense | |
| 312 | Type 2 Land-based Reconnaissance Aircraft (Skilled) | 9 | 7 | 28 | 1.18x bonus to FP during Sortie 1.15x bonus to attack power against surface targets during Sortie Can trigger Contact during Sortie 1.24x bonus to FP during Defense | |
| Flying Boats | ||||||
|---|---|---|---|---|---|---|
| Equip Dex Number |
Name of Plane | Statistics | Combat Radius | Equip Cost | Notes | |
| per plane | per slot | |||||
| 138 | Type 2 Flying Boat | 20 | 25 | 100 | Adds +3 range to your LBAS distance | |
| 178 | PBY-5A Catalina | 10 | 6 | 24 | Adds +1-3 range to your LBAS distance (depending on shortest range in base) | |
Detail of Each Action
There are 5 actions each squadron can take: Standby, Mission, Air Defense, Take Cover, and Rest.
| Action | Effect |
|---|---|
| Standby |
Default state. Use if you wish to sortie without utilizing the squadron. |
| Mission |
As you enter the sortie, for each squadron you chose to send on a mission, you can choose up to 2 nodes that the squadron will perform mission at. You can choose the same node twice for the squadron; if so, the squadron will have two phases to itself. Note that each squadron has a maximum radius in which it can carry out a mission; you will be unable to use the squadron beyond its combat radius. Costs |
| Air Defense |
During certain maps (such as E-5 and E-7 of the Spring 2016 Event), the enemy can perform air raids against the player's airfield, inflicting damage to planes and resources. This action orders the squadron to perform air defense in order to reduce the damage inflicted to planes and resources. In the Summer 2016 Event, the enemy raid will occur in all of the maps that use land base squadron |
| Take Cover |
Orders the planes to scramble to avoid enemy attacks. This, however, renders the base vulnerable. |
| Rest |
Will restore morale at a faster rate. However, the planes will suffer heavier damage if under attack while this action is taken. This also reduces your natural bauxite regeneration rate to 1 per 6 minutes (instead of 1 per 3). |
Fighter Power [4]
| Fighter / Interceptor Name | Japanese Name | AA Value [5] | Interception Value | Anti-Bomber Value | Range | Net Sortie Coefficient [6] | Sortie FP (18 Slots, Veterancy) | Net Defense Coefficient [7] | Defense FP (18 Slots, Veterancy) |
|---|---|---|---|---|---|---|---|---|---|
| Model 21 Skilled | 零式艦戦21型 (熟練) | 8 | N/A | N/A | 7 | 8 | 59 | 8 | 59 |
| Model 21 Skilled (Max★) | 零式艦戦21型(熟練) | 10 (8+2) | N/A | N/A | 7 | 10 | 67 | 10 | 67 |
| Model 52 Skilled | 零式艦戦52型 (熟練) | 9 | N/A | N/A | 6 | 9 | 63 | 9 | 63 |
| Model 52 Skilled (Max★) | 零式艦戦 52型(熟練) | 11 (9+2) | N/A | N/A | 6 | 11 | 72 | 11 | 72 |
| Shiden Kai Ni | 紫電改二 | 9 | N/A | N/A | 3 | 9 | 63 | 9 | 63 |
| Reppuu | 烈風 | 10 | N/A | N/A | 5 | 10 | 67 | 10 | 67 |
| Iwamoto Squadron | 零式艦戦53型(岩本隊) | 12 | N/A | N/A | 6 | 12 | 76 | 12 | 76 |
| Iwamoto Squadron (Max★) | 零式艦戦53型(岩本隊) | 14 (12+2) | N/A | N/A | 6 | 14 | 84 | 14 | 84 |
| Hien 244th Squadron | 三式戦 飛燕(飛行第244戦隊) | 9 | 4 | 3 | 4 | 15 | 89 | 19 | 106 |
| Hien 1D | 三式戦 飛燕一型丁 | 9 | 3 | 2 | 4 | 13.5 | 82 | 16 | 93 |
| Type 3 Hien | 三式戦 飛燕 | 8 | 3 | 1 | 3 | 12.5 | 78 | 13 | 80
|
| Hayate | 四式戦 疾風 | 10 | 1 | 1 | 5 | 11.5 | 74 | 13 | 80
|
| Raiden | 雷電 | 6 | 2 | 5 | 2 | 9 | 63 | 18 | 101 |
| Hayabusa Model 2 | 一式戦 隼II型 | 6 | 2 | N/A | 6 | 9 | 63 | 8 | 59 |
| Hayabusa Model 2 (Max★) | 一式戦 隼II型 | 8 (6+2) | 2 | N/A | 6 | 11 | 72 | 10 | 67 |
| Hayabusa Model 2 (64th) | 一式戦 隼II型 (64戦隊) | 11 | 5 | 1 | 7 | 18.5 | 103 | 18 | 101 |
| Hayabusa 3A | 一式戦 隼III型甲 | 7 | 3 | 1 | 6 | 11.5 | 74 | 12 | 76 |
| Hayabusa 3A (Max★) | 一式戦 隼III型甲 | 9 (7+2) | 3 | 1 | 6 | 13.5 | 82 | 14 | 84 |
| Hayabusa 54th Squadron | 一式戦 隼III型甲(54戦隊) | 8 | 3 | 1 | 7 | 12.5 | 78 | 13 | 80 |
| Hayabusa Model 3 Kai (65th) [8] | 爆装一式戦 隼III型改(65戦隊) | 6 | N/A | N/A | 5 | 6 | 25 | 6 | |
| Spitfire Mk 1 | Spitfire Mk.I | 7 | 1 | 2 | 4 | 8.5 | 61 | 12 | 76 |
| Spitfire Mk 5 | Spitfire Mk V | 9 | 2 | 3 | 5 | 12 | 76 | 17 | 97 |
| Spitfire Mk 9 (Skilled) | Spitfire Mk.IX(熟練) | 10 | 4 | 2 | 4 | 16 | 93 | 18 | 101 |
| Shiden Model 11 | 紫電一一型 | 8 | 1 | 1 | 3 | 9.5 | 65 | 11 | 72 |
| Shiden Model 11 (Max★) | 紫電一一型 | 10 (8+2) | 1 | 1 | 3 | 11.5 | 74 | 13 | 80 |
| Shiden Model 21 | 紫電二一型 | 9 | 3 | 1 | 4 | 13.5 | 82 | 14 | 84 |
| Shiden Kai (343 Air Group) Fighter Unit 301 | 紫電改(三四三空) 戦闘301 | 11 | 4 | 2 | 4 | 17 | 97 | 19 | 106 |
| Reppuu Kai | 烈風改 | 10 | 2 | 6 | 4 | 13 | 80 | 24 | 127 |
| Reppuu Kai (352 Air Group/Skilled) | 烈風改(三五二空/熟練) | 11 | 3 | 7 | 4 | 15.5 | 91 | 28 | 144 |
| Me163B | Me163B | 2 | N/A | 9 | 1 | 2 | 33 | 20 | 110 |
| Prototype Shuusui | 試製 秋水 | 2 | N/A | 8 | 1 | 2 | 33 | 18 | 101 |
| Shuusui | 秋水 | 3 | N/A | 9 | 1 | 3 | 37 | 21 | 114 |
| Fw 190 D-9 | Fw190 D-9 | 12 | 3 | 3 | 3 | 16.5 | 95 | 21 | 114 |
FP of a single Squadron (On Sortie)
The FP of a fighter squadron sent out on sortie follows a formula similar to that of carrier based aircraft, with some modifications.
sqrt(Squad Size) X (Sortie Coefficient) + Veterancy.
The Sortie Coefficient is defined as: AA + 1.5(Interception), which essentially gives land-based fighters a bonus to their total AA score.
FP of a single Squadron (On Defense)
The amount of fighter power each squad contributes aerial defense is determined by a similar formula, as above, but once again, with some minor differences.
sqrt(Squad Size) X (Defense Coefficient) + Veterancy.
In this case, Defense Coefficient is defined as: AA + Interception + 2(Anti-Bomber)
The square root of 18 (the squad size as of time of writing) is approximately 4.25.
For example, a Raiden (6 AA, 2 Interception, 5 Anti-bomber) would have a defense coefficient of 6+2+2(5) = 18; it therefore contributes 18*4.25 = 76.5 FP before applying veterancy bonuses.
The best interceptor is therefore the Reppuu Kai (352 Air Group/Skilled), with a defense coefficient of 28, and its basic variant the Reppuu Kai (24).
The carrier-capable Shinden Kai has a defense coefficient of 15, and is technically better than the T3 Hien, though using it on aerial defense would clearly be quite a waste of its capabilities.
FP of an Air Group
The total fighter power contributed by an air group as a whole is the SUM of the FP provided by all squadrons, multiplied by a factor for recon planes deployed to the air group, such as recon seaplanes, carrier-based scouts (e.g. Saiuns and Keiuns), and flying boats.
| Line of Sight | Seaplanes/Flying Boats | Carrier Scouts |
|---|---|---|
| 7 or less | 1.1 | 1.2 |
| 8 | 1.13 | N/A |
| 9 or more | 1.16 | 1.3 |
The table above depicts the bonus conferred by a spotting plane
- The FP bonus conferred upon an air group applies only to the planes in that air group, not all intercepting squadrons
- When composing defense squadrons, it is therefore important to take into consideration the bonus a Saiun would add (i.e. 1.3 FP multiplier) against the additional FP of adding a fourth fighter group
Bombing Power [9]
Offensively, bombers operate the similarly to regular airstrike with a few major differences which will be highlighted as they are explained, however, a general rule to abide by is that a dedicated land-based bomber will always outperform a carrier-based bomber of equal bombing stat
Specifically, the power of an airstrike is:
Power = Basic Attack Power * Critical Modifier * Veterancy Modifier * Contact Modifier * Land-Based Bonus * Special Modifiers
ASW LBAS
LBAS is capable of attacking enemy submarines. For LBAS to do so, the squadrons equipped must have ≥ 7 ![]() . In a mixed LBAS base, any squadrons equipped that have < 7 ASW will not attack submarines[10].
. In a mixed LBAS base, any squadrons equipped that have < 7 ASW will not attack submarines[10].
With recon aircraft equipped, LBAS ASW can also benefit from Contact bonuses[11].
Equipment Screen


Upon gaining the ability to utilize the Land-Based Air Squadrons, you will gain access to a separate equipment screen (see first image to the right for how to access the screen). Each airfield has 4 equipment slots, and each slot can be equipped with a different plane. You are able to change the lock status of planes in this screen (and this is currently the only way to place locks on land attackers and interceptors).
In the equipment screen, the overview of each equipment lists the following, in order:
- Name of the aircraft
- Expertise level of the aircraft
- Combat Radius of the aircraft
- Specific stats of the plane: Anti-Air
 , Dive Bomb
  , Torpedo
  , and Accuracy
- Lock Status
Equipping a plane to an airfield slot follows the same procedure as equipping a piece of equipment to a kanmusu: click on the slot you wish for the plane to go into, click the plane you wish to equip, and confirm the choice. Note that the usage costs of the plane being equipped is immediately deducted at this time.
Transfer Restriction
There are a few things to keep in mind when equipping the airfields:
- Each time a plane is unequipped from a slot (other than being moved to another slot), the plane goes under transfer restriction (配置転換中) and will not be able to be equipped by anything, including ships (in fact, it will disappear from the equip list as if something else is equipping it), until the restriction expires.
- Each time a plane is unequipped from a slot and another plane isn't replacing it at the same time (this can happen when you drag-and-drop a plane out of a slot), the airfield slot itself goes under transfer restriction and nothing can be equipped to that slot until the restriction expires.
- It takes 20 minutes for the restriction to expire.
- Swapping two planes already equipped in slots will not trigger the restriction. Note that you can only do this with planes equipped to the same airfield.
See the 3rd image to the right for an example of both a slot and a plane under restriction.
Combat Radius
This is a stat that can be viewed directly viewed at the top right of each LBAS (for each LBAS), or in the equipment menu (for each piece of equipment); it shows how far from the starting point the plane is able to be sent to. The radius of all planes in the specific squadron is taken, and that is how far the full squadron can go on a mission.
The mechanic to the combat mechanic has changed since the Summer 2016 Event.
The old formula from Spring 2016 Event followed along this example Example: It takes a Carrier Task Force at least 5 nodes to reach the boss of E-4 of Spring 2016 Event.
- Any squadron with an average Combat Radius of at least 5 can be sent to the boss node, even if the CTF itself takes 6 nodes (since ABCEFK and ABDEFK are both possible routes).
- A squadron with an average Combat Radius of 4 can be sent to the following nodes: A, C, D, E, F, and H. (Node B is not a combat node)
The present formula, implemented in the Summer 2016 Event is simple: the combat radius of the entire air group is determined by that of the shortest-ranged squadron.
- The distance to a certain node is independent of the route the fleet takes to reach there.
- Recon planes (carrier, land-based and seaplanes) and flying boats can increase the combat radius.
- 3 extra nodes with Type 2 Flying Boat,
- Between 1-3 extra nodes with a PBY-5A Catalina or Type 2 Land-based Reconnaissance Aircraft (Skilled), depending on the range of shortest-ranged squadron.
- Type 2 Land Based Reconnaissance Aircraft, Recon Keiuns, Saiuns, Type 0 Seaplanes, and Type 2 aircraft also increase the distance by up to 2 nodes (although they are extremely limited themselves).
The exact formula for range extension is: Sortie Radius of shortest-ranged squadron + √(Sortie Radius of longest-ranged Recon Aircraft/Flying Boat equipped - Sortie Radius of shortest-ranged squadron)[12]
- Round to 1 decimal place, following standard rounding rules.
- The final range extension is rounded to the nearest whole number (displayed to the right of each base's basic range in the UI for each LBAS as "+X", where applicable).
- The maximum possible range extension is +3.
Air Raids
In nodes where you can use land base air squadron, you will receive air raids from the enemy that can attack and damage your planes.

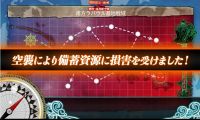
After a battle, you will receive one of three messages depending on how much damage was inflicted by the enemy.
The white message will display when no damage is taken by your base.
The orange message will display when some damage is taken by your base, and slight amount of resources will be lost.
The red message indicates the abyssals have damaged your base. This will result in a loss of resources, plane proficiency, and morale.
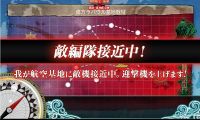
Indicating that an enemy air raid is en route.
Indicating that only minor damages were incurred
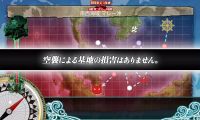
You successfully defended against the enemy raid. Only can happen when your land base take ZERO damage. (This was tested with double air defense and wouldn't be recommended to try when clearing the boss. Especially if it's an installation type)

.jpg)

Restrictions and Gaining Access to Land Based Air Squadrons for Normal Maps
6-4 and 6-5 offers a chance for players to gain access to Land Based air Squadrons for the normal maps of the game. However, unlike event maps, gaining access to Land Based Air Squadrons requires you to gain a hold of an unique item called a Construction Crew
A construction crew allows for you to build one Land Based which will allow you to use one Land Based Air Sqaudron. You can have up to a total of 2 Land Based Air Squadrons for the normal maps in the game. In order to obtain a construction crew, you can earn them one of two possible ways:
- Complete Quests in required to gain a Construction Crew. (B80 and B81)
- Purchase a construction crew via the premium shop for 800yen.
Upon acquiring a construction crew, you will need to complete the "Begin Preparation for the "Land Base Air Squadron" Quest (F43) in order to gain access to your Land Based Air Squadron. Currently you can have up to a total of three Land Bases. Meaning you can assemble up to three LBAS squadrons.
To expand the Land bases once you have access to it, you will need to get a Construction Crew and then go to your LBAS menu where you can select a one of the other Land Base Air Squadron that is currently locked away. Once selected, you will be given a prompt to choose to use your construction crew to build a Land base or not. If you choose build one, you will gain access to another Land Base Air Squadron to use.
6-4 and 6-5 will offer the usage of Land Based Air Squadrons, but will have restrictions placed upon them as noted on the LBAS icon placed on the map. The following information regarding LBAS restrictions on normal maps applies to the following maps:
- 6-4 will only allow the usage of 1 Land Based Air Squadron for battle
- 6-5 will only allow the usage of 2 Land Based Air Squadron for battle
Any extra land base air squadrons can be set to perform Air Defense where it may apply, in this case 6-5 which can have air raids happen.
| |||||||||||||||||||||||||||||||||||||
- ↑ http://wikiwiki.jp/kancolle/?%B4%F0%C3%CF%B9%D2%B6%F5%C2%E2#airskill
- ↑ https://twitter.com/Nishisonic/status/1080146808318263296?s=19
- ↑ https://twitter.com/andanteyk/status/1082311884928278529
- ↑ http://wikiwiki.jp/kancolle/?%B4%F0%C3%CF%B9%D2%B6%F5%C2%E2#AirSupremacy
- ↑ Where applicable, add 0.2 AA for each improvement point, up to a max of 2 AA at maximum improvement
- ↑ AA + 1.5 (Interception)
- ↑ AA + Interception + 2 (Anti-bomber)
- ↑ Fighter-Bomber
- ↑ http://wikiwiki.jp/kancolle/?%B4%F0%C3%CF%B9%D2%B6%F5%C2%E2#Offence
- ↑ https://wikiwiki.jp/kancolle/%E5%9F%BA%E5%9C%B0%E8%88%AA%E7%A9%BA%E9%9A%8A#Antisubmarine
- ↑ https://twitter.com/syoukuretin/status/1072188046609539072
- ↑ https://twitter.com/buntan_oic/status/764754696649138177