• Welcome to the Kancolle Wiki!
  • If you have any questions regarding site content, account registration, etc., please visit the KanColle Wiki Discord

Difference between revisions of "Winter 2018 Event"

From Kancolle Wiki
Jump to navigation Jump to search
(→‎Friend Fleet Voice Lines: Added originally unlisted voice line for Kirishima. Same file is used on KC wikia for Winter 2018 Event)
 
(11 intermediate revisions by 5 users not shown)
Line 36: Line 36:
 
|'''CV''' & '''CVL''': [[Zuikaku]], [[Zuihou]], [[Chiyoda]], [[Chitose]]<br>'''BB(V)''': [[Ise]], [[Hyuuga]]<br>'''CL''': [[Isuzu]], [[Ooyodo]], [[Tama]]<br>'''DD''': [[Akizuki]], [[Hatsuzuki]]
 
|'''CV''' & '''CVL''': [[Zuikaku]], [[Zuihou]], [[Chiyoda]], [[Chitose]]<br>'''BB(V)''': [[Ise]], [[Hyuuga]]<br>'''CL''': [[Isuzu]], [[Ooyodo]], [[Tama]]<br>'''DD''': [[Akizuki]], [[Hatsuzuki]]
 
|<span style="color:Purple">'''Shima Fleet'''</span>
 
|<span style="color:Purple">'''Shima Fleet'''</span>
|'''CA''': [[Nachi]], [[Ashigara]]<br>'''DD''': [[Shiranui]], [[Kasumi]], [[Ushio]], [[Akebono]]<br>※[[Abukuma]] does '''not''' count as a Shima Fleet ship.
+
|'''CA''': [[Nachi]], [[Ashigara]]<br>'''CL''':※[[Abukuma]]<br>'''DD''': [[Shiranui]], [[Kasumi]], [[Ushio]], [[Akebono]]<br>※[[Abukuma]], [[Shiranui]] does '''not''' count as a Shima Fleet ship for E-5 and E-6.
 
|-
 
|-
 
|'''Suzuki Fleet'''
 
|'''Suzuki Fleet'''
 
|'''BB''': [[Kongou]], [[Haruna]]<br>'''CA(V)''': [[Tone]], [[Chikuma]], [[Kumano]], [[Suzuya]]<br>'''CL''': [[Yahagi]]<br>'''DD''': [[Urakaze]], [[Isokaze]],  [[Hamakaze]], [[Yukikaze]], [[Kiyoshimo]], [[Nowaki]]
 
|'''BB''': [[Kongou]], [[Haruna]]<br>'''CA(V)''': [[Tone]], [[Chikuma]], [[Kumano]], [[Suzuya]]<br>'''CL''': [[Yahagi]]<br>'''DD''': [[Urakaze]], [[Isokaze]],  [[Hamakaze]], [[Yukikaze]], [[Kiyoshimo]], [[Nowaki]]
 
|'''Shima Fleet''' (optional)
 
|'''Shima Fleet''' (optional)
|'''CA''': [[Aoba]]<br>'''CL''': [[Kinu]]<br>'''DD''': [[Wakaba]], [[Hatsushimo]], [[Hatsuharu]], [[Uranami]]
+
|'''CA''': [[Aoba]]<br>'''CL''': [[Kinu]]<br>'''DD''': [[Wakaba]], [[Hatsushimo]], [[Hatsuharu]], [[Uranami]]<br>※ [[Aoba]] does '''not''' count as a Shima Fleet ship for E-5 and E-6.
 
|}
 
|}
  
Line 915: Line 915:
 
|scenario = [[Noshiro]]
 
|scenario = [[Noshiro]]
 
|origin = 二水戦、突撃します。各艦隊、艦隊陣形確認。よろしくどぞ。
 
|origin = 二水戦、突撃します。各艦隊、艦隊陣形確認。よろしくどぞ。
|translation = DesRo n2 is attacking. All fleets, check your formation. Please and thanks.
+
|translation = DesRon 2 is attacking. All fleets, check your formation. Please and thanks.
 
|audio = Noshiro FriendFleet.mp3
 
|audio = Noshiro FriendFleet.mp3
 
|notes =  
 
|notes =  
Line 986: Line 986:
 
|translation = We're entering a night battle now? Please leave it to me.
 
|translation = We're entering a night battle now? Please leave it to me.
 
|audio = Haruna FriendFleet.mp3
 
|audio = Haruna FriendFleet.mp3
 +
|notes =
 +
}}
 +
{{SeasonalQuote
 +
|scenario = [[Kirishima]]
 +
|origin = 霧島、了解!主砲、打ち方初め、てー!
 +
|translation = Roger! Main cannons, begin firing, fire!
 +
|audio = Kirishima-FriendFleet.mp3
 
|notes =  
 
|notes =  
 
}}
 
}}
Line 1,177: Line 1,184:
 
** Fleet contains no AV
 
** Fleet contains no AV
 
** Fleet contains no AS (Taigei)
 
** Fleet contains no AS (Taigei)
** Amount of DD/DE ≧ 2
+
** Amount of DD + DE ≧ 2
  
 
|B -> C/empty =  
 
|B -> C/empty =  
Line 6,179: Line 6,186:
  
 
|tips =  
 
|tips =  
<br>
+
'''Tagging Rules'''[[File:2018WinterPurpleTag.png|thumb|right]] <br>[[File:2018WinterGreenTag.png|thumb|right]]
'''Objectives'''
+
 
 +
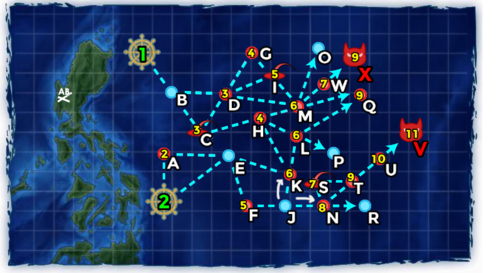
* Untagged Ships that partake in '''E-6''' will be given the  <font color="Purple">'''Shima Fleet Tag'''</font>
 +
* <font color="Purple">'''Shima Fleet Tagged Members'''</font> will begin from '''Starting Point 1'''.
 +
* Mixed tags on '''Easy and Very Easy difficulty''' will begin from '''Starting Point 1'''.
 +
* <font color="Green">'''Kurita Fleet Tagged Members'''</font> will begin from '''Starting Point 2'''.
 +
* If you need to add in additional <font color="Green">'''Kurita Fleet Tagged Ships'''</font> to use for the '''Phase 2''' of the operation, you will need to sortie them to '''E-2 or E-4 first''' so they can tagged with the <font color="Green">'''Kurita Fleet Tag'''</font>.
 +
'''E6 Objectives'''
  
Objectives will be listed in order of difficulties
+
E6 contains mutiple objectives that need to be comlpleted depending of the difficulty level. Objectives will be listed in order of difficulties.
  
Phase 1 Objectives - Shima Striking Force
+
Phase 1 Objectives - <font color="Purple">'''Shima Striking Force'''</font>
  
* Defeat boss gauge at Node U, AV Hime ('''all difficulties''')
+
* Defeat boss gauge at Node U, '''[[Seaplane Tender Princess]]''' ('''all difficulties''')
 
**…and Reach Node I ('''Easy''')
 
**…and Reach Node I ('''Easy''')
 
**…and S-rank I and reach node K ('''Med''')  
 
**…and S-rank I and reach node K ('''Med''')  
 
***…and A-Rank K ('''Hard''')
 
***…and A-Rank K ('''Hard''')
  
Phase 2 Objectives - Kurita Striking Force
+
Phase 2 Objectives - <font color="Green">'''Kurita Striking Force'''</font>
* Defeat boss gauge at node V, BB Hime Kai ('''all''')
+
* Defeat boss gauge at node V, '''[[Battleship Princess Kai]]''' ('''all''')
 
**…And obtain AS against an LBAS raid ('''1 on Med, 3 on Hard''')
 
**…And obtain AS against an LBAS raid ('''1 on Med, 3 on Hard''')
  
Phase 3 Objectives - Shima Striking Force
+
Phase 3 Objectives - <font color="Purple">'''Shima Striking Force'''</font>
* Sink CV Water Demon
+
* Sink '''[[Aircraft Carrier Water Demon]]'''
  
 
'''Required Ships'''<br>
 
'''Required Ships'''<br>
Line 6,208: Line 6,221:
 
'''Phase 1 - AV Hime'''
 
'''Phase 1 - AV Hime'''
  
AV Hime will require the use of the Shima fleet (Purple). This phase is relatively simple and straightforward.
+
2DD Mandatory, Fast mandatory.
 +
 
 +
AV Hime will require the use of the Shima fleet (Purple). This phase is relatively straightforward.
  
 
Attaining AS here is completely impractical (504 FP) if not impossible, as it would require the sacrifice of Nachi and Ashigara, removing bombers from LBAS for fighters, and more.
 
Attaining AS here is completely impractical (504 FP) if not impossible, as it would require the sacrifice of Nachi and Ashigara, removing bombers from LBAS for fighters, and more.
 +
 +
Key Pointers:
 +
 +
* Nachi and Ashigara are highly recommended for their post-cap firepower bonuses, as are most historical ships.
 +
* The Littorio-Class are  also excellent here for their ability to attain AS (they are capable of carrying Seaplane Fighters) when unopposed
 +
 +
* A submarine may be utilized to divert fire, however, as a fast fleet is a requirement, a boiler+turbine combination is mandatory
 +
** The SS may be retreated without consequence. As sparkling a submarine is extremely cheap and submarines benefit greatly proportionately from the extra evasion when sparkled, it is highly recommended that you sparkle the SSV.
 +
** This can be done extremely cheaply at E5
 +
 +
The final composition of the fleet would therefore look along the lines of: SSV 2FBB 2CA 3DD
 +
 +
* ASW bombers may be sent to node H to increase the consistency of reaching the boss node
 +
* Node O checks for 2DD, an FCF may therefore be used prior to or at node O if you would still have at least 2DDs remaining
 +
 +
The boss node of E6 Phase 1 contains AV hime, due to the historical bonuses and the presence of the friend fleet, finishing this phase should be relatively simple and is mostly a matter of time and resources given proper setups.
  
 
'''Phase 2 - BB Hime Kai'''
 
'''Phase 2 - BB Hime Kai'''
  
BB Hime requires the use of the Kurita fleet (Green), this phase is arguably the hardest of the three due to the extreme durability of the boss.
+
BB Hime requires the use of the Kurita fleet (Green), this phase is arguably the hardest of the three due to the extreme durability of the boss. One CAV should be used to provide AP/AS (3-4 Seaplane fighters) at the boss.
  
'''Phase 1 - CV Water Demon'''
+
'''Node V - BB Hime Kai'''
 +
 
 +
BB Hime Kai represents most of the challenge in clearing E6; this is largely due to two factors, her extreme durability, and the lack of a friend fleet.
 +
 
 +
* Most nodes prior to the boss are relatively straightforward, but should not by any means be underestimated: The presence of Nu CAs and Ri Kais are still significant threats and can force retreats.
 +
** At most, it may be possible to utilize one LBAS to assist with problem nodes
 +
 
 +
 
 +
The Boss:
 +
 
 +
* BB Hime Kai almost necessitates the use of LBAS support on her. At least two and possibly all three bases should committed on her. Barring final form on hard mode, this boss has ''absolutely no air power'', fighters are completely unnecessary.
 +
* Saiuns and FCFs should not the first things dropped for final form to maximize kill rates.
 +
 
 +
* This is a prime area for using TCIs
 +
** Do not neglect the flagship cut-in rate bonus. On ships without luck modifications (e.g. Naganami K2), the use of skilled lookouts is worth consideration/
 +
** Ideally, the CA used should be TCI capable, Myoukou in particular comes with a high base luck good night battle power. Luckmodded Choukai or Maya would be ideal for this map.
 +
** TCIs on a CLT, however, is still not recommended, they may, however, be moved further up the shelling order, ahead of a capped TCI ship.
 +
 
 +
* Given the high difficulty of this boss, boss support expeditions are extremely highly recommended. Sparkling remains optional, but should be considered if problems persist
 +
 
 +
'''Phase 3 - CV Water Demon'''
 +
 
 +
Key Pointers
 +
 
 +
* As with Phase 1, the FCF should only be used at (or prior to) node O if your fleet would have at least 2DDs after withdrawing one
  
 
{{clear}}
 
{{clear}}
Line 6,991: Line 7,046:
 
|0 -> 1 =  
 
|0 -> 1 =  
 
* Carrier Task Force
 
* Carrier Task Force
|0 -> 2/empty =  
+
|0 -> 2 =  
 
* Surface Task Force
 
* Surface Task Force
 
* Transport Escort Fleet
 
* Transport Escort Fleet
Line 7,070: Line 7,125:
 
Branching compositions were reported over the course of the event.
 
Branching compositions were reported over the course of the event.
  
|tips = <br/>
+
|tips =  
 +
 
 +
'''Tagging Rules'''
 +
* This Maps has no tagging rules and any members can be used for this map
 +
* On '''Normal and Hard Difficulty''' only the '''Vangaurd Force''' will be restricted from being used on this map.
 +
 
 +
'''Historical Fleet Bonus Notes'''
 +
* On E-7, ships that are tied to the '''Kurita, Suzuki, Nishimura, Shima and Ozawa Fleet''' will all recive historical bonuses which will allow them to do more damage against the boss fleets. (Please Read Historical Background for more details)
 +
* Due to this, it's highly recommended to bring your strongest members that are tied to the historical fleets to get the performance out of them.
 +
 
 
'''E7 is divided into distinct phases that must be completed in order.'''
 
'''E7 is divided into distinct phases that must be completed in order.'''
 
# Unlock 1st Boss Node.
 
# Unlock 1st Boss Node.
Line 7,079: Line 7,143:
  
 
<br/>
 
<br/>
'''Unlocking the 1st Boss'''
+
'''Unlocking the path to the [[Battleship Water Demon Kai]]'''
* '''A''' rank node '''Q''' using a Fast CTF
+
 
* Obtain AS on Land Base air raids 0/1/2/2 times.
+
'''Preferred Composition: '''
 +
 
 +
'''Main Fleet: 4 CV(B) / 2 (F)BB'''
 
<br/>
 
<br/>
'''Unlocking the shortcuts'''
+
'''Escort Fleet: 1 CL / 2 DD / 0-1 CLT / 1-2 CA / 0-1 CVL'''
* Very Easy - Reach/Defeat node '''D'''.
 
* Easy - Reach/Defeat node '''D'''. '''A''' rank node '''H'''.
 
* Medium - Reach/Defeat node '''D'''. '''A''' rank node '''H'''.
 
* Hard - '''S''' rank nodes '''G''' and '''H'''. Obtain AS at node '''I'''.
 
 
<br/>
 
<br/>
'''Obtain the historical bonus'''
+
 
* '''S''' rank nodes '''M''' and '''W''' using '''STF'''.
+
Key Note: <br>
* '''A''' rank node '''Q'''.
+
In order unlock the path to the [[Battleship Water Demon Kai]] the following conditions must be met
** A slow STF containing 5 (F)BB(V) will routes to node '''Q'''.
+
* '''A''' rank node '''Q''' using a Fast CTF '''(All Difficulties)'''
* A quest complete sound will be heard upon returning to base.
+
* Obtain AS on Land Base air raids 0/1/2/2 times.
<br/>
+
 
'''Recommended Composition:'''<br/>
+
While making your path to Node Q you will be facing off against 2 Air Battles, 2 Surface Battles before reaching Node Q.
'''[[Battleship Water Demon Kai]] STF composition'''<br/>
+
 
 +
*It's advised to bring a CL or DD with preemptive ASW to mode D to deal with the Submarine that will appear in the mixed fleet.
 +
* Node C and I are Air Attack nodes, strong Air defense is recommended
 +
* Node M featuring [[Light Carrier Nu-Class| Light Carrier Nu-Class Elite]] variants or [[Aircraft Carrier Princess | Aircraft Carrier Princesses]] depending on the difficulty.
 +
* Node Q is a combined fleet node that has [[Light Carrier Nu-Class| Light Carrier Nu-Class Elite]] variants or [[Aircraft Carrier Princess | Aircraft Carrier Princesses]] depending on the difficulty.
 +
 
 +
'''Preferred LBAS'''
 +
 
 +
'''Node Q'''
 +
*'''3 LBAS'''
 +
*'''LBAS 1: 2 Fighter, 1 Torpedo / Land Based Bombers, 1 Flying Boat - Distance 9 needed'''  
 +
*'''LBAS 2-3: 1 Fighter, 2 Torpedo / Land Based Bombers, 1 Flying Boat - Distance 9 needed'''  
 +
 
 +
If you wish to bring an [[LBAS]] here with fighters, you'll need to have a [[Type 2 Flying Boat]] to reach the required distance. With the air strength and bombers, it should make possible to score an A rank on Node Q without issue.
 +
 
 +
'''Defending the Base'''
 +
*'''2-3 LBAS'''
 +
*'''LBAS 1-3: 3 Fighter/Interceptor, 1 Saiun  (Air Defense)'''  
 +
 
 +
One Easy and higher difficulties, you'll need to protect your land base from Air raids against your base. Bring enough interceptors and fighters to gain AS 1-2 times.
 +
 
 +
Once the conditions are met the path to the [[Battleship Water Demon Kai]] will be unlocked.
 +
 
 +
'''Sinking [[Battleship Water Demon Kai]]'''
 +
 
 +
'''Preferred Composition:'''<br>
 +
'''Fast STF composition'''<br>
 
Main Fleet: 4 (F)BB / 1 CV(B) / 1 CAV
 
Main Fleet: 4 (F)BB / 1 CV(B) / 1 CAV
 
<br/>
 
<br/>
Escort Fleet: 1 CL / 2 DD / 1-2 CA / 0-1 CLT / 0-1 CVL
+
Alt. Main Fleet: 4 (F)BB / 2 CVL[1]
 
<br/>
 
<br/>
<br/>
+
Escort Fleet: 1 CL / 2 DD / 1-2 CA / 0-1 CLT / 0-1 CVL / 0-1 AO[2]
'''[[Abyssal Crane Princess]] CTF composition'''<br/>
+
 
Main Fleet: 4 CV(B) / 2 (F)BB
+
[1]An alternative main fleet composition that does not utilize a Seaplane Fighter (SPF) CAV mule. This composition is not recommended in harder difficulties due to lacking surviability in the pre-boss nodes.
<br/>
+
[2]AO should only be considered for Last Dance on Medium / Hard Difficulty, all other difficulties can be usually done without using an AO.
Escort Fleet: 1 CL / 2 DD / 0-1 CLT / 1-2 CA / 0-1 CVL
 
<br/>
 
<br/>
 
{{clear}}
 
  
<tabber>Hard=
+
In this segment, your fleet will need to go through a series of battles against carriers, subs and other various ships while dealing with not having AS over the majority of the battles.
{{#invoke:EnemyEncounters2|encounterTemplate
+
 
|A_label = 深海潜水艦部隊 岬沖再配備集団
+
* It's highly recommended to bring strong historical ships for this segments as the fight against the boss in this phase is very high in armor.
|A-1_node_info = ss_so-class_flagship ss_so-class_elite ss_so-class_elite ss_so-class_elite ss_so-class_elite
+
* For your CV(B), use [[Zuikaku]] and arm her with the best possible fighters along with 1 Torpedo Bomber
|A-1_form = echelon
+
* Your CAV should be equipped with SPF to improve your air power.
|A-1_xp =  
+
* Node N will feature a [[New Submarine Princess]] along with [[Submarine So-Class]] in the mix. It's strongly advised to bring an ASW [[LBAS]] to this node, especially on Medium and Hard difficulty.
|A-1_enemy_air_power =  
+
* Node T will have 1-2 [[Aircraft Carrier Princess]] along with Nu-class Carriers, bring enough air power for air parity (AP) to prevent the enemy from being able to use Artillery spotting and CV Cut-Ins.
|A-2_node_info = ss_so-class_flagship ss_so-class_flagship ss_so-class_elite ss_so-class_elite ss_so-class_elite
+
 
|A-2_form = echelon
+
'''Node V - [[Battleship Water Demon Kai]]'''
|A-2_xp =  
+
 
|A-2_enemy_air_power =  
+
In this boss battle, the [[Battleship Water Demon Kai]] will be a strong and powerful opponent as she has high armor making her difficult to beat. If you are playing on Medium and Hard difficulty, bringing [[LBAS]] to the boss is '''HIGHLY REQUIRED''' to have a chance at defeating the boss. However, due to the range requirements this map needs to reach the boss please consider following:
|A-3_node_info = ss_so-class_flagship ss_so-class_flagship ss_so-class_flagship ss_so-class_elite ss_so-class_elite
+
 
|A-3_form = echelon
+
*[[Akitsushima]] can be farmed in E-2 Node '''Y''' from S ranks.
|A-3_xp =  
+
*If you lack in any '''[[Type 2 Flying Boat]]''' for this segment, consider challenging this part on '''Casual or Easy Difficulty'''
|A-3_enemy_air_power =  
+
*If you have 1-3 '''[[Type 2 Flying Boat]]''' for this segment, consider challenging the part on '''Medium and Hard Difficulty'''
|A-4_node_info = ss_so-class_flagship ss_so-class_flagship ss_so-class_flagship ss_so-class_flagship ss_so-class_flagship
+
 
|A-4_form = echelon
+
 
|A-4_xp =  
+
The Distance needed to reach the boss node is '''11''' meaning only '''Land Base Bombers and a [[Type 2 Flying Boat]] are capable of reaching the boss node'''.
|A-4_enemy_air_power =  
+
 
|
+
Using the combination of '''Historical Ships''', along with a '''Boss Support Fleet''', '''[[LBAS]]''', '''and '''Friend Fleet''' you will need to deliver a strong of a blow as you can against the Hime during the entire course of the battle.
|B_label =  
+
Consider leaving the Friend Fleet 10th Battle Divsion comprising of [[Yahagi]], [[Isokaze]], [[Hamakaze]], [[Urakaze]] and [[Yukikaze]] open to appear. They have a high rate of being chosen over the Destroyer Division 19 Friend Fleet.
|B-1_node_info = '''<span style="color:blue">"Must be my imagination" (battle avoided)</span>'''
+
 
|
+
* All historical ships are given a 1.15x historical bonus during this battle.
|C_label = 深海任務部隊 艦載機群<br>'''<span style="color:green">Air Battle Node</span>'''
+
* Ships such as [[Musashi]], [[Yamato]], [[Kongou]], [[Haruna]], and [[Zuikaku]] make good units to use for the Day Battle Segment
|C-1_node_info = cvl_nu-class_flagship cvl_nu-class_elite cvl_nu-class_elite cl_tsu-class_elite dd_na-class_elite dd_na-class_elite
+
* Ships such as [[Myoukou]], [[Yukikaze]], [[Kasumi]], [[Abukuma]], and [[Shigure]] have high base luck or are highly effective with a torpedo cut-in setup.
|C-1_form = diamond
+
* Carrier Night Battle equipment such as the [[Night Deck Personel]] and Night planes like the [[F6F-3N]], [[F6F-5N]] and [[TBM-3D]] can make [[Zuihou | Zuihou Kai Ni or Zuihou Kai Ni B]] a valuable asset to use in the escort fleet as she can hit night battle cap easily and has a historical bonus.
|C-1_xp =  
+
 
|C-1_enemy_air_power = 414
+
When you reach the final kill, the [[Battleship Water Demon Kai]] will get a larger boost in her armor ('''up to 305 on Hard''') along with a stronger fleet composition('''can have up to 2 [[Battleship Princess]] on Hard''') resulting in your fleet having to depend on crits and low armor rolls to deal suitable damage to her.
|C-2_node_info = aircraft_carrier_princess cvl_nu-class_elite cvl_nu-class_elite cl_tsu-class_elite dd_na-class_elite dd_na-class_elite
+
 
|C-2_form = diamond
+
*Modifying Equipment is vital to help improve your chances of succeeding against the boss.
|C-2_xp =  
+
*As a last resort option, bringing in an AO such as [[Hayasui]] or [[Kamoi]] for the final kill can help turn the tied of the battle.
|C-2_enemy_air_power = 418
+
**Since your fleet will arrive at the boss node with '''30% fuel and 40% ammo''' using [[Maritime Resupply]] can help reduce the ammo and fuel penalty your fleet would otherwise receive without it.
|C-3_node_info = aircraft_carrier_princess cvl_nu-class_flagship cvl_nu-class_flagship cl_tsu-class_elite dd_na-class_late_model_elite dd_na-class_late_model_elite
+
** Using 1 [[Maritime Resupply]] can completely remove the ammo penalty altogether.
|C-3_form = diamond
+
 
|C-3_xp =  
+
Once you have successfully defeated the [[Battleship Water Demon Kai]] the path to the [[Abyssal Crane Princess]] will open.
|C-3_enemy_air_power = 454
+
 
|
+
'''Suggested [[LBAS]]'''
|D_label = 深海任務部隊 岬沖艦隊前衛 I群
+
 
|D-1_node_info = cl_he-class_flagship cl_tsu-class_elite cl_tsu-class_elite dd_na-class_elite dd_na-class_elite ss_so-class_flagship
+
'''Node N'''
|D-1_form = line_ahead double_line  
+
*'''1 LBAS'''
|D-1_xp =  
+
*'''LBAS 1: 3 Toukai - Distance 8 needed'''
|D-1_enemy_air_power =  
+
*'''LBAS 1: 3 ASW Planes, 1 [[Type 2 Flying Boat]] - (For those who don't have Toukai) Distance 8 needed'''
|
+
 
|E_label =  
+
Since Node N has a powerful set of submarines, using an ASW LBAS is '''Highly Recommended''' to take out as many of the submarines as possible leaving only the New Submarine Princess left to deal with.
|E-1_node_info = '''<span style="color:blue">"Must be my imagination" (battle avoided)</span>'''
+
 
|
+
'''Node V'''
|F_label = 深海岬沖艦隊 哨戒護衛空母群
+
*'''2 LBAS'''
|F-1_node_info = cvl_nu-class_flagship cvl_nu-class_flagship cl_he-class_flagship cl_tsu-class_elite dd_na-class_elite dd_na-class_elite
+
*'''LBAS 2: 3 Land Base Bombers , 1 [[Type 2 Flying Boat]] - Distance 11 needed'''
|F-1_form = line_ahead double_line diamond  
+
 
|F-1_xp =  
+
The air power requirement for air denial (AD) on this node is low enough that a base with 3 LBAA can achieve this. It is highly recommended that you aim to achieve this '''if possible'''. Ensure that your base(s) are configured optimally and in the correct order to take advantage of phase 1 shot downs of previous LBAS waves.
|F-1_enemy_air_power = 300
+
 
|
+
<br/>
|G_label = 深海任務部隊 岬沖水雷戦隊
+
'''Unlocking the shortcuts'''<br>
 +
Unlocking the shortcut path needed to make a path from '''B to D''' and '''K to H''' will require you to completion one of the following conditions depending on the difficulty:
 +
 
 +
* Very Easy - Reach/Defeat node '''D'''.
 +
* Easy - Reach/Defeat node '''D'''. '''A''' rank node '''H'''.
 +
* Medium - Reach/Defeat node '''D'''. '''A''' rank node '''H'''.
 +
* Hard - '''S''' rank nodes '''G''' and '''H'''. Obtain AS at node '''I'''.
 +
 
 +
'''Node D'''
 +
'''Preferred Composition: '''
 +
 
 +
'''Main Fleet: 4 CV(B) / 2 (F)BB'''
 +
<br/>
 +
'''Escort Fleet: 1 CL / 2 DD / 0-1 CLT / 1-2 CA / 0-1 CVL'''
 +
 
 +
* For '''Casual to Medium Mode''' completing Node D's requirement should be easy to do as all you need is a set of strong carriers and a ship or 2 with ASW capabilities to take care of the submarine that will in the fleet.
 +
 
 +
'''Node H'''
 +
 
 +
'''Preferred Composition:'''<br>
 +
'''Fast STF composition'''<br>
 +
Main Fleet: 4 (F)BB / 1 CV(B) / 1 CAV
 +
<br/>
 +
Escort Fleet: 1 CL / 2-4 DD / 1 CA / 0-1 CLT / 0-1 CVL (ASW focused)
 +
 
 +
* For '''Easy to Hard''' you will need to have a escrot fleet of ASW capable ships travel through several waves of carrier battles till they reach node H which will be a submarine node with a [[New Submarine Princess]] and some [[Submarine So-Class]].
 +
*Bringing an [[LBAS]] of ASW bombing planes is recommended especially on higher difficulties to successfully complete the node's requirements.
 +
*If you are unable to successfully defeat all the subs needed for the requirement you can still kill the submarines in night battle due to the combine fleet's mechanics.
 +
 
 +
'''Suggested [[LBAS]]'''
 +
 
 +
'''Node H'''
 +
*'''1 LBAS'''
 +
*'''LBAS 1: 3 Toukai, 1 ASW Bomber Plane - Distance 4 needed'''
 +
*'''LBAS 1: 4 ASW Planes - Distance of 4 needed'''
 +
 
 +
'''Node G'''
 +
 
 +
'''Preffered Composition:'''<br>
 +
'''Slow CTF composition'''<br>
 +
'''Main Fleet: 4 CV(B) / 2 (F)BB'''
 +
<br/>
 +
'''Escort Fleet: 1 CL / 2 DD / 0-1 CLT / 1-2 CA / 0-1 CVL'''
 +
<br/>
 +
 
 +
* For '''Hard Mode''', Node G contains a surface fleet of cruisers and destroyers. The fight should be winnable without needing [[LBAS]].
 +
 
 +
 
 +
'''Node I'''
 +
 
 +
'''Preffered Composition:'''<br>
 +
'''Fast CTF composition'''<br>
 +
'''Main Fleet: 4 CV(B) / 2 (F)BB'''
 +
<br/>
 +
'''Escort Fleet: 1 CL / 2 DD / 0-1 CLT / 1-2 CA / 0-1 CVL'''
 +
*  For '''Hard Mode''', Node I is an air attack node where you'll face a strong Air powered fleet.
 +
* Bring an LBAS or 2 full of fighters if you need additional air power support to secure AS on this node
 +
* If you survived node G without anyone taking any heavy damage from that node you can try using your fleet from there to complete this requirement at the same time.
 +
 
 +
Once the conditions are complete, the shortcut paths will become available.
 +
 
 +
<br/>
 +
'''Obtain the historical bonus (Medium and Hard Mode Only)'''
 +
 
 +
'''Note:'''If you are playing '''Casual and Easy''', disregard this section all together and proceed to "Sinking the [[Abyssal Crane Princess]]".
 +
 
 +
In '''Medium and Hard Difficulty''' it is possible to boost your fleet's historical damaged beyond the 1.2x by completing the following requirements:
 +
 
 +
* '''S''' rank nodes '''M''' and '''W''' using '''STF'''.
 +
* '''A''' rank node '''Q'''.
 +
 
 +
'''Node Q'''
 +
 
 +
'''Preffered Composition:'''<br>
 +
'''Slow STF composition'''<br>
 +
Main Fleet: 4 (F)BB / 1 CV(B) / 1 CAV
 +
<br/>
 +
Escort Fleet: 1 CL / 2 DD / 1 FBB / 0-1 CA / 0-1 CLT / 0-1 CVL
 +
 
 +
* A slow STF containing 5 (F)BB(V) will routes to node '''Q'''.
 +
* Use an ASW focused [[LBAS]] on Node A to help reduce the number of [[Submarine So-Class]].
 +
* Using your [[LBAS]] at Node Q can help you with securing an A rank that is needed for the requirements.
 +
 
 +
 
 +
'''Suggested [[LBAS]]'''
 +
'''Node A'''
 +
*'''1 LBAS'''
 +
*'''LBAS 1: 3 Toukai / ASW TB, 1 Type 2 Flying Boat /Carrier Recon - Distance 2 needed'''
 +
 
 +
'''Node Q'''
 +
*'''2 LBAS'''
 +
*'''LBAS 1: 2 Fighter, 1 Torpedo / Land Based Bombers, 1 Flying Boat - Distance 9 needed'''
 +
*'''LBAS 2-3: 1 Fighter, 2 Torpedo / Land Based Bombers, 1 Flying Boat - Distance 9 needed'''
 +
 
 +
Though you may not reach AS on this node, being able to prevent air denial (AD) can help make it more possible to secure an A rank here.
 +
 
 +
'''Node M and Node W'''
 +
 
 +
'''Preffered Composition:'''<br>
 +
'''Fast STF composition'''<br>
 +
Main Fleet: 4 (F)BB / 1 CV(B) / 1 CAV
 +
<br/>
 +
Escort Fleet: 1 CL / 2 DD / 1 FBB / 1 CA / 0-1 CLT / 0-1 CVL
 +
 
 +
* '''Node M and W''' are along the path required for this fleet will travel
 +
* Trying to score an S rank on '''Node M''' will require some effort, send at least 2 [[LBAS]] to Node M while sending an ASW LBAS to Node H.
 +
* '''Node W''' simple requires you to reach the node with a Surface Fleet.
 +
*By the time you reach '''Node W''' you will have no fuel or ammo left. So fighting there will result in most if not all of your ship getting heavily damaged.
 +
 
 +
'''Suggested [[LBAS]]'''
 +
 
 +
'''Node M'''
 +
*'''2 LBAS'''
 +
*'''LBAS 1: 2 Fighter, 2 Torpedo / Land Based Bombers - Distance 5 needed'''
 +
*'''LBAS 2: 1 Fighter, 3 Torpedo / Land Based Bombers - Distance 5 needed'''
 +
 
 +
'''Node H'''
 +
*'''1 LBAS'''
 +
*'''LBAS 1: 3 Toukai / ASW TB, Type 2 Flying Boat/Carrier Recon - Distance 4 needed'''
 +
*'''LBAS 1: 4 ASW Planes - Distance of 4 needed'''
 +
 
 +
* Once the condition are met, a quest complete sound will be heard upon returning to base.
 +
 
 +
Upon completing the Conditions, the following changes will happen:
 +
 
 +
* All '''Kurita, Shima, Nishimura and Ozawa Fleet Members''' will get a '''1.6x historical bonus'''
 +
* '''[[Musashi]], [[Zuikaku]] and [[Zuihou]]''' will get a '''1.8x historical bonus'''
 +
* '''[[Shoukaku]]''' will get a '''2.4x historical bonus'''
 +
 
 +
'''Sinking the [[Abyssal Crane Princess]]'''
 +
 
 +
'''Recommended Composition:'''<br/>
 +
 
 +
'''[[Abyssal Crane Princess]] Fast CTF composition'''<br/>
 +
'''Main Fleet: 4 CV(B) / 2 (F)BB'''
 +
<br/>
 +
'''Escort Fleet: 1 CL / 2 DD / 0-1 CLT / 1-2 CA / 0-1 CVL'''
 +
<br/>
 +
 
 +
Depending on the difficulty, the final phase of the event will either require extensive effort or can be simple. The way you'll need to tackle the boss will be similar but can consist of some differences.
 +
 
 +
* During this Phase your escort fleet will generally be in the most dangerous especially in '''Node W'''.
 +
* As like in the other phases an ASW capable ship can still helpful especially one that can pre-emptive ASW like in higher difficulties to take out the [[Submarine So-Class]]
 +
* In route Support is recommended in higher difficulties to make tougher nodes like '''Nodes D and W''' passable.
 +
 
 +
Once you made it to the boss node, depending on the difficulty, the following things should be considered:
 +
 
 +
'''[[Abyssal Crane Princess]] on Medium and Hard Mode'''
 +
 
 +
With the debuff method complete on Medium and Hard mode, the [[Abyssal Crane Princess]] will become significantly weaker against historical ships. However, in order to make the win far more successful, you will need to not only bring the proper kanmusu for the job but also efficiently rig the '''Friend Fleets''' to get some of the best possible benefits.
 +
 
 +
Below here are a few important points regarding ships to consider for Medium and Hard Mode Difficulty:
 +
 
 +
*[[Shoukaku]], [[Zuikaku]], [[Zuihou]], and [[Musashi]] are very vital when the debuff is triggered as they can do far more damage compared to anyone else in the entire fleet.
 +
* [[Kaga]] while not a historical ship still has an important role due to her large plane capacity which allows her to carry a large fighter power. She will be doing a fighter mule role in this event segment to help your fleet get closer to gaining air superiority.
 +
* Due to their historical buff [[Shoukaku]] and [[Zuikaku]] should be armed to perform CV cut-ins.
 +
* [[Taihou]] can be a small time damage dealer on this map as she's the only CVB that doesn't interfere with certain Friend Fleet arrangements.
 +
* Torpedo Cut in ships such as [[Yukikaze]] and [[Shigure]] are good here not just for their historical damage, but to also prevent certain unnecessary Friend Fleets from appearing.
 +
* If you have a luck modded [[Choukai]] or [[Maya]] you can use them to help torpedo cut-in along with the other ships in a night battle.
 +
* [[Zuihou]]'s Kai 2 B will have a vital role in helping deliver the kill against the boss if you have the night battle planes and gear to set her up to launch an attack against the boss at night.
 +
** If you are lacking in night planes, you will likely be depending more on Torpedo Cut-Ins to help win the battle.
 +
* Avoid bringing in [[Yamato]], [[Nagato]], [[Myoukou]], [[Haguro]], [[Naganami]] and [[Hatsushimo]] in your fleet as they are needed to trigger the Kurita main Friend Fleet which is vital to scoring a victory in the fight during the night battle.
 +
* Yamato's Kurita Friend Fleet will also be given the historical bonus allows them to also efficiently damage or even kill tougher targets such as Hime types.
 +
** This becomes more apparent in Hard mode as the final kill will pit you against the main fleet consisting of nothing but [[Aircraft Carrier Princess]] and [[Battleship Princess]].
 +
* The International Friend Fleet can also be used but is less effective overall against the [[Abyssal Crane Princess]]'s Fleet due to the random nature of coming with 3-7 ships and having not as effective equipment setups.
 +
** It is possible to lock them out by using ships like [[Iowa]] and [[Saratoga]] in your fleet, but in return, you will also be crippling your main fleet's power by bringing in additional non-historical ships.
 +
* Fleet Oilers like [[Hayasui]] and [[Kamoi]] will be helpful on the final kill on Hard mode by bringing [[Maritime Resupply]] to help your fleet reach it's best to combat potential.
 +
**When your fleet reaches the boss node, they will have only '''35% fuel and ammo'''
 +
**Using 1 [[Maritime Resupply]] should remove the ammo penalties from your fleet altogether and 2 will reduce the fuel penalty further to dodge more efficiently.
 +
* If you have a strong enough [[LBAS]] set up to help easily secure air superiority along with your fleet's air power. It may become possible to bring in a [[Saiun]] to prevent T-Disadvantage to make killing the boss fleet more possible.
 +
* Boss Support Fleet is Highly recommended
 +
 
 +
'''[[Abyssal Crane Princess]] on Casual and Easy Mode'''
 +
 
 +
On this difficulty, you will be lacking the full-scale debuff effect as there is no way to trigger this feature on casual and easy mode. Expect to be putting more effort into your fleet's own strength however even without the debuff, historical ships are still important.
 +
 
 +
* Most of the Key points from Medium and Hard mode apply to here as well. Even though [[Shoukaku]], [[Zuikaku]], [[Zuihou]], and [[Musashi]] will not have the big historical bonus, they will still be your big hitters in this battle.
 +
* [[Kitakami]] and [[Ooi]] have a more important role in this difficulty as the boss should be weaker and having them equipped with double attacks to do consistant cap damage can help weaken the boss for your torpedo cut-in members to score an easier kill.
 +
* Easy mode may be somewhat difficulty to complete even with a proper set up so if possible avoid going down to this difficulty and if you are playing on this difficulty and are still having trouble, consider dropping to Casual.
 +
 
 +
'''Preffered [[LBAS]]
 +
 
 +
'''Node X'''<br>
 +
'''3 LBAS'''<br>
 +
* '''LBAS 1: 3 Fighters (Range 6), 1 [[Type 2 Flying Boat]]'''
 +
* '''LBAS 2 (Pre-Last Kill): ''' 2 Fighters (Range 6), 1 Land Base Bomber, 1 [[Type 2 Flying Boat]]'''
 +
* '''LBAS 2-3 (Pre/Last Kill):  ''' 1 Fighters (Range 6), 2 Land Base Bomber, 1 [[Type 2 Flying Boat]]'''
 +
 
 +
To bring any fighters to help lower the air power at the boss node, you're going to need a fighter plane with a range of 6 or greater. Hayabusa and Type 52 Fighters should be able to reach this with the assistance of a [[Type 2 Flying Boat]].
 +
 
 +
Since the boss contains a lot of air power, you want your first set of LBAS planes to clean out as many of the planes as you can while having the remaining bases bring fighters and bombers to wipe out what ships they can.
 +
 
 +
During the Final Kill, the air power requirement is lower so it is possible to use fewer fighters and more bombers to the boss node.
 +
 
 +
Once the boss is successfully defeated, the event is considered complete.
 +
 
 +
'''What to do if you don't have a [[Type 2 Flying Boat]]?'''
 +
 
 +
Without a [[Type 2 Flying Boat]] you fleet will have a very difficult time securing the win at the boss node. Since the boss has a huge amount of air power. If you are challening a harder difficulty you will find score the win quite difficult. If possible seek out [[Akitsushima]] from E-2 if you can and train her to get her Flying Boat. Otherwise the main options are to either lower the difficulty or try to use your LBAS in different methods:
 +
 
 +
'''Node M'''<br>
 +
'''1 LBAS'''<br>
 +
* '''LBAS : 4 Fighters / Land Base Fighters (Range 6 Needed)'''
 +
 
 +
A fighter sweep over this node can help reduce the total number of abyssal bombers that will target your fleet in the opening phase. You may potentially disable the carriers in this node by deplaning them with Fleet AA and AACI.
 +
 
 +
'''Node W'''<br>
 +
'''1 LBAS'''<br>
 +
* '''LBAS : 4 Land Based Bombers (Range 7 Needed)'''
 +
 
 +
This node features a surface fleet that can often present trouble to the escort fleet since they can occasionally appear in Line ahead or Vanguard Formation. Using and LBAS to clear some if not most of the enemy ships out can help here.
 +
 
 +
 
 +
'''Node X'''<br>
 +
'''1 LBAS'''<br>
 +
* '''LBAS : 4 Land Based Bombers (Range 9 Needed)'''
 +
 
 +
Unlike the other LBAS method used on the boss, this method is more of a Last Resort measure to try wiping out some of the enemies in the boss node. Since if you're lacking in a flying boat, this will be the only way you can bring anything to the boss and killing some ship may be possible, but it will also likely result in your losing a large amount of planes and possibly lose your Land Base Bomber's rank in the process. Only consider this option if you have no other means of bringing fighters to the boss node.
 +
{{clear}}
 +
 
 +
<tabber>Hard=
 +
{{#invoke:EnemyEncounters2|encounterTemplate
 +
|A_label = 深海潜水艦部隊 岬沖再配備集団
 +
|A-1_node_info = ss_so-class_flagship ss_so-class_elite ss_so-class_elite ss_so-class_elite ss_so-class_elite
 +
|A-1_form = echelon
 +
|A-1_xp =  
 +
|A-1_enemy_air_power =  
 +
|A-2_node_info = ss_so-class_flagship ss_so-class_flagship ss_so-class_elite ss_so-class_elite ss_so-class_elite
 +
|A-2_form = echelon
 +
|A-2_xp =  
 +
|A-2_enemy_air_power =  
 +
|A-3_node_info = ss_so-class_flagship ss_so-class_flagship ss_so-class_flagship ss_so-class_elite ss_so-class_elite
 +
|A-3_form = echelon
 +
|A-3_xp =  
 +
|A-3_enemy_air_power =  
 +
|A-4_node_info = ss_so-class_flagship ss_so-class_flagship ss_so-class_flagship ss_so-class_flagship ss_so-class_flagship
 +
|A-4_form = echelon
 +
|A-4_xp =  
 +
|A-4_enemy_air_power =  
 +
|
 +
|B_label =  
 +
|B-1_node_info = '''<span style="color:blue">"Must be my imagination" (battle avoided)</span>'''
 +
|
 +
|C_label = 深海任務部隊 艦載機群<br>'''<span style="color:green">Air Battle Node</span>'''
 +
|C-1_node_info = cvl_nu-class_flagship cvl_nu-class_elite cvl_nu-class_elite cl_tsu-class_elite dd_na-class_elite dd_na-class_elite
 +
|C-1_form = diamond
 +
|C-1_xp =  
 +
|C-1_enemy_air_power = 414
 +
|C-2_node_info = aircraft_carrier_princess cvl_nu-class_elite cvl_nu-class_elite cl_tsu-class_elite dd_na-class_elite dd_na-class_elite
 +
|C-2_form = diamond
 +
|C-2_xp =  
 +
|C-2_enemy_air_power = 418
 +
|C-3_node_info = aircraft_carrier_princess cvl_nu-class_flagship cvl_nu-class_flagship cl_tsu-class_elite dd_na-class_late_model_elite dd_na-class_late_model_elite
 +
|C-3_form = diamond
 +
|C-3_xp =  
 +
|C-3_enemy_air_power = 454
 +
|
 +
|D_label = 深海任務部隊 岬沖艦隊前衛 I群
 +
|D-1_node_info = cl_he-class_flagship cl_tsu-class_elite cl_tsu-class_elite dd_na-class_elite dd_na-class_elite ss_so-class_flagship
 +
|D-1_form = line_ahead double_line  
 +
|D-1_xp =  
 +
|D-1_enemy_air_power =  
 +
|
 +
|E_label =  
 +
|E-1_node_info = '''<span style="color:blue">"Must be my imagination" (battle avoided)</span>'''
 +
|
 +
|F_label = 深海岬沖艦隊 哨戒護衛空母群
 +
|F-1_node_info = cvl_nu-class_flagship cvl_nu-class_flagship cl_he-class_flagship cl_tsu-class_elite dd_na-class_elite dd_na-class_elite
 +
|F-1_form = line_ahead double_line diamond  
 +
|F-1_xp =  
 +
|F-1_enemy_air_power = 300
 +
|
 +
|G_label = 深海任務部隊 岬沖水雷戦隊
 
|G-1_node_info = cl_he-class_flagship clt_chi-class_flagship clt_chi-class_flagship dd_na-class_elite dd_ni-class_late_model dd_ni-class_late_model
 
|G-1_node_info = cl_he-class_flagship clt_chi-class_flagship clt_chi-class_flagship dd_na-class_elite dd_ni-class_late_model dd_ni-class_late_model
 
|G-1_form = line_ahead double_line echelon  
 
|G-1_form = line_ahead double_line echelon  
Line 8,022: Line 8,378:
 
==Event Completion Lines==
 
==Event Completion Lines==
  
Upon Completing the event, the player is given a special dialogue line from [[Musashi]], [[Shoukaku]], and [[Zuikaku]] regarding their success at the Leyte Gulf. Tsukiyomi Ver. 2 ([月夜海]ニ番) also plays between Musashi and Zuikaku's 2nd lines.
+
Upon completing the event, dialogue from [[Musashi]], [[Shoukaku]], and [[Zuikaku]] plays regarding their success at the Leyte Gulf. ''Tsukiyomi Ver. 2'' (月夜海ニ番) also plays before Zuikaku's final line, which serves as the closing line.
  
 
'''Event Completion Lines'''
 
'''Event Completion Lines'''
 
{| class="wikitable" style="text-align:center;"
 
{| class="wikitable" style="text-align:center;"
!style="width:6%;"|Audio
+
!style="width:6%;"|Ship
!style="width:3%;"|Ship Name
+
!style="width:3%;"|Audio
 
!style="width:35%;"|Japanese
 
!style="width:35%;"|Japanese
 
!style="width:35%;"|English
 
!style="width:35%;"|English
Line 8,034: Line 8,390:
 
|[[Musashi]]
 
|[[Musashi]]
 
|{{audio|file=Musashi ShoGo 2018 End1.mp3}}
 
|{{audio|file=Musashi ShoGo 2018 End1.mp3}}
|相棒よ、終わったぞ。我が連合艦隊、第一遊撃部隊、そう、栗田艦隊は、敵艦隊を撃滅だぞ!うおおおぉ!
+
|相棒よ、終わったぞ。我が連合艦隊、第一遊撃部隊、そう、栗田艦隊は、敵艦隊を撃滅したぞ!うおおおぉ!
 
|It's over, partner. Our Combined Fleet, the 1st Striking Force, yes, the Kurita Fleet, has annihilated the enemy fleet! Yeeeeeaaaaaaah!
 
|It's over, partner. Our Combined Fleet, the 1st Striking Force, yes, the Kurita Fleet, has annihilated the enemy fleet! Yeeeeeaaaaaaah!
 
|
 
|
Line 8,041: Line 8,397:
 
|{{audio|file=Zuikaku ShoGo 2018 End1.mp3}}
 
|{{audio|file=Zuikaku ShoGo 2018 End1.mp3}}
 
|捷一号作戦、作戦成功!やった!やったよ私たち!
 
|捷一号作戦、作戦成功!やった!やったよ私たち!
|Operation Sho-1, is completed! Alright! We did it, everyone!
+
|Operation Sho-1 is completed! We did it! We did it, everyone!
 
|
 
|
 
|-
 
|-
 
|[[Shoukaku]]
 
|[[Shoukaku]]
 
|{{audio|file=Shoukaku ShoGo 2018 End1.mp3}}
 
|{{audio|file=Shoukaku ShoGo 2018 End1.mp3}}
|瑞鶴、提督、お疲れ様でした。私はもずっと一緒に…
+
|瑞鶴、提督、お疲れ様でした。私もずっと一緒に…
|Zuikaku, Admiral, good work. I'll be with you forever...
+
|Zuikaku, Admiral, good work. I'll always be with you...
 
|
 
|
 
|-
 
|-
Line 8,053: Line 8,409:
 
|{{audio|file=Musashi ShoGo 2018 End2.mp3}}
 
|{{audio|file=Musashi ShoGo 2018 End2.mp3}}
 
|そうだな、今はゆっくり眠りたい。相棒よ、少しそばにいてくれ。はぁ〜これでゆっくり眠れそうだ。ありが…とう…
 
|そうだな、今はゆっくり眠りたい。相棒よ、少しそばにいてくれ。はぁ〜これでゆっくり眠れそうだ。ありが…とう…
|Right, now I can finally get some rest. Let me stay beside you a while, partner. *sigh* Now I can rest. Thank... you...
+
|Right, now I can finally get some rest. Stay by me for a bit, partner. ''Sigh.'' Now I can rest. Thank... you...
 
|
 
|
 
|-
 
|-
Line 8,059: Line 8,415:
 
|{{audio|file=Zuikaku ShoGo 2018 End2.mp3}}
 
|{{audio|file=Zuikaku ShoGo 2018 End2.mp3}}
 
|提督さん、翔鶴姉、ありがとう。愛してる、ずっと。
 
|提督さん、翔鶴姉、ありがとう。愛してる、ずっと。
|Admiral, Shoukaku, thank you. I'll always love you.
+
|Admiral, Shoukaku, thank you. I'll love you, always.
|
+
|This line plays separately from the others, after ''Tsukioymi Ver. 2'' has finished.
 
|-
 
|-
 
|}
 
|}
  
'''Tsukiyomi Ver. 2 Lyrics'''
+
'''''Tsukiyomi Ver. 2'' Lyrics'''
 +
 
 +
The second part is nearly but not quite identical to the original ''Tsukiyomi''.
 +
 
 
{| class="wikitable" style="text-align:center;"
 
{| class="wikitable" style="text-align:center;"
 
!style="width:4%;"|Audio
 
!style="width:4%;"|Audio
!style="width:32%;"|Kanji
+
!style="width:32%;"|Japanese
!style="width:32%;"|Romanji
+
!style="width:32%;"|''Romaji''
 
!style="width:32%;"|English
 
!style="width:32%;"|English
 
|-
 
|-
Line 8,076: Line 8,435:
 
見上げた月の空、幾星霜輝いて。
 
見上げた月の空、幾星霜輝いて。
  
この夜も、この星も、きっと巡り行く。<br>
+
この夜も、この星も、きっと巡りゆく。<br>
あの冬の夜は私それが当てた。<br>
+
あの冬の夜、私そう願ってた。<br>
だけど全ては、消えてゆくのね。<br>
+
だけど全ては 消えてゆくのね。<br>
それでも、月はそこにあるの。
+
それでも、月はそこにあるの。そうよ。
 
 
そうよ。


あなたと歩んだ季節いつでも胸で光ってる。<br>
 
あなたと歩んだ季節いつでも胸で光ってる。<br>
走ってね、転んだね、一緒にね、恋のように叫んだね。
+
走ったね、転んだね、一緒にね、恋のように叫んだね。
 
 
私たち心の咲く花、波に春芽吹くかな。<br>
 
笑ったね、泣いたよね、君がいたいろいろな奇跡。
 
  
あなたと目指した優しに未来きっと信じてる。<br>
+
私たち心の桜まだ見ぬ春芽吹くから。<br>
宵の口、夏の夜、時が満ち全て消えてゆく前に。
+
笑ったね、泣いたよね、君がいた色々な奇跡。
  
夜風散る花の中で あなたと月を見上げてる。<br>
+
あなたと目指した優しい未来きっと信じてる。<br>
笑ったね、泣いたよね、大切な大切な記憶。<br>
+
宵の中、夏の夜、<br>
忘れない忘れない、ずっと。
+
時が満ち 全て消えてゆく前に。<br>
 +
夜風散る 花の中で あなたと月を見上げてる。<br>
 +
笑ったね 泣いたよね 大切な大切な記憶。<br>
 +
忘れない 忘れない ずっと。
 
|
 
|
Moshi ima akari ga kie, mukaikaze ni shizun demo.<br>
+
Moshi ima akari ga kie, mukaikaze ni shizun demo,<br>
Miageru tsuki no sora, ikuseisou kagayaite.
+
miageta tsuki no sora, ikuseisou kagayaite.
  
Kono yoru mo, kono hoshi mo, kitto meguri iku.<br>
+
"Kono yoru mo, kono hoshi mo, kitto meguri yuku."<br>
Ano fuyu no yoru wa watashi sore ga ateta.<br>
+
Ano fuyu no yoru watashi sou negatteta.<br>
 
Dakedo subete wa, kiete yuku no ne.<br>
 
Dakedo subete wa, kiete yuku no ne.<br>
Soredemo, tsuki wa soko ni aru no.
+
Soredemo, tsuki wa soko ni aru no. Sou yo.
 
 
Sou yo.


Anata to ayunda kisetsu itsu demo mune de hikatteru.<br>
 
Anata to ayunda kisetsu itsu demo mune de hikatteru.<br>
Hashitte ne, koronda ne, isshho ni ne, koi no you ni sakenda ne.
+
Hashitta ne, koronda ne, issho ni ne, koi no you ni sakenda ne.
  
Watashitachi kokoro no saku hana, nami ni haru mebuku ka na.<br>
+
Watashitachi kokoro no sakura mada minu haru mebuku kara.<br>
 
Waratta ne, naita yo ne, kimi ga ita, iroiro na kiseki.
 
Waratta ne, naita yo ne, kimi ga ita, iroiro na kiseki.
  
Anata to mezashita yasashi ni mirai kitto shinjiteru.<br>
+
Anata to mezashita yasashii mirai kitto shinjiteru.<br>
Yoi no kuchi, natsu no yoru, toki ga michi subete kiete yuku mae ni.
+
Yoi no uchi, natsu no yoru,<br>
 
+
toki ga michi subete kieyuku mae ni,<br>
Yokaze chiru hana no naka de anata to tsuki o miageteru.<br>
+
yokaze chiru hana no naka de anata to tsuki o miageteru.<br>
 
Waratta ne, naita yo ne, taisetsuna taisetsuna kioku.<br>
 
Waratta ne, naita yo ne, taisetsuna taisetsuna kioku.<br>
 
Wasurenai, wasurenai, zutto.
 
Wasurenai, wasurenai, zutto.
 
|
 
|
Even if the light fades and the wind ceases.<br>
+
Even if the light fades and we succumb to the headwinds,<br>
The moonlit sky we look upon, will always be shining.
+
the moonlit sky we admired will shine on and on.
 
 
This night, these stars, will keep revolving.<br>
 
That winter night when you called on me.<br>
 
But everything will end someday.<br>
 
But still, the moon will be there.


That's right.
 
  
The time when I walked with you still shines in my heart.<br>
+
"This night, this world, they'll keep spinning."<br>
Running, falling down, declaring our love to each other.
+
That's what I wished for that winter night.<br>
 +
But all things fade away, don't they?<br>
 +
Even so, the moon will be there. That's right.
  
The blooming flowers in our hearts, are blooming like a wave in spring.<br>
+
The seasons I walked with you still glow in my heart.<br>
Laughing or crying, everything is a miracle with you.
+
We ran, we fell, we called out together as if in love, didn't we?
  
I'll always believe in the gentle future you wish for.<br>
+
There are still unseen springs for the cherry blossoms in our hearts to bloom in.<br>
When the summer night falls, it's the time when everything disappears.
+
We laughed, we cried - there were so many miracles with you there.
  
Watching the moon with you as the night wind scatters petals around us.<br>
+
I'll always believe in the gentle future I aimed for with you.<br>
Laughing or crying, these are very precious memories.<br>
+
In the early evenings, in the summer nights,<br>
 +
before the time comes and everything fades away,<br>
 +
as the night wind scatters the petals around us, I'll admire the moon with you.<br>
 +
We laughed, we cried - so many precious memories.<br>
 
I'll never, ever forget them.
 
I'll never, ever forget them.
 
|-
 
|-

Latest revision as of 12:34, 3 October 2018

The Winter 2018 Event is scheduled to begin on February 16th, 2018. This Event is titled " Showdown at Operation Shou-Gou! Battle of Leyte Gulf (Part 2)".

This event will serve as a continuation of the Battle of Leyte Gulf from back in the Fall 2017 Event. Unlike the previous event, this event will focus heavily on the Kurita Fleet, Suzuki Fleet and the Ozawa Fleet being the main participants in the event waters. Meanwhile members of the Nishimura Fleet and Shima Fleet will still have a valuable role in the event.

The Event will bring back the new mechanic known as the Striking Force Fleet which will allow you to organize a 7 ship fleet. A new formation known as the Vanguard Formation which will protect some of the front ships while allowing other ships to evade efficiently. [1]

Details about the event mentioned in Kensuke Tanaka's interview in January's Comptiq and Feburary's Comptiq have noted that the event will serve as the Final Event for KanColle Phase 1.

In addition to this, Dev Tweets have noted the event will be a Large Scale Decisive Battle. [2]

For additional information regarding event-related subjects and content, please refer to the following links:

Historical Background

Disclaimer: The following information is based upon a summary of World War II history and may not have any influence on the game itself. This is for historical reference only.

Overview
Kurita Fleet
(E2 and E4)
BB: Yamato, Musashi, Nagato
CA: Myoukou, Haguro, Maya, Choukai, Takao, Atago
CL: Noshiro
DD: Hayashimo, Asashimo, Naganami, Fujinami
Nishimura Fleet
(E2 and E4)
BB(V): Yamashiro, Fusou
CA(V): Mogami
DD: Yamagumo, Asagumo, Michishio, Shigure
Ozawa Fleet
(E3)
CV & CVL: Zuikaku, Zuihou, Chiyoda, Chitose
BB(V): Ise, Hyuuga
CL: Isuzu, Ooyodo, Tama
DD: Akizuki, Hatsuzuki
Shima Fleet CA: Nachi, Ashigara
CL:※Abukuma
DD: ※Shiranui, Kasumi, Ushio, Akebono
Abukuma, Shiranui does not count as a Shima Fleet ship for E-5 and E-6.
Suzuki Fleet BB: Kongou, Haruna
CA(V): Tone, Chikuma, Kumano, Suzuya
CL: Yahagi
DD: Urakaze, Isokaze, Hamakaze, Yukikaze, Kiyoshimo, Nowaki
Shima Fleet (optional) CA: ※Aoba
CL: Kinu
DD: Wakaba, Hatsushimo, Hatsuharu, Uranami
Aoba does not count as a Shima Fleet ship for E-5 and E-6.

Battle of the Leyte Gulf

Wikipedia Article on Battle of Leyte Gulf

Known to be the largest Naval Battle in history which occurred in waters near the Philippine islands of Leyte, Samar and Luzon, from 23–26 October 1944, between the US Navy and Australian Forces vs. the Imperial Japanese Navy as the, fought over the Island of Leyte that served as the IJN's main supply line. Due to the size of this battle, it's recommended to go view the Wikipedia Article on the Battle of Leyte Gulf for additional details. The Fall 2017 Event itself will focus mainly on the Southern IJN's counter-attack operation to attack through the Surigao Strait and the fleet's involved in it.

The Northern Force Fleet - Ozawa's Fleet

The Fleet lead by Jisaburou Ozawa, who lead a decoy fleet into the battle of the Leyte Gulf to help draw out the US's 3rd Carrier Force in an attempt to help Kurita's Fleet safely pass the San Bernardino Strait in an attempt to get to the main landing forces at Leyte. This fleet consisted of the last of the IJN's then functioning carrier force which at the time of battle served as nothing more than a bait fleet to distract Hearsay's Fleet from the real part of the operation. All the Carriers were sunk in the fight resulting inthe IJN losing the last of it's working carrier forces.

The Fleet consisted of Zuikaku (Sunk), Zuihou (Sunk), Chiyoda (Sunk), Chitose (Sunk), Ise, Hyuuga, Isuzu, Ooyodo, Tama (sunk later following the battle), Akizuki (Sunk), and Hatsuzuki (Sunk)

In the KanColle Event, this Fleet plays a role in the 3rd Event Map.

The Central Force Fleet Group 1 - Kurita's Fleet

This Fleet was lead by Takeo Kurita who lead the main fleet that was part of the attack group intended to stage the main assault against the US fleet invading the Island of Leyte. His plan was to invade the American Fleet forces invading Leytw by coming from the North of Samar. During his attempt to traverse the waters he ran into several obstacles which causes several ships in the fleet to sink, but upon passing the San Bernardino Strait was when the Main Forces experienced taking a heavy hit from group of the 3rd Fleet Carrier Task Force that was located at Samar taking out most of Kurita's main forces.

This ships that he had within his fleet were: Yamato, Musashi (sunk), Nagato, Myoukou, Haguro, Maya (Sunk), Choukai (Sunk), Takao, Atago (Sunk), Noshiro, Hayashimo, Asashimo, Naganami, and Fujinami

The Central Force Fleet Group 2 - Suzuki's Fleet

This Fleet was lead by Yoshio Suzuki who leads followed along with Kurita' Fleet that was part of the attack group intended to stage the main assault against the US fleet invading the Island of Leyte. He was there to help aid Kurita's fleet during the assult on Leyte. During his attempt to traverse the waters he ran into several obstacles which cause several ships in the fleet to sink, but upon passing the San Bernardino Strait was when the Main Forces experienced taking a heavy hit from the group of the 3rd Fleet Carrier Task Force that was located at Samar forcing him to retreat.

The ships he had in his fleet were: Kongou, Haruna, Tone, Chikuma (sunk), Kumano, Suzuya (sunk), Yahagi, Urakaze, Isokaze, Hamakaze, Yukikaze, Kiyoshimo and Nowaki

First Striking Force (1YB), Third Group - Nishimura's Fleet

The fleet lead by Admiral Shouji Nishimura, who would be one of the main fleets that would lead the attack into the Surigao Strait on the night of October 24th, 1944. It would be at this strait he would meet his end after running into an ambush conducted by the US Navy's 7th Support Fleet.

The ships that he had within his fleet were: Yamashiro (Flagship) (Sunk), Fusou (Sunk), Mogami (Sunk), Yamagumo (Sunk), Asagumo (Sunk), Michishio (Sunk), and Shigure.

Second Striking Force (2YB) - Shima's Fleet

The Fleet lead by Admiral Kiyohide Shima, who served as the second part of the Fleet that would conduct an attack against the US Navy at Leyte. He along with Nishimura attempted to invade the Surigao Strait on the night of October 24th, 1944, however after witnessing the fall of Admiral Nishimura's Fleet due to the ambush and bad timing with keeping the fleet in sync Nishimura. He was forced to retreat thus preventing the attack on the Leyte Gulf from the South.


The ships that he had within his fleet were: Nachi, Ashigara, Abukuma, Shiranui, Kasumi, Ushio, and Akebono.


Other members of the Second Striking Force (2YB)

While note entirely connected to the Battle of the Surigao Strait, there were other ships in Shima's Fleet who were a part of his fleet that was also formerly part of Nishimura's Fleet. Whether or not they'll have any impact on the event is unknown.

The Fleet Members consisted of: Wakaba, Hatsushimo, Hatsuharu, Aoba, Kinu, and Uranami

Information

New Ships

Currently, a Total of 7 ships are planned to be introduced this event.
Destroyers

  • J-class destroyer Jervis - E4 Boss drop on Very Easy +
  • Tashkent-class destroyer Tashkent
  • Yuugumo-class destroyer Hamanami

Destroyer Escorts

  • Hiburi-class destroyer escort Hiburi - E2 Reward
  • Hiburi-class destroyer escort Daitou - E4 Boss drop on Very Easy +

Carriers

Remodel

Musashi Kai Ni is scheduled to be getting her remodel release at the same time as the event.

New Equipment

Suspected Equipment

Current Rank Reward Equipment handed out from January Rank Rewards were equipment that was tied to the upcoming Leyte event according to the DMM forum. Current suspected equipment is to be handed out as rewards during the event include:

  • Saiun (4th Recon)
  • FM-2
    • FM-2's design matches that of the USN Escort Carrier Gambier Bay, who has just been confirmed for the event.

New Enemy Vessels

New Enemy Equipment

Event Quests

Friend Fleet

Fleet Formations

E-4
Kanmusu Equipment 1 Equipment 2 Equipment 3 Equipment 4
Cruiser Division 4
Ship Banner Takao Kai.png
Takao
Equipment Card 20.3cm Twin Gun Mount.png Equipment Card 20.3cm Twin Gun Mount.png Equipment Card 61cm Quadruple (Oxygen) Torpedo Mount.png Equipment Card Star Shell.png
Ship Banner Atago Kai.png
Atago
Equipment Card 20.3cm Twin Gun Mount.png Equipment Card 20.3cm Twin Gun Mount.png Equipment Card 61cm Quadruple (Oxygen) Torpedo Mount.png Equipment Card Type 22 Surface Radar.png
Ship Banner Maya Kai Ni.png
Maya
Equipment Card 20.3cm (No.3) Twin Gun Mount.png Equipment Card 20.3cm (No.3) Twin Gun Mount.png Equipment Card 12.7cm High-angle Gun + Anti-Aircraft Fire Director.png Equipment Card 25mm Triple Autocannon Mount (Concentrated Deployment).png
Ship Banner Choukai Kai Ni.png
Choukai
Equipment Card 20.3cm (No.3) Twin Gun Mount.png Equipment Card 20.3cm (No.3) Twin Gun Mount.png Equipment Card 61cm Quadruple (Oxygen) Torpedo Mount.png Equipment Card Skilled Lookouts.png
Destroyer Division 19
Ship Banner Ayanami Kai Ni.png
Ayanami
Equipment Card 12.7cm Twin Gun Mount Model B Kai 2.png Equipment Card 12.7cm Twin Gun Mount Model B Kai 2.png Equipment Card Searchlight.png
Ship Banner Shikinami Kai.png
Shikinami
Equipment Card 12.7cm Twin Gun Mount Model B Kai 2.png Equipment Card 12.7cm Twin Gun Mount Model B Kai 2.png Equipment Card Star Shell.png
Ship Banner Isonami Kai.png
Isonami
Equipment Card 12.7cm Twin Gun Mount.png Equipment Card 61cm Quadruple (Oxygen) Torpedo Mount.png Equipment Card Type 22 Surface Radar.png
Ship Banner Uranami Kai.png
Uranami
Equipment Card 12.7cm Twin Gun Mount.png Equipment Card 61cm Quadruple (Oxygen) Torpedo Mount.png Equipment Card Type 22 Surface Radar.png
European Combined Grand Fleet
Ship Banner Warspite.png
Warspite
150px 150px 150px 191-1.png
Ship Banner Ark Royal Kai.png
Ark Royal
Equipment Card Swordfish Mk.III (Skilled).png Equipment Card Swordfish Mk.II (Skilled).png Equipment Card Swordfish.png Equipment Card Swordfish.png
Ship Banner Richelieu Kai.png
Richelieu
Equipment Card 38cm Quadruple Gun Mount.png Equipment Card 38cm Quadruple Gun Mount.png Equipment Card 15.2cm Triple Gun Mount.png
Ship Banner Jervis Kai.png
Jervis
Equipment Card QF 4.7inch Gun Mk.XII Kai.png Equipment Card QF 4.7inch Gun Mk.XII Kai.png Equipment Card Type124 ASDIC.png
Guadacanal Fleet
Ship Banner Kirishima Kai Ni.png
Kirishima
150px 150px Equipment Card Type 3 Shell.png Equipment Card Type 22 Surface Radar.png
Ship Banner Hiei Kai Ni.png
Hiei
150px 150px Equipment Card Type 22 Surface Radar.png Equipment Card Searchlight.png
Ship Banner Yuudachi Kai Ni.png
Yuudachi
Equipment Card 12.7cm Twin Gun Mount Model B Kai 2.png Equipment Card 12.7cm Twin Gun Mount Model B Kai 2.png Equipment Card 61cm Quadruple (Oxygen) Torpedo Mount.png
Ship Banner Harusame Kai.png
Harusame
Equipment Card 12.7cm Twin Gun Mount Model B Kai 2.png Equipment Card 12.7cm Twin Gun Mount Model B Kai 2.png Equipment Card 61cm Quadruple (Oxygen) Torpedo Mount.png
Ship Banner Yukikaze Kai.png
Yukikaze
Equipment Card 12.7cm Twin Gun Mount Model C Kai 2.png Equipment Card 12.7cm Twin Gun Mount Model C Kai 2.png Equipment Card 61cm Quadruple (Oxygen) Torpedo Mount.png
Ship Banner Amatsukaze Kai.png
Amatsukaze
Equipment Card 12.7cm Twin Gun Mount Model C Kai 2.png Equipment Card 12.7cm Twin Gun Mount Model C Kai 2.png Equipment Card 61cm Quadruple (Oxygen) Torpedo Mount.png
Nishimura Fleet
Ship Banner Fusou Kai Ni.png
Fusou
150px 150px Equipment Card Type 22 Surface Radar.png Equipment Card Searchlight.png
Ship Banner Yamashiro Kai Ni.png
Yamashiro
150px 150px Equipment Card Striking Force Fleet Command Facility.png Equipment Card Star Shell.png
Ship Banner Mogami Kai.png
Mogami
Equipment Card 20.3cm (No.3) Twin Gun Mount.png Equipment Card 20.3cm (No.3) Twin Gun Mount.png Equipment Card 61cm Quadruple (Oxygen) Torpedo Mount.png Equipment Card Zuiun.png
Ship Banner Michishio Kai Ni.png
Michishio
Equipment Card 12.7cm Twin Gun Mount Model C Kai 2.png Equipment Card 61cm Quadruple (Oxygen) Torpedo Mount.png Equipment Card Type 22 Surface Radar.png
Ship Banner Asagumo Kai.png
Asagumo
Equipment Card 12.7cm Twin Gun Mount Model C Kai 2.png Equipment Card 61cm Quadruple (Oxygen) Torpedo Mount.png Equipment Card Type 22 Surface Radar.png
Ship Banner Yamagumo Kai.png
Yamagumo
Equipment Card 12.7cm Twin Gun Mount Model C Kai 2.png Equipment Card 61cm Quadruple (Oxygen) Torpedo Mount.png Equipment Card Type 22 Surface Radar.png
Ship Banner Shigure Kai Ni.png
Shigure
Equipment Card 12.7cm Twin Gun Mount Model B Kai 2.png Equipment Card 12.7cm Twin Gun Mount Model B Kai 2.png Equipment Card Skilled Lookouts.png
E-6
Kanmusu Equipment 1 Equipment 2 Equipment 3 Equipment 4
Northern Combined Fleet
Ship Banner Tashkent.png
Tashkent
Equipment Card 130mm B-13 Twin Gun Mount.png Equipment Card 130mm B-13 Twin Gun Mount.png Equipment Card 533mm Triple Torpedo Mount.png
Ship Banner Gangut Dva.png
Gangut
Equipment Card 30.5cm Triple Gun Mount Kai.png Equipment Card 30.5cm Triple Gun Mount Kai.png Equipment Card 30.5cm Triple Gun Mount Kai.png Equipment Card Searchlight.png
Ship Banner Z1 Zwei.png
Z1
Equipment Card 12.7cm Single Gun Mount.png Equipment Card 12.7cm Single Gun Mount.png Equipment Card 2cm Flakvierling 38.png
Ship Banner Z3 Zwei.png
Z3
Equipment Card 12.7cm Single Gun Mount.png Equipment Card 12.7cm Single Gun Mount.png Equipment Card 3.7cm FlaK M42.png
Ship Banner Verniy.png
Verniy
Equipment Card 533mm Triple Torpedo Mount.png Equipment Card 533mm Triple Torpedo Mount.png Equipment Card 533mm Triple Torpedo Mount.png
Nishimura Fleet
Ship Banner Mogami Kai.png
Mogami
Equipment Card 20.3cm (No.3) Twin Gun Mount.png Equipment Card 20.3cm (No.3) Twin Gun Mount.png Equipment Card 61cm Quadruple (Oxygen) Torpedo Mount.png Equipment Card Searchlight.png
Ship Banner Asagumo.png
Asagumo
Equipment Card 12.7cm Twin Gun Mount Model C Kai 2.png Equipment Card 12.7cm Twin Gun Mount Model C Kai 2.png Equipment Card Star Shell.png
Ship Banner Yamagumo.png
Yamagumo
Equipment Card 12.7cm Twin Gun Mount Model C Kai 2.png Equipment Card 61cm Quadruple (Oxygen) Torpedo Mount.png Equipment Card Type 22 Surface Radar Kai 4.png
Ship Banner Michishio Kai Ni.png
Michishio
Equipment Card 12.7cm Twin Gun Mount Model C Kai 2.png Equipment Card 61cm Quadruple (Oxygen) Torpedo Mount.png Equipment Card Type 22 Surface Radar Kai 4.png
Ship Banner Shigure Kai Ni.png
Shigure
Equipment Card 61cm Quadruple (Oxygen) Torpedo Mount.png Equipment Card 61cm Quadruple (Oxygen) Torpedo Mount.png Equipment Card 61cm Quadruple (Oxygen) Torpedo Mount.png
Cruiser Division 4
Ship Banner Takao.png
Takao
Equipment Card 20.3cm Twin Gun Mount.png Equipment Card 20.3cm Twin Gun Mount.png Equipment Card 61cm Quadruple (Oxygen) Torpedo Mount.png Equipment Card Star Shell.png
Ship Banner Atago.png
Atago
Equipment Card 20.3cm Twin Gun Mount.png Equipment Card 20.3cm Twin Gun Mount.png Equipment Card 61cm Quadruple (Oxygen) Torpedo Mount.png Equipment Card Type 22 Surface Radar.png
Ship Banner Choukai Kai Ni.png
Choukai
Equipment Card 20.3cm (No.3) Twin Gun Mount.png Equipment Card 20.3cm (No.3) Twin Gun Mount.png Equipment Card 61cm Quadruple (Oxygen) Torpedo Mount.png Equipment Card Skilled Lookouts.png
Ship Banner Maya Kai Ni.png
Maya
Equipment Card 20.3cm (No.3) Twin Gun Mount.png Equipment Card 20.3cm (No.3) Twin Gun Mount.png Equipment Card 12.7cm High-angle Gun + Anti-Aircraft Fire Director.png Equipment Card 25mm Triple Autocannon Mount (Concentrated Deployment).png
Destroyer Division 19
Ship Banner Ayanami Kai Ni.png
Ayanami
Equipment Card 12.7cm Twin Gun Mount Model B Kai 2.png Equipment Card 12.7cm Twin Gun Mount Model B Kai 2.png Equipment Card Searchlight.png
Ship Banner Shikinami Kai.png
Shikinami
Equipment Card 12.7cm Twin Gun Mount Model B Kai 2.png Equipment Card 12.7cm Twin Gun Mount Model B Kai 2.png Equipment Card Star Shell.png
Ship Banner Isonami Kai.png
Isonami
Equipment Card 12.7cm Twin Gun Mount.png Equipment Card 61cm Quadruple (Oxygen) Torpedo Mount.png Equipment Card Type 22 Surface Radar.png
Ship Banner Uranami Kai.png
Uranami
Equipment Card 12.7cm Twin Gun Mount.png Equipment Card 61cm Quadruple (Oxygen) Torpedo Mount.png Equipment Card Type 22 Surface Radar.png
Russian Fleet
Ship Banner Gangut Dva.png
Gangut
Equipment Card 30.5cm Triple Gun Mount Kai.png Equipment Card 30.5cm Triple Gun Mount Kai.png Equipment Card 30.5cm Triple Gun Mount Kai.png
Ship Banner Tashkent.png
Tashkent
Equipment Card 130mm B-13 Twin Gun Mount.png Equipment Card 130mm B-13 Twin Gun Mount.png Equipment Card 533mm Triple Torpedo Mount.png
Ship Banner Verniy.png
Verniy
Equipment Card 533mm Triple Torpedo Mount.png Equipment Card 533mm Triple Torpedo Mount.png Equipment Card 533mm Triple Torpedo Mount.png
E-7 Phase 1
Kanmusu Equipment 1 Equipment 2 Equipment 3 Equipment 4
2nd Torpedo Squadron
Ship Banner Noshiro.png
Noshiro
Ship Banner Shimakaze.png
Shimakaze
Ship Banner Naganami Kai Ni.png
Naganami Kai Ni
Ship Banner Kiyoshimo.png
Kiyoshimo
Ship Banner Hayashimo.png
Hayashimo
Ship Banner Hatsushimo Kai Ni.png
Hatsushimo Kai Ni
10th Battle Division
Ship Banner Yahagi.png
Yahagi
Ship Banner Isokaze.png
Isokaze
Ship Banner Hamakaze.png
Hamakaze
Ship Banner Urakaze.png
Urakaze
Ship Banner Yukikaze.png
Yukikaze
Kurita Fleet 1
Ship Banner Kongou Kai Ni.png
Kongou Kai Ni
Ship Banner Haruna Kai Ni.png
Haruna Kai Ni
Ship Banner Tone Kai Ni.png
Tone Kai Ni
Ship Banner Chikuma Kai Ni.png
Chikuma Kai Ni
Kurita Fleet 2
Ship Banner Kongou Kai Ni.png
Kongou Kai Ni
Ship Banner Haruna Kai Ni.png
Haruna Kai Ni
Ship Banner Kumano Kai Ni.png
Kumano Kai Ni
Ship Banner Suzuya Kai Ni.png
Suzuya Kai Ni
Ship Banner Tone Kai Ni.png
Tone Kai Ni
Ship Banner Chikuma Kai Ni.png
Chikuma Kai Ni
Destroyer Division 19
Ship Banner Ayanami Kai Ni.png
Ayanami
Equipment Card 12.7cm Twin Gun Mount Model B Kai 2.png Equipment Card 12.7cm Twin Gun Mount Model B Kai 2.png Equipment Card Searchlight.png
Ship Banner Shikinami Kai.png
Shikinami
Equipment Card 12.7cm Twin Gun Mount Model B Kai 2.png Equipment Card 12.7cm Twin Gun Mount Model B Kai 2.png Equipment Card Star Shell.png
Ship Banner Isonami Kai.png
Isonami
Equipment Card 12.7cm Twin Gun Mount.png Equipment Card 61cm Quadruple (Oxygen) Torpedo Mount.png Equipment Card Type 22 Surface Radar.png
Ship Banner Uranami Kai.png
Uranami
Equipment Card 12.7cm Twin Gun Mount.png Equipment Card 61cm Quadruple (Oxygen) Torpedo Mount.png Equipment Card Type 22 Surface Radar.png
E-7 Phase 2
Kanmusu Equipment 1 Equipment 2 Equipment 3 Equipment 4
Western Strike Force
Ship Banner Iowa.png
Iowa
Equipment Card 16inch Triple Gun Mount Mk.7.png Equipment Card 16inch Triple Gun Mount Mk.7.png Equipment Card 16inch Triple Gun Mount Mk.7.png Equipment Card 5inch Twin Gun Mount Mk.28 mod.2.png
Ship Banner Saratoga.png
Saratoga
Equipment Card F6F-5N.png Equipment Card TBM-3D.png Equipment Card TBM-3D.png Equipment Card Night Operation Aviation Personnel + Skilled Deckhands.png
Ship Banner Richelieu.png
Richelieu
Equipment Card 38cm Quadruple Gun Mount Kai.png Equipment Card 38cm Quadruple Gun Mount Kai.png Equipment Card 15.2cm Triple Gun Mount.png Equipment Card 15.2cm Triple Gun Mount.png
Ship Banner Warspite.png
Warspite
Equipment Card 38.1cm Mk.I Twin Gun Mount.png Equipment Card 38.1cm Mk.I Twin Gun Mount.png Equipment Card 38.1cm Mk.I Twin Gun Mount.png Equipment Card QF 2-pounder Octuple Pom-pom Gun Mount.png
Ship Banner Ark Royal.png
Ark Royal
Equipment Card Swordfish Mk.III (Skilled).png Equipment Card Swordfish Mk.II (Skilled).png Equipment Card Swordfish Mk.III (Skilled).png Equipment Card Swordfish Mk.III (Skilled).png
Ship Banner Graf Zeppelin.png
Graf Zeppelin
Equipment Card Ju 87C Kai.png Equipment Card Ju 87C Kai.png Equipment Card Bf 109T Kai.png Equipment Card Fw 190T Kai.png
Ship Banner Bismarck Drei.png
Bismarck
Equipment Card 38cm Twin Gun Mount Kai.png Equipment Card 38cm Twin Gun Mount Kai.png Equipment Card 38cm Twin Gun Mount Kai.png Equipment Card 3.7cm FlaK M42.png
Western Strike Fleet
Ship Banner Iowa.png
Iowa
Equipment Card 16inch Triple Gun Mount Mk.7.png Equipment Card 16inch Triple Gun Mount Mk.7.png Equipment Card 16inch Triple Gun Mount Mk.7.png Equipment Card 5inch Twin Gun Mount Mk.28 mod.2.png
Ship Banner Saratoga.png
Saratoga
Equipment Card F6F-5N.png Equipment Card TBM-3D.png Equipment Card TBM-3D.png Equipment Card Night Operation Aviation Personnel + Skilled Deckhands.png
Ship Banner Ark Royal.png
Ark Royal
Equipment Card Swordfish Mk.III (Skilled).png Equipment Card Swordfish Mk.II (Skilled).png Equipment Card Swordfish Mk.III (Skilled).png Equipment Card Swordfish Mk.III (Skilled).png
Ship Banner Graf Zeppelin.png
Graf Zeppelin
Equipment Card Ju 87C Kai.png Equipment Card Ju 87C Kai.png Equipment Card Bf 109T Kai.png Equipment Card Fw 190T Kai.png
Ship Banner Bismarck Drei.png
Bismarck
Equipment Card 38cm Twin Gun Mount Kai.png Equipment Card 38cm Twin Gun Mount Kai.png Equipment Card 38cm Twin Gun Mount Kai.png Equipment Card 3.7cm FlaK M42.png
Western Strike Force
Ship Banner Richelieu.png
Richelieu
Equipment Card 38cm Quadruple Gun Mount Kai.png Equipment Card 38cm Quadruple Gun Mount Kai.png Equipment Card 15.2cm Triple Gun Mount.png Equipment Card 15.2cm Triple Gun Mount.png
Ship Banner Iowa.png
Iowa
Equipment Card 16inch Triple Gun Mount Mk.7.png Equipment Card 16inch Triple Gun Mount Mk.7.png Equipment Card 16inch Triple Gun Mount Mk.7.png Equipment Card 5inch Twin Gun Mount Mk.28 mod.2.png
Ship Banner Bismarck Drei.png
Bismarck
Equipment Card 38cm Twin Gun Mount Kai.png Equipment Card 38cm Twin Gun Mount Kai.png Equipment Card 38cm Twin Gun Mount Kai.png Equipment Card 3.7cm FlaK M42.png
Battle of Cape Engaño Fleet
Ship Banner Yamato Kai.png
Yamato
Equipment Card 46cm Triple Gun Mount Kai.png Equipment Card 46cm Triple Gun Mount Kai.png Equipment Card 15.5cm Triple Secondary Gun Mount Kai.png Equipment Card Type 91 Armor Piercing Shell.png
Ship Banner Nagato Kai Ni.png
Nagato
Equipment Card 41cm Twin Gun Mount.png Equipment Card Prototype 41cm Triple Gun Mount.png Equipment Card 10cm Twin High-angle Gun Mount (Carriage).png Equipment Card Type 22 Surface Radar Kai 4.png
Ship Banner Myoukou Kai Ni.png
Myoukou
Equipment Card 20.3cm (No.3) Twin Gun Mount.png Equipment Card 20.3cm (No.3) Twin Gun Mount.png Equipment Card 61cm Quadruple (Oxygen) Torpedo Mount.png Equipment Card Type 0 Reconnaissance Seaplane Model 11B (Skilled).png
Ship Banner Haguro Kai Ni.png
Haguro
Equipment Card 20.3cm (No.3) Twin Gun Mount.png Equipment Card 20.3cm (No.3) Twin Gun Mount.png Equipment Card 61cm Quadruple (Oxygen) Torpedo Mount.png Equipment Card Type 0 Reconnaissance Seaplane Model 11B (Skilled).png
Ship Banner Naganami Kai Ni.png
Naganami
Equipment Card 12.7cm Twin Gun Mount Model D Kai 2.png Equipment Card 61cm Quadruple (Oxygen) Torpedo Mount.png Equipment Card Type 22 Surface Radar Kai 4.png
Ship Banner Hatsushimo Kai Ni.png
Hatsushimo
Equipment Card 61cm Quadruple (Oxygen) Torpedo Mount.png Equipment Card 61cm Quadruple (Oxygen) Torpedo Mount.png Equipment Card 61cm Quadruple (Oxygen) Torpedo Mount.png
Nishimura Fleet
Ship Banner Mogami Kai.png
Mogami
Equipment Card 20.3cm (No.3) Twin Gun Mount.png Equipment Card 20.3cm (No.3) Twin Gun Mount.png Equipment Card 61cm Quadruple (Oxygen) Torpedo Mount.png Equipment Card Searchlight.png
Ship Banner Asagumo.png
Asagumo
Equipment Card 12.7cm Twin Gun Mount Model C Kai 2.png Equipment Card 12.7cm Twin Gun Mount Model C Kai 2.png Equipment Card Star Shell.png
Ship Banner Yamagumo.png
Yamagumo
Equipment Card 12.7cm Twin Gun Mount Model C Kai 2.png Equipment Card 61cm Quadruple (Oxygen) Torpedo Mount.png Equipment Card Type 22 Surface Radar Kai 4.png
Ship Banner Michishio Kai Ni.png
Michishio
Equipment Card 12.7cm Twin Gun Mount Model C Kai 2.png Equipment Card 61cm Quadruple (Oxygen) Torpedo Mount.png Equipment Card Type 22 Surface Radar Kai 4.png
Ship Banner Shigure Kai Ni.png
Shigure
Equipment Card 61cm Quadruple (Oxygen) Torpedo Mount.png Equipment Card 61cm Quadruple (Oxygen) Torpedo Mount.png Equipment Card 61cm Quadruple (Oxygen) Torpedo Mount.png
Cruiser Division 4
Ship Banner Takao.png
Takao
Equipment Card 20.3cm Twin Gun Mount.png Equipment Card 20.3cm Twin Gun Mount.png Equipment Card 61cm Quadruple (Oxygen) Torpedo Mount.png Equipment Card Star Shell.png
Ship Banner Atago.png
Atago
Equipment Card 20.3cm Twin Gun Mount.png Equipment Card 20.3cm Twin Gun Mount.png Equipment Card 61cm Quadruple (Oxygen) Torpedo Mount.png Equipment Card Type 22 Surface Radar.png
Ship Banner Choukai Kai Ni.png
Choukai
Equipment Card 20.3cm (No.3) Twin Gun Mount.png Equipment Card 20.3cm (No.3) Twin Gun Mount.png Equipment Card 61cm Quadruple (Oxygen) Torpedo Mount.png Equipment Card Skilled Lookouts.png
Ship Banner Maya Kai Ni.png
Maya
Equipment Card 20.3cm (No.3) Twin Gun Mount.png Equipment Card 20.3cm (No.3) Twin Gun Mount.png Equipment Card 12.7cm High-angle Gun + Anti-Aircraft Fire Director.png Equipment Card 25mm Triple Autocannon Mount (Concentrated Deployment).png
Destroyer Division 19
Ship Banner Ayanami Kai Ni.png
Ayanami
Equipment Card 12.7cm Twin Gun Mount Model B Kai 2.png Equipment Card 12.7cm Twin Gun Mount Model B Kai 2.png Equipment Card Searchlight.png
Ship Banner Shikinami Kai.png
Shikinami
Equipment Card 12.7cm Twin Gun Mount Model B Kai 2.png Equipment Card 12.7cm Twin Gun Mount Model B Kai 2.png Equipment Card Star Shell.png
Ship Banner Isonami Kai.png
Isonami
Equipment Card 12.7cm Twin Gun Mount.png Equipment Card 61cm Quadruple (Oxygen) Torpedo Mount.png Equipment Card Type 22 Surface Radar.png
Ship Banner Uranami Kai.png
Uranami
Equipment Card 12.7cm Twin Gun Mount.png Equipment Card 61cm Quadruple (Oxygen) Torpedo Mount.png Equipment Card Type 22 Surface Radar.png

Friend Fleet Voice Lines

Ship Japanese/English Notes
Destroyers
Ayanami
Play
Destroyer Division 19 has arrived on the battlefield! We're charging in now!
第十九駆逐隊、戦場に到着!これより突撃する!
Ayanami
Play
Roger that! H-here I gooooooo~!
綾波、了解!い、行きますよおぉー!
Shikinami
Play
This is Shikinami, roger. DesDiv 19, 1st Platoon will charge in. 2nd Platoon, stay close behind. Charge!
敷波、了解。十九駆、第一小隊突撃。第二小隊続いて!突撃!
Shikinami
Play
DesDiv 19 is here. Are you ready, Ayanami? Alright, let's support the allied fleet. Begin the assault!
十九駆、見参。綾波さ、準備はいい?よし、味方艦隊を援護する。突撃開始!
Shigure
Play
Alright, the Nishimura Fleet has broken through Surigao and is advancing through Leyte Gulf. That's...? That's the Kurita Fleet!? We're beaten up too, but we can support the Kurita Fleet now. Let's charge!
よし、西村艦隊、スリガオを抜けて、レイテ湾に進撃中。あれは…?あれは栗田艦隊!?僕たちもぼろぼろだけど、今なら栗田艦隊を援護できる。突入しよう!
Shigure
Play
The Nishimura Fleet will now support the main forces. Ready, everyone? Attack!
西村艦隊、これより主力部隊を援護するよ。みんな、いいかい?突撃!
Tashkent
Play
Alright now. The Northern Combined Fleet will be supporting you! Are you ready, comrades? Alright! Hurrah!!
よし、いいね。北方連合艦隊、これより援護する!同志諸君、準備はいいかい?よし!Ура!!
Light Cruisers
Yahagi
Play
Roger, 1st Striking Force, 2nd Section, DesRon 10, flagship Yahagi, has arrived. Now, let's attack. Get them!
了解、第一遊撃部隊、第二部隊、十戦隊、旗艦矢矧、推参。さぁ、突撃する。掛かれ!
Noshiro
Play
DesRon 2 is attacking. All fleets, check your formation. Please and thanks.
二水戦、突撃します。各艦隊、艦隊陣形確認。よろしくどぞ。
Noshiro
Play
We're going on ahead, Yahagi.
矢矧、われはね、先に行くわ。
Heavy Cruisers
Takao
Play
You're being cheeky, Maya. CruDiv 4, arriving on station! Fire!
摩耶ったら、生意気ね。第四戦隊、推参!って!
Maya
Play
Ah, let's go, Choukai. We'll show them our strength! Aneki, are you all ready too? Don't fall behind!
あぁ、鳥海、行くぜ。あたしらの力を叩きつけるさ!姉貴たちもいいか?遅れるなよ!
Choukai
Play
CruDiv 4, all ships have arrived on the battlefield. Ready, Maya? We'll blast them out of the water. Open fire!
第四戦隊、全艦戦場に到着。摩耶、いい?撃ちまくるわよ。撃ち方、始め!
Chikuma
Play
I'm counting on you to spot the shell splashes, my recon seaplanes. Tone-class CA, Chikuma, heading out.
水偵のみんな、着弾観測お願いね。利根型重巡、筑摩、参ります。
Battleships
Kongou
Play
BatDiv 3, Haruna, are you ready? I'll be the one to capture the Admiral's heart!
第三戦隊、榛名、準備はいい?提督のハートは掴むのは、私デス!
Hiei
Play
BatDiv 11, flagship Hiei! We've reached the battlefield. We'll now support the allied fleet. Let's go, Kirishima!
第十一戦隊、旗艦比叡!戦場海域に到達する。これより、友軍を援護する。霧島、行くよ!
Hiei
Play
I've come to help, onee-sama! Firing with all my might!
お姉さま、比叡助けに来ました!気合、入れて、撃ちます!
Haruna
Play
We're entering a night battle now? Please leave it to me.
これから夜戦ですか?榛名にどぞお任せてください。
Kirishima
Play
Roger! Main cannons, begin firing, fire!
霧島、了解!主砲、打ち方初め、てー!
Kirishima
Play
BatDiv 11, battleship Kirishima, has reached the battlefield! We'll now carry out the attack! Support the 1st Striking Force! Fire!
第十一戦隊、戦艦霧島、洗浄に突入する!これより突撃を敢行!第一遊撃部隊を援護する!てー!
Nagato
Play
Alright! All guns ready! Full broadside, FIRE!
よし!全主砲、行くぞ!一斉射、てっ!
Yamato
Play
Main guns, please hurry up with a firing solution. Battleship Yamato, opening fire with all guns. FIRE!
主砲、諸元修正急いで下さい。戦艦大和、全主砲、全力射撃、行きます。てっ!
Iowa
Play
You sure are serious, Admiral.
Admiral、本気ね。
Warspite
Play
The European Combined Grand Fleet, flagship Warspite, has arrived at the battlefield. Now we'll support the friend fleet. All ships, charge!
European Combined Grand Fleet、旗艦Warspite、戦場海域に到着。これよりfriend fleetを援護します!全艦、突撃!
Gangut
Play
I see, it's finally time for the desicive battle. Alright, leave this to me! Come with me, you all! Don't fall behind!
そうか、いよいよ艦隊決戦だな。よし、この私に任せておけ!キサマ、ともに行くぞ!遅れるな!
Richelieu
Play
I'm Richelieu. I've arrived now. I'll support you. Now, open fire.
Richelieuよ。来て上げたは。援護してあげます。さぁ、撃ちなさい。
Richelieu
Play
It can't be helped then, Admiral. I'll save you. Fire!
仕方ないはね、Amiral. 助けてあげるは。Feu!

Mechanics

Participation requirements

  • Must have a 75% sortie win ratio.
  • Must have 5 empty ship slots for new ships.
  • Must have 20 free equipment slots.

Special Mechanics

  1. The difficulty system first used in Spring 2015 Event returns: you can choose between Operation A (, Hard), Operation B (, Medium), Operation C (, Easy) or Operation D (, Very Easy) .
    • Choosing A or B requires certain HQ Level (HQ Lv 35 for B / 80 for A in Spring 2015 Event).
    • An important note to all Admirals intending to clear the event on Hard difficulty - further (new) conditions now apply:
      • When switching difficulty from any other difficulty to Hard, the map's debuff mechanism (where applicable) will be reset.
        • Switching between any other difficulties will not reset the debuff mechanism.
  2. The debuff system from Summer 2015 Event's final map, where certain nodes had to be killed to reduce boss armor will return.
  3. Returning this event will allow a fleet with seven ships (Striking Force Fleet) to sortie to certain event maps that allow single fleet operations starting from E-2, and also includes the final map of the event.
    • The Striking Force cannot be sortied during exercises or sent on expeditions while it contains seven ships.
    • The Striking Force can only be created and used in the third fleet in the menu (out of a total of four fleets).
    • A Striking Force with a flagship that carries a new piece of equipment, the Striking Force Fleet Command Facility, will be able to make use of the new Single Ship Evacuation mechanic.
      • The new Single Ship Evacuation mechanic that will become available for the Striking Force as of E-4 allowing a single ship in the fleet to retreat from the battlefield after an enemy engagement if she suffered heavy damage.
        • It is possible for the damage to become even worse during a Single Ship Evacuation.
        • Unlike the Combined Fleet's evacuation mechanic, it does not require an escort destroyer.
      • The new Striking Force Fleet Command Facility will become obtainable and useable via the old Fleet Command Facility and the Action Report that can be earned in the upcoming Fall Event. The Fleet Command Facility, as well as the new Action Report item, will be obtainable on all difficulty levels, including Medium and Easy Mode.
      • Supplementary information regarding the new Striking Force Fleet Command Facility and the Single Ship Evacuation it allows when carried by the striking force's flagship:
        • The evacuation does not require an escort destroyer.
        • The evacuation consumes the ship's entire fuel & ammo reserves.
        • Only one ship can be evacuated per battle.
        • The damage the ship suffered may become worse during the evacuation, but she will never sink.
  4. Returning this event, a new Fleet formation will be introduced called the Vanguard Formation.
    • This formation will organize the fleet such that the 3rd-6th/7th ships protect the Flagship and 2nd Ship of the Fleet.
      • In addition, the formation allows for ships to become more evasive in combat situations, especially with well-trained Destroyer.
      • This formation is also available only during the duration of the event.
      • The formation will be usable by both normal fleets as well as the Striking Force Fleet.
  5. New: NPC Friend Fleets have been introduced into the game.
    • Friend Fleets act as another unit that appears in particular battles to help aid your fleet when attacking the enemy at the start of night battle.
      • As of current, only E-4 will allow the use of Friend Fleets at the boss node.
      • NPC Friend Fleets are selected from a randomized preset list of ship.
      • Depending on who you have in your fleet can also influence who will be arrive to aid you in battle.

Quick Info Table

Classification Map Name Fleet Type? Land-Based Air Squadron? Color of Tag Tag Condition & Deployment Restriction Difficulty Restrictions Notes
Main Operation E-1 Battle Stations! Perform Thorough Patrols of the Route Ahead! Single Fleet
+
Striking Force Fleet
Yes
(1)
2018WinterGreyTag.png Tagging:
Ships not already color-tagged will be tagged with the color associated with the map when deployed. This tag exists on all difficulties and is not reset on remodel, etc.
Deployment Restriction:
Normal or Hard: Must have either the same-colored tag or no tag.
Easy: Restrictions apply only to maps involving multiple tags in E-2, E-4. an E-6 please review map for additional details.
No restrictions. All difficulties OK
E-2 The Kurita Fleet's Grand Sortie! Single Fleet
+
Striking Force Fleet
+
Combined Fleet
Yes
(1)
2018WinterGreenTag.pngFall2017YellowTag.png In order to play these maps on hard, you must complete the previous map* on either normal or hard.
(e.g., to do E-4 on hard, you must complete E-3 on normal or hard.)
E-3 Ozawa Mobile Force, Sortie at Full Strength! Single Fleet
+
Striking Force Fleet
+
Combined Fleet
Yes
(2)
2018WinterBlueTag.png
E-4 Beyond Samar... Single Fleet
+
Striking Force Fleet
+
Combined Fleet
Yes
(2)
2018WinterGreenTag.pngFall2017YellowTag.png
Extra Operation E-5 Operation Ta-Gou Kai Single Fleet
+
Striking Force Fleet
Yes
(2)
2018WinterPurpleTag.png
E-6 Pursuit! The Second Striking Force Single Fleet
+
Striking Force Fleet
Yes
(3)
2018WinterGreenTag.png2018WinterPurpleTag.png
E-7 Victory on the Dawn Horizon... Combined Fleet Yes
(3)
2018WinterGreenTag.pngFall2017YellowTag.png2018WinterPurpleTag.png2018WinterBlueTag.png

Event Maps

E-1

OoyodoE-1Winter2018.png

Battle Stations! Perform Thorough Patrols of the Route Ahead! [3]
作戦開始 前路哨戒を厳とせよ!

Information

  • Event Tag: 2018WinterGreyTag.png

Boss: New Submarine Princess

  • Hard (): 1500
  • Medium (): 985
  • Easy (): 708
  • Very Easy (): 708

Key Rewards:

  • Clearing on Hard (): 3x Irako, 1x Furniture Fairy, 1x Battle Rations, 1x New Type Artillery Armament Materials, 1x Blueprint, Prototype Toukai
  • Clearing on Medium (): 3x Irako, 1x New Type Artillery Armament Materials, 1x Blueprint
  • Clearing on Easy (): 1x New Type Artillery Armament Materials, 1x Blueprint
  • Clearing on Very Easy (): 1x Furniture Fairy, 1x Battle Rations
Winter 2018 Event E-1 Banner.png
Winter2018E-1Map.png

Branching rules

E-1 Branching Rules
Nodes Rules
1
A
  • Do not meet the requirements to go to D.
D
  • Meet all of the following requirements:
    • Amount of (F)BB(V) ≦ 1
    • Fleet must contain a CL
    • Fleet contains no AV
    • Fleet contains no AS (Taigei)
    • Amount of DD + DE ≧ 2
B
C
  • Fail the LoS check.
E
  • Pass the LoS check.
D
E
  • Active Branching
G
E
F
  • Active Branching
H
G
J
  • Do not meet the requirements to go to K.
K
  • Meet all of the following requirements:
    • Fleet contains no battleships.
    • Amount of DD ≧ 3
I
L
  • Fail the LoS check.
O
  • Pass the LoS check of 48 Cn3 F33.
J
K
  • * Pass the LoS check of 48 Cn3 F33.
M
  • Fail the LoS check.
K
M
  • Fail the LoS check.
N
  • * Pass the LoS check of 48 Cn3 F33.

Branching compositions were reported over the course of the event.

Tips

  • Should you choose to, you may use a Striking Force Fleet instead of a standard fleet here.
  • Unlocking Boss Node:
    • A+ Rank at 2 of the 3 nodes: B, F, and N.
    • Medium and Hard require A+ on all 3 nodes.


Recommended Compositions:

When planning for this map, it is highly advisable to set aside any ships required for future maps first, be it Kurita, Nishimura, Ozawa, or Shima fleet ships. In line with this, utilizing ships which are unlikely to be required for historical purposes in this event, such as Satsuki, Fumizuki, Yuubari, and Libeccio may be of value.

There are three primary objectives that must be completed before the boss node (O) becomes available, A ranks are required at:

  • Node B
  • Node F
  • Node N

The core final fleet that used to reach the boss node O will run along the lines of CL 2DD/DE 3XX. The three wild cards are usually be a BBV (for a second shelling round) along with 2 more DD/DEs. Should problems present themselves, the addition of an additional ship and use of a striking force may be required.

Post-EO Release Update: The transport operation for this event at E5 does not utilize a CVL, if, for some reason, you are encountering difficulties killing the boss, Taiyou may safely be released for use here.

Node B

Node B is relatively simple to reach: a CL is required to route to D, removing the CL and replacing with a DD will guarantee routing for this node. Two ASW

Node F

Node F can be reached with a single CL and 2DD/DEs in the fleet, with no need to worry about branching. Node F, being a surface node, will not require as much ASW gear, although the presence of a single sub increases the value of bringing an OASW ship if one can be spared.

Node N

As only two nodes are required for those on easy and below difficulties, node N can safely be ignored by players on such difficulties.

Node N can be reached with the same fleet as used to reach F, a third DD/DE will guarantee the fastest route possible (DGKN). Node N is relatively difficult for a unprepared fleet (Ancient DD hime), however, the presence of LBAS should greatly improve one's chances here.

Boss Node: O

The last major check here is the LoS requirement to be routed to the boss. The boss node itself is relatively simple and easy in the presence of well-equipped ships, it is therefore possible to have the BBV carry recon planes to fill out any LoS deficit.

Recommended LBAS Planes

4 LBAS Bombers / ASW Capable Bombers

ASW planes such as the Prototype Toukai are useful against the boss node, while LBAS bombers may be used at any surface node should any issues be encountered.

Show/Hide Nodes and Enemy Encounters
Nodes and Enemy Encounters
NodePatternXpNode InfoFormAir
A
深海潜水艦 待伏部隊D群
Pattern 1 Submarine Ka-Class eliteSubmarine Ka-Class eliteSubmarine Ka-Class elite
Formation 4: Echelon
Formation 5: Line Abreast
Pattern 2 Submarine Ka-Class flagshipSubmarine Ka-Class eliteSubmarine Ka-Class elite
Formation 4: Echelon
Formation 5: Line Abreast
Pattern 3 Submarine Ka-Class flagshipSubmarine Ka-Class eliteSubmarine Ka-Class eliteSubmarine Ka-Class elite
Formation 4: Echelon
B
深海潜水艦 待伏部隊B群
Pattern 1 Submarine So-Class eliteSubmarine Ka-Class eliteSubmarine Ka-Class elite
Formation 4: Echelon
Formation 5: Line Abreast
Pattern 2 Submarine So-Class flagshipSubmarine Ka-Class eliteSubmarine Ka-Class eliteSubmarine Ka-Class elite
Formation 4: Echelon
C
Pattern 1"Must be my imagination" (battle avoided)
D
Pattern 1Choose your route
E
Pattern 1Choose your route
F
深海潜水艦 待伏支援部隊 II群
Pattern 1 Light Cruiser Tsu-Class eliteDestroyer I-Class Late ModelDestroyer I-Class Late ModelDestroyer I-Class Late ModelDestroyer I-Class Late ModelSubmarine Ka-Class flagship
Formation 1: Line Ahead
Pattern 2 Light Cruiser Tsu-Class eliteDestroyer I-Class Late ModelDestroyer I-Class Late ModelDestroyer I-Class Late ModelDestroyer I-Class Late ModelSubmarine Yo-Class flagship
Formation 1: Line Ahead
Pattern 3 Light Cruiser Tsu-Class eliteDestroyer I-Class Late ModelDestroyer I-Class Late ModelDestroyer I-Class Late ModelDestroyer I-Class Late ModelSubmarine So-Class flagship
Formation 1: Line Ahead
G
深海潜水艦 待伏部隊E群
Pattern 1 Submarine Ka-Class flagshipSubmarine Ka-ClassSubmarine Ka-Class
Formation 4: Echelon
Formation 5: Line Abreast
Pattern 2 Submarine Ka-Class flagshipSubmarine Ka-ClassSubmarine Ka-ClassSubmarine Ka-Class
Formation 4: Echelon
Formation 5: Line Abreast
Pattern 3 Submarine Ka-Class flagshipSubmarine Ka-Class flagshipSubmarine Ka-ClassSubmarine Ka-Class
Formation 4: Echelon
H
深海潜水艦 待伏部隊A群
Pattern 1 Submarine So-Class eliteSubmarine So-ClassSubmarine So-ClassSubmarine So-Class
Formation 4: Echelon
Formation 5: Line Abreast
Pattern 2 Submarine So-Class eliteSubmarine So-Class eliteSubmarine So-ClassSubmarine So-Class
Formation 4: Echelon
Pattern 3 Submarine So-Class eliteSubmarine So-Class eliteSubmarine So-Class eliteSubmarine So-Class elite
Formation 4: Echelon
Pattern 4 Submarine So-Class flagshipSubmarine So-Class eliteSubmarine So-Class eliteSubmarine So-Class elite
Formation 4: Echelon
I
深海潜水艦 待伏支援部隊 I群
Pattern 1 Light Cruiser Tsu-Class eliteDestroyer I-Class Late ModelDestroyer I-Class Late ModelDestroyer I-Class Late ModelSubmarine Yo-Class eliteSubmarine Yo-Class elite
Formation 1: Line Ahead
Formation 2: Double Line
Pattern 2 Light Cruiser Tsu-Class eliteDestroyer I-Class Late ModelDestroyer I-Class Late ModelDestroyer I-Class Late ModelSubmarine Yo-Class flagshipSubmarine Yo-Class flagship
Formation 1: Line Ahead
J
深海潜水艦 待伏部隊C群
Pattern 1 Submarine So-Class flagshipSubmarine Ka-ClassSubmarine Ka-Class
Formation 4: Echelon
Formation 5: Line Abreast
Pattern 2 Submarine So-Class flagshipSubmarine Ka-ClassSubmarine Ka-ClassSubmarine Ka-Class
Formation 4: Echelon
Formation 5: Line Abreast
Pattern 3 Submarine So-Class flagshipSubmarine Ka-Class eliteSubmarine Ka-Class eliteSubmarine Ka-Class elite
Formation 4: Echelon
K
深海侵攻任務部隊 哨戒艦隊
Pattern 1 Destroyer I-Class Late ModelDestroyer I-Class Late ModelDestroyer I-Class Late ModelDestroyer I-ClassDestroyer I-Class
Formation 1: Line Ahead
Formation 2: Double Line
Pattern 2 Destroyer I-Class Late Model eliteDestroyer I-Class Late ModelDestroyer I-Class Late ModelDestroyer I-ClassDestroyer I-Class
Formation 1: Line Ahead
Formation 2: Double Line
L
Pattern 1"Must be my imagination" (battle avoided)
M
Pattern 1"Must be my imagination" (battle avoided)
N
深海侵攻任務部隊 哨戒艦隊旗艦
Pattern 1 Old Destroyer PrincessDestroyer I-Class Late ModelDestroyer I-Class Late ModelDestroyer I-ClassDestroyer I-ClassTransport Ship Wa-Class
Formation 1: Line Ahead
Formation 2: Double Line
Pattern 2 Old Destroyer PrincessDestroyer I-Class Late ModelDestroyer I-Class Late ModelDestroyer I-Class Late ModelDestroyer I-Class Late ModelTransport Ship Wa-Class
Formation 1: Line Ahead
Formation 2: Double Line
O
深海潜水待伏部隊 指揮潜水艦
Pattern 1 New Submarine Princess Flagship (B)Submarine Yo-Class eliteSubmarine Yo-Class eliteSubmarine Yo-Class eliteDestroyer I-Class Late ModelDestroyer I-Class Late Model
Formation 4: Echelon
Pattern 2 New Submarine Princess Flagship (B)Submarine Yo-Class eliteSubmarine Yo-Class eliteDestroyer I-Class Late ModelDestroyer I-Class Late Model
Formation 4: Echelon
Pattern 3
Final Form
New Submarine Princess Flagship (C)Submarine Yo-Class eliteSubmarine Yo-Class eliteSubmarine Yo-Class eliteDestroyer I-Class Late ModelDestroyer I-Class Late Model
Formation 4: Echelon

Show/Hide Nodes and Enemy Encounters
Nodes and Enemy Encounters
NodePatternXpNode InfoFormAir
A
深海潜水艦 待伏部隊D群
Pattern 1 Submarine Ka-Class eliteSubmarine Ka-ClassSubmarine Ka-Class
Formation 5: Line Abreast
Formation 4: Echelon
Pattern 2 Submarine Ka-Class eliteSubmarine Ka-Class eliteSubmarine Ka-Class elite
Formation 4: Echelon
Formation 5: Line Abreast
B
深海潜水艦 待伏部隊B群
Pattern 1 Submarine Ka-Class eliteSubmarine Ka-ClassSubmarine Ka-Class
Formation 5: Line Abreast
Pattern 2 Submarine So-Class eliteSubmarine Ka-ClassSubmarine Ka-Class
Formation 4: Echelon
Pattern 3 Submarine So-Class eliteSubmarine Ka-Class eliteSubmarine Ka-Class elite
Formation 4: Echelon
Formation 5: Line Abreast
C
Pattern 1"Must be my imagination" (battle avoided)
D
Pattern 1Choose your route
E
Pattern 1Choose your route
F
深海潜水艦 待伏支援部隊 II群
Pattern 1 Light Cruiser Tsu-ClassDestroyer I-Class Late ModelDestroyer I-Class Late ModelDestroyer I-ClassDestroyer I-ClassSubmarine Ka-Class elite
Formation 1: Line Ahead
Pattern 2 Light Cruiser Tsu-ClassDestroyer I-Class Late ModelDestroyer I-Class Late ModelDestroyer I-ClassDestroyer I-ClassSubmarine Yo-Class elite
Formation 1: Line Ahead
Pattern 3 Light Cruiser Tsu-ClassDestroyer I-Class Late ModelDestroyer I-Class Late ModelDestroyer I-ClassDestroyer I-ClassSubmarine So-Class elite
Formation 1: Line Ahead
G
深海潜水艦 待伏部隊E群
Pattern 1 Submarine Ka-Class eliteSubmarine Ka-ClassSubmarine Ka-Class
Formation 4: Echelon
Formation 5: Line Abreast
Pattern 2 Submarine Ka-Class flagshipSubmarine Ka-ClassSubmarine Ka-Class
Formation 4: Echelon
Formation 5: Line Abreast
Formation 4: Echelon
Formation 5: Line Abreast
H
深海潜水艦 待伏部隊A群
Pattern 1 Submarine So-ClassSubmarine So-ClassSubmarine So-Class
Formation 4: Echelon
Formation 5: Line Abreast
Pattern 2 Submarine So-Class eliteSubmarine So-ClassSubmarine So-ClassSubmarine So-Class
Formation 4: Echelon
Formation 5: Line Abreast
Pattern 3 Submarine So-Class eliteSubmarine So-Class eliteSubmarine So-ClassSubmarine So-Class
Formation 4: Echelon
I
深海潜水艦 待伏支援部隊 I群
Pattern 1 Light Cruiser Tsu-ClassDestroyer I-ClassDestroyer I-ClassSubmarine Yo-Class
Formation 2: Double Line
Pattern 2 Light Cruiser Tsu-ClassDestroyer I-Class Late ModelDestroyer I-ClassDestroyer I-ClassSubmarine Yo-ClassSubmarine Yo-Class
Formation 1: Line Ahead
Formation 2: Double Line
Pattern 3 Light Cruiser Tsu-ClassDestroyer I-Class Late ModelDestroyer I-ClassDestroyer I-ClassSubmarine Yo-Class eliteSubmarine Yo-Class elite
Formation 1: Line Ahead
J
深海潜水艦 待伏部隊C群
Pattern 1 Submarine So-Class eliteSubmarine Ka-ClassSubmarine Ka-Class
Formation 4: Echelon
Formation 5: Line Abreast
Pattern 2 Submarine So-Class flagshipSubmarine Ka-ClassSubmarine Ka-Class
Formation 4: Echelon
Formation 5: Line Abreast
K
深海侵攻任務部隊 哨戒艦隊
Pattern 1 Destroyer I-Class Late ModelDestroyer I-ClassDestroyer I-ClassDestroyer I-ClassDestroyer I-Class
Formation 1: Line Ahead
Formation 2: Double Line
Pattern 2 Destroyer I-Class Late ModelDestroyer I-Class Late ModelDestroyer I-ClassDestroyer I-ClassDestroyer I-Class
Formation 1: Line Ahead
Formation 2: Double Line
L
Pattern 1"Must be my imagination" (battle avoided)
M
Pattern 1"Must be my imagination" (battle avoided)
N
深海侵攻任務部隊 哨戒艦隊旗艦
Pattern 1 Old Destroyer PrincessDestroyer I-Class Late ModelDestroyer I-ClassDestroyer I-ClassTransport Ship Wa-Class
Formation 1: Line Ahead
Formation 2: Double Line
Pattern 2 Old Destroyer PrincessDestroyer I-Class Late ModelDestroyer I-Class Late ModelDestroyer I-ClassDestroyer I-ClassTransport Ship Wa-Class
Formation 1: Line Ahead
Formation 2: Double Line
O
深海潜水待伏部隊 指揮潜水艦
Pattern 1 New Submarine Princess Flagship (A)Submarine Yo-ClassSubmarine Yo-ClassDestroyer I-Class Late ModelDestroyer I-Class Late Model
Formation 4: Echelon
Pattern 2 New Submarine Princess Flagship (D)Submarine Ka-ClassSubmarine Ka-Class
Formation 4: Echelon
Pattern 3 New Submarine Princess Flagship (D)Submarine Yo-ClassSubmarine Yo-Class
Formation 4: Echelon
Pattern 4
Final Form
New Submarine Princess Flagship (D)Submarine Yo-ClassSubmarine Yo-ClassDestroyer I-Class Late ModelDestroyer I-Class Late Model
Formation 4: Echelon

Show/Hide Nodes and Enemy Encounters
Nodes and Enemy Encounters
NodePatternXpNode InfoFormAir
A
深海潜水艦 待伏部隊D群
Pattern 1 Submarine Ka-ClassSubmarine Ka-ClassSubmarine Ka-Class
Formation 4: Echelon
Formation 5: Line Abreast
Pattern 2 Submarine Ka-Class eliteSubmarine Ka-ClassSubmarine Ka-Class
Formation 4: Echelon
Formation 5: Line Abreast
Pattern 3 Submarine Ka-Class flagshipSubmarine Ka-Class eliteSubmarine Ka-Class eliteSubmarine Ka-Class elite
Formation 4: Echelon
B
深海潜水艦 待伏部隊B群
Pattern 1 Submarine Ka-Class eliteSubmarine Ka-ClassSubmarine Ka-Class
Formation 5: Line Abreast
Pattern 2 Submarine So-ClassSubmarine Ka-ClassSubmarine Ka-Class
Formation 4: Echelon
Formation 5: Line Abreast
Pattern 3 Submarine So-Class eliteSubmarine Ka-ClassSubmarine Ka-Class
Formation 4: Echelon
Pattern 4 Submarine So-Class eliteSubmarine Ka-Class eliteSubmarine Ka-Class elite
Formation 5: Line Abreast
C
Pattern 1"Must be my imagination" (battle avoided)
D
Pattern 1Choose your route
E
Pattern 1Choose your route
F
深海潜水艦 待伏支援部隊 II群
Pattern 1 Light Cruiser Tsu-ClassDestroyer I-ClassDestroyer I-ClassSubmarine Yo-Class
Formation 1: Line Ahead
Formation 2: Double Line
Pattern 2 Light Cruiser Tsu-ClassDestroyer I-Class Late ModelDestroyer I-ClassDestroyer I-ClassSubmarine So-Class
Formation 1: Line Ahead
G
深海潜水艦 待伏部隊E群
Pattern 1 Submarine Ka-ClassSubmarine Ka-ClassSubmarine Ka-Class
Formation 4: Echelon
Formation 5: Line Abreast
Pattern 2 Submarine Ka-Class eliteSubmarine Ka-ClassSubmarine Ka-Class
Formation 4: Echelon
Formation 5: Line Abreast
H
深海潜水艦 待伏部隊A群
Pattern 1 Submarine So-ClassSubmarine So-Class
Formation 4: Echelon
Formation 5: Line Abreast
Pattern 2 Submarine So-ClassSubmarine So-ClassSubmarine So-Class
Formation 4: Echelon
Formation 5: Line Abreast
I
深海潜水艦 待伏支援部隊 I群
Pattern 1 Light Cruiser Tsu-ClassDestroyer I-ClassDestroyer I-ClassSubmarine Yo-Class
Formation 1: Line Ahead
Formation 2: Double Line
Pattern 2 Light Cruiser Tsu-ClassDestroyer I-ClassDestroyer I-ClassSubmarine Yo-ClassSubmarine Yo-Class
Formation 1: Line Ahead
J
深海潜水艦 待伏部隊C群
Pattern 1 Submarine So-ClassSubmarine Ka-ClassSubmarine Ka-Class
Formation 4: Echelon
Formation 5: Line Abreast
Pattern 2 Submarine So-Class eliteSubmarine Ka-ClassSubmarine Ka-Class
Formation 4: Echelon
Formation 5: Line Abreast
K
深海侵攻任務部隊 哨戒艦隊
Pattern 1 Destroyer I-Class Late ModelDestroyer I-ClassDestroyer I-ClassDestroyer I-Class
Formation 1: Line Ahead
Pattern 2 Destroyer I-Class Late ModelDestroyer I-ClassDestroyer I-ClassDestroyer I-ClassDestroyer I-Class
Formation 1: Line Ahead
Formation 2: Double Line
L
Pattern 1"Must be my imagination" (battle avoided)
M
Pattern 1"Must be my imagination" (battle avoided)
N
深海侵攻任務部隊 哨戒艦隊旗艦
Pattern 1 Old Destroyer PrincessDestroyer I-ClassDestroyer I-ClassTransport Ship Wa-Class
Formation 1: Line Ahead
Pattern 2 Old Destroyer PrincessDestroyer I-Class Late ModelDestroyer I-ClassDestroyer I-ClassTransport Ship Wa-Class
Formation 1: Line Ahead
Formation 2: Double Line
O
深海潜水待伏部隊 指揮潜水艦
Pattern 1 New Submarine Princess Flagship (D)
Formation 4: Echelon
Pattern 2 New Submarine Princess Flagship (D)Submarine Ka-Class
Formation 4: Echelon
Pattern 3
Final Form
New Submarine Princess Flagship (D)Submarine Ka-ClassSubmarine Ka-Class
Formation 4: Echelon

Show/Hide Nodes and Enemy Encounters
Nodes and Enemy Encounters
NodePatternXpNode InfoFormAir
A
深海潜水艦 待伏部隊D群
Pattern 1 Submarine Ka-ClassSubmarine Ka-ClassSubmarine Ka-Class
Formation 4: Echelon
Formation 5: Line Abreast
Pattern 2 Submarine Ka-Class eliteSubmarine Ka-Class eliteSubmarine Ka-Class elite
Formation 4: Echelon
B
深海潜水艦 待伏部隊B群
Pattern 1 Submarine So-ClassSubmarine Ka-ClassSubmarine Ka-Class
Formation 4: Echelon
Formation 5: Line Abreast
Pattern 2 Submarine So-Class eliteSubmarine Ka-Class eliteSubmarine Ka-Class elite
Formation 4: Echelon
C
Pattern 1"Must be my imagination" (battle avoided)
D
Pattern 1Choose your route
E
Pattern 1Choose your route
F
深海潜水艦 待伏支援部隊 II群
Pattern 1 Light Cruiser Tsu-ClassDestroyer I-ClassDestroyer I-ClassSubmarine Yo-Class
Formation 1: Line Ahead
Formation 2: Double Line
Pattern 2 Light Cruiser Tsu-ClassDestroyer I-Class Late ModelDestroyer I-ClassDestroyer I-ClassSubmarine So-Class
Formation 1: Line Ahead
Pattern 3 Light Cruiser Tsu-Class eliteDestroyer I-Class Late ModelDestroyer I-Class Late ModelDestroyer I-Class Late ModelDestroyer I-Class Late ModelSubmarine So-Class flagship
Formation 1: Line Ahead
G
深海潜水艦 待伏部隊E群
Pattern 1 Submarine Ka-ClassSubmarine Ka-ClassSubmarine Ka-Class
Formation 4: Echelon
Formation 5: Line Abreast
Pattern 2 Submarine Ka-Class eliteSubmarine Ka-ClassSubmarine Ka-Class
Formation 4: Echelon
H
深海潜水艦 待伏部隊A群
Pattern 1 Submarine So-ClassSubmarine So-Class
Formation 4: Echelon
Formation 5: Line Abreast
I
深海潜水艦 待伏支援部隊 I群
Pattern 1 Light Cruiser Tsu-ClassDestroyer I-ClassDestroyer I-ClassSubmarine Yo-Class
Formation 1: Line Ahead
Formation 2: Double Line
J
深海潜水艦 待伏部隊C群
Pattern 1 Submarine So-ClassSubmarine Ka-ClassSubmarine Ka-Class
Formation 4: Echelon
Formation 5: Line Abreast
K
深海侵攻任務部隊 哨戒艦隊
Pattern 1 Destroyer I-Class Late ModelDestroyer I-ClassDestroyer I-ClassDestroyer I-Class
Formation 1: Line Ahead
Pattern 2 Destroyer I-Class Late ModelDestroyer I-ClassDestroyer I-ClassDestroyer I-ClassDestroyer I-Class
Formation 1: Line Ahead
Formation 2: Double Line
L
Pattern 1"Must be my imagination" (battle avoided)
M
Pattern 1"Must be my imagination" (battle avoided)
N
深海侵攻任務部隊 哨戒艦隊旗艦
Pattern 1 Old Destroyer PrincessDestroyer I-ClassDestroyer I-ClassTransport Ship Wa-Class
Formation 1: Line Ahead
Pattern 2 Old Destroyer PrincessDestroyer I-Class Late ModelDestroyer I-ClassDestroyer I-ClassTransport Ship Wa-Class
Formation 1: Line Ahead
Formation 2: Double Line
O
深海潜水待伏部隊 指揮潜水艦
Pattern 1
Final Form
New Submarine Princess Flagship (D)
Formation 4: Echelon

Ship drops

NodeShip List
FDestroyersAkatsuki Akebono Ayanami Fubuki Fumizuki Harukaze Hatakaze Hatsuharu Hatsushimo Hatsuyuki Hibiki Ikazuchi Inazuma Isonami Kamikaze Kikuzuki Kisaragi Mikazuki Miyuki Mochizuki Murakumo Mutsuki Nagatsuki Nenohi Oboro Satsuki Sazanami Shikinami Shirayuki Ushio Wakaba
Light CruisersIsuzu Jintsuu Kiso Kitakami Kuma Nagara Naka Natori Ooi Ooyodo Sendai Tama Yura
Auxiliary ShipsHayasui
IDestroyersAkatsuki Akebono Ayanami Fubuki Fumizuki Hatsuharu Hatsushimo Hatsuyuki Hibiki Ikazuchi Inazuma Isonami Kikuzuki Kisaragi Mikazuki Miyuki Mochizuki Murakumo Mutsuki Nagatsuki Nenohi Oboro Satsuki Sazanami Shikinami Shirayuki Ushio Wakaba
Light CruisersIsuzu Jintsuu Nagara Naka Natori Sendai Yura
KDestroyersAkatsuki Akebono Fumizuki Hatsuharu Hatsushimo Hibiki Ikazuchi Inazuma Kikuzuki Kisaragi Mikazuki Mochizuki Mutsuki Nagatsuki Nenohi Oboro Satsuki Sazanami Ushio Wakaba
NDestroyersAkatsuki Akebono Ayanami Fubuki Fumizuki Harukaze Hatakaze Hatsuharu Hatsushimo Hatsuyuki Hibiki Ikazuchi Inazuma Isonami Kamikaze Kikuzuki Kisaragi Mikazuki Miyuki Mochizuki Murakumo Mutsuki Nagatsuki Nenohi Oboro Satsuki Sazanami Shikinami Shirayuki Ushio Wakaba
Light CruisersIsuzu Jintsuu Kiso Kitakami Kuma Nagara Naka Natori Ooi Ooyodo Sendai Tama Yura
Auxiliary ShipsHayasui
ODestroyer EscortsEtorofu Shimushu
DestroyersAkebono Akigumo Ayanami Fubuki Fujinami Fumizuki Hatsuharu Hatsushimo Hatsuyuki Hibiki Ikazuchi Inazuma Isonami Kikuzuki Kisaragi Makigumo Mikazuki Miyuki Mochizuki Murakumo Mutsuki Naganami Nagatsuki Nenohi Oboro Satsuki Sazanami Shikinami Shirayuki Ushio Wakaba Yuugumo
Light CruisersAbukuma Isuzu Jintsuu Kinu Kiso Kuma Nagara Naka Natori Noshiro Ooyodo Sendai Tama Yura
Heavy CruisersAoba Ashigara Atago Chikuma Choukai Furutaka Haguro Kako Kinugasa Maya Mogami Myoukou Nachi Takao Tone
BattleshipsFusou Hyuuga Ise Yamashiro
Light Aircraft CarriersHiyou Houshou Junyou Ryuujou Shouhou Zuihou
Seaplane TendersChitose Chiyoda
SubmarinesMaruyu


E-2

OoyodoE-2Winter2018.png

The Kurita Fleet's Grand Sortie![4]
威風堂々 出撃!栗田艦隊

Information

  • Event Tag: 2018WinterGreenTag.png Fall2017YellowTag.png

Note: Tags are dependant on the Fleet type you use on the map, for more details check the event guide

Boss: Light Carrier Nu-Class

  • Hard (): 708
  • Medium (): 650
  • Easy (): 420
  • Very Easy (): 420

Key Rewards:

  • Clearing on Hard (): 2x Mamiya, 1x Repair Goddess, Type 2 Depth Charge, 2x Artillery Parts, 1x Blueprint, Hiburi
  • Clearing on Medium (): ?x Mamiya, 1x Repair Goddess, 1x Blueprint, 1x New Type Artillery Armament Materials, Hiburi
  • Clearing on Easy (): 1x Blueprint, 1x New Type Artillery Armament Materials, Hiburi
  • Clearing on Very Easy (): Hiburi
Winter 2018 Event E-2 Banner.png
Winter2018E-2Map.png

Branching rules

E-2 Branching Rules Starting Points
Nodes Rules
Start
1
  • Starting point 2 is not unlocked yet.
  • Do not meet the requirement to start at 2.
2
  • Meet all of the following requirements:
    • Unlock starting point 2.
    • Surface Task Force


E-2 Branching Rules Part 1
Nodes Rules
1
A
  • Do not meet the requirements to go to either B or D.
B
  • Surface Task Force
D
  • Meet all of the following requirements:
    • The 3rd fleet is used for sortie.
    • Everyone in the fleet must have either no tag or the yellow shiplock tag.
A
B
C
  • ???
B
C
  • Do not meet the requirements to go to E.
E
  • Meet all of the following requirements:
    • Amount of Kurita Fleet members ≧ 4/6/8 on Easy/Medium/Hard
    • Surface Task Force
G
H
  • Do not meet the requirements to go to J.
J
  • Meet one of the following requirements:
    • Amount of Nishimura Fleet members ≧ 2/4/6 on Easy/Medium/Hard
    • Very Easy players route straight to J.
H
J
  • Amount of Nishimura Fleet members ≧ 1/3/5 on Easy/Medium/Hard
K
  • Do not meet the requirements to go to J.


E-2 Branching Rules Part 2
Nodes Rules
L
N
  • Do not meet the requirements to go to P.
P
  • Meet all of the following requirements:
    • Surface Task Force
    • Amount of Kurita Fleet members ≧ ?/?/6 on Easy/Medium/Hard
Q
R
  • Do not meet the requirements to go to T.
T
  • Meet all of the following requirements:
    • Surface Task Force
    • Fast Fleet (Hard)
    • Amount of Kurita Fleet members ≧ 4/6/8 on Easy/Medium/Hard

Branching compositions were reported over the course of the event.

Tips

Event Planning

  • This map will utilize the Kurita/Suzuki Fleet (often simply referred to as Kurita) and Nishimura Fleet. All ships used here may be used again in E4, Kurita fleet ships may also be utilized yet again in E6.
    • E4 is a difficult map, and calls for a heavy investment of ships for locking
    • Critically, E5 and E6 call for the Shima fleet, one member of which is 'Abukuma', a key asset in any event. Do consider keeping Abukuma for those maps if possible.
  • E3 utilizes a submarine, saving your best subs is a consideration
  • E3, the Ozawa fleet map, calls for Zuihou, Chitose and Chiyoda as historical options, limiting the number of fast CVLs available

For the most optimal branching, easy, medium, and hard require 3, 4, and 6 Nishimura ships respectively, and 4, 6, and 8 Kurita fleet ships respectively

Tagging Details:

  • Strike forces sortied out in the third fleet will receive the Nishimura tag
  • Single or combined fleets sortied here will receive the Kurita tag
  • On Medium and hard, combined fleets may not include ships with the Nishimura tag

Additional Planning

  • Suzuya, Kumano, Tone and Chikuma are all CAVs who were part of the Kurita fleet, be cautious before using them in the Nishimura fleet (if for some reason, you do not have Mogami and are doing medium)

Map Objectives

The fleet that will be used for the final boss is a combined fleet, with the map itself being relatively simple from the second starting point (2 airstrikes, 2 surface nodes prior to boss)

In order to unlock the second starting point, up to four objectives must be met.

  • Very Easy: Reach Node T
  • Easy: Reach Node T and A+ Node S
  • Med+: Reach Node T and A+ Nodes S, X and Y

Nishimura Fleet Objective: Node S, X, and Y

General base fleet: 2BBV CAV 4DD

Nodes S, X, and Y are reached through going through at least nodes G and M, a sub and air raid node specifically, neither of these nodes is particularly dangerous, with G comprising Ka-flags at worst.

Node S, X, and Y can be reached using the Nishimura fleet (i.e. third fleet strike force). Nodes S and X are PT boat nodes, while Node Y is a combined fleet battle starting at night. For this reason, DDs can be equipped with two guns and skilled lookouts.

The fleet generally utilized for this route is 2BBV (Fusou-class) CAV (most often Mogami), 4DD (Shigure, Michishio, Asagumo, and Yamagumo). As only up to 6 of them are required, feel free to recompose your fleet as required.

An additional option is to add on a submarine as a tank (e.g. 2BBV CAV 3DD SS), PT boats, like destroyers, are capable of ASW and are therefore forced to attack submarines. As the submarine here is only used as a tank to draw fire and is not under serious threat, do not feel pressured to use your best submarines.

Node Y, being a conventional surface battle, calls for the use of anti-surface equipment, conventional double attack setups more than suffice, taking AS to utilize artillery spotting is possible in the day battle phase.

AA guns and skilled lookouts function well as a third slot on DDs for anti PT boat equipment, while Mogami and the Fusous can utilize an AA gun (or secondary gun) with a seaplane bomber against them. Do take the need to fight effectively at Y into consideration before doing so.

Throughout this phase, do consider the use of a (striking force) fleet command to withdraw ships as necessary.


Kurita Fleet Objective: Reach T

General base fleet: 2FBB 2CA(V) 2CVL with CL2DD 2CA CLT/CA

T can be reached in one of two ways: either with a single submarine (or fleet of submarines), or with a conventional surface task force.

The Kurita fleet requires 4, 6, or 8 members of the historical fleet for the best possible path. Use of multiple (O)ASW ships and even ASW land support here should greatly simplify this run.

Alternatively, T can be reached using a single fleet of submarines, this fleet will face ASW challenges at nodes C and I, conventional bomber support to these nodes should be used if required.

Boss Phase

With the second phase unlocked, obtaining the shortest route in this phase requires:

  • Kurita fleet ships in an STF (once again, 4, 6, and 8 respectively)
  • A FAST fleet (Hard Mode only)

Kongou, Haruna, Tone, Chikuma, Maya, Choukai, Suzuya, Kumano, Haguro, Myoukou and Yukikaze offer many options (that list is not exhaustive), the main group of ships that should be avoided here from the Kurita fleet include Nagato and Yamato class ships.

A surface task group here can comprise an escort group of CL2DD 2CA (chosen from the many cruisers available for this map), with the main force comprising 2FBB 2CA(V) 2CVLs. Be cautious not to choose CVLs from the Ozawa fleet, Suzuya and Kumano here are particularly useful as they fulfill both roles at once.

CVLs in this fleet will be mostly called upon to provide fighter power, with (usually) three fighters and a dive bomber, a dive is chosen over a TB in this case to provide shelling power and due to the high amount of enemy AA, consider the use of fighter bombers here.

Likewise, CAVs here can carry seaplane fighters to provide supplementary air power, as always, their seaplane fighters may never be completely depleted, due to the nature of how percentage shootdown works.

As an alternative option, a CV with an additional CAV may be brought in place of the 2 CVLs.

Overall, this map is relatively simple, even on hard, with the most dangerous node being node W, LBAS can safely be sent there, an FCF can be brought safely without compromising fleet capabilities too heavily.


Show/Hide Nodes and Enemy Encounters
Nodes and Enemy Encounters
NodePatternXpNode InfoFormAir
A
深海潜水艦 待伏前衛部隊B群
Pattern 1 Submarine Ka-Class eliteSubmarine Ka-Class eliteSubmarine Ka-Class eliteSubmarine Ka-Class eliteSubmarine Ka-ClassSubmarine Ka-Class
Formation 4: Echelon
Formation 5: Line Abreast
Pattern 2 Submarine Ka-Class eliteSubmarine Ka-Class eliteSubmarine Ka-Class eliteSubmarine Ka-Class elite
Formation 4: Echelon
Formation 5: Line Abreast
Pattern 3 Submarine Ka-Class flagshipSubmarine Ka-Class eliteSubmarine Ka-Class eliteSubmarine Ka-Class eliteSubmarine Ka-Class eliteSubmarine Ka-Class elite
Formation 4: Echelon
B
Pattern 1"Must be my imagination" (battle avoided)
C
深海潜水艦 待伏支援部隊 II群
Pattern 1 Submarine So-Class flagshipSubmarine So-Class eliteSubmarine So-Class eliteLight Cruiser Tsu-Class eliteDestroyer I-Class Late ModelDestroyer I-Class Late Model
Formation 2: Double Line
Formation 4: Echelon
Pattern 2 Submarine So-Class flagshipSubmarine So-Class flagshipSubmarine So-Class flagshipLight Cruiser Tsu-Class eliteDestroyer I-Class Late ModelDestroyer I-Class Late Model
Formation 2: Double Line
D
Pattern 1"Must be my imagination" (battle avoided)
E
深海潜水艦 待伏前衛部隊A群
Pattern 1 Submarine Ka-Class eliteSubmarine Ka-Class eliteSubmarine Ka-Class eliteSubmarine Ka-Class eliteSubmarine Ka-ClassSubmarine Ka-Class
Formation 4: Echelon
Formation 5: Line Abreast
Pattern 2 Submarine Ka-Class flagshipSubmarine Ka-Class flagshipSubmarine Ka-Class flagshipSubmarine Ka-Class flagshipSubmarine Ka-ClassSubmarine Ka-Class
Formation 4: Echelon
Formation 5: Line Abreast
F
深海潜水艦 待伏部隊本隊
Pattern 1 Submarine So-Class eliteSubmarine So-Class eliteSubmarine So-Class eliteSubmarine So-ClassSubmarine So-Class
Formation 4: Echelon
Pattern 2 Submarine So-Class eliteSubmarine So-Class eliteSubmarine So-Class eliteSubmarine So-Class eliteSubmarine So-Class
Formation 4: Echelon
Pattern 3 Submarine So-Class eliteSubmarine So-Class eliteSubmarine So-Class eliteSubmarine So-Class eliteSubmarine So-Class elite
Formation 4: Echelon
Pattern 4 Submarine So-Class flagshipSubmarine So-Class eliteSubmarine So-Class eliteSubmarine So-Class eliteSubmarine So-Class elite
Formation 4: Echelon
G
深海潜水艦 待伏前衛部隊C群
Pattern 1 Submarine Ka-Class flagshipSubmarine Ka-ClassSubmarine Ka-Class
Formation 4: Echelon
Formation 5: Line Abreast
Pattern 2 Submarine Ka-Class flagshipSubmarine Ka-ClassSubmarine Ka-ClassSubmarine Ka-Class
Formation 4: Echelon
Formation 5: Line Abreast
Pattern 3 Submarine Ka-Class flagshipSubmarine Ka-Class flagshipSubmarine Ka-ClassSubmarine Ka-Class
Formation 4: Echelon
H
深海潜水艦 待伏増派部隊
Pattern 1 Submarine So-Class eliteSubmarine So-Class eliteSubmarine So-ClassSubmarine So-Class
Formation 4: Echelon
Formation 5: Line Abreast
Pattern 2 Submarine So-Class eliteSubmarine So-Class eliteSubmarine So-Class eliteSubmarine So-ClassSubmarine So-Class
Formation 4: Echelon
Formation 5: Line Abreast
I
深海潜水艦 待伏支援部隊 I群
Pattern 1 Light Cruiser He-Class flagshipLight Cruiser Tsu-Class eliteDestroyer I-Class Late ModelDestroyer I-Class Late ModelSubmarine So-Class eliteSubmarine So-Class elite
Formation 2: Double Line
Formation 4: Echelon
Pattern 2 Light Cruiser He-Class flagshipLight Cruiser Tsu-Class eliteDestroyer I-Class Late ModelDestroyer I-Class Late ModelSubmarine So-Class flagshipSubmarine So-Class flagship
Formation 2: Double Line
J
Pattern 1"Must be my imagination" (battle avoided)
K
深海任務部隊 艦載機群
Air Battle Node
Pattern 1 Aircraft Carrier PrincessLight Cruiser Tsu-Class eliteDestroyer Ha-Class Late ModelDestroyer Ha-Class Late ModelDestroyer Ha-Class Late ModelDestroyer Ha-Class Late Model
Formation 3: Diamond
AP:103
AS:231
AS+:462
Pattern 2 Aircraft Carrier PrincessLight Carrier Nu-Class eliteLight Cruiser Tsu-Class eliteDestroyer Ha-Class Late ModelDestroyer Ha-Class Late ModelDestroyer Ha-Class Late Model
Formation 3: Diamond
AP:149
AS:335
AS+:669
Pattern 3 Aircraft Carrier PrincessLight Carrier Nu-Class eliteLight Carrier Nu-Class eliteLight Cruiser Tsu-Class eliteDestroyer Ha-Class Late ModelDestroyer Ha-Class Late Model
Formation 3: Diamond
AP:195
AS:438
AS+:876
L
Pattern 1"Must be my imagination" (battle avoided)
M
深海任務部隊 艦載機群
Air Battle Node
Pattern 1 Light Carrier Nu-Class flagshipLight Carrier Nu-Class eliteLight Carrier Nu-Class eliteLight Cruiser Tsu-Class eliteDestroyer Ha-Class Late ModelDestroyer Ha-Class Late Model
Formation 3: Diamond
AP:84
AS:188
AS+:375
Pattern 2 Light Carrier Nu-Class flagshipLight Carrier Nu-Class eliteLight Carrier Nu-Class eliteLight Cruiser Tsu-Class eliteDestroyer Ha-Class Late ModelDestroyer Ha-Class Late Model
Formation 3: Diamond
AP:114
AS:255
AS+:510
Pattern 3 Light Carrier Nu-Class flagshipLight Carrier Nu-Class eliteLight Carrier Nu-Class eliteLight Cruiser Tsu-Class eliteDestroyer Ha-Class Late ModelDestroyer Ha-Class Late Model
Formation 3: Diamond
AP:144
AS:323
AS+:645
N
深海潜水艦 第二待伏部隊
Pattern 1 Submarine So-Class eliteSubmarine So-Class eliteSubmarine So-Class eliteSubmarine So-ClassSubmarine So-Class
Formation 4: Echelon
Pattern 2 Submarine So-Class eliteSubmarine So-Class eliteSubmarine So-Class eliteSubmarine So-Class eliteSubmarine So-Class elite
Formation 4: Echelon
Pattern 3 Submarine So-Class flagshipSubmarine So-Class eliteSubmarine So-Class eliteSubmarine So-Class eliteSubmarine So-Class elite
Formation 4: Echelon
Pattern 4 Submarine So-Class flagshipSubmarine So-Class flagshipSubmarine So-Class eliteSubmarine So-Class eliteSubmarine So-Class elite
Formation 4: Echelon
O
Pattern 1"Must be my imagination" (battle avoided)
P
Pattern 1"Must be my imagination" (battle avoided)
Q
Pattern 1"Must be my imagination" (battle avoided)
R
深海任務部隊 艦載機群
Air Battle Node
Pattern 1 Aircraft Carrier PrincessLight Carrier Nu-Class flagshipLight Cruiser Tsu-Class eliteDestroyer Ha-Class Late ModelDestroyer Ha-Class Late ModelDestroyer Ha-Class Late Model
Formation 3: Diamond
AP:166
AS:372
AS+:744
Pattern 2 Aircraft Carrier PrincessLight Carrier Nu-Class flagshipLight Carrier Nu-Class flagshipLight Cruiser Tsu-Class eliteDestroyer Ha-Class Late ModelDestroyer Ha-Class Late Model
Formation 3: Diamond
AP:228
AS:513
AS+:1026
Pattern 3 Aircraft Carrier PrincessLight Carrier Nu-Class flagshipLight Carrier Nu-Class flagshipLight Carrier Nu-Class flagshipDestroyer Ha-Class Late ModelDestroyer Ha-Class Late Model
Formation 3: Diamond
AP:291
AS:654
AS+:1308
S
深棲棲艦 島嶼配備PT部隊
Night Battle Node
Pattern 1 PT Imp GroupPT Imp GroupPT Imp GroupPT Imp GroupPT Imp Group
Formation 1: Line Ahead
Formation 4: Echelon
Pattern 2 PT Imp GroupPT Imp GroupPT Imp GroupPT Imp GroupPT Imp GroupPT Imp Group
Formation 1: Line Ahead
T
深海任務部隊 艦載機群
Air Battle Node
Pattern 1 Aircraft Carrier PrincessLight Carrier Nu-Class eliteLight Cruiser Tsu-Class eliteDestroyer Ha-Class Late ModelDestroyer Ha-Class Late ModelDestroyer Ha-Class Late Model
Formation 3: Diamond
AP:149
AS:335
AS+:669
Pattern 2 Aircraft Carrier PrincessLight Carrier Nu-Class eliteLight Carrier Nu-Class eliteLight Cruiser Tsu-Class eliteDestroyer Ha-Class Late ModelDestroyer Ha-Class Late Model
Formation 3: Diamond
AP:195
AS:438
AS+:876
Pattern 3 Aircraft Carrier PrincessLight Carrier Nu-Class flagshipLight Carrier Nu-Class flagshipLight Cruiser Tsu-Class eliteDestroyer Ha-Class Late ModelDestroyer Ha-Class Late Model
Formation 3: Diamond
AP:228
AS:513
AS+:1026
U
深海任務部隊 艦載機群
Air Battle Node
Pattern 1 Light Carrier Nu-Class flagshipLight Carrier Nu-Class eliteLight Carrier Nu-Class eliteLight Cruiser Tsu-Class eliteDestroyer Ha-Class Late ModelDestroyer Ha-Class Late Model
Formation 3: Diamond
AP:192
AS:432
AS+:864
Pattern 2 Light Carrier Nu-Class flagshipLight Carrier Nu-Class flagshipLight Carrier Nu-Class flagshipLight Cruiser Tsu-Class eliteDestroyer Ha-Class Late ModelDestroyer Ha-Class Late Model
Formation 3: Diamond
AP:226
AS:507
AS+:1014
Pattern 3 Light Carrier Nu-Class flagshipLight Carrier Nu-Class flagshipLight Carrier Nu-Class flagshipLight Carrier Nu-Class flagshipDestroyer Ha-Class Late ModelDestroyer Ha-Class Late Model
Formation 3: Diamond
AP:288
AS:648
AS+:1296
V
深海任務部隊 護衛艦艇群
Pattern 1 Light Cruiser He-Class flagshipLight Cruiser Tsu-Class eliteLight Cruiser Tsu-Class eliteDestroyer Ha-Class Late Model eliteDestroyer Ha-Class Late Model eliteDestroyer Ha-Class Late Model elite
Formation 1: Line Ahead
Pattern 2 Light Cruiser He-Class flagshipLight Cruiser Tsu-Class eliteDestroyer Ha-Class Late Model eliteDestroyer Ha-Class Late Model eliteDestroyer Ha-Class Late ModelDestroyer Ha-Class Late Model
Formation 1: Line Ahead
Formation 2: Double Line
W
深海任務部隊 護衛空母群
Pattern 1 Light Carrier Nu-Class flagshipLight Carrier Nu-Class flagshipBattleship Ru-Class flagshipLight Cruiser Tsu-Class eliteDestroyer Ha-Class Late ModelDestroyer Ha-Class Late Model
Formation 1: Line Ahead
Formation 3: Diamond
AP:126
AS:282
AS+:564
Pattern 2 Light Carrier Nu-Class flagshipLight Carrier Nu-Class flagshipBattleship Ru-Class Kai flagshipLight Cruiser Tsu-Class eliteDestroyer Ha-Class Late Model eliteDestroyer Ha-Class Late Model elite
Formation 1: Line Ahead
AP:126
AS:282
AS+:564
X
深棲棲艦 海峡配備水雷戦隊
Night Battle Node
Pattern 1 Destroyer Ro-Class Late ModelDestroyer Ro-Class Late ModelDestroyer Ro-Class Late ModelDestroyer Ro-Class Late ModelPT Imp GroupPT Imp Group
Formation 1: Line Ahead
Formation 4: Echelon
Pattern 2 Destroyer Ro-Class Late ModelDestroyer Ro-Class Late ModelDestroyer Ro-Class Late ModelDestroyer Ro-Class Late ModelPT Imp GroupPT Imp Group
Formation 1: Line Ahead
Y
深棲棲艦 海峡旧式戦艦部隊
Enemy Combined Fleet
Night to Day Battle Node
Pattern 1
main fleet
Battleship Ru-Class flagshipBattleship Ru-Class flagshipBattleship Ru-Class flagshipBattleship Ru-Class flagshipBattleship Ru-Class eliteBattleship Ru-Class elite
escort fleet
Heavy Cruiser Ri-Class flagshipHeavy Cruiser Ri-Class flagshipDestroyer Ro-Class Late ModelDestroyer Ro-Class Late ModelDestroyer I-ClassDestroyer I-Class
Cruising Formation 4: Battle Formation
Pattern 2
Final Form
main fleet
Battleship Ru-Class flagshipBattleship Ru-Class flagshipBattleship Ru-Class flagshipBattleship Ru-Class flagshipBattleship Ru-Class flagshipBattleship Ru-Class flagship
escort fleet
Heavy Cruiser Ri-Class flagshipHeavy Cruiser Ri-Class flagshipDestroyer Ro-Class Late ModelDestroyer Ro-Class Late ModelDestroyer Ro-Class Late ModelDestroyer Ro-Class Late Model
Cruising Formation 4: Battle Formation
Z
深海任務部隊 護衛空母群
Enemy Combined Fleet
Pattern 1
main fleet
Light Carrier Nu-Class flagshipLight Carrier Nu-Class eliteLight Carrier Nu-Class eliteBattleship Ru-Class flagshipDestroyer Ha-Class Late ModelDestroyer Ha-Class Late Model
escort fleet
Light Cruiser He-Class flagshipLight Cruiser Tsu-Class eliteDestroyer Ha-Class Late ModelDestroyer Ha-Class Late ModelDestroyer Ha-Class Late ModelDestroyer Ha-Class Late Model
Cruising Formation 4: Battle Formation
AP:192
AS:432
AS+:864
Pattern 2
Final Form
main fleet
Light Carrier Nu-Class flagshipLight Carrier Nu-Class eliteLight Carrier Nu-Class eliteBattleship Ru-Class Kai flagshipDestroyer Ha-Class Late Model eliteDestroyer Ha-Class Late Model elite
escort fleet
Light Cruiser He-Class flagshipLight Cruiser Tsu-Class eliteDestroyer Ha-Class Late Model eliteDestroyer Ha-Class Late Model eliteDestroyer Ha-Class Late Model eliteDestroyer Ha-Class Late Model elite
Cruising Formation 4: Battle Formation
AP:192
AS:432
AS+:864

Show/Hide Nodes and Enemy Encounters
Nodes and Enemy Encounters
NodePatternXpNode InfoFormAir
A
深海潜水艦 待伏前衛部隊B群
Pattern 1 Submarine Ka-Class eliteSubmarine Ka-Class eliteSubmarine Ka-ClassSubmarine Ka-Class
Formation 4: Echelon
Formation 5: Line Abreast
Pattern 2 Submarine Ka-Class eliteSubmarine Ka-Class eliteSubmarine Ka-Class eliteSubmarine Ka-Class elite
Formation 4: Echelon
Formation 5: Line Abreast
Pattern 3 Submarine Ka-Class eliteSubmarine Ka-Class eliteSubmarine Ka-Class eliteSubmarine Ka-Class eliteSubmarine Ka-ClassSubmarine Ka-Class
Formation 5: Line Abreast
B
Pattern 1"Must be my imagination" (battle avoided)
C
深海潜水艦 待伏支援部隊 II群
Pattern 1 Submarine So-Class eliteSubmarine So-ClassSubmarine So-ClassLight Cruiser Tsu-ClassDestroyer I-ClassDestroyer I-Class
Formation 2: Double Line
Formation 4: Echelon
Pattern 2 Submarine So-Class eliteSubmarine So-Class eliteSubmarine So-Class eliteLight Cruiser Tsu-ClassDestroyer I-ClassDestroyer I-Class
Formation 2: Double Line
D
Pattern 1"Must be my imagination" (battle avoided)
E
深海潜水艦 待伏前衛部隊A群
Pattern 1 Submarine Ka-Class eliteSubmarine Ka-Class eliteSubmarine Ka-ClassSubmarine Ka-ClassSubmarine Ka-Class
Formation 4: Echelon
Formation 5: Line Abreast
Pattern 2 Submarine Ka-Class eliteSubmarine Ka-Class eliteSubmarine Ka-Class eliteSubmarine Ka-ClassSubmarine Ka-ClassSubmarine Ka-Class
Formation 4: Echelon
Formation 5: Line Abreast
Pattern 3 Submarine Ka-Class eliteSubmarine Ka-Class eliteSubmarine Ka-Class eliteSubmarine Ka-Class eliteSubmarine Ka-ClassSubmarine Ka-Class
Formation 4: Echelon
Formation 5: Line Abreast
F
深海潜水艦 待伏部隊本隊
Pattern 1 Submarine So-Class eliteSubmarine So-ClassSubmarine So-ClassSubmarine So-Class
Formation 4: Echelon
Pattern 2 Submarine So-Class eliteSubmarine So-Class eliteSubmarine So-ClassSubmarine So-ClassSubmarine So-Class
Formation 4: Echelon
Pattern 3 Submarine So-Class eliteSubmarine So-Class eliteSubmarine So-Class eliteSubmarine So-ClassSubmarine So-Class
Formation 4: Echelon
G
深海潜水艦 待伏前衛部隊C群
Pattern 1 Submarine Ka-Class eliteSubmarine Ka-ClassSubmarine Ka-Class
Formation 4: Echelon
Formation 5: Line Abreast
Pattern 2 Submarine Ka-Class flagshipSubmarine Ka-ClassSubmarine Ka-Class
Formation 4: Echelon
Formation 5: Line Abreast
H
深海潜水艦 待伏増派部隊
Pattern 1 Submarine So-Class eliteSubmarine So-ClassSubmarine So-Class
Formation 4: Echelon
Formation 5: Line Abreast
Pattern 2 Submarine So-Class eliteSubmarine So-ClassSubmarine So-ClassSubmarine So-Class
Formation 4: Echelon
Formation 5: Line Abreast
Pattern 3 Submarine So-Class eliteSubmarine So-Class eliteSubmarine So-ClassSubmarine So-Class
Formation 4: Echelon
Formation 5: Line Abreast
I
深海潜水艦 待伏支援部隊 I群
Pattern 1 Light Cruiser Ho-Class flagshipLight Cruiser Tsu-ClassDestroyer I-ClassDestroyer I-ClassSubmarine So-ClassSubmarine So-Class
Formation 2: Double Line
Formation 4: Echelon
Pattern 2 Light Cruiser Ho-Class flagshipLight Cruiser Tsu-ClassDestroyer I-ClassDestroyer I-ClassSubmarine So-Class eliteSubmarine So-Class elite
Formation 2: Double Line
J
Pattern 1"Must be my imagination" (battle avoided)
K
深海任務部隊 艦載機群
Air Battle Node
Pattern 1 Aircraft Carrier PrincessLight Cruiser Tsu-ClassDestroyer Ro-Class Late ModelDestroyer Ro-Class Late ModelDestroyer Ro-Class Late ModelDestroyer Ro-Class Late Model
Formation 3: Diamond
AP:103
AS:231
AS+:462
Pattern 2 Aircraft Carrier PrincessLight Carrier Nu-Class eliteLight Cruiser Tsu-ClassDestroyer Ro-Class Late ModelDestroyer Ro-Class Late ModelDestroyer Ro-Class Late Model
Formation 3: Diamond
AP:119
AS:267
AS+:534
Pattern 3 Aircraft Carrier PrincessLight Carrier Nu-Class eliteLight Carrier Nu-Class eliteLight Cruiser Tsu-ClassDestroyer Ro-Class Late ModelDestroyer Ro-Class Late Model
Formation 3: Diamond
AP:135
AS:303
AS+:606
L
Pattern 1"Must be my imagination" (battle avoided)
M
深海任務部隊 艦載機群
Air Battle Node
Pattern 1 Light Carrier Nu-Class flagshipLight Carrier Nu-ClassLight Carrier Nu-ClassLight Cruiser Tsu-ClassDestroyer Ro-Class Late ModelDestroyer Ro-Class Late Model
Formation 3: Diamond
AP:62
AS:140
AS+:279
Pattern 2 Light Carrier Nu-Class flagshipLight Carrier Nu-Class eliteLight Carrier Nu-ClassLight Cruiser Tsu-ClassDestroyer Ro-Class Late ModelDestroyer Ro-Class Late Model
Formation 3: Diamond
AP:73
AS:164
AS+:327
Pattern 3 Light Carrier Nu-Class flagshipLight Carrier Nu-Class eliteLight Carrier Nu-Class eliteLight Cruiser Tsu-ClassDestroyer Ro-Class Late ModelDestroyer Ro-Class Late Model
Formation 3: Diamond
AP:84
AS:188
AS+:375
N
深海潜水艦 第二待伏部隊
Pattern 1 Submarine So-Class eliteSubmarine So-ClassSubmarine So-ClassSubmarine So-Class
Formation 4: Echelon
Pattern 2 Submarine So-Class eliteSubmarine So-Class eliteSubmarine So-ClassSubmarine So-ClassSubmarine So-Class
Formation 4: Echelon
Pattern 3 Submarine So-Class eliteSubmarine So-Class eliteSubmarine So-ClassSubmarine So-Class
Formation 4: Echelon
Pattern 4 Submarine So-Class eliteSubmarine So-Class eliteSubmarine So-Class eliteSubmarine So-ClassSubmarine So-Class
Formation 4: Echelon
O
Pattern 1"Must be my imagination" (battle avoided)
P
Pattern 1"Must be my imagination" (battle avoided)
Q
Pattern 1"Must be my imagination" (battle avoided)
R
深海任務部隊 艦載機群
Air Battle Node
Pattern 1 Aircraft Carrier PrincessLight Carrier Nu-Class eliteLight Cruiser Tsu-ClassDestroyer Ro-Class Late ModelDestroyer Ro-Class Late ModelDestroyer Ro-Class Late Model
Formation 3: Diamond
AP:149
AS:335
AS+:669
Pattern 2 Aircraft Carrier PrincessLight Carrier Nu-Class eliteLight Carrier Nu-Class eliteLight Cruiser Tsu-ClassDestroyer Ro-Class Late ModelDestroyer Ro-Class Late Model
Formation 3: Diamond
AP:195
AS:438
AS+:876
Pattern 3 Aircraft Carrier PrincessLight Carrier Nu-Class eliteLight Carrier Nu-Class eliteLight Carrier Nu-Class eliteDestroyer Ro-Class Late ModelDestroyer Ro-Class Late Model
Formation 3: Diamond
AP:241
AS:542
AS+:1083
S
深棲棲艦 島嶼配備PT部隊
Night Battle Node
Pattern 1 PT Imp GroupPT Imp GroupPT Imp GroupPT Imp Group
Formation 1: Line Ahead
Formation 4: Echelon
Pattern 2 PT Imp GroupPT Imp GroupPT Imp GroupPT Imp GroupPT Imp Group
Formation 1: Line Ahead
T
深海任務部隊 艦載機群
Air Battle Node
Pattern 1 Aircraft Carrier PrincessLight Carrier Nu-Class eliteLight Cruiser Tsu-ClassDestroyer Ro-Class Late ModelDestroyer Ro-Class Late ModelDestroyer Ro-Class Late Model
Formation 3: Diamond
AP:119
AS:267
AS+:534
Pattern 2 Aircraft Carrier PrincessLight Carrier Nu-Class eliteLight Carrier Nu-Class eliteLight Cruiser Tsu-ClassDestroyer Ro-Class Late ModelDestroyer Ro-Class Late Model
Formation 3: Diamond
AP:149
AS:335
AS+:669
Pattern 3 Aircraft Carrier PrincessLight Carrier Nu-Class eliteLight Cruiser Tsu-ClassDestroyer Ro-Class Late ModelDestroyer Ro-Class Late ModelDestroyer Ro-Class Late Model
Formation 3: Diamond
AP:165
AS:371
AS+:741
U
深海任務部隊 艦載機群
Air Battle Node
Pattern 1 Light Carrier Nu-Class flagshipLight Carrier Nu-Class eliteLight Carrier Nu-Class eliteLight Cruiser Tsu-ClassDestroyer Ro-Class Late ModelDestroyer Ro-Class Late Model
Formation 3: Diamond
AP:132
AS:297
AS+:594
Pattern 2 Light Carrier Nu-Class flagshipLight Carrier Nu-Class eliteLight Carrier Nu-Class eliteLight Cruiser Tsu-ClassDestroyer Ro-Class Late ModelDestroyer Ro-Class Late Model
Formation 3: Diamond
AP:192
AS:432
AS+:864
Pattern 3 Light Carrier Nu-Class flagshipLight Carrier Nu-Class eliteLight Carrier Nu-Class eliteLight Carrier Nu-Class eliteDestroyer Ro-Class Late ModelDestroyer Ro-Class Late Model
Formation 3: Diamond
AP:238
AS:536
AS+:1071
V
深海任務部隊 護衛艦艇群
Pattern 1 Light Cruiser Ho-Class flagshipLight Cruiser Tsu-Class eliteDestroyer Ro-Class Late ModelDestroyer Ro-Class Late ModelDestroyer I-ClassDestroyer I-Class
Formation 1: Line Ahead
Formation 2: Double Line
Pattern 2 Light Cruiser Ho-Class flagshipLight Cruiser Tsu-Class eliteDestroyer Ro-Class Late ModelDestroyer Ro-Class Late ModelDestroyer Ro-Class Late ModelDestroyer Ro-Class Late Model
Formation 2: Double Line
W
深海任務部隊 護衛空母群
Pattern 1 Light Carrier Nu-Class eliteLight Carrier Nu-Class eliteBattleship Ru-Class flagshipDestroyer Ro-Class Late ModelDestroyer Ro-Class Late ModelDestroyer I-Class
Formation 1: Line Ahead
Formation 3: Diamond
AP:92
AS:207
AS+:414
Pattern 2 Light Carrier Nu-Class eliteLight Carrier Nu-Class eliteBattleship Ru-Class flagshipLight Cruiser Tsu-ClassDestroyer Ro-Class Late ModelDestroyer Ro-Class Late Model
Formation 1: Line Ahead
AP:92
AS:207
AS+:414
X
深棲棲艦 海峡配備水雷戦隊
Night Battle Node
Pattern 1 Destroyer Ro-Class Late ModelDestroyer Ro-Class Late ModelDestroyer I-ClassDestroyer I-ClassPT Imp GroupPT Imp Group
Formation 1: Line Ahead
Formation 4: Echelon
Pattern 2 Destroyer Ro-Class Late ModelDestroyer Ro-Class Late ModelDestroyer I-ClassDestroyer I-ClassPT Imp GroupPT Imp Group
Formation 2: Double Line
Y
深棲棲艦 海峡旧式戦艦部隊
Enemy Combined Fleet
Night to Day Battle Node
Pattern 1
main fleet
Battleship Ru-Class flagshipBattleship Ru-Class flagshipBattleship Ru-Class eliteBattleship Ru-Class eliteBattleship Ru-Class eliteBattleship Ru-Class elite
escort fleet
Heavy Cruiser Ri-Class flagshipDestroyer Ro-Class Late ModelDestroyer Ro-Class Late ModelDestroyer I-ClassDestroyer I-ClassDestroyer I-Class
Cruising Formation 4: Battle Formation
Pattern 2
Final Form
main fleet
Battleship Ru-Class flagshipBattleship Ru-Class flagshipBattleship Ru-Class flagshipBattleship Ru-Class eliteBattleship Ru-Class eliteBattleship Ru-Class elite
escort fleet
Heavy Cruiser Ri-Class flagshipHeavy Cruiser Ri-Class flagshipDestroyer Ro-Class Late ModelDestroyer Ro-Class Late ModelDestroyer I-ClassDestroyer I-Class
Cruising Formation 4: Battle Formation
Z
深海任務部隊 護衛空母群
Enemy Combined Fleet
Pattern 1
main fleet
Light Carrier Nu-Class eliteLight Carrier Nu-Class eliteLight Carrier Nu-Class eliteBattleship Ru-Class flagshipDestroyer Ro-Class Late ModelDestroyer Ro-Class Late Model
escort fleet
Light Cruiser Ho-Class flagshipLight Cruiser Tsu-ClassDestroyer Ro-Class Late ModelDestroyer I-ClassDestroyer I-ClassDestroyer I-Class
Cruising Formation 4: Battle Formation
AP:120
AS:270
AS+:540
Pattern 2
Final Form
main fleet
Light Carrier Nu-Class eliteLight Carrier Nu-Class eliteLight Carrier Nu-Class eliteBattleship Ru-Class flagshipDestroyer Ro-Class Late ModelDestroyer Ro-Class Late Model
escort fleet
Light Cruiser Ho-Class flagshipLight Cruiser Tsu-ClassDestroyer Ro-Class Late ModelDestroyer Ro-Class Late ModelDestroyer I-ClassDestroyer I-Class
Cruising Formation 4: Battle Formation
AP:180
AS:405
AS+:810

Show/Hide Nodes and Enemy Encounters
Nodes and Enemy Encounters
NodePatternXpNode InfoFormAir
A
深海潜水艦 待伏前衛部隊B群
Pattern 1 Submarine Ka-Class eliteSubmarine Ka-ClassSubmarine Ka-ClassSubmarine Ka-Class
Formation 4: Echelon
Formation 5: Line Abreast
Pattern 2 Submarine Ka-Class eliteSubmarine Ka-Class eliteSubmarine Ka-ClassSubmarine Ka-Class
Formation 4: Echelon
Formation 5: Line Abreast
B
Pattern 1"Must be my imagination" (battle avoided)
C
深海潜水艦 待伏支援部隊 II群
Pattern 1 Submarine So-ClassSubmarine So-ClassSubmarine So-ClassLight Cruiser Tsu-ClassDestroyer I-ClassDestroyer I-Class
Formation 2: Double Line
Pattern 2 Submarine So-ClassSubmarine So-ClassLight Cruiser Tsu-ClassDestroyer I-ClassDestroyer I-ClassDestroyer I-Class
Formation 2: Double Line
Formation 4: Echelon
D
Pattern 1"Must be my imagination" (battle avoided)
E
深海潜水艦 待伏前衛部隊A群
Pattern 1 Submarine Ka-Class eliteSubmarine Ka-ClassSubmarine Ka-ClassSubmarine Ka-Class
Formation 4: Echelon
Pattern 2 Submarine Ka-Class eliteSubmarine Ka-Class eliteSubmarine Ka-ClassSubmarine Ka-ClassSubmarine Ka-Class
Formation 4: Echelon
Formation 5: Line Abreast
F
深海潜水艦 待伏部隊本隊
Pattern 1 Submarine So-ClassSubmarine So-ClassSubmarine So-Class
Formation 4: Echelon
Pattern 2 Submarine So-ClassSubmarine So-ClassSubmarine So-ClassSubmarine So-Class
Formation 4: Echelon
Pattern 3 Submarine So-Class eliteSubmarine So-ClassSubmarine So-ClassSubmarine So-Class
Formation 4: Echelon
Pattern 4 Submarine So-Class eliteSubmarine So-ClassSubmarine So-ClassSubmarine So-ClassSubmarine So-Class
Formation 4: Echelon
G
深海潜水艦 待伏前衛部隊C群
Pattern 1 Submarine Ka-ClassSubmarine Ka-ClassSubmarine Ka-Class
Formation 4: Echelon
Formation 5: Line Abreast
Pattern 2 Submarine Ka-Class eliteSubmarine Ka-ClassSubmarine Ka-Class
Formation 4: Echelon
Formation 5: Line Abreast
H
深海潜水艦 待伏増派部隊
Pattern 1 Submarine So-ClassSubmarine So-ClassSubmarine So-Class
Formation 4: Echelon
Pattern 2 Submarine So-Class eliteSubmarine So-ClassSubmarine So-Class
Formation 4: Echelon
Formation 5: Line Abreast
Pattern 3 Submarine So-Class eliteSubmarine So-ClassSubmarine So-ClassSubmarine So-Class
Formation 4: Echelon
Formation 5: Line Abreast
I
深海潜水艦 待伏支援部隊 I群
Pattern 1 Light Cruiser Ho-Class eliteLight Cruiser Tsu-ClassDestroyer I-ClassDestroyer I-ClassSubmarine So-Class
Formation 2: Double Line
Pattern 2 Light Cruiser Ho-Class eliteLight Cruiser Tsu-ClassDestroyer I-ClassSubmarine So-Class
Formation 2: Double Line
Formation 4: Echelon
Pattern 3 Light Cruiser Ho-Class flagshipLight Cruiser Tsu-ClassDestroyer I-ClassDestroyer I-ClassSubmarine So-ClassSubmarine So-Class
Formation 4: Echelon
J
Pattern 1"Must be my imagination" (battle avoided)
K
深海任務部隊 艦載機群
Air Battle Node
Pattern 1 Light Carrier Nu-Class flagshipLight Cruiser Tsu-ClassDestroyer I-Class Late ModelDestroyer I-Class Late ModelDestroyer I-ClassDestroyer I-Class
Formation 3: Diamond
AP:52
AS:116
AS+:231
Pattern 2 Aircraft Carrier PrincessLight Cruiser Tsu-ClassDestroyer I-Class Late ModelDestroyer I-Class Late ModelDestroyer I-ClassDestroyer I-Class
Formation 3: Diamond
AP:86
AS:194
AS+:387
Pattern 3 Aircraft Carrier PrincessLight Carrier Nu-Class eliteLight Cruiser Tsu-ClassDestroyer I-Class Late ModelDestroyer I-ClassDestroyer I-Class
Formation 3: Diamond
AP:102
AS:230
AS+:459
L
Pattern 1"Must be my imagination" (battle avoided)
M
深海任務部隊 艦載機群
Air Battle Node
Pattern 1 Light Carrier Nu-Class eliteLight Carrier Nu-ClassLight Carrier Nu-ClassLight Cruiser Tsu-ClassDestroyer I-ClassDestroyer I-Class
Formation 3: Diamond
AP:27
AS:60
AS+:120
Pattern 2 Light Carrier Nu-Class eliteLight Carrier Nu-ClassLight Carrier Nu-ClassLight Cruiser Tsu-ClassDestroyer I-ClassDestroyer I-Class
Formation 3: Diamond
AP:57
AS:128
AS+:255
Pattern 3 Light Carrier Nu-Class eliteLight Carrier Nu-Class eliteLight Carrier Nu-Class eliteLight Cruiser Tsu-ClassDestroyer I-ClassDestroyer I-Class
Formation 3: Diamond
AP:78
AS:176
AS+:351
N
深海潜水艦 第二待伏部隊
Pattern 1 Submarine So-ClassSubmarine So-ClassSubmarine So-Class
Formation 4: Echelon
Pattern 2 Submarine So-ClassSubmarine So-ClassSubmarine So-ClassSubmarine So-Class
Formation 4: Echelon
Pattern 3 Submarine So-Class eliteSubmarine So-ClassSubmarine So-ClassSubmarine So-Class
Formation 4: Echelon
Pattern 4 Submarine So-Class eliteSubmarine So-Class eliteSubmarine So-ClassSubmarine So-Class
Formation 4: Echelon
O
Pattern 1"Must be my imagination" (battle avoided)
P
Pattern 1"Must be my imagination" (battle avoided)
Q
Pattern 1"Must be my imagination" (battle avoided)
R
深海任務部隊 艦載機群
Air Battle Node
Pattern 1 Aircraft Carrier PrincessLight Cruiser Tsu-ClassDestroyer I-Class Late ModelDestroyer I-ClassDestroyer I-ClassDestroyer I-Class
Formation 3: Diamond
AP:86
AS:194
AS+:387
Pattern 2 Aircraft Carrier PrincessLight Carrier Nu-Class eliteLight Cruiser Tsu-ClassDestroyer I-Class Late ModelDestroyer I-ClassDestroyer I-Class
Formation 3: Diamond
AP:132
AS:297
AS+:594
Pattern 3 Aircraft Carrier PrincessLight Carrier Nu-Class eliteLight Carrier Nu-Class eliteDestroyer I-Class Late ModelDestroyer I-ClassDestroyer I-Class
Formation 3: Diamond
AP:178
AS:401
AS+:801
S
深棲棲艦 島嶼配備PT部隊
Night Battle Node
Pattern 1 PT Imp GroupPT Imp GroupPT Imp GroupPT Imp Group
Formation 1: Line Ahead
Formation 4: Echelon
Pattern 2 PT Imp GroupPT Imp GroupPT Imp GroupPT Imp Group
Formation 1: Line Ahead
T
深海任務部隊 艦載機群
Air Battle Node
Pattern 1 Aircraft Carrier PrincessLight Cruiser Tsu-ClassDestroyer I-Class Late ModelDestroyer I-ClassDestroyer I-ClassDestroyer I-Class
Formation 3: Diamond
AP:86
AS:194
AS+:387
Pattern 2 Aircraft Carrier PrincessLight Carrier Nu-Class eliteLight Cruiser Tsu-ClassDestroyer I-Class Late ModelDestroyer I-ClassDestroyer I-Class
Formation 3: Diamond
AP:102
AS:230
AS+:459
Pattern 3 Aircraft Carrier PrincessLight Carrier Nu-Class eliteLight Carrier Nu-Class eliteDestroyer I-Class Late ModelDestroyer I-ClassDestroyer I-Class
Formation 3: Diamond
AP:118
AS:266
AS+:531
U
深海任務部隊 艦載機群
Air Battle Node
Pattern 1 Light Carrier Nu-Class eliteLight Carrier Nu-Class eliteLight Cruiser Tsu-ClassDestroyer I-Class Late ModelDestroyer I-ClassDestroyer I-Class
Formation 3: Diamond
AP:104
AS:234
AS+:468
Pattern 2 Light Carrier Nu-Class eliteLight Carrier Nu-Class eliteLight Carrier Nu-Class eliteLight Cruiser Tsu-ClassDestroyer I-Class Late ModelDestroyer I-Class
Formation 3: Diamond
AP:120
AS:270
AS+:540
Pattern 3 Light Carrier Nu-Class eliteLight Carrier Nu-Class eliteLight Carrier Nu-Class eliteLight Carrier Nu-Class eliteDestroyer I-Class Late ModelDestroyer I-Class Late Model
Formation 3: Diamond
AP:166
AS:374
AS+:747
V
深海任務部隊 護衛艦艇群
Pattern 1 Light Cruiser Ho-Class flagshipLight Cruiser Tsu-ClassDestroyer I-Class Late ModelDestroyer I-ClassDestroyer I-ClassDestroyer I-Class
Formation 2: Double Line
Pattern 2 Light Cruiser Ho-Class flagshipLight Cruiser Tsu-ClassDestroyer I-Class Late ModelDestroyer I-Class Late ModelDestroyer I-ClassDestroyer I-Class
Formation 1: Line Ahead
Formation 2: Double Line
W
深海任務部隊 護衛空母群
Pattern 1 Light Carrier Nu-Class eliteBattleship Ru-Class flagshipDestroyer I-Class Late ModelDestroyer I-ClassDestroyer I-ClassDestroyer I-Class
Formation 1: Line Ahead
Formation 3: Diamond
AP:46
AS:104
AS+:207
Pattern 2 Light Carrier Nu-Class eliteBattleship Ru-Class flagshipDestroyer I-Class Late ModelDestroyer I-Class Late ModelDestroyer I-ClassDestroyer I-Class
Formation 1: Line Ahead
AP:46
AS:104
AS+:207
X
深棲棲艦 海峡配備水雷戦隊
Night Battle Node
Pattern 1 Destroyer I-Class Late ModelDestroyer I-ClassDestroyer I-ClassDestroyer I-ClassPT Imp GroupPT Imp Group
Formation 1: Line Ahead
Formation 4: Echelon
Pattern 2 Destroyer I-Class Late ModelDestroyer I-Class Late ModelDestroyer I-ClassDestroyer I-ClassPT Imp GroupPT Imp Group
Formation 1: Line Ahead
Y
深棲棲艦 海峡旧式戦艦部隊
Enemy Combined Fleet
Night to Day Battle Node
Pattern 1
main fleet
Battleship Ru-Class eliteBattleship Ru-Class eliteBattleship Ru-Class eliteBattleship Ru-Class eliteBattleship Ru-Class eliteBattleship Ru-Class elite
escort fleet
Heavy Cruiser Ri-Class eliteHeavy Cruiser Ri-Class eliteDestroyer I-Class Late ModelDestroyer I-Class Late ModelDestroyer I-ClassDestroyer I-Class
Cruising Formation 4: Battle Formation
Pattern 2
Final Form
main fleet
Battleship Ru-Class flagshipBattleship Ru-Class eliteBattleship Ru-Class eliteBattleship Ru-Class eliteBattleship Ru-Class eliteBattleship Ru-Class elite
escort fleet
Heavy Cruiser Ri-Class flagshipHeavy Cruiser Ri-Class flagshipDestroyer I-Class Late ModelDestroyer I-Class Late ModelDestroyer I-ClassDestroyer I-Class
Cruising Formation 4: Battle Formation
Z
深海任務部隊 護衛空母群
Enemy Combined Fleet
Pattern 1
main fleet
Light Carrier Nu-Class eliteLight Carrier Nu-Class eliteLight Carrier Nu-Class eliteBattleship Ru-Class flagshipDestroyer I-Class Late ModelDestroyer I-Class Late Model
escort fleet
Light Cruiser Ho-Class flagshipLight Cruiser Tsu-ClassDestroyer I-ClassDestroyer I-ClassDestroyer I-ClassDestroyer I-Class
Cruising Formation 4: Battle Formation
AP:120
AS:270
AS+:540
Pattern 2
Final Form
main fleet
Light Carrier Nu-Class eliteLight Carrier Nu-Class eliteLight Carrier Nu-Class eliteBattleship Ru-Class flagshipDestroyer I-Class Late ModelDestroyer I-Class Late Model
escort fleet
Light Cruiser Ho-Class flagshipLight Cruiser Tsu-ClassDestroyer I-Class Late ModelDestroyer I-ClassDestroyer I-ClassDestroyer I-Class
Cruising Formation 4: Battle Formation
AP:150
AS:338
AS+:675

Show/Hide Nodes and Enemy Encounters
Nodes and Enemy Encounters
NodePatternXpNode InfoFormAir
A
深海潜水艦 待伏前衛部隊B群
Pattern 1 Submarine Ka-Class eliteSubmarine Ka-ClassSubmarine Ka-ClassSubmarine Ka-Class
Formation 4: Echelon
Formation 5: Line Abreast
Pattern 2 Submarine Ka-Class eliteSubmarine Ka-Class eliteSubmarine Ka-ClassSubmarine Ka-Class
Formation 5: Line Abreast
B
Pattern 1"Must be my imagination" (battle avoided)
C
深海潜水艦 待伏支援部隊 II群
Pattern 1 Submarine So-ClassSubmarine So-ClassLight Cruiser Tsu-ClassDestroyer I-ClassDestroyer I-ClassDestroyer I-Class
Formation 2: Double Line
Formation 4: Echelon
D
Pattern 1"Must be my imagination" (battle avoided)
E
深海潜水艦 待伏前衛部隊A群
Pattern 1 Submarine Ka-Class eliteSubmarine Ka-ClassSubmarine Ka-ClassSubmarine Ka-Class
Formation 4: Echelon
F
深海潜水艦 待伏部隊本隊
Pattern 1 Submarine So-ClassSubmarine So-ClassSubmarine So-Class
Formation 4: Echelon
Pattern 2 Submarine So-ClassSubmarine So-ClassSubmarine So-ClassSubmarine So-Class
Formation 4: Echelon
G
深海潜水艦 待伏前衛部隊C群
Pattern 1 Submarine Ka-ClassSubmarine Ka-ClassSubmarine Ka-Class
Formation 4: Echelon
Formation 5: Line Abreast
H
深海潜水艦 待伏増派部隊
Pattern 1
I
深海潜水艦 待伏支援部隊 I群
Pattern 1 Light Cruiser Ho-Class eliteLight Cruiser Tsu-ClassDestroyer I-ClassDestroyer I-ClassSubmarine So-Class
Formation 2: Double Line
Pattern 2 Light Cruiser Ho-Class eliteLight Cruiser Tsu-ClassDestroyer I-ClassSubmarine So-Class
Formation 2: Double Line
Formation 4: Echelon
J
Pattern 1"Must be my imagination" (battle avoided)
K
深海任務部隊 艦載機群
Air Battle Node
Pattern 1
L
Pattern 1"Must be my imagination" (battle avoided)
M
深海任務部隊 艦載機群
Air Battle Node
Pattern 1 Light Carrier Nu-Class eliteLight Carrier Nu-ClassLight Carrier Nu-ClassLight Cruiser Tsu-ClassDestroyer I-ClassDestroyer I-Class
Formation 3: Diamond
AP:27
AS:60
AS+:120
Pattern 2 Light Carrier Nu-Class eliteLight Carrier Nu-ClassLight Carrier Nu-ClassLight Cruiser Tsu-ClassDestroyer I-ClassDestroyer I-Class
Formation 3: Diamond
AP:57
AS:128
AS+:255
N
深海潜水艦 第二待伏部隊
Pattern 1 Submarine So-ClassSubmarine So-ClassSubmarine So-ClassSubmarine So-Class
Formation 4: Echelon
Pattern 2 Submarine So-ClassSubmarine So-ClassSubmarine So-Class
Formation 4: Echelon
O
Pattern 1"Must be my imagination" (battle avoided)
P
Pattern 1"Must be my imagination" (battle avoided)
Q
Pattern 1"Must be my imagination" (battle avoided)
R
深海任務部隊 艦載機群
Air Battle Node
Pattern 1 Aircraft Carrier PrincessLight Cruiser Tsu-ClassDestroyer I-Class Late ModelDestroyer I-ClassDestroyer I-ClassDestroyer I-Class
Formation 3: Diamond
AP:86
AS:194
AS+:387
Pattern 2 Aircraft Carrier PrincessLight Carrier Nu-Class eliteLight Cruiser Tsu-ClassDestroyer I-Class Late ModelDestroyer I-ClassDestroyer I-Class
Formation 3: Diamond
AP:132
AS:297
AS+:594
S
深棲棲艦 島嶼配備PT部隊
Night Battle Node
Pattern 1 PT Imp GroupPT Imp GroupPT Imp GroupPT Imp Group
Formation 1: Line Ahead
Formation 4: Echelon
T
深海任務部隊 艦載機群
Air Battle Node
Pattern 1 Aircraft Carrier PrincessLight Cruiser Tsu-ClassDestroyer I-Class Late ModelDestroyer I-ClassDestroyer I-ClassDestroyer I-Class
Formation 3: Diamond
AP:86
AS:194
AS+:387
Pattern 2 Aircraft Carrier PrincessLight Carrier Nu-Class eliteLight Cruiser Tsu-ClassDestroyer I-Class Late ModelDestroyer I-ClassDestroyer I-Class
Formation 3: Diamond
AP:102
AS:230
AS+:459
U
深海任務部隊 艦載機群
Air Battle Node
Pattern 1 Light Carrier Nu-Class eliteLight Carrier Nu-Class eliteLight Cruiser Tsu-ClassDestroyer I-Class Late ModelDestroyer I-ClassDestroyer I-Class
Formation 3: Diamond
AP:104
AS:234
AS+:468
Pattern 2 Light Carrier Nu-Class eliteLight Carrier Nu-Class eliteLight Carrier Nu-Class eliteLight Cruiser Tsu-ClassDestroyer I-Class Late ModelDestroyer I-Class
Formation 3: Diamond
AP:120
AS:270
AS+:540
V
深海任務部隊 護衛艦艇群
Pattern 1 Light Cruiser Ho-Class flagshipLight Cruiser Tsu-ClassDestroyer I-Class Late ModelDestroyer I-ClassDestroyer I-ClassDestroyer I-Class
Formation 2: Double Line
Pattern 2 Light Cruiser Ho-Class flagshipLight Cruiser Tsu-ClassDestroyer I-Class Late ModelDestroyer I-Class Late ModelDestroyer I-ClassDestroyer I-Class
Formation 2: Double Line
W
深海任務部隊 護衛空母群
Pattern 1 Light Carrier Nu-Class eliteBattleship Ru-Class flagshipDestroyer I-Class Late ModelDestroyer I-ClassDestroyer I-ClassDestroyer I-Class
Formation 1: Line Ahead
Formation 3: Diamond
AP:46
AS:104
AS+:207
X
深棲棲艦 海峡配備水雷戦隊
Night Battle Node
Pattern 1 Destroyer I-Class Late ModelDestroyer I-ClassDestroyer I-ClassDestroyer I-ClassPT Imp GroupPT Imp Group
Formation 1: Line Ahead
Formation 4: Echelon
Y
深棲棲艦 海峡旧式戦艦部隊
Enemy Combined Fleet
Night to Day Battle Node
Pattern 1
main fleet
Battleship Ru-Class eliteBattleship Ru-Class eliteBattleship Ru-Class eliteBattleship Ru-ClassBattleship Ru-ClassBattleship Ru-Class
escort fleet
Heavy Cruiser Ri-Class eliteHeavy Cruiser Ri-Class eliteDestroyer I-ClassDestroyer I-ClassDestroyer I-ClassDestroyer I-Class
Cruising Formation 4: Battle Formation
Pattern 2
Final Form
main fleet
Battleship Ru-Class eliteBattleship Ru-Class eliteBattleship Ru-Class eliteBattleship Ru-Class eliteBattleship Ru-ClassBattleship Ru-Class
escort fleet
Heavy Cruiser Ri-Class eliteHeavy Cruiser Ri-Class eliteDestroyer I-Class Late ModelDestroyer I-ClassDestroyer I-ClassDestroyer I-Class
Cruising Formation 4: Battle Formation
Z
深海任務部隊 護衛空母群
Enemy Combined Fleet
Pattern 1
main fleet
Light Carrier Nu-Class eliteLight Carrier Nu-ClassLight Carrier Nu-ClassBattleship Ru-Class eliteDestroyer I-Class Late ModelDestroyer I-Class Late Model
escort fleet
Light Cruiser Ho-Class eliteDestroyer I-ClassDestroyer I-ClassDestroyer I-ClassDestroyer I-ClassDestroyer I-Class
Cruising Formation 4: Battle Formation
AP:57
AS:128
AS+:255
Pattern 2
Final Form
main fleet
Light Carrier Nu-Class flagshipLight Carrier Nu-Class eliteLight Carrier Nu-Class eliteBattleship Ru-Class eliteDestroyer I-Class Late ModelDestroyer I-Class Late Model
escort fleet
Light Cruiser Ho-Class eliteLight Cruiser Tsu-ClassDestroyer I-ClassDestroyer I-ClassDestroyer I-ClassDestroyer I-Class
Cruising Formation 4: Battle Formation
AP:84
AS:188
AS+:375

Ship drops

NodeShip List
CDestroyersArare Arashio Kagerou Kasumi Kuroshio Michishio Murasame Ooshio Shigure Shiranui Yuudachi
IDestroyersArare Arashio Kagerou Kasumi Kuroshio Michishio Murasame Ooshio Shigure Shiranui Yuudachi
VDestroyersArare Arashio Asashio Kagerou Kasumi Kuroshio Michishio Murasame Ooshio Samidare Shigure Shiranui Shiratsuyu Suzukaze Yuudachi
WDestroyersArare Arashio Asashio Kagerou Kasumi Kuroshio Michishio Murasame Ooshio Samidare Shigure Shiranui Shiratsuyu Suzukaze Yuudachi
Light CruisersIsuzu Jintsuu Kiso Kuma Nagara Naka Natori Sendai Tama Yura
Heavy CruisersMogami
BattleshipsFusou Hyuuga Ise Yamashiro
XDestroyersArare Arashio Asashio Kagerou Kasumi Kuroshio Michishio Murasame Ooshio Samidare Shigure Shiranui Shiratsuyu Suzukaze Yuudachi
Light CruisersIsuzu Jintsuu Nagara Naka Natori Sendai Yura
YDestroyersArare Arashio Asagumo Asashio Kagerou Kasumi Kuroshio Michishio Murasame Ooshio Samidare Shigure Shiranui Shiratsuyu Suzukaze Yamagumo Yuudachi
Light CruisersIsuzu Jintsuu Kiso Kuma Nagara Naka Natori Sendai Tama Yura
Heavy CruisersMogami
BattleshipsFusou Hyuuga Ise Yamashiro
Seaplane TendersAkitsushima Mizuho
Auxiliary ShipsKamoi
ZDestroyer EscortsKunashiri Matsuwa
DestroyersAkigumo Arare Arashio Asashio Fujinami Kagerou Kasumi Kuroshio Makigumo Michishio Murasame Naganami Nowaki Okinami Ooshio Samidare Shigure Shiranui Shiratsuyu Suzukaze Yuudachi Yuugumo
Light CruisersIsuzu Jintsuu Kinu Kiso Kuma Nagara Naka Natori Noshiro Ooyodo Sendai Tama Yahagi Yura
Heavy CruisersAoba Ashigara Atago Chikuma Choukai Furutaka Haguro Kako Kinugasa Maya Mogami Myoukou Nachi Takao Tone
BattleshipsHaruna Hiei Kirishima Kongou Hyuuga Ise Mutsu Nagato
Aircraft CarriersKatsuragi
Light Aircraft CarriersHiyou Houshou Junyou Ryuujou
Seaplane TendersChitose Chiyoda


E-3

OoyodoE-3Winter2018.png

Ozawa Mobile Force, Sortie at Full Strength!
小沢機動部隊 全力出撃!

Information

  • Event Tag: 2018WinterBlueTag.png

Boss: Aircraft Carrier Princess

  • Hard (): 2100
  • Medium (): 1750
  • Easy (): 1750
  • Very Easy (): 1750

Key Rewards:

  • Clearing on Hard (): 1x Blueprint, 3x Maritime Resupply, 1x Action Report, 2x New Model Aviation Weapon Material, Prototype Flight Deck, Type 4 Fighter Hayate
  • Clearing on Medium (): 1x Blueprint, 2x Maritime Resupply, 1x Action Report, 1x New Model Aviation Weapon Material, Prototype Flight Deck
  • Clearing on Easy (): 1x Blueprint, 2x Maritime Resupply, 1x Action Report, 1x New Model Aviation Weapon Material
  • Clearing on Very Easy (): 1x Blueprint, 2x Maritime Resupply
Winter 2018 Event E-3 Banner.png
Winter2018E-3Map.png

Branching rules

E-3 Branching Rules Starting Points
Nodes Rules
Start
1
  • Single Fleet
  • Strike Force
2
  • Carrier Task Force


E-3 Branching Rules Part 1
Nodes Rules
A
B
  • Do not meet the requirements to go to D.
D
  • Meet one of the following requirements:
    • All members of the Troop Transport Unit are present.
    • All members of the Shima Fleet Escort Unit are present.
    • Difficulty is set to Casual.
B
C
  • Do not meet the requirements to go to D.
D
  • Fleet contains no CA (CAV unconfirmed)
F
E
  • Random routing if you do not meet the requirements to go to G.
G
  • Meet one of the following requirements:
    • Amount of ships in the fleet ≦ 3


E-3 Branching Rules Part 2
Nodes Rules
J
I
  • Do not meet the requirements to go to either K or N.
K
  • Meet all of the following requirements:
    • Do not meet the requirements to go to N.
    • Amount of CV(B) ≦ 2
    • Amount of (F)BB(V) + CV(B) ≦ 4
    • Fleet contains no SS(V)
    • Amount of Ozawa Fleet members ≧ ?/?/5? on Easy/Medium/Hard
N
  • Meet all of the following requirements:
    • The shortcut must be unlocked.
    • Amount of CV(B) ≦ 2
    • Amount of (F)BB(V) + CV(B) ≦ 4
    • Fleet contains no SS(V)
    • Amount of Ozawa Fleet members ≧ 3/3/8? on Easy/Medium/Hard
L
J
  • Meet all of the following requirements:
    • Amount of Ozawa Fleet members ≧ 3/4/5 on Easy/Medium/Hard
    • Amount of CV(B) ≦ 2
M
  • Do not meet the requirements to go to J.
N
O
  • Meet all of the following requirements:
    • Fast Fleet
    • Amount of Ozawa Fleet members ≧ 4/6/8 on Easy/Medium/Hard
Q
  • Do not meet the requirements to go to O.
O
R
  • Fail the LoS check.
S
  • Pass the LoS check.
P
O
  • Do not meet the requirement to go to S.
S
  • Amount of Ozawa Fleet members ≧ 3/4/6 on Easy/Medium/Hard
Q
P
  • Fail to meet the requirements to go to S, but pass the LoS check.
S
  • Meet all of the following requirements:
    • Amount of Ozawa Fleet members ≧ 4/6/8 on Easy/Medium/Hard
    • Escort Fleet contains no battleships
    • Amount of (F)BB(V) + CV(B) ≦ 4
    • Pass the LoS check.
T
  • Fail the LoS check.

Branching compositions were reported over the course of the event.

Tips

  • This map requires you to organize the Ozawa Fleet.
  • For more details on Historical Ozawa Fleet members, please view the Historical Background for more details.
  • All Ships formed in the Combined Fleet or Single fleet will use the Ozawa Fleet Tag. 2018WinterBlueTag.png
  • On Very Easy and Easy Mode, ships with the Nishimura Fleet Tag Fall2017YellowTag.pngcannot be used in the Combined Fleet segment of the map, so plan carefully around this.

Unlocking the Shortcuts (J->N):

  • Reach Node H and S (Easy+)
  • Gain Air Superiority while Defending in a Land Base Air Raid (Hard)
    • All LBAS should also not be damaged to 75% or below of their total health (混乱).


Reach Node H (and also gain Air Superiority while Defending against a Land Base Air Raid on Hard)

  • The easiest way to do this is to send a single SS(V) to the western portion of the map.
    • Set all LBAS to interceptors/fighters on defense before the sortie.
  • The only node that may endanger your SS(V) is node B. Sparkling is recommended.
    • The rest of the nodes are submarine or air battle nodes.
  • The LBAS air raid should trigger during your submarine's passage towards Node H. Repeat until you fulfill the conditions listed above.


Reach Node S

  • The shortcut that will be unlocked only helps you avoid one additional air battle node (node K; shortcut is from node J to node N), so bring a full fleet for a chipping run to the boss node.
  • As with later runs, you will need at least 4/6/8 Ozawa Fleet members for the shortest route to the boss.
    • Shoukaku does not count as an Ozawa Fleet member (see above for the full list of Ozawa Fleet ships).
    • See below for fleet composition recommendations.
  • Once you have reached node S (and assuming that you have cleared all other requirements), the shortcut will appear on the map.


Boss Phase

With enough Ozawa Fleet ships (4/6/8 on Easy/Medium/Hard), you should be able to take the shortest route: L-J-N-Q-S-U.

Recommended fleet composition:

  • Main Fleet: 2CV, 2CVL, 2BBV
  • Escort Fleet: 1CL, 2DD, 2-3CA, 0-1CLT

This is not an absolute requirement. Various factors may affect your considerations in terms of fleet composition:

  • How many Ozawa Fleet ships you need on your preferred difficulty.
    • Again, Shoukaku does not count as an Ozawa Fleet member.
  • How much fighter power you have, and the availability of high-quality fighters. (See also below for LBAS considerations.)
    • This should also inform your choices in terms of equipment set-ups. Fighter-bombers are likely to be useful.
  • How many CLTs you have to spare. A CLT is not really needed for this map, so save your CLTs if you need to.
  • Available CA(V)s. TCIs are not very necessary here.
    • Additionally, CAVs (or CAs that can utilise seaplane fighters) in a combined fleet's escort fleet can contribute to fighter power during battles against an enemy combined fleet,
    • But be aware that most CAVs are part of historical fleets necessary for E-2 and E-4, and also that ships tagged to the Nishimura Fleet cannot be sortied to the combined fleet segment of this map.
  • AACI is highly recommended. Akizuki and Hatsuzuki are both Ozawa Fleet members.

On Hard, your options are limited. You will likely be using Zuikaku, Ise, Hyuuga, and 2 out of 3 Ozawa Fleet CVLs (Chitose/Chiyoda/Zuihou) for your main fleet (along with 1 more CV). The escort fleet will then need to contain 3 Ozawa Fleet ships (likely the 2 DDs and 1 CL).

Speed does not matter; on higher difficulties, you will likely need Ise and Hyuuga (both slow) to meet the required number of Ozawa Fleet ships anyway.

An important consideration to take into account here is the availability of good LBAS fighters with long range, and range extension equipment:

  • Even with very high starting fighter power, you will lose substantial amounts of fighter power on the way to the boss.
  • The LBAS range required to reach the boss node is 8. The LBAS range required to reach the pre-boss node (S) is 7.
  • Depending on available equipment, it is advisable to commit LBAS squadrons to at least the boss node, in order to help in reducing the fighter power required for Air Superiority during the air combat phase (and to assist in damaging the boss' fleet).
    • Attaining at least AS is important for your fleet to be able to bring down the enemy more easily through the use of cut-in / double attacks.
  • The exact composition of your LBAS squadrons will vary depending on:
    • Number of fighters available and range of fighters available
    • Number of bombers available and range of bombers available
    • Availability of range extension equipment such as the Type 2 Flying Boat or the PBY-5A Catalina

Please also do note that the fighter power requirements at the boss node increase significantly during Last Dance. This will probably require additional LBAS strikes (if they are not already committed to the boss node), and/or an increase in the number of fighters slotted into your fleet.

FCF is helpful for retreating damaged ships (especially at the pre-boss; LoS check is before the pre-boss node). But you may wish to consider replacing it for additional fighter power during Last Dance, if needed.

Overall, this map is also relatively simple, albeit with rather high fighter power requirements (especially on Hard).


Show/Hide Nodes and Enemy Encounters
Nodes and Enemy Encounters
NodePatternXpNode InfoFormAir
A
深海潜水艦 通商破壊部隊 III群
Pattern 1 Submarine Ka-Class eliteSubmarine Ka-Class eliteSubmarine Ka-ClassSubmarine Ka-Class
Formation 4: Echelon
Formation 5: Line Abreast
Pattern 2 Submarine Ka-Class eliteSubmarine Ka-Class eliteSubmarine Ka-Class eliteSubmarine Ka-Class
Formation 4: Echelon
Formation 5: Line Abreast
Pattern 3 Submarine Ka-Class eliteSubmarine Ka-Class eliteSubmarine Ka-Class eliteSubmarine Ka-Class elite
Formation 4: Echelon
Formation 5: Line Abreast
B
深海通商破壊部隊 支援戦闘団
Pattern 1 Submarine Ka-Class eliteSubmarine Ka-Class eliteLight Cruiser Tsu-Class eliteDestroyer Ro-Class Late Model eliteDestroyer Ro-Class Late ModelDestroyer Ro-Class Late Model
Formation 1: Line Ahead
Formation 2: Double Line
Formation 4: Echelon
C
深海潜水艦 通商破壊部隊 II群
Pattern 1 Submarine So-Class eliteSubmarine So-ClassSubmarine So-ClassSubmarine So-ClassSubmarine So-Class
Formation 4: Echelon
Formation 5: Line Abreast
Pattern 2 Submarine So-Class eliteSubmarine So-Class eliteSubmarine So-ClassSubmarine So-ClassSubmarine So-Class
Formation 4: Echelon
Formation 5: Line Abreast
Pattern 3 Submarine So-Class eliteSubmarine So-Class eliteSubmarine So-Class eliteSubmarine So-ClassSubmarine So-Class
Formation 4: Echelon
Formation 5: Line Abreast
D
深海任務部隊 艦載機群
Air Battle Node
Pattern 1 Standard Carrier Wo-Class Kai flagshipLight Carrier Nu-Class eliteLight Carrier Nu-Class eliteLight Cruiser Tsu-Class eliteDestroyer Ha-Class Late ModelDestroyer Ha-Class Late Model
Formation 3: Diamond
AP:104
AS:234
AS+:468
Pattern 2 Standard Carrier Wo-Class Kai flagshipLight Carrier Nu-Class eliteLight Carrier Nu-Class eliteLight Cruiser Tsu-Class eliteDestroyer Ha-Class Late ModelDestroyer Ha-Class Late Model
Formation 3: Diamond
AP:134
AS:302
AS+:603
Pattern 3 Standard Carrier Wo-Class Kai flagshipLight Carrier Nu-Class eliteLight Carrier Nu-Class eliteLight Cruiser Tsu-Class eliteDestroyer Ha-Class Late ModelDestroyer Ha-Class Late Model
Formation 3: Diamond
AP:164
AS:369
AS+:738
E
Pattern 1"Must be my imagination" (battle avoided)
F
深海潜水艦 通商破壊部隊 I群
Pattern 1 Submarine So-Class eliteSubmarine So-ClassSubmarine So-ClassSubmarine So-ClassSubmarine So-Class
Formation 4: Echelon
Formation 5: Line Abreast
Pattern 2 Submarine So-Class eliteSubmarine So-Class eliteSubmarine So-ClassSubmarine So-ClassSubmarine So-Class
Formation 4: Echelon
Formation 5: Line Abreast
Pattern 3 Submarine So-Class eliteSubmarine So-Class eliteSubmarine So-Class eliteSubmarine So-ClassSubmarine So-Class
Formation 4: Echelon
Formation 5: Line Abreast
G
深海任務部隊 艦載機群
Air Battle Node
Pattern 1 Aircraft Carrier PrincessLight Cruiser Tsu-Class eliteDestroyer Ha-Class Late ModelDestroyer Ha-Class Late ModelDestroyer Ha-Class Late ModelDestroyer Ha-Class Late Model
Formation 3: Diamond
AP:103
AS:231
AS+:462
Pattern 2 Aircraft Carrier PrincessLight Carrier Nu-Class eliteLight Cruiser Tsu-Class eliteDestroyer Ha-Class Late ModelDestroyer Ha-Class Late ModelDestroyer Ha-Class Late Model
Formation 3: Diamond
AP:149
AS:335
AS+:669
Pattern 3 Aircraft Carrier PrincessLight Carrier Nu-Class eliteLight Carrier Nu-Class eliteLight Cruiser Tsu-Class eliteDestroyer Ha-Class Late ModelDestroyer Ha-Class Late Model
Formation 3: Diamond
AP:195
AS:438
AS+:876
H
Pattern 1Transport Drop-Off Node
I
深海任務部隊 護衛空母群
Pattern 1 Light Carrier Nu-Class flagshipLight Carrier Nu-Class flagshipLight Carrier Nu-Class flagshipLight Cruiser Tsu-Class eliteDestroyer Ha-Class Late ModelDestroyer Ha-Class Late Model
Formation 3: Diamond
AP:226
AS:507
AS+:1014
Pattern 2 Light Carrier Nu-Class flagshipLight Carrier Nu-Class flagshipLight Carrier Nu-Class flagshipLight Carrier Nu-Class flagshipDestroyer Ha-Class Late ModelDestroyer Ha-Class Late Model
Formation 3: Diamond
AP:288
AS:648
AS+:1296
J
深海任務部隊 護衛空母群
Air Battle Node
Pattern 1 Light Carrier Nu-Class flagshipLight Carrier Nu-Class eliteLight Carrier Nu-Class eliteLight Cruiser Tsu-Class eliteDestroyer Ha-Class Late ModelDestroyer Ha-Class Late Model
Formation 3: Diamond
AP:192
AS:432
AS+:864
Pattern 2 Light Carrier Nu-Class flagshipLight Carrier Nu-Class flagshipLight Carrier Nu-Class flagshipLight Cruiser Tsu-Class eliteDestroyer Ha-Class Late ModelDestroyer Ha-Class Late Model
Formation 3: Diamond
AP:226
AS:507
AS+:1014
Pattern 3 Light Carrier Nu-Class flagshipLight Carrier Nu-Class flagshipLight Carrier Nu-Class flagshipLight Carrier Nu-Class flagshipDestroyer Ha-Class Late ModelDestroyer Ha-Class Late Model
Formation 3: Diamond
AP:288
AS:648
AS+:1296
K
深海任務部隊 空母群
Air Battle Node
Pattern 1 Standard Carrier Wo-Class Kai flagshipLight Carrier Nu-Class eliteLight Carrier Nu-Class eliteLight Cruiser Tsu-Class eliteDestroyer Ha-Class Late ModelDestroyer Ha-Class Late Model
Formation 3: Diamond
AP:104
AS:234
AS+:468
Pattern 2 Standard Carrier Wo-Class Kai flagshipLight Carrier Nu-Class eliteLight Carrier Nu-Class eliteLight Cruiser Tsu-Class eliteDestroyer Ha-Class Late ModelDestroyer Ha-Class Late Model
Formation 3: Diamond
AP:134
AS:302
AS+:603
Pattern 3 Standard Carrier Wo-Class Kai flagshipLight Carrier Nu-Class eliteLight Carrier Nu-Class eliteLight Cruiser Tsu-Class eliteDestroyer Ha-Class Late ModelDestroyer Ha-Class Late Model
Formation 3: Diamond
AP:164
AS:369
AS+:738
L
Pattern 1"Must be my imagination" (battle avoided)
M
深海潜水部隊 任務部隊付属群
Pattern 1 Submarine So-Class eliteSubmarine So-Class eliteSubmarine So-Class eliteSubmarine So-ClassSubmarine So-Class
Formation 4: Echelon
Pattern 2 Submarine So-Class eliteSubmarine So-Class eliteSubmarine So-Class eliteSubmarine So-Class eliteSubmarine So-Class elite
Formation 4: Echelon
Pattern 3 Submarine So-Class flagshipSubmarine So-Class flagshipSubmarine So-Class eliteSubmarine So-Class eliteSubmarine So-Class elite
Formation 4: Echelon
N
深海任務部隊 空母群
Pattern 1 Standard Carrier Wo-Class Kai flagshipLight Carrier Nu-Class eliteLight Carrier Nu-Class eliteLight Cruiser Tsu-Class eliteDestroyer Ha-Class Late ModelDestroyer Ha-Class Late Model
Formation 3: Diamond
AP:104
AS:234
AS+:468
Pattern 2 Standard Carrier Wo-Class Kai flagshipLight Carrier Nu-Class eliteLight Carrier Nu-Class eliteLight Cruiser Tsu-Class eliteDestroyer Ha-Class Late ModelDestroyer Ha-Class Late Model
Formation 3: Diamond
AP:134
AS:302
AS+:603
Pattern 3 Standard Carrier Wo-Class Kai flagshipLight Carrier Nu-Class eliteLight Carrier Nu-Class eliteLight Cruiser Tsu-Class eliteDestroyer Ha-Class Late ModelDestroyer Ha-Class Late Model
Formation 3: Diamond
AP:164
AS:369
AS+:738
O
深海任務部隊 艦載機群
Air Battle Node
Pattern 1 Aircraft Carrier PrincessStandard Carrier Wo-Class flagshipStandard Carrier Wo-Class flagshipBattleship Ta-Class eliteHeavy Cruiser Ne-Class eliteHeavy Cruiser Ne-Class elite
Formation 3: Diamond
AP:190
AS:428
AS+:855
Pattern 2 Aircraft Carrier PrincessStandard Carrier Wo-Class flagshipStandard Carrier Wo-Class flagshipBattleship Ta-Class flagshipHeavy Cruiser Ne-Class eliteHeavy Cruiser Ne-Class elite
Formation 3: Diamond
AP:240
AS:540
AS+:1080
Pattern 3 Aircraft Carrier PrincessStandard Carrier Wo-Class Kai flagshipStandard Carrier Wo-Class Kai flagshipBattleship Ta-Class flagshipHeavy Cruiser Ne-Class eliteHeavy Cruiser Ne-Class elite
Formation 3: Diamond
AP:279
AS:627
AS+:1254
P
深海任務部隊 空母II群
Pattern 1 Standard Carrier Wo-Class Kai flagshipLight Carrier Nu-Class eliteLight Carrier Nu-Class eliteDestroyer Ha-Class Late ModelDestroyer Ha-Class Late ModelDestroyer Ha-Class Late Model
Formation 3: Diamond
AP:164
AS:369
AS+:738
Pattern 2 Standard Carrier Wo-Class Kai flagshipLight Carrier Nu-Class eliteLight Carrier Nu-Class eliteLight Cruiser Tsu-Class eliteDestroyer Ha-Class Late ModelDestroyer Ha-Class Late Model
Formation 3: Diamond
AP:164
AS:369
AS+:738
Pattern 3 Standard Carrier Wo-Class Kai flagshipLight Carrier Nu-Class flagshipLight Carrier Nu-Class flagshipLight Cruiser Tsu-Class eliteDestroyer Ha-Class Late ModelDestroyer Ha-Class Late Model
Formation 3: Diamond
AP:198
AS:444
AS+:888
Q
深海任務部隊 艦載機群
Air Battle Node
Pattern 1 Aircraft Carrier PrincessStandard Carrier Wo-Class flagshipStandard Carrier Wo-Class flagshipBattleship Ta-Class eliteHeavy Cruiser Ne-Class eliteHeavy Cruiser Ne-Class elite
Formation 3: Diamond
AP:190
AS:428
AS+:855
Pattern 2 Aircraft Carrier PrincessStandard Carrier Wo-Class flagshipStandard Carrier Wo-Class flagshipBattleship Ta-Class flagshipHeavy Cruiser Ne-Class eliteHeavy Cruiser Ne-Class elite
Formation 3: Diamond
AP:240
AS:540
AS+:1080
Pattern 3 Aircraft Carrier PrincessStandard Carrier Wo-Class Kai flagshipStandard Carrier Wo-Class Kai flagshipBattleship Ta-Class flagshipHeavy Cruiser Ne-Class eliteHeavy Cruiser Ne-Class elite
Formation 3: Diamond
AP:279
AS:627
AS+:1254
R
Pattern 1"Must be my imagination" (battle avoided)
S
深海任務部隊 空母I群
Pattern 1 Standard Carrier Wo-Class Kai flagshipLight Carrier Nu-Class eliteLight Carrier Nu-Class eliteLight Cruiser Tsu-Class eliteDestroyer Ha-Class Late ModelDestroyer Ha-Class Late Model
Formation 3: Diamond
AP:180
AS:405
AS+:810
Pattern 2 Standard Carrier Wo-Class Kai flagshipLight Carrier Nu-Class flagshipLight Carrier Nu-Class eliteLight Cruiser Tsu-Class eliteDestroyer Ha-Class Late ModelDestroyer Ha-Class Late Model
Formation 3: Diamond
AP:197
AS:443
AS+:885
Pattern 3 Standard Carrier Wo-Class Kai flagshipLight Carrier Nu-Class flagshipLight Carrier Nu-Class flagshipLight Cruiser Tsu-Class eliteDestroyer Ha-Class Late ModelDestroyer Ha-Class Late Model
Formation 3: Diamond
AP:214
AS:480
AS+:960
T
Pattern 1"Must be my imagination" (battle avoided)
U
深海任務部隊 第二戦闘群旗艦
Enemy Combined Fleet
Pattern 1
main fleet
Aircraft Carrier PrincessStandard Carrier Wo-Class flagshipStandard Carrier Wo-Class flagshipBattleship Ta-Class flagshipHeavy Cruiser Ne-Class eliteHeavy Cruiser Ne-Class elite
escort fleet
Light Cruiser He-Class flagshipLight Cruiser Tsu-Class eliteDestroyer Ha-Class Late ModelDestroyer Ha-Class Late ModelDestroyer Ha-Class Late ModelDestroyer Ha-Class Late Model
Cruising Formation 4: Battle Formation
AP:240
AS:540
AS+:1080
Pattern 2
main fleet
Aircraft Carrier PrincessStandard Carrier Wo-Class Kai flagshipStandard Carrier Wo-Class Kai flagshipBattleship Ta-Class flagshipHeavy Cruiser Ne-Class eliteHeavy Cruiser Ne-Class elite
escort fleet
Light Cruiser He-Class flagshipLight Cruiser Tsu-Class eliteDestroyer Ha-Class Late Model eliteDestroyer Ha-Class Late Model eliteDestroyer Ha-Class Late Model eliteDestroyer Ha-Class Late Model elite
Cruising Formation 4: Battle Formation
AP:279
AS:627
AS+:1254

Show/Hide Nodes and Enemy Encounters
Nodes and Enemy Encounters
NodePatternXpNode InfoFormAir
A
深海潜水艦 通商破壊部隊 III群
Pattern 1 Submarine Ka-Class eliteSubmarine Ka-ClassSubmarine Ka-ClassSubmarine Ka-Class
Formation 4: Echelon
Formation 5: Line Abreast
Pattern 2 Submarine Ka-Class eliteSubmarine Ka-Class eliteSubmarine Ka-ClassSubmarine Ka-Class
Formation 4: Echelon
Formation 5: Line Abreast
Pattern 3 Submarine Ka-Class eliteSubmarine Ka-Class eliteSubmarine Ka-Class eliteSubmarine Ka-Class
Formation 4: Echelon
Formation 5: Line Abreast
B
深海通商破壊部隊 支援戦闘団
Pattern 1 Submarine Ka-Class eliteSubmarine Ka-Class eliteLight Cruiser Tsu-ClassDestroyer Ro-Class Late ModelDestroyer I-ClassDestroyer I-Class
Formation 1: Line Ahead
Formation 2: Double Line
Formation 4: Echelon
C
深海潜水艦 通商破壊部隊 II群
Pattern 1 Submarine So-Class eliteSubmarine So-ClassSubmarine So-ClassSubmarine So-ClassSubmarine So-Class
Formation 4: Echelon
Formation 5: Line Abreast
Pattern 2 Submarine So-Class eliteSubmarine So-ClassSubmarine So-ClassSubmarine So-Class
Formation 4: Echelon
Formation 5: Line Abreast
D
深海任務部隊 艦載機群
Air Battle Node
Pattern 1 Standard Carrier Wo-Class flagshipLight Carrier Nu-ClassLight Carrier Nu-ClassLight Cruiser Tsu-ClassDestroyer Ro-Class Late ModelDestroyer Ro-Class Late Model
Formation 3: Diamond
AP:78
AS:174
AS+:348
Pattern 2 Standard Carrier Wo-Class flagshipLight Carrier Nu-Class eliteLight Carrier Nu-ClassLight Cruiser Tsu-ClassDestroyer Ro-Class Late ModelDestroyer Ro-Class Late Model
Formation 3: Diamond
AP:88
AS:198
AS+:396
Pattern 3 Standard Carrier Wo-Class flagshipLight Carrier Nu-Class eliteLight Carrier Nu-Class eliteLight Cruiser Tsu-ClassDestroyer Ro-Class Late ModelDestroyer Ro-Class Late Model
Formation 3: Diamond
AP:99
AS:222
AS+:444
E
Pattern 1"Must be my imagination" (battle avoided)
F
深海潜水艦 通商破壊部隊 I群
Pattern 1 Submarine So-Class eliteSubmarine So-ClassSubmarine So-ClassSubmarine So-Class
Formation 4: Echelon
Formation 5: Line Abreast
Pattern 2 Submarine So-Class eliteSubmarine So-ClassSubmarine So-ClassSubmarine So-ClassSubmarine So-Class
Formation 4: Echelon
Formation 5: Line Abreast
Pattern 3 Submarine So-Class eliteSubmarine So-Class eliteSubmarine So-ClassSubmarine So-ClassSubmarine So-Class
Formation 4: Echelon
Formation 5: Line Abreast
G
深海任務部隊 艦載機群
Air Battle Node
Pattern 1 Aircraft Carrier PrincessLight Cruiser Tsu-ClassDestroyer Ro-Class Late ModelDestroyer Ro-Class Late ModelDestroyer Ro-Class Late ModelDestroyer Ro-Class Late Model
Formation 3: Diamond
AP:86
AS:194
AS+:387
Pattern 2 Aircraft Carrier PrincessLight Carrier Nu-Class eliteLight Cruiser Tsu-ClassDestroyer Ro-Class Late ModelDestroyer Ro-Class Late ModelDestroyer Ro-Class Late Model
Formation 3: Diamond
AP:102
AS:230
AS+:459
Pattern 3 Aircraft Carrier PrincessLight Carrier Nu-Class eliteLight Carrier Nu-Class eliteLight Cruiser Tsu-ClassDestroyer Ro-Class Late ModelDestroyer Ro-Class Late Model
Formation 3: Diamond
AP:148
AS:333
AS+:666
H
Pattern 1Transport Drop-Off Node
I
深海任務部隊 護衛空母群
Pattern 1 Light Carrier Nu-Class flagshipLight Carrier Nu-Class eliteLight Carrier Nu-Class eliteLight Cruiser Tsu-ClassDestroyer Ro-Class Late ModelDestroyer Ro-Class Late Model
Formation 3: Diamond
AP:132
AS:297
AS+:594
Pattern 2 Light Carrier Nu-Class flagshipLight Carrier Nu-Class eliteLight Carrier Nu-Class eliteLight Cruiser Tsu-ClassDestroyer Ro-Class Late ModelDestroyer Ro-Class Late Model
Formation 3: Diamond
AP:192
AS:432
AS+:864
Pattern 3 Light Carrier Nu-Class flagshipLight Carrier Nu-Class eliteLight Carrier Nu-Class eliteLight Carrier Nu-Class eliteDestroyer Ro-Class Late ModelDestroyer Ro-Class Late Model
Formation 3: Diamond
AP:238
AS:536
AS+:1071
J
深海任務部隊 護衛空母群
Air Battle Node
Pattern 1 Light Carrier Nu-Class flagshipLight Carrier Nu-Class eliteLight Carrier Nu-Class eliteLight Cruiser Tsu-ClassDestroyer Ro-Class Late ModelDestroyer Ro-Class Late Model
Formation 3: Diamond
AP:132
AS:297
AS+:594
Pattern 2 Light Carrier Nu-Class flagshipLight Carrier Nu-Class eliteLight Carrier Nu-Class eliteLight Cruiser Tsu-ClassDestroyer Ro-Class Late ModelDestroyer Ro-Class Late Model
Formation 3: Diamond
AP:192
AS:432
AS+:864
Pattern 3 Light Carrier Nu-Class flagshipLight Carrier Nu-Class eliteLight Carrier Nu-Class eliteLight Carrier Nu-Class eliteDestroyer Ro-Class Late ModelDestroyer Ro-Class Late Model
Formation 3: Diamond
AP:238
AS:536
AS+:1071
K
深海任務部隊 空母群
Air Battle Node
Pattern 1 Standard Carrier Wo-Class flagshipLight Carrier Nu-ClassLight Carrier Nu-ClassLight Cruiser Tsu-ClassDestroyer Ro-Class Late ModelDestroyer Ro-Class Late Model
Formation 3: Diamond
AP:78
AS:174
AS+:348
Pattern 2 Standard Carrier Wo-Class flagshipLight Carrier Nu-Class eliteLight Carrier Nu-ClassLight Cruiser Tsu-ClassDestroyer Ro-Class Late ModelDestroyer Ro-Class Late Model
Formation 3: Diamond
AP:88
AS:198
AS+:396
Pattern 3 Standard Carrier Wo-Class flagshipLight Carrier Nu-Class eliteLight Carrier Nu-Class eliteLight Cruiser Tsu-ClassDestroyer Ro-Class Late ModelDestroyer Ro-Class Late Model
Formation 3: Diamond
AP:99
AS:222
AS+:444
L
Pattern 1"Must be my imagination" (battle avoided)
M
深海潜水部隊 任務部隊付属群
Pattern 1 Submarine So-Class eliteSubmarine So-ClassSubmarine So-ClassSubmarine So-Class
Formation 4: Echelon
Pattern 2 Submarine So-Class eliteSubmarine So-Class eliteSubmarine So-ClassSubmarine So-ClassSubmarine So-Class
Formation 4: Echelon
Pattern 3 Submarine So-Class eliteSubmarine So-Class eliteSubmarine So-ClassSubmarine So-Class
Formation 4: Echelon
Pattern 4 Submarine So-Class eliteSubmarine So-Class eliteSubmarine So-Class eliteSubmarine So-ClassSubmarine So-Class
Formation 4: Echelon
N
深海任務部隊 空母群
Pattern 1 Standard Carrier Wo-Class flagshipLight Carrier Nu-ClassLight Carrier Nu-ClassLight Cruiser Tsu-ClassDestroyer Ro-Class Late ModelDestroyer Ro-Class Late Model
Formation 3: Diamond
AP:78
AS:174
AS+:348
Pattern 2 Standard Carrier Wo-Class flagshipLight Carrier Nu-Class eliteLight Carrier Nu-ClassLight Cruiser Tsu-ClassDestroyer Ro-Class Late ModelDestroyer Ro-Class Late Model
Formation 3: Diamond
AP:88
AS:198
AS+:396
Pattern 3 Standard Carrier Wo-Class flagshipLight Carrier Nu-Class eliteLight Carrier Nu-Class eliteLight Cruiser Tsu-ClassDestroyer Ro-Class Late ModelDestroyer Ro-Class Late Model
Formation 3: Diamond
AP:99
AS:222
AS+:444
O
深海任務部隊 艦載機群
Air Battle Node
Pattern 1 Aircraft Carrier PrincessStandard Carrier Wo-Class flagshipStandard Carrier Wo-Class eliteBattleship Ta-ClassHeavy Cruiser Ne-ClassHeavy Cruiser Ne-Class
Formation 3: Diamond
AP:123
AS:276
AS+:552
Pattern 2 Aircraft Carrier PrincessStandard Carrier Wo-Class flagshipStandard Carrier Wo-Class flagshipBattleship Ta-ClassHeavy Cruiser Ne-ClassHeavy Cruiser Ne-Class
Formation 3: Diamond
AP:124
AS:278
AS+:555
Pattern 3 Aircraft Carrier PrincessStandard Carrier Wo-Class flagshipStandard Carrier Wo-Class flagshipBattleship Ta-Class eliteHeavy Cruiser Ne-Class eliteHeavy Cruiser Ne-Class elite
Formation 3: Diamond
AP:140
AS:315
AS+:630
P
深海任務部隊 空母II群
Pattern 1 Standard Carrier Wo-Class flagshipLight Carrier Nu-Class eliteLight Carrier Nu-Class eliteDestroyer Ro-Class Late ModelDestroyer Ro-Class Late ModelDestroyer I-Class
Formation 3: Diamond
AP:101
AS:227
AS+:453
Pattern 2 Standard Carrier Wo-Class flagshipLight Carrier Nu-Class eliteLight Cruiser Tsu-ClassDestroyer Ro-Class Late ModelDestroyer Ro-Class Late ModelDestroyer I-Class
Formation 3: Diamond
AP:115
AS:258
AS+:516
Pattern 3 Standard Carrier Wo-Class flagshipLight Carrier Nu-Class eliteLight Carrier Nu-Class eliteLight Cruiser Tsu-ClassDestroyer Ro-Class Late ModelDestroyer Ro-Class Late Model
Formation 3: Diamond
AP:161
AS:362
AS+:723
Q
深海任務部隊 艦載機群
Air Battle Node
Pattern 1 Aircraft Carrier PrincessStandard Carrier Wo-Class flagshipStandard Carrier Wo-Class eliteBattleship Ta-ClassHeavy Cruiser Ne-ClassHeavy Cruiser Ne-Class
Formation 3: Diamond
AP:123
AS:276
AS+:552
Pattern 2 Aircraft Carrier PrincessStandard Carrier Wo-Class flagshipStandard Carrier Wo-Class flagshipBattleship Ta-ClassHeavy Cruiser Ne-ClassHeavy Cruiser Ne-Class
Formation 3: Diamond
AP:124
AS:278
AS+:555
Pattern 3 Aircraft Carrier PrincessStandard Carrier Wo-Class flagshipStandard Carrier Wo-Class flagshipBattleship Ta-Class eliteHeavy Cruiser Ne-Class eliteHeavy Cruiser Ne-Class elite
Formation 3: Diamond
AP:140
AS:315
AS+:630
R
Pattern 1"Must be my imagination" (battle avoided)
S
深海任務部隊 空母I群
Pattern 1 Standard Carrier Wo-Class flagshipLight Carrier Nu-Class eliteLight Cruiser Tsu-ClassDestroyer Ro-Class Late ModelDestroyer Ro-Class Late ModelDestroyer Ro-Class Late Model
Formation 3: Diamond
AP:85
AS:191
AS+:381
Pattern 2 Standard Carrier Wo-Class flagshipLight Carrier Nu-Class eliteLight Cruiser Tsu-ClassDestroyer Ro-Class Late ModelDestroyer Ro-Class Late ModelDestroyer Ro-Class Late Model
Formation 3: Diamond
AP:115
AS:258
AS+:516
Pattern 3 Standard Carrier Wo-Class flagshipLight Carrier Nu-Class eliteLight Carrier Nu-Class eliteLight Cruiser Tsu-ClassDestroyer Ro-Class Late ModelDestroyer Ro-Class Late Model
Formation 3: Diamond
AP:161
AS:362
AS+:723
T
Pattern 1"Must be my imagination" (battle avoided)
U
深海任務部隊 第二戦闘群旗艦
Enemy Combined Fleet
Pattern 1
main fleet
Aircraft Carrier PrincessStandard Carrier Wo-Class flagshipStandard Carrier Wo-Class flagshipBattleship Ta-Class eliteHeavy Cruiser Ne-Class eliteHeavy Cruiser Ne-Class elite
escort fleet
Light Cruiser Ho-Class flagshipLight Cruiser Tsu-ClassDestroyer Ro-Class Late ModelDestroyer I-ClassDestroyer I-ClassDestroyer I-Class
Cruising Formation 4: Battle Formation
AP:140
AS:315
AS+:630
Pattern 2
Final Form
main fleet
Aircraft Carrier PrincessStandard Carrier Wo-Class flagshipStandard Carrier Wo-Class flagshipBattleship Ta-Class eliteHeavy Cruiser Ne-Class eliteHeavy Cruiser Ne-Class elite
escort fleet
Light Cruiser Ho-Class flagshipLight Cruiser Tsu-ClassDestroyer Ro-Class Late ModelDestroyer Ro-Class Late ModelDestroyer I-ClassDestroyer I-Class
Cruising Formation 4: Battle Formation
AP:240
AS:540
AS+:1080

Show/Hide Nodes and Enemy Encounters
Nodes and Enemy Encounters
NodePatternXpNode InfoFormAir
A
深海潜水艦 通商破壊部隊 III群
Pattern 1 Submarine Ka-ClassSubmarine Ka-ClassSubmarine Ka-ClassSubmarine Ka-Class
Formation 4: Echelon
Pattern 2 Submarine Ka-Class eliteSubmarine Ka-ClassSubmarine Ka-ClassSubmarine Ka-Class
Formation 4: Echelon
Formation 5: Line Abreast
B
深海通商破壊部隊 支援戦闘団
Pattern 1 Submarine Ka-Class eliteSubmarine Ka-ClassDestroyer I-Class Late ModelDestroyer I-ClassDestroyer I-ClassDestroyer I-Class
Formation 1: Line Ahead
Formation 2: Double Line
Formation 4: Echelon
C
深海潜水艦 通商破壊部隊 II群
Pattern 1 Submarine So-ClassSubmarine So-ClassSubmarine So-ClassSubmarine So-Class
Formation 4: Echelon
Pattern 2 Submarine So-Class eliteSubmarine So-ClassSubmarine So-ClassSubmarine So-Class
Formation 4: Echelon
Formation 5: Line Abreast
D
深海任務部隊 艦載機群
Air Battle Node
Pattern 1 Standard Carrier Wo-Class eliteLight Carrier Nu-ClassLight Carrier Nu-ClassLight Cruiser Tsu-ClassDestroyer I-ClassDestroyer I-Class
Formation 3: Diamond
AP:29
AS:65
AS+:129
Pattern 2 Standard Carrier Wo-Class flagshipLight Carrier Nu-ClassLight Carrier Nu-ClassLight Cruiser Tsu-ClassDestroyer I-ClassDestroyer I-Class
Formation 3: Diamond
AP:30
AS:66
AS+:132
Pattern 3 Standard Carrier Wo-Class flagshipLight Carrier Nu-Class eliteLight Carrier Nu-Class eliteLight Cruiser Tsu-ClassDestroyer I-ClassDestroyer I-Class
Formation 3: Diamond
AP:51
AS:114
AS+:228
E
Pattern 1"Must be my imagination" (battle avoided)
F
深海潜水艦 通商破壊部隊 I群
Pattern 1 Submarine So-ClassSubmarine So-ClassSubmarine So-ClassSubmarine So-Class
Formation 4: Echelon
Pattern 2 Submarine So-Class eliteSubmarine So-ClassSubmarine So-ClassSubmarine So-Class
Formation 4: Echelon
Formation 5: Line Abreast
G
深海任務部隊 艦載機群
Air Battle Node
Pattern 1 Light Carrier Nu-Class flagshipLight Cruiser Tsu-ClassDestroyer I-Class Late ModelDestroyer I-Class Late ModelDestroyer I-ClassDestroyer I-Class
Formation 3: Diamond
AP:52
AS:116
AS+:231
Pattern 2 Aircraft Carrier PrincessLight Cruiser Tsu-ClassDestroyer I-Class Late ModelDestroyer I-Class Late ModelDestroyer I-ClassDestroyer I-Class
Formation 3: Diamond
AP:86
AS:194
AS+:387
Pattern 3 Aircraft Carrier PrincessLight Carrier Nu-Class eliteLight Cruiser Tsu-ClassDestroyer I-Class Late ModelDestroyer I-ClassDestroyer I-Class
Formation 3: Diamond
AP:102
AS:230
AS+:459
H
Pattern 1Transport Drop-Off Node
I
深海任務部隊 護衛空母群
Pattern 1 Light Carrier Nu-Class eliteLight Carrier Nu-Class eliteLight Cruiser Tsu-ClassDestroyer I-Class Late ModelDestroyer I-ClassDestroyer I-Class
Formation 3: Diamond
AP:104
AS:234
AS+:468
Pattern 2 Light Carrier Nu-Class eliteLight Carrier Nu-Class eliteLight Carrier Nu-Class eliteLight Cruiser Tsu-ClassDestroyer I-Class Late ModelDestroyer I-Class
Formation 3: Diamond
AP:120
AS:270
AS+:540
Pattern 3 Light Carrier Nu-Class eliteLight Carrier Nu-Class eliteLight Carrier Nu-Class eliteLight Carrier Nu-Class eliteDestroyer I-Class Late ModelDestroyer I-Class Late Model
Formation 3: Diamond
AP:166
AS:374
AS+:747
J
深海任務部隊 護衛空母群
Air Battle Node
Pattern 1 Light Carrier Nu-Class eliteLight Carrier Nu-Class eliteLight Cruiser Tsu-ClassDestroyer I-Class Late ModelDestroyer I-ClassDestroyer I-Class
Formation 3: Diamond
AP:104
AS:234
AS+:468
Pattern 2 Light Carrier Nu-Class eliteLight Carrier Nu-Class eliteLight Carrier Nu-Class eliteLight Cruiser Tsu-ClassDestroyer I-Class Late ModelDestroyer I-Class
Formation 3: Diamond
AP:120
AS:270
AS+:540
Pattern 3 Light Carrier Nu-Class eliteLight Carrier Nu-Class eliteLight Carrier Nu-Class eliteLight Carrier Nu-Class eliteDestroyer I-Class Late ModelDestroyer I-Class Late Model
Formation 3: Diamond
AP:166
AS:374
AS+:747
K
深海任務部隊 空母群
Air Battle Node
Pattern 1 Standard Carrier Wo-Class eliteLight Carrier Nu-ClassLight Carrier Nu-ClassLight Cruiser Tsu-ClassDestroyer I-ClassDestroyer I-Class
Formation 3: Diamond
AP:29
AS:65
AS+:129
Pattern 2 Standard Carrier Wo-Class flagshipLight Carrier Nu-ClassLight Carrier Nu-ClassLight Cruiser Tsu-ClassDestroyer I-ClassDestroyer I-Class
Formation 3: Diamond
AP:30
AS:66
AS+:132
Pattern 3 Standard Carrier Wo-Class flagshipLight Carrier Nu-Class eliteLight Carrier Nu-Class eliteLight Cruiser Tsu-ClassDestroyer I-ClassDestroyer I-Class
Formation 3: Diamond
AP:51
AS:114
AS+:228
L
Pattern 1"Must be my imagination" (battle avoided)
M
深海潜水部隊 任務部隊付属群
Pattern 1 Submarine So-ClassSubmarine So-ClassSubmarine So-ClassSubmarine So-Class
Formation 4: Echelon
Pattern 2 Submarine So-ClassSubmarine So-ClassSubmarine So-Class
Formation 4: Echelon
Pattern 3 Submarine So-Class eliteSubmarine So-ClassSubmarine So-ClassSubmarine So-Class
Formation 4: Echelon
Pattern 4 Submarine So-Class eliteSubmarine So-Class eliteSubmarine So-ClassSubmarine So-Class
Formation 4: Echelon
N
深海任務部隊 空母群
Pattern 1 Standard Carrier Wo-Class eliteLight Carrier Nu-ClassLight Carrier Nu-ClassLight Cruiser Tsu-ClassDestroyer I-ClassDestroyer I-Class
Formation 3: Diamond
AP:29
AS:65
AS+:129
Pattern 2 Standard Carrier Wo-Class flagshipLight Carrier Nu-ClassLight Carrier Nu-ClassLight Cruiser Tsu-ClassDestroyer I-ClassDestroyer I-Class
Formation 3: Diamond
AP:30
AS:66
AS+:132
Pattern 3 Standard Carrier Wo-Class flagshipLight Carrier Nu-Class eliteLight Carrier Nu-Class eliteLight Cruiser Tsu-ClassDestroyer I-ClassDestroyer I-Class
Formation 3: Diamond
AP:51
AS:114
AS+:228
O
深海任務部隊 艦載機群
Air Battle Node
Pattern 1 Aircraft Carrier PrincessStandard Carrier Wo-ClassStandard Carrier Wo-ClassBattleship Ta-ClassHeavy Cruiser Ri-ClassHeavy Cruiser Ri-Class
Formation 3: Diamond
AP:100
AS:224
AS+:447
Pattern 2 Aircraft Carrier PrincessStandard Carrier Wo-Class eliteStandard Carrier Wo-ClassBattleship Ta-ClassHeavy Cruiser Ri-ClassHeavy Cruiser Ri-Class
Formation 3: Diamond
AP:111
AS:249
AS+:498
Pattern 3 Aircraft Carrier PrincessStandard Carrier Wo-Class eliteStandard Carrier Wo-Class eliteBattleship Ta-ClassHeavy Cruiser Ri-ClassHeavy Cruiser Ri-Class
Formation 3: Diamond
AP:122
AS:275
AS+:549
P
深海任務部隊 空母II群
Pattern 1 Standard Carrier Wo-Class flagshipLight Cruiser Tsu-ClassDestroyer I-Class Late ModelDestroyer I-ClassDestroyer I-ClassDestroyer I-Class
Formation 3: Diamond
AP:67
AS:150
AS+:300
Pattern 2 Standard Carrier Wo-Class flagshipLight Carrier Nu-Class eliteLight Cruiser Tsu-ClassDestroyer I-Class Late ModelDestroyer I-ClassDestroyer I-Class
Formation 3: Diamond
AP:83
AS:186
AS+:372
Pattern 3 Standard Carrier Wo-Class flagshipLight Carrier Nu-Class eliteLight Carrier Nu-Class eliteLight Cruiser Tsu-ClassDestroyer I-Class Late ModelDestroyer I-Class Late Model
Formation 3: Diamond
AP:99
AS:222
AS+:444
Q
深海任務部隊 艦載機群
Air Battle Node
Pattern 1 Aircraft Carrier PrincessStandard Carrier Wo-ClassStandard Carrier Wo-ClassBattleship Ta-ClassHeavy Cruiser Ri-ClassHeavy Cruiser Ri-Class
Formation 3: Diamond
AP:100
AS:224
AS+:447
Pattern 2 Aircraft Carrier PrincessStandard Carrier Wo-Class eliteStandard Carrier Wo-ClassBattleship Ta-ClassHeavy Cruiser Ri-ClassHeavy Cruiser Ri-Class
Formation 3: Diamond
AP:111
AS:249
AS+:498
Pattern 3 Aircraft Carrier PrincessStandard Carrier Wo-Class eliteStandard Carrier Wo-Class eliteBattleship Ta-ClassHeavy Cruiser Ri-ClassHeavy Cruiser Ri-Class
Formation 3: Diamond
AP:122
AS:275
AS+:549
R
Pattern 1"Must be my imagination" (battle avoided)
S
深海任務部隊 空母I群
Pattern 1 Standard Carrier Wo-Class flagshipLight Cruiser Tsu-ClassDestroyer I-Class Late ModelDestroyer I-Class Late ModelDestroyer I-ClassDestroyer I-Class
Formation 3: Diamond
AP:69
AS:155
AS+:309
Pattern 2 Standard Carrier Wo-Class flagshipLight Carrier Nu-Class eliteLight Cruiser Tsu-ClassDestroyer I-Class Late ModelDestroyer I-Class Late ModelDestroyer I-Class
Formation 3: Diamond
AP:85
AS:191
AS+:381
Pattern 3 Standard Carrier Wo-Class flagshipLight Carrier Nu-Class eliteLight Carrier Nu-Class eliteLight Cruiser Tsu-ClassDestroyer I-Class Late ModelDestroyer I-Class Late Model
Formation 3: Diamond
AP:101
AS:227
AS+:453
T
Pattern 1"Must be my imagination" (battle avoided)
U
深海任務部隊 第二戦闘群旗艦
Enemy Combined Fleet
Pattern 1
main fleet
Aircraft Carrier PrincessStandard Carrier Wo-Class eliteStandard Carrier Wo-Class eliteBattleship Ta-ClassHeavy Cruiser Ne-ClassHeavy Cruiser Ne-Class
escort fleet
Light Cruiser Ho-Class flagshipLight Cruiser Tsu-ClassDestroyer I-ClassDestroyer I-ClassDestroyer I-ClassDestroyer I-Class
Cruising Formation 4: Battle Formation
AP:122
AS:275
AS+:549
Pattern 2
Final Form
main fleet
Aircraft Carrier PrincessStandard Carrier Wo-Class flagshipStandard Carrier Wo-Class flagshipBattleship Ta-ClassHeavy Cruiser Ne-ClassHeavy Cruiser Ne-Class
escort fleet
Light Cruiser Ho-Class flagshipLight Cruiser Tsu-ClassDestroyer I-Class Late ModelDestroyer I-ClassDestroyer I-ClassDestroyer I-Class
Cruising Formation 4: Battle Formation
AP:124
AS:278
AS+:555

Show/Hide Nodes and Enemy Encounters
Nodes and Enemy Encounters
NodePatternXpNode InfoFormAir
A
深海潜水艦 通商破壊部隊 III群
Pattern 1 Submarine Ka-ClassSubmarine Ka-ClassSubmarine Ka-ClassSubmarine Ka-Class
Formation 4: Echelon
B
深海通商破壊部隊 支援戦闘団
Pattern 1 Submarine Ka-Class eliteSubmarine Ka-ClassDestroyer I-Class Late ModelDestroyer I-ClassDestroyer I-ClassDestroyer I-Class
Formation 2: Double Line
C
深海潜水艦 通商破壊部隊 II群
Pattern 1 Submarine So-ClassSubmarine So-ClassSubmarine So-ClassSubmarine So-Class
Formation 4: Echelon
D
深海任務部隊 艦載機群
Air Battle Node
Pattern 1 Standard Carrier Wo-Class eliteLight Carrier Nu-ClassLight Carrier Nu-ClassLight Cruiser Tsu-ClassDestroyer I-ClassDestroyer I-Class
Formation 3: Diamond
AP:29
AS:65
AS+:129
Pattern 2 Standard Carrier Wo-Class flagshipLight Carrier Nu-ClassLight Carrier Nu-ClassLight Cruiser Tsu-ClassDestroyer I-ClassDestroyer I-Class
Formation 3: Diamond
AP:30
AS:66
AS+:132
E
Pattern 1"Must be my imagination" (battle avoided)
F
深海潜水艦 通商破壊部隊 I群
Pattern 1 Submarine So-ClassSubmarine So-ClassSubmarine So-ClassSubmarine So-Class
Formation 4: Echelon
G
深海任務部隊 艦載機群
Air Battle Node
Pattern 1 Light Carrier Nu-Class flagshipLight Cruiser Tsu-ClassDestroyer I-Class Late ModelDestroyer I-Class Late ModelDestroyer I-ClassDestroyer I-Class
Formation 3: Diamond
AP:52
AS:116
AS+:231
Pattern 2 Aircraft Carrier PrincessLight Cruiser Tsu-ClassDestroyer I-Class Late ModelDestroyer I-Class Late ModelDestroyer I-ClassDestroyer I-Class
Formation 3: Diamond
AP:86
AS:194
AS+:387
H
Pattern 1Transport Drop-Off Node
I
深海任務部隊 護衛空母群
Pattern 1 Light Carrier Nu-Class eliteLight Carrier Nu-Class eliteLight Cruiser Tsu-ClassDestroyer I-Class Late ModelDestroyer I-ClassDestroyer I-Class
Formation 3: Diamond
AP:104
AS:234
AS+:468
Pattern 2 Light Carrier Nu-Class eliteLight Carrier Nu-Class eliteLight Carrier Nu-Class eliteLight Cruiser Tsu-ClassDestroyer I-Class Late ModelDestroyer I-Class
Formation 3: Diamond
AP:120
AS:270
AS+:540
J
深海任務部隊 護衛空母群
Air Battle Node
Pattern 1 Light Carrier Nu-Class eliteLight Carrier Nu-Class eliteLight Cruiser Tsu-ClassDestroyer I-Class Late ModelDestroyer I-ClassDestroyer I-Class
Formation 3: Diamond
AP:104
AS:234
AS+:468
Pattern 2 Light Carrier Nu-Class eliteLight Carrier Nu-Class eliteLight Carrier Nu-Class eliteLight Cruiser Tsu-ClassDestroyer I-Class Late ModelDestroyer I-Class
Formation 3: Diamond
AP:120
AS:270
AS+:540
K
深海任務部隊 空母群
Air Battle Node
Pattern 1 Standard Carrier Wo-Class eliteLight Carrier Nu-ClassLight Carrier Nu-ClassLight Cruiser Tsu-ClassDestroyer I-ClassDestroyer I-Class
Formation 3: Diamond
AP:29
AS:65
AS+:129
Pattern 2 Standard Carrier Wo-Class flagshipLight Carrier Nu-ClassLight Carrier Nu-ClassLight Cruiser Tsu-ClassDestroyer I-ClassDestroyer I-Class
Formation 3: Diamond
AP:30
AS:66
AS+:132
L
Pattern 1"Must be my imagination" (battle avoided)
M
深海潜水部隊 任務部隊付属群
Pattern 1 Submarine So-ClassSubmarine So-ClassSubmarine So-ClassSubmarine So-Class
Formation 4: Echelon
Pattern 2 Submarine So-ClassSubmarine So-ClassSubmarine So-Class
Formation 4: Echelon
Pattern 3 Submarine So-Class eliteSubmarine So-ClassSubmarine So-ClassSubmarine So-Class
Formation 4: Echelon
N
深海任務部隊 空母群
Pattern 1 Standard Carrier Wo-Class eliteLight Carrier Nu-ClassLight Carrier Nu-ClassLight Cruiser Tsu-ClassDestroyer I-ClassDestroyer I-Class
Formation 3: Diamond
AP:29
AS:65
AS+:129
Pattern 2 Standard Carrier Wo-Class flagshipLight Carrier Nu-ClassLight Carrier Nu-ClassLight Cruiser Tsu-ClassDestroyer I-ClassDestroyer I-Class
Formation 3: Diamond
AP:30
AS:66
AS+:132
O
深海任務部隊 艦載機群
Air Battle Node
Pattern 1 Aircraft Carrier PrincessStandard Carrier Wo-ClassStandard Carrier Wo-ClassBattleship Ta-ClassHeavy Cruiser Ri-ClassHeavy Cruiser Ri-Class
Formation 3: Diamond
AP:100
AS:224
AS+:447
Pattern 2 Aircraft Carrier PrincessStandard Carrier Wo-Class eliteStandard Carrier Wo-ClassBattleship Ta-ClassHeavy Cruiser Ri-ClassHeavy Cruiser Ri-Class
Formation 3: Diamond
AP:111
AS:249
AS+:498
P
深海任務部隊 空母II群
Pattern 1 Standard Carrier Wo-Class flagshipLight Cruiser Tsu-ClassDestroyer I-Class Late ModelDestroyer I-ClassDestroyer I-ClassDestroyer I-Class
Formation 3: Diamond
AP:67
AS:150
AS+:300
Pattern 2 Standard Carrier Wo-Class flagshipLight Carrier Nu-Class eliteLight Cruiser Tsu-ClassDestroyer I-Class Late ModelDestroyer I-ClassDestroyer I-Class
Formation 3: Diamond
AP:83
AS:186
AS+:372
Q
深海任務部隊 艦載機群
Air Battle Node
Pattern 1 Aircraft Carrier PrincessStandard Carrier Wo-ClassStandard Carrier Wo-ClassBattleship Ta-ClassHeavy Cruiser Ri-ClassHeavy Cruiser Ri-Class
Formation 3: Diamond
AP:100
AS:224
AS+:447
Pattern 2 Aircraft Carrier PrincessStandard Carrier Wo-Class eliteStandard Carrier Wo-ClassBattleship Ta-ClassHeavy Cruiser Ri-ClassHeavy Cruiser Ri-Class
Formation 3: Diamond
AP:111
AS:249
AS+:498
R
Pattern 1"Must be my imagination" (battle avoided)
S
深海任務部隊 空母I群
Pattern 1 Standard Carrier Wo-Class flagshipLight Cruiser Tsu-ClassDestroyer I-Class Late ModelDestroyer I-Class Late ModelDestroyer I-ClassDestroyer I-Class
Formation 3: Diamond
AP:69
AS:155
AS+:309
Pattern 2 Standard Carrier Wo-Class flagshipLight Carrier Nu-Class eliteLight Cruiser Tsu-ClassDestroyer I-Class Late ModelDestroyer I-Class Late ModelDestroyer I-Class
Formation 3: Diamond
AP:85
AS:191
AS+:381
T
Pattern 1"Must be my imagination" (battle avoided)
U
深海任務部隊 第二戦闘群旗艦
Enemy Combined Fleet
Pattern 1
main fleet
Aircraft Carrier PrincessStandard Carrier Wo-ClassStandard Carrier Wo-ClassBattleship Ta-ClassHeavy Cruiser Ri-ClassHeavy Cruiser Ri-Class
escort fleet
Light Cruiser Ho-Class eliteDestroyer I-ClassDestroyer I-ClassDestroyer I-ClassDestroyer I-ClassDestroyer I-Class
Cruising Formation 4: Battle Formation
AP:100
AS:224
AS+:447
Pattern 2
Final Form
main fleet
Aircraft Carrier PrincessStandard Carrier Wo-Class eliteStandard Carrier Wo-Class eliteBattleship Ta-ClassHeavy Cruiser Ri-ClassHeavy Cruiser Ri-Class
escort fleet
Light Cruiser Ho-Class eliteLight Cruiser Tsu-ClassDestroyer I-ClassDestroyer I-ClassDestroyer I-ClassDestroyer I-Class
Cruising Formation 4: Battle Formation
AP:122
AS:275
AS+:549

Ship drops

NodeShip List
ADestroyersAkatsuki Hatsuharu Hatsushimo Hibiki Ikazuchi Inazuma Kiyoshimo Nenohi Sazanami Ushio Wakaba
BDestroyersAkatsuki Akebono Ayanami Fubuki Fumizuki Hatsuharu Hatsushimo Hibiki Ikazuchi Inazuma Isonami Kikuzuki Kisaragi Mikazuki Miyuki Mochizuki Murakumo Mutsuki Nagatsuki Nenohi Oboro Satsuki Sazanami Shikinami Shirayuki Ushio Wakaba
Light CruisersIsuzu Jintsuu Kiso Kuma Nagara Naka Natori Sendai Tama Tenryuu Yura
Heavy CruisersChikuma Mogami
CDestroyersAkatsuki Nenohi Ushio
FDestroyersAkatsuki Hatsuharu Hatsushimo Hibiki Ikazuchi Inazuma Kiyoshimo Nenohi Sazanami Ushio Wakaba
IDestroyersAkatsuki Akebono Ayanami Fubuki Fumizuki Hatsuharu Hatsushimo Hatsuyuki Hibiki Ikazuchi Inazuma Isonami Kikuzuki Kisaragi Mikazuki Miyuki Mochizuki Murakumo Mutsuki Nagatsuki Oboro Satsuki Sazanami Shikinami Shirayuki Ushio Wakaba
Light CruisersIsuzu Jintsuu Kiso Kuma Nagara Naka Natori Sendai Tama Tatsuta Tenryuu Yura
Heavy CruisersChikuma Choukai Mogami Tone
MDestroyersAkatsuki Hatsushimo Hibiki Ushio Wakaba
NDestroyersAkatsuki Akebono Ayanami Fubuki Fumizuki Hamakaze Hatsuharu Hatsushimo Hatsuyuki Hibiki Ikazuchi Inazuma Isonami Kawakaze Kikuzuki Kisaragi Mikazuki Miyuki Mochizuki Murakumo Mutsuki Nagatsuki Nenohi Oboro Satsuki Sazanami Shikinami Shirayuki Tanikaze Umikaze Urakaze Ushio Wakaba
Light CruisersIsuzu Jintsuu Kiso Kuma Nagara Naka Natori Sendai Tama Tatsuta Tenryuu Yura
Heavy CruisersAtago Chikuma Choukai Maya Mikuma Mogami Takao Tone
PDestroyersAkebono Amagiri Ayanami Fubuki Fumizuki Hamakaze Hatsushimo Hatsuyuki Ikazuchi Isonami Kawakaze Kikuzuki Kisaragi Mikazuki Miyuki Mochizuki Murakumo Mutsuki Nagatsuki Oboro Sagiri Satsuki Shikinami Shirayuki Tanikaze Umikaze Urakaze
Light CruisersIsuzu Jintsuu Kiso Kuma Nagara Naka Natori Sendai Tama Tatsuta Tenryuu Yura
Heavy CruisersAtago Chikuma Choukai Maya Mikuma Mogami Takao Tone
SDestroyersAkatsuki Akebono Amagiri Ayanami Fubuki Fumizuki Hamakaze Hatsuharu Hatsushimo Hatsuyuki Hibiki Ikazuchi Inazuma Isonami Kawakaze Kikuzuki Kisaragi Mikazuki Miyuki Mochizuki Murakumo Mutsuki Nagatsuki Nenohi Oboro Sagiri Satsuki Sazanami Shikinami Shirayuki Tanikaze Umikaze Urakaze Ushio Wakaba
Light CruisersIsuzu Jintsuu Kiso Kuma Nagara Naka Natori Sendai Tama Tatsuta Tenryuu Yura
Heavy CruisersAtago Chikuma Choukai Maya Mikuma Mogami Takao Tone
Aircraft CarriersUnryuu
Auxiliary ShipsAkashi
UDestroyer EscortsEtorofu Kunashiri
DestroyersAkizuki Arare Asashio Kagerou Kasumi Kawakaze Michishio Ooshio Samidare Shigure Shiranui Shiratsuyu Suzukaze Umikaze Yuudachi
Light CruisersIsuzu Kiso Kuma Nagara Sendai Tama Yura
Heavy CruisersAoba Ashigara Atago Chikuma Choukai Furutaka Haguro Kako Kinugasa Maya Mogami Myoukou Nachi Takao Tone
BattleshipsHaruna Hiei Kirishima Kongou Hyuuga Ise Mutsu Nagato
Aircraft CarriersAkagi Hiryuu Kaga Shoukaku Souryuu Zuikaku
Light Aircraft CarriersHiyou Houshou Junyou Kasuga Maru Ryuujou
Seaplane TendersChitose Chiyoda
SubmarinesLuigi Torelli
Auxiliary ShipsTaigei


E-4

OoyodoE-4Winter2018.png

Beyond Samar...
サマール沖 その先へ――

Information

  • Event Tag: 2018WinterGreenTag.png Fall2017YellowTag.png

Note: Tags are dependant on the Fleet type you use on the map, for more details check the event guide

Boss: Escort Water Princess

  • Hard (): 4400
  • Medium (): 4400
  • Easy (): 4400
  • Very Easy (): 4400

Key Rewards:

Winter 2018 Event E-4 Banner.png
Winter2018E-4Map.png

Branching rules

E-4 Branching Rules Starting Points
Nodes Rules
Start
1
  • Surface Task Force
  • Carrier Task Force
2
  • Single Fleet
  • Strike Force


E-4 Branching Rules North
Nodes Rules
B
D
  • Do not meet the requirements to go to E.
E
  • Meet all of the following requirements:
    • Amount of ships with Slow base speed ≦ 3 (Engine irrelevant)
    • Amount of Kurita Fleet members ≧ 4/6/8 on Easy/Medium/Hard
    • Surface Task Force
E
G
  • Do not meet the requirements to go to I.
I
  • Meet all of the following requirements:
    • Amount of ships with Slow base speed ≦ 4 (Engine irrelevant)
    • Surface Task Force
Q
P
  • Meet all of the following requirements:
    • Do not meet the requirement to go to S.
    • Amount of Kurita Fleet members ≧ ?/?/9? on Easy/Medium/Hard
    • Surface Task Force
S
  • Meet all of the following requirements:
    • Amount of Kurita Fleet members ≧ 5/7/10 on Easy/Medium/Hard
    • Surface Task Force
T
  • Do not meet the requirements to go to either S or P.
S
R
  • Active branching
V
V
U
  • Fail the LoS check.
W
  • Pass the LoS check.


E-4 Branching Rules South
Nodes Rules
H
J
  • Do not meet the requirements to go to K.
K
  • Fast Fleet
  • Or meet all of the following requirements:
    • Amount of Nishimura Fleet members ≧ 3/4/6 on Easy/Medium/Hard
    • Fleet contains no SS(V)
    • Fleet contains no CV(L/B)
    • Amount of (F)BB(V) ≦ 2

Branching compositions were reported over the course of the event.

Tips

Map Info

Note: All info is currently based upon initial reports, so take the advice with caution before using your fleet regarding what may come in later missions.

Event Planning

  • This map utilizes the same locks as E-2. However, Fast speed is no longer a hard requirement, although some restrictions apply (up to 3 slow ships, no overriding wiht boilers)
  • CAVs like Suzuya, Kumano, Tone, and Chikuma can be used for E-4 as part of the historical fleet there, but at least one CAV should be saved for E5 and E6.
Tag Notes
2018WinterGreenTag.png
Fall2017YellowTag.png
  • This map requires you to organize the Kurita Fleet and Nishimura Fleet.
    • For more details on Historical Kurita/Suzuki and Nishimura Fleet members, please view the Historical Background for more details.
  • Ships formed in the Combined Fleet with no tag will use the Kurita Fleet Tag.
    • When forming the Kurita Fleet, both Kurita and Suzuki Fleet members may be used.
  • Ships formed in the Striking Force Fleet with no tag will be marked as the Nishimura Fleet Tag.

Unlocking the Boss Node

  • Casual: Reach Node M
  • Easy: Reach Node N
  • Med: Score B+ Rank at Node N
  • Hard: Score A+ Rank at Node N

Nishimura Fleet Phase

Recommended Fleet
2 BBV, 1 CAV, 4DD (Nishimura Fleet members required Easy - 3 , Normal - 5, Hard - 6)

Overall, the Nishimura phase is nearly identical to its E-2 counterpart and is extremely straightforward.

The Vanguard Formation can be used to protect the fleet until the target node is reached. As with E2, PT Imps will appear on nodes H and M, ships equipped with an Anti-Air Gun and/or Skilled Lookouts should easily counter them. (See PT Imp Group page for more details)

Node N contains an enemy fleet consisting of mostly BBs in a battle beginning at night, as only an A rank is required even on hard, this should be a fairly straightforward battle

Once the required condition (above) has been completed, the path to the boss will appear, commencing the Kurita fleet phase.

Recommended LBAS for Nishimura Fleet

  • 3 Bombers 1 ASW Bomber to Node F (node with mixed enemy fleet including 1 submarine)
  • 4 Fighters / Interceptors to Node C (air battle node)

Use of the in-route/node support expedition is recommended should difficulties arise. Please note that Node N is not a boss node.

Kurita Fleet Phase

Recommended Fleets
2-4 (F)BB 2CVL + CL2DD 2CA CLT/CA 2-4 (F)BB CV CAV + CL2DD 2CA CLT/CA

Note: The route requires no more than 3 slow ships based on ORIGINAL speed, turbines and boilers may NOT be used to override the requirements.

This route involves 2 airstrikes followed by 3 surface battles prior to the boss.

  • This phase requires a very high amount of fighter power, with CVLs as full fighter carriers not being uncommon
    • If additional air power is required, Nagato, Yamato, and Musashi can all fit seaplane fighters if needed, which will usually require the tradeoff of an AP shell (except on Musashi)
    • Suzuya and Kumano can be used as CVLs on this map, however, if they are unavailable, then a CV+CAV combo may be used instead
  • On the boss node, ships in the escort fleet can also participate in the air battle (combined fleet vs combined fleet), should Suzuya and Kumano be used in the escort fleet, they can still contribute to the air fight here.
  • Maya Kai Ni (also a Kurita Fleet member) is highly recommended for this map, both for her AACI, and also as a very strong attacker in the escort fleet, she is capable of running a TCI if luckmodded.


  • The primary challenges are the surface nodes and the penultimate node, with up to 4 Nu-kais or 6 Rus.
  • A 12cm 30 Tube Rocket Launcher Kai 2 has a chance to neutralize the damage done by an airstrike if equipped on a BBV, CV(B/L), AV, or CAV. In this case, it would be invaluable for protecting your vulnerable CVLs

The FCF is usually for retreating damaged ships, however, this map possesses some differences

  • 5/7/10 (Easy, Med, and Hard respectively) Kurita Fleet ships are are required for the shortest route to the boss at node Q.
  • The only node where the FCF is completely safe to use is therefore Node R (the pre-boss node), after the Kurita member check at node Q.

Despite this issue, bringing an FCF is still a valid option especially when chipping, given the difficulty of node R. Additionally, there is no LoS check between the pre-boss and boss nodes.


Battling the Escort Water Princess

The Escort Water Princess will be in a combined fleet, notably, her main fleet includes transport ships which themselves pose little threat to your fleet other than drawing fire.

The boss will only attack your fleet at night if you have a searchlight equipped; consider the risk of an attack against the rewards of bringing one to increase your night battling capability.

The boss, especially on hard mode, has extremely high armor (278 on hard), torpedo CIs here are highly recommended. Yukikaze and Myoukou are amongst the best choices for this map to take advantage of the Kurita fleet bonuses, especially in the absence of a luckmodded Maya/Choukai .

With regard to LBAS options, at least 3 bombers should be used, with the final slot being either a bomber or fighter. There is no point in using a fighter if doing so would not change the air state from AI to AD (see aerial combat).

AO as an option

With regard to final form (on hard mode), an AO with one Maritime Resupply may be considered to offset the fuel and ammo penalties.

Nonetheless, there are two key tradeoffs that need to be made:

  • Firstly, there is a restriction of 3 ships with an base speed of "Slow", Hayasui being one of them would almost certainly require an extra raid node (or a slow BB to be removed in favor of a Kongou).
  • Secondly, Hayasui would fit in the escort fleet alongside CL2DD, necessitating the removal of a CA or CLT from the composition, in itself significant.
    • Hard mode only allows up to 2 non-Kurita ships, of which Hayasui and a CLT would be, therefore requiring all 10 others to be historical ships (therefore shutting Abukuma usage out)

The Friend Fleet

It is possible to influence what friend fleets will arrive:

  • With the exception of DesDiv 19, Friend fleets will not appear if a member of your fleet matches one of theirs.
    • The best possible friend fleet that can arrive is the Nishimura fleet with its 7 members
  • Maya and Yukikaze would be excellent choices for E4 even if this mechanic had not existed, and as such automatically exclude the possibility of CruDiv4 and the Guadacanal fleet

At this point, the three fleets which could appear are DesDiv19 (default), the European fleet (weakish), and Nishimura (ideal)

To exclude the European fleet would require one of Warspite, Ark Royal, Richelieu, or Jervis to be run. The only non-impractical way to exclude this fleet would be to use Richelieu in place of a Kongou (or Warspite in place of a Nagato/Yamato). Using Richelieu, of course, comes with its tradeoffs in terms of fleet composition, and may be more practical for medium or easy difficulties.

LBAS Recommendations

  • 4 Land-Based Bombers - For Node R

This node requires a combat radius of 5. There being no enemy carriers here allows 4 bombers to be run.

  • 3 Bombers +(Fighter or Bomber) - For Boss node

This node requires a combat radius of 4.

At least three bombers should be sent to the boss, the fourth group, however, depend upon the difficulty. Achieving AD (on hard) requires approximately 96+ fighter power, if this threshold cannot be reached with the addition of a single fighter (remember that bombers contribute AA as well), it would simply be better to use four bombers. (link provided below)

On Last Dance, you may wish to consider committing both LBAS to the boss node to maximize your chances of victory. As with other last dance runs, both support expeditions are recommended; sparkling your fleet is also an additional option should issues arise.

Additional Reading: LBAS Fighter Chart


Show/Hide Nodes and Enemy Encounters
Nodes and Enemy Encounters
NodePatternXpNode InfoFormAir
A
深海潜水艦部隊 阻止線
Pattern 1 Submarine So-Class eliteSubmarine So-ClassSubmarine So-ClassSubmarine So-ClassSubmarine So-Class
Formation 4: Echelon
Formation 5: Line Abreast
Pattern 2 Submarine So-Class eliteSubmarine So-Class eliteSubmarine So-ClassSubmarine So-ClassSubmarine So-Class
Formation 4: Echelon
Formation 5: Line Abreast
Pattern 3 Submarine So-Class eliteSubmarine So-Class eliteSubmarine So-Class eliteSubmarine So-ClassSubmarine So-Class
Formation 4: Echelon
Formation 5: Line Abreast
C
深海任務部隊 空母群
Air Battle Node
Pattern 1 Standard Carrier Wo-Class Kai flagshipLight Carrier Nu-Class eliteLight Carrier Nu-Class eliteLight Cruiser Tsu-Class eliteDestroyer Ha-Class Late ModelDestroyer Ha-Class Late Model
Formation 3: Diamond
AP:104
AS:234
AS+:468
Pattern 2 Standard Carrier Wo-Class Kai flagshipLight Carrier Nu-Class eliteLight Carrier Nu-Class eliteLight Cruiser Tsu-Class eliteDestroyer Ha-Class Late ModelDestroyer Ha-Class Late Model
Formation 3: Diamond
AP:134
AS:302
AS+:603
Pattern 3 Standard Carrier Wo-Class Kai flagshipLight Carrier Nu-Class eliteLight Carrier Nu-Class eliteLight Cruiser Tsu-Class eliteDestroyer Ha-Class Late ModelDestroyer Ha-Class Late Model
Formation 3: Diamond
AP:164
AS:369
AS+:738
D
深海任務部隊 艦載機群
Air Battle Node
Pattern 1 Escort Water PrincessLight Carrier Nu-Class flagshipLight Carrier Nu-Class eliteLight Cruiser Tsu-Class eliteDestroyer Ha-Class Late ModelDestroyer Ha-Class Late Model
Formation 3: Diamond
AP:208
AS:467
AS+:933
Pattern 2 Escort Water PrincessLight Carrier Nu-Class flagshipLight Carrier Nu-Class flagshipLight Cruiser Tsu-Class eliteDestroyer Ha-Class Late ModelDestroyer Ha-Class Late Model
Formation 3: Diamond
AP:233
AS:524
AS+:1047
Pattern 3 Escort Water PrincessLight Carrier Nu-Class flagshipLight Carrier Nu-Class flagshipLight Carrier Nu-Class flagshipDestroyer Ha-Class Late ModelDestroyer Ha-Class Late Model
Formation 3: Diamond
AP:304
AS:684
AS+:1368
E
深海任務部隊 空母群
Air Battle Node
Pattern 1 Standard Carrier Wo-Class Kai flagshipLight Carrier Nu-Class eliteLight Carrier Nu-Class eliteLight Cruiser Tsu-Class eliteDestroyer Ha-Class Late ModelDestroyer Ha-Class Late Model
Formation 3: Diamond
AP:104
AS:234
AS+:468
Pattern 2 Standard Carrier Wo-Class Kai flagshipLight Carrier Nu-Class eliteLight Carrier Nu-Class eliteLight Cruiser Tsu-Class eliteDestroyer Ha-Class Late ModelDestroyer Ha-Class Late Model
Formation 3: Diamond
AP:134
AS:302
AS+:603
Pattern 3 Standard Carrier Wo-Class Kai flagshipLight Carrier Nu-Class eliteLight Carrier Nu-Class eliteLight Cruiser Tsu-Class eliteDestroyer Ha-Class Late ModelDestroyer Ha-Class Late Model
Formation 3: Diamond
AP:164
AS:369
AS+:738
F
深海任務部隊 哨戒警戒線
Pattern 1 Light Cruiser He-Class flagshipLight Cruiser Tsu-Class eliteDestroyer Ha-Class Late ModelDestroyer Ha-Class Late ModelDestroyer Ha-Class Late ModelSubmarine So-Class elite
Formation 1: Line Ahead
Formation 4: Echelon
Pattern 2 Light Cruiser He-Class flagshipLight Cruiser Tsu-Class eliteDestroyer Ha-Class Late ModelDestroyer Ha-Class Late ModelDestroyer Ha-Class Late ModelSubmarine So-Class flagship
Formation 1: Line Ahead
G
深海任務部隊 艦載機群
Air Battle Node
Pattern 1
H
深海任務部隊 哨戒警戒線
Pattern 1 Destroyer Na-Class eliteDestroyer Na-Class elitePT Imp GroupPT Imp GroupPT Imp GroupPT Imp Group
Formation 1: Line Ahead
Formation 2: Double Line
Formation 4: Echelon
I
深海任務部隊 艦載機群
Air Battle Node
Pattern 1 Light Carrier Nu-Class flagshipLight Carrier Nu-Class flagshipLight Carrier Nu-Class flagshipDestroyer Na-Class Late Model eliteDestroyer Na-Class eliteDestroyer Na-Class elite
Formation 3: Diamond
AP:226
AS:507
AS+:1014
Pattern 2 Light Carrier Nu-Class flagshipLight Carrier Nu-Class flagshipLight Carrier Nu-Class flagshipDestroyer Na-Class Late Model eliteDestroyer Na-Class eliteDestroyer Na-Class elite
Formation 3: Diamond
AP:263
AS:591
AS+:1182
Pattern 3 Light Carrier Nu-Class flagshipLight Carrier Nu-Class flagshipLight Carrier Nu-Class flagshipLight Carrier Nu-Class flagshipDestroyer Na-Class eliteDestroyer Na-Class elite
Formation 3: Diamond
AP:288
AS:648
AS+:1296
J
深海任務部隊 艦載機群
Air Battle Node
Pattern 1 Escort Water PrincessLight Carrier Nu-Class eliteLight Carrier Nu-Class eliteLight Cruiser Tsu-Class eliteDestroyer Ha-Class Late ModelDestroyer Ha-Class Late Model
Formation 3: Diamond
AP:152
AS:342
AS+:684
Pattern 2 Escort Water PrincessLight Carrier Nu-Class eliteLight Carrier Nu-Class eliteLight Cruiser Tsu-Class eliteDestroyer Ha-Class Late ModelDestroyer Ha-Class Late Model
Formation 3: Diamond
AP:182
AS:410
AS+:819
Pattern 3 Escort Water PrincessLight Carrier Nu-Class eliteLight Carrier Nu-Class eliteLight Carrier Nu-Class eliteDestroyer Ha-Class Late ModelDestroyer Ha-Class Late Model
Formation 3: Diamond
AP:228
AS:513
AS+:1026
M
深海任務部隊 海峡守備PT部隊
Night Battle Node
Pattern 1 PT Imp GroupPT Imp GroupPT Imp GroupPT Imp GroupPT Imp Group
Formation 1: Line Ahead
Formation 4: Echelon
Pattern 2 PT Imp GroupPT Imp GroupPT Imp GroupPT Imp GroupPT Imp GroupPT Imp Group
Formation 1: Line Ahead
N
深海任務部隊 海峡守備残存部隊
Night Battle Node
Pattern 1 Battleship Ru-Class Kai flagshipBattleship Ru-Class flagshipBattleship Ru-Class flagshipBattleship Ru-Class flagshipBattleship Ru-Class flagshipBattleship Ru-Class flagship
Formation 1: Line Ahead
Pattern 2 Battleship Ru-Class Kai flagshipBattleship Ru-Class flagshipBattleship Ru-Class flagshipBattleship Ru-Class flagshipHeavy Cruiser Ne-Class eliteHeavy Cruiser Ne-Class elite
Formation 1: Line Ahead
Pattern 3 Battleship Ru-Class Kai flagshipBattleship Ru-Class flagshipBattleship Ru-Class flagshipBattleship Ru-Class flagshipDestroyer Na-Class Late Model eliteDestroyer Na-Class Late Model elite
Formation 1: Line Ahead
O
深海任務部隊 飴玉護衛空母I群
Pattern 1 Light Carrier Nu-Class flagshipLight Carrier Nu-Class eliteLight Carrier Nu-Class eliteDestroyer Ha-Class Late ModelDestroyer Ha-Class Late ModelDestroyer I-Class Late Model
Formation 3: Diamond
AP:192
AS:432
AS+:864
Pattern 2 Light Carrier Nu-Class flagshipLight Carrier Nu-Class flagshipLight Carrier Nu-Class eliteLight Carrier Nu-Class eliteDestroyer Ha-Class Late ModelDestroyer Ha-Class Late Model
Formation 3: Diamond
AP:255
AS:573
AS+:1146
Pattern 3 Light Carrier Nu-Class flagshipLight Carrier Nu-Class flagshipLight Carrier Nu-Class flagshipDestroyer Ha-Class Late ModelDestroyer Ha-Class Late ModelDestroyer I-Class Late Model
Formation 3: Diamond
AP:226
AS:507
AS+:1014
P
深海任務部隊 飴玉護衛空母II群
Pattern 1 Light Carrier Nu-Class flagshipLight Carrier Nu-Class flagshipLight Carrier Nu-Class flagshipDestroyer Na-Class Late Model eliteDestroyer Na-Class eliteDestroyer Na-Class elite
Formation 3: Diamond
AP:226
AS:507
AS+:1014
Pattern 2 Light Carrier Nu-Class flagshipLight Carrier Nu-Class flagshipLight Carrier Nu-Class flagshipDestroyer Na-Class Late Model eliteDestroyer Na-Class eliteDestroyer Na-Class elite
Formation 3: Diamond
AP:263
AS:591
AS+:1182
Pattern 3 Light Carrier Nu-Class flagshipLight Carrier Nu-Class flagshipLight Carrier Nu-Class flagshipLight Carrier Nu-Class flagshipDestroyer Na-Class eliteDestroyer Na-Class elite
Formation 3: Diamond
AP:288
AS:648
AS+:1296
Q
深海任務部隊 飴玉護衛空母III群
Pattern 1 Light Carrier Nu-Class flagshipLight Carrier Nu-Class flagshipLight Carrier Nu-Class flagshipDestroyer Na-Class Late Model eliteDestroyer Na-Class eliteDestroyer Na-Class elite
Formation 3: Diamond
AP:226
AS:507
AS+:1014
Pattern 2 Light Carrier Nu-Class flagshipLight Carrier Nu-Class flagshipLight Carrier Nu-Class flagshipDestroyer Na-Class Late Model eliteDestroyer Na-Class eliteDestroyer Na-Class elite
Formation 3: Diamond
AP:263
AS:591
AS+:1182
Pattern 3 Light Carrier Nu-Class flagshipLight Carrier Nu-Class flagshipLight Carrier Nu-Class flagshipLight Carrier Nu-Class flagshipDestroyer Na-Class eliteDestroyer Na-Class elite
Formation 3: Diamond
AP:288
AS:648
AS+:1296
R
深海任務部隊 上陸支援部隊
Enemy Combined Fleet
Pattern 1
main fleet
Battleship Ru-Class flagshipBattleship Ru-Class flagshipBattleship Ru-Class flagshipBattleship Ru-Class eliteBattleship Ru-Class eliteBattleship Ru-Class elite
escort fleet
Light Cruiser He-Class flagshipLight Cruiser Tsu-Class eliteDestroyer Ha-Class Late ModelDestroyer Ha-Class Late ModelDestroyer I-ClassDestroyer I-Class
Cruising Formation 4: Battle Formation
Pattern 2
main fleet
Battleship Ru-Class Kai flagshipBattleship Ru-Class flagshipBattleship Ru-Class flagshipBattleship Ru-Class eliteBattleship Ru-Class eliteBattleship Ru-Class elite
escort fleet
Light Cruiser He-Class flagshipLight Cruiser Tsu-Class eliteDestroyer Na-Class eliteDestroyer Na-Class eliteDestroyer Na-Class eliteDestroyer Na-Class elite
Cruising Formation 4: Battle Formation
T
深海任務部隊 艦載機群
Air Battle Node
Pattern 1
V
深海任務部隊 艦載機群
Air Battle Node
Pattern 1 Standard Carrier Wo-Class Kai flagshipStandard Carrier Wo-Class Kai flagshipLight Carrier Nu-Class eliteLight Cruiser Tsu-Class eliteDestroyer Ha-Class Late ModelDestroyer Ha-Class Late Model
Formation 3: Diamond
AP:222
AS:500
AS+:999
Pattern 2 Standard Carrier Wo-Class Kai flagshipStandard Carrier Wo-Class Kai flagshipLight Carrier Nu-Class flagshipLight Cruiser Tsu-Class eliteDestroyer Ha-Class Late ModelDestroyer Ha-Class Late Model
Formation 3: Diamond
AP:239
AS:537
AS+:1074
Pattern 3 Standard Carrier Wo-Class Kai flagshipStandard Carrier Wo-Class Kai flagshipLight Carrier Nu-Class flagshipLight Cruiser Tsu-Class eliteDestroyer Ha-Class Late ModelDestroyer Ha-Class Late Model
Formation 3: Diamond
AP:248
AS:557
AS+:1113
W
深海任務部隊 機動部隊群
Pattern 1 Standard Carrier Wo-Class Kai flagshipStandard Carrier Wo-Class Kai flagshipLight Carrier Nu-Class eliteLight Cruiser Tsu-Class eliteDestroyer Ha-Class Late ModelDestroyer Ha-Class Late Model
Formation 3: Diamond
AP:222
AS:500
AS+:999
Pattern 2 Standard Carrier Wo-Class Kai flagshipStandard Carrier Wo-Class Kai flagshipLight Carrier Nu-Class flagshipLight Cruiser Tsu-Class eliteDestroyer Ha-Class Late ModelDestroyer Ha-Class Late Model
Formation 3: Diamond
AP:239
AS:537
AS+:1074
Pattern 3 Standard Carrier Wo-Class Kai flagshipStandard Carrier Wo-Class Kai flagshipLight Carrier Nu-Class flagshipLight Cruiser Tsu-Class eliteDestroyer Ha-Class Late ModelDestroyer Ha-Class Late Model
Formation 3: Diamond
AP:248
AS:557
AS+:1113
X
深海レイテ侵攻 主力輸送船団
Enemy Combined Fleet
Pattern 1
main fleet
Escort Water PrincessLight Carrier Nu-Class flagshipTransport Ship Wa-Class flagshipTransport Ship Wa-Class flagshipBattleship Ru-Class flagshipBattleship Ru-Class flagship
escort fleet
Heavy Cruiser Ne-Class eliteHeavy Cruiser Ne-Class eliteDestroyer Na-Class eliteDestroyer Na-Class eliteDestroyer Na-Class eliteDestroyer Na-Class elite
Cruising Formation 4: Battle Formation
AP:190
AS:428
AS+:855
Pattern 2
Final Form
main fleet
Escort Water Princess - DamagedLight Carrier Nu-Class flagshipTransport Ship Wa-Class flagshipTransport Ship Wa-Class flagshipBattleship Ru-Class Kai flagshipBattleship Ru-Class Kai flagship
escort fleet
Heavy Cruiser Ne-Class eliteHeavy Cruiser Ne-Class eliteDestroyer Na-Class Late Model eliteDestroyer Na-Class Late Model eliteDestroyer Na-Class Late Model eliteDestroyer Na-Class Late Model elite
Cruising Formation 4: Battle Formation
Unknown

Show/Hide Nodes and Enemy Encounters
Nodes and Enemy Encounters
NodePatternXpNode InfoFormAir
A
深海潜水艦部隊 阻止線
Pattern 1 Submarine So-Class eliteSubmarine So-ClassSubmarine So-ClassSubmarine So-ClassSubmarine So-Class
Formation 4: Echelon
Formation 5: Line Abreast
Pattern 2 Submarine So-Class eliteSubmarine So-ClassSubmarine So-ClassSubmarine So-Class
Formation 4: Echelon
Formation 5: Line Abreast
Pattern 3 Submarine So-Class eliteSubmarine So-Class eliteSubmarine So-ClassSubmarine So-ClassSubmarine So-Class
Formation 4: Echelon
Formation 5: Line Abreast
B
Pattern 1"Must be my imagination" (battle avoided)
C
深海任務部隊 空母群
Air Battle Node
Pattern 1 Standard Carrier Wo-Class flagshipLight Carrier Nu-ClassLight Carrier Nu-ClassLight Cruiser Tsu-ClassDestroyer Ro-Class Late ModelDestroyer Ro-Class Late Model
Formation 3: Diamond
AP:78
AS:174
AS+:348
Pattern 2 Standard Carrier Wo-Class flagshipLight Carrier Nu-Class eliteLight Carrier Nu-ClassLight Cruiser Tsu-ClassDestroyer Ro-Class Late ModelDestroyer Ro-Class Late Model
Formation 3: Diamond
AP:88
AS:198
AS+:396
Pattern 3 Standard Carrier Wo-Class flagshipLight Carrier Nu-Class eliteLight Carrier Nu-Class eliteLight Cruiser Tsu-ClassDestroyer Ro-Class Late ModelDestroyer Ro-Class Late Model
Formation 3: Diamond
AP:99
AS:222
AS+:444
D
深海任務部隊 艦載機群
Air Battle Node
Pattern 1 Escort Water PrincessLight Carrier Nu-Class flagshipLight Carrier Nu-Class eliteLight Cruiser Tsu-Class eliteDestroyer Ha-Class Late ModelDestroyer Ha-Class Late Model
Formation 3: Diamond
AP:208
AS:467
AS+:933
Pattern 2 Escort Water PrincessLight Carrier Nu-Class flagshipLight Carrier Nu-Class flagshipLight Cruiser Tsu-Class eliteDestroyer Ha-Class Late ModelDestroyer Ha-Class Late Model
Formation 3: Diamond
AP:233
AS:524
AS+:1047
Pattern 3 Escort Water PrincessLight Carrier Nu-Class flagshipLight Carrier Nu-Class eliteLight Carrier Nu-Class eliteDestroyer Ro-Class Late ModelDestroyer Ro-Class Late Model
Formation 3: Diamond
AP:254
AS:570
AS+:1140
Pattern 4 Escort Water PrincessLight Carrier Nu-Class flagshipLight Carrier Nu-Class flagshipLight Carrier Nu-Class flagshipDestroyer Ha-Class Late ModelDestroyer Ha-Class Late Model
Formation 3: Diamond
AP:304
AS:684
AS+:1368
E
深海任務部隊 空母群
Air Battle Node
Pattern 1 Standard Carrier Wo-Class flagshipLight Carrier Nu-Class eliteLight Carrier Nu-Class eliteLight Cruiser Tsu-ClassDestroyer Ro-Class Late ModelDestroyer Ro-Class Late Model
Formation 3: Diamond
AP:99
AS:222
AS+:444
Pattern 2 Standard Carrier Wo-Class Kai flagshipLight Carrier Nu-Class eliteLight Carrier Nu-Class eliteLight Cruiser Tsu-Class eliteDestroyer Ha-Class Late ModelDestroyer Ha-Class Late Model
Formation 3: Diamond
AP:104
AS:234
AS+:468
Pattern 3 Standard Carrier Wo-Class Kai flagshipLight Carrier Nu-Class eliteLight Carrier Nu-Class eliteLight Cruiser Tsu-Class eliteDestroyer Ha-Class Late ModelDestroyer Ha-Class Late Model
Formation 3: Diamond
AP:134
AS:302
AS+:603
Pattern 4 Standard Carrier Wo-Class Kai flagshipLight Carrier Nu-Class eliteLight Carrier Nu-Class eliteLight Cruiser Tsu-Class eliteDestroyer Ha-Class Late ModelDestroyer Ha-Class Late Model
Formation 3: Diamond
AP:164
AS:369
AS+:738
F
深海任務部隊 哨戒警戒線
Pattern 1 Light Cruiser Ho-Class flagshipLight Cruiser Tsu-ClassDestroyer Ro-Class Late ModelDestroyer Ro-Class Late ModelDestroyer I-ClassSubmarine So-Class
Formation 1: Line Ahead
Formation 4: Echelon
Pattern 2 Light Cruiser Ho-Class flagshipLight Cruiser Tsu-ClassDestroyer Ro-Class Late ModelDestroyer Ro-Class Late ModelDestroyer I-ClassSubmarine So-Class elite
Formation 1: Line Ahead
G
深海任務部隊 艦載機群
Air Battle Node
Pattern 1 Standard Carrier Wo-Class flagshipStandard Carrier Wo-Class flagshipLight Carrier Nu-Class flagshipBattleship Ta-Class flagshipHeavy Cruiser Ne-Class eliteHeavy Cruiser Ne-Class elite
Formation 3: Diamond
AP:200
AS:450
AS+:900
Pattern 2 Standard Carrier Wo-Class Kai flagshipStandard Carrier Wo-Class flagshipLight Carrier Nu-Class flagshipBattleship Ta-Class flagshipHeavy Cruiser Ne-Class eliteHeavy Cruiser Ne-Class elite
Formation 3: Diamond
AP:220
AS:494
AS+:987
Pattern 3 Standard Carrier Wo-Class Kai flagshipStandard Carrier Wo-Class Kai flagshipLight Carrier Nu-Class flagshipBattleship Ta-Class flagshipHeavy Cruiser Ne-Class eliteHeavy Cruiser Ne-Class elite
Formation 3: Diamond
AP:239
AS:537
AS+:1074
H
深海任務部隊 哨戒警戒線
Pattern 1 Destroyer Ro-Class Late ModelDestroyer Ro-Class Late ModelPT Imp GroupPT Imp GroupPT Imp GroupPT Imp Group
Formation 1: Line Ahead
Formation 2: Double Line
Formation 4: Echelon
I
深海任務部隊 艦載機群
Air Battle Node
Pattern 1 Light Carrier Nu-Class eliteLight Carrier Nu-Class eliteLight Carrier Nu-Class eliteDestroyer Na-ClassDestroyer Na-ClassDestroyer Ro-Class Late Model
Formation 3: Diamond
AP:108
AS:243
AS+:486
Pattern 2 Light Carrier Nu-Class flagshipLight Carrier Nu-Class flagshipLight Carrier Nu-Class eliteDestroyer Na-ClassDestroyer Na-ClassDestroyer Ro-Class Late Model
Formation 3: Diamond
AP:172
AS:386
AS+:771
Pattern 3 Light Carrier Nu-Class flagshipLight Carrier Nu-Class eliteLight Carrier Nu-Class eliteLight Carrier Nu-Class eliteDestroyer Na-ClassDestroyer Na-Class
Formation 3: Diamond
AP:201
AS:452
AS+:903
J
深海任務部隊 艦載機群
Air Battle Node
Pattern 1 Escort Water PrincessLight Carrier Nu-Class eliteLight Carrier Nu-Class eliteLight Cruiser Tsu-ClassDestroyer Ro-Class Late ModelDestroyer Ro-Class Late Model
Formation 3: Diamond
AP:122
AS:275
AS+:549
Pattern 2 Escort Water PrincessLight Carrier Nu-Class eliteLight Carrier Nu-Class eliteLight Carrier Nu-Class eliteDestroyer Ro-Class Late ModelDestroyer Ro-Class Late Model
Formation 3: Diamond
AP:168
AS:378
AS+:756
K
Pattern 1"Must be my imagination" (battle avoided)
L
Pattern 1"Must be my imagination" (battle avoided)
M
深海任務部隊 海峡守備PT部隊
Night Battle Node
Pattern 1 PT Imp GroupPT Imp GroupPT Imp GroupPT Imp Group
Formation 1: Line Ahead
Formation 4: Echelon
Pattern 2 PT Imp GroupPT Imp GroupPT Imp GroupPT Imp GroupPT Imp Group
Formation 1: Line Ahead
N
深海任務部隊 海峡守備残存部隊
Night Battle Node
Pattern 1 Battleship Ru-Class flagshipBattleship Ru-Class flagshipBattleship Ru-Class eliteBattleship Ru-Class eliteHeavy Cruiser Ne-ClassHeavy Cruiser Ne-Class
Formation 1: Line Ahead
Pattern 2 Battleship Ru-Class flagshipBattleship Ru-Class flagshipBattleship Ru-Class eliteBattleship Ru-Class eliteDestroyer Na-ClassDestroyer Na-Class
Formation 1: Line Ahead
Pattern 3 Battleship Ru-Class flagshipBattleship Ru-Class flagshipBattleship Ru-Class flagshipBattleship Ru-Class flagshipBattleship Ru-Class eliteBattleship Ru-Class elite
Formation 1: Line Ahead
O
深海任務部隊 飴玉護衛空母I群
Pattern 1 Light Carrier Nu-Class eliteLight Carrier Nu-Class eliteLight Carrier Nu-Class eliteDestroyer Ro-Class Late ModelDestroyer Ro-Class Late ModelDestroyer I-Class
Formation 3: Diamond
AP:108
AS:243
AS+:486
Pattern 2 Light Carrier Nu-Class flagshipLight Carrier Nu-Class eliteLight Carrier Nu-Class eliteDestroyer Ro-Class Late ModelDestroyer Ro-Class Late ModelDestroyer I-Class
Formation 3: Diamond
AP:155
AS:348
AS+:696
Pattern 3 Light Carrier Nu-Class flagshipLight Carrier Nu-Class eliteLight Carrier Nu-Class eliteLight Carrier Nu-Class eliteDestroyer Ro-Class Late ModelDestroyer Ro-Class Late Model
Formation 3: Diamond
AP:171
AS:384
AS+:768
P
深海任務部隊 飴玉護衛空母II群
Pattern 1 Light Carrier Nu-Class eliteLight Carrier Nu-Class eliteLight Carrier Nu-Class eliteDestroyer Na-ClassDestroyer Na-ClassDestroyer Ro-Class Late Model
Formation 3: Diamond
AP:108
AS:243
AS+:486
Pattern 2 Light Carrier Nu-Class flagshipLight Carrier Nu-Class flagshipLight Carrier Nu-Class eliteDestroyer Na-ClassDestroyer Na-ClassDestroyer Ro-Class Late Model
Formation 3: Diamond
AP:172
AS:386
AS+:771
Q
深海任務部隊 飴玉護衛空母III群
Pattern 1 Light Carrier Nu-Class flagshipLight Carrier Nu-Class eliteLight Carrier Nu-Class eliteLight Carrier Nu-Class eliteDestroyer Na-ClassDestroyer Na-Class
Formation 3: Diamond
AP:201
AS:452
AS+:903
Pattern 2 Light Carrier Nu-Class flagshipLight Carrier Nu-Class flagshipLight Carrier Nu-Class flagshipDestroyer Na-Class Late Model eliteDestroyer Na-Class eliteDestroyer Na-Class elite
Formation 3: Diamond
AP:226
AS:507
AS+:1014
Pattern 3 Light Carrier Nu-Class flagshipLight Carrier Nu-Class flagshipLight Carrier Nu-Class flagshipDestroyer Na-Class Late Model eliteDestroyer Na-Class eliteDestroyer Na-Class elite
Formation 3: Diamond
AP:263
AS:591
AS+:1182
Pattern 4 Light Carrier Nu-Class flagshipLight Carrier Nu-Class flagshipLight Carrier Nu-Class flagshipLight Carrier Nu-Class flagshipDestroyer Na-Class eliteDestroyer Na-Class elite
Formation 3: Diamond
AP:288
AS:648
AS+:1296
R
深海任務部隊 上陸支援部隊
Enemy Combined Fleet
Pattern 1
main fleet
Battleship Ru-Class flagshipBattleship Ru-Class flagshipBattleship Ru-Class eliteBattleship Ru-Class eliteBattleship Ru-Class eliteBattleship Ru-Class elite
escort fleet
Light Cruiser Ho-Class flagshipLight Cruiser Tsu-ClassDestroyer Ro-Class Late ModelDestroyer Ro-Class Late ModelDestroyer I-ClassDestroyer I-Class
Cruising Formation 4: Battle Formation
Pattern 2
main fleet
Battleship Ru-Class flagshipBattleship Ru-Class flagshipBattleship Ru-Class flagshipBattleship Ru-Class eliteBattleship Ru-Class eliteBattleship Ru-Class elite
escort fleet
Light Cruiser Ho-Class flagshipLight Cruiser Tsu-ClassDestroyer Na-ClassDestroyer Na-ClassDestroyer I-ClassDestroyer I-Class
Cruising Formation 4: Battle Formation
S
Pattern 1Choose your route
T
深海任務部隊 艦載機群
Air Battle Node
Pattern 1 Standard Carrier Wo-Class flagshipStandard Carrier Wo-Class flagshipLight Carrier Nu-Class eliteLight Cruiser Tsu-ClassDestroyer Ro-Class Late ModelDestroyer Ro-Class Late Model
Formation 3: Diamond
AP:184
AS:413
AS+:825
U
Pattern 1"Must be my imagination" (battle avoided)
V
深海任務部隊 艦載機群
Air Battle Node
Pattern 1 Standard Carrier Wo-Class flagshipLight Carrier Nu-Class eliteLight Cruiser Tsu-ClassDestroyer Ro-Class Late ModelDestroyer Ro-Class Late ModelDestroyer Ro-Class Late Model
Formation 3: Diamond
AP:115
AS:258
AS+:516
Pattern 2 Standard Carrier Wo-Class flagshipLight Carrier Nu-Class eliteLight Carrier Nu-Class eliteLight Cruiser Tsu-ClassDestroyer Ro-Class Late ModelDestroyer Ro-Class Late Model
Formation 3: Diamond
AP:161
AS:362
AS+:723
Pattern 3 Standard Carrier Wo-Class flagshipStandard Carrier Wo-Class flagshipLight Carrier Nu-Class eliteLight Cruiser Tsu-ClassDestroyer Ro-Class Late ModelDestroyer Ro-Class Late Model
Formation 3: Diamond
AP:184
AS:413
AS+:825
W
深海任務部隊 機動部隊群
Pattern 1 Standard Carrier Wo-Class flagshipLight Carrier Nu-Class eliteLight Cruiser Tsu-ClassDestroyer Ro-Class Late ModelDestroyer Ro-Class Late ModelDestroyer Ro-Class Late Model
Formation 3: Diamond
AP:115
AS:258
AS+:516
Pattern 2 Standard Carrier Wo-Class flagshipLight Carrier Nu-Class eliteLight Carrier Nu-Class eliteLight Cruiser Tsu-ClassDestroyer Ro-Class Late ModelDestroyer Ro-Class Late Model
Formation 3: Diamond
AP:161
AS:362
AS+:723
X
深海レイテ侵攻 主力輸送船団
Enemy Combined Fleet
Pattern 1
main fleet
Escort Water PrincessTransport Ship Wa-Class flagshipTransport Ship Wa-Class flagshipTransport Ship Wa-Class flagshipBattleship Ru-Class flagshipBattleship Ru-Class flagship
escort fleet
Heavy Cruiser Ne-ClassHeavy Cruiser Ne-ClassDestroyer Ro-Class Late ModelDestroyer Ro-Class Late ModelDestroyer I-ClassDestroyer I-Class
Cruising Formation 4: Battle Formation
AP:90
AS:203
AS+:405
Pattern 2
Final Form
main fleet
Escort Water Princess - DamagedLight Carrier Nu-Class flagshipTransport Ship Wa-Class flagshipTransport Ship Wa-Class flagshipBattleship Ru-Class flagshipBattleship Ru-Class flagship
escort fleet
Heavy Cruiser Ne-ClassHeavy Cruiser Ne-ClassDestroyer Na-ClassDestroyer Na-ClassDestroyer Na-ClassDestroyer Na-Class
Cruising Formation 4: Battle Formation

Show/Hide Nodes and Enemy Encounters
Nodes and Enemy Encounters
NodePatternXpNode InfoFormAir
A
深海潜水艦部隊 阻止線
Pattern 1 Submarine So-ClassSubmarine So-ClassSubmarine So-Class
Formation 4: Echelon
Pattern 2 Submarine So-Class eliteSubmarine So-ClassSubmarine So-ClassSubmarine So-Class
Formation 4: Echelon
Formation 5: Line Abreast
B
Pattern 1"Must be my imagination" (battle avoided)
C
深海任務部隊 空母群
Air Battle Node
Pattern 1 Standard Carrier Wo-Class eliteLight Carrier Nu-ClassLight Carrier Nu-ClassLight Cruiser Tsu-ClassDestroyer I-ClassDestroyer I-Class
Formation 3: Diamond
AP:29
AS:65
AS+:129
Pattern 2 Standard Carrier Wo-Class flagshipLight Carrier Nu-ClassLight Carrier Nu-ClassLight Cruiser Tsu-ClassDestroyer I-ClassDestroyer I-Class
Formation 3: Diamond
AP:30
AS:66
AS+:132
Pattern 3 Standard Carrier Wo-Class flagshipLight Carrier Nu-Class eliteLight Carrier Nu-Class eliteLight Cruiser Tsu-ClassDestroyer I-ClassDestroyer I-Class
Formation 3: Diamond
AP:51
AS:114
AS+:228
D
深海任務部隊 艦載機群
Air Battle Node
Pattern 1 Escort Water PrincessLight Carrier Nu-ClassLight Carrier Nu-ClassLight Cruiser Tsu-ClassDestroyer I-ClassDestroyer I-Class
Formation 3: Diamond
Unknown
Pattern 2 Escort Water PrincessLight Carrier Nu-Class eliteLight Carrier Nu-Class eliteLight Cruiser Tsu-ClassDestroyer I-ClassDestroyer I-Class
Formation 3: Diamond
Unknown
Pattern 3 Escort Water PrincessLight Carrier Nu-Class eliteLight Carrier Nu-Class eliteLight Cruiser Tsu-ClassDestroyer I-ClassDestroyer I-Class
Formation 3: Diamond
Unknown
E
深海任務部隊 空母群
Air Battle Node
Pattern 1 Standard Carrier Wo-Class eliteLight Carrier Nu-ClassLight Carrier Nu-ClassLight Cruiser Tsu-ClassDestroyer I-ClassDestroyer I-Class
Formation 3: Diamond
AP:29
AS:65
AS+:129
Pattern 2 Standard Carrier Wo-Class flagshipLight Carrier Nu-ClassLight Carrier Nu-ClassLight Cruiser Tsu-ClassDestroyer I-ClassDestroyer I-Class
Formation 3: Diamond
AP:30
AS:66
AS+:132
Pattern 3 Standard Carrier Wo-Class flagshipLight Carrier Nu-Class eliteLight Carrier Nu-Class eliteLight Cruiser Tsu-ClassDestroyer I-ClassDestroyer I-Class
Formation 3: Diamond
AP:51
AS:114
AS+:228
F
深海任務部隊 哨戒警戒線
Pattern 1 Light Cruiser Ho-Class flagshipLight Cruiser Tsu-ClassDestroyer I-ClassDestroyer I-ClassSubmarine So-Class
Formation 1: Line Ahead
Formation 4: Echelon
Pattern 2 Light Cruiser Ho-Class flagshipLight Cruiser Tsu-ClassDestroyer I-Class Late ModelDestroyer I-ClassDestroyer I-ClassSubmarine So-Class
Formation 1: Line Ahead
G
深海任務部隊 艦載機群
Air Battle Node
Pattern 1 Standard Carrier Wo-ClassStandard Carrier Wo-ClassLight Carrier Nu-Class eliteBattleship Ta-ClassHeavy Cruiser Ri-ClassHeavy Cruiser Ri-Class
Formation 3: Diamond
AP:60
AS:134
AS+:267
Pattern 2 Standard Carrier Wo-Class eliteStandard Carrier Wo-Class eliteLight Carrier Nu-Class eliteBattleship Ta-ClassHeavy Cruiser Ri-ClassHeavy Cruiser Ri-Class
Formation 3: Diamond
AP:82
AS:185
AS+:369
Pattern 3 Standard Carrier Wo-Class flagshipStandard Carrier Wo-Class eliteLight Carrier Nu-Class eliteBattleship Ta-ClassHeavy Cruiser Ri-ClassHeavy Cruiser Ri-Class
Formation 3: Diamond
AP:133
AS:299
AS+:597
H
深海任務部隊 哨戒警戒線
Pattern 1 Destroyer I-ClassDestroyer I-ClassPT Imp GroupPT Imp GroupPT Imp Group
Formation 1: Line Ahead
Formation 2: Double Line
Formation 4: Echelon
I
深海任務部隊 艦載機群
Air Battle Node
Pattern 1 Light Carrier Nu-Class eliteLight Carrier Nu-ClassLight Carrier Nu-ClassDestroyer Na-ClassDestroyer I-ClassDestroyer I-Class
Formation 3: Diamond
AP:57
AS:128
AS+:255
Pattern 2 Light Carrier Nu-Class eliteLight Carrier Nu-Class eliteLight Carrier Nu-Class eliteDestroyer Na-ClassDestroyer I-ClassDestroyer I-Class
Formation 3: Diamond
AP:78
AS:176
AS+:351
Pattern 3 Light Carrier Nu-Class eliteLight Carrier Nu-Class eliteLight Carrier Nu-Class eliteLight Carrier Nu-Class eliteDestroyer Na-ClassDestroyer Na-Class
Formation 3: Diamond
AP:124
AS:279
AS+:558
J
深海任務部隊 艦載機群
Air Battle Node
Pattern 1 Escort Water PrincessLight Carrier Nu-ClassLight Carrier Nu-ClassLight Cruiser Tsu-ClassDestroyer I-ClassDestroyer I-Class
Formation 3: Diamond
Unknown
Pattern 2 Escort Water PrincessLight Carrier Nu-Class eliteLight Carrier Nu-Class eliteLight Cruiser Tsu-ClassDestroyer I-ClassDestroyer I-Class
Formation 3: Diamond
Unknown
Pattern 3 Escort Water PrincessLight Carrier Nu-Class eliteLight Carrier Nu-Class eliteLight Cruiser Tsu-ClassDestroyer I-ClassDestroyer I-Class
Formation 3: Diamond
Unknown
K
Pattern 1"Must be my imagination" (battle avoided)
L
Pattern 1"Must be my imagination" (battle avoided)
M
深海任務部隊 海峡守備PT部隊
Night Battle Node
Pattern 1 PT Imp GroupPT Imp GroupPT Imp GroupPT Imp Group
Formation 1: Line Ahead
Formation 4: Echelon
Pattern 2 PT Imp GroupPT Imp GroupPT Imp GroupPT Imp Group
Formation 1: Line Ahead
N
深海任務部隊 海峡守備残存部隊
Night Battle Node
Pattern 1 Battleship Ru-Class flagshipBattleship Ru-Class eliteBattleship Ru-Class eliteBattleship Ru-Class eliteDestroyer I-Class Late ModelDestroyer I-Class Late Model
Formation 3: Diamond
Pattern 2 Battleship Ru-Class flagshipBattleship Ru-Class eliteBattleship Ru-Class eliteBattleship Ru-Class eliteHeavy Cruiser Ne-ClassHeavy Cruiser Ne-Class
Formation 3: Diamond
Pattern 3 Battleship Ru-Class flagshipBattleship Ru-Class flagshipBattleship Ru-Class eliteBattleship Ru-Class eliteBattleship Ru-Class eliteBattleship Ru-Class elite
Formation 3: Diamond
O
深海任務部隊 飴玉護衛空母I群
Pattern 1 Light Carrier Nu-Class eliteLight Carrier Nu-ClassLight Carrier Nu-ClassDestroyer I-Class Late ModelDestroyer I-ClassDestroyer I-Class
Formation 3: Diamond
AP:57
AS:128
AS+:255
Pattern 2 Light Carrier Nu-Class eliteLight Carrier Nu-Class eliteLight Carrier Nu-Class eliteDestroyer I-Class Late ModelDestroyer I-ClassDestroyer I-Class
Formation 3: Diamond
AP:78
AS:176
AS+:351
Pattern 3 Light Carrier Nu-Class eliteLight Carrier Nu-Class eliteLight Carrier Nu-Class eliteLight Carrier Nu-Class eliteDestroyer I-Class Late ModelDestroyer I-Class Late Model
Formation 3: Diamond
AP:94
AS:212
AS+:423
P
深海任務部隊 飴玉護衛空母II群
Pattern 1 Light Carrier Nu-Class eliteLight Carrier Nu-ClassLight Carrier Nu-ClassDestroyer Na-ClassDestroyer I-ClassDestroyer I-Class
Formation 3: Diamond
AP:57
AS:128
AS+:255
Pattern 2 Light Carrier Nu-Class eliteLight Carrier Nu-Class eliteLight Carrier Nu-Class eliteDestroyer Na-ClassDestroyer I-ClassDestroyer I-Class
Formation 3: Diamond
AP:78
AS:176
AS+:351
Pattern 3 Light Carrier Nu-Class eliteLight Carrier Nu-Class eliteLight Carrier Nu-Class eliteLight Carrier Nu-Class eliteDestroyer Na-ClassDestroyer Na-Class
Formation 3: Diamond
AP:124
AS:279
AS+:558
Q
深海任務部隊 飴玉護衛空母III群
Pattern 1 Light Carrier Nu-Class eliteLight Carrier Nu-ClassLight Carrier Nu-ClassDestroyer Na-ClassDestroyer I-ClassDestroyer I-Class
Formation 3: Diamond
AP:57
AS:128
AS+:255
Pattern 2 Light Carrier Nu-Class eliteLight Carrier Nu-Class eliteLight Carrier Nu-Class eliteDestroyer Na-ClassDestroyer I-ClassDestroyer I-Class
Formation 3: Diamond
AP:78
AS:176
AS+:351
Pattern 3 Light Carrier Nu-Class eliteLight Carrier Nu-Class eliteLight Carrier Nu-Class eliteLight Carrier Nu-Class eliteDestroyer Na-ClassDestroyer Na-Class
Formation 3: Diamond
AP:94
AS:212
AS+:423
R
深海任務部隊 上陸支援部隊
Enemy Combined Fleet
Pattern 1
main fleet
Battleship Ru-Class eliteBattleship Ru-Class eliteBattleship Ru-Class eliteBattleship Ru-Class eliteBattleship Ru-ClassBattleship Ru-Class
escort fleet
Light Cruiser Ho-Class flagshipLight Cruiser Tsu-ClassDestroyer I-ClassDestroyer I-ClassDestroyer I-ClassDestroyer I-Class
Cruising Formation 4: Battle Formation
Pattern 2
main fleet
Battleship Ru-Class flagshipBattleship Ru-Class eliteBattleship Ru-Class eliteBattleship Ru-Class eliteBattleship Ru-Class eliteBattleship Ru-Class elite
escort fleet
Light Cruiser Ho-Class flagshipLight Cruiser Tsu-ClassDestroyer I-Class Late ModelDestroyer I-ClassDestroyer I-ClassDestroyer I-Class
Cruising Formation 4: Battle Formation
S
Pattern 1Choose your route
T
深海任務部隊 艦載機群
Air Battle Node
Pattern 1 Standard Carrier Wo-Class flagshipLight Cruiser Tsu-ClassDestroyer I-Class Late ModelDestroyer I-Class Late ModelDestroyer I-ClassDestroyer I-Class
Formation 3: Diamond
AP:69
AS:155
AS+:309
Pattern 2 Standard Carrier Wo-Class flagshipLight Carrier Nu-Class eliteLight Cruiser Tsu-ClassDestroyer I-Class Late ModelDestroyer I-Class Late ModelDestroyer I-Class
Formation 3: Diamond
AP:85
AS:191
AS+:381
Pattern 3 Standard Carrier Wo-Class flagshipLight Carrier Nu-Class eliteLight Carrier Nu-Class eliteLight Cruiser Tsu-ClassDestroyer I-Class Late ModelDestroyer I-Class Late Model
Formation 3: Diamond
AP:101
AS:227
AS+:453
U
Pattern 1"Must be my imagination" (battle avoided)
V
深海任務部隊 艦載機群
Air Battle Node
Pattern 1 Standard Carrier Wo-Class flagshipLight Cruiser Tsu-ClassDestroyer I-Class Late ModelDestroyer I-Class Late ModelDestroyer I-ClassDestroyer I-Class
Formation 3: Diamond
AP:69
AS:155
AS+:309
Pattern 2 Standard Carrier Wo-Class flagshipLight Carrier Nu-Class eliteLight Cruiser Tsu-ClassDestroyer I-Class Late ModelDestroyer I-Class Late ModelDestroyer I-Class
Formation 3: Diamond
AP:85
AS:191
AS+:381
Pattern 3 Standard Carrier Wo-Class flagshipLight Carrier Nu-Class eliteLight Carrier Nu-Class eliteLight Cruiser Tsu-ClassDestroyer I-Class Late ModelDestroyer I-Class Late Model
Formation 3: Diamond
AP:101
AS:227
AS+:453
W
深海任務部隊 機動部隊群
Pattern 1 Standard Carrier Wo-Class flagshipLight Cruiser Tsu-ClassDestroyer I-Class Late ModelDestroyer I-Class Late ModelDestroyer I-ClassDestroyer I-Class
Formation 3: Diamond
AP:69
AS:155
AS+:309
Pattern 2 Standard Carrier Wo-Class flagshipLight Carrier Nu-Class eliteLight Cruiser Tsu-ClassDestroyer I-Class Late ModelDestroyer I-Class Late ModelDestroyer I-Class
Formation 3: Diamond
AP:85
AS:191
AS+:381
Pattern 3 Standard Carrier Wo-Class flagshipLight Carrier Nu-Class eliteLight Carrier Nu-Class eliteLight Cruiser Tsu-ClassDestroyer I-Class Late ModelDestroyer I-Class Late Model
Formation 3: Diamond
AP:101
AS:227
AS+:453
X
深海レイテ侵攻 主力輸送船団
Enemy Combined Fleet
Pattern 1
main fleet
Escort Water PrincessTransport Ship Wa-Class eliteTransport Ship Wa-Class eliteTransport Ship Wa-Class eliteBattleship Ru-Class eliteBattleship Ru-Class elite
escort fleet
Heavy Cruiser Ne-ClassDestroyer I-Class Late ModelDestroyer I-Class Late ModelDestroyer I-ClassDestroyer I-ClassDestroyer I-Class
Cruising Formation 4: Battle Formation
Unknown
Pattern 2
Final Form
main fleet
Escort Water Princess - DamagedTransport Ship Wa-Class eliteTransport Ship Wa-Class eliteTransport Ship Wa-Class eliteBattleship Ru-Class flagshipBattleship Ru-Class flagship
escort fleet
Heavy Cruiser Ne-ClassDestroyer I-Class Late ModelDestroyer I-Class Late ModelDestroyer I-ClassDestroyer I-ClassDestroyer I-Class
Cruising Formation 4: Battle Formation
Unknown

Show/Hide Nodes and Enemy Encounters
Nodes and Enemy Encounters
NodePatternXpNode InfoFormAir
A
深海潜水艦部隊 阻止線
Pattern 1 Submarine So-ClassSubmarine So-ClassSubmarine So-Class
Formation 4: Echelon
B
Pattern 1"Must be my imagination" (battle avoided)
C
深海任務部隊 空母群
Air Battle Node
Pattern 1 Standard Carrier Wo-Class eliteLight Carrier Nu-ClassLight Carrier Nu-ClassLight Cruiser Tsu-ClassDestroyer I-ClassDestroyer I-Class
Formation 3: Diamond
AP:29
AS:65
AS+:129
Pattern 2 Standard Carrier Wo-Class flagshipLight Carrier Nu-ClassLight Carrier Nu-ClassLight Cruiser Tsu-ClassDestroyer I-ClassDestroyer I-Class
Formation 3: Diamond
AP:30
AS:66
AS+:132
D
深海任務部隊 艦載機群
Air Battle Node
Pattern 1 Escort Water PrincessLight Carrier Nu-ClassLight Carrier Nu-ClassLight Cruiser Tsu-ClassDestroyer I-ClassDestroyer I-Class
Formation 3: Diamond
Unknown
Pattern 2 Escort Water PrincessLight Carrier Nu-Class eliteLight Carrier Nu-Class eliteLight Cruiser Tsu-ClassDestroyer I-ClassDestroyer I-Class
Formation 3: Diamond
Unknown
E
深海任務部隊 空母群
Air Battle Node
Pattern 1 Standard Carrier Wo-Class eliteLight Carrier Nu-ClassLight Carrier Nu-ClassLight Cruiser Tsu-ClassDestroyer I-ClassDestroyer I-Class
Formation 3: Diamond
AP:29
AS:65
AS+:129
Pattern 2 Standard Carrier Wo-Class flagshipLight Carrier Nu-ClassLight Carrier Nu-ClassLight Cruiser Tsu-ClassDestroyer I-ClassDestroyer I-Class
Formation 3: Diamond
AP:30
AS:66
AS+:132
F
深海任務部隊 哨戒警戒線
Pattern 1 Light Cruiser Ho-Class flagshipLight Cruiser Tsu-ClassDestroyer I-ClassDestroyer I-ClassSubmarine So-Class
Formation 1: Line Ahead
Formation 4: Echelon
G
深海任務部隊 艦載機群
Air Battle Node
Pattern 1 Standard Carrier Wo-ClassStandard Carrier Wo-ClassLight Carrier Nu-Class eliteBattleship Ta-ClassHeavy Cruiser Ri-ClassHeavy Cruiser Ri-Class
Formation 3: Diamond
AP:60
AS:134
AS+:267
H
深海任務部隊 哨戒警戒線
Pattern 1 Destroyer I-ClassDestroyer I-ClassPT Imp GroupPT Imp GroupPT Imp Group
Formation 2: Double Line
Formation 4: Echelon
I
深海任務部隊 艦載機群
Air Battle Node
Pattern 1 Light Carrier Nu-Class eliteLight Carrier Nu-ClassLight Carrier Nu-ClassDestroyer Na-ClassDestroyer I-ClassDestroyer I-Class
Formation 3: Diamond
AP:57
AS:128
AS+:255
Pattern 2 Light Carrier Nu-Class eliteLight Carrier Nu-Class eliteLight Carrier Nu-Class eliteDestroyer Na-ClassDestroyer I-ClassDestroyer I-Class
Formation 3: Diamond
AP:78
AS:176
AS+:351
J
深海任務部隊 艦載機群
Air Battle Node
Pattern 1 Escort Water PrincessLight Carrier Nu-ClassLight Carrier Nu-ClassLight Cruiser Tsu-ClassDestroyer I-ClassDestroyer I-Class
Formation 3: Diamond
Unknown
K
Pattern 1"Must be my imagination" (battle avoided)
L
Pattern 1"Must be my imagination" (battle avoided)
M
深海任務部隊 海峡守備PT部隊
Night Battle Node
Pattern 1 PT Imp GroupPT Imp GroupPT Imp GroupPT Imp Group
Formation 1: Line Ahead
Formation 4: Echelon
N
深海任務部隊 海峡守備残存部隊
Night Battle Node
Pattern 1 Battleship Ru-Class flagshipBattleship Ru-Class eliteBattleship Ru-Class eliteBattleship Ru-Class eliteDestroyer I-Class Late ModelDestroyer I-Class Late Model
Formation 3: Diamond
Pattern 2 Battleship Ru-Class flagshipBattleship Ru-Class eliteBattleship Ru-Class eliteBattleship Ru-Class eliteHeavy Cruiser Ne-ClassHeavy Cruiser Ne-Class
Formation 3: Diamond
O
深海任務部隊 飴玉護衛空母I群
Pattern 1 Light Carrier Nu-Class eliteLight Carrier Nu-ClassLight Carrier Nu-ClassDestroyer I-Class Late ModelDestroyer I-ClassDestroyer I-Class
Formation 3: Diamond
AP:57
AS:128
AS+:255
Pattern 2 Light Carrier Nu-Class eliteLight Carrier Nu-Class eliteLight Carrier Nu-Class eliteDestroyer I-Class Late ModelDestroyer I-ClassDestroyer I-Class
Formation 3: Diamond
AP:78
AS:176
AS+:351
P
深海任務部隊 飴玉護衛空母II群
Pattern 1 Light Carrier Nu-Class eliteLight Carrier Nu-ClassLight Carrier Nu-ClassDestroyer Na-ClassDestroyer I-ClassDestroyer I-Class
Formation 3: Diamond
AP:57
AS:128
AS+:255
Q
深海任務部隊 飴玉護衛空母III群
Pattern 1 Light Carrier Nu-Class eliteLight Carrier Nu-ClassLight Carrier Nu-ClassDestroyer Na-ClassDestroyer I-ClassDestroyer I-Class
Formation 3: Diamond
AP:57
AS:128
AS+:255
Pattern 2 Light Carrier Nu-Class eliteLight Carrier Nu-Class eliteLight Carrier Nu-Class eliteDestroyer Na-ClassDestroyer I-ClassDestroyer I-Class
Formation 3: Diamond
AP:78
AS:176
AS+:351
R
深海任務部隊 上陸支援部隊
Enemy Combined Fleet
Pattern 1
main fleet
Battleship Ru-Class eliteBattleship Ru-Class eliteBattleship Ru-ClassBattleship Ru-ClassBattleship Ru-ClassBattleship Ru-Class
escort fleet
Light Cruiser Ho-Class eliteDestroyer I-ClassDestroyer I-ClassDestroyer I-ClassDestroyer I-ClassDestroyer I-Class
Cruising Formation 4: Battle Formation
Pattern 2
main fleet
Battleship Ru-Class eliteBattleship Ru-Class eliteBattleship Ru-Class eliteBattleship Ru-ClassBattleship Ru-ClassBattleship Ru-Class
escort fleet
Light Cruiser Ho-Class eliteLight Cruiser Tsu-ClassDestroyer I-ClassDestroyer I-ClassDestroyer I-ClassDestroyer I-Class
Cruising Formation 4: Battle Formation
S
Pattern 1Choose your route
T
深海任務部隊 艦載機群
Air Battle Node
Pattern 1 Standard Carrier Wo-Class flagshipLight Cruiser Tsu-ClassDestroyer I-Class Late ModelDestroyer I-Class Late ModelDestroyer I-ClassDestroyer I-Class
Formation 3: Diamond
AP:69
AS:155
AS+:309
Pattern 2 Standard Carrier Wo-Class flagshipLight Carrier Nu-Class eliteLight Cruiser Tsu-ClassDestroyer I-Class Late ModelDestroyer I-Class Late ModelDestroyer I-Class
Formation 3: Diamond
AP:85
AS:191
AS+:381
U
Pattern 1"Must be my imagination" (battle avoided)
V
深海任務部隊 艦載機群
Air Battle Node
Pattern 1 Standard Carrier Wo-Class flagshipLight Cruiser Tsu-ClassDestroyer I-Class Late ModelDestroyer I-Class Late ModelDestroyer I-ClassDestroyer I-Class
Formation 3: Diamond
AP:69
AS:155
AS+:309
Pattern 2 Standard Carrier Wo-Class flagshipLight Carrier Nu-Class eliteLight Cruiser Tsu-ClassDestroyer I-Class Late ModelDestroyer I-Class Late ModelDestroyer I-Class
Formation 3: Diamond
AP:85
AS:191
AS+:381
W
深海任務部隊 機動部隊群
Pattern 1 Standard Carrier Wo-Class flagshipLight Cruiser Tsu-ClassDestroyer I-Class Late ModelDestroyer I-Class Late ModelDestroyer I-ClassDestroyer I-Class
Formation 3: Diamond
AP:69
AS:155
AS+:309
Pattern 2 Standard Carrier Wo-Class flagshipLight Carrier Nu-Class eliteLight Cruiser Tsu-ClassDestroyer I-Class Late ModelDestroyer I-Class Late ModelDestroyer I-Class
Formation 3: Diamond
AP:85
AS:191
AS+:381
X
深海レイテ侵攻 主力輸送船団
Enemy Combined Fleet
Pattern 1
main fleet
Escort Water PrincessTransport Ship Wa-ClassTransport Ship Wa-ClassTransport Ship Wa-ClassBattleship Ru-Class eliteBattleship Ru-Class elite
escort fleet
Destroyer I-Class Late ModelDestroyer I-Class Late ModelDestroyer I-ClassDestroyer I-ClassDestroyer I-ClassDestroyer I-Class
Cruising Formation 4: Battle Formation
Unknown
Pattern 2
Final Form
main fleet
Escort Water Princess - DamagedTransport Ship Wa-Class eliteTransport Ship Wa-Class eliteTransport Ship Wa-Class eliteBattleship Ru-Class eliteBattleship Ru-Class elite
escort fleet
Heavy Cruiser Ne-ClassDestroyer I-Class Late ModelDestroyer I-Class Late ModelDestroyer I-ClassDestroyer I-ClassDestroyer I-Class
Cruising Formation 4: Battle Formation
Unknown

Ship drops

NodeShip List
FDestroyersAkatsuki Akebono Ayanami Fubuki Fumizuki Hatsuharu Hatsushimo Hatsuyuki Hibiki Ikazuchi Inazuma Isonami Kikuzuki Kisaragi Mikazuki Miyuki Mochizuki Murakumo Mutsuki Nagatsuki Nenohi Oboro Satsuki Sazanami Shikinami Shirayuki Ushio Wakaba
Light CruisersIsuzu Jintsuu Kiso Nagara Naka Natori Sendai Tama Yura
HDestroyersAkatsuki Hatsuharu Hatsushimo Hibiki Ikazuchi Inazuma Nenohi Sazanami Ushio Wakaba
MDestroyersAkatsuki Hatsuharu Hatsushimo Hibiki Ikazuchi Inazuma Nenohi Sazanami Ushio Wakaba
NDestroyersAkatsuki Akebono Asagumo Ayanami Fubuki Fumizuki Hamakaze Hatsuharu Hatsushimo Hatsuyuki Hayashimo Hibiki Ikazuchi Inazuma Isonami Kikuzuki Kisaragi Kiyoshimo Michishio Mikazuki Miyuki Mochizuki Murakumo Mutsuki Nagatsuki Nenohi Oboro Satsuki Sazanami Shigure Shikinami Shirayuki Urakaze Ushio Wakaba Yamagumo
Light CruisersIsuzu Jintsuu Kiso Kuma Nagara Naka Natori Sendai Tama Tatsuta Tenryuu Yura Yuubari
Heavy CruisersAtago Chikuma Choukai Maya Mogami Takao Tone
BattleshipsFusou Yamashiro
Auxiliary ShipsAkashi
ODestroyersAkatsuki Akebono Ayanami Fubuki Fumizuki Hatsuharu Hatsushimo Hatsuyuki Hibiki Ikazuchi Inazuma Isonami Kikuzuki Kisaragi Michishio Mikazuki Miyuki Mochizuki Murakumo Mutsuki Nagatsuki Nenohi Oboro Satsuki Sazanami Shigure Shikinami Shirayuki Ushio Wakaba
Light CruisersIsuzu Jintsuu Kiso Kuma Nagara Naka Natori Sendai Tama Tatsuta Tenryuu Yura Yuubari
Heavy CruisersAtago Chikuma Choukai Maya Mogami Takao Tone
BattleshipsFusou Yamashiro
PDestroyersAkatsuki Akebono Asagumo Ayanami Fubuki Fumizuki Hatsuharu Hatsushimo Hatsuyuki Hibiki Ikazuchi Inazuma Isonami Kikuzuki Kisaragi Michishio Mikazuki Miyuki Mochizuki Murakumo Mutsuki Nagatsuki Nenohi Oboro Satsuki Sazanami Shigure Shikinami Shirayuki Ushio Wakaba Yamagumo
Light CruisersIsuzu Jintsuu Kiso Kuma Nagara Naka Natori Sendai Tama Tatsuta Tenryuu Yura Yuubari
Heavy CruisersAtago Chikuma Choukai Maya Mogami Takao Tone
BattleshipsFusou Yamashiro
QDestroyersAkatsuki Akebono Asagumo Ayanami Fubuki Fumizuki Hamakaze Hatsuharu Hatsushimo Hatsuyuki Hibiki Ikazuchi Inazuma Isonami Kikuzuki Kisaragi Michishio Mikazuki Miyuki Mochizuki Murakumo Mutsuki Nagatsuki Nenohi Oboro Satsuki Sazanami Shigure Shikinami Shirayuki Urakaze Ushio Wakaba Yamagumo
Light CruisersIsuzu Jintsuu Kiso Kuma Nagara Naka Natori Sendai Tama Tatsuta Tenryuu Yura Yuubari
Heavy CruisersAtago Chikuma Choukai Maya Mogami Takao Tone
BattleshipsFusou Yamashiro
RDestroyersAkatsuki Akebono Asagumo Ayanami Fubuki Fumizuki Hamakaze Hatsuharu Hatsushimo Hatsuyuki Hayashimo Hibiki Ikazuchi Inazuma Isonami Kikuzuki Kisaragi Kiyoshimo Michishio Mikazuki Miyuki Mochizuki Murakumo Mutsuki Nagatsuki Nenohi Oboro Satsuki Sazanami Shigure Shikinami Shirayuki Urakaze Ushio Wakaba Yamagumo
Light CruisersIsuzu Jintsuu Kiso Kuma Nagara Naka Natori Sendai Tama Tatsuta Tenryuu Yura Yuubari
Heavy CruisersAtago Chikuma Choukai Maya Mogami Takao Tone
BattleshipsFusou Yamashiro
Auxiliary ShipsAkashi
WDestroyersAsagumo Ayanami Fubuki Hamakaze Hatsuyuki Isokaze Isonami Kisaragi Kiyoshimo Michishio Miyuki Murakumo Mutsuki Shigure Shirayuki Urakaze Yamagumo
Light CruisersIsuzu Jintsuu Kiso Kuma Nagara Natori Sendai Tama Tenryuu Yura Yuubari
Heavy CruisersAtago Chikuma Choukai Mogami Tone
BattleshipsYamashiro
Auxiliary ShipsAkashi
XDestroyer EscortsDaitou
DestroyersArashio Asashio Fujinami Hayashimo Jervis Kagerou Kasumi Kiyoshimo Kuroshio Michishio Murasame Naganami Okinami Ooshio Shimakaze Shiratsuyu Suzukaze Yukikaze Yuudachi
Light CruisersIsuzu Jintsuu Kiso Kuma Nagara Natori Sendai Tama Yura
Heavy CruisersAoba Ashigara Atago Chikuma Choukai Furutaka Haguro Kako Kinugasa Kumano Maya Mikuma Mogami Myoukou Nachi Suzuya Takao Tone
BattleshipsHaruna Hiei Kirishima Kongou Hyuuga Ise Mutsu Nagato Richelieu Warspite
Aircraft CarriersArk Royal
Light Aircraft CarriersHiyou Junyou
Seaplane TendersChitose Chiyoda
Auxiliary ShipsAkitsumaru


E-5

OoyodoE-5Winter2018.png

Operation Ta-Gou Kai
多号作戦改

Information

  • Event Tag: 2018WinterPurpleTag.png

TP Boss: Light Cruiser Princess

  • Hard (): 800
  • Medium (): 600
  • Easy (): 500
  • Very Easy (): 500

HP Boss: Heavy Cruiser Princess

  • Hard (): 1400
  • Medium (): 1400
  • Easy (): 1400
  • Very Easy (): 1400

Key Rewards:

Winter 2018 Event E-5 Banner.png
Winter2018E-5Map.png

Branching rules

E-5 Branching Rules Starting Points
Nodes Rules
Start
1
  • Meet one of the following requirements:
    • Phase 2 isn't unlocked yet.
    • Fleet contains AV.
    • Fleet contains SS(V).
2
  • Do not meet the requirements to start at 1.


E-5 Branching Rules Part 1
Nodes Rules
1
B
  • Do not meet the requirements to go to C.
C
B
A
  • Do not meet the requirements to go to D.
D
  • Amount of CA(V) ≦ 1
J
K
  • Fail the LoS check.
L
  • Pass the LoS check.


E-5 Branching Rules Part 2
Nodes Rules
O
R
  • Do not meet the requirements to go to N.
N
  • Amount of DD + DE ≧ 4
R
N
  • Pass the LoS check.
S
  • Fail the LoS check.
N
M
  • Do not meet the requirements to go to P.
P
  • Meet one of the following requirements:
    • Amount of DD ≧ ?
    • Amount of the Operation Ta-gō Kai members ≧ ?/?/3 on Easy/Medium/Hard
P
Q
  • Fail the LoS check.
T
  • Pass the LoS check.

Branching compositions were reported over the course of the event.

Tips

Event Planning

For this map, you will be using members of the Shima Fleet.

Historic Members of Battle of Ormoc Bay

CA: Ashigara,Nachi
CL: Kinu
DD: Akebono, Asashimo, Hatsuharu, Hatsushimo, Kasumi. Naganami, Okinami, Ushio, Uranami, Wakaba
DE: Shimushu

Despite historically being involved with the Shima fleet, members such as Abukuma, Shiranui, and Aoba do not count for this segment of the event, and may be used on other maps, Abukuma in particular may be deployed where issues arise.

Tagging Rules
2018WinterPurpleTag.png
  • Untagged Ships that partake in E-5 will be given the 'Shima Fleet Tag

E5 Objectives

E5 is a map with two phases, with additional requirements to unlock the second phase.

  • The first phase is a transport phase involving a strike force; in order to unlock the second phase, you'll need to:
    • Complete the Transport Operation
    • Score Air Parity / Superiority on Node D (AP for Medium / AS for Hard)
    • Get Air Superiority on an Land Base Air Raid (Medium +)

Phase 1 - Transport Phase

The Transport Operation is relatively straightforward with the appropriate number of historical ships (2 on Easy / 3 on Normal / 5 on Hard). Even on hard, most of this phase presents few issues, largely due to the presence of an additional LBAS squadron.

Clearing the TP bar

Example fleet: 2CA CL 3DD DD/Akitsumaru

With the appropriate number of historical ships, the route taken is C-D-E-G-F-H-I-J-L, with two airstrike nodes and 2 surface nodes prior to the boss

As with other transport operations, your main objective should be to bring as many drums and/or landing craft as possible while scoring at least an A-rank at the boss. Unusually, the Type 2 Ka-Mi Tank grants 22 TP points on an S-rank at the boss, far more than it has provided in previous TP maps.

Key points:

  • The primary threat posed prior to the boss on this map are the two air raid nodes and node J, the penultimate node.
  • Both nodes H and J can be cleared consistently through the use of the vanguard formation
  • Ships that turn back after node I (i.e. those ships retreating at node J) will still count as having successfully offloaded their cargo, and will contribute towards the TP bar.

The TP phase boss consists of the Light Cruiser Princess with a CVL (2 on hard), and most other ships being CAs, CLs, and DDs. The upshot being that as only an A-rank is required to -deplete the TP bar, the enemy flagship does not necessarily have to be sunk, even on the final form. As such, killing enough of the escort fleet to allow the night battle to be against the the main enemy force is usually enough to secure the 4 kills needed to deplete the bar.

AP/AS at node D

LBAS sorties with 4 fighters apiece can be used to decrease the air power requirement at node D prior to the air battle. Akitsumaru makes achieving AP/AS here a trivial issue following fighter sweeps; however, in the absence of Akitsumaru, Seaplane fighters will be required. Medium difficulty requires 326 for AP, which should be reduced by the aforementioned fighter sorties.

Air Superiority on a Raid

The simplest way to achieve this is to utilize 3 interceptors and a saiun at both available bases, set to defense. A single submarine may be sortied to trigger the raid.

Note that only Air Superiority is required, not a perfect defense.


HP Bar Phase - CA Princess

This phase does not allow the use of AVs or Akitsumaru (which will start the fleet at the first phase start point) on any difficulty, as such, your primary source of air support will come in the form of LBAS, and if you choose to employ them, CAVs.

Given the post-cap firepower buffs received by historical members, however, this map is very doable even without any fighter power in the fleet itself. If you are not utilizing any fighter power, then utility equips may replace the recon planes as LoS requirements permit.

This guide has been written in the context of hard mode, differences will be mentioned where possible.

The best routing in this map is achieved through the use of 2CA(V) CL 4DD, with most other compositions offrouting, starting at the wrong start point, not being allowed to enter the map, or simply being inferior (e.g. bringing a DE)

  • 4DDs should first be selected to prevent an offroute to R node, this applies to all difficulties.
    • Ideally, Kasumi, Hatsuharu, Hatsushimo, and Ushio can all be used here.
    • One of these four DDs may be replaced by an Akizuki-class for AACI.
  • Nachi and Ashigara should be the two cruisers chosen for this map on account of their post-cap bonuses.
    • Either one of them may be substituted for a CAV if desired.
  • Abukuma would be the ideal CL for this map if available, Yura is also strong here.

This phase comprises a single airstrike node and two surface nodes prior to the boss node. As with the first phase of this map, vanguard formation may be utilized to make it through the surface nodes, with the FCF utilized where taihas occur.

Importantly, the pre-boss node possesses a submarine on some forms, which will draw fire from at least five of your ships. Sonars may be used as needed, or LBAS may include a single ASW bomber, with Double Line being another possible option (when support shelling is used), in most cases, however, vanguard formation should suffice.

The boss of this map is Heavy Cruiser Princess. Obtaining AS here is not likely, nonetheless, this boss is fairly easy to kill due to the combination of LBAS and the post-cap bonuses of most ships. TCIs for this boss are not required due to the previously-covered post-cap firepower bonuses.

As with other maps, pre-boss support, boss support, and sparkling should be used as required. Do remember that the use of vanguard formation will affect the efficacy of your support shelling.

Recommended LBAS

4 Fighters f or node N or.. 3 Bombers 1 ASW Bomber for node P

Combat radii of 4 and 5 are required for nodes N and P respectively.

Node N is an airstrike risk, while node P can be somewhat annoying with its submarine. This LBAS base is mostly flexible and can be used as seen fit.


1 Fighter 3 Bombers - For Boss Node

A combat radius of 6 is required for the boss node. A fighter should be added only if doing so would improve your air state.


Show/Hide Nodes and Enemy Encounters
Nodes and Enemy Encounters
NodePatternXpNode InfoFormAir
A
深海任務部隊 艦載機群
Air Battle Node
Pattern 1 Light Carrier Nu-Class flagshipLight Carrier Nu-Class eliteLight Carrier Nu-Class eliteLight Carrier Nu-Class eliteDestroyer Ha-Class Late ModelDestroyer Ha-Class Late Model
Formation 3: Diamond
AP:150
AS:336
AS+:672
Pattern 2 Light Carrier Nu-Class flagshipLight Carrier Nu-Class eliteLight Carrier Nu-Class eliteLight Carrier Nu-Class eliteDestroyer Ha-Class Late ModelDestroyer Ha-Class Late Model
Formation 3: Diamond
AP:180
AS:404
AS+:807
Pattern 3 Light Carrier Nu-Class flagshipLight Carrier Nu-Class eliteLight Carrier Nu-Class eliteLight Carrier Nu-Class eliteDestroyer Ha-Class Late ModelDestroyer Ha-Class Late Model
Formation 3: Diamond
AP:210
AS:471
AS+:942
B
深海潜水艦部隊 増援阻止線
Pattern 1 Submarine Yo-Class flagshipSubmarine Yo-Class eliteSubmarine Yo-Class eliteSubmarine Yo-Class elite
Formation 4: Echelon
Pattern 2 Submarine Yo-Class flagshipSubmarine Yo-Class flagshipSubmarine Yo-Class eliteSubmarine Yo-Class elite
Formation 4: Echelon
Pattern 3 Submarine Yo-Class flagshipSubmarine Yo-Class flagshipSubmarine Yo-Class flagshipSubmarine Yo-Class elite
Formation 4: Echelon
Pattern 4 Submarine Yo-Class flagshipSubmarine Yo-Class flagshipSubmarine Yo-Class flagshipSubmarine Yo-Class flagship
Formation 4: Echelon
C
Pattern 1"Must be my imagination" (battle avoided)
D
深海任務部隊 艦載機群
Air Battle Node
Pattern 1 Light Carrier Nu-Class flagshipLight Carrier Nu-Class flagshipLight Carrier Nu-Class eliteLight Carrier Nu-Class eliteDestroyer Ha-Class Late ModelDestroyer Ha-Class Late Model
Formation 3: Diamond
AP:226
AS:509
AS+:1017
Pattern 2 Light Carrier Nu-Class flagshipLight Carrier Nu-Class flagshipLight Carrier Nu-Class flagshipLight Carrier Nu-Class eliteDestroyer Ha-Class Late ModelDestroyer Ha-Class Late Model
Formation 3: Diamond
AP:243
AS:546
AS+:1092
Pattern 3 Light Carrier Nu-Class flagshipLight Carrier Nu-Class flagshipLight Carrier Nu-Class flagshipLight Carrier Nu-Class flagshipDestroyer Ha-Class Late ModelDestroyer Ha-Class Late Model
Formation 3: Diamond
AP:260
AS:584
AS+:1167
E
Pattern 1"Must be my imagination" (battle avoided)
F
深海任務部隊 艦載機群
Air Battle Node
Pattern 1 Standard Carrier Wo-Class Kai flagshipLight Carrier Nu-Class flagshipLight Carrier Nu-Class flagshipLight Carrier Nu-Class flagshipDestroyer Ha-Class Late ModelDestroyer Ha-Class Late Model
Formation 3: Diamond
AP:269
AS:605
AS+:1209
Pattern 2 Standard Carrier Wo-Class Kai flagshipLight Carrier Nu-Class flagshipLight Carrier Nu-Class flagshipLight Carrier Nu-Class flagshipDestroyer Ha-Class Late ModelDestroyer Ha-Class Late Model
Formation 3: Diamond
AP:278
AS:624
AS+:1248
Pattern 3 Standard Carrier Wo-Class Kai flagshipLight Carrier Nu-Class flagshipLight Carrier Nu-Class flagshipLight Carrier Nu-Class flagshipDestroyer Ha-Class Late ModelDestroyer Ha-Class Late Model
Formation 3: Diamond
AP:286
AS:644
AS+:1287
G
Pattern 1Transport Drop-Off Node
H
深海任務部隊 増援迎撃戦隊B群
Pattern 1 Destroyer Na-ClassDestroyer Na-ClassDestroyer Ha-Class Late ModelDestroyer Ha-Class Late ModelPT Imp GroupPT Imp Group
Formation 1: Line Ahead
Formation 2: Double Line
Formation 4: Echelon
I
Pattern 1Resource Node
J
深海任務部隊 増援迎撃戦隊A群
Pattern 1 Light Cruiser He-Class flagshipLight Cruiser Tsu-Class eliteDestroyer Na-ClassDestroyer Na-ClassDestroyer Ha-Class Late ModelDestroyer Ha-Class Late Model
Formation 1: Line Ahead
Formation 2: Double Line
Formation 4: Echelon
K
Pattern 1"Must be my imagination" (battle avoided)
L
深海任務部隊 増援迎撃戦隊旗艦
Enemy Combined Fleet
Pattern 1
main fleet
Light Cruiser PrincessLight Carrier Nu-Class flagshipDestroyer Ha-Class Late ModelDestroyer Ha-Class Late ModelPT Imp GroupPT Imp Group
escort fleet
Destroyer Na-Class eliteDestroyer Ha-Class Late ModelDestroyer Ha-Class Late ModelDestroyer Ha-Class Late ModelDestroyer I-ClassDestroyer I-Class
Cruising Formation 4: Battle Formation
AP:52
AS:116
AS+:231
Pattern 2
Final Form
main fleet
Light Cruiser PrincessLight Carrier Nu-Class flagshipLight Carrier Nu-Class flagshipOld Destroyer PrincessDestroyer Ha-Class Late ModelDestroyer Ha-Class Late Model
escort fleet
Destroyer Na-Class Late Model eliteDestroyer Na-Class Late Model eliteDestroyer Na-Class Late Model eliteDestroyer Na-Class Late Model eliteDestroyer Ha-Class Late ModelDestroyer Ha-Class Late Model
Cruising Formation 4: Battle Formation
AP:103
AS:231
AS+:462
M
深海任務部隊 残存旧式戦艦群
Pattern 1 Battleship Ru-Class flagshipBattleship Ru-Class flagshipHeavy Cruiser Ri-Class flagshipHeavy Cruiser Ri-Class flagshipDestroyer Ha-Class Late ModelDestroyer Ha-Class Late Model
Formation 1: Line Ahead
Formation 2: Double Line
Pattern 2 Battleship Ru-Class flagshipBattleship Ru-Class flagshipBattleship Ru-Class flagshipHeavy Cruiser Ri-Class flagshipDestroyer Ha-Class Late ModelDestroyer Ha-Class Late Model
Formation 1: Line Ahead
N
深海任務部隊 飴玉残存空母A群
Pattern 1 Light Carrier Nu-Class eliteLight Carrier Nu-Class eliteLight Carrier Nu-Class eliteLight Cruiser Tsu-Class eliteDestroyer Ha-Class Late ModelDestroyer Ha-Class Late Model
Formation 3: Diamond
AP:190
AS:428
AS+:855
Pattern 2 Light Carrier Nu-Class flagshipLight Carrier Nu-Class eliteLight Carrier Nu-Class eliteLight Cruiser Tsu-Class eliteDestroyer Ha-Class Late ModelDestroyer Ha-Class Late Model
Formation 3: Diamond
AP:244
AS:549
AS+:1098
Pattern 3 Light Carrier Nu-Class flagshipLight Carrier Nu-Class flagshipLight Carrier Nu-Class eliteLight Cruiser Tsu-Class eliteDestroyer Ha-Class Late ModelDestroyer Ha-Class Late Model
Formation 3: Diamond
AP:272
AS:612
AS+:1224
O
深海任務部隊 艦載機群
Air Battle Node
Pattern 1 Light Carrier Nu-Class flagshipLight Carrier Nu-Class eliteLight Carrier Nu-Class eliteLight Carrier Nu-Class eliteDestroyer Ha-Class Late ModelDestroyer Ha-Class Late Model
Formation 3: Diamond
AP:201
AS:452
AS+:903
Pattern 2 Light Carrier Nu-Class flagshipLight Carrier Nu-Class eliteLight Carrier Nu-Class eliteLight Carrier Nu-Class eliteDestroyer Ha-Class Late ModelDestroyer Ha-Class Late Model
Formation 3: Diamond
AP:210
AS:471
AS+:942
Pattern 3 Light Carrier Nu-Class flagshipLight Carrier Nu-Class flagshipLight Carrier Nu-Class eliteLight Carrier Nu-Class eliteDestroyer Ha-Class Late ModelDestroyer Ha-Class Late Model
Formation 3: Diamond
AP:226
AS:509
AS+:1017
P
深海任務部隊 収容部隊前衛群
Pattern 1 Light Cruiser He-Class flagshipBattleship Ta-Class flagshipLight Cruiser Tsu-Class eliteDestroyer Ha-Class Late ModelDestroyer Ha-Class Late ModelSubmarine So-Class elite
Formation 1: Line Ahead
Formation 2: Double Line
Pattern 2 Light Carrier Nu-Class flagshipLight Cruiser He-Class flagshipLight Cruiser Tsu-Class eliteDestroyer Ha-Class Late ModelDestroyer Ha-Class Late ModelDestroyer Ha-Class Late Model
Formation 3: Diamond
AP:100
AS:225
AS+:450
Q
Pattern 1"Must be my imagination" (battle avoided)
R
深海任務部隊 飴玉残存空母B群
Pattern 1 Light Carrier Nu-Class flagshipLight Carrier Nu-Class flagshipLight Cruiser He-Class flagshipLight Cruiser Tsu-Class eliteDestroyer Ha-Class Late ModelDestroyer Ha-Class Late Model
Formation 2: Double Line
Formation 3: Diamond
AP:126
AS:282
AS+:564
Pattern 2 Light Carrier Nu-Class flagshipLight Carrier Nu-Class flagshipLight Cruiser He-Class flagshipLight Cruiser Tsu-Class eliteDestroyer Ha-Class Late ModelDestroyer Ha-Class Late Model
Formation 3: Diamond
AP:134
AS:302
AS+:603
S
Pattern 1"Must be my imagination" (battle avoided)
T
深海任務部隊 増援迎撃戦隊旗艦
Enemy Combined Fleet
Pattern 1
main fleet
Heavy Cruiser PrincessLight Carrier Nu-Class eliteLight Carrier Nu-Class eliteHeavy Cruiser Ne-ClassHeavy Cruiser Ne-ClassLight Cruiser Tsu-Class
escort fleet
Destroyer Na-Class Late Model eliteDestroyer Na-Class Late Model eliteDestroyer Ha-Class Late ModelDestroyer Ha-Class Late ModelDestroyer Ha-Class Late ModelDestroyer Ha-Class Late Model
Cruising Formation 4: Battle Formation
AP:92
AS:207
AS+:414
Pattern 2
Final Form
main fleet
Heavy Cruiser PrincessLight Carrier Nu-Class eliteLight Carrier Nu-Class eliteHeavy Cruiser Ne-ClassHeavy Cruiser Ne-ClassLight Cruiser Tsu-Class
escort fleet
Destroyer Na-Class Late Model eliteDestroyer Na-Class Late Model eliteDestroyer Na-Class Late Model eliteDestroyer Na-Class Late Model eliteDestroyer Ha-Class Late ModelDestroyer Ha-Class Late Model
Cruising Formation 4: Battle Formation
AP:176
AS:396
AS+:792

Show/Hide Nodes and Enemy Encounters
Nodes and Enemy Encounters
NodePatternXpNode InfoFormAir
A
深海任務部隊 艦載機群
Air Battle Node
Pattern 1 Light Carrier Nu-Class flagshipLight Carrier Nu-Class eliteLight Carrier Nu-Class eliteLight Carrier Nu-Class eliteDestroyer Ro-Class Late ModelDestroyer Ro-Class Late Model
Formation 3: Diamond
AP:111
AS:249
AS+:498
Pattern 2 Light Carrier Nu-Class flagshipLight Carrier Nu-Class eliteLight Carrier Nu-Class eliteLight Carrier Nu-Class eliteDestroyer Ro-Class Late ModelDestroyer Ro-Class Late Model
Formation 3: Diamond
AP:141
AS:317
AS+:633
Pattern 3 Light Carrier Nu-Class flagshipLight Carrier Nu-Class eliteLight Carrier Nu-Class eliteLight Carrier Nu-Class eliteDestroyer Ro-Class Late ModelDestroyer Ro-Class Late Model
Formation 3: Diamond
AP:171
AS:384
AS+:768
B
深海潜水艦部隊 増援阻止線
Pattern 1 Submarine Yo-Class eliteSubmarine Yo-ClassSubmarine Yo-ClassSubmarine Yo-Class
Formation 4: Echelon
Pattern 2 Submarine Yo-Class eliteSubmarine Yo-Class eliteSubmarine Yo-ClassSubmarine Yo-Class
Formation 4: Echelon
Pattern 3 Submarine Yo-Class eliteSubmarine Yo-Class eliteSubmarine Yo-Class eliteSubmarine Yo-Class
Formation 5: Line Abreast
Pattern 4 Submarine Yo-Class eliteSubmarine Yo-Class eliteSubmarine Yo-Class eliteSubmarine Yo-Class elite
Formation 4: Echelon
Pattern 5 Submarine Yo-Class flagshipSubmarine Yo-Class eliteSubmarine Yo-Class eliteSubmarine Yo-Class elite
Formation 4: Echelon
C
Pattern 1"Must be my imagination" (battle avoided)
D
深海任務部隊 艦載機群
Air Battle Node
Pattern 1 Light Carrier Nu-Class flagshipLight Carrier Nu-Class eliteLight Carrier Nu-Class eliteLight Carrier Nu-Class eliteDestroyer Ro-Class Late ModelDestroyer Ro-Class Late Model
Formation 3: Diamond
AP:171
AS:384
AS+:768
Pattern 2 Light Carrier Nu-Class flagshipLight Carrier Nu-Class eliteLight Carrier Nu-Class eliteLight Carrier Nu-Class eliteDestroyer Ro-Class Late ModelDestroyer Ro-Class Late Model
Formation 3: Diamond
AP:201
AS:452
AS+:903
Pattern 3 Light Carrier Nu-Class flagshipLight Carrier Nu-Class flagshipLight Carrier Nu-Class eliteLight Carrier Nu-Class eliteDestroyer Ro-Class Late ModelDestroyer Ro-Class Late Model
Formation 3: Diamond
AP:218
AS:489
AS+:978
E
Pattern 1"Must be my imagination" (battle avoided)
F
深海任務部隊 艦載機群
Air Battle Node
Pattern 1 Standard Carrier Wo-Class flagshipLight Carrier Nu-Class eliteLight Carrier Nu-Class eliteLight Carrier Nu-Class eliteDestroyer Ro-Class Late ModelDestroyer Ro-Class Late Model
Formation 3: Diamond
AP:205
AS:461
AS+:921
Pattern 2 Standard Carrier Wo-Class flagshipLight Carrier Nu-Class flagshipLight Carrier Nu-Class eliteLight Carrier Nu-Class eliteDestroyer Ro-Class Late ModelDestroyer Ro-Class Late Model
Formation 3: Diamond
AP:230
AS:518
AS+:1035
Pattern 3 Standard Carrier Wo-Class flagshipLight Carrier Nu-Class flagshipLight Carrier Nu-Class flagshipLight Carrier Nu-Class eliteDestroyer Ro-Class Late ModelDestroyer Ro-Class Late Model
Formation 3: Diamond
AP:256
AS:575
AS+:1149
G
Pattern 1Transport Drop-Off Node
H
深海任務部隊 増援迎撃戦隊B群
Pattern 1 Destroyer Ro-Class Late ModelDestroyer Ro-Class Late ModelDestroyer Ro-Class Late ModelDestroyer Ro-Class Late ModelPT Imp GroupPT Imp Group
Formation 1: Line Ahead
Formation 2: Double Line
Formation 4: Echelon
I
Pattern 1Resource Node
J
深海任務部隊 増援迎撃戦隊A群
Pattern 1 Light Cruiser He-Class flagshipLight Cruiser Tsu-ClassDestroyer Ha-Class Late ModelDestroyer Ro-Class Late ModelDestroyer I-ClassDestroyer I-Class
Formation 1: Line Ahead
Formation 2: Double Line
Formation 4: Echelon
K
Pattern 1"Must be my imagination" (battle avoided)
L
深海任務部隊 増援迎撃戦隊旗艦
Enemy Combined Fleet
Pattern 1
main fleet
Light Cruiser PrincessLight Carrier Nu-Class eliteDestroyer Ro-Class Late ModelDestroyer Ro-Class Late ModelPT Imp GroupPT Imp Group
escort fleet
Destroyer Ha-Class Late ModelDestroyer Ro-Class Late ModelDestroyer Ro-Class Late ModelDestroyer Ro-Class Late ModelDestroyer I-ClassDestroyer I-Class
Cruising Formation 4: Battle Formation
AP:46
AS:104
AS+:207
Pattern 2
Final Form
main fleet
Light Cruiser PrincessLight Carrier Nu-Class eliteLight Carrier Nu-Class eliteDestroyer Ha-Class Late ModelDestroyer I-ClassDestroyer I-Class
escort fleet
Destroyer Na-ClassDestroyer Ha-Class Late ModelDestroyer Ha-Class Late ModelDestroyer I-ClassDestroyer I-ClassDestroyer I-Class
Cruising Formation 4: Battle Formation
AP:92
AS:207
AS+:414
M
深海任務部隊 残存旧式戦艦群
Pattern 1 Battleship Ru-Class flagshipBattleship Ru-Class flagshipBattleship Ru-Class eliteHeavy Cruiser Ri-Class eliteDestroyer Ro-Class Late ModelDestroyer Ro-Class Late Model
Formation 1: Line Ahead
N
深海任務部隊 飴玉残存空母A群
Pattern 1 Light Carrier Nu-Class eliteLight Carrier Nu-Class eliteLight Carrier Nu-Class eliteLight Cruiser Tsu-ClassDestroyer Ro-Class Late ModelDestroyer Ro-Class Late Model
Formation 3: Diamond
AP:134
AS:302
AS+:603
Pattern 2 Light Carrier Nu-Class eliteLight Carrier Nu-Class eliteLight Carrier Nu-Class eliteLight Cruiser Tsu-ClassDestroyer Ro-Class Late ModelDestroyer Ro-Class Late Model
Formation 3: Diamond
AP:190
AS:428
AS+:855
O
深海任務部隊 艦載機群
Air Battle Node
Pattern 1 Light Carrier Nu-Class eliteLight Carrier Nu-Class eliteLight Carrier Nu-Class eliteLight Carrier Nu-Class eliteDestroyer Ro-Class Late ModelDestroyer Ro-Class Late Model
Formation 3: Diamond
AP:124
AS:279
AS+:558
Pattern 2 Light Carrier Nu-Class flagshipLight Carrier Nu-Class eliteLight Carrier Nu-Class eliteLight Carrier Nu-Class eliteDestroyer Ro-Class Late ModelDestroyer Ro-Class Late Model
Formation 3: Diamond
AP:141
AS:317
AS+:633
Pattern 3 Light Carrier Nu-Class flagshipLight Carrier Nu-Class eliteLight Carrier Nu-Class eliteLight Carrier Nu-Class eliteDestroyer Ro-Class Late ModelDestroyer Ro-Class Late Model
Formation 3: Diamond
AP:171
AS:384
AS+:768
P
深海任務部隊 収容部隊前衛群
Pattern 1 Light Cruiser Ho-Class flagshipLight Cruiser Tsu-ClassLight Cruiser Tsu-ClassDestroyer Ro-Class Late ModelDestroyer Ro-Class Late ModelSubmarine So-Class elite
Formation 1: Line Ahead
Formation 2: Double Line
Pattern 2 Light Carrier Nu-Class eliteLight Cruiser Ho-Class flagshipLight Cruiser Tsu-ClassDestroyer Ro-Class Late ModelDestroyer Ro-Class Late ModelDestroyer Ro-Class Late Model
Formation 3: Diamond
AP:88
AS:198
AS+:396
Q
Pattern 1"Must be my imagination" (battle avoided)
R
深海任務部隊 飴玉残存空母B群
Pattern 1 Light Carrier Nu-Class eliteLight Carrier Nu-Class eliteLight Cruiser He-Class flagshipLight Cruiser Tsu-ClassDestroyer Ro-Class Late ModelDestroyer Ro-Class Late Model
Formation 2: Double Line
Formation 3: Diamond
AP:92
AS:207
AS+:414
Pattern 2 Light Carrier Nu-Class flagshipLight Carrier Nu-Class eliteLight Cruiser He-Class flagshipLight Cruiser Tsu-ClassDestroyer Ro-Class Late ModelDestroyer Ro-Class Late Model
Formation 3: Diamond
AP:118
AS:264
AS+:528
S
Pattern 1"Must be my imagination" (battle avoided)
T
深海任務部隊 増援迎撃戦隊旗艦
Enemy Combined Fleet
Pattern 1
main fleet
Heavy Cruiser PrincessLight Carrier Nu-Class eliteHeavy Cruiser Ne-ClassLight Cruiser Tsu-ClassDestroyer Ha-Class Late ModelDestroyer Ha-Class Late Model
escort fleet
Destroyer Ha-Class Late ModelDestroyer Ha-Class Late ModelDestroyer I-ClassDestroyer I-ClassDestroyer I-ClassDestroyer I-Class
Cruising Formation 4: Battle Formation
AP:46
AS:104
AS+:207
Pattern 2
Final Form
main fleet
Heavy Cruiser PrincessLight Carrier Nu-Class eliteLight Carrier Nu-Class eliteHeavy Cruiser Ne-ClassHeavy Cruiser Ne-ClassLight Cruiser Tsu-Class
escort fleet
Destroyer Na-Class Late Model eliteDestroyer Ha-Class Late ModelDestroyer Ha-Class Late ModelDestroyer Ha-Class Late ModelDestroyer I-ClassDestroyer I-Class
Cruising Formation 4: Battle Formation
AP:92
AS:207
AS+:414

Show/Hide Nodes and Enemy Encounters
Nodes and Enemy Encounters
NodePatternXpNode InfoFormAir
A
深海任務部隊 艦載機群
Air Battle Node
Pattern 1 Light Carrier Nu-Class eliteLight Carrier Nu-Class eliteLight Carrier Nu-ClassLight Carrier Nu-ClassDestroyer I-ClassDestroyer I-Class
Formation 3: Diamond
AP:73
AS:164
AS+:327
Pattern 2 Light Carrier Nu-Class eliteLight Carrier Nu-Class eliteLight Carrier Nu-ClassLight Carrier Nu-ClassDestroyer I-ClassDestroyer I-Class
Formation 3: Diamond
AP:103
AS:231
AS+:462
Pattern 3 Light Carrier Nu-Class eliteLight Carrier Nu-Class eliteLight Carrier Nu-Class eliteLight Carrier Nu-Class eliteDestroyer I-ClassDestroyer I-Class
Formation 3: Diamond
AP:124
AS:279
AS+:558
B
深海潜水艦部隊 増援阻止線
Pattern 1 Submarine Yo-ClassSubmarine Yo-ClassSubmarine Yo-ClassSubmarine Yo-Class
Formation 4: Echelon
Pattern 2 Submarine Yo-Class eliteSubmarine Yo-ClassSubmarine Yo-ClassSubmarine Yo-Class
Formation 4: Echelon
Pattern 3 Submarine Yo-Class eliteSubmarine Yo-Class eliteSubmarine Yo-ClassSubmarine Yo-Class
Formation 4: Echelon
C
Pattern 1"Must be my imagination" (battle avoided)
D
深海任務部隊 艦載機群
Air Battle Node
Pattern 1 Light Carrier Nu-Class eliteLight Carrier Nu-Class eliteLight Carrier Nu-ClassLight Carrier Nu-ClassDestroyer I-ClassDestroyer I-Class
Formation 3: Diamond
AP:103
AS:231
AS+:462
Pattern 2 Light Carrier Nu-Class eliteLight Carrier Nu-Class eliteLight Carrier Nu-Class eliteLight Carrier Nu-Class eliteDestroyer I-ClassDestroyer I-Class
Formation 3: Diamond
AP:124
AS:279
AS+:558
Pattern 3 Light Carrier Nu-Class eliteLight Carrier Nu-Class eliteLight Carrier Nu-Class eliteLight Carrier Nu-Class eliteDestroyer I-ClassDestroyer I-Class
Formation 3: Diamond
AP:154
AS:347
AS+:693
E
Pattern 1"Must be my imagination" (battle avoided)
F
深海任務部隊 艦載機群
Air Battle Node
Pattern 1 Standard Carrier Wo-Class flagshipLight Carrier Nu-Class eliteLight Carrier Nu-ClassLight Carrier Nu-ClassDestroyer I-ClassDestroyer I-Class
Formation 3: Diamond
AP:124
AS:278
AS+:555
Pattern 2 Standard Carrier Wo-Class flagshipLight Carrier Nu-Class eliteLight Carrier Nu-Class eliteLight Carrier Nu-Class eliteDestroyer I-ClassDestroyer I-Class
Formation 3: Diamond
AP:145
AS:326
AS+:651
Pattern 3 Standard Carrier Wo-Class flagshipLight Carrier Nu-Class eliteLight Carrier Nu-Class eliteLight Carrier Nu-Class eliteDestroyer I-ClassDestroyer I-Class
Formation 3: Diamond
AP:175
AS:393
AS+:786
G
Pattern 1Transport Drop-Off Node
H
深海任務部隊 増援迎撃戦隊B群
Pattern 1 Destroyer Ro-Class Late ModelDestroyer I-ClassDestroyer I-ClassDestroyer I-ClassPT Imp GroupPT Imp Group
Formation 2: Double Line
Formation 4: Echelon
Pattern 2 Destroyer Ro-Class Late ModelDestroyer Ro-Class Late ModelDestroyer I-ClassDestroyer I-ClassPT Imp GroupPT Imp Group
Formation 1: Line Ahead
I
Pattern 1Resource Node
J
深海任務部隊 増援迎撃戦隊A群
Pattern 1 Light Cruiser Tsu-ClassDestroyer Ro-Class Late ModelDestroyer Ro-Class Late ModelDestroyer I-ClassDestroyer I-ClassDestroyer I-Class
Formation 1: Line Ahead
Formation 2: Double Line
Formation 4: Echelon
K
Pattern 1"Must be my imagination" (battle avoided)
L
深海任務部隊 増援迎撃戦隊旗艦
Enemy Combined Fleet
Pattern 1
main fleet
Light Cruiser PrincessLight Carrier Nu-Class eliteDestroyer I-ClassDestroyer I-ClassPT Imp GroupPT Imp Group
escort fleet
Destroyer Ro-Class Late ModelDestroyer Ro-Class Late ModelDestroyer I-ClassDestroyer I-ClassDestroyer I-ClassDestroyer I-Class
Cruising Formation 4: Battle Formation
AP:46
AS:104
AS+:207
Pattern 2
Final Form
main fleet
Light Cruiser PrincessLight Carrier Nu-Class eliteLight Carrier Nu-Class eliteDestroyer Ro-Class Late ModelDestroyer I-ClassDestroyer I-Class
escort fleet
Destroyer Ro-Class Late ModelDestroyer Ro-Class Late ModelDestroyer Ro-Class Late ModelDestroyer I-ClassDestroyer I-ClassDestroyer I-Class
Cruising Formation 4: Battle Formation
AP:92
AS:207
AS+:414
M
深海任務部隊 残存旧式戦艦群
Pattern 1 Battleship Ru-Class flagshipBattleship Ru-Class eliteHeavy Cruiser Ri-Class eliteDestroyer Ro-Class Late ModelDestroyer I-ClassDestroyer I-Class
Formation 1: Line Ahead
Formation 2: Double Line
Pattern 2 Battleship Ru-Class flagshipBattleship Ru-Class flagshipHeavy Cruiser Ri-Class eliteDestroyer Ro-Class Late ModelDestroyer I-ClassDestroyer I-Class
Formation 1: Line Ahead
N
深海任務部隊 飴玉残存空母A群
Pattern 1 Light Carrier Nu-Class eliteLight Carrier Nu-Class eliteDestroyer Ro-Class Late ModelDestroyer I-ClassDestroyer I-ClassDestroyer I-Class
Formation 3: Diamond
AP:88
AS:198
AS+:396
Pattern 2 Light Carrier Nu-Class eliteLight Carrier Nu-Class eliteLight Cruiser Tsu-ClassDestroyer Ro-Class Late ModelDestroyer I-ClassDestroyer I-Class
Formation 3: Diamond
AP:88
AS:198
AS+:396
Pattern 3 Light Carrier Nu-Class eliteLight Carrier Nu-Class eliteLight Cruiser Tsu-ClassDestroyer Ro-Class Late ModelDestroyer I-ClassDestroyer I-Class
Formation 3: Diamond
AP:144
AS:324
AS+:648
O
深海任務部隊 艦載機群
Air Battle Node
Pattern 1 Light Carrier Nu-Class eliteLight Carrier Nu-Class eliteLight Carrier Nu-Class eliteLight Carrier Nu-ClassDestroyer I-ClassDestroyer I-Class
Formation 3: Diamond
AP:84
AS:188
AS+:375
Pattern 2 Light Carrier Nu-Class eliteLight Carrier Nu-Class eliteLight Carrier Nu-Class eliteLight Carrier Nu-Class eliteDestroyer I-ClassDestroyer I-Class
Formation 3: Diamond
AP:94
AS:212
AS+:423
Pattern 3 Light Carrier Nu-Class eliteLight Carrier Nu-Class eliteLight Carrier Nu-Class eliteLight Carrier Nu-Class eliteDestroyer I-ClassDestroyer I-Class
Formation 3: Diamond
AP:124
AS:279
AS+:558
P
深海任務部隊 収容部隊前衛群
Pattern 1 Light Cruiser Ho-Class flagshipLight Cruiser Tsu-ClassBattleship Ta-ClassDestroyer I-ClassDestroyer I-ClassSubmarine So-Class
Formation 1: Line Ahead
Pattern 2 Light Cruiser Ho-Class flagshipLight Cruiser Tsu-ClassBattleship Ta-ClassDestroyer Ro-Class Late ModelDestroyer I-ClassDestroyer I-Class
Formation 2: Double Line
Pattern 3 Light Carrier Nu-Class eliteLight Cruiser Ho-Class flagshipLight Cruiser Tsu-ClassDestroyer Ro-Class Late ModelDestroyer I-ClassDestroyer I-Class
Formation 3: Diamond
AP:72
AS:162
AS+:324
Q
Pattern 1"Must be my imagination" (battle avoided)
R
深海任務部隊 飴玉残存空母B群
Pattern 1 Light Carrier Nu-Class eliteLight Carrier Nu-Class eliteLight Cruiser Tsu-ClassDestroyer I-ClassDestroyer I-ClassDestroyer I-Class
Formation 2: Double Line
Formation 3: Diamond
AP:62
AS:140
AS+:279
Pattern 2 Light Carrier Nu-Class eliteLight Carrier Nu-Class eliteLight Cruiser Tsu-ClassDestroyer Ro-Class Late ModelDestroyer I-ClassDestroyer I-Class
Formation 3: Diamond
AP:62
AS:140
AS+:279
S
Pattern 1"Must be my imagination" (battle avoided)
T
深海任務部隊 増援迎撃戦隊旗艦
Enemy Combined Fleet
Pattern 1
main fleet
Heavy Cruiser PrincessLight Carrier Nu-Class eliteHeavy Cruiser Ne-ClassLight Cruiser Tsu-ClassDestroyer I-ClassDestroyer I-Class
escort fleet
Destroyer Ro-Class Late ModelDestroyer I-ClassDestroyer I-ClassDestroyer I-ClassDestroyer I-ClassDestroyer I-Class
Cruising Formation 4: Battle Formation
AP:46
AS:104
AS+:207
Pattern 2
Final Form
main fleet
Heavy Cruiser PrincessLight Carrier Nu-Class eliteLight Carrier Nu-Class eliteHeavy Cruiser Ne-ClassLight Cruiser Tsu-ClassDestroyer Ro-Class Late Model
escort fleet
Destroyer Ro-Class Late ModelDestroyer Ro-Class Late ModelDestroyer I-ClassDestroyer I-ClassDestroyer I-ClassDestroyer I-Class
Cruising Formation 4: Battle Formation
AP:92
AS:207
AS+:414

Show/Hide Nodes and Enemy Encounters
Nodes and Enemy Encounters
NodePatternXpNode InfoFormAir
A
深海任務部隊 艦載機群
Air Battle Node
Pattern 1
B
深海潜水艦部隊 増援阻止線
Pattern 1
C
Pattern 1"Must be my imagination" (battle avoided)
D
深海任務部隊 艦載機群
Air Battle Node
Pattern 1 Light Carrier Nu-Class eliteLight Carrier Nu-Class eliteLight Carrier Nu-ClassLight Carrier Nu-ClassDestroyer I-ClassDestroyer I-Class
Formation 3: Diamond
AP:103
AS:231
AS+:462
Pattern 2 Light Carrier Nu-Class eliteLight Carrier Nu-Class eliteLight Carrier Nu-Class eliteLight Carrier Nu-Class eliteDestroyer I-ClassDestroyer I-Class
Formation 3: Diamond
AP:124
AS:279
AS+:558
E
Pattern 1"Must be my imagination" (battle avoided)
F
深海任務部隊 艦載機群
Air Battle Node
Pattern 1 Standard Carrier Wo-Class flagshipLight Carrier Nu-Class eliteLight Carrier Nu-ClassLight Carrier Nu-ClassDestroyer I-ClassDestroyer I-Class
Formation 3: Diamond
AP:124
AS:278
AS+:555
Pattern 2 Standard Carrier Wo-Class flagshipLight Carrier Nu-Class eliteLight Carrier Nu-Class eliteLight Carrier Nu-Class eliteDestroyer I-ClassDestroyer I-Class
Formation 3: Diamond
AP:145
AS:326
AS+:651
G
Pattern 1Transport Drop-Off Node
H
深海任務部隊 増援迎撃戦隊B群
Pattern 1 Destroyer Ro-Class Late ModelDestroyer I-ClassDestroyer I-ClassDestroyer I-ClassPT Imp GroupPT Imp Group
Formation 2: Double Line
Formation 4: Echelon
I
Pattern 1Resource Node
J
深海任務部隊 増援迎撃戦隊A群
Pattern 1 Light Cruiser Tsu-ClassDestroyer Ro-Class Late ModelDestroyer Ro-Class Late ModelDestroyer I-ClassDestroyer I-ClassDestroyer I-Class
Formation 2: Double Line
Formation 4: Echelon
K
Pattern 1"Must be my imagination" (battle avoided)
L
深海任務部隊 増援迎撃戦隊旗艦
Enemy Combined Fleet
Pattern 1
main fleet
Light Cruiser PrincessDestroyer Ro-Class Late ModelDestroyer I-ClassDestroyer I-ClassDestroyer I-ClassPT Imp Group
escort fleet
Destroyer I-ClassDestroyer I-ClassDestroyer I-ClassDestroyer I-ClassDestroyer I-ClassDestroyer I-Class
Cruising Formation 4: Battle Formation
Pattern 2
Final Form
main fleet
Light Cruiser PrincessLight Carrier Nu-Class eliteDestroyer Ro-Class Late ModelDestroyer Ro-Class Late ModelDestroyer I-ClassDestroyer I-Class
escort fleet
Destroyer Ro-Class Late ModelDestroyer I-ClassDestroyer I-ClassDestroyer I-ClassDestroyer I-ClassDestroyer I-Class
Cruising Formation 4: Battle Formation
AP:46
AS:104
AS+:207
M
深海任務部隊 残存旧式戦艦群
Pattern 1
N
深海任務部隊 飴玉残存空母A群
Pattern 1 Light Carrier Nu-Class eliteLight Carrier Nu-Class eliteDestroyer Ro-Class Late ModelDestroyer I-ClassDestroyer I-ClassDestroyer I-Class
Formation 3: Diamond
AP:88
AS:198
AS+:396
Pattern 2 Light Carrier Nu-Class eliteLight Carrier Nu-Class eliteLight Cruiser Tsu-ClassDestroyer Ro-Class Late ModelDestroyer I-ClassDestroyer I-Class
Formation 3: Diamond
AP:88
AS:198
AS+:396
O
深海任務部隊 艦載機群
Air Battle Node
Pattern 1 Light Carrier Nu-Class eliteLight Carrier Nu-Class eliteLight Carrier Nu-Class eliteLight Carrier Nu-ClassDestroyer I-ClassDestroyer I-Class
Formation 3: Diamond
AP:84
AS:188
AS+:375
Pattern 2 Light Carrier Nu-Class eliteLight Carrier Nu-Class eliteLight Carrier Nu-Class eliteLight Carrier Nu-Class eliteDestroyer I-ClassDestroyer I-Class
Formation 3: Diamond
AP:94
AS:212
AS+:423
P
深海任務部隊 収容部隊前衛群
Pattern 1 Light Cruiser Ho-Class flagshipLight Cruiser Tsu-ClassBattleship Ta-ClassDestroyer I-ClassDestroyer I-ClassSubmarine So-Class
Formation 1: Line Ahead
Pattern 2 Light Cruiser Ho-Class flagshipLight Cruiser Tsu-ClassBattleship Ta-ClassDestroyer Ro-Class Late ModelDestroyer I-ClassDestroyer I-Class
Formation 2: Double Line
Pattern 3 Light Carrier Nu-Class eliteLight Cruiser Ho-Class flagshipLight Cruiser Tsu-ClassDestroyer Ro-Class Late ModelDestroyer I-ClassDestroyer I-Class
Formation 3: Diamond
AP:72
AS:162
AS+:324
Q
Pattern 1"Must be my imagination" (battle avoided)
R
深海任務部隊 飴玉残存空母B群
Pattern 1
S
Pattern 1"Must be my imagination" (battle avoided)
T
深海任務部隊 増援迎撃戦隊旗艦
Enemy Combined Fleet
Pattern 1
main fleet
Heavy Cruiser PrincessLight Carrier Nu-Class eliteLight Cruiser Tsu-ClassDestroyer I-ClassDestroyer I-ClassDestroyer I-Class
escort fleet
Destroyer Ro-Class Late ModelDestroyer I-ClassDestroyer I-ClassDestroyer I-ClassDestroyer I-ClassDestroyer I-Class
Cruising Formation 4: Battle Formation
AP:46
AS:104
AS+:207
Pattern 2
Final Form
main fleet
Heavy Cruiser PrincessLight Carrier Nu-Class eliteHeavy Cruiser Ne-ClassDestroyer Ro-Class Late ModelDestroyer I-ClassDestroyer I-Class
escort fleet
Destroyer Ro-Class Late ModelDestroyer Ro-Class Late ModelDestroyer I-ClassDestroyer I-ClassDestroyer I-ClassDestroyer I-Class
Cruising Formation 4: Battle Formation
AP:46
AS:104
AS+:207

Ship drops

NodeShip List
HDestroyersAkebono Arare Arashio Asashio Hatsuharu Hatsushimo Kasumi Michishio Naganami Nenohi Oboro Ooshio Sazanami Shiranui Ushio
Light CruisersJintsuu Naka
JDestroyersAkebono Arare Arashio Asashio Hatsuharu Hatsushimo Kasumi Michishio Naganami Nenohi Oboro Okinami Ooshio Sazanami Shiranui Ushio
Light CruisersAbukuma Isuzu Jintsuu Kinu Kiso Kuma Nagara Naka Natori Sendai Tama Yura Yuubari
Heavy CruisersAshigara Nachi
LDestroyer EscortsDaitou Shimushu
DestroyersAkebono Arare Arashio Asakaze Asashimo Asashio Fujinami Hatsuharu Hatsushimo Hayashimo Kasumi Michishio Naganami Nenohi Oboro Okinami Ooshio Sazanami Shimakaze Shiranui Uranami Ushio Uzuki
Light CruisersAbukuma Isuzu Jintsuu Kinu Kiso Kuma Nagara Naka Natori Sendai Tama Yura Yuubari
Heavy CruisersAshigara Nachi
MDestroyersAkebono Arashio Hatsuharu
Light CruisersNagara
NDestroyersAkebono Arare Arashio Asashio Hatsuharu Hatsushimo Kasumi Michishio Naganami Nagatsuki Nenohi Oboro Ooshio Sazanami Shiranui Ushio
Light CruisersIsuzu Jintsuu Kiso Kuma Nagara Naka Natori Sendai Tama Yura
Heavy CruisersAshigara Nachi
PDestroyer EscortsDaitou
DestroyersAkebono Arare Arashio Asakaze Asashimo Asashio Fujinami Hatsuharu Hatsushimo Hayashimo Kasumi Michishio Naganami Nenohi Oboro Okinami Ooshio Sazanami Shimakaze Shiranui Ushio Uzuki
Light CruisersAbukuma Isuzu Jintsuu Kinu Kiso Kuma Nagara Naka Natori Sendai Tama Yura Yuubari
Heavy CruisersAshigara Nachi
RDestroyersAkebono Arare Arashio Asashio Hatsuharu Hatsushimo Kasumi Michishio Naganami Nenohi Oboro Ooshio Sazanami Shiranui Ushio
Light CruisersJintsuu Naka Natori Sendai Yura
TDestroyersAkigumo Amatsukaze Arashio Asashimo Fujinami Hamakaze Hamanami Hayashimo Jervis Kiyoshimo Maikaze Matsukaze Michishio Naganami Nowaki Okinami Ooshio Shimakaze Tanikaze Tokitsukaze Urakaze Uranami Uzuki Yamakaze
Light CruisersAgano Isuzu Jintsuu Kiso Kuma Nagara Naka Natori Sendai Tama Tatsuta Tenryuu Yura
Heavy CruisersAoba Ashigara Atago Chikuma Choukai Furutaka Haguro Kako Kinugasa Kumano Maya Mikuma Mogami Myoukou Nachi Suzuya Takao Tone
BattleshipsHaruna Hiei Kirishima Kongou
Seaplane TendersChitose Chiyoda


E-6

OoyodoE-6Winter2018.png

Pursuit! The Second Striking Force
追撃!第ニ遊撃部隊

Information

  • Event Tag: 2018WinterGreenTag.png2018WinterPurpleTag.png

Phase 1 Boss: Seaplane Tender Princess

  • Hard (): 1050
  • Medium (): 1050
  • Easy (): 1050
  • Very Easy (): 1050

Phase 2 Boss: Battleship Princess Kai

  • Hard (): 2100
  • Medium (): 2100
  • Easy (): 2100
  • Very Easy (): 2100

Phase 3 Boss: Aircraft Carrier Demon

  • Hard (): 1560
  • Medium (): 1360
  • Easy (): 1170
  • Very Easy (): 1170

Key Rewards:

Winter 2018 Event E-6 Banner.png
Winter2018E-6Map.png

Branching rules

E-6 Branching Rules
Nodes Rules
Start
1
  • Do not meet the requirement to start at 2.
2
  • Everyone in the fleet has the Kurita shiplock tag (Green).
H
G
  • Pass the LoS check.
M
  • Fail the LoS check.
O
K
  • Meet one of the following requirements:
    • Fleet started at point 2.
    • Amount of DD ≦ 1 AND do not meet the requirement to go to P.
M
  • Slow Fleet (Overrides all other branching rules)
P
  • Meet all of the following requirements:
    • Amount of DD ≧ 2 during the 1st Phase
    • Fleet contains AV after the 1st Phase
    • Fast Fleet
    • Fleet started at point 1.
R
  • Meet all of the following requirements:
    • Amount of DD ≧ 2 (Medium/Hard)
    • Fast Fleet
    • Fleet started at point 1.
    • Fleet contains no AV
    • Node R is unlocked.
    • Do not meet the requirements to go to P.
P
S
  • Fail the LoS check.
U
  • Pass the LoS check.
R
T
  • Fail the LoS check.
W
  • Pass the LoS check.
N
L
  • Active branching
O
L
E
  • Fail the LoS check.
I
  • Pass the LoS check, but fail to meet the requirements to go to Q.
Q
  • Meet all of the following requirements:
    • Pass the LoS check.
    • Amount of DD ≧ 2
    • Node Q is unlocked.
Q
T
  • Fail the LoS check.
V
  • Pass the LoS check.

Branching compositions were reported over the course of the event.

Tips

Tagging Rules
2018WinterPurpleTag.png

2018WinterGreenTag.png
  • Untagged Ships that partake in E-6 will be given the Shima Fleet Tag
  • Shima Fleet Tagged Members will begin from Starting Point 1.
  • Mixed tags on Easy and Very Easy difficulty will begin from Starting Point 1.
  • Kurita Fleet Tagged Members will begin from Starting Point 2.
  • If you need to add in additional Kurita Fleet Tagged Ships to use for the Phase 2 of the operation, you will need to sortie them to E-2 or E-4 first so they can tagged with the Kurita Fleet Tag.

E6 Objectives

E6 contains mutiple objectives that need to be comlpleted depending of the difficulty level. Objectives will be listed in order of difficulties.

Phase 1 Objectives - Shima Striking Force

  • Defeat boss gauge at Node U, Seaplane Tender Princess (all difficulties)
    • …and Reach Node I (Easy)
    • …and S-rank I and reach node K (Med)
      • …and A-Rank K (Hard)

Phase 2 Objectives - Kurita Striking Force

  • Defeat boss gauge at node V, Battleship Princess Kai (all)
    • …And obtain AS against an LBAS raid (1 on Med, 3 on Hard)

Phase 3 Objectives - Shima Striking Force

Required Ships

Phase 1: 2DDs mandatory, fast fleet mandatory

Phase 2: 2DDs mandatory

Phase 3: 2DDs mandatory, fast fleet mandatory

Phase 1 - AV Hime

2DD Mandatory, Fast mandatory.

AV Hime will require the use of the Shima fleet (Purple). This phase is relatively straightforward.

Attaining AS here is completely impractical (504 FP) if not impossible, as it would require the sacrifice of Nachi and Ashigara, removing bombers from LBAS for fighters, and more.

Key Pointers:

  • Nachi and Ashigara are highly recommended for their post-cap firepower bonuses, as are most historical ships.
  • The Littorio-Class are also excellent here for their ability to attain AS (they are capable of carrying Seaplane Fighters) when unopposed
  • A submarine may be utilized to divert fire, however, as a fast fleet is a requirement, a boiler+turbine combination is mandatory
    • The SS may be retreated without consequence. As sparkling a submarine is extremely cheap and submarines benefit greatly proportionately from the extra evasion when sparkled, it is highly recommended that you sparkle the SSV.
    • This can be done extremely cheaply at E5

The final composition of the fleet would therefore look along the lines of: SSV 2FBB 2CA 3DD

  • ASW bombers may be sent to node H to increase the consistency of reaching the boss node
  • Node O checks for 2DD, an FCF may therefore be used prior to or at node O if you would still have at least 2DDs remaining

The boss node of E6 Phase 1 contains AV hime, due to the historical bonuses and the presence of the friend fleet, finishing this phase should be relatively simple and is mostly a matter of time and resources given proper setups.

Phase 2 - BB Hime Kai

BB Hime requires the use of the Kurita fleet (Green), this phase is arguably the hardest of the three due to the extreme durability of the boss. One CAV should be used to provide AP/AS (3-4 Seaplane fighters) at the boss.

Node V - BB Hime Kai

BB Hime Kai represents most of the challenge in clearing E6; this is largely due to two factors, her extreme durability, and the lack of a friend fleet.

  • Most nodes prior to the boss are relatively straightforward, but should not by any means be underestimated: The presence of Nu CAs and Ri Kais are still significant threats and can force retreats.
    • At most, it may be possible to utilize one LBAS to assist with problem nodes


The Boss:

  • BB Hime Kai almost necessitates the use of LBAS support on her. At least two and possibly all three bases should committed on her. Barring final form on hard mode, this boss has absolutely no air power, fighters are completely unnecessary.
  • Saiuns and FCFs should not the first things dropped for final form to maximize kill rates.
  • This is a prime area for using TCIs
    • Do not neglect the flagship cut-in rate bonus. On ships without luck modifications (e.g. Naganami K2), the use of skilled lookouts is worth consideration/
    • Ideally, the CA used should be TCI capable, Myoukou in particular comes with a high base luck good night battle power. Luckmodded Choukai or Maya would be ideal for this map.
    • TCIs on a CLT, however, is still not recommended, they may, however, be moved further up the shelling order, ahead of a capped TCI ship.
  • Given the high difficulty of this boss, boss support expeditions are extremely highly recommended. Sparkling remains optional, but should be considered if problems persist

Phase 3 - CV Water Demon

Key Pointers

  • As with Phase 1, the FCF should only be used at (or prior to) node O if your fleet would have at least 2DDs after withdrawing one

Show/Hide Nodes and Enemy Encounters
Nodes and Enemy Encounters
NodePatternXpNode InfoFormAir
A
Pattern 1"Must be my imagination" (battle avoided)
B
Pattern 1"Must be my imagination" (battle avoided)
C
深海任務部隊 艦載機群
Air Battle Node
Pattern 1 Light Carrier Nu-Class eliteLight Carrier Nu-Class eliteLight Carrier Nu-Class eliteLight Cruiser Tsu-Class eliteDestroyer Ni-Class Late ModelDestroyer Ni-Class Late Model
Formation 3: Diamond
AP:216
AS:486
AS+:972
Pattern 2 Aircraft Carrier PrincessLight Carrier Nu-Class eliteLight Carrier Nu-Class eliteLight Cruiser Tsu-Class eliteDestroyer Ni-Class Late ModelDestroyer Ni-Class Late Model
Formation 3: Diamond
AP:247
AS:555
AS+:1110
Pattern 3 Aircraft Carrier PrincessLight Carrier Nu-Class eliteLight Carrier Nu-Class eliteLight Cruiser Tsu-Class eliteDestroyer Ni-Class Late ModelDestroyer Ni-Class Late Model
Formation 3: Diamond
AP:279
AS:627
AS+:1254
D
Pattern 1"Must be my imagination" (battle avoided)
E
Pattern 1"Must be my imagination" (battle avoided)
F
Pattern 1"Must be my imagination" (battle avoided)
G
深海任務部隊 再編水雷戦隊
Pattern 1 Light Cruiser He-Class flagshipTorpedo Cruiser Chi-Class flagshipTorpedo Cruiser Chi-Class flagshipDestroyer Na-Class flagshipDestroyer Ha-Class Late ModelDestroyer Ha-Class Late Model
Formation 1: Line Ahead
Formation 2: Double Line
Pattern 2 Light Cruiser He-Class flagshipTorpedo Cruiser Chi-Class flagshipTorpedo Cruiser Chi-Class flagshipDestroyer Na-Class flagshipDestroyer Na-Class flagshipDestroyer Na-Class flagship
Formation 1: Line Ahead
H
深海潜水艦部隊 独立強襲群
Pattern 1 Submarine So-Class eliteSubmarine So-Class eliteSubmarine So-Class eliteSubmarine So-Class elite
Formation 4: Echelon
Pattern 2 Submarine So-Class flagshipSubmarine So-Class eliteSubmarine So-Class eliteSubmarine So-Class elite
Formation 4: Echelon
Pattern 3 Submarine So-Class flagshipSubmarine So-Class flagshipSubmarine So-Class eliteSubmarine So-Class elite
Formation 4: Echelon
Pattern 4 Submarine So-Class flagshipSubmarine So-Class flagshipSubmarine So-Class flagshipSubmarine So-Class elite
Formation 4: Echelon
I
深海任務部隊 残存輸送船団
Pattern 1 Light Cruiser He-Class flagshipTransport Ship Wa-Class flagshipTransport Ship Wa-Class eliteLight Cruiser Tsu-Class eliteDestroyer Na-Class Late Model flagshipDestroyer Na-Class Late Model flagship
Formation 2: Double Line
Pattern 2 Light Cruiser He-Class flagshipTransport Ship Wa-Class flagshipTransport Ship Wa-Class flagshipLight Cruiser Tsu-Class eliteDestroyer Na-Class Late Model flagshipDestroyer Na-Class Late Model flagship
Formation 1: Line Ahead
Formation 2: Double Line
J
深海任務部隊 再編巡洋艦戦隊
Pattern 1 Heavy Cruiser Ri-Class flagshipHeavy Cruiser Ne-Class eliteHeavy Cruiser Ne-Class eliteLight Cruiser Tsu-Class eliteDestroyer Na-Class flagshipDestroyer Na-Class flagship
Formation 1: Line Ahead
Formation 2: Double Line
Pattern 2 Heavy Cruiser Ri-Class KaiHeavy Cruiser Ne-Class eliteHeavy Cruiser Ne-Class eliteLight Cruiser Tsu-Class eliteDestroyer Na-Class flagshipDestroyer Na-Class flagship
Formation 1: Line Ahead
K
深海任務部隊 再編空母打撃群
Pattern 1 Aircraft Carrier PrincessBattleship Ta-Class flagshipBattleship Ta-Class flagshipLight Cruiser Tsu-Class eliteDestroyer Na-Class Late Model eliteDestroyer Na-Class Late Model elite
Formation 1: Line Ahead
Formation 2: Double Line
Formation 3: Diamond
AP:103
AS:231
AS+:462
L
深海任務部隊 残存輸送船団護衛
Pattern 1 Light Cruiser He-Class flagshipLight Cruiser Tsu-Class eliteLight Cruiser Tsu-Class eliteDestroyer Na-Class eliteDestroyer Na-Class eliteDestroyer Na-Class elite
Formation 1: Line Ahead
Formation 2: Double Line
M
Pattern 1"Must be my imagination" (battle avoided)
N
Pattern 1Choose your route
O
深海任務部隊 再編飴玉空母部隊
Pattern 1 Light Carrier Nu-Class flagshipLight Carrier Nu-Class flagshipLight Cruiser He-Class flagshipLight Cruiser Tsu-Class eliteDestroyer Ha-Class Late ModelDestroyer Ha-Class Late Model
Formation 3: Diamond
AP:200
AS:450
AS+:900
Pattern 2 Light Carrier Nu-Class flagshipLight Carrier Nu-Class flagshipHeavy Cruiser Ri-Class KaiLight Cruiser Tsu-Class eliteDestroyer Ha-Class Late ModelDestroyer Ha-Class Late Model
Formation 2: Double Line
Formation 3: Diamond
AP:200
AS:450
AS+:900
P
深海任務部隊 艦載機群
Air Battle Node
Pattern 1 Seaplane Tender PrincessLight Carrier Nu-Class eliteLight Carrier Nu-Class eliteLight Cruiser Tsu-Class eliteDestroyer Ha-Class Late ModelDestroyer Ha-Class Late Model
Formation 3: Diamond
AP:224
AS:504
AS+:1008
Pattern 2 Seaplane Tender PrincessLight Carrier Nu-Class flagshipLight Carrier Nu-Class flagshipBattleship Ta-Class eliteLight Cruiser Tsu-Class eliteLight Cruiser Tsu-Class elite
Formation 3: Diamond
AP:248
AS:558
AS+:1116
Pattern 3 Seaplane Tender PrincessLight Carrier Nu-Class flagshipLight Carrier Nu-Class flagshipLight Carrier Nu-Class eliteLight Cruiser Tsu-Class eliteLight Cruiser Tsu-Class elite
Formation 3: Diamond
AP:336
AS:756
AS+:1512
Q
深海任務部隊 増援支援集団前衛
Pattern 1 Light Cruiser He-Class flagshipHeavy Cruiser Ne-Class eliteHeavy Cruiser Ne-Class eliteLight Cruiser Tsu-Class eliteDestroyer Na-Class eliteDestroyer Na-Class elite
Formation 1: Line Ahead
Formation 2: Double Line
R
深海任務部隊 艦載機群
Air Battle Node
Pattern 1 Aircraft Carrier Water Demon Final FormBattleship PrincessLight Carrier Nu-Class flagshipLight Carrier Nu-Class flagshipDestroyer Na-Class Late Model eliteDestroyer Na-Class Late Model elite
Formation 3: Diamond
AP:274
AS:617
AS+:1233
Pattern 2 Aircraft Carrier Water Demon Final FormBattleship PrincessLight Carrier Nu-Class flagshipLight Carrier Nu-Class flagshipLight Carrier Nu-Class eliteLight Cruiser Tsu-Class elite
Formation 3: Diamond
AP:362
AS:815
AS+:1629
Pattern 3 Aircraft Carrier Water Demon Final FormBattleship PrincessBattleship PrincessLight Carrier Nu-Class flagshipLight Carrier Nu-Class flagshipLight Carrier Nu-Class elite
Formation 3: Diamond
AP:362
AS:815
AS+:1629
S
Pattern 1"Must be my imagination" (battle avoided)
T
Pattern 1"Must be my imagination" (battle avoided)
U
深海任務部隊 増援索敵集団
Enemy Combined Fleet
Pattern 1
main fleet
Seaplane Tender PrincessLight Carrier Nu-Class eliteLight Carrier Nu-Class eliteLight Cruiser Tsu-Class eliteDestroyer Ha-Class Late ModelDestroyer Ha-Class Late Model
escort fleet
Destroyer Na-Class Late Model eliteDestroyer Na-Class Late Model eliteDestroyer Ha-Class Late ModelDestroyer Ha-Class Late ModelDestroyer Ha-Class Late ModelDestroyer Ha-Class Late Model
Cruising Formation 4: Battle Formation
AP:224
AS:504
AS+:1008
Pattern 2
Final Form
main fleet
Seaplane Tender PrincessLight Carrier Nu-Class eliteLight Carrier Nu-Class eliteBattleship Ta-Class eliteLight Cruiser Tsu-Class eliteLight Cruiser Tsu-Class elite
escort fleet
Destroyer Na-Class Late Model eliteDestroyer Na-Class Late Model eliteDestroyer Na-Class Late Model eliteDestroyer Na-Class Late Model eliteDestroyer Ha-Class Late ModelDestroyer Ha-Class Late Model
Cruising Formation 4: Battle Formation
AP:224
AS:504
AS+:1008
V
深海任務部隊 増援支援集団
Enemy Combined Fleet
Pattern 1
main fleet
Battleship Princess KaiHeavy Cruiser Ne-Class eliteHeavy Cruiser Ne-Class eliteLight Cruiser Tsu-Class eliteDestroyer Na-Class eliteDestroyer Na-Class elite
escort fleet
Destroyer Na-Class Late Model eliteDestroyer Na-Class Late Model eliteDestroyer Na-ClassDestroyer Na-ClassDestroyer Na-ClassDestroyer Na-Class
Cruising Formation 4: Battle Formation
Pattern 2
Final Form
main fleet
Battleship Princess KaiLight Carrier Nu-Class flagshipHeavy Cruiser Ne-Class eliteHeavy Cruiser Ne-Class eliteLight Cruiser Tsu-Class eliteLight Cruiser Tsu-Class elite
escort fleet
Destroyer Na-Class Late Model eliteDestroyer Na-Class Late Model eliteDestroyer Na-Class Late Model eliteDestroyer Na-Class Late Model eliteDestroyer Na-Class Late Model eliteDestroyer Na-Class Late Model elite
Cruising Formation 4: Battle Formation
AP:100
AS:225
AS+:450
W
深海任務部隊 増援集団旗艦艦隊
Enemy Combined Fleet
Pattern 1
main fleet
Aircraft Carrier Water Demon Final FormBattleship PrincessLight Carrier Nu-Class eliteLight Cruiser Tsu-Class eliteDestroyer Ha-Class Late ModelDestroyer Ha-Class Late Model
escort fleet
Light Cruiser He-Class flagshipDestroyer Na-Class Late Model eliteDestroyer Na-Class Late Model eliteDestroyer Ha-Class Late ModelDestroyer Ha-Class Late ModelDestroyer Ha-Class Late Model
Cruising Formation 4: Battle Formation
AP:162
AS:365
AS+:729
Pattern 2
Final Form
main fleet
Aircraft Carrier Water Demon Final FormBattleship PrincessBattleship PrincessLight Carrier Nu-Class eliteLight Carrier Nu-Class eliteLight Cruiser Tsu-Class elite
escort fleet
Light Cruiser He-Class flagshipDestroyer Na-Class Late Model eliteDestroyer Na-Class Late Model eliteDestroyer Na-Class Late Model eliteDestroyer Ha-Class Late ModelDestroyer Ha-Class Late Model
Cruising Formation 4: Battle Formation
AP:250
AS:563
AS+:1125

Show/Hide Nodes and Enemy Encounters
Nodes and Enemy Encounters
NodePatternXpNode InfoFormAir
A
Pattern 1"Must be my imagination" (battle avoided)
B
Pattern 1"Must be my imagination" (battle avoided)
C
深海任務部隊 艦載機群
Air Battle Node
Pattern 1 Light Carrier Nu-Class eliteLight Carrier Nu-Class eliteLight Carrier Nu-Class eliteLight Cruiser Tsu-ClassDestroyer Ha-Class Late ModelDestroyer Ha-Class Late Model
Formation 3: Diamond
AP:160
AS:360
AS+:720
Pattern 2 Light Carrier Nu-Class eliteLight Carrier Nu-Class eliteLight Carrier Nu-Class eliteLight Cruiser Tsu-ClassDestroyer Ha-Class Late ModelDestroyer Ha-Class Late Model
Formation 3: Diamond
AP:216
AS:486
AS+:972
Pattern 3 Aircraft Carrier PrincessLight Carrier Nu-Class eliteLight Carrier Nu-Class eliteLight Cruiser Tsu-ClassDestroyer Ha-Class Late ModelDestroyer Ha-Class Late Model
Formation 3: Diamond
AP:247
AS:555
AS+:1110
D
Pattern 1"Must be my imagination" (battle avoided)
E
Pattern 1"Must be my imagination" (battle avoided)
F
Pattern 1"Must be my imagination" (battle avoided)
G
深海任務部隊 再編水雷戦隊
Pattern 1 Light Cruiser He-Class flagshipTorpedo Cruiser Chi-Class flagshipTorpedo Cruiser Chi-Class flagshipDestroyer Ro-Class Late ModelDestroyer Ro-Class Late ModelDestroyer I-Class
Formation 1: Line Ahead
Formation 2: Double Line
Pattern 2 Light Cruiser He-Class flagshipTorpedo Cruiser Chi-Class flagshipTorpedo Cruiser Chi-Class flagshipDestroyer Na-Class eliteDestroyer Ro-Class Late ModelDestroyer Ro-Class Late Model
Formation 1: Line Ahead
H
深海潜水艦部隊 独立強襲群
Pattern 1 Submarine So-Class eliteSubmarine So-ClassSubmarine So-ClassSubmarine So-Class
Formation 4: Echelon
Pattern 2 Submarine So-Class eliteSubmarine So-Class eliteSubmarine So-ClassSubmarine So-Class
Formation 4: Echelon
Pattern 3 Submarine So-Class eliteSubmarine So-Class eliteSubmarine So-Class eliteSubmarine So-Class
Formation 4: Echelon
Pattern 4 Submarine So-Class eliteSubmarine So-Class eliteSubmarine So-Class eliteSubmarine So-Class elite
Formation 4: Echelon
I
深海任務部隊 残存輸送船団
Pattern 1 Light Cruiser He-Class flagshipTransport Ship Wa-Class eliteTransport Ship Wa-Class eliteLight Cruiser Tsu-ClassDestroyer Na-Class Late ModelDestroyer Na-Class Late Model
Formation 2: Double Line
Pattern 2 Light Cruiser He-Class flagshipTransport Ship Wa-Class eliteTransport Ship Wa-Class eliteLight Cruiser Tsu-Class eliteDestroyer Na-Class Late ModelDestroyer Na-Class Late Model
Formation 1: Line Ahead
Formation 2: Double Line
J
深海任務部隊 再編巡洋艦戦隊
Pattern 1 Heavy Cruiser Ri-Class flagshipHeavy Cruiser Ne-ClassHeavy Cruiser Ne-ClassLight Cruiser Tsu-ClassDestroyer Ro-Class Late ModelDestroyer Ro-Class Late Model
Formation 1: Line Ahead
Formation 2: Double Line
Pattern 2 Heavy Cruiser Ri-Class flagshipHeavy Cruiser Ne-Class eliteHeavy Cruiser Ne-ClassLight Cruiser Tsu-ClassDestroyer Ro-Class Late ModelDestroyer Ro-Class Late Model
Formation 1: Line Ahead
K
深海任務部隊 再編空母打撃群
Pattern 1 Aircraft Carrier PrincessBattleship Ta-Class eliteBattleship Ta-Class eliteLight Cruiser Tsu-Class eliteDestroyer Na-Class eliteDestroyer Na-Class elite
Formation 1: Line Ahead
Formation 2: Double Line
Formation 3: Diamond
AP:103
AS:231
AS+:462
L
深海任務部隊 残存輸送船団護衛
Pattern 1 Light Cruiser He-Class flagshipLight Cruiser Tsu-ClassLight Cruiser Tsu-ClassDestroyer Na-Class eliteDestroyer Ha-Class Late ModelDestroyer Ha-Class Late Model
Formation 1: Line Ahead
Formation 2: Double Line
M
Pattern 1"Must be my imagination" (battle avoided)
N
Pattern 1Choose your route
O
深海任務部隊 再編飴玉空母部隊
Pattern 1 Light Carrier Nu-Class eliteLight Carrier Nu-Class eliteLight Cruiser He-Class flagshipLight Cruiser Tsu-ClassDestroyer Ro-Class Late ModelDestroyer Ro-Class Late Model
Formation 3: Diamond
AP:160
AS:360
AS+:720
Pattern 2 Light Carrier Nu-Class eliteLight Carrier Nu-Class eliteHeavy Cruiser Ri-Class flagshipLight Cruiser Tsu-ClassDestroyer Ro-Class Late ModelDestroyer Ro-Class Late Model
Formation 2: Double Line
AP:176
AS:396
AS+:792
Pattern 3 Light Carrier Nu-Class eliteLight Carrier Nu-Class eliteHeavy Cruiser Ri-Class flagshipLight Cruiser Tsu-ClassDestroyer Ha-Class Late ModelDestroyer Ha-Class Late Model
Formation 3: Diamond
AP:176
AS:396
AS+:792
P
深海任務部隊 艦載機群
Air Battle Node
Pattern 1 Seaplane Tender PrincessLight Carrier Nu-Class eliteLight Carrier Nu-Class eliteLight Cruiser Tsu-ClassDestroyer Ha-Class Late ModelDestroyer Ha-Class Late Model
Formation 3: Diamond
AP:175
AS:393
AS+:786
Pattern 2 Seaplane Tender PrincessLight Carrier Nu-Class eliteLight Carrier Nu-Class eliteLight Cruiser Tsu-ClassDestroyer Ha-Class Late ModelDestroyer Ha-Class Late Model
Formation 3: Diamond
AP:191
AS:429
AS+:858
Pattern 3 Seaplane Tender PrincessLight Carrier Nu-Class eliteLight Carrier Nu-Class eliteLight Carrier Nu-Class eliteLight Cruiser Tsu-ClassLight Cruiser Tsu-Class
Formation 3: Diamond
AP:279
AS:627
AS+:1254
Q
深海任務部隊 増援支援集団前衛
Pattern 1 Light Cruiser He-Class flagshipHeavy Cruiser Ne-ClassHeavy Cruiser Ne-ClassLight Cruiser Tsu-ClassDestroyer Ha-Class Late ModelDestroyer Ha-Class Late Model
Formation 1: Line Ahead
Formation 2: Double Line
R
深海任務部隊 艦載機群
Air Battle Node
Pattern 1 Aircraft Carrier Water Demon Final FormBattleship Ta-Class eliteLight Carrier Nu-Class eliteLight Carrier Nu-Class eliteDestroyer Ha-Class Late ModelDestroyer Ha-Class Late Model
Formation 3: Diamond
AP:218
AS:491
AS+:981
Pattern 2 Aircraft Carrier Water Demon Final FormBattleship Ta-Class eliteLight Carrier Nu-Class eliteLight Carrier Nu-Class eliteLight Carrier Nu-Class eliteLight Cruiser Tsu-Class
Formation 3: Diamond
AP:306
AS:689
AS+:1377
Pattern 3 Aircraft Carrier Water Demon Final FormBattleship PrincessLight Carrier Nu-Class eliteLight Carrier Nu-Class eliteLight Carrier Nu-Class eliteLight Cruiser Tsu-Class elite
Formation 3: Diamond
AP:306
AS:689
AS+:1377
S
Pattern 1"Must be my imagination" (battle avoided)
T
Pattern 1"Must be my imagination" (battle avoided)
U
深海任務部隊 増援索敵集団
Enemy Combined Fleet
Pattern 1
main fleet
Seaplane Tender PrincessLight Carrier Nu-Class eliteLight Carrier Nu-Class eliteLight Cruiser Tsu-ClassDestroyer Ha-Class Late ModelDestroyer Ha-Class Late Model
escort fleet
Destroyer Ha-Class Late ModelDestroyer Ha-Class Late ModelDestroyer I-ClassDestroyer I-ClassDestroyer I-ClassDestroyer I-Class
Cruising Formation 4: Battle Formation
AP:159
AS:357
AS+:714
Pattern 2
Final Form
main fleet
Seaplane Tender PrincessLight Carrier Nu-Class eliteLight Carrier Nu-Class eliteBattleship Ta-ClassLight Cruiser Tsu-ClassLight Cruiser Tsu-Class
escort fleet
Destroyer Na-Class Late ModelDestroyer Na-Class Late ModelDestroyer Ha-Class Late ModelDestroyer Ha-Class Late ModelDestroyer I-ClassDestroyer I-Class
Cruising Formation 4: Battle Formation
AP:159
AS:357
AS+:714
V
深海任務部隊 増援支援集団
Enemy Combined Fleet
Pattern 1
main fleet
Battleship Princess KaiHeavy Cruiser Ri-Class flagshipHeavy Cruiser Ri-Class flagshipLight Cruiser Tsu-ClassDestroyer Ha-Class Late ModelDestroyer Ha-Class Late Model
escort fleet
Destroyer Na-Class eliteDestroyer Na-Class eliteDestroyer Ha-Class Late ModelDestroyer Ha-Class Late ModelDestroyer I-ClassDestroyer I-Class
Cruising Formation 4: Battle Formation
Pattern 2
Final Form
main fleet
Battleship Princess KaiHeavy Cruiser Ri-Class flagshipHeavy Cruiser Ri-Class flagshipLight Cruiser Tsu-Class eliteDestroyer Ha-Class Late ModelDestroyer Ha-Class Late Model
escort fleet
Destroyer Na-Class Late Model eliteDestroyer Na-Class Late Model eliteDestroyer Ha-Class Late ModelDestroyer Ha-Class Late ModelDestroyer Ha-Class Late ModelDestroyer Ha-Class Late Model
Cruising Formation 4: Battle Formation
W
深海任務部隊 増援集団旗艦艦隊
Enemy Combined Fleet
Pattern 1
main fleet
Aircraft Carrier Water Demon Final FormBattleship Ta-Class eliteLight Carrier Nu-Class eliteLight Cruiser Tsu-ClassDestroyer Ha-Class Late ModelDestroyer Ha-Class Late Model
escort fleet
Light Cruiser He-Class flagshipDestroyer Ha-Class Late ModelDestroyer Ha-Class Late ModelDestroyer Ha-Class Late ModelDestroyer I-ClassDestroyer I-Class
Cruising Formation 4: Battle Formation
AP:162
AS:365
AS+:729
Pattern 2
Final Form
main fleet
Aircraft Carrier Water Demon Final FormBattleship PrincessLight Carrier Nu-Class eliteLight Cruiser Tsu-Class eliteDestroyer Ha-Class Late ModelDestroyer Ha-Class Late Model
escort fleet
Light Cruiser He-Class flagshipDestroyer Na-Class Late Model eliteDestroyer Ha-Class Late ModelDestroyer Ha-Class Late ModelDestroyer I-ClassDestroyer I-Class
Cruising Formation 4: Battle Formation
AP:162
AS:365
AS+:729

Show/Hide Nodes and Enemy Encounters
Nodes and Enemy Encounters
NodePatternXpNode InfoFormAir
A
Pattern 1"Must be my imagination" (battle avoided)
B
Pattern 1"Must be my imagination" (battle avoided)
C
深海任務部隊 艦載機群
Air Battle Node
Pattern 1 Light Carrier Nu-Class eliteLight Carrier Nu-Class eliteLight Carrier Nu-Class eliteLight Cruiser Tsu-ClassDestroyer I-ClassDestroyer I-Class
Formation 3: Diamond
AP:104
AS:234
AS+:468
Pattern 2 Light Carrier Nu-Class eliteLight Carrier Nu-Class eliteLight Carrier Nu-Class eliteLight Cruiser Tsu-ClassDestroyer I-ClassDestroyer I-Class
Formation 3: Diamond
AP:160
AS:360
AS+:720
Pattern 3 Light Carrier Nu-Class eliteLight Carrier Nu-Class eliteLight Carrier Nu-Class eliteLight Cruiser Tsu-ClassDestroyer I-ClassDestroyer I-Class
Formation 3: Diamond
AP:216
AS:486
AS+:972
D
Pattern 1"Must be my imagination" (battle avoided)
E
Pattern 1"Must be my imagination" (battle avoided)
F
Pattern 1"Must be my imagination" (battle avoided)
G
深海任務部隊 再編水雷戦隊
Pattern 1 Light Cruiser He-Class flagshipTorpedo Cruiser Chi-Class eliteTorpedo Cruiser Chi-Class eliteDestroyer Ro-Class Late ModelDestroyer I-ClassDestroyer I-Class
Formation 1: Line Ahead
Formation 2: Double Line
Pattern 2 Light Cruiser He-Class flagshipTorpedo Cruiser Chi-Class eliteTorpedo Cruiser Chi-Class eliteDestroyer Ro-Class Late ModelDestroyer Ro-Class Late ModelDestroyer I-Class
Formation 1: Line Ahead
H
深海潜水艦部隊 独立強襲群
Pattern 1 Submarine So-ClassSubmarine So-ClassSubmarine So-ClassSubmarine So-Class
Formation 5: Line Abreast
Pattern 2 Submarine So-Class eliteSubmarine So-ClassSubmarine So-ClassSubmarine So-Class
Formation 4: Echelon
I
深海任務部隊 残存輸送船団
Pattern 1 Light Cruiser Ho-Class flagshipTransport Ship Wa-Class eliteTransport Ship Wa-Class eliteLight Cruiser Tsu-ClassDestroyer Ro-Class Late ModelDestroyer Ro-Class Late Model
Formation 1: Line Ahead
Formation 2: Double Line
Pattern 2 Light Cruiser He-Class flagshipTransport Ship Wa-ClassTransport Ship Wa-ClassLight Cruiser Tsu-ClassDestroyer Ro-Class Late ModelDestroyer Ro-Class Late Model
Formation 2: Double Line
J
深海任務部隊 再編巡洋艦戦隊
Pattern 1 Heavy Cruiser Ri-Class flagshipHeavy Cruiser Ne-ClassLight Cruiser Tsu-ClassDestroyer I-ClassDestroyer I-ClassDestroyer I-Class
Formation 1: Line Ahead
Formation 2: Double Line
Pattern 2 Heavy Cruiser Ri-Class flagshipHeavy Cruiser Ne-ClassLight Cruiser Tsu-ClassDestroyer Ro-Class Late ModelDestroyer I-ClassDestroyer I-Class
Formation 1: Line Ahead
K
深海任務部隊 再編空母打撃群
Pattern 1 Aircraft Carrier PrincessBattleship Ta-ClassBattleship Ta-ClassLight Cruiser Tsu-ClassDestroyer I-ClassDestroyer I-Class
Formation 1: Line Ahead
Formation 2: Double Line
Formation 3: Diamond
AP:103
AS:231
AS+:462
L
深海任務部隊 残存輸送船団護衛
Pattern 1 Light Cruiser He-Class flagshipLight Cruiser Tsu-ClassDestroyer Ro-Class Late ModelDestroyer Ro-Class Late ModelDestroyer I-ClassDestroyer I-Class
Formation 1: Line Ahead
Formation 2: Double Line
M
Pattern 1"Must be my imagination" (battle avoided)
N
Pattern 1Choose your route
O
深海任務部隊 再編飴玉空母部隊
Pattern 1 Light Carrier Nu-Class eliteLight Carrier Nu-Class eliteLight Cruiser He-Class flagshipLight Cruiser Tsu-ClassDestroyer I-ClassDestroyer I-Class
Formation 3: Diamond
AP:88
AS:198
AS+:396
Pattern 2 Light Carrier Nu-Class eliteLight Carrier Nu-Class eliteHeavy Cruiser Ri-Class flagshipLight Cruiser Tsu-ClassDestroyer I-ClassDestroyer I-Class
Formation 2: Double Line
Formation 3: Diamond
AP:144
AS:324
AS+:648
P
深海任務部隊 艦載機群
Air Battle Node
Pattern 1 Seaplane Tender PrincessLight Carrier Nu-Class eliteLight Carrier Nu-Class eliteLight Cruiser Tsu-ClassDestroyer I-ClassDestroyer I-Class
Formation 3: Diamond
AP:103
AS:231
AS+:462
Pattern 2 Standard Carrier Wo-Class flagshipLight Carrier Nu-Class eliteLight Cruiser Tsu-ClassDestroyer I-ClassDestroyer I-ClassDestroyer I-Class
Formation 3: Diamond
AP:139
AS:312
AS+:624
Pattern 3 Seaplane Tender PrincessLight Carrier Nu-Class eliteLight Carrier Nu-Class eliteBattleship Ta-ClassLight Cruiser Tsu-ClassLight Cruiser Tsu-Class
Formation 3: Diamond
AP:159
AS:357
AS+:714
Q
深海任務部隊 増援支援集団前衛
Pattern 1 Light Cruiser He-Class flagshipHeavy Cruiser Ne-ClassLight Cruiser Tsu-ClassDestroyer Ro-Class Late ModelDestroyer I-ClassDestroyer I-Class
Formation 1: Line Ahead
Formation 2: Double Line
R
深海任務部隊 艦載機群
Air Battle Node
Pattern 1 Aircraft Carrier Water DemonLight Carrier Nu-Class eliteLight Cruiser Tsu-ClassDestroyer I-ClassDestroyer I-ClassDestroyer I-Class
Formation 3: Diamond
AP:146
AS:329
AS+:657
Pattern 2 Aircraft Carrier Water DemonLight Carrier Nu-Class eliteLight Carrier Nu-Class eliteLight Cruiser Tsu-ClassDestroyer I-ClassDestroyer I-Class
Formation 3: Diamond
AP:218
AS:491
AS+:981
Pattern 3 Aircraft Carrier Water DemonBattleship PrincessLight Carrier Nu-Class eliteLight Carrier Nu-Class eliteDestroyer I-ClassDestroyer I-Class
Formation 3: Diamond
AP:218
AS:491
AS+:981
S
Pattern 1"Must be my imagination" (battle avoided)
T
Pattern 1"Must be my imagination" (battle avoided)
U
深海任務部隊 増援索敵集団
Enemy Combined Fleet
Pattern 1
main fleet
Seaplane Tender PrincessLight Carrier Nu-Class eliteLight Carrier Nu-Class eliteLight Cruiser Tsu-ClassDestroyer I-ClassDestroyer I-Class
escort fleet
Destroyer Ro-Class Late ModelDestroyer Ro-Class Late ModelDestroyer I-ClassDestroyer I-ClassDestroyer I-ClassDestroyer I-Class
Cruising Formation 4: Battle Formation
AP:159
AS:357
AS+:714
Pattern 2
Final Form
main fleet
Seaplane Tender PrincessLight Carrier Nu-Class eliteLight Carrier Nu-Class eliteBattleship Ta-ClassLight Cruiser Tsu-ClassLight Cruiser Tsu-Class
escort fleet
Destroyer Ro-Class Late ModelDestroyer Ro-Class Late ModelDestroyer I-ClassDestroyer I-ClassDestroyer I-ClassDestroyer I-Class
Cruising Formation 4: Battle Formation
AP:159
AS:357
AS+:714
V
深海任務部隊 増援支援集団
Enemy Combined Fleet
Pattern 1
main fleet
Battleship Princess KaiHeavy Cruiser Ri-Class eliteHeavy Cruiser Ri-Class eliteLight Cruiser Tsu-ClassDestroyer I-ClassDestroyer I-Class
escort fleet
Destroyer Na-ClassDestroyer Ro-Class Late ModelDestroyer Ro-Class Late ModelDestroyer I-ClassDestroyer I-ClassDestroyer I-Class
Cruising Formation 4: Battle Formation
Pattern 2
Final Form
main fleet
Battleship Princess KaiHeavy Cruiser Ri-Class eliteHeavy Cruiser Ri-Class eliteLight Cruiser Tsu-ClassDestroyer Ro-Class Late ModelDestroyer Ro-Class Late Model
escort fleet
Destroyer Na-ClassDestroyer Na-ClassDestroyer Ro-Class Late ModelDestroyer Ro-Class Late ModelDestroyer I-ClassDestroyer I-Class
Cruising Formation 4: Battle Formation
W
深海任務部隊 増援集団旗艦艦隊
Enemy Combined Fleet
Pattern 1
main fleet
Aircraft Carrier Water DemonBattleship Ta-Class eliteLight Cruiser Tsu-ClassDestroyer Ro-Class Late ModelDestroyer I-ClassDestroyer I-Class
escort fleet
Light Cruiser He-Class flagshipDestroyer Ro-Class Late ModelDestroyer I-ClassDestroyer I-ClassDestroyer I-ClassDestroyer I-Class
Cruising Formation 4: Battle Formation
AP:74
AS:167
AS+:333
Pattern 2
Final Form
main fleet
Aircraft Carrier Water DemonBattleship PrincessLight Carrier Nu-Class eliteLight Cruiser Tsu-ClassDestroyer I-ClassDestroyer I-Class
escort fleet
Light Cruiser He-Class flagshipDestroyer Ro-Class Late ModelDestroyer Ro-Class Late ModelDestroyer I-ClassDestroyer I-ClassDestroyer I-Class
Cruising Formation 4: Battle Formation
AP:146
AS:329
AS+:657

Show/Hide Nodes and Enemy Encounters
Nodes and Enemy Encounters
NodePatternXpNode InfoFormAir
A
Pattern 1"Must be my imagination" (battle avoided)
B
Pattern 1"Must be my imagination" (battle avoided)
C
深海任務部隊 艦載機群
Air Battle Node
Pattern 1 Light Carrier Nu-Class eliteLight Carrier Nu-Class eliteLight Carrier Nu-Class eliteLight Cruiser Tsu-ClassDestroyer I-ClassDestroyer I-Class
Formation 3: Diamond
AP:104
AS:234
AS+:468
Pattern 2 Light Carrier Nu-Class eliteLight Carrier Nu-Class eliteLight Carrier Nu-Class eliteLight Cruiser Tsu-ClassDestroyer I-ClassDestroyer I-Class
Formation 3: Diamond
AP:160
AS:360
AS+:720
D
Pattern 1"Must be my imagination" (battle avoided)
E
Pattern 1"Must be my imagination" (battle avoided)
F
Pattern 1"Must be my imagination" (battle avoided)
G
深海任務部隊 再編水雷戦隊
Pattern 1 Light Cruiser He-Class flagshipTorpedo Cruiser Chi-Class eliteTorpedo Cruiser Chi-Class eliteDestroyer Ro-Class Late ModelDestroyer I-ClassDestroyer I-Class
Formation 1: Line Ahead
Formation 2: Double Line
H
深海潜水艦部隊 独立強襲群
Pattern 1 Submarine So-ClassSubmarine So-ClassSubmarine So-ClassSubmarine So-Class
Formation 5: Line Abreast
I
深海任務部隊 残存輸送船団
Pattern 1 Light Cruiser Ho-Class flagshipTransport Ship Wa-Class eliteTransport Ship Wa-Class eliteLight Cruiser Tsu-ClassDestroyer Ro-Class Late ModelDestroyer Ro-Class Late Model
Formation 1: Line Ahead
Formation 2: Double Line
Pattern 2 Light Cruiser He-Class flagshipTransport Ship Wa-ClassTransport Ship Wa-ClassLight Cruiser Tsu-ClassDestroyer Ro-Class Late ModelDestroyer Ro-Class Late Model
Formation 2: Double Line
J
深海任務部隊 再編巡洋艦戦隊
Pattern 1 Heavy Cruiser Ri-Class flagshipHeavy Cruiser Ne-ClassLight Cruiser Tsu-ClassDestroyer I-ClassDestroyer I-ClassDestroyer I-Class
Formation 1: Line Ahead
Formation 2: Double Line
K
深海任務部隊 再編空母打撃群
Pattern 1 Aircraft Carrier PrincessBattleship Ta-ClassBattleship Ta-ClassLight Cruiser Tsu-ClassDestroyer I-ClassDestroyer I-Class
Formation 2: Double Line
Formation 3: Diamond
AP:103
AS:231
AS+:462
L
深海任務部隊 残存輸送船団護衛
Pattern 1 Light Cruiser He-Class flagshipLight Cruiser Tsu-ClassDestroyer Ro-Class Late ModelDestroyer Ro-Class Late ModelDestroyer I-ClassDestroyer I-Class
Formation 1: Line Ahead
Formation 2: Double Line
M
Pattern 1"Must be my imagination" (battle avoided)
N
Pattern 1Choose your route
O
深海任務部隊 再編飴玉空母部隊
Pattern 1 Light Carrier Nu-Class eliteLight Carrier Nu-Class eliteLight Cruiser He-Class flagshipLight Cruiser Tsu-ClassDestroyer I-ClassDestroyer I-Class
Formation 3: Diamond
AP:88
AS:198
AS+:396
Pattern 2 Light Carrier Nu-Class eliteLight Carrier Nu-Class eliteHeavy Cruiser Ri-Class flagshipLight Cruiser Tsu-ClassDestroyer I-ClassDestroyer I-Class
Formation 2: Double Line
Formation 3: Diamond
AP:144
AS:324
AS+:648
P
深海任務部隊 艦載機群
Air Battle Node
Pattern 1 Seaplane Tender PrincessLight Carrier Nu-Class eliteLight Carrier Nu-Class eliteLight Cruiser Tsu-ClassDestroyer I-ClassDestroyer I-Class
Formation 3: Diamond
AP:103
AS:231
AS+:462
Pattern 2 Standard Carrier Wo-Class flagshipLight Carrier Nu-Class eliteLight Cruiser Tsu-ClassDestroyer I-ClassDestroyer I-ClassDestroyer I-Class
Formation 3: Diamond
AP:139
AS:312
AS+:624
Pattern 3 Seaplane Tender PrincessLight Carrier Nu-Class eliteLight Carrier Nu-Class eliteBattleship Ta-ClassLight Cruiser Tsu-ClassLight Cruiser Tsu-Class
Formation 3: Diamond
AP:159
AS:357
AS+:714
Q
深海任務部隊 増援支援集団前衛
Pattern 1 Light Cruiser He-Class flagshipHeavy Cruiser Ne-ClassLight Cruiser Tsu-ClassDestroyer Ro-Class Late ModelDestroyer I-ClassDestroyer I-Class
Formation 1: Line Ahead
Formation 2: Double Line
R
深海任務部隊 艦載機群
Air Battle Node
Pattern 1 Aircraft Carrier Water DemonLight Carrier Nu-Class eliteLight Cruiser Tsu-ClassDestroyer I-ClassDestroyer I-ClassDestroyer I-Class
Formation 3: Diamond
AP:146
AS:329
AS+:657
Pattern 2 Aircraft Carrier Water DemonLight Carrier Nu-Class eliteLight Carrier Nu-Class eliteLight Cruiser Tsu-ClassDestroyer I-ClassDestroyer I-Class
Formation 3: Diamond
AP:218
AS:491
AS+:981
S
Pattern 1"Must be my imagination" (battle avoided)
T
Pattern 1"Must be my imagination" (battle avoided)
U
深海任務部隊 増援索敵集団
Enemy Combined Fleet
Pattern 1
main fleet
Seaplane Tender PrincessLight Carrier Nu-Class eliteLight Cruiser Tsu-ClassDestroyer I-ClassDestroyer I-ClassDestroyer I-Class
escort fleet
Destroyer I-ClassDestroyer I-ClassDestroyer I-ClassDestroyer I-ClassDestroyer I-ClassDestroyer I-Class
Cruising Formation 4: Battle Formation
AP:87
AS:195
AS+:390
Pattern 2
Final Form
main fleet
Seaplane Tender PrincessLight Carrier Nu-Class eliteLight Carrier Nu-Class eliteLight Cruiser Tsu-ClassDestroyer I-ClassDestroyer I-Class
escort fleet
Destroyer Ro-Class Late ModelDestroyer I-ClassDestroyer I-ClassDestroyer I-ClassDestroyer I-ClassDestroyer I-Class
Cruising Formation 4: Battle Formation
AP:103
AS:231
AS+:462
V
深海任務部隊 増援支援集団
Enemy Combined Fleet
Pattern 1
main fleet
Battleship Princess KaiHeavy Cruiser Ri-Class eliteHeavy Cruiser Ri-Class eliteDestroyer I-ClassDestroyer I-ClassDestroyer I-Class
escort fleet
Destroyer I-ClassDestroyer I-ClassDestroyer I-ClassDestroyer I-ClassDestroyer I-ClassDestroyer I-Class
Cruising Formation 4: Battle Formation
Pattern 2
Final Form
main fleet
Battleship Princess KaiHeavy Cruiser Ri-Class eliteHeavy Cruiser Ri-Class eliteLight Cruiser Tsu-ClassDestroyer I-ClassDestroyer I-Class
escort fleet
Destroyer Ro-Class Late ModelDestroyer Ro-Class Late ModelDestroyer I-ClassDestroyer I-ClassDestroyer I-ClassDestroyer I-Class
Cruising Formation 4: Battle Formation
W
深海任務部隊 増援集団旗艦艦隊
Enemy Combined Fleet
Pattern 1
main fleet
Aircraft Carrier Water DemonLight Cruiser Tsu-ClassDestroyer Ro-Class Late ModelDestroyer I-ClassDestroyer I-ClassDestroyer I-Class
escort fleet
Light Cruiser He-Class eliteDestroyer I-ClassDestroyer I-ClassDestroyer I-ClassDestroyer I-ClassDestroyer I-Class
Cruising Formation 4: Battle Formation
AP:74
AS:167
AS+:333
Pattern 2
Final Form
main fleet
Aircraft Carrier Water DemonBattleship Ta-ClassLight Cruiser Tsu-ClassDestroyer Ro-Class Late ModelDestroyer I-ClassDestroyer I-Class
escort fleet
Light Cruiser He-Class flagshipDestroyer I-ClassDestroyer I-ClassDestroyer I-ClassDestroyer I-ClassDestroyer I-Class
Cruising Formation 4: Battle Formation
AP:74
AS:167
AS+:333

Ship drops

NodeShip List
GDestroyersAkebono Ayanami Fubuki Hatsuyuki Isonami Miyuki Murakumo Murasame Oboro Sazanami Shigure Shikinami Shiratsuyu Shirayuki Ushio Yuudachi
Light CruisersIsuzu Jintsuu Kiso Kuma Nagara Naka Natori Sendai Tama Yura
Heavy CruisersAshigara Chikuma Nachi Tone
IDestroyersAkebono Ayanami Fubuki Hatsuyuki Isonami Miyuki Murakumo Murasame Oboro Sazanami Shigure Shikinami Shiratsuyu Shirayuki Ushio Yuudachi
Light CruisersIsuzu Jintsuu Kiso Kuma Nagara Naka Natori Sendai Tama Yura
Heavy CruisersAshigara Chikuma Nachi Tone
JDestroyersAkebono Ayanami Fubuki Hatsuyuki Isonami Miyuki Murakumo Murasame Oboro Sazanami Shigure Shikinami Shiratsuyu Shirayuki Ushio Yuudachi
Light CruisersIsuzu Jintsuu Kiso Kuma Nagara Naka Natori Sendai Tama Yura
Heavy CruisersAshigara Chikuma Nachi Tone
KDestroyer EscortsSado Tsushima
DestroyersAkebono Ayanami Fubuki Hatsuyuki Hayashimo Isonami Kiyoshimo Miyuki Murakumo Murasame Oboro Sazanami Shigure Shikinami Shiratsuyu Shirayuki Ushio Yuudachi
Light CruisersIsuzu Jintsuu Kiso Kitakami Kuma Nagara Naka Natori Noshiro Ooi Sendai Tama Yahagi Yura
Heavy CruisersAshigara Chikuma Kumano Mogami Nachi Suzuya Tone
LDestroyersAkebono Ayanami Fubuki Hatsuyuki Isonami Miyuki Murakumo Murasame Oboro Sazanami Shigure Shikinami Shiratsuyu Shirayuki Ushio Yuudachi
Light CruisersIsuzu Jintsuu Kiso Kuma Nagara Naka Natori Sendai Tama Yura
Heavy CruisersAshigara Chikuma Nachi Tone
ODestroyersAkebono Ayanami Fubuki Hatsuyuki Isonami Miyuki Murakumo Murasame Oboro Sazanami Shigure Shikinami Shiratsuyu Shirayuki Ushio Yuudachi
Light CruisersIsuzu Jintsuu Kiso Kuma Nagara Naka Natori Sendai Tama Yura
Heavy CruisersAshigara Chikuma Nachi Tone
QDestroyersAkebono Ayanami Fubuki Hatsuyuki Isonami Miyuki Murakumo Murasame Oboro Sazanami Shigure Shikinami Shiratsuyu Shirayuki Ushio Yuudachi
Light CruisersIsuzu Jintsuu Kiso Kuma Nagara Naka Natori Sendai Tama Yura
UDestroyer EscortsSado Tsushima
DestroyersAkebono Ayanami Fubuki Hatsuyuki Hayashimo Isonami Kiyoshimo Miyuki Murakumo Murasame Oboro Sazanami Shigure Shikinami Shiratsuyu Shirayuki Ushio Yuudachi
Light CruisersIsuzu Jintsuu Kiso Kitakami Kuma Nagara Naka Natori Noshiro Ooi Sakawa Sendai Tama Yahagi Yura
Heavy CruisersAshigara Chikuma Kumano Mogami Nachi Suzuya Tone
Auxiliary ShipsHayasui
VDestroyer EscortsSado Tsushima
DestroyersAkebono Ayanami Fubuki Hatsuyuki Hayashimo Isonami Kiyoshimo Miyuki Murakumo Murasame Oboro Sazanami Shigure Shikinami Shiratsuyu Shirayuki Ushio Yuudachi
Light CruisersIsuzu Jintsuu Kiso Kitakami Kuma Nagara Naka Natori Noshiro Ooi Sakawa Sendai Tama Yahagi Yura
Heavy CruisersAshigara Chikuma Kumano Mogami Nachi Suzuya Tone
Auxiliary ShipsHayasui
WDestroyersAkatsuki Akigumo Harusame Hayashimo Hibiki Ikazuchi Kazagumo Kiyoshimo Maikaze Makigumo Naganami Takanami Tashkent Yuugumo Z1 Z3
Light CruisersIsuzu Jintsuu Kiso Kuma Nagara Naka Natori Noshiro Ooyodo Sakawa Sendai Tama Tatsuta Tenryuu Yahagi Yura
Heavy CruisersAoba Ashigara Atago Chikuma Choukai Furutaka Haguro Kako Kinugasa Kumano Maya Mikuma Mogami Myoukou Nachi Suzuya Takao Tone
BattleshipsGangut Haruna Hiei Kirishima Kongou
Light Aircraft CarriersZuihou
Seaplane TendersChitose Chiyoda


E-7

OoyodoE-7Winter2018.png

Victory on the Dawn Horizon...
暁の水平線に勝利を――

Information

  • Event Tag: 2018WinterGreenTag.pngFall2017YellowTag.png2018WinterPurpleTag.png2018WinterBlueTag.png

Phase 1 Boss: Battleship Water Demon Kai

  • Hard (): 2400
  • Medium (): 2400
  • Easy (): 2400
  • Very Easy (): 2400

Phase 2 Boss: Abyssal Crane Princess

  • Hard (): 4500
  • Medium (): 4500
  • Easy (): 4500
  • Very Easy (): 4500

Key Rewards:

Winter 2018 Event E-7 Banner.png
Winter2018E-7Map.png

Branching rules

E-7 Branching Rules Starting Points
Nodes Rules
Start
1
  • Carrier Task Force
2
  • Surface Task Force
  • Transport Escort Fleet


E-7 Branching Rules Part 1
Nodes Rules
B
C
  • Do not meet the requirements to go to D.
  • Shortcut is not unlocked.
D
  • Meet any of the following requirements after unlocking the shortcut:
    • Fast+ Fleet
    • Fast Fleet AND Amount of (F)BB(V) ≦ 2
C
D
  • Do not meet the requirements to go to H.
H
  • Fast+ Fleet
D
G
  • Slow Fleet
I
  • Fast Fleet
M
  • Fast+ Fleet
M
O
  • Fail the LoS check.
Q
  • Meet one of the following requirements:
    • Fleet contains AV.
    • Fleet contains AS.
    • Default route when at the first unlocking Phase.
W
  • Meet all of the following requirements:
    • Do not meet the requirements to go to Q.
    • The route to Node W must be unlocked.
    • Pass the LoS check.


E-7 Branching Rules Part 2
Nodes Rules
2
A
  • Slow Fleet
E
  • Fast Fleet
E
F
  • Do not meet the requirements to go to K.
K
  • Meet any of the following requirements:
    • Fast+ Fleet
    • ???
J
K
  • Active Branching
N
K
H
  • Meet all of the following requirements:
    • Fast Fleet
    • Shortcut is unlocked.
L
  • Do not meet the requirements to go to H.
L
H
  • Meet all of the following requirements:
    • Pass the LoS check.
    • Do not meet the requirements to go to Q.
P
  • Fail the LoS check.
Q
  • Meet all of the following requirements:
    • Pass the LoS check.
    • Fleet went through node A.
    • Amount of (F)BB(V) ≧ 5
N
R
  • Fail the LoS check.
S
  • Pass the LoS check, but do not meet the requirements to go to T.
T
  • Meet all of the following requirements:
    • Fast Fleet
    • Amount of (F)BB(V) ≦ 4
    • Pass the LoS check.

Branching compositions were reported over the course of the event.

Tips Tagging Rules

  • This Maps has no tagging rules and any members can be used for this map
  • On Normal and Hard Difficulty only the Vangaurd Force will be restricted from being used on this map.

Historical Fleet Bonus Notes

  • On E-7, ships that are tied to the Kurita, Suzuki, Nishimura, Shima and Ozawa Fleet will all recive historical bonuses which will allow them to do more damage against the boss fleets. (Please Read Historical Background for more details)
  • Due to this, it's highly recommended to bring your strongest members that are tied to the historical fleets to get the performance out of them.

E7 is divided into distinct phases that must be completed in order.

  1. Unlock 1st Boss Node.
  2. Defeat Battleship Water Demon Kai using a STF.
  3. Unlock the shortcut routes.
  4. Obtain the historical bonus. Note: Can only be done on Normal and Hard mode.
  5. Defeat Abyssal Crane Princess.


Unlocking the path to the Battleship Water Demon Kai

Preferred Composition:

Main Fleet: 4 CV(B) / 2 (F)BB
Escort Fleet: 1 CL / 2 DD / 0-1 CLT / 1-2 CA / 0-1 CVL

Key Note:
In order unlock the path to the Battleship Water Demon Kai the following conditions must be met

  • A rank node Q using a Fast CTF (All Difficulties)
  • Obtain AS on Land Base air raids 0/1/2/2 times.

While making your path to Node Q you will be facing off against 2 Air Battles, 2 Surface Battles before reaching Node Q.

Preferred LBAS

Node Q

  • 3 LBAS
  • LBAS 1: 2 Fighter, 1 Torpedo / Land Based Bombers, 1 Flying Boat - Distance 9 needed
  • LBAS 2-3: 1 Fighter, 2 Torpedo / Land Based Bombers, 1 Flying Boat - Distance 9 needed

If you wish to bring an LBAS here with fighters, you'll need to have a Type 2 Flying Boat to reach the required distance. With the air strength and bombers, it should make possible to score an A rank on Node Q without issue.

Defending the Base

  • 2-3 LBAS
  • LBAS 1-3: 3 Fighter/Interceptor, 1 Saiun (Air Defense)

One Easy and higher difficulties, you'll need to protect your land base from Air raids against your base. Bring enough interceptors and fighters to gain AS 1-2 times.

Once the conditions are met the path to the Battleship Water Demon Kai will be unlocked.

Sinking Battleship Water Demon Kai

Preferred Composition:
Fast STF composition
Main Fleet: 4 (F)BB / 1 CV(B) / 1 CAV
Alt. Main Fleet: 4 (F)BB / 2 CVL[1]
Escort Fleet: 1 CL / 2 DD / 1-2 CA / 0-1 CLT / 0-1 CVL / 0-1 AO[2]

[1]An alternative main fleet composition that does not utilize a Seaplane Fighter (SPF) CAV mule. This composition is not recommended in harder difficulties due to lacking surviability in the pre-boss nodes. [2]AO should only be considered for Last Dance on Medium / Hard Difficulty, all other difficulties can be usually done without using an AO.

In this segment, your fleet will need to go through a series of battles against carriers, subs and other various ships while dealing with not having AS over the majority of the battles.

  • It's highly recommended to bring strong historical ships for this segments as the fight against the boss in this phase is very high in armor.
  • For your CV(B), use Zuikaku and arm her with the best possible fighters along with 1 Torpedo Bomber
  • Your CAV should be equipped with SPF to improve your air power.
  • Node N will feature a New Submarine Princess along with Submarine So-Class in the mix. It's strongly advised to bring an ASW LBAS to this node, especially on Medium and Hard difficulty.
  • Node T will have 1-2 Aircraft Carrier Princess along with Nu-class Carriers, bring enough air power for air parity (AP) to prevent the enemy from being able to use Artillery spotting and CV Cut-Ins.

Node V - Battleship Water Demon Kai

In this boss battle, the Battleship Water Demon Kai will be a strong and powerful opponent as she has high armor making her difficult to beat. If you are playing on Medium and Hard difficulty, bringing LBAS to the boss is HIGHLY REQUIRED to have a chance at defeating the boss. However, due to the range requirements this map needs to reach the boss please consider following:

  • Akitsushima can be farmed in E-2 Node Y from S ranks.
  • If you lack in any Type 2 Flying Boat for this segment, consider challenging this part on Casual or Easy Difficulty
  • If you have 1-3 Type 2 Flying Boat for this segment, consider challenging the part on Medium and Hard Difficulty


The Distance needed to reach the boss node is 11 meaning only Land Base Bombers and a Type 2 Flying Boat are capable of reaching the boss node.

Using the combination of Historical Ships, along with a Boss Support Fleet, LBAS, and Friend Fleet you will need to deliver a strong of a blow as you can against the Hime during the entire course of the battle. Consider leaving the Friend Fleet 10th Battle Divsion comprising of Yahagi, Isokaze, Hamakaze, Urakaze and Yukikaze open to appear. They have a high rate of being chosen over the Destroyer Division 19 Friend Fleet.

When you reach the final kill, the Battleship Water Demon Kai will get a larger boost in her armor (up to 305 on Hard) along with a stronger fleet composition(can have up to 2 Battleship Princess on Hard) resulting in your fleet having to depend on crits and low armor rolls to deal suitable damage to her.

  • Modifying Equipment is vital to help improve your chances of succeeding against the boss.
  • As a last resort option, bringing in an AO such as Hayasui or Kamoi for the final kill can help turn the tied of the battle.
    • Since your fleet will arrive at the boss node with 30% fuel and 40% ammo using Maritime Resupply can help reduce the ammo and fuel penalty your fleet would otherwise receive without it.
    • Using 1 Maritime Resupply can completely remove the ammo penalty altogether.

Once you have successfully defeated the Battleship Water Demon Kai the path to the Abyssal Crane Princess will open.

Suggested LBAS

Node N

  • 1 LBAS
  • LBAS 1: 3 Toukai - Distance 8 needed
  • LBAS 1: 3 ASW Planes, 1 Type 2 Flying Boat - (For those who don't have Toukai) Distance 8 needed

Since Node N has a powerful set of submarines, using an ASW LBAS is Highly Recommended to take out as many of the submarines as possible leaving only the New Submarine Princess left to deal with.

Node V

The air power requirement for air denial (AD) on this node is low enough that a base with 3 LBAA can achieve this. It is highly recommended that you aim to achieve this if possible. Ensure that your base(s) are configured optimally and in the correct order to take advantage of phase 1 shot downs of previous LBAS waves.


Unlocking the shortcuts
Unlocking the shortcut path needed to make a path from B to D and K to H will require you to completion one of the following conditions depending on the difficulty:

  • Very Easy - Reach/Defeat node D.
  • Easy - Reach/Defeat node D. A rank node H.
  • Medium - Reach/Defeat node D. A rank node H.
  • Hard - S rank nodes G and H. Obtain AS at node I.

Node D Preferred Composition:

Main Fleet: 4 CV(B) / 2 (F)BB
Escort Fleet: 1 CL / 2 DD / 0-1 CLT / 1-2 CA / 0-1 CVL

  • For Casual to Medium Mode completing Node D's requirement should be easy to do as all you need is a set of strong carriers and a ship or 2 with ASW capabilities to take care of the submarine that will in the fleet.

Node H

Preferred Composition:
Fast STF composition
Main Fleet: 4 (F)BB / 1 CV(B) / 1 CAV
Escort Fleet: 1 CL / 2-4 DD / 1 CA / 0-1 CLT / 0-1 CVL (ASW focused)

  • For Easy to Hard you will need to have a escrot fleet of ASW capable ships travel through several waves of carrier battles till they reach node H which will be a submarine node with a New Submarine Princess and some Submarine So-Class.
  • Bringing an LBAS of ASW bombing planes is recommended especially on higher difficulties to successfully complete the node's requirements.
  • If you are unable to successfully defeat all the subs needed for the requirement you can still kill the submarines in night battle due to the combine fleet's mechanics.

Suggested LBAS

Node H

  • 1 LBAS
  • LBAS 1: 3 Toukai, 1 ASW Bomber Plane - Distance 4 needed
  • LBAS 1: 4 ASW Planes - Distance of 4 needed

Node G

Preffered Composition:
Slow CTF composition
Main Fleet: 4 CV(B) / 2 (F)BB
Escort Fleet: 1 CL / 2 DD / 0-1 CLT / 1-2 CA / 0-1 CVL

  • For Hard Mode, Node G contains a surface fleet of cruisers and destroyers. The fight should be winnable without needing LBAS.


Node I

Preffered Composition:
Fast CTF composition
Main Fleet: 4 CV(B) / 2 (F)BB
Escort Fleet: 1 CL / 2 DD / 0-1 CLT / 1-2 CA / 0-1 CVL

  • For Hard Mode, Node I is an air attack node where you'll face a strong Air powered fleet.
  • Bring an LBAS or 2 full of fighters if you need additional air power support to secure AS on this node
  • If you survived node G without anyone taking any heavy damage from that node you can try using your fleet from there to complete this requirement at the same time.

Once the conditions are complete, the shortcut paths will become available.


Obtain the historical bonus (Medium and Hard Mode Only)

Note:If you are playing Casual and Easy, disregard this section all together and proceed to "Sinking the Abyssal Crane Princess".

In Medium and Hard Difficulty it is possible to boost your fleet's historical damaged beyond the 1.2x by completing the following requirements:

  • S rank nodes M and W using STF.
  • A rank node Q.

Node Q

Preffered Composition:
Slow STF composition
Main Fleet: 4 (F)BB / 1 CV(B) / 1 CAV
Escort Fleet: 1 CL / 2 DD / 1 FBB / 0-1 CA / 0-1 CLT / 0-1 CVL

  • A slow STF containing 5 (F)BB(V) will routes to node Q.
  • Use an ASW focused LBAS on Node A to help reduce the number of Submarine So-Class.
  • Using your LBAS at Node Q can help you with securing an A rank that is needed for the requirements.


Suggested LBAS Node A

  • 1 LBAS
  • LBAS 1: 3 Toukai / ASW TB, 1 Type 2 Flying Boat /Carrier Recon - Distance 2 needed

Node Q

  • 2 LBAS
  • LBAS 1: 2 Fighter, 1 Torpedo / Land Based Bombers, 1 Flying Boat - Distance 9 needed
  • LBAS 2-3: 1 Fighter, 2 Torpedo / Land Based Bombers, 1 Flying Boat - Distance 9 needed

Though you may not reach AS on this node, being able to prevent air denial (AD) can help make it more possible to secure an A rank here.

Node M and Node W

Preffered Composition:
Fast STF composition
Main Fleet: 4 (F)BB / 1 CV(B) / 1 CAV
Escort Fleet: 1 CL / 2 DD / 1 FBB / 1 CA / 0-1 CLT / 0-1 CVL

  • Node M and W are along the path required for this fleet will travel
  • Trying to score an S rank on Node M will require some effort, send at least 2 LBAS to Node M while sending an ASW LBAS to Node H.
  • Node W simple requires you to reach the node with a Surface Fleet.
  • By the time you reach Node W you will have no fuel or ammo left. So fighting there will result in most if not all of your ship getting heavily damaged.

Suggested LBAS

Node M

  • 2 LBAS
  • LBAS 1: 2 Fighter, 2 Torpedo / Land Based Bombers - Distance 5 needed
  • LBAS 2: 1 Fighter, 3 Torpedo / Land Based Bombers - Distance 5 needed

Node H

  • 1 LBAS
  • LBAS 1: 3 Toukai / ASW TB, Type 2 Flying Boat/Carrier Recon - Distance 4 needed
  • LBAS 1: 4 ASW Planes - Distance of 4 needed
  • Once the condition are met, a quest complete sound will be heard upon returning to base.

Upon completing the Conditions, the following changes will happen:

  • All Kurita, Shima, Nishimura and Ozawa Fleet Members will get a 1.6x historical bonus
  • Musashi, Zuikaku and Zuihou will get a 1.8x historical bonus
  • Shoukaku will get a 2.4x historical bonus

Sinking the Abyssal Crane Princess

Recommended Composition:

Abyssal Crane Princess Fast CTF composition
Main Fleet: 4 CV(B) / 2 (F)BB
Escort Fleet: 1 CL / 2 DD / 0-1 CLT / 1-2 CA / 0-1 CVL

Depending on the difficulty, the final phase of the event will either require extensive effort or can be simple. The way you'll need to tackle the boss will be similar but can consist of some differences.

  • During this Phase your escort fleet will generally be in the most dangerous especially in Node W.
  • As like in the other phases an ASW capable ship can still helpful especially one that can pre-emptive ASW like in higher difficulties to take out the Submarine So-Class
  • In route Support is recommended in higher difficulties to make tougher nodes like Nodes D and W passable.

Once you made it to the boss node, depending on the difficulty, the following things should be considered:

Abyssal Crane Princess on Medium and Hard Mode

With the debuff method complete on Medium and Hard mode, the Abyssal Crane Princess will become significantly weaker against historical ships. However, in order to make the win far more successful, you will need to not only bring the proper kanmusu for the job but also efficiently rig the Friend Fleets to get some of the best possible benefits.

Below here are a few important points regarding ships to consider for Medium and Hard Mode Difficulty:

  • Shoukaku, Zuikaku, Zuihou, and Musashi are very vital when the debuff is triggered as they can do far more damage compared to anyone else in the entire fleet.
  • Kaga while not a historical ship still has an important role due to her large plane capacity which allows her to carry a large fighter power. She will be doing a fighter mule role in this event segment to help your fleet get closer to gaining air superiority.
  • Due to their historical buff Shoukaku and Zuikaku should be armed to perform CV cut-ins.
  • Taihou can be a small time damage dealer on this map as she's the only CVB that doesn't interfere with certain Friend Fleet arrangements.
  • Torpedo Cut in ships such as Yukikaze and Shigure are good here not just for their historical damage, but to also prevent certain unnecessary Friend Fleets from appearing.
  • If you have a luck modded Choukai or Maya you can use them to help torpedo cut-in along with the other ships in a night battle.
  • Zuihou's Kai 2 B will have a vital role in helping deliver the kill against the boss if you have the night battle planes and gear to set her up to launch an attack against the boss at night.
    • If you are lacking in night planes, you will likely be depending more on Torpedo Cut-Ins to help win the battle.
  • Avoid bringing in Yamato, Nagato, Myoukou, Haguro, Naganami and Hatsushimo in your fleet as they are needed to trigger the Kurita main Friend Fleet which is vital to scoring a victory in the fight during the night battle.
  • Yamato's Kurita Friend Fleet will also be given the historical bonus allows them to also efficiently damage or even kill tougher targets such as Hime types.
  • The International Friend Fleet can also be used but is less effective overall against the Abyssal Crane Princess's Fleet due to the random nature of coming with 3-7 ships and having not as effective equipment setups.
    • It is possible to lock them out by using ships like Iowa and Saratoga in your fleet, but in return, you will also be crippling your main fleet's power by bringing in additional non-historical ships.
  • Fleet Oilers like Hayasui and Kamoi will be helpful on the final kill on Hard mode by bringing Maritime Resupply to help your fleet reach it's best to combat potential.
    • When your fleet reaches the boss node, they will have only 35% fuel and ammo
    • Using 1 Maritime Resupply should remove the ammo penalties from your fleet altogether and 2 will reduce the fuel penalty further to dodge more efficiently.
  • If you have a strong enough LBAS set up to help easily secure air superiority along with your fleet's air power. It may become possible to bring in a Saiun to prevent T-Disadvantage to make killing the boss fleet more possible.
  • Boss Support Fleet is Highly recommended

Abyssal Crane Princess on Casual and Easy Mode

On this difficulty, you will be lacking the full-scale debuff effect as there is no way to trigger this feature on casual and easy mode. Expect to be putting more effort into your fleet's own strength however even without the debuff, historical ships are still important.

  • Most of the Key points from Medium and Hard mode apply to here as well. Even though Shoukaku, Zuikaku, Zuihou, and Musashi will not have the big historical bonus, they will still be your big hitters in this battle.
  • Kitakami and Ooi have a more important role in this difficulty as the boss should be weaker and having them equipped with double attacks to do consistant cap damage can help weaken the boss for your torpedo cut-in members to score an easier kill.
  • Easy mode may be somewhat difficulty to complete even with a proper set up so if possible avoid going down to this difficulty and if you are playing on this difficulty and are still having trouble, consider dropping to Casual.

Preffered LBAS

Node X
3 LBAS

To bring any fighters to help lower the air power at the boss node, you're going to need a fighter plane with a range of 6 or greater. Hayabusa and Type 52 Fighters should be able to reach this with the assistance of a Type 2 Flying Boat.

Since the boss contains a lot of air power, you want your first set of LBAS planes to clean out as many of the planes as you can while having the remaining bases bring fighters and bombers to wipe out what ships they can.

During the Final Kill, the air power requirement is lower so it is possible to use fewer fighters and more bombers to the boss node.

Once the boss is successfully defeated, the event is considered complete.

What to do if you don't have a Type 2 Flying Boat?

Without a Type 2 Flying Boat you fleet will have a very difficult time securing the win at the boss node. Since the boss has a huge amount of air power. If you are challening a harder difficulty you will find score the win quite difficult. If possible seek out Akitsushima from E-2 if you can and train her to get her Flying Boat. Otherwise the main options are to either lower the difficulty or try to use your LBAS in different methods:

Node M
1 LBAS

  • LBAS : 4 Fighters / Land Base Fighters (Range 6 Needed)

A fighter sweep over this node can help reduce the total number of abyssal bombers that will target your fleet in the opening phase. You may potentially disable the carriers in this node by deplaning them with Fleet AA and AACI.

Node W
1 LBAS

  • LBAS : 4 Land Based Bombers (Range 7 Needed)

This node features a surface fleet that can often present trouble to the escort fleet since they can occasionally appear in Line ahead or Vanguard Formation. Using and LBAS to clear some if not most of the enemy ships out can help here.


Node X
1 LBAS

  • LBAS : 4 Land Based Bombers (Range 9 Needed)

Unlike the other LBAS method used on the boss, this method is more of a Last Resort measure to try wiping out some of the enemies in the boss node. Since if you're lacking in a flying boat, this will be the only way you can bring anything to the boss and killing some ship may be possible, but it will also likely result in your losing a large amount of planes and possibly lose your Land Base Bomber's rank in the process. Only consider this option if you have no other means of bringing fighters to the boss node.

Show/Hide Nodes and Enemy Encounters
Nodes and Enemy Encounters
NodePatternXpNode InfoFormAir
A
深海潜水艦部隊 岬沖再配備集団
Pattern 1 Submarine So-Class flagshipSubmarine So-Class eliteSubmarine So-Class eliteSubmarine So-Class eliteSubmarine So-Class elite
Formation 4: Echelon
Pattern 2 Submarine So-Class flagshipSubmarine So-Class flagshipSubmarine So-Class eliteSubmarine So-Class eliteSubmarine So-Class elite
Formation 4: Echelon
Pattern 3 Submarine So-Class flagshipSubmarine So-Class flagshipSubmarine So-Class flagshipSubmarine So-Class eliteSubmarine So-Class elite
Formation 4: Echelon
Pattern 4 Submarine So-Class flagshipSubmarine So-Class flagshipSubmarine So-Class flagshipSubmarine So-Class flagshipSubmarine So-Class flagship
Formation 4: Echelon
B
Pattern 1"Must be my imagination" (battle avoided)
C
深海任務部隊 艦載機群
Air Battle Node
Pattern 1 Light Carrier Nu-Class flagshipLight Carrier Nu-Class eliteLight Carrier Nu-Class eliteLight Cruiser Tsu-Class eliteDestroyer Na-Class eliteDestroyer Na-Class elite
Formation 3: Diamond
AP:276
AS:621
AS+:1242
Pattern 2 Aircraft Carrier PrincessLight Carrier Nu-Class eliteLight Carrier Nu-Class eliteLight Cruiser Tsu-Class eliteDestroyer Na-Class eliteDestroyer Na-Class elite
Formation 3: Diamond
AP:279
AS:627
AS+:1254
Pattern 3 Aircraft Carrier PrincessLight Carrier Nu-Class flagshipLight Carrier Nu-Class flagshipLight Cruiser Tsu-Class eliteDestroyer Na-Class Late Model eliteDestroyer Na-Class Late Model elite
Formation 3: Diamond
AP:303
AS:681
AS+:1362
D
深海任務部隊 岬沖艦隊前衛 I群
Pattern 1 Light Cruiser He-Class flagshipLight Cruiser Tsu-Class eliteLight Cruiser Tsu-Class eliteDestroyer Na-Class eliteDestroyer Na-Class eliteSubmarine So-Class flagship
Formation 1: Line Ahead
Formation 2: Double Line
E
Pattern 1"Must be my imagination" (battle avoided)
F
深海岬沖艦隊 哨戒護衛空母群
Pattern 1 Light Carrier Nu-Class flagshipLight Carrier Nu-Class flagshipLight Cruiser He-Class flagshipLight Cruiser Tsu-Class eliteDestroyer Na-Class eliteDestroyer Na-Class elite
Formation 1: Line Ahead
Formation 2: Double Line
Formation 3: Diamond
AP:200
AS:450
AS+:900
G
深海任務部隊 岬沖水雷戦隊
Pattern 1 Light Cruiser He-Class flagshipTorpedo Cruiser Chi-Class flagshipTorpedo Cruiser Chi-Class flagshipDestroyer Na-Class eliteDestroyer Ni-Class Late ModelDestroyer Ni-Class Late Model
Formation 1: Line Ahead
Formation 2: Double Line
Formation 4: Echelon
H
深海潜水艦部隊 親衛艦隊I群
Pattern 1 New Submarine Princess Flagship (B)Submarine So-Class eliteSubmarine So-Class eliteSubmarine So-Class eliteSubmarine So-Class elite
Formation 4: Echelon
Pattern 2 New Submarine Princess Flagship (C)Submarine So-Class eliteSubmarine So-Class eliteSubmarine So-Class eliteSubmarine So-Class elite
Formation 4: Echelon
Pattern 3 New Submarine Princess Flagship (C)Submarine So-Class flagshipSubmarine So-Class flagshipSubmarine So-Class flagshipSubmarine So-Class flagship
Formation 4: Echelon
Pattern 4 New Submarine Princess Flagship (C)Submarine So-Class flagshipSubmarine So-Class flagshipSubmarine So-Class flagship
Formation 4: Echelon
I
深海任務部隊 艦載機群
Air Battle Node
Pattern 1 Abyssal Crane PrincessLight Carrier Nu-Class flagshipLight Carrier Nu-Class flagshipLight Cruiser Tsu-Class eliteDestroyer Na-Class Late Model flagshipDestroyer Na-Class Late Model flagship
Formation 3: Diamond
AP:322
AS:725
AS+:1449
Pattern 2 Abyssal Crane PrincessLight Carrier Nu-Class flagshipLight Carrier Nu-Class flagshipLight Carrier Nu-Class flagshipDestroyer Na-Class Late Model flagshipDestroyer Na-Class Late Model flagship
Formation 3: Diamond
AP:422
AS:950
AS+:1899
Pattern 3 Abyssal Crane Princess - DamagedAircraft Carrier PrincessAircraft Carrier PrincessLight Carrier Nu-Class flagshipDestroyer Na-Class Late Model flagshipDestroyer Na-Class Late Model flagship
Formation 3: Diamond
Unknown
J
Pattern 1Choose your route
K
深海岬沖艦隊 前衛哨戒空母群
Pattern 1 Standard Carrier Wo-Class Kai flagshipLight Cruiser He-Class flagshipLight Cruiser Tsu-Class eliteLight Cruiser Tsu-Class eliteDestroyer Na-Class eliteDestroyer Na-Class elite
Formation 1: Line Ahead
Formation 2: Double Line
Formation 3: Diamond
AP:88
AS:198
AS+:396
L
深海任務部隊 岬艦隊空母第IV群
Pattern 1 Standard Carrier Wo-Class flagshipLight Carrier Nu-Class eliteLight Carrier Nu-Class eliteLight Cruiser Tsu-Class eliteDestroyer Na-Class eliteDestroyer Na-Class elite
Formation 3: Diamond
AP:245
AS:551
AS+:1101
Pattern 2 Standard Carrier Wo-Class Kai flagshipLight Carrier Nu-Class eliteLight Carrier Nu-Class eliteLight Cruiser Tsu-Class eliteDestroyer Na-Class eliteDestroyer Na-Class elite
Formation 3: Diamond
AP:264
AS:594
AS+:1188
Pattern 3 Standard Carrier Wo-Class Kai flagshipLight Carrier Nu-Class flagshipLight Carrier Nu-Class flagshipLight Cruiser Tsu-Class eliteDestroyer Na-Class Late Model eliteDestroyer Na-Class Late Model elite
Formation 3: Diamond
AP:288
AS:648
AS+:1296
M
深海任務部隊 岬艦隊空母第III群
Pattern 1 Aircraft Carrier PrincessLight Carrier Nu-Class eliteLight Carrier Nu-Class eliteLight Cruiser Tsu-Class eliteDestroyer Na-Class eliteDestroyer Na-Class elite
Formation 3: Diamond
AP:279
AS:627
AS+:1254
Pattern 2 Aircraft Carrier PrincessLight Carrier Nu-Class flagshipLight Carrier Nu-Class eliteLight Cruiser Tsu-Class eliteDestroyer Na-Class eliteDestroyer Na-Class elite
Formation 3: Diamond
AP:291
AS:654
AS+:1308
Pattern 3 Aircraft Carrier PrincessLight Carrier Nu-Class flagshipLight Carrier Nu-Class flagshipLight Cruiser Tsu-Class eliteDestroyer Na-Class Late Model eliteDestroyer Na-Class Late Model elite
Formation 3: Diamond
AP:303
AS:681
AS+:1362
N
深海潜水艦部隊 親衛艦隊II群
Pattern 1 New Submarine Princess Flagship (B)Submarine So-Class eliteSubmarine So-Class eliteSubmarine So-Class eliteSubmarine So-Class elite
Formation 4: Echelon
Pattern 2 New Submarine Princess Flagship (C)Submarine So-Class eliteSubmarine So-Class eliteSubmarine So-Class eliteSubmarine So-Class elite
Formation 4: Echelon
Pattern 3 New Submarine Princess Flagship (C)Submarine So-Class flagshipSubmarine So-Class flagshipSubmarine So-Class flagshipSubmarine So-Class flagship
Formation 4: Echelon
Pattern 4 New Submarine Princess Flagship (C)Submarine So-Class flagshipSubmarine So-Class flagshipSubmarine So-Class flagship
Formation 4: Echelon
O
Pattern 1"Must be my imagination" (battle avoided)
P
Pattern 1"Must be my imagination" (battle avoided)
Q
深海任務部隊 岬艦隊空母第I群
Enemy Combined Fleet
Pattern 1
main fleet
Aircraft Carrier PrincessAircraft Carrier PrincessLight Carrier Nu-Class flagshipLight Carrier Nu-Class flagshipHeavy Cruiser Ne-Class eliteHeavy Cruiser Ne-Class elite
escort fleet
Light Cruiser Tsu-Class eliteLight Cruiser Tsu-Class eliteDestroyer Na-Class Late Model eliteDestroyer Na-Class Late Model eliteDestroyer Ni-Class Late ModelDestroyer Ni-Class Late Model
Cruising Formation 4: Battle Formation
AP:406
AS:912
AS+:1824
Pattern 2
main fleet
Aircraft Carrier PrincessAircraft Carrier PrincessLight Carrier Nu-Class flagshipLight Carrier Nu-Class flagshipBattleship Ta-Class flagshipBattleship Ta-Class flagship
escort fleet
Light Cruiser Tsu-Class eliteLight Cruiser Tsu-Class eliteDestroyer Na-Class Late Model eliteDestroyer Na-Class Late Model eliteDestroyer Na-Class Late Model eliteDestroyer Na-Class Late Model elite
Cruising Formation 4: Battle Formation
AP:406
AS:912
AS+:1824
R
Pattern 1"Must be my imagination" (battle avoided)
S
深海任務部隊 艦載機群
Air Battle Node
Pattern 1 Aircraft Carrier PrincessLight Carrier Nu-Class eliteLight Carrier Nu-Class eliteLight Cruiser Tsu-Class eliteDestroyer Ni-Class Late ModelDestroyer Ni-Class Late Model
Formation 3: Diamond
AP:279
AS:627
AS+:1254
Pattern 2 Aircraft Carrier PrincessAircraft Carrier PrincessLight Carrier Nu-Class eliteLight Cruiser Tsu-Class eliteDestroyer Ni-Class Late ModelDestroyer Ni-Class Late Model
Formation 3: Diamond
AP:294
AS:660
AS+:1320
Pattern 3 Aircraft Carrier PrincessAircraft Carrier PrincessLight Carrier Nu-Class flagshipLight Cruiser Tsu-Class eliteDestroyer Ni-Class Late ModelDestroyer Ni-Class Late Model
Formation 3: Diamond
AP:306
AS:687
AS+:1374
T
深海任務部隊 岬艦隊空母第II群
Pattern 1 Aircraft Carrier PrincessLight Carrier Nu-Class eliteLight Carrier Nu-Class eliteLight Cruiser Tsu-Class eliteDestroyer Ni-Class Late ModelDestroyer Ni-Class Late Model
Formation 3: Diamond
AP:279
AS:627
AS+:1254
Pattern 2 Aircraft Carrier PrincessAircraft Carrier PrincessLight Carrier Nu-Class eliteLight Cruiser Tsu-Class eliteDestroyer Ni-Class Late ModelDestroyer Ni-Class Late Model
Formation 3: Diamond
AP:294
AS:660
AS+:1320
Pattern 3 Aircraft Carrier PrincessAircraft Carrier PrincessLight Carrier Nu-Class flagshipLight Cruiser Tsu-Class eliteDestroyer Ni-Class Late ModelDestroyer Ni-Class Late Model
Formation 3: Diamond
AP:306
AS:687
AS+:1374
U
深海岬沖艦隊 支援集団随伴護衛
Pattern 1 Heavy Cruiser Ri-Class KaiHeavy Cruiser Ne-Class eliteLight Cruiser Tsu-Class eliteLight Cruiser Tsu-Class eliteDestroyer Na-Class Late Model eliteDestroyer Na-Class Late Model elite
Formation 1: Line Ahead
Pattern 2 Heavy Cruiser Ri-Class KaiHeavy Cruiser Ne-Class eliteHeavy Cruiser Ne-Class eliteLight Cruiser Tsu-Class eliteDestroyer Na-Class Late Model eliteDestroyer Na-Class Late Model elite
Formation 1: Line Ahead
Pattern 3 Heavy Cruiser Ne-Class eliteHeavy Cruiser Ne-Class eliteLight Cruiser Tsu-Class eliteLight Cruiser Tsu-Class eliteDestroyer Na-Class Late Model eliteDestroyer Na-Class Late Model elite
Formation 1: Line Ahead
V
深海任務部隊 岬沖艦隊支援集団
Enemy Combined Fleet
Pattern 1
main fleet
Battleship Water Demon KaiBattleship Ta-Class flagshipBattleship Ta-Class flagshipHeavy Cruiser Ne-Class eliteHeavy Cruiser Ne-Class eliteLight Carrier Nu-Class flagship
escort fleet
Light Cruiser Tsu-Class eliteLight Cruiser Tsu-Class eliteDestroyer Na-Class Late Model eliteDestroyer Na-Class Late Model eliteDestroyer Na-Class Late Model eliteDestroyer Na-Class Late Model elite
Cruising Formation 4: Battle Formation
AP:100
AS:225
AS+:450
Pattern 2
Final Form
main fleet
Battleship Water Demon Kai - DamagedBattleship PrincessBattleship PrincessBattleship Ta-Class flagshipBattleship Ta-Class flagshipLight Carrier Nu-Class flagship
escort fleet
Light Cruiser Tsu-Class eliteLight Cruiser Tsu-Class eliteDestroyer Na-Class Late Model eliteDestroyer Na-Class Late Model eliteDestroyer Na-Class Late Model eliteDestroyer Na-Class Late Model elite
Cruising Formation 4: Battle Formation
AP:100
AS:225
AS+:450
W
深海岬沖艦隊 総旗艦随伴護衛
Pattern 1 Heavy Cruiser Ri-Class KaiHeavy Cruiser Ne-Class eliteLight Cruiser Tsu-Class eliteLight Cruiser Tsu-Class eliteDestroyer Na-Class Late Model flagshipDestroyer Na-Class Late Model flagship
Formation 1: Line Ahead
Formation 2: Double Line
X
深海任務部隊 岬沖艦隊総旗艦
Enemy Combined Fleet
Pattern 1
main fleet
Abyssal Crane PrincessLight Carrier Nu-Class flagshipLight Carrier Nu-Class flagshipLight Carrier Nu-Class flagshipBattleship Princess KaiHeavy Cruiser Ne-Class elite
escort fleet
Light Cruiser He-Class flagshipLight Cruiser Tsu-Class eliteLight Cruiser Tsu-Class eliteDestroyer Na-Class Late Model flagshipDestroyer Na-Class Late Model flagshipDestroyer Na-Class Late Model flagship
Cruising Formation 4: Battle Formation
AP:422
AS:950
AS+:1899
Pattern 2
Final Form
main fleet
Abyssal Crane Princess - DamagedAircraft Carrier PrincessAircraft Carrier PrincessBattleship Princess KaiBattleship PrincessBattleship Princess
escort fleet
Light Cruiser He-Class flagshipLight Cruiser Tsu-Class eliteLight Cruiser Tsu-Class eliteDestroyer Na-Class Late Model flagshipDestroyer Na-Class Late Model flagshipDestroyer Na-Class Late Model flagship
Cruising Formation 4: Battle Formation
Unknown

Show/Hide Nodes and Enemy Encounters
Nodes and Enemy Encounters
NodePatternXpNode InfoFormAir
A
深海潜水艦部隊 岬沖再配備集団
Pattern 1 Submarine So-Class eliteSubmarine So-ClassSubmarine So-ClassSubmarine So-ClassSubmarine So-Class
Formation 4: Echelon
Pattern 2 Submarine So-Class eliteSubmarine So-Class eliteSubmarine So-ClassSubmarine So-ClassSubmarine So-Class
Formation 4: Echelon
Pattern 3 Submarine So-Class eliteSubmarine So-Class eliteSubmarine So-Class eliteSubmarine So-ClassSubmarine So-Class
Formation 5: Line Abreast
Pattern 4 Submarine So-Class eliteSubmarine So-Class eliteSubmarine So-Class eliteSubmarine So-Class eliteSubmarine So-Class elite
Formation 4: Echelon
Pattern 5 Submarine So-Class flagshipSubmarine So-Class eliteSubmarine So-Class eliteSubmarine So-Class eliteSubmarine So-Class elite
Formation 4: Echelon
B
Pattern 1"Must be my imagination" (battle avoided)
C
深海任務部隊 艦載機群
Air Battle Node
Pattern 1 Light Carrier Nu-Class flagshipLight Carrier Nu-Class eliteLight Carrier Nu-Class eliteLight Cruiser Tsu-ClassDestroyer Na-ClassDestroyer Na-Class
Formation 3: Diamond
AP:244
AS:549
AS+:1098
Pattern 2 Aircraft Carrier PrincessLight Carrier Nu-Class eliteLight Carrier Nu-Class eliteLight Cruiser Tsu-ClassDestroyer Na-ClassDestroyer Na-Class
Formation 3: Diamond
AP:247
AS:555
AS+:1110
Pattern 3 Aircraft Carrier PrincessLight Carrier Nu-Class eliteLight Carrier Nu-Class eliteLight Cruiser Tsu-ClassDestroyer Na-ClassDestroyer Na-Class
Formation 3: Diamond
AP:279
AS:627
AS+:1254
D
深海任務部隊 岬沖艦隊前衛 I群
Pattern 1 Light Cruiser He-Class flagshipLight Cruiser Tsu-ClassLight Cruiser Tsu-ClassDestroyer Ha-Class Late ModelDestroyer Ha-Class Late ModelSubmarine So-Class elite
Formation 1: Line Ahead
Formation 2: Double Line
E
Pattern 1"Must be my imagination" (battle avoided)
F
深海岬沖艦隊 哨戒護衛空母群
Pattern 1 Light Carrier Nu-Class eliteLight Carrier Nu-Class eliteLight Cruiser He-Class flagshipLight Cruiser Tsu-ClassDestroyer Ha-Class Late ModelDestroyer Ha-Class Late Model
Formation 1: Line Ahead
Formation 2: Double Line
Formation 3: Diamond
AP:176
AS:396
AS+:792
G
深海任務部隊 岬沖水雷戦隊
Pattern 1 Light Cruiser He-Class flagshipTorpedo Cruiser Chi-Class flagshipTorpedo Cruiser Chi-Class flagshipDestroyer Na-ClassDestroyer Ha-Class Late ModelDestroyer Ha-Class Late Model
Formation 1: Line Ahead
Formation 2: Double Line
Formation 4: Echelon
H
深海潜水艦部隊 親衛艦隊I群
Pattern 1
I
深海任務部隊 艦載機群
Air Battle Node
Pattern 1 Abyssal Crane PrincessLight Carrier Nu-Class eliteLight Carrier Nu-Class eliteLight Cruiser Tsu-Class eliteDestroyer Na-Class Late Model eliteDestroyer Na-Class Late Model elite
Formation 3: Diamond
Unknown
J
Pattern 1Choose your route
K
深海岬沖艦隊 前衛哨戒空母群
Pattern 1 Standard Carrier Wo-Class flagshipLight Cruiser Tsu-ClassLight Cruiser Tsu-ClassDestroyer Ha-Class Late ModelDestroyer Ha-Class Late ModelSubmarine So-Class elite
Formation 2: Double Line
Formation 3: Diamond
AP:69
AS:155
AS+:309
Pattern 2 Standard Carrier Wo-Class flagshipLight Cruiser He-Class flagshipLight Cruiser Tsu-ClassLight Cruiser Tsu-ClassDestroyer Ha-Class Late ModelDestroyer Ha-Class Late Model
Formation 1: Line Ahead
AP:69
AS:155
AS+:309
L
深海任務部隊 岬艦隊空母第IV群
Pattern 1 Light Carrier Nu-Class flagshipLight Carrier Nu-Class eliteLight Carrier Nu-Class eliteLight Cruiser Tsu-ClassDestroyer Na-ClassDestroyer Na-Class
Formation 3: Diamond
AP:160
AS:359
AS+:717
Pattern 2 Standard Carrier Wo-Class flagshipLight Carrier Nu-Class eliteLight Carrier Nu-Class eliteLight Cruiser Tsu-ClassDestroyer Na-ClassDestroyer Na-Class
Formation 3: Diamond
AP:213
AS:479
AS+:957
Pattern 3 Standard Carrier Wo-Class flagshipLight Carrier Nu-Class eliteLight Carrier Nu-Class eliteLight Cruiser Tsu-ClassDestroyer Na-ClassDestroyer Na-Class
Formation 3: Diamond
AP:245
AS:551
AS+:1101
M
深海任務部隊 岬艦隊空母第III群
Pattern 1 Aircraft Carrier PrincessLight Carrier Nu-Class eliteLight Carrier Nu-Class eliteLight Cruiser Tsu-ClassDestroyer Na-ClassDestroyer Na-Class
Formation 3: Diamond
AP:247
AS:555
AS+:1110
Pattern 2 Aircraft Carrier PrincessLight Carrier Nu-Class eliteLight Carrier Nu-Class eliteLight Cruiser Tsu-ClassDestroyer Na-ClassDestroyer Na-Class
Formation 3: Diamond
AP:263
AS:591
AS+:1182
Pattern 3 Aircraft Carrier PrincessLight Carrier Nu-Class eliteLight Carrier Nu-Class eliteLight Cruiser Tsu-ClassDestroyer Na-ClassDestroyer Na-Class
Formation 3: Diamond
AP:279
AS:627
AS+:1254
N
深海潜水艦部隊 親衛艦隊II群
Pattern 1 New Submarine Princess Flagship (A)Submarine So-ClassSubmarine So-ClassSubmarine So-ClassSubmarine So-Class
Formation 4: Echelon
Pattern 2 New Submarine Princess Flagship (B)Submarine So-Class eliteSubmarine So-Class eliteSubmarine So-Class eliteSubmarine So-Class elite
Formation 4: Echelon
Pattern 3 New Submarine Princess Flagship (B)Submarine So-Class eliteSubmarine So-Class eliteSubmarine So-Class elite
Formation 4: Echelon
Pattern 4 New Submarine Princess Flagship (B)Submarine So-Class eliteSubmarine So-Class elite
Formation 5: Line Abreast
Pattern 5 New Submarine Princess Flagship (D)Submarine So-ClassSubmarine So-ClassSubmarine So-Class
Formation 4: Echelon
O
Pattern 1"Must be my imagination" (battle avoided)
P
Pattern 1"Must be my imagination" (battle avoided)
Q
深海任務部隊 岬艦隊空母第I群
Enemy Combined Fleet
Pattern 1
main fleet
Aircraft Carrier PrincessAircraft Carrier PrincessLight Carrier Nu-Class eliteBattleship Ta-Class eliteDestroyer Ha-Class Late ModelDestroyer Ha-Class Late Model
escort fleet
Light Cruiser Tsu-ClassDestroyer Na-Class Late ModelDestroyer Na-Class Late ModelDestroyer Ha-Class Late ModelDestroyer Ro-ClassDestroyer Ro-Class
Cruising Formation 4: Battle Formation
AP:278
AS:624
AS+:1248
Pattern 2
main fleet
Aircraft Carrier PrincessAircraft Carrier PrincessLight Carrier Nu-Class eliteLight Carrier Nu-Class eliteHeavy Cruiser Ne-ClassHeavy Cruiser Ne-Class
escort fleet
Light Cruiser Tsu-Class eliteDestroyer Na-Class Late Model eliteDestroyer Na-Class Late Model eliteDestroyer Ha-Class Late ModelDestroyer Ro-ClassDestroyer Ro-Class
Cruising Formation 4: Battle Formation
AP:382
AS:858
AS+:1716
Pattern 3
main fleet
Aircraft Carrier PrincessAircraft Carrier PrincessLight Carrier Nu-Class eliteLight Carrier Nu-Class eliteBattleship Ta-Class eliteBattleship Ta-Class elite
escort fleet
Light Cruiser Tsu-Class eliteDestroyer Na-Class Late Model eliteDestroyer Na-Class Late Model eliteDestroyer Ha-Class Late ModelDestroyer Ha-Class Late ModelDestroyer Ha-Class Late Model
Cruising Formation 4: Battle Formation
AP:382
AS:858
AS+:1716
R
Pattern 1"Must be my imagination" (battle avoided)
S
深海任務部隊 艦載機群
Air Battle Node
Pattern 1 Aircraft Carrier PrincessAircraft Carrier PrincessLight Carrier Nu-Class eliteLight Cruiser Tsu-ClassDestroyer Ha-Class Late ModelDestroyer Ha-Class Late Model
Formation 3: Diamond
AP:278
AS:624
AS+:1248
Pattern 2 Aircraft Carrier PrincessAircraft Carrier PrincessLight Carrier Nu-Class eliteLight Cruiser Tsu-ClassDestroyer Ha-Class Late ModelDestroyer Ha-Class Late Model
Formation 3: Diamond
AP:294
AS:660
AS+:1320
T
深海任務部隊 岬艦隊空母第II群
Pattern 1 Aircraft Carrier PrincessLight Carrier Nu-Class eliteLight Carrier Nu-Class eliteLight Cruiser Tsu-ClassDestroyer Ha-Class Late ModelDestroyer Ha-Class Late Model
Formation 3: Diamond
AP:247
AS:555
AS+:1110
Pattern 2 Aircraft Carrier PrincessAircraft Carrier PrincessLight Carrier Nu-Class eliteLight Cruiser Tsu-ClassDestroyer Ha-Class Late ModelDestroyer Ha-Class Late Model
Formation 3: Diamond
AP:278
AS:624
AS+:1248
Pattern 3 Aircraft Carrier PrincessAircraft Carrier PrincessLight Carrier Nu-Class eliteLight Cruiser Tsu-ClassDestroyer Ha-Class Late ModelDestroyer Ha-Class Late Model
Formation 3: Diamond
AP:294
AS:660
AS+:1320
U
深海岬沖艦隊 支援集団随伴護衛
Pattern 1 Heavy Cruiser Ne-Class eliteHeavy Cruiser Ne-Class eliteLight Cruiser Tsu-ClassLight Cruiser Tsu-ClassDestroyer Ha-Class Late ModelDestroyer Ha-Class Late Model
Formation 1: Line Ahead
Pattern 2 Heavy Cruiser Ne-Class eliteHeavy Cruiser Ne-Class eliteLight Cruiser Tsu-ClassLight Cruiser Tsu-ClassDestroyer Na-Class eliteDestroyer Na-Class elite
Formation 1: Line Ahead
Pattern 3 Heavy Cruiser Ne-Class eliteHeavy Cruiser Ne-Class eliteLight Cruiser Tsu-Class eliteLight Cruiser Tsu-Class eliteDestroyer Na-Class eliteDestroyer Na-Class elite
Formation 1: Line Ahead
V
深海任務部隊 岬沖艦隊支援集団
Enemy Combined Fleet
Pattern 1
main fleet
Battleship Water Demon KaiBattleship Ta-Class eliteBattleship Ta-Class eliteHeavy Cruiser Ne-Class eliteHeavy Cruiser Ne-Class eliteLight Carrier Nu-Class elite
escort fleet
Light Cruiser Tsu-Class eliteDestroyer Na-Class Late Model eliteDestroyer Na-Class Late Model eliteDestroyer Ha-Class Late ModelDestroyer Ha-Class Late ModelDestroyer Ha-Class Late Model
Cruising Formation 4: Battle Formation
AP:88
AS:198
AS+:396
Pattern 2
Final Form
main fleet
Battleship Water Demon Kai - DamagedBattleship PrincessBattleship PrincessHeavy Cruiser Ne-Class eliteHeavy Cruiser Ne-Class eliteLight Carrier Nu-Class elite
escort fleet
Light Cruiser Tsu-Class eliteDestroyer Na-Class Late Model eliteDestroyer Na-Class Late Model eliteDestroyer Ha-Class Late ModelDestroyer Ha-Class Late ModelDestroyer Ha-Class Late Model
Cruising Formation 4: Battle Formation
AP:88
AS:198
AS+:396
W
深海岬沖艦隊 総旗艦随伴護衛
Pattern 1
X
深海任務部隊 岬沖艦隊総旗艦
Enemy Combined Fleet
Pattern 1

Show/Hide Nodes and Enemy Encounters
Nodes and Enemy Encounters
NodePatternXpNode InfoFormAir
A
深海潜水艦部隊 岬沖再配備集団
Pattern 1 Submarine So-ClassSubmarine So-ClassSubmarine So-ClassSubmarine So-ClassSubmarine So-Class
Formation 4: Echelon
Pattern 2 Submarine So-Class eliteSubmarine So-ClassSubmarine So-ClassSubmarine So-ClassSubmarine So-Class
Formation 4: Echelon
Pattern 3 Submarine So-Class eliteSubmarine So-Class eliteSubmarine So-ClassSubmarine So-ClassSubmarine So-Class
Formation 4: Echelon
B
Pattern 1"Must be my imagination" (battle avoided)
C
深海任務部隊 艦載機群
Air Battle Node
Pattern 1 Light Carrier Nu-Class eliteLight Carrier Nu-Class eliteLight Cruiser Tsu-ClassDestroyer Na-ClassDestroyer Ro-ClassDestroyer Ro-Class
Formation 3: Diamond
AP:144
AS:324
AS+:648
Pattern 2 Light Carrier Nu-Class eliteLight Carrier Nu-Class eliteLight Carrier Nu-Class eliteLight Cruiser Tsu-ClassDestroyer Ro-ClassDestroyer Ro-Class
Formation 3: Diamond
AP:216
AS:486
AS+:972
Pattern 3 Light Carrier Nu-Class flagshipLight Carrier Nu-Class eliteLight Carrier Nu-Class eliteLight Cruiser Tsu-ClassDestroyer Ha-Class Late ModelDestroyer Ha-Class Late Model
Formation 3: Diamond
AP:244
AS:549
AS+:1098
D
深海任務部隊 岬沖艦隊前衛 I群
Pattern 1 Light Cruiser He-Class flagshipLight Cruiser Tsu-ClassDestroyer Ro-Class Late ModelDestroyer Ro-Class Late ModelDestroyer I-ClassSubmarine So-Class
Formation 2: Double Line
Pattern 2 Light Cruiser He-Class flagshipLight Cruiser Tsu-ClassLight Cruiser Tsu-ClassDestroyer Ro-Class Late ModelDestroyer Ro-Class Late ModelSubmarine So-Class
Formation 1: Line Ahead
E
Pattern 1"Must be my imagination" (battle avoided)
F
深海岬沖艦隊 哨戒護衛空母群
Pattern 1 Light Carrier Nu-Class eliteLight Cruiser He-Class flagshipLight Cruiser Tsu-ClassDestroyer Ha-Class Late ModelDestroyer Ro-ClassDestroyer Ro-Class
Formation 1: Line Ahead
Formation 2: Double Line
Formation 3: Diamond
AP:88
AS:198
AS+:396
G
深海任務部隊 岬沖水雷戦隊
Pattern 1 Light Cruiser He-Class flagshipTorpedo Cruiser Chi-Class eliteTorpedo Cruiser Chi-Class eliteDestroyer Na-ClassDestroyer Ro-Class Late ModelDestroyer Ro-Class Late Model
Formation 1: Line Ahead
Formation 2: Double Line
Formation 4: Echelon
H
深海潜水艦部隊 親衛艦隊I群
Pattern 1 New Submarine Princess Flagship (A)Submarine So-ClassSubmarine So-ClassSubmarine So-ClassSubmarine So-Class
Formation 4: Echelon
Pattern 2 New Submarine Princess Flagship (D)Submarine So-ClassSubmarine So-ClassSubmarine So-Class
Formation 4: Echelon
Pattern 3 New Submarine Princess Flagship (D)Submarine So-ClassSubmarine So-Class
Formation 4: Echelon
I
深海任務部隊 艦載機群
Air Battle Node
Pattern 1 Abyssal Crane PrincessLight Carrier Nu-Class eliteLight Carrier Nu-Class eliteLight Cruiser Tsu-ClassDestroyer Na-Class Late ModelDestroyer Na-Class Late Model
Formation 3: Diamond
Unknown
Pattern 2 Abyssal Crane Princess - DamagedLight Carrier Nu-Class flagshipLight Carrier Nu-Class flagshipLight Cruiser Tsu-ClassDestroyer Na-Class Late ModelDestroyer Na-Class Late Model
Formation 3: Diamond
Unknown
J
Pattern 1Choose your route
K
深海岬沖艦隊 前衛哨戒空母群
Pattern 1 Standard Carrier Wo-Class flagshipLight Cruiser He-Class flagshipLight Cruiser Tsu-ClassDestroyer Ha-Class Late ModelDestroyer Ro-ClassDestroyer Ro-Class
Formation 1: Line Ahead
Formation 2: Double Line
Formation 3: Diamond
AP:19
AS:42
AS+:84
L
深海任務部隊 岬艦隊空母第IV群
Pattern 1 Light Carrier Nu-Class eliteLight Carrier Nu-Class eliteLight Cruiser Tsu-ClassDestroyer Ha-Class Late ModelDestroyer Ro-ClassDestroyer Ro-Class
Formation 3: Diamond
AP:144
AS:324
AS+:648
Pattern 2 Light Carrier Nu-Class flagshipLight Carrier Nu-Class eliteLight Carrier Nu-Class eliteLight Cruiser Tsu-ClassDestroyer Ha-Class Late ModelDestroyer Ro-Class
Formation 3: Diamond
AP:160
AS:359
AS+:717
Pattern 3 Light Carrier Nu-Class flagshipLight Carrier Nu-Class eliteLight Carrier Nu-Class eliteLight Cruiser Tsu-ClassDestroyer Ha-Class Late ModelDestroyer Ha-Class Late Model
Formation 3: Diamond
AP:160
AS:359
AS+:717
M
深海任務部隊 岬艦隊空母第III群
Pattern 1 Light Carrier Nu-Class eliteLight Carrier Nu-Class eliteLight Cruiser Tsu-ClassDestroyer Na-ClassDestroyer Ro-ClassDestroyer Ro-Class
Formation 3: Diamond
AP:144
AS:324
AS+:648
Pattern 2 Light Carrier Nu-Class eliteLight Carrier Nu-Class eliteLight Cruiser Tsu-ClassDestroyer Na-ClassDestroyer Ro-ClassDestroyer Ro-Class
Formation 3: Diamond
AP:176
AS:396
AS+:792
Pattern 3 Light Carrier Nu-Class flagshipLight Carrier Nu-Class eliteLight Carrier Nu-Class eliteLight Cruiser Tsu-ClassDestroyer Ha-Class Late ModelDestroyer Ha-Class Late Model
Formation 3: Diamond
AP:244
AS:549
AS+:1098
N
深海潜水艦部隊 親衛艦隊II群
Pattern 1 New Submarine Princess Flagship (A)Submarine So-ClassSubmarine So-ClassSubmarine So-ClassSubmarine So-Class
Formation 4: Echelon
Pattern 2 New Submarine Princess Flagship (D)Submarine So-ClassSubmarine So-ClassSubmarine So-Class
Formation 4: Echelon
Pattern 3 New Submarine Princess Flagship (D)Submarine So-ClassSubmarine So-Class
Formation 4: Echelon
O
Pattern 1"Must be my imagination" (battle avoided)
P
Pattern 1"Must be my imagination" (battle avoided)
Q
深海任務部隊 岬艦隊空母第I群
Enemy Combined Fleet
Pattern 1
main fleet
Aircraft Carrier PrincessLight Carrier Nu-Class eliteLight Carrier Nu-Class eliteHeavy Cruiser Ne-ClassDestroyer Ha-Class Late ModelDestroyer Ha-Class Late Model
escort fleet
Light Cruiser Tsu-ClassDestroyer Ha-Class Late ModelDestroyer Ha-Class Late ModelDestroyer Ha-Class Late ModelDestroyer Ro-ClassDestroyer Ro-Class
Cruising Formation 4: Battle Formation
AP:247
AS:555
AS+:1110
Pattern 2
main fleet
Light Carrier Nu-Class eliteLight Carrier Nu-Class eliteLight Carrier Nu-Class eliteBattleship Ta-Class eliteDestroyer Ha-Class Late ModelDestroyer Ha-Class Late Model
escort fleet
Light Cruiser Tsu-ClassDestroyer Ha-Class Late ModelDestroyer Ha-Class Late ModelDestroyer Ro-ClassDestroyer Ro-ClassDestroyer Ro-Class
Cruising Formation 4: Battle Formation
AP:248
AS:558
AS+:1116
Pattern 3
main fleet
Aircraft Carrier PrincessAircraft Carrier PrincessLight Carrier Nu-Class eliteBattleship Ta-Class eliteDestroyer Ha-Class Late ModelDestroyer Ha-Class Late Model
escort fleet
Light Cruiser Tsu-ClassDestroyer Na-Class Late ModelDestroyer Na-Class Late ModelDestroyer Ha-Class Late ModelDestroyer Ro-ClassDestroyer Ro-Class
Cruising Formation 4: Battle Formation
AP:278
AS:624
AS+:1248
R
Pattern 1"Must be my imagination" (battle avoided)
S
深海任務部隊 艦載機群
Air Battle Node
Pattern 1 Aircraft Carrier PrincessLight Carrier Nu-Class eliteLight Carrier Nu-Class eliteLight Cruiser Tsu-ClassDestroyer Ro-Class Late ModelDestroyer Ro-Class Late Model
Formation 3: Diamond
AP:135
AS:303
AS+:606
Pattern 2 Aircraft Carrier PrincessLight Carrier Nu-Class eliteLight Carrier Nu-Class eliteLight Cruiser Tsu-ClassDestroyer Ro-Class Late ModelDestroyer Ro-Class Late Model
Formation 3: Diamond
AP:191
AS:429
AS+:858
Pattern 3 Aircraft Carrier PrincessLight Carrier Nu-Class eliteLight Carrier Nu-Class eliteLight Cruiser Tsu-ClassDestroyer Ro-Class Late ModelDestroyer Ro-Class Late Model
Formation 3: Diamond
AP:247
AS:555
AS+:1110
T
深海任務部隊 岬艦隊空母第II群
Pattern 1 Aircraft Carrier PrincessLight Carrier Nu-Class eliteLight Carrier Nu-Class eliteLight Cruiser Tsu-ClassDestroyer Ro-Class Late ModelDestroyer Ro-Class Late Model
Formation 3: Diamond
AP:135
AS:303
AS+:606
Pattern 2 Aircraft Carrier PrincessLight Carrier Nu-Class eliteLight Carrier Nu-Class eliteLight Cruiser Tsu-ClassDestroyer Ro-Class Late ModelDestroyer Ro-Class Late Model
Formation 3: Diamond
AP:191
AS:429
AS+:858
Pattern 3 Aircraft Carrier PrincessLight Carrier Nu-Class eliteLight Carrier Nu-Class eliteLight Cruiser Tsu-ClassDestroyer Ro-Class Late ModelDestroyer Ro-Class Late Model
Formation 3: Diamond
AP:247
AS:555
AS+:1110
U
深海岬沖艦隊 支援集団随伴護衛
Pattern 1 Heavy Cruiser Ne-ClassHeavy Cruiser Ne-ClassLight Cruiser Tsu-ClassLight Cruiser Tsu-ClassDestroyer Na-ClassDestroyer Na-Class
Formation 1: Line Ahead
Pattern 2 Heavy Cruiser Ne-ClassHeavy Cruiser Ne-ClassLight Cruiser Tsu-ClassDestroyer Na-ClassDestroyer I-ClassDestroyer I-Class
Formation 1: Line Ahead
Pattern 3 Heavy Cruiser Ne-ClassHeavy Cruiser Ne-ClassLight Cruiser Tsu-ClassDestroyer Na-ClassDestroyer Na-ClassDestroyer I-Class
Formation 1: Line Ahead
V
深海任務部隊 岬沖艦隊支援集団
Enemy Combined Fleet
Pattern 1
main fleet
Battleship Water Demon KaiBattleship Ta-Class eliteBattleship Ta-Class eliteHeavy Cruiser Ne-ClassHeavy Cruiser Ne-ClassLight Carrier Nu-Class elite
escort fleet
Light Cruiser Tsu-ClassDestroyer Na-Class Late ModelDestroyer Na-Class Late ModelDestroyer Ha-Class Late ModelDestroyer Ha-Class Late ModelDestroyer Ha-Class Late Model
Cruising Formation 4: Battle Formation
AP:72
AS:162
AS+:324
Pattern 2
Final Form
main fleet
Battleship Water Demon Kai - DamagedBattleship Ta-Class flagshipBattleship Ta-Class flagshipHeavy Cruiser Ne-ClassHeavy Cruiser Ne-ClassLight Carrier Nu-Class elite
escort fleet
Light Cruiser Tsu-ClassDestroyer Na-Class Late ModelDestroyer Na-Class Late ModelDestroyer Ha-Class Late ModelDestroyer Ha-Class Late ModelDestroyer Ha-Class Late Model
Cruising Formation 4: Battle Formation
AP:88
AS:198
AS+:396
W
深海岬沖艦隊 総旗艦随伴護衛
Pattern 1 Heavy Cruiser Ne-ClassHeavy Cruiser Ne-ClassLight Cruiser Tsu-ClassLight Cruiser Tsu-ClassDestroyer Na-ClassDestroyer Na-Class
Formation 1: Line Ahead
Formation 2: Double Line
X
深海任務部隊 岬沖艦隊総旗艦
Enemy Combined Fleet
Pattern 1
main fleet
Abyssal Crane PrincessLight Carrier Nu-Class eliteLight Carrier Nu-Class eliteLight Carrier Nu-Class eliteHeavy Cruiser Ne-ClassHeavy Cruiser Ne-Class
escort fleet
Light Cruiser He-Class flagshipLight Cruiser Tsu-ClassLight Cruiser Tsu-ClassDestroyer Na-Class Late ModelDestroyer Na-Class Late ModelDestroyer Na-Class Late Model
Cruising Formation 4: Battle Formation
Unknown
Pattern 2
Final Form
main fleet
Abyssal Crane Princess - DamagedLight Carrier Nu-Class flagshipLight Carrier Nu-Class flagshipBattleship PrincessHeavy Cruiser Ne-ClassHeavy Cruiser Ne-Class
escort fleet
Light Cruiser He-Class flagshipLight Cruiser Tsu-ClassLight Cruiser Tsu-ClassDestroyer Na-Class Late ModelDestroyer Na-Class Late ModelDestroyer Na-Class Late Model
Cruising Formation 4: Battle Formation
Unknown

Show/Hide Nodes and Enemy Encounters
Nodes and Enemy Encounters
NodePatternXpNode InfoFormAir
A
深海潜水艦部隊 岬沖再配備集団
Pattern 1 Submarine So-ClassSubmarine So-ClassSubmarine So-ClassSubmarine So-ClassSubmarine So-Class
Formation 4: Echelon
B
Pattern 1"Must be my imagination" (battle avoided)
C
深海任務部隊 艦載機群
Air Battle Node
Pattern 1 Light Carrier Nu-Class eliteLight Carrier Nu-Class eliteLight Cruiser Tsu-ClassDestroyer Na-ClassDestroyer Ro-ClassDestroyer Ro-Class
Formation 3: Diamond
AP:144
AS:324
AS+:648
Pattern 2 Light Carrier Nu-Class eliteLight Carrier Nu-Class eliteLight Carrier Nu-Class eliteLight Cruiser Tsu-ClassDestroyer Ro-ClassDestroyer Ro-Class
Formation 3: Diamond
AP:216
AS:486
AS+:972
D
深海任務部隊 岬沖艦隊前衛 I群
Pattern 1 Light Cruiser He-Class flagshipLight Cruiser Tsu-ClassDestroyer Ro-Class Late ModelDestroyer Ro-Class Late ModelDestroyer I-ClassSubmarine So-Class
Formation 2: Double Line
Pattern 2 Light Cruiser He-Class flagshipLight Cruiser Tsu-ClassLight Cruiser Tsu-ClassDestroyer Ro-Class Late ModelDestroyer Ro-Class Late ModelSubmarine So-Class
Formation 1: Line Ahead
E
Pattern 1"Must be my imagination" (battle avoided)
F
深海岬沖艦隊 哨戒護衛空母群
Pattern 1 Light Carrier Nu-Class eliteLight Cruiser He-Class flagshipLight Cruiser Tsu-ClassDestroyer Ha-Class Late ModelDestroyer Ro-ClassDestroyer Ro-Class
Formation 2: Double Line
Formation 3: Diamond
AP:88
AS:198
AS+:396
G
深海任務部隊 岬沖水雷戦隊
Pattern 1 Light Cruiser He-Class flagshipTorpedo Cruiser Chi-Class eliteTorpedo Cruiser Chi-Class eliteDestroyer Na-ClassDestroyer Ro-Class Late ModelDestroyer Ro-Class Late Model
Formation 1: Line Ahead
Formation 2: Double Line
Formation 4: Echelon
H
深海潜水艦部隊 親衛艦隊I群
Pattern 1 New Submarine Princess Flagship (D)Submarine So-ClassSubmarine So-ClassSubmarine So-Class
Formation 4: Echelon
Pattern 2 New Submarine Princess Flagship (D)Submarine So-ClassSubmarine So-Class
Formation 4: Echelon
I
深海任務部隊 艦載機群
Air Battle Node
Pattern 1 Abyssal Crane PrincessLight Carrier Nu-Class eliteLight Carrier Nu-Class eliteLight Cruiser Tsu-ClassDestroyer Na-Class Late ModelDestroyer Na-Class Late Model
Formation 3: Diamond
Unknown
Pattern 2 Abyssal Crane Princess - DamagedLight Carrier Nu-Class eliteLight Carrier Nu-Class eliteLight Cruiser Tsu-ClassDestroyer Na-Class Late ModelDestroyer Na-Class Late Model
Formation 3: Diamond
Unknown
J
Pattern 1Choose your route
K
深海岬沖艦隊 前衛哨戒空母群
Pattern 1 Standard Carrier Wo-Class flagshipLight Cruiser He-Class flagshipLight Cruiser Tsu-ClassDestroyer Ha-Class Late ModelDestroyer Ro-ClassDestroyer Ro-Class
Formation 2: Double Line
Formation 3: Diamond
AP:19
AS:42
AS+:84
L
深海任務部隊 岬艦隊空母第IV群
Pattern 1 Light Carrier Nu-Class eliteLight Carrier Nu-Class eliteLight Cruiser Tsu-ClassDestroyer Ha-Class Late ModelDestroyer Ro-ClassDestroyer Ro-Class
Formation 3: Diamond
AP:144
AS:324
AS+:648
Pattern 2 Light Carrier Nu-Class flagshipLight Carrier Nu-Class eliteLight Carrier Nu-Class eliteLight Cruiser Tsu-ClassDestroyer Ha-Class Late ModelDestroyer Ro-Class
Formation 3: Diamond
AP:160
AS:359
AS+:717
M
深海任務部隊 岬艦隊空母第III群
Pattern 1 Light Carrier Nu-Class eliteLight Carrier Nu-Class eliteLight Cruiser Tsu-ClassDestroyer Na-ClassDestroyer Ro-ClassDestroyer Ro-Class
Formation 3: Diamond
AP:144
AS:324
AS+:648
Pattern 2 Light Carrier Nu-Class eliteLight Carrier Nu-Class eliteLight Cruiser Tsu-ClassDestroyer Na-ClassDestroyer Ro-ClassDestroyer Ro-Class
Formation 3: Diamond
AP:176
AS:396
AS+:792
N
深海潜水艦部隊 親衛艦隊II群
Pattern 1 New Submarine Princess Flagship (D)Submarine So-ClassSubmarine So-ClassSubmarine So-Class
Formation 4: Echelon
Pattern 2 New Submarine Princess Flagship (D)Submarine So-ClassSubmarine So-Class
Formation 4: Echelon
O
Pattern 1"Must be my imagination" (battle avoided)
P
Pattern 1"Must be my imagination" (battle avoided)
Q
深海任務部隊 岬艦隊空母第I群
Enemy Combined Fleet
Pattern 1
main fleet
Light Carrier Nu-Class eliteLight Carrier Nu-Class eliteLight Carrier Nu-Class eliteHeavy Cruiser Ne-ClassDestroyer Ha-Class Late ModelDestroyer Ha-Class Late Model
escort fleet
Light Cruiser Tsu-ClassDestroyer Ha-Class Late ModelDestroyer Ha-Class Late ModelDestroyer Ro-ClassDestroyer Ro-ClassDestroyer Ro-Class
Cruising Formation 4: Battle Formation
AP:232
AS:522
AS+:1044
Pattern 2
main fleet
Light Carrier Nu-Class eliteLight Carrier Nu-Class eliteLight Carrier Nu-Class eliteBattleship Ta-Class eliteDestroyer Ha-Class Late ModelDestroyer Ha-Class Late Model
escort fleet
Light Cruiser Tsu-ClassDestroyer Ha-Class Late ModelDestroyer Ha-Class Late ModelDestroyer Ro-ClassDestroyer Ro-ClassDestroyer Ro-Class
Cruising Formation 4: Battle Formation
AP:248
AS:558
AS+:1116
R
Pattern 1"Must be my imagination" (battle avoided)
S
深海任務部隊 艦載機群
Air Battle Node
Pattern 1 Aircraft Carrier PrincessLight Carrier Nu-Class eliteLight Carrier Nu-Class eliteLight Cruiser Tsu-ClassDestroyer Ro-Class Late ModelDestroyer Ro-Class Late Model
Formation 3: Diamond
AP:135
AS:303
AS+:606
Pattern 2 Aircraft Carrier PrincessLight Carrier Nu-Class eliteLight Carrier Nu-Class eliteLight Cruiser Tsu-ClassDestroyer Ro-Class Late ModelDestroyer Ro-Class Late Model
Formation 3: Diamond
AP:191
AS:429
AS+:858
T
深海任務部隊 岬艦隊空母第II群
Pattern 1 Aircraft Carrier PrincessLight Carrier Nu-Class eliteLight Carrier Nu-Class eliteLight Cruiser Tsu-ClassDestroyer Ro-Class Late ModelDestroyer Ro-Class Late Model
Formation 3: Diamond
AP:135
AS:303
AS+:606
Pattern 2 Aircraft Carrier PrincessLight Carrier Nu-Class eliteLight Carrier Nu-Class eliteLight Cruiser Tsu-ClassDestroyer Ro-Class Late ModelDestroyer Ro-Class Late Model
Formation 3: Diamond
AP:191
AS:429
AS+:858
U
深海岬沖艦隊 支援集団随伴護衛
Pattern 1 Heavy Cruiser Ne-ClassHeavy Cruiser Ne-ClassLight Cruiser Tsu-ClassDestroyer Na-ClassDestroyer I-ClassDestroyer I-Class
Formation 1: Line Ahead
Pattern 2 Heavy Cruiser Ne-ClassHeavy Cruiser Ne-ClassLight Cruiser Tsu-ClassDestroyer Na-ClassDestroyer Na-ClassDestroyer I-Class
Formation 1: Line Ahead
V
深海任務部隊 岬沖艦隊支援集団
Enemy Combined Fleet
Pattern 1
main fleet
Battleship Water Demon KaiBattleship Ta-ClassBattleship Ta-ClassHeavy Cruiser Ne-ClassDestroyer Ha-Class Late ModelDestroyer Ha-Class Late Model
escort fleet
Light Cruiser Tsu-ClassDestroyer Ha-Class Late ModelDestroyer Ha-Class Late ModelDestroyer Ro-ClassDestroyer Ro-ClassDestroyer Ro-Class
Cruising Formation 4: Battle Formation
Pattern 2
Final Form
main fleet
Battleship Water Demon Kai - DamagedBattleship Ta-Class eliteBattleship Ta-ClassHeavy Cruiser Ne-ClassHeavy Cruiser Ne-ClassLight Carrier Nu-Class elite
escort fleet
Light Cruiser Tsu-ClassDestroyer Ha-Class Late ModelDestroyer Ha-Class Late ModelDestroyer Ro-ClassDestroyer Ro-ClassDestroyer Ro-Class
Cruising Formation 4: Battle Formation
AP:72
AS:162
AS+:324
W
深海岬沖艦隊 総旗艦随伴護衛
Pattern 1 Heavy Cruiser Ne-ClassHeavy Cruiser Ne-ClassLight Cruiser Tsu-ClassLight Cruiser Tsu-ClassDestroyer Na-ClassDestroyer Na-Class
Formation 2: Double Line
X
深海任務部隊 岬沖艦隊総旗艦
Enemy Combined Fleet
Pattern 1
main fleet
Abyssal Crane PrincessLight Carrier Nu-Class eliteLight Carrier Nu-Class eliteLight Carrier Nu-Class eliteHeavy Cruiser Ne-ClassHeavy Cruiser Ne-Class
escort fleet
Light Cruiser Tsu-ClassDestroyer Na-Class Late ModelDestroyer Na-Class Late ModelDestroyer Ro-ClassDestroyer Ro-ClassDestroyer Ro-Class
Cruising Formation 4: Battle Formation
Unknown
Pattern 2
Final Form
main fleet
Abyssal Crane Princess - DamagedLight Carrier Nu-Class eliteLight Carrier Nu-Class eliteBattleship Ta-Class eliteHeavy Cruiser Ne-ClassHeavy Cruiser Ne-Class
escort fleet
Light Cruiser He-Class flagshipLight Cruiser Tsu-ClassDestroyer Na-Class Late ModelDestroyer Na-Class Late ModelDestroyer Ro-ClassDestroyer Ro-Class
Cruising Formation 4: Battle Formation
Unknown

Ship drops

NodeShip List
DDestroyersAyanami Fumizuki Isonami Kagerou Kikuzuki Kisaragi Kuroshio Mikazuki Mochizuki Murakumo Mutsuki Nagatsuki Satsuki Shikinami Shiranui
FDestroyersFumizuki Kikuzuki Mikazuki Mochizuki Nagatsuki Satsuki
GDestroyersAyanami Fumizuki Hatsuyuki Isonami Kagerou Kikuzuki Kisaragi Kuroshio Mikazuki Miyuki Mochizuki Murakumo Mutsuki Nagatsuki Shikinami Shiranui Shirayuki
Heavy CruisersChoukai
KDestroyersAyanami Fumizuki Kagerou Kikuzuki Kisaragi Kuroshio Mikazuki Mochizuki Mutsuki Nagatsuki Satsuki Shikinami Shiranui
LDestroyersAyanami Fubuki Fumizuki Hatsuyuki Isonami Kagerou Kikuzuki Kisaragi Kuroshio Mikazuki Miyuki Mochizuki Murakumo Mutsuki Nagatsuki Satsuki Shikinami Shiranui Shirayuki
Heavy CruisersAshigara Atago Chikuma Choukai Haguro Maya Mogami Nachi Takao Tone
MDestroyersAyanami Fubuki Fumizuki Hatsuyuki Isonami Kagerou Kikuzuki Kisaragi Kuroshio Mikazuki Miyuki Mochizuki Murakumo Mutsuki Nagatsuki Satsuki Shikinami Shiranui Shirayuki
Heavy CruisersAshigara Atago Chikuma Choukai Haguro Maya Mogami Myoukou Nachi Tone
QDestroyersAyanami Fubuki Fumizuki Hatsuyuki Isonami Kagerou Kikuzuki Kisaragi Kuroshio Mikazuki Miyuki Mochizuki Murakumo Mutsuki Nagatsuki Oyashio Satsuki Shikinami Shiranui Shirayuki
Heavy CruisersAshigara Atago Chikuma Choukai Haguro Maya Mogami Myoukou Nachi Takao Tone
BattleshipsHyuuga
Aircraft CarriersAkagi Ark Royal Hiryuu Kaga Shoukaku Souryuu Zuikaku
Light Aircraft CarriersZuihou
Auxiliary ShipsKashima
TDestroyersAyanami Fubuki Fumizuki Hatsuyuki Isonami Kagerou Kikuzuki Kisaragi Kuroshio Mikazuki Miyuki Mochizuki Murakumo Mutsuki Nagatsuki Satsuki Shikinami Shiranui Shirayuki
Heavy CruisersAshigara Chikuma Choukai Haguro Maya Mogami Nachi
UDestroyersAyanami Fubuki Fumizuki Hatsuyuki Isonami Kagerou Kikuzuki Kisaragi Kuroshio Mikazuki Miyuki Mochizuki Murakumo Mutsuki Nagatsuki Oyashio Satsuki Shikinami Shiranui Shirayuki
Heavy CruisersAshigara Atago Chikuma Choukai Haguro Maya Mogami Myoukou Nachi Takao Tone
Aircraft CarriersKaga Shoukaku Souryuu
Light Aircraft CarriersZuihou
VDestroyersAyanami Fubuki Fumizuki Hatsuyuki Isonami Kagerou Kikuzuki Kisaragi Kuroshio Mikazuki Miyuki Mochizuki Murakumo Mutsuki Nagatsuki Oyashio Satsuki Shikinami Shiranui Shirayuki
Heavy CruisersAshigara Atago Chikuma Choukai Haguro Maya Mogami Myoukou Nachi Takao Tone
BattleshipsRichelieu Hyuuga Ise
Aircraft CarriersAkagi Ark Royal Hiryuu Kaga Shoukaku Souryuu Zuikaku
Light Aircraft CarriersZuihou
Auxiliary ShipsKashima
WDestroyersAyanami Fubuki Fumizuki Hatsuyuki Isonami Kagerou Kikuzuki Kisaragi Kuroshio Mikazuki Miyuki Mochizuki Murakumo Mutsuki Nagatsuki Oyashio Satsuki Shikinami Shiranui Shirayuki
Heavy CruisersAshigara Atago Chikuma Choukai Haguro Maya Mogami Myoukou Nachi Takao Tone
Aircraft CarriersHiryuu Kaga Shoukaku Souryuu
Light Aircraft CarriersZuihou
XDestroyersAkigumo Harusame Hayashimo Kawakaze Kiyoshimo Makigumo Umikaze Yuugumo
Light CruisersIsuzu Jintsuu Kiso Kuma Nagara Naka Natori Ooyodo Sendai Tama Tatsuta Tenryuu Yura
Heavy CruisersAoba Ashigara Atago Chikuma Choukai Furutaka Haguro Kako Kinugasa Kumano Maya Mikuma Mogami Myoukou Nachi Suzuya Takao Tone
BattleshipsBismarck Haruna Hiei Iowa Kirishima Kongou Richelieu Fusou Hyuuga Ise Mutsu Nagato Yamashiro
Aircraft CarriersAkagi Ark Royal Graf Zeppelin Hiryuu Kaga Saratoga Shoukaku Souryuu Zuikaku
Light Aircraft CarriersZuihou
Seaplane TendersChitose Chiyoda


Event Completion Lines

Upon completing the event, dialogue from Musashi, Shoukaku, and Zuikaku plays regarding their success at the Leyte Gulf. Tsukiyomi Ver. 2 (月夜海ニ番) also plays before Zuikaku's final line, which serves as the closing line.

Event Completion Lines

Ship Audio Japanese English Notes
Musashi Play 相棒よ、終わったぞ。我が連合艦隊、第一遊撃部隊、そう、栗田艦隊は、敵艦隊を撃滅したぞ!うおおおぉ! It's over, partner. Our Combined Fleet, the 1st Striking Force, yes, the Kurita Fleet, has annihilated the enemy fleet! Yeeeeeaaaaaaah!
Zuikaku Play 捷一号作戦、作戦成功!やった!やったよ私たち! Operation Sho-1 is completed! We did it! We did it, everyone!
Shoukaku Play 瑞鶴、提督、お疲れ様でした。私もずっと一緒に… Zuikaku, Admiral, good work. I'll always be with you...
Musashi Play そうだな、今はゆっくり眠りたい。相棒よ、少しそばにいてくれ。はぁ〜これでゆっくり眠れそうだ。ありが…とう… Right, now I can finally get some rest. Stay by me for a bit, partner. Sigh. Now I can rest. Thank... you...
Zuikaku Play 提督さん、翔鶴姉、ありがとう。愛してる、ずっと。 Admiral, Shoukaku, thank you. I'll love you, always. This line plays separately from the others, after Tsukioymi Ver. 2 has finished.

Tsukiyomi Ver. 2 Lyrics

The second part is nearly but not quite identical to the original Tsukiyomi.

Audio Japanese Romaji English
Play

もし今 明かりが消え、向かい風に沈んでも。
見上げた月の空、幾星霜輝いて。

この夜も、この星も、きっと巡りゆく。
あの冬の夜、私そう願ってた。
だけど全ては 消えてゆくのね。
それでも、月はそこにあるの。そうよ。

あなたと歩んだ季節いつでも胸で光ってる。
走ったね、転んだね、一緒にね、恋のように叫んだね。

私たち心の桜まだ見ぬ春芽吹くから。
笑ったね、泣いたよね、君がいた色々な奇跡。

あなたと目指した優しい未来きっと信じてる。
宵の中、夏の夜、
時が満ち 全て消えてゆく前に。
夜風散る 花の中で あなたと月を見上げてる。
笑ったね 泣いたよね 大切な大切な記憶。
忘れない 忘れない ずっと。

Moshi ima akari ga kie, mukaikaze ni shizun demo,
miageta tsuki no sora, ikuseisou kagayaite.

"Kono yoru mo, kono hoshi mo, kitto meguri yuku."
Ano fuyu no yoru watashi sou negatteta.
Dakedo subete wa, kiete yuku no ne.
Soredemo, tsuki wa soko ni aru no. Sou yo.

Anata to ayunda kisetsu itsu demo mune de hikatteru.
Hashitta ne, koronda ne, issho ni ne, koi no you ni sakenda ne.

Watashitachi kokoro no sakura mada minu haru mebuku kara.
Waratta ne, naita yo ne, kimi ga ita, iroiro na kiseki.

Anata to mezashita yasashii mirai kitto shinjiteru.
Yoi no uchi, natsu no yoru,
toki ga michi subete kieyuku mae ni,
yokaze chiru hana no naka de anata to tsuki o miageteru.
Waratta ne, naita yo ne, taisetsuna taisetsuna kioku.
Wasurenai, wasurenai, zutto.

Even if the light fades and we succumb to the headwinds,
the moonlit sky we admired will shine on and on.

"This night, this world, they'll keep spinning."
That's what I wished for that winter night.
But all things fade away, don't they?
Even so, the moon will be there. That's right.

The seasons I walked with you still glow in my heart.
We ran, we fell, we called out together as if in love, didn't we?

There are still unseen springs for the cherry blossoms in our hearts to bloom in.
We laughed, we cried - there were so many miracles with you there.

I'll always believe in the gentle future I aimed for with you.
In the early evenings, in the summer nights,
before the time comes and everything fades away,
as the night wind scatters the petals around us, I'll admire the moon with you.
We laughed, we cried - so many precious memories.
I'll never, ever forget them.