- Welcome to the Kancolle Wiki!
- If you have any questions regarding site content, account registration, etc., please visit the KanColle Wiki Discord
Difference between revisions of "Land-Based Air Squadron"
(removing duplicate images that were commented out for some reason) |
ArashiTaigei (talk | contribs) (Updated and got rid of the "Spring E-5 etc. etc. will attack" and also revised some info to more of a general term in some stuff that said "Spring event") |
||
| Line 1: | Line 1: | ||
| − | '''{{PAGENAME}}''' is a mechanic introduced with the [[Game Updates/2016/May 3|May 3, 2016 update]] that also started the [[Spring 2016 Event]]. | + | '''{{PAGENAME}}''' is a mechanic introduced with the [[Game Updates/2016/May 3|May 3, 2016 update]] that also started the [[Spring 2016 Event]]. It is also reintroduced in [[Summer 2016 Event]] |
==Outline== | ==Outline== | ||
| Line 17: | Line 17: | ||
When an equipped plane is removed, the removed plane will be temporarily marked "transferring" ({{lang|ja|配置転換中}}) and will not be able to be equipped during this time. | When an equipped plane is removed, the removed plane will be temporarily marked "transferring" ({{lang|ja|配置転換中}}) and will not be able to be equipped during this time. | ||
| − | Clearing [[Spring 2016 Event#E-4|E-4]] and [[Spring 2016 Event#E-5|E-5]] of the Spring Event increases the number of squadrons that can be utilized. | + | Clearing certain maps such as [[Spring 2016 Event#E-4|E-4]] and [[Spring 2016 Event#E-5|E-5]] of the Spring Event increases the number of squadrons that can be utilized. |
Each plane has its own ''equip cost'' (in bauxite) that is immediately deducted when ''it is equipped''; thus, rapid change of equipment will drain your bauxite quickly. The equip cost for the slot is calculated this way: [math]\text{Equip Cost of Slot} = \text{# of planes allowed in slot(4 or 12, depending on what kind)} \times \text{Equip Cost of Plane}[/math] | Each plane has its own ''equip cost'' (in bauxite) that is immediately deducted when ''it is equipped''; thus, rapid change of equipment will drain your bauxite quickly. The equip cost for the slot is calculated this way: [math]\text{Equip Cost of Slot} = \text{# of planes allowed in slot(4 or 12, depending on what kind)} \times \text{Equip Cost of Plane}[/math] | ||
| Line 635: | Line 635: | ||
|- | |- | ||
|Air Defense [[File:LBAS Air Defense.PNG]] | |Air Defense [[File:LBAS Air Defense.PNG]] | ||
| − | |During certain maps (such as [[Spring 2016 Event#E-5|E-5]] and [[Spring 2016 Event#E-7|E-7]] of the Spring 2016 Event), the enemy can perform air raids against the player's airfield, inflicting damage to planes and resources. This action orders the squadron to perform air defense in order to reduce the damage inflicted to planes and resources. | + | |During certain maps (such as [[Spring 2016 Event#E-5|E-5]] and [[Spring 2016 Event#E-7|E-7]] of the Spring 2016 Event), the enemy can perform air raids against the player's airfield, inflicting damage to planes and resources. This action orders the squadron to perform air defense in order to reduce the damage inflicted to planes and resources. In the [[Summer 2016 Event]], the enemy raid will occur in all of the maps that use land base squadron |
|- | |- | ||
|Take Cover [[File:LBAS Take Cover.PNG]] | |Take Cover [[File:LBAS Take Cover.PNG]] | ||
| Line 687: | Line 687: | ||
===Air Raids=== | ===Air Raids=== | ||
| − | In | + | In nodes where you can use land base air squadron, you will receive air raids from the enemy that can attack and damage your planes. |
[[File:Air Raid.jpg|200px|left|thumb|A battle will look like this]] | [[File:Air Raid.jpg|200px|left|thumb|A battle will look like this]] | ||
| Line 700: | Line 700: | ||
File:Successfully Defended (Orange Message).jpg|Indicating that only minor damages were incurred | File:Successfully Defended (Orange Message).jpg|Indicating that only minor damages were incurred | ||
File:Air Raid Planes Damaged.jpg|Indicating that some part of your land base is damaged | File:Air Raid Planes Damaged.jpg|Indicating that some part of your land base is damaged | ||
| − | File:Landbase Gray Message.jpg|You successfully defended against the enemy raid. Only can happen when your land base take ZERO damage. (This was tested with double air defense) | + | File:Landbase Gray Message.jpg|You successfully defended against the enemy raid. Only can happen when your land base take ZERO damage. (This was tested with double air defense and wouldn't be recommended to try when clearing the boss. Especially if it's an installation type) |
</gallery> | </gallery> | ||
Revision as of 22:10, 26 August 2016
Land-Based Air Squadron is a mechanic introduced with the May 3, 2016 update that also started the Spring 2016 Event. It is also reintroduced in Summer 2016 Event
Outline
This mechanic allows aerial support to be launched from allied air bases. The attack will occur prior to the fleet's attack (after detection and before the fleet does its aerial combat phase).
Usable Plane Classes
- Land Attackers
- Interceptors
- Carrier-based Fighters

- Carrier-based Bombers
 /
/
- Seaplane Bombers & Fighters

- Carrier-based Recon Planes, Recon Seaplanes & Flying Boat
 //
//
How to Use
Each Squadron consists of 4 flights. Each flight can be equipped with a different plane, and the amount differs depending on the type of plane it is: 4 for planes in class 6 above and 12 for all others.
When an equipped plane is removed, the removed plane will be temporarily marked "transferring" (配置転換中) and will not be able to be equipped during this time.
Clearing certain maps such as E-4 and E-5 of the Spring Event increases the number of squadrons that can be utilized.
Each plane has its own equip cost (in bauxite) that is immediately deducted when it is equipped; thus, rapid change of equipment will drain your bauxite quickly. The equip cost for the slot is calculated this way: [math]\text{Equip Cost of Slot} = \text{# of planes allowed in slot(4 or 12, depending on what kind)} \times \text{Equip Cost of Plane}[/math]
As of May 5th, your airfields can be attacked by enemy planes. If your airfield gets heavily damaged too often, your planes will be fatigued faster and increase costs of airfield supports. To avoid this, use the air defense option outlined below.
Tables of Usage Costs
Carrier-Based Fighters
| Carrier-Based Fighters | |||||
|---|---|---|---|---|---|
| Equip Dex Number |
Name of Plane | Statistics | Combat Radius | Equip Cost | |
| per plane | per slot | ||||
| 19 | Type 96 Fighter | 3 | 3 | 36 | |
| 20 | Zero Fighter Type 21 | 7 | 4 | 48 | |
| 21 | Zero Fighter Type 52 | 6 | 5 | 60 | |
| 22 | Reppuu | 5 | 7 | 84 | |
| 53 | Reppuu Kai | 5 | 8 | 96 | |
| 55 | Shiden Kai 2 | 3 | 6 | 72 | |
| 56 | Shinden Kai | 2 | 9 | 108 | |
| 96 | Zero Fighter Type 21 (Skilled) | 7 | 4 | 48 | |
| 109 | Zero Fighter Type 52 Model C (601 Air Group) | 6 | 5 | 60 | |
| 110 | Reppuu (601 Air Group) | 5 | 7 | 84 | |
| 152 | Zero Fighter Type 52 (Skilled) | 6 | 5 | 60 | |
| 153 | Zero Fighter Type 52 Model C (Iwai Squadron) | 6 | 5 | 60 | |
| 155 | Zero Fighter Type 21 (Iwamoto Squadron) | 7 | 4 | 48 | |
| 156 | Zero Fighter Type 52 Model A (Iwamoto Squadron) | 6 | 5 | 60 | |
| 157 | Zero Fighter Type 53 (Iwamoto Squadron) | 6 | 6 | 72 | |
| 158 | Bf109 T Kai | 2 | 6 | 72 | |
| 159 | Fw190 T Kai | 3 | 6 | 72 | |
| 184 | Re. 2001 OR Kai | 4 | |||
Carrier-Based Bombers
| Dive Bombers | |||||
|---|---|---|---|---|---|
| Equip Dex Number |
Name of Plane | Statistics | Combat Radius | Equip Cost | |
| per plane | per slot | ||||
| 23 | Type 99 Dive Bomber | 6 | 4 | 48 | |
| 24 | Suisei | 4 | 5 | 60 | |
| 57 | Suisei Model 12A | 5 | 6 | 72 | |
| 60 | Zero Fighter Type 62 (Fighter-bomber) | 4 | 5 | 60 | |
| 64 | Ju 87C Kai | 4 | 6 | 72 | |
| 97 | Type 99 Dive Bomber (Skilled) | 4 | 4 | 48 | |
| 99 | Type 99 Dive Bomber (Egusa Squadron) | 4 | 4 | 48 | |
| 100 | Suisei (Egusa Squadron) | 5 | 5 | 60 | |
| 111 | Suisei (601 Air Group) | 5 | 5 | 60 | |
| 148 | Prototype Nanzan | 5 | 9 | 108 | |
| 154 | Zero Fighter Type 62 (Fighter-bomber/Iwai Squadron) | 5 | 5 | 60 | |
| Torpedo Bombers | |||||
|---|---|---|---|---|---|
| Equip Dex Number |
Name of Plane | Statistics | Combat Radius | Equip Cost | |
| per plane | per slot | ||||
| 16 | Type 97 Torpedo Bomber | 4 | 5 | 60 | |
| 17 | Tenzan | 5 | 6 | 72 | |
| 18 | Ryuusei | 6 | 7 | 84 | |
| 52 | Ryuusei Kai | 6 | 8 | 96 | |
| 82 | Type 97 Torpedo Bomber (931 Air Group) | 4 | 5 | 60 | |
| 83 | Tenzan (931 Air Group) | 5 | 6 | 72 | |
| 93 | Type 97 Torpedo Bomber (Tomonaga Squadron) | 4 | 5 | 60 | |
| 94 | Tenzan Model 12 (Tomonaga Squadron) | 5 | 6 | 72 | |
| 98 | Type 97 Torpedo Bomber (Skilled) | 4 | 5 | 60 | |
| 112 | Tenzan (601 Air Group) | 5 | 6 | 72 | |
| 113 | Ryuusei (601 Air Group) | 6 | 7 | 84 | |
| 143 | Type 97 Torpedo Bomber (Murata Squadron) | 4 | 5 | 60 | |
| 144 | Tenzan Model 12 (Murata Squadron) | 5 | 6 | 72 | |
Seaplane Bombers & Fighters
| Seaplane Bombers | |||||
|---|---|---|---|---|---|
| Equip Dex Number |
Name of Plane | Statistics | Combat Radius | Equip Cost | |
| per plane | per slot | ||||
| 26 | Zuiun | 5 | 6 | 72 | |
| 62 | Prototype Seiran | 4 | 10 | 120 | |
| 79 | Zuiun (634 Air Group) | 5 | 6 | 72 | |
| 80 | Zuiun Model 12 | 5 | 7 | 84 | |
| 81 | Zuiun Model 12 (634 Air Group) | 5 | 7 | 84 | |
| Seaplane Fighters | |||||
|---|---|---|---|---|---|
| Equip Dex Number |
Name of Plane | Statistics | Combat Radius | Equip Cost | |
| per plane | per slot | ||||
| 164 | Ro.44 Seaplane Fighter | 3 | 4 | 48 | |
| 165 | Type 2 Seaplane Fighter Kai | 4 | 5 | 60 | |
Land Attackers & Interceptors
| Land Attackers | |||||
|---|---|---|---|---|---|
| Equip Dex Number |
Name of Plane | Statistics | Combat Radius | Equip Cost | |
| per plane | per slot | ||||
| 168 | Type 96 Land Attacker | 8 | 10 | 120 | |
| 169 | Type 1 Land Attacker | 9 | 12 | 144 | |
| 170 | Type 1 Land Attacker (Nonaka Squadron) | 9 | 12 | 144 | |
| Interceptors | |||||
|---|---|---|---|---|---|
| Equip Dex Number |
Name of Plane | Statistics | Combat Radius | Equip Cost | |
| per plane | per slot | ||||
| 175 | Raiden | 2 | 6 | 72 | |
| 176 | Type 3 Fighter Hien | 3 | 7 | 84 | |
| 177 | Type 3 Fighter Hien (244th Air Combat Group) | 4 | 7 | 84 | |
Recon Seaplanes, Carrier-based Recon Planes, & Flying Boats
| Recon Seaplanes | |||||
|---|---|---|---|---|---|
| Equip Dex Number |
Name of Plane | Statistics | Combat Radius | Equip Cost | |
| per plane | per slot | ||||
| 25 | Type 0 Recon Seaplane | 7 | 5 | 20 | |
| 59 | Type 0 Observation Seaplane | 3 | 6 | 24 | |
| 102 | Type 98 Recon Seaplane (Night Scout) | 6 | 8 | 32 | |
| 115 | Ar196 Kai | 3 | 5 | 20 | |
| 118 | Shiun | 4 | 9 | 36 | |
| 163 | Ro.43 Recon Seaplane | 3 | 4 | 16 | |
| Carrier-Based Recon Planes | |||||
|---|---|---|---|---|---|
| Equip Dex Number |
Name of Plane | Statistics | Combat Radius | Equip Cost | |
| per plane | per slot | ||||
| 54 | Saiun | 8 | 9 | 36 | |
| 61 | Type 2 Recon Aircraft | 5 | 6 | 24 | |
| 151 | Prototype Keiun | 8 | 12 | 48 | |
| Flying Boats | |||||
|---|---|---|---|---|---|
| Equip Dex Number |
Name of Plane | Statistics | Combat Radius | Equip Cost | |
| per plane | per slot | ||||
| 138 | Type 2 Flying Boat | 20 | 25 | 100 | |
| 178 | PBY-5A Catalina | 5 | 6 | 24 | |
Detail of Each Action
There are 5 actions each squadron can take: Standby, Mission, Air Defense, Take Cover, and Rest.
| Action | Effect |
|---|---|
| Standby |
Default state. Use if you wish to sortie without utilizing the squadron. |
| Mission |
As you enter the sortie, for each squadron you chose to send on a mission, you can choose up to 2 nodes that the squadron will perform mission at. You can choose the same node twice for the squadron; if so, the squadron will have two phases to itself. Note that each squadron has a maximum radius in which it can carry out a mission; you will be unable to use the squadron beyond its combat radius. Costs |
| Air Defense |
During certain maps (such as E-5 and E-7 of the Spring 2016 Event), the enemy can perform air raids against the player's airfield, inflicting damage to planes and resources. This action orders the squadron to perform air defense in order to reduce the damage inflicted to planes and resources. In the Summer 2016 Event, the enemy raid will occur in all of the maps that use land base squadron |
| Take Cover |
Orders the planes to scramble to avoid enemy attacks. This, however, renders the base vulnerable. |
| Rest |
Will restore morale at a faster rate. However, the planes will suffer heavier damage if under attack while this action is taken. This also reduces your natural bauxite regeneration rate to 1 per 6 minutes (instead of 1 per 3). |
Equipment Screen


Upon gaining the ability to utilize the Land-Based Air Squadrons, you will gain access to a separate equipment screen (see first image to the right for how to access the screen). Each airfield has 4 equipment slots, and each slot can be equipped with a different plane. You are able to change the lock status of planes in this screen (and this is currently the only way to place locks on land attackers and interceptors).
In the equipment screen, the overview of each equipment lists the following, in order:
- Name of the aircraft
- Expertise level of the aircraft
- Combat Radius of the aircraft
- Specific stats of the plane: Anti-Air
 , Dive Bomb
  , Torpedo
  , and Accuracy
- Lock Status
Equipping a plane to an airfield slot follows the same procedure as equipping a piece of equipment to a kanmusu: click on the slot you wish for the plane to go into, click the plane you wish to equip, and confirm the choice. Note that the usage costs of the plane being equipped is immediately deducted at this time.
Transfer Restriction
There are a few things to keep in mind when equipping the airfields:
- Each time a plane is unequipped from a slot (other than being moved to another slot), the plane goes under transfer restriction (配置転換中) and will not be able to be equipped by anything, including ships (in fact, it will disappear from the equip list as if something else is equipping it), until the restriction expires.
- Each time a plane is unequipped from a slot and another plane isn't replacing it at the same time (this can happen when you drag-and-drop a plane out of a slot), the airfield slot itself goes under transfer restriction and nothing can be equipped to that slot until the restriction expires.
- It takes 20 minutes for the restriction to expire.
- Swapping two planes already equipped in slots will not trigger the restriction. Note that you can only do this with planes equipped to the same airfield.
See the 3rd image to the right for an example of both a slot and a plane under restriction.
Combat Radius
This is a stat that cannot be directly check anywhere except at the equipment screen; it shows how far from the starting point the plane is able to be sent to. The radius of all planes in the specific squadron is taken, and that is how far the full squadron can go on a mission. The mechanic to the combat mechanic has changed since the Summer 2016 Event.
The old formula from Spring 2016 Event followed along this example Example: It takes a Carrier Task Force at least 5 nodes to reach the boss of E-4 of Spring 2016 Event.
- Any squadron with an average Combat Radius of at least 5 can be sent to the boss node, even if the CTF itself takes 6 nodes (since ABCEFK and ABDEFK are both possible routes).
- A squadron with an average Combat Radius of 4 can be sent to the following nodes: A, C, D, E, F, and H. (Node B is not a combat node)
As of now the Summer 2016 Event has updated the combat radius formula to work as follows:
- The combat radius the Squadron must travel is determined by the shortest distance it can take to get from one node to another (from start to the boss node), even if the fleet detours.
- The longest combat radius is determined by the plane's lowest combat radius. (Example: Bringing a 3 Ryuusei which all have the distance of 6 and 1 Type 97 Torpedo Bomber which has the distance of 4 will place the Sqaudron's distance to 4 due to the Type 97 Torpedo Bomber's lower distance.
- Flying boat planes can help assist in increasing the distances the planes can travel from the above mentioned new formula by several a few extra nodes. (3 extra nodes with Type 2 Flying Boat, 2 extra nodes with a PBY-5A Catalina.
Some things to keep in mind:
- For the Spring 2016 Event Since there are multiple starting points depending on the fleet composition, some plane compositions will only work for specific fleet setup. For example, a squadron with an average Combat Radius of 4 can only be used to attack the E-4 boss of Spring 2016 Event if a Surface Task Force is used (as the shortest route to boss from that starting point has a total of 4 nodes).
- For the Summer 2016 Event check to make sure your planes cover the necessary distance since shortest distance plane determines the overall distances.
- For the Summer 2016 Event, if need be, bring flying boats to boost the distance the squadron can travel by 2-3 nodes.
- The combat radius for a named plane is the same as the base plane, except Type 1 Land Attacker (Nonaka Squadron).
Air Raids
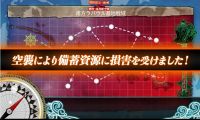
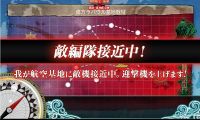
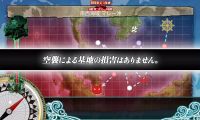
In nodes where you can use land base air squadron, you will receive air raids from the enemy that can attack and damage your planes.

After a battle, you will receive one of three messages depending on how much damage was inflicted by the enemy.
The white message will display when no damage is taken by your base.
The orange message will display when some damage is taken by your base, and slight amount of resources will be lost.
The red message indicates the abyssals have damaged your base. This will result in a loss of resources, plane proficiency, and morale.
Indicating that only minor damages were incurred
Indicating that some part of your land base is damaged
You successfully defended against the enemy raid. Only can happen when your land base take ZERO damage. (This was tested with double air defense and wouldn't be recommended to try when clearing the boss. Especially if it's an installation type)
.jpg)


| |||||||||||||||||||||||||||||||||||||