|
|
| Line 10: |
Line 10: |
| | |-|6-5= | | |-|6-5= |
| | {{:{{BASEPAGENAME}}/6-5}} | | {{:{{BASEPAGENAME}}/6-5}} |
| − | </tabber>
| |
| − | <tabber>
| |
| − | |-| 6-1=
| |
| − | ==World 6-1: 潜水艦作戦 Submarine Operation==
| |
| − | {{LabSortieworld
| |
| − | | map = 6-1 Map.png
| |
| − | | difficulty = ☆ ☆ ☆ ☆ ☆ ☆ ☆ ☆
| |
| − | | item = None
| |
| − | | exp = 380
| |
| − | | code = 潜水艦作戦 (Submarine Operation)
| |
| − | | jptext = 有力な潜水艦隊を編成し、中部海域哨戒線に進出せよ。敵艦隊を発見、これを漸減撃滅せよ!
| |
| − | | entext = Organize a strong submarine fleet and advance a patrol line into the Middle Sea region. Locate enemy fleets and gradually destroy them!
| |
| − | }}
| |
| − |
| |
| − | ===Stage Guide===
| |
| − | {{MapBranchingTable
| |
| − | |title = 6-1 Branching Rules
| |
| − | |expand = true
| |
| − | |id = 6-1
| |
| − |
| |
| − | |0 -> A/empty, B/empty, C=
| |
| − | *Meet '''ANY''' of the following to '''FORCE''' B
| |
| − | **CA(V)+(F)BB(V)+CV(L/B) ≥ 3
| |
| − | **(F)BB(V) ≥ 2
| |
| − | *Meet '''ANY''' of the following to go to A
| |
| − | **Fleet contains SS(V) only
| |
| − | **Fleet contains AS ([[Taigei]]) '''and''' meets '''one''' of the following
| |
| − | ***SS(V) ≥ 3, no other ship types allowed
| |
| − | ***SS(V) = 3 and DD = 2
| |
| − | ***SS(V) = 4 and CL+DD = 1
| |
| − | *Go to B if fleet contains no CL and DDs
| |
| − | *Otherwise, C
| |
| − |
| |
| − | |A/empty -> D = * Fleet does not contains [[Taigei]]
| |
| − |
| |
| − | |A/empty -> F = * [[Taigei]] Is in the fleet
| |
| − |
| |
| − | |G/empty -> H =
| |
| − | * Meet '''ALL''' of the following requirements:
| |
| − | ** Amount of SS(V) ≥ 3
| |
| − | ** Amount of BB(V) + CV(L/B) + CA(V) ≤ 1
| |
| − | ** Pass the LOS check of 16 using the F33(Cn=4) formula
| |
| − | *** Routing becomes random if the LoS is between 12-15.9 using the F33(Cn=4) Formula
| |
| − |
| |
| − | |G/empty -> I =
| |
| − | * Meet '''ANY''' of the following requirements:
| |
| − | ** Fail the LoS check
| |
| − | ** Amount of SS(V) ≤ 2
| |
| − | ** Amount of BB(V) + CV(L) + CA(V) ≥ 2
| |
| − | * If the fleet does not contain [[Taigei]]:
| |
| − | ** 15% chance of off-routing to I regardless of LoS check result
| |
| − |
| |
| − | |H -> E/empty, J, K =
| |
| − | * Always node E if LOS is ≤ 20 using the F33(Cn=4) Formula
| |
| − | * If the fleet contains [[Taigei]]:
| |
| − | ** Always node K if LOS is ≥ 25 using the F33(Cn=4) Formula
| |
| − | ** Random between E and K if LOS is between 20-24.9 using the F33(Cn=4) Formula
| |
| − | * If the fleet does not contain [[Taigei]]:
| |
| − | ** Always node K if LOS is ≥ 36 using the F33(Cn=4) formula
| |
| − | ** Random between J and K if LOS is between 25-35.9 using the F33(Cn=4) Formula
| |
| − | ** Random between E, J and K if LOS is between 20-24.9 using the F33(Cn=4) Formula
| |
| − |
| |
| − | }}
| |
| − | {{AirControlSystem
| |
| − | | Map = 6-1
| |
| − | | AS = 126
| |
| − | | Notes = 540/270/120 FP for AS+/AS/AP at I node.
| |
| − | }}
| |
| − |
| |
| − | ===Tips===
| |
| − | *At least 3 SS are required to reach the boss.
| |
| − | *There are LoS checks G-H and H-K. They do not have high LoS requirements (SSVs with a couple recon planes will pass), but an all-sub fleet without recon planes will be sent to I.
| |
| − | <br/>'''Recommended Fleet'''
| |
| − | *'''CLT + CL + CV + 3 SS(V)''' routes '''CFGHK'''
| |
| − | **Effective fleet for taking out the boss but it will have to go through node C where there's a Ru-class Flagship.
| |
| − | **CV may or may not wish to equip SCAMP, as it allows the CV to act first. Try to use armored CV so that it can attack even in chuuha.
| |
| − | **Saiun is probably not a good idea for clearing purposes (you want to minimize damage taken along the route). Only consider that if you're using this fleet for the monthly quest (3 S Victory at 6-1 boss).
| |
| − | *'''An all-sub fleet''' routes '''ADFGHK'''
| |
| − | **Allows the fleet to completely ignore any enemy ships that can't attack subs, however node D is pretty harsh on subs with late-model DDs and flagship CLs.
| |
| − | **You pretty much want to count on cut-in attacks (at boss), so only use remodeled subs if you're using this composition. Note that you need recon planes for this map, and as SS(V) only have 2 slots, you may want to just give both planes to the same girl. You will want as many submarines that are actually combat capable for this route, meaning that you really need I-401 and/or U-511 (Ro-500).
| |
| − | ***For those who obtained both during the Spring 2017 event, the kai versions of I-13 & I-14 have 3 equipment slots. You can equip a recon plane in their first slot, leaving 2 slots available for torpedo equipment (and torpedo cut-ins).
| |
| − | *'''Taigei + 2 DD + 3 SS(V), Taigei + 1 CL + 4 SS(V)''' routes '''AFGHK'''
| |
| − | **The shortest route in terms of number of battles. Taigei can also equip recon planes to free up slots for your SS(V)s.
| |
| − | **The trade off is that any enemy ship still in lightly damage or better shape at the end of shelling phase will have fewer targets to launch their torpedoes at. Taigei (and escorts if any) also has to tank all the preboss ships that can't perform ASW i.e. the Wa-class Transport Elite, and far more dangerously, the Flag and/or Elite Ri-Class CA
| |
| − | **She'll also be targeted by closing torpedoes, which now have much fewer targets than normal. However, most of the formation pre-boss is echelon or diamond so the chance of getting hit by torpedoes is small.
| |
| − | *<u>Pattern 1 on node I has a chance to drop I-401 with S Victory</u>. If you want to farm her there, '''1 BB 3 CLT 1 CL 1 CV or 1 CL 3 CLT 2 CV both guarantee CFGI''' and are good enough to get S Rank.
| |
| − |
| |
| − | ===Nodes And Enemy Encounters===
| |
| − | {{#invoke:EnemyEncounters2|encounterTemplate
| |
| − | |A_label = '''<span style="color:blue">Battle Avoided</span>'''
| |
| − | |A-1_node_info = "Must be my imagination" (battle avoided)
| |
| − | |
| |
| − | |B_label = '''<span style="color:blue">Battle Avoided</span>'''
| |
| − | |B-1_node_info = "Must be my imagination" (battle avoided)
| |
| − | |
| |
| − | |C_label = 中部海域 敵遊撃部隊
| |
| − | |C-1_node_info = bb_ru-class_flagship cvl_nu-class_flagship ca_ri-class_flagship cl_tsu-class dd_ro-class_late_model dd_ro-class_late_model
| |
| − | |C-1_form = line_ahead double_line
| |
| − | |C-1_xp =
| |
| − | |C-1_enemy_air_power = 23
| |
| − | |C-2_node_info = bb_ru-class_flagship cvl_nu-class_flagship ca_ri-class_elite cl_tsu-class dd_i-class_late_model dd_i-class_late_model
| |
| − | |C-2_form = double_line
| |
| − | |C-2_xp =
| |
| − | |C-2_enemy_air_power = 23
| |
| − | |
| |
| − | |D_label = 中部海域哨戒戦 D地点
| |
| − | |D-1_node_info = cl_ho-class_flagship dd_ha-class_elite dd_ha-class_elite dd_i-class_late_model dd_i-class_late_model
| |
| − | |D-1_form = echelon diamond line_ahead
| |
| − | |D-1_xp =
| |
| − | |D-1_enemy_air_power =
| |
| − | |
| |
| − | |E_label = '''<span style="color:blue">Battle Avoided</span>'''
| |
| − | |E-1_node_info = "Must be my imagination" (battle avoided)
| |
| − | |
| |
| − | |F_label = 中部海域哨戒戦 F地点
| |
| − | |F-1_node_info = cl_he-class_flagship dd_ni-class_elite dd_ni-class_elite dd_i-class_late_model dd_i-class_late_model
| |
| − | |F-1_form = double_line
| |
| − | |F-1_xp =
| |
| − | |F-1_enemy_air_power =
| |
| − | |F-2_node_info = cl_he-class_flagship dd_ha-class_elite dd_ha-class_elite dd_i-class_late_model dd_i-class_late_model
| |
| − | |F-2_form = double_line
| |
| − | |F-2_xp =
| |
| − | |F-2_enemy_air_power =
| |
| − | |F-3_node_info = cl_he-class_flagship transport_wa-class_elite transport_wa-class_elite dd_i-class_late_model dd_i-class_late_model
| |
| − | |F-3_form = diamond
| |
| − | |F-3_xp =
| |
| − | |F-3_enemy_air_power =
| |
| − | |F-4_node_info = cl_he-class_flagship cl_to-class_elite dd_ni-class_elite dd_ni-class_elite dd_i-class_late_model dd_i-class_late_model
| |
| − | |F-4_form = double_line
| |
| − | |F-4_xp =
| |
| − | |F-4_enemy_air_power =
| |
| − | |
| |
| − | |G_label = '''<span style="color:blue">Battle Avoided</span>'''
| |
| − | |G-1_node_info = "Must be my imagination" (battle avoided)
| |
| − | |
| |
| − | |H_label = 中部海域哨戒戦 H地点
| |
| − | |H-1_node_info = ca_ri-class_flagship dd_ha-class_elite dd_ha-class_elite cl_tsu-class dd_ro-class_late_model dd_ro-class_late_model
| |
| − | |H-1_form = diamond
| |
| − | |H-1_xp =
| |
| − | |H-1_enemy_air_power =
| |
| − | |H-2_node_info = ca_ri-class_flagship cl_he-class_flagship dd_ha-class_elite dd_ha-class_elite dd_ro-class_late_model dd_ro-class_late_model
| |
| − | |H-2_form = echelon
| |
| − | |H-2_xp =
| |
| − | |H-2_enemy_air_power =
| |
| − | |H-3_node_info = ca_ri-class_flagship ca_ri-class_elite clt_chi-class_elite cl_tsu-class dd_i-class_late_model dd_i-class_late_model
| |
| − | |H-3_form = double_line
| |
| − | |H-3_xp =
| |
| − | |H-3_enemy_air_power =
| |
| − | |
| |
| − | |I_label = 敵機動部隊
| |
| − | |I-1_node_info = cv_wo-class_flagship_2 cv_wo-class_flagship_2 ca_ri-class_flagship cl_tsu-class dd_ro-class_late_model dd_ro-class_late_model
| |
| − | |I-1_form = diamond
| |
| − | |I-1_xp =
| |
| − | |I-1_enemy_air_power = 168
| |
| − | |I-2_node_info = aircraft_carrier_demon cv_wo-class_flagship_2 ca_ri-class_flagship cl_tsu-class dd_ro-class_late_model dd_ro-class_late_model
| |
| − | |I-2_form = diamond
| |
| − | |I-2_xp =
| |
| − | |I-2_enemy_air_power = 180
| |
| − | |I-3_node_info = aircraft_carrier_demon ca_ri-class_flagship ca_ri-class_flagship cl_tsu-class dd_ro-class_late_model dd_ro-class_late_model
| |
| − | |I-3_form = diamond
| |
| − | |I-3_xp =
| |
| − | |I-3_enemy_air_power = 96
| |
| − | |
| |
| − | |J_label = 中部海域 敵輸送船団
| |
| − | |J-1_node_info = transport_wa-class_flagship transport_wa-class_flagship cl_he-class_flagship cl_he-class_flagship dd_ha-class_late_model dd_ha-class_late_model
| |
| − | |J-1_form = double_line diamond line_ahead
| |
| − | |J-1_xp =
| |
| − | |J-1_enemy_air_power =
| |
| − | |J-2_node_info = transport_wa-class_flagship transport_wa-class_flagship cl_he-class_flagship cl_tsu-class_elite dd_ha-class_late_model dd_ha-class_late_model
| |
| − | |J-2_form = diamond line_ahead
| |
| − | |J-2_xp =
| |
| − | |J-2_enemy_air_power =
| |
| − | |
| |
| − | |K_label = 敵回航中空母
| |
| − | |K-1_node_info = cv_wo-class_flagship_2 ca_ri-class_flagship cl_tsu-class_elite cl_tsu-class_elite dd_ni-class_late_model dd_ni-class_late_model
| |
| − | |K-1_form = double_line diamond
| |
| − | |K-1_xp =
| |
| − | |K-1_enemy_air_power = 84
| |
| − | |K-2_node_info = cv_wo-class_flagship_2 ca_ri-class_flagship cl_he-class_flagship cl_tsu-class_elite dd_ha-class_late_model dd_ha-class_late_model
| |
| − | |K-2_form = diamond
| |
| − | |K-2_xp =
| |
| − | |K-2_enemy_air_power = 84
| |
| − | |
| |
| − | |final_form =
| |
| − | |boss_node = K
| |
| − | }}
| |
| − |
| |
| − | ===Drops===
| |
| − | <div class="mw-customtoggle-6-1-drop globalbutton">Show/Hide Drops</div>
| |
| − | {| class="mw-collapsible mw-collapsed wikitable" id="mw-customcollapsible-6-1-drop"
| |
| − | !Node
| |
| − | !Destroyers
| |
| − | !Light Cruisers
| |
| − | !Heavy Cruisers
| |
| − | !Seaplane Tender
| |
| − | !Aircraft Carrier
| |
| − | !Battleship
| |
| − | !Submarine
| |
| − | !Others
| |
| − | |-
| |
| − | |A
| |
| − | |
| |
| − | |
| |
| − | |
| |
| − | |
| |
| − | |[[Shouhou]]
| |
| − | |
| |
| − | |
| |
| − | |
| |
| − | |-
| |
| − | |B
| |
| − | |[[Ayanami]], [[Shikinami]], [[Mutsuki]], [[Kisaragi]], [[Satsuki]], [[Fumizuki]], [[Nagatsuki]], [[Kikuzuki]], [[Mikazuki]], [[Mochizuki]], [[Oboro]], [[Akebono]], [[Sazanami]], [[Ushio]], [[Samidare]], [[Suzukaze]]
| |
| − | |[[Kiso]], [[Nagara]], [[Isuzu]], [[Natori]], [[Yura]], [[Jintsuu]], [[Naka]], [[Kinu]]
| |
| − | |[[Furutaka]], [[Kako]], [[Ashigara]], [[Haguro]], [[Choukai]], [[Maya]]
| |
| − | |
| |
| − | |[[Hiyou]], [[Junyou]]
| |
| − | |
| |
| − | |[[I-168|'''<span style="color:red">I-168</span>''']]
| |
| − | |
| |
| − | |-
| |
| − | |C
| |
| − | |[[Ayanami]], [[Shikinami]], [[Mutsuki]], [[Kisaragi]], [[Satsuki]], [[Fumizuki]], [[Nagatsuki]], [[Kikuzuki]], [[Mikazuki]], [[Mochizuki]], [[Oboro]], [[Akebono]], [[Sazanami]], [[Ushio]], [[Samidare]], [[Suzukaze]]
| |
| − | |[[Kiso]], [[Nagara]], [[Natori]], [[Yura]], [[Jintsuu]], [[Naka]]
| |
| − | |[[Furutaka]], [[Kako]], [[Ashigara]], [[Haguro]], [[Choukai]], [[Maya]], [[Nachi]], [[Aoba]]
| |
| − | |
| |
| − | |[[Hiyou]], [[Junyou]], [[Shouhou]], [[Ryuujou]]
| |
| − | |[[Kirishima]]
| |
| − | |[[I-19|'''<span style="color:red">I-19</span>''']], [[I-168|'''<span style="color:red">I-168</span>''']]
| |
| − | |
| |
| − | |-
| |
| − | |D
| |
| − | |[[Ayanami]], [[Shikinami]], [[Kisaragi]], [[Satsuki]], [[Fumizuki]], [[Nagatsuki]], [[Kikuzuki]], [[Mikazuki]], [[Mochizuki]], [[Oboro]], [[Akebono]], [[Sazanami]], [[Ushio]], [[Samidare]], [[Suzukaze]]
| |
| − | |[[Kiso]], [[Nagara]], [[Isuzu]], [[Natori]], [[Yura]], [[Jintsuu]], [[Naka]], [[Sendai]]
| |
| − | |[[Furutaka]], [[Kako]], [[Ashigara]], [[Haguro]], [[Choukai]], [[Maya]], [[Nachi]], [[Aoba]], [[Mogami]], [[Myoukou]], [[Takao]], [[Atago]], [[Chikuma]], [[Kumano]]
| |
| − | |
| |
| − | |[[Hiyou]], [[Junyou]], [[Shouhou]], [[Ryuujou]]
| |
| − | |[[Kongou]]
| |
| − | |[[I-19|'''<span style="color:red">I-19</span>''']], [[I-168|'''<span style="color:red">I-168</span>''']]
| |
| − | |
| |
| − | |-
| |
| − | |G
| |
| − | |
| |
| − | |
| |
| − | |
| |
| − | |
| |
| − | |
| |
| − | |
| |
| − | |
| |
| − | |
| |
| − | |-
| |
| − | |H
| |
| − | |[[Ayanami]], [[Kisaragi]], [[Fumizuki]], [[Nagatsuki]], [[Kikuzuki]], [[Mikazuki]], [[Mochizuki]], [[Oboro]], [[Akebono]], [[Sazanami]], [[Ushio]], [[Samidare]]
| |
| − | |[[Kiso]], [[Isuzu]], [[Yura]], [[Naka]]
| |
| − | |[[Kako]], [[Ashigara]], [[Haguro]], [[Maya]], [[Nachi]], [[Aoba]], [[Mogami]], [[Myoukou]]
| |
| − | |
| |
| − | |[[Hiyou]], [[Shouhou]]
| |
| − | |[[Hiei]], [[Kongou]]
| |
| − | |[[I-19|'''<span style="color:red">I-19</span>''']], [[I-168|'''<span style="color:red">I-168</span>''']], [[I-58|'''<span style="color:red">I-58</span>''']], [[I-401|'''<span style="color:red">I-401</span>''']], [[Maruyu|'''<span style="color:red">Maruyu</span>''']]
| |
| − | |
| |
| − | |-
| |
| − | |F
| |
| − | |[[Ayanami]], [[Shikinami]], [[Mutsuki]], [[Kisaragi]], [[Satsuki]], [[Fumizuki]], [[Nagatsuki]], [[Kikuzuki]], [[Mikazuki]], [[Mochizuki]], [[Oboro]], [[Akebono]], [[Sazanami]], [[Ushio]], [[Samidare]], [[Suzukaze]]
| |
| − | |[[Kiso]], [[Nagara]], [[Isuzu]], [[Natori]], [[Yura]], [[Jintsuu]], [[Naka]], [[Sendai]]
| |
| − | |[[Furutaka]], [[Kako]], [[Ashigara]], [[Haguro]], [[Choukai]], [[Maya]], [[Nachi]], [[Aoba]], [[Mogami]], [[Myoukou]], [[Takao]], [[Atago]], [[Chikuma]], [[Tone]]
| |
| − | |
| |
| − | |[[Hiyou]], [[Junyou]], [[Shouhou]], [[Ryuujou]]
| |
| − | |[[Kongou]], [[Hiei]], [[Kirishima]], [[Haruna]]
| |
| − | |[[I-19|'''<span style="color:red">I-19</span>''']], [[I-168|'''<span style="color:red">I-168</span>''']], [[I-58|'''<span style="color:red">I-58</span>''']]
| |
| − | |
| |
| − | |-
| |
| − | |J
| |
| − | |
| |
| − | |
| |
| − | |
| |
| − | |
| |
| − | |
| |
| − | |
| |
| − | |
| |
| − | |
| |
| − | |-
| |
| − | | style="color:red" |'''K'''
| |
| − | |[[Yukikaze|'''<span style="color:red">Yukikaze</span>''']], [[Amatsukaze|'''<span style="color:red">Amatsukaze</span>''']], [[Naganami|'''<span style="color:red">Naganami</span>''']], [[Makigumo|'''<span style="color:red">Makigumo</span>''']]
| |
| − | |[[Yuubari|'''<span style="color:red">Yuubari</span>''']], [[Ooi]], [[Kinu]]
| |
| − | |[[Kinugasa|'''<span style="color:red">Kinugasa</span>''']], [[Kumano|'''<span style="color:red">Kumano</span>''']], [[Takao]], [[Mogami]], [[Suzuya]]
| |
| − | |[[Chiyoda]]
| |
| − | |
| |
| − | [[Hiyou]], [[Souryuu]], [[Ryuujou]], [[Zuihou|'''<span style="color:red">Zuihou</span>''']]'''<span style="color:red">, [[Hiryuu|'''<span style="color:red">Hiryuu</span>''']]'''
| |
| − | |[[Hiei]], [[Ise]], [[Kongou]], [[Kirishima]], [[Yamashiro]], [[Mutsu|'''<span style="color:red">Mutsu</span>''']]'''<span style="color:red">, [[Nagato|'''<span style="color:red">Nagato</span>''']]'''
| |
| − | |[[I-19|'''<span style="color:red">I-19</span>''']], [[I-8|'''<span style="color:red">I-8</span>''']], [[I-168|'''<span style="color:red">I-168</span>''']], [[I-58|'''<span style="color:red">I-58</span>''']], [[Maruyu|'''<span style="color:red">Maruyu</span>''']]
| |
| − | |[[Taigei|'''<span style="color:red">Taigei</span>''']]
| |
| − | |}
| |
| − | |-| 6-2=
| |
| − | ==World 6-2: MS諸島防衛戦 Defense of the MS Archipelago==
| |
| − | {{LabSortieworld
| |
| − | | map = 6-2 Map.png
| |
| − | | difficulty = ☆ ☆ ☆ ☆ ☆ ☆ ☆ ☆ ☆
| |
| − | | item = None
| |
| − | | exp = 420
| |
| − | | code = MS諸島防衛戦 (Defense of the MS Archipelago)
| |
| − | | jptext = MS諸島沖前面に展開し、同諸島方面に接近しつつある敵攻略部隊を捕捉、全力で撃滅せよ!
| |
| − | | entext = Expand to the forward part of the MS Archipelago sea, seize the enemy fleet that is slowly advancing to capture the archipelago, and destroy them with all your might!
| |
| − | }}
| |
| − |
| |
| − | ===Stage Guide===
| |
| − | {{MapBranchingTable
| |
| − | |title = 6-2 Branching Rules
| |
| − | |expand = true
| |
| − | |id = 6-2
| |
| − | |0 -> B, C =
| |
| − | *'''FORCE''' node B if CL+DD ≧ 4
| |
| − | *Meet '''ANY''' of the following to go to C
| |
| − | **BBV ≧ 2
| |
| − | **(F)BB(V)+CV(L/B) ≦ 3
| |
| − | *Go to B if (F)BB(V)+CV(L/B) ≧ 5
| |
| − | *Otherwise, random routing, but the more (F)BB(V) you have in fleet, the more likely you will go to B
| |
| − |
| |
| − | |B -> C, D/storm =
| |
| − | *Go to D if CL+DD ≧ 5
| |
| − | *Meet '''ANY''' of the following to go to C
| |
| − | **Fleet contains slow ship
| |
| − | **Fleet contains (F)BB(V)
| |
| − | **CL+DD ≦ 3
| |
| − | *Otherwise, random routing
| |
| − |
| |
| − | |C -> A/empty, D/storm, E/empty =
| |
| − | *Meet '''ANY''' of the following to '''FORCE''' A
| |
| − | **SS(V) = 6
| |
| − | **(F)BB(V)+CV(L/B)+CA(V) = 6
| |
| − | *Go to D if (F)BB(V)+CV(L/B) ≧ 3
| |
| − | *Otherwise, E
| |
| − |
| |
| − | |D/storm -> F = * Does not meet the requirements to go to H
| |
| − | |D/storm -> H =
| |
| − | *Meet '''ALL''' of the following
| |
| − | **CL+DD ≧ 5
| |
| − | **DD ≧ 3
| |
| − | **No (F)BB(V) and CV(L/B)
| |
| − |
| |
| − | |F -> I = * Fixed route
| |
| − |
| |
| − | |E/empty -> F = *Does not meet the requirements to go to either I or J
| |
| − | |E/empty -> I,J =
| |
| − | *Go to I if fleet contains BB ≤ 1 & CV(L) ≤ 1 & DD ≥ 2, '''and''' [[Line_of_Sight#Equipment_LoS_weighting_modifier|F33(C<sub>n</sub>=3)]] < 43
| |
| − | *Go to J if fleet contains BB ≤ 1 & CV(L) ≤ 1 & DD ≥ 2, '''and''' [[Line_of_Sight#Equipment_LoS_weighting_modifier|F33(C<sub>n</sub>=3)]] > 51
| |
| − | *Random between I and J if fleet contains BB ≤ 1 & CV(L) ≤ 1 & DD ≥ 2, '''and''' [[Line_of_Sight#Equipment_LoS_weighting_modifier|F33(C<sub>n</sub>=3)]] is between 43 and 51
| |
| − |
| |
| − | |H -> G/empty = *Fail the LoS check
| |
| − | |H -> K = * [[Line_of_Sight#Equipment_LoS_weighting_modifier|F33(C<sub>n</sub>=3)]] > 41
| |
| − |
| |
| − | |I -> G/empty, K =
| |
| − | *Go to G if [[Line_of_Sight#Equipment_LoS_weighting_modifier|F33(C<sub>n</sub>=3)]] < 34
| |
| − | *Go to K if [[Line_of_Sight#Equipment_LoS_weighting_modifier|F33(C<sub>n</sub>=3)]] > 41
| |
| − | *Otherwise, random routing
| |
| − | }}
| |
| − |
| |
| − | {|
| |
| − | |- style="vertical-align: top;"
| |
| − | |{{AirControlSystem
| |
| − | | Map =6-2 CEFIK
| |
| − | | AS =252
| |
| − | | Fleet =2 CLT, 2 CA(V), 2CV or 1 CV & 1 BB
| |
| − | | Notes =Requires failing LoS for I but passing LoS for K, a very narrow margin}}
| |
| − | |{{AirControlSystem
| |
| − | | Map =6-2 CEI/JK
| |
| − | | AS =153
| |
| − | | Fleet =1 BB(V), 1 CV, 2DD, 2 CLT/CA(V)
| |
| − | | Notes =Up to ''one'' CV allowed for this route
| |
| − | }}
| |
| − | |}
| |
| − |
| |
| − | ===Tips===
| |
| − | *Requires sinking the flagship at the boss node '''3''' times to deplete the gauge.
| |
| − | *One thing to note for this map is the presence of [[Light Cruiser Tsu-Class]] everywhere, you will probably want bombers in larger slots of CV(L) should you bring them in order not to run into the risk of having them all shot down, rendering your CV(L) unable to attack during shelling.
| |
| − | <br/>'''Recommended Fleet'''
| |
| − | *'''1 BB(V), 1 CV(L), 2 DD, 2 CA(V) / 1 BB(V), 1 CV, 2 DD, 2 CLT''' routes '''C-E-I/J-K'''
| |
| − | **There is a LoS check for E → J (LoS [[Line of Sight#Equipment LoS weighting modifier|F33(C<sub>n</sub>=3)]] > 51 needed for E → J). Using a composition that fails this check will go to I instead. As node I is generally an easier node than J, failing this LoS check is more preferable.
| |
| − | *** LoS [[Line of Sight#Equipment LoS weighting modifier|F33(C<sub>n</sub>=3)]] in range 41-43 guarantees going I and passing the second LoS check.
| |
| − | *'''2 CLT, 2 CA(V), 2 CV / 2 CLT, 2 CA(V), 1 CV, 1 BB''' routes '''C-E-F-I-K'''
| |
| − | **Higher chance to kill the boss, but not as efficient for farming.
| |
| − |
| |
| − | ===Nodes And Enemy Encounters===
| |
| − | {{#invoke:EnemyEncounters2|encounterTemplate
| |
| − | |A_label = '''<span style="color:blue">Battle Avoided</span>'''
| |
| − | |A-1_node_info = "Must be my imagination" (battle avoided)
| |
| − | |
| |
| − | |B_label = 敵攻略支援部隊A群
| |
| − | |B-1_node_info = ca_ri-class_flagship cvl_nu-class_elite cvl_nu-class_elite cl_tsu-class dd_i-class_late_model dd_i-class_late_model
| |
| − | |B-1_form = double_line diamond
| |
| − | |B-1_xp =
| |
| − | |B-1_enemy_air_power = 48
| |
| − | |B-2_node_info = ca_ri-class_flagship cvl_nu-class_elite cl_tsu-class dd_i-class_late_model dd_i-class_late_model dd_i-class_late_model
| |
| − | |B-2_form = double_line
| |
| − | |B-2_xp =
| |
| − | |B-2_enemy_air_power = 24
| |
| − | |
| |
| − | |C_label = 敵攻略支援部隊B群
| |
| − | |C-1_node_info = bb_ru-class_flagship ca_ri-class_elite ca_ri-class_elite cvl_nu-class_elite dd_i-class_late_model dd_i-class_late_model
| |
| − | |C-1_form = double_line
| |
| − | |C-1_xp =
| |
| − | |C-1_enemy_air_power = 24
| |
| − | |C-2_node_info = bb_ru-class_flagship cvl_nu-class_elite ca_ri-class_elite cl_tsu-class dd_i-class_late_model dd_i-class_late_model
| |
| − | |C-2_form = diamond
| |
| − | |C-2_xp =
| |
| − | |C-2_enemy_air_power = 24
| |
| − | |C-3_node_info = cvl_nu-class_flagship cvl_nu-class_flagship bb_ru-class_elite cl_tsu-class dd_i-class_late_model dd_i-class_late_model
| |
| − | |C-3_form = diamond
| |
| − | |C-3_xp =
| |
| − | |C-3_enemy_air_power = 46
| |
| − | |C-4_node_info = cvl_nu-class_flagship bb_ru-class_flagship ca_ri-class_elite cl_tsu-class dd_i-class_late_model dd_i-class_late_model
| |
| − | |C-4_form = diamond
| |
| − | |C-4_xp =
| |
| − | |C-4_enemy_air_power = 23
| |
| − | |
| |
| − | |D_label = '''<span style="color:purple">Maelstrom Node</span>'''
| |
| − | |D-1_node_info = fuel - ?
| |
| − | |
| |
| − | |E_label = '''<span style="color:blue">Battle Avoided</span>'''
| |
| − | |E-1_node_info = "Must be my imagination" (battle avoided)
| |
| − | |
| |
| − | |F_label = 敵空母機動部隊
| |
| − | |F-1_node_info = cv_wo-class_flagship_2 ca_ri-class_flagship cl_tsu-class cl_tsu-class dd_i-class_late_model dd_i-class_late_model
| |
| − | |F-1_form = diamond
| |
| − | |F-1_xp =
| |
| − | |F-1_enemy_air_power = 84
| |
| − | |F-2_node_info = cv_wo-class_flagship_2 cv_wo-class_flagship_2 cl_tsu-class_elite dd_ro-class_late_model dd_i-class_late_model dd_i-class_late_model
| |
| − | |F-2_form = diamond
| |
| − | |F-2_xp =
| |
| − | |F-2_enemy_air_power = 168
| |
| − | |F-3_node_info = cv_wo-class_flagship_2 cl_tsu-class cl_tsu-class dd_i-class_late_model dd_i-class_late_model dd_i-class_late_model
| |
| − | |F-3_form = double_line diamond
| |
| − | |F-3_xp =
| |
| − | |F-3_enemy_air_power = 84
| |
| − | |
| |
| − | |G_label = '''<span style="color:blue">Battle Avoided</span>'''
| |
| − | |G-1_node_info = "Must be my imagination" (battle avoided)
| |
| − | |
| |
| − | |H_label = 敵高速水上打撃部隊
| |
| − | |H-1_node_info = bb_ta-class_flagship ca_ri-class_elite cl_tsu-class_elite dd_ha-class_late_model dd_ro-class_late_model dd_ro-class_late_model
| |
| − | |H-1_form = line_ahead double_line
| |
| − | |H-1_xp =
| |
| − | |H-1_enemy_air_power =
| |
| − | |H-2_node_info = bb_ta-class_flagship ca_ri-class_flagship ca_ri-class_elite cl_tsu-class_elite dd_ha-class_late_model dd_ha-class_late_model
| |
| − | |H-2_form = line_ahead
| |
| − | |H-2_xp =
| |
| − | |H-2_enemy_air_power =
| |
| − | |
| |
| − | |I_label = 敵任務部隊B群
| |
| − | |I-1_node_info = bb_ru-class_flagship bb_ru-class_flagship cvl_nu-class_flagship cl_tsu-class dd_ha-class_late_model dd_ro-class_late_model
| |
| − | |I-1_form = double_line line_ahead
| |
| − | |I-1_xp =
| |
| − | |I-1_enemy_air_power = 23
| |
| − | |I-2_node_info = bb_ru-class_flagship bb_ru-class_flagship cl_tsu-class cl_tsu-class dd_ro-class_late_model dd_ro-class_late_model
| |
| − | |I-2_form = double_line
| |
| − | |I-2_xp =
| |
| − | |I-2_enemy_air_power =
| |
| − | |
| |
| − | |J_label = 敵任務部隊A群
| |
| − | |J-1_node_info = cv_wo-class_flagship_kai bb_ru-class_flagship cl_tsu-class_elite dd_ha-class_late_model dd_ro-class_late_model dd_ro-class_late_model
| |
| − | |J-1_form = diamond
| |
| − | |J-1_xp =
| |
| − | |J-1_enemy_air_power = 102
| |
| − | |J-2_node_info = ca_ri-class_flagship_kai bb_ru-class_flagship cvl_nu-class_elite cl_tsu-class dd_ha-class_late_model dd_ha-class_late_model
| |
| − | |J-2_form = double_line
| |
| − | |J-2_xp =
| |
| − | |J-2_enemy_air_power = 24
| |
| − | |J-3_node_info = bb_ru-class_flagship_kai bb_ru-class_elite bb_ru-class_elite cl_tsu-class_elite dd_ha-class_late_model dd_ha-class_late_model
| |
| − | |J-3_form = line_ahead
| |
| − | |J-3_xp =
| |
| − | |J-3_enemy_air_power =
| |
| − | |
| |
| − | |K_label = 敵攻略部隊本体
| |
| − | |K-1_node_info = transport_wa-class_flagship cv_wo-class_flagship_2 bb_ru-class_flagship_kai cl_tsu-class_elite dd_ni-class_late_model dd_ni-class_late_model
| |
| − | |K-1_form = line_ahead diamond
| |
| − | |K-1_xp =
| |
| − | |K-1_enemy_air_power = 84
| |
| − | |K-2_node_info = transport_wa-class_flagship bb_ru-class_flagship_kai cl_tsu-class_elite cl_tsu-class_elite dd_ni-class_late_model dd_ni-class_late_model
| |
| − | |K-2_form = line_ahead
| |
| − | |K-2_xp =
| |
| − | |K-2_enemy_air_power =
| |
| − | |
| |
| − | |final_form =
| |
| − | |boss_node = K
| |
| − | }}
| |
| − |
| |
| − | ===Drops===
| |
| − | <div class="mw-customtoggle-6-2-drop globalbutton">Show/Hide Drops</div>
| |
| − | {| class="mw-collapsible mw-collapsed wikitable" id="mw-customcollapsible-6-2-drop"
| |
| − | !Node
| |
| − | !Destroyers
| |
| − | !Light Cruisers
| |
| − | !Heavy Cruisers
| |
| − | !Seaplane Tender
| |
| − | !Aircraft Carrier
| |
| − | !Battleship
| |
| − | !Submarine
| |
| − | !Others
| |
| − | |-
| |
| − | |A
| |
| − | |
| |
| − | |
| |
| − | |
| |
| − | |
| |
| − | |
| |
| − | |
| |
| − | |
| |
| − | |
| |
| − | |-
| |
| − | |B
| |
| − | |[[Arashio]], [[Asashio]], [[Fubuki]], [[Kasumi]], [[Murakumo]], [[Nenohi]]
| |
| − | |[[Isuzu]], [[Jintsuu]], [[Kinu|'''<span style="color:red">Kinu</span>''']], [[Naka]], [[Sendai]]
| |
| − | |[[Aoba]], [[Atago]], [[Haguro]], [[Kako]], [[Maya]]
| |
| − | |
| |
| − | |[[Hiyou]], [[Junyou]], [[Shouhou]]
| |
| − | |
| |
| − | |
| |
| − | |
| |
| − | |-
| |
| − | |C
| |
| − | |
| |
| − | |
| |
| − | |
| |
| − | |
| |
| − | |
| |
| − | |
| |
| − | |
| |
| − |
| |
| − | |
| |
| − | |-
| |
| − | |E
| |
| − | |
| |
| − | |[[Naka]]
| |
| − | |[[Mogami]]
| |
| − | |
| |
| − | |
| |
| − | |
| |
| − | |
| |
| − | |
| |
| − | |-
| |
| − | |G
| |
| − | |
| |
| − | |
| |
| − | |
| |
| − | |
| |
| − | |
| |
| − | |
| |
| − | |
| |
| − | |
| |
| − | |-
| |
| − | |H
| |
| − | |[[Hatsuharu]], [[Hatsuyuki]], [[Ooshio]], [[Shirayuki]], [[Yuugumo|'''<span style="color:red">Yuugumo</span>''']]
| |
| − | |[[Isuzu]], [[Jintsuu]], [[Kinu|'''<span style="color:red">Kinu</span>''']], [[Nagara]]
| |
| − | |[[Aoba]], [[Ashigara]], [[Kinugasa|'''<span style="color:red">Kinugasa</span>''']], [[Kumano|'''<span style="color:red">Kumano</span>''']], [[Myoukou]], [[Suzuya|'''<span style="color:red">Suzuya</span>''']], [[Tone]]
| |
| − | |
| |
| − | |[[Junyou]], [[Shouhou]]
| |
| − | |[[Mutsu|'''<span style="color:red">Mutsu</span>''']], [[Yamashiro]]
| |
| − | |
| |
| − | |[[Akashi|'''<span style="color:red">Akashi</span>''']]
| |
| − | |-
| |
| − | |I
| |
| − | |
| |
| − | |[[Kinu|'''<span style="color:red">Kinu</span>''']], [[Sendai]]
| |
| − | |[[Ashigara]], [[Choukai]], [[Kinugasa|'''<span style="color:red">Kinugasa</span>''']], [[Kumano|'''<span style="color:red">Kumano</span>''']], [[Suzuya|'''<span style="color:red">Suzuya</span>''']], [[Takao]]
| |
| − | |
| |
| − | |
| |
| − | |[[Ise]], [[Mutsu|'''<span style="color:red">Mutsu</span>''']]
| |
| − | |
| |
| − | |[[Akashi|'''<span style="color:red">Akashi</span>''']]
| |
| − | |-
| |
| − | |J
| |
| − | |
| |
| − | |
| |
| − | |
| |
| − | |
| |
| − | |
| |
| − | |
| |
| − | |
| |
| − | |
| |
| − | |-
| |
| − | | style="color:red" |'''K'''
| |
| − | |[[Hamakaze|'''<span style="color:red">Hamakaze</span>''']], [[Shimakaze|'''<span style="color:red">Shimakaze</span>''']], [[Yuugumo|'''<span style="color:red">Yuugumo</span>''']], [[Uranami|'''<span style="color:red">Uranami</span>''']]
| |
| − | |[[Sakawa|'''<span style="color:red">Sakawa</span>''']], [[Yahagi|'''<span style="color:red">Yahagi</span>''']], [[Yuubari|'''<span style="color:red">Yuubari</span>''']]
| |
| − | |[[Atago]], [[Kinugasa|'''<span style="color:red">Kinugasa</span>''']], [[Kumano|'''<span style="color:red">Kumano</span>''']], [[Mogami]], [[Myoukou]], [[Suzuya|'''<span style="color:red">Suzuya</span>''']], [[Tone]]
| |
| − | |
| |
| − | |[[Junyou]], [[Ryuujou]], [[Shoukaku|'''<span style="color:red">Shoukaku</span>''']], [[Shouhou]], [[Zuihou]], [[Zuikaku|'''<span style="color:red">Zuikaku</span>''']]
| |
| − | |[[Fusou]], [[Haruna]], [[Hiei]], [[Hyuuga]], [[Ise]], [[Kirishima]], [[Mutsu|'''<span style="color:red">Mutsu</span>''']], [[Nagato|'''<span style="color:red">Nagato</span>''']], [[Yamashiro]]
| |
| − | |[[I-168|'''<span style="color:red">I-168</span>''']], [[I-19|'''<span style="color:red">I-19</span>''']], [[Maruyu|'''<span style="color:red">Maruyu</span>''']]
| |
| − | |
| |
| − | |}
| |
| − | |-| 6-3=
| |
| − | ==World 6-3: K作戦 Operation K==
| |
| − | {{LabSortieworld
| |
| − | | map = Map6-3.png
| |
| − | | difficulty = ☆ ☆ ☆ ☆ ☆ ☆ ☆
| |
| − | | item = Depends
| |
| − | | exp = Varies
| |
| − | | code = K作戦 (Operation K)
| |
| − | | jptext = 飛行艇または水上偵察機を装備した水上機母艦・軽巡・駆逐艦による艦隊を同方面へ進出、航空偵察「K作戦」を実施せよ!
| |
| − | | entext = Sortie to this region with light cruisers, destroyers, and seaplane tenderd equipped with [[Type 2 Flying Boat|flying boats]] or recon seaplanes, and undertake the air reconnaissance "Operation K"!
| |
| − | }}
| |
| − |
| |
| − | ===Stage Guide===
| |
| − | {{MapBranchingTable
| |
| − | |title = 6-3 Branching Rules
| |
| − | |expand = true
| |
| − | |id = 2-5
| |
| − | |A/empty -> B,C = * Choice node
| |
| − |
| |
| − | |E -> F, G/resource =
| |
| − | *Meet '''ANY''' of the following to go to F
| |
| − | **Amount of AV+CL ≧ 4
| |
| − | **Amount of AV ≧ 2
| |
| − | *Go to G if CL ≤ 1 '''and''' DD ≧ 3
| |
| − | *Otherwise, random routing (More likely to go to F)
| |
| − |
| |
| − | |G/resource -> H/resource = * Fixed route
| |
| − |
| |
| − | |H/resource -> I/empty =
| |
| − | * Fail the LoS check
| |
| − | ** Routing becomes random if the LoS is between '''36 - 38 F33 Cn3'''
| |
| − | |H/resource -> J = * Pass the LoS check of 38 or higher using the '''F33 Cn3''' formula
| |
| − | }}
| |
| − |
| |
| − | ===Tips===
| |
| − | '''Regarding the map'''
| |
| − | *Requires '''sinking boss flagship 4 times''' to clear.
| |
| − | **Once the map is cleared, you can no longer roll the Final Form at the boss node
| |
| − | *'''Only seaplane tenders, light cruisers, training cruisers, and destroyers allowed!''' Specifically at least 1 AV, at least 1 DD, and at least 1 CL. Torpedo cruisers (CLT) cannot be used here.
| |
| − | '''<br/>Specific node notes'''
| |
| − | *Node C is a submarine node, but you will not get the normal indication that it is a submarine node. Node B can be a submarine node, but isn't always.
| |
| − | *There is very little reason to head towards B, unless the fleet cannot (or do not) want to face [[Submarine So-Class#Elite|SS So-Class Elite]] at node C. But avoiding So-Class requires an additional fight which is not preferable
| |
| − | *[[Light Cruiser Tsu-Class#Elite|CL Tsu-Class Elite]] can show up at node E.
| |
| − | *Node G can be guaranteed with 4 destroyers in the fleet.
| |
| − | '''<br/>Regarding air reconnaissance mechanic'''
| |
| − | *From nodes G and H, recon planes will be flown towards the green X (the recon route is shown on the map as green arrows). Successful reconnaissance will reward additional resources upon '''winning at the boss node'''.
| |
| − | **Neither G or H have combat.
| |
| − | **Animation will be shown for the Air Reconnaissance; if both [[Type 2 Flying Boat]] and other seaplanes are brought, Type 2 Flying Boat animation takes priority.
| |
| − | **Success rate (and possibly critical success rate) of the air reconnaissance depends on which AV and what equipment(s) are equipped, if any. [[Akitsushima]] equipped with [[Type 2 Flying Boat]] appears to increase the critical (and normal?) success rate.
| |
| − | **'''You forfeit all reconnaissance rewards if you either drift away from boss or lose at the boss node.'''.
| |
| − | '''<br/>Regarding Boss Fleet'''
| |
| − | *Before the gauge can be depleted ('''Initial Form'''), the boss fleet consists of 1~2 [[Battleship Ta-Class#Flagship|BB Ta-Class Flagships]], 1~2 [[Heavy Cruiser Ri-Class#Flagship|CA Ri-Class Flagships]], 0~1 [[Light Cruiser He-Class#Flagship|CL He-Class Flagship]], the [[Destroyer Princess]] (weaker version), and 2 late model destroyers (either [[Destroyer Ro-Class#Late Model|Ro-Class]], [[Destroyer Ha-Class#Late Model|Ha-Class]], or [[Destroyer Ni-Class#Late Model|Ni-Class]]). The two destroyers appearing will be the same class.
| |
| − | *When the gauge can be depleted ('''Final Form'''), the boss fleet is led by [[Destroyer Princess]] (stronger version), 2 [[Battleship Ta-Class#Flagship|BB Ta-Class Flagships]], 1 [[Heavy Cruiser Ri-Class#Flagship|CA Ri-Class Flagship]], and 2 [[Destroyer Ni-Class#Late Model|DD Ni-Class Late Models]].
| |
| − | **Because you can only deploy AV/CL/CT/DD, it is unlikely for the player's fleet to be able to inflict significant damage during daytime battle. You should expect the battle to last into night time.
| |
| − |
| |
| − | <br/>'''Recommend Fleet'''
| |
| − | *'''1 AV, 1 CL, 4 DD (A → C → E → G → H → J, 3 fights total)'''
| |
| − | **Pros: The most cost-effective way to get to boss, and guarantees G branching, which allows two air reconnaissance rewards. CL can be [[Abukuma|Abukuma Kai Ni]] in order to grant yourself another preemptive torpedo salvo if she is equipped with a [[Type A Ko-hyoteki]].
| |
| − | **Cons: Lowest damage output of the setup and may not be able to consistently get a victory at boss.
| |
| − | *'''2 AV, 3 CL, 1 DD (A → C → E → F → H → J, 4 fights total)'''
| |
| − | **Pros: Highest damage output at boss, especially due to the boss fight almost always requiring night battle
| |
| − | **Cons: Needs to fight an extra battle against enemy fleet led by a [[Heavy Cruiser Ne-Class#Elite|CA Ne-Class Elite]] which has the stats close to a battleship.
| |
| − | *'''1 AV, 2 CL, 3 DD (Either of the above routes, 3 or 4 fights total)'''
| |
| − | **Pros: Has better damage over 1 AV 1 CL 4 DD, and if the random compass sends you to G node, can fight at boss with better output and still only fighting 3 battles total.
| |
| − | **Cons: Has to deal with RNG, and being sent to node F this way hurts a bit more.
| |
| − |
| |
| − | <br/>'''Suggested Ships (and equipment setups)'''
| |
| − | *AV: Despite the fact that [[Akitsushima]] with her [[Type 2 Flying Boat|flying boats]] can succeed at the air reconnaissance better, her battle output is low, and as the boss fleet is rather tanky, using either [[Chitose]], [[Chiyoda]] or [[Mizuho]] equipped with 2 Zuiun (or variants) and 1 [[Type A Ko-hyoteki]] is the better choice, especially since the opening torpedo can easily take out a less-armored target before shelling begins. If aviable, [[Nisshin|Nisshin A]] will be the best choice as AV, since her 4 slots allow her to equip Zuiun for Air Superiority and Artillery Spotting, Two main guns for day- and nighttime double-attack and a minisub with a potent opening Torpedo. (Akitsushima cannot equip [[Type A Ko-hyoteki]], lower plane capacity, and no torpedo capability, period.) Note that any setup with seaplane bombers have chances being shot down, especially if Tsu-Class Elite shows up at node E, which may result in no air superiority at boss node.
| |
| − | *CL: Generally, your 1~3 best CLs here. Unless your other ships can compensate for the lowered night battle damage, it is not recommended to use [[Ooyodo]] here. [[Abukuma|Abukuma Kai Ni]] is highly recommended for here since she can be armed with a [[Type A Ko-hyoteki]].
| |
| − | *DD: Consider the boss fight will require night battle for the most part, and the fact that [[Destroyer Princess]] (harder version) has 115 armor, it is better to bring ships that have better night battle performances. Anti-Air equipment is not required for this map because no enemy fleets here have air capability.
| |
| − |
| |
| − | ===Nodes And Enemy Encounters===
| |
| − | {{#invoke:EnemyEncounters2|encounterTemplate
| |
| − | |A_label = '''<span style="color:blue">Choose your route</span>'''
| |
| − | |A-1_node_info = Choose your route
| |
| − | |
| |
| − | |B_label = 泊地哨戒線
| |
| − | |B-1_node_info = ss_ka-class_elite ss_ka-class ss_ka-class ss_ka-class ss_ka-class
| |
| − | |B-1_form = line_abreast echelon
| |
| − | |B-1_xp =
| |
| − | |B-1_enemy_air_power =
| |
| − | |B-2_node_info = cl_ho-class_flagship dd_ro-class_late_model dd_ro-class_late_model
| |
| − | |B-2_form = double_line
| |
| − | |B-2_xp =
| |
| − | |B-2_enemy_air_power =
| |
| − | |B-3_node_info = ss_ka-class_elite ss_ka-class ss_ka-class ss_ka-class
| |
| − | |B-3_form = echelon line_abreast
| |
| − | |B-3_xp =
| |
| − | |B-3_enemy_air_power =
| |
| − | |B-4_node_info = dd_ro-class_late_model dd_ro-class_late_model dd_ro-class_late_model
| |
| − | |B-4_form = double_line
| |
| − | |B-4_xp =
| |
| − | |B-4_enemy_air_power =
| |
| − | |
| |
| − | |C_label = 深海潜水艦隊
| |
| − | |C-1_node_info = ss_so-class_elite ss_yo-class_elite ss_ka-class_elite ss_ka-class ss_ka-class
| |
| − | |C-1_form = echelon line_abreast
| |
| − | |C-1_xp =
| |
| − | |C-1_enemy_air_power =
| |
| − | |C-2_node_info = ss_yo-class_elite ss_ka-class_elite ss_ka-class_elite ss_ka-class ss_ka-class ss_ka-class
| |
| − | |C-2_form = echelon line_abreast
| |
| − | |C-2_xp =
| |
| − | |C-2_enemy_air_power =
| |
| − | |C-3_node_info = ss_yo-class_elite ss_yo-class_elite ss_ka-class ss_ka-class ss_ka-class
| |
| − | |C-3_form = echelon line_abreast
| |
| − | |C-3_xp =
| |
| − | |C-3_enemy_air_power =
| |
| − | |
| |
| − | |D_label = 深海ピケット艦隊
| |
| − | |D-1_node_info = cl_he-class_flagship dd_ro-class_late_model dd_ro-class_late_model dd_ro-class_late_model
| |
| − | |D-1_form = line_ahead double_line
| |
| − | |D-1_xp =
| |
| − | |D-1_enemy_air_power =
| |
| − | |D-2_node_info = cl_he-class_flagship dd_ro-class_late_model dd_i-class_late_model dd_i-class_late_model
| |
| − | |D-2_form = double_line line_ahead
| |
| − | |D-2_xp =
| |
| − | |D-2_enemy_air_power =
| |
| − | |D-3_node_info = cl_he-class_flagship dd_ro-class_late_model dd_ro-class_late_model
| |
| − | |D-3_form = double_line line_ahead
| |
| − | |D-3_xp =
| |
| − | |D-3_enemy_air_power =
| |
| − | |
| |
| − | |E_label = 深海哨戒水雷戦隊
| |
| − | |E-1_node_info = cl_tsu-class_elite clt_chi-class_elite clt_chi-class_elite dd_i-class_late_model dd_i-class_late_model
| |
| − | |E-1_form = line_ahead double_line
| |
| − | |E-1_xp =
| |
| − | |E-1_enemy_air_power =
| |
| − | |E-2_node_info = cl_he-class_flagship clt_chi-class_elite clt_chi-class_elite dd_i-class_late_model dd_i-class_late_model dd_i-class_late_model
| |
| − | |E-2_form = line_ahead double_line
| |
| − | |E-2_xp =
| |
| − | |E-2_enemy_air_power =
| |
| − | |E-3_node_info = cl_he-class_flagship clt_chi-class_elite clt_chi-class_elite dd_i-class_late_model dd_i-class_late_model
| |
| − | |E-3_form = line_ahead double_line
| |
| − | |E-3_xp =
| |
| − | |E-3_enemy_air_power =
| |
| − | |
| |
| − | |F_label = 深海中部水上打撃群
| |
| − | |F-1_node_info = ca_ne-class_elite ca_ri-class_elite cl_to-class_elite dd_i-class_late_model dd_i-class_late_model
| |
| − | |F-1_form = line_ahead double_line
| |
| − | |F-1_xp =
| |
| − | |F-1_enemy_air_power =
| |
| − | |F-2_node_info = ca_ne-class_elite cl_to-class_elite cl_to-class_elite dd_i-class_late_model dd_i-class_late_model
| |
| − | |F-2_form = line_ahead double_line
| |
| − | |F-2_xp =
| |
| − | |F-2_enemy_air_power =
| |
| − | |F-3_node_info = ca_ne-class_elite cl_to-class_elite cl_ho-class_elite dd_i-class_late_model dd_i-class_late_model
| |
| − | |F-3_form = double_line line_ahead
| |
| − | |F-3_xp =
| |
| − | |F-3_enemy_air_power =
| |
| − | |
| |
| − | |G_label =
| |
| − | |G-1_node_info =
| |
| − | |
| |
| − | |H_label =
| |
| − | |H-1_node_info =
| |
| − | |
| |
| − | |I_label = '''<span style="color:blue">Battle Avoided</span>'''
| |
| − | |I-1_node_info = "Must be my imagination" (battle avoided)
| |
| − | |
| |
| − | |J_label = 留守泊地旗艦艦隊
| |
| − | |J-1_node_info = bb_ta-class_flagship bb_ta-class_flagship ca_ri-class_flagship destroyer_princess dd_ni-class_late_model dd_ni-class_late_model
| |
| − | |J-1_form = line_ahead
| |
| − | |J-1_xp =
| |
| − | |J-1_enemy_air_power =
| |
| − | |J-2_node_info = destroyer_princess bb_ta-class_flagship bb_ta-class_flagship ca_ri-class_flagship dd_ni-class_late_model dd_ni-class_late_model
| |
| − | |J-2_form = line_ahead
| |
| − | |J-2_xp =
| |
| − | |J-2_enemy_air_power =
| |
| − | |J-3_node_info = bb_ta-class_flagship ca_ri-class_flagship ca_ri-class_flagship destroyer_princess dd_ni-class_late_model dd_ni-class_late_model
| |
| − | |J-3_form = line_ahead
| |
| − | |J-3_xp =
| |
| − | |J-3_enemy_air_power =
| |
| − | |J-4_node_info = bb_ta-class_flagship ca_ri-class_flagship ca_ri-class_flagship destroyer_princess dd_ha-class_late_model dd_ha-class_late_model
| |
| − | |J-4_form = line_ahead
| |
| − | |J-4_xp =
| |
| − | |J-4_enemy_air_power =
| |
| − | |J-5_node_info = bb_ta-class_flagship ca_ri-class_flagship ca_ri-class_flagship destroyer_princess dd_ro-class_late_model dd_ro-class_late_model
| |
| − | |J-5_form = line_ahead
| |
| − | |J-5_xp =
| |
| − | |J-5_enemy_air_power =
| |
| − | |J-6_node_info = bb_ta-class_flagship ca_ri-class_flagship cl_he-class_flagship destroyer_princess dd_ro-class_late_model dd_ro-class_late_model
| |
| − | |J-6_form = line_ahead
| |
| − | |J-6_xp =
| |
| − | |J-6_enemy_air_power =
| |
| − | |
| |
| − | |final_form =
| |
| − | |boss_node =
| |
| − | }}
| |
| − |
| |
| − | ===Drops===
| |
| − | <div class="mw-customtoggle-6-3-drop globalbutton">Show/Hide Drops</div>
| |
| − | {| class="mw-collapsible mw-collapsed wikitable" id="mw-customcollapsible-6-3-drop"
| |
| − | !Node
| |
| − | !Destroyers
| |
| − | !Light Cruisers
| |
| − | !Heavy Cruisers
| |
| − | !Seaplane Tender
| |
| − | !Aircraft Carrier
| |
| − | !Battleship
| |
| − | !Submarine
| |
| − | !Others
| |
| − | |-
| |
| − | |B
| |
| − | |
| |
| − | |
| |
| − | |
| |
| − | |
| |
| − | |
| |
| − | |
| |
| − | |
| |
| − | |
| |
| − | |-
| |
| − | |C
| |
| − | |
| |
| − | |
| |
| − | |
| |
| − | |
| |
| − | |
| |
| − | |
| |
| − | |
| |
| − | |
| |
| − | |-
| |
| − | |D
| |
| − | |[[Kikuzuki]], [[Mutsuki]]
| |
| − | |
| |
| − | |[[Maya]]
| |
| − | |
| |
| − | |
| |
| − | |
| |
| − | |
| |
| − | |
| |
| − | |-
| |
| − | |E
| |
| − | |[[Satsuki]], [[Sazanami]]
| |
| − | |[[Isuzu]], [[Jintsuu]], [[Kiso]], [[Kitakami]], [[Naka]], [[Ooi]], [[Sendai]], [[Tatsuta]], [[Tenryuu]]
| |
| − | |[[Aoba]], [[Ashigara]], [[Chikuma]], [[Choukai]], [[Furutaka]], [[Kinugasa]], [[Mogami]]
| |
| − | |
| |
| − | |
| |
| − | |[[Hiei]], [[Hyuuga]], [[Ise]], [[Kirishima]], [[Kongou]]
| |
| − | |[[I-19|'''<span style="color:red">I-19</span>''']]
| |
| − | |[[Katori|'''<span style="color:red">Katori</span>''']]
| |
| − | |-
| |
| − | |F
| |
| − | |
| |
| − | |[[Jintsuu]], [[Sendai]]
| |
| − | |[[Mogami]]
| |
| − | |
| |
| − | |
| |
| − | |[[Hiei]], [[Ise]]
| |
| − | |[[I-19|'''<span style="color:red">I-19</span>''']]
| |
| − | |
| |
| − | |-
| |
| − | | style="color:red" |'''J'''
| |
| − | |[[Harusame|'''<span style="color:red">Harusame</span>''']], [[Mutsuki]], [[Satsuki]], [[Shiranui]]
| |
| − | |[[Kitakami]], [[Nagara]], [[Noshiro|'''<span style="color:red">Noshiro</span>''']], [[Ooi]], [[Ooyodo|'''<span style="color:red">Ooyodo</span>''']], [[Sendai]], [[Tama]],[[Yuubari|'''<span style="color:red">Yuubari</span>''']]
| |
| − | |[[Aoba]], [[Ashigara]], [[Atago]], [[Chikuma]], [[Choukai]], [[Furutaka]], [[Haguro]], [[Kako]], [[Kinugasa]], [[Kumano]], [[Mogami]], [[Myoukou]], [[Suzuya]], [[Takao]], [[Tone]]
| |
| − | |
| |
| − | |[[Hiyou]], [[Jun'you]], [[Ryuujou]], [[Shouhou]], [[Shoukaku]], [[Unryuu|'''<span style="color:red">Unryuu?</span>''']], [[Zuihou]], [[Zuikaku]]
| |
| − | |[[Haruna]], [[Hiei]], [[Hyuuga]], [[Ise]], [[Kirishima]], [[Kongou]]
| |
| − | |[[I-19|'''<span style="color:red">I-19</span>''']], [[I-168|'''<span style="color:red">I-168</span>''']], [[I-58|'''<span style="color:red">I-58</span>''']],
| |
| − | |
| |
| − | |}
| |
| − | |-| 6-4=
| |
| − | ==World 6-4: 中部北海域ピーコック島沖 Central Northern Offshore Sea of Peacock Island==
| |
| − | {{LabSortieworld
| |
| − | | map = Map6-4.png
| |
| − | | difficulty = ☆ ☆ ☆ ☆ ☆ ☆ ☆ ☆ ☆
| |
| − | | item =
| |
| − | | exp = Varies
| |
| − | | code = 離島再攻略作戦 (Island Recapture Operation)
| |
| − | | jptext = 水雷戦隊を旗艦とした攻略部隊または空母最大2隻を擁する機動部隊による中部海域離島攻略作戦を発動!艦隊、出撃せよ!
| |
| − | | entext = Organize a unit to undertake an operation to capture the Island. Form a fleet consisting of a maximum of 2 Aircraft Carrier or a torpedo squadron flagship! Fleet, set sail!
| |
| − | }}
| |
| − |
| |
| − | ===Stage Guide===
| |
| − | {{MapBranchingTable
| |
| − | |title = 6-4 Branching Rules
| |
| − | |expand = true
| |
| − | |id = 6-4
| |
| − | |0 -> A,B,M =
| |
| − | *Meet '''ANY''' of the following to '''FORCE''' M
| |
| − | **Fleet contains [[Akitsumaru]]
| |
| − | **Fleet contains any CV(L)
| |
| − | **Fleet contains 3 CA(V)
| |
| − | **Fleet contains DD ≤ 1
| |
| − | **Fleet contains 2 (F)BB(V) ('''Ignored if you bring [[Nagato|Nagato Kai Ni]] and [[Mutsu|Mutsu Kai Ni]]''')
| |
| − | *Meet '''ALL''' of the following to go to B
| |
| − | **'''FAST''' fleet
| |
| − | **'''AND''' meet one of the following
| |
| − | ***Fleet contains 4 DD
| |
| − | ***Fleet contains 3 DD with 1 CL as flagship
| |
| − | ***Fleet contains [[Nagato|Nagato Kai Ni]] and [[Mutsu|Mutsu Kai Ni]] + 4 DD
| |
| − | ***Fleet contains [[Nagato|Nagato Kai Ni]] and [[Mutsu|Mutsu Kai Ni]] + 3 DD + 1 CL as flagship
| |
| − | *Otherwise, go to A
| |
| − |
| |
| − | |A -> D, E =
| |
| − | *Meet '''ANY''' of the following to go to D
| |
| − | **Fleet contains [[Akitsushima]] and meets '''ONE''' of the following
| |
| − | ***CAV = 1
| |
| − | ***Fleet contains CL
| |
| − | ***DD ≥ 3
| |
| − | **Meet '''ALL''' of the following
| |
| − | ***Fleet contains CL as flagship '''OR''' DD ≥ 3
| |
| − | ***Fast fleet
| |
| − | ***Fleet contains no (F)BB(V)
| |
| − | *Otherwise, E
| |
| − |
| |
| − | |D -> C = *Fixed Route
| |
| − |
| |
| − | |E -> D =
| |
| − | *Fleet contains [[Akitsushima]] or [[Kisaragi]]
| |
| − | *Fast fleet and fleet contains CL
| |
| − |
| |
| − | |E -> G = * Does not meet the requirements to go to D
| |
| − |
| |
| − | |J -> I,L,N =
| |
| − | *'''FORCE''' node N if fleet contains [[Akitsumaru]], CL = 1 and DD ≥ 2
| |
| − | *Meet '''ANY''' of the following to go to L
| |
| − | **Fleet contains no CL
| |
| − | **Slow fleet and CV(L/B) ≥ 2
| |
| − | *Otherwise, I
| |
| − |
| |
| − | |K -> H,J =
| |
| − | *Meet '''ANY''' of the following to go to H
| |
| − | **(F)BB(V) ≥ 2
| |
| − | **(F)BB(V)+CA(V) ≥ 3
| |
| − | **DD ≤ 1
| |
| − | *Otherwise, J
| |
| − | }}
| |
| − |
| |
| − | {{AirControlSystem
| |
| − | | Map =6-4 Boss (West)
| |
| − | | AS = 168
| |
| − | | Notes = Requires less if LBAS waves are sent to the boss node
| |
| − | }}
| |
| − |
| |
| − | ===Tips===
| |
| − | '''Requires destroying the [[Isolated Island Princess]] 5 times to clear.'''
| |
| − | <br/>
| |
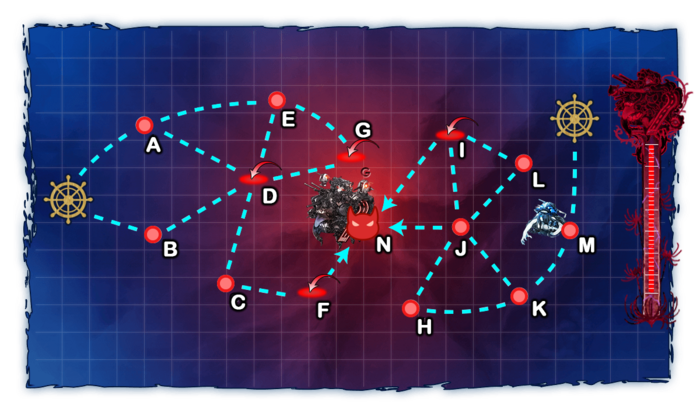
| − | This map features '''multiple starting zone positions''' which were introduced in the [[Winter 2016 Event]].
| |
| − | *Fleet consisting of a Torpedo Squadron (i.e. mostly DDs or CL and DDs) will start on left side of the map
| |
| − | *Existence of any carrier will start on the east, as will any two battleships, or three CA(V)s (Obviously [[Nagato]] and [[Mutsu]] Kai Ni is the exception)
| |
| − | *Not having two destroyers will also start on the west
| |
| − | *You cannot bring no more than 2 CV(L)(B)
| |
| − | *You cannot bring more than 2 (F)BB
| |
| − | <br/>'''Regarding Boss Fleet'''
| |
| − | *Boss Fleet is heavily effected based on your HQ level.
| |
| − | **Admirals below HQ level 103 will not feature a 6-enemy composition in the boss composition outside of the last kill, but will have a chance of appearing if your HQ level is '''103 or higher'''.
| |
| − | **Admirals below HQ level 113 have a chance of rolling a 5-enemy composition with the Late Model DDs (This is the easiest comp). But once your HQ is '''113 or higher''', this composition will disappear completely and can no longer be rolled.
| |
| − | *Boss fleet's flagship is the [[Isolated Island Princess]]
| |
| − | **Isolated Hime will usually have [[Battery Imp]]s and [[Supply Depot Princess]] with her.
| |
| − | **Dev tweet says [[Battery Imp]]s are immune to [[Type 3 Shell]]s but there are many reports of CAs and BBs doing high damage to them in yasen.
| |
| − | **Using [[WG42]] and [[Daihatsu]] will do decent damage to them.
| |
| − | **If you have enough [[WG42]] then you may want to use [[Ooyodo]] or [[Gotland]] and equip her with 2 of them as they stack and can deliver severe damage and can easily one shot an Imp or one of the Hime.
| |
| − | **Stacking [[Type 2 Ka-Mi Tank]] and [[Daihatsu-class Landing Craft (Type 89 Medium Tanks & Marines)]] upgraded with [[WG42]] can do a lot of damage to [[Supply Depot Princess]] and [[Battery Imp]].
| |
| − | <br/>'''Regarding [[Land-Based Air Squadron]]s'''
| |
| − | *You are permitted to use 1 [[Land-Based Air Squadron]]. There are no air raids on this map.
| |
| − | *Upon completing the quest B80 and F43, you will earn a Construction Team to gain access to your [[Land-Based Air Squadron]], which is '''highly recommended''' to help simplify the battle on the boss node for this map.
| |
| − | *It's recommended to bring 2 Land Based Bombers and 2 Fighters if you have access to your [[LBAS]].
| |
| − | **3 Land Based Bombers and 1 Fighters is an alternative recommendation, if you want to have a better shot at damaging the installations, but may result in your losing planes more and also will likely lose your Land Based Attack Bombers' expertise in the process.
| |
| − | **Another alternative is to bring 4 Land Based Bombers and focus them on C node instead of the boss node. Plane loss here is minimal. This can significantly improve the pass rate of an [[Akitsushima]] / [[Nagato]] Kai Ni fleet which emphasizes anti-installation over anti-ship performance.
| |
| − | *The Distance your Land Based Planes can travel on this map is calculated from Start Point 1 and heading eastward each node.
| |
| − | *Bring planes with a distance of 5 or more in order for this to support an attack on the boss node.
| |
| − | *If your Land Based planes focus on targeting the [[Artillery Imp]]s and [[Supply Depot Princess]], the battle will be significantly easier.
| |
| − | *This map can also serve as a good location to train your Land Based attack planes to max expertise. Bring only Land Based Attackers with a distances of 8 or more as they will reach enough distance to allow you to use Maruyu solo on the submarine node on Node M which your planes should target in order to train them.
| |
| − | <br/>'''Recommended Fleet'''
| |
| − | *'''1 CL flagship, 1 (F)BB, 3 DD, 1 CAV / 1 (F)BB, 4 DD, 1 CAV / [[Nagato]] Kai Ni, [[Mutsu]] Kai Ni, 4 DD / 1 CL flagship, [[Nagato]] Kai Ni, [[Mutsu]] Kai Ni, 3 DD''' routes '''B-D-C-F-N'''
| |
| − | **Gives the shortest and easiest route to boss, '''but requires Fast fleet''', this means if you are using slow BB, you have to speed them up by the help of Turbine + Boiler Synergy.
| |
| − | **Highly recommended only if you have enough [[WG42]]s, [[Daihatsu-class Landing Craft (Type 89 Medium Tanks & Marines)]] and [[Type 2 Ka-Mi Tank]] and had constructed a Seaplane Fighter.
| |
| − | **Fleet has the best chance of reaching the boss node while maintaining fuel and ammo to allow for a better outcome in the boss fight.
| |
| − | ** It's highly recommended to have a seaplane fighter or an Italian ship to help aid you in maintaining air superiority / air parity over the fights on your way to the boss.
| |
| − | **DDs and CLs are recommended to have [[WG42]]s and [[Daihatsu]] as these are the only effective ways to do damage to the [[Battery Imp]]s and do decent chipping damage to the [[Isolated Island Princess]], CAs and BBs should be armed with a [[Type 3 Shell]] against the installation bosses. BBs may also bring AP shells to help aid in doing daytime battle damage.
| |
| − | *'''1 BB(V), 1 CAV, 1CL, 2 DD, and [[Akitsushima]] / [[Nagato]] Kai Ni, [[Mutsu]] Kai Ni, 1 CAV, 2 DD, [[Akitsushima]] / [[Nagato]] Kai Ni, [[Mutsu]] Kai Ni, 1 CL, 2 DD, [[Akitsushima]]''' routes '''A-D-C-F-N'''
| |
| − | **[[Akitsushima]] allows for the shortest possible path on the west entrance going from A,D,C,F and N.
| |
| − | **In this case Akitsushima should be armed with at least 2 seaplane fighters as her role will serve to be a distraction and to maintain a degree of air superiority at the boss node depending on the formation.
| |
| − | *'''2 CAV, 1CL, and 3 DD''' routes '''A-D-C-F-N'''
| |
| − | **More powerful set up in compared to [[Akitsushima]] fleet but will require some luck to ensure you'll deliver damage.
| |
| − |
| |
| − | ===Nodes And Enemy Encounters===
| |
| − | {{#invoke:EnemyEncounters2|encounterTemplate
| |
| − | |A_label = 中部海域哨戒水雷戦隊 A群
| |
| − | |A-1_node_info = cl_ho-class_flagship clt_chi-class_flagship clt_chi-class_flagship dd_ro-class_late_model dd_ro-class_late_model dd_ro-class_late_model
| |
| − | |A-1_form = line_ahead
| |
| − | |A-1_xp =
| |
| − | |A-1_enemy_air_power =
| |
| − | |A-2_node_info = cl_ho-class_flagship clt_chi-class_flagship clt_chi-class_flagship dd_ro-class_late_model dd_i-class_late_model dd_i-class_late_model
| |
| − | |A-2_form = line_ahead
| |
| − | |A-2_xp =
| |
| − | |A-2_enemy_air_power =
| |
| − | |A-3_node_info = cl_he-class_flagship clt_chi-class_flagship clt_chi-class_flagship dd_ha-class_late_model dd_ro-class_late_model dd_ro-class_late_model
| |
| − | |A-3_form = line_ahead
| |
| − | |A-3_xp =
| |
| − | |A-3_enemy_air_power =
| |
| − | |A-4_node_info = cl_ho-class_flagship clt_chi-class_flagship clt_chi-class_flagship dd_ha-class_late_model dd_ro-class_late_model dd_ro-class_late_model
| |
| − | |A-4_form = line_ahead
| |
| − | |A-4_xp =
| |
| − | |A-4_enemy_air_power =
| |
| − | |A-5_node_info = cl_ho-class_flagship clt_chi-class_flagship clt_chi-class_flagship dd_i-class_late_model dd_i-class_late_model dd_i-class_late_model
| |
| − | |A-5_form = line_ahead double_line
| |
| − | |A-5_xp =
| |
| − | |A-5_enemy_air_power =
| |
| − | |
| |
| − | |B_label = 中部海域哨戒水雷戦隊 B群
| |
| − | |B-1_node_info = cl_ho-class_flagship dd_ro-class_late_model dd_i-class_late_model dd_i-class_late_model dd_i-class_late_model
| |
| − | |B-1_form = line_ahead
| |
| − | |B-1_xp =
| |
| − | |B-1_enemy_air_power =
| |
| − | |B-2_node_info = cl_ho-class_flagship dd_ro-class_late_model dd_ro-class_late_model dd_i-class_late_model dd_i-class_late_model
| |
| − | |B-2_form = line_ahead
| |
| − | |B-2_xp =
| |
| − | |B-2_enemy_air_power =
| |
| − | |B-3_node_info = cl_ho-class_flagship dd_ha-class_late_model dd_ro-class_late_model dd_ro-class_late_model dd_ro-class_late_model
| |
| − | |B-3_form = line_ahead
| |
| − | |B-3_xp =
| |
| − | |B-3_enemy_air_power =
| |
| − | |B-4_node_info = cl_ho-class_flagship dd_ha-class_late_model dd_ha-class_late_model dd_ro-class_late_model dd_ro-class_late_model
| |
| − | |B-4_form = line_ahead
| |
| − | |B-4_xp =
| |
| − | |B-4_enemy_air_power =
| |
| − | |B-5_node_info = cl_ho-class_flagship dd_i-class_late_model dd_i-class_late_model dd_i-class_late_model dd_i-class_late_model
| |
| − | |B-5_form = line_ahead double_line
| |
| − | |B-5_xp =
| |
| − | |B-5_enemy_air_power =
| |
| − | |
| |
| − | |C_label = 離島防衛低速戦艦部隊
| |
| − | |C-1_node_info = bb_ru-class_flagship bb_ru-class_flagship cl_he-class_flagship dd_ro-class_late_model dd_ro-class_late_model cvl_nu-class_elite
| |
| − | |C-1_form = line_ahead
| |
| − | |C-1_xp =
| |
| − | |C-1_enemy_air_power = 24
| |
| − | |C-2_node_info = bb_ru-class_flagship bb_ru-class_flagship cl_he-class_flagship dd_ro-class_late_model dd_ro-class_late_model cvl_nu-class
| |
| − | |C-2_form = line_ahead
| |
| − | |C-2_xp =
| |
| − | |C-2_enemy_air_power = 8
| |
| − | |C-3_node_info = bb_ru-class_flagship bb_ru-class_flagship cl_he-class_flagship dd_ha-class_late_model dd_ha-class_late_model cvl_nu-class_elite
| |
| − | |C-3_form = line_ahead
| |
| − | |C-3_xp =
| |
| − | |C-3_enemy_air_power = 24
| |
| − | |C-4_node_info = bb_ru-class_flagship bb_ru-class_flagship cl_he-class_flagship dd_ni-class_late_model dd_ni-class_late_model cvl_nu-class_elite
| |
| − | |C-4_form = line_ahead
| |
| − | |C-4_xp =
| |
| − | |C-4_enemy_air_power = 24
| |
| − | |C-5_node_info = bb_ru-class_flagship bb_ru-class_flagship cl_he-class_flagship dd_i-class_late_model dd_i-class_late_model cvl_nu-class
| |
| − | |C-5_form = line_ahead double_line
| |
| − | |C-5_xp =
| |
| − | |C-5_enemy_air_power = 8
| |
| − | |
| |
| − | |D_label = 離島陸上航空隊<br>'''<span style="color:green">Air Battle Node</span>'''
| |
| − | |D-1_node_info = isolated_island_princess
| |
| − | |D-1_form = diamond
| |
| − | |D-1_xp =
| |
| − | |D-1_enemy_air_power = 59
| |
| − | |D-2_node_info = isolated_island_princess
| |
| − | |D-2_form = diamond
| |
| − | |D-2_xp =
| |
| − | |D-2_enemy_air_power = 82
| |
| − | |
| |
| − | |E_label = 中部海域哨戒遊撃部隊
| |
| − | |E-1_node_info = ca_ri-class_flagship cl_ho-class_flagship dd_i-class_late_model dd_i-class_late_model ss_ka-class_elite ss_ka-class_elite
| |
| − | |E-1_form = line_ahead
| |
| − | |E-1_xp =
| |
| − | |E-1_enemy_air_power =
| |
| − | |E-2_node_info = ca_ri-class_flagship cl_ho-class_flagship dd_i-class_late_model dd_i-class_late_model ss_ka-class_elite ss_ka-class
| |
| − | |E-2_form = line_ahead
| |
| − | |E-2_xp =
| |
| − | |E-2_enemy_air_power =
| |
| − | |E-3_node_info = ca_ri-class_flagship cl_ho-class_flagship dd_i-class_late_model dd_i-class_late_model ss_ka-class ss_ka-class
| |
| − | |E-3_form = line_ahead double_line
| |
| − | |E-3_xp =
| |
| − | |E-3_enemy_air_power =
| |
| − | |E-4_node_info = ca_ri-class_flagship cl_ho-class_flagship dd_ro-class_late_model dd_ro-class_late_model ss_ka-class_elite ss_ka-class_elite
| |
| − | |E-4_form = line_ahead
| |
| − | |E-4_xp =
| |
| − | |E-4_enemy_air_power =
| |
| − | |E-5_node_info = ca_ri-class_flagship cl_ho-class_flagship dd_ha-class_late_model dd_ha-class_late_model ss_ka-class_elite ss_ka-class_elite
| |
| − | |E-5_form = line_ahead
| |
| − | |E-5_xp =
| |
| − | |E-5_enemy_air_power =
| |
| − | |
| |
| − | |F_label = 離島陸上航空隊<br>'''<span style="color:green">Air Battle Node</span>'''
| |
| − | |F-1_node_info = isolated_island_princess
| |
| − | |F-1_form = diamond
| |
| − | |F-1_xp =
| |
| − | |F-1_enemy_air_power = 82
| |
| − | |F-2_node_info = isolated_island_princess
| |
| − | |F-2_form = diamond
| |
| − | |F-2_xp =
| |
| − | |F-2_enemy_air_power = 78
| |
| − | |
| |
| − | |G_label = 離島陸上航空隊<br>'''<span style="color:green">Air Battle Node</span>'''
| |
| − | |G-1_node_info = isolated_island_princess
| |
| − | |G-1_form = diamond
| |
| − | |G-1_xp =
| |
| − | |G-1_enemy_air_power = 82
| |
| − | |
| |
| − | |H_label = 離島防衛低速戦艦部隊
| |
| − | |H-1_node_info = bb_ru-class_flagship bb_ru-class_flagship cl_he-class_flagship dd_ro-class_late_model dd_ro-class_late_model cvl_nu-class_flagship
| |
| − | |H-1_form = line_ahead
| |
| − | |H-1_xp =
| |
| − | |H-1_enemy_air_power = 23
| |
| − | |H-2_node_info = bb_ru-class_flagship bb_ru-class_flagship cl_he-class_flagship dd_ro-class_late_model dd_ro-class_late_model cvl_nu-class_elite
| |
| − | |H-2_form = line_ahead
| |
| − | |H-2_xp =
| |
| − | |H-2_enemy_air_power = 24
| |
| − | |H-3_node_info = bb_ru-class_flagship bb_ru-class_flagship cl_he-class_flagship dd_i-class_late_model dd_i-class_late_model cvl_nu-class_elite
| |
| − | |H-3_form = line_ahead
| |
| − | |H-3_xp =
| |
| − | |H-3_enemy_air_power = 24
| |
| − | |
| |
| − | |I_label = 離島混成航空隊<br>'''<span style="color:green">Air Battle Node</span>'''
| |
| − | |I-1_node_info = isolated_island_princess cvl_nu-class_flagship dd_i-class_late_model dd_i-class_late_model dd_i-class_late_model
| |
| − | |I-1_form = diamond
| |
| − | |I-1_xp =
| |
| − | |I-1_enemy_air_power = 101
| |
| − | |I-2_node_info = isolated_island_princess cvl_nu-class_flagship dd_i-class_late_model dd_i-class_late_model dd_i-class_late_model
| |
| − | |I-2_form = diamond
| |
| − | |I-2_xp =
| |
| − | |I-2_enemy_air_power = 105
| |
| − | |
| |
| − | |J_label = 任務部隊 I群
| |
| − | |J-1_node_info = cv_wo-class_flagship_kai bb_ta-class_flagship ca_ne-class_elite cl_tsu-class dd_ro-class_late_model dd_ro-class_late_model
| |
| − | |J-1_form = diamond
| |
| − | |J-1_xp =
| |
| − | |J-1_enemy_air_power = 108
| |
| − | |J-2_node_info = cv_wo-class_flagship_kai bb_ru-class_flagship_kai ca_ne-class_elite cl_tsu-class_elite dd_ro-class_late_model dd_ro-class_late_model
| |
| − | |J-2_form = diamond
| |
| − | |J-2_xp =
| |
| − | |J-2_enemy_air_power = 132
| |
| − | |J-3_node_info = cv_wo-class_flagship_kai bb_ta-class_flagship ca_ne-class_elite cl_tsu-class_elite dd_ro-class_late_model dd_ro-class_late_model
| |
| − | |J-3_form = diamond
| |
| − | |J-3_xp =
| |
| − | |J-3_enemy_air_power = 126
| |
| − | |J-4_node_info = aircraft_carrier_princess bb_ru-class_flagship_kai ca_ne-class_elite cl_tsu-class_elite dd_ro-class_late_model dd_ro-class_late_model
| |
| − | |J-4_form = diamond
| |
| − | |J-4_xp =
| |
| − | |J-4_enemy_air_power = 129
| |
| − | |J-5_node_info = cv_wo-class_flagship_kai bb_ta-class_flagship ca_ne-class_elite cl_tsu-class dd_i-class_late_model dd_i-class_late_model
| |
| − | |J-5_form = diamond
| |
| − | |J-5_xp =
| |
| − | |J-5_enemy_air_power = 108
| |
| − | |J-6_node_info = aircraft_carrier_princess bb_ru-class_flagship_kai ca_ne-class_elite cl_tsu-class_elite dd_ha-class_late_model dd_ha-class_late_model
| |
| − | |J-6_form = diamond
| |
| − | |J-6_xp =
| |
| − | |J-6_enemy_air_power = 129
| |
| − | |
| |
| − | |K_label = 任務部隊 II群
| |
| − | |K-1_node_info = cv_wo-class_flagship_kai bb_ta-class_flagship ca_ri-class_flagship cl_ho-class_flagship dd_ro-class_late_model dd_ro-class_late_model
| |
| − | |K-1_form = diamond
| |
| − | |K-1_xp =
| |
| − | |K-1_enemy_air_power = 108
| |
| − | |K-2_node_info = cv_wo-class_flagship_2 bb_ta-class_elite ca_ri-class_flagship cl_ho-class_flagship dd_ro-class_late_model dd_ro-class_late_model
| |
| − | |K-2_form = diamond
| |
| − | |K-2_xp =
| |
| − | |K-2_enemy_air_power = 103
| |
| − | |K-3_node_info = cv_wo-class_flagship_2 bb_ta-class_elite ca_ri-class_flagship cl_ho-class_flagship dd_ro-class_late_model dd_ro-class_late_model
| |
| − | |K-3_form = diamond
| |
| − | |K-3_xp =
| |
| − | |K-3_enemy_air_power = 100
| |
| − | |K-4_node_info = cv_wo-class_flagship_kai bb_ta-class_flagship ca_ri-class_flagship cl_ho-class_flagship dd_ro-class_late_model dd_ro-class_late_model
| |
| − | |K-4_form = diamond
| |
| − | |K-4_xp =
| |
| − | |K-4_enemy_air_power = 126
| |
| − | |K-5_node_info = cv_wo-class_flagship_kai bb_ta-class_flagship ca_ri-class_flagship cl_ho-class_flagship dd_ro-class_late_model dd_ro-class_late_model
| |
| − | |K-5_form = diamond
| |
| − | |K-5_xp =
| |
| − | |K-5_enemy_air_power = 132
| |
| − | |K-6_node_info = cv_wo-class_flagship_2 bb_ta-class_elite ca_ri-class_flagship cl_ho-class_flagship dd_i-class_late_model dd_i-class_late_model
| |
| − | |K-6_form = diamond
| |
| − | |K-6_xp =
| |
| − | |K-6_enemy_air_power = 100
| |
| − | |
| |
| − | |L_label = 増援護衛空母部隊
| |
| − | |L-1_node_info = cvl_nu-class_flagship cvl_nu-class_flagship ca_ri-class_flagship dd_i-class_late_model dd_i-class_late_model
| |
| − | |L-1_form = diamond double_line
| |
| − | |L-1_xp =
| |
| − | |L-1_enemy_air_power = 46
| |
| − | |
| |
| − | |M_label = 中部海域潜水哨戒線
| |
| − | |M-1_node_info = ss_so-class_flagship ss_so-class_elite ss_so-class ss_so-class ss_so-class
| |
| − | |M-1_form = echelon line_abreast
| |
| − | |M-1_xp =
| |
| − | |M-1_enemy_air_power =
| |
| − | |M-2_node_info = ss_so-class_flagship ss_so-class_elite ss_so-class_elite ss_so-class ss_so-class
| |
| − | |M-2_form = echelon line_abreast
| |
| − | |M-2_xp =
| |
| − | |M-2_enemy_air_power =
| |
| − | |M-3_node_info = ss_so-class_flagship ss_so-class_elite ss_so-class ss_so-class
| |
| − | |M-3_form = echelon line_abreast
| |
| − | |M-3_xp =
| |
| − | |M-3_enemy_air_power =
| |
| − | |
| |
| − | |N_label = 離島守備隊
| |
| − | |N-1_node_info = isolated_island_princess artillery_imp artillery_imp artillery_imp supply_depot_princess transport_wa-class_flagship
| |
| − | |N-1_form = line_ahead
| |
| − | |N-1_xp =
| |
| − | |N-1_enemy_air_power = 112
| |
| − | |N-2_node_info = isolated_island_princess artillery_imp artillery_imp artillery_imp supply_depot_princess_damaged cl_ho-class_flagship
| |
| − | |N-2_form = line_ahead
| |
| − | |N-2_xp =
| |
| − | |N-2_enemy_air_power = 48
| |
| − | |N-3_node_info = isolated_island_princess artillery_imp artillery_imp supply_depot_princess cl_ho-class_flagship
| |
| − | |N-3_form = line_ahead
| |
| − | |N-3_xp =
| |
| − | |N-3_enemy_air_power = 34
| |
| − | |N-4_node_info = isolated_island_princess artillery_imp artillery_imp artillery_imp supply_depot_princess_damaged transport_wa-class_flagship
| |
| − | |N-4_form = line_ahead
| |
| − | |N-4_xp =
| |
| − | |N-4_enemy_air_power = 48
| |
| − | |N-5_node_info = isolated_island_princess artillery_imp artillery_imp artillery_imp supply_depot_princess_damaged cl_he-class_flagship
| |
| − | |N-5_form = line_ahead
| |
| − | |N-5_xp =
| |
| − | |N-5_enemy_air_power = 48
| |
| − | |N-6_node_info = isolated_island_princess artillery_imp artillery_imp dd_i-class_late_model dd_i-class_late_model
| |
| − | |N-6_form = line_ahead
| |
| − | |N-6_xp =
| |
| − | |N-6_enemy_air_power = 78
| |
| − | |
| |
| − | |final_form =
| |
| − | |boss_node = N
| |
| − | }}
| |
| − |
| |
| − | ===Drops===
| |
| − | <div class="mw-customtoggle-6-4-drop globalbutton">Show/Hide Drops</div>
| |
| − | {| class="mw-collapsible mw-collapsed wikitable" id="mw-customcollapsible-6-4-drop"
| |
| − | !Node
| |
| − | !Destroyers
| |
| − | !Light Cruisers
| |
| − | !Heavy Cruisers
| |
| − | !Seaplane Tender
| |
| − | !Aircraft Carrier
| |
| − | !Battleship
| |
| − | !Submarine
| |
| − | !Others
| |
| − | |-
| |
| − | |A
| |
| − | |[[Mutsuki]] [[Kisaragi]] [[Satsuki]] [[Fumizuki]] [[Nagatsuki]] [[Kikuzuki]] [[Mikazuki]] [[Mochizuki]] [[Yuudachi]] [[Murasame]] [[Samidare]] [[Suzukaze]]
| |
| − | |
| |
| − | |
| |
| − | |
| |
| − | |
| |
| − | |
| |
| − | |
| |
| − | |
| |
| − | |-
| |
| − | |B
| |
| − | |[[Mutsuki]] [[Kisaragi]] [[Satsuki]] [[Fumizuki]] [[Nagatsuki]] [[Kikuzuki]] [[Mikazuki]] [[Mochizuki]] [[Yuudachi]] [[Murasame]] [[Samidare]] [[Suzukaze]]
| |
| − | |
| |
| − | |
| |
| − | |
| |
| − | |
| |
| − | |
| |
| − | |
| |
| − | |
| |
| − | |-
| |
| − | |C
| |
| − | |[[Mutsuki]] [[Kisaragi]] [[Satsuki]] [[Fumizuki]] [[Nagatsuki]] [[Kikuzuki]] [[Mikazuki]] [[Mochizuki]] [[Yuudachi]] [[Murasame]] [[Samidare]] [[Suzukaze]] [[Yayoi]] [[Tanikaze|'''<span style="color:red">Tanikaze</span>''']] [[Urakaze|'''<span style="color:red">Urakaze</span>''']]
| |
| − | |[[Tenryuu]] [[Tatsuta]] [[Yuubari|'''<span style="color:red">Yuubari</span>''']]
| |
| − | |[[Furutaka]], [[Kako]], [[Tone]], [[Chikuma]], [[Aoba]], [[Kinugasa|'''<span style="color:red">Kinugasa</span>''']]
| |
| − | |[[Chiyoda]], [[Chitose]], [[Akitsushima|'''<span style="color:red">Akitsushima</span>''']] [[Mizuho|'''<span style="color:red">Mizuho</span>''']]
| |
| − | |[[Souryuu]], [[Hiryuu]]
| |
| − | |
| |
| − | |
| |
| − | |
| |
| − | |-
| |
| − | |E
| |
| − | |[[Mutsuki]] [[Kisaragi]] [[Satsuki]] [[Fumizuki]] [[Nagatsuki]] [[Kikuzuki]] [[Mikazuki]] [[Mochizuki]] [[Yuudachi]] [[Murasame]] [[Samidare]] [[Suzukaze]] [[Yayoi]]
| |
| − | |[[Yuubari|'''<span style="color:red">Yuubari</span>''']]
| |
| − | |[[Aoba]]
| |
| − | |
| |
| − | |
| |
| − | |
| |
| − | |
| |
| − | |
| |
| − | |-
| |
| − | |H
| |
| − | |[[Mutsuki]] [[Kisaragi]] [[Satsuki]] [[Fumizuki]] [[Nagatsuki]] [[Kikuzuki]] [[Mikazuki]] [[Mochizuki]] [[Yuudachi]] [[Murasame]] [[Samidare]] [[Suzukaze]] [[Yayoi]] [[Tanikaze|'''<span style="color:red">Tanikaze</span>''']] [[Urakaze|'''<span style="color:red">Urakaze</span>''']]
| |
| − | |[[Tenryuu]] [[Tatsuta]] [[Yuubari|'''<span style="color:red">Yuubari</span>''']]
| |
| − | |[[Furutaka]], [[Kako]], [[Tone]], [[Chikuma]], [[Aoba]], [[Kinugasa|'''<span style="color:red">Kinugasa</span>''']]
| |
| − | |[[Chiyoda]], [[Chitose]], [[Akitsushima|'''<span style="color:red">Akitsushima</span>''']]
| |
| − | |[[Souryuu]], [[Hiryuu]]
| |
| − | |
| |
| − | |
| |
| − | |
| |
| − | |-
| |
| − | |J
| |
| − | |[[Mutsuki]] [[Kisaragi]] [[Satsuki]] [[Fumizuki]] [[Nagatsuki]] [[Kikuzuki]] [[Mikazuki]] [[Mochizuki]] [[Yuudachi]] [[Murasame]] [[Samidare]] [[Suzukaze]] [[Yayoi]] [[Tanikaze|'''<span style="color:red">Tanikaze</span>''']] [[Urakaze|'''<span style="color:red">Urakaze</span>''']]
| |
| − | |[[Tenryuu]] [[Tatsuta]] [[Yuubari|'''<span style="color:red">Yuubari</span>''']]
| |
| − | |[[Furutaka]], [[Kako]], [[Tone]], [[Chikuma]], [[Aoba]], [[Kinugasa|'''<span style="color:red">Kinugasa</span>''']]
| |
| − | |
| |
| − | |[[Souryuu]], [[Hiryuu]]
| |
| − | |
| |
| − | |
| |
| − | |
| |
| − | |-
| |
| − | |K
| |
| − | |[[Mutsuki]] [[Kisaragi]] [[Satsuki]] [[Fumizuki]] [[Nagatsuki]] [[Kikuzuki]] [[Mikazuki]] [[Mochizuki]] [[Yuudachi]] [[Murasame]] [[Samidare]] [[Suzukaze]]
| |
| − | |
| |
| − | |
| |
| − | |
| |
| − | |
| |
| − | |
| |
| − | |
| |
| − | |
| |
| − | |-
| |
| − | |L
| |
| − | |[[Mutsuki]] [[Kisaragi]] [[Satsuki]] [[Fumizuki]] [[Nagatsuki]] [[Kikuzuki]] [[Mikazuki]] [[Mochizuki]] [[Yuudachi]] [[Murasame]] [[Samidare]] [[Suzukaze]] [[Yayoi]] [[Tanikaze|'''<span style="color:red">Tanikaze</span>''']]
| |
| − | |
| |
| − | |[[Furutaka]], [[Kako]]
| |
| − | |[[Akitsushima|'''<span style="color:red">Akitsushima</span>''']], [[Mizuho|'''<span style="color:red">Mizuho</span>''']]
| |
| − | |[[Souryuu]], [[Hiryuu]]
| |
| − | |
| |
| − | |
| |
| − | |
| |
| − | |-
| |
| − | | style="color:red" |'''N'''
| |
| − | |[[Fubuki]], [[Shirayuki]], [[Hatsuyuki]], [[Murakumo]], [[Ayanami]], [[Isonami]], [[Shikinami]], [[Oboro]], [[Sazanami]], [[Akebono]], [[Ushio]], [[Akatsuki]], [[Hibiki]], [[Inazuma]], [[Ikazuchi]], [[Hatsuharu]], [[Wakaba]], [[Hatsushimo]], [[Nenohi]], [[Asashio]], [[Arashio]], [[Arare]], [[Kasumi]], [[Ooshio]], [[Michishio]], [[Kagerou]], [[Shiranui]], [[Kuroshio]], [[Mutsuki]], [[Kisaragi]], [[Satsuki]] [[Fumizuki]] [[Nagatsuki]] [[Kikuzuki]] [[Mikazuki]] [[Mochizuki]] [[Shiratsuyu]], [[Shigure]], [[Yuudachi]], [[Murasame]], [[Samidare]], [[Suzukaze]], [[Yayoi]], [[Akigumo]] [[Yuugumo|'''<span style="color:red">Yuugumo</span>''']], [[Makigumo|'''<span style="color:red">Makigumo</span>''']], [[Tanikaze|'''<span style="color:red">Tanikaze</span>''']], [[Tokitsukaze|'''<span style="color:red">Tokitsukaze</span>''']], [[Asagumo|'''<span style="color:red">Asagumo</span>''']], [[Yamagumo|'''<span style="color:red">Yamagumo</span>''']]
| |
| − | |[[Tenryuu]], [[Yuubari|'''<span style="color:red">Yuubari</span>''']]
| |
| − | |[[Aoba]], [[Atago]], [[Chikuma]], [[Furutaka]], [[Kako]], [[Kinugasa]], [[Mogami]], [[Takao]], [[Tone]]
| |
| − | |[[Chiyoda]], [[Chitose]]
| |
| − | |[[Souryuu]], [[Hiryuu]]
| |
| − | |[[Haruna]], [[Hiei]], [[Hyuuga]], [[Ise]], [[Kirishima]], [[Kongou]], [[Fusou]], [[Yamashiro]], [[Nagato]], [[Mutsu]]
| |
| − | |
| |
| − | |[[Hayasui|'''<span style="color:red">Hayasui</span>''']]
| |
| − | |}
| |
| − | |-| 6-5=
| |
| − | ==World 6-5: KW環礁沖海域 "Carrier Task Force Interception" Off the Coast of KW Atoll==
| |
| − | {{LabSortieworld
| |
| − | | map = 6-5Map.png
| |
| − | | difficulty = ☆☆☆☆☆☆☆☆☆☆☆☆☆
| |
| − | | item = None
| |
| − | | exp = Varies
| |
| − | | code = 空母機動部隊迎撃戦 <br>Carrier Task Force Interception
| |
| − | | jptext = 中部海域最前線に有力な敵機動部隊が襲来した!同戦域に展開する基地航空隊と協同し、敵艦隊を迎撃、これを撃滅せよ!
| |
| − | | entext = A Powerful Carrier Task force is conducting an invasion in the Central Water Frontlines! With the Cooperation of your Land Base Air Sqaudron, deploy into the same theater, intercept the enemy fleet, and eliminate them!
| |
| − | }}
| |
| − |
| |
| − | ===Stage Guide===
| |
| − |
| |
| − | {{MapBranchingTable
| |
| − | |title = 6-5 Branching Rules
| |
| − | |expand = true
| |
| − | |id = 6-5
| |
| − | |0 -> 1 =
| |
| − | *Meet '''ANY''' of the following requirements:
| |
| − | **Fleet contains CV(L/B) or CLT
| |
| − | **Amount of BB(V) in fleet ≥ 4
| |
| − | **The fleet has no CL
| |
| − |
| |
| − | |0 -> 2 = * Does not meet any of the requirements to start at 1
| |
| − |
| |
| − | |B -> C =
| |
| − | * Meet '''ANY''' of the following requirements:
| |
| − | ** Amount of DD in fleet ≤ 1
| |
| − | ** Amount of BB(V) in Fleet ≥ 3
| |
| − |
| |
| − | |B -> F = * Does not meet any requirement to go C
| |
| − |
| |
| − | |C -> D =
| |
| − | *Does not meet the requirements to go to E
| |
| − |
| |
| − | |C -> E =
| |
| − | * Meet '''ANY''' of the following requirements:
| |
| − | **Amount of CLT in fleet ≥ 2
| |
| − | **Amount of BB(V) + CV(L/B) + CA(V) in fleet ≥ 5
| |
| − | **Amount of BB(V) + CV(L/B) in fleet ≥ 4
| |
| − | **Fleet contains no DDs
| |
| − |
| |
| − | |E -> H,I =
| |
| − | *Go to H if fleet contains CV(L/B), CL '''and''' DD
| |
| − | *Otherwise, I
| |
| − |
| |
| − | |G -> K/empty = * Fail the LOS Check
| |
| − |
| |
| − | |G -> M = * Pass the LOS Check ('''≧ 50 F33 Cn3''')
| |
| − |
| |
| − | |I -> H = *Does not meet any of the requirements to go to J
| |
| − |
| |
| − | |I -> J/night = *Fleet contains CL and DD ≥ 2
| |
| − |
| |
| − | |J -> L/empty = * Fail the LOS Check
| |
| − |
| |
| − | |J -> M = * Pass the LOS Check ('''≧ 35 F33 Cn3''')
| |
| − | }}
| |
| − |
| |
| − | {{AirControlSystem
| |
| − | | Map =6-5 Boss 2 Wo Comp
| |
| − | | AS = 468
| |
| − | | Notes = Requires less if LBAS waves are sent to the boss node
| |
| − | }}
| |
| − |
| |
| − | ===Tips===
| |
| − | *'''Requires destroying the [[Aircraft Carrier Princess]] 6 times to clear.'''
| |
| − | *This map features multiple starting zone positions. The south route has nodes without enemy CVs and a night battle node, while north route is filled with enemy carriers
| |
| − | *Clearing this map rewards 1 Medal and 250 ranking points. The boss HP bar is reset at the beginning of each month.
| |
| − | *Air raids will appear once you get the second kill on the boss. However, these will stop after you deplete the bar.
| |
| − | *The enemy composition of the map will get harder after you get 3 kills (1 elite ship) and when you reach the final kill (all elite ships)
| |
| − | **The map reverts to all possible pre-final compositions after clearing until the next month reset.
| |
| − | *Do prepare a lot of fuel and bauxite for this map as it'll be a costly monthly EO.
| |
| − | Regarding the boss fleet, it is the first normal map that introduces [[Enemy Combined Fleet]]
| |
| − | *Having access to both of your [[LBAS]] for this map is highly recommended for the sake of being able to complete this map with relative easy.
| |
| − | **[[LBAS]] setup should be 2 fighters and 2 Land Based Land Attack Bombers.
| |
| − | **[[LBAS]] should be set to target the boss node.
| |
| − | **If fortunate enough, it can be possible to take out the [[Aircraft Carrier Princess]] with the [[LBAS]] or take out a majority of her planes allowing for a chance to easily wipe out all of her bombers rendering her defenseless.
| |
| − | **You are required to have '''5 Range''' to reach the boss with LBAS planes
| |
| − | *Eliminating the entire Escort fleet at the boss node is the key so that you can have a high chance of getting a torpedo salvo on the main fleet.
| |
| − | *If you are able to take out the enemy fleet's escort flagship along with any of the three enemy escorts, the escort fleet should be removed in night battle, leaving only the main fleet.
| |
| − | **Conditions to engage a night battle against enemy main fleet are not fully known yet, as there are some circumstances that enemy escort flagship is alive, but you still get to fight the enemy main fleet at night.
| |
| − |
| |
| − | <br/>'''Recommended Fleet'''
| |
| − | ====North Route====
| |
| − | *'''1 BB 1 CA(V) 2 CV(B) 1 DD 1 CLT''' routes '''ACDGM'''
| |
| − | **Node G is an Air Defense node.
| |
| − | **This comp gives the lowest remaining ammo modifier (36% fuel and 32% ammo) when you arrive at the boss, also consumes a lot of bauxite due to the presence of CL Tsu-Class on the way. Only use this comp if you can't use any of the other comps below.
| |
| − | **It is recommended to bring at least 1 ship with Anti-Air Cut-in setup to defend against the enemy Carriers (Akizuki, Maya Kai Ni, Fletcher, ...)
| |
| − | **The BB can be swapped for a 3rd CV(B). The 2nd CV(B) can be swapped for a 2nd BB.
| |
| − | **The CA(V) can be swapped for a CL or DD. If so, Abukuma Kai Ni or Yuubari Kai Ni Toku is recommended.
| |
| − |
| |
| − | ====South Route====
| |
| − | *'''2 BB(V) 1 CA(V) 1 CL 2 DD''' routes '''BFIJM'''
| |
| − | **Node B is a Submarine node.
| |
| − | **Node J is a Night Battle node.
| |
| − | **You will arrive at the boss node with 42% fuel and 50% ammo left, there will be no damage penalty for your ships.
| |
| − | **It's highly recommended to bring at least one AACI ship such as Akizuki, Maya Kai Ni, Fletcher, ...
| |
| − | **Using the 5-slot BBVs Ise Kai Ni, CAV and seaplane fighter-carrying battleships such as Musashi Kai Ni, along with LBAS can enable Air Superiority or Air Supremacy to be achieved at the boss.
| |
| − | ***With all 4 LBAS waves of Air Parity sent to boss, your fleet needs average '''275+ air''' ('''300+''' for safety) to ensure AS at boss.
| |
| − | ****'''140+''' air is enough if you only want AP at the boss node while still ensuring AS+ preboss
| |
| − | **The enemies in this route are lighter and easier to break through except for the boss, will require good ships and equip to score a kill reliably
| |
| − | **The CA(V) can be swapped for a 2nd CL
| |
| − |
| |
| − | ====South-North Route====
| |
| − | *'''3 BB(V) 1 CA(V)/CL 1 CL 1 DD''' routes '''BCDGM'''
| |
| − | **Node G is an Air Defense node.
| |
| − | **This comp currently gives the best remaining fuel and ammo modifier when you arrive at the boss (48% fuel and 52% ammo)
| |
| − | **However, a lot of good ships are required to make this comp work reliably such as Ise Kai Ni, Hyuuga Kai Ni and good AACI ships like Atlanta, Fletcher, Akizuki class
| |
| − | **Touch attack can be used on node C to increase the passing rate.
| |
| − |
| |
| − | ====Middle Route====
| |
| − | *'''1 (F)BB(V) 1 CV(L/B) 2 (F)BB(V)/CV(L/B) 1 CL 1 DD''' routes '''ACEHGM'''
| |
| − | **Node G and H are Air Defense node.
| |
| − | **Arriving at the boss node with a slight ammo penalty (44% fuel 44% ammo), this comp is currently the strongest variant you can bring to the boss node with 4 heavy ships in total. It is also an option for any 6-5 related quests with CV(L) such as '''B154''' (Kaga Kai Ni quest).
| |
| − | **However, a full base of [[Prototype Toukai]] is required to increase the passing rate at node E due to the appearance of [[Submarine So-Class]] Elite and Flagship there. Like the South-North comp, a lot of good ships are also required to make this comp work reliably such as 5-slot BB(V), good AACI ships like [[Atlanta]], [[Fletcher]], [[Akizuki]] class.
| |
| − | **Touch attack can be used on node C to increase the passing rate.
| |
| − |
| |
| − | ===Nodes And Enemy Encounters===
| |
| − | {{#invoke:EnemyEncounters2|encounterTemplate
| |
| − | |A_label = 先遣任務部隊 前衛艦隊
| |
| − | |A-1_node_info = cl_he-class_flagship cl_ho-class_flagship dd_ro-class_late_model dd_ro-class_late_model dd_i-class_late_model dd_i-class_late_model
| |
| − | |A-1_form = line_ahead
| |
| − | |A-1_xp =
| |
| − | |A-1_enemy_air_power =
| |
| − | |A-2_node_info = cl_he-class_flagship cl_ho-class_flagship dd_i-class_late_model dd_i-class_late_model dd_i-class_late_model dd_i-class_late_model
| |
| − | |A-2_form = line_ahead
| |
| − | |A-2_xp =
| |
| − | |A-2_enemy_air_power =
| |
| − | |A-3_node_info = cl_he-class_flagship cl_ho-class_flagship dd_ha-class_late_model dd_ro-class_late_model dd_ro-class_late_model dd_ro-class_late_model
| |
| − | |A-3_form = line_ahead
| |
| − | |A-3_xp =
| |
| − | |A-3_enemy_air_power =
| |
| − | |A-4_node_info = cl_he-class_flagship cl_ho-class_flagship dd_ro-class_late_model dd_ro-class_late_model dd_ro-class_late_model dd_ro-class_late_model
| |
| − | |A-4_form = line_ahead
| |
| − | |A-4_xp =
| |
| − | |A-4_enemy_air_power =
| |
| − | |A-5_node_info = cl_he-class_flagship cl_ho-class_flagship cl_ho-class_flagship dd_ha-class_late_model dd_ha-class_late_model dd_ha-class_late_model
| |
| − | |A-5_form = line_ahead
| |
| − | |A-5_xp =
| |
| − | |A-5_enemy_air_power =
| |
| − | |A-6_node_info = cl_he-class_flagship dd_i-class_late_model dd_i-class_late_model dd_i-class_late_model dd_i-class_late_model dd_i-class_late_model
| |
| − | |A-6_form = line_ahead
| |
| − | |A-6_xp =
| |
| − | |A-6_enemy_air_power =
| |
| − | |A-7_node_info = cl_he-class_flagship cl_he-class_flagship cl_ho-class_flagship cl_ho-class_flagship dd_ha-class_late_model dd_ha-class_late_model
| |
| − | |A-7_form = line_ahead
| |
| − | |A-7_xp =
| |
| − | |A-7_enemy_air_power =
| |
| − | |A-8_node_info = cl_he-class_flagship cl_ho-class_flagship dd_ha-class_late_model dd_ha-class_late_model dd_ro-class_late_model dd_ro-class_late_model
| |
| − | |A-8_form = line_ahead
| |
| − | |A-8_xp =
| |
| − | |A-8_enemy_air_power =
| |
| − | |A-9_node_info = cl_he-class_flagship cl_ho-class_flagship cl_ho-class_flagship dd_ha-class_late_model dd_ro-class_late_model dd_ro-class_late_model
| |
| − | |A-9_form = line_ahead
| |
| − | |A-9_xp =
| |
| − | |A-9_enemy_air_power =
| |
| − | |
| |
| − | |B_label = 深海潜水艦隊 前方展開部隊
| |
| − | |B-1_node_info = ss_ka-class_flagship ss_ka-class_elite ss_ka-class_elite
| |
| − | |B-1_form = line_abreast echelon
| |
| − | |B-1_xp =
| |
| − | |B-1_enemy_air_power =
| |
| − | |B-2_node_info = ss_ka-class_flagship ss_ka-class_elite ss_ka-class_elite ss_ka-class_elite
| |
| − | |B-2_form = line_abreast echelon
| |
| − | |B-2_xp =
| |
| − | |B-2_enemy_air_power =
| |
| − | |B-3_node_info = ss_ka-class_flagship ss_ka-class_flagship ss_ka-class_elite ss_ka-class_elite ss_ka-class_elite
| |
| − | |B-3_form = echelon line_abreast
| |
| − | |B-3_xp =
| |
| − | |B-3_enemy_air_power =
| |
| − | |B-4_node_info = ss_ka-class_elite ss_ka-class_elite ss_ka-class_elite
| |
| − | |B-4_form = echelon
| |
| − | |B-4_xp =
| |
| − | |B-4_enemy_air_power =
| |
| − | |B-5_node_info = ss_ka-class_flagship ss_ka-class_elite ss_ka-class_elite ss_ka-class_elite ss_ka-class_elite
| |
| − | |B-5_form = line_abreast echelon
| |
| − | |B-5_xp =
| |
| − | |B-5_enemy_air_power =
| |
| − | |
| |
| − | |C_label = 先遣任務部隊
| |
| − | |C-1_node_info = cv_wo-class_flagship_kai bb_ta-class_flagship ca_ne-class cl_tsu-class dd_i-class_late_model dd_i-class_late_model
| |
| − | |C-1_form = diamond
| |
| − | |C-1_xp =
| |
| − | |C-1_enemy_air_power = 132
| |
| − | |C-2_node_info = cv_wo-class_flagship_kai bb_ta-class_flagship ca_ne-class_elite cl_tsu-class dd_ro-class_late_model dd_ro-class_late_model
| |
| − | |C-2_form = diamond
| |
| − | |C-2_xp =
| |
| − | |C-2_enemy_air_power = 132
| |
| − | |C-3_node_info = cv_wo-class_flagship_kai bb_ta-class_flagship ca_ne-class ca_ne-class dd_i-class_late_model dd_i-class_late_model
| |
| − | |C-3_form = diamond
| |
| − | |C-3_xp =
| |
| − | |C-3_enemy_air_power = 132
| |
| − | |C-4_node_info = cv_wo-class_flagship_kai bb_ta-class_flagship cl_tsu-class cl_tsu-class dd_i-class_late_model dd_i-class_late_model
| |
| − | |C-4_form = diamond
| |
| − | |C-4_xp =
| |
| − | |C-4_enemy_air_power = 132
| |
| − | |C-5_node_info = cv_wo-class_flagship_kai bb_ta-class_flagship cl_tsu-class_elite cl_tsu-class dd_ro-class_late_model dd_ro-class_late_model
| |
| − | |C-5_form = diamond
| |
| − | |C-5_xp =
| |
| − | |C-5_enemy_air_power = 132
| |
| − | |C-6_node_info = cv_wo-class_flagship_kai bb_ta-class_flagship ca_ne-class_elite ca_ne-class dd_ro-class_late_model dd_ro-class_late_model
| |
| − | |C-6_form = diamond
| |
| − | |C-6_xp =
| |
| − | |C-6_enemy_air_power = 132
| |
| − | |C-7_node_info = cv_wo-class_flagship_kai bb_ta-class_flagship ca_ne-class_elite cl_tsu-class_elite dd_ha-class_late_model dd_ha-class_late_model
| |
| − | |C-7_form = diamond
| |
| − | |C-7_xp =
| |
| − | |C-7_enemy_air_power = 132
| |
| − | |C-8_node_info = cv_wo-class_flagship_kai bb_ta-class_flagship ca_ne-class_elite ca_ne-class_elite dd_ha-class_late_model dd_ha-class_late_model
| |
| − | |C-8_form = diamond
| |
| − | |C-8_xp =
| |
| − | |C-8_enemy_air_power = 132
| |
| − | |C-9_node_info = cv_wo-class_flagship_kai bb_ta-class_flagship cl_tsu-class_elite cl_tsu-class_elite dd_ha-class_late_model dd_ha-class_late_model
| |
| − | |C-9_form = diamond
| |
| − | |C-9_xp =
| |
| − | |C-9_enemy_air_power = 132
| |
| − | |
| |
| − | |D_label = 深海護衛空母部隊 B群
| |
| − | |D-1_node_info = cvl_nu-class_flagship cvl_nu-class_flagship cl_tsu-class dd_ro-class_late_model dd_i-class_late_model dd_i-class_late_model
| |
| − | |D-1_form = diamond line_ahead double_line
| |
| − | |D-1_xp =
| |
| − | |D-1_enemy_air_power = 46
| |
| − | |D-2_node_info = cvl_nu-class_flagship cvl_nu-class_flagship ca_ne-class_elite cl_tsu-class dd_ro-class_late_model dd_ro-class_late_model
| |
| − | |D-2_form = double_line line_ahead diamond
| |
| − | |D-2_xp =
| |
| − | |D-2_enemy_air_power = 46
| |
| − | |D-3_node_info = cvl_nu-class_flagship cvl_nu-class_flagship ca_ne-class_elite cl_tsu-class_elite dd_ha-class_late_model dd_ha-class_late_model
| |
| − | |D-3_form = double_line line_ahead diamond
| |
| − | |D-3_xp =
| |
| − | |D-3_enemy_air_power = 46
| |
| − | |
| |
| − | |E_label = 深海潜水艦隊 精鋭群狼部隊
| |
| − | |E-1_node_info = ss_so-class_flagship ss_so-class_elite ss_so-class_elite
| |
| − | |E-1_form = line_abreast echelon
| |
| − | |E-1_xp =
| |
| − | |E-1_enemy_air_power =
| |
| − | |E-2_node_info = ss_so-class_flagship ss_so-class_elite ss_so-class_elite ss_so-class_elite ss_so-class_elite
| |
| − | |E-2_form = echelon line_abreast
| |
| − | |E-2_xp =
| |
| − | |E-2_enemy_air_power =
| |
| − | |E-3_node_info = ss_so-class_flagship ss_so-class_elite ss_so-class_elite ss_so-class_elite
| |
| − | |E-3_form = line_abreast echelon
| |
| − | |E-3_xp =
| |
| − | |E-3_enemy_air_power =
| |
| − | |E-4_node_info = ss_so-class_flagship ss_so-class_elite ss_so-class_elite ss_so-class_elite ss_so-class_elite ss_so-class_elite
| |
| − | |E-4_form = echelon
| |
| − | |E-4_xp =
| |
| − | |E-4_enemy_air_power =
| |
| − | |
| |
| − | |F_label = 深海巡洋艦戦隊
| |
| − | |F-1_node_info = ca_ri-class_flagship clt_chi-class_flagship clt_chi-class_flagship cl_ho-class_flagship dd_i-class_late_model dd_i-class_late_model
| |
| − | |F-1_form = echelon double_line line_ahead
| |
| − | |F-1_xp =
| |
| − | |F-1_enemy_air_power =
| |
| − | |F-2_node_info = ca_ri-class_flagship_kai clt_chi-class_flagship clt_chi-class_flagship cl_he-class_flagship dd_ro-class_late_model dd_ro-class_late_model
| |
| − | |F-2_form = line_ahead double_line echelon
| |
| − | |F-2_xp =
| |
| − | |F-2_enemy_air_power =
| |
| − | |F-3_node_info = ca_ri-class_flagship clt_chi-class_flagship clt_chi-class_flagship cl_he-class_flagship dd_ro-class_late_model dd_ro-class_late_model
| |
| − | |F-3_form = line_ahead double_line echelon
| |
| − | |F-3_xp =
| |
| − | |F-3_enemy_air_power =
| |
| − | |
| |
| − | |G_label = 深海任務部隊 艦載機群<br>
| |
| − | |G-1_node_info = aircraft_carrier_princess cv_wo-class_flagship_2 ca_ri-class_flagship cl_tsu-class_elite dd_ro-class_late_model dd_ro-class_late_model
| |
| − | |G-1_form = diamond
| |
| − | |G-1_xp =
| |
| − | |G-1_enemy_air_power = 209
| |
| − | |G-2_node_info = aircraft_carrier_princess cv_wo-class_flagship_2 cv_wo-class_flagship_2 cl_tsu-class_elite dd_ha-class_late_model dd_ha-class_late_model
| |
| − | |G-2_form = diamond
| |
| − | |G-2_xp =
| |
| − | |G-2_enemy_air_power = 312
| |
| − | |G-3_node_info = aircraft_carrier_princess cv_wo-class_flagship_2 cv_wo-class_flagship_2 cl_tsu-class_elite dd_ni-class_late_model dd_ni-class_late_model
| |
| − | |G-3_form = diamond
| |
| − | |G-3_xp =
| |
| − | |G-3_enemy_air_power = 312
| |
| − | |
| |
| − | |H_label = 深海任務部隊 艦載機群<br>'''<span style="color:green">Air Battle Node</span>'''
| |
| − | |H-1_node_info = cv_wo-class_flagship_2 ca_ri-class_flagship cl_tsu-class_elite dd_ro-class_late_model dd_ro-class_late_model dd_ro-class_late_model
| |
| − | |H-1_form = diamond
| |
| − | |H-1_xp =
| |
| − | |H-1_enemy_air_power = 103
| |
| − | |H-2_node_info = cv_wo-class_flagship_2 cv_wo-class_flagship_2 cl_tsu-class_elite dd_ha-class_late_model dd_ha-class_late_model dd_ha-class_late_model
| |
| − | |H-2_form = diamond
| |
| − | |H-2_xp =
| |
| − | |H-2_enemy_air_power = 206
| |
| − | |
| |
| − | |I_label = 深海護衛空母部隊 A群
| |
| − | |I-1_node_info = cvl_nu-class_flagship cvl_nu-class_flagship cl_tsu-class dd_i-class_late_model dd_i-class_late_model dd_i-class_late_model
| |
| − | |I-1_form = diamond double_line line_ahead
| |
| − | |I-1_xp =
| |
| − | |I-1_enemy_air_power = 46
| |
| − | |I-2_node_info = cvl_nu-class_flagship cvl_nu-class_flagship cl_tsu-class_elite dd_ha-class_late_model dd_i-class_late_model dd_i-class_late_model
| |
| − | |I-2_form = line_ahead double_line diamond
| |
| − | |I-2_xp =
| |
| − | |I-2_enemy_air_power = 46
| |
| − | |I-3_node_info = cvl_nu-class_flagship cvl_nu-class_flagship cl_he-class_flagship cl_tsu-class_elite dd_ha-class_late_model dd_ha-class_late_model
| |
| − | |I-3_form = double_line diamond line_ahead
| |
| − | |I-3_xp =
| |
| − | |I-3_enemy_air_power = 46
| |
| − | |
| |
| − | |J_label = 深海護衛空母部隊 C群<br>'''<span style="color:purple">Night Battle Node</span>'''
| |
| − | |J-1_node_info = cvl_nu-class_flagship cl_he-class_flagship cl_tsu-class dd_i-class dd_i-class dd_i-class
| |
| − | |J-1_form = line_ahead diamond double_line
| |
| − | |J-1_xp =
| |
| − | |J-1_enemy_air_power = 23
| |
| − | |J-2_node_info = cvl_nu-class_flagship cl_he-class_flagship cl_tsu-class dd_i-class_late_model dd_i-class dd_i-class
| |
| − | |J-2_form = line_ahead double_line diamond
| |
| − | |J-2_xp =
| |
| − | |J-2_enemy_air_power = 23
| |
| − | |J-3_node_info = cvl_nu-class_flagship cl_he-class_flagship cl_tsu-class dd_ro-class_late_model dd_i-class_late_model dd_i-class_late_model
| |
| − | |J-3_form = line_ahead diamond double_line
| |
| − | |J-3_xp =
| |
| − | |J-3_enemy_air_power = 23
| |
| − | |
| |
| − | |K_label = '''<span style="color:blue">Battle Avoided</span>'''
| |
| − | |K-1_node_info = "Must be my imagination" (battle avoided)
| |
| − | |
| |
| − | |L_label = '''<span style="color:blue">Battle Avoided</span>'''
| |
| − | |L-1_node_info = "Must be my imagination" (battle avoided)
| |
| − | |
| |
| − | |M_label = 任務部隊 主力群
| |
| − | |M-1_node_info = aircraft_carrier_princess cv_wo-class_flagship_2 ca_ri-class_flagship cl_tsu-class_elite dd_ro-class_late_model dd_ro-class_late_model cl_he-class_flagship ca_ri-class_flagship dd_i-class_late_model dd_i-class_late_model dd_i-class_late_model dd_i-class_late_model
| |
| − | |M-1_form = cruising_form_3
| |
| − | |M-1_xp =
| |
| − | |M-1_enemy_air_power = 209
| |
| − | |M-2_node_info = aircraft_carrier_princess cv_wo-class_flagship_2 cv_wo-class_flagship_2 cl_tsu-class_elite dd_ha-class_late_model dd_ha-class_late_model cl_he-class_flagship ca_ri-class_flagship ca_ri-class_flagship dd_ha-class_late_model dd_i-class_late_model dd_i-class_late_model
| |
| − | |M-2_form = cruising_form_3
| |
| − | |M-2_xp =
| |
| − | |M-2_enemy_air_power = 312
| |
| − | |M-3_node_info = aircraft_carrier_princess cv_wo-class_flagship_2 cv_wo-class_flagship_2 cl_tsu-class_elite dd_ni-class_late_model dd_ni-class_late_model cl_he-class_flagship ca_ri-class_flagship ca_ri-class_flagship dd_ha-class_late_model dd_ro-class_late_model dd_ro-class_late_model
| |
| − | |M-3_form = cruising_form_3
| |
| − | |M-3_xp =
| |
| − | |M-3_enemy_air_power = 312
| |
| − | |
| |
| − | |final_form = M3
| |
| − | |boss_node = M
| |
| − | }}
| |
| − |
| |
| − | ===Drops===
| |
| − | <div class="mw-customtoggle-6-5-drop globalbutton">Show/Hide Drops</div>
| |
| − | {| class="mw-collapsible mw-collapsed wikitable" id="mw-customcollapsible-6-5-drop"
| |
| − | !Node
| |
| − | !Destroyers
| |
| − | !Light Cruisers
| |
| − | !Heavy Cruisers
| |
| − | !Seaplane Tender
| |
| − | !Aircraft Carrier
| |
| − | !Battleship
| |
| − | !Submarine
| |
| − | !Others
| |
| − | |-
| |
| − | |A
| |
| − | |[[Fubuki]], [[Shirayuki]], [[Hatsuyuki]], [[Murakumo]], [[Ayanami]], [[Isonami]], [[Shikinami]], [[Oboro]], [[Sazanami]], [[Akebono]], [[Ushio]], [[Akatsuki]], [[Hibiki]], [[Inazuma]], [[Ikazuchi]], [[Hatsuharu]], [[Wakaba]], [[Hatsushimo]], [[Shiratsuyu]], [[Shigure]], [[Yuudachi]], [[Murasame]], [[Samidare]], [[Suzukaze]]
| |
| − | |[[Isuzu]], [[Natori]], [[Jintsuu]], [[Naka]]
| |
| − | |
| |
| − | |
| |
| − | |
| |
| − | |
| |
| − | |
| |
| − | |
| |
| − | |-
| |
| − | |C
| |
| − | |[[Fubuki]], [[Shirayuki]], [[Hatsuyuki]], [[Murakumo]], [[Ayanami]], [[Isonami]], [[Shikinami]], [[Oboro]], [[Sazanami]], [[Akebono]], [[Ushio]], [[Akatsuki]], [[Hibiki]], [[Inazuma]], [[Ikazuchi]], [[Mutsuki]], [[Kisaragi]], [[Satsuki]] [[Fumizuki]] [[Nagatsuki]] [[Kikuzuki]] [[Mikazuki]] [[Mochizuki]] [[Shiratsuyu]], [[Shigure]], [[Yuudachi]], [[Murasame]], [[Samidare]], [[Suzukaze]], [[Akigumo]]
| |
| − | |[[Nagara]], [[Natori]], [[Isuzu]], [[Yura]], [[Kuma]], [[Tama]], [[Kiso]], [[Sendai]], [[Jintsuu]], [[Naka]]
| |
| − | |
| |
| − | |
| |
| − | |[[Houshou]], [[Ryuujou]], [[Hiyou]], [[Junyou]]
| |
| − | |
| |
| − | |
| |
| − | |
| |
| − | |-
| |
| − | |D
| |
| − | |[[Fubuki]], [[Shirayuki]], [[Hatsuyuki]], [[Murakumo]], [[Ayanami]], [[Isonami]], [[Shikinami]], [[Oboro]], [[Sazanami]], [[Akebono]], [[Ushio]], [[Akatsuki]], [[Hibiki]], [[Inazuma]], [[Ikazuchi]], [[Mutsuki]], [[Kisaragi]], [[Satsuki]] [[Fumizuki]] [[Nagatsuki]] [[Kikuzuki]] [[Mikazuki]] [[Mochizuki]] [[Shiratsuyu]], [[Shigure]], [[Yuudachi]], [[Murasame]], [[Samidare]], [[Suzukaze]], [[Akigumo]]
| |
| − | |[[Nagara]], [[Natori]], [[Isuzu]], [[Yura]], [[Kinu]], [[Abukuma]], [[Kuma]], [[Tama]], [[Kiso]], [[Kitakami]], [[Ooi]], [[Sendai]], [[Jintsuu]], [[Naka]]
| |
| − | |
| |
| − | |
| |
| − | |[[Houshou]], [[Ryuujou]], [[Hiyou]], [[Junyou]], [[Shouhou]]
| |
| − | |
| |
| − | |[[I-168]]
| |
| − | |
| |
| − | |-
| |
| − | |style="color:red" |'''M'''
| |
| − | |[[Fubuki]], [[Shirayuki]], [[Hatsuyuki]], [[Murakumo]], [[Ayanami]], [[Isonami]], [[Shikinami]], [[Oboro]], [[Sazanami]], [[Akebono]], [[Ushio]], [[Akatsuki]], [[Hibiki]], [[Inazuma]], [[Ikazuchi]], [[Mutsuki]], [[Kisaragi]], [[Satsuki]] [[Fumizuki]] [[Nagatsuki]] [[Kikuzuki]] [[Mikazuki]] [[Mochizuki]] [[Shiratsuyu]], [[Shigure]], [[Yuudachi]], [[Murasame]], [[Samidare]], [[Suzukaze]], [[Akigumo]], [[Maikaze|'''<span style="color:red">Maikaze</span>''']], [[Yuugumo|'''<span style="color:red">Yuugumo</span>''']], [[Makigumo|'''<span style="color:red">Makigumo</span>''']], [[Naganami|'''<span style="color:red">Naganami</span>''']], [[Harusame|'''<span style="color:red">Harusame</span>''']], [[Asashimo|'''<span style="color:red">Asashimo</span>''']], [[Nowaki|'''<span style="color:red">Nowaki</span>''']], [[Takanami|'''<span style="color:red">Takanami</span>''']], [[Kawakaze|'''<span style="color:red">Kawakaze</span>''']], [[Umikaze|'''<span style="color:red">Umikaze</span>''']], [[Okinami|'''<span style="color:red">Okinami</span>''']]
| |
| − | |[[Tenryuu]], [[Tatsuta]], [[Nagara]], [[Natori]], [[Isuzu]], [[Yura]], [[Kinu]], [[Abukuma]], [[Kuma]], [[Tama]], [[Kiso]], [[Kitakami]], [[Ooi]], [[Sendai]], [[Jintsuu]], [[Naka]], [[Yuubari]]
| |
| − | |[[Furutaka]], [[Kako]], [[Aoba]], [[Takao]], [[Atago]], [[Choukai]], [[Maya]], [[Tone]], [[Chikuma]], [[Suzuya]], [[Kinugasa]]
| |
| − | |[[Chiyoda]], [[Chitose]]
| |
| − | |[[Akagi]],[[Kaga]], [[Shoukaku]], [[Zuikaku]], [[Houshou]]
| |
| − | |[[Nagato]], [[Mutsu]], [[Kongou]], [[Hiei]], [[Kirishima]], [[Haruna]]
| |
| − | |
| |
| − | |[[Kashima|'''<span style="color:red">Kashima</span>''']]
| |
| − | |-
| |
| − | |}
| |
| | </tabber> | | </tabber> |
| | {{Navbox World}} | | {{Navbox World}} |


 on both the CL & CLT gives a powerful Opening Torpedo Salvo (Otorp).
 , adding the Jet Assault phase to the already strong Otorp, allowing to wipe all pre-boss fleets before they can attack the fleet.
 range extender to be set on Long Range, and so act first after the Opening phases (note that Jets also extend the range to long).
 may be used to meet the LoS requirements.
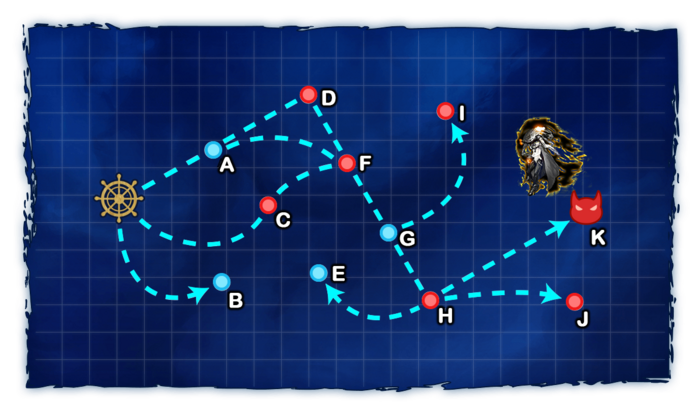
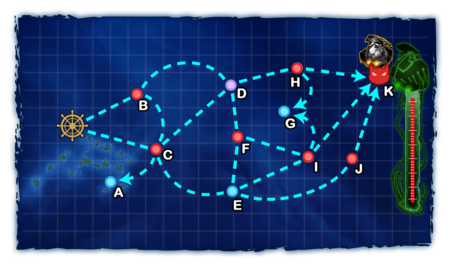
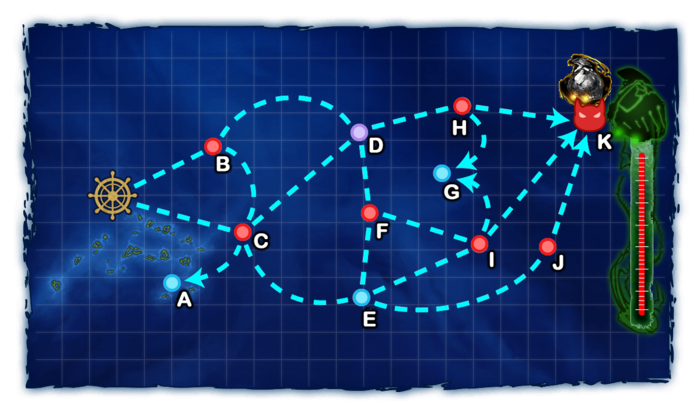
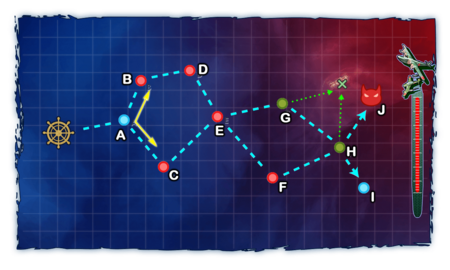
 or recon seaplanes, and undertake the air reconnaissance "Operation K"!
 /
/ consumption
 Large Flying Boats
 Seaplanes (SPR and SPB) are brought, Flying Boat animation takes priority.
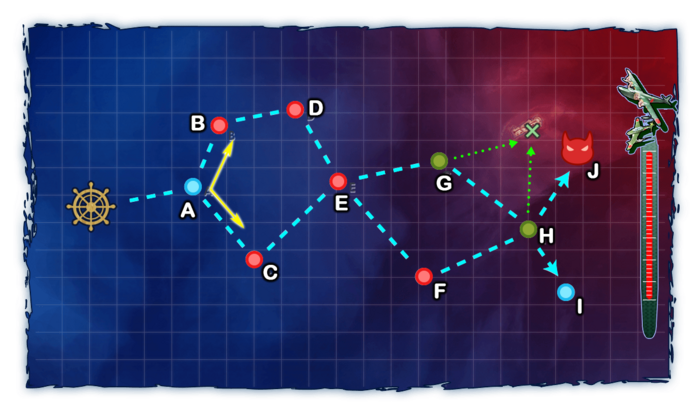
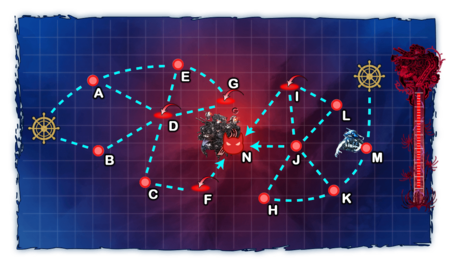

 , Mutsu Kai Ni
 , 1CL/CAV, 2DD, Akitsushima
 Anti-Ground Rockets
 ,
,  "Landing Equipments", and
  Amphibious Tanks
 will do decent damage to them, especially if arranged in Nuke set-ups, where stacking them can do a lot of damage to Supply Depot Princess and Artillery Imp.
 AA Shells
 is debated.
 equipped UNLESS it's one of the dive-bombers from the following list:


 Speed modifiers
 .
.