- Welcome to the Kancolle Wiki!
- If you have any questions regarding site content, account registration, etc., please visit the KanColle Wiki Discord
World 6/6-2
< World 6
Jump to navigation
Jump to search
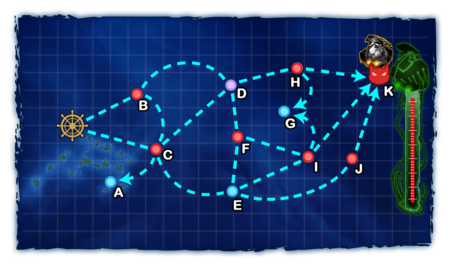
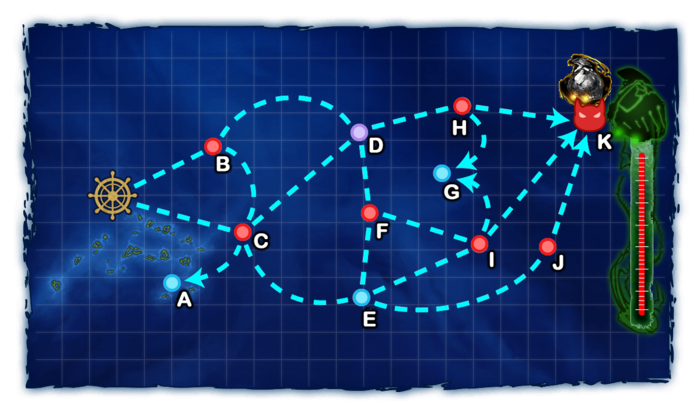
World 6-2: MS諸島沖 - MS Islands Offshore
| Strategy Name | MS諸島防衛戦 Defense of the MS Islands |
|---|---|
| Difficulty | ☆ ☆ ☆ ☆ ☆ ☆ ☆ ☆ ☆ |
| Item | - |
| Strategy Content | MS諸島沖前面に展開し、同諸島方面に接近しつつある敵攻略部隊を捕捉、全力で撃滅せよ! Expand to the forward part of the MS Islands sea, seize the enemy fleet that is slowly advancing to capture the islands, and destroy them with all your might! |
| Boss Air Control | |||
|---|---|---|---|
| AD | AP | AS | AS+ |
| 46 | 68 | 153 | 306 |
| Boss Route Air Control | |||
| AD | AP | AS | AS+ |
| 75 | 112 | 252 | 504 |
| 6-2 Unlocking & Progression | ||||
|---|---|---|---|---|
| Unlock conditions | 6-2 is unlocked after clearing 6-1 | |||
| Clear conditions | To clear the map: the boss's flagship must be sunk 3 times | |||
Stage Guide
| 6-2 Branching Rules |
|---|
Tips
There are Light Cruiser Tsu-Class everywhere. Any CV(B/L) should bring bombers with AAR and in bigger slots, in order to not have them deplaned.
This map is a good spot to farm both Yahagi and Maruyu drops (see here).
Recommended Fleets
Using a Special Attack is recommended, especially the Nelson Touch, as it requires only 1 BB.
| ExpandHeavy Fleet |
|---|
| ExpandLight Fleet |
|---|
| Expand"LoS Snipe" |
|---|
Enemy CompositionsCollapse
6-2 A
| # | Empty Node | ||
|---|---|---|---|
| A | 気のせいだった。/敵影を見ず。/穏やかな海です。/穏やかな海峡です。/警戒が必要です。/静かな海です。 Must be my imagination./No enemy spotted./Calm seas./Calm straits./Be alert./Peaceful seas. | ||
| # | Empty Node | ||
6-2 B: 敵攻略支援部隊A群 (PoiDB)
| # | Formation | Normal Battle Node | AD/AP AS/AS+ |
|---|---|---|---|
| B | Diamond | 9/17 36/72 | |
| Double Line Diamond |
17/33 72/144 | ||
| # | Formation | Normal Battle Node | AD/AP AS/AS+ |
6-2 C: 敵攻略支援部隊B群 (PoiDB)
| # | Formation | Normal Battle Node | AD/AP AS/AS+ |
|---|---|---|---|
| C | Double Line | 9/17 36/72 | |
| Diamond | 16/31 69/138 | ||
| Diamond | 9/17 36/72 | ||
| # | Formation | Normal Battle Node | AD/AP AS/AS+ |
6-2 D
| # | Maelstrom Node | ||
|---|---|---|---|
| D | Lost Strong | ||
| # | Maelstrom Node | ||
6-2 E
| # | Empty Node | ||
|---|---|---|---|
| E | 気のせいだった。/敵影を見ず。/穏やかな海です。/穏やかな海峡です。/警戒が必要です。/静かな海です。 Must be my imagination./No enemy spotted./Calm seas./Calm straits./Be alert./Peaceful seas. | ||
| # | Empty Node | ||
6-2 F: 敵空母機動部隊 (PoiDB)
| # | Formation | Normal Battle Node | AD/AP AS/AS+ |
|---|---|---|---|
| F | Diamond | 57/113 252/504 | |
| Double Line Diamond |
29/57 126/252 | ||
| Diamond | 29/57 126/252 | ||
| # | Formation | Normal Battle Node | AD/AP AS/AS+ |
6-2 G
| # | Empty Node | ||
|---|---|---|---|
| G | 気のせいだった。/敵影を見ず。/穏やかな海です。/穏やかな海峡です。/警戒が必要です。/静かな海です。 Must be my imagination./No enemy spotted./Calm seas./Calm straits./Be alert./Peaceful seas. | ||
| # | Empty Node | ||
6-2 H: 敵高速水上打撃部隊 (PoiDB)
| # | Formation | Normal Battle Node | AD/AP AS/AS+ |
|---|---|---|---|
| H | Line Ahead | 0/0 0/0 | |
| Line Ahead Double Line |
8/16 35/69 | ||
| Line Ahead | 0/0 0/0 | ||
| # | Formation | Normal Battle Node | AD/AP AS/AS+ |
6-2 I: 敵任務部隊B群 (PoiDB)
| # | Formation | Normal Battle Node | AD/AP AS/AS+ |
|---|---|---|---|
| I | Line Ahead Double Line |
0/0 0/0 | |
| Line Ahead Diamond |
8/16 35/69 | ||
| # | Formation | Normal Battle Node | AD/AP AS/AS+ |
6-2 J: 敵任務部隊A群 (PoiDB)
| # | Formation | Normal Battle Node | AD/AP AS/AS+ |
|---|---|---|---|
| J | Line Ahead | 0/0 0/0 | |
| Diamond | 35/69 153/306 | ||
| Double Line | 9/17 36/72 | ||
| # | Formation | Normal Battle Node | AD/AP AS/AS+ |
6-2 K: 敵攻略部隊本体 (PoiDB)
| # | Formation | Boss Battle Node | AD/AP AS/AS+ |
|---|---|---|---|
| K | Line Ahead | 0/0 0/0 | |
| Line Ahead Diamond |
29/57 126/252 | ||
| # | Formation | Boss Battle Node | AD/AP AS/AS+ |
Ship Drops
☒ All drops (disabled, only rare drops)
| ExpandShip drops |
|---|
| ||
