| Strategy Name
|
東京急行
Tokyo Express
|
| Difficulty
|
☆ ☆ ☆ ☆ ☆ ☆ ☆ ☆ ☆
|
| Item
|

|
| Strategy Content
|
南方海域に有力な艦隊を投入し鼠輸送作戦を敢行、可能であれば同方面の敵艦隊も撃滅せよ!
Perform a vital "rat transport" operation. If possible, also destroy the enemy fleet in the area!
|
| Boss Air Control
|
| AD
|
AP
|
AS
|
AS+
|
| 42
|
63
|
140
|
280
|
| Boss Route Air Control
|
| AD
|
AP
|
AS
|
AS+
|
| 92
|
138
|
309
|
618
|
| 5-4 Unlocking & Progression
|
| Unlock conditions
|
5-4 is unlocked after clearing 5-3 HP bar
|
| Clear conditions
|
To clear the map: the boss's flagship must be sunk 5 times
|
| Notes
|
Support Expeditions are available on this map
|
Stage Guide
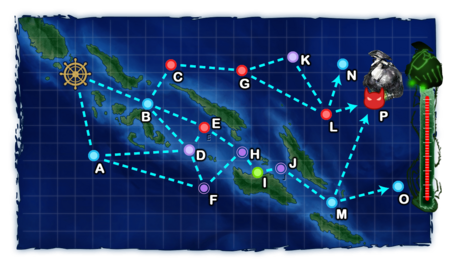
| 5-4 Branching Rules
|
| Nodes |
Rules
|
| Start
|
|
- FORCE node B if fleet contains CV(L/B)
- Meet ANY of the following to go to A
- Meet ANY of the following to go to B
- Otherwise, go to A
|
|
|
|
|
|
- Meet ANY of the following requirements to go to D
- Fleet contains SS(V)
- (F)BB(V) ≥ 5
- DD ≥ 2
- CA(V) ≥ 3
- Otherwise, go to F
|
|
|
|
|
|
- Go to C if fleet contains CV(L/B) or SS(V)
- Go to E if Fast+ fleet
- Meet ANY of the following requirements to go to D
- DD = 0
- Fleet contains (F)BB(V) AND slow ship
- BBV ≥ 1 and amount of slow BB(V) in total ≥ 2 (Ignores Speed improvements)
- Random between D and E if DD ≤ 2
- Otherwise, go to E
|
|
|
|
|
|
|
|
- Go to E if DD ≥ 2 AND slow BB ≤ 1 (BBV doesn't count, ignores Speed improvements)
- Otherwise, go to F
|
|
|
|
|
|
- Go to K if (F)BB(V) ≥ 4
- Random between K and L if CV(B) ≥ 3
- Otherwise, go to L
|
|
|
|
|
|
- Meet ALL of the following to go to P
- (F)BB(V)+CV(B) ≤ 4
- Fast+ fleet OR pass the LoS Check, ≥ 60 (Cn2)
- Random between N and P if (F)BB(V)+CV(B) ≥ 5
- Otherwise, N
|
|
|
|
|
|
- Random between O and P if fleet contains SS(V)
- Fail the LoS Check, < 45 (Cn2)
|
|
|
- Random between O and P if fleet contains SS(V)
- Meet ANY of the following requirements:
- Pass the LoS check, ≥ 45 (Cn2)
- Fast+ fleet (LoS check ignored)
|
Tips
There are two main routes available to reach the boss: north and south.
- North route contains Standard Carrier Wo-Class Flagship IV
 and Battleship Ta-Class Flagship
 with high evasion and accuracy.
- Node C can also contain 1-2 Submarine Ka-Class Elite
 , sometimes in Line Ahead. It is recommended to go Line Abreast against this Node (BBs and CVs can handle all Surface Enemies in the Node even in this formation), and bring OASW DDs to deal with the submarines.
- There is an LoS Check in L to go to the Boss Node, requiring LoS ≥ 60 (Cn2).
- South route doesn't feature any enemy carrier, but will enter night battle nodes like in 5-3 against enemy Heavy Cruiser Ri-Class

 and Late Model DDs.
- SPF are highly advised for this route in order to obtain AS at the boss node, as no CVs are allowed.
There are LoS Checks in L M to go to the Boss, being ignored if the fleet is Fast+.
- No matter which route is taken, Light Cruiser Tsu-Class
 will show up nearly everywhere in this map. Therefore, when using a composition with CVs and going north, it is recommended to use ones with high capacity slots, and place bombers only in the highest capacity slots to avoid all bombers getting shot down to 0 before the Boss Node.
As with every map in World 5, Support Expeditions are available to assist with clearing. This can be especially useful for completing more difficult quests.
After clearing, the boss node will no longer contain Battleship Ta-Class Flagship nor Destroyer Ha-Class Late Model
 .
.
- When arriving via the southern route, the boss node additionally will not contain Heavy Cruiser Ne-Class Elite

- This can make the southern route a viable leveling spot as nodes J P each give a significant amount of experienc.
Regarding nodes:
- D K are maelstrom nodes. It is recommended to bring some radars to reduce fuel losses.
- F H K are night battle nodes.
Recommended Fleets
| ExpandMiddle Route
|
| Fleet Info
|
| Single
|
2 FBB/CA(V), 1 CL, 3 DD
1 FBB, 1 CLT, 4 DD
|
| LoS
|
Cn2: 45
|
| Speed
|
Fast
|
RouteNode Types:
RED: Battle
PURPLE: Night Battle
PINK: Air Raid/Battle
ORANGE: Enemy Ambush/ASS
BLUE: Empty/Choice
Light Blue: Emergency Anchorage Repair
GREEN: Resource/TP
VIOLET: Maelstrom
|
B E H I J M P
|
| Quests
|
Bq6
|
|
| Air State
|
| AD
|
AP
|
AS
|
AS+
|
| 42
|
63
|
140
|
280
|
|
| Fleet Notes
|
| The standard route to clear the map.
The use of Kongou-class Special Attacks is recommended.
|
| ExpandTorpedo Squadron
|
| Fleet Info
|
| Single
|
"Torpedo Squadron": 1 CL (flagship), 2 CLT, 3 DD
|
| LoS
|
Cn2: 45
|
| Speed
|
Fast
|
RouteNode Types:
RED: Battle
PURPLE: Night Battle
PINK: Air Raid/Battle
ORANGE: Enemy Ambush/ASS
BLUE: Empty/Choice
Light Blue: Emergency Anchorage Repair
GREEN: Resource/TP
VIOLET: Maelstrom
|
B E H I J M P
|
|
| Air State
|
| AD
|
AP
|
AS
|
AS+
|
| 42
|
63
|
140
|
280
|
|
| Fleet Notes
|
This solution requires more advanced gears, and might be out of reach of new players. It is required to bring an  FCF capable CL as flagship, preferably an Agano-class Kai+, equipped with: FCF capable CL as flagship, preferably an Agano-class Kai+, equipped with:
The best comp for farming boss node without the need of Support Expedition, having the highest pass rate thanks to the usage of ETSCF in case a ship got heavily damaged.
The Evacuation mechanic of the ETSCF should be used if needed, as long as the routing requirements are maintained.
Do note that the Night Zuiun will likely be shot down completely due to fighting under AI and the presence of CL Tsu-Class , something negligible face to the potential double targeting of the Night Zuiun CI on previous nodes. , something negligible face to the potential double targeting of the Night Zuiun CI on previous nodes.
|
| ExpandNorth Route
|
| Fleet Info
|
| Single
|
2 BB(V), 2 CV(B), 2 XX (XX cannot be (F)BB(V)/CV(L))
1 CV(B), 3 CA, 2 CL
|
| LoS
|
Cn2: 60
|
| Speed
|
Any
|
RouteNode Types:
RED: Battle
PURPLE: Night Battle
PINK: Air Raid/Battle
ORANGE: Enemy Ambush/ASS
BLUE: Empty/Choice
Light Blue: Emergency Anchorage Repair
GREEN: Resource/TP
VIOLET: Maelstrom
|
B C G L P
|
| Quests
|
Bq7 & Bq13
|
|
| Air State
|
| AD
|
AP
|
AS
|
AS+
|
| 92
|
138
|
309
|
618
|
|
| Fleet Notes
|
| A strong fleet, but taking a harder route.
|
| ExpandSouth Route Heavy
|
| Fleet Info
|
| Single
|
1 BBV, 3 CA, 2 CL
3-4 CA, 2 CAV, 0-1 CL
|
| LoS
|
Cn2: 45
|
| Speed
|
Any
|
RouteNode Types:
RED: Battle
PURPLE: Night Battle
PINK: Air Raid/Battle
ORANGE: Enemy Ambush/ASS
BLUE: Empty/Choice
Light Blue: Emergency Anchorage Repair
GREEN: Resource/TP
VIOLET: Maelstrom
|
A D F H I J M P
|
| Quests
|
Bq7, Bq13
|
|
| Air State
|
| AD
|
AP
|
AS
|
AS+
|
| 42
|
63
|
140
|
280
|
|
| Fleet Notes
|
| A strong cheap comp to clear quests.
|
| ExpandSouth Route Light
|
| Fleet Info
|
| Single
|
3 CA(V), 1 CL, 2 DD
|
| LoS
|
Cn2: 45
|
| Speed
|
Any
|
RouteNode Types:
RED: Battle
PURPLE: Night Battle
PINK: Air Raid/Battle
ORANGE: Enemy Ambush/ASS
BLUE: Empty/Choice
Light Blue: Emergency Anchorage Repair
GREEN: Resource/TP
VIOLET: Maelstrom
|
A D E H I J M P
|
| Quests
|
Bq6, Bq7
|
|
| Air State
|
| AD
|
AP
|
AS
|
AS+
|
| 42
|
63
|
140
|
280
|
|
| Fleet Notes
|
| A cheap comp to clear quests.
|
Resource Nodes
I is a "Special Resource Node" rewarding ammo  .
.
- See here for more details.
Enemy CompositionsCollapse
Ship Drops
This map currently has "limited-time" drops that don't appear in the table below, see Drop List for more info. ☑ All drops (enabled)☒ All drops (disabled, only rare drops)


 and Battleship Ta-Class Flagship
 with high evasion and accuracy.
 , sometimes in Line Ahead. It is recommended to go Line Abreast against this Node (BBs and CVs can handle all Surface Enemies in the Node even in this formation), and bring OASW DDs to deal with the submarines.
 and Late Model DDs.
 will show up nearly everywhere in this map. Therefore, when using a composition with CVs and going north, it is recommended to use ones with high capacity slots, and place bombers only in the highest capacity slots to avoid all bombers getting shot down to 0 before the Boss Node.
 nor Destroyer Ha-Class Late Model
 .
.

![]() .
.


