- Welcome to the Kancolle Wiki!
- If you have any questions regarding site content, account registration, etc., please visit the KanColle Wiki Discord
World 6/6-4
Jump to navigation
Jump to search
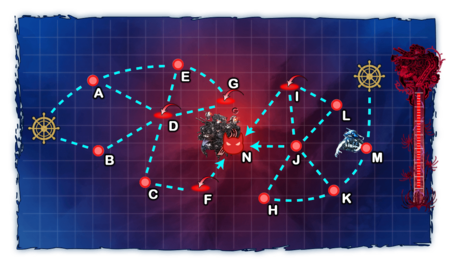
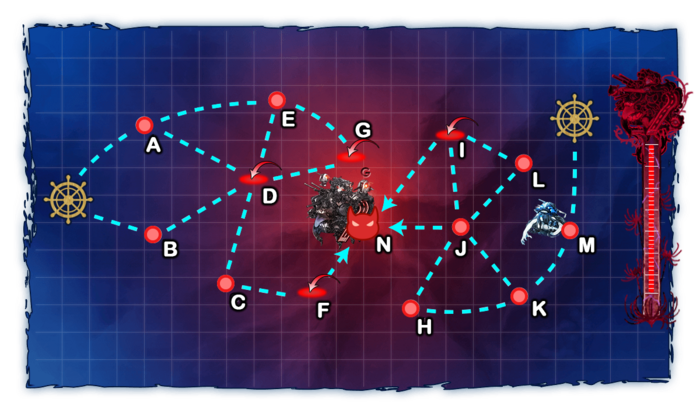
World 6-4: 中部北海域ピーコック島沖 - Peacock Island, On Northern Part of Central Waters

| Strategy Name | 離島再攻略作戦 Island Recapture Operation |
|---|---|
| Difficulty | ☆ ☆ ☆ ☆ ☆ ☆ ☆ ☆ ☆ |
| Item | - |
| Strategy Content | 水雷戦隊を旗艦とした攻略部隊または空母最大2隻を擁する機動部隊による中部海域離島攻略作戦を発動!艦隊、出撃せよ! Organize a unit to undertake an operation to capture the Island. Form a fleet consisting of a maximum of 2 aircraft carriers or with a torpedo squadron flagship! Fleet, set sail! |
| Boss Air Control | |||
|---|---|---|---|
| AD | AP | AS | AS+ |
| 50 | 75 | 168 | 336 |
| Boss Route Air Control | |||
| AD | AP | AS | AS+ |
| 59 | 88 | 198 | 396 |
| 6-4 Unlocking & Progression | ||||
|---|---|---|---|---|
| Unlock conditions | 6-4 is unlocked after clearing 6-3 HP bar | |||
| Clear conditions | To clear the map: the boss's flagship must be sunk 5 times | |||
| Notes | 1 LBAS is available on this map
| |||
Stage Guide
| 6-4 Branching Rules |
|---|
Historical Routing
Ships with special routing on the map:
| BB | ||
|---|---|---|
| DD | ||
| AV | ||
Tips
This map features multiple starting zone positions.
- Fleets consisting of a Torpedo Squadron (i.e. mostly CLs and DDs) will start on the West side of the map.
- Fleets containing any CV(B/L), 2 (F)BB(V), or 3CA(V)s, or having less than 2 DD, will start on the East (Nagato Kai Ni + Mutsu Kai Ni is the exception)
- It is not possible to bring more than 2 (F)BB(V) or 2 CV(B/L).
- Regarding Land-Based Air Squadrons
1 Land-Based Air Squadron can be sortied on the map.
- There is no air raid on this map.
- It is highly recommended to use this LBAS to help simplify the battle on the boss node for this map.
This map can also train land-based attackers if 7-4 LBAS is not unlocked yet. Bring only Land-Based bombers with a range of 8 or more on Node M, and sortie a single SS.
Regarding Boss Fleet
Boss Fleet is heavily affected by the HQ level.
- If HQ < 103: no 6-enemy composition is found in the boss compositions outside of the Last Dance.
- If HQ < 113: have a chance of rolling the easiest comp (5-enemy composition with the Late Model DD).
The Boss is the Isolated Island Princess, a Hard-skinned Installation, with Artillery Imps and a Supply Depot Princess are escorting her.
- Using
 Anti-Ground Rockets
 ,
,  "Landing Equipments", and
  Amphibious Tanks
 will do great damage to them, especially if arranged in Nuke set-ups to damage the Supply Depot Princess.
 - If having enough Anti-Ground Rockets, a 4 slots CL and equip her with 2 of them may be used.
- Aircraft carriers CANNOT attack installations if they have a
 equipped UNLESS it's one of the dive-bombers from the following list:
| Expand |
|---|


Recommended Fleets
| ExpandWest Akitsushima Route |
|---|
| ExpandWest Route |
|---|
| ExpandEast Route |
|---|
Enemy CompositionsCollapse
6-4 A: 中部海域哨戒水雷戦隊 A群 (PoiDB)
| # | Enemy Form. |
Base EXP | Normal Battle Node | AD/AP AS/AS+ |
|---|---|---|---|---|
| A | Double Line | 160 | 0/0 0/0 | |
| Line Ahead | 170 | 0/0 0/0 | ||
| Line Ahead | 190 | 0/0 0/0 | ||
| Line Ahead (Final)
|
200 | 0/0 0/0 | ||
| # | Enemy Form. |
Base EXP | Normal Battle Node | AD/AP AS/AS+ |
6-4 B: 中部海域哨戒水雷戦隊 B群 (PoiDB)
| # | Enemy Form. |
Base EXP | Normal Battle Node | AD/AP AS/AS+ |
|---|---|---|---|---|
| B | Line Ahead Double Line |
150 | 0/0 0/0 | |
| Line Ahead | 160 | 0/0 0/0 | ||
| Line Ahead | 170 | 0/0 0/0 | ||
| Line Ahead (Final)
|
190 | 0/0 0/0 | ||
| Line Ahead (Final)
|
200 | 0/0 0/0 | ||
| # | Enemy Form. |
Base EXP | Normal Battle Node | AD/AP AS/AS+ |
6-4 C: 離島防衛低速戦艦部隊 (PoiDB)
| # | Enemy Form. |
Base EXP | Normal Battle Node | AD/AP AS/AS+ |
|---|---|---|---|---|
| C | Line Ahead Double Line |
220 | 3/6 12/24 | |
| Line Ahead | 240 | 3/6 12/24 | ||
| Line Ahead | 250 | 9/17 36/72 | ||
| Line Ahead (Final)
|
260 | 9/17 36/72 | ||
| Line Ahead (Final)
|
280 | 9/17 36/72 | ||
| # | Enemy Form. |
Base EXP | Normal Battle Node | AD/AP AS/AS+ |
6-4 D: 離島陸上航空隊 (PoiDB)
| # | Enemy Form. |
Base EXP | Air Defense Node | AD/AP AS/AS+ |
|---|---|---|---|---|
| D | Line Ahead | 120 | 20/40 89/177 | |
| Line Ahead | 120 | 28/55 123/246 | ||
| # | Enemy Form. |
Base EXP | Air Defense Node | AD/AP AS/AS+ |
6-4 E: 中部海域哨戒遊撃部隊 (PoiDB)
| # | Enemy Form. |
Base EXP | Normal Battle Node | AD/AP AS/AS+ |
|---|---|---|---|---|
| E | Line Ahead | 140 | 0/0 0/0 | |
| Line Ahead | 150 | 0/0 0/0 | ||
| Line Ahead | 160 | 0/0 0/0 | ||
| # | Enemy Form. |
Base EXP | Normal Battle Node | AD/AP AS/AS+ |
6-4 F: 離島陸上航空隊 (PoiDB)
| # | Enemy Form. |
Base EXP | Air Defense Node | AD/AP AS/AS+ |
|---|---|---|---|---|
| F | Line Ahead | 130 | 20/40 89/177 | |
| Line Ahead | 140 | 27/53 117/234 | ||
| Line Ahead | 150 | 28/55 123/246 | ||
| # | Enemy Form. |
Base EXP | Air Defense Node | AD/AP AS/AS+ |
6-4 G: 離島陸上航空隊 (PoiDB)
| # | Enemy Form. |
Base EXP | Air Defense Node | AD/AP AS/AS+ |
|---|---|---|---|---|
| G | Line Ahead | 100 | 20/40 89/177 | |
| Line Ahead | 100 | 28/55 123/246 | ||
| # | Enemy Form. |
Base EXP | Air Defense Node | AD/AP AS/AS+ |
6-4 H: 離島防衛低速戦艦部隊 (PoiDB)
| # | Enemy Form. |
Base EXP | Normal Battle Node | AD/AP AS/AS+ |
|---|---|---|---|---|
| H | Line Ahead | 180 | 9/17 36/72 | |
| Line Ahead | 200 | 9/17 36/72 | ||
| Line Ahead | 210 | 8/16 35/69 | ||
| Line Ahead (Final)
|
230 | 8/16 35/69 | ||
| Line Ahead (Final)
|
260 | 8/16 35/69 | ||
| # | Enemy Form. |
Base EXP | Normal Battle Node | AD/AP AS/AS+ |
6-4 I: 離島混成航空隊 (PoiDB)
| # | Enemy Form. |
Base EXP | Air Defense Node | AD/AP AS/AS+ |
|---|---|---|---|---|
| I | Diamond | 160 | 34/68 152/303 | |
| Diamond | 170 | 36/71 158/315 | ||
| # | Enemy Form. |
Base EXP | Air Defense Node | AD/AP AS/AS+ |
6-4 J: 任務部隊 I群 (PoiDB)
| # | Enemy Form. |
Base EXP | Normal Battle Node | AD/AP AS/AS+ |
|---|---|---|---|---|
| J | Diamond | ? | 37/73 162/324 | |
| Diamond | 270 | 37/73 162/324 | ||
| Diamond | 280 | 43/85 189/378 | ||
| Diamond | 290 | 45/89 198/396 | ||
| Diamond (Final)
|
330 | 44/87 194/387 | ||
| Diamond (Final)
|
350 | 44/87 194/387 | ||
| # | Enemy Form. |
Base EXP | Normal Battle Node | AD/AP AS/AS+ |
6-4 K: 任務部隊 II群 (PoiDB)
| # | Enemy Form. |
Base EXP | Normal Battle Node | AD/AP AS/AS+ |
|---|---|---|---|---|
| K | Diamond | 200 | 34/67 150/300 | |
| Diamond | 220 | 35/69 155/309 | ||
| Diamond | 240 | 37/73 162/324 | ||
| Diamond | 250 | 43/85 189/378 | ||
| # | Enemy Form. |
Base EXP | Normal Battle Node | AD/AP AS/AS+ |
6-4 L: 増援護衛空母部隊 (PoiDB)
| # | Enemy Form. |
Base EXP | Normal Battle Node | AD/AP AS/AS+ |
|---|---|---|---|---|
| L | Double Line Diamond |
140 | 16/31 69/138 | |
| Diamond | 160 | 16/31 69/138 | ||
| # | Enemy Form. |
Base EXP | Normal Battle Node | AD/AP AS/AS+ |
6-4 M: 中部海域潜水哨戒線 (PoiDB)
| # | Enemy Form. |
Base EXP | Normal Battle Node | AD/AP AS/AS+ |
|---|---|---|---|---|
| M | Echelon | 120 | 0/0 0/0 | |
| Line Abreast Echelon |
140 | 0/0 0/0 | ||
| Echelon Line Abreast |
160 | 0/0 0/0 | ||
| # | Enemy Form. |
Base EXP | Normal Battle Node | AD/AP AS/AS+ |
6-4 N: 離島守備隊 (PoiDB)
| # | Enemy Form. |
Base EXP | Boss Battle Node | AD/AP AS/AS+ |
|---|---|---|---|---|
| N | Line Ahead | 640 | 27/53 117/234 | |
| Line Ahead | 680 | 12/23 51/102 | ||
| Line Ahead | 700 | 38/75 168/336 | ||
| Line Ahead | 720 | 17/33 72/144 | ||
| Line Ahead (Final)
|
740 | 17/33 72/144 | ||
| Line Ahead (Final)
|
740 | 17/33 72/144 | ||
| # | Enemy Form. |
Base EXP | Boss Battle Node | AD/AP AS/AS+ |
Ship Drops
☒ All drops (disabled, only rare drops)
| ExpandShip drops |
|---|
| ||
