• Welcome to the Kancolle Wiki!
  • If you have any questions regarding site content, account registration, etc., please visit the KanColle Wiki Discord

World 1/1-3

From Kancolle Wiki
< World 1(Redirected from 1-3)
Jump to navigation Jump to search

World 1-3: 製油所地帯沿岸 Coastal Refinery Zone

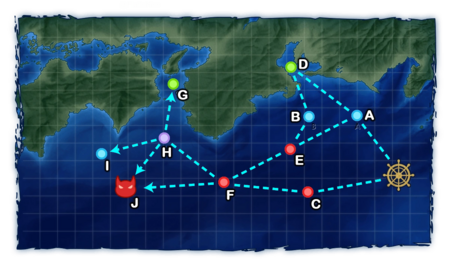
World 1 1-3 Map.png
Strategy Name
海上護衛作戦 (Maritime Escort Operation)
Difficulty
☆ ☆
Item
Fuel
Strategy Content
製油所地帯沿岸部の海上輸送ラインを防衛せよ!
Protect the supply lines around our coastal refineries!

Map Unlocking & Progression

1-3 is unlocked after clearing 1-2.

To clear the map, the boss's flagship must be sunk once.

Stage Guide

1-3 Branching Rules
Nodes Rules
Start
A
  • Go to A if fleet contains AO or AV
  • Go to C if fleet contains CV(L)
  • Otherwise, random routing
C
A
D
  • Meet ANY of the following to go to D
    • Fleet contains AO
    • DE ≥ 4
  • Go to E if fleet only contains SS(V)
  • 80% to D if fleet contains AV and DD+DE ≥ 4
  • Otherwise, random routing
E
F
H
  • Go to H if fleet contains any CV(B), slow BBs (BBV doesn't count)
  • Meet ANY of the following to go to J
    • DD ≥ 4
    • Fleet contains CL and DD+DE ≥ 4
  • Otherwise, random routing (The more CV(L/B) you bring, the higher chance you will go to node H)
J
H
G
  • Go to G if fleet contains AO
  • Go to J if fleet contains CL and DD ≥ 2, or fleet contains AV
  • Otherwise
    • If DD ≥ 3, random routing (Very small chance for I)
    • If DD ≤ 2, random routing (Very small chance for G)
I
J


Recommended Fleet

2XX, 4DD(XX can't be any heavy ships such as (F)BB or CV; BBV and CVL are fine, though)

  • guarantees F J branching

Resource Nodes

D G are "Normal Resource Nodes" rewarding both Fuel Fuel.

  • See here for more details.
Normal Resource Nodes Gain Modifiers
Equipment / Ship Bonus Gains (per DLC / Ship)[1]
Type Name FuelAmmunitionSteel
(& 7-3 O Bauxite)
Bauxite Instant construction MaterialDevelopment material
Furniture Box (Medium)Furniture Box (Large)
Landing Craft A Toku Daihatsu Landing CraftToku Daihatsu Landing Craft
Daihatsu Landing CraftDaihatsu Landing Craft
Armed DaihatsuArmed Daihatsu
DLC + T89 TankDaihatsu Landing Craft (Type 89 Medium Tank & Landing Force)
DLC + Panzer IIDaihatsu Landing Craft (Panzer II/North African Specification)
SoukouteiSoukoutei (Armored Boat Class)
Toku DLC + Ho-Ni TankToku Daihatsu Landing Craft + Type 1 Gun Tank
3.0 2.0 0.0
Amphibious Vehicle Ka-Mi TankSpecial Type 2 Amphibious Tank
Ka-Tsu TankSpecial Type 4 Amphibious Tank
Ka-Tsu Tank KaiSpecial Type 4 Amphibious Tank Kai
Drum Canister B DrumsDrum Canister (Transport Use) 2.0 1.5 0.0
Landing Craft C Toku DLC + 11th RegToku Daihatsu Landing Craft + 11th Tank Regiment
M4A1 DDM4A1 DD
Toku DLC + Panzer IIIToku Daihatsu Landing Craft + Panzer III (North African Specification)
Toku DLC + Chi-HaToku Daihatsu Landing Craft + Chi-Ha
Toku DLC + Chi-Ha KaiToku Daihatsu Landing Craft + Chi-Ha Kai
Toku DLC + Panzer III JToku Daihatsu Landing Craft + Panzer III Ausf. J
0.0
All ships 0.0
Resource Cap N/A
Random Resource Increments 5 0
Notes:
  1. If the total value has a decimal, only the rounded-down value is applied.

Fuel Farming

Node D is a good spot to farm fuel Fuel. The recommended fleet are:

  • Kamoi/Souya, 4-5DD, 0-1SS(V)
  • 1AV/AO, 4-5DD, 0-1SS(V) (if lacking those AO)
  • Route = A D B E

The base gain is 10/15/20 Fuel.

  • Has many Landing Craft Landing Craft and Amphibious Vehicle Amphibious TanksSpecial Type 2 Amphibious Tank should be equipped to maximize fuel gain (+3 per craft).
    • Drum Canister DrumsDrum Canister (Transport Use) work as an inferior substitute (+2 per drum).
    • Only using those equipment in the fleet is a viable solution.
  • When lacking enough Amphibious Tanks for SS(V), Drum-capable SS are recommended as a substitute.
  • When using an AO, the reach rate is 100%, but is only 80% when using an AV instead.
  • Once the first battle is complete, "retreat" and "resupply" before going back out.

If done correctly, this can result in an outstanding fuel gain that can surpass expedition gains.

  • Using "cheap" ships to refuel in the fleet (such as Kamikaze-class and Mutsuki-class) will optimize the fuel consumption/farming.
  • It is alternatively possible to use throwaway DDs with Drums that are never refueled until they are critically damaged, and then scraped to save on resources (do not forget to swap their drums with the new ones before doing this).

Enemy Compositions

1-3 A
# Empty Node
A 気のせいだった。/敵影を見ず。/穏やかな海です。/穏やかな海峡です。/警戒が必要です。/静かな海です。
Must be my imagination./No enemy spotted./Calm seas./Calm straits./Be alert./Peaceful seas.
# Empty Node
1-3 B
# Empty Node
B 気のせいだった。/敵影を見ず。/穏やかな海です。/穏やかな海峡です。/警戒が必要です。/静かな海です。
Must be my imagination./No enemy spotted./Calm seas./Calm straits./Be alert./Peaceful seas.
# Empty Node
1-3 C: 敵前衛艦隊 (PoiDB)
# Enemy
Form.
Base EXP Normal Battle Node AD/AP
AS/AS+
C Line Ahead 50 Light Cruiser Ho-Class (1505): 15 Armor, 33 HPBattle Card Flagship Icon.png Destroyer I-Class (1501): 5 Armor, 20 HP Destroyer I-Class (1501): 5 Armor, 20 HP 0/0
0/0
Line Ahead 60 Light Cruiser Ho-Class (1505): 15 Armor, 33 HPBattle Card Flagship Icon.png Destroyer Ro-Class (1502): 6 Armor, 22 HP Destroyer Ro-Class (1502): 6 Armor, 22 HP 0/0
0/0
Line Ahead 70 Light Cruiser Ho-Class (1505): 15 Armor, 33 HPBattle Card Flagship Icon.png Destroyer Ha-Class (1503): 7 Armor, 24 HP Destroyer Ha-Class (1503): 7 Armor, 24 HP 0/0
0/0
Line Ahead 70 Light Cruiser He-Class (1506): 18 Armor, 36 HPBattle Card Flagship Icon.png Destroyer Ha-Class (1503): 7 Armor, 24 HP Destroyer Ha-Class (1503): 7 Armor, 24 HP 0/0
0/0
Line Ahead 80 Light Cruiser He-Class (1506): 18 Armor, 36 HPBattle Card Flagship Icon.png Destroyer Ha-Class (1503): 7 Armor, 24 HP Destroyer Ha-Class (1503): 7 Armor, 24 HP 0/0
0/0
Line Ahead 90 Light Cruiser He-Class (1506): 18 Armor, 36 HPBattle Card Flagship Icon.png Destroyer Ha-Class (1503): 7 Armor, 24 HP Destroyer Ro-Class (1502): 6 Armor, 22 HP Destroyer Ro-Class (1502): 6 Armor, 22 HP 0/0
0/0
# Enemy
Form.
Base EXP Normal Battle Node AD/AP
AS/AS+
1-3 D
# Resource Node
D Gained 10~20 Fuel
# Resource Node
1-3 E: 敵前衛艦隊 (PoiDB)
# Enemy
Form.
Base EXP Normal Battle Node AD/AP
AS/AS+
E Line Ahead 50 Light Cruiser Ho-Class (1505): 15 Armor, 33 HPBattle Card Flagship Icon.png Destroyer I-Class (1501): 5 Armor, 20 HP Destroyer I-Class (1501): 5 Armor, 20 HP 0/0
0/0
Line Ahead 60 Light Cruiser Ho-Class (1505): 15 Armor, 33 HPBattle Card Flagship Icon.png Destroyer Ro-Class (1502): 6 Armor, 22 HP Destroyer Ro-Class (1502): 6 Armor, 22 HP 0/0
0/0
Line Ahead 70 Light Cruiser Ho-Class (1505): 15 Armor, 33 HPBattle Card Flagship Icon.png Destroyer Ha-Class (1503): 7 Armor, 24 HP Destroyer Ha-Class (1503): 7 Armor, 24 HP 0/0
0/0
Line Ahead 70 Light Cruiser He-Class (1506): 18 Armor, 36 HPBattle Card Flagship Icon.png Destroyer Ha-Class (1503): 7 Armor, 24 HP Destroyer Ha-Class (1503): 7 Armor, 24 HP 0/0
0/0
Line Ahead 80 Light Cruiser He-Class (1506): 18 Armor, 36 HPBattle Card Flagship Icon.png Destroyer Ha-Class (1503): 7 Armor, 24 HP Destroyer Ha-Class (1503): 7 Armor, 24 HP 0/0
0/0
Line Ahead 90 Light Cruiser He-Class (1506): 18 Armor, 36 HPBattle Card Flagship Icon.png Destroyer Ha-Class (1503): 7 Armor, 24 HP Destroyer Ro-Class (1502): 6 Armor, 22 HP Destroyer Ro-Class (1502): 6 Armor, 22 HP 0/0
0/0
# Enemy
Form.
Base EXP Normal Battle Node AD/AP
AS/AS+
1-3 F: 敵支援艦隊 (PoiDB)
# Enemy
Form.
Base EXP Normal Battle Node AD/AP
AS/AS+
F Line Ahead
Double Line
65 Heavy Cruiser Ri-Class (1509): 28 Armor, 58 HPBattle Card Flagship Icon.png Destroyer I-Class (1501): 5 Armor, 20 HP Destroyer I-Class (1501): 5 Armor, 20 HP Destroyer I-Class (1501): 5 Armor, 20 HP 0/0
0/0
Line Ahead
Double Line
80 Heavy Cruiser Ri-Class (1509): 28 Armor, 58 HPBattle Card Flagship Icon.png Destroyer Ro-Class (1502): 6 Armor, 22 HP Destroyer Ro-Class (1502): 6 Armor, 22 HP Destroyer Ro-Class (1502): 6 Armor, 22 HP 0/0
0/0
Line Ahead
Double Line
85 Heavy Cruiser Ri-Class (1509): 28 Armor, 58 HPBattle Card Flagship Icon.png Torpedo Cruiser Chi-Class (1508): 22 Armor, 48 HP Destroyer Ro-Class (1502): 6 Armor, 22 HP Destroyer Ro-Class (1502): 6 Armor, 22 HP 0/0
0/0
Line Ahead
Double Line
90 Heavy Cruiser Ri-Class (1509): 28 Armor, 58 HPBattle Card Flagship Icon.png Heavy Cruiser Ri-Class (1509): 28 Armor, 58 HP Destroyer Ro-Class (1502): 6 Armor, 22 HP Destroyer Ro-Class (1502): 6 Armor, 22 HP 0/0
0/0
# Enemy
Form.
Base EXP Normal Battle Node AD/AP
AS/AS+
1-3 G
# Resource Node
G Gained 10~30 Fuel
# Resource Node
1-3 H
# Maelstrom Node
H Lost ? Fuel
# Maelstrom Node
1-3 I
# Empty Node
I 気のせいだった。/敵影を見ず。/穏やかな海です。/穏やかな海峡です。/警戒が必要です。/静かな海です。
Must be my imagination./No enemy spotted./Calm seas./Calm straits./Be alert./Peaceful seas.
# Empty Node
1-3 J: 敵主力艦隊 (PoiDB)
# Enemy
Form.
Base EXP Boss Battle Node AD/AP
AS/AS+
J Line Ahead
Double Line
110 Battleship Ru-Class (1511): 70 Armor, 90 HPBattle Card Flagship Icon.png Light Cruiser He-Class (1506): 18 Armor, 36 HP Destroyer I-Class (1501): 5 Armor, 20 HP Destroyer I-Class (1501): 5 Armor, 20 HP Destroyer I-Class (1501): 5 Armor, 20 HP 0/0
0/0
Line Ahead
Double Line
120 Battleship Ru-Class (1511): 70 Armor, 90 HPBattle Card Flagship Icon.png Torpedo Cruiser Chi-Class (1508): 22 Armor, 48 HP Light Cruiser He-Class (1506): 18 Armor, 36 HP Destroyer I-Class (1501): 5 Armor, 20 HP Destroyer I-Class (1501): 5 Armor, 20 HP 0/0
0/0
Line Ahead
Double Line
130 Battleship Ru-Class (1511): 70 Armor, 90 HPBattle Card Flagship Icon.png Torpedo Cruiser Chi-Class (1508): 22 Armor, 48 HP Light Cruiser He-Class (1506): 18 Armor, 36 HP Destroyer Ro-Class (1502): 6 Armor, 22 HP Destroyer Ro-Class (1502): 6 Armor, 22 HP 0/0
0/0
# Enemy
Form.
Base EXP Boss Battle Node AD/AP
AS/AS+

Ship Drops

This map currently has "limited-time" drops that don't appear in the table below, see Drop List for more info.
Ship drops
Type Ship? C E F J
CL Kitakami ✔️
CL Nagara ✔️ ✔️
CL Sendai ✔️ ✔️ ✔️ ✔️
CA Kinugasa ✔️
DD Mutsuki ✔️ ✔️ ✔️ ✔️
DD Kisaragi ✔️ ✔️ ✔️ ✔️
DD Satsuki ✔️ ✔️ ✔️ ✔️
DD Fumizuki ✔️ ✔️ ✔️ ✔️
DD Nagatsuki ✔️ ✔️ ✔️ ✔️
DD Kikuzuki ✔️ ✔️ ✔️ ✔️
DD Mikazuki ✔️ ✔️ ✔️ ✔️
DD Mochizuki ✔️ ✔️ ✔️ ✔️
DD Fubuki ✔️
DD Shirayuki ✔️ ✔️ ✔️ ✔️
DD Hatsuyuki ✔️ ✔️ ✔️ ✔️
DD Miyuki ✔️ ✔️ ✔️ ✔️
DD Murakumo ✔️
DD Isonami ✔️ ✔️ ✔️ ✔️
DD Ayanami ✔️ ✔️ ✔️ ✔️
DD Shikinami ✔️ ✔️ ✔️ ✔️
DD Oboro ✔️ ✔️ ✔️ ✔️
DD Akebono ✔️ ✔️ ✔️ ✔️
DD Sazanami ✔️
DD Ushio ✔️ ✔️ ✔️ ✔️
DD Akatsuki ✔️ ✔️ ✔️ ✔️
DD Hibiki ✔️ ✔️ ✔️ ✔️
DD Ikazuchi ✔️ ✔️ ✔️ ✔️
DD Inazuma ✔️ ✔️ ✔️ ✔️
DD Hatsuharu ✔️ ✔️ ✔️ ✔️
DD Nenohi ✔️ ✔️ ✔️ ✔️
DD Wakaba ✔️ ✔️ ✔️ ✔️
DD Hatsushimo ✔️ ✔️ ✔️ ✔️
DD Shiratsuyu ✔️ ✔️ ✔️ ✔️
DD Shigure ✔️ ✔️ ✔️ ✔️
DD Murasame ✔️ ✔️ ✔️ ✔️
DD Yuudachi ✔️ ✔️ ✔️ ✔️
DD Samidare ✔️
DD Suzukaze ✔️ ✔️ ✔️ ✔️
DD Ooshio ✔️ ✔️ ✔️ ✔️
DD Michishio ✔️ ✔️ ✔️ ✔️
DD Arashio ✔️ ✔️ ✔️ ✔️
DD Arare ✔️ ✔️ ✔️ ✔️
DD Kasumi ✔️ ✔️ ✔️ ✔️
DD Shiranui ✔️ ✔️ ✔️ ✔️
DD Kuroshio ✔️ ✔️ ✔️
CL Tenryuu ✔️
CL Tatsuta ✔️
CL Kuma ✔️
CL Tama ✔️ ✔️ ✔️ ✔️
CL Kiso ✔️ ✔️ ✔️ ✔️
CL Isuzu ✔️ ✔️
CL Natori ✔️ ✔️
CL Yura ✔️ ✔️
CL Jintsuu ✔️ ✔️ ✔️ ✔️
CL Naka ✔️ ✔️ ✔️ ✔️
CA Furutaka ✔️
CA Kako ✔️
CA Aoba ✔️
CVL Houshou ✔️
AV Chitose ✔️ ✔️
AV Chiyoda ✔️ ✔️