| Strategy Name
|
第一次サーモン沖海戦
First Battle of the Solomon Sea
|
| Difficulty
|
☆ ☆ ☆ ☆ ☆ ☆ ☆ ☆ ☆
|
| Item
|
 
|
| Strategy Content
|
敵泊地に対して水上打撃部隊による夜戦突撃を敢行し、艦隊後方の敵輸送艦を叩け!
Engage in a daring night raid against the enemy fleet. Your goal is to destroy the transport they are escorting!
|
| Boss Air Control
|
| AD
|
AP
|
AS
|
AS+
|
| 42
|
63
|
140
|
280
|
| 5-3 Unlocking & Progression
|
| Unlock conditions
|
5-3 is unlocked after clearing 5-2 HP bar
|
| Clear conditions
|
To clear the map: the boss's flagship must be sunk 5 times
|
| Notes
|
Support Expeditions are available on this map
|
Stage Guide
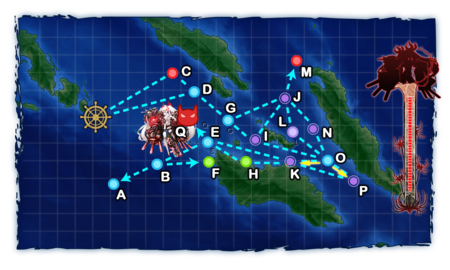
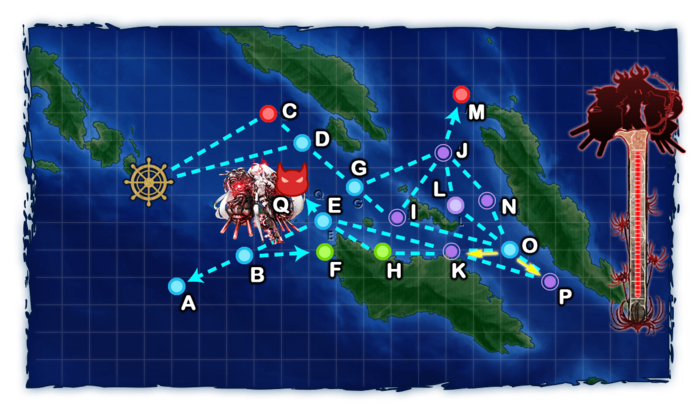
| 5-3 Branching Rules
|
| Nodes |
Rules
|
| Start
|
|
- Go to D if Fast+ fleet
- Meet ANY of the following to go to C
- (F)BB(V)+CV(L/B) ≥ 3
- (F)BB(V)+CV(L/B) ≥ 2 AND Slow Fleet
- Random between C and D if fleet contains SS(V)
- Otherwise, D
|
|
|
|
|
|
|
|
|
|
|
|
- FORCE random routing if meeting ANY of the following
- Fleet contains SS(V)
- Fleet contains (F)BB(V) and DD ≤ 1
- Meet ANY of the following to go to Q:
- Fleet contains CL and DD ≥ 2
- CA(V) ≥ 4 and CL+CA+DD = 6
- DD ≥ 4
- Otherwise, random routing
|
|
|
|
|
|
- Do not meet the requirement to go to J
|
|
|
- Fleet contains BBV, CV(B) or SS(V)
- Amount of slow BB ≥ 2
- Fleet contains exactly 1 CVL
|
|
|
|
- FORCE node J if fleet contains CVL or (F)BB(V) ≥ 3
- Meet ANY of the following to go to O
- DD ≥ 3
- (F)BB(V) ≤ 1 and DD ≥ 2
- Fleet contains CL and DD ≥ 2
- Fleet contains CL, CA(V) ≥ 4 and CA+CL+DD = 6
- Go to J if (F)BB(V) = 2
- Otherwise, random routing
|
|
|
|
|
|
- Meet ANY of the following to FORCE M
- Fleet contains CV(B)
- (F)BB(V) ≥ 3
- CVL ≥ 2
- Random between L, M, and N if fleet contains SS(V)
- Random between L and N if fleet contains BBV
- Meet ALL of the following to go to L
- CVL = 1
- FBB ≤ 2
- CL+DD ≥ 3
- DD ≥ 2
- No BB(V)
- Otherwise, random between L and N
- The more DD you have in the fleet, the higher chance you will go to L
|
|
|
|
|
|
|
|
- Meet ANY of the following to go to H:
- DD ≥ 4
- CL = 1 AND DD ≥ 3
- Fast+ fleet AND DD ≥ 2
- BBV = 1 AND DD ≥ 2
- DD ≥ 2 AND 2 ships carrying 2 Drums or 2 DLCs total in the fleet
- Otherwise go to E
|
|
|
|
|
|
|
|
|
Tips
Unlike the previous maps, most of 5-3 pre-boss nodes feature "Night Nodes", where only the night battle is played, and so triggering night mechanics from both fleets, which can cause some difficulties.
The use of Support Expeditions is highly recommended for both pre-boss and boss fights.
- "Node Support Expeditions" can minimize the risk of ships taking damage and subsequently increase the chances of reaching the boss node in good condition.
- "Support Shelling" is highly recommended, as Aerial Support cannot trigger on night nodes.
Using night battle elements is highly advised:
Regarding the boss node, the boss is a Southern War Princess who has tough armor and firepower.
- There is a little chance that 2 Light Carrier Nu-Class Flagships show up at the boss.
- 71+ air power is required to obtain AS at the boss node for the comp with Southern War Princess alone, or at least force AP for the comp with the 2CVL (requires 140+ for AS otherwise).
 SPF can be used, but are unadvised. Bringing an AACI can be advisable if it's not detrimental to the fleet's survivability and effectiveness.
- It is unlikely to kill the boss during day, so do expect the battle to last till night.
Recommended Fleets
If not already sparkled, it can be advisable to start the sortie at 49 morale and go through the optional node P all the time. Assuming S ranking both nodes I and P, the fleet will gain sparkle effect in node K, which will help increase the pass rate for almost no cost.
| ExpandShort Route Medium
|
| Fleet Info
|
| Single
|
1 (F)BB, 2 CA(V)/CLT, 1 CL, 2 DD
4-5 CA(V), 1-2 CL
|
| LoS
|
Any
|
| Speed
|
Any
|
RouteNode Types:
RED: Battle
PURPLE: Night Battle
PINK: Air Raid/Battle
ORANGE: Enemy Ambush/ASS
BLUE: Empty/Choice
Light Blue: Emergency Anchorage Repair
GREEN: Resource/TP
VIOLET: Maelstrom
|
D G I O K E Q
|
| Quests
|
Bq7
|
|
| Air State
|
| AD
|
AP
|
AS
|
AS+
|
| 42
|
63
|
140
|
280
|
|
| Fleet Notes
|
| CAVs can trigger an Artillery Spotting as long as AS is reached at the boss, helping take out enemy escorts more easily.
A Nelson Touch can be utilized. If that is the case, it is recommended to touch on node K.
|
| ExpandShort Route Heavy
|
| Fleet Info
|
| Single
|
2 FBB, 1 CAV/CLT, 1 CL, 2 DD
|
| LoS
|
Any
|
| Speed
|
Fast
|
RouteNode Types:
RED: Battle
PURPLE: Night Battle
PINK: Air Raid/Battle
ORANGE: Enemy Ambush/ASS
BLUE: Empty/Choice
Light Blue: Emergency Anchorage Repair
GREEN: Resource/TP
VIOLET: Maelstrom
|
D G I O K E Q
|
|
| Air State
|
| AD
|
AP
|
AS
|
AS+
|
| 42
|
63
|
140
|
280
|
|
| Fleet Notes
|
| A stronger fleet utilizing the shortest route.
Kongou-class Touch can be utilized. If that's the case, it is recommended to touch on nodes I K.
|
| ExpandShort Route Light
|
| Fleet Info
|
| Single
|
2 CAV, 1 CL, 3 DD
|
| LoS
|
Any
|
| Speed
|
Any
|
RouteNode Types:
RED: Battle
PURPLE: Night Battle
PINK: Air Raid/Battle
ORANGE: Enemy Ambush/ASS
BLUE: Empty/Choice
Light Blue: Emergency Anchorage Repair
GREEN: Resource/TP
VIOLET: Maelstrom
|
D G I O K H E Q
|
|
| Air State
|
| AD
|
AP
|
AS
|
AS+
|
| 42
|
63
|
140
|
280
|
|
| Fleet Notes
|
| A light fleet, strong enough to pass the night nodes and defeat the boss.
|
| ExpandTorpedo Squadron
|
| Fleet Info
|
| Single
|
"Torpedo Squadron": 1 CL (flagship), 2 CLT, 3 DD
|
| LoS
|
Any
|
| Speed
|
Any
|
RouteNode Types:
RED: Battle
PURPLE: Night Battle
PINK: Air Raid/Battle
ORANGE: Enemy Ambush/ASS
BLUE: Empty/Choice
Light Blue: Emergency Anchorage Repair
GREEN: Resource/TP
VIOLET: Maelstrom
|
D G I O K E Q
|
|
| Air State
|
| AD
|
AP
|
AS
|
AS+
|
| 42
|
63
|
140
|
280
|
|
| Fleet Notes
|
| This solution requires more advanced gears, and might be out of reach of new players.
To make this comp work properly, it is required to bring an  FCF capable CL as flagship, preferably an Agano-class Kai+, equipped with: FCF capable CL as flagship, preferably an Agano-class Kai+, equipped with:
The best comp for farming boss node without the need of Support Expedition, having the highest pass rate thanks to the usage of ETSCF in case a ship got heavily damaged.
- The Evacuation mechanic of the ETSCF should be used if needed, as long as the routing is maintained.
- As there is no LoS check in this map, the boss routing is secured as long as 2 DD are still in the fleet.
- Do note that the Night Zuiun will likely be shot down completely due to fighting under AI and the presence of CL Tsu-Class
 , something negligible face to the potential double targeting of the Night Zuiun CI on previous nodes. , something negligible face to the potential double targeting of the Night Zuiun CI on previous nodes.
|
| ExpandNorth Route
|
| Fleet Info
|
| Single
|
1 (F)BB(V), 1 CVL, 1 CAV, 1 CL, 2 DD
|
| LoS
|
Any
|
| Speed
|
Fast
|
RouteNode Types:
RED: Battle
PURPLE: Night Battle
PINK: Air Raid/Battle
ORANGE: Enemy Ambush/ASS
BLUE: Empty/Choice
Light Blue: Emergency Anchorage Repair
GREEN: Resource/TP
VIOLET: Maelstrom
|
D G J L O K E Q
|
|
| Air State
|
| AD
|
AP
|
AS
|
AS+
|
| 42
|
63
|
140
|
280
|
|
| Fleet Notes
|
| An heavy fleet utilizing a Nelson Touch on Node K and CVL with CVNCI.
Equipping additional  Radars will reduce the amount of fuel Radars will reduce the amount of fuel  lost on the maelstrom at node L lost on the maelstrom at node L
|
Resource Nodes
F H are "Normal Resource Nodes" rewarding respectively ammo  , and steel
  .
.
- See here for more details.
Enemy CompositionsCollapse
Ship Drops
☑ All drops (enabled)☒ All drops (disabled, only rare drops)

 Star Shell
 ,
,  Skilled Lookouts
 , and
, and  Night Recons.
 Night Zuiun CI
 , or the "Kongou-class Night Assault".
 Searchlights
 , however, is discouraged due to the drastic penalties the equipped ships suffer in night battle.
![]() , and steel
, and steel ![]() .
.


