- Welcome to the Kancolle Wiki!
- If you have any questions regarding site content, account registration, etc., please visit the KanColle Wiki Discord
Difference between revisions of "World 6"
m (Moved world 7) |
m |
||
| Line 9: | Line 9: | ||
</div> | </div> | ||
<tabber> | <tabber> | ||
| − | |-|6-1 = | + | |-|6-1= |
{{:{{BASEPAGENAME}}/6-1}} | {{:{{BASEPAGENAME}}/6-1}} | ||
|-|6-2= | |-|6-2= | ||
Revision as of 17:47, 31 October 2021
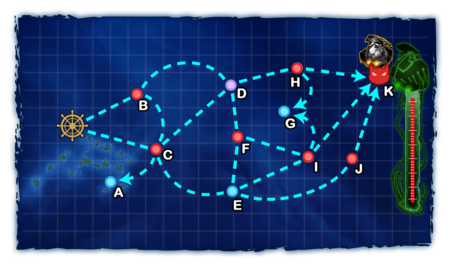
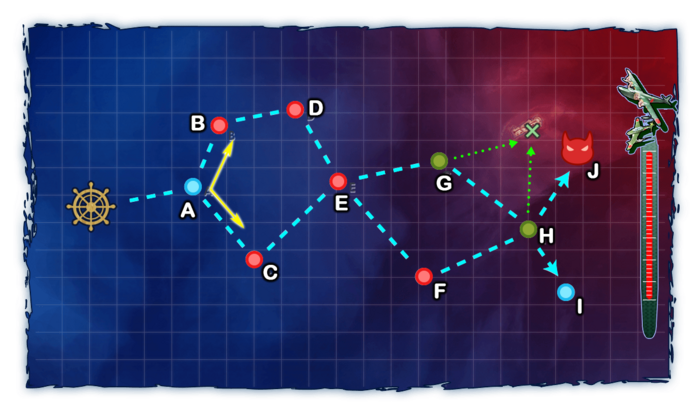
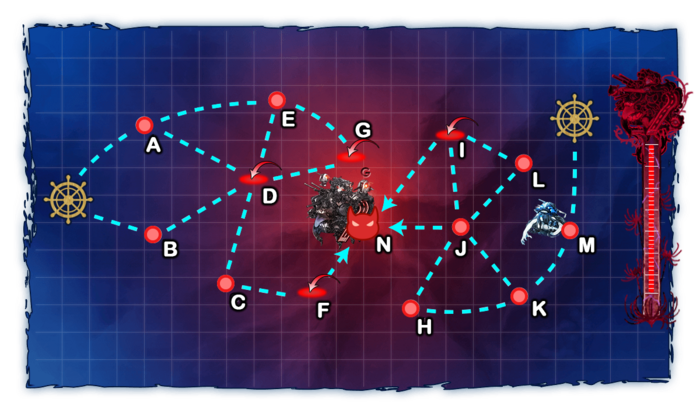
World 6-1: 中部海域哨戒線 - Central Sea Combat Patrol Line

| Strategy Name | 潜水艦作戦 Submarine Operation |
|---|---|
| Difficulty | ☆ ☆ ☆ ☆ ☆ ☆ ☆ ☆ |
| Item | - |
| Strategy Content | 有力な潜水艦隊を編成し、中部海域哨戒線に進出せよ。敵艦隊を発見、これを漸減撃滅せよ! Organize a strong submarine fleet and advance a patrol line into the Middle Sea region. Locate enemy fleets and gradually destroy them! |
| World 6 Unlocking & Progression | ||||
|---|---|---|---|---|
| Unlock conditions | World 6 is unlocked after clearing 5-4 HP bar | |||
| Clear conditions | To clear the map: the boss's flagship must be sunk once | |||
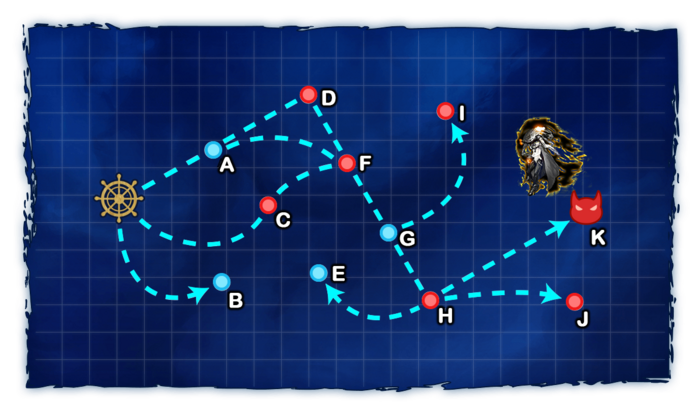
Stage Guide
| 6-1 Branching Rules | ||
|---|---|---|
| Nodes | Rules | |
| Start | A |
|
B | ||
C | ||
A |
D |
|
F |
| |
G |
H |
|
I |
| |
H |
E |
|
J | ||
K | ||
Tips
- At least 3 SS(V) are required to reach the boss.
- There are LoS checks at G H and H K. They do not have high LoS requirements, but an all-submarine fleet without recons/radar can be sent to I.
Recommended Fleets
| CV Fleet | ||||
|---|---|---|---|---|
| Fleet | 1 CV(B), 1 CL, 1 CLT, 3 SS(V) | |||
| LoS | Speed | |||
| Cn4: 36 | Any | |||
| RouteNode Types: BLUE: Empty/Choice RED: Battle GREEN: Resource/TP VIOLET: Maelstrom PURPLE: Night Battle PINK: Air Raid/Battle ORANGE: Enemy Ambush/ASS |
Random:
| |||
| Fleet Notes | The CLT can be replaced with an AS to avoid the off-route chance and reduce the LoS check at 25.
Most effective fleet for taking out the boss but it will have to go through node C where there's a Ru-class Flagship.
For the CV, either:
| |||
| Quests | Bm2 | |||
| Air State | AD | AP | AS | AS+ |
| 38 | 56 | 126 | 252 | |


| SS Fleet | ||||
|---|---|---|---|---|
| Fleet | 6 SS(V) | |||
| LoS | Speed | |||
| Cn4: 36 | Any | |||
| RouteNode Types: BLUE: Empty/Choice RED: Battle GREEN: Resource/TP VIOLET: Maelstrom PURPLE: Night Battle PINK: Air Raid/Battle ORANGE: Enemy Ambush/ASS |
A D F G H K | |||
| Fleet Notes | Allows the fleet to completely ignore any enemy ships that cannot do ASW, however node D is pretty harsh on SS with late-model DDs and flagship CLs.
As many combat-capable submarines as possible are needed for this route.
Seplane recons or Submarine Radars
| |||
| Air State | AD | AP | AS | AS+ |
| 38 | 56 | 126 | 252 | |
| AS Fleet | ||||
|---|---|---|---|---|
| Fleet | 1 CL, 4 SS(V), 1 AS
2 DD, 3 SS(V), 1 AS | |||
| LoS | Speed | |||
| Cn4: 25 | Any | |||
| RouteNode Types: BLUE: Empty/Choice RED: Battle GREEN: Resource/TP VIOLET: Maelstrom PURPLE: Night Battle PINK: Air Raid/Battle ORANGE: Enemy Ambush/ASS |
A F G H K | |||
| Fleet Notes | *The shortest route in terms of the number of battles.
1 AS combined with at least 2 SS(V) unlocks the "Submarine Touch", a special attack that can trigger several times on the map, consuming a Submarine Supply Material per battle.
A trade-off is that any enemy ship still in light damage or better shape at the end of the shelling phase will have fewer targets to launch their torpedoes at, so the AS and its escorts have to tank all the preboss ships that can't perform ASW. | |||
| Air State | AD | AP | AS | AS+ |
| 38 | 56 | 126 | 252 | |
| Node I Farming | ||||
|---|---|---|---|---|
| Fleet | 1 (F)BB(V), 1 CV(B), 1 CL, 3 CLT
2 CV(B), 1 CL, 3 CLT | |||
| LoS | Speed | |||
| Any | Any | |||
| RouteNode Types: BLUE: Empty/Choice RED: Battle GREEN: Resource/TP VIOLET: Maelstrom PURPLE: Night Battle PINK: Air Raid/Battle ORANGE: Enemy Ambush/ASS |
C F G I | |||
| Fleet Notes | Node I has some good drops like I-401. | |||
| Air State | AD | AP | AS | AS+ |
| 80 | 120 | 270 | 540 | |
Enemy Compositions
| # | Empty Node | ||
|---|---|---|---|
| A | 気のせいだった。/敵影を見ず。/穏やかな海です。/穏やかな海峡です。/警戒が必要です。/静かな海です。 Must be my imagination./No enemy spotted./Calm seas./Calm straits./Be alert./Peaceful seas. | ||
| # | Empty Node | ||
| # | Empty Node | ||
|---|---|---|---|
| B | 気のせいだった。/敵影を見ず。/穏やかな海です。/穏やかな海峡です。/警戒が必要です。/静かな海です。 Must be my imagination./No enemy spotted./Calm seas./Calm straits./Be alert./Peaceful seas. | ||
| # | Empty Node | ||
| # | Formation | Normal Battle Node | AD/AP AS/AS+ |
|---|---|---|---|
| C | Double Line | 8/16 35/69 | |
| Line Ahead Double Line |
8/16 35/69 | ||
| Line Ahead | 8/16 35/69 | ||
| # | Formation | Normal Battle Node | AD/AP AS/AS+ |
| # | Formation | Normal Battle Node | AD/AP AS/AS+ |
|---|---|---|---|
| D | Line Ahead Diamond Echelon |
0/0 0/0 | |
| # | Formation | Normal Battle Node | AD/AP AS/AS+ |
| # | Empty Node | ||
|---|---|---|---|
| E | 気のせいだった。/敵影を見ず。/穏やかな海です。/穏やかな海峡です。/警戒が必要です。/静かな海です。 Must be my imagination./No enemy spotted./Calm seas./Calm straits./Be alert./Peaceful seas. | ||
| # | Empty Node | ||
| # | Formation | Normal Battle Node | AD/AP AS/AS+ |
|---|---|---|---|
| F | Double Line | 0/0 0/0 | |
| Double Line | 0/0 0/0 | ||
| Diamond | 0/0 0/0 | ||
| Double Line | 0/0 0/0 | ||
| # | Formation | Normal Battle Node | AD/AP AS/AS+ |
| # | Empty Node | ||
|---|---|---|---|
| G | 気のせいだった。/敵影を見ず。/穏やかな海です。/穏やかな海峡です。/警戒が必要です。/静かな海です。 Must be my imagination./No enemy spotted./Calm seas./Calm straits./Be alert./Peaceful seas. | ||
| # | Empty Node | ||
| # | Formation | Normal Battle Node | AD/AP AS/AS+ |
|---|---|---|---|
| H | Echelon | 0/0 0/0 | |
| Diamond | 0/0 0/0 | ||
| Double Line | 0/0 0/0 | ||
| # | Formation | Normal Battle Node | AD/AP AS/AS+ |
| # | Formation | Normal Battle Node | AD/AP AS/AS+ |
|---|---|---|---|
| I | Diamond | 61/121 270/540 | |
| Diamond | 33/65 144/288 | ||
| Diamond | 57/113 252/504 | ||
| # | Formation | Normal Battle Node | AD/AP AS/AS+ |
| # | Formation | Normal Battle Node | AD/AP AS/AS+ |
|---|---|---|---|
| J | Line Ahead | 0/0 0/0 | |
| Line Ahead | 0/0 0/0 | ||
| # | Formation | Normal Battle Node | AD/AP AS/AS+ |
| # | Formation | Boss Battle Node | AD/AP AS/AS+ |
|---|---|---|---|
| K | Diamond Double Line |
29/57 126/252 | |
| Diamond | 29/57 126/252 | ||
| Diamond | 29/57 126/252 | ||
| # | Formation | Boss Battle Node | AD/AP AS/AS+ |
Ship Drops
- The below table contains limited-time drop data and may not be up to date.
| Ship drops | |||||||||||||||||||||||||||||||||||||||||||||||||||||||||||||||||||||||||||||||||||||||||||||||||||
|---|---|---|---|---|---|---|---|---|---|---|---|---|---|---|---|---|---|---|---|---|---|---|---|---|---|---|---|---|---|---|---|---|---|---|---|---|---|---|---|---|---|---|---|---|---|---|---|---|---|---|---|---|---|---|---|---|---|---|---|---|---|---|---|---|---|---|---|---|---|---|---|---|---|---|---|---|---|---|---|---|---|---|---|---|---|---|---|---|---|---|---|---|---|---|---|---|---|---|---|
| Type | Ship? | C | D | F | H | I | J | K | |||||||||||||||||||||||||||||||||||||||||||||||||||||||||||||||||||||||||||||||||||||||||||
| SS | Maruyu | ✔️ | ✔️ | ||||||||||||||||||||||||||||||||||||||||||||||||||||||||||||||||||||||||||||||||||||||||||||||||
| SSV | I-401 | ✔️ | |||||||||||||||||||||||||||||||||||||||||||||||||||||||||||||||||||||||||||||||||||||||||||||||||
| AS | Taigei | ✔️ | |||||||||||||||||||||||||||||||||||||||||||||||||||||||||||||||||||||||||||||||||||||||||||||||||
| DD | Yukikaze | ✔️ | |||||||||||||||||||||||||||||||||||||||||||||||||||||||||||||||||||||||||||||||||||||||||||||||||
| DD | Makigumo | ✔️ | |||||||||||||||||||||||||||||||||||||||||||||||||||||||||||||||||||||||||||||||||||||||||||||||||
| DD | Naganami | ✔️ | |||||||||||||||||||||||||||||||||||||||||||||||||||||||||||||||||||||||||||||||||||||||||||||||||
| CL | Kitakami | ✔️ | |||||||||||||||||||||||||||||||||||||||||||||||||||||||||||||||||||||||||||||||||||||||||||||||||
| CL | Ooi | ✔️ | |||||||||||||||||||||||||||||||||||||||||||||||||||||||||||||||||||||||||||||||||||||||||||||||||
| CL | Nagara | ✔️ | ✔️ | ✔️ | ✔️ | ✔️ | ✔️ | ✔️ | |||||||||||||||||||||||||||||||||||||||||||||||||||||||||||||||||||||||||||||||||||||||||||
| CL | Kinu | ✔️ | |||||||||||||||||||||||||||||||||||||||||||||||||||||||||||||||||||||||||||||||||||||||||||||||||
| CL | Sendai | ✔️ | ✔️ | ✔️ | ✔️ | ✔️ | ✔️ | ✔️ | |||||||||||||||||||||||||||||||||||||||||||||||||||||||||||||||||||||||||||||||||||||||||||
| CL | Yuubari | ✔️ | |||||||||||||||||||||||||||||||||||||||||||||||||||||||||||||||||||||||||||||||||||||||||||||||||
| CA | Kinugasa | ✔️ | |||||||||||||||||||||||||||||||||||||||||||||||||||||||||||||||||||||||||||||||||||||||||||||||||
| CA | Myoukou | ✔️ | ✔️ | ✔️ | ✔️ | ✔️ | ✔️ | ||||||||||||||||||||||||||||||||||||||||||||||||||||||||||||||||||||||||||||||||||||||||||||
| CA | Takao | ✔️ | ✔️ | ✔️ | ✔️ | ✔️ | |||||||||||||||||||||||||||||||||||||||||||||||||||||||||||||||||||||||||||||||||||||||||||||
| CA | Atago | ✔️ | ✔️ | ✔️ | ✔️ | ✔️ | ✔️ | ||||||||||||||||||||||||||||||||||||||||||||||||||||||||||||||||||||||||||||||||||||||||||||
| CA | Mogami | ✔️ | ✔️ | ✔️ | ✔️ | ✔️ | |||||||||||||||||||||||||||||||||||||||||||||||||||||||||||||||||||||||||||||||||||||||||||||
| CA | Suzuya | ✔️ | |||||||||||||||||||||||||||||||||||||||||||||||||||||||||||||||||||||||||||||||||||||||||||||||||
| CA | Kumano | ✔️ | |||||||||||||||||||||||||||||||||||||||||||||||||||||||||||||||||||||||||||||||||||||||||||||||||
| CA | Tone | ✔️ | ✔️ | ✔️ | ✔️ | ||||||||||||||||||||||||||||||||||||||||||||||||||||||||||||||||||||||||||||||||||||||||||||||
| CA | Chikuma | ✔️ | ✔️ | ✔️ | ✔️ | ✔️ | |||||||||||||||||||||||||||||||||||||||||||||||||||||||||||||||||||||||||||||||||||||||||||||
| CVL | Ryuujou | ✔️ | ✔️ | ✔️ | ✔️ | ✔️ | ✔️ | ✔️ | |||||||||||||||||||||||||||||||||||||||||||||||||||||||||||||||||||||||||||||||||||||||||||
| CVL | Shouhou | ✔️ | ✔️ | ✔️ | ✔️ | ✔️ | ✔️ | ✔️ | |||||||||||||||||||||||||||||||||||||||||||||||||||||||||||||||||||||||||||||||||||||||||||
| CVL | Zuihou | ✔️ | |||||||||||||||||||||||||||||||||||||||||||||||||||||||||||||||||||||||||||||||||||||||||||||||||
| CVL | Hiyou | ✔️ | ✔️ | ✔️ | ✔️ | ✔️ | ✔️ | ✔️ | |||||||||||||||||||||||||||||||||||||||||||||||||||||||||||||||||||||||||||||||||||||||||||
| CVL | Junyou | ✔️ | ✔️ | ✔️ | ✔️ | ✔️ | ✔️ | ✔️ | |||||||||||||||||||||||||||||||||||||||||||||||||||||||||||||||||||||||||||||||||||||||||||
| FBB | Kongou | ✔️ | ✔️ | ✔️ | ✔️ | ||||||||||||||||||||||||||||||||||||||||||||||||||||||||||||||||||||||||||||||||||||||||||||||
| FBB | Hiei | ✔️ | ✔️ | ✔️ | ✔️ | ||||||||||||||||||||||||||||||||||||||||||||||||||||||||||||||||||||||||||||||||||||||||||||||
| FBB | Haruna | ✔️ | ✔️ | ✔️ | ✔️ | ||||||||||||||||||||||||||||||||||||||||||||||||||||||||||||||||||||||||||||||||||||||||||||||
| FBB | Kirishima | ✔️ | ✔️ | ✔️ | ✔️ | ||||||||||||||||||||||||||||||||||||||||||||||||||||||||||||||||||||||||||||||||||||||||||||||
| BB | Fusou | ✔️ | |||||||||||||||||||||||||||||||||||||||||||||||||||||||||||||||||||||||||||||||||||||||||||||||||
| BB | Yamashiro | ✔️ | |||||||||||||||||||||||||||||||||||||||||||||||||||||||||||||||||||||||||||||||||||||||||||||||||
| BB | Ise | ✔️ | |||||||||||||||||||||||||||||||||||||||||||||||||||||||||||||||||||||||||||||||||||||||||||||||||
| BB | Hyuuga | ✔️ | |||||||||||||||||||||||||||||||||||||||||||||||||||||||||||||||||||||||||||||||||||||||||||||||||
| BB | Nagato | ✔️ | |||||||||||||||||||||||||||||||||||||||||||||||||||||||||||||||||||||||||||||||||||||||||||||||||
| BB | Mutsu | ✔️ | |||||||||||||||||||||||||||||||||||||||||||||||||||||||||||||||||||||||||||||||||||||||||||||||||
| CV | Souryuu | ✔️ | |||||||||||||||||||||||||||||||||||||||||||||||||||||||||||||||||||||||||||||||||||||||||||||||||
| CV | Hiryuu | ✔️ | |||||||||||||||||||||||||||||||||||||||||||||||||||||||||||||||||||||||||||||||||||||||||||||||||
| SS | I-8 | ✔️ | ✔️ | ✔️ | |||||||||||||||||||||||||||||||||||||||||||||||||||||||||||||||||||||||||||||||||||||||||||||||
| SS | I-19 | ✔️ | ✔️ | ✔️ | ✔️ | ✔️ | |||||||||||||||||||||||||||||||||||||||||||||||||||||||||||||||||||||||||||||||||||||||||||||
| SS | I-58 | ✔️ | ✔️ | ✔️ | ✔️ | ||||||||||||||||||||||||||||||||||||||||||||||||||||||||||||||||||||||||||||||||||||||||||||||
| DD | Mutsuki | ✔️ | ✔️ | ✔️ | ✔️ | ✔️ | ✔️ | ||||||||||||||||||||||||||||||||||||||||||||||||||||||||||||||||||||||||||||||||||||||||||||
| DD | Kisaragi | ✔️ | ✔️ | ✔️ | ✔️ | ✔️ | |||||||||||||||||||||||||||||||||||||||||||||||||||||||||||||||||||||||||||||||||||||||||||||
| DD | Satsuki | ✔️ | ✔️ | ✔️ | ✔️ | ✔️ | ✔️ | ||||||||||||||||||||||||||||||||||||||||||||||||||||||||||||||||||||||||||||||||||||||||||||
| DD | Fumizuki | ✔️ | ✔️ | ✔️ | ✔️ | ✔️ | ✔️ | ||||||||||||||||||||||||||||||||||||||||||||||||||||||||||||||||||||||||||||||||||||||||||||
| DD | Nagatsuki | ✔️ | ✔️ | ✔️ | ✔️ | ✔️ | ✔️ | ||||||||||||||||||||||||||||||||||||||||||||||||||||||||||||||||||||||||||||||||||||||||||||
| DD | Kikuzuki | ✔️ | ✔️ | ✔️ | ✔️ | ✔️ | ✔️ | ||||||||||||||||||||||||||||||||||||||||||||||||||||||||||||||||||||||||||||||||||||||||||||
| DD | Mikazuki | ✔️ | ✔️ | ✔️ | ✔️ | ✔️ | ✔️ | ||||||||||||||||||||||||||||||||||||||||||||||||||||||||||||||||||||||||||||||||||||||||||||
| DD | Mochizuki | ✔️ | ✔️ | ✔️ | ✔️ | ✔️ | ✔️ | ||||||||||||||||||||||||||||||||||||||||||||||||||||||||||||||||||||||||||||||||||||||||||||
| DD | Ayanami | ✔️ | ✔️ | ✔️ | ✔️ | ✔️ | ✔️ | ||||||||||||||||||||||||||||||||||||||||||||||||||||||||||||||||||||||||||||||||||||||||||||
| DD | Shikinami | ✔️ | ✔️ | ✔️ | ✔️ | ✔️ | ✔️ | ||||||||||||||||||||||||||||||||||||||||||||||||||||||||||||||||||||||||||||||||||||||||||||
| DD | Oboro | ✔️ | ✔️ | ✔️ | ✔️ | ✔️ | ✔️ | ||||||||||||||||||||||||||||||||||||||||||||||||||||||||||||||||||||||||||||||||||||||||||||
| DD | Akebono | ✔️ | ✔️ | ✔️ | ✔️ | ✔️ | ✔️ | ||||||||||||||||||||||||||||||||||||||||||||||||||||||||||||||||||||||||||||||||||||||||||||
| DD | Sazanami | ✔️ | ✔️ | ✔️ | ✔️ | ✔️ | ✔️ | ||||||||||||||||||||||||||||||||||||||||||||||||||||||||||||||||||||||||||||||||||||||||||||
| DD | Ushio | ✔️ | ✔️ | ✔️ | ✔️ | ✔️ | ✔️ | ||||||||||||||||||||||||||||||||||||||||||||||||||||||||||||||||||||||||||||||||||||||||||||
| DD | Samidare | ✔️ | ✔️ | ✔️ | ✔️ | ✔️ | |||||||||||||||||||||||||||||||||||||||||||||||||||||||||||||||||||||||||||||||||||||||||||||
| DD | Suzukaze | ✔️ | ✔️ | ✔️ | ✔️ | ✔️ | |||||||||||||||||||||||||||||||||||||||||||||||||||||||||||||||||||||||||||||||||||||||||||||
| CL | Tenryuu | ✔️ | |||||||||||||||||||||||||||||||||||||||||||||||||||||||||||||||||||||||||||||||||||||||||||||||||
| CL | Tatsuta | ✔️ | |||||||||||||||||||||||||||||||||||||||||||||||||||||||||||||||||||||||||||||||||||||||||||||||||
| CL | Kiso | ✔️ | ✔️ | ✔️ | ✔️ | ✔️ | ✔️ | ||||||||||||||||||||||||||||||||||||||||||||||||||||||||||||||||||||||||||||||||||||||||||||
| CL | Isuzu | ✔️ | ✔️ | ✔️ | ✔️ | ✔️ | ✔️ | ✔️ | |||||||||||||||||||||||||||||||||||||||||||||||||||||||||||||||||||||||||||||||||||||||||||
| CL | Natori | ✔️ | ✔️ | ✔️ | ✔️ | ✔️ | ✔️ | ||||||||||||||||||||||||||||||||||||||||||||||||||||||||||||||||||||||||||||||||||||||||||||
| CL | Yura | ✔️ | ✔️ | ✔️ | ✔️ | ✔️ | ✔️ | ✔️ | |||||||||||||||||||||||||||||||||||||||||||||||||||||||||||||||||||||||||||||||||||||||||||
| CL | Jintsuu | ✔️ | ✔️ | ✔️ | ✔️ | ✔️ | ✔️ | ✔️ | |||||||||||||||||||||||||||||||||||||||||||||||||||||||||||||||||||||||||||||||||||||||||||
| CL | Naka | ✔️ | ✔️ | ✔️ | ✔️ | ✔️ | ✔️ | ✔️ | |||||||||||||||||||||||||||||||||||||||||||||||||||||||||||||||||||||||||||||||||||||||||||
| CA | Furutaka | ✔️ | ✔️ | ✔️ | ✔️ | ✔️ | ✔️ | ✔️ | |||||||||||||||||||||||||||||||||||||||||||||||||||||||||||||||||||||||||||||||||||||||||||
| CA | Kako | ✔️ | ✔️ | ✔️ | ✔️ | ✔️ | ✔️ | ✔️ | |||||||||||||||||||||||||||||||||||||||||||||||||||||||||||||||||||||||||||||||||||||||||||
| CA | Aoba | ✔️ | ✔️ | ✔️ | ✔️ | ✔️ | ✔️ | ✔️ | |||||||||||||||||||||||||||||||||||||||||||||||||||||||||||||||||||||||||||||||||||||||||||
| CA | Nachi | ✔️ | ✔️ | ✔️ | ✔️ | ✔️ | ✔️ | ✔️ | |||||||||||||||||||||||||||||||||||||||||||||||||||||||||||||||||||||||||||||||||||||||||||
| CA | Ashigara | ✔️ | ✔️ | ✔️ | ✔️ | ✔️ | ✔️ | ✔️ | |||||||||||||||||||||||||||||||||||||||||||||||||||||||||||||||||||||||||||||||||||||||||||
| CA | Haguro | ✔️ | ✔️ | ✔️ | ✔️ | ✔️ | ✔️ | ✔️ | |||||||||||||||||||||||||||||||||||||||||||||||||||||||||||||||||||||||||||||||||||||||||||
| CA | Maya | ✔️ | ✔️ | ✔️ | ✔️ | ✔️ | ✔️ | ✔️ | |||||||||||||||||||||||||||||||||||||||||||||||||||||||||||||||||||||||||||||||||||||||||||
| CA | Choukai | ✔️ | ✔️ | ✔️ | ✔️ | ✔️ | ✔️ | ✔️ | |||||||||||||||||||||||||||||||||||||||||||||||||||||||||||||||||||||||||||||||||||||||||||
| CVL | Houshou | ✔️ | |||||||||||||||||||||||||||||||||||||||||||||||||||||||||||||||||||||||||||||||||||||||||||||||||
| SS | I-168 | ✔️ | ✔️ | ✔️ | ✔️ | ✔️ | ✔️ | ✔️ | |||||||||||||||||||||||||||||||||||||||||||||||||||||||||||||||||||||||||||||||||||||||||||
| AV | Chitose | ✔️ | |||||||||||||||||||||||||||||||||||||||||||||||||||||||||||||||||||||||||||||||||||||||||||||||||
| AV | Chiyoda | ✔️ | |||||||||||||||||||||||||||||||||||||||||||||||||||||||||||||||||||||||||||||||||||||||||||||||||
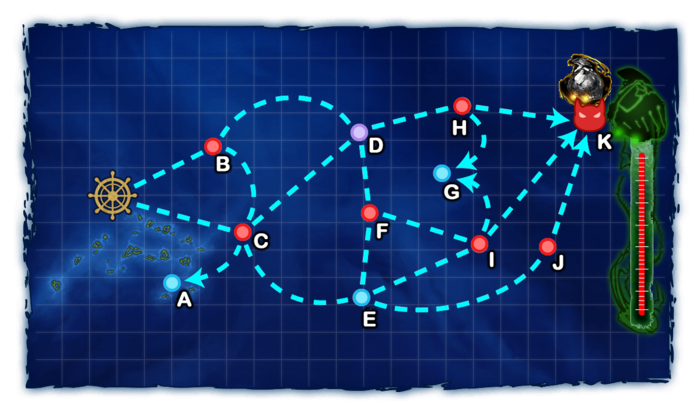
World 6-2: MS諸島沖 - MS Islands Offshore
| Strategy Name | MS諸島防衛戦 Defense of the MS Islands |
|---|---|
| Difficulty | ☆ ☆ ☆ ☆ ☆ ☆ ☆ ☆ ☆ |
| Item | - |
| Strategy Content | MS諸島沖前面に展開し、同諸島方面に接近しつつある敵攻略部隊を捕捉、全力で撃滅せよ! Expand to the forward part of the MS Islands sea, seize the enemy fleet that is slowly advancing to capture the islands, and destroy them with all your might! |
| World 6 Unlocking & Progression | ||||
|---|---|---|---|---|
| Unlock conditions | World 6 is unlocked after clearing 6-1 | |||
| Clear conditions | To clear the map: the boss's flagship must be sunk 3 times | |||
Stage Guide
| 6-2 Branching Rules | ||
|---|---|---|
| Nodes | Rules | |
| Start | B |
|
C | ||
B |
C |
|
D | ||
C |
A |
|
D | ||
E | ||
D |
F |
|
H |
| |
E |
F |
|
I |
| |
J | ||
F |
I |
|
H |
G |
|
K |
| |
I |
G |
|
K | ||
Tips
There are Light Cruiser Tsu-Class everywhere. Any CV(B/L) should bring bombers with AAR and in bigger slots, in order to not have them deplaned.
This map is a good spot to farm both Yahagi and Maruyu drops (see here).
Recommended Fleets
Using a Special Attack is recommended, especially the Nelson Touch, as it requires only 1 BB.
| Heavy Fleet | ||||
|---|---|---|---|---|
| Fleet | 2 (F)BB(V)/CV(B), 2 CLT, 2 CA(V) | |||
| LoS | Speed | |||
| Cn3: 41 | Any | |||
| RouteNode Types: BLUE: Empty/Choice RED: Battle GREEN: Resource/TP VIOLET: Maelstrom PURPLE: Night Battle PINK: Air Raid/Battle ORANGE: Enemy Ambush/ASS |
C E F I K | |||
| Fleet Notes | Higher chance to kill the boss, but less efficient for farming. | |||
| Air State | AD | AP | AS | AS+ |
| 75 | 112 | 252 | 504 | |
| Light Fleet | ||||
|---|---|---|---|---|
| Fleet | 1 (F)BB(V), 1 CV(B), 1-2 CA(V)/CLT/AV, 0-1 CL, 2 DD | |||
| LoS | Speed | |||
| Cn3: 51 | Any | |||
| RouteNode Types: BLUE: Empty/Choice RED: Battle GREEN: Resource/TP VIOLET: Maelstrom PURPLE: Night Battle PINK: Air Raid/Battle ORANGE: Enemy Ambush/ASS |
C E J K | |||
| Fleet Notes | Lesser chance to reach/kill the boss, but more efficient for farming. | |||
| Air State | AD | AP | AS | AS+ |
| 46 | 68 | 153 | 306 | |
| "LoS Snipe" | ||||
|---|---|---|---|---|
| Fleet | 1 (F)BB(V), 1 CV(B), 2 CA(V)/CLT, 2DD | |||
| LoS | Speed | |||
| Cn3: min 41, max 43 | Any | |||
| RouteNode Types: BLUE: Empty/Choice RED: Battle GREEN: Resource/TP VIOLET: Maelstrom PURPLE: Night Battle PINK: Air Raid/Battle ORANGE: Enemy Ambush/ASS |
Random:
| |||
| Fleet Notes | There is a LoS check at Node E:
There is an LoS check at Node I:
Node I is generally easier than node J, but it requires nerfing the fleet, to fall into LoS range between 41-43 (a very small range), and it makes little to no difference in general.
| |||
| Air State | AD | AP | AS | AS+ |
| 46 | 68 | 153 | 306 | |
Enemy Compositions
| # | Empty Node | ||
|---|---|---|---|
| A | 気のせいだった。/敵影を見ず。/穏やかな海です。/穏やかな海峡です。/警戒が必要です。/静かな海です。 Must be my imagination./No enemy spotted./Calm seas./Calm straits./Be alert./Peaceful seas. | ||
| # | Empty Node | ||
| # | Formation | Normal Battle Node | AD/AP AS/AS+ |
|---|---|---|---|
| B | Diamond | 9/17 36/72 | |
| Double Line Diamond |
17/33 72/144 | ||
| # | Formation | Normal Battle Node | AD/AP AS/AS+ |
| # | Formation | Normal Battle Node | AD/AP AS/AS+ |
|---|---|---|---|
| C | Double Line | 9/17 36/72 | |
| Diamond | 16/31 69/138 | ||
| Diamond | 9/17 36/72 | ||
| # | Formation | Normal Battle Node | AD/AP AS/AS+ |
| # | Maelstrom Node | ||
|---|---|---|---|
| D | Lost Strong | ||
| # | Maelstrom Node | ||
| # | Empty Node | ||
|---|---|---|---|
| E | 気のせいだった。/敵影を見ず。/穏やかな海です。/穏やかな海峡です。/警戒が必要です。/静かな海です。 Must be my imagination./No enemy spotted./Calm seas./Calm straits./Be alert./Peaceful seas. | ||
| # | Empty Node | ||
| # | Formation | Normal Battle Node | AD/AP AS/AS+ |
|---|---|---|---|
| F | Diamond | 57/113 252/504 | |
| Double Line Diamond |
29/57 126/252 | ||
| Diamond | 29/57 126/252 | ||
| # | Formation | Normal Battle Node | AD/AP AS/AS+ |
| # | Empty Node | ||
|---|---|---|---|
| G | 気のせいだった。/敵影を見ず。/穏やかな海です。/穏やかな海峡です。/警戒が必要です。/静かな海です。 Must be my imagination./No enemy spotted./Calm seas./Calm straits./Be alert./Peaceful seas. | ||
| # | Empty Node | ||
| # | Formation | Normal Battle Node | AD/AP AS/AS+ |
|---|---|---|---|
| H | Line Ahead | 0/0 0/0 | |
| Line Ahead Double Line |
8/16 35/69 | ||
| Line Ahead | 0/0 0/0 | ||
| # | Formation | Normal Battle Node | AD/AP AS/AS+ |
| # | Formation | Normal Battle Node | AD/AP AS/AS+ |
|---|---|---|---|
| I | Line Ahead Double Line |
0/0 0/0 | |
| Line Ahead Diamond |
8/16 35/69 | ||
| # | Formation | Normal Battle Node | AD/AP AS/AS+ |
| # | Formation | Normal Battle Node | AD/AP AS/AS+ |
|---|---|---|---|
| J | Line Ahead | 0/0 0/0 | |
| Diamond | 35/69 153/306 | ||
| Double Line | 9/17 36/72 | ||
| # | Formation | Normal Battle Node | AD/AP AS/AS+ |
| # | Formation | Boss Battle Node | AD/AP AS/AS+ |
|---|---|---|---|
| K | Line Ahead | 0/0 0/0 | |
| Line Ahead Diamond |
29/57 126/252 | ||
| # | Formation | Boss Battle Node | AD/AP AS/AS+ |
Ship Drops
| Ship drops | |||||||||||||||||||||||||||||||||||||||||||||||||||||||||||||||||||||||||||||||||||||||||||||||||||
|---|---|---|---|---|---|---|---|---|---|---|---|---|---|---|---|---|---|---|---|---|---|---|---|---|---|---|---|---|---|---|---|---|---|---|---|---|---|---|---|---|---|---|---|---|---|---|---|---|---|---|---|---|---|---|---|---|---|---|---|---|---|---|---|---|---|---|---|---|---|---|---|---|---|---|---|---|---|---|---|---|---|---|---|---|---|---|---|---|---|---|---|---|---|---|---|---|---|---|---|
| Type | Ship? | B | C | F | H | I | J | K | |||||||||||||||||||||||||||||||||||||||||||||||||||||||||||||||||||||||||||||||||||||||||||
| DD | Uranami | ✔️ | |||||||||||||||||||||||||||||||||||||||||||||||||||||||||||||||||||||||||||||||||||||||||||||||||
| CL | Yahagi | ✔️ | |||||||||||||||||||||||||||||||||||||||||||||||||||||||||||||||||||||||||||||||||||||||||||||||||
| CL | Sakawa | ✔️ | |||||||||||||||||||||||||||||||||||||||||||||||||||||||||||||||||||||||||||||||||||||||||||||||||
| SS | Maruyu | ✔️ | |||||||||||||||||||||||||||||||||||||||||||||||||||||||||||||||||||||||||||||||||||||||||||||||||
| AR | Akashi | ✔️ | ✔️ | ||||||||||||||||||||||||||||||||||||||||||||||||||||||||||||||||||||||||||||||||||||||||||||||||
| DD | Hamakaze | ✔️ | |||||||||||||||||||||||||||||||||||||||||||||||||||||||||||||||||||||||||||||||||||||||||||||||||
| DD | Yuugumo | ✔️ | ✔️ | ✔️ | |||||||||||||||||||||||||||||||||||||||||||||||||||||||||||||||||||||||||||||||||||||||||||||||
| DD | Shimakaze | ✔️ | |||||||||||||||||||||||||||||||||||||||||||||||||||||||||||||||||||||||||||||||||||||||||||||||||
| CL | Nagara | ✔️ | ✔️ | ✔️ | ✔️ | ✔️ | ✔️ | ✔️ | |||||||||||||||||||||||||||||||||||||||||||||||||||||||||||||||||||||||||||||||||||||||||||
| CL | Kinu | ✔️ | ✔️ | ✔️ | ✔️ | ✔️ | ✔️ | ✔️ | |||||||||||||||||||||||||||||||||||||||||||||||||||||||||||||||||||||||||||||||||||||||||||
| CL | Sendai | ✔️ | ✔️ | ✔️ | ✔️ | ✔️ | ✔️ | ✔️ | |||||||||||||||||||||||||||||||||||||||||||||||||||||||||||||||||||||||||||||||||||||||||||
| CL | Yuubari | ✔️ | |||||||||||||||||||||||||||||||||||||||||||||||||||||||||||||||||||||||||||||||||||||||||||||||||
| CA | Kinugasa | ✔️ | ✔️ | ✔️ | ✔️ | ✔️ | |||||||||||||||||||||||||||||||||||||||||||||||||||||||||||||||||||||||||||||||||||||||||||||
| CA | Myoukou | ✔️ | ✔️ | ✔️ | ✔️ | ✔️ | ✔️ | ✔️ | |||||||||||||||||||||||||||||||||||||||||||||||||||||||||||||||||||||||||||||||||||||||||||
| CA | Takao | ✔️ | ✔️ | ✔️ | ✔️ | ✔️ | ✔️ | ||||||||||||||||||||||||||||||||||||||||||||||||||||||||||||||||||||||||||||||||||||||||||||
| CA | Atago | ✔️ | ✔️ | ✔️ | ✔️ | ✔️ | ✔️ | ✔️ | |||||||||||||||||||||||||||||||||||||||||||||||||||||||||||||||||||||||||||||||||||||||||||
| CA | Mogami | ✔️ | ✔️ | ✔️ | ✔️ | ✔️ | ✔️ | ||||||||||||||||||||||||||||||||||||||||||||||||||||||||||||||||||||||||||||||||||||||||||||
| CA | Suzuya | ✔️ | ✔️ | ✔️ | ✔️ | ||||||||||||||||||||||||||||||||||||||||||||||||||||||||||||||||||||||||||||||||||||||||||||||
| CA | Kumano | ✔️ | ✔️ | ✔️ | ✔️ | ||||||||||||||||||||||||||||||||||||||||||||||||||||||||||||||||||||||||||||||||||||||||||||||
| CA | Tone | ✔️ | ✔️ | ✔️ | ✔️ | ||||||||||||||||||||||||||||||||||||||||||||||||||||||||||||||||||||||||||||||||||||||||||||||
| CA | Chikuma | ✔️ | ✔️ | ✔️ | ✔️ | ✔️ | |||||||||||||||||||||||||||||||||||||||||||||||||||||||||||||||||||||||||||||||||||||||||||||
| CVL | Ryuujou | ✔️ | |||||||||||||||||||||||||||||||||||||||||||||||||||||||||||||||||||||||||||||||||||||||||||||||||
| CVL | Shouhou | ✔️ | ✔️ | ✔️ | ✔️ | ✔️ | ✔️ | ✔️ | |||||||||||||||||||||||||||||||||||||||||||||||||||||||||||||||||||||||||||||||||||||||||||
| CVL | Zuihou | ✔️ | |||||||||||||||||||||||||||||||||||||||||||||||||||||||||||||||||||||||||||||||||||||||||||||||||
| CVL | Hiyou | ✔️ | ✔️ | ✔️ | ✔️ | ✔️ | ✔️ | ✔️ | |||||||||||||||||||||||||||||||||||||||||||||||||||||||||||||||||||||||||||||||||||||||||||
| CVL | Junyou | ✔️ | ✔️ | ✔️ | ✔️ | ✔️ | ✔️ | ✔️ | |||||||||||||||||||||||||||||||||||||||||||||||||||||||||||||||||||||||||||||||||||||||||||
| FBB | Kongou | ✔️ | |||||||||||||||||||||||||||||||||||||||||||||||||||||||||||||||||||||||||||||||||||||||||||||||||
| FBB | Hiei | ✔️ | |||||||||||||||||||||||||||||||||||||||||||||||||||||||||||||||||||||||||||||||||||||||||||||||||
| FBB | Haruna | ✔️ | |||||||||||||||||||||||||||||||||||||||||||||||||||||||||||||||||||||||||||||||||||||||||||||||||
| FBB | Kirishima | ✔️ | |||||||||||||||||||||||||||||||||||||||||||||||||||||||||||||||||||||||||||||||||||||||||||||||||
| BB | Fusou | ✔️ | ✔️ | ✔️ | ✔️ | ✔️ | |||||||||||||||||||||||||||||||||||||||||||||||||||||||||||||||||||||||||||||||||||||||||||||
| BB | Yamashiro | ✔️ | ✔️ | ✔️ | ✔️ | ||||||||||||||||||||||||||||||||||||||||||||||||||||||||||||||||||||||||||||||||||||||||||||||
| BB | Ise | ✔️ | ✔️ | ✔️ | ✔️ | ✔️ | |||||||||||||||||||||||||||||||||||||||||||||||||||||||||||||||||||||||||||||||||||||||||||||
| BB | Hyuuga | ✔️ | ✔️ | ✔️ | ✔️ | ✔️ | |||||||||||||||||||||||||||||||||||||||||||||||||||||||||||||||||||||||||||||||||||||||||||||
| BB | Nagato | ✔️ | ✔️ | ||||||||||||||||||||||||||||||||||||||||||||||||||||||||||||||||||||||||||||||||||||||||||||||||
| BB | Mutsu | ✔️ | ✔️ | ✔️ | |||||||||||||||||||||||||||||||||||||||||||||||||||||||||||||||||||||||||||||||||||||||||||||||
| CV | Shoukaku | ✔️ | |||||||||||||||||||||||||||||||||||||||||||||||||||||||||||||||||||||||||||||||||||||||||||||||||
| CV | Zuikaku | ✔️ | |||||||||||||||||||||||||||||||||||||||||||||||||||||||||||||||||||||||||||||||||||||||||||||||||
| SS | I-19 | ✔️ | |||||||||||||||||||||||||||||||||||||||||||||||||||||||||||||||||||||||||||||||||||||||||||||||||
| DD | Fubuki | ✔️ | ✔️ | ✔️ | ✔️ | ✔️ | ✔️ | ||||||||||||||||||||||||||||||||||||||||||||||||||||||||||||||||||||||||||||||||||||||||||||
| DD | Shirayuki | ✔️ | ✔️ | ✔️ | ✔️ | ✔️ | ✔️ | ||||||||||||||||||||||||||||||||||||||||||||||||||||||||||||||||||||||||||||||||||||||||||||
| DD | Hatsuyuki | ✔️ | ✔️ | ✔️ | ✔️ | ✔️ | ✔️ | ||||||||||||||||||||||||||||||||||||||||||||||||||||||||||||||||||||||||||||||||||||||||||||
| DD | Miyuki | ✔️ | ✔️ | ✔️ | ✔️ | ✔️ | ✔️ | ||||||||||||||||||||||||||||||||||||||||||||||||||||||||||||||||||||||||||||||||||||||||||||
| DD | Murakumo | ✔️ | ✔️ | ✔️ | ✔️ | ✔️ | ✔️ | ||||||||||||||||||||||||||||||||||||||||||||||||||||||||||||||||||||||||||||||||||||||||||||
| DD | Isonami | ✔️ | ✔️ | ✔️ | ✔️ | ✔️ | ✔️ | ||||||||||||||||||||||||||||||||||||||||||||||||||||||||||||||||||||||||||||||||||||||||||||
| DD | Hatsuharu | ✔️ | ✔️ | ✔️ | ✔️ | ✔️ | ✔️ | ||||||||||||||||||||||||||||||||||||||||||||||||||||||||||||||||||||||||||||||||||||||||||||
| DD | Nenohi | ✔️ | ✔️ | ✔️ | ✔️ | ✔️ | ✔️ | ||||||||||||||||||||||||||||||||||||||||||||||||||||||||||||||||||||||||||||||||||||||||||||
| DD | Wakaba | ✔️ | ✔️ | ✔️ | ✔️ | ✔️ | ✔️ | ||||||||||||||||||||||||||||||||||||||||||||||||||||||||||||||||||||||||||||||||||||||||||||
| DD | Hatsushimo | ✔️ | ✔️ | ✔️ | ✔️ | ✔️ | ✔️ | ||||||||||||||||||||||||||||||||||||||||||||||||||||||||||||||||||||||||||||||||||||||||||||
| DD | Asashio | ✔️ | ✔️ | ✔️ | ✔️ | ✔️ | ✔️ | ||||||||||||||||||||||||||||||||||||||||||||||||||||||||||||||||||||||||||||||||||||||||||||
| DD | Ooshio | ✔️ | ✔️ | ✔️ | ✔️ | ✔️ | ✔️ | ||||||||||||||||||||||||||||||||||||||||||||||||||||||||||||||||||||||||||||||||||||||||||||
| DD | Michishio | ✔️ | ✔️ | ✔️ | ✔️ | ✔️ | ✔️ | ||||||||||||||||||||||||||||||||||||||||||||||||||||||||||||||||||||||||||||||||||||||||||||
| DD | Arashio | ✔️ | ✔️ | ✔️ | ✔️ | ✔️ | ✔️ | ||||||||||||||||||||||||||||||||||||||||||||||||||||||||||||||||||||||||||||||||||||||||||||
| DD | Arare | ✔️ | ✔️ | ✔️ | ✔️ | ✔️ | ✔️ | ||||||||||||||||||||||||||||||||||||||||||||||||||||||||||||||||||||||||||||||||||||||||||||
| DD | Kasumi | ✔️ | ✔️ | ✔️ | ✔️ | ✔️ | ✔️ | ||||||||||||||||||||||||||||||||||||||||||||||||||||||||||||||||||||||||||||||||||||||||||||
| CL | Tenryuu | ✔️ | |||||||||||||||||||||||||||||||||||||||||||||||||||||||||||||||||||||||||||||||||||||||||||||||||
| CL | Tatsuta | ✔️ | |||||||||||||||||||||||||||||||||||||||||||||||||||||||||||||||||||||||||||||||||||||||||||||||||
| CL | Isuzu | ✔️ | ✔️ | ✔️ | ✔️ | ✔️ | ✔️ | ✔️ | |||||||||||||||||||||||||||||||||||||||||||||||||||||||||||||||||||||||||||||||||||||||||||
| CL | Natori | ✔️ | ✔️ | ✔️ | ✔️ | ✔️ | ✔️ | ✔️ | |||||||||||||||||||||||||||||||||||||||||||||||||||||||||||||||||||||||||||||||||||||||||||
| CL | Yura | ✔️ | ✔️ | ✔️ | ✔️ | ✔️ | ✔️ | ✔️ | |||||||||||||||||||||||||||||||||||||||||||||||||||||||||||||||||||||||||||||||||||||||||||
| CL | Jintsuu | ✔️ | ✔️ | ✔️ | ✔️ | ✔️ | ✔️ | ✔️ | |||||||||||||||||||||||||||||||||||||||||||||||||||||||||||||||||||||||||||||||||||||||||||
| CL | Naka | ✔️ | ✔️ | ✔️ | ✔️ | ✔️ | ✔️ | ✔️ | |||||||||||||||||||||||||||||||||||||||||||||||||||||||||||||||||||||||||||||||||||||||||||
| CA | Furutaka | ✔️ | ✔️ | ✔️ | ✔️ | ✔️ | ✔️ | ✔️ | |||||||||||||||||||||||||||||||||||||||||||||||||||||||||||||||||||||||||||||||||||||||||||
| CA | Kako | ✔️ | ✔️ | ✔️ | ✔️ | ✔️ | ✔️ | ✔️ | |||||||||||||||||||||||||||||||||||||||||||||||||||||||||||||||||||||||||||||||||||||||||||
| CA | Aoba | ✔️ | ✔️ | ✔️ | ✔️ | ✔️ | ✔️ | ✔️ | |||||||||||||||||||||||||||||||||||||||||||||||||||||||||||||||||||||||||||||||||||||||||||
| CA | Nachi | ✔️ | ✔️ | ✔️ | ✔️ | ✔️ | ✔️ | ✔️ | |||||||||||||||||||||||||||||||||||||||||||||||||||||||||||||||||||||||||||||||||||||||||||
| CA | Ashigara | ✔️ | ✔️ | ✔️ | ✔️ | ✔️ | ✔️ | ✔️ | |||||||||||||||||||||||||||||||||||||||||||||||||||||||||||||||||||||||||||||||||||||||||||
| CA | Haguro | ✔️ | ✔️ | ✔️ | ✔️ | ✔️ | ✔️ | ✔️ | |||||||||||||||||||||||||||||||||||||||||||||||||||||||||||||||||||||||||||||||||||||||||||
| CA | Maya | ✔️ | ✔️ | ✔️ | ✔️ | ✔️ | ✔️ | ✔️ | |||||||||||||||||||||||||||||||||||||||||||||||||||||||||||||||||||||||||||||||||||||||||||
| CA | Choukai | ✔️ | ✔️ | ✔️ | ✔️ | ✔️ | ✔️ | ✔️ | |||||||||||||||||||||||||||||||||||||||||||||||||||||||||||||||||||||||||||||||||||||||||||
| CVL | Houshou | ✔️ | |||||||||||||||||||||||||||||||||||||||||||||||||||||||||||||||||||||||||||||||||||||||||||||||||
| SS | I-168 | ✔️ | |||||||||||||||||||||||||||||||||||||||||||||||||||||||||||||||||||||||||||||||||||||||||||||||||
| AV | Chitose | ✔️ | |||||||||||||||||||||||||||||||||||||||||||||||||||||||||||||||||||||||||||||||||||||||||||||||||
| AV | Chiyoda | ✔️ | |||||||||||||||||||||||||||||||||||||||||||||||||||||||||||||||||||||||||||||||||||||||||||||||||
| |||||||||||||||||||||||||||||||||||||||||||||||||||||||||||||||||||||||||||||||||||||||||||||||||||||||||||||||||||||||||||||||||||||||||||||||||||||||||||||||||||||||||||||||||||||||||||||||||||||||||||||||||||||||||||||||||||||||||||||||||||||||||||||||||||||||||||||||||||||||||||||||||||||||||||
World 6-3: グアノ環礁沖海域 - Guano Atoll Offshore Sea
| Strategy Name | K作戦 Operation K |
|---|---|
| Difficulty | ☆ ☆ ☆ ☆ ☆ ☆ ☆ |
| Item | Depends |
| Strategy Content | 飛行艇または水上偵察機を装備した水上機母艦・軽巡・駆逐艦による艦隊を同方面へ進出、航空偵察「K作戦」を実施せよ! Sortie to this region with light cruisers, destroyers, and seaplane tenderd equipped with Flying boats  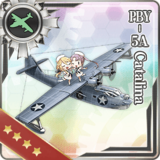 or recon seaplanes, and undertake the air reconnaissance "Operation K"! or recon seaplanes, and undertake the air reconnaissance "Operation K"!
|
| World 6 Unlocking & Progression | ||||
|---|---|---|---|---|
| Unlock conditions | World 6 is unlocked after clearing 6-2 HP bar | |||
| Clear conditions | To clear the map: the boss's flagship must be sunk 4 times | |||
Stage Guide
| 6-3 Branching Rules | ||
|---|---|---|
| Nodes | Rules | |
A |
B |
|
C | ||
E |
F |
|
G | ||
G |
H |
|
H |
I |
|
J |
| |
Tips
Regarding the map
Once the map is cleared, it is no longer possible to roll the final boss form.
- Only AVs, CLs, CTs, and DDs are allowed to sortie!
- Specifically at least 1AV, 1CL, and 1DD. CLT cannot be used here.
- Maximum of 2 AV allowed.
- Maximum of 3 CL/CT allowed.
Node notes
- Node C is a normal submarine node
- Node B is a submarine node that sometimes contains surface ships instead of submarines
- Regardless of enemies present, B is treated as a Submarine node for
 /
/ consumption
 - The only reason to head towards B is to have a fleet that cannot/doesn't want to face SS So-Class Elite at node C but at the cost of an extra surface node
- Regardless of enemies present, B is treated as a Submarine node for
- A CL Tsu-Class Elite can show up at node E.
- Node G can be guaranteed with 4 DDs in the fleet.
Recommended Fleets
AVs and CL able to carry Midget Submarines

 are advised in every composition.
- Because only AV/CL/CT/DD can be deployed, it is unlikely that the fleet win during daytime battle, and so should be ready for yasen.
- Using Seaplane Bombers on the AV's biggest slots can help achieve AS and Artillery Spotting.
| Heavy Fleet | ||||
|---|---|---|---|---|
| Fleet | 2 AV, 3 CL, 1 DD
2 AV, 1 CL, 1 DD, 2 CL/CT/DD | |||
| LoS | Speed | |||
| Cn3: 38 | Any | |||
| RouteNode Types: BLUE: Empty/Choice RED: Battle GREEN: Resource/TP VIOLET: Maelstrom PURPLE: Night Battle PINK: Air Raid/Battle ORANGE: Enemy Ambush/ASS |
A C E F H J | |||
| Fleet Notes | Has the highest damage output at the boss, especially since the boss fight almost always requires night battle.
| |||
| Air State | AD | AP | AS | AS+ |
| 0 | 0 | 0 | 0 | |
| Light Fleet | ||||
|---|---|---|---|---|
| Fleet | 1 AV, 1 CL, 4 DD | |||
| LoS | Speed | |||
| Cn3: 38 | Any | |||
| RouteNode Types: BLUE: Empty/Choice RED: Battle GREEN: Resource/TP VIOLET: Maelstrom PURPLE: Night Battle PINK: Air Raid/Battle ORANGE: Enemy Ambush/ASS |
A C E G H J | |||
| Fleet Notes | **The most cost-effective way to get to the boss, and guarantees G branching, which allows two air reconnaissance rewards.
| |||
| Air State | AD | AP | AS | AS+ |
| 0 | 0 | 0 | 0 | |
| Medium Fleet | ||||
|---|---|---|---|---|
| Fleet | 1 AV, 2 CL, 3 DD | |||
| LoS | Speed | |||
| Cn3: 38 | Any | |||
| RouteNode Types: BLUE: Empty/Choice RED: Battle GREEN: Resource/TP VIOLET: Maelstrom PURPLE: Night Battle PINK: Air Raid/Battle ORANGE: Enemy Ambush/ASS |
Random:
| |||
| Fleet Notes | Has better damage over the light fleet, and on the shortest route, can fight at the boss with better damage output, but has to deal with RNG.
Being sent to Node F may hurt a bit more. | |||
| Quests | Bq4 | |||
| Air State | AD | AP | AS | AS+ |
| 0 | 0 | 0 | 0 | |
Air Reconnaissance Mechanic
On Nodes G and H, Seaplanes will be flown towards the "green X" (the recon route is shown on the map as green arrows).
- Successful reconnaissance will reward additional resources upon getting a B+ rank on the boss.
- Neither G or H have combat.
- Animation will be shown for the Air Reconnaissance; if both
 Large Flying Boats and other
  Seaplanes (SPR and SPB) are brought, Flying Boat animation takes priority.
 - Success rate of the air reconnaissance depends on the LoS and Seaplanes count.
- All reconnaissance rewards are forfeit if the fleet fails to win at the boss node J.
The formula for Air Reconnaissance is:
| Air Reconnaissance Success Formula | |
|---|---|
| |
|

To sum up, the more LoS and Seaplanes used, the better, with Flying Boats counting for more than other seaplanes.
|
| ||||||||||||||||||||||||||||||||||||||||||||||||||
Enemy Compositions
| # | Selection Node | ||
|---|---|---|---|
| A | 艦隊の針路を選択できます。提督、どちらの針路をとられますか? You can decide the fleet's course. Admiral, which heading should we take? | ||
| # | Selection Node | ||
| # | Enemy Form. |
Base EXP | Normal Battle Node | AD/AP AS/AS+ |
|---|---|---|---|---|
| B | Line Abreast Echelon |
90 | 0/0 0/0 | |
| Line Abreast Echelon |
100 | 0/0 0/0 | ||
| Line Ahead | 100 | 0/0 0/0 | ||
| Line Ahead | 110 | 0/0 0/0 | ||
| # | Enemy Form. |
Base EXP | Normal Battle Node | AD/AP AS/AS+ |
| # | Enemy Form. |
Base EXP | Normal Battle Node | AD/AP AS/AS+ |
|---|---|---|---|---|
| C | Line Abreast | 90 | 0/0 0/0 | |
| Line Abreast Echelon |
100 | 0/0 0/0 | ||
| Line Abreast Echelon |
110 | 0/0 0/0 | ||
| # | Enemy Form. |
Base EXP | Normal Battle Node | AD/AP AS/AS+ |
| # | Enemy Form. |
Base EXP | Normal Battle Node | AD/AP AS/AS+ |
|---|---|---|---|---|
| D | Double Line | 100 | 0/0 0/0 | |
| Line Ahead | 110 | 0/0 0/0 | ||
| Double Line | 120 | 0/0 0/0 | ||
| Line Ahead | 130 | 0/0 0/0 | ||
| Double Line | 140 | 0/0 0/0 | ||
| Line Ahead | 150 | 0/0 0/0 | ||
| # | Enemy Form. |
Base EXP | Normal Battle Node | AD/AP AS/AS+ |
| # | Enemy Form. |
Base EXP | Normal Battle Node | AD/AP AS/AS+ |
|---|---|---|---|---|
| E | Line Ahead Double Line |
200 | 0/0 0/0 | |
| Line Ahead Double Line |
210 | 0/0 0/0 | ||
| Line Ahead Double Line |
220 | 0/0 0/0 | ||
| # | Enemy Form. |
Base EXP | Normal Battle Node | AD/AP AS/AS+ |
| # | Enemy Form. |
Base EXP | Normal Battle Node | AD/AP AS/AS+ |
|---|---|---|---|---|
| F | Double Line | 200 | 0/0 0/0 | |
| Line Ahead | 210 | 0/0 0/0 | ||
| Double Line | 220 | 0/0 0/0 | ||
| Line Ahead | 230 | 0/0 0/0 | ||
| Double Line | 240 | 0/0 0/0 | ||
| Line Ahead | 250 | 0/0 0/0 | ||
| # | Enemy Form. |
Base EXP | Normal Battle Node | AD/AP AS/AS+ |
| # | Resource Node | ||
|---|---|---|---|
| G | Gained 100-200 | ||
| G | Gained 100-150 | ||
| G | Gained 100-150 | ||
| G | Gained 30-40-80-100 | ||
| G | Gained 2-4 | ||
| G | Gained 2-3-4 | ||
| # | Resource Node | ||
| # | Resource Node | ||
|---|---|---|---|
| H | Gained 100-200 | ||
| H | Gained 80-150 | ||
| H | Gained 100-150 | ||
| H | Gained 30-40 | ||
| H | Gained 2-4 | ||
| H | Gained 1-2-3 | ||
| # | Resource Node | ||
| # | Empty Node | ||
|---|---|---|---|
| I | 気のせいだった。/敵影を見ず。/穏やかな海です。/穏やかな海峡です。/警戒が必要です。/静かな海です。 Must be my imagination./No enemy spotted./Calm seas./Calm straits./Be alert./Peaceful seas. | ||
| # | Empty Node | ||
| # | Enemy Form. |
Base EXP | Boss Battle Node | AD/AP AS/AS+ |
|---|---|---|---|---|
| J | Line Ahead | 400 | 0/0 0/0 | |
| Line Ahead | 400 | 0/0 0/0 | ||
| Line Ahead | 400 | 0/0 0/0 | ||
| Line Ahead | 400 | 0/0 0/0 | ||
| Line Ahead | 400 | 0/0 0/0 | ||
| Line Ahead (Final)
|
400 | 0/0 0/0 | ||
| # | Enemy Form. |
Base EXP | Boss Battle Node | AD/AP AS/AS+ |
Ship Drops
| Ship drops | |||||||||||||||||||||||||||||||||||||||||||||||||||||||||||||||||||||||||||||||||||||||||||||||||||
|---|---|---|---|---|---|---|---|---|---|---|---|---|---|---|---|---|---|---|---|---|---|---|---|---|---|---|---|---|---|---|---|---|---|---|---|---|---|---|---|---|---|---|---|---|---|---|---|---|---|---|---|---|---|---|---|---|---|---|---|---|---|---|---|---|---|---|---|---|---|---|---|---|---|---|---|---|---|---|---|---|---|---|---|---|---|---|---|---|---|---|---|---|---|---|---|---|---|---|---|
| Type | Ship? | B | C | D | E | F | J | ||||||||||||||||||||||||||||||||||||||||||||||||||||||||||||||||||||||||||||||||||||||||||||
| DD | Harusame | ✔️ | |||||||||||||||||||||||||||||||||||||||||||||||||||||||||||||||||||||||||||||||||||||||||||||||||
| CL | Noshiro | ✔️ | |||||||||||||||||||||||||||||||||||||||||||||||||||||||||||||||||||||||||||||||||||||||||||||||||
| CV | Unryuu | ✔️ | |||||||||||||||||||||||||||||||||||||||||||||||||||||||||||||||||||||||||||||||||||||||||||||||||
| CL | Kitakami | ✔️ | ✔️ | ✔️ | |||||||||||||||||||||||||||||||||||||||||||||||||||||||||||||||||||||||||||||||||||||||||||||||
| CL | Ooi | ✔️ | ✔️ | ||||||||||||||||||||||||||||||||||||||||||||||||||||||||||||||||||||||||||||||||||||||||||||||||
| CL | Nagara | ✔️ | ✔️ | ✔️ | ✔️ | ||||||||||||||||||||||||||||||||||||||||||||||||||||||||||||||||||||||||||||||||||||||||||||||
| CL | Abukuma | ✔️ | |||||||||||||||||||||||||||||||||||||||||||||||||||||||||||||||||||||||||||||||||||||||||||||||||
| CL | Sendai | ✔️ | ✔️ | ✔️ | ✔️ | ||||||||||||||||||||||||||||||||||||||||||||||||||||||||||||||||||||||||||||||||||||||||||||||
| CL | Yuubari | ✔️ | |||||||||||||||||||||||||||||||||||||||||||||||||||||||||||||||||||||||||||||||||||||||||||||||||
| CA | Kinugasa | ✔️ | ✔️ | ✔️ | |||||||||||||||||||||||||||||||||||||||||||||||||||||||||||||||||||||||||||||||||||||||||||||||
| CA | Myoukou | ✔️ | ✔️ | ✔️ | |||||||||||||||||||||||||||||||||||||||||||||||||||||||||||||||||||||||||||||||||||||||||||||||
| CA | Takao | ✔️ | ✔️ | ✔️ | |||||||||||||||||||||||||||||||||||||||||||||||||||||||||||||||||||||||||||||||||||||||||||||||
| CA | Atago | ✔️ | ✔️ | ✔️ | |||||||||||||||||||||||||||||||||||||||||||||||||||||||||||||||||||||||||||||||||||||||||||||||
| CA | Mogami | ✔️ | ✔️ | ✔️ | |||||||||||||||||||||||||||||||||||||||||||||||||||||||||||||||||||||||||||||||||||||||||||||||
| CA | Suzuya | ✔️ | |||||||||||||||||||||||||||||||||||||||||||||||||||||||||||||||||||||||||||||||||||||||||||||||||
| CA | Kumano | ✔️ | |||||||||||||||||||||||||||||||||||||||||||||||||||||||||||||||||||||||||||||||||||||||||||||||||
| CA | Tone | ✔️ | ✔️ | ✔️ | |||||||||||||||||||||||||||||||||||||||||||||||||||||||||||||||||||||||||||||||||||||||||||||||
| CA | Chikuma | ✔️ | ✔️ | ✔️ | |||||||||||||||||||||||||||||||||||||||||||||||||||||||||||||||||||||||||||||||||||||||||||||||
| CVL | Ryuujou | ✔️ | |||||||||||||||||||||||||||||||||||||||||||||||||||||||||||||||||||||||||||||||||||||||||||||||||
| CVL | Shouhou | ✔️ | |||||||||||||||||||||||||||||||||||||||||||||||||||||||||||||||||||||||||||||||||||||||||||||||||
| CVL | Zuihou | ✔️ | |||||||||||||||||||||||||||||||||||||||||||||||||||||||||||||||||||||||||||||||||||||||||||||||||
| CVL | Hiyou | ✔️ | |||||||||||||||||||||||||||||||||||||||||||||||||||||||||||||||||||||||||||||||||||||||||||||||||
| CVL | Junyou | ✔️ | |||||||||||||||||||||||||||||||||||||||||||||||||||||||||||||||||||||||||||||||||||||||||||||||||
| FBB | Kongou | ✔️ | ✔️ | ✔️ | |||||||||||||||||||||||||||||||||||||||||||||||||||||||||||||||||||||||||||||||||||||||||||||||
| FBB | Hiei | ✔️ | ✔️ | ✔️ | |||||||||||||||||||||||||||||||||||||||||||||||||||||||||||||||||||||||||||||||||||||||||||||||
| FBB | Haruna | ✔️ | ✔️ | ✔️ | |||||||||||||||||||||||||||||||||||||||||||||||||||||||||||||||||||||||||||||||||||||||||||||||
| FBB | Kirishima | ✔️ | ✔️ | ✔️ | |||||||||||||||||||||||||||||||||||||||||||||||||||||||||||||||||||||||||||||||||||||||||||||||
| BB | Ise | ✔️ | ✔️ | ✔️ | |||||||||||||||||||||||||||||||||||||||||||||||||||||||||||||||||||||||||||||||||||||||||||||||
| BB | Hyuuga | ✔️ | ✔️ | ✔️ | |||||||||||||||||||||||||||||||||||||||||||||||||||||||||||||||||||||||||||||||||||||||||||||||
| CV | Shoukaku | ✔️ | |||||||||||||||||||||||||||||||||||||||||||||||||||||||||||||||||||||||||||||||||||||||||||||||||
| CV | Zuikaku | ✔️ | |||||||||||||||||||||||||||||||||||||||||||||||||||||||||||||||||||||||||||||||||||||||||||||||||
| SS | I-19 | ✔️ | ✔️ | ✔️ | |||||||||||||||||||||||||||||||||||||||||||||||||||||||||||||||||||||||||||||||||||||||||||||||
| SS | I-58 | ✔️ | |||||||||||||||||||||||||||||||||||||||||||||||||||||||||||||||||||||||||||||||||||||||||||||||||
| CT | Katori | ✔️ | ✔️ | ||||||||||||||||||||||||||||||||||||||||||||||||||||||||||||||||||||||||||||||||||||||||||||||||
| DD | Mutsuki | ✔️ | ✔️ | ✔️ | ✔️ | ✔️ | |||||||||||||||||||||||||||||||||||||||||||||||||||||||||||||||||||||||||||||||||||||||||||||
| DD | Kisaragi | ✔️ | ✔️ | ✔️ | ✔️ | ✔️ | |||||||||||||||||||||||||||||||||||||||||||||||||||||||||||||||||||||||||||||||||||||||||||||
| DD | Satsuki | ✔️ | ✔️ | ✔️ | ✔️ | ✔️ | |||||||||||||||||||||||||||||||||||||||||||||||||||||||||||||||||||||||||||||||||||||||||||||
| DD | Fumizuki | ✔️ | ✔️ | ✔️ | ✔️ | ✔️ | |||||||||||||||||||||||||||||||||||||||||||||||||||||||||||||||||||||||||||||||||||||||||||||
| DD | Nagatsuki | ✔️ | ✔️ | ✔️ | ✔️ | ✔️ | |||||||||||||||||||||||||||||||||||||||||||||||||||||||||||||||||||||||||||||||||||||||||||||
| DD | Kikuzuki | ✔️ | ✔️ | ✔️ | ✔️ | ✔️ | |||||||||||||||||||||||||||||||||||||||||||||||||||||||||||||||||||||||||||||||||||||||||||||
| DD | Mikazuki | ✔️ | ✔️ | ✔️ | ✔️ | ✔️ | |||||||||||||||||||||||||||||||||||||||||||||||||||||||||||||||||||||||||||||||||||||||||||||
| DD | Mochizuki | ✔️ | ✔️ | ✔️ | ✔️ | ✔️ | |||||||||||||||||||||||||||||||||||||||||||||||||||||||||||||||||||||||||||||||||||||||||||||
| DD | Oboro | ✔️ | ✔️ | ✔️ | ✔️ | ✔️ | ✔️ | ||||||||||||||||||||||||||||||||||||||||||||||||||||||||||||||||||||||||||||||||||||||||||||
| DD | Akebono | ✔️ | ✔️ | ✔️ | ✔️ | ✔️ | ✔️ | ||||||||||||||||||||||||||||||||||||||||||||||||||||||||||||||||||||||||||||||||||||||||||||
| DD | Sazanami | ✔️ | ✔️ | ✔️ | ✔️ | ✔️ | ✔️ | ||||||||||||||||||||||||||||||||||||||||||||||||||||||||||||||||||||||||||||||||||||||||||||
| DD | Ushio | ✔️ | ✔️ | ✔️ | ✔️ | ✔️ | ✔️ | ||||||||||||||||||||||||||||||||||||||||||||||||||||||||||||||||||||||||||||||||||||||||||||
| DD | Hatsuharu | ✔️ | |||||||||||||||||||||||||||||||||||||||||||||||||||||||||||||||||||||||||||||||||||||||||||||||||
| DD | Nenohi | ✔️ | |||||||||||||||||||||||||||||||||||||||||||||||||||||||||||||||||||||||||||||||||||||||||||||||||
| DD | Wakaba | ✔️ | |||||||||||||||||||||||||||||||||||||||||||||||||||||||||||||||||||||||||||||||||||||||||||||||||
| DD | Hatsushimo | ✔️ | |||||||||||||||||||||||||||||||||||||||||||||||||||||||||||||||||||||||||||||||||||||||||||||||||
| DD | Shiratsuyu | ✔️ | |||||||||||||||||||||||||||||||||||||||||||||||||||||||||||||||||||||||||||||||||||||||||||||||||
| DD | Shigure | ✔️ | |||||||||||||||||||||||||||||||||||||||||||||||||||||||||||||||||||||||||||||||||||||||||||||||||
| DD | Murasame | ✔️ | |||||||||||||||||||||||||||||||||||||||||||||||||||||||||||||||||||||||||||||||||||||||||||||||||
| DD | Yuudachi | ✔️ | |||||||||||||||||||||||||||||||||||||||||||||||||||||||||||||||||||||||||||||||||||||||||||||||||
| DD | Asashio | ✔️ | |||||||||||||||||||||||||||||||||||||||||||||||||||||||||||||||||||||||||||||||||||||||||||||||||
| DD | Ooshio | ✔️ | |||||||||||||||||||||||||||||||||||||||||||||||||||||||||||||||||||||||||||||||||||||||||||||||||
| DD | Michishio | ✔️ | |||||||||||||||||||||||||||||||||||||||||||||||||||||||||||||||||||||||||||||||||||||||||||||||||
| DD | Arashio | ✔️ | |||||||||||||||||||||||||||||||||||||||||||||||||||||||||||||||||||||||||||||||||||||||||||||||||
| DD | Arare | ✔️ | |||||||||||||||||||||||||||||||||||||||||||||||||||||||||||||||||||||||||||||||||||||||||||||||||
| DD | Kasumi | ✔️ | |||||||||||||||||||||||||||||||||||||||||||||||||||||||||||||||||||||||||||||||||||||||||||||||||
| DD | Kagerou | ✔️ | |||||||||||||||||||||||||||||||||||||||||||||||||||||||||||||||||||||||||||||||||||||||||||||||||
| DD | Shiranui | ✔️ | |||||||||||||||||||||||||||||||||||||||||||||||||||||||||||||||||||||||||||||||||||||||||||||||||
| DD | Kuroshio | ✔️ | |||||||||||||||||||||||||||||||||||||||||||||||||||||||||||||||||||||||||||||||||||||||||||||||||
| CL | Tenryuu | ✔️ | ✔️ | ✔️ | ✔️ | ||||||||||||||||||||||||||||||||||||||||||||||||||||||||||||||||||||||||||||||||||||||||||||||
| CL | Tatsuta | ✔️ | ✔️ | ✔️ | ✔️ | ✔️ | |||||||||||||||||||||||||||||||||||||||||||||||||||||||||||||||||||||||||||||||||||||||||||||
| CL | Kuma | ✔️ | ✔️ | ✔️ | |||||||||||||||||||||||||||||||||||||||||||||||||||||||||||||||||||||||||||||||||||||||||||||||
| CL | Tama | ✔️ | ✔️ | ✔️ | |||||||||||||||||||||||||||||||||||||||||||||||||||||||||||||||||||||||||||||||||||||||||||||||
| CL | Kiso | ✔️ | ✔️ | ✔️ | |||||||||||||||||||||||||||||||||||||||||||||||||||||||||||||||||||||||||||||||||||||||||||||||
| CL | Isuzu | ✔️ | ✔️ | ✔️ | ✔️ | ||||||||||||||||||||||||||||||||||||||||||||||||||||||||||||||||||||||||||||||||||||||||||||||
| CL | Natori | ✔️ | ✔️ | ✔️ | ✔️ | ||||||||||||||||||||||||||||||||||||||||||||||||||||||||||||||||||||||||||||||||||||||||||||||
| CL | Yura | ✔️ | ✔️ | ✔️ | ✔️ | ||||||||||||||||||||||||||||||||||||||||||||||||||||||||||||||||||||||||||||||||||||||||||||||
| CL | Jintsuu | ✔️ | ✔️ | ✔️ | ✔️ | ||||||||||||||||||||||||||||||||||||||||||||||||||||||||||||||||||||||||||||||||||||||||||||||
| CL | Naka | ✔️ | ✔️ | ✔️ | ✔️ | ✔️ | |||||||||||||||||||||||||||||||||||||||||||||||||||||||||||||||||||||||||||||||||||||||||||||
| CA | Furutaka | ✔️ | ✔️ | ✔️ | |||||||||||||||||||||||||||||||||||||||||||||||||||||||||||||||||||||||||||||||||||||||||||||||
| CA | Kako | ✔️ | ✔️ | ✔️ | |||||||||||||||||||||||||||||||||||||||||||||||||||||||||||||||||||||||||||||||||||||||||||||||
| CA | Aoba | ✔️ | ✔️ | ✔️ | |||||||||||||||||||||||||||||||||||||||||||||||||||||||||||||||||||||||||||||||||||||||||||||||
| CA | Nachi | ✔️ | ✔️ | ✔️ | |||||||||||||||||||||||||||||||||||||||||||||||||||||||||||||||||||||||||||||||||||||||||||||||
| CA | Ashigara | ✔️ | ✔️ | ✔️ | |||||||||||||||||||||||||||||||||||||||||||||||||||||||||||||||||||||||||||||||||||||||||||||||
| CA | Haguro | ✔️ | ✔️ | ✔️ | |||||||||||||||||||||||||||||||||||||||||||||||||||||||||||||||||||||||||||||||||||||||||||||||
| CA | Maya | ✔️ | ✔️ | ✔️ | ✔️ | ||||||||||||||||||||||||||||||||||||||||||||||||||||||||||||||||||||||||||||||||||||||||||||||
| CA | Choukai | ✔️ | ✔️ | ✔️ | ✔️ | ||||||||||||||||||||||||||||||||||||||||||||||||||||||||||||||||||||||||||||||||||||||||||||||
| SS | I-168 | ✔️ | |||||||||||||||||||||||||||||||||||||||||||||||||||||||||||||||||||||||||||||||||||||||||||||||||
| |||||||||||||||||||||||||||||||||||||||||||||||||||||||||||||||||||||||||||||||||||||||||||||||||||||||||||||||||||||||||||||||||||||||||||||||||||||||||||||||||||||||||||||||||||||||||||||||||||||||||||||||||||||||||||||||||||||||||||||||||||||||||||||||||||||||||||||||||||||||||||||||||||||||||||
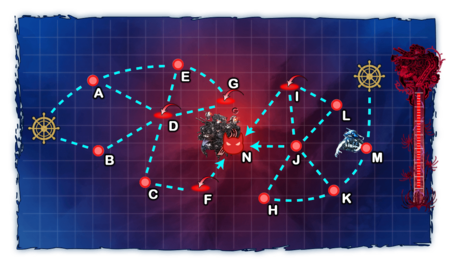
World 6-4: 中部北海域ピーコック島沖 - Peacock Island, On Northern Part of Central Waters

| Strategy Name | 離島再攻略作戦 Island Recapture Operation |
|---|---|
| Difficulty | ☆ ☆ ☆ ☆ ☆ ☆ ☆ ☆ ☆ |
| Item | - |
| Strategy Content | 水雷戦隊を旗艦とした攻略部隊または空母最大2隻を擁する機動部隊による中部海域離島攻略作戦を発動!艦隊、出撃せよ! Organize a unit to undertake an operation to capture the Island. Form a fleet consisting of a maximum of 2 aircraft carriers or with a torpedo squadron flagship! Fleet, set sail! |
| World 6 Unlocking & Progression | ||||
|---|---|---|---|---|
| Unlock conditions | World 6 is unlocked after clearing 6-3 HP bar | |||
| Clear conditions | To clear the map: the boss's flagship must be sunk 5 times | |||
| Notes | 1 LBAS is available on this map
| |||
Stage Guide
| 6-4 Branching Rules | ||
|---|---|---|
| Nodes | Rules | |
| Start | A |
|
B | ||
M | ||
A |
D |
|
E | ||
D |
C |
|
E |
D |
|
G |
| |
J |
I |
|
L | ||
N | ||
K |
H |
|
J | ||
Historical Routing
Tips
This map features multiple starting zone positions.
- Fleets consisting of a Torpedo Squadron (i.e. mostly CLs and DDs) will start on the West side of the map.
- Fleets containing any CV(B/L), 2 (F)BB(V), or 3CA(V)s, or having less than 2 DD, will start on the East (Nagato Kai Ni + Mutsu Kai Ni is the exception)
- It is not possible to bring more than 2 (F)BB(V) or 2 CV(B/L).
- Regarding Land-Based Air Squadrons
1 Land-Based Air Squadron can be sortied on the map.
- There is no air raid on this map.
- It is highly recommended to use this LBAS to help simplify the battle on the boss node for this map.
This map can also train land-based attackers if 7-4 LBAS is not unlocked yet. Bring only Land-Based bombers with a range of 8 or more on Node M, and sortie a single SS.
Regarding Boss Fleet
Boss Fleet is heavily affected by the HQ level.
- If HQ < 103: no 6-enemy composition is found in the boss compositions outside of the Last Dance.
- If HQ < 113: have a chance of rolling the easiest comp (5-enemy composition with the Late Model DD).
The Boss is the Isolated Island Princess, a Hard-skinned Installation, with Artillery Imps and a Supply Depot Princess are escorting her.
- Using
 Anti-Ground Rockets
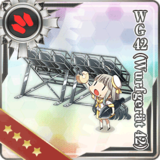
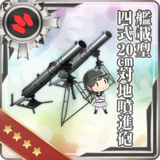
 ,
,  "Landing Equipments", and
  Amphibious Tanks
 will do great damage to them, especially if arranged in Nuke set-ups to damage the Supply Depot Princess.
 - If having enough Anti-Ground Rockets, a 4 slots CL and equip her with 2 of them may be used.
- Aircraft carriers CANNOT attack installations if they have a
 equipped UNLESS it's one of the dive-bombers from the following list:
| This is a segment from a bigger article. See Combat/Anti-Installation for details on Installation mechanics.
Carriers will only attack installations in the shelling phase if equipped with Torpedo Bombers or Anti-Installation Dive Bombers.
| |||
 Ju 87C Kai  Prototype Nanzan  F4U-1D  FM-2  Ju 87C Kai Ni (w/ KMX)  Ju 87C Kai Ni (w/ KMX/Skilled)  Suisei Model 12 (634 Air Group w/ Type 3 Cluster Bombs)  Suisei Model 12 (w/ Type 31 Photoelectric Fuze Bombs)  Type 99 Dive Bomber Model 22  Type 99 Dive Bomber Model 22 (Skilled)  SB2C-3  SB2C-5  F4U-4 | |||
Recommended Fleets
| West Akitsushima Route | ||||
|---|---|---|---|---|
| Fleet | Nagato Kai Ni, Mutsu Kai Ni, 1 CAV/CL, 2 DD, Akitsushima
1 BB(V), 1 CAV, 1 CL, 2 DD, Akitsushima | |||
| LoS | Speed | |||
| Any | Any | |||
| RouteNode Types: BLUE: Empty/Choice RED: Battle GREEN: Resource/TP VIOLET: Maelstrom PURPLE: Night Battle PINK: Air Raid/Battle ORANGE: Enemy Ambush/ASS |
A D C F N | |||
| Fleet Notes | Akitsushima allows for the shortest possible path on the west entrance with a strong fleet.
| |||
| Quests | Bq2, Bq13 | |||
| Air State | AD | AP | AS | AS+ |
| 50 | 75 | 168 | 336 | |
| LBAS | Range | AS Sortie | AS Defense | |
| Node C: 3 / Node N: 5 | 168 | N/A | ||
| LBAS Notes | The base should be sent on the boss, using 2 Land-based Bombers and 2 fighters.
An alternative is to bring 4 land-based bombers and focus them on Node C instead of the boss, to significantly improve the pass rate. | |||
| West Route | ||||
|---|---|---|---|---|
| Fleet | Normal:
Historical:
| |||
| LoS | Speed | |||
| Any | Fast (unless using both Nagato-class Kai Ni) | |||
| RouteNode Types: BLUE: Empty/Choice RED: Battle GREEN: Resource/TP VIOLET: Maelstrom PURPLE: Night Battle PINK: Air Raid/Battle ORANGE: Enemy Ambush/ASS |
B D C F N | |||
| Fleet Notes | Gives the shortest and easiest route to the boss, but requires a Fast fleet, this means that using slow BB(V)/CL have to be speed modded.
It is highly recommended to have an SPF to help maintain AS/AP on the route.
| |||
| Quests | Bq2, Bq13 | |||
| Air State | AD | AP | AS | AS+ |
| 50 | 75 | 168 | 336 | |
| LBAS | Range | AS Sortie | AS Defense | |
| Node N: 5 | 168 | N/A | ||
| LBAS Notes | The base should be sent on the boss, using 2 Land-based Bombers and 2 fighters.
| |||
| East Route | ||||
|---|---|---|---|---|
| Fleet | 1 CV(B/L) (flagship), 1 BB(V), 1 CA(V), 1 CL, 2 DD | |||
| LoS | Speed | |||
| Any | Any | |||
| RouteNode Types: BLUE: Empty/Choice RED: Battle GREEN: Resource/TP VIOLET: Maelstrom PURPLE: Night Battle PINK: Air Raid/Battle ORANGE: Enemy Ambush/ASS |
M K J I N | |||
| Fleet Notes | NOT RECOMMENDED for normal clear, only use this comp for particular quests, due to the very hard nature of 6-4 East route.
Keep in mind that the boss's Artillery Imps have high AA that can easily wipe out the CV's bombers, so do consider the bombers that have AAR. The CAV can be replaced with an LHA to skip node I, which is an air raid node, but LHA may have some issues surviving the pre-boss.
| |||
| Quests | By10 | |||
| Air State | AD | AP | AS | AS+ |
| 50 | 75 | 168 | 336 | |
| LBAS | Range | AS Sortie | AS Defense | |
| Node K: 7 / Node J: 6 / Node N: 5 | 168 | N/A | ||
| LBAS Notes | The base should be sent on the boss, using 2 Land-based Bombers and 2 fighters.
LBAS can be used on prebosses to pass them more easily. | |||
Enemy Compositions
| # | Enemy Form. |
Base EXP | Normal Battle Node | AD/AP AS/AS+ |
|---|---|---|---|---|
| A | Double Line | 160 | 0/0 0/0 | |
| Line Ahead | 170 | 0/0 0/0 | ||
| Line Ahead | 190 | 0/0 0/0 | ||
| Line Ahead (Final)
|
200 | 0/0 0/0 | ||
| # | Enemy Form. |
Base EXP | Normal Battle Node | AD/AP AS/AS+ |
| # | Enemy Form. |
Base EXP | Normal Battle Node | AD/AP AS/AS+ |
|---|---|---|---|---|
| B | Line Ahead Double Line |
150 | 0/0 0/0 | |
| Line Ahead | 160 | 0/0 0/0 | ||
| Line Ahead | 170 | 0/0 0/0 | ||
| Line Ahead (Final)
|
190 | 0/0 0/0 | ||
| Line Ahead (Final)
|
200 | 0/0 0/0 | ||
| # | Enemy Form. |
Base EXP | Normal Battle Node | AD/AP AS/AS+ |
| # | Enemy Form. |
Base EXP | Normal Battle Node | AD/AP AS/AS+ |
|---|---|---|---|---|
| C | Line Ahead Double Line |
220 | 3/6 12/24 | |
| Line Ahead | 240 | 3/6 12/24 | ||
| Line Ahead | 250 | 9/17 36/72 | ||
| Line Ahead (Final)
|
260 | 9/17 36/72 | ||
| Line Ahead (Final)
|
280 | 9/17 36/72 | ||
| # | Enemy Form. |
Base EXP | Normal Battle Node | AD/AP AS/AS+ |
| # | Enemy Form. |
Base EXP | Air Defense Node | AD/AP AS/AS+ |
|---|---|---|---|---|
| D | Line Ahead | 120 | 20/40 89/177 | |
| Line Ahead | 120 | 28/55 123/246 | ||
| # | Enemy Form. |
Base EXP | Air Defense Node | AD/AP AS/AS+ |
| # | Enemy Form. |
Base EXP | Normal Battle Node | AD/AP AS/AS+ |
|---|---|---|---|---|
| E | Line Ahead | 140 | 0/0 0/0 | |
| Line Ahead | 150 | 0/0 0/0 | ||
| Line Ahead | 160 | 0/0 0/0 | ||
| # | Enemy Form. |
Base EXP | Normal Battle Node | AD/AP AS/AS+ |
| # | Enemy Form. |
Base EXP | Air Defense Node | AD/AP AS/AS+ |
|---|---|---|---|---|
| F | Line Ahead | 130 | 20/40 89/177 | |
| Line Ahead | 140 | 27/53 117/234 | ||
| Line Ahead | 150 | 28/55 123/246 | ||
| # | Enemy Form. |
Base EXP | Air Defense Node | AD/AP AS/AS+ |
| # | Enemy Form. |
Base EXP | Air Defense Node | AD/AP AS/AS+ |
|---|---|---|---|---|
| G | Line Ahead | 100 | 20/40 89/177 | |
| Line Ahead | 100 | 28/55 123/246 | ||
| # | Enemy Form. |
Base EXP | Air Defense Node | AD/AP AS/AS+ |
| # | Enemy Form. |
Base EXP | Normal Battle Node | AD/AP AS/AS+ |
|---|---|---|---|---|
| H | Line Ahead | 180 | 9/17 36/72 | |
| Line Ahead | 200 | 9/17 36/72 | ||
| Line Ahead | 210 | 8/16 35/69 | ||
| Line Ahead (Final)
|
230 | 8/16 35/69 | ||
| Line Ahead (Final)
|
260 | 8/16 35/69 | ||
| # | Enemy Form. |
Base EXP | Normal Battle Node | AD/AP AS/AS+ |
| # | Enemy Form. |
Base EXP | Air Defense Node | AD/AP AS/AS+ |
|---|---|---|---|---|
| I | Diamond | 160 | 34/68 152/303 | |
| Diamond | 170 | 36/71 158/315 | ||
| # | Enemy Form. |
Base EXP | Air Defense Node | AD/AP AS/AS+ |
| # | Enemy Form. |
Base EXP | Normal Battle Node | AD/AP AS/AS+ |
|---|---|---|---|---|
| J | Diamond | ? | 37/73 162/324 | |
| Diamond | 270 | 37/73 162/324 | ||
| Diamond | 280 | 43/85 189/378 | ||
| Diamond | 290 | 45/89 198/396 | ||
| Diamond (Final)
|
330 | 44/87 194/387 | ||
| Diamond (Final)
|
350 | 44/87 194/387 | ||
| # | Enemy Form. |
Base EXP | Normal Battle Node | AD/AP AS/AS+ |
| # | Enemy Form. |
Base EXP | Normal Battle Node | AD/AP AS/AS+ |
|---|---|---|---|---|
| K | Diamond | 200 | 34/67 150/300 | |
| Diamond | 220 | 35/69 155/309 | ||
| Diamond | 240 | 37/73 162/324 | ||
| Diamond | 250 | 43/85 189/378 | ||
| # | Enemy Form. |
Base EXP | Normal Battle Node | AD/AP AS/AS+ |
| # | Enemy Form. |
Base EXP | Normal Battle Node | AD/AP AS/AS+ |
|---|---|---|---|---|
| L | Double Line Diamond |
140 | 16/31 69/138 | |
| Diamond | 160 | 16/31 69/138 | ||
| # | Enemy Form. |
Base EXP | Normal Battle Node | AD/AP AS/AS+ |
| # | Enemy Form. |
Base EXP | Normal Battle Node | AD/AP AS/AS+ |
|---|---|---|---|---|
| M | Echelon | 120 | 0/0 0/0 | |
| Line Abreast Echelon |
140 | 0/0 0/0 | ||
| Echelon Line Abreast |
160 | 0/0 0/0 | ||
| # | Enemy Form. |
Base EXP | Normal Battle Node | AD/AP AS/AS+ |
| # | Enemy Form. |
Base EXP | Boss Battle Node | AD/AP AS/AS+ |
|---|---|---|---|---|
| N | Line Ahead | 640 | 27/53 117/234 | |
| Line Ahead | 680 | 12/23 51/102 | ||
| Line Ahead | 700 | 38/75 168/336 | ||
| Line Ahead | 720 | 17/33 72/144 | ||
| Line Ahead (Final)
|
740 | 17/33 72/144 | ||
| Line Ahead (Final)
|
740 | 17/33 72/144 | ||
| # | Enemy Form. |
Base EXP | Boss Battle Node | AD/AP AS/AS+ |
Ship Drops
| Ship drops | |||||||||||||||||||||||||||||||||||||||||||||||||||||||||||||||||||||||||||||||||||||||||||||||||||
|---|---|---|---|---|---|---|---|---|---|---|---|---|---|---|---|---|---|---|---|---|---|---|---|---|---|---|---|---|---|---|---|---|---|---|---|---|---|---|---|---|---|---|---|---|---|---|---|---|---|---|---|---|---|---|---|---|---|---|---|---|---|---|---|---|---|---|---|---|---|---|---|---|---|---|---|---|---|---|---|---|---|---|---|---|---|---|---|---|---|---|---|---|---|---|---|---|---|---|---|
| Type | Ship? | A | B | C | E | J | K | L | N | ||||||||||||||||||||||||||||||||||||||||||||||||||||||||||||||||||||||||||||||||||||||||||
| DD | Asagumo | ✔️ | |||||||||||||||||||||||||||||||||||||||||||||||||||||||||||||||||||||||||||||||||||||||||||||||||
| DD | Tokitsukaze | ✔️ | |||||||||||||||||||||||||||||||||||||||||||||||||||||||||||||||||||||||||||||||||||||||||||||||||
| DD | Tanikaze | ✔️ | ✔️ | ✔️ | |||||||||||||||||||||||||||||||||||||||||||||||||||||||||||||||||||||||||||||||||||||||||||||||
| AV | Mizuho | ✔️ | |||||||||||||||||||||||||||||||||||||||||||||||||||||||||||||||||||||||||||||||||||||||||||||||||
| AV | Akitsushima | ✔️ | |||||||||||||||||||||||||||||||||||||||||||||||||||||||||||||||||||||||||||||||||||||||||||||||||
| AO | Hayasui | ✔️ | |||||||||||||||||||||||||||||||||||||||||||||||||||||||||||||||||||||||||||||||||||||||||||||||||
| DD | Yayoi | ✔️ | ✔️ | ✔️ | ✔️ | ✔️ | |||||||||||||||||||||||||||||||||||||||||||||||||||||||||||||||||||||||||||||||||||||||||||||
| DD | Yamagumo | ✔️ | |||||||||||||||||||||||||||||||||||||||||||||||||||||||||||||||||||||||||||||||||||||||||||||||||
| DD | Urakaze | ✔️ | ✔️ | ✔️ | |||||||||||||||||||||||||||||||||||||||||||||||||||||||||||||||||||||||||||||||||||||||||||||||
| DD | Akigumo | ✔️ | |||||||||||||||||||||||||||||||||||||||||||||||||||||||||||||||||||||||||||||||||||||||||||||||||
| DD | Yuugumo | ✔️ | |||||||||||||||||||||||||||||||||||||||||||||||||||||||||||||||||||||||||||||||||||||||||||||||||
| DD | Makigumo | ✔️ | |||||||||||||||||||||||||||||||||||||||||||||||||||||||||||||||||||||||||||||||||||||||||||||||||
| CL | Nagara | ✔️ | |||||||||||||||||||||||||||||||||||||||||||||||||||||||||||||||||||||||||||||||||||||||||||||||||
| CL | Sendai | ✔️ | |||||||||||||||||||||||||||||||||||||||||||||||||||||||||||||||||||||||||||||||||||||||||||||||||
| CL | Yuubari | ✔️ | ✔️ | ✔️ | ✔️ | ✔️ | |||||||||||||||||||||||||||||||||||||||||||||||||||||||||||||||||||||||||||||||||||||||||||||
| CA | Kinugasa | ✔️ | ✔️ | ✔️ | ✔️ | ||||||||||||||||||||||||||||||||||||||||||||||||||||||||||||||||||||||||||||||||||||||||||||||
| CA | Takao | ✔️ | |||||||||||||||||||||||||||||||||||||||||||||||||||||||||||||||||||||||||||||||||||||||||||||||||
| CA | Atago | ✔️ | |||||||||||||||||||||||||||||||||||||||||||||||||||||||||||||||||||||||||||||||||||||||||||||||||
| CA | Mogami | ✔️ | |||||||||||||||||||||||||||||||||||||||||||||||||||||||||||||||||||||||||||||||||||||||||||||||||
| CA | Tone | ✔️ | ✔️ | ✔️ | ✔️ | ||||||||||||||||||||||||||||||||||||||||||||||||||||||||||||||||||||||||||||||||||||||||||||||
| CA | Chikuma | ✔️ | ✔️ | ✔️ | |||||||||||||||||||||||||||||||||||||||||||||||||||||||||||||||||||||||||||||||||||||||||||||||
| FBB | Kongou | ✔️ | |||||||||||||||||||||||||||||||||||||||||||||||||||||||||||||||||||||||||||||||||||||||||||||||||
| FBB | Hiei | ✔️ | |||||||||||||||||||||||||||||||||||||||||||||||||||||||||||||||||||||||||||||||||||||||||||||||||
| FBB | Haruna | ✔️ | |||||||||||||||||||||||||||||||||||||||||||||||||||||||||||||||||||||||||||||||||||||||||||||||||
| FBB | Kirishima | ✔️ | |||||||||||||||||||||||||||||||||||||||||||||||||||||||||||||||||||||||||||||||||||||||||||||||||
| BB | Fusou | ✔️ | |||||||||||||||||||||||||||||||||||||||||||||||||||||||||||||||||||||||||||||||||||||||||||||||||
| BB | Yamashiro | ✔️ | |||||||||||||||||||||||||||||||||||||||||||||||||||||||||||||||||||||||||||||||||||||||||||||||||
| BB | Ise | ✔️ | |||||||||||||||||||||||||||||||||||||||||||||||||||||||||||||||||||||||||||||||||||||||||||||||||
| BB | Hyuuga | ✔️ | |||||||||||||||||||||||||||||||||||||||||||||||||||||||||||||||||||||||||||||||||||||||||||||||||
| BB | Nagato | ✔️ | |||||||||||||||||||||||||||||||||||||||||||||||||||||||||||||||||||||||||||||||||||||||||||||||||
| BB | Mutsu | ✔️ | |||||||||||||||||||||||||||||||||||||||||||||||||||||||||||||||||||||||||||||||||||||||||||||||||
| CV | Souryuu | ✔️ | ✔️ | ✔️ | ✔️ | ||||||||||||||||||||||||||||||||||||||||||||||||||||||||||||||||||||||||||||||||||||||||||||||
| CV | Hiryuu | ✔️ | ✔️ | ||||||||||||||||||||||||||||||||||||||||||||||||||||||||||||||||||||||||||||||||||||||||||||||||
| DD | Mutsuki | ✔️ | ✔️ | ✔️ | ✔️ | ✔️ | ✔️ | ✔️ | |||||||||||||||||||||||||||||||||||||||||||||||||||||||||||||||||||||||||||||||||||||||||||
| DD | Kisaragi | ✔️ | ✔️ | ✔️ | ✔️ | ✔️ | ✔️ | ✔️ | ✔️ | ||||||||||||||||||||||||||||||||||||||||||||||||||||||||||||||||||||||||||||||||||||||||||
| DD | Satsuki | ✔️ | ✔️ | ✔️ | ✔️ | ✔️ | ✔️ | ✔️ | |||||||||||||||||||||||||||||||||||||||||||||||||||||||||||||||||||||||||||||||||||||||||||
| DD | Fumizuki | ✔️ | ✔️ | ✔️ | ✔️ | ✔️ | ✔️ | ||||||||||||||||||||||||||||||||||||||||||||||||||||||||||||||||||||||||||||||||||||||||||||
| DD | Nagatsuki | ✔️ | ✔️ | ✔️ | ✔️ | ✔️ | ✔️ | ✔️ | |||||||||||||||||||||||||||||||||||||||||||||||||||||||||||||||||||||||||||||||||||||||||||
| DD | Kikuzuki | ✔️ | ✔️ | ✔️ | ✔️ | ✔️ | ✔️ | ✔️ | |||||||||||||||||||||||||||||||||||||||||||||||||||||||||||||||||||||||||||||||||||||||||||
| DD | Mikazuki | ✔️ | ✔️ | ✔️ | ✔️ | ✔️ | ✔️ | ✔️ | |||||||||||||||||||||||||||||||||||||||||||||||||||||||||||||||||||||||||||||||||||||||||||
| DD | Mochizuki | ✔️ | ✔️ | ✔️ | ✔️ | ✔️ | ✔️ | ✔️ | ✔️ | ||||||||||||||||||||||||||||||||||||||||||||||||||||||||||||||||||||||||||||||||||||||||||
| DD | Fubuki | ✔️ | |||||||||||||||||||||||||||||||||||||||||||||||||||||||||||||||||||||||||||||||||||||||||||||||||
| DD | Shirayuki | ✔️ | |||||||||||||||||||||||||||||||||||||||||||||||||||||||||||||||||||||||||||||||||||||||||||||||||
| DD | Hatsuyuki | ✔️ | |||||||||||||||||||||||||||||||||||||||||||||||||||||||||||||||||||||||||||||||||||||||||||||||||
| DD | Miyuki | ✔️ | |||||||||||||||||||||||||||||||||||||||||||||||||||||||||||||||||||||||||||||||||||||||||||||||||
| DD | Murakumo | ✔️ | |||||||||||||||||||||||||||||||||||||||||||||||||||||||||||||||||||||||||||||||||||||||||||||||||
| DD | Isonami | ✔️ | |||||||||||||||||||||||||||||||||||||||||||||||||||||||||||||||||||||||||||||||||||||||||||||||||
| DD | Ayanami | ✔️ | |||||||||||||||||||||||||||||||||||||||||||||||||||||||||||||||||||||||||||||||||||||||||||||||||
| DD | Shikinami | ✔️ | |||||||||||||||||||||||||||||||||||||||||||||||||||||||||||||||||||||||||||||||||||||||||||||||||
| DD | Oboro | ✔️ | |||||||||||||||||||||||||||||||||||||||||||||||||||||||||||||||||||||||||||||||||||||||||||||||||
| DD | Akebono | ✔️ | |||||||||||||||||||||||||||||||||||||||||||||||||||||||||||||||||||||||||||||||||||||||||||||||||
| DD | Sazanami | ✔️ | |||||||||||||||||||||||||||||||||||||||||||||||||||||||||||||||||||||||||||||||||||||||||||||||||
| DD | Ushio | ✔️ | |||||||||||||||||||||||||||||||||||||||||||||||||||||||||||||||||||||||||||||||||||||||||||||||||
| DD | Akatsuki | ✔️ | |||||||||||||||||||||||||||||||||||||||||||||||||||||||||||||||||||||||||||||||||||||||||||||||||
| DD | Hibiki | ✔️ | |||||||||||||||||||||||||||||||||||||||||||||||||||||||||||||||||||||||||||||||||||||||||||||||||
| DD | Ikazuchi | ✔️ | |||||||||||||||||||||||||||||||||||||||||||||||||||||||||||||||||||||||||||||||||||||||||||||||||
| DD | Hatsuharu | ✔️ | |||||||||||||||||||||||||||||||||||||||||||||||||||||||||||||||||||||||||||||||||||||||||||||||||
| DD | Nenohi | ✔️ | |||||||||||||||||||||||||||||||||||||||||||||||||||||||||||||||||||||||||||||||||||||||||||||||||
| DD | Wakaba | ✔️ | |||||||||||||||||||||||||||||||||||||||||||||||||||||||||||||||||||||||||||||||||||||||||||||||||
| DD | Hatsushimo | ✔️ | |||||||||||||||||||||||||||||||||||||||||||||||||||||||||||||||||||||||||||||||||||||||||||||||||
| DD | Shiratsuyu | ✔️ | ✔️ | ✔️ | ✔️ | ✔️ | |||||||||||||||||||||||||||||||||||||||||||||||||||||||||||||||||||||||||||||||||||||||||||||
| DD | Shigure | ✔️ | ✔️ | ✔️ | ✔️ | ||||||||||||||||||||||||||||||||||||||||||||||||||||||||||||||||||||||||||||||||||||||||||||||
| DD | Murasame | ✔️ | ✔️ | ✔️ | ✔️ | ✔️ | ✔️ | ||||||||||||||||||||||||||||||||||||||||||||||||||||||||||||||||||||||||||||||||||||||||||||
| DD | Yuudachi | ✔️ | ✔️ | ✔️ | ✔️ | ✔️ | ✔️ | ✔️ | |||||||||||||||||||||||||||||||||||||||||||||||||||||||||||||||||||||||||||||||||||||||||||
| DD | Samidare | ✔️ | ✔️ | ✔️ | ✔️ | ✔️ | ✔️ | ✔️ | |||||||||||||||||||||||||||||||||||||||||||||||||||||||||||||||||||||||||||||||||||||||||||
| DD | Suzukaze | ✔️ | ✔️ | ✔️ | ✔️ | ✔️ | ✔️ | ||||||||||||||||||||||||||||||||||||||||||||||||||||||||||||||||||||||||||||||||||||||||||||
| CL | Tenryuu | ✔️ | ✔️ | ✔️ | ✔️ | ✔️ | |||||||||||||||||||||||||||||||||||||||||||||||||||||||||||||||||||||||||||||||||||||||||||||
| CL | Tatsuta | ✔️ | ✔️ | ✔️ | ✔️ | ||||||||||||||||||||||||||||||||||||||||||||||||||||||||||||||||||||||||||||||||||||||||||||||
| CL | Kuma | ✔️ | |||||||||||||||||||||||||||||||||||||||||||||||||||||||||||||||||||||||||||||||||||||||||||||||||
| CL | Tama | ✔️ | |||||||||||||||||||||||||||||||||||||||||||||||||||||||||||||||||||||||||||||||||||||||||||||||||
| CL | Kiso | ✔️ | |||||||||||||||||||||||||||||||||||||||||||||||||||||||||||||||||||||||||||||||||||||||||||||||||
| CL | Isuzu | ✔️ | |||||||||||||||||||||||||||||||||||||||||||||||||||||||||||||||||||||||||||||||||||||||||||||||||
| CL | Natori | ✔️ | |||||||||||||||||||||||||||||||||||||||||||||||||||||||||||||||||||||||||||||||||||||||||||||||||
| CL | Yura | ✔️ | |||||||||||||||||||||||||||||||||||||||||||||||||||||||||||||||||||||||||||||||||||||||||||||||||
| CL | Jintsuu | ✔️ | |||||||||||||||||||||||||||||||||||||||||||||||||||||||||||||||||||||||||||||||||||||||||||||||||
| CL | Naka | ✔️ | |||||||||||||||||||||||||||||||||||||||||||||||||||||||||||||||||||||||||||||||||||||||||||||||||
| CA | Furutaka | ✔️ | ✔️ | ✔️ | ✔️ | ✔️ | |||||||||||||||||||||||||||||||||||||||||||||||||||||||||||||||||||||||||||||||||||||||||||||
| CA | Kako | ✔️ | ✔️ | ✔️ | ✔️ | ✔️ | |||||||||||||||||||||||||||||||||||||||||||||||||||||||||||||||||||||||||||||||||||||||||||||
| CA | Aoba | ✔️ | ✔️ | ✔️ | ✔️ | ✔️ | |||||||||||||||||||||||||||||||||||||||||||||||||||||||||||||||||||||||||||||||||||||||||||||
| CA | Maya | ✔️ | |||||||||||||||||||||||||||||||||||||||||||||||||||||||||||||||||||||||||||||||||||||||||||||||||
| CA | Choukai | ✔️ | |||||||||||||||||||||||||||||||||||||||||||||||||||||||||||||||||||||||||||||||||||||||||||||||||
| AV | Chitose | ✔️ | ✔️ | ✔️ | ✔️ | ||||||||||||||||||||||||||||||||||||||||||||||||||||||||||||||||||||||||||||||||||||||||||||||
| AV | Chiyoda | ✔️ | ✔️ | ✔️ | ✔️ | ||||||||||||||||||||||||||||||||||||||||||||||||||||||||||||||||||||||||||||||||||||||||||||||
| |||||||||||||||||||||||||||||||||||||||||||||||||||||||||||||||||||||||||||||||||||||||||||||||||||||||||||||||||||||||||||||||||||||||||||||||||||||||||||||||||||||||||||||||||||||||||||||||||||||||||||||||||||||||||||||||||||||||||||||||||||||||||||||||||||||||||||||||||||||||||||||||||||||||||||