World 7-4: 昭南本土航路 - Shounan Mainland Route
| Strategy Name
|
ヒ船団海上護衛作戦
Hi Convoy Maritime Escort Operation
|
| Difficulty
|
☆☆☆☆☆☆☆☆☆
|
| Item
|
 
|
| Strategy Content
|
南方から本土方面に重要資源を輸送するヒ船団。同船団を敵潜及び敵機動部隊から護る海上護衛作戦を発動する!抜錨せよ!
The Hi Convoy transports vital resources from the south to the mainland. To protect the fleet from enemy submarines and task forces, we're launching a maritime escort operation! Weigh anchor!
|
| Boss Air Control
|
| AD
|
AP
|
AS
|
AS+
|
| 72
|
107
|
240
|
480
|
| Boss Route Air Control
|
| AD
|
AP
|
AS
|
AS+
|
| 166
|
248
|
558
|
1116
|
| 7-4 Unlocking & Progression
|
| Unlock conditions
|
7-4 is unlocked after clearing 7-3 HP bar once
|
| Clear conditions
|
To clear the map: the boss's flagship must be sunk 4 times
|
| Notes
|
1 LBAS is available on this map
- The LBAS is only available once B175 is cleared
- See the unlocking steps here: LBAS Unlocking
|
| Map reset
|
Resets at midnight JST at the beginning of every month
|
Stage Guide
| 7-4 Branching Rules
|
| Nodes |
Rules
|
|
|
|
- Meet ALL of the following to go to A
- Meet one of the following
- DD + DE ≥ 3
- DE ≥ 2
- LHA ≥ 1, DE ≥ 2 and DD + DE ≥ 3
- (F)BB + CV(B) = 0
- BBV + CVL + Akitsumaru ≤ 2
- CA(V) ≤ 1
- CL + CT + CLT ≤ 1
- SS(V) = 0
- Otherwise, C
|
|
|
|
|
|
- Meet ANY of the following to go to D
- SS(V) ≥ 1
- (F)BB + CV(B) ≥ 1
- BBV ≥ 3
- CVL + Akitsumaru ≥ 3
- Meet ANY of the following to go to E
- DD + DE ≥ 4
- CT ≥ 1 and DD + DE ≥ 3
- DE ≥ 3
- Fast+ fleet and DD ≥ 2
- Otherwise, D
|
|
|
|
|
|
- To route to G fleet must have
- AO + LHA ≥ 1 AND DE ≥ 4 AND Taiyou-class


 + AO + DD + LHA + DE = 6 + AO + DD + LHA + DE = 6
- Otherwise, J
|
|
|
|
|
|
|
|
|
|
|
|
- Fail LoS Check to go to I
- Otherwise, L
|
|
|
|
|
|
- Go to K if LoS < 33 (Cn4)
- Random if 33 ≤ LoS < 37 (Cn4)
- If LoS ≥ 37 (Cn4), the fleet will go as the following
- Go to P if CT ≥ 1, DE ≥ 3 AND Taiyou-class
+ CT + DD + DE = 5 (5 ships only, no more no less)
- Meet ALL of the following to go to L
- SS(V) + (F)BB + CV(B) = 0
- BBV ≤ 2
- CVL + Akitsumaru ≤ 2
- Meet one of the following
- LHA ≥ 1, DE ≥ 2 and DD + DE ≥ 3
- DD + DE ≥ 4
- CT ≥ 1 and DD + DE ≥ 3
- DE ≥ 3
- Fast+ fleet and DD ≥ 2
- Otherwise, meet ANY of the following to go to K
- BBV + CVL + Akitsumaru ≥ 3
- CA(V) ≥ 2
- CL + CLT + CT ≥ 2
- Go to L if DD + DE ≥ 3 or DE ≥ 2
- Finally, go to K if the fleet doesn't meet any of the above conditions.
|
|
|
|
|
|
|
|
- All current composition routes to M. Nothing routes to P
|
|
|
|
|
|
- Go to N if LoS < 45 (Cn4)
- Random N/O if 45 ≤ LoS < 47 (Cn4)
- Meet ANY of the following to go to O AND LoS ≥ 47 (Cn4)
- SS(V) + BB + CV(B) ≥ 1
- FBB ≥ 2
- BBV ≥ 2
- CVL + Akitsumaru ≥ 2
- DD + DE ≤ 1
- Otherwise, P
|
|
|
|
|
Ship Bonuses
DISCLAIMER: This information is based on user-submitted data and is subject to revisions as more data is gathered. Any version of the ship receives the bonus regardless of remodel.
| Ships
|
Damage
|
Evasion
|
Accuracy
|
Nodes
J, L
|
Node
P
|
Map-wide
|
Map-wide
|
  
|
??
|
??
|
??
|
??
|
 
|
1.15x
|
1.22 ~ 1.23x
|
??
|
??
|

|
-
|
1.18x
|
1.18x
|
| Coastal Defense Ships (DE)
|
1.25x
|
1.33x
|
1.35x
|
1.25?x
|
Historical Routing
Ships with special routing on the map:
Tips
Be advised: The Developers have mentioned that the composition and map will change over time, this may even include the resource node. So take advantage of the map while it is possible.
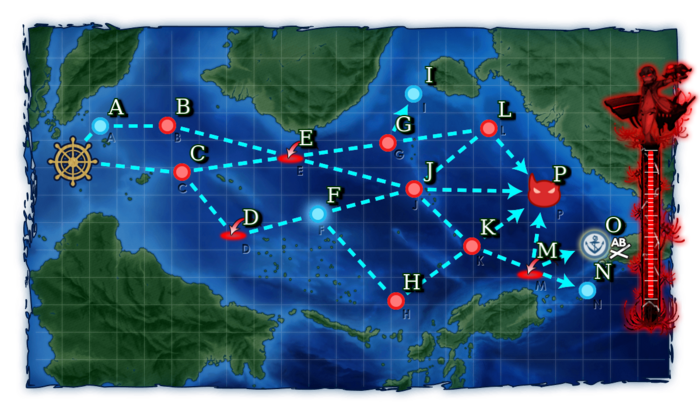
This map only has a single phase, however, 2 main routes are present:
- The main boss route, ending at node P,
- The resource route, ending at node O.
In addition, one LBAS can be unlocked and its use it highly advised.
- It is unlocked by quest B175.
This map notably features a lot of submarines, and so requires adequate ASW capabilities to be defeated.
- Formation Notes
It is advised to use the following Formations:
- Line Abreast on nodes B C G J K L
- Diamond on nodes E M
- For Boss P, depending on how the LBAS is setuped:
- Line ahead is recommended if the LBAS can effectively kill the enemy SS.
- Echelon is preferred if the LBAS is not set to fight SS.
- Regarding Land-Based Air Squadrons
- 1 LBAS is available to sortie.
- It is highly recommended to use the LBAS to either help reaching or defeating the boss node.
- This map is also the best location to train all land-based planes to max-proficiency ❱❱ . Bring only planes with a range of at least 3 (7 for furthest nodes) as they will reach submarine Nodes on B, C, J, and K.
Recommended Fleets
Reach Node O
Quest B175 requires to reach node O:
| ExpandNode O Route
|
| Fleet Info
|
| Single
|
1-6 SS(V)
|
| LoS
|
Cn3: 32
|
| Speed
|
Any
|
RouteNode Types:
RED: Battle
PURPLE: Night Battle
PINK: Air Raid/Battle
ORANGE: Enemy Ambush/ASS
BLUE: Empty/Choice
Light Blue: Emergency Anchorage Repair
GREEN: Resource/TP
VIOLET: Maelstrom
|
C D F J K M O
|
| Quests
|
B175
|
|
| Air State
|
| AD
|
AP
|
AS
|
AS+
|
| 166
|
248
|
558
|
1116
|
|
| Fleet Notes
|
Several  Seaplanes or Seaplanes or  Submarine Radars might be needed to have enough LoS to route from M to O. Submarine Radars might be needed to have enough LoS to route from M to O.
Submarines will face little to no threat along the way.
|
Sink the Hi Convoy Princess
In this part, it is recommended to use the LBAS to clear the map more easily, as this will give the necessary edge needed to fight against the boss. While the boss is not strong, she is very tanky and is escorted by a fleet that may be troublesome to wipe.
| ExpandHeavy Fleet
|
| Fleet Info
|
| Single
|
0-1 BBV, 1 CVE, 1 CA/CL, 3-4 DD/DE
|
| LoS
|
Cn4: 37
|
| Speed
|
Any
|
RouteNode Types:
RED: Battle
PURPLE: Night Battle
PINK: Air Raid/Battle
ORANGE: Enemy Ambush/ASS
BLUE: Empty/Choice
Light Blue: Emergency Anchorage Repair
GREEN: Resource/TP
VIOLET: Maelstrom
|
A B E J L P
|
|
| Air State
|
| AD
|
AP
|
AS
|
AS+
|
| 70
|
105
|
236
|
472
|
| LBAS
|
| Range
|
AS Sortie
|
AS Defense
|
| Node P: 2
|
238
|
N/A
|
|
| Fleet Notes
|
Allows bringing a strong fleet to the boss, passing through 2 Submarine Nodes, 1 Air Node, and 2 Surface/Submarine Nodes.
- Node J can especially be problematic due to it featuring 3 Submarine So-Class Flagship
 , but will become even more dangerous on Last Dance with the enemy fleet in line ahead formation. , but will become even more dangerous on Last Dance with the enemy fleet in line ahead formation.
It is recommended to bring:
- Ships that can effectively OASW to kill the numerous submarines.
- An Ise-class Kai Ni

 and a CVE to help clearing while having AS. and a CVE to help clearing while having AS.
- An AACI for node E as well as the boss.
- At least 1 TCI capable DD.
- If possible, ships that can take on multiple roles.
The boss does not have a lot of planes, bringing enough airpower and AACI can effectively deplane her, rendering her defenseless.
- Last Dance comp will buff the DD and CL in her fleet along with giving her additional airpower.
- Bring additional airpower as a countermeasure to effectively beat her.
|
| LBAS Notes
|
It is recommended to bring 1-2 Land-Based Attackers, 1-2 land-based ASW bombers
 , and 1-2 fighters, to increase effectiveness at the Boss. , and 1-2 fighters, to increase effectiveness at the Boss.
|
| ExpandTorpedo Squadron
|
| Fleet Info
|
| Single
|
"Torpedo Squadron": 1 CL (flagship), 1 CLT, 4 DD
|
| LoS
|
Cn4: 37
|
| Speed
|
Any
|
RouteNode Types:
RED: Battle
PURPLE: Night Battle
PINK: Air Raid/Battle
ORANGE: Enemy Ambush/ASS
BLUE: Empty/Choice
Light Blue: Emergency Anchorage Repair
GREEN: Resource/TP
VIOLET: Maelstrom
|
C E J L P
|
|
| Air State
|
| AD
|
AP
|
AS
|
AS+
|
| 70
|
105
|
236
|
472
|
| LBAS
|
| Range
|
AS Sortie
|
AS Defense
|
| Node P: 2
|
238
|
N/A
|
|
| Fleet Notes
|
This solution requires more advanced gears, and might be out of reach of new players. It is required to bring an  FCF capable CL as flagship, preferably an Agano-class Kai+, equipped with: FCF capable CL as flagship, preferably an Agano-class Kai+, equipped with:
If all of the above requirements are met, this is the cheapest (for resource) and the best comp for farming the boss node, having the highest pass rate thanks to the usage of ETSCF in case a ship gets heavily damaged.
The evacuation mechanic of the ETSCF should be used if needed, as long as the routing is maintained.
- C E routing is maintained as long as the 4 DD are left.
- The boss routing is maintained as long as the fleet keeps enough LoS'.
|
| LBAS Notes
|
It is recommended to bring 1-2 Land-Based Attackers, 1-2 land-based ASW bombers
, and 1-2 fighters, to increase effectiveness at the Boss.
|
| ExpandSuper Light Fleet
|
| Fleet Info
|
| Single
|
1 Taiyou-class, 3 DE
1 CT, 1 DD, 2 DE
1 CT, Hatsuzuki Kai Ni , Inagi Kai Ni , Inagi Kai Ni , 2 DE , 2 DE
|
| LoS
|
Any
|
| Speed
|
Any
|
RouteNode Types:
RED: Battle
PURPLE: Night Battle
PINK: Air Raid/Battle
ORANGE: Enemy Ambush/ASS
BLUE: Empty/Choice
Light Blue: Emergency Anchorage Repair
GREEN: Resource/TP
VIOLET: Maelstrom
|
A B E J P
|
|
| Air State
|
| AD
|
AP
|
AS
|
AS+
|
| 70
|
105
|
236
|
472
|
| LBAS
|
| Range
|
AS Sortie
|
AS Defense
|
| Node P: 2
|
238
|
N/A
|
|
| Fleet Notes
|
| Completely gives up S rank as it is almost impossible to kill the boss, but can be useful if only an A rank is required (DE still drop in A rank, albeit at a lesser rate) while leveling DE on the way.
It is a cheap but weak fleet, utilizing this map's special routing for Taiyou-class

 and CT, who can be brought when using light fleet to get more firepower. and CT, who can be brought when using light fleet to get more firepower.
- Goes through, 1 Submarine Node, 1 Air Node, and 1 Surface/Submarine Node.
- Nodes E and P may be troublesome due to a lack of air defense.
Dependent on the only DD or CVE to score the kill against the boss, with DE taking on OASW.
- The DD should do a TCI, and CVE do a night carrier cut-in in order to sink the boss.
Hatsuzuki Kai Ni and Inagi Kai Ni are also among the best picks, stabilizing the route to the boss thanks to Hatsuzuki's AACI and OASW along with Inagi's higher stats compared to the other DEs.
|
| LBAS Notes
|
| Should focus on removing the surface ships to make scoring the kill against the Boss more likely.
|
Farming
This map can be farmed to obtain:
- Resource gains
| Resources earnings
|
|
|
| Base
|
40 |
20
|
| Maximum
|
200 |
120
|
|
|
| ExpandLBAS Farm
|
| Fleet Info
|
| Single
|
1-6 SS(V)
|
| LoS
|
Cn3: 32
|
| Speed
|
Any
|
RouteNode Types:
RED: Battle
PURPLE: Night Battle
PINK: Air Raid/Battle
ORANGE: Enemy Ambush/ASS
BLUE: Empty/Choice
Light Blue: Emergency Anchorage Repair
GREEN: Resource/TP
VIOLET: Maelstrom
|
C D F J K M O
|
|
| Air State
|
| AD
|
AP
|
AS
|
AS+
|
| 165
|
247
|
554
|
1108
|
| LBAS
|
| Range
|
AS Sortie
|
AS Defense
|
| Node J: 3; Node K: 3
|
0
|
N/A
|
|
| Fleet Notes
|
| This fleet should be preferably the above mentioned resource route, in order to kill 2 birds with 1 stone.
|
| LBAS Notes
|
It is possible to farm for LBAS Plane Proficiency ❱❱ by sending the LBAS on a submarine node like J or K.
- Just set-up an LBAS with any planes, according the final range is enough to reach J or K.
- Sending a surface-focused LBAS on J can assure a safer path.
- Such runs consume little to no resources on the LBAS.
|
Enemy CompositionsCollapse
7-4 A
| #
|
Empty Node
|
| A
|
気のせいだった。
Must be my imagination.
|
| #
|
Empty Node
|
7-4 B: 深海潜水艦隊 哨戒集団 B群 (
PoiDB)
| #
|
Formation
|
Normal Battle Node
|
AD/AP
AS/AS+
|
| B
|
Echelon
Line Abreast
|
|
0/0
0/0
|
Echelon
Line Abreast
|
|
0/0
0/0
|
Echelon
Line Abreast
|
|
0/0
0/0
|
Echelon
Line Abreast
|
|
0/0
0/0
|
Echelon
Line Abreast
|
|
0/0
0/0
|
| #
|
Formation
|
Normal Battle Node
|
AD/AP
AS/AS+
|
7-4 C: 深海潜水艦隊 哨戒集団 C群 (
PoiDB)
| #
|
Formation
|
Normal Battle Node
|
AD/AP
AS/AS+
|
| C
|
Echelon
Line Abreast
|
|
0/0
0/0
|
Echelon
Line Abreast
|
|
0/0
0/0
|
Echelon
Line Abreast
|
|
0/0
0/0
|
Echelon
Line Abreast
|
|
0/0
0/0
|
Echelon
Line Abreast
|
|
0/0
0/0
|
| #
|
Formation
|
Normal Battle Node
|
AD/AP
AS/AS+
|
7-4 D: 深海任務部隊 艦載機群 (
PoiDB)
| #
|
Formation
|
Air Defense Node
|
AD/AP
AS/AS+
|
| D
|
Diamond
|
|
44/88
197/393
|
| Diamond
|
|
72/143
321/642
|
| Diamond
|
|
72/143
321/642
|
| Diamond
|
|
108/215
482/963
|
| Diamond
|
|
108/215
482/963
|
| Diamond
|
|
116/231
519/1038
|
| #
|
Formation
|
Air Defense Node
|
AD/AP
AS/AS+
|
7-4 E: 深海任務部隊 艦載機群 (
PoiDB)
| #
|
Formation
|
Air Defense Node
|
AD/AP
AS/AS+
|
| E
|
Diamond
|
|
39/77
173/345
|
| Diamond
|
|
44/88
197/393
|
| Diamond
|
|
44/88
197/393
|
| Diamond
|
|
72/143
321/642
|
| Diamond
|
|
72/143
321/642
|
| Diamond
|
|
80/160
359/717
|
| #
|
Formation
|
Air Defense Node
|
AD/AP
AS/AS+
|
| #
|
Formation
|
Normal Battle Node
|
AD/AP
AS/AS+
|
| #
|
Formation
|
Normal Battle Node
|
AD/AP
AS/AS+
|
7-4 G: 深海潜水艦隊 哨戒集団 A群 (
PoiDB)
| #
|
Formation
|
Normal Battle Node
|
AD/AP
AS/AS+
|
| G
|
Echelon
|
|
0/0
0/0
|
Echelon
Line Abreast
|
|
0/0
0/0
|
Echelon
Line Abreast
|
|
0/0
0/0
|
Echelon
Line Abreast
|
|
0/0
0/0
|
| #
|
Formation
|
Normal Battle Node
|
AD/AP
AS/AS+
|
7-4 H: 深海任務部隊 空母機動部隊 (
PoiDB)
| #
|
Formation
|
Normal Battle Node
|
AD/AP
AS/AS+
|
| H
|
Diamond
|
|
72/143
321/642
|
| Diamond
|
|
80/160
359/717
|
| Diamond
|
|
108/215
482/963
|
| Diamond
|
|
116/231
519/1038
|
| #
|
Formation
|
Normal Battle Node
|
AD/AP
AS/AS+
|
7-4 I
| #
|
Empty Node
|
| I
|
敵影を見ず。
No enemy spotted.
|
| #
|
Empty Node
|
7-4 J: 深海艦隊 特殊任務部隊 (
PoiDB)
| #
|
Formation
|
Normal Battle Node
|
AD/AP
AS/AS+
|
| J
|
Echelon
Line Abreast
|
|
0/0
0/0
|
Echelon
Line Abreast
|
|
0/0
0/0
|
| Line Ahead
|
|
0/0
0/0
|
| Line Ahead
|
|
0/0
0/0
|
| #
|
Formation
|
Normal Battle Node
|
AD/AP
AS/AS+
|
7-4 K: 深海潜水艦隊 哨戒集団 旗艦群 (
PoiDB)
| #
|
Formation
|
Normal Battle Node
|
AD/AP
AS/AS+
|
| K
|
Echelon
Line Abreast
|
|
0/0
0/0
|
Echelon
Line Abreast
|
|
0/0
0/0
|
Echelon
Line Abreast
|
|
0/0
0/0
|
Echelon
Line Abreast
|
|
0/0
0/0
|
Echelon
Line Abreast
|
|
0/0
0/0
|
| #
|
Formation
|
Normal Battle Node
|
AD/AP
AS/AS+
|
7-4 L: 深海任務部隊 船団攻撃集団 (
PoiDB)
| #
|
Formation
|
Normal Battle Node
|
AD/AP
AS/AS+
|
| L
|
Echelon
|
|
0/0
0/0
|
Line Ahead
Double Line
|
|
0/0
0/0
|
Line Ahead
Double Line
Echelon
|
|
0/0
0/0
|
| #
|
Formation
|
Normal Battle Node
|
AD/AP
AS/AS+
|
7-4 M: 深海任務部隊 艦載機群 (
PoiDB)
| #
|
Formation
|
Air Defense Node
|
AD/AP
AS/AS+
|
| M
|
Diamond
|
|
109/217
488/975
|
| Diamond
|
|
104/207
464/927
|
| Diamond
|
|
116/231
518/1035
|
| Diamond
|
|
110/220
494/987
|
| Diamond
|
|
125/249
558/1116
|
| Diamond
|
|
124/247
554/1107
|
| #
|
Formation
|
Air Defense Node
|
AD/AP
AS/AS+
|
7-4 N
| #
|
Empty Node
|
| N
|
敵影を見ず。
No enemy spotted.
|
| #
|
Empty Node
|
7-4 O
| #
|
Resource Node
|
| O
|
40 (cap 200)
|
| O
|
20 (cap 120)
|
| #
|
Resource Node
|
7-4 P: 深海 ヒ船団棲姫船団 (
PoiDB)
| #
|
Formation
|
Boss Battle Node
|
AD/AP
AS/AS+
|
| P
|
Diamond
|
|
32/63
140/279
|
| Diamond
|
|
33/65
146/291
|
| Diamond
|
|
32/63
140/279
|
| Diamond
|
|
33/65
146/291
|
| Diamond
|
|
54/107
240/480
|
Diamond
(Final)
|
|
53/105
236/471
|
| #
|
Formation
|
Boss Battle Node
|
AD/AP
AS/AS+
|
Ship Drops
This map currently has "limited-time" drops, see Drop List for more info.
- The below table contains limited-time drop data and may not be up to date.