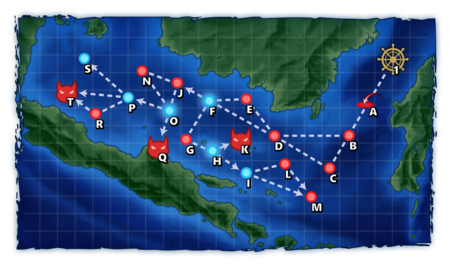
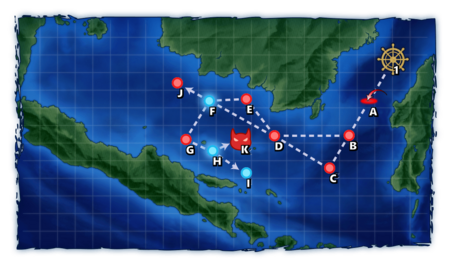
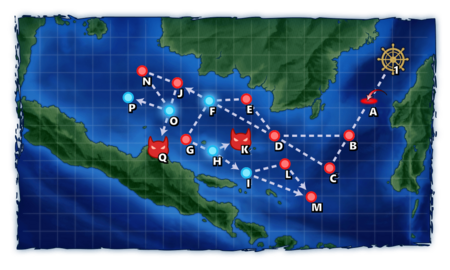
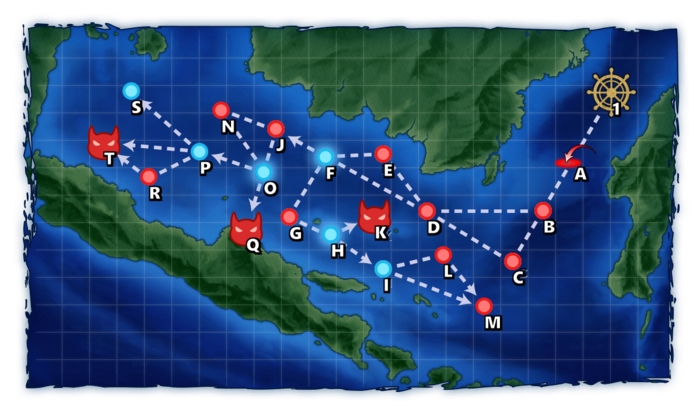
World 7-5 Extra Operation: ジャワ島沖 - Off Java Island
| Strategy Name
|
スラバヤ沖海戦・バタビア沖海戦
Battle of Surabaya and Battle of Batavia
|
| Difficulty
|
☆☆☆☆☆☆☆☆☆☆☆
|
| Item
|
None
|
| Strategy Content
|
ジャワ島東部に攻略部隊を揚陸する!有力なる艦隊でスラバヤ沖にて敵の迎撃戦力を撃破し、敵残存艦隊も猛追!撃滅せよ!
You land an attack force on the Eastern Java Island! At off Surabaya, defeat enemy interception forces with your strong fleet. Chase and annihilate enemy survivors after that!
|
| 1st Boss Air Control
|
| AD
|
AP
|
AS
|
AS+
|
| 0
|
0
|
0
|
0
|
| 1st Boss Route Air Control
|
| AD
|
AP
|
AS
|
AS+
|
| 150
|
224
|
503
|
1006
|
| 2nd Boss Air Control
|
| AD
|
AP
|
AS
|
AS+
|
| 51
|
76
|
171
|
342
|
| 2nd Boss Route Air Control
|
| AD
|
AP
|
AS
|
AS+
|
| 150
|
224
|
503
|
1006
|
| 3rd Boss Air Control
|
| AD
|
AP
|
AS
|
AS+
|
| 0
|
0
|
0
|
0
|
| 3rd Boss Route Air Control
|
| AD
|
AP
|
AS
|
AS+
|
| 150
|
224
|
503
|
1006
|
| 7-5 Unlocking & Progression
|
| Unlock conditions
|
7-5 is unlocked after clearing 7-4 HP bar once
|
| Clear conditions
|
To clear the map: all 3 phases must be cleared:
- Phase 1: K boss requires 2 kills to clear
- Phase 2: Q boss requires 3 kills to clear
- Phase 3: T boss requires 3 kills to clear
|
| Clearing rewards
|
170  Ranking Points and 1 Ranking Points and 1  Medal Medal
|
| Map reset
|
Resets at midnight JST at the beginning of every month
|
Stage Guide
| 7-5 Branching Rules
|
| Nodes |
Rules
|
|
|
|
- Does not meet the requirements to go to D
|
|
|
- Meet ALL of the following requirements:
- Amount of CV(B) ≤ 1
- If amount of CV(B) = 1, then amount of DD ≥ 3
- Amount of CVL ≤ 2
- If amount of CVL = 2, then amount of DD ≥ 3
- Amount of BB ≤ 1
- Amount of CA(V) ≤ 2
- Amount of CL ≥ 1
- Amount of DD ≥ 2
- Otherwise, fleet is Fast+
|
|
|
|
- Does not meet the requirements to go to F
|
|
|
- Meet ALL of the following requirements:
- Amount of (F)BB(V) + CV(B) + CA(V) ≤ 2
- Amount of CV(B/L) ≤ 2
- Amount of CL + DD ≥ 2
- If Fast+, then amount of CL + DD ≥ 1
- If Slow and (F)BB(V) = 2, then amount of DD ≥ 3
- If Fast+ and (F)BB(V) = 2, then amount of CLT ≤ 2
- Otherwise, fleet is Fastest
|
|
|
|
|
|
|
|
|
|
|
|
|
|
|
|
|
|
|
- Pass the LoS check (Cn3 ≥ 40)
|
|
|
|
- Does not meet the requirements to go to O
|
|
|
- Meet ALL of the following:
- Amount of CV(B) = 0
- Amount of CVL ≤ 2
- Amount of BB ≤ 1 (Ignores FBB/BBV)
- Amount of (F)BB(V) + CA(V) ≤ 2
- Amount of DD ≥ 2
- And meet ANY of the following:
- Fleet is Fast
- Amount of DD ≥ 3
- Fleet contains 1CVL 2CA(V) 1CL 2DD
- Otherwise, fleet is Fast+
|
|
|
|
|
|
|
|
|
|
- Does not meet the requirements to go to T
- Pass the LoS check (Cn3 ≥ 55)
|
|
|
|
|
|
- Meet ALL of the following requirements:
- Amount of CV(B) = 0
- Amount of (F)BB(V) + CVL ≤ 1
- Amount of (F)BB(V) + CA(V) ≤ 2
- Amount of CL ≥ 1
- Pass the LoS check (Cn3 ≥ 55)
- Otherwise, fleet is Fastest
|
Ship Bonuses
DISCLAIMER: This information is based on user-submitted data and is subject to revisions as more data is gathered. Any version of the ship receives the bonus regardless of remodel.
| Ships [1][2]
|
Nodes B, C, D, E, J
|
Nodes G, K, L, M
|
Node Q
|
Nodes N, R, T
|
 |
 |
 |

|
1.08x
|
1.13x
|
1.14x
|
-
|
 |
 |
 |

|
 |
 |
 |

|
 |
 |
 |

|
 |
 |
 |

|
 |
 |
 |

|
 |
 |
 |

|
 
|
1.1448x1.08 * 1.06
|
1.13x
|
1.14x
|
1.15x
|
 |
 |
 |

|
1.06x
|
-
|
-
|
1.15x
|
 |
 |
 |

|
 |
 |
 |

|
 |
 |
 |

|
 |
 |
 |

|
Tips
Be advised: The Developers have mentioned that the enemy compositions and map may change over time [3]. So take advantage of the map while it is possible.
The 1st normal map to feature 3 phases as well as a gimmick.
- The 1st and 3rd phases are standard surface battles.
- The 2nd phase is installation focused, featuring PT boats.
- A "gimmick phase" is required to unlock the last phase.
A lot of branchings are active ones, making the overall routing easier.
In every phase:
- Bringing AACI is recommended.
- Bringing OASW is advised if not too detrimental to surface combat effectiveness.
- Bringing historical ships is recommended.
Phase 1
Recommended Fleets
| ExpandShort Route
|
| Fleet Info
|
| Single
|
1-4 CL, 0-3 CLT, 2-5 DD
0-1 (F)BB(V), 0-2 CA(V), 1-2 CL, 0-1 CLT, 2-4 DD
|
| LoS
|
Any
|
| Speed
|
Any
|
RouteNode Types:
RED: Battle
PURPLE: Night Battle
PINK: Air Raid/Battle
ORANGE: Enemy Ambush/ASS
BLUE: Empty/Choice
Light Blue: Emergency Anchorage Repair
GREEN: Resource/TP
VIOLET: Maelstrom
|
A B D F G H K
|
|
| Air State
|
| AD
|
AP
|
AS
|
AS+
|
| 150
|
224
|
503
|
1006
|
|
| Fleet Notes
|
| Shortest route to the boss
There is no air power on the boss node.
|
Gimmick Phase
In addition to clearing Phase 2, Node M must be S ranked to unlock Phase 3. This step can be done at any point, right after clearing Phase 1. As it can use the same fleet as Phase 1, it is more convenient to do it after clearing Phase 1.
Recommended Fleets
| ExpandGimmick
|
| Fleet Info
|
| Single
|
Phase 1 or Phase 2's fleet
|
| LoS
|
Cn3: 40
|
| Speed
|
Any
|
RouteNode Types:
RED: Battle
PURPLE: Night Battle
PINK: Air Raid/Battle
ORANGE: Enemy Ambush/ASS
BLUE: Empty/Choice
Light Blue: Emergency Anchorage Repair
GREEN: Resource/TP
VIOLET: Maelstrom
|
A B D F G H I M
|
|
| Air State
|
| AD
|
AP
|
AS
|
AS+
|
| 150
|
224
|
503
|
1006
|
|
| Fleet Notes
|
| Failing the LoS check pass through extra node L.
|
Phase 2
The boss is an installation and is escorted by more installations and PT boats.
- Bug: Despite being an installation node,
 Balloons cannot be deployed here.
Recommended Fleets
| ExpandShort Route
|
| Fleet Info
|
| Single
|
1 BBV, 1 CAV/LHA, 1 CL, 3 DD
|
| LoS
|
Any
|
| Speed
|
Any
|
RouteNode Types:
RED: Battle
PURPLE: Night Battle
PINK: Air Raid/Battle
ORANGE: Enemy Ambush/ASS
BLUE: Empty/Choice
Light Blue: Emergency Anchorage Repair
GREEN: Resource/TP
VIOLET: Maelstrom
|
A B D F J O Q
|
|
| Air State
|
| AD
|
AP
|
AS
|
AS+
|
| 51
|
76
|
171
|
342
|
|
| Fleet Notes
|
| Shortest route to the boss.
The boss is an "Installation" and requires appropriate gears to be defeated,
- The boss fleet includes one or two PT Imp Packs, requiring appropriate gears to be defeated (these can be ignored if an S-rank is unnecessary):
| ExpandAnti-PT boat
|
Unlike most standard Abyssals, "PT boats" (PT Imp Pack & Schnellboot Imp Pack & Schnellboot Imp Pack ) are "very small and fast". ) are "very small and fast".
- All ship types suffer a severe
 accuracy and accuracy and  firepower penalty against PT boats. firepower penalty against PT boats.
- Attacking them with larger guns is not very effective, smaller guns being recommended instead.
- Support Expeditions are not affect by any of the following[1].
| ExpandAttack formula against PT boats
|
The Attack formula against PT boats:[2][3]
- Jet Assault & Airstrike
- [math]\displaystyle{ \text{Damage}_\text{PT}= \text{Atk}_\text{post-cap} \times \text{Rand} [0.5 ; 0.8] }[/math]
- LBAS[4]
- [math]\displaystyle{ \text{Damage}_\text{PT}= \text{Atk}_\text{post-cap} \times \text{Rand} [0.4 ; 0.7] }[/math]
- Shelling
- [math]\displaystyle{ \text{Damage}_\text{PT}= ( 0.3 \times \text{Atk}_\text{post-cap} + \sqrt{\text{Atk}_\text{post-cap}} + 10 ) \times \prod^{All Equipment}{\text{Mod}_\text{EquipmentAtk}} }[/math]
- Opening & Closing Torpedo Salvos
- [math]\displaystyle{ \text{Damage}_\text{PT}= 0.3 \times \text{Atk}_\text{post-cap} + \sqrt{\text{Atk}_\text{post-cap}} + 10 }[/math]
- Night Battle
- Night Battle data are unclear yet.
- With
- [math]\displaystyle{ \text{Atk}_\text{post-cap} }[/math] the post cap attack power defined here,
- [math]\displaystyle{ \text{Mod}_\text{EquipmentAtk} }[/math] the bonuses given by equipment, described below.
|
| ExpandAccuracy formula against PT boats
|
The Accuracy formula against PT boats:[5][6][7][8]
| [math]\displaystyle{ \text{Hit Rate}_\text{vs.PT} \text{%} = \Big\lfloor ( 0.3 \times \text{Accuracy}_\text{Atk} + \sqrt{\text{Accuracy}_\text{Atk}} + 15 ) \times 1.2 \times \text{Mod}_\text{Ship} \times \Big( \prod^{All Equipment}{\text{Mod}_\text{EquipmentAcc}} \Big) \times \text{Mod}_\text{Night} \Big\rfloor - \text{EVA}_\text{PT} + 1 }[/math]
|
- With
- [math]\displaystyle{ \text{Acc}_\text{Atk} }[/math] the standard accuracy described here
- PT boats are "DDs" in the game, so the [math]\displaystyle{ \text{Mod}_\text{formation} }[/math] for vanguard is 1.1 during shelling, and 1.2 during the torpedo phase.
- Historical accuracy bonuses during Events are included in the Standard Accuracy Term, i.e. it is affected by the [math]\displaystyle{ \text{Mod}_\text{PT} }[/math] modifier.
- [math]\displaystyle{ \text{EVA}_\text{PT} }[/math] the PT estimated evasion
 described bellow, described bellow,
- The main Accuracy modifiers are
- [math]\displaystyle{ \text{Mod}_\text{Amagiri} }[/math] being include in [math]\displaystyle{ \text{Acc}_\text{Atk} }[/math]:
- [math]\displaystyle{ \text{Mod}_\text{Ship} }[/math] the bonus given by ship types, described below,
- [math]\displaystyle{ \text{Mod}_\text{EquipmentAcc} }[/math] the bonuses given by equipment, described below,
- [math]\displaystyle{ \text{Mod}_\text{Night} }[/math] being 0.7 during night battle, 1 during day battle.
|
Amagiri Kai Ni/D
 has the ability to prioritize focusing on attacking PT imps with significantly increased accuracy if any are present. has the ability to prioritize focusing on attacking PT imps with significantly increased accuracy if any are present.
- DD placed in the composition slots above and below her will gain a noticeable accuracy boost and will prioritize attacking PT boats if any are present.
- The PT boat targeting rate is 100% for all affected ships [9].
During Events, some special bonuses may be added, with "historical" ships and equipment gaining some accuracy bonuses[10].
| Ship Type |
[math]\displaystyle{ \text{Mod}_\text{Ship} }[/math]
|
| DD & DE |
1.0
|
| CL, CLT, & CT |
0.82
|
| All other types |
0.7
|
- Notes
- It is recommended to use anti-PT setups on DDs only, such setups compromising overall combat effectiveness.
- Having a Reinforcement Expansion is important because it can save a ship slot by containing a machine gun or skilled lookouts.
- Combining equipment is recommended to see significant boosts to accuracy.
- The
 Ka-Tsu Tanks Ka-Tsu Tanks
 bonus does not stack with the bonus does not stack with the  Armed Boats Armed Boats
 ones. ones.
- Using other setups improving accuracy is also advisable:
|
|
|
| [edit]
|
|
Phase 3
The final boss has very high armor, so using historical ships and Night Cut-ins is required to reliably defeat it.
Recommended Fleets
| ExpandLight Fleet
|
| Fleet Info
|
| Single
|
0-1 (F)BB(V), 1-2 CA(V), 1 CL, 3 DD
1 CVL, 2 CA(V), 1 CL, 2 DD
|
| LoS
|
Cn3: 55
|
| Speed
|
Any
|
RouteNode Types:
RED: Battle
PURPLE: Night Battle
PINK: Air Raid/Battle
ORANGE: Enemy Ambush/ASS
BLUE: Empty/Choice
Light Blue: Emergency Anchorage Repair
GREEN: Resource/TP
VIOLET: Maelstrom
|
A B D F J O P T
|
|
| Air State
|
| AD
|
AP
|
AS
|
AS+
|
| 150
|
224
|
503
|
1006
|
|
| Fleet Notes
|
| Shortest route to the boss, strong enough to reliably defeat it.
|
| ExpandMedium Fast Fleet
|
| Fleet Info
|
| Single
|
1 (F)BB(V)/CVL, 1 CA(V), 1 CLT/AV, 1 CL, 2 DD
|
| LoS
|
Cn3: 55
|
| Speed
|
Fast
|
RouteNode Types:
RED: Battle
PURPLE: Night Battle
PINK: Air Raid/Battle
ORANGE: Enemy Ambush/ASS
BLUE: Empty/Choice
Light Blue: Emergency Anchorage Repair
GREEN: Resource/TP
VIOLET: Maelstrom
|
A B D F J O P T
|
|
| Air State
|
| AD
|
AP
|
AS
|
AS+
|
| 150
|
224
|
503
|
1006
|
|
| Fleet Notes
|
| Shortest route to the boss, a bit stronger than the light fleet.
|
| ExpandHeavy Fleet
|
| Fleet Info
|
| Single
|
1-2 (F)BB(V), 0-1 CVL, 1 CL, 2-3 DD
|
| LoS
|
Cn3: 55
|
| Speed
|
Any
|
RouteNode Types:
RED: Battle
PURPLE: Night Battle
PINK: Air Raid/Battle
ORANGE: Enemy Ambush/ASS
BLUE: Empty/Choice
Light Blue: Emergency Anchorage Repair
GREEN: Resource/TP
VIOLET: Maelstrom
|
A B D F J O P R T
|
|
| Air State
|
| AD
|
AP
|
AS
|
AS+
|
| 150
|
224
|
503
|
1006
|
|
| Fleet Notes
|
| Allows an extra battleship or light carrier in exchange for an extra surface combat at node R.
Slow fleets require 3DD
|
| ExpandFastest Fleet
|
| Fleet Info
|
| Single
|
6 XX
|
| LoS
|
Cn3: 55
|
| Speed
|
Fastest
|
RouteNode Types:
RED: Battle
PURPLE: Night Battle
PINK: Air Raid/Battle
ORANGE: Enemy Ambush/ASS
BLUE: Empty/Choice
Light Blue: Emergency Anchorage Repair
GREEN: Resource/TP
VIOLET: Maelstrom
|
A B D F J O P T
|
|
| Air State
|
| AD
|
AP
|
AS
|
AS+
|
| 150
|
224
|
503
|
1006
|
|
| Fleet Notes
|
| Shortest route to the boss with no composition restriction, bust requires speed modding.
See Improving Ship Speed.
|
SS and Carrier Exp farming
The 1st enemy node being an Air Node, it's possible to take advantage of how it works to level up any SS(V) as well as "carriers" risk-free.
- All SS(V) won't take any damage on Node A, so any SS(V) fleet can level up risk-free on this node.
- If possessing one or more 12cm 30-tube Rocket Launcher Kai Ni
 , it is possible to take advantage of the AARB mechanic to also level up BBV, CV(B/L), CAV, and AV.
- By equipping one RLK2 on carriers, passing a certain AA threshold, said carrier won't take any damage on the Air Node.
- Having more than 1 RLK2 on the same ship decreases the AA threshold, making it possible to level up weaker carriers.
- Once Node A cleared , retreat to the base and repeat.
Enemy CompositionsCollapse
Ship Drops
World 7/7-5/Ship drops

 Balloons cannot be deployed here.
 , it is possible to take advantage of the AARB mechanic to also level up BBV, CV(B/L), CAV, and AV.


