- Welcome to the Kancolle Wiki!
- If you have any questions regarding site content, account registration, etc., please visit the KanColle Wiki Discord
Difference between revisions of "Combat/Map Mechanics and Nodes"
Jigaraphale (talk | contribs) m (→Routing) |
Jigaraphale (talk | contribs) m (→Nodes) |
||
| Line 62: | Line 62: | ||
=Nodes= | =Nodes= | ||
| − | |||
===Full Battle Nodes=== | ===Full Battle Nodes=== | ||
| − | |||
These nodes have as the main objective engaging the enemy fleet and destroying the enemy flagship and/or the enemy combatants as a whole. | These nodes have as the main objective engaging the enemy fleet and destroying the enemy flagship and/or the enemy combatants as a whole. | ||
| − | {| class="wikitable" | + | {|class="wikitable" |
| − | ! | + | !width=150px rowspan=2|Node |
| − | ! rowspan= | + | !rowspan=2|Description |
| − | ! colspan= | + | !colspan=2|Consumption |
|- | |- | ||
| − | ! | + | !width=8%|{{Fuel}} |
| − | ! | + | !width=8%|{{Ammo}} |
|- | |- | ||
| − | + | !rowspan=4|[[File:BattleNode.png]]<br>Normal Battle | |
|Normal Battle Nodes are the main types of nodes present in a sortie, oftentimes making up for the majority of nodes on the map. A Battle Node will always begin with Day Battle and can be followed up by a Night Battle. | |Normal Battle Nodes are the main types of nodes present in a sortie, oftentimes making up for the majority of nodes on the map. A Battle Node will always begin with Day Battle and can be followed up by a Night Battle. | ||
*'''''Node'' Support Expedition''' may appear in these nodes. | *'''''Node'' Support Expedition''' may appear in these nodes. | ||
*On some Battle Nodes, an abyssal submarine may appear above it upon reaching the node, indicating that this is a submarine node, involving ASW. | *On some Battle Nodes, an abyssal submarine may appear above it upon reaching the node, indicating that this is a submarine node, involving ASW. | ||
| − | |||
Specifically for Battle Nodes, the battle cost varies depending on the node composition. | Specifically for Battle Nodes, the battle cost varies depending on the node composition. | ||
|style="text-align:center"|20% | |style="text-align:center"|20% | ||
| Line 96: | Line 93: | ||
|style="text-align:center"|8% | |style="text-align:center"|8% | ||
|- | |- | ||
| − | + | ![[File:NightNode.png]]<br>Night Battle | |
| − | |||
|Night Battle nodes consist of only the Night Battle phase. The battle will automatically finish after the Night Shelling phase is ended. | |Night Battle nodes consist of only the Night Battle phase. The battle will automatically finish after the Night Shelling phase is ended. | ||
*'''''Node'' Support Expedition''' may appear in these nodes even though they begin the battle at night. | *'''''Node'' Support Expedition''' may appear in these nodes even though they begin the battle at night. | ||
| Line 103: | Line 99: | ||
|style="text-align:center"|10% | |style="text-align:center"|10% | ||
|- | |- | ||
| − | + | ![[File:NightToDayNode.png]]<br>Night to Day Battle | |
| − | |||
|Night to Day Battle nodes invert the usual Battle node format, beginning the battle on Night Battle and then automatically transitioning to Day Battle afterward. | |Night to Day Battle nodes invert the usual Battle node format, beginning the battle on Night Battle and then automatically transitioning to Day Battle afterward. | ||
*The applicable '''Support Expedition''' will trigger when the battle starts (during the night), but Day-only phases such as [[LBAS]] and [[Aerial Combat]] will be performed as soon as the Day Battle begins. | *The applicable '''Support Expedition''' will trigger when the battle starts (during the night), but Day-only phases such as [[LBAS]] and [[Aerial Combat]] will be performed as soon as the Day Battle begins. | ||
| − | * As of | + | * As of 03/2023, Night to Day Battles are exclusive to events, with its last appearance on [[Fall 2017 Event]]. |
|style="text-align:center"|20% | |style="text-align:center"|20% | ||
|style="text-align:center"|30%<ref name="UP"/> | |style="text-align:center"|30%<ref name="UP"/> | ||
|- | |- | ||
| − | + | ![[File:Airstrike Supported Combat Node.png]]<br>Airstrike Supported Combat | |
| − | |style="text-align:center"|[[File:BossNode.png]]<br> | + | |Airstrike Supported Combat nodes are combat nodes where the enemy fleet will consist of: |
| + | *"Surface enemies" (4-5 SS so far), that are fought like in regular "combat nodes", | ||
| + | *Followed by "air support enemies" (1-2 CVL so far), bringing an air assault like in "air raid nodes", and that cannot be attacked, being visually behind the rest of the enemy fleet and with no visible HP. | ||
| + | * As of 03/2023, Airstrike Supported Combat Node are exclusive to events, with its last appearance on [[Early Spring 2023 Event]]. | ||
| + | |style="text-align:center"|??% | ||
| + | |style="text-align:center"|??% | ||
| + | |- | ||
| + | ![[File:BossNode.png]]<br>Boss Battle | ||
|Boss Nodes are the Ending point of a map's route and are where the map's boss resides, if it has one. After the Boss Node battle ends, the sortie automatically finishes and the player fleet returns to Homeport. Boss nodes can be of any kind of battle node, meaning they can be a Night to Day Node, Night Battle Node, or a Battle Node. | |Boss Nodes are the Ending point of a map's route and are where the map's boss resides, if it has one. After the Boss Node battle ends, the sortie automatically finishes and the player fleet returns to Homeport. Boss nodes can be of any kind of battle node, meaning they can be a Night to Day Node, Night Battle Node, or a Battle Node. | ||
*'''''Boss'' Support Expedition''' may appear in these nodes. | *'''''Boss'' Support Expedition''' may appear in these nodes. | ||
| Line 122: | Line 124: | ||
===Short Battle Nodes=== | ===Short Battle Nodes=== | ||
| + | These battle nodes have different objectives and win conditions from regular battles. | ||
| − | + | {|class="wikitable" | |
| − | + | ! width=150px rowspan=2|Node | |
| − | {| class="wikitable" | + | ! rowspan=2|Description |
| − | ! | + | ! colspan=2|Consumption |
| − | ! rowspan= | ||
| − | ! colspan= | ||
|- | |- | ||
| − | ! | + | ! width=8%|{{Fuel}} |
| − | ! | + | ! width=8%|{{Ammo}} |
|- | |- | ||
| − | + | ! rowspan=2|[[File:AirRaidNode.png]]<br>Enemy Air Raid | |
| − | + | | rowspan=2|Air Raid nodes are special nodes where only [[LBAS]], as well as Stage 1 of the [[Aerial Combat]], are performed. This node consists of a purely defensive battle against enemy Aircraft Carriers. The enemy fleet is able to further progress to Stage 3 of Aerial Combat and perform an Airstrike against the fleet. | |
| − | | rowspan= | ||
*The enemy fleet cannot be damaged but by [[LBAS]] planes. | *The enemy fleet cannot be damaged but by [[LBAS]] planes. | ||
*AA mechanics like [[AACI]] or {{EquipmentLink|12cm 30-tube Rocket Launcher Kai Ni|text=RLK2}} can also be triggered. | *AA mechanics like [[AACI]] or {{EquipmentLink|12cm 30-tube Rocket Launcher Kai Ni|text=RLK2}} can also be triggered. | ||
| − | |||
|style="text-align:center"|6% | |style="text-align:center"|6% | ||
|style="text-align:center"|4% | |style="text-align:center"|4% | ||
| Line 145: | Line 144: | ||
|style="text-align:center"|'''World 6:'''<br>8% | |style="text-align:center"|'''World 6:'''<br>8% | ||
|- | |- | ||
| − | + | ![[File:AirBattleNode.png]]<br>Aerial Combat | |
| − | |||
|Similar to Air Raid nodes, however [[LBAS]] is performed once, followed by full [[Aerial Combat]] phases performed twice back-to-back. It is also possible to do night battle afterward, unlike regular Air nodes. | |Similar to Air Raid nodes, however [[LBAS]] is performed once, followed by full [[Aerial Combat]] phases performed twice back-to-back. It is also possible to do night battle afterward, unlike regular Air nodes. | ||
*If the fleet has no ships that can attack during Aerial Combat, it will get a ''D rank'' (see [[Combat#Victory_Conditions|1st D rank condition]]), unless entering night combat. | *If the fleet has no ships that can attack during Aerial Combat, it will get a ''D rank'' (see [[Combat#Victory_Conditions|1st D rank condition]]), unless entering night combat. | ||
| Line 152: | Line 150: | ||
|style="text-align:center"|20% | |style="text-align:center"|20% | ||
|- | |- | ||
| − | + | ![[File:AmbushNode.png]]<br>Enemy Ambush | |
| − | |||
|Ambush nodes are purely defensive nodes where the fleet is attacked by an enemy fleet without being able to fight back. Specifically for Ambush nodes, '''there is no formation selection prompt prior to the battle''', and formation is set by default to Line Ahead or Cruising Formation 4 (for Combined Fleet). | |Ambush nodes are purely defensive nodes where the fleet is attacked by an enemy fleet without being able to fight back. Specifically for Ambush nodes, '''there is no formation selection prompt prior to the battle''', and formation is set by default to Line Ahead or Cruising Formation 4 (for Combined Fleet). | ||
* As of 04/2022, Ambush Nodes are exclusive to events, with its last appearance on [[Spring 2019 Event]]. | * As of 04/2022, Ambush Nodes are exclusive to events, with its last appearance on [[Spring 2019 Event]]. | ||
| Line 161: | Line 158: | ||
===Non-Combat Nodes=== | ===Non-Combat Nodes=== | ||
| − | |||
These nodes present different mechanics that are unrelated to combat. | These nodes present different mechanics that are unrelated to combat. | ||
| − | {| class="wikitable" | + | {|class="wikitable" |
| − | ! | + | ! width=150px rowspan=2|Node |
| − | ! rowspan= | + | ! rowspan=2|Description |
| − | ! colspan= | + | ! colspan=2|Consumption |
|- | |- | ||
| − | ! | + | ! width=8%|{{Fuel}} |
| − | ! | + | ! width=8%|{{Ammo}} |
|- | |- | ||
| − | + | ![[File:StartNode.png]]<br>Start Node | |
|The Start Node dictates the point from which the fleet will start. | |The Start Node dictates the point from which the fleet will start. | ||
| Line 178: | Line 174: | ||
|style="text-align:center"|— | |style="text-align:center"|— | ||
|style="text-align:center"|— | |style="text-align:center"|— | ||
| − | |||
|- | |- | ||
| − | + | ![[File:EmptyNode.png]]<br>Empty Node | |
|An Empty Node is a tool mainly used to increase routing complexity, creating branching paths, dead-ends, as well as to display a small piece of flavour text. | |An Empty Node is a tool mainly used to increase routing complexity, creating branching paths, dead-ends, as well as to display a small piece of flavour text. | ||
|style="text-align:center"|— | |style="text-align:center"|— | ||
|style="text-align:center"|— | |style="text-align:center"|— | ||
| − | |||
|- | |- | ||
| − | + | ![[File:ChoiceNode.png]]<br>Active Branching | |
|{{Anchor|Active Branching}}An Active Branching Node, also known as "Choice Node", is an Empty Node with a mechanic that allows the fleet to route to any of the desired paths. | |{{Anchor|Active Branching}}An Active Branching Node, also known as "Choice Node", is an Empty Node with a mechanic that allows the fleet to route to any of the desired paths. | ||
| Line 192: | Line 186: | ||
|style="text-align:center"|— | |style="text-align:center"|— | ||
|style="text-align:center"|— | |style="text-align:center"|— | ||
| − | |||
|- | |- | ||
| − | + | ![[File:EmptyNode.png]]<br>Emergency Repairs Node | |
|Generally only accessible with either '''[[Akashi Kai]]''', '''[[Akitsushima Kai]]''', or any '''Kai [[AO]]''' present in the fleet. By equipping {{EquipmentLink|Ship Repair Facility}}, it is possible to use [[Emergency Repair Materials]] to repair ships mid-sortie. Otherwise, it behave like an Empty Node. | |Generally only accessible with either '''[[Akashi Kai]]''', '''[[Akitsushima Kai]]''', or any '''Kai [[AO]]''' present in the fleet. By equipping {{EquipmentLink|Ship Repair Facility}}, it is possible to use [[Emergency Repair Materials]] to repair ships mid-sortie. Otherwise, it behave like an Empty Node. | ||
| Line 200: | Line 193: | ||
|style="text-align:center"|— | |style="text-align:center"|— | ||
|style="text-align:center"|— | |style="text-align:center"|— | ||
| − | |||
|- | |- | ||
| − | + | ![[File:MaelstromNode.png]]<br>Maelstrom | |
| − | |{{Anchor|Maelstrom}} Upon entering the node, drains a specific value of a specific resource of the entire '''current fleet'''. This means that penalties derived from low levels of {{Fuel}} and {{Ammo}} are applied immediately. The | + | |{{Anchor|Maelstrom}} Upon entering the node, drains a specific value of a specific resource of the entire '''current fleet'''. This means that penalties derived from low levels of {{Fuel}} and {{Ammo}} are applied immediately. The strength of Maelstroms can be mitigated by the number of ships independently carrying a RADAR. Maelstroms drain either {{Fuel}} or {{Ammo}}, but not both. |
Certain Maelstroms are '''strong''', draining 150% more resources than regular Maelstroms, and having roughly a 25% chance of draining all of a resource. See [[Maelstrom]] page for details. | Certain Maelstroms are '''strong''', draining 150% more resources than regular Maelstroms, and having roughly a 25% chance of draining all of a resource. See [[Maelstrom]] page for details. | ||
| Line 232: | Line 224: | ||
|style="text-align:center"|0 or X% | |style="text-align:center"|0 or X% | ||
|style="text-align:center"|0 or X% | |style="text-align:center"|0 or X% | ||
| − | |||
|- | |- | ||
| − | + | ![[File:ResourceNode.png]]<br>Resource Node | |
|Upon entering, adds a specific amount of a specific Resource ({{Fuel}}{{Ammo}}{{Steel}}{{Bauxite}}), consumables ({{IR}}{{IC}}{{DM}}), or Coin Boxes ({{FBsmall}}{{FBmedium}}{{FBlarge}}) to the '''stockpile'''. Resource Nodes do not refill the fleet's current resource levels. | |Upon entering, adds a specific amount of a specific Resource ({{Fuel}}{{Ammo}}{{Steel}}{{Bauxite}}), consumables ({{IR}}{{IC}}{{DM}}), or Coin Boxes ({{FBsmall}}{{FBmedium}}{{FBlarge}}) to the '''stockpile'''. Resource Nodes do not refill the fleet's current resource levels. | ||
Note that the node must be a dead-end node, or a subsequent battle node must be completed, before the resources are added to the overall stockpile. Immediately refreshing the game after reaching such nodes '''does not''' provide resources. | Note that the node must be a dead-end node, or a subsequent battle node must be completed, before the resources are added to the overall stockpile. Immediately refreshing the game after reaching such nodes '''does not''' provide resources. | ||
| − | Using {{Drum}} [[Drum]]s, {{LandingCraft}} [[ | + | Using {{Drum}} [[Drum]]s, {{LandingCraft}} [[Landing Craft]], and {{Amphibious Tank}} {{EquipmentLink|Special Type 2 Amphibious Tank|text=Tanks}} increases the resource gain up to a possible node-specific cap: |
{|class="wikitable mw-collapsible mw-collapsed" style="text-align:center; margin:auto" | {|class="wikitable mw-collapsible mw-collapsed" style="text-align:center; margin:auto" | ||
| Line 292: | Line 283: | ||
|style="text-align:center"|— | |style="text-align:center"|— | ||
|style="text-align:center"|— | |style="text-align:center"|— | ||
| − | |||
|- | |- | ||
| − | + | ![[File:FinishLineNode.png]]<br>Finish Line<br>Harbour Node | |
|Is often considered an Ending node like Boss nodes. | |Is often considered an Ending node like Boss nodes. | ||
*It can reward none, one, or two resources at once, but no consumable so far. | *It can reward none, one, or two resources at once, but no consumable so far. | ||
| − | **Like Resources nodes, using {{Drum}} [[Drum]]s, {{LandingCraft}} [[ | + | **Like Resources nodes, using {{Drum}} [[Drum]]s, {{LandingCraft}} [[Landing Craft]], and {{Amphibious Tank}} {{EquipmentLink|Special Type 2 Amphibious Tank|text=Tanks}} increases the resource gain, but equipment effectiveness may vary. |
*In [[1-6]], the Finish Line has a pool of possible resources as rewards rather than a single one. | *In [[1-6]], the Finish Line has a pool of possible resources as rewards rather than a single one. | ||
**Unlike other Nodes, the resources here cannot be increased using any equipment. | **Unlike other Nodes, the resources here cannot be increased using any equipment. | ||
| − | |||
|style="text-align:center"|— | |style="text-align:center"|— | ||
|style="text-align:center"|— | |style="text-align:center"|— | ||
| − | |||
|- | |- | ||
| − | + | ![[File:TransportLoadoutNode.png]]<br>Transport Loadout | |
|Present in any map with Trasport Loadout operation. Upon reaching this node, the fleet's {{Drum}}, {{LandingCraft}}, {{Landing Craft}}, and {{Rations}}, as well as ships that are not '''Heavily Damaged''' will be taken account of. The result of this node determines the quantity of Transport Points (TP) deducted of a map's Transport Gauge after a successful Boss Battle with A-Rank or higher. Simply reaching this node has no effect on the map's Transport Gauge. | |Present in any map with Trasport Loadout operation. Upon reaching this node, the fleet's {{Drum}}, {{LandingCraft}}, {{Landing Craft}}, and {{Rations}}, as well as ships that are not '''Heavily Damaged''' will be taken account of. The result of this node determines the quantity of Transport Points (TP) deducted of a map's Transport Gauge after a successful Boss Battle with A-Rank or higher. Simply reaching this node has no effect on the map's Transport Gauge. | ||
*See [[Transport Operation]] page for breakdown of values. | *See [[Transport Operation]] page for breakdown of values. | ||
| − | |||
|style="text-align:center"|— | |style="text-align:center"|— | ||
|style="text-align:center"|— | |style="text-align:center"|— | ||
| − | |||
|- | |- | ||
| − | + | ![[File:AirReconNode.png]]<br>Aerial Reconnaissance Node | |
|Exclusive to [[6-3]]. Can reward some Ammo {{Ammo}}, Bauxite {{Bauxite}}, or Devmats {{DM}}, using some aircraft. The type of aircraft as well as the ship carrying it influences the result. Unlike Resource Nodes, the resources obtainable originate from a drop pool. | |Exclusive to [[6-3]]. Can reward some Ammo {{Ammo}}, Bauxite {{Bauxite}}, or Devmats {{DM}}, using some aircraft. The type of aircraft as well as the ship carrying it influences the result. Unlike Resource Nodes, the resources obtainable originate from a drop pool. | ||
*If the Boss Battle is a Defeat, the resources are forfeited. Otherwise, a small message saying that the resources were secured will be shown on the lower right side of the victory screen. | *If the Boss Battle is a Defeat, the resources are forfeited. Otherwise, a small message saying that the resources were secured will be shown on the lower right side of the victory screen. | ||
*See [[Air Reconnaissance|here]] for more detail. | *See [[Air Reconnaissance|here]] for more detail. | ||
| − | |||
|style="text-align:center"|— | |style="text-align:center"|— | ||
|style="text-align:center"|— | |style="text-align:center"|— | ||
|} | |} | ||
| − | + | ;Note about Consumption | |
* These percent values are applied to a ship's maximum Fuel/Ammo stat. The amount subtracted is '''rounded down but at least 1''' in most cases, except for ''Pursuing the enemy into night battle'' and ''Night to Day Battle'' where the ammo cost is '''rounded up'''. | * These percent values are applied to a ship's maximum Fuel/Ammo stat. The amount subtracted is '''rounded down but at least 1''' in most cases, except for ''Pursuing the enemy into night battle'' and ''Night to Day Battle'' where the ammo cost is '''rounded up'''. | ||
** Some mechanics like [[Special Attacks]] will increase ammo consumption. | ** Some mechanics like [[Special Attacks]] will increase ammo consumption. | ||
Revision as of 11:12, 1 March 2023
Map Mechanics
Maps are made out of nodes connected to each other through paths called edges. Nodes are only accessible by traveling through those edges. Each node is independent of each other, and the fleet state will carry over from node to node.
There are a few mechanics that take place in the map itself.
Routing
The route taken through a given map is defined by the:
- Fleet Type, being either a:
- Single fleet,
- Combined Fleet, either Carrier Task Force (CTF), Surface Task Force (STF), or Transport Escort Force (TCF/TE),
- Striking Force Fleet.
- Fleet Composition, depending on the number of certain ship types used.
- Some specific ships may also alter routing, being usually referred as "historical ships", as they are related to a map's thematic operation or to a specific mechanic.
- The presence of "Active Branching", where a path must be manually selected.
- Fleet Stats, mainly LoS and Speed.
- Paths that require a given LoS requirement to be met will show an animation of a Recon plane going back and forth toward the destination node.
- Equipment types and quantity used in the fleet, like Surface Radars or Drums.
- The curent Fleet tag on certain events maps.
- Additionally, routing might be simply random.
On certain events, an edge may be taken in either sense depending on the current routing. Some edges are marked with an arrow to make the routing clearer.
Land Base Air Raids
In maps where a Land Base is present, an additional mechanic may be imposed where an enemy abyssal fleet will attack the allied Land Base. A text alert saying "Enemy formation approaching! Enemy aircraft are approaching our base." (敵編隊接近中!我が航空基地に敵機接近中。) will appear in the map screen and the Raid will follow shortly. Raids may trigger whenever traveling to another node.
With the Winter 2022 Event also appeared a mechanic known as "Superfortress Air-Raid Sequence", which works very similarly to Land Base Air Raids, with the difference that it also includes the only QTE within the entire game, where clicking on a button at a right time will directly affect the LBAS interception effectiveness.
Please refer to the Land-Based Air Squadron page for additional details.
Map Unlocking / Phase Progression

In some maps (mostly in Events), Completion Gimmicks might be required to further progress the map, demanding certain conditions to be accomplished on a given map to unlock several things:
- Boss debuff, where once the "Last Dance" of the final boss of a given map is reached, its debuffed form can be unlocked.
- Map phases, where some map areas need to be unlocked, like on 7-2, 7-3, and 7-5.
- Map areas can either be a path to the next boss, an intermediate path asking for new gimmicks, or a shortcut.
- Choosing a higher difficulty on an event map will reset it to its initial state.
- Those "Gimmicks" can be
- Reaching certain nodes,
- Defeating specific nodes,
- Attaining air superiority (AS/AS+) on certain nodes,
- Defending against LBAS Air Raids.
As soon as all the given conditions are met, the map advances to the next phase. Lower difficulties may require fewer conditions to be met to complete the phase.
- Since Summer 2019 Event, completing a gimmick will play a "bell sound" when returning back to the main menu (according the sounds are activated),
- Play Bell Completion Sound Effect
- Since Summer 2022 Event, some Nodes required to be visited/defeated in gimmicks are now highlighted.
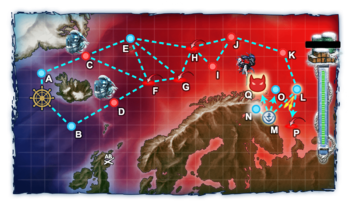
Initial state of the Fall 2020 E-3 map
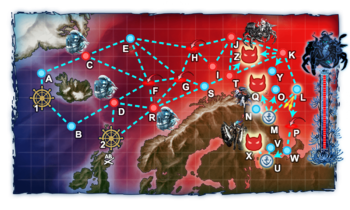
Final state of the Fall 2020 E-3 map


Nodes
Full Battle Nodes
These nodes have as the main objective engaging the enemy fleet and destroying the enemy flagship and/or the enemy combatants as a whole.
| Node | Description | Consumption | |
|---|---|---|---|
Normal Battle |
Normal Battle Nodes are the main types of nodes present in a sortie, oftentimes making up for the majority of nodes on the map. A Battle Node will always begin with Day Battle and can be followed up by a Night Battle.
Specifically for Battle Nodes, the battle cost varies depending on the node composition. |
20% | 20% |
| Pursuing the enemy into night battle | — | +10%[1] | |
| Only submarines present | 8% | 0% | |
| Only PT Imp Pack present | 4% | 8% | |
Night Battle |
Night Battle nodes consist of only the Night Battle phase. The battle will automatically finish after the Night Shelling phase is ended.
|
10% | 10% |
Night to Day Battle |
Night to Day Battle nodes invert the usual Battle node format, beginning the battle on Night Battle and then automatically transitioning to Day Battle afterward.
|
20% | 30%[1] |
 Airstrike Supported Combat |
Airstrike Supported Combat nodes are combat nodes where the enemy fleet will consist of:
|
??% | ??% |
 Boss Battle |
Boss Nodes are the Ending point of a map's route and are where the map's boss resides, if it has one. After the Boss Node battle ends, the sortie automatically finishes and the player fleet returns to Homeport. Boss nodes can be of any kind of battle node, meaning they can be a Night to Day Node, Night Battle Node, or a Battle Node.
|
20% | 20% |
Short Battle Nodes
These battle nodes have different objectives and win conditions from regular battles.
| Node | Description | Consumption | |
|---|---|---|---|
 Enemy Air Raid |
Air Raid nodes are special nodes where only LBAS, as well as Stage 1 of the Aerial Combat, are performed. This node consists of a purely defensive battle against enemy Aircraft Carriers. The enemy fleet is able to further progress to Stage 3 of Aerial Combat and perform an Airstrike against the fleet. | 6% | 4% |
| World 6: 4% |
World 6: 8% | ||
 Aerial Combat |
Similar to Air Raid nodes, however LBAS is performed once, followed by full Aerial Combat phases performed twice back-to-back. It is also possible to do night battle afterward, unlike regular Air nodes.
|
20% | 20% |
 Enemy Ambush |
Ambush nodes are purely defensive nodes where the fleet is attacked by an enemy fleet without being able to fight back. Specifically for Ambush nodes, there is no formation selection prompt prior to the battle, and formation is set by default to Line Ahead or Cruising Formation 4 (for Combined Fleet).
|
4% | — |
Non-Combat Nodes
These nodes present different mechanics that are unrelated to combat.
| Node | Description | Consumption | ||||||||||||||||||||||||||||||||||||||||
|---|---|---|---|---|---|---|---|---|---|---|---|---|---|---|---|---|---|---|---|---|---|---|---|---|---|---|---|---|---|---|---|---|---|---|---|---|---|---|---|---|---|---|
 Start Node |
The Start Node dictates the point from which the fleet will start.
Multiple start points may be present on the same map. In such cases, the Start Node from which the fleet will begin sortieing is defined by the fleet composition as well as the fleet type, when it enters the map. |
— | — | |||||||||||||||||||||||||||||||||||||||
Empty Node |
An Empty Node is a tool mainly used to increase routing complexity, creating branching paths, dead-ends, as well as to display a small piece of flavour text. | — | — | |||||||||||||||||||||||||||||||||||||||
 Active Branching |
An Active Branching Node, also known as "Choice Node", is an Empty Node with a mechanic that allows the fleet to route to any of the desired paths.
Upon hitting an active branching node, a text bubble will appear above the fleet icon saying "You can select the fleet's course!" (艦隊針路選択可能!). Nodes able to be selected will glow. Clicking on the node will send the fleet in that direction. |
— | — | |||||||||||||||||||||||||||||||||||||||
Emergency Repairs Node |
Generally only accessible with either Akashi Kai, Akitsushima Kai, or any Kai AO present in the fleet. By equipping Ship Repair Facility , it is possible to use Emergency Repair Materials to repair ships mid-sortie. Otherwise, it behave like an Empty Node. , it is possible to use Emergency Repair Materials to repair ships mid-sortie. Otherwise, it behave like an Empty Node.
Please refer to Emergency Anchorage Repairs for more details. |
— | — | |||||||||||||||||||||||||||||||||||||||
Maelstrom |
Upon entering the node, drains a specific value of a specific resource of the entire current fleet. This means that penalties derived from low levels of Certain Maelstroms are strong, draining 150% more resources than regular Maelstroms, and having roughly a 25% chance of draining all of a resource. See Maelstrom page for details.
|
0 or X% | 0 or X% | |||||||||||||||||||||||||||||||||||||||
Resource Node |
Upon entering, adds a specific amount of a specific Resource ( Note that the node must be a dead-end node, or a subsequent battle node must be completed, before the resources are added to the overall stockpile. Immediately refreshing the game after reaching such nodes does not provide resources. Using
|
— | — | |||||||||||||||||||||||||||||||||||||||
Finish Line Harbour Node |
Is often considered an Ending node like Boss nodes.
|
— | — | |||||||||||||||||||||||||||||||||||||||
Transport Loadout |
Present in any map with Trasport Loadout operation. Upon reaching this node, the fleet's
|
— | — | |||||||||||||||||||||||||||||||||||||||
Aerial Reconnaissance Node |
Exclusive to 6-3. Can reward some Ammo
|
— | — | |||||||||||||||||||||||||||||||||||||||


- Note about Consumption
- These percent values are applied to a ship's maximum Fuel/Ammo stat. The amount subtracted is rounded down but at least 1 in most cases, except for Pursuing the enemy into night battle and Night to Day Battle where the ammo cost is rounded up.
- Some mechanics like Special Attacks will increase ammo consumption.
- In maps introduced prior to Fall 2017 Event (including pre-Phase 2 maps), Submarine battle nodes costed 20%
 0%
0%  , and Air Raid nodes costed 8% 4%
See Also
| |||||||||||||||||||||||||||||||||||||