|
Time remaining until Event ends [1]:
1 May 2023 11:00:00 +0900
The Early Spring 2023 Event has ended!
|
KC anniversary maintenance has started, time remaining until maintenance ends [2]: (~4h event pause)
23 April 2023 20:30:00 +0900
The maintenance has ended. See 2023-04-23 patch notes.
|
|
|
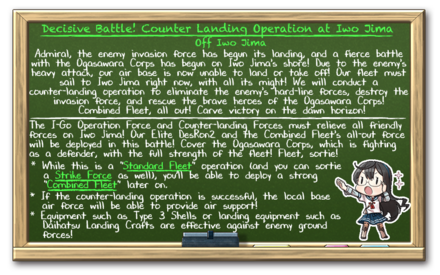
Decisive Battle! Counter Landing Operation at Iwo Jima
決戦!硫黄島逆上陸作戦
| Rewards
|
| All
|
|
|
| Equipment/Item
|
丁
Casual
|
丙
Easy
|
乙
Medium
|
甲
Hard
|
|
|
|
|
|
|
|
|
|
|
|
|
|
|
|
|
|
|
|
|
|
|
|
|
|
|
|
|
|
|
|
|
|
|
|
|
|
|
|
|
|
|
|
|
|
|
|
|
|
|
|
|
|
|
|
|
|
|
|
|
|
|
|
|
|
|
The event guides are to be constructed through the respective Event map page guide sandbox and reviewed by editors before being approved here.
- Do not update the guides through this page unless it is a minor fix. Please only update guides through their respective sandbox pages.
Branching Table
| E-6 Branching Rules (Start Points)
|
| Nodes |
Rules
|
| Start
|
|
- Single / Striking Force fleet
- Operation I-go Fleet tag
 only (Hard) only (Hard)
|
|
|
- Phase 2 & 3: Combined Fleet
- Phase 4: TCF
- Counter Landing Force tag
 only (Hard) only (Hard)
|
|
|
- Single / Striking Force fleet
- 2nd Torpedo Squadron tag
 only (All difficulties) only (All difficulties)
|
|
|
- Phase 4: CTF / STF
- Tag requirements: (Hard)
- Supporting Combined Fleet

- Combined Fleet

- Decisive Combined Fleet

|
| E-6 Branching Rules (Start Point 1)
|
| Nodes |
Rules
|
|
|
|
- Does not meet the requirements to go to C
|
|
|
- Meet ALL of the following requirements:
- Amount of CV(B/L) ≤ 2
- Amount of CL ≥ 1
- Amount of DD ≥ 2
|
|
|
|
- Does not meet the requirements to go to E
|
|
|
- Meet ALL of the following requirements:
- Amount of CL ≥ 1
- Amount of DD ≥ 3
|
|
|
|
- Does not meet the requirements to go to E
|
|
|
- Meet ALL of the following requirements:
- Amount of (F)BB(V) + CV(B) ≤ 2
- If slow, amount of (F)BB(V) + CV(B) ≤ 1
- Amount of CL ≥ 1
- Amount of DD ≥ 2
- If Phase 2+, fleet does not contain AO, AV, or LHA
|
|
|
|
- Does not meet the requirements to go to I
|
|
|
- Fleet contains AO, AV, or LHA
|
|
|
|
|
|
|
|
|
|
|
- Does not meet the requirements to go to M
|
|
|
- Meet ALL of the following requirements:
- Amount of CV(B/L) = 0
- ???
|
|
|
|
|
|
|
|
| E-6 Branching Rules (Start Point 2)
|
| Nodes |
Rules
|
|
|
|
|
|
|
|
|
|
|
- Meet ALL of the following requirements:
- Fast fleet
- Amount of DD ≥ 5 (?)
- ???
|
|
|
- Does not meet the requirements to go to H2
|
|
|
|
- Does not meet the requirements to go to M
|
|
|
- Meet ALL of the following requirements:
- TCF?
- Amount of CV(B/L) = 0
|
|
|
|
|
|
|
|
| E-6 Branching Rules (Start Point 3 & 4)
|
| Nodes |
Rules
|
|
|
|
- Does not meet the requirements to go to Q
|
|
|
- Meet ALL of the following requirements:
- Amount of CL ≥ 1
- Amount of DD ≥ 2
|
|
|
|
- Does not meet the requirements to go to R
|
|
|
- Meet ALL of the following requirements:
- Route to R unlocked
- Fast fleet
- If slow, amount of Yamato-class ships = 0
- If slow, amount of (F)BB(V) ≤ 3
|
|
|
|
- Does not meet the requirements to go to S or Y
|
|
|
- Meet ALL of the following requirements:
- Single / Striking Force fleet
- Amount of ships carrying surface radars ≥ 1/2/3/5 (Casual/Easy/Normal/Hard)
|
|
|
- Meet ALL of the following requirements:
- STF / CTF
- Amount of ships carrying surface radars ≥ 2/3/4/6 (Casual/Easy/Normal/Hard)
|
|
|
|
- Does not meet the requirements to go to V
|
|
|
- Meet ALL of the following requirements:
- V node unlocked
- Single / Striking Force fleet
- Fast fleet
- Amount of CV(B) = 0
|
|
|
|
|
|
|
|
|
|
|
- Does not meet the requirements to go to Z
|
|
|
- Meet ALL of the following requirements:
- Fast fleet
- Amount of Yamato-class ships ≤ 1
- Amount of (F)BB(V) ≤ 3
- Amount of CA ≥ 2
- Amount of DD ≥ 3
- STF: Amount of CL ≥ 2
- STF: Amount of BBV + CV(B/L) ≤ 2
|
|
|
|
- Does not meet the requirements to go to Z
|
|
|
- Fleet contains AS and SS(V) ≥ 2
- Otherwise, meet ALL of the following requirements:
- CTF: Amount of CA ≥ 2
- STF: If slow, amount of (F)BB(V) ≤ 2
- STF: If fast, CV(B/L) ≥ 2 and CA ≤ 1; amount of (F)BB(V) ≤ 2
- STF: Amount of DD ≥ 3
|
|
|
|
|
|
|
- Pass the LoS check
- Does not meet the requirements to go to Z2
|
|
|
- Meet ALL of the following requirements:
- Route to Z2 unlocked
- Fast fleet
- Amount of (F)BB(V) ≤ 2
- Amount of CA ≥ 2
- Pass the LoS check
- STF: Amount of CL ≥ 2
|
Branching compositions were reported over the course of the event. (NGA and KCNav)
Historical Bonuses
DISCLAIMER: This information is based on user-submitted data and is subject to revisions as more data is gathered. Any version of the ship receives the bonus regardless of remodel.
Ship Bonuses
- Notes
- Damage bonuses given by types stack with named ships.
- Accuracy or Evasion bonuses given by types do not stack with named ships.
- Evasion bonus is only roughly checked as it is hard to estimate. The info will be updated if an inconsistency is found (@Divinity_123).
[3]
[4]
[5]
[6]
[7]
[8]
Equipment Bonuses
Those bonuses only apply to planes in LBAS.
- All 4 planes in the base will gain the bonus provided by any bonus plane within their base
- Bonuses will stack with each other (within the same base)
[9][10][11]
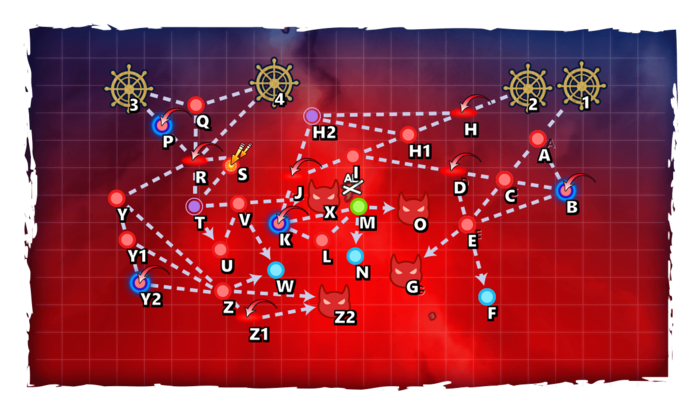
Map Overview
E-6 consists of 4 main phases and requires the use of Single Fleets, Striking Forces, and Combined Fleets.
- This map uses 4 to 6 locks:
 2nd Torpedo Squadron (from E-2, E-3, & E-5),
 Supporting Combined Fleet (from E-2),
 Combined Fleet (from E-3),
 Operation I-go Fleet (from E-4 & E-5),
 Counter Landing Force
 Decisive Combined Fleet
- Some tags can be mixed in all difficulties , see here.
- Initially, no LBAS is available to be sortied to this map,
- Clearing Phase 2 allows 1 Land Base to be sortied,
- Unlocking Phase 3 allows 2 Land Bases to be sortied and 1 to defend,
- Clearing Phase 3 allows 3 Land Bases to be sortied.
- "Airstrike Supported Battle" nodes are present on B Y2
- "Night Battle" nodes are present on H2 T
- "Enemy Ambush" node is present on S
Phase 1
- Striking Force: "1FBB, 1FBB/CV, 0-2CVL/CAV/CLT, 1CL, 2-3DD"
- Route: 1 A C E G
Phase 2 - TP
Phase 2 is a "Transport Operation":
- TCF: "1LHA/CL/AV, 1AV, 4DD + 1-2CAV, 1-2CL, 3-4DD "
- Route: 2 H H2 J K M O
- LoS check: 75 Cn3 (Hard)
- A CVE can be used instead of the LHA/CL/AV, adding an extra node (L).
Phase 2.5 - Gimmick
|
U
|
| Hard |
S x3
|
| Medium |
S x2
|
| Easy |
A+ x2
|
| Casual |
A+
|
Phase 3
- Striking Force: "1CAV, 1CL, 5DD" (Fast)
- Locking Notes: Forced Ship Locking wherein all ships must be the E2 Yellow Tag (used in E2) to start on western side. APPLIES ON ALL DIFFICULTY
- If any other tagged ship is on the fleet you will automatically start on the east side of the map.
- Route: 3 Q R T V X
- LBAS: Range 1, AP/AS ??/??
- At least 5/3/2/1 (H/M/E/C) ships need to be equipped with
 Surface Surface Radars to avoid the "Enemy Ambush" node on S.
- The use of the
 SFFCF Striking Force Fleet Command Facility
 (SFFCF) is recommended
- The boss is an Installation and requires appropriate gear to be defeated,
- She is especially weak to "Nuke" setups
- The boss fleet includes one or two PT Imp Packs, requiring appropriate gear to be defeated (these can be ignored as S-rank is optional):
| ExpandAnti-PT boat
|
Unlike most standard Abyssals, "PT boats" (PT Imp Pack & Schnellboot Imp Pack & Schnellboot Imp Pack ) are "very small and fast". ) are "very small and fast".
- All ship types suffer a severe
 accuracy and accuracy and  firepower penalty against PT boats. firepower penalty against PT boats.
- Attacking them with larger guns is not very effective, smaller guns being recommended instead.
- Support Expeditions are not affect by any of the following[1].
| ExpandAttack formula against PT boats
|
The Attack formula against PT boats:[2][3]
- Jet Assault & Airstrike
- [math]\displaystyle{ \text{Damage}_\text{PT}= \text{Atk}_\text{post-cap} \times \text{Rand} [0.5 ; 0.8] }[/math]
- LBAS[4]
- [math]\displaystyle{ \text{Damage}_\text{PT}= \text{Atk}_\text{post-cap} \times \text{Rand} [0.4 ; 0.7] }[/math]
- Shelling
- [math]\displaystyle{ \text{Damage}_\text{PT}= ( 0.3 \times \text{Atk}_\text{post-cap} + \sqrt{\text{Atk}_\text{post-cap}} + 10 ) \times \prod^{All Equipment}{\text{Mod}_\text{EquipmentAtk}} }[/math]
- Opening & Closing Torpedo Salvos
- [math]\displaystyle{ \text{Damage}_\text{PT}= 0.3 \times \text{Atk}_\text{post-cap} + \sqrt{\text{Atk}_\text{post-cap}} + 10 }[/math]
- Night Battle
- Night Battle data are unclear yet.
- With
- [math]\displaystyle{ \text{Atk}_\text{post-cap} }[/math] the post cap attack power defined here,
- [math]\displaystyle{ \text{Mod}_\text{EquipmentAtk} }[/math] the bonuses given by equipment, described below.
|
| ExpandAccuracy formula against PT boats
|
The Accuracy formula against PT boats:[5][6][7][8]
| [math]\displaystyle{ \text{Hit Rate}_\text{vs.PT} \text{%} = \Big\lfloor ( 0.3 \times \text{Accuracy}_\text{Atk} + \sqrt{\text{Accuracy}_\text{Atk}} + 15 ) \times 1.2 \times \text{Mod}_\text{Ship} \times \Big( \prod^{All Equipment}{\text{Mod}_\text{EquipmentAcc}} \Big) \times \text{Mod}_\text{Night} \Big\rfloor - \text{EVA}_\text{PT} + 1 }[/math]
|
- With
- [math]\displaystyle{ \text{Acc}_\text{Atk} }[/math] the standard accuracy described here
- PT boats are "DDs" in the game, so the [math]\displaystyle{ \text{Mod}_\text{formation} }[/math] for vanguard is 1.1 during shelling, and 1.2 during the torpedo phase.
- Historical accuracy bonuses during Events are included in the Standard Accuracy Term, i.e. it is affected by the [math]\displaystyle{ \text{Mod}_\text{PT} }[/math] modifier.
- [math]\displaystyle{ \text{EVA}_\text{PT} }[/math] the PT estimated evasion
 described bellow, described bellow,
- The main Accuracy modifiers are
- [math]\displaystyle{ \text{Mod}_\text{Amagiri} }[/math] being include in [math]\displaystyle{ \text{Acc}_\text{Atk} }[/math]:
- [math]\displaystyle{ \text{Mod}_\text{Ship} }[/math] the bonus given by ship types, described below,
- [math]\displaystyle{ \text{Mod}_\text{EquipmentAcc} }[/math] the bonuses given by equipment, described below,
- [math]\displaystyle{ \text{Mod}_\text{Night} }[/math] being 0.7 during night battle, 1 during day battle.
|
Amagiri Kai Ni/D
 has the ability to prioritize focusing on attacking PT imps with significantly increased accuracy if any are present. has the ability to prioritize focusing on attacking PT imps with significantly increased accuracy if any are present.
- DD placed in the composition slots above and below her will gain a noticeable accuracy boost and will prioritize attacking PT boats if any are present.
- The PT boat targeting rate is 100% for all affected ships [9].
During Events, some special bonuses may be added, with "historical" ships and equipment gaining some accuracy bonuses[10].
| Ship Type |
[math]\displaystyle{ \text{Mod}_\text{Ship} }[/math]
|
| DD & DE |
1.0
|
| CL, CLT, & CT |
0.82
|
| All other types |
0.7
|
- Notes
- It is recommended to use anti-PT setups on DDs only, such setups compromising overall combat effectiveness.
- Having a Reinforcement Expansion is important because it can save a ship slot by containing a machine gun or skilled lookouts.
- Combining equipment is recommended to see significant boosts to accuracy.
- The
 Ka-Tsu Tanks Ka-Tsu Tanks
 bonus does not stack with the bonus does not stack with the  Armed Boats Armed Boats
 ones. ones.
- Using other setups improving accuracy is also advisable:
|
|
|
| [edit]
|
Phase 3.5 - Gimmick: Unlocking the shortcut
The following steps have to be performed to unlock the Shortcut (can be done right from the start of P4):
|
G |
Z1 |
LBAS
|
| Hard |
S x2 |
AS |
ASx2
|
| Medium |
A+ x2 |
AS |
ASx2
|
| Easy |
A+ x2 |
- |
AS
|
| Casual |
A+ x2 |
- |
-
|
- Use #Phase 1's fleet
- AV no longer allowed due to Branching Rules at Phase 2+
- Use #Phase 4's fleet
- AP/AS: 321/722 (Hard)
Phase 4
- STF: "4(F)BB(V), 1CV, 0-1CL, 0-1AS + 0-1AS, 0-1CVL/CLT, 1CL, 2DD, 2SS"
- Route: 4 Q R Y Y1 Z Z1 Z2
- The strongest fleet, bringing very high firepower as well as air power.
- One AS is required for this routing, being either:
- The escort fleet's flagship, rendering it retreat-proof,
- Alternatively in the main fleet, allowing to bring a stronger ship for the night battle.
- The BB should be both the Yamato-class Kai Ni and the Ise-class Kai Ni, to bring the strongest Touch and great air power.
- LBAS: Range 4, 168/335 AD/AP (Hard)
- A minimum of 2CA (not CAV), 2CL (for STF), and 3DD is needed to take the shortest path.
- A fast fleet with 2 Yamato-class would additionally take Y1.
- The I-201-class

 have outstanding historical bonuses in this situation.
- 6/4/3/2 Surface Radars are required to route to Y on (H/M/E/C).
Debuff
Once LD has been reached, the following steps have to be performed to debuff the boss:
|
G |
O |
L |
X |
Z1 |
LBAS
|
| Hard |
S |
S |
S |
S |
AS |
AS x2
|
| Medium |
S |
S |
- |
S |
- |
AS
|
| Easy |
A+ |
A+ |
- |
A+ |
- |
AS
|
| Casual |
A+ |
A+ |
- |
- |
- |
?
|
- Use #Phase 1's fleet
- AV no longer allowed due to Branching Rules at Phase 2+
- This step can be accomplished by sending 1 SS(V) until the Air Raid is triggered.
- Numbers may be different due to the presence of unknown elements
|
AP |
AS
|
| Hard |
281 |
632
|
| Medium |
262 |
588
|
| Easy |
251 |
564
|
| Casual |
91 |
204
|
Once Debuff is complete the CG will change to the following:
Enemy Compositions
E-6 Hard AB
| #
|
Formation
|
Air Raids
|
AD/AP
AS/AS+
|
| AB
|
Diamond
|
    
|
92/183
411/822
|
| Diamond
|
|
137/273
614/1227
|
| Diamond
|
|
142/284
638/1275
|
| #
|
Formation
|
Air Raids
|
AD/AP
AS/AS+
|
E-6 Hard A: 深海潜水艦隊 硫黄島哨戒線A群 (
PoiDB)
| #
|
Formation
|
Normal Battle Node
|
AD/AP
AS/AS+
|
| A
|
Echelon
Line Abreast
Phases: 1, 4
|
 
|
0/0
0/0
|
Echelon
Line Abreast
Phases: 1, 4
|
|
0/0
0/0
|
Echelon
Line Abreast
Phases: 1, 4
|
|
0/0
0/0
|
| #
|
Formation
|
Normal Battle Node
|
AD/AP
AS/AS+
|
E-6 Hard B: 深海潜水艦隊 硫黄島哨戒線B群 (
PoiDB)
| #
|
Formation
|
Supported Battle Node
|
AD/AP
AS/AS+
|
| B
|
Echelon
Line Abreast
|
 
|
46/91
204/408
|
Echelon
Line Abreast
Phases: 1
|
|
50/100
224/447
|
Echelon
Line Abreast
Phases: 4
|

|
50/100
224/447
|
| #
|
Formation
|
Supported Battle Node
|
AD/AP
AS/AS+
|
E-6 Hard C: 深海任務部隊 船影ピケット艦隊 (
PoiDB)
| #
|
Formation
|
Normal Battle Node
|
AD/AP
AS/AS+
|
| C
|
Line Ahead
Double Line
Phases: 1, 4
|
  
|
0/0
0/0
|
Line Ahead
Phases: 1, 4
|

|
0/0
0/0
|
| #
|
Formation
|
Normal Battle Node
|
AD/AP
AS/AS+
|
E-6 Hard D: 深海任務部隊 高速支援空母群 (
PoiDB)
| #
|
Formation
|
Air Defense Node
|
AD/AP
AS/AS+
|
| D
|
Diamond
Phases: 1, 4
|
 
|
96/192
431/861
|
| Diamond
|
|
102/203
455/909
|
| Diamond
|
  
|
117/233
522/1044
|
| #
|
Formation
|
Air Defense Node
|
AD/AP
AS/AS+
|
E-6 Hard E: 深海任務部隊 偵察巡洋艦戦隊 (
PoiDB)
| #
|
Formation
|
Normal Battle Node
|
AD/AP
AS/AS+
|
| E
|
Line Ahead
Double Line
Vanguard
Phases: 1, 4
|
 
|
0/0
0/0
|
| #
|
Formation
|
Normal Battle Node
|
AD/AP
AS/AS+
|
E-6 Hard F
| #
|
Empty Node
|
| F
|
敵影を見ず。
No enemy spotted.
|
| #
|
Empty Node
|
E-6 Hard G: 深海任務部隊 高速支援空母群 (
PoiDB)
E-6 Hard H: 深海空母機動部隊 艦載機群 (
PoiDB)
| #
|
Formation
|
Air Defense Node
|
AD/AP
AS/AS+
|
| H
|
Diamond
Phases: 2, 4
|
  
|
111/221
495/990
|
Diamond
Phases: 2, 4
|
|
116/231
519/1038
|
Diamond
Phases: 2, 4
|
|
127/253
567/1134
|
| #
|
Formation
|
Air Defense Node
|
AD/AP
AS/AS+
|
| #
|
Formation
|
Normal Battle Node
|
AD/AP
AS/AS+
|
| #
|
Formation
|
Normal Battle Node
|
AD/AP
AS/AS+
|
E-6 Hard H2: 深海任務部隊 硫黄島前衛警戒隊 (
PoiDB)
| #
|
Formation
|
Night Battle Node
|
AD/AP
AS/AS+
|
| H2
|
Line Ahead
Echelon
Vanguard
Phases: 2, 4
|
 
|
0/0
0/0
|
| #
|
Formation
|
Night Battle Node
|
AD/AP
AS/AS+
|
| #
|
Formation
|
Normal Battle Node
|
AD/AP
AS/AS+
|
| #
|
Formation
|
Normal Battle Node
|
AD/AP
AS/AS+
|
E-6 Hard J: 深海空母機動部隊 艦載機群 (
PoiDB)
| #
|
Formation
|
Air Defense Node
|
AD/AP
AS/AS+
|
| J
|
Diamond
Phases: 2, 4
|
|
111/221
495/990
|
Diamond
Phases: 2, 4
|
|
116/231
519/1038
|
Diamond
Phases: 2, 4
|
|
127/253
567/1134
|
| #
|
Formation
|
Air Defense Node
|
AD/AP
AS/AS+
|
E-6 Hard K: 深海任務部隊 硫黄島揚陸阻止線 (
PoiDB)
| #
|
Formation
|
Supported Battle Node
|
AD/AP
AS/AS+
|
| K
|
Echelon
Line Abreast
Phases: 2, 4
|
|
46/91
204/408
|
Echelon
Line Abreast
Phases: 2, 4
|
|
50/100
224/447
|
Echelon
Line Abreast
Phases: 2, 4
|
|
50/100
224/447
|
| #
|
Formation
|
Supported Battle Node
|
AD/AP
AS/AS+
|
E-6 Hard L: 深海任務部隊 硫黄島攻略支援群 (
PoiDB)
| #
|
Formation
|
Normal Battle Node
|
AD/AP
AS/AS+
|
| L
|
Diamond
Phases: 4
|
|
116/231
519/1038
|
Diamond
Phases: 4
|
|
120/240
539/1077
|
Diamond
Phases: 4
|
|
127/253
567/1134
|
| #
|
Formation
|
Normal Battle Node
|
AD/AP
AS/AS+
|
E-6 Hard M
| #
|
Landing Node
|
| M
|
輸送物資の揚陸地点に到達しました。本海域の輸送作戦は無事完了しています。
The landing point of the convoy has been reached. The transport operation here has already been completed successfully.
|
| #
|
Landing Node
|
E-6 Hard N
| #
|
Empty Node
|
| N
|
敵影を見ず。
No enemy spotted.
|
| #
|
Empty Node
|
E-6 Hard O: 深海硫黄島攻略支援 旗艦艦隊 (
PoiDB)
| #
|
Formation
|
Supported Battle Node
|
AD/AP
AS/AS+
|
| #
|
Formation
|
Supported Battle Node
|
AD/AP
AS/AS+
|
E-6 Hard Q: 深海潜水艦隊 硫黄島哨戒線D群 (
PoiDB)
| #
|
Formation
|
Normal Battle Node
|
AD/AP
AS/AS+
|
| Q
|
Echelon
Line Abreast
Phases: 3, 4
|
|
0/0
0/0
|
Echelon
Line Abreast
Phases: 3, 4
|
|
0/0
0/0
|
Echelon
Line Abreast
Phases: 3, 4
|
|
0/0
0/0
|
| #
|
Formation
|
Normal Battle Node
|
AD/AP
AS/AS+
|
E-6 Hard R: 深海空母機動部隊 艦載機群 (
PoiDB)
| #
|
Formation
|
Air Defense Node
|
AD/AP
AS/AS+
|
| R
|
Diamond
Phases: 3, 4
|

|
105/210
471/942
|
Diamond
Phases: 3, 4
|
|
145/290
651/1302
|
Diamond
Phases: 3, 4
|
|
149/298
669/1338
|
| #
|
Formation
|
Air Defense Node
|
AD/AP
AS/AS+
|
E-6 Hard S: 深海任務部隊 レーダー射撃戦隊 (
PoiDB)
| #
|
Formation
|
Ambush Battle Node
|
AD/AP
AS/AS+
|
| S
|
Line Ahead
Double Line
Phases: 3, 4
|
 
|
0/0
0/0
|
| Line Ahead
|

|
0/0
0/0
|
| #
|
Formation
|
Ambush Battle Node
|
AD/AP
AS/AS+
|
E-6 Hard T: 深海任務部隊 夜間突入警戒線 (
PoiDB)
| #
|
Formation
|
Night Battle Node
|
AD/AP
AS/AS+
|
| T
|
Line Ahead
Echelon
Phases: 3, 4
|

|
0/0
0/0
|
Line Ahead
Phases: 3
|
|
0/0
0/0
|
| #
|
Formation
|
Night Battle Node
|
AD/AP
AS/AS+
|
E-6 Hard U: 深海硫黄島攻略 火力支援部隊 (
PoiDB)
| #
|
Formation
|
Normal Battle Node
|
AD/AP
AS/AS+
|
| U
|
Line Ahead
Double Line
Vanguard
Phases: 3
|

|
0/0
0/0
|
| #
|
Formation
|
Normal Battle Node
|
AD/AP
AS/AS+
|
E-6 Hard V: 深海硫黄島攻略支援 機動部隊群 (
PoiDB)
| #
|
Formation
|
Normal Battle Node
|
AD/AP
AS/AS+
|
| V
|
Diamond
Phases: 3, 4
|
|
105/210
471/942
|
Diamond
Phases: 3, 4
|
|
145/290
651/1302
|
Diamond
Phases: 3
|
|
149/298
669/1338
|
| #
|
Formation
|
Normal Battle Node
|
AD/AP
AS/AS+
|
E-6 Hard W
| #
|
Empty Node
|
| W
|
敵影を見ず。
No enemy spotted.
|
| #
|
Empty Node
|
E-6 Hard X: 深海硫黄島 上陸攻略部隊 (
PoiDB)
E-6 Hard Y: 硫黄島攻略部隊直轄 潜水戦隊I群 (
PoiDB)
| #
|
Formation
|
Normal Battle Node
|
AD/AP
AS/AS+
|
| Y
|
Echelon
Line Abreast
Phases: 4
|
|
0/0
0/0
|
Echelon
Line Abreast
Phases: 4
|
|
0/0
0/0
|
Echelon
Line Abreast
Phases: 4
|
|
0/0
0/0
|
| #
|
Formation
|
Normal Battle Node
|
AD/AP
AS/AS+
|
E-6 Hard Y1: 深海任務部隊 快速警戒遊撃戦隊 (
PoiDB)
| #
|
Formation
|
Normal Battle Node
|
AD/AP
AS/AS+
|
| Y1
|
Vanguard
Phases: 4
|
|
0/0
0/0
|
Vanguard
Phases: 4
|
|
0/0
0/0
|
Vanguard
Phases: 4
|
|
0/0
0/0
|
| #
|
Formation
|
Normal Battle Node
|
AD/AP
AS/AS+
|
E-6 Hard Y2: 硫黄島攻略部隊直轄 潜水戦隊II群 (
PoiDB)
| #
|
Formation
|
Supported Battle Node
|
AD/AP
AS/AS+
|
| Y2
|
Echelon
Line Abreast
|

|
50/100
224/447
|
Echelon
Line Abreast
Phases: 4
|
|
91/182
408/816
|
| #
|
Formation
|
Supported Battle Node
|
AD/AP
AS/AS+
|
E-6 Hard Z: 深海硫黄島攻略部隊 随伴艦隊 (
PoiDB)
| #
|
Formation
|
Normal Battle Node
|
AD/AP
AS/AS+
|
| Z
|
Line Ahead
Double Line
Phases: 4
|
|
0/0
0/0
|
Line Ahead
Phases: 4
|
|
0/0
0/0
|
| #
|
Formation
|
Normal Battle Node
|
AD/AP
AS/AS+
|
E-6 Hard Z1: 深海空母機動部隊 艦載機群 (
PoiDB)
| #
|
Formation
|
Air Defense Node
|
AD/AP
AS/AS+
|
| Z1
|
Diamond
Phases: 4
|
|
146/292
656/1311
|
Diamond
Phases: 4
|
|
142/283
635/1269
|
Diamond
Phases: 4
|
|
162/323
726/1452
|
| #
|
Formation
|
Air Defense Node
|
AD/AP
AS/AS+
|
E-6 Hard Z2: 深海硫黄島攻略部隊 主力艦隊 (
PoiDB)
| Type | Ships |
|---|
| DD |   |
|---|
| Type | Ships |
|---|
| DD |  |
|---|
| Type | Ships |
|---|
| DD |  |
|---|
| Type | Ships |
|---|
| DD | |
|---|
E-6 Medium AB
| #
|
Formation
|
Air Raids
|
AD/AP
AS/AS+
|
| AB
|
Diamond
|

|
86/172
386/771
|
| Diamond
|
|
126/251
564/1128
|
| Diamond
|
|
131/262
588/1176
|
| #
|
Formation
|
Air Raids
|
AD/AP
AS/AS+
|
E-6 Medium A: 深海潜水艦隊 硫黄島哨戒線A群 (
PoiDB)
| #
|
Formation
|
Normal Battle Node
|
AD/AP
AS/AS+
|
| A
|
Echelon
Line Abreast
Phases: 1, 4
|
|
0/0
0/0
|
Echelon
Line Abreast
Phases: 1, 4
|
|
0/0
0/0
|
Echelon
Line Abreast
Phases: 1, 4
|
|
0/0
0/0
|
| #
|
Formation
|
Normal Battle Node
|
AD/AP
AS/AS+
|
E-6 Medium B: 深海潜水艦隊 硫黄島哨戒線B群 (
PoiDB)
| #
|
Formation
|
Supported Battle Node
|
AD/AP
AS/AS+
|
| B
|
Line Abreast
|

|
41/81
180/360
|
Echelon
Line Abreast
|
|
41/81
180/360
|
| Echelon
|
|
46/91
204/408
|
| #
|
Formation
|
Supported Battle Node
|
AD/AP
AS/AS+
|
E-6 Medium C: 深海任務部隊 船影ピケット艦隊 (
PoiDB)
| #
|
Formation
|
Normal Battle Node
|
AD/AP
AS/AS+
|
| C
|
Line Ahead
Double Line
Phases: 1, 4
|
 
|
0/0
0/0
|
Line Ahead
Phases: 1, 4
|
|
0/0
0/0
|
| #
|
Formation
|
Normal Battle Node
|
AD/AP
AS/AS+
|
E-6 Medium D: 深海任務部隊 高速支援空母群 (
PoiDB)
| #
|
Formation
|
Air Defense Node
|
AD/AP
AS/AS+
|
| D
|
Diamond
Phases: 1
|
|
62/123
276/552
|
Diamond
Phases: 1
|
|
94/187
420/840
|
| #
|
Formation
|
Air Defense Node
|
AD/AP
AS/AS+
|
E-6 Medium E: 深海任務部隊 偵察巡洋艦戦隊 (
PoiDB)
| #
|
Formation
|
Normal Battle Node
|
AD/AP
AS/AS+
|
| E
|
Line Ahead
Double Line
Vanguard
Phases: 1, 4
|
 
|
0/0
0/0
|
| #
|
Formation
|
Normal Battle Node
|
AD/AP
AS/AS+
|
E-6 Medium F
| #
|
Empty Node
|
| F
|
敵影を見ず。
No enemy spotted.
|
| #
|
Empty Node
|
E-6 Medium G: 深海任務部隊 高速支援空母群 (
PoiDB)
E-6 Medium H: 深海空母機動部隊 艦載機群 (
PoiDB)
| #
|
Formation
|
Air Defense Node
|
AD/AP
AS/AS+
|
| H
|
Diamond
Phases: 2
|
|
86/171
384/768
|
Diamond
Phases: 2
|
|
91/182
408/816
|
Diamond
Phases: 2
|
|
96/191
428/855
|
| #
|
Formation
|
Air Defense Node
|
AD/AP
AS/AS+
|
| #
|
Formation
|
Normal Battle Node
|
AD/AP
AS/AS+
|
| #
|
Formation
|
Normal Battle Node
|
AD/AP
AS/AS+
|
E-6 Medium H2: 深海任務部隊 硫黄島前衛警戒隊 (
PoiDB)
| #
|
Formation
|
Night Battle Node
|
AD/AP
AS/AS+
|
| H2
|
Line Ahead
Echelon
Vanguard
Phases: 2
|

|
0/0
0/0
|
| #
|
Formation
|
Night Battle Node
|
AD/AP
AS/AS+
|
| #
|
Formation
|
Normal Battle Node
|
AD/AP
AS/AS+
|
| #
|
Formation
|
Normal Battle Node
|
AD/AP
AS/AS+
|
E-6 Medium J: 深海空母機動部隊 艦載機群 (
PoiDB)
| #
|
Formation
|
Air Defense Node
|
AD/AP
AS/AS+
|
| J
|
Diamond
Phases: 2
|
|
86/171
384/768
|
Diamond
Phases: 2
|
|
91/182
408/816
|
Diamond
Phases: 2
|
|
96/191
428/855
|
| #
|
Formation
|
Air Defense Node
|
AD/AP
AS/AS+
|
E-6 Medium K: 深海任務部隊 硫黄島揚陸阻止線 (
PoiDB)
| #
|
Formation
|
Supported Battle Node
|
AD/AP
AS/AS+
|
| K
|
Echelon
Line Abreast
Phases: 2
|
|
41/81
180/360
|
Echelon
Line Abreast
Phases: 2
|
|
41/81
180/360
|
Echelon
Line Abreast
Phases: 2
|
|
46/91
204/408
|
| #
|
Formation
|
Supported Battle Node
|
AD/AP
AS/AS+
|
E-6 Medium L: 深海任務部隊 硫黄島攻略支援群 (
PoiDB)
| #
|
Formation
|
Normal Battle Node
|
AD/AP
AS/AS+
|
| L
|
Diamond
|
|
86/171
384/768
|
| Diamond
|
|
90/180
404/807
|
| #
|
Formation
|
Normal Battle Node
|
AD/AP
AS/AS+
|
E-6 Medium M
| #
|
Landing Node
|
| M
|
輸送物資の揚陸地点に到達しました。本海域の輸送作戦は無事完了しています。
The landing point of the convoy has been reached. The transport operation here has already been completed successfully.
|
| #
|
Landing Node
|
E-6 Medium N
| #
|
Empty Node
|
| N
|
敵影を見ず。
No enemy spotted.
|
| #
|
Empty Node
|
E-6 Medium O: 深海硫黄島攻略支援 旗艦艦隊 (
PoiDB)
| #
|
Formation
|
Supported Battle Node
|
AD/AP
AS/AS+
|
| #
|
Formation
|
Supported Battle Node
|
AD/AP
AS/AS+
|
E-6 Medium Q: 深海潜水艦隊 硫黄島哨戒線D群 (
PoiDB)
| #
|
Formation
|
Normal Battle Node
|
AD/AP
AS/AS+
|
| Q
|
Echelon
Line Abreast
Phases: 3, 4
|
|
0/0
0/0
|
Echelon
Line Abreast
Phases: 3, 4
|
|
0/0
0/0
|
Echelon
Line Abreast
Phases: 3
|
|
0/0
0/0
|
| #
|
Formation
|
Normal Battle Node
|
AD/AP
AS/AS+
|
E-6 Medium R: 深海空母機動部隊 艦載機群 (
PoiDB)
| #
|
Formation
|
Air Defense Node
|
AD/AP
AS/AS+
|
| R
|
Diamond
Phases: 3, 4
|
|
97/193
432/864
|
Diamond
Phases: 3, 4
|
|
113/226
507/1014
|
Diamond
Phases: 3, 4
|
|
145/290
651/1302
|
| #
|
Formation
|
Air Defense Node
|
AD/AP
AS/AS+
|
| #
|
Formation
|
Ambush Battle Node
|
AD/AP
AS/AS+
|
| #
|
Formation
|
Ambush Battle Node
|
AD/AP
AS/AS+
|
E-6 Medium T: 深海任務部隊 夜間突入警戒線 (
PoiDB)
| #
|
Formation
|
Night Battle Node
|
AD/AP
AS/AS+
|
| T
|
Line Ahead
Echelon
Phases: 3
|
|
0/0
0/0
|
Line Ahead
Phases: 3
|
|
0/0
0/0
|
| #
|
Formation
|
Night Battle Node
|
AD/AP
AS/AS+
|
E-6 Medium U: 深海硫黄島攻略 火力支援部隊 (
PoiDB)
| #
|
Formation
|
Normal Battle Node
|
AD/AP
AS/AS+
|
| U
|
Line Ahead
Double Line
Vanguard
Phases: 3
|
|
0/0
0/0
|
| #
|
Formation
|
Normal Battle Node
|
AD/AP
AS/AS+
|
E-6 Medium V: 深海硫黄島攻略支援 機動部隊群 (
PoiDB)
| #
|
Formation
|
Normal Battle Node
|
AD/AP
AS/AS+
|
| V
|
Diamond
Phases: 3
|
|
97/193
432/864
|
Diamond
Phases: 3
|
|
113/226
507/1014
|
Diamond
Phases: 3
|
|
145/290
651/1302
|
| #
|
Formation
|
Normal Battle Node
|
AD/AP
AS/AS+
|
E-6 Medium W
| #
|
Empty Node
|
| W
|
敵影を見ず。
No enemy spotted.
|
| #
|
Empty Node
|
E-6 Medium X: 深海硫黄島 上陸攻略部隊 (
PoiDB)
E-6 Medium Y: 硫黄島攻略部隊直轄 潜水戦隊I群 (
PoiDB)
| #
|
Formation
|
Normal Battle Node
|
AD/AP
AS/AS+
|
| Y
|
Echelon
Line Abreast
Phases: 4
|
|
0/0
0/0
|
Echelon
Line Abreast
Phases: 4
|
|
0/0
0/0
|
Echelon
Line Abreast
Phases: 4
|
|
0/0
0/0
|
| #
|
Formation
|
Normal Battle Node
|
AD/AP
AS/AS+
|
E-6 Medium Y1: 深海任務部隊 快速警戒遊撃戦隊 (
PoiDB)
| #
|
Formation
|
Normal Battle Node
|
AD/AP
AS/AS+
|
| Y1
|
Vanguard
|
|
0/0
0/0
|
| Vanguard
|
|
0/0
0/0
|
| Vanguard
|
|
0/0
0/0
|
| #
|
Formation
|
Normal Battle Node
|
AD/AP
AS/AS+
|
E-6 Medium Y2: 硫黄島攻略部隊直轄 潜水戦隊II群 (
PoiDB)
| #
|
Formation
|
Supported Battle Node
|
AD/AP
AS/AS+
|
| Y2
|
Echelon
Line Abreast
|
|
41/81
180/360
|
Echelon
Line Abreast
|
|
46/91
204/408
|
| #
|
Formation
|
Supported Battle Node
|
AD/AP
AS/AS+
|
E-6 Medium Z: 深海硫黄島攻略部隊 随伴艦隊 (
PoiDB)
| #
|
Formation
|
Normal Battle Node
|
AD/AP
AS/AS+
|
| Z
|
Line Ahead
Double Line
Phases: 4
|
 
|
0/0
0/0
|
Line Ahead
Phases: 4
|
|
0/0
0/0
|
| #
|
Formation
|
Normal Battle Node
|
AD/AP
AS/AS+
|
E-6 Medium Z1: 深海空母機動部隊 艦載機群 (
PoiDB)
| #
|
Formation
|
Air Defense Node
|
AD/AP
AS/AS+
|
| Z1
|
Diamond
Phases: 4
|
|
136/271
608/1215
|
Diamond
Phases: 4
|
|
134/267
600/1200
|
| Diamond
|
|
144/287
644/1287
|
| #
|
Formation
|
Air Defense Node
|
AD/AP
AS/AS+
|
E-6 Medium Z2: 深海硫黄島攻略部隊 主力艦隊 (
PoiDB)
| Type | Ships |
|---|
| DD | |
|---|
| Type | Ships |
|---|
| DD | |
|---|
| Type | Ships |
|---|
| DD |  |
|---|
| Type | Ships |
|---|
| DD |  |
|---|
| Type | Ships |
|---|
| DD | |
|---|
| Type | Ships |
|---|
| DD | |
|---|
| Type | Ships |
|---|
| DD |  |
|---|
| Type | Ships |
|---|
| DD |  |
|---|
| BB |  |
|---|
| Type | Ships |
|---|
| DD | |
|---|
E-6 Easy AB
| #
|
Formation
|
Air Raids
|
AD/AP
AS/AS+
|
| AB
|
Diamond
|

|
81/161
362/723
|
| Diamond
|

|
83/166
372/744
|
| Diamond
|
|
126/251
564/1128
|
| #
|
Formation
|
Air Raids
|
AD/AP
AS/AS+
|
E-6 Easy A: 深海潜水艦隊 硫黄島哨戒線A群 (
PoiDB)
| #
|
Formation
|
Normal Battle Node
|
AD/AP
AS/AS+
|
| A
|
Echelon
Line Abreast
Phases: 1, 3
|
|
0/0
0/0
|
Echelon
Line Abreast
Phases: 1, 3
|
|
0/0
0/0
|
Echelon
Line Abreast
Phases: 1, 3
|
|
0/0
0/0
|
| #
|
Formation
|
Normal Battle Node
|
AD/AP
AS/AS+
|
E-6 Easy B: 深海潜水艦隊 硫黄島哨戒線B群 (
PoiDB)
| #
|
Formation
|
Supported Battle Node
|
AD/AP
AS/AS+
|
| B
|
Echelon
|
|
41/81
180/360
|
Line Abreast
Phases: 3
|
|
41/81
180/360
|
| #
|
Formation
|
Supported Battle Node
|
AD/AP
AS/AS+
|
E-6 Easy C: 深海任務部隊 船影ピケット艦隊 (
PoiDB)
| #
|
Formation
|
Normal Battle Node
|
AD/AP
AS/AS+
|
| C
|
Line Ahead
Double Line
Phases: 1, 3
|

|
0/0
0/0
|
Line Ahead
Phases: 1, 3
|
|
0/0
0/0
|
| #
|
Formation
|
Normal Battle Node
|
AD/AP
AS/AS+
|
E-6 Easy D: 深海任務部隊 高速支援空母群 (
PoiDB)
| #
|
Formation
|
Air Defense Node
|
AD/AP
AS/AS+
|
| D
|
Diamond
|
|
57/113
252/504
|
Diamond
Phases: 3
|
|
62/123
276/552
|
| #
|
Formation
|
Air Defense Node
|
AD/AP
AS/AS+
|
E-6 Easy E: 深海任務部隊 偵察巡洋艦戦隊 (
PoiDB)
| #
|
Formation
|
Normal Battle Node
|
AD/AP
AS/AS+
|
| E
|
Line Ahead
Double Line
Vanguard
Phases: 1, 3
|

|
0/0
0/0
|
| #
|
Formation
|
Normal Battle Node
|
AD/AP
AS/AS+
|
E-6 Easy F
| #
|
Empty Node
|
| F
|
敵影を見ず。
No enemy spotted.
|
| #
|
Empty Node
|
E-6 Easy G: 深海任務部隊 高速支援空母群 (
PoiDB)
E-6 Easy H: 深海空母機動部隊 艦載機群 (
PoiDB)
| #
|
Formation
|
Air Defense Node
|
AD/AP
AS/AS+
|
| H
|
Diamond
Phases: 2, 3
|
|
81/161
360/720
|
Diamond
Phases: 2, 3
|
|
86/171
384/768
|
Diamond
Phases: 2
|
|
91/182
408/816
|
| #
|
Formation
|
Air Defense Node
|
AD/AP
AS/AS+
|
| #
|
Formation
|
Normal Battle Node
|
AD/AP
AS/AS+
|
| #
|
Formation
|
Normal Battle Node
|
AD/AP
AS/AS+
|
E-6 Easy H2: 深海任務部隊 硫黄島前衛警戒隊 (
PoiDB)
| #
|
Formation
|
Night Battle Node
|
AD/AP
AS/AS+
|
| H2
|
Line Ahead
Echelon
Vanguard
Phases: 2, 3
|
|
0/0
0/0
|
| #
|
Formation
|
Night Battle Node
|
AD/AP
AS/AS+
|
E-6 Easy I: 深海任務部隊 攻略支援重巡戦隊 (
PoiDB)
| #
|
Formation
|
Normal Battle Node
|
AD/AP
AS/AS+
|
| I
|
Line Ahead
|

|
0/0
0/0
|
| #
|
Formation
|
Normal Battle Node
|
AD/AP
AS/AS+
|
E-6 Easy J: 深海空母機動部隊 艦載機群 (
PoiDB)
| #
|
Formation
|
Air Defense Node
|
AD/AP
AS/AS+
|
| J
|
Diamond
Phases: 2, 3
|
|
81/161
360/720
|
Diamond
Phases: 2
|
|
86/171
384/768
|
Diamond
Phases: 2, 3
|
|
91/182
408/816
|
| #
|
Formation
|
Air Defense Node
|
AD/AP
AS/AS+
|
E-6 Easy K: 深海任務部隊 硫黄島揚陸阻止線 (
PoiDB)
| #
|
Formation
|
Supported Battle Node
|
AD/AP
AS/AS+
|
| K
|
Echelon
Line Abreast
Phases: 2, 3
|
|
3/6
12/24
|
Echelon
Line Abreast
Phases: 2, 3
|
|
41/81
180/360
|
Echelon
Line Abreast
Phases: 2, 3
|
|
41/81
180/360
|
| #
|
Formation
|
Supported Battle Node
|
AD/AP
AS/AS+
|
E-6 Easy L: 深海任務部隊 硫黄島攻略支援群 (
PoiDB)
| #
|
Formation
|
Normal Battle Node
|
AD/AP
AS/AS+
|
| L
|
Diamond
Phases: 2
|
|
81/161
360/720
|
| Diamond
|
|
91/182
408/816
|
| #
|
Formation
|
Normal Battle Node
|
AD/AP
AS/AS+
|
E-6 Easy M
| #
|
Landing Node
|
| M
|
輸送物資の揚陸地点に到達しました。本海域の輸送作戦は無事完了しています。
The landing point of the convoy has been reached. The transport operation here has already been completed successfully.
|
| #
|
Landing Node
|
E-6 Easy N
| #
|
Empty Node
|
| N
|
敵影を見ず。
No enemy spotted.
|
| #
|
Empty Node
|
E-6 Easy O: 深海硫黄島攻略支援 旗艦艦隊 (
PoiDB)
| #
|
Formation
|
Supported Battle Node
|
AD/AP
AS/AS+
|
| #
|
Formation
|
Supported Battle Node
|
AD/AP
AS/AS+
|
E-6 Easy Q: 深海潜水艦隊 硫黄島哨戒線D群 (
PoiDB)
| #
|
Formation
|
Normal Battle Node
|
AD/AP
AS/AS+
|
| Q
|
Echelon
Line Abreast
Phases: 3
|
|
0/0
0/0
|
Echelon
Line Abreast
Phases: 3
|
|
0/0
0/0
|
Echelon
Line Abreast
Phases: 3
|
|
0/0
0/0
|
| #
|
Formation
|
Normal Battle Node
|
AD/AP
AS/AS+
|
E-6 Easy R: 深海空母機動部隊 艦載機群 (
PoiDB)
| #
|
Formation
|
Air Defense Node
|
AD/AP
AS/AS+
|
| R
|
Diamond
Phases: 3
|

|
13/25
54/108
|
Diamond
Phases: 3
|
|
59/118
264/528
|
Diamond
Phases: 4
|
|
65/129
288/576
|
| #
|
Formation
|
Air Defense Node
|
AD/AP
AS/AS+
|
E-6 Easy S: 深海任務部隊 レーダー射撃戦隊 (
PoiDB)
| #
|
Formation
|
Ambush Battle Node
|
AD/AP
AS/AS+
|
| S
|
Line Ahead
Double Line
Phases: 3
|
|
0/0
0/0
|
| #
|
Formation
|
Ambush Battle Node
|
AD/AP
AS/AS+
|
E-6 Easy T: 深海任務部隊 夜間突入警戒線 (
PoiDB)
| #
|
Formation
|
Night Battle Node
|
AD/AP
AS/AS+
|
| T
|
Line Ahead
Echelon
Phases: 3
|
|
0/0
0/0
|
| Line Ahead
|
|
0/0
0/0
|
| #
|
Formation
|
Night Battle Node
|
AD/AP
AS/AS+
|
E-6 Easy U: 深海硫黄島攻略 火力支援部隊 (
PoiDB)
| #
|
Formation
|
Normal Battle Node
|
AD/AP
AS/AS+
|
| U
|
Line Ahead
Double Line
Vanguard
Phases: 3
|

|
0/0
0/0
|
| #
|
Formation
|
Normal Battle Node
|
AD/AP
AS/AS+
|
E-6 Easy V: 深海硫黄島攻略支援 機動部隊群 (
PoiDB)
| #
|
Formation
|
Normal Battle Node
|
AD/AP
AS/AS+
|
| V
|
Diamond
Phases: 3
|
|
13/25
54/108
|
Diamond
Phases: 3
|
|
59/118
264/528
|
| Diamond
|
|
65/129
288/576
|
| #
|
Formation
|
Normal Battle Node
|
AD/AP
AS/AS+
|
E-6 Easy W
| #
|
Empty Node
|
| W
|
敵影を見ず。
No enemy spotted.
|
| #
|
Empty Node
|
E-6 Easy X: 深海硫黄島 上陸攻略部隊 (
PoiDB)
E-6 Easy Y: 硫黄島攻略部隊直轄 潜水戦隊I群 (
PoiDB)
| #
|
Formation
|
Normal Battle Node
|
AD/AP
AS/AS+
|
| Y
|
Echelon
Line Abreast
|
|
0/0
0/0
|
Echelon
Line Abreast
Phases: 4
|
|
0/0
0/0
|
Echelon
Line Abreast
|
|
0/0
0/0
|
| #
|
Formation
|
Normal Battle Node
|
AD/AP
AS/AS+
|
E-6 Easy Y1: 深海任務部隊 快速警戒遊撃戦隊 (
PoiDB)
| #
|
Formation
|
Normal Battle Node
|
AD/AP
AS/AS+
|
| Y1
|
Vanguard
|

|
0/0
0/0
|
| Vanguard
|

|
0/0
0/0
|
| Vanguard
|
|
0/0
0/0
|
| #
|
Formation
|
Normal Battle Node
|
AD/AP
AS/AS+
|
E-6 Easy Y2: 硫黄島攻略部隊直轄 潜水戦隊II群 (
PoiDB)
| #
|
Formation
|
Supported Battle Node
|
AD/AP
AS/AS+
|
| Y2
|
Line Abreast
|
|
3/6
12/24
|
| Echelon
|
|
41/81
180/360
|
| #
|
Formation
|
Supported Battle Node
|
AD/AP
AS/AS+
|
E-6 Easy Z: 深海硫黄島攻略部隊 随伴艦隊 (
PoiDB)
| #
|
Formation
|
Normal Battle Node
|
AD/AP
AS/AS+
|
| Z
|
Line Ahead
Double Line
|

|
0/0
0/0
|
Line Ahead
Phases: 4
|
|
0/0
0/0
|
| #
|
Formation
|
Normal Battle Node
|
AD/AP
AS/AS+
|
E-6 Easy Z1: 深海空母機動部隊 艦載機群 (
PoiDB)
| #
|
Formation
|
Air Defense Node
|
AD/AP
AS/AS+
|
| Z1
|
Diamond
|
|
89/177
396/792
|
| Diamond
|
|
94/187
420/840
|
| #
|
Formation
|
Air Defense Node
|
AD/AP
AS/AS+
|
E-6 Easy Z2: 深海硫黄島攻略部隊 主力艦隊 (
PoiDB)
| Type | Ships |
|---|
| DD | |
|---|
| Type | Ships |
|---|
| DD | |
|---|
| Type | Ships |
|---|
| DD | |
|---|
| Type | Ships |
|---|
| DD |  |
|---|
E-6 Casual AB
| #
|
Formation
|
Air Raids
|
AD/AP
AS/AS+
|
| AB
|
Diamond
|
|
42/83
186/372
|
| Diamond
|
|
44/88
197/393
|
| Diamond
|
|
46/91
204/408
|
| #
|
Formation
|
Air Raids
|
AD/AP
AS/AS+
|
E-6 Casual A: 深海潜水艦隊 硫黄島哨戒線A群 (
PoiDB)
| #
|
Formation
|
Normal Battle Node
|
AD/AP
AS/AS+
|
| A
|
Echelon
Line Abreast
Phases: 1, 3, 4
|
|
0/0
0/0
|
Echelon
Line Abreast
Phases: 1, 3, 4
|
|
0/0
0/0
|
| #
|
Formation
|
Normal Battle Node
|
AD/AP
AS/AS+
|
| #
|
Formation
|
Supported Battle Node
|
AD/AP
AS/AS+
|
| #
|
Formation
|
Supported Battle Node
|
AD/AP
AS/AS+
|
E-6 Casual C: 深海任務部隊 船影ピケット艦隊 (
PoiDB)
| #
|
Formation
|
Normal Battle Node
|
AD/AP
AS/AS+
|
| C
|
Line Ahead
Double Line
Phases: 1, 4
|
|
0/0
0/0
|
Line Ahead
Phases: 1, 3, 4
|
|
0/0
0/0
|
| #
|
Formation
|
Normal Battle Node
|
AD/AP
AS/AS+
|
| #
|
Formation
|
Air Defense Node
|
AD/AP
AS/AS+
|
| #
|
Formation
|
Air Defense Node
|
AD/AP
AS/AS+
|
E-6 Casual E: 深海任務部隊 偵察巡洋艦戦隊 (
PoiDB)
| #
|
Formation
|
Normal Battle Node
|
AD/AP
AS/AS+
|
| E
|
Line Ahead
Double Line
Phases: 1, 4
|
|
0/0
0/0
|
Line Ahead
Phases: 1, 4
|
|
0/0
0/0
|
| #
|
Formation
|
Normal Battle Node
|
AD/AP
AS/AS+
|
E-6 Casual F
| #
|
Empty Node
|
| F
|
敵影を見ず。
No enemy spotted.
|
| #
|
Empty Node
|
E-6 Casual G: 深海任務部隊 高速支援空母群 (
PoiDB)
E-6 Casual H: 深海空母機動部隊 艦載機群 (
PoiDB)
| #
|
Formation
|
Air Defense Node
|
AD/AP
AS/AS+
|
| H
|
Diamond
Phases: 2
|
|
43/86
192/384
|
Diamond
Phases: 2
|
|
49/97
216/432
|
Diamond
Phases: 2
|
|
81/161
360/720
|
| #
|
Formation
|
Air Defense Node
|
AD/AP
AS/AS+
|
| #
|
Formation
|
Normal Battle Node
|
AD/AP
AS/AS+
|
| #
|
Formation
|
Normal Battle Node
|
AD/AP
AS/AS+
|
E-6 Casual H2: 深海任務部隊 硫黄島前衛警戒隊 (
PoiDB)
| #
|
Formation
|
Night Battle Node
|
AD/AP
AS/AS+
|
| H2
|
Line Ahead
Echelon
Vanguard
Phases: 2
|
|
0/0
0/0
|
| #
|
Formation
|
Night Battle Node
|
AD/AP
AS/AS+
|
| #
|
Formation
|
Normal Battle Node
|
AD/AP
AS/AS+
|
| #
|
Formation
|
Normal Battle Node
|
AD/AP
AS/AS+
|
E-6 Casual J: 深海空母機動部隊 艦載機群 (
PoiDB)
| #
|
Formation
|
Air Defense Node
|
AD/AP
AS/AS+
|
| J
|
Diamond
Phases: 2
|
|
43/86
192/384
|
Diamond
Phases: 2
|
|
49/97
216/432
|
Diamond
Phases: 2
|
|
81/161
360/720
|
| #
|
Formation
|
Air Defense Node
|
AD/AP
AS/AS+
|
E-6 Casual K: 深海任務部隊 硫黄島揚陸阻止線 (
PoiDB)
| #
|
Formation
|
Supported Battle Node
|
AD/AP
AS/AS+
|
| K
|
Echelon
Line Abreast
Phases: 2
|
|
3/6
12/24
|
Echelon
Line Abreast
Phases: 2
|
|
41/81
180/360
|
| #
|
Formation
|
Supported Battle Node
|
AD/AP
AS/AS+
|
| #
|
Formation
|
Normal Battle Node
|
AD/AP
AS/AS+
|
| #
|
Formation
|
Normal Battle Node
|
AD/AP
AS/AS+
|
E-6 Casual M
| #
|
Landing Node
|
| M
|
輸送物資の揚陸地点に到達しました。本海域の輸送作戦は無事完了しています。
The landing point of the convoy has been reached. The transport operation here has already been completed successfully.
|
| #
|
Landing Node
|
E-6 Casual N
| #
|
Empty Node
|
| N
|
敵影を見ず。
No enemy spotted.
|
| #
|
Empty Node
|
E-6 Casual O: 深海硫黄島攻略支援 旗艦艦隊 (
PoiDB)
| #
|
Formation
|
Supported Battle Node
|
AD/AP
AS/AS+
|
| #
|
Formation
|
Supported Battle Node
|
AD/AP
AS/AS+
|
E-6 Casual Q: 深海潜水艦隊 硫黄島哨戒線D群 (
PoiDB)
| #
|
Formation
|
Normal Battle Node
|
AD/AP
AS/AS+
|
| Q
|
Echelon
Line Abreast
Phases: 3, 4
|
|
0/0
0/0
|
Echelon
Line Abreast
Phases: 3, 4
|
|
0/0
0/0
|
| #
|
Formation
|
Normal Battle Node
|
AD/AP
AS/AS+
|
E-6 Casual R: 深海空母機動部隊 艦載機群 (
PoiDB)
| #
|
Formation
|
Air Defense Node
|
AD/AP
AS/AS+
|
| R
|
Diamond
Phases: 3
|

|
12/24
53/105
|
Diamond
Phases: 3, 4
|
|
13/25
54/108
|
Diamond
Phases: 3, 4
|
|
18/35
78/156
|
| #
|
Formation
|
Air Defense Node
|
AD/AP
AS/AS+
|
E-6 Casual S: 深海任務部隊 レーダー射撃戦隊 (
PoiDB)
| #
|
Formation
|
Ambush Battle Node
|
AD/AP
AS/AS+
|
| S
|
Line Ahead
Double Line
Phases: 3, 4
|
|
0/0
0/0
|
| #
|
Formation
|
Ambush Battle Node
|
AD/AP
AS/AS+
|
E-6 Casual T: 深海任務部隊 夜間突入警戒線 (
PoiDB)
| #
|
Formation
|
Night Battle Node
|
AD/AP
AS/AS+
|
| T
|
Line Ahead
Echelon
Phases: 3, 4
|
|
0/0
0/0
|
Line Ahead
Phases: 3
|
|
0/0
0/0
|
| #
|
Formation
|
Night Battle Node
|
AD/AP
AS/AS+
|
E-6 Casual U: 深海硫黄島攻略 火力支援部隊 (
PoiDB)
| #
|
Formation
|
Normal Battle Node
|
AD/AP
AS/AS+
|
| U
|
Line Ahead
Double Line
Vanguard
Phases: 3
|
|
0/0
0/0
|
| #
|
Formation
|
Normal Battle Node
|
AD/AP
AS/AS+
|
E-6 Casual V: 深海硫黄島攻略支援 機動部隊群 (
PoiDB)
| #
|
Formation
|
Normal Battle Node
|
AD/AP
AS/AS+
|
| V
|
Diamond
Phases: 3, 4
|
|
12/24
53/105
|
Diamond
Phases: 3, 4
|
|
13/25
54/108
|
Diamond
Phases: 3
|
|
18/35
78/156
|
| #
|
Formation
|
Normal Battle Node
|
AD/AP
AS/AS+
|
E-6 Casual W
| #
|
Empty Node
|
| W
|
敵影を見ず。
No enemy spotted.
|
| #
|
Empty Node
|
E-6 Casual X: 深海硫黄島 上陸攻略部隊 (
PoiDB)
E-6 Casual Y: 硫黄島攻略部隊直轄 潜水戦隊I群 (
PoiDB)
| #
|
Formation
|
Normal Battle Node
|
AD/AP
AS/AS+
|
| Y
|
Echelon
Line Abreast
Phases: 4
|
|
0/0
0/0
|
Echelon
Line Abreast
Phases: 4
|
|
0/0
0/0
|
| #
|
Formation
|
Normal Battle Node
|
AD/AP
AS/AS+
|
E-6 Casual Y1: 深海任務部隊 快速警戒遊撃戦隊 (
PoiDB)
| #
|
Formation
|
Normal Battle Node
|
AD/AP
AS/AS+
|
| Y1
|
Vanguard
Phases: 4
|
|
0/0
0/0
|
Vanguard
Phases: 4
|
|
0/0
0/0
|
Vanguard
Phases: 4
|
|
0/0
0/0
|
| #
|
Formation
|
Normal Battle Node
|
AD/AP
AS/AS+
|
E-6 Casual Y2: 硫黄島攻略部隊直轄 潜水戦隊II群 (
PoiDB)
| #
|
Formation
|
Supported Battle Node
|
AD/AP
AS/AS+
|
| Y2
|
Echelon
Line Abreast
Phases: 4
|
|
3/6
12/24
|
Line Abreast
Phases: 4
|
|
41/81
180/360
|
| #
|
Formation
|
Supported Battle Node
|
AD/AP
AS/AS+
|
E-6 Casual Z: 深海硫黄島攻略部隊 随伴艦隊 (
PoiDB)
| #
|
Formation
|
Normal Battle Node
|
AD/AP
AS/AS+
|
| Z
|
Line Ahead
Double Line
Phases: 4
|
|
0/0
0/0
|
Line Ahead
Phases: 4
|
|
0/0
0/0
|
| #
|
Formation
|
Normal Battle Node
|
AD/AP
AS/AS+
|
E-6 Casual Z1: 深海空母機動部隊 艦載機群 (
PoiDB)
| #
|
Formation
|
Air Defense Node
|
AD/AP
AS/AS+
|
| Z1
|
Diamond
Phases: 4
|
|
49/97
216/432
|
Diamond
Phases: 4
|
|
57/113
252/504
|
Diamond
Phases: 4
|
|
94/187
420/840
|
| #
|
Formation
|
Air Defense Node
|
AD/AP
AS/AS+
|
E-6 Casual Z2: 深海硫黄島攻略部隊 主力艦隊 (
PoiDB)
Ship Drops
|
|
Time remaining until Event ends [12]:
1 May 2023 11:00:00 +0900
The Early Spring 2023 Event has ended!
|
KC anniversary maintenance has started, time remaining until maintenance ends [13]: (~4h event pause)
23 April 2023 20:30:00 +0900
The maintenance has ended. See 2023-04-23 patch notes.
|
|
|


 · 701st
 · 407th
 · Hien (244th)

 · (Sk.FB)
 · (ASFS)
 · (Sk)
 · Hiryuu (Sk)
 · Ki-102 + Missile
 · III K (Sk/20th)