- Welcome to the Kancolle Wiki!
- If you have any questions regarding site content, account registration, etc., please visit the KanColle Wiki Discord
Difference between revisions of "Transport Operation"
Jump to navigation
Jump to search
| Line 1: | Line 1: | ||
| − | Transport Operations are | + | =Overview= |
| + | Transport Operations are an event mechanic that was introduced during the [[Fall 2015 Event]]. Unlike the usual map clearing mechanic, completing a Transport Operation doesn't require you to kill the boss. | ||
| − | |||
[[File:Transport Map.png|thumb|right|Example of an event map with a transport operation from Winter 2016.]] | [[File:Transport Map.png|thumb|right|Example of an event map with a transport operation from Winter 2016.]] | ||
| − | + | * The objective of the Transport Operation is to deplete a '''Transport (TP)''' gauge. | |
| + | ** The amount of TP that needs to be depleted varies by difficulty. | ||
| + | * The TP Gauge is depleted everytime the fleet reaches a '''Transport Drop Off''' point (a node marked with a green flag) then scores at least an '''A rank''' victory at the boss. | ||
| + | ** Ship girls that are <span style="color:red;">'''heavily damaged (大破)'''</span>, evacuated using the [[Fleet Command Facility]] or sunk are not counted towards gauge depletion. | ||
| + | * You do not need to sink the boss on the final run to clear the gauge. | ||
| + | * These maps are usually completed by a single fleet or a [[Combined_Fleet#Transport_Escort_Force|Transport Escort Force]]. | ||
| − | |||
| − | + | =TP Gauge Depletion= | |
| + | TP gauge reduction is calculated using the following formula: | ||
| + | <math>\text{TP Drain} = \lfloor \text{Mod}_\text{rank} \times \left( \sum^{\text{All equipment slots}} \text{TP}_\text{equip} + \sum^{\text{All ships in fleet}} \text{TP}_\text{ship} \right) \rfloor </math> | ||
| − | |||
| − | |||
| − | |||
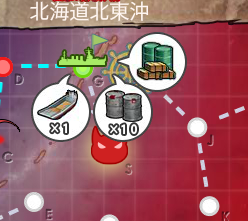
[[File:Transport Supply notice.png|thumb|right|When your fleet reaches the transport drop-off point, you will receive a notice which shows how much transport equipment you brought with your fleet which will count toward you TP score. In this case, this fleet was equipped with 10 [[drum canister|drum canisters]] and 1 [[daihatsu]].]] | [[File:Transport Supply notice.png|thumb|right|When your fleet reaches the transport drop-off point, you will receive a notice which shows how much transport equipment you brought with your fleet which will count toward you TP score. In this case, this fleet was equipped with 10 [[drum canister|drum canisters]] and 1 [[daihatsu]].]] | ||
| − | |||
| − | |||
| − | Note that the | + | * <math>\text{Mod}_\text{rank}</math> is the rank modifier. It is <math>1.0</math> for S ranks and <math>0.7</math> for A ranks. |
| + | ** Note that the TP total from ship girls and equipment is '''rounded down''' before being multiplied by the rank multiplier and '''rounded down again'''. | ||
| + | * <math>\text{TP}_\text{equip}</math> is the Equipment TP value. See [[#Equipment TP|below]] for details. | ||
| + | * <math>\text{TP}_\text{ship}</math> is the Ship TP value. See [[#Ship TP|below]] for details. | ||
[[File:Transport Complete.png|thumb|right|Once you successfully deplete the TP Gauge, the TP Gauge will explode before either the map is considered complete or moves on to the Boss Gauge.]] | [[File:Transport Complete.png|thumb|right|Once you successfully deplete the TP Gauge, the TP Gauge will explode before either the map is considered complete or moves on to the Boss Gauge.]] | ||
| − | + | === Equipment TP=== | |
| − | |||
| − | |||
| − | === Equipment TP | ||
Some equipment provides TP values when used in Transport Operations. Each instance of the equipment shown in the table below contributes towards the TP drain. | Some equipment provides TP values when used in Transport Operations. Each instance of the equipment shown in the table below contributes towards the TP drain. | ||
| Line 30: | Line 31: | ||
! Equipment !! S-Rank !! A-Rank | ! Equipment !! S-Rank !! A-Rank | ||
|- | |- | ||
| − | | '''[[Daihatsu-class Landing Craft]]''' / '''[[Toku Daihatsu-class Landing Craft]]''' / | + | | '''[[Daihatsu-class Landing Craft]]''' / '''[[Toku Daihatsu-class Landing Craft]]''' / '''[[Daihatsu-class Landing Craft (Type 89 Medium Tanks & Marines)]]''' || 8.0 || 5.6 |
| − | |||
| − | |||
|- | |- | ||
| '''[[Drum Canister]]''' || 5.0 || 3.5 | | '''[[Drum Canister]]''' || 5.0 || 3.5 | ||
|- | |- | ||
| − | | '''Type 2 Ka-Mi Tank''' || 2.0 || 1.4 | + | | '''[[Type 2 Ka-Mi Tank]]''' || 2.0 || 1.4 |
|- | |- | ||
| '''[[Battle Rations]] / [[Canned Saury]]''' || 1.0 || 0.7 | | '''[[Battle Rations]] / [[Canned Saury]]''' || 1.0 || 0.7 | ||
|} | |} | ||
| − | |||
| − | === Ship TP | + | === Ship TP=== |
| − | |||
{| class="wikitable" | {| class="wikitable" | ||
| Line 77: | Line 74: | ||
|} | |} | ||
| − | + | =Tips= | |
| − | * | + | * Stacking only TP depleting equipment can compromise your ability to score an A-rank and result in no depletion at all. On the other hand, focusing too much on offensive capability may result in minimal gauge depletion even on an S-rank. It is ideal to find a balance where you can reliably A-rank the boss while taking as many TP depleting equipment as possible. |
| − | * | + | * When using a Transport Escort Fleet, the escort fleet should be where all your combat-focused ship girls are assigned. This is because the escort will bear the brunt of all combat. |
| − | * | + | * Although the daihatsu variants deplete the most TP, careful consideration should go into whether using daihatsu-capable ship girls is appropriate. [[Ship Locking|Locking]] key ship girls when [[Anti-Installation]] is required in subsequent maps can result in disaster. |
| + | =See Also= | ||
{{Mechanics}} | {{Mechanics}} | ||
[[Category:Events]] | [[Category:Events]] | ||
Revision as of 05:08, 8 November 2019
Overview
Transport Operations are an event mechanic that was introduced during the Fall 2015 Event. Unlike the usual map clearing mechanic, completing a Transport Operation doesn't require you to kill the boss.
- The objective of the Transport Operation is to deplete a Transport (TP) gauge.
- The amount of TP that needs to be depleted varies by difficulty.
- The TP Gauge is depleted everytime the fleet reaches a Transport Drop Off point (a node marked with a green flag) then scores at least an A rank victory at the boss.
- Ship girls that are heavily damaged (大破), evacuated using the Fleet Command Facility or sunk are not counted towards gauge depletion.
- You do not need to sink the boss on the final run to clear the gauge.
- These maps are usually completed by a single fleet or a Transport Escort Force.
TP Gauge Depletion
TP gauge reduction is calculated using the following formula: [math]\displaystyle{ \text{TP Drain} = \lfloor \text{Mod}_\text{rank} \times \left( \sum^{\text{All equipment slots}} \text{TP}_\text{equip} + \sum^{\text{All ships in fleet}} \text{TP}_\text{ship} \right) \rfloor }[/math]
When your fleet reaches the transport drop-off point, you will receive a notice which shows how much transport equipment you brought with your fleet which will count toward you TP score. In this case, this fleet was equipped with 10 drum canisters and 1 daihatsu.
- [math]\displaystyle{ \text{Mod}_\text{rank} }[/math] is the rank modifier. It is [math]\displaystyle{ 1.0 }[/math] for S ranks and [math]\displaystyle{ 0.7 }[/math] for A ranks.
- Note that the TP total from ship girls and equipment is rounded down before being multiplied by the rank multiplier and rounded down again.
- [math]\displaystyle{ \text{TP}_\text{equip} }[/math] is the Equipment TP value. See below for details.
- [math]\displaystyle{ \text{TP}_\text{ship} }[/math] is the Ship TP value. See below for details.
Equipment TP
Some equipment provides TP values when used in Transport Operations. Each instance of the equipment shown in the table below contributes towards the TP drain.
The values appear to change from event to event. This table is very likely outdated.
| Equipment | S-Rank | A-Rank |
|---|---|---|
| Daihatsu-class Landing Craft / Toku Daihatsu-class Landing Craft / Daihatsu-class Landing Craft (Type 89 Medium Tanks & Marines) | 8.0 | 5.6 |
| Drum Canister | 5.0 | 3.5 |
| Type 2 Ka-Mi Tank | 2.0 | 1.4 |
| Battle Rations / Canned Saury | 1.0 | 0.7 |
Ship TP
| Ship Type | S-Rank | A-Rank |
|---|---|---|
| Destroyer | 5.0 | 3.5 |
| Light Cruiser | 2.0 | 1.2 |
| Heavy Cruiser | 0.0 | 0.0 |
| Aviation Cruiser | 4.0 | 2.8 |
| Aviation Battleship | 7.0 | 4.9 |
| Seaplane Tender | 9.0 | 6.3 |
| Amphibious Assault Ship | 12.0 | 8.4 |
| Submarine Tender | 7.0 | 4.9 |
| Training Cruiser | 6.0 | 4.2 |
| Supply Ship | 15.0 | 10.5 |
| Light Carrier | 0.0 | 0.0 |
| Standard Carrier | 0.0 | 0.0 |
| Destroyer Escorts | 0.0 | 0.0 |
Tips
- Stacking only TP depleting equipment can compromise your ability to score an A-rank and result in no depletion at all. On the other hand, focusing too much on offensive capability may result in minimal gauge depletion even on an S-rank. It is ideal to find a balance where you can reliably A-rank the boss while taking as many TP depleting equipment as possible.
- When using a Transport Escort Fleet, the escort fleet should be where all your combat-focused ship girls are assigned. This is because the escort will bear the brunt of all combat.
- Although the daihatsu variants deplete the most TP, careful consideration should go into whether using daihatsu-capable ship girls is appropriate. Locking key ship girls when Anti-Installation is required in subsequent maps can result in disaster.
See Also
| |||||||||||||||||||||||||||||||||||||