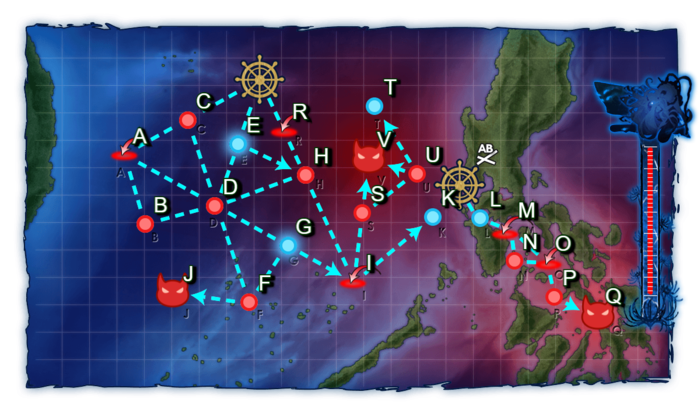
E-1
31st Squadron, Deploy!
第三十一戦隊、展開せよ!
| Rewards
|
| All
|

|
| Equipment/Item
|
丁
Casual
|
丙
Easy
|
乙
Medium
|
甲
Hard
|
 Food Supply Ship Mamiya |
|
1
|
1
|
2
|
 Food Supply Ship Irako |
|
1
|
2
|
2
|
 Furniture Fairy |
|
|
|
1
|
 Torpedo Squadron Skilled Lookouts |
|
|
1
|
1 (★4)
|
 Submarine Supply Material |
2
|
4
|
5
|
8
|
|
|
|
|
|
|
|
|
|
|
|
|
|
|
|
|
|
|
|
|
|
|
|
|
|
|
|
|
|
|
|
|
|
|
|
|

| E-1 Branching Rules
|
| Nodes |
Rules
|
| Start
|
|
- Start point 2 is not unlocked
- Meet ANY of the following requirements:
- Fleet includes ship types other than DD, DE, CL, AV, AO and LHA
- CL + AV + AO + LHA ≥ 2
- Fleet size = 1
|
|
|
Does not meet the requirements for start point 1
|
|
|
|
- Meet ANY of the following requirements:
- Fleet contains (F)BB(V) or CVL.
- Fleet contains SS(V)
- CA(V) ≥ 2
- CL + CT = 0
- If node R is not unlocked:
- CL + CT + CVL ≥ 3
- DD + DE ≤ 2
|
|
|
- Does not meet the requirements to go to C or R
- If node R is unlocked:
- Number of historical ships ≥ 3/2/1/0 (Hard/Medium/Easy/Casual)
- (Kitakami, Isuzu, Satsuki, Uzuki, Hibiki, Ushio, Suzutsuki, Matsu, Take, Yukikaze, Hatsushimo)
|
|
|
- Node R is unlocked
- Meet ANY of the following requirements:
- Difficulty is not Casual
- Slow Fleet
- Fleet contains AV
- CL + CT ≥ 2
|
|
|
|
- Does not meet the requirements to go to D
- Meet ANY of the following requirements:
- (F)BB(V) + CVL ≥ 2 (except Ise + Hyuuga)
- CL + CT + CLT ≥ 3
- DD + DE < 2
- Fleet does not contain CL
- Fleet contains SS(V)
|
|
|
- Meet ANY of the following requirements: (higher in the list equals higher priority)
- Fast fleet
- Number of historical ships ≥ 3/2/1/0 (Hard/Medium/Easy/Casual)
|
|
|
|
|
|
|
|
|
|
- Does not meet the requirements to go to D
|
|
|
- Meet ALL of the following requirements:
- (F)BB(V) + CVL + AV < 3
- CL + CT + CLT ≤ 2
- Fleet contains CL
- DD + DE ≥ 2
- If difficulty is not Casual:
- Fast fleet
- Number of historical ships ≥ 2
|
|
|
|
- Meet ANY of the following requirements:
- (F)BB(V) + CVL ≥ 2
- Fleet contains SS(V)
|
|
|
- Does not meet the requirements to go to F
- Fast fleet
|
|
|
|
|
|
|
|
|
|
- Meet ANY of the following requirements:
- Fleet contains CA(V)
- CL + CT + CLT ≥ 3 (2 if fleet is Slow)
|
|
|
- Does not meet the requirements to go to D
|
|
|
|
- Meet ANY of the following requirements:
- Number of historical ships ≤ 1 (Hard only)
- (F)BB(V) + CVL ≥ 2
- DD + DE ≤ 2
- Fleet does not contain CL (Hard and Medium only)
|
|
|
- Does not meet the requirements to go to K
- Force S if difficulty is Casual
|
|
|
|
- Does not meet the requirements to go to O
|
|
|
- Force O if difficulty is Easy or Casual
- Meet ALL of the following requirements:
- Fast fleet
- Fleet size ≤ 5, only if difficulty is Hard
|
|
|
|
- Does not meet the requirements to go to V
- Fail the LoS check
|
|
|
- Meet ALL of the following requirements:
- Fast fleet
- Fleet does not contain (F)BB(V) or CVL
- CA(V) + CLT + AV ≤ 1
- CA(V) + CL ≤ 2
- Number of historical ships ≥ 3/2/0/0 (Hard/Medium/Easy/Casual)
- Pass the LoS check
- Cn = 3; 48+/38+/29+/29+ (Hard/Medium/Easy/Casual) LoS
|
|
|
|
|
|
|
- Pass the LoS check
- Cn = 3; 41+/33+/27+/23+ (Hard/Medium/Easy/Casual) LoS
|
Branching compositions were reported over the course of the event. (NGA and Piro)
The event guides are to be constructed through the respective Event map page guide and reviewed by editor staff / collaboration committee before being approved here. Do not under any circumstance update the guides through this page or attempt to fix them through this page. Please only update guides through their respective sandbox pages.
Ship Bonuses (Tentative)
DISCLAIMER: This information is based on user submitted data and is subject to revisions as more data is gathered. Any version of the ship receives the bonus regardless of remodel.
| Ships
|
Nodes D/F
|
Nodes J
|
Nodes N/P/Q
|
Nodes S/V
|

|

|
-
|
1.25x
|
1.575x
|
1.375x
|

|

|
-
|
1.25x
|
|
|
| Any Destroyer Escort (DE)
|
1.15x
|
|
1.265x
|
|
|
|

|
-
|
-
|
1.25x
|

|

|

|
1.15x
|

|
-
|
-
|
|
|

|

|

|
|
1.25x
|
|

|

|

|

|

|

|

|

|
-
|
|
|

|

|
-
|
1.1x
|
1.23x
|
|
1.1x
|
General Guidelines
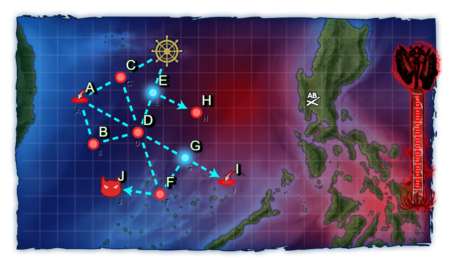
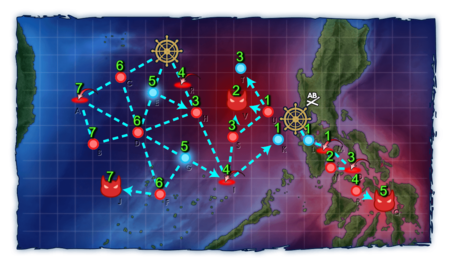
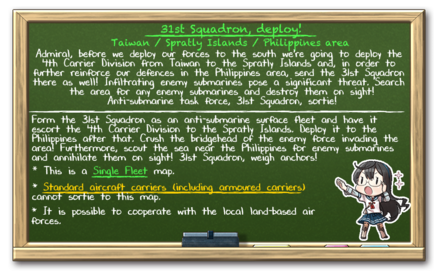
E-1 is a 3.5 Phase Map with the 31st Squadron Lock Tag (Green) consisting of three HP Phases and a minimal Unlock. One base of Land Based Aerial Support (LBAS) is available to sortie on this Map. Due to the span of different combat types on this map (Surface, ASW, Anti-Installation) it is recommended to take ships that are good at multiple of these categories to avoid locking too many ships to this map.
Phase 1: Defeat the Ru-Class Patrol at Node J
The goal of this phase is to deplete the HP Bar and defeat the Ru Class Battleship at J. There is a submarine node and light surface squadron on the way, while the boss itself consists of only surface ships.
- Recommended Fleet: 1CL 0-1AV 4-5DD (Fast Fleet)
- Route: E D G F J
- LBAS: Range 7, no Airpower
- Additional Notes: Vanguard Formation can be utilized to help with preboss sub node. Support Expeditions are not needed
Phase 1.5: Unlocking the Path to the Second Boss
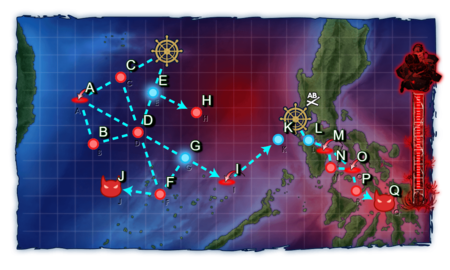
To unlock the path to the second Boss, you simply have to reach K once.
- Recommended Fleet: 1CL 0-1AV 4-5DD (Fast Fleet)
- Route: E D G I K
- LBAS: Range 7, no Airpower
- Additional Notes: There is no surface combat on route, only ASW and Anti-Air Combat. If you get critically damaged at I you can still proceed the sortie as the Route to the non-combat node K is fixed.
Phase 2: The Benchmarkening (Defeat Supply Depot Hime)
To complete this Phase, you need to deplete the HP Bar of the Second Boss Q, consisting of a mix of Installations and PT Boats. Set up your Ships with the according equipment to deal with them as outlined here. PT Imps are weak to AA Guns + Skilled Lookouts on your DDs. There are PT Imps and two pretty powerful airstrike on the way.
| ExpandAnti-PT boat
|
Unlike most standard Abyssals, "PT boats" (PT Imp Pack & Schnellboot Imp Pack & Schnellboot Imp Pack ) are "very small and fast". ) are "very small and fast".
- All ship types suffer a severe
 accuracy and accuracy and  firepower penalty against PT boats. firepower penalty against PT boats.
- Attacking them with larger guns is not very effective, smaller guns being recommended instead.
- Support Expeditions are not affect by any of the following[1].
| ExpandAccuracy formula against PT boats
|
The Accuracy formula against PT boats:[5][6][7][8]
- With
- the standard accuracy described here
- PT boats are "DDs" in the game, so the for vanguard is 1.1 during shelling, and 1.2 during the torpedo phase.
- Historical accuracy bonuses during Events are included in the Standard Accuracy Term, i.e. it is affected by the modifier.
- the PT estimated evasion
 described bellow, described bellow,
- The main Accuracy modifiers are
- being include in :
- the bonus given by ship types, described below,
- the bonuses given by equipment, described below,
- being 0.7 during night battle, 1 during day battle.
|
Amagiri Kai Ni/D
 has the ability to prioritize focusing on attacking PT imps with significantly increased accuracy if any are present. has the ability to prioritize focusing on attacking PT imps with significantly increased accuracy if any are present.
- DD placed in the composition slots above and below her will gain a noticeable accuracy boost and will prioritize attacking PT boats if any are present.
- The PT boat targeting rate is 100% for all affected ships [9].
During Events, some special bonuses may be added, with "historical" ships and equipment gaining some accuracy bonuses[10].
| Ship Type |
|
| DD & DE |
1.0
|
| CL, CLT, & CT |
0.82
|
| All other types |
0.7
|
- Notes
- It is recommended to use anti-PT setups on DDs only, such setups compromising overall combat effectiveness.
- Having a Reinforcement Expansion is important because it can save a ship slot by containing a machine gun or skilled lookouts.
- Combining equipment is recommended to see significant boosts to accuracy.
- The
 Ka-Tsu Tanks Ka-Tsu Tanks
 bonus does not stack with the bonus does not stack with the  Armed Boats Armed Boats
 ones. ones.
- Using other setups improving accuracy is also advisable:
|
|
|
| [edit]
|
- Recommended Fleet: 1AV/CL 4-5DD (Fast Fleet) (On Hard, only a 5 ship fleet takes the shortest route)
- Route: L M O P Q
- LBAS: Range 5, (29/69/79/121) Airpower for AP at Last Dance (C/E/M/H)
- Additional Notes: Support fleets can be taken due to the presence of PT Imps.
Phase 3: Defeat the Enemy Submarine Force!
The goal of this phase is to sink the New Old Submarine Princess found at V to deplete the HP Bar and clear the map. There is a surface engagement S, a Submarine Node H and high airpower air raid I on route, but the Boss itself is an Anti-Submarine operation. AACI is highly recommended for this route, the surface Nodes can be passed using Vanguard formation as to not sacrifice too many equipment slots that should be occupied with ASW equipment.
- Recommended Fleet: 0-1 AV 0-1CLT 1-2CL 4DD (Fast Fleet)
- Route: E H I S V
- LBAS: Range 2, no Airpower present at the Boss. I has (138/144/149/229) AP for (C/E/M/H)
- Additional Notes:
- 1 Regular CL is required within the fleet composition
- LBAS can be Toukai sent to the Boss, Bombers to the Preboss Surface Nodes or a fighter sweep to Node I, depending on your surface fleet setup.
- The required LoS to reach the boss is Cn3 48+/38+/29+/29+ on Hard/Medium/Easy/Casual
- 3/2/1/1 historical ships are required on Hard/Medium/Easy/Casual
- (Kitakami, Isuzu, Satsuki, Uzuki, Hibiki, Ushio, Suzutsuki, Matsu, Take, Yukikaze, Hatsushimo)
Enemy Compositions

E-1 Hard A: 深海任務部隊 空母艦載機群 (
PoiDB)
| #
|
Formation
|
Air Defense Node
|
AD/AP
AS/AS+
|
| A
|
Diamond
Phases: 1, 2, 3
|
|
75/149
335/669
|
Diamond
Phases: 1, 2, 3
|
|
78/155
347/693
|
Diamond
Phases: 1, 2, 3
|
|
88/175
392/783
|
Diamond
Phases: 1, 2, 3
|
|
98/195
437/873
|
Diamond
Phases: 1, 2, 3
|
|
108/215
482/963
|
| #
|
Formation
|
Air Defense Node
|
AD/AP
AS/AS+
|
E-1 Hard B: 深海艦隊 南沙方面警戒群 (
PoiDB)
| #
|
Formation
|
Normal Battle Node
|
AD/AP
AS/AS+
|
| B
|
Line Ahead
Double Line
Phases: 1, 2, 3
|
|
0/0
0/0
|
Line Ahead
Double Line
Phases: 1, 2, 3
|
|
0/0
0/0
|
| #
|
Formation
|
Normal Battle Node
|
AD/AP
AS/AS+
|
E-1 Hard C: 深海潜水艦隊 台湾沖偵察部隊 (
PoiDB)
| #
|
Formation
|
Normal Battle Node
|
AD/AP
AS/AS+
|
| C
|
Echelon
Line Abreast
Phases: 1, 2, 3
|
|
0/0
0/0
|
Echelon
Line Abreast
Phases: 1, 2, 3
|
|
0/0
0/0
|
| #
|
Formation
|
Normal Battle Node
|
AD/AP
AS/AS+
|
E-1 Hard D: 深海潜水艦隊 南沙哨戒線 (
PoiDB)
| #
|
Formation
|
Normal Battle Node
|
AD/AP
AS/AS+
|
| D
|
Echelon
Line Abreast
Phases: 1, 2, 3
|
|
0/0
0/0
|
Echelon
Line Abreast
Phases: 1, 2, 3
|
|
0/0
0/0
|
| #
|
Formation
|
Normal Battle Node
|
AD/AP
AS/AS+
|
E-1 Hard E
| #
|
Selection Node
|
| E
|
艦隊の針路を選択できます。提督、どちらの針路をとられますか?
You can decide the fleet's course. Admiral, which heading should we take?
|
| #
|
Selection Node
|
E-1 Hard F: 深海艦隊 南沙方面艦隊 前衛集団 (
PoiDB)
| #
|
Formation
|
Normal Battle Node
|
AD/AP
AS/AS+
|
| F
|
Line Ahead
Double Line
Echelon
Phases: 1, 2, 3
|
|
0/0
0/0
|
| #
|
Formation
|
Normal Battle Node
|
AD/AP
AS/AS+
|
E-1 Hard G
| #
|
Selection Node
|
| G
|
艦隊の針路を選択できます。提督、どちらの針路をとられますか?
You can decide the fleet's course. Admiral, which heading should we take?
|
| #
|
Selection Node
|
E-1 Hard H: 深海潜水艦隊 増援封鎖部隊 I群 (
PoiDB)
| #
|
Formation
|
Normal Battle Node
|
AD/AP
AS/AS+
|
| H
|
Echelon
Line Abreast
Phases: 1, 2, 3
|
|
0/0
0/0
|
Echelon
Line Abreast
Phases: 2, 3
|
|
0/0
0/0
|
| #
|
Formation
|
Normal Battle Node
|
AD/AP
AS/AS+
|
E-1 Hard I: 深海任務部隊 空母艦載機群 (
PoiDB)
| #
|
Formation
|
Air Defense Node
|
AD/AP
AS/AS+
|
| I
|
Diamond
Phases: 2, 3
|
|
75/149
335/669
|
Diamond
Phases: 1, 2, 3
|
|
78/155
347/693
|
Diamond
Phases: 1, 2, 3
|
|
88/175
392/783
|
Diamond
Phases: 3
|
|
95/189
425/849
|
Diamond
Phases: 3
|
|
115/229
515/1029
|
| #
|
Formation
|
Air Defense Node
|
AD/AP
AS/AS+
|
E-1 Hard J: 深海艦隊 南沙方面艦隊 中央集団 (
PoiDB)
| #
|
Formation
|
Boss Battle Node
|
AD/AP
AS/AS+
|
| J
|
Line Ahead
Double Line
Phases: 1, 2, 3
|
|
0/0
0/0
|
Line Ahead
Phases: 1
(Final)
|
|
0/0
0/0
|
| #
|
Formation
|
Boss Battle Node
|
AD/AP
AS/AS+
|
E-1 Hard K
| #
|
Empty Node
|
| K
|
気のせいだった。
第三十一戦隊、これよりマニラに入港す。
Must be my imagination.
31st Squadron, entering the Port of Manila!
|
| #
|
Empty Node
|
E-1 Hard L
| #
|
Empty Node
|
| L
|
気のせいだった。
第三十一戦隊、これよりマニラを抜錨、ルソン方面に出撃す!
Must be my imagination.
31st Squadron, setting sail from Manilla,
sortieing to the Luzon front!
|
| #
|
Empty Node
|
E-1 Hard M: 深海任務部隊 空母艦載機群 (
PoiDB)
| #
|
Formation
|
Air Defense Node
|
AD/AP
AS/AS+
|
| M
|
Diamond
Phases: 2, 3
|
|
49/98
219/438
|
Diamond
Phases: 2, 3
|
|
70/139
311/621
|
Diamond
Phases: 2, 3
|
|
72/144
323/645
|
Diamond
Phases: 2, 3
|
|
75/149
335/669
|
Diamond
Phases: 2
|
|
78/155
347/693
|
| #
|
Formation
|
Air Defense Node
|
AD/AP
AS/AS+
|
E-1 Hard N: 深海艦隊 比島方面警戒駆逐隊 (
PoiDB)
| #
|
Formation
|
Normal Battle Node
|
AD/AP
AS/AS+
|
| N
|
Line Ahead
Echelon
Phases: 2, 3
|
|
0/0
0/0
|
Line Ahead
Echelon
Phases: 2, 3
|
|
0/0
0/0
|
| #
|
Formation
|
Normal Battle Node
|
AD/AP
AS/AS+
|
E-1 Hard O: 深海任務部隊 空母艦載機群 (
PoiDB)
| #
|
Formation
|
Air Defense Node
|
AD/AP
AS/AS+
|
| O
|
Diamond
Phases: 2, 3
|
|
49/98
219/438
|
Diamond
Phases: 2, 3
|
|
67/133
297/594
|
Diamond
Phases: 2, 3
|
|
90/179
401/801
|
Diamond
Phases: 2, 3
|
|
92/184
413/825
|
Diamond
Phases: 2
|
|
95/189
425/849
|
| #
|
Formation
|
Air Defense Node
|
AD/AP
AS/AS+
|
E-1 Hard P: 深海艦隊 比島侵攻集団 警戒線 (
PoiDB)
| #
|
Formation
|
Normal Battle Node
|
AD/AP
AS/AS+
|
| P
|
Line Ahead
Echelon
Phases: 2, 3
|
|
0/0
0/0
|
Line Ahead
Echelon
Phases: 2, 3
|
|
0/0
0/0
|
| #
|
Formation
|
Normal Battle Node
|
AD/AP
AS/AS+
|
E-1 Hard Q: 深海艦隊 比島侵攻集団 集積地 (
PoiDB)
| #
|
Formation
|
Boss Battle Node
|
AD/AP
AS/AS+
|
| Q
|
Line Ahead
Phases: 2
|
|
50/99
222/444
|
Double Line
Phases: 3
|
|
31/61
135/270
|
Line Ahead
Phases: 2
(Final)
|
|
61/121
270/540
|
| #
|
Formation
|
Boss Battle Node
|
AD/AP
AS/AS+
|
E-1 Hard R: 深海任務部隊 空母艦載機群 (
PoiDB)
| #
|
Formation
|
Air Defense Node
|
AD/AP
AS/AS+
|
| R
|
Diamond
Phases: 3
|
|
72/144
323/645
|
Diamond
Phases: 3
|
|
75/149
335/669
|
Diamond
Phases: 3
|
|
78/155
347/693
|
Diamond
Phases: 3
|
|
88/175
392/783
|
Diamond
Phases: 3
|
|
98/195
437/873
|
| #
|
Formation
|
Air Defense Node
|
AD/AP
AS/AS+
|
E-1 Hard S: 深海艦隊 増援封鎖水上部隊 (
PoiDB)
| #
|
Formation
|
Normal Battle Node
|
AD/AP
AS/AS+
|
| S
|
Line Ahead
Double Line
Echelon
Phases: 3
|
|
0/0
0/0
|
| #
|
Formation
|
Normal Battle Node
|
AD/AP
AS/AS+
|
E-1 Hard T
| #
|
Empty Node
|
| T
|
敵影を見ず。
No enemy spotted.
|
| #
|
Empty Node
|
E-1 Hard U: 深海潜水艦隊 増援封鎖部隊 II群 (
PoiDB)
| #
|
Formation
|
Normal Battle Node
|
AD/AP
AS/AS+
|
| U
|
Echelon
Line Abreast
Phases: 3
|
|
0/0
0/0
|
Echelon
Line Abreast
Phases: 3
|
|
0/0
0/0
|
| #
|
Formation
|
Normal Battle Node
|
AD/AP
AS/AS+
|
E-1 Hard V: 深海潜水艦隊 増援封鎖部隊主力 (
PoiDB)
| #
|
Formation
|
Boss Battle Node
|
AD/AP
AS/AS+
|
| V
|
Echelon
Phases: 3
|
|
0/0
0/0
|
Line Ahead
Phases: 3
|
|
0/0
0/0
|
Line Ahead
Phases: 3
(Final)
|
|
0/0
0/0
|
| #
|
Formation
|
Boss Battle Node
|
AD/AP
AS/AS+
|

E-1 Medium A: 深海任務部隊 空母艦載機群 (
PoiDB)
| #
|
Formation
|
Air Defense Node
|
AD/AP
AS/AS+
|
| A
|
Diamond
Phases: 1, 3
|
|
47/93
207/414
|
Diamond
Phases: 1, 2, 3
|
|
70/139
311/621
|
Diamond
Phases: 1, 2
|
|
72/144
323/645
|
Diamond
Phases: 1, 2, 3
|
|
75/149
335/669
|
Diamond
Phases: 1, 2
|
|
78/155
347/693
|
| #
|
Formation
|
Air Defense Node
|
AD/AP
AS/AS+
|
E-1 Medium B: 深海艦隊 南沙方面警戒群 (
PoiDB)
| #
|
Formation
|
Normal Battle Node
|
AD/AP
AS/AS+
|
| B
|
Line Ahead
Double Line
Phases: 1, 2, 3
|
|
0/0
0/0
|
Line Ahead
Double Line
Phases: 1, 2, 3
|
|
0/0
0/0
|
| #
|
Formation
|
Normal Battle Node
|
AD/AP
AS/AS+
|
E-1 Medium C: 深海潜水艦隊 台湾沖偵察部隊 (
PoiDB)
| #
|
Formation
|
Normal Battle Node
|
AD/AP
AS/AS+
|
| C
|
Echelon
Line Abreast
Phases: 1, 2, 3
|
|
0/0
0/0
|
Echelon
Line Abreast
Phases: 1, 2, 3
|
|
0/0
0/0
|
Echelon
Line Abreast
Phases: 1, 2, 3
|
|
0/0
0/0
|
Echelon
Line Abreast
Phases: 1, 2, 3
|
|
0/0
0/0
|
| #
|
Formation
|
Normal Battle Node
|
AD/AP
AS/AS+
|
E-1 Medium D: 深海潜水艦隊 南沙哨戒線 (
PoiDB)
| #
|
Formation
|
Normal Battle Node
|
AD/AP
AS/AS+
|
| D
|
Echelon
Line Abreast
Phases: 1, 2, 3
|
|
0/0
0/0
|
Echelon
Line Abreast
Phases: 1, 2, 3
|
|
0/0
0/0
|
Echelon
Line Abreast
Phases: 1, 2, 3
|
|
0/0
0/0
|
Echelon
Line Abreast
Phases: 1, 2, 3
|
|
0/0
0/0
|
| #
|
Formation
|
Normal Battle Node
|
AD/AP
AS/AS+
|
E-1 Medium E
| #
|
Selection Node
|
| E
|
艦隊の針路を選択できます。提督、どちらの針路をとられますか?
You can decide the fleet's course. Admiral, which heading should we take?
|
| #
|
Selection Node
|
E-1 Medium F: 深海艦隊 南沙方面艦隊 前衛集団 (
PoiDB)
| #
|
Formation
|
Normal Battle Node
|
AD/AP
AS/AS+
|
| F
|
Line Ahead
Double Line
Echelon
Phases: 1, 2, 3
|
|
0/0
0/0
|
| #
|
Formation
|
Normal Battle Node
|
AD/AP
AS/AS+
|
E-1 Medium G
| #
|
Selection Node
|
| G
|
艦隊の針路を選択できます。提督、どちらの針路をとられますか?
You can decide the fleet's course. Admiral, which heading should we take?
|
| #
|
Selection Node
|
E-1 Medium H: 深海潜水艦隊 増援封鎖部隊 I群 (
PoiDB)
| #
|
Formation
|
Normal Battle Node
|
AD/AP
AS/AS+
|
| H
|
Echelon
Line Abreast
Phases: 1, 2, 3
|
|
0/0
0/0
|
Echelon
Line Abreast
Phases: 1, 2, 3
|
|
0/0
0/0
|
Echelon
Line Abreast
Phases: 1, 2, 3
|
|
0/0
0/0
|
Echelon
Line Abreast
Phases: 2, 3
|
|
0/0
0/0
|
| #
|
Formation
|
Normal Battle Node
|
AD/AP
AS/AS+
|
E-1 Medium I: 深海任務部隊 空母艦載機群 (
PoiDB)
| #
|
Formation
|
Air Defense Node
|
AD/AP
AS/AS+
|
| I
|
Diamond
Phases: 2, 3
|
|
47/93
207/414
|
Diamond
Phases: 2, 3
|
|
70/139
311/621
|
Diamond
Phases: 2, 3
|
|
72/144
323/645
|
Diamond
Phases: 2, 3
|
|
75/149
335/669
|
Diamond
Phases: 2, 3
|
|
78/155
347/693
|
| #
|
Formation
|
Air Defense Node
|
AD/AP
AS/AS+
|
E-1 Medium J: 深海艦隊 南沙方面艦隊 中央集団 (
PoiDB)
| #
|
Formation
|
Boss Battle Node
|
AD/AP
AS/AS+
|
| J
|
Line Ahead
Double Line
Phases: 1, 2, 3
|
|
0/0
0/0
|
Line Ahead
Phases: 1
(Final)
|
|
0/0
0/0
|
| #
|
Formation
|
Boss Battle Node
|
AD/AP
AS/AS+
|
E-1 Medium K
| #
|
Empty Node
|
| K
|
気のせいだった。
第三十一戦隊、これよりマニラに入港す。
Must be my imagination.
31st Squadron, entering the Port of Manila!
|
| #
|
Empty Node
|
E-1 Medium L
| #
|
Empty Node
|
| L
|
気のせいだった。
第三十一戦隊、これよりマニラを抜錨、ルソン方面に出撃す!
Must be my imagination.
31st Squadron, setting sail from Manilla,
sortieing to the Luzon front!
|
| #
|
Empty Node
|
E-1 Medium M: 深海任務部隊 空母艦載機群 (
PoiDB)
| #
|
Formation
|
Air Defense Node
|
AD/AP
AS/AS+
|
| M
|
Diamond
Phases: 2, 3
|
|
17/33
72/144
|
Diamond
Phases: 2, 3
|
|
32/63
140/279
|
Diamond
Phases: 2, 3
|
|
47/93
207/414
|
Diamond
Phases: 2, 3
|
|
49/98
219/438
|
| #
|
Formation
|
Air Defense Node
|
AD/AP
AS/AS+
|
E-1 Medium N: 深海艦隊 比島方面警戒駆逐隊 (
PoiDB)
| #
|
Formation
|
Normal Battle Node
|
AD/AP
AS/AS+
|
| N
|
Line Ahead
Echelon
Phases: 2
|
|
0/0
0/0
|
Line Ahead
Echelon
Phases: 2
|
|
0/0
0/0
|
Line Ahead
Echelon
Phases: 2
|
|
0/0
0/0
|
Line Ahead
Echelon
Phases: 2
|
|
0/0
0/0
|
| #
|
Formation
|
Normal Battle Node
|
AD/AP
AS/AS+
|
E-1 Medium O: 深海任務部隊 空母艦載機群 (
PoiDB)
| #
|
Formation
|
Air Defense Node
|
AD/AP
AS/AS+
|
| O
|
Diamond
Phases: 2, 3
|
|
32/63
140/279
|
Diamond
Phases: 2, 3
|
|
47/93
207/414
|
Diamond
Phases: 2, 3
|
|
49/98
219/438
|
Diamond
Phases: 2
|
|
67/133
297/594
|
Diamond
Phases: 2
|
|
90/179
401/801
|
| #
|
Formation
|
Air Defense Node
|
AD/AP
AS/AS+
|
E-1 Medium P: 深海艦隊 比島侵攻集団 警戒線 (
PoiDB)
| #
|
Formation
|
Normal Battle Node
|
AD/AP
AS/AS+
|
| P
|
Line Ahead
Echelon
Phases: 2, 3
|
|
0/0
0/0
|
Line Ahead
Echelon
Phases: 2, 3
|
|
0/0
0/0
|
Line Ahead
Echelon
Phases: 2, 3
|
|
0/0
0/0
|
Line Ahead
Echelon
Phases: 2, 3
|
|
0/0
0/0
|
| #
|
Formation
|
Normal Battle Node
|
AD/AP
AS/AS+
|
E-1 Medium Q: 深海艦隊 比島侵攻集団 集積地 (
PoiDB)
| #
|
Formation
|
Boss Battle Node
|
AD/AP
AS/AS+
|
| Q
|
Line Ahead
Phases: 2
|
|
28/56
125/249
|
Double Line
Phases: 3
|
|
23/45
99/198
|
Line Ahead
Phases: 2
(Final)
|
|
40/79
176/351
|
| #
|
Formation
|
Boss Battle Node
|
AD/AP
AS/AS+
|
E-1 Medium R: 深海任務部隊 空母艦載機群 (
PoiDB)
| #
|
Formation
|
Air Defense Node
|
AD/AP
AS/AS+
|
| R
|
Diamond
Phases: 3
|
|
24/47
104/207
|
Diamond
Phases: 3
|
|
47/93
207/414
|
Diamond
Phases: 3
|
|
70/139
311/621
|
Diamond
Phases: 3
|
|
72/144
323/645
|
Diamond
Phases: 3
|
|
75/149
335/669
|
| #
|
Formation
|
Air Defense Node
|
AD/AP
AS/AS+
|
E-1 Medium S: 深海艦隊 増援封鎖水上部隊 (
PoiDB)
| #
|
Formation
|
Normal Battle Node
|
AD/AP
AS/AS+
|
| S
|
Line Ahead
Double Line
Echelon
Phases: 3
|
|
0/0
0/0
|
| #
|
Formation
|
Normal Battle Node
|
AD/AP
AS/AS+
|
E-1 Medium T
| #
|
Empty Node
|
| T
|
敵影を見ず。
No enemy spotted.
|
| #
|
Empty Node
|
E-1 Medium U: 深海潜水艦隊 増援封鎖部隊 II群 (
PoiDB)
| #
|
Formation
|
Normal Battle Node
|
AD/AP
AS/AS+
|
| U
|
Echelon
Line Abreast
Phases: 3
|
|
0/0
0/0
|
Echelon
Line Abreast
Phases: 3
|
|
0/0
0/0
|
Echelon
Line Abreast
Phases: 3
|
|
0/0
0/0
|
Echelon
Line Abreast
Phases: 3
|
|
0/0
0/0
|
| #
|
Formation
|
Normal Battle Node
|
AD/AP
AS/AS+
|
E-1 Medium V: 深海潜水艦隊 増援封鎖部隊主力 (
PoiDB)
| #
|
Formation
|
Boss Battle Node
|
AD/AP
AS/AS+
|
| V
|
Line Ahead
Echelon
Phases: 3
|
|
0/0
0/0
|
Line Ahead
Phases: 3
(Final)
|
|
0/0
0/0
|
| #
|
Formation
|
Boss Battle Node
|
AD/AP
AS/AS+
|

E-1 Easy A: 深海任務部隊 空母艦載機群 (
PoiDB)
| #
|
Formation
|
Air Defense Node
|
AD/AP
AS/AS+
|
| A
|
Diamond
Phases: 2
|
|
24/47
104/207
|
Diamond
Phases: 1, 2
|
|
47/93
207/414
|
Diamond
Phases: 1, 2
|
|
70/139
311/621
|
Diamond
Phases: 1, 2
|
|
72/144
323/645
|
| #
|
Formation
|
Air Defense Node
|
AD/AP
AS/AS+
|
E-1 Easy B: 深海艦隊 南沙方面警戒群 (
PoiDB)
| #
|
Formation
|
Normal Battle Node
|
AD/AP
AS/AS+
|
| B
|
Line Ahead
Double Line
Phases: 1, 2
|
|
0/0
0/0
|
Line Ahead
Double Line
Phases: 1
|
|
0/0
0/0
|
Line Ahead
Double Line
Phases: 1, 2
|
|
0/0
0/0
|
Line Ahead
Double Line
Phases: 2
|
|
0/0
0/0
|
| #
|
Formation
|
Normal Battle Node
|
AD/AP
AS/AS+
|
E-1 Easy C: 深海潜水艦隊 台湾沖偵察部隊 (
PoiDB)
| #
|
Formation
|
Normal Battle Node
|
AD/AP
AS/AS+
|
| C
|
Echelon
Line Abreast
Phases: 2, 3
|
|
0/0
0/0
|
Echelon
Line Abreast
Phases: 1, 2, 3
|
|
0/0
0/0
|
Echelon
Line Abreast
Phases: 1, 2, 3
|
|
0/0
0/0
|
Echelon
Line Abreast
Phases: 1, 2
|
|
0/0
0/0
|
| #
|
Formation
|
Normal Battle Node
|
AD/AP
AS/AS+
|
E-1 Easy D: 深海潜水艦隊 南沙哨戒線 (
PoiDB)
| #
|
Formation
|
Normal Battle Node
|
AD/AP
AS/AS+
|
| D
|
Echelon
Line Abreast
Phases: 1, 2, 3
|
|
0/0
0/0
|
Echelon
Line Abreast
Phases: 1, 2, 3
|
|
0/0
0/0
|
Echelon
Line Abreast
Phases: 1, 2, 3
|
|
0/0
0/0
|
Echelon
Line Abreast
Phases: 1, 2, 3
|
|
0/0
0/0
|
| #
|
Formation
|
Normal Battle Node
|
AD/AP
AS/AS+
|
E-1 Easy E
| #
|
Selection Node
|
| E
|
艦隊の針路を選択できます。提督、どちらの針路をとられますか?
You can decide the fleet's course. Admiral, which heading should we take?
|
| #
|
Selection Node
|
E-1 Easy F: 深海艦隊 南沙方面艦隊 前衛集団 (
PoiDB)
| #
|
Formation
|
Normal Battle Node
|
AD/AP
AS/AS+
|
| F
|
Line Ahead
Double Line
Echelon
Phases: 1, 2, 3
|
|
0/0
0/0
|
| #
|
Formation
|
Normal Battle Node
|
AD/AP
AS/AS+
|
E-1 Easy G
| #
|
Selection Node
|
| G
|
艦隊の針路を選択できます。提督、どちらの針路をとられますか?
You can decide the fleet's course. Admiral, which heading should we take?
|
| #
|
Selection Node
|
E-1 Easy H: 深海潜水艦隊 増援封鎖部隊 I群 (
PoiDB)
| #
|
Formation
|
Normal Battle Node
|
AD/AP
AS/AS+
|
| H
|
Echelon
Line Abreast
Phases: 2, 3
|
|
0/0
0/0
|
Echelon
Line Abreast
Phases: 1, 2, 3
|
|
0/0
0/0
|
Echelon
Line Abreast
Phases: 1, 3
|
|
0/0
0/0
|
Echelon
Line Abreast
Phases: 2, 3
|
|
0/0
0/0
|
| #
|
Formation
|
Normal Battle Node
|
AD/AP
AS/AS+
|
E-1 Easy I: 深海任務部隊 空母艦載機群 (
PoiDB)
| #
|
Formation
|
Air Defense Node
|
AD/AP
AS/AS+
|
| I
|
Diamond
Phases: 2, 3
|
|
24/47
104/207
|
Diamond
Phases: 1, 2, 3
|
|
47/93
207/414
|
Diamond
Phases: 2, 3
|
|
70/139
311/621
|
Diamond
Phases: 2, 3
|
|
72/144
323/645
|
| #
|
Formation
|
Air Defense Node
|
AD/AP
AS/AS+
|
E-1 Easy J: 深海艦隊 南沙方面艦隊 中央集団 (
PoiDB)
| #
|
Formation
|
Boss Battle Node
|
AD/AP
AS/AS+
|
| J
|
Line Ahead
Double Line
Phases: 1, 2, 3
|
|
0/0
0/0
|
Line Ahead
Phases: 1
(Final)
|
|
0/0
0/0
|
| #
|
Formation
|
Boss Battle Node
|
AD/AP
AS/AS+
|
E-1 Easy K
| #
|
Empty Node
|
| K
|
気のせいだった。
第三十一戦隊、これよりマニラに入港す。
Must be my imagination.
31st Squadron, entering the Port of Manila!
|
| #
|
Empty Node
|
E-1 Easy L
| #
|
Empty Node
|
| L
|
気のせいだった。
第三十一戦隊、これよりマニラを抜錨、ルソン方面に出撃す!
Must be my imagination.
31st Squadron, setting sail from Manilla,
sortieing to the Luzon front!
|
| #
|
Empty Node
|
E-1 Easy M: 深海任務部隊 空母艦載機群 (
PoiDB)
| #
|
Formation
|
Air Defense Node
|
AD/AP
AS/AS+
|
| M
|
Diamond
Phases: 2, 3
|
|
9/17
36/72
|
Diamond
Phases: 2, 3
|
|
17/33
72/144
|
Diamond
Phases: 2, 3
|
|
32/63
140/279
|
Diamond
Phases: 2, 3
|
|
47/93
207/414
|
| #
|
Formation
|
Air Defense Node
|
AD/AP
AS/AS+
|
| #
|
Formation
|
Normal Battle Node
|
AD/AP
AS/AS+
|
| #
|
Formation
|
Normal Battle Node
|
AD/AP
AS/AS+
|
E-1 Easy O: 深海任務部隊 空母艦載機群 (
PoiDB)
| #
|
Formation
|
Air Defense Node
|
AD/AP
AS/AS+
|
| O
|
Diamond
Phases: 2, 3
|
|
9/17
36/72
|
Diamond
Phases: 2, 3
|
|
17/33
72/144
|
Diamond
Phases: 2, 3
|
|
32/63
140/279
|
Diamond
Phases: 2, 3
|
|
47/93
207/414
|
| #
|
Formation
|
Air Defense Node
|
AD/AP
AS/AS+
|
E-1 Easy P: 深海艦隊 比島侵攻集団 警戒線 (
PoiDB)
| #
|
Formation
|
Normal Battle Node
|
AD/AP
AS/AS+
|
| P
|
Line Ahead
Echelon
Phases: 2, 3
|
|
0/0
0/0
|
Line Ahead
Echelon
Phases: 2, 3
|
|
0/0
0/0
|
Line Ahead
Echelon
Phases: 2, 3
|
|
0/0
0/0
|
Line Ahead
Echelon
Phases: 2, 3
|
|
0/0
0/0
|
| #
|
Formation
|
Normal Battle Node
|
AD/AP
AS/AS+
|
E-1 Easy Q: 深海艦隊 比島侵攻集団 集積地 (
PoiDB)
| #
|
Formation
|
Boss Battle Node
|
AD/AP
AS/AS+
|
| Q
|
Line Ahead
Phases: 2
|
|
25/49
108/216
|
Double Line
Phases: 3
|
|
18/35
77/153
|
Line Ahead
Phases: 2
(Final)
|
|
35/69
153/306
|
| #
|
Formation
|
Boss Battle Node
|
AD/AP
AS/AS+
|
E-1 Easy R: 深海任務部隊 空母艦載機群 (
PoiDB)
| #
|
Formation
|
Air Defense Node
|
AD/AP
AS/AS+
|
| R
|
Diamond
Phases: 3
|
|
9/17
36/72
|
Diamond
Phases: 3
|
|
24/47
104/207
|
Diamond
Phases: 3
|
|
47/93
207/414
|
Diamond
Phases: 3
|
|
70/139
311/621
|
| #
|
Formation
|
Air Defense Node
|
AD/AP
AS/AS+
|
E-1 Easy S: 深海艦隊 増援封鎖水上部隊 (
PoiDB)
| #
|
Formation
|
Normal Battle Node
|
AD/AP
AS/AS+
|
| S
|
Line Ahead
Double Line
Echelon
Phases: 3
|
|
0/0
0/0
|
| #
|
Formation
|
Normal Battle Node
|
AD/AP
AS/AS+
|
E-1 Easy T
| #
|
Empty Node
|
| T
|
敵影を見ず。
No enemy spotted.
|
| #
|
Empty Node
|
E-1 Easy U: 深海潜水艦隊 増援封鎖部隊 II群 (
PoiDB)
| #
|
Formation
|
Normal Battle Node
|
AD/AP
AS/AS+
|
| U
|
Echelon
Line Abreast
Phases: 3
|
|
0/0
0/0
|
Echelon
Line Abreast
Phases: 3
|
|
0/0
0/0
|
Echelon
Line Abreast
Phases: 3
|
|
0/0
0/0
|
Echelon
Line Abreast
Phases: 3
|
|
0/0
0/0
|
| #
|
Formation
|
Normal Battle Node
|
AD/AP
AS/AS+
|
E-1 Easy V: 深海潜水艦隊 増援封鎖部隊主力 (
PoiDB)
| #
|
Formation
|
Boss Battle Node
|
AD/AP
AS/AS+
|
| V
|
Line Ahead
Echelon
Phases: 3
|
|
0/0
0/0
|
Line Ahead
Phases: 3
(Final)
|
|
0/0
0/0
|
| #
|
Formation
|
Boss Battle Node
|
AD/AP
AS/AS+
|

E-1 Casual A: 深海任務部隊 空母艦載機群 (
PoiDB)
| #
|
Formation
|
Air Defense Node
|
AD/AP
AS/AS+
|
| A
|
Diamond
Phases: 1, 2, 3
|
|
24/47
104/207
|
Diamond
Phases: 1, 2, 3
|
|
47/93
207/414
|
Diamond
Phases: 1, 2
|
|
70/139
311/621
|
| #
|
Formation
|
Air Defense Node
|
AD/AP
AS/AS+
|
E-1 Casual B: 深海艦隊 南沙方面警戒群 (
PoiDB)
| #
|
Formation
|
Normal Battle Node
|
AD/AP
AS/AS+
|
| B
|
Line Ahead
Double Line
Phases: 1, 2, 3
|
|
0/0
0/0
|
Line Ahead
Double Line
Phases: 1, 2, 3
|
|
0/0
0/0
|
| #
|
Formation
|
Normal Battle Node
|
AD/AP
AS/AS+
|
E-1 Casual C: 深海潜水艦隊 台湾沖偵察部隊 (
PoiDB)
| #
|
Formation
|
Normal Battle Node
|
AD/AP
AS/AS+
|
| C
|
Echelon
Line Abreast
Phases: 1, 2, 3
|
|
0/0
0/0
|
Echelon
Line Abreast
Phases: 1, 2, 3
|
|
0/0
0/0
|
| #
|
Formation
|
Normal Battle Node
|
AD/AP
AS/AS+
|
E-1 Casual D: 深海潜水艦隊 南沙哨戒線 (
PoiDB)
| #
|
Formation
|
Normal Battle Node
|
AD/AP
AS/AS+
|
| D
|
Echelon
Line Abreast
Phases: 1, 2, 3
|
|
0/0
0/0
|
Echelon
Line Abreast
Phases: 1, 2, 3
|
|
0/0
0/0
|
| #
|
Formation
|
Normal Battle Node
|
AD/AP
AS/AS+
|
E-1 Casual E
| #
|
Selection Node
|
| E
|
艦隊の針路を選択できます。提督、どちらの針路をとられますか?
You can decide the fleet's course. Admiral, which heading should we take?
|
| #
|
Selection Node
|
E-1 Casual F: 深海艦隊 南沙方面艦隊 前衛集団 (
PoiDB)
| #
|
Formation
|
Normal Battle Node
|
AD/AP
AS/AS+
|
| F
|
Line Ahead
Double Line
Echelon
Phases: 1, 2, 3
|
|
0/0
0/0
|
| #
|
Formation
|
Normal Battle Node
|
AD/AP
AS/AS+
|
E-1 Casual G
| #
|
Selection Node
|
| G
|
艦隊の針路を選択できます。提督、どちらの針路をとられますか?
You can decide the fleet's course. Admiral, which heading should we take?
|
| #
|
Selection Node
|
E-1 Casual H: 深海潜水艦隊 増援封鎖部隊 I群 (
PoiDB)
| #
|
Formation
|
Normal Battle Node
|
AD/AP
AS/AS+
|
| H
|
Echelon
Line Abreast
Phases: 1, 2, 3
|
|
0/0
0/0
|
Echelon
Line Abreast
Phases: 1, 2, 3
|
|
0/0
0/0
|
| #
|
Formation
|
Normal Battle Node
|
AD/AP
AS/AS+
|
E-1 Casual I: 深海任務部隊 空母艦載機群 (
PoiDB)
| #
|
Formation
|
Air Defense Node
|
AD/AP
AS/AS+
|
| I
|
Diamond
Phases: 1, 2, 3
|
|
24/47
104/207
|
Diamond
Phases: 1, 2, 3
|
|
47/93
207/414
|
Diamond
Phases: 1, 2, 3
|
|
70/139
311/621
|
| #
|
Formation
|
Air Defense Node
|
AD/AP
AS/AS+
|
E-1 Casual J: 深海艦隊 南沙方面艦隊 中央集団 (
PoiDB)
| #
|
Formation
|
Boss Battle Node
|
AD/AP
AS/AS+
|
| J
|
Line Ahead
Double Line
Phases: 1, 2, 3
|
|
0/0
0/0
|
Line Ahead
Phases: 1
(Final)
|
|
0/0
0/0
|
| #
|
Formation
|
Boss Battle Node
|
AD/AP
AS/AS+
|
E-1 Casual K
| #
|
Empty Node
|
| K
|
気のせいだった。
第三十一戦隊、これよりマニラに入港す。
Must be my imagination.
31st Squadron, entering the Port of Manila!
|
| #
|
Empty Node
|
E-1 Casual L
| #
|
Empty Node
|
| L
|
気のせいだった。
第三十一戦隊、これよりマニラを抜錨、ルソン方面に出撃す!
Must be my imagination.
31st Squadron, setting sail from Manilla,
sortieing to the Luzon front!
|
| #
|
Empty Node
|
E-1 Casual M: 深海任務部隊 空母艦載機群 (
PoiDB)
| #
|
Formation
|
Air Defense Node
|
AD/AP
AS/AS+
|
| M
|
Diamond
Phases: 2, 3
|
|
9/17
36/72
|
Diamond
Phases: 2, 3
|
|
17/33
72/144
|
Diamond
Phases: 2, 3
|
|
32/63
140/279
|
| #
|
Formation
|
Air Defense Node
|
AD/AP
AS/AS+
|
| #
|
Formation
|
Normal Battle Node
|
AD/AP
AS/AS+
|
| #
|
Formation
|
Normal Battle Node
|
AD/AP
AS/AS+
|
E-1 Casual O: 深海任務部隊 空母艦載機群 (
PoiDB)
| #
|
Formation
|
Air Defense Node
|
AD/AP
AS/AS+
|
| O
|
Diamond
Phases: 2, 3
|
|
9/17
36/72
|
Diamond
Phases: 2, 3
|
|
17/33
72/144
|
Diamond
Phases: 2, 3
|
|
32/63
140/279
|
| #
|
Formation
|
Air Defense Node
|
AD/AP
AS/AS+
|
E-1 Casual P: 深海艦隊 比島侵攻集団 警戒線 (
PoiDB)
| #
|
Formation
|
Normal Battle Node
|
AD/AP
AS/AS+
|
| P
|
Line Ahead
Echelon
Phases: 2, 3
|
|
0/0
0/0
|
Line Ahead
Echelon
Phases: 2, 3
|
|
0/0
0/0
|
| #
|
Formation
|
Normal Battle Node
|
AD/AP
AS/AS+
|
E-1 Casual Q: 深海艦隊 比島侵攻集団 集積地 (
PoiDB)
| #
|
Formation
|
Boss Battle Node
|
AD/AP
AS/AS+
|
| Q
|
Line Ahead
Phases: 2
|
|
11/22
48/96
|
Double Line
Phases: 3
|
|
15/29
63/126
|
Line Ahead
Phases: 2
(Final)
|
|
15/29
63/126
|
| #
|
Formation
|
Boss Battle Node
|
AD/AP
AS/AS+
|
| #
|
Formation
|
Air Defense Node
|
AD/AP
AS/AS+
|
| #
|
Formation
|
Air Defense Node
|
AD/AP
AS/AS+
|
E-1 Casual S: 深海艦隊 増援封鎖水上部隊 (
PoiDB)
| #
|
Formation
|
Normal Battle Node
|
AD/AP
AS/AS+
|
| S
|
Line Ahead
Double Line
Echelon
Phases: 3
|
|
0/0
0/0
|
| #
|
Formation
|
Normal Battle Node
|
AD/AP
AS/AS+
|
E-1 Casual T
| #
|
Empty Node
|
| T
|
敵影を見ず。
No enemy spotted.
|
| #
|
Empty Node
|
E-1 Casual U: 深海潜水艦隊 増援封鎖部隊 II群 (
PoiDB)
| #
|
Formation
|
Normal Battle Node
|
AD/AP
AS/AS+
|
| U
|
Echelon
Line Abreast
Phases: 3
|
|
0/0
0/0
|
Echelon
Line Abreast
Phases: 3
|
|
0/0
0/0
|
| #
|
Formation
|
Normal Battle Node
|
AD/AP
AS/AS+
|
E-1 Casual V: 深海潜水艦隊 増援封鎖部隊主力 (
PoiDB)
| #
|
Formation
|
Boss Battle Node
|
AD/AP
AS/AS+
|
| V
|
Line Ahead
Echelon
Phases: 3
|
|
0/0
0/0
|
Line Ahead
Phases: 3
(Final)
|
|
0/0
0/0
|
| #
|
Formation
|
Boss Battle Node
|
AD/AP
AS/AS+
|
Ship Drops:


