- Welcome to the Kancolle Wiki!
- If you have any questions regarding site content, account registration, etc., please visit the KanColle Wiki Discord
Difference between revisions of "World 5"
Typesafety (talk | contribs) m (Fix incorrect node letter) |
|||
| Line 1: | Line 1: | ||
| + | <tabber> | ||
| + | |-|5-1 = | ||
| + | {{:{{BASEPAGENAME}}/5-1}} | ||
| + | |-|5-2= | ||
| + | {{:{{BASEPAGENAME}}/5-2}} | ||
| + | |-|5-3= | ||
| + | {{:{{BASEPAGENAME}}/5-3}} | ||
| + | |-|5-4= | ||
| + | {{:{{BASEPAGENAME}}/5-4}} | ||
| + | |-|5-5= | ||
| + | {{:{{BASEPAGENAME}}/5-5}} | ||
| + | </tabber> | ||
<tabber> | <tabber> | ||
|-| 5-1= | |-| 5-1= | ||
Revision as of 16:58, 24 March 2021
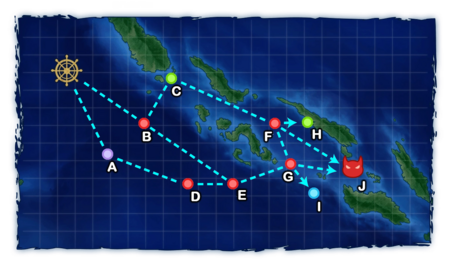
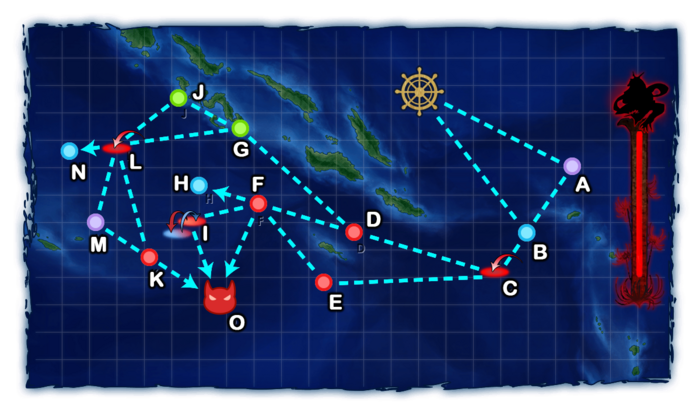
World 5-1: 南方海域前面 - The Forefront of the Southern Sea
| Strategy Name | 南方海域進出作戦 Southern Sea Advancement Tactics |
|---|---|
| Difficulty | ☆ ☆ ☆ ☆ ☆ ☆ ☆ ☆ |
| Item | |
| Strategy Content | 練度の高い水上打撃部隊を編成し、南方海域への進出を図れ! Create a diverse surface fleet to expand into the southern sea area! |
| World 5 Unlocking & Progression | ||||
|---|---|---|---|---|
| Unlock conditions | World 5 is unlocked after clearing 3-4 | |||
| Clear conditions | To clear the map: the boss's flagship must be sunk once | |||
| Notes | Support Expeditions are available on this map | |||
Stage Guide
| 5-1 Branching Rules | ||
|---|---|---|
| Nodes | Rules | |
| Start | A |
|
B | ||
B |
C |
|
E |
| |
F |
G |
|
H | ||
J | ||
G |
I |
|
J | ||
Tips
By the number order of the world map, this is the first time Wo Flagship II and Light Cruiser Tsu-Class appear. Wo Flagship II is notably much stronger than the previously encountered Wo Flagship I due to the addition of Abyssal Hell Dive Bomber, while the Tsu-Class has much higher stats compared to the other enemy CL.
- With the presence of Tsu-class, there is a chance to lose a large number of bombers (or even their rank, should the Tsu shoot all of them down) before reaching the boss node. Keep this in mind when equipping bombers on any CV(L).
- Node E is a submarine node without warning.
As with every World 5 map, Support Expeditions are available to help with clearing the map, often useful to clear harder quests.
Recommended fleets
| Standard Fleets | ||||
|---|---|---|---|---|
| Fleet | 1-2 (F)BB(V), 0-1CVL, 1 CL, 2 DD, 1 XX (XX cannot be a (F)BB(V)) | |||
| LoS | Speed | |||
| Any | Any | |||
| RouteNode Types: BLUE: Empty/Choice RED: Battle GREEN: Resource/TP VIOLET: Maelstrom PURPLE: Night Battle PINK: Air Raid/Battle ORANGE: Enemy Ambush/ASS |
B C F J | |||
| Fleet Notes | The standard comp to clear the map.
| |||
| Air State | AD | AP | AS | AS+ |
| 75 | 112 | 252 | 504 | |
| Torpedo Squadron | ||||
|---|---|---|---|---|
| Fleet | "Torpedo Squadron": 1 CL (flagship), 2 CLT, 3 DD | |||
| LoS | Speed | |||
| Any | Any | |||
| RouteNode Types: BLUE: Empty/Choice RED: Battle GREEN: Resource/TP VIOLET: Maelstrom PURPLE: Night Battle PINK: Air Raid/Battle ORANGE: Enemy Ambush/ASS |
B C F J | |||
| Fleet Notes | This solution requires more advanced gears, and might be out of reach of new players. It is required to bring an
The best comp for farming boss node without the need of Support Expedition, having the highest pass rate thanks to the usage of ETSCF in case a ship got heavily damaged. The Evacuation mechanic of the ETSCF should be used if needed, as long as the routing is maintained.
Do note that the Night Zuiun will likely be shot down completely due to fighting under AI and the presence of CL Tsu-Class | |||
| Air State | AD | AP | AS | AS+ |
| 75 | 112 | 252 | 504 | |

| Quests Fleets | ||||
|---|---|---|---|---|
| Fleet | 3 BB(V), 1 CL, 2 DD
1 CV(B), 3 CA, 2 CL | |||
| LoS | Speed | |||
| Any | Any | |||
| RouteNode Types: BLUE: Empty/Choice RED: Battle GREEN: Resource/TP VIOLET: Maelstrom PURPLE: Night Battle PINK: Air Raid/Battle ORANGE: Enemy Ambush/ASS |
Random:
| |||
| Fleet Notes | Support Expedition can be advised for prebosses.
| |||
| Quests | Bm4, Bq7, Bq13 | |||
| Air State | AD | AP | AS | AS+ |
| 75 | 112 | 252 | 504 | |

| Quarterly Mikawa | ||||
|---|---|---|---|---|
| Fleet | 3 CA, 1 CL, 2 DD | |||
| LoS | Speed | |||
| Any | Any | |||
| RouteNode Types: BLUE: Empty/Choice RED: Battle GREEN: Resource/TP VIOLET: Maelstrom PURPLE: Night Battle PINK: Air Raid/Battle ORANGE: Enemy Ambush/ASS |
B C F J | |||
| Fleet Notes | Support Expedition can be advised for the preboss. | |||
| Quests | Bq7 | |||
| Air State | AD | AP | AS | AS+ |
| 75 | 112 | 252 | 504 | |
| Fast+ Fleet | ||||
|---|---|---|---|---|
| Fleet | 3 BB(V), 2 CA(V), 1 CL | |||
| LoS | Speed | |||
| Any | Fast+ | |||
| RouteNode Types: BLUE: Empty/Choice RED: Battle GREEN: Resource/TP VIOLET: Maelstrom PURPLE: Night Battle PINK: Air Raid/Battle ORANGE: Enemy Ambush/ASS |
B E G J | |||
| Fleet Notes | Same as above, with a guaranteed B start using a stronger fleet, but requires a Fast+ fleet.
| |||
| Air State | AD | AP | AS | AS+ |
| 75 | 112 | 252 | 504 | |
Resource Nodes
C H are "Normal Resource Nodes" rewarding respectively steel ![]() , and ammo
, and ammo ![]() .
.
- See here for more details.
Enemy Compositions

| # | Maelstrom Node | ||
|---|---|---|---|
| A | Lost Normal | ||
| # | Maelstrom Node | ||
| # | Enemy Form. |
Base EXP | Normal Battle Node | AD/AP AS/AS+ |
|---|---|---|---|---|
| B | Line Ahead Double Line |
170 | 0/0 0/0 | |
| Line Ahead Double Line |
190 | 0/0 0/0 | ||
| Line Ahead Double Line |
200 | 0/0 0/0 | ||
| # | Enemy Form. |
Base EXP | Normal Battle Node | AD/AP AS/AS+ |
| # | Resource Node | ||
|---|---|---|---|
| C | Gained 25~50 | ||
| # | Resource Node | ||
| # | Enemy Form. |
Base EXP | Normal Battle Node | AD/AP AS/AS+ |
|---|---|---|---|---|
| D | Diamond | 100 | 27/53 119/237 | |
| Diamond | 110 | 27/54 120/240 | ||
| Diamond | 120 | 27/54 120/240 | ||
| Diamond | 130 | 27/53 119/237 | ||
| Diamond | 140 | 46/91 203/405 | ||
| Diamond | 160 | 64/128 287/573 | ||
| # | Enemy Form. |
Base EXP | Normal Battle Node | AD/AP AS/AS+ |
| # | Enemy Form. |
Base EXP | Normal Battle Node | AD/AP AS/AS+ |
|---|---|---|---|---|
| E | Double Line Echelon |
180 | 0/0 0/0 | |
| Echelon Line Abreast |
200 | 0/0 0/0 | ||
| Echelon Line Abreast |
230 | 0/0 0/0 | ||
| # | Enemy Form. |
Base EXP | Normal Battle Node | AD/AP AS/AS+ |
| # | Enemy Form. |
Base EXP | Normal Battle Node | AD/AP AS/AS+ |
|---|---|---|---|---|
| F | Diamond | 200 | 9/17 36/72 | |
| Diamond | 210 | 9/17 36/72 | ||
| Line Ahead Double Line |
220 | 0/0 0/0 | ||
| Line Ahead Double Line |
250 | 0/0 0/0 | ||
| # | Enemy Form. |
Base EXP | Normal Battle Node | AD/AP AS/AS+ |
| # | Enemy Form. |
Base EXP | Normal Battle Node | AD/AP AS/AS+ |
|---|---|---|---|---|
| G | Line Ahead Double Line |
300 | 9/17 36/72 | |
| Line Ahead Double Line |
340 | 8/16 35/69 | ||
| Line Ahead Double Line |
360 | 8/16 35/69 | ||
| # | Enemy Form. |
Base EXP | Normal Battle Node | AD/AP AS/AS+ |
| # | Resource Node | ||
|---|---|---|---|
| H | Gained 40~80 | ||
| # | Resource Node | ||
| # | Empty Node | ||
|---|---|---|---|
| I | 気のせいだった。/敵影を見ず。/穏やかな海です。/穏やかな海峡です。/警戒が必要です。/静かな海です。 Must be my imagination./No enemy spotted./Calm seas./Calm straits./Be alert./Peaceful seas. | ||
| # | Empty Node | ||
| # | Enemy Form. |
Base EXP | Boss Battle Node | AD/AP AS/AS+ |
|---|---|---|---|---|
| J | Line Ahead Double Line |
400 | 0/0 0/0 | |
| Double Line | 420 | 0/0 0/0 | ||
| Diamond | 430 | 0/0 0/0 | ||
| Diamond | 440 | 29/57 126/252 | ||
| Diamond | 450 | 57/113 252/504 | ||
| # | Enemy Form. |
Base EXP | Boss Battle Node | AD/AP AS/AS+ |
Ship Drops
| Ship drops | |||||||||||||||||||||||||||||||||||||||||||||||||||||||||||||||||||||||||||||||||||||||||||||||||||
|---|---|---|---|---|---|---|---|---|---|---|---|---|---|---|---|---|---|---|---|---|---|---|---|---|---|---|---|---|---|---|---|---|---|---|---|---|---|---|---|---|---|---|---|---|---|---|---|---|---|---|---|---|---|---|---|---|---|---|---|---|---|---|---|---|---|---|---|---|---|---|---|---|---|---|---|---|---|---|---|---|---|---|---|---|---|---|---|---|---|---|---|---|---|---|---|---|---|---|---|
| Type | Ship? | B | D | E | F | G | J | ||||||||||||||||||||||||||||||||||||||||||||||||||||||||||||||||||||||||||||||||||||||||||||
| DD | Uzuki | ✔️ | |||||||||||||||||||||||||||||||||||||||||||||||||||||||||||||||||||||||||||||||||||||||||||||||||
| DD | Uranami | ✔️ | |||||||||||||||||||||||||||||||||||||||||||||||||||||||||||||||||||||||||||||||||||||||||||||||||
| DD | Yayoi | ✔️ | |||||||||||||||||||||||||||||||||||||||||||||||||||||||||||||||||||||||||||||||||||||||||||||||||
| DD | Hamakaze | ✔️ | |||||||||||||||||||||||||||||||||||||||||||||||||||||||||||||||||||||||||||||||||||||||||||||||||
| DD | Yuugumo | ✔️ | |||||||||||||||||||||||||||||||||||||||||||||||||||||||||||||||||||||||||||||||||||||||||||||||||
| DD | Naganami | ✔️ | |||||||||||||||||||||||||||||||||||||||||||||||||||||||||||||||||||||||||||||||||||||||||||||||||
| DD | Shimakaze | ✔️ | |||||||||||||||||||||||||||||||||||||||||||||||||||||||||||||||||||||||||||||||||||||||||||||||||
| CL | Kitakami | ✔️ | ✔️ | ✔️ | ✔️ | ✔️ | |||||||||||||||||||||||||||||||||||||||||||||||||||||||||||||||||||||||||||||||||||||||||||||
| CL | Ooi | ✔️ | ✔️ | ✔️ | |||||||||||||||||||||||||||||||||||||||||||||||||||||||||||||||||||||||||||||||||||||||||||||||
| CL | Kinu | ✔️ | |||||||||||||||||||||||||||||||||||||||||||||||||||||||||||||||||||||||||||||||||||||||||||||||||
| CL | Abukuma | ✔️ | |||||||||||||||||||||||||||||||||||||||||||||||||||||||||||||||||||||||||||||||||||||||||||||||||
| CL | Sendai | ✔️ | |||||||||||||||||||||||||||||||||||||||||||||||||||||||||||||||||||||||||||||||||||||||||||||||||
| CA | Kinugasa | ✔️ | |||||||||||||||||||||||||||||||||||||||||||||||||||||||||||||||||||||||||||||||||||||||||||||||||
| CA | Myoukou | ✔️ | ✔️ | ✔️ | ✔️ | ✔️ | |||||||||||||||||||||||||||||||||||||||||||||||||||||||||||||||||||||||||||||||||||||||||||||
| CA | Takao | ✔️ | ✔️ | ✔️ | ✔️ | ||||||||||||||||||||||||||||||||||||||||||||||||||||||||||||||||||||||||||||||||||||||||||||||
| CA | Atago | ✔️ | ✔️ | ✔️ | ✔️ | ||||||||||||||||||||||||||||||||||||||||||||||||||||||||||||||||||||||||||||||||||||||||||||||
| CA | Mogami | ✔️ | ✔️ | ✔️ | ✔️ | ||||||||||||||||||||||||||||||||||||||||||||||||||||||||||||||||||||||||||||||||||||||||||||||
| CA | Tone | ✔️ | ✔️ | ✔️ | ✔️ | ✔️ | |||||||||||||||||||||||||||||||||||||||||||||||||||||||||||||||||||||||||||||||||||||||||||||
| CA | Chikuma | ✔️ | ✔️ | ✔️ | ✔️ | ✔️ | |||||||||||||||||||||||||||||||||||||||||||||||||||||||||||||||||||||||||||||||||||||||||||||
| CVL | Ryuujou | ✔️ | ✔️ | ✔️ | ✔️ | ✔️ | |||||||||||||||||||||||||||||||||||||||||||||||||||||||||||||||||||||||||||||||||||||||||||||
| CVL | Shouhou | ✔️ | ✔️ | ✔️ | ✔️ | ✔️ | |||||||||||||||||||||||||||||||||||||||||||||||||||||||||||||||||||||||||||||||||||||||||||||
| CVL | Hiyou | ✔️ | ✔️ | ✔️ | ✔️ | ✔️ | |||||||||||||||||||||||||||||||||||||||||||||||||||||||||||||||||||||||||||||||||||||||||||||
| CVL | Junyou | ✔️ | ✔️ | ✔️ | ✔️ | ✔️ | |||||||||||||||||||||||||||||||||||||||||||||||||||||||||||||||||||||||||||||||||||||||||||||
| FBB | Kongou | ✔️ | ✔️ | ||||||||||||||||||||||||||||||||||||||||||||||||||||||||||||||||||||||||||||||||||||||||||||||||
| FBB | Hiei | ✔️ | ✔️ | ||||||||||||||||||||||||||||||||||||||||||||||||||||||||||||||||||||||||||||||||||||||||||||||||
| FBB | Haruna | ✔️ | ✔️ | ||||||||||||||||||||||||||||||||||||||||||||||||||||||||||||||||||||||||||||||||||||||||||||||||
| FBB | Kirishima | ✔️ | ✔️ | ||||||||||||||||||||||||||||||||||||||||||||||||||||||||||||||||||||||||||||||||||||||||||||||||
| BB | Fusou | ✔️ | ✔️ | ✔️ | |||||||||||||||||||||||||||||||||||||||||||||||||||||||||||||||||||||||||||||||||||||||||||||||
| BB | Yamashiro | ✔️ | ✔️ | ✔️ | ✔️ | ||||||||||||||||||||||||||||||||||||||||||||||||||||||||||||||||||||||||||||||||||||||||||||||
| BB | Ise | ✔️ | |||||||||||||||||||||||||||||||||||||||||||||||||||||||||||||||||||||||||||||||||||||||||||||||||
| BB | Hyuuga | ✔️ | |||||||||||||||||||||||||||||||||||||||||||||||||||||||||||||||||||||||||||||||||||||||||||||||||
| CV | Kaga | ✔️ | |||||||||||||||||||||||||||||||||||||||||||||||||||||||||||||||||||||||||||||||||||||||||||||||||
| CV | Souryuu | ✔️ | |||||||||||||||||||||||||||||||||||||||||||||||||||||||||||||||||||||||||||||||||||||||||||||||||
| CV | Shoukaku | ✔️ | |||||||||||||||||||||||||||||||||||||||||||||||||||||||||||||||||||||||||||||||||||||||||||||||||
| SS | I-58 | ✔️ | |||||||||||||||||||||||||||||||||||||||||||||||||||||||||||||||||||||||||||||||||||||||||||||||||
| DD | Mutsuki | ✔️ | ✔️ | ✔️ | ✔️ | ||||||||||||||||||||||||||||||||||||||||||||||||||||||||||||||||||||||||||||||||||||||||||||||
| DD | Kisaragi | ✔️ | ✔️ | ✔️ | ✔️ | ||||||||||||||||||||||||||||||||||||||||||||||||||||||||||||||||||||||||||||||||||||||||||||||
| DD | Satsuki | ✔️ | ✔️ | ✔️ | ✔️ | ||||||||||||||||||||||||||||||||||||||||||||||||||||||||||||||||||||||||||||||||||||||||||||||
| DD | Fumizuki | ✔️ | ✔️ | ✔️ | ✔️ | ||||||||||||||||||||||||||||||||||||||||||||||||||||||||||||||||||||||||||||||||||||||||||||||
| DD | Nagatsuki | ✔️ | ✔️ | ✔️ | ✔️ | ||||||||||||||||||||||||||||||||||||||||||||||||||||||||||||||||||||||||||||||||||||||||||||||
| DD | Kikuzuki | ✔️ | ✔️ | ✔️ | ✔️ | ||||||||||||||||||||||||||||||||||||||||||||||||||||||||||||||||||||||||||||||||||||||||||||||
| DD | Mikazuki | ✔️ | ✔️ | ✔️ | ✔️ | ||||||||||||||||||||||||||||||||||||||||||||||||||||||||||||||||||||||||||||||||||||||||||||||
| DD | Mochizuki | ✔️ | ✔️ | ✔️ | ✔️ | ||||||||||||||||||||||||||||||||||||||||||||||||||||||||||||||||||||||||||||||||||||||||||||||
| DD | Murakumo | ✔️ | ✔️ | ✔️ | ✔️ | ||||||||||||||||||||||||||||||||||||||||||||||||||||||||||||||||||||||||||||||||||||||||||||||
| DD | Hatsuharu | ✔️ | ✔️ | ✔️ | ✔️ | ||||||||||||||||||||||||||||||||||||||||||||||||||||||||||||||||||||||||||||||||||||||||||||||
| DD | Shiratsuyu | ✔️ | ✔️ | ✔️ | ✔️ | ||||||||||||||||||||||||||||||||||||||||||||||||||||||||||||||||||||||||||||||||||||||||||||||
| DD | Shigure | ✔️ | ✔️ | ✔️ | ✔️ | ||||||||||||||||||||||||||||||||||||||||||||||||||||||||||||||||||||||||||||||||||||||||||||||
| DD | Murasame | ✔️ | ✔️ | ✔️ | ✔️ | ||||||||||||||||||||||||||||||||||||||||||||||||||||||||||||||||||||||||||||||||||||||||||||||
| DD | Yuudachi | ✔️ | ✔️ | ✔️ | ✔️ | ||||||||||||||||||||||||||||||||||||||||||||||||||||||||||||||||||||||||||||||||||||||||||||||
| CL | Tenryuu | ✔️ | |||||||||||||||||||||||||||||||||||||||||||||||||||||||||||||||||||||||||||||||||||||||||||||||||
| CL | Tatsuta | ✔️ | |||||||||||||||||||||||||||||||||||||||||||||||||||||||||||||||||||||||||||||||||||||||||||||||||
| CL | Tama | ✔️ | ✔️ | ✔️ | ✔️ | ✔️ | |||||||||||||||||||||||||||||||||||||||||||||||||||||||||||||||||||||||||||||||||||||||||||||
| CL | Kiso | ✔️ | ✔️ | ✔️ | ✔️ | ✔️ | |||||||||||||||||||||||||||||||||||||||||||||||||||||||||||||||||||||||||||||||||||||||||||||
| CL | Isuzu | ✔️ | ✔️ | ✔️ | ✔️ | ✔️ | |||||||||||||||||||||||||||||||||||||||||||||||||||||||||||||||||||||||||||||||||||||||||||||
| CL | Natori | ✔️ | ✔️ | ✔️ | ✔️ | ✔️ | |||||||||||||||||||||||||||||||||||||||||||||||||||||||||||||||||||||||||||||||||||||||||||||
| CL | Yura | ✔️ | ✔️ | ✔️ | ✔️ | ✔️ | |||||||||||||||||||||||||||||||||||||||||||||||||||||||||||||||||||||||||||||||||||||||||||||
| CL | Jintsuu | ✔️ | ✔️ | ✔️ | ✔️ | ||||||||||||||||||||||||||||||||||||||||||||||||||||||||||||||||||||||||||||||||||||||||||||||
| CL | Naka | ✔️ | ✔️ | ✔️ | ✔️ | ||||||||||||||||||||||||||||||||||||||||||||||||||||||||||||||||||||||||||||||||||||||||||||||
| CA | Furutaka | ✔️ | ✔️ | ✔️ | ✔️ | ||||||||||||||||||||||||||||||||||||||||||||||||||||||||||||||||||||||||||||||||||||||||||||||
| CA | Kako | ✔️ | ✔️ | ✔️ | ✔️ | ✔️ | |||||||||||||||||||||||||||||||||||||||||||||||||||||||||||||||||||||||||||||||||||||||||||||
| CA | Aoba | ✔️ | ✔️ | ✔️ | ✔️ | ||||||||||||||||||||||||||||||||||||||||||||||||||||||||||||||||||||||||||||||||||||||||||||||
| CA | Nachi | ✔️ | ✔️ | ✔️ | ✔️ | ✔️ | |||||||||||||||||||||||||||||||||||||||||||||||||||||||||||||||||||||||||||||||||||||||||||||
| CA | Ashigara | ✔️ | ✔️ | ✔️ | ✔️ | ✔️ | |||||||||||||||||||||||||||||||||||||||||||||||||||||||||||||||||||||||||||||||||||||||||||||
| CA | Haguro | ✔️ | ✔️ | ✔️ | ✔️ | ✔️ | |||||||||||||||||||||||||||||||||||||||||||||||||||||||||||||||||||||||||||||||||||||||||||||
| CA | Maya | ✔️ | ✔️ | ✔️ | ✔️ | ✔️ | |||||||||||||||||||||||||||||||||||||||||||||||||||||||||||||||||||||||||||||||||||||||||||||
| CA | Choukai | ✔️ | ✔️ | ✔️ | ✔️ | ✔️ | |||||||||||||||||||||||||||||||||||||||||||||||||||||||||||||||||||||||||||||||||||||||||||||
| CVL | Houshou | ✔️ | |||||||||||||||||||||||||||||||||||||||||||||||||||||||||||||||||||||||||||||||||||||||||||||||||
| AV | Chitose | ✔️ | ✔️ | ✔️ | ✔️ | ✔️ | |||||||||||||||||||||||||||||||||||||||||||||||||||||||||||||||||||||||||||||||||||||||||||||
| AV | Chiyoda | ✔️ | ✔️ | ✔️ | ✔️ | ✔️ | |||||||||||||||||||||||||||||||||||||||||||||||||||||||||||||||||||||||||||||||||||||||||||||
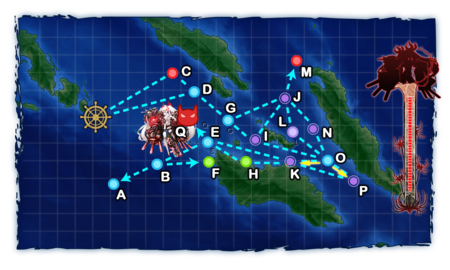
World 5-2: 珊瑚諸島沖 - The Coral Islands

| Strategy Name | 珊瑚諸島沖海戦 Coral Islands Naval Battle |
|---|---|
| Difficulty | ☆ ☆ ☆ ☆ ☆ ☆ ☆ ☆ ☆ |
| Item | |
| Strategy Content | MO作戦を実施する。空母機動部隊を展開し、南方海域に出没する敵機動部隊を叩け! We are executing Operation MO. Form a carrier battle group and crush the enemy task force! |
| World 5 Unlocking & Progression | ||||
|---|---|---|---|---|
| Unlock conditions | World 5 is unlocked after clearing 4-4 HP bar and 5-1 | |||
| Clear conditions | To clear the map: the boss's flagship must be sunk 4 times | |||
| Notes | Support Expeditions are available on this map | |||
Stage Guide
| 5-2 Branching Rules | ||
|---|---|---|
| Nodes | Rules | |
| Start | A |
|
B | ||
C |
D |
|
E |
| |
D |
F |
|
G |
||
F |
H |
|
I |
| |
O | ||
G |
J |
|
L | ||
L |
K |
|
M |
| |
N |
| |
Historical Routing
Tips
This map is based on the historical operation known as Operation MO. Ships that participated in this operation can be used here to obtain special routing on this map.
- Like 5-1, Standard Carrier Wo-Class Flagship also makes an appearance here, especially at pre-boss nodes.
- AACI is required to reach and kill the boss node consistently.
- The boss can be either a Wo Kai Flagship or an Aircraft Carrier Demon.
- Sinking Aircraft Carrier Demon can be a bit harder than sinking Wo Kai Flagship, therefore, do prepare good equipment and girls for better success rate.
As every World 5 map, Support Expeditions are available to help clear the map, notably for harder quests.
Recommended Fleets
| Historical Fleets | ||||
|---|---|---|---|---|
| Fleet | Shoukaku, Zuikaku, 2 (F)BB/CA(V), 2 DD 2 CV(B/L), 2 DD, 2 CA(V) Yuubari, 2 CVL, 3 CA(V) | |||
| LoS | Speed | |||
| Cn2: 71 | Fast (excepted Yuubari's comp) | |||
| RouteNode Types: BLUE: Empty/Choice RED: Battle GREEN: Resource/TP VIOLET: Maelstrom PURPLE: Night Battle PINK: Air Raid/Battle ORANGE: Enemy Ambush/ASS |
B C D F O | |||
| Fleet Notes | Heavier fleets have a chance to off-route to Node I, which will significantly deplete your plane count due to the nature of that node. | |||
| Air State | AD | AP | AS | AS+ |
| 75 | 112 | 252 | 504 | |
| Non-Historical Fleets | ||||
|---|---|---|---|---|
| Fleet | 2 FBB/CA(V), 2 CV(B), 2 CA(V)/CL(T)/DD | |||
| LoS | Speed | |||
| Cn2: 71 | Any | |||
| RouteNode Types: BLUE: Empty/Choice RED: Battle GREEN: Resource/TP VIOLET: Maelstrom PURPLE: Night Battle PINK: Air Raid/Battle ORANGE: Enemy Ambush/ASS |
B C E F O | |||
| Fleet Notes | Will pass through Node E instead of D compared to historical fleets, which is way tougher. | |||
| Air State | AD | AP | AS | AS+ |
| 75 | 112 | 252 | 504 | |
Resource Nodes
G J are "Normal Resource Nodes" rewarding respectively ammo ![]() , and bauxite
, and bauxite ![]() .
.
- See here for more details.
SS and Carrier Exp Farming
The 1st enemy node being an Air Node, it's possible to take advantage of how it works to level up any SS(V) as well as "carriers" risk-free.
- All SS(V) won't take any damage on Node C, so any SS(V) fleet can level up risk-free on this node.
- If possessing one or more 12cm 30-tube Rocket Launcher Kai Ni
 , it is possible to take advantage of the AARB mechanic to also level up CV(B/L), BBV, CAV, and AV.
- By equipping one RLK2 on carriers, passing a certain AA threshold, said carrier won't take any damage on the Air Node.
- Having more than 1 RLK2 on the same ship decreases the AA threshold, making it possible to level up weaker carriers.
- Once Node C cleared , retreat to the base and repeat.
- There is a random chance to off route to Node A, losing some resources, but this is negligible.
Enemy Compositions
| # | Maelstrom Node | ||
|---|---|---|---|
| A | Lost Normal | ||
| # | Maelstrom Node | ||
| # | Empty Node | ||
|---|---|---|---|
| B | 気のせいだった。/敵影を見ず。/穏やかな海です。/穏やかな海峡です。/警戒が必要です。/静かな海です。 Must be my imagination./No enemy spotted./Calm seas./Calm straits./Be alert./Peaceful seas. | ||
| # | Empty Node | ||
| # | Enemy Form. |
Base EXP | Air Defense Node | AD/AP AS/AS+ |
|---|---|---|---|---|
| C | Diamond | 140 | 29/57 126/252 | |
| Double Line | 150 | 38/75 168/336 | ||
| Diamond | 160 | 57/113 252/504 | ||
| # | Enemy Form. |
Base EXP | Air Defense Node | AD/AP AS/AS+ |
| # | Enemy Form. |
Base EXP | Normal Battle Node | AD/AP AS/AS+ |
|---|---|---|---|---|
| D | Double Line Echelon |
200 | 0/0 0/0 | |
| Double Line Diamond |
200 | 0/0 0/0 | ||
| Double Line Diamond |
200 | 0/0 0/0 | ||
| # | Enemy Form. |
Base EXP | Normal Battle Node | AD/AP AS/AS+ |
| # | Enemy Form. |
Base EXP | Normal Battle Node | AD/AP AS/AS+ |
|---|---|---|---|---|
| E | Double Line Diamond |
280 | 29/57 126/252 | |
| Double Line Diamond |
300 | 29/57 126/252 | ||
| Double Line Diamond |
310 | 29/57 126/252 | ||
| # | Enemy Form. |
Base EXP | Normal Battle Node | AD/AP AS/AS+ |
| # | Enemy Form. |
Base EXP | Normal Battle Node | AD/AP AS/AS+ |
|---|---|---|---|---|
| F | Double Line Diamond |
300 | 29/57 126/252 | |
| Double Line Diamond |
310 | 29/57 126/252 | ||
| Double Line Diamond |
320 | 29/57 126/252 | ||
| # | Enemy Form. |
Base EXP | Normal Battle Node | AD/AP AS/AS+ |
| # | Resource Node | ||
|---|---|---|---|
| G | Gained 20~50 | ||
| # | Resource Node | ||
| # | Empty Node | ||
|---|---|---|---|
| H | 気のせいだった。/敵影を見ず。/穏やかな海です。/穏やかな海峡です。/警戒が必要です。/静かな海です。 Must be my imagination./No enemy spotted./Calm seas./Calm straits./Be alert./Peaceful seas. | ||
| # | Empty Node | ||
| # | Enemy Form. |
Base EXP | Aerial Battle Node | AD/AP AS/AS+ |
|---|---|---|---|---|
| I | Diamond | 200 | 69/137 306/612 | |
| Diamond | 250 | 40/79 176/351 | ||
| Diamond | 250 | 74/147 329/657 | ||
| # | Enemy Form. |
Base EXP | Aerial Battle Node | AD/AP AS/AS+ |
| # | Resource Node | ||
|---|---|---|---|
| J | Gained 40~80 | ||
| # | Resource Node | ||
| # | Enemy Form. |
Base EXP | Normal Battle Node | AD/AP AS/AS+ |
|---|---|---|---|---|
| K | Line Ahead Double Line |
220 | 0/0 0/0 | |
| Line Ahead | 240 | 0/0 0/0 | ||
| Line Ahead Double Line |
260 | 0/0 0/0 | ||
| # | Enemy Form. |
Base EXP | Normal Battle Node | AD/AP AS/AS+ |
| # | Enemy Form. |
Base EXP | Air Defense Node | AD/AP AS/AS+ |
|---|---|---|---|---|
| L | Diamond | 140 | 29/57 126/252 | |
| Double Line | 150 | 38/75 168/336 | ||
| Diamond | 160 | 57/113 252/504 | ||
| # | Enemy Form. |
Base EXP | Air Defense Node | AD/AP AS/AS+ |
| # | Maelstrom Node | ||
|---|---|---|---|
| M | Lost Strong | ||
| # | Maelstrom Node | ||
| # | Empty Node | ||
|---|---|---|---|
| N | 気のせいだった。/敵影を見ず。/穏やかな海です。/穏やかな海峡です。/警戒が必要です。/静かな海です。 Must be my imagination./No enemy spotted./Calm seas./Calm straits./Be alert./Peaceful seas. | ||
| # | Empty Node | ||
| # | Enemy Form. |
Base EXP | Boss Battle Node | AD/AP AS/AS+ |
|---|---|---|---|---|
| O | Diamond | 400 | 35/69 153/306 | |
| Diamond | 420 | 35/69 153/306 | ||
| Diamond | 440 | 35/69 153/306 | ||
| Diamond | 460 | 35/69 153/306 | ||
| Line Ahead Diamond |
480 | 40/79 176/351 | ||
| # | Enemy Form. |
Base EXP | Boss Battle Node | AD/AP AS/AS+ |
Ship Drops
| Ship drops | |||||||||||||||||||||||||||||||||||||||||||||||||||||||||||||||||||||||||||||||||||||||||||||||||||
|---|---|---|---|---|---|---|---|---|---|---|---|---|---|---|---|---|---|---|---|---|---|---|---|---|---|---|---|---|---|---|---|---|---|---|---|---|---|---|---|---|---|---|---|---|---|---|---|---|---|---|---|---|---|---|---|---|---|---|---|---|---|---|---|---|---|---|---|---|---|---|---|---|---|---|---|---|---|---|---|---|---|---|---|---|---|---|---|---|---|---|---|---|---|---|---|---|---|---|---|
| Type | Ship? | D | E | F | K | O | |||||||||||||||||||||||||||||||||||||||||||||||||||||||||||||||||||||||||||||||||||||||||||||
| CA | Mikuma | ✔️ | |||||||||||||||||||||||||||||||||||||||||||||||||||||||||||||||||||||||||||||||||||||||||||||||||
| AS | Taigei | ✔️ | |||||||||||||||||||||||||||||||||||||||||||||||||||||||||||||||||||||||||||||||||||||||||||||||||
| DD | Yukikaze | ✔️ | |||||||||||||||||||||||||||||||||||||||||||||||||||||||||||||||||||||||||||||||||||||||||||||||||
| DD | Hamakaze | ✔️ | |||||||||||||||||||||||||||||||||||||||||||||||||||||||||||||||||||||||||||||||||||||||||||||||||
| DD | Akigumo | ✔️ | ✔️ | ||||||||||||||||||||||||||||||||||||||||||||||||||||||||||||||||||||||||||||||||||||||||||||||||
| DD | Yuugumo | ✔️ | |||||||||||||||||||||||||||||||||||||||||||||||||||||||||||||||||||||||||||||||||||||||||||||||||
| DD | Makigumo | ✔️ | |||||||||||||||||||||||||||||||||||||||||||||||||||||||||||||||||||||||||||||||||||||||||||||||||
| CL | Kitakami | ✔️ | |||||||||||||||||||||||||||||||||||||||||||||||||||||||||||||||||||||||||||||||||||||||||||||||||
| CL | Ooi | ✔️ | |||||||||||||||||||||||||||||||||||||||||||||||||||||||||||||||||||||||||||||||||||||||||||||||||
| CL | Nagara | ✔️ | |||||||||||||||||||||||||||||||||||||||||||||||||||||||||||||||||||||||||||||||||||||||||||||||||
| CL | Sendai | ✔️ | |||||||||||||||||||||||||||||||||||||||||||||||||||||||||||||||||||||||||||||||||||||||||||||||||
| CL | Yuubari | ✔️ | |||||||||||||||||||||||||||||||||||||||||||||||||||||||||||||||||||||||||||||||||||||||||||||||||
| CA | Kinugasa | ✔️ | |||||||||||||||||||||||||||||||||||||||||||||||||||||||||||||||||||||||||||||||||||||||||||||||||
| CA | Myoukou | ✔️ | ✔️ | ✔️ | |||||||||||||||||||||||||||||||||||||||||||||||||||||||||||||||||||||||||||||||||||||||||||||||
| CA | Takao | ✔️ | ✔️ | ✔️ | |||||||||||||||||||||||||||||||||||||||||||||||||||||||||||||||||||||||||||||||||||||||||||||||
| CA | Atago | ✔️ | ✔️ | ✔️ | |||||||||||||||||||||||||||||||||||||||||||||||||||||||||||||||||||||||||||||||||||||||||||||||
| CA | Mogami | ✔️ | ✔️ | ✔️ | |||||||||||||||||||||||||||||||||||||||||||||||||||||||||||||||||||||||||||||||||||||||||||||||
| CA | Tone | ✔️ | ✔️ | ✔️ | |||||||||||||||||||||||||||||||||||||||||||||||||||||||||||||||||||||||||||||||||||||||||||||||
| CA | Chikuma | ✔️ | ✔️ | ✔️ | |||||||||||||||||||||||||||||||||||||||||||||||||||||||||||||||||||||||||||||||||||||||||||||||
| CVL | Ryuujou | ✔️ | ✔️ | ✔️ | ✔️ | ||||||||||||||||||||||||||||||||||||||||||||||||||||||||||||||||||||||||||||||||||||||||||||||
| CVL | Shouhou | ✔️ | ✔️ | ✔️ | ✔️ | ||||||||||||||||||||||||||||||||||||||||||||||||||||||||||||||||||||||||||||||||||||||||||||||
| CVL | Zuihou | ✔️ | |||||||||||||||||||||||||||||||||||||||||||||||||||||||||||||||||||||||||||||||||||||||||||||||||
| CVL | Hiyou | ✔️ | ✔️ | ✔️ | ✔️ | ||||||||||||||||||||||||||||||||||||||||||||||||||||||||||||||||||||||||||||||||||||||||||||||
| CVL | Junyou | ✔️ | ✔️ | ✔️ | ✔️ | ||||||||||||||||||||||||||||||||||||||||||||||||||||||||||||||||||||||||||||||||||||||||||||||
| FBB | Kongou | ✔️ | ✔️ | ||||||||||||||||||||||||||||||||||||||||||||||||||||||||||||||||||||||||||||||||||||||||||||||||
| FBB | Hiei | ✔️ | ✔️ | ||||||||||||||||||||||||||||||||||||||||||||||||||||||||||||||||||||||||||||||||||||||||||||||||
| FBB | Haruna | ✔️ | ✔️ | ✔️ | |||||||||||||||||||||||||||||||||||||||||||||||||||||||||||||||||||||||||||||||||||||||||||||||
| FBB | Kirishima | ✔️ | ✔️ | ✔️ | |||||||||||||||||||||||||||||||||||||||||||||||||||||||||||||||||||||||||||||||||||||||||||||||
| BB | Fusou | ✔️ | ✔️ | ✔️ | |||||||||||||||||||||||||||||||||||||||||||||||||||||||||||||||||||||||||||||||||||||||||||||||
| BB | Yamashiro | ✔️ | ✔️ | ✔️ | |||||||||||||||||||||||||||||||||||||||||||||||||||||||||||||||||||||||||||||||||||||||||||||||
| BB | Ise | ✔️ | |||||||||||||||||||||||||||||||||||||||||||||||||||||||||||||||||||||||||||||||||||||||||||||||||
| BB | Hyuuga | ✔️ | |||||||||||||||||||||||||||||||||||||||||||||||||||||||||||||||||||||||||||||||||||||||||||||||||
| BB | Mutsu | ✔️ | |||||||||||||||||||||||||||||||||||||||||||||||||||||||||||||||||||||||||||||||||||||||||||||||||
| CV | Akagi | ✔️ | |||||||||||||||||||||||||||||||||||||||||||||||||||||||||||||||||||||||||||||||||||||||||||||||||
| CV | Kaga | ✔️ | |||||||||||||||||||||||||||||||||||||||||||||||||||||||||||||||||||||||||||||||||||||||||||||||||
| CV | Souryuu | ✔️ | |||||||||||||||||||||||||||||||||||||||||||||||||||||||||||||||||||||||||||||||||||||||||||||||||
| CV | Hiryuu | ✔️ | |||||||||||||||||||||||||||||||||||||||||||||||||||||||||||||||||||||||||||||||||||||||||||||||||
| CV | Zuikaku | ✔️ | |||||||||||||||||||||||||||||||||||||||||||||||||||||||||||||||||||||||||||||||||||||||||||||||||
| SS | I-58 | ✔️ | |||||||||||||||||||||||||||||||||||||||||||||||||||||||||||||||||||||||||||||||||||||||||||||||||
| DD | Akatsuki | ✔️ | ✔️ | ✔️ | |||||||||||||||||||||||||||||||||||||||||||||||||||||||||||||||||||||||||||||||||||||||||||||||
| DD | Hibiki | ✔️ | ✔️ | ✔️ | |||||||||||||||||||||||||||||||||||||||||||||||||||||||||||||||||||||||||||||||||||||||||||||||
| DD | Ikazuchi | ✔️ | ✔️ | ✔️ | |||||||||||||||||||||||||||||||||||||||||||||||||||||||||||||||||||||||||||||||||||||||||||||||
| DD | Inazuma | ✔️ | ✔️ | ✔️ | |||||||||||||||||||||||||||||||||||||||||||||||||||||||||||||||||||||||||||||||||||||||||||||||
| DD | Samidare | ✔️ | ✔️ | ✔️ | |||||||||||||||||||||||||||||||||||||||||||||||||||||||||||||||||||||||||||||||||||||||||||||||
| DD | Suzukaze | ✔️ | ✔️ | ✔️ | |||||||||||||||||||||||||||||||||||||||||||||||||||||||||||||||||||||||||||||||||||||||||||||||
| DD | Asashio | ✔️ | ✔️ | ✔️ | |||||||||||||||||||||||||||||||||||||||||||||||||||||||||||||||||||||||||||||||||||||||||||||||
| DD | Michishio | ✔️ | ✔️ | ✔️ | |||||||||||||||||||||||||||||||||||||||||||||||||||||||||||||||||||||||||||||||||||||||||||||||
| DD | Arashio | ✔️ | ✔️ | ✔️ | |||||||||||||||||||||||||||||||||||||||||||||||||||||||||||||||||||||||||||||||||||||||||||||||
| DD | Kasumi | ✔️ | ✔️ | ✔️ | |||||||||||||||||||||||||||||||||||||||||||||||||||||||||||||||||||||||||||||||||||||||||||||||
| DD | Kagerou | ✔️ | ✔️ | ✔️ | |||||||||||||||||||||||||||||||||||||||||||||||||||||||||||||||||||||||||||||||||||||||||||||||
| DD | Shiranui | ✔️ | ✔️ | ✔️ | |||||||||||||||||||||||||||||||||||||||||||||||||||||||||||||||||||||||||||||||||||||||||||||||
| DD | Kuroshio | ✔️ | ✔️ | ✔️ | |||||||||||||||||||||||||||||||||||||||||||||||||||||||||||||||||||||||||||||||||||||||||||||||
| CL | Tenryuu | ✔️ | ✔️ | ✔️ | ✔️ | ||||||||||||||||||||||||||||||||||||||||||||||||||||||||||||||||||||||||||||||||||||||||||||||
| CL | Tatsuta | ✔️ | ✔️ | ✔️ | ✔️ | ||||||||||||||||||||||||||||||||||||||||||||||||||||||||||||||||||||||||||||||||||||||||||||||
| CL | Kuma | ✔️ | ✔️ | ✔️ | ✔️ | ||||||||||||||||||||||||||||||||||||||||||||||||||||||||||||||||||||||||||||||||||||||||||||||
| CL | Tama | ✔️ | ✔️ | ✔️ | |||||||||||||||||||||||||||||||||||||||||||||||||||||||||||||||||||||||||||||||||||||||||||||||
| CL | Kiso | ✔️ | ✔️ | ✔️ | |||||||||||||||||||||||||||||||||||||||||||||||||||||||||||||||||||||||||||||||||||||||||||||||
| CL | Isuzu | ✔️ | ✔️ | ✔️ | ✔️ | ||||||||||||||||||||||||||||||||||||||||||||||||||||||||||||||||||||||||||||||||||||||||||||||
| CL | Natori | ✔️ | ✔️ | ✔️ | ✔️ | ||||||||||||||||||||||||||||||||||||||||||||||||||||||||||||||||||||||||||||||||||||||||||||||
| CL | Yura | ✔️ | ✔️ | ✔️ | ✔️ | ||||||||||||||||||||||||||||||||||||||||||||||||||||||||||||||||||||||||||||||||||||||||||||||
| CL | Jintsuu | ✔️ | ✔️ | ✔️ | |||||||||||||||||||||||||||||||||||||||||||||||||||||||||||||||||||||||||||||||||||||||||||||||
| CL | Naka | ✔️ | ✔️ | ✔️ | |||||||||||||||||||||||||||||||||||||||||||||||||||||||||||||||||||||||||||||||||||||||||||||||
| CA | Furutaka | ✔️ | ✔️ | ✔️ | ✔️ | ||||||||||||||||||||||||||||||||||||||||||||||||||||||||||||||||||||||||||||||||||||||||||||||
| CA | Kako | ✔️ | ✔️ | ✔️ | ✔️ | ||||||||||||||||||||||||||||||||||||||||||||||||||||||||||||||||||||||||||||||||||||||||||||||
| CA | Aoba | ✔️ | ✔️ | ✔️ | ✔️ | ||||||||||||||||||||||||||||||||||||||||||||||||||||||||||||||||||||||||||||||||||||||||||||||
| CA | Nachi | ✔️ | ✔️ | ✔️ | |||||||||||||||||||||||||||||||||||||||||||||||||||||||||||||||||||||||||||||||||||||||||||||||
| CA | Ashigara | ✔️ | ✔️ | ✔️ | |||||||||||||||||||||||||||||||||||||||||||||||||||||||||||||||||||||||||||||||||||||||||||||||
| CA | Haguro | ✔️ | ✔️ | ✔️ | ✔️ | ||||||||||||||||||||||||||||||||||||||||||||||||||||||||||||||||||||||||||||||||||||||||||||||
| CA | Maya | ✔️ | ✔️ | ✔️ | ✔️ | ||||||||||||||||||||||||||||||||||||||||||||||||||||||||||||||||||||||||||||||||||||||||||||||
| CA | Choukai | ✔️ | ✔️ | ✔️ | ✔️ | ||||||||||||||||||||||||||||||||||||||||||||||||||||||||||||||||||||||||||||||||||||||||||||||
| CVL | Houshou | ✔️ | |||||||||||||||||||||||||||||||||||||||||||||||||||||||||||||||||||||||||||||||||||||||||||||||||
| AV | Chitose | ✔️ | ✔️ | ✔️ | ✔️ | ||||||||||||||||||||||||||||||||||||||||||||||||||||||||||||||||||||||||||||||||||||||||||||||
| AV | Chiyoda | ✔️ | ✔️ | ✔️ | ✔️ | ||||||||||||||||||||||||||||||||||||||||||||||||||||||||||||||||||||||||||||||||||||||||||||||
| |||||||||||||||||||||||||||||||||||||||||||||||||||||||||||||||||||||||||||||||||||||||||||||||||||||||||||||||||||||||||||||||||||||||||||||||||||||||||||||||||||||||||||||||||||||||||||||||||||||||||||||||||||||||||||||||||||||||||||||||||||||||||||||||||||||||||||||||||||||||||||||||||||||||||||
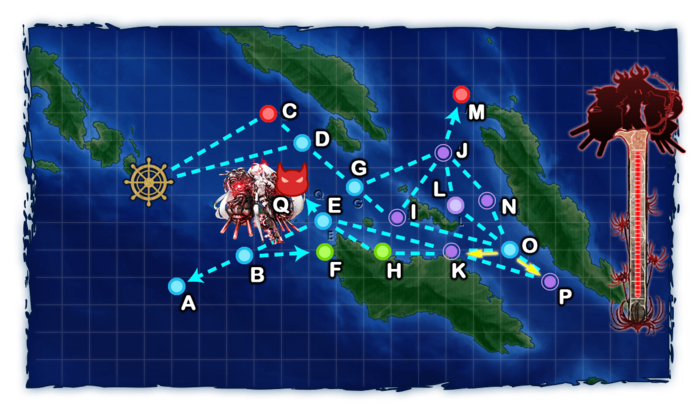
World 5-3: サブ島沖海域 - Sav Island
| Strategy Name | 第一次サーモン沖海戦 First Battle of the Solomon Sea |
|---|---|
| Difficulty | ☆ ☆ ☆ ☆ ☆ ☆ ☆ ☆ ☆ |
| Item | |
| Strategy Content | 敵泊地に対して水上打撃部隊による夜戦突撃を敢行し、艦隊後方の敵輸送艦を叩け! Engage in a daring night raid against the enemy fleet. Your goal is to destroy the transport they are escorting! |
| World 5 Unlocking & Progression | ||||
|---|---|---|---|---|
| Unlock conditions | World 5 is unlocked after clearing 5-2 HP bar | |||
| Clear conditions | To clear the map: the boss's flagship must be sunk 5 times | |||
| Notes | Support Expeditions are available on this map | |||
Stage Guide
| 5-3 Branching Rules | ||
|---|---|---|
| Nodes | Rules | |
| Start | C |
|
D | ||
B |
A |
|
F | ||
E |
B |
|
Q | ||
G |
I |
|
J |
| |
I |
J |
|
O | ||
J |
L |
|
M | ||
N | ||
K |
E |
|
H | ||
O |
K |
|
P | ||
Tips
Unlike the previous maps, most of 5-3 pre-boss nodes feature "Night Nodes", where only the night battle is played, and so triggering night mechanics from both fleets, which can cause some difficulties.
The use of Support Expeditions is highly recommended for both pre-boss and boss fights.
- "Node Support Expeditions" can minimize the risk of ships taking damage and subsequently increase the chances of reaching the boss node in good condition.
- "Support Shelling" is highly recommended, as Aerial Support cannot trigger on night nodes.
Using night battle elements is highly advised:
- Equipment such as
 Star Shell
 ,
,  Skilled Lookouts
 , and
, and  Night Recons.
 - Attacks like Night Cut-Ins, especially the
 Night Zuiun CI
 , or the "Kongou-class Night Assault".
 - The usage of
 Searchlights
 , however, is discouraged due to the drastic penalties the equipped ships suffer in night battle.
Regarding the boss node, the boss is a Southern War Princess who has tough armor and firepower.
- There is a little chance that 2 Light Carrier Nu-Class Flagships show up at the boss.
- 71+ air power is required to obtain AS at the boss node for the comp with Southern War Princess alone, or at least force AP for the comp with the 2CVL (requires 140+ for AS otherwise).
- It is unlikely to kill the boss during day, so do expect the battle to last till night.
Recommended Fleets
If not already sparkled, it can be advisable to start the sortie at 49 morale and go through the optional node P all the time. Assuming S ranking both nodes I and P, the fleet will gain sparkle effect in node K, which will help increase the pass rate for almost no cost.
| Short Route Medium | ||||
|---|---|---|---|---|
| Fleet | 1 (F)BB, 2 CA(V)/CLT, 1 CL, 2 DD
4-5 CA(V), 1-2 CL | |||
| LoS | Speed | |||
| Any | Any | |||
| RouteNode Types: BLUE: Empty/Choice RED: Battle GREEN: Resource/TP VIOLET: Maelstrom PURPLE: Night Battle PINK: Air Raid/Battle ORANGE: Enemy Ambush/ASS |
D G I O K E Q | |||
| Fleet Notes | CAVs can trigger an Artillery Spotting as long as AS is reached at the boss, helping take out enemy escorts more easily.
A Nelson Touch can be utilized. If that is the case, it is recommended to touch on node K. | |||
| Quests | Bq7 | |||
| Air State | AD | AP | AS | AS+ |
| 42 | 63 | 140 | 280 | |
| Short Route Heavy | ||||
|---|---|---|---|---|
| Fleet | 2 FBB, 1 CAV/CLT, 1 CL, 2 DD | |||
| LoS | Speed | |||
| Any | Fast | |||
| RouteNode Types: BLUE: Empty/Choice RED: Battle GREEN: Resource/TP VIOLET: Maelstrom PURPLE: Night Battle PINK: Air Raid/Battle ORANGE: Enemy Ambush/ASS |
D G I O K E Q | |||
| Fleet Notes | A stronger fleet utilizing the shortest route.
Kongou-class Touch can be utilized. If that's the case, it is recommended to touch on nodes I K. | |||
| Air State | AD | AP | AS | AS+ |
| 42 | 63 | 140 | 280 | |
| Short Route Light | ||||
|---|---|---|---|---|
| Fleet | 2 CAV, 1 CL, 3 DD | |||
| LoS | Speed | |||
| Any | Any | |||
| RouteNode Types: BLUE: Empty/Choice RED: Battle GREEN: Resource/TP VIOLET: Maelstrom PURPLE: Night Battle PINK: Air Raid/Battle ORANGE: Enemy Ambush/ASS |
D G I O K H E Q | |||
| Fleet Notes | A light fleet, strong enough to pass the night nodes and defeat the boss. | |||
| Air State | AD | AP | AS | AS+ |
| 42 | 63 | 140 | 280 | |
| Torpedo Squadron | ||||
|---|---|---|---|---|
| Fleet | "Torpedo Squadron": 1 CL (flagship), 2 CLT, 3 DD | |||
| LoS | Speed | |||
| Any | Any | |||
| RouteNode Types: BLUE: Empty/Choice RED: Battle GREEN: Resource/TP VIOLET: Maelstrom PURPLE: Night Battle PINK: Air Raid/Battle ORANGE: Enemy Ambush/ASS |
D G I O K E Q | |||
| Fleet Notes | This solution requires more advanced gears, and might be out of reach of new players.
To make this comp work properly, it is required to bring an
The best comp for farming boss node without the need of Support Expedition, having the highest pass rate thanks to the usage of ETSCF in case a ship got heavily damaged.
| |||
| Air State | AD | AP | AS | AS+ |
| 42 | 63 | 140 | 280 | |
| North Route | ||||
|---|---|---|---|---|
| Fleet | 1 (F)BB(V), 1 CVL, 1 CAV, 1 CL, 2 DD | |||
| LoS | Speed | |||
| Any | Fast | |||
| RouteNode Types: BLUE: Empty/Choice RED: Battle GREEN: Resource/TP VIOLET: Maelstrom PURPLE: Night Battle PINK: Air Raid/Battle ORANGE: Enemy Ambush/ASS |
D G J L O K E Q | |||
| Fleet Notes | An heavy fleet utilizing a Nelson Touch on Node K and CVL with CVNCI.
Equipping additional | |||
| Air State | AD | AP | AS | AS+ |
| 42 | 63 | 140 | 280 | |
Resource Nodes
F H are "Normal Resource Nodes" rewarding respectively ammo ![]() , and steel
, and steel ![]() .
.
- See here for more details.
Enemy Compositions
| # | Empty Node | ||
|---|---|---|---|
| A | 気のせいだった。/敵影を見ず。/穏やかな海です。/穏やかな海峡です。/警戒が必要です。/静かな海です。 Must be my imagination./No enemy spotted./Calm seas./Calm straits./Be alert./Peaceful seas. | ||
| # | Empty Node | ||
| # | Empty Node | ||
|---|---|---|---|
| B | 気のせいだった。/敵影を見ず。/穏やかな海です。/穏やかな海峡です。/警戒が必要です。/静かな海です。 Must be my imagination./No enemy spotted./Calm seas./Calm straits./Be alert./Peaceful seas. | ||
| # | Empty Node | ||
| # | Enemy Form. |
Base EXP | Normal Battle Node | AD/AP AS/AS+ |
|---|---|---|---|---|
| C | Line Ahead | 200 | 0/0 0/0 | |
| Line Ahead Double Line |
210 | 0/0 0/0 | ||
| Double Line | 200 | 0/0 0/0 | ||
| Line Ahead Double Line |
220 | 0/0 0/0 | ||
| # | Enemy Form. |
Base EXP | Normal Battle Node | AD/AP AS/AS+ |
| # | Empty Node | ||
|---|---|---|---|
| D | 気のせいだった。/敵影を見ず。/穏やかな海です。/穏やかな海峡です。/警戒が必要です。/静かな海です。 Must be my imagination./No enemy spotted./Calm seas./Calm straits./Be alert./Peaceful seas. | ||
| # | Empty Node | ||
| # | Empty Node | ||
|---|---|---|---|
| E | 気のせいだった。/敵影を見ず。/穏やかな海です。/穏やかな海峡です。/警戒が必要です。/静かな海です。 Must be my imagination./No enemy spotted./Calm seas./Calm straits./Be alert./Peaceful seas. | ||
| # | Empty Node | ||
| # | Resource Node | ||
|---|---|---|---|
| F | Gained 60~80 | ||
| # | Resource Node | ||
| # | Empty Node | ||
|---|---|---|---|
| G | 気のせいだった。/敵影を見ず。/穏やかな海です。/穏やかな海峡です。/警戒が必要です。/静かな海です。 Must be my imagination./No enemy spotted./Calm seas./Calm straits./Be alert./Peaceful seas. | ||
| # | Empty Node | ||
| # | Resource Node | ||
|---|---|---|---|
| H | Gained 50~80 | ||
| # | Resource Node | ||
| # | Enemy Form. |
Base EXP | Night Battle Node | AD/AP AS/AS+ |
|---|---|---|---|---|
| I | Line Ahead Double Line |
200 | 0/0 0/0 | |
| Line Ahead Double Line |
210 | 0/0 0/0 | ||
| Line Ahead Double Line |
220 | 0/0 0/0 | ||
| # | Enemy Form. |
Base EXP | Night Battle Node | AD/AP AS/AS+ |
| # | Enemy Form. |
Base EXP | Night Battle Node | AD/AP AS/AS+ |
|---|---|---|---|---|
| J | Line Ahead Echelon |
300 | 0/0 0/0 | |
| Line Ahead Echelon |
310 | 0/0 0/0 | ||
| Line Ahead Echelon |
320 | 0/0 0/0 | ||
| # | Enemy Form. |
Base EXP | Night Battle Node | AD/AP AS/AS+ |
| # | Enemy Form. |
Base EXP | Night Battle Node | AD/AP AS/AS+ |
|---|---|---|---|---|
| K | Double Line | 200 | 0/0 0/0 | |
| Line Ahead | 200 | 0/0 0/0 | ||
| Line Ahead Double Line |
210 | 0/0 0/0 | ||
| Line Ahead Double Line |
220 | 0/0 0/0 | ||
| # | Enemy Form. |
Base EXP | Night Battle Node | AD/AP AS/AS+ |
| # | Maelstrom Node | ||
|---|---|---|---|
| L | Lost Normal | ||
| # | Maelstrom Node | ||
| # | Enemy Form. |
Base EXP | Normal Battle Node | AD/AP AS/AS+ |
|---|---|---|---|---|
| M | Diamond | ? | 37/73 162/324 | |
| Diamond | 410 | 37/73 162/324 | ||
| Diamond | 420 | 37/73 162/324 | ||
| Diamond | 430 | 36/72 161/321 | ||
| Diamond | 440 | 64/128 287/573 | ||
| Diamond | 450 | 85/169 378/756 | ||
| # | Enemy Form. |
Base EXP | Normal Battle Node | AD/AP AS/AS+ |
| # | Enemy Form. |
Base EXP | Night Battle Node | AD/AP AS/AS+ |
|---|---|---|---|---|
| N | Line Ahead Echelon |
400 | 0/0 0/0 | |
| Line Ahead Echelon |
410 | 0/0 0/0 | ||
| Line Ahead Echelon |
420 | 0/0 0/0 | ||
| # | Enemy Form. |
Base EXP | Night Battle Node | AD/AP AS/AS+ |
| # | Selection Node | ||
|---|---|---|---|
| O | 艦隊の針路を選択できます。提督、どちらの針路をとられますか? You can decide the fleet's course. Admiral, which heading should we take? | ||
| # | Selection Node | ||
| # | Enemy Form. |
Base EXP | Night Battle Node | AD/AP AS/AS+ |
|---|---|---|---|---|
| P | Double Line | 700 | 0/0 0/0 | |
| Double Line | 710 | 0/0 0/0 | ||
| Double Line | 720 | 0/0 0/0 | ||
| Double Line | 730 | 0/0 0/0 | ||
| Double Line | 740 | 0/0 0/0 | ||
| Double Line | 750 | 0/0 0/0 | ||
| # | Enemy Form. |
Base EXP | Night Battle Node | AD/AP AS/AS+ |
| # | Enemy Form. |
Base EXP | Boss Battle Node | AD/AP AS/AS+ |
|---|---|---|---|---|
| Q | Line Ahead Double Line |
670 | 16/32 71/141 | |
| Line Ahead Double Line |
670 | 16/32 71/141 | ||
| Line Ahead Double Line |
700 | 32/63 140/279 | ||
| # | Enemy Form. |
Base EXP | Boss Battle Node | AD/AP AS/AS+ |
Ship Drops
| Ship drops | |||||||||||||||||||||||||||||||||||||||||||||||||||||||||||||||||||||||||||||||||||||||||||||||||||
|---|---|---|---|---|---|---|---|---|---|---|---|---|---|---|---|---|---|---|---|---|---|---|---|---|---|---|---|---|---|---|---|---|---|---|---|---|---|---|---|---|---|---|---|---|---|---|---|---|---|---|---|---|---|---|---|---|---|---|---|---|---|---|---|---|---|---|---|---|---|---|---|---|---|---|---|---|---|---|---|---|---|---|---|---|---|---|---|---|---|---|---|---|---|---|---|---|---|---|---|
| Type | Ship? | C | I | J | K | N | P | Q | |||||||||||||||||||||||||||||||||||||||||||||||||||||||||||||||||||||||||||||||||||||||||||
| DD | Uzuki | ✔️ | |||||||||||||||||||||||||||||||||||||||||||||||||||||||||||||||||||||||||||||||||||||||||||||||||
| AV | Mizuho | ✔️ | |||||||||||||||||||||||||||||||||||||||||||||||||||||||||||||||||||||||||||||||||||||||||||||||||
| DD | Yayoi | ✔️ | |||||||||||||||||||||||||||||||||||||||||||||||||||||||||||||||||||||||||||||||||||||||||||||||||
| DD | Yamagumo | ✔️ | |||||||||||||||||||||||||||||||||||||||||||||||||||||||||||||||||||||||||||||||||||||||||||||||||
| DD | Urakaze | ✔️ | |||||||||||||||||||||||||||||||||||||||||||||||||||||||||||||||||||||||||||||||||||||||||||||||||
| DD | Hamakaze | ✔️ | |||||||||||||||||||||||||||||||||||||||||||||||||||||||||||||||||||||||||||||||||||||||||||||||||
| DD | Akigumo | ✔️ | |||||||||||||||||||||||||||||||||||||||||||||||||||||||||||||||||||||||||||||||||||||||||||||||||
| DD | Yuugumo | ✔️ | |||||||||||||||||||||||||||||||||||||||||||||||||||||||||||||||||||||||||||||||||||||||||||||||||
| DD | Naganami | ✔️ | |||||||||||||||||||||||||||||||||||||||||||||||||||||||||||||||||||||||||||||||||||||||||||||||||
| CL | Kitakami | ✔️ | |||||||||||||||||||||||||||||||||||||||||||||||||||||||||||||||||||||||||||||||||||||||||||||||||
| CL | Ooi | ✔️ | |||||||||||||||||||||||||||||||||||||||||||||||||||||||||||||||||||||||||||||||||||||||||||||||||
| CL | Yuubari | ✔️ | ✔️ | ||||||||||||||||||||||||||||||||||||||||||||||||||||||||||||||||||||||||||||||||||||||||||||||||
| CA | Kinugasa | ✔️ | ✔️ | ✔️ | ✔️ | ✔️ | ✔️ | ✔️ | |||||||||||||||||||||||||||||||||||||||||||||||||||||||||||||||||||||||||||||||||||||||||||
| CA | Myoukou | ✔️ | ✔️ | ✔️ | ✔️ | ✔️ | ✔️ | ✔️ | |||||||||||||||||||||||||||||||||||||||||||||||||||||||||||||||||||||||||||||||||||||||||||
| CA | Takao | ✔️ | ✔️ | ✔️ | ✔️ | ||||||||||||||||||||||||||||||||||||||||||||||||||||||||||||||||||||||||||||||||||||||||||||||
| CA | Atago | ✔️ | ✔️ | ✔️ | |||||||||||||||||||||||||||||||||||||||||||||||||||||||||||||||||||||||||||||||||||||||||||||||
| CA | Mogami | ✔️ | ✔️ | ✔️ | ✔️ | ||||||||||||||||||||||||||||||||||||||||||||||||||||||||||||||||||||||||||||||||||||||||||||||
| CA | Suzuya | ✔️ | |||||||||||||||||||||||||||||||||||||||||||||||||||||||||||||||||||||||||||||||||||||||||||||||||
| CA | Tone | ✔️ | ✔️ | ✔️ | ✔️ | ✔️ | ✔️ | ✔️ | |||||||||||||||||||||||||||||||||||||||||||||||||||||||||||||||||||||||||||||||||||||||||||
| CA | Chikuma | ✔️ | ✔️ | ✔️ | ✔️ | ✔️ | ✔️ | ✔️ | |||||||||||||||||||||||||||||||||||||||||||||||||||||||||||||||||||||||||||||||||||||||||||
| CVL | Ryuujou | ✔️ | ✔️ | ✔️ | ✔️ | ✔️ | ✔️ | ||||||||||||||||||||||||||||||||||||||||||||||||||||||||||||||||||||||||||||||||||||||||||||
| CVL | Shouhou | ✔️ | ✔️ | ✔️ | ✔️ | ✔️ | ✔️ | ✔️ | |||||||||||||||||||||||||||||||||||||||||||||||||||||||||||||||||||||||||||||||||||||||||||
| CVL | Hiyou | ✔️ | ✔️ | ✔️ | ✔️ | ✔️ | ✔️ | ✔️ | |||||||||||||||||||||||||||||||||||||||||||||||||||||||||||||||||||||||||||||||||||||||||||
| CVL | Junyou | ✔️ | ✔️ | ✔️ | ✔️ | ✔️ | ✔️ | ✔️ | |||||||||||||||||||||||||||||||||||||||||||||||||||||||||||||||||||||||||||||||||||||||||||
| FBB | Kongou | ✔️ | |||||||||||||||||||||||||||||||||||||||||||||||||||||||||||||||||||||||||||||||||||||||||||||||||
| FBB | Hiei | ✔️ | ✔️ | ||||||||||||||||||||||||||||||||||||||||||||||||||||||||||||||||||||||||||||||||||||||||||||||||
| FBB | Haruna | ✔️ | |||||||||||||||||||||||||||||||||||||||||||||||||||||||||||||||||||||||||||||||||||||||||||||||||
| FBB | Kirishima | ✔️ | ✔️ | ||||||||||||||||||||||||||||||||||||||||||||||||||||||||||||||||||||||||||||||||||||||||||||||||
| BB | Fusou | ✔️ | ✔️ | ||||||||||||||||||||||||||||||||||||||||||||||||||||||||||||||||||||||||||||||||||||||||||||||||
| BB | Yamashiro | ✔️ | ✔️ | ✔️ | ✔️ | ||||||||||||||||||||||||||||||||||||||||||||||||||||||||||||||||||||||||||||||||||||||||||||||
| BB | Ise | ✔️ | ✔️ | ||||||||||||||||||||||||||||||||||||||||||||||||||||||||||||||||||||||||||||||||||||||||||||||||
| BB | Hyuuga | ✔️ | ✔️ | ||||||||||||||||||||||||||||||||||||||||||||||||||||||||||||||||||||||||||||||||||||||||||||||||
| CV | Akagi | ✔️ | |||||||||||||||||||||||||||||||||||||||||||||||||||||||||||||||||||||||||||||||||||||||||||||||||
| CV | Kaga | ✔️ | |||||||||||||||||||||||||||||||||||||||||||||||||||||||||||||||||||||||||||||||||||||||||||||||||
| CV | Souryuu | ✔️ | |||||||||||||||||||||||||||||||||||||||||||||||||||||||||||||||||||||||||||||||||||||||||||||||||
| CV | Hiryuu | ✔️ | |||||||||||||||||||||||||||||||||||||||||||||||||||||||||||||||||||||||||||||||||||||||||||||||||
| CV | Shoukaku | ✔️ | |||||||||||||||||||||||||||||||||||||||||||||||||||||||||||||||||||||||||||||||||||||||||||||||||
| CV | Zuikaku | ✔️ | |||||||||||||||||||||||||||||||||||||||||||||||||||||||||||||||||||||||||||||||||||||||||||||||||
| SS | I-58 | ✔️ | |||||||||||||||||||||||||||||||||||||||||||||||||||||||||||||||||||||||||||||||||||||||||||||||||
| DD | Mutsuki | ✔️ | ✔️ | ✔️ | ✔️ | ✔️ | ✔️ | ||||||||||||||||||||||||||||||||||||||||||||||||||||||||||||||||||||||||||||||||||||||||||||
| DD | Kisaragi | ✔️ | ✔️ | ✔️ | ✔️ | ✔️ | ✔️ | ||||||||||||||||||||||||||||||||||||||||||||||||||||||||||||||||||||||||||||||||||||||||||||
| DD | Fubuki | ✔️ | ✔️ | ✔️ | ✔️ | ✔️ | ✔️ | ||||||||||||||||||||||||||||||||||||||||||||||||||||||||||||||||||||||||||||||||||||||||||||
| DD | Ayanami | ✔️ | ✔️ | ✔️ | ✔️ | ✔️ | ✔️ | ||||||||||||||||||||||||||||||||||||||||||||||||||||||||||||||||||||||||||||||||||||||||||||
| DD | Shikinami | ✔️ | ✔️ | ✔️ | ✔️ | ✔️ | ✔️ | ||||||||||||||||||||||||||||||||||||||||||||||||||||||||||||||||||||||||||||||||||||||||||||
| DD | Akebono | ✔️ | ✔️ | ✔️ | ✔️ | ✔️ | ✔️ | ||||||||||||||||||||||||||||||||||||||||||||||||||||||||||||||||||||||||||||||||||||||||||||
| DD | Sazanami | ✔️ | ✔️ | ✔️ | ✔️ | ✔️ | ✔️ | ||||||||||||||||||||||||||||||||||||||||||||||||||||||||||||||||||||||||||||||||||||||||||||
| DD | Hatsuharu | ✔️ | ✔️ | ✔️ | ✔️ | ✔️ | ✔️ | ||||||||||||||||||||||||||||||||||||||||||||||||||||||||||||||||||||||||||||||||||||||||||||
| DD | Yuudachi | ✔️ | ✔️ | ✔️ | ✔️ | ✔️ | ✔️ | ||||||||||||||||||||||||||||||||||||||||||||||||||||||||||||||||||||||||||||||||||||||||||||
| DD | Asashio | ✔️ | ✔️ | ✔️ | ✔️ | ✔️ | ✔️ | ||||||||||||||||||||||||||||||||||||||||||||||||||||||||||||||||||||||||||||||||||||||||||||
| DD | Michishio | ✔️ | ✔️ | ✔️ | ✔️ | ✔️ | ✔️ | ||||||||||||||||||||||||||||||||||||||||||||||||||||||||||||||||||||||||||||||||||||||||||||
| DD | Arashio | ✔️ | ✔️ | ✔️ | ✔️ | ✔️ | ✔️ | ||||||||||||||||||||||||||||||||||||||||||||||||||||||||||||||||||||||||||||||||||||||||||||
| DD | Kasumi | ✔️ | ✔️ | ✔️ | ✔️ | ✔️ | ✔️ | ||||||||||||||||||||||||||||||||||||||||||||||||||||||||||||||||||||||||||||||||||||||||||||
| CL | Tenryuu | ✔️ | ✔️ | ✔️ | ✔️ | ✔️ | ✔️ | ||||||||||||||||||||||||||||||||||||||||||||||||||||||||||||||||||||||||||||||||||||||||||||
| CL | Tatsuta | ✔️ | ✔️ | ✔️ | ✔️ | ✔️ | ✔️ | ||||||||||||||||||||||||||||||||||||||||||||||||||||||||||||||||||||||||||||||||||||||||||||
| CL | Kuma | ✔️ | ✔️ | ✔️ | ✔️ | ✔️ | ✔️ | ||||||||||||||||||||||||||||||||||||||||||||||||||||||||||||||||||||||||||||||||||||||||||||
| CL | Tama | ✔️ | ✔️ | ✔️ | ✔️ | ✔️ | ✔️ | ||||||||||||||||||||||||||||||||||||||||||||||||||||||||||||||||||||||||||||||||||||||||||||
| CL | Kiso | ✔️ | ✔️ | ✔️ | ✔️ | ✔️ | ✔️ | ||||||||||||||||||||||||||||||||||||||||||||||||||||||||||||||||||||||||||||||||||||||||||||
| CL | Isuzu | ✔️ | ✔️ | ✔️ | ✔️ | ✔️ | ✔️ | ||||||||||||||||||||||||||||||||||||||||||||||||||||||||||||||||||||||||||||||||||||||||||||
| CL | Natori | ✔️ | ✔️ | ✔️ | ✔️ | ✔️ | ✔️ | ||||||||||||||||||||||||||||||||||||||||||||||||||||||||||||||||||||||||||||||||||||||||||||
| CL | Yura | ✔️ | ✔️ | ✔️ | ✔️ | ✔️ | ✔️ | ||||||||||||||||||||||||||||||||||||||||||||||||||||||||||||||||||||||||||||||||||||||||||||
| CL | Jintsuu | ✔️ | ✔️ | ✔️ | ✔️ | ✔️ | ✔️ | ||||||||||||||||||||||||||||||||||||||||||||||||||||||||||||||||||||||||||||||||||||||||||||
| CL | Naka | ✔️ | ✔️ | ✔️ | ✔️ | ✔️ | ✔️ | ||||||||||||||||||||||||||||||||||||||||||||||||||||||||||||||||||||||||||||||||||||||||||||
| CA | Furutaka | ✔️ | ✔️ | ✔️ | ✔️ | ✔️ | ✔️ | ||||||||||||||||||||||||||||||||||||||||||||||||||||||||||||||||||||||||||||||||||||||||||||
| CA | Kako | ✔️ | ✔️ | ✔️ | ✔️ | ✔️ | ✔️ | ||||||||||||||||||||||||||||||||||||||||||||||||||||||||||||||||||||||||||||||||||||||||||||
| CA | Aoba | ✔️ | ✔️ | ✔️ | ✔️ | ✔️ | ✔️ | ✔️ | |||||||||||||||||||||||||||||||||||||||||||||||||||||||||||||||||||||||||||||||||||||||||||
| CA | Nachi | ✔️ | ✔️ | ✔️ | ✔️ | ||||||||||||||||||||||||||||||||||||||||||||||||||||||||||||||||||||||||||||||||||||||||||||||
| CA | Ashigara | ✔️ | ✔️ | ✔️ | ✔️ | ✔️ | ✔️ | ||||||||||||||||||||||||||||||||||||||||||||||||||||||||||||||||||||||||||||||||||||||||||||
| CA | Haguro | ✔️ | ✔️ | ✔️ | ✔️ | ✔️ | ✔️ | ✔️ | |||||||||||||||||||||||||||||||||||||||||||||||||||||||||||||||||||||||||||||||||||||||||||
| CA | Maya | ✔️ | ✔️ | ✔️ | ✔️ | ✔️ | ✔️ | ✔️ | |||||||||||||||||||||||||||||||||||||||||||||||||||||||||||||||||||||||||||||||||||||||||||
| CA | Choukai | ✔️ | ✔️ | ✔️ | ✔️ | ✔️ | ✔️ | ✔️ | |||||||||||||||||||||||||||||||||||||||||||||||||||||||||||||||||||||||||||||||||||||||||||
| SS | I-168 | ✔️ | |||||||||||||||||||||||||||||||||||||||||||||||||||||||||||||||||||||||||||||||||||||||||||||||||
| AV | Chitose | ✔️ | ✔️ | ✔️ | ✔️ | ✔️ | ✔️ | ✔️ | |||||||||||||||||||||||||||||||||||||||||||||||||||||||||||||||||||||||||||||||||||||||||||
| AV | Chiyoda | ✔️ | ✔️ | ✔️ | ✔️ | ✔️ | ✔️ | ✔️ | |||||||||||||||||||||||||||||||||||||||||||||||||||||||||||||||||||||||||||||||||||||||||||
| |||||||||||||||||||||||||||||||||||||||||||||||||||||||||||||||||||||||||||||||||||||||||||||||||||||||||||||||||||||||||||||||||||||||||||||||||||||||||||||||||||||||||||||||||||||||||||||||||||||||||||||||||||||||||||||||||||||||||||||||||||||||||||||||||||||||||||||||||||||||||||||||||||||||||||
World 5-1: 南方海域前面 The Forefront of the Southern Sea
Stage Guide
Template:MapBranchingTable Template:AirControlSystem
Tips
Regarding the map
- By the number order of the world map, this is the first time Wo Flagship with hellcat planes and Light Cruiser Tsu-Class appear. Wo Flagship with hellcat planes is notably much stronger than it's normal Flagship counterpart, while CL Tsu-Class has much higher stats compared to the other enemy CL.
- With the presence of CL Tsu-Class, there is a chance you will lose a lot of bombers (Or even their rank, should Tsu shot all of them down) before reaching the boss node. Keep this in mind if you wish to bring any bombers on your CV(L)
- Node E is actually a submarine node without warning.
Regarding the branching and recommended fleet
- 2 DD and 2 or less (F)BB(V) + CV(B/L) to guarantee B start.
- 1 CL and 2 DD to guarantee boss node on North routing.
- 3 XX 1 CL 2 DD with a maximum of 2 (F)BB(V) will take the shortest BCFJ route.
- 1 BB can be replaced with a CVL.
- Taking CV(B) will introduce random off-routing to E which continues to the double Ta-class node G.
Regarding the quests in this map
- Monthly Quest: "Surface Strike Fleet" to the South! (Bm4) : 3 BB(V) 1 CL 2 DD
- This quest requires three slow battleships (or BBVs), exactly one light cruiser, and two other ships, with an S-Rank at the boss node.
- Quarterly Mikawa (Bq7) : 3 CA 1 CL 2 DD
- Routes BCFJ, requires Support Expedition for easier time pre-boss.
Nodes and Enemy Encounters
Drops
| Node | Destroyer | Light Cruiser | Heavy Cruiser | Seaplane Tender | Aircraft Carrier | Submarine | Battleship |
|---|---|---|---|---|---|---|---|
| A | Mutsuki, Kisaragi, Satsuki, Nagatsuki, Fumizuki, Kikuzuki, Mikazuki, Mochizuki, Hatsuharu, Shiratsuyu, Murakumo, Shigure | Ooi, Kitakami, Tama, Kiso, Isuzu, Natori, Yura, Jintsuu, Naka | Mogami, Furutaka, Kako, Aoba, Myoukou, Nachi, Ashigara, Haguro, Atago, Maya, Choukai, Tone, Chikuma | Chitose, Chiyoda | Ryuujou, Hiyou, Jun'you, Shouhou | Kongou, Hiei, Haruna, Kirishima, Fusou, Yamashiro | |
| D | Murakumo, Kisaragi, Satsuki, Nagatsuki, Hatsuharu, Shiratsuyu, Shigure, Yuudachi | Ooi, Kitakami, Tama, Kiso, Isuzu, Natori, Yura, Jintsuu, Naka | Mogami, Suzuya, Furutaka, Kako, Aoba, Myoukou, Nachi, Ashigara, Haguro, Takao, Atago, Maya, Choukai, Tone, Chikuma | Chitose, Chiyoda | Ryuujou, Hiyou, Shouhou, Souryuu | Kongou, Hiei, Haruna, Kirishima, Fusou, Yamashiro | |
| E | Mutsuki, Kisaragi, Satsuki, Kikuzuki, Mochizuki, Hatsuharu, Murasame | Ooi, Tama, Kiso, Isuzu, Yura, Naka | Kako, Aoba, Myoukou, Haguro, Maya, Choukai, Chikuma | Chitose, Chiyoda | Jun'you, Shouhou | Kongou, Hiei, Yamashiro | |
| F | Murakumo, Mutsuki, Kisaragi, Satsuki, Fumizuki, Nagatsuki, Mikazuki, Mochizuki, Hatsuharu, Shiratsuyu, Shigure, Yuudachi | Ooi, Kitakami, Kiso, Isuzu, Natori, Yura, Jintsuu, Naka | Furutaka, Kako, Myoukou, Nachi, Ashigara, Takao, Maya, Choukai | Chitose, Chiyoda | Jun'you, Shouhou | Kongou, Hiei, Haruna, Kirishima, Fusou, Yamashiro | |
| H | Murakumo, Kisaragi, Satsuki, Fumizuki, Mikazuki, Mochizuki, Hatsuharu, Shiratsuyu, Murasame, Yuudachi | Ooi, Kitakami, Tama, Kiso, Isuzu, Natori, Yura, Jintsuu, Naka | Mogami, Myoukou, Nachi, Ashigara, Haguro, Tone, Chikuma, Takao, Atago | Chitose, Chiyoda | Ryuujou, Hiyou, Shouhou | Kongou, Hiei, Haruna, Kirishima | |
| I | Shimakaze, Akigumo, Yuugumo, Naganami, Yayoi, Uzuki, Hamakaze, Uranami | Kitakami, Tenryuu, Tatsuta, Tama, Kiso, Isuzu, Natori, Yura, Sendai, Kinu, Abukuma | Mogami, Kako, Myoukou, Nachi, Ashigara, Haguro, Takao, Atago, Maya, Choukai, Tone, Chikuma, Kinugasa | Chitose, Chiyoda | Kaga, Souryuu, Shoukaku, Houshou, Ryuujou, Hiyou, Jun'you | I-58 | Ise, Hyuuga, Kongou, Hiei, Haruna, Kirishima, Fusou, Yamashiro |
World 5-2: 珊瑚諸島沖 The Coral Islands
Stage Guide
Template:MapBranchingTable Template:AirControlSystem
- Unlocking 5-2 requires clearing both 4-4 and 5-1.
- You must sink the boss 4 times to clear the map.
Tips
- This map is based on the historical operation known as Operation MO. Ships that participated in this operation can be used here to obtain special routing on this map.
- Like map 5-1, Standard Carrier Wo-Class Flagship with hellcat planes also makes an appearance here, especially at pre-boss nodes
- AACI is required if you wish to reach the boss node consistently
- The boss can be either Wo Kai Flagship or Aircraft Carrier Demon.
- Sinking Aircraft Carrier Demon can be a bit harder than sinking Wo Kai Flagship, therefore, do prepare a lot of good equipment and high-level girls before attempting this map for the best success rate
- With the use of AACI, it's possible to destroy all of the enemy bombers at the boss node, completely disables the boss at day battle which can make the boss fight a lot easier
Recommended Fleet
- Shoukaku, Zuikaku, 2 DD, 2 [(F)BB(V)+CA(V)] / 2CV(L/B), 2DD, 2CA(V) routes BCDFO
- Please note that the fleet must be Fast.
- Los required: >= 71 (F33 Cn2)
- Any heavier fleets (refer to branching rules) are not recommended as these have a chance of off-routing to Node I, which will likely significantly deplete your bomber count due to the nature of that node.
Nodes and Enemy Encounters
Drops
| Node | Destroyer | Light Cruiser | Heavy Cruiser | Seaplane Tender | Submarine Tender | Aircraft Carrier | Submarine | Battleship |
|---|---|---|---|---|---|---|---|---|
| A | Akatsuki, Hibiki, Ikazuchi, Inazuma, Samidare, Suzukaze, Asashio, Michishio, Arashio, Kasumi, Kagerou, Shiranui, Kuroshio, Akigumo | Tenryuu, Tatsuta, Kuma, Tama, Kiso, Isuzu, Natori, Yura, Jintsuu, Naka | Mogami, Furutaka, Kako, Aoba, Myoukou, Nachi, Ashigara, Haguro, Takao, Atago, Maya, Choukai, Tone, Chikuma | Chitose, Chiyoda | Ryuujou, Hiyou, Jun'you, Shouhou | Kongou, Hiei, Haruna, Kirishima, Fusou, Yamashiro | ||
| B | Akatsuki, Hibiki, Ikazuchi, Inazuma, Samidare, Suzukaze, Asashio, Michishio, Arashio, Kasumi, Kagerou, Shiranui, Kuroshio, Maikaze, Akigumo | Tenryuu, Tatsuta, Kuma, Tama, Kiso, Isuzu, Natori, Yura, Jintsuu, Naka | Mogami, Furutaka, Kako, Aoba, Myoukou, Nachi, Ashigara, Haguro, Takao, Atago, Maya, Choukai, Tone, Chikuma | Chitose | Ryuujou, Hiyou, Jun'you, Shouhou | Kongou, Hiei, Haruna, Kirishima, Fusou, Yamashiro | ||
| C | Akatsuki, Hibiki, Ikazuchi, Inazuma, Samidare, Suzukaze, Asashio, Michishio, Arashio, Kasumi, Kagerou, Shiranui, Kuroshio, Akigumo | Tenryuu, Tatsuta, Kuma, Tama, Kiso, Isuzu, Natori, Yura, Jintsuu, Naka | Mogami, Furutaka, Kako, Aoba, Myoukou, Nachi, Ashigara, Haguro, Takao, Atago, Maya, Choukai, Tone, Chikuma | Chiyoda | Ryuujou, Hiyou, Jun'you, Shouhou | Kongou, Hiei, Haruna, Kirishima, Fusou, Yamashiro | ||
| D |
Yukikaze, Hatsuharu, Maikaze, Akigumo, Yuugumo, Hamakaze, Makigumo | Ooi, Kitakami, Tenryuu, Tatsuta, Nagara, Isuzu, Natori, Yura, Sendai, Yuubari | Mogami, Furutaka, Kako, Aoba, Myoukou, Nachi, Ashigara, Haguro, Takao, Atago, Maya, Choukai, Tone, Chikuma, Mikuma, Kinugasa | Chitose, Chiyoda | Taigei | Akagi, Kaga, Souryuu, Hiryuu, Zuikaku, Houshou, Ryuujou, Hiyou, Jun'you, Shouhou, Zuihou |
I-58 | Mutsu, Ise, Hyuuga, Kongou, Hiei, Haruna, Kirishima, Fusou, Yamashiro |
| F | Akatsuki, Hibiki, Ikazuchi, Inazuma, Samidare, Kasumi, Asashio, Kuroshio, Michishio, Akigumo | Ooi, Tenryuu, Tatsuta, Tama, Kiso, Natori, Jintsuu, Naka | Mogami, Kako, Aoba, Myoukou, Nachi, Ashigara, Haguro, Atago, Maya, Choukai, Chikuma | Chitose, Chiyoda | Ryuujou, Shouhou | Kongou, Hiei, Haruna, Kirishima | ||
| G | Akatsuki, Hibiki, Ikazuchi, Inazuma, Samidare, Suzukaze, Asashio, Michishio, Kagerou, Shiranui, Kuroshio, Akigumo | Tenryuu, Tatsuta, Kuma, Tama, Kiso, Isuzu, Natori, Yura, Naka | Mogami, Furutaka, Kako, Aoba, Myoukou, Nachi, Ashigara, Haguro, Takao, Atago, Maya, Choukai, Tone, Chikuma | Chitose, Chiyoda | Ryuujou, Hiyou, Jun'you, Shouhou | Kongou, Hiei, Haruna, Kirishima, Fusou, Yamashiro | ||
| I | Akatsuki, Ikazuchi, Michishio, Kasumi, Shiranui, Akigumo | Tenryuu, Tatsuta, Tama, Kiso, Isuzu, Natori, Jintsuu, Naka | Mogami, Furutaka, Aoba, Nachi, Ashigara, Choukai, Takao, Maya | Hiyou, Shouhou | Kongou, Haruna, Kirishima, Fusou | |||
| J | Samidare, Suzukaze, Michishio, Arashio, Kasumi, Kagerou, Kuroshio, Akigumo | Tatsuta, Tama, Yura, Jintsuu | Mogami, Furutaka, Kako, Aoba, Nachi, Haguro, Maya, Chikuma | Chitose | Ryuujou, Shouhou | Haruna, Kirishima, Fusou, Yamashiro |
World 5-3: サブ島沖海域 Sav Island
Stage Guide
Template:MapBranchingTable Template:AirControlSystem
- You must sink the Boss 5 times to clear the map.
Tips
- Unlike the previous maps, all of 5-3 pre-boss nodes feature night battle, where every enemies drastically become more powerful compared to the day battle.
- The use of Support Expeditions is highly recommended for both pre-boss and boss fights.
- With normal support expedition help, you can minimize the risk of your ships getting heavily damaged and subsequently increase the chances of your fleet arriving to the boss node in good conditions.
- The use of Support Shelling is highly recommended, as Aerial Support will not trigger on pre-boss nodes, while Long Range Torpedo Attacks may activate but will cause negligible amounts of damage.
- Taking advantage of night battle equipment (Star Shell and Type 98 Recon Seaplane (Night Scout)) and sparkling your ships are recommended.
- Usage of the Searchlight, however, is highly discouraged due to the drastic evasion reduction the equipping ship suffers in night battle.
- The use of Support Expeditions is highly recommended for both pre-boss and boss fights.
- Regarding boss node, the boss of this map is Southern War Princess who has pretty tough armor and firepower that can potentially wreck any of your ships.
- There is a little chance that 2 Light Carrier Nu-Class Flagship will show up at boss, AACI can be brought here to shoot down enemy bombers and protect your light ships.
- CAV can carry Seaplane Fighters in order to obtain AS at the boss node (71+ air for the comp with Southern War Princess alone), or at least force AP for the comp with dual Light Carrier Nu-Class Flagship (requires 140+ air for AS otherwise)
- It's unlikely that you will finish the boss off at day so do expect the battle to last till night.
- As of the January 22nd update, Southern War Princess has retained her buff from the Winter 2019 Event, giving her more HP and armor, thus making the boss fight slightly harder.
Recommended Fleet
- D - G - I - O - K - H - E - Q
- 2 CAV 1 CL 3 DD
- Standard composition for 5-3 that balance between firepower and evasion.
- CAVs can trigger Artillery Spotting as long as you have AS at boss, help take out enemy escorts easier.
- 2 CAV 1 CL 3 DD
- D - G - I - O - K - E - Q
- 1 FBB 1 CL 2 CA(V) 2 DD
- 5 CA(V) 1 CL (Quest Bq7)
- 3 CA(V) 1 CL 2 DD (Quest Bq7)
- Skipping resource node H for more firepower at the boss node.
Nodes and Enemy Encounters
Drops
| Node | Destroyer | Light Cruiser | Heavy Cruiser | Seaplane Tender | Aircraft Carrier | Submarine | Battleship |
|---|---|---|---|---|---|---|---|
| B | Shikinami, Sazanami, Hatsuharu, Yuudachi | Tenryuu, Tatsuta, Kuma, Jintsuu, Yuubari | Myoukou, Ashigara, Atago, Tone, Kinugasa | Chitose | Jun'you, Shouhou | Hyuuga, Hiei, Kirishima, Fusou | |
| C | Fubuki, Ayanami, Shikinami, Mutsuki, Kisaragi, Akebono, Sazanami, Hatsuharu, Yuudachi, Asashio, Kasumi | Tenryuu, Tatsuta, Kuma, Tama, Kiso, Isuzu, Natori, Yura, Jintsuu, Naka, Yuubari | Mogami, Furutaka, Kako, Aoba, Myoukou, Nachi, Ashigara, Haguro, Takao, Atago, Maya, Choukai, Chikuma, Kinugasa | Chitose, Chiyoda | Ryuujou, Hiyou, Jun'you, Shouhou | Ise, Hyuuga, Hiei, Kirishima, Fusou, Yamashiro | |
| D | Fubuki, Ayanami, Shikinami, Mutsuki, Akebono, Sazanami, Hatsuharu, Yuudachi, Asashio, Michishio, Arashio, Kasumi | Tenryuu, Tatsuta, Kuma, Tama, Kiso, Isuzu, Natori, Yura, Naka, Jintsuu, Yuubari | Mogami, Furutaka, Kako, Aoba, Nachi, Ashigara, Haguro, Takao, Atago, Choukai, Tone, Chikuma, Kinugasa | Chitose | Hiyou, Ryuujou | I-168 | Ise, Hyuuga, Hiei, Kirishima, Fusou |
| E | Mutsuki | Tenryuu, Isuzu, Naka, Yuubari | Mogami, Furutaka, Kinugasa, Maya, Chikuma | Ryuujou | Hiei, Kirishima, Yamashiro | ||
| F | Shikinami, Akebono, Sazanami, Michishio, Kasumi, Yuudachi | Tatsuta, Kuma, Yura, Naka, Yuubari | Furutaka, Aoba, Myoukou, Takao, Atago, Kinugasa | Chitose | Hiyou, Shouhou | Ise, Hyuuga, Hiei, Kirishima, Yamashiro | |
| J | Sazanami, Yuudachi | Tama, Kiso, Isuzu, Natori, Naka, Yuubari | Mogami, Furutaka, Aoba, Nachi, Takao, Choukai, Kinugasa | Ryuujou | Ise, Hyuuga, Kirishima | ||
| K | Akigumo, Yuugumo, Naganami, Uzuki, Yayoi | Ooi, Kitakami, Tenryuu, Tatsuta, Kuma, Nagara, Isuzu, Natori, Yura, Sendai, Yuubari | Mogami, Furutaka, Kako, Aoba, Myoukou, Nachi, Ashigara, Haguro, Takao, Atago, Maya, Choukai, Tone, Chikuma, Kinugasa, Suzuya | Chitose, Chiyoda Mizuho | Akagi, Kaga, Souryuu, Hiryuu, Shoukaku, Zuikaku, Houshou, Ryuujou, Hiyou, Jun'you, Shouhou | I-168, I-58 | Ise, Hyuuga, Kongou, Hiei, Haruna, Kirishima, Fusou, Yamashiro |
World 5-4: サーモン海域 Salmon Sea Area
Stage Guide
| Template:AirControlSystem | Template:AirControlSystem |
- You must sink the boss 5 times to clear the map.
Tips
- There are two routes you can go to beat the boss, north and south.
- North route is occupied with Standard Carrier Wo-Class Flagship IV, who carries Hellcat Kai plane version, and Battleship Ta-Class Flagship, who has high evasion and accuracy. They can potentially damage any of your ships on the way to the boss if not evaded.
- Node C also has a pattern with 1-2 Enemy Submarines, sometimes in Line Ahead. You are recommended go Line Abreast against this Node (Heavy Ships such as BB/CV can handle all Surface Enemies in the Node even in this formation), and bring OASW capable Destroyers to deal with them.
- There is an LoS Check in L to go to the Boss Node, requiring above eLoS (F33) Cn=2 of 60 or higher.
- South route, however, doesn't feature any enemy carrier at all, but instead, you have go through the night battle nodes like in 5-3 against enemy Heavy Cruiser Ri-Class and Late Model DDs
- Seaplane Fighters are required for this route if you wish to obtain Air Superiority at the boss node, as no CVs are allowed
- There is an LoS Check in M to go to the Boss Node. It is ignored if your fleet is Fast+. If your fleet is just Fast (and not Fast+), it requires above eLoS (F33) Cn=2 of 45 or higher.
- North route is occupied with Standard Carrier Wo-Class Flagship IV, who carries Hellcat Kai plane version, and Battleship Ta-Class Flagship, who has high evasion and accuracy. They can potentially damage any of your ships on the way to the boss if not evaded.
- No matter which route you take, Light Cruiser Tsu-Class will nearly show up everywhere in this map. Therefore, If you are using a composition with CVs and go north route, you are recommended to use ones with high capacity aircraft slots, and place Bombers only in the Highest Capacity Slots on your CVs to avoid all of your Bombers getting shot down to 0 by the time you reach the Boss Node.
Recommended Fleet
- North : B - C - G - L - P
- 2 BB(V) 2 DD 2 CV(B)
- 2 BB(V) 2 CA(V) 2 CV(B)
- South : B - E - H - I - J - M - P (Requires Fast Fleet)
- 1 fBB(V) 1 CLT 4 DD
- 2 fBB(V)/CA(V) 1 CL 3 DD (Quest Bq6)
- South : A - D - E/F - H - I - J - M - P
- 3 CA(V) 1 CL 2 DD (Quest Bq6 / Bq7, goes through node E)
- 4 CA 2 CAV (Quest Bq7, goes through node F)
Nodes and Enemy Encounters
Drops
| Node | Destroyer | Light Cruiser | Heavy Cruiser | Seaplane Tender | Aircraft Carrier | Submarine | Battleship |
|---|---|---|---|---|---|---|---|
| A | Fubuki, Hatsuyuki, Ayanami, Mikazuki, Mochizuki, Mutsuki, Satsuki, Kagerou, Akatsuki, Hibiki, Yuudachi, Samidare, Suzukaze, Makigumo | Tenryuu, Nagara, Isuzu, Yura, Sendai, Jintsuu | Furutaka, Kako, Aoba, Myoko, Haguro, Takao, Atago, Maya, Choukai, Tone, Chikuma, Kinugasa | Chitose | Ryuujou, | Kongou, Hiei, Haruna, Kirishima | |
| C | Yura, Sendai, Jintsuu | Furutaka | Ryuujou, | Kirishima | |||
| F | Fubuki, Hatsuyuki, Ayanami, Shikinami, Satsuki, Mikazuki, Mochizuki, Akatsuki, Inazuma, Yuudachi, Suzukaze, Kagerou, Makigumo, Naganami | Tenryuu, Nagara, Isuzu, Yura, Sendai, Jintsuu | Furutaka, Kako, Aoba, Myoko, Takao, Atago, Maya, Choukai, Tone, Chikuma, Kinugasa | Chitose | Ryuujou, | Kongou, Hiei, Haruna, Kirishima | |
| G | Kagerou, Makigumo, Naganami | Nagara, Yura, Jintsuu | Kako, Maya, Choukai, Tone | Jun'you | Haruna, Kirishima | ||
| H | Fubuki, Hatsuyuki, Ayanami, Murakumo, Mutsuki, Satsuki, Mikazuki, Mochizuki, Akatsuki, Ikazuchi, Inazuma, Yuudachi, Samidare, Suzukaze, Kagerou, Kuroshio, Makigumo, Naganami | Tenryuu, Nagara, Isuzu, Yura, Sendai, Jintsuu | Furutaka, Kako, Aoba, Takao, Atago, Maya, Choukai, Tone, Chikuma, Kinugasa | Chitose | Ryuujou, | Kongou, Hiei, Haruna, Kirishima, Yamashiro | |
| I | Fubuki, Hatsuyuki, Ayanami, Satsuki, Mikazuki, Mochizuki, Akatsuki, Inazuma, Yuudachi, Suzukaze, Kagerou, Kuroshio, Makigumo, Naganami | Tenryuu, Nagara, Isuzu, Yura, Sendai, Jintsuu | Furutaka, Kako, Aoba, Takao, Maya, Tone, Kinugasa | Chitose | Ryuujou, | Kongou, Haruna, Kirishima | |
| K | Fubuki, Murakumo, Inazuma, Satsuki, Mikazuki, Mochizuki, Ikazuchi, Samidare, Naganami | Tenryuu, Sendai, Jintsuu | Kinugasa | Chitose | Ryuujou | ||
| N | Fubuki, Mochizuki, Akatsuki, Ikazuchi, Inazuma, Kagerou, Yuugumo, Makigumo, Naganami | Tenryuu, Nagara, Yura, Sendai | Furutaka, Aoba, Myoko, Haguro, Atago, Choukai, Tone, Chikuma, Kinugasa | Ryuujou | Kongou, Hiei, Kirishima | ||
| O | Fubuki, Hatsuyuki, Murakumo, Ayanami, Shikinami, Mutsuki, Satsuki, Mikazuki, Mochizuki, Akatsuki, Ikazuchi, Inazuma, Yuudachi, Samidare, Suzukaze, Kagerou, Kuroshio, Akigumo, Yuugumo, Yukikaze, Makigumo, Naganami, Yayoi, Uzuki, Hamakaze | Tenryuu, Nagara, Isuzu, Yura, Sendai, Jintsuu, Yuubari, Agano | Furutaka, Kako, Aoba, Myoko, Ashigara, Haguro, Takao, Atago, Maya, Choukai, Tone, Chikuma, Kinugasa, Suzuya, Kumano | Chitose | Ryuujou, Hiyou, Jun'you, Shoukaku, Zuikaku, Zuihou | I-19, I-58 | Mutsu, Hyuuga, Kongou, Hiei, Haruna, Kirishima, Fusou, Yamashiro |
World 5-5:【Extra Operation】サーモン海域北方 Northern Salmon Sea Area
Stage Guide
| Template:AirControlSystem | Template:AirControlSystem |
- You must sink the Boss 5 times to clear the map.
- Clearing this map rewards 1 medal and 200 points for ranking. The boss HP bar is reset at midnight of the beginning of each month, allowing the reward to be obtained again.
- The enemy composition at the boss node will be locked into either formation 5 or 6 after clearing. If you are planning on clearing any quests that require you to clear 5-5 with an A/S-Rank, it is recommended that you attempt these quests after clearing 5-5 for the month, as the post-clear boss compositions are significantly less dangerous than the pre-clear comps. The fleet composition restrictions for most of these quests mean that your fleet will face some difficulty in defeating the pre-clear comps, particularly after the buff to the Southern War Princess in Winter 2019 Event (who does not appear at all in post-clear comps).
- This is especially true if said quests require 2DDs, as DDs will face difficulty in dealing any significant damage to the pre-clear boss comps during the daytime battle
- Please note that Submarine Yo-Class at the boss node will be in Elite form post-clear, so a dedicated OASW ship must be brought if one wishes to secure a S-rank.
- The enemy composition at the boss node will be locked into either formation 5 or 6 after clearing. If you are planning on clearing any quests that require you to clear 5-5 with an A/S-Rank, it is recommended that you attempt these quests after clearing 5-5 for the month, as the post-clear boss compositions are significantly less dangerous than the pre-clear comps. The fleet composition restrictions for most of these quests mean that your fleet will face some difficulty in defeating the pre-clear comps, particularly after the buff to the Southern War Princess in Winter 2019 Event (who does not appear at all in post-clear comps).
- As with all World 5 maps, support expeditions 33 and 34 are applicable on this map.
- Node B is a submarine node.
- Nodes G and M are night battles.
Tips
- 5-5 is one of the few maps that has arguably become more difficult after the Phase 2 update.
- 2 of the pre-clear boss compositions now contain 2 Elite Re-class Abyssals.
- The Southern War Princess has also gained additional armour followed by Winter 2019 Event
- Her escort has been slightly weakened to compensate for this. The Submarine in her escort has been changed from an Elite variant to a basic variant.
- The addition of CL Tsu-class to multiple nodes has also made the map potentially more costly in terms of bauxite.
- Pre-boss Node P still has the chance of containing an Elite Re-class in Line Ahead.
- Depending on your choice of ships (and also dependent on engagement modifiers & enemy fleet formation), bulges equipped in Reinforcement Expansion slots may improve survivability against opening torpedoes.
- Support Expedition(s) may help as well.
- However, routing to the boss is now guaranteed with the correct composition(s) and sufficient LoS. Speed is also no longer a major factor in determining routing.
- The special attack (Touch mechanic) from Nelson Kai, Nagato Kai Ni and Mutsu Kai Ni are also a good option to consider if you want to clear out enemies at the boss node easier.
Recommended Fleet
- North : B-K-P-S or B-F-J-P-S: 4 (F)BB(V)/CV(L/B) + 2 XX
- LoS required: ≥ 81 F33 Cn2
- Maximum of 4 (F)BB(V)/CV(L/B), otherwise chance of off-routing at pre-boss node P.
- Routing B->K or B->F will depend on your fleet. Fleet with either 3CV(B) or 4(F)BB(V)s will always go to K, otherwise will go to F as long as you have 2 DDs.
- F is a choice node. For the above fleet, routing to J is recommended as D is a maelstrom node, and fleet comp will route to P after H anyway.
- CAVs can help provide additional fighter power, allowing for optimized set-ups on CVs.
- Ise Kai Ni is another option if additional fighter power is needed. However, keep in mind that she is significantly weaker in terms of firepower compared to almost every other battleship.
- Seaplane Bombers should not be used in smaller slots due to the potential presence of multiple Light Cruiser Tsu-Class along this route.
- Middle : B-F-D-H-N-O-S: 2 (F)BB(V) + 2 CA(V) + 2 DD
- LoS required: ≥ 67 F33 Cn2
- Easier preboss, but will struggle against the double Re Elite boss node formations
- CAV can be replaced with CLT (Maximum 1 CLT)
- D node is a maelstrom node that wipe out your fuel. Recommended to bring some radars to reduce the loss.
- South : A-C-E-G-I-M-O-S: 2 [(F)BB(V)+CV(B/L)] + 4 DD
- LoS required: ≥ 67 F33 Cn2
- The first battle is a relatively easy enemy torpedo squadron, but the next two battles are fairly dangerous night battles
- Pre-boss support shelling expeditions can help stabilize the night battles significantly
- Fleets that take this route will struggle significantly against the double Re Elite boss node formations
- Generally lower bauxite consumption when compared to other routes
Nodes and Enemy Encounters
Drops
| Node | Destroyer | Light Cruiser | Heavy Cruiser | Seaplane Tender | Aircraft Carrier | Submarine | Battleship |
|---|---|---|---|---|---|---|---|
| A | Shiratsuyu, Mochizuki, Kagero, Mutsuki, Shigure, Suzukaze | Yura | Chikuma, Haguro, Maya | Ryuujou | Hiei, Kirishima | ||
| B | |||||||
| C | |||||||
| D | Ayanami, Shikinami, Shiratsuyu, Kagerou, Mutsuki, Suzukaze, Mochizuki, Shigure | Yura, Jintsuu | Haguro, Tone, Takao, Chikuma, Maya | Chitose | Ryuujou | Hiei, Kirishima | |
| E | Shigure, Suzukaze, Mochizuki, Shiratsuyu, Mutsuki, Kagerou, Maikaze, Akigumo, Ayanami | Yura, Nagara | Myoukou, Maya, Chikuma, Takao | Chitose | Ryuujou | Hiei | |
| F | Nagara | Takao, Atago | Chitose | ||||
| G | Haguro | ||||||
| H | |||||||
| K | |||||||
| M | |||||||
| N | Uzuki | Yura, Nagara | Atago | Chitose | Shoukaku | Kirishima, Hiei |