- Welcome to the Kancolle Wiki!
- If you have any questions regarding site content, account registration, etc., please visit the KanColle Wiki Discord
Difference between revisions of "Repairs"
(Created page with "==Repair time== right|thumb|404px|Confirmation window for repairs <math>\text {Total repair time} = \text {HP loss} \times \text {base repair time} \tim...") |
Jigaraphale (talk | contribs) |
||
| (51 intermediate revisions by 7 users not shown) | |||
| Line 1: | Line 1: | ||
| − | + | {{PortMechanicsPortal}} | |
| − | [[ | + | Ship girls are mainly repaired through the [[Docking]] menu, and can be repaired in some situations, by using some consumables or ship mechanics with [[AR]]s and [[Akitsushima Kai]]. It is important to keep ship healthy as damage can have detrimental effects on their [[Damage_Calculations#Damage_State|combat performance]]. Also important to note is that only {{color|red|'''heavily damaged'''}} ship girls can be sunk and '''permanently lost''' in sorties. |
| − | + | =Overview= | |
| + | * Repairs cost fuel {{Fuel}}, steel {{Steel}} and time. | ||
| + | ** The cost is the same for both methods. | ||
| + | * Repairs can be completed immediately using {{IR}} Instant Repairs (Buckets). | ||
| + | * Repairs will reset a ship girl's [[Morale and Fatigue|morale]] to 40 if she is below 39 morale. | ||
| + | * Ship girls being repaired can be: | ||
| + | ** [[Supply (Mechanic)|Resupplied]] | ||
| + | ** [[Composition|Placed in a fleet]] | ||
| + | * Ship girls being repaired cannot: | ||
| + | ** Have their equipment adjusted through the [[Remodel_(Menu)|Remodel menu]]. | ||
| + | *** Swapping equipment with another ship girl still works. | ||
| + | *** Equipment in a [[Reinforcement Expansion]] can still be adjusted. | ||
| + | ** Be sent on [[Sortie]]s, [[Expeditions]], or [[Exercises]]. | ||
| + | * There are actions which will restore girls to full HP besides repairs. | ||
| + | ** [[Repair Goddess]] | ||
| + | ** [[Remodel (Mechanic)|Remodeling]] | ||
| + | ** [[Marriage]] | ||
| + | * Returning to the docking menu with less than 1 minute remaining on the timer will automatically complete the repair. | ||
| + | ** This also works for skipping the instant repair animation. | ||
| − | <math>\text { | + | ===Repair Time=== |
| + | The length of time (in seconds) it takes to repair a ship girl can be calculated by: | ||
| + | {{Formula | ||
| + | |Title= Repair time formula | ||
| + | |Math= \text{Repair Time} = \text{HP}_\text{loss} \times \text{Repair Time}_\text{base} \times \text{Mod}_\text{ship} \times \text{Mod}_\text{AR} + \text{Mod}_\text{Dock} | ||
| + | |Var=<math>\text{HP}_\text{loss}</math> the amount of '''HP''' {{HP}} that needs recovering, | ||
| + | * <math>\text{Repair Time}_\text{base} = \begin{align*} | ||
\left\{ | \left\{ | ||
\begin{array}{l l} | \begin{array}{l l} | ||
| Line 12: | Line 36: | ||
\right\} | \right\} | ||
\end{align*}</math> | \end{align*}</math> | ||
| + | *<math>\text {Level}</math> being the level of the ship, | ||
| + | * <math>\text{Mod}_\text{ship}</math> the ship type modifier: | ||
| + | {{{!}}class="wikitable" style="text-align:center" | ||
| + | !colspan=2{{!}}<math>\text{Mod}_\text{ship}</math> | ||
| + | {{!}}- | ||
| + | !Ship Type!!Multiplier | ||
| + | {{!}}- | ||
| + | {{!}}BB, BBV, CV, CVB, AR{{!}}{{!}}2 | ||
| + | {{!}}- | ||
| + | {{!}}CA, CAV, FBB, CVL, AS{{!}}{{!}}1.5 | ||
| + | {{!}}- | ||
| + | {{!}}CL, CLT, CT, DD, SSV, AV, LHA{{!}}{{!}}1 | ||
| + | {{!}}- | ||
| + | {{!}}SS, DE{{!}}{{!}}0.5 | ||
| + | {{!}}} | ||
| + | * <math>\text{Mod}_\text{AR}</math> the [[#Anchorage Repairs]] modifier, | ||
| + | * <math>\text{Mod}_\text{Dock}</math> being '''30''' for ships in [[Docking]], '''0''' other wise. | ||
| + | |Notes= | ||
| + | }} | ||
| + | The repair time depends on: | ||
| + | *'''HP''' {{HP}} lost, | ||
| + | *Level of the ship, | ||
| + | *Its type (DD, CL, ...). | ||
| − | + | ===Repair cost=== | |
| − | + | The fuel {{Fuel}} and steel {{Steel}} costs for repairs are calculated by: | |
| − | + | {{Formula | |
| − | + | |Title=Repair Cost Formula | |
| − | | | + | |Math=\begin{align} |
| − | | | + | \text {Fuel} &= \lfloor(\text {Base Fuel} \times \text{HP}_\text{loss} \times 0.032)\rfloor \\ |
| − | + | \text {Steel} &= \lfloor(\text {Base Fuel} \times \text{HP}_\text{loss} \times 0.06)\rfloor | |
| − | + | \end{align} | |
| − | + | |Var=<math>\text {Base Fuel}</math> the fuel cost for that ship girl. Please refer to the individual ship girl pages for their fuel costs. Remember that this can vary based on remodel, | |
| − | + | * <math>\text{HP}_\text{loss}</math> the amount of HP that needs recovering. | |
| − | | | + | }} |
| − | + | ||
| − | + | =Repair Personnels= | |
| − | + | {{Category:Repair Personnel}} | |
| − | + | ||
| − | |} | + | =Anchorage Repairs= |
| + | [[Repair Ship]]s (AR) have the ability to repair ships that are {{color|gold|'''lightly damaged (小破)'''}} or better. | ||
| − | + | * The AR must be the flagship (of any fleet). | |
| − | + | * The ships being prepared (including the AR itself), must: | |
| − | + | ** Not be more than {{color|gold|'''lightly damaged (小破)'''}}. | |
| + | ** Not be in [[Repair]] docks. | ||
| + | * The [[#Repair cost]] is unchanged and is automatically deducted based on how much HP has been repaired on update. | ||
| + | ** When not having sufficient resources, the repair will not work. | ||
| − | + | ;Repair Reach | |
| − | + | *An AR needs to equip {{Facility}} to start Anchorage Repairs. | |
| − | The | + | **{{ShipLink|Akashi|Akashi/Kai|text=Akashi/Kai}} act as she has 2 innate {{Facility}}. |
| + | *The number of ships reached (including the AR) is extended by | ||
| + | **Equipping {{Facility}} (on any AR, including Akashi's innate ones), | ||
| + | **Adding another AR. | ||
| − | {| class=" | + | {|class="wikitable" |
| − | ! colspan= | + | !rowspan=2|# of {{Facility}}!!colspan=2|Ships Repaired |
|- | |- | ||
| − | + | !1 AR!!2 AR | |
| − | |||
| − | |||
|- | |- | ||
| − | | | + | !1 |
| − | | | + | |1||1, 2 |
|- | |- | ||
| − | + | !2 | |
| − | | | + | |1, 2||1, 2, 3 |
| − | |||
| − | | | ||
|- | |- | ||
| − | + | !3 | |
| − | | | + | |1, 2, 3||1, 2, 3, 4 |
| − | | | ||
|- | |- | ||
| − | | | + | !4 |
| − | + | |1, 2, 3, 4||1, 2, 3, 4, 5 | |
| − | |||
| − | |||
|- | |- | ||
| − | + | !5 | |
| − | | | + | |1, 2, 3, 4, 5||1, 2, 3, 4, 5, 6 |
| − | | | ||
|- | |- | ||
| − | + | !6 | |
| − | | | + | |1, 2, 3, 4, 5, 6||1, 2, 3, 4, 5, 6, 7 |
| − | | | ||
|- | |- | ||
| − | + | !7+ | |
| − | + | |N/A||1, 2, 3, 4, 5, 6, 7 | |
| − | | | + | |} |
| − | | | + | |
| − | + | ;Repair Speed | |
| − | + | * By default, the repair speed for each ship follows the [[#Repair Time|above formula]], | |
| − | + | * The 1st repair work may happen only after '''20 min''' since the last "reset". | |
| − | + | ** The timer is "reseted" each time the fleet formation is changed (order or ships in it), or the [[UI|main menu]] is loaded. | |
| − | + | ** It is not reseted when swapping equipment, but this will disable the 2AR bonus if cranes are moved from the 2nd AR. | |
| − | + | * If at least 20 min have elapsed, loading the [[UI|main menu]] will reset the timer and repair all eligible ships. | |
| − | + | ** If the timer is reseted by another way, the repairs are not applied, | |
| − | + | ** If more than 20 min have elapsed, the HP recovered can be higher, | |
| − | + | *** If the amount of HP recovery would be less than 1 after 20 minutes, it will be rounded up, | |
| − | + | *** This means ships that take more than 20 minutes to recover 1HP can be repaired faster by Akashi when checking in every 20 minutes, but others will be slower. | |
| − | + | ||
| − | + | *Using 2 AR in the same fleet will increase the repair speed: | |
| − | + | **This works regardless of which is the flagship, | |
| − | + | **Both need to be 1st and 2nd ships respectively, | |
| − | + | **The second AR must have at least 1 {{Facility}} equipped. | |
| − | + | ||
| − | + | When meeting the above conditions, the repair speed is then: | |
| − | + | {|class="wikitable" style="text-align:center" | |
| − | + | !#AR!! <math>\text{Mod}_\text{AR}</math>!!Faster | |
| − | |||
| − | |||
| − | |||
| − | |||
| − | |||
| − | |||
| − | |||
| − | |||
| − | |||
| − | |||
| − | |||
| − | |||
| − | |||
| − | |||
| − | |||
| − | |||
| − | |||
| − | |||
| − | |||
| − | |||
| − | |||
| − | |||
| − | |||
| − | |||
| − | | | ||
| − | |||
| − | |||
| − | | | ||
| − | |||
| − | |||
| − | |||
| − | |||
| − | |||
| − | |||
| − | |||
| − | |||
| − | |||
| − | |||
| − | |||
| − | | | ||
| − | |||
| − | |||
| − | |||
| − | |||
| − | |||
| − | |||
| − | |||
| − | |||
| − | |||
| − | |||
| − | |||
| − | |||
| − | |||
| − | |||
| − | |||
| − | |||
| − | |||
| − | |||
| − | |||
| − | |||
| − | |||
| − | |||
| − | |||
| − | |||
| − | |||
| − | |||
| − | |||
| − | |||
| − | |||
| − | |||
| − | |||
| − | |||
| − | |||
| − | |||
| − | |||
| − | |||
| − | |||
| − | |||
| − | |||
| − | |||
| − | |||
| − | |||
| − | |||
| − | |||
| − | |||
| − | |||
| − | |||
| − | |||
| − | |||
| − | |||
| − | |||
| − | |||
| − | |||
| − | |||
| − | |||
| − | |||
| − | |||
| − | |||
| − | |||
| − | |||
| − | |||
|- | |- | ||
| − | + | !1 | |
| − | | | + | |1||0% |
| − | | | ||
|- | |- | ||
| − | + | !2 | |
| − | + | |0.85||15% | |
| − | | | ||
| − | | | ||
|} | |} | ||
| − | + | [https://x.com/Schmeichel20/status/1703728038700278122?s=20][https://twitter.com/Schmeichel20/status/1700426867797557276?s=20][https://x.com/yukicacoon/status/1701163814455329259?s=20] | |
| − | = | + | =Emergency Anchorage Repairs= |
| − | + | {{:Emergency Repair Material}} | |
| − | |||
| − | |||
| − | |||
| − | |||
| − | |||
| − | |||
| − | |||
| − | |||
| − | |||
| − | |||
| − | |||
| − | |||
| − | |||
| − | |||
| − | |||
| − | |||
=See Also= | =See Also= | ||
{{Mechanics}} | {{Mechanics}} | ||
Latest revision as of 11:41, 30 April 2024
| Home Port's Mechanics Portal | ||
|---|---|---|
| Ship | Equipment | |
| Marriage · Morale and Fatigue · Gifting · Supply Repairs · Remodel · Modernization · Construction |
Development · Improvement · Fit Bonuses Speed · Range · Plane Proficiency | |
| Stats · Resources · Experience and Rank · Ranking | ||
Ship girls are mainly repaired through the Docking menu, and can be repaired in some situations, by using some consumables or ship mechanics with ARs and Akitsushima Kai. It is important to keep ship healthy as damage can have detrimental effects on their combat performance. Also important to note is that only heavily damaged ship girls can be sunk and permanently lost in sorties.
Overview
- Repairs cost fuel
 , steel
  and time.
- The cost is the same for both methods.
- Repairs can be completed immediately using
 Instant Repairs (Buckets).
 - Repairs will reset a ship girl's morale to 40 if she is below 39 morale.
- Ship girls being repaired can be:
- Ship girls being repaired cannot:
- Have their equipment adjusted through the Remodel menu.
- Swapping equipment with another ship girl still works.
- Equipment in a Reinforcement Expansion can still be adjusted.
- Be sent on Sorties, Expeditions, or Exercises.
- Have their equipment adjusted through the Remodel menu.
- There are actions which will restore girls to full HP besides repairs.
- Returning to the docking menu with less than 1 minute remaining on the timer will automatically complete the repair.
- This also works for skipping the instant repair animation.
Repair Time
The length of time (in seconds) it takes to repair a ship girl can be calculated by:
| Repair time formula | |||||||||||||
|---|---|---|---|---|---|---|---|---|---|---|---|---|---|
| |||||||||||||
The repair time depends on:
Repair cost
The fuel ![]() and steel
and steel ![]() costs for repairs are calculated by:
costs for repairs are calculated by:
| Repair Cost Formula | |
|---|---|
|
Repair Personnels
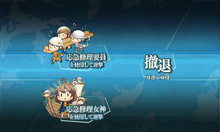
![]() "Emergency Repair Personnel
"Emergency Repair Personnel
 " are consumable items:
- As "consumables", they do not take any equipment slot and appear in the Inventory and are equippable in RE.
Ships entering a battle whilst Heavily Damaged (大破) have a chance to be Sunk (撃沈) .
- In the case of the flagship, being Heavily Damaged (大破) will force a retreat after that node.
Equipping at least one ![]() Emergency Repair Personnel can prevent the equipped ship from sinking, by reviving it after being sunk.
Emergency Repair Personnel can prevent the equipped ship from sinking, by reviving it after being sunk.
- If this is equipped on a flagship, the player can use this before heading to another node.
- Emergency Repair Personnel can only repair the ship they are equipped on.
- Once repaired, a ship becomes unsinkable for the rest of the battle, including night battle.
- The item is consumed upon activation.
The restored ships will be as followed:
| HP recovered when sunk | HP recovered on flagship | Fuel/Ammo restored | |
|---|---|---|---|

|
20% | 50% | 0% |

|
100% | 100% | 100% |
Anchorage Repairs
Repair Ships (AR) have the ability to repair ships that are lightly damaged (小破) or better.
- The AR must be the flagship (of any fleet).
- The ships being prepared (including the AR itself), must:
- Not be more than lightly damaged (小破).
- Not be in Repair docks.
- The #Repair cost is unchanged and is automatically deducted based on how much HP has been repaired on update.
- When not having sufficient resources, the repair will not work.
- Repair Reach
- An AR needs to equip
 to start Anchorage Repairs.
- Akashi/Kai

 act as she has 2 innate
  .
.
- Akashi/Kai
- The number of ships reached (including the AR) is extended by
- Repair Speed
- By default, the repair speed for each ship follows the above formula,
- The 1st repair work may happen only after 20 min since the last "reset".
- The timer is "reseted" each time the fleet formation is changed (order or ships in it), or the main menu is loaded.
- It is not reseted when swapping equipment, but this will disable the 2AR bonus if cranes are moved from the 2nd AR.
- If at least 20 min have elapsed, loading the main menu will reset the timer and repair all eligible ships.
- If the timer is reseted by another way, the repairs are not applied,
- If more than 20 min have elapsed, the HP recovered can be higher,
- If the amount of HP recovery would be less than 1 after 20 minutes, it will be rounded up,
- This means ships that take more than 20 minutes to recover 1HP can be repaired faster by Akashi when checking in every 20 minutes, but others will be slower.
- Using 2 AR in the same fleet will increase the repair speed:
When meeting the above conditions, the repair speed is then:
| #AR | [math]\displaystyle{ \text{Mod}_\text{AR} }[/math] | Faster |
|---|---|---|
| 1 | 1 | 0% |
| 2 | 0.85 | 15% |
Emergency Anchorage Repairs
Akashi Kai , Asahi Kai
 , or Akitsushima Kai
 have the ability to repair moderately damaged ships mid-sortie if they are equipped with
 ![]() Ship Repair Facility
Ship Repair Facility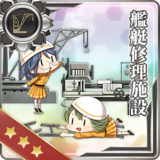 and the player has one or more
 ![]() Emergency Repair Material
Emergency Repair Material in their item inventory (this item cannot be equipped). The repairs are triggered when the fleet reaches an Emergency Repair Node, an Event only occurence so far.
Depending on the slot the ![]() Ship Repair Facility
Ship Repair Facility is equipped in, the range of ships that can be repaired will be different:
| Ship Repairing [4] | |||
|---|---|---|---|
| Slot equipping the |
Ships being repaired | ||
| 1st Slot | Main Fleet 1st - 3rd Ships |
Escort Fleet 1st - 3rd Ships |
Escort Fleet 1st - 3rd Ships |
| 2nd Slot | Main Fleet 4th - 6th Ships |
Escort Fleet 4th - 6th Ships |
Escort Fleet 4th - 6th Ships |
| 3rd Slot | Escort Fleet 1st - 3rd Ships |
Main Fleet 4th - 6th Ships |
Nobody |
| 4th Slot | Escort Fleet 4th - 6th Ships |
- | - |
| Repair Amount | +30% of Max HP | +28% of Max HP | +25% of Max HP |
- Multiple
 Ship Repair Facility
 can be equipped to cover larger areas of the fleet.
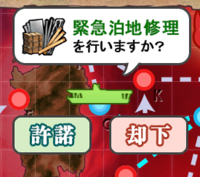
 - Upon reaching an anchorage node, if the following requirements are met the game will prompt if "you would like to perform repairs".
- No ship within the repair-capable fleet positions is heavily damaged (大破).
- The repairing ship is in the fleet and placed anywhere other than the flagship position of the first fleet.
- The repairing ship is no more than lightly damaged (小破).
- One Emergency Repair Material
 will be consumed per mass repair.
 - Any ships that are in range of the Ship Repair Facilities that are not at max HP will be repaired.
- The amount of HP repaired will be rounded up.
- Steel required for the amount of HP repaired will also be deducted as necessary.
- Repaired ships will also additionally gain 15-20 morale.
Currently, this mechanic is rarely worth using due to the very limited nature of the "Emergency Repair Material".
- On maps involving this mechanic, it is possible to take advantage of the routing meant to deploy Emergency Anchorage Repair without using it.
- In such case, Oilers Kai can often be used as a routing substitute.
See Also
| |||||||||||||||||||||||||||||||||||||
