- Welcome to the Kancolle Wiki!
- If you have any questions regarding site content, account registration, etc., please visit the KanColle Wiki Discord
Difference between revisions of "Summer 2021 Event/E-1"
(→E-1) |
|||
| (99 intermediate revisions by 13 users not shown) | |||
| Line 7: | Line 7: | ||
|tag_text= {{Shiplock|Summer2021EventTag1}} Yellow Tag: 1st Special Squadron<br/>{{Shiplock|Summer2021EventTag2}} Grey Tag: Mediterranean Fleet | |tag_text= {{Shiplock|Summer2021EventTag1}} Yellow Tag: 1st Special Squadron<br/>{{Shiplock|Summer2021EventTag2}} Grey Tag: Mediterranean Fleet | ||
|header_thumb=[[File:Summer2021_E1BossThumb.png]] | |header_thumb=[[File:Summer2021_E1BossThumb.png]] | ||
| − | |map_1=[[File: | + | |map_1=[[File:Summer 2021 Event E-1 Map.png|450px]] |
|map_1_text=Map | |map_1_text=Map | ||
|map_2=[[File:Summmer2021E-1MapP1.png|450px]] | |map_2=[[File:Summmer2021E-1MapP1.png|450px]] | ||
| Line 18: | Line 18: | ||
|map_5_text=LBAS | |map_5_text=LBAS | ||
|boss_hard= 2750 HP + 800 TP + 2350 HP | |boss_hard= 2750 HP + 800 TP + 2350 HP | ||
| − | |boss_medium= | + | |boss_medium= 2000 HP + 500 TP + 1950 HP |
| − | |boss_easy= | + | |boss_easy= 1600 HP + 300 TP + 1800 HP |
| − | |boss_casual= | + | |boss_casual= 1600 HP + 300 TP + 1650 HP |
|reward_all= | |reward_all= | ||
| − | |phase_1_boss= | + | |phase_1_boss= {{EnemyLink|Heavy Cruiser Summer Princess}} |
| − | |phase_2_boss= | + | |phase_2_boss= {{EnemyLink|Battleship Summer Princess}} |
| − | |phase_3_boss= | + | |phase_3_boss= {{EnemyLink|Heavy Cruiser Ne-Class Kai B Summer Mode}} |
|phase_4_boss= | |phase_4_boss= | ||
|phase_5_boss= | |phase_5_boss= | ||
| Line 82: | Line 82: | ||
|C -> C2/resource = | |C -> C2/resource = | ||
* Meet '''ALL''' of the following requirements: | * Meet '''ALL''' of the following requirements: | ||
| − | ** Fleet contains AO | + | ** Fleet contains AO, AS or AV |
| − | ** Amount of DD ≥ 4 | + | ** Amount of DD+DE ≥ 3 |
| + | ** If fleet contains anything other than AO/AS/AV/DD/DE, amount of DD+DE ≥ 4 | ||
| + | ** If fleet contains AV, then amount of ships in the fleet must be 4. | ||
** No CV(L/B) | ** No CV(L/B) | ||
|C -> D = | |C -> D = | ||
| Line 93: | Line 95: | ||
** Do not meet the requirements to go to C2. | ** Do not meet the requirements to go to C2. | ||
** No (F)BB(V) or CV(L/B) | ** No (F)BB(V) or CV(L/B) | ||
| + | ** Amount of DD ≥ 2 | ||
** Amount of DD ≥ 4 '''OR''' Fast Fleet | ** Amount of DD ≥ 4 '''OR''' Fast Fleet | ||
| Line 99: | Line 102: | ||
* Meet '''ALL''' of the following requirements: | * Meet '''ALL''' of the following requirements: | ||
** Node G is unlocked. | ** Node G is unlocked. | ||
| − | ** Pass the LoS check. | + | ** Pass the LoS check (Cn1 > 0). |
|2 -> H = * Do not meet the requirements to go to I. | |2 -> H = * Do not meet the requirements to go to I. | ||
|2 -> I = | |2 -> I = | ||
* Meet '''ALL''' of the following requirements: | * Meet '''ALL''' of the following requirements: | ||
| − | ** Amount of DD ≥ 3 '''OR''' Fast Fleet | + | ** Amount of DD ≥ 2 |
| + | ** Amount of DD+DE ≥ 3 '''OR''' Fast Fleet | ||
** Amount of (F)BB(V)+CV(L/B) ≤ 3 | ** Amount of (F)BB(V)+CV(L/B) ≤ 3 | ||
| Line 112: | Line 116: | ||
** Do not meet the requirements to go to N. | ** Do not meet the requirements to go to N. | ||
** Amount of (F)BB(V) ≤ 2 | ** Amount of (F)BB(V) ≤ 2 | ||
| − | ** No CV(L/B) | + | ** No CV(L/B) or Akitsu Maru |
|I -> N/empty = | |I -> N/empty = | ||
* Meet '''ALL''' of the following requirements: | * Meet '''ALL''' of the following requirements: | ||
| − | |||
** If amount of DD ≤ 2, no (F)BB(V) allowed. | ** If amount of DD ≤ 2, no (F)BB(V) allowed. | ||
** Amount of (F)BB(V) ≤ 2 | ** Amount of (F)BB(V) ≤ 2 | ||
| − | ** No CV(L/B) | + | ** No CV(L/B) or Akitsu Maru |
| + | ** No SS(V) | ||
|J -> K = | |J -> K = | ||
| Line 129: | Line 133: | ||
* Meet '''ALL''' of the following requirements: | * Meet '''ALL''' of the following requirements: | ||
** Do not meet the requirements to go to K. | ** Do not meet the requirements to go to K. | ||
| + | ** Amount of DD ≥ 2 | ||
** No (F)BB(V) | ** No (F)BB(V) | ||
| Line 139: | Line 144: | ||
|R/empty -> T/night = | |R/empty -> T/night = | ||
* Meet '''ALL''' of the following requirements: | * Meet '''ALL''' of the following requirements: | ||
| − | |||
** Amount of DD ≥ 3 | ** Amount of DD ≥ 3 | ||
| + | ** Fleet contains CL '''OR''' amount of DD ≥ 4 | ||
** If Slow Fleet, amount of (F)BB(V) ≤ 1 | ** If Slow Fleet, amount of (F)BB(V) ≤ 1 | ||
| Line 146: | Line 151: | ||
|T/night -> V = * Pass the LoS check. | |T/night -> V = * Pass the LoS check. | ||
}} | }} | ||
| − | Branching compositions were reported over the course of the event. ([https://bbs.nga.cn/read.php?pid=514129578 NGA] and [https:// | + | Branching compositions were reported over the course of the event. ([https://bbs.nga.cn/read.php?pid=514129578 NGA] and [https://tsunkit.net/nav/#/ KCNav]) |
The event guides are to be constructed through the respective [[Sandbox/Summer 2021 E-1|Event map page guide]] and reviewed by editor staff / collaboration committee before being approved here. '''Do not under any circumstance update the guides through this page or attempt to fix them through this page.''' Please only update guides through their respective sandbox pages. | The event guides are to be constructed through the respective [[Sandbox/Summer 2021 E-1|Event map page guide]] and reviewed by editor staff / collaboration committee before being approved here. '''Do not under any circumstance update the guides through this page or attempt to fix them through this page.''' Please only update guides through their respective sandbox pages. | ||
| + | |||
| + | ==Ship Bonuses (Tentative)== | ||
| + | |||
| + | {{:{{BASEPAGENAME}}/E-1/Historical_Ships}} | ||
=Overview= | =Overview= | ||
| − | * There are quests | + | * There are quests related to this event where clearing them will allow access to the Strike Force Fleet (7 Ship Fleet) |
| − | ** The prerequisite for the quest is one of the event preparation quests that was released | + | ** The prerequisite for the quest is one of the event preparation quests that was released in the [[Game Updates/2021/August 4th|August 4th update]] prior to the event. |
| − | * For players who wish to clear E1 on Hard mode, you have the | + | * For players who wish to clear E1 on Hard mode, the quests can be cleared on '''Casual''' first before switching to Hard mode and clearing the map. |
| + | ** Be aware that switching to a higher difficulty will reset all progress on the map. So, unless you really need to conserve resources and are confident enough, you can opt to do all the quests while clearing on Hard. | ||
| + | {{color|red|※ Once the 2nd starting point has been unlocked, having '''"3+ historical European ships"''' or '''"2+ DDs & 1- DE & (2+ CL / Strike Force)"''' should guarantee Starting Point {{MapRoute|2|}} and giving {{Shiplock|Summer2021EventTag2}}{{ToolTip|[Grey Tag]|'''Mediterranean Fleet'''}} to the fleet.}} | ||
| + | * Failure to meet the above requirements will automatically force the fleet to Starting Point {{MapRoute|1|}} and be labeled with {{Shiplock|Summer2021EventTag1}}{{ToolTip|[Yellow Tag]|'''1st Special Squadron'''}}. Please review the fleet setup before launching them on sortie. | ||
| + | * Historical European Ships include all ships from the European nations with the exception of Russian ships (excluding '''[[Verniy]]''' who is allowed). | ||
| + | * In Addition to this, ships that are affiliated with ties to service with the European nations are acceptable: | ||
| + | ** '''ABDA Forces: [[Houston]], [[Perth]], [[De Ruyter]] | ||
| + | ** '''Atlantic Fleet: [[Washington]] | ||
| + | * Players who have the appropriate Anti-installation gear and a decent amount of European planes that are part of the bonus list, can possibly clear E1 without using European ships. | ||
| + | |||
| + | =Event Quest Guide= | ||
| + | * Both quests are available on '''all''' difficulties and can be done at any point on E1. {{color|red|The completion of the first quest requires the second phase of the map to be unlocked.}} | ||
| + | |||
| + | {{ProtoQuestsHeader}} | ||
| + | {{ProtoQuests | ||
| + | | type = Sortie | ||
| + | | listnum = 2108 LB1 | ||
| + | | reqQuest = C2 | ||
| + | | namejp = 【地中海作戦】特務艦隊、遊撃部隊編成 | ||
| + | | nameen = {{color|black|[Mediterranean Special Fleet] Special Mission Fleet, Tactical Force Formation}} | ||
| + | | req = [Mediterranean Squadron Formation] Attack the Enemy frontline logistic Supply Depots in Point F and L in the first operation area! In addition, intercept the enemy battleship squadron aiming for the transport unit to Malta from the direction of Tarant and destroy it! | ||
| + | |||
| + | * Get an A rank on nodes F, L, and O in E1 | ||
| + | | fuel = 500 | ||
| + | | ammo = 500 | ||
| + | | steel = 0 | ||
| + | | bauxite = 0 | ||
| + | | other = [[File:Striking force fleet reward.png|Striking force fleet]]<br> '''[[Striking_Force_Fleet|Access to Striking Force Fleet]]''' <br> '''Choose between:'''<br/>{{QuestRewardEquip|Type 3 Shell}}{{QuestRewardEquip|Shipborne Model Type 4 20cm Anti-ground Rocket Launcher}}{{QuestRewardItem|Instant Repair Material|qty=4}} <br> | ||
| + | | notes = *For more info on how to clear F, L and O, check out Quest 1's guide | ||
| + | }} | ||
| + | {{ProtoQuests | ||
| + | | type = Sortie | ||
| + | | listnum = 2108 LB2 | ||
| + | | reqQuest = 2108 LB1 | ||
| + | | reqQuest2 = B171 | ||
| + | | namejp = 【地中海作戦】地中海配備の敵戦力を叩け! | ||
| + | | nameen = {{color|black|[Mediterranean Mission] Strike the enemy forces deploy within the Mediterranean!}} | ||
| + | | req = Defeat the enemy torpedo boats (at Point [H] and [S])deployed in the Mediterranean Sea in the first operation area! Furthermore, assault the Talent military port occupied by the enemy, and try to gradually destroy the enemy's abyssal forces deployed in the Eastern Mediterranean Sea! | ||
| + | |||
| + | * Get a A rank on nodes P, H and S in E1 | ||
| + | | fuel = 0 | ||
| + | | ammo = 600 | ||
| + | | steel = 0 | ||
| + | | bauxite = 600 | ||
| + | | other = '''Choose between:'''<br/>{{QuestRewardItem|Development Material|qty=6}}{{QuestRewardItem|Instant Repair Material|qty=5}}{{QuestRewardItem|Improvement Material|qty=3}} <br> '''Then choose between:'''<br/>{{QuestRewardEquip|Type 3 Depth Charge Projector}}{{QuestRewardItem|Furniture Fairy|}}{{QuestRewardItem|Medal|}} | ||
| + | | notes = *For more info on how to clear P, H and S, check out Quest 2's guide | ||
| + | }} | ||
| + | |} | ||
| + | |||
| + | =='''Quest 1'''== | ||
| + | |||
| + | '''[Mediterranean Special Fleet] Special Mission Fleet, Tactical Force Formation''' can be done after opening phase 2 of the map. Completing this quest unlocks the [[Striking Force Fleet]], which can be used in this event. | ||
| + | |||
| + | *A+ Rank nodes {{MapRoute|F|red|L|red|O|red}} | ||
| + | |||
| + | <tabber> | ||
| + | |-| Node F = | ||
| + | |||
| + | Same as Phase 0.5 | ||
| − | {{ | + | |-| Node L = |
| + | Method #1: {{Shiplock|Summer2021EventTag2}}{{ToolTip|[Grey Tag]|'''Mediterranean Fleet'''}} Single Fleet: '''1 CV(L/B)/[[Akitsu Maru]], 1 (F)BB(V), 2 CL, 2 DD (FAST)''' | ||
| + | * Route: {{MapRoute|2||I|red|J|red|L|red}} | ||
| + | * Slow will route through {{MapRoute|H|red}} | ||
| + | Method #2: {{Shiplock|Summer2021EventTag2}}{{ToolTip|[Grey Tag]|'''Mediterranean Fleet'''}} Single Fleet: '''1 CV(L/B)/[[Akitsu Maru]], 1 (F)BB(V), 1 CL, 1 CA, 2 DD (≥3 Historical) (FAST)''' | ||
| + | * Route: {{MapRoute|2||I|red|J|red|L|red}} | ||
| + | * <3 Historical ships will start at {{MapRoute|1|}} | ||
| + | * Slow will route through {{MapRoute|H|red}} | ||
| + | LBAS | ||
| + | * Range = 3 | ||
| + | * AD/AP/AS = 33/66/147 (Hard) | ||
| + | Strategic Notes: | ||
| + | * Equip DDs with [[Combat/Anti-Installation#Equipment_Setups|nuke setups]]. | ||
| + | * It is recommended to complete this during Phase 2. | ||
| + | |-| Node O = | ||
| − | + | Same as Phase 2 | |
| − | + | </tabber> | |
| − | |||
| − | =='''Quest | + | =='''Quest 2'''== |
| − | + | '''[Mediterranean Mission] Strike the enemy forces deploy within the Mediterranean!''' is the 2nd quest of the event. This quest can be done during phase 2.5 and 3. | |
| − | + | *A+ Rank nodes {{MapRoute|P|red|H|red|S|red}} | |
| − | |||
| − | |||
| − | |||
| − | |||
| − | |||
| − | |||
| − | * A+ | ||
| − | |||
| − | |||
| − | |||
| − | = | + | <tabber> |
| − | + | |-| Node P = | |
| − | + | ||
| − | + | Same as Phase 2.5 with only a A+ rank needed. | |
| − | + | |-| Node H = | |
| − | + | {{Shiplock|Summer2021EventTag2}}{{ToolTip|[Grey Tag]|'''Mediterranean Fleet'''}} Strike Force Fleet: '''2DD 5XX (SLOW)''' | |
| − | * | + | * Route: {{MapRoute|2||H|red}} |
| − | ** | + | * If using '''≥3 Historical''', 6-7 XX (Slow) can also be used |
| − | + | * '''Max of 2 DD+DE''' | |
| − | + | LBAS | |
| − | + | * Range = 2 | |
| − | + | * No enemy air present | |
| − | * | + | Strategic Notes: |
| + | * Multiple PT Imps present at {{MapRoute|H|red}} | ||
| + | |-| Node S = | ||
| + | {{Shiplock|Summer2021EventTag2}}{{ToolTip|[Grey Tag]|'''Mediterranean Fleet'''}} Strike Force Fleet: '''1-2 (F)BB(V) 3 DD 2-3 CA(V)/AV''' | ||
| + | * Route: {{MapRoute|2||I|red|N|blue|R|blue|S|red}} | ||
| + | LBAS | ||
| + | * Range = 5 | ||
| + | * No enemy air present | ||
| + | Strategic Notes: | ||
| + | * Multiple PT Imps present at {{MapRoute|S|red}} | ||
| + | </tabber> | ||
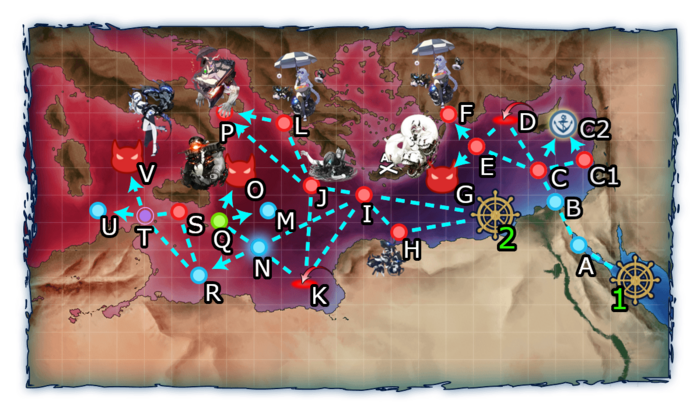
=Event Map Guide= | =Event Map Guide= | ||
| Line 216: | Line 296: | ||
<tabber> | <tabber> | ||
| − | |-|Node F= | + | |-| Node F = |
| − | + | {{Shiplock|Summer2021EventTag1}}{{ToolTip|[Yellow Tag]|'''1st Special Squadron'''}} Single Fleet: '''1-2 CA(V), 1 CL, 3-4 DD''' | |
| − | * Route: {{MapRoute|A|blue|B|blue|C|red|F| | + | * Route: {{MapRoute|1||A|blue|B|blue|C|red|E|red|F|red}} |
| − | * LBAS | + | * Slow with <4 DD will route through {{MapRoute|D|red}} |
| − | * Bring Nukes and DD with MG | + | LBAS |
| + | * Range = 2 | ||
| + | * AP/AS = 34/74 (Hard) | ||
| + | Strategic Notes: | ||
| + | * Bring [[Combat/Anti-Installation#Equipment_Setups|Nukes]] and DD with MG. The fleet will be fighting against both PT Imps & Installations. | ||
|-|Node C2= | |-|Node C2= | ||
| − | + | Method #1: {{Shiplock|Summer2021EventTag1}}{{ToolTip|[Yellow Tag]|'''1st Special Squadron'''}} Single Fleet: '''1 CL, 1 CAV, 1 CV, 3 DD''' | |
| − | * Route: {{MapRoute|A|blue|B|blue|C|red|C1|Red|C2|blue}} | + | * Route: {{MapRoute|1||A|blue|B|blue|C|red|C1|Red|C2|blue}} |
| − | * LBAS: N/A | + | Method #2: {{Shiplock|Summer2021EventTag1}}{{ToolTip|[Yellow Tag]|'''1st Special Squadron'''}} Single Fleet: '''AO, 3-5 DD/DE''' |
| − | * | + | * Route: {{MapRoute|1||A|blue|B|blue|C|red|C2|blue}} |
| + | LBAS: N/A | ||
| + | * Set LBAS to standby/rest or send them to the battle node before {{MapRoute|C2|blue}} | ||
| + | Strategic Notes: | ||
| + | * Method #2 can be used for ammo farming, please view [[Summer_2021_Event/E-1#Bonus:_Cyprus_Ammo_Farming|Cyprus Ammo Farming]] within the guide. | ||
</tabber> | </tabber> | ||
=='''Phase 1: Defeat Summer CA Hime'''== | =='''Phase 1: Defeat Summer CA Hime'''== | ||
| − | + | {{Shiplock|Summer2021EventTag1}}{{ToolTip|[Yellow Tag]|'''1st Special Squadron'''}} Single Fleet: '''1-2 CA(V), 1 CL, 3-4 DD''' | |
| − | * Route: {{MapRoute|A|blue|B|blue|C|red|E|red|G|red}} | + | * Route: {{MapRoute|1||A|blue|B|blue|C|red|E|red|G|red}} |
| − | * LBAS | + | * Must pass LoS to enter {{MapRoute|G|red}} |
| − | * | + | LBAS |
| + | * Range = 2 | ||
| + | * No enemy air present | ||
| + | Strategic Notes: | ||
| + | * Vanguard formation across all nodes until the boss | ||
| + | * Can use the same composition as Node F from phase 0.5 but equipped for surface combat | ||
| + | * TCI can be helpful with clearing the boss out | ||
=='''Phase 2: Deplete the TP'''== | =='''Phase 2: Deplete the TP'''== | ||
| − | + | {{Shiplock|Summer2021EventTag2}}{{ToolTip|[Grey Tag]|'''Mediterranean Fleet'''}} Single/Strike Force Fleet: '''0-2 (F)BB(V), 0-1 AV, 0-2 CA(V), 0-2 CL, 3-7 DD''' | |
| − | + | * Route: {{MapRoute|2||I|red|N|blue|Q|green|O|red}} | |
| − | + | * Fleet must include '''≥3 Historical''' or '''2DD + (2CL / Strike Force Fleet)''' to start at {{MapRoute|2|}} | |
| − | ** LBAS | + | * Must pass LoS (Cn3 >= 45 on Hard) to enter {{MapRoute|O|red}} |
| − | * | + | LBAS |
| + | * Range = 4 | ||
| + | * No enemy air present | ||
| + | Strategic Notes: | ||
| + | * Equip as many [[Daihatsu-class Landing Craft|Daihatsu]] and/or [[Drum Canister|drum canisters]] as possible to deplete the bar quickly. | ||
| + | * Equip AP shells to maximize your damage output from your BBs against the Battleship Summer Princess. | ||
=='''Phase 2.5: Unlock the Last Boss Node'''== | =='''Phase 2.5: Unlock the Last Boss Node'''== | ||
| − | |||
{| class="wikitable" | {| class="wikitable" | ||
|- | |- | ||
| Line 261: | Line 359: | ||
|} | |} | ||
| − | + | {{Shiplock|Summer2021EventTag2}}{{ToolTip|[Grey Tag]|'''Mediterranean Fleet'''}} Strike Force Fleet: '''2 CV(L/B), 5 XX''' | |
| − | * Route: {{MapRoute|I|red|J|red|P|red}} | + | * Route: {{MapRoute|2||I|red|J|red|P|red}} |
| − | * LBAS | + | * Fleet must include '''≥3 Historical''' or '''≥2DD''' to start at {{MapRoute|2|}} |
| − | * | + | ** If using '''≥3 historicals''', 2 CV(L/B), 4XX can also be used |
| + | * '''Must be FAST or ≥3 DD''' to skip node {{MapRoute|H|Red}} | ||
| + | * Any (F)BB(V) will add extra battles or cause an offroute | ||
| + | LBAS | ||
| + | * Range = 4 | ||
| + | * AD/AP/AS/AS+ = 17/33/72/144 (Hard) | ||
| + | Strategic Notes: | ||
| + | * After completing Phase 2, {{MapRoute|P|red}} is locked to the third composition | ||
| + | * Node P is a fight against 3 Installation Princesses/Demons, all of which have various weaknesses against different anti-installation equipment. | ||
| + | * Equip with [[Combat/Anti-Installation#Equipment_Setups|nuke setups]]; however, please note the specific weaknesses listed below. | ||
| + | ** Anchorage Water Demon | ||
| + | *** Vulnerable to most anti-installation equipment but is also the most resilient. | ||
| + | *** Avoid using DBs that can target installations as carriers should be focusing this target | ||
| + | *** One effective method to take her down is by using carriers with 2DB + 1TB setups and using one European plane from Group A and one from Group B, if available. | ||
| + | ** Supply Depot Princess | ||
| + | *** [[Combat/Anti-Installation#Equipment_Setups|Nuke setups]] are the most effective way to take her down. | ||
| + | *** May require several hits to take down due to high HP. | ||
| + | ** Airfield Princess | ||
| + | *** Type 3 Shells are the most effective means of defeating her. | ||
=='''Phase 3: Destroy Enemy Ne Kai's Combined Fleet'''== | =='''Phase 3: Destroy Enemy Ne Kai's Combined Fleet'''== | ||
| − | + | {{Shiplock|Summer2021EventTag2}}{{ToolTip|[Grey Tag]|'''Mediterranean Fleet'''}} Strike Force Fleet: '''0-2 (F)BB(V), 1-2 CA(V), 0-1 AV, 0-2 CL, 3-4 DD''' | |
| − | * Route: {{MapRoute|I|red|N|blue|R|blue|T|purple|V|red}} | + | * Route: {{MapRoute|2||I|red|N|blue|R|blue|T|purple|V|red}} |
| − | * LBAS | + | * If slow, max of 1 (F)BB(V) |
| − | + | LBAS | |
| − | * Node {{MapRoute|T|purple}} is a | + | * Range = 6 |
| + | * Pre-LD: No enemy air present (Hard) | ||
| + | * LD: AD/AP/AS = 32/63/140 (Hard) | ||
| + | Strategic Notes: | ||
| + | * Node {{MapRoute|T|purple}} is a Night battle. So it's highly recommended to make use of the Vanguard Formation to pass through the node. | ||
| + | * The boss node {{MapRoute|V|red}} is an abyssal combined fleet. | ||
| + | * Be aware a CVL will appear in the comp on LD on harder difficulties. | ||
| + | |||
| + | ==Bonus: Cyprus Ammo Farming== | ||
| + | It is possible to collect ammo on E1 with a simple fleet comp, facing only a single battle before reaching the resource node. This can be used to collect ammo as high as '''150 ammo per run'''. | ||
| + | |||
| + | Method #1: {{Shiplock|Summer2021EventTag1}}{{ToolTip|[Yellow Tag]|'''1st Special Squadron'''}} Single Fleet: '''AO, 3-5 DD/DE''' | ||
| + | * Route: {{MapRoute|1||A|blue|B|blue|C|red|C2|blue}} | ||
| + | LBAS: N/A | ||
| + | * Either set LBAS on standby/rest or send them to the battle node before {{MapRoute|C2|blue}} | ||
| + | * Use Vanguard to survive Node {{MapRoute|C|red}}. | ||
| + | Increase resource gains by equipping the following: | ||
| + | * +10 Ammo per [[Drum Canister]] | ||
| + | * +15 Ammo per [[Daihatsu]], [[Daihatsu Landing Craft (Type 89 Medium Tank & Landing Force)|89 Tank Variants]] and [[Type 2 Ka-Mi Tank]] | ||
==Enemy Compositions== | ==Enemy Compositions== | ||
Latest revision as of 02:59, 12 June 2022
E-1
MA3作戦
![]()
![]()


| Information | ||||
|---|---|---|---|---|
| Event Tag | ||||
| Boss Gauges | Hard (甲): 2750 HP + 800 TP + 2350 HP | |||
| Medium (乙): 2000 HP + 500 TP + 1950 HP | ||||
| Easy (丙): 1600 HP + 300 TP + 1800 HP | ||||
| Casual (丁): 1600 HP + 300 TP + 1650 HP | ||||
| Map Bosses | Heavy Cruiser Summer Princess
| |||
Battleship Summer Princess
| ||||
Heavy Cruiser Ne-Class Kai B Summer Mode
| ||||
| Rewards | ||||
|---|---|---|---|---|
| Equipment/Item | 丁 Casual |
丙 Easy |
乙 Medium |
甲 Hard |
Food Supply Ship Mamiya |
1 | 1 | 2 | 2 |
Food Supply Ship Irako |
1 | 1 | 2 | 2 |
 305mm/46 Twin Gun Mount |
1 (★2) | 1 (★2) | ||
 305mm/46 Triple Gun Mount |
1 (★2) | 1 (★2) | ||
 Emergency Repair Goddess |
1 | 1 | 2 | 2 |
 SM.79 |
1 (★2) | |||
 Fulmar (Reconnaissance Fighter/Skilled) |
1 | 1 (★2) | ||

| E-1 Branching Rules | ||
|---|---|---|
| Nodes | Rules | |
| Start | 1 |
|
2 |
| |
C |
C1 |
|
C2 |
| |
D |
| |
E |
| |
E |
F |
|
G |
| |
2 |
H |
|
I |
| |
I |
J |
|
K |
| |
N |
| |
J |
K |
|
L |
| |
P |
| |
N |
Q |
|
R | ||
Q |
M |
|
O |
| |
R |
S |
|
T |
| |
T |
U |
|
V |
| |
Branching compositions were reported over the course of the event. (NGA and KCNav)
The event guides are to be constructed through the respective Event map page guide and reviewed by editor staff / collaboration committee before being approved here. Do not under any circumstance update the guides through this page or attempt to fix them through this page. Please only update guides through their respective sandbox pages.
Ship Bonuses (Tentative)
DISCLAIMER: This information is based on user submitted data and is subject to revisions as more data is gathered. Any version of the ship receives the bonus regardless of remodel.
| Ships | Map-wide | Nodes O | Nodes V | ||
|---|---|---|---|---|---|
| 1.2x | 1.3x | 1.38x | |||
| 1.1x | 1.1x | 1.265x | |||
Equipment Bonuses
| Historical Aircraft Bonuses | Map-wide | ||
|---|---|---|---|
 Swordfish  TBF  TBM-3D  Re.2001 G Kai  Skua  Re.2001 CB Kai |
1.15x | ||
Installation DB
|
 FM-2  F4U-1D  Ju 87C Kai  Ju 87C Kai Ni (w/ KMX)  Ju 87C Kai Ni (w/ KMX/Skilled) | ||
Group B
|
Carrier-based
|
 Swordfish Mk.II (Skilled)  Swordfish Mk.III (Skilled)  Barracuda Mk.II  Barracuda Mk.III |
1.2x |
Land-based
|
SM.79  SM.79 bis  Do 217 E-5 + Hs293 Initial Model  Do 217 K-2 + Fritz-X | ||
| Stacking multiple planes from the same group on a CV does not give higher bonus e.g. A + A = 1.15 B + B = 1.2 A + B = 1.38 | |||
The following equipment deals bonus damage to Battleship Princess and Heavy Cruiser Princess Variants.
This is not a map specific bonus, but applies to enemies appearing in this map.
| Equipment | Damage Bonus | |
|---|---|---|
| CAH | BBH | |
| 1.1x | 1.2x | |
| 1.15x | 1.1x | |
| Water Demon Anchorage Modifiers | |
|---|---|
|
1.5x |
|
1.15x |
|
1.15~1.25x |
|
1.25x |
| x2
|
1.6x |

|
1.43~1.49x |

|
1.44~1.56x |

|
1.67~1.72x |
| (+10)
|
2~2.09x |

|
2.39~2.42x |
| (+10)
|
3.14-3.32x |

|
2.54x |
| 1.4x | |
| 2.4~2.44x | |
Overview
- There are quests related to this event where clearing them will allow access to the Strike Force Fleet (7 Ship Fleet)
- The prerequisite for the quest is one of the event preparation quests that was released in the August 4th update prior to the event.
- For players who wish to clear E1 on Hard mode, the quests can be cleared on Casual first before switching to Hard mode and clearing the map.
- Be aware that switching to a higher difficulty will reset all progress on the map. So, unless you really need to conserve resources and are confident enough, you can opt to do all the quests while clearing on Hard.
※ Once the 2nd starting point has been unlocked, having "3+ historical European ships" or "2+ DDs & 1- DE & (2+ CL / Strike Force)" should guarantee Starting Point 2 and giving ![]() [Grey Tag]Mediterranean Fleet to the fleet.
[Grey Tag]Mediterranean Fleet to the fleet.
- Failure to meet the above requirements will automatically force the fleet to Starting Point 1 and be labeled with
 [Yellow Tag]1st Special Squadron. Please review the fleet setup before launching them on sortie.
 - Historical European Ships include all ships from the European nations with the exception of Russian ships (excluding Verniy who is allowed).
- In Addition to this, ships that are affiliated with ties to service with the European nations are acceptable:
- ABDA Forces: Houston, Perth, De Ruyter
- Atlantic Fleet: Washington
- Players who have the appropriate Anti-installation gear and a decent amount of European planes that are part of the bonus list, can possibly clear E1 without using European ships.
Event Quest Guide
- Both quests are available on all difficulties and can be done at any point on E1. The completion of the first quest requires the second phase of the map to be unlocked.
| Quest info | Rewards | |||||
|---|---|---|---|---|---|---|
2108 LB1 【地中海作戦】特務艦隊、遊撃部隊編成
[Mediterranean Special Fleet] Special Mission Fleet, Tactical Force Formation |
500 |
500 |
0 |
0 | ||
[Mediterranean Squadron Formation] Attack the Enemy frontline logistic Supply Depots in Point F and L in the first operation area! In addition, intercept the enemy battleship squadron aiming for the transport unit to Malta from the direction of Tarant and destroy it!
|
 Access to Striking Force Fleet Choose between:  Type 3 Shell  Shipborne Model Type 4 20cm Anti-ground Rocket Launcher Instant Repair Material 4x | |||||
| Notes | Requires: C2
| |||||
|
| ||||||
2108 LB2 【地中海作戦】地中海配備の敵戦力を叩け!
[Mediterranean Mission] Strike the enemy forces deploy within the Mediterranean! |
0 |
600 |
0 |
600 | ||
Defeat the enemy torpedo boats (at Point [H] and [S])deployed in the Mediterranean Sea in the first operation area! Furthermore, assault the Talent military port occupied by the enemy, and try to gradually destroy the enemy's abyssal forces deployed in the Eastern Mediterranean Sea!
|
Choose between: Development Material 6x Instant Repair Material 5x Improvement Material 3x Then choose between:  Type 3 Depth Charge Projector Furniture Fairy Medal | |||||
| Notes | Requires: 2108 LB1, B171
| |||||
|
| ||||||
Quest 1
[Mediterranean Special Fleet] Special Mission Fleet, Tactical Force Formation can be done after opening phase 2 of the map. Completing this quest unlocks the Striking Force Fleet, which can be used in this event.
- A+ Rank nodes F L O
Same as Phase 0.5
Method #1: ![]() [Grey Tag]Mediterranean Fleet Single Fleet: 1 CV(L/B)/Akitsu Maru, 1 (F)BB(V), 2 CL, 2 DD (FAST)
[Grey Tag]Mediterranean Fleet Single Fleet: 1 CV(L/B)/Akitsu Maru, 1 (F)BB(V), 2 CL, 2 DD (FAST)
- Route: 2 I J L
- Slow will route through H
- Route: 2 I J L
- <3 Historical ships will start at 1
- Slow will route through H
- Range = 3
- AD/AP/AS = 33/66/147 (Hard)
- Equip DDs with nuke setups.
- It is recommended to complete this during Phase 2.
Same as Phase 2
Quest 2
[Mediterranean Mission] Strike the enemy forces deploy within the Mediterranean! is the 2nd quest of the event. This quest can be done during phase 2.5 and 3.
- A+ Rank nodes P H S
Same as Phase 2.5 with only a A+ rank needed.
![]() [Grey Tag]Mediterranean Fleet Strike Force Fleet: 2DD 5XX (SLOW)
[Grey Tag]Mediterranean Fleet Strike Force Fleet: 2DD 5XX (SLOW)
- Route: 2 H
- If using ≥3 Historical, 6-7 XX (Slow) can also be used
- Max of 2 DD+DE
- Range = 2
- No enemy air present
- Multiple PT Imps present at H
![]() [Grey Tag]Mediterranean Fleet Strike Force Fleet: 1-2 (F)BB(V) 3 DD 2-3 CA(V)/AV
[Grey Tag]Mediterranean Fleet Strike Force Fleet: 1-2 (F)BB(V) 3 DD 2-3 CA(V)/AV
- Route: 2 I N R S
- Range = 5
- No enemy air present
- Multiple PT Imps present at S
Event Map Guide
Phase 0.5: Unlocking Node G
- Unlocking G has two requirements:
| Node | C2 | F |
|---|---|---|
| Hard | Reach | S x2 |
| Medium | Reach | S |
| Easy | - | A+ |
| Casual | - | A+ |
![]() [Yellow Tag]1st Special Squadron Single Fleet: 1-2 CA(V), 1 CL, 3-4 DD
[Yellow Tag]1st Special Squadron Single Fleet: 1-2 CA(V), 1 CL, 3-4 DD
- Route: 1 A B C E F
- Slow with <4 DD will route through D
- Range = 2
- AP/AS = 34/74 (Hard)
- Bring Nukes and DD with MG. The fleet will be fighting against both PT Imps & Installations.
Method #1: ![]() [Yellow Tag]1st Special Squadron Single Fleet: 1 CL, 1 CAV, 1 CV, 3 DD
[Yellow Tag]1st Special Squadron Single Fleet: 1 CL, 1 CAV, 1 CV, 3 DD
- Route: 1 A B C C1 C2
- Route: 1 A B C C2
- Set LBAS to standby/rest or send them to the battle node before C2
- Method #2 can be used for ammo farming, please view Cyprus Ammo Farming within the guide.
Phase 1: Defeat Summer CA Hime
![]() [Yellow Tag]1st Special Squadron Single Fleet: 1-2 CA(V), 1 CL, 3-4 DD
[Yellow Tag]1st Special Squadron Single Fleet: 1-2 CA(V), 1 CL, 3-4 DD
- Route: 1 A B C E G
- Must pass LoS to enter G
LBAS
- Range = 2
- No enemy air present
Strategic Notes:
- Vanguard formation across all nodes until the boss
- Can use the same composition as Node F from phase 0.5 but equipped for surface combat
- TCI can be helpful with clearing the boss out
Phase 2: Deplete the TP
![]() [Grey Tag]Mediterranean Fleet Single/Strike Force Fleet: 0-2 (F)BB(V), 0-1 AV, 0-2 CA(V), 0-2 CL, 3-7 DD
[Grey Tag]Mediterranean Fleet Single/Strike Force Fleet: 0-2 (F)BB(V), 0-1 AV, 0-2 CA(V), 0-2 CL, 3-7 DD
- Route: 2 I N Q O
- Fleet must include ≥3 Historical or 2DD + (2CL / Strike Force Fleet) to start at 2
- Must pass LoS (Cn3 >= 45 on Hard) to enter O
LBAS
- Range = 4
- No enemy air present
Strategic Notes:
- Equip as many Daihatsu and/or drum canisters as possible to deplete the bar quickly.
- Equip AP shells to maximize your damage output from your BBs against the Battleship Summer Princess.
Phase 2.5: Unlock the Last Boss Node
| Node | P |
|---|---|
| Hard | S x2 |
| Medium | S |
| Easy | A+ |
| Casual | - |
![]() [Grey Tag]Mediterranean Fleet Strike Force Fleet: 2 CV(L/B), 5 XX
[Grey Tag]Mediterranean Fleet Strike Force Fleet: 2 CV(L/B), 5 XX
- Route: 2 I J P
- Fleet must include ≥3 Historical or ≥2DD to start at 2
- If using ≥3 historicals, 2 CV(L/B), 4XX can also be used
- Must be FAST or ≥3 DD to skip node H
- Any (F)BB(V) will add extra battles or cause an offroute
LBAS
- Range = 4
- AD/AP/AS/AS+ = 17/33/72/144 (Hard)
Strategic Notes:
- After completing Phase 2, P is locked to the third composition
- Node P is a fight against 3 Installation Princesses/Demons, all of which have various weaknesses against different anti-installation equipment.
- Equip with nuke setups; however, please note the specific weaknesses listed below.
- Anchorage Water Demon
- Vulnerable to most anti-installation equipment but is also the most resilient.
- Avoid using DBs that can target installations as carriers should be focusing this target
- One effective method to take her down is by using carriers with 2DB + 1TB setups and using one European plane from Group A and one from Group B, if available.
- Supply Depot Princess
- Nuke setups are the most effective way to take her down.
- May require several hits to take down due to high HP.
- Airfield Princess
- Type 3 Shells are the most effective means of defeating her.
- Anchorage Water Demon
Phase 3: Destroy Enemy Ne Kai's Combined Fleet
![]() [Grey Tag]Mediterranean Fleet Strike Force Fleet: 0-2 (F)BB(V), 1-2 CA(V), 0-1 AV, 0-2 CL, 3-4 DD
[Grey Tag]Mediterranean Fleet Strike Force Fleet: 0-2 (F)BB(V), 1-2 CA(V), 0-1 AV, 0-2 CL, 3-4 DD
- Route: 2 I N R T V
- If slow, max of 1 (F)BB(V)
LBAS
- Range = 6
- Pre-LD: No enemy air present (Hard)
- LD: AD/AP/AS = 32/63/140 (Hard)
Strategic Notes:
- Node T is a Night battle. So it's highly recommended to make use of the Vanguard Formation to pass through the node.
- The boss node V is an abyssal combined fleet.
- Be aware a CVL will appear in the comp on LD on harder difficulties.
Bonus: Cyprus Ammo Farming
It is possible to collect ammo on E1 with a simple fleet comp, facing only a single battle before reaching the resource node. This can be used to collect ammo as high as 150 ammo per run.
Method #1: ![]() [Yellow Tag]1st Special Squadron Single Fleet: AO, 3-5 DD/DE
[Yellow Tag]1st Special Squadron Single Fleet: AO, 3-5 DD/DE
- Route: 1 A B C C2
LBAS: N/A
- Either set LBAS on standby/rest or send them to the battle node before C2
- Use Vanguard to survive Node C.
Increase resource gains by equipping the following:
- +10 Ammo per Drum Canister
- +15 Ammo per Daihatsu, 89 Tank Variants and Type 2 Ka-Mi Tank
Enemy Compositions
| # | Empty Node | ||
|---|---|---|---|
| A | 気のせいだった。 艦隊は、紅海よりスエズ運河に! Must be my imagination. The fleet is entering the Suez Canal from the Red Sea! | ||
| # | Empty Node | ||
| # | Empty Node | ||
|---|---|---|---|
| B | 気のせいだった。 これよりスエズ運河から、地中海に! Must be my imagination. We'll now pass through the Suez Canal into the Mediterranean! | ||
| # | Empty Node | ||
| # | Formation | Normal Battle Node | AD/AP AS/AS+ |
|---|---|---|---|
| C | Line Ahead Echelon Phases: 1, 2, 3 |
0/0 0/0 | |
| Line Ahead Phases: 1 |
0/0 0/0 | ||
| # | Formation | Normal Battle Node | AD/AP AS/AS+ |
| # | Formation | Normal Battle Node | AD/AP AS/AS+ |
|---|---|---|---|
| C1 | Line Ahead Double Line Echelon Phases: 1, 2, 3 |
0/0 0/0 | |
| # | Formation | Normal Battle Node | AD/AP AS/AS+ |
| # | Resource Node | ||
|---|---|---|---|
| # | Resource Node | ||
| # | Formation | Air Defense Node | AD/AP AS/AS+ |
|---|---|---|---|
| D | Diamond Phases: 1, 2, 3 |
44/88 197/393 | |
| Diamond Phases: 1, 2, 3 |
56/111 248/495 | ||
| Diamond Phases: 1, 2, 3 |
60/120 269/537 | ||
| # | Formation | Air Defense Node | AD/AP AS/AS+ |
| # | Formation | Normal Battle Node | AD/AP AS/AS+ |
|---|---|---|---|
| E | Line Ahead Echelon Vanguard Phases: 1, 2, 3 |
0/0 0/0 | |
| # | Formation | Normal Battle Node | AD/AP AS/AS+ |
| # | Formation | Normal Battle Node | AD/AP AS/AS+ |
|---|---|---|---|
| F | Double Line Phases: 1, 2, 3 |
17/33 74/147 | |
| Double Line Phases: 1, 2, 3 |
17/33 74/147 | ||
| Double Line Phases: 2, 3 |
0/0 0/0 | ||
| # | Formation | Normal Battle Node | AD/AP AS/AS+ |
| # | Formation | Boss Battle Node | AD/AP AS/AS+ |
|---|---|---|---|
| G | Line Ahead Double Line Phases: 1, 2, 3 |
0/0 0/0 | |
| Line Ahead Phases: 1 (Final)
|
0/0 0/0 | ||
| # | Formation | Boss Battle Node | AD/AP AS/AS+ |
| # | Formation | Normal Battle Node | AD/AP AS/AS+ |
|---|---|---|---|
| H | Echelon Phases: 2, 3 |
0/0 0/0 | |
| Echelon Phases: 2, 3 |
0/0 0/0 | ||
| Echelon Phases: 2, 3 |
0/0 0/0 | ||
| # | Formation | Normal Battle Node | AD/AP AS/AS+ |
| # | Formation | Normal Battle Node | AD/AP AS/AS+ |
|---|---|---|---|
| I | Line Ahead Double Line Phases: 2, 3 |
0/0 0/0 | |
| Line Ahead Phases: 3 |
0/0 0/0 | ||
| # | Formation | Normal Battle Node | AD/AP AS/AS+ |
| # | Formation | Normal Battle Node | AD/AP AS/AS+ |
|---|---|---|---|
| J | Echelon Line Abreast Phases: 2, 3 |
0/0 0/0 | |
| Echelon Line Abreast Phases: 2, 3 |
0/0 0/0 | ||
| Echelon Line Abreast Phases: 2, 3 |
0/0 0/0 | ||
| # | Formation | Normal Battle Node | AD/AP AS/AS+ |
| # | Formation | Air Defense Node | AD/AP AS/AS+ |
|---|---|---|---|
| K | Diamond Phases: 2, 3 |
60/119 267/534 | |
| Diamond Phases: 2, 3 |
71/142 318/636 | ||
| Diamond Phases: 2, 3 |
78/155 348/696 | ||
| # | Formation | Air Defense Node | AD/AP AS/AS+ |
| # | Formation | Normal Battle Node | AD/AP AS/AS+ |
|---|---|---|---|
| L | Double Line Phases: 2 |
33/66 147/294 | |
| Double Line Phases: 2 |
33/66 147/294 | ||
| Double Line Phases: 3 |
0/0 0/0 | ||
| # | Formation | Normal Battle Node | AD/AP AS/AS+ |
| # | Empty Node | ||
|---|---|---|---|
| M | 敵影を見ず。 No enemy spotted. | ||
| # | Empty Node | ||
| # | Selection Node | ||
|---|---|---|---|
| N | 艦隊の針路を選択できます。提督、どちらの針路をとられますか? You can decide the fleet's course. Admiral, which heading should we take? | ||
| # | Selection Node | ||
| # | Formation | Boss Battle Node | AD/AP AS/AS+ |
|---|---|---|---|
| O | Line Ahead Phases: 2, 3 |
0/0 0/0 | |
| Line Ahead Phases: 2, 3 |
0/0 0/0 | ||
| Line Ahead Phases: 2, 3 (Final)
|
0/0 0/0 | ||
| # | Formation | Boss Battle Node | AD/AP AS/AS+ |
| # | Formation | Normal Battle Node | AD/AP AS/AS+ |
|---|---|---|---|
| P | Double Line Phases: 2 |
60/120 269/537 | |
| Double Line Phases: 2 |
60/120 269/537 | ||
| Double Line Phases: 3 |
17/33 72/144 | ||
| # | Formation | Normal Battle Node | AD/AP AS/AS+ |
| # | Landing Node | ||
|---|---|---|---|
| # | Landing Node | ||
| # | Empty Node | ||
|---|---|---|---|
| R | 気のせいだった。 付近に敵増援部隊を認む。警戒を厳に! Must be my imagination. Enemy reinforcements are in the area. Be on high alert! | ||
| # | Empty Node | ||
| # | Formation | Normal Battle Node | AD/AP AS/AS+ |
|---|---|---|---|
| S | Line Ahead Echelon Phases: 3 |
0/0 0/0 | |
| Line Ahead Phases: 3 |
0/0 0/0 | ||
| # | Formation | Normal Battle Node | AD/AP AS/AS+ |
| # | Formation | Night Battle Node | AD/AP AS/AS+ |
|---|---|---|---|
| T | Line Ahead Echelon Vanguard Phases: 3 |
0/0 0/0 | |
| # | Formation | Night Battle Node | AD/AP AS/AS+ |
| # | Empty Node | ||
|---|---|---|---|
| U | 敵影を見ず。 付近に敵増援部隊を認む。警戒を厳に! No enemy spotted. Enemy reinforcements are in the area. Be on high alert! | ||
| # | Empty Node | ||
| # | Formation | Boss Battle Node | AD/AP AS/AS+ |
|---|---|---|---|
| V | Cruising Formation 4 Phases: 3 |
0/0 0/0 | |
| Cruising Formation 4 Phases: 3 (Final)
|
32/63 140/279 | ||
| # | Formation | Boss Battle Node | AD/AP AS/AS+ |
| # | Empty Node | ||
|---|---|---|---|
| A | 気のせいだった。 艦隊は、紅海よりスエズ運河に! Must be my imagination. The fleet is entering the Suez Canal from the Red Sea! | ||
| # | Empty Node | ||
| # | Empty Node | ||
|---|---|---|---|
| B | 気のせいだった。 これよりスエズ運河から、地中海に! Must be my imagination. We'll now pass through the Suez Canal into the Mediterranean! | ||
| # | Empty Node | ||
| # | Formation | Normal Battle Node | AD/AP AS/AS+ |
|---|---|---|---|
| C | Line Ahead Echelon Phases: 1, 2, 3 |
0/0 0/0 | |
| Line Ahead Phases: 1 |
0/0 0/0 | ||
| # | Formation | Normal Battle Node | AD/AP AS/AS+ |
| # | Formation | Normal Battle Node | AD/AP AS/AS+ |
|---|---|---|---|
| C1 | Line Ahead Double Line Echelon Phases: 1, 2, 3 |
0/0 0/0 | |
| # | Formation | Normal Battle Node | AD/AP AS/AS+ |
| # | Resource Node | ||
|---|---|---|---|
| # | Resource Node | ||
| # | Formation | Air Defense Node | AD/AP AS/AS+ |
|---|---|---|---|
| D | Diamond Phases: 1 |
39/77 171/342 | |
| Diamond Phases: 1, 2, 3 |
43/86 192/384 | ||
| Diamond Phases: 1 |
48/95 213/426 | ||
| # | Formation | Air Defense Node | AD/AP AS/AS+ |
| # | Formation | Normal Battle Node | AD/AP AS/AS+ |
|---|---|---|---|
| E | Line Ahead Echelon Vanguard Phases: 1, 2, 3 |
0/0 0/0 | |
| # | Formation | Normal Battle Node | AD/AP AS/AS+ |
| # | Formation | Normal Battle Node | AD/AP AS/AS+ |
|---|---|---|---|
| F | Double Line Phases: 1, 3 |
16/31 69/138 | |
| Double Line Phases: 1, 3 |
16/31 69/138 | ||
| Double Line Phases: 2, 3 |
0/0 0/0 | ||
| # | Formation | Normal Battle Node | AD/AP AS/AS+ |
| # | Formation | Boss Battle Node | AD/AP AS/AS+ |
|---|---|---|---|
| G | Line Ahead Double Line Phases: 1, 2, 3 |
0/0 0/0 | |
| Line Ahead Phases: 1 (Final)
|
0/0 0/0 | ||
| # | Formation | Boss Battle Node | AD/AP AS/AS+ |
| # | Formation | Normal Battle Node | AD/AP AS/AS+ |
|---|---|---|---|
| H | Echelon Phases: 2, 3 |
0/0 0/0 | |
| Echelon Phases: 2, 3 |
0/0 0/0 | ||
| Echelon Phases: 2, 3 |
0/0 0/0 | ||
| # | Formation | Normal Battle Node | AD/AP AS/AS+ |
| # | Formation | Normal Battle Node | AD/AP AS/AS+ |
|---|---|---|---|
| I | Line Ahead Double Line Phases: 2, 3 |
0/0 0/0 | |
| Line Ahead Phases: 3 |
0/0 0/0 | ||
| # | Formation | Normal Battle Node | AD/AP AS/AS+ |
| # | Formation | Normal Battle Node | AD/AP AS/AS+ |
|---|---|---|---|
| J | Echelon Line Abreast Phases: 2, 3 |
0/0 0/0 | |
| Echelon Line Abreast Phases: 2, 3 |
0/0 0/0 | ||
| Echelon Line Abreast Phases: 2, 3 |
0/0 0/0 | ||
| # | Formation | Normal Battle Node | AD/AP AS/AS+ |
| # | Formation | Air Defense Node | AD/AP AS/AS+ |
|---|---|---|---|
| K | Diamond Phases: 2, 3 |
52/103 231/462 | |
| Diamond Phases: 2, 3 |
59/117 261/522 | ||
| Diamond Phases: 2, 3 |
63/126 282/564 | ||
| # | Formation | Air Defense Node | AD/AP AS/AS+ |
| # | Formation | Normal Battle Node | AD/AP AS/AS+ |
|---|---|---|---|
| L | Double Line Phases: 2 |
31/62 138/276 | |
| Double Line Phases: 2 |
31/62 138/276 | ||
| Double Line Phases: 3 |
0/0 0/0 | ||
| # | Formation | Normal Battle Node | AD/AP AS/AS+ |
| # | Empty Node | ||
|---|---|---|---|
| M | 敵影を見ず。 No enemy spotted. | ||
| # | Empty Node | ||
| # | Selection Node | ||
|---|---|---|---|
| N | 艦隊の針路を選択できます。提督、どちらの針路をとられますか? You can decide the fleet's course. Admiral, which heading should we take? | ||
| # | Selection Node | ||
| # | Formation | Boss Battle Node | AD/AP AS/AS+ |
|---|---|---|---|
| O | Line Ahead Phases: 2, 3 |
0/0 0/0 | |
| Line Ahead Phases: 2, 3 |
0/0 0/0 | ||
| Line Ahead Phases: 2, 3 (Final)
|
0/0 0/0 | ||
| # | Formation | Boss Battle Node | AD/AP AS/AS+ |
| # | Formation | Normal Battle Node | AD/AP AS/AS+ |
|---|---|---|---|
| P | Double Line Phases: 2 |
51/102 228/456 | |
| Double Line Phases: 2 |
51/102 228/456 | ||
| Double Line Phases: 3 |
12/23 51/102 | ||
| # | Formation | Normal Battle Node | AD/AP AS/AS+ |
| # | Landing Node | ||
|---|---|---|---|
| # | Landing Node | ||
| # | Empty Node | ||
|---|---|---|---|
| R | 気のせいだった。 付近に敵増援部隊を認む。警戒を厳に! Must be my imagination. Enemy reinforcements are in the area. Be on high alert! | ||
| # | Empty Node | ||
| # | Formation | Normal Battle Node | AD/AP AS/AS+ |
|---|---|---|---|
| S | Line Ahead Echelon Phases: 3 |
0/0 0/0 | |
| Line Ahead Phases: 3 |
0/0 0/0 | ||
| # | Formation | Normal Battle Node | AD/AP AS/AS+ |
| # | Formation | Night Battle Node | AD/AP AS/AS+ |
|---|---|---|---|
| T | Line Ahead Echelon Vanguard Phases: 3 |
0/0 0/0 | |
| # | Formation | Night Battle Node | AD/AP AS/AS+ |
| # | Empty Node | ||
|---|---|---|---|
| U | 敵影を見ず。 付近に敵増援部隊を認む。警戒を厳に! No enemy spotted. Enemy reinforcements are in the area. Be on high alert! | ||
| # | Empty Node | ||
| # | Formation | Boss Battle Node | AD/AP AS/AS+ |
|---|---|---|---|
| V | Cruising Formation 4 Phases: 3 |
0/0 0/0 | |
| Cruising Formation 4 Phases: 3 (Final)
|
24/47 104/207 | ||
| # | Formation | Boss Battle Node | AD/AP AS/AS+ |
| # | Empty Node | ||
|---|---|---|---|
| A | 気のせいだった。 艦隊は、紅海よりスエズ運河に! Must be my imagination. The fleet is entering the Suez Canal from the Red Sea! | ||
| # | Empty Node | ||
| # | Empty Node | ||
|---|---|---|---|
| B | 気のせいだった。 これよりスエズ運河から、地中海に! Must be my imagination. We'll now pass through the Suez Canal into the Mediterranean! | ||
| # | Empty Node | ||
| # | Formation | Normal Battle Node | AD/AP AS/AS+ |
|---|---|---|---|
| C | Line Ahead Echelon Phases: 1, 2, 3 |
0/0 0/0 | |
| Line Ahead Phases: 1 |
0/0 0/0 | ||
| # | Formation | Normal Battle Node | AD/AP AS/AS+ |
| # | Formation | Normal Battle Node | AD/AP AS/AS+ |
|---|---|---|---|
| C1 | Line Ahead Double Line Echelon Phases: 1, 2, 3 |
0/0 0/0 | |
| # | Formation | Normal Battle Node | AD/AP AS/AS+ |
| # | Resource Node | ||
|---|---|---|---|
| # | Resource Node | ||
| # | Formation | Air Defense Node | AD/AP AS/AS+ |
|---|---|---|---|
| D | Diamond Phases: 1, 2, 3 |
25/50 111/222 | |
| Diamond Phases: 1, 2, 3 |
37/73 162/324 | ||
| Diamond Phases: 1, 2, 3 |
39/77 171/342 | ||
| # | Formation | Air Defense Node | AD/AP AS/AS+ |
| # | Formation | Normal Battle Node | AD/AP AS/AS+ |
|---|---|---|---|
| E | Line Ahead Echelon Vanguard Phases: 1, 2, 3 |
0/0 0/0 | |
| # | Formation | Normal Battle Node | AD/AP AS/AS+ |
| # | Formation | Normal Battle Node | AD/AP AS/AS+ |
|---|---|---|---|
| F | Double Line Phases: 2, 3 |
0/0 0/0 | |
| Double Line Phases: 1 |
14/27 60/120 | ||
| Double Line Phases: 1, 3 |
14/27 60/120 | ||
| # | Formation | Normal Battle Node | AD/AP AS/AS+ |
| # | Formation | Boss Battle Node | AD/AP AS/AS+ |
|---|---|---|---|
| G | Line Ahead Double Line Phases: 1, 2, 3 |
0/0 0/0 | |
| Line Ahead Phases: 1 (Final)
|
0/0 0/0 | ||
| # | Formation | Boss Battle Node | AD/AP AS/AS+ |
| # | Formation | Normal Battle Node | AD/AP AS/AS+ |
|---|---|---|---|
| H | Echelon Phases: 2, 3 |
0/0 0/0 | |
| Echelon Phases: 2, 3 |
0/0 0/0 | ||
| # | Formation | Normal Battle Node | AD/AP AS/AS+ |
| # | Formation | Normal Battle Node | AD/AP AS/AS+ |
|---|---|---|---|
| I | Line Ahead Double Line Phases: 2, 3 |
0/0 0/0 | |
| Line Ahead Phases: 3 |
0/0 0/0 | ||
| # | Formation | Normal Battle Node | AD/AP AS/AS+ |
| # | Formation | Normal Battle Node | AD/AP AS/AS+ |
|---|---|---|---|
| J | Echelon Line Abreast Phases: 2, 3 |
0/0 0/0 | |
| Echelon Line Abreast Phases: 2, 3 |
0/0 0/0 | ||
| Echelon Line Abreast Phases: 2, 3 |
0/0 0/0 | ||
| # | Formation | Normal Battle Node | AD/AP AS/AS+ |
| # | Formation | Air Defense Node | AD/AP AS/AS+ |
|---|---|---|---|
| K | Diamond Phases: 2, 3 |
39/77 171/342 | |
| Diamond Phases: 2, 3 |
45/90 201/402 | ||
| Diamond Phases: 2, 3 |
52/103 231/462 | ||
| # | Formation | Air Defense Node | AD/AP AS/AS+ |
| # | Formation | Normal Battle Node | AD/AP AS/AS+ |
|---|---|---|---|
| L | Double Line Phases: 2 |
27/54 120/240 | |
| Double Line Phases: 2 |
27/54 120/240 | ||
| Double Line Phases: 3 |
0/0 0/0 | ||
| # | Formation | Normal Battle Node | AD/AP AS/AS+ |
| # | Empty Node | ||
|---|---|---|---|
| M | 敵影を見ず。 No enemy spotted. | ||
| # | Empty Node | ||
| # | Selection Node | ||
|---|---|---|---|
| N | 艦隊の針路を選択できます。提督、どちらの針路をとられますか? You can decide the fleet's course. Admiral, which heading should we take? | ||
| # | Selection Node | ||
| # | Formation | Boss Battle Node | AD/AP AS/AS+ |
|---|---|---|---|
| O | Line Ahead Phases: 2, 3 |
0/0 0/0 | |
| Line Ahead Phases: 2, 3 |
0/0 0/0 | ||
| Line Ahead Phases: 2, 3 (Final)
|
0/0 0/0 | ||
| # | Formation | Boss Battle Node | AD/AP AS/AS+ |
| # | Formation | Normal Battle Node | AD/AP AS/AS+ |
|---|---|---|---|
| P | Double Line Phases: 2 |
47/94 210/420 | |
| Double Line Phases: 2 |
47/94 210/420 | ||
| Double Line Phases: 3 |
12/23 51/102 | ||
| # | Formation | Normal Battle Node | AD/AP AS/AS+ |
| # | Landing Node | ||
|---|---|---|---|
| # | Landing Node | ||
| # | Empty Node | ||
|---|---|---|---|
| R | 気のせいだった。 付近に敵増援部隊を認む。警戒を厳に! Must be my imagination. Enemy reinforcements are in the area. Be on high alert! | ||
| # | Empty Node | ||
| # | Formation | Normal Battle Node | AD/AP AS/AS+ |
|---|---|---|---|
| S | Line Ahead Echelon Phases: 3 |
0/0 0/0 | |
| Line Ahead Phases: 3 |
0/0 0/0 | ||
| # | Formation | Normal Battle Node | AD/AP AS/AS+ |
| # | Formation | Night Battle Node | AD/AP AS/AS+ |
|---|---|---|---|
| T | Line Ahead Echelon Vanguard Phases: 3 |
0/0 0/0 | |
| # | Formation | Night Battle Node | AD/AP AS/AS+ |
| # | Empty Node | ||
|---|---|---|---|
| U | 敵影を見ず。 付近に敵増援部隊を認む。警戒を厳に! No enemy spotted. Enemy reinforcements are in the area. Be on high alert! | ||
| # | Empty Node | ||
| # | Formation | Boss Battle Node | AD/AP AS/AS+ |
|---|---|---|---|
| V | Cruising Formation 4 Phases: 3 |
0/0 0/0 | |
| Cruising Formation 4 Phases: 3 (Final)
|
0/0 0/0 | ||
| # | Formation | Boss Battle Node | AD/AP AS/AS+ |
| # | Empty Node | ||
|---|---|---|---|
| A | 気のせいだった。 艦隊は、紅海よりスエズ運河に! Must be my imagination. The fleet is entering the Suez Canal from the Red Sea! | ||
| # | Empty Node | ||
| # | Empty Node | ||
|---|---|---|---|
| B | 気のせいだった。 これよりスエズ運河から、地中海に! Must be my imagination. We'll now pass through the Suez Canal into the Mediterranean! | ||
| # | Empty Node | ||
| # | Formation | Normal Battle Node | AD/AP AS/AS+ |
|---|---|---|---|
| C | Line Ahead Echelon Phases: 1, 2, 3 |
0/0 0/0 | |
| Line Ahead Phases: 1 |
0/0 0/0 | ||
| # | Formation | Normal Battle Node | AD/AP AS/AS+ |
| # | Formation | Normal Battle Node | AD/AP AS/AS+ |
|---|---|---|---|
| C1 | Line Ahead Double Line Echelon Phases: 1, 2, 3 |
0/0 0/0 | |
| # | Formation | Normal Battle Node | AD/AP AS/AS+ |
| # | Resource Node | ||
|---|---|---|---|
| # | Resource Node | ||
| # | Formation | Air Defense Node | AD/AP AS/AS+ |
|---|---|---|---|
| D | Diamond Phases: 1, 2, 3 |
12/23 51/102 | |
| Diamond Phases: 1, 2, 3 |
25/50 111/222 | ||
| Diamond Phases: 1, 2, 3 |
37/73 162/324 | ||
| # | Formation | Air Defense Node | AD/AP AS/AS+ |
| # | Formation | Normal Battle Node | AD/AP AS/AS+ |
|---|---|---|---|
| E | Line Ahead Echelon Vanguard Phases: 1, 2, 3 |
0/0 0/0 | |
| # | Formation | Normal Battle Node | AD/AP AS/AS+ |
| # | Formation | Normal Battle Node | AD/AP AS/AS+ |
|---|---|---|---|
| F | Double Line Phases: 1, 2 |
6/11 24/48 | |
| Double Line Phases: 2, 3 |
0/0 0/0 | ||
| Double Line Phases: 1 |
6/11 24/48 | ||
| # | Formation | Normal Battle Node | AD/AP AS/AS+ |
| # | Formation | Boss Battle Node | AD/AP AS/AS+ |
|---|---|---|---|
| G | Line Ahead Double Line Phases: 1, 2, 3 |
0/0 0/0 | |
| Line Ahead Phases: 1 (Final)
|
0/0 0/0 | ||
| # | Formation | Boss Battle Node | AD/AP AS/AS+ |
| # | Formation | Normal Battle Node | AD/AP AS/AS+ |
|---|---|---|---|
| H | Echelon Phases: 2, 3 |
0/0 0/0 | |
| Echelon Phases: 2, 3 |
0/0 0/0 | ||
| # | Formation | Normal Battle Node | AD/AP AS/AS+ |
| # | Formation | Normal Battle Node | AD/AP AS/AS+ |
|---|---|---|---|
| I | Line Ahead Double Line Phases: 2, 3 |
0/0 0/0 | |
| Line Ahead Phases: 3 |
0/0 0/0 | ||
| # | Formation | Normal Battle Node | AD/AP AS/AS+ |
| # | Formation | Normal Battle Node | AD/AP AS/AS+ |
|---|---|---|---|
| J | Echelon Line Abreast Phases: 2, 3 |
0/0 0/0 | |
| Echelon Line Abreast Phases: 2, 3 |
0/0 0/0 | ||
| # | Formation | Normal Battle Node | AD/AP AS/AS+ |
| # | Formation | Air Defense Node | AD/AP AS/AS+ |
|---|---|---|---|
| K | Diamond Phases: 2, 3 |
12/23 51/102 | |
| Diamond Phases: 2, 3 |
39/77 171/342 | ||
| Diamond Phases: 2, 3 |
45/90 201/402 | ||
| # | Formation | Air Defense Node | AD/AP AS/AS+ |
| # | Formation | Normal Battle Node | AD/AP AS/AS+ |
|---|---|---|---|
| L | Double Line Phases: 2 |
11/22 48/96 | |
| Double Line Phases: 2 |
11/22 48/96 | ||
| Double Line Phases: 3 |
0/0 0/0 | ||
| # | Formation | Normal Battle Node | AD/AP AS/AS+ |
| # | Empty Node | ||
|---|---|---|---|
| M | 敵影を見ず。 No enemy spotted. | ||
| # | Empty Node | ||
| # | Selection Node | ||
|---|---|---|---|
| N | 艦隊の針路を選択できます。提督、どちらの針路をとられますか? You can decide the fleet's course. Admiral, which heading should we take? | ||
| # | Selection Node | ||
| # | Formation | Boss Battle Node | AD/AP AS/AS+ |
|---|---|---|---|
| O | Line Ahead Phases: 2, 3 |
0/0 0/0 | |
| Line Ahead Phases: 2, 3 |
0/0 0/0 | ||
| Line Ahead Phases: 2, 3 (Final)
|
0/0 0/0 | ||
| # | Formation | Boss Battle Node | AD/AP AS/AS+ |
| # | Formation | Normal Battle Node | AD/AP AS/AS+ |
|---|---|---|---|
| P | Double Line Phases: 2 |
28/55 123/246 | |
| Double Line Phases: 2 |
28/55 123/246 | ||
| Double Line Phases: 3 |
0/0 0/0 | ||
| # | Formation | Normal Battle Node | AD/AP AS/AS+ |
| # | Landing Node | ||
|---|---|---|---|
| # | Landing Node | ||
| # | Empty Node | ||
|---|---|---|---|
| R | 気のせいだった。 付近に敵増援部隊を認む。警戒を厳に! Must be my imagination. Enemy reinforcements are in the area. Be on high alert! | ||
| # | Empty Node | ||
| # | Formation | Normal Battle Node | AD/AP AS/AS+ |
|---|---|---|---|
| S | Line Ahead Echelon Phases: 3 |
0/0 0/0 | |
| Line Ahead Phases: 3 |
0/0 0/0 | ||
| # | Formation | Normal Battle Node | AD/AP AS/AS+ |
| # | Formation | Night Battle Node | AD/AP AS/AS+ |
|---|---|---|---|
| T | Line Ahead Echelon Vanguard Phases: 3 |
0/0 0/0 | |
| # | Formation | Night Battle Node | AD/AP AS/AS+ |
| # | Empty Node | ||
|---|---|---|---|
| U | 敵影を見ず。 付近に敵増援部隊を認む。警戒を厳に! No enemy spotted. Enemy reinforcements are in the area. Be on high alert! | ||
| # | Empty Node | ||
| # | Formation | Boss Battle Node | AD/AP AS/AS+ |
|---|---|---|---|
| V | Cruising Formation 4 Phases: 3 |
0/0 0/0 | |
| Cruising Formation 4 Phases: 3 (Final)
|
0/0 0/0 | ||
| # | Formation | Boss Battle Node | AD/AP AS/AS+ |
Ship Drops
| Ship drops | |||||||||||||||||||||||||||||||||||||||||||||||||||||||||||||||||||||||||||||||||||||||||||||||||||
|---|---|---|---|---|---|---|---|---|---|---|---|---|---|---|---|---|---|---|---|---|---|---|---|---|---|---|---|---|---|---|---|---|---|---|---|---|---|---|---|---|---|---|---|---|---|---|---|---|---|---|---|---|---|---|---|---|---|---|---|---|---|---|---|---|---|---|---|---|---|---|---|---|---|---|---|---|---|---|---|---|---|---|---|---|---|---|---|---|---|---|---|---|---|---|---|---|---|---|---|
| Type | Ship? | G | L | O | P | T | V | ||||||||||||||||||||||||||||||||||||||||||||||||||||||||||||||||||||||||||||||||||||||||||||
| DE | Etorofu | Casual+ | Casual+ | ||||||||||||||||||||||||||||||||||||||||||||||||||||||||||||||||||||||||||||||||||||||||||||||||
| DE | Matsuwa | Casual+ | |||||||||||||||||||||||||||||||||||||||||||||||||||||||||||||||||||||||||||||||||||||||||||||||||
| DE | Sado | Casual+ | Casual+ | Casual+ | Casual+ | ||||||||||||||||||||||||||||||||||||||||||||||||||||||||||||||||||||||||||||||||||||||||||||||
| DD | Uranami | Casual+ | Casual+ | Casual+ | Casual+ | ||||||||||||||||||||||||||||||||||||||||||||||||||||||||||||||||||||||||||||||||||||||||||||||
| DD | Ariake | Casual+ | |||||||||||||||||||||||||||||||||||||||||||||||||||||||||||||||||||||||||||||||||||||||||||||||||
| DD | Hatsukaze | Casual+ | |||||||||||||||||||||||||||||||||||||||||||||||||||||||||||||||||||||||||||||||||||||||||||||||||
| DD | Maestrale | Medium+ | Casual+ | ||||||||||||||||||||||||||||||||||||||||||||||||||||||||||||||||||||||||||||||||||||||||||||||||
| DD | Libeccio | Easy+ | Casual+ | ||||||||||||||||||||||||||||||||||||||||||||||||||||||||||||||||||||||||||||||||||||||||||||||||
| DD | Scirocco | Casual+ | Casual+ | Casual+ | |||||||||||||||||||||||||||||||||||||||||||||||||||||||||||||||||||||||||||||||||||||||||||||||
| DD | Janus | Casual+ | Casual+ | Casual+ | Hard+ | Casual+ | |||||||||||||||||||||||||||||||||||||||||||||||||||||||||||||||||||||||||||||||||||||||||||||
| CL | Agano | Casual+ | |||||||||||||||||||||||||||||||||||||||||||||||||||||||||||||||||||||||||||||||||||||||||||||||||
| CL | Noshiro | Casual+ | |||||||||||||||||||||||||||||||||||||||||||||||||||||||||||||||||||||||||||||||||||||||||||||||||
| CL | Ooyodo | Casual+ | Casual+ | Casual+ | Casual+ | ||||||||||||||||||||||||||||||||||||||||||||||||||||||||||||||||||||||||||||||||||||||||||||||
| CL | Duca degli Abruzzi | Casual+ | Casual+ | ||||||||||||||||||||||||||||||||||||||||||||||||||||||||||||||||||||||||||||||||||||||||||||||||
| CL | Perth | Casual+ | Casual+ | Casual+ | Medium+ | Casual+ | |||||||||||||||||||||||||||||||||||||||||||||||||||||||||||||||||||||||||||||||||||||||||||||
| CA | Mikuma | Easy+ | Casual+ | ||||||||||||||||||||||||||||||||||||||||||||||||||||||||||||||||||||||||||||||||||||||||||||||||
| BB | Warspite | Casual+ | Casual+ | Hard+ | Casual+ | Easy+ | Casual+ | ||||||||||||||||||||||||||||||||||||||||||||||||||||||||||||||||||||||||||||||||||||||||||||
| AS | Chougei | Casual+ | Casual+ | ||||||||||||||||||||||||||||||||||||||||||||||||||||||||||||||||||||||||||||||||||||||||||||||||
| AO | Souya | Easy+ | Casual+ | Casual+ | |||||||||||||||||||||||||||||||||||||||||||||||||||||||||||||||||||||||||||||||||||||||||||||||
| DD | Yukikaze | Casual+ | |||||||||||||||||||||||||||||||||||||||||||||||||||||||||||||||||||||||||||||||||||||||||||||||||
| CL | Kitakami | Casual+ | |||||||||||||||||||||||||||||||||||||||||||||||||||||||||||||||||||||||||||||||||||||||||||||||||
| CL | Ooi | Casual+ | Casual+ | Casual+ | Casual+ | Casual+ | |||||||||||||||||||||||||||||||||||||||||||||||||||||||||||||||||||||||||||||||||||||||||||||
| CL | Nagara | Casual+ | Casual+ | Casual+ | Casual+ | Casual+ | Casual+ | ||||||||||||||||||||||||||||||||||||||||||||||||||||||||||||||||||||||||||||||||||||||||||||
| CL | Kinu | Casual+ | Casual+ | Casual+ | Casual+ | ||||||||||||||||||||||||||||||||||||||||||||||||||||||||||||||||||||||||||||||||||||||||||||||
| CL | Abukuma | Casual+ | Casual+ | Casual+ | Easy+ | ||||||||||||||||||||||||||||||||||||||||||||||||||||||||||||||||||||||||||||||||||||||||||||||
| CL | Sendai | Casual+ | |||||||||||||||||||||||||||||||||||||||||||||||||||||||||||||||||||||||||||||||||||||||||||||||||
| CL | Yuubari | Easy+ | Casual+ | Casual+ | |||||||||||||||||||||||||||||||||||||||||||||||||||||||||||||||||||||||||||||||||||||||||||||||
| CA | Myoukou | Casual+ | Casual+ | ||||||||||||||||||||||||||||||||||||||||||||||||||||||||||||||||||||||||||||||||||||||||||||||||
| CA | Atago | Casual+ | Casual+ | ||||||||||||||||||||||||||||||||||||||||||||||||||||||||||||||||||||||||||||||||||||||||||||||||
| CA | Mogami | Easy+ | Hard+ | Casual+ | Casual+ | ||||||||||||||||||||||||||||||||||||||||||||||||||||||||||||||||||||||||||||||||||||||||||||||
| CA | Suzuya | Casual+ | Casual+ | ||||||||||||||||||||||||||||||||||||||||||||||||||||||||||||||||||||||||||||||||||||||||||||||||
| CA | Kumano | Casual+ | Casual+ | ||||||||||||||||||||||||||||||||||||||||||||||||||||||||||||||||||||||||||||||||||||||||||||||||
| CA | Chikuma | Casual+ | Casual+ | ||||||||||||||||||||||||||||||||||||||||||||||||||||||||||||||||||||||||||||||||||||||||||||||||
| FBB | Kongou | Casual+ | |||||||||||||||||||||||||||||||||||||||||||||||||||||||||||||||||||||||||||||||||||||||||||||||||
| FBB | Haruna | Medium+ | Casual+ | ||||||||||||||||||||||||||||||||||||||||||||||||||||||||||||||||||||||||||||||||||||||||||||||||
| FBB | Kirishima | Casual+ | Casual+ | ||||||||||||||||||||||||||||||||||||||||||||||||||||||||||||||||||||||||||||||||||||||||||||||||
| BB | Fusou | Casual+ | |||||||||||||||||||||||||||||||||||||||||||||||||||||||||||||||||||||||||||||||||||||||||||||||||
| BB | Yamashiro | Casual+ | |||||||||||||||||||||||||||||||||||||||||||||||||||||||||||||||||||||||||||||||||||||||||||||||||
| BB | Ise | Casual+ | |||||||||||||||||||||||||||||||||||||||||||||||||||||||||||||||||||||||||||||||||||||||||||||||||
| BB | Hyuuga | Casual+ | |||||||||||||||||||||||||||||||||||||||||||||||||||||||||||||||||||||||||||||||||||||||||||||||||
| BB | Mutsu | Casual+ | Casual+ | Hard+ | Casual+ | Easy+ | Casual+ | ||||||||||||||||||||||||||||||||||||||||||||||||||||||||||||||||||||||||||||||||||||||||||||