E-1
Patrol the Nansei Islands
南西諸島の哨戒
| Rewards
|
| All
|
|
|
| Equipment/Item
|
丁
Casual
|
丙
Easy
|
乙
Medium
|
甲
Hard
|
 Food Supply Ship Mamiya |
|
|
1
|
2
|
 Food Supply Ship Irako |
1
|
1
|
1
|
2
|
 Furniture Fairy |
|
1
|
1
|
1
|
 Emergency Repair Goddess |
1
|
1
|
1
|
1
|
 New Model Rocket Development Material |
|
1
|
1
|
2
|
 Type 13 Air Radar Kai |
1 (★1)
|
1 (★2)
|
|
|
 Type 13 Air Radar Kai (Late Model) |
|
|
1 (★1)
|
1 (★2)
|
|
|
|
|
|
|
|
|
|
|
|
|
|
|
|
|
|
|
|
|
|
|
|
|
Branching Table
| E-1 Branching Rules
|
| Nodes |
Rules
|
|
|
|
- Meet ANY of the following requirements:
- Fleet contains CV(B)
- Amount of AS = 0 and amount of SS(V) ≥ 1
|
|
|
- Does not meet the requirements to go to C
|
|
|
|
- Fleet contains SS(V) or DE
|
|
|
- Does not meet the requirements to go to F
|
|
|
|
- Does not meet the requirements to go to H
|
|
|
- Fleet contains (F)BB(V), CV, SS(V), LHA, or AS
|
|
|
|
Choose your own adventure!
|
|
|
|
|
|
Choose your own adventure!
|
|
|
|
|
|
- Node H1 is not unlocked
- Does not meet the requirements to go to H1
|
|
|
- Meet ANY of the following requirements:
- Amount of CA(V) ≥ 2
- Amount of AS ≥ 1 and amount of SS(V) ≥ 1
|
|
|
|
- Route to O3 is not unlocked
- Does not meet the requirements to go to O3
|
|
|
- Meet ALL of the following to go to O3:
- Fast Fleet
- Amount of (F)BB(V)+CV(B) ≥ 2
|
|
|
|
Choose your own adventure!
|
|
|
|
|
|
- Meet ALL of the following to go to O1:
- Amount of CV(L) ≤ 1
- Amount of CA(V) + CL ≤ 2
- Amount of DD ≥ 3
|
|
|
- Does not meet the requirements to go to O1
|
|
|
|
- Does not meet the requirements to go to Q
|
|
|
- Meet ANY of the following to go to Q:
- Fleet contains DE, AO, or AS
- Amount of DD ≥ 4
|
|
|
|
Choose your own adventure!
|
|
|
|
|
|
- Force Q2, if fleet contains SS(V)
- Does not meet the requirements to go to Q3
|
|
|
- Meet ANY of the following requirements:
- Fast Fleet
- If fleet is slow, (F)BB(V) = 0
|
|
|
|
Choose your own adventure!
|
|
|
|
|
|
- Force V, if fleet contains SS(V)
- Meet ANY of the following requirements:
- Amount of (F)BB(V) + CV(B) ≥ 3
- Amount of CV(B/L) ≥ 3
|
|
|
- Does not meet the requirements for V or V3
|
|
|
- Meet ALL of the following requirements:
- Fast Fleet
- Amount of (F)BB(V) ≤ 1
- Amount of CV(B) = 0
- Amount of DD ≥ 3
- Pass the LOS check
|
|
|
|
|
|
|
|
Branching compositions were reported over the course of the event. (NGA and KCNav)
The event guides are to be constructed through the respective Event map page guide and reviewed by editors before being approved here.
Do not under any circumstance update the guides through this page or attempt to fix them through this page.
Please only update guides through their respective sandbox pages.
Ship Bonuses
DISCLAIMER: This information is based on user submitted data and is subject to revisions as more data is gathered. Any version of the ship receives the bonus regardless of remodel.
Ship Bonuses
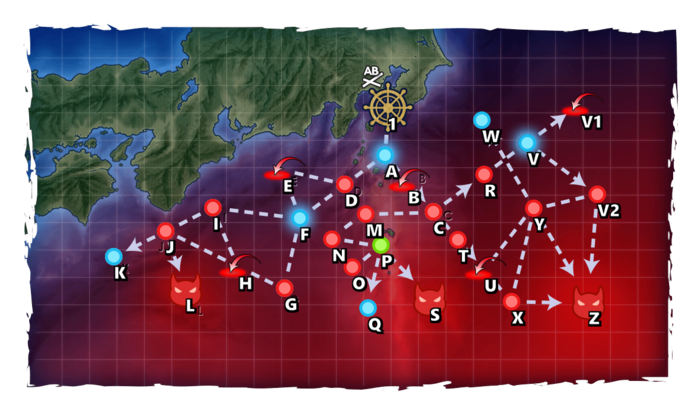
Map Overview
- E1 is a single fleet map consisting of multiple lengthy unlock phases followed by a single HP phase. Due to the weaker nature of the enemy fleets not using any historical ships can be considered.
- One LBAS is usable on this map, which can help clear the different gimmicks as well as the boss, as long as the range is adequate (8 range for the boss).
- This map utilizes
 [Green]South-Western Fleet tag.
Cruising the Nansei Islands Part 1
This Phase contains up to 4 requirements, depending on difficulty:
|
|
A
|
N
|
L
|
M
|
| Hard
|
Reach
|
A+
|
Reach
|
A+
|
| Medium
|
Reach
|
A+
|
Reach
|
A+
|
| Easy
|
Reach
|
A+
|
Reach
|
A+
|
| Casual
|
Reach
|
- 1CL, 5DD (Fast Fleet)
- Route: 1 B F E D A
- AA/ASW Gear is recommended
- Using a generic AACI on a generic ship can be helpful on E.
- 1CL, 5DD (Fast Fleet)
- Route: 1 B F J N
- Fleet should be equipped for surface combat.
- Using a generic AACI on a generic ship can be helpful on J.
- 1FBB, 1CV, 1CL, 3DD (Fast Fleet)
- Route: 1 B C G I L
- I features a heavy cruiser surface fleet
- 1FBB, 1CV, 1CL, 3DD (Fast Fleet)
- Route: 1 B C G K M
- A fleet with a standard carrier forces the fleet to go to M.
- Using 1-2 ASW ships to help with M is recommended.
Once conditions are met additional nodes will unlock.
Cruising the Nansei Islands Part 2
This Phase contains up to 4 requirements, depending on difficulty:
|
|
O1
|
O4
|
O3
|
H2
|
| Hard
|
Reach
|
A+
|
AS
|
S
|
| Medium
|
Reach
|
A+
|
AS
|
S
|
| Easy
|
Reach
|
B+
|
AS
|
| Casual
|
Reach
|
- 1CL, 5DD (Fast Fleet)
- Route: 1 B F J N O O2 O1
- O2 will be a heavy enemy surface fleet. Using Vanguard to minimize damage is recommended.
- 1CL, 5DD (Fast Fleet)
- Route: 1 B F J N O O4
- Using 1-2 ASW ships is recommended
- 0-1FBB, 1CV, 0-1 CVL, 1CL, 3-4DD (Fast Fleet)
- Route: 1 B C G K M O3
- AACI is highly recommended for this step.
- It is recommended to Fighter sweep the Node (5 Range) if the fleet is unable to reach the requirement by itself.
- 1FBB, 1CVL, 2CA, 1 CL, 1DD (Fast Fleet)
- Route: 1 B F E H H1 H2
- H2 is a surface fight with a CVL present in the fleet.
Once conditions are met additional nodes will unlock.
Cruising the Nansei Islands Part 3, Unlock V3
This Phase contains up to 3 requirements, depending on difficulty:
|
|
Q3
|
U
|
T
|
| Hard
|
Reach
|
Reach
|
Reach
|
| Medium
|
Reach
|
Reach
|
Reach
|
| Easy
|
Reach
|
Reach
|
| Casual
|
Reach
|
- 1CL, 5DD (Fast Fleet)
- Route: 1 B F J N O O4 Q Q3
- Path is identical to going through O4, requiring a diverse setup with AA, ASW and surface combat in mind.
- 1FBB, 1CVL, 1CL, 3DD (Fast Fleet)
- Route: 1 B F J N O O4 P R S U
- Focusing on AA capabilities is highly recommended.
- 1FBB, 1CVL, 1CL, 3DD (Fast Fleet)
- Route: 1 B F J N O O4 P R S T
- Focusing on AA capabilities is highly recommended.
Once conditions are met the Boss will unlock.
Boss Phase: Eliminate the Enemy Carrier Task Force at V3
The Last Phase of this map contains an HP Phase, requiring killing the Wo-Class Flagship of the enemy Carrier Task Force found at V3.
There are two approaches to this boss, both sharing these features:
- High AA and AACI are recommended.
- Boss airpower is 191 AP / 422 AS / 828 AS+ on Hard Mode.
- LBAS is recommended to be sent to the Boss (8 Range).
- Boss support is optional.
- 1CV, 1CVL, 1CA(V), 1CL, 2DD (Fast Fleet)
- Route = 1 B C K O3 S T V1 V3
- A more Air-Power oriented approach:
- Strong enemy carrier fleets are present on Route, possibly reducing pass rate
- Meeting Air Power requirements is easier
- Allows for a strong opening Air Strike
- No Second shelling will be initiated by using this fleet.
- 0-1FBB, 1-2CVL, 1CL, 3DD (Fast Fleet)
- Route = 1 B F J N O O4 P R S T V3
- Bringing a FBB will allow a 2nd Shelling Phase
- Using 2 CVL will allow for better protection from air nodes leading up to the boss fight
- Splitting the land base between R and V3 may improve passing rate.
Enemy Compositions
E-1 Hard A
| #
|
Empty Node
|
| A
|
気のせいだった。
Must be my imagination.
|
| #
|
Empty Node
|
E-1 Hard B: 深海潜水艦隊 先遣哨戒 I群 (
PoiDB)
| #
|
Formation
|
Normal Battle Node
|
AD/AP
AS/AS+
|
| B
|
Echelon
Line Abreast
|
|
0/0
0/0
|
Echelon
Line Abreast
|
|
0/0
0/0
|
Echelon
Line Abreast
|
|
0/0
0/0
|
| #
|
Formation
|
Normal Battle Node
|
AD/AP
AS/AS+
|
E-1 Hard C: 深海偵察任務群 先遣哨戒戦隊 (
PoiDB)
| #
|
Formation
|
Normal Battle Node
|
AD/AP
AS/AS+
|
| C
|
Line Ahead
Double Line
|
|
0/0
0/0
|
| Line Ahead
|
|
0/0
0/0
|
| #
|
Formation
|
Normal Battle Node
|
AD/AP
AS/AS+
|
E-1 Hard D: 深海潜水艦隊 先遣哨戒 II群 (
PoiDB)
| #
|
Formation
|
Normal Battle Node
|
AD/AP
AS/AS+
|
| D
|
Echelon
Line Abreast
|
|
0/0
0/0
|
Echelon
Line Abreast
|
|
0/0
0/0
|
Echelon
Line Abreast
|
|
0/0
0/0
|
| #
|
Formation
|
Normal Battle Node
|
AD/AP
AS/AS+
|
E-1 Hard E: 深海偵察任務群 空母艦載機群 (
PoiDB)
| #
|
Formation
|
Air Defense Node
|
AD/AP
AS/AS+
|
| E
|
Diamond
|
|
47/93
207/414
|
| Diamond
|
|
49/98
219/438
|
| #
|
Formation
|
Air Defense Node
|
AD/AP
AS/AS+
|
E-1 Hard F
| #
|
Selection Node
|
| F
|
艦隊の針路を選択できます。提督、どちらの針路をとられますか?
You can decide the fleet's course. Admiral, which heading should we take?
|
| #
|
Selection Node
|
E-1 Hard G
| #
|
Selection Node
|
| G
|
艦隊の針路を選択できます。提督、どちらの針路をとられますか?
You can decide the fleet's course. Admiral, which heading should we take?
|
| #
|
Selection Node
|
E-1 Hard H: 深海偵察任務群 突撃水雷戦隊 (
PoiDB)
| #
|
Formation
|
Normal Battle Node
|
AD/AP
AS/AS+
|
| H
|
Line Ahead
Vanguard
|
|
0/0
0/0
|
| Line Ahead
|
|
0/0
0/0
|
| #
|
Formation
|
Normal Battle Node
|
AD/AP
AS/AS+
|
E-1 Hard H1: 深海潜水艦隊 群狼北部集団 (
PoiDB)
| #
|
Formation
|
Normal Battle Node
|
AD/AP
AS/AS+
|
| H1
|
Echelon
Line Abreast
|
|
0/0
0/0
|
Echelon
Line Abreast
|
|
0/0
0/0
|
| #
|
Formation
|
Normal Battle Node
|
AD/AP
AS/AS+
|
E-1 Hard H2: 深海偵察任務群 護衛空母D群 (
PoiDB)
| #
|
Formation
|
Normal Battle Node
|
AD/AP
AS/AS+
|
| H2
|
Diamond
|
|
26/52
116/231
|
| Diamond
|
|
26/52
116/231
|
| Diamond
|
|
36/72
161/321
|
| #
|
Formation
|
Normal Battle Node
|
AD/AP
AS/AS+
|
E-1 Hard I: 深海偵察任務群 随伴巡洋艦戦隊 (
PoiDB)
| #
|
Formation
|
Normal Battle Node
|
AD/AP
AS/AS+
|
| I
|
Line Ahead
Double Line
Vanguard
|
|
0/0
0/0
|
| #
|
Formation
|
Normal Battle Node
|
AD/AP
AS/AS+
|
E-1 Hard J: 深海偵察任務群 空母艦載機群 (
PoiDB)
| #
|
Formation
|
Air Defense Node
|
AD/AP
AS/AS+
|
| J
|
Diamond
|
|
47/93
207/414
|
| Diamond
|
|
49/98
219/438
|
| Diamond
|
|
52/103
231/462
|
| #
|
Formation
|
Air Defense Node
|
AD/AP
AS/AS+
|
E-1 Hard K: 深海偵察任務群 護衛空母B群 (
PoiDB)
| #
|
Formation
|
Normal Battle Node
|
AD/AP
AS/AS+
|
| K
|
Diamond
|
|
47/93
207/414
|
| Diamond
|
|
49/98
219/438
|
| Diamond
|
|
52/103
231/462
|
| #
|
Formation
|
Normal Battle Node
|
AD/AP
AS/AS+
|
E-1 Hard L
| #
|
Empty Node
|
| L
|
気のせいだった。
Must be my imagination.
|
| #
|
Empty Node
|
E-1 Hard M: 深海潜水艦隊 群狼南部集団 (
PoiDB)
| #
|
Formation
|
Normal Battle Node
|
AD/AP
AS/AS+
|
| M
|
Echelon
Line Abreast
|
|
0/0
0/0
|
Echelon
Line Abreast
|
|
0/0
0/0
|
Echelon
Line Abreast
|
|
0/0
0/0
|
| #
|
Formation
|
Normal Battle Node
|
AD/AP
AS/AS+
|
E-1 Hard N: 深海偵察任務群 前衛哨戒戦隊 (
PoiDB)
| #
|
Formation
|
Normal Battle Node
|
AD/AP
AS/AS+
|
| N
|
Line Ahead
Vanguard
|
|
0/0
0/0
|
| Vanguard
|
|
0/0
0/0
|
| #
|
Formation
|
Normal Battle Node
|
AD/AP
AS/AS+
|
E-1 Hard O
| #
|
Selection Node
|
| O
|
艦隊の針路を選択できます。提督、どちらの針路をとられますか?
You can decide the fleet's course. Admiral, which heading should we take?
|
| #
|
Selection Node
|
E-1 Hard O1
| #
|
Resource Node
|
| #
|
Resource Node
|
E-1 Hard O2: 深海侵攻任務群 低速戦艦戦隊 (
PoiDB)
| #
|
Formation
|
Normal Battle Node
|
AD/AP
AS/AS+
|
| O2
|
Line Ahead
Double Line
Echelon
|
|
0/0
0/0
|
| #
|
Formation
|
Normal Battle Node
|
AD/AP
AS/AS+
|
E-1 Hard O3: 深海任務群主力 空母艦載機群 (
PoiDB)
| #
|
Formation
|
Air Defense Node
|
AD/AP
AS/AS+
|
| O3
|
Diamond
|
|
91/181
405/810
|
| Diamond
|
|
93/186
417/834
|
| Diamond
|
|
96/191
429/858
|
| #
|
Formation
|
Air Defense Node
|
AD/AP
AS/AS+
|
E-1 Hard O4: 深海潜水艦隊 群狼中央集団 (
PoiDB)
| #
|
Formation
|
Normal Battle Node
|
AD/AP
AS/AS+
|
| O4
|
Echelon
Line Abreast
|
|
0/0
0/0
|
Echelon
Line Abreast
|
|
0/0
0/0
|
| #
|
Formation
|
Normal Battle Node
|
AD/AP
AS/AS+
|
E-1 Hard O5: 深海偵察任務群 護衛空母C群 (
PoiDB)
| #
|
Formation
|
Normal Battle Node
|
AD/AP
AS/AS+
|
| O5
|
Diamond
|
|
26/52
116/231
|
| Diamond
|
|
26/52
116/231
|
| Diamond
|
|
36/72
161/321
|
| #
|
Formation
|
Normal Battle Node
|
AD/AP
AS/AS+
|
E-1 Hard P
| #
|
Selection Node
|
| P
|
艦隊の針路を選択できます。提督、どちらの針路をとられますか?
You can decide the fleet's course. Admiral, which heading should we take?
|
| #
|
Selection Node
|
E-1 Hard Q: 深海侵攻任務群 突撃水雷戦隊 (
PoiDB)
| #
|
Formation
|
Normal Battle Node
|
AD/AP
AS/AS+
|
| Q
|
Line Ahead
Vanguard
|
|
0/0
0/0
|
| Line Ahead
|
|
0/0
0/0
|
| #
|
Formation
|
Normal Battle Node
|
AD/AP
AS/AS+
|
E-1 Hard Q1: 深海侵攻任務群 巡洋艦戦隊 (
PoiDB)
| #
|
Formation
|
Normal Battle Node
|
AD/AP
AS/AS+
|
| Q1
|
Line Ahead
Double Line
Vanguard
|
|
0/0
0/0
|
| #
|
Formation
|
Normal Battle Node
|
AD/AP
AS/AS+
|
E-1 Hard Q2: 深海任務群主力 空母艦載機群 (
PoiDB)
| #
|
Formation
|
Air Defense Node
|
AD/AP
AS/AS+
|
| Q2
|
Diamond
|
|
91/181
405/810
|
| Diamond
|
|
93/186
417/834
|
| #
|
Formation
|
Air Defense Node
|
AD/AP
AS/AS+
|
E-1 Hard Q3
| #
|
Resource Node
|
| #
|
Resource Node
|
E-1 Hard R: 深海任務群主力 空母艦載機群 (
PoiDB)
| #
|
Formation
|
Air Defense Node
|
AD/AP
AS/AS+
|
| R
|
Diamond
|
|
91/181
405/810
|
| Diamond
|
|
93/186
417/834
|
| Diamond
|
|
96/191
429/858
|
| #
|
Formation
|
Air Defense Node
|
AD/AP
AS/AS+
|
E-1 Hard S
| #
|
Selection Node
|
| S
|
艦隊の針路を選択できます。提督、どちらの針路をとられますか?
You can decide the fleet's course. Admiral, which heading should we take?
|
| #
|
Selection Node
|
E-1 Hard T
| #
|
Empty Node
|
| T
|
気のせいだった。
Must be my imagination.
|
| #
|
Empty Node
|
E-1 Hard U
| #
|
Empty Node
|
| U
|
気のせいだった。
Must be my imagination.
|
| #
|
Empty Node
|
E-1 Hard V: 深海偵察任務群 護衛空母A群 (
PoiDB)
| #
|
Formation
|
Normal Battle Node
|
AD/AP
AS/AS+
|
| V
|
Diamond
|
|
47/93
207/414
|
| Diamond
|
|
49/98
219/438
|
| #
|
Formation
|
Normal Battle Node
|
AD/AP
AS/AS+
|
E-1 Hard V1: 深海任務群主力 空母艦載機群 (
PoiDB)
| #
|
Formation
|
Air Defense Node
|
AD/AP
AS/AS+
|
| V1
|
Diamond
|
|
91/181
405/810
|
| Diamond
|
|
93/186
417/834
|
| Diamond
|
|
96/191
429/858
|
| #
|
Formation
|
Air Defense Node
|
AD/AP
AS/AS+
|
E-1 Hard V2
| #
|
Empty Node
|
| V2
|
敵影を見ず。
No enemy spotted.
|
| #
|
Empty Node
|
E-1 Hard V3: 深海侵攻任務部隊 主力機動部隊 (
PoiDB)
| #
|
Formation
|
Boss Battle Node
|
AD/AP
AS/AS+
|
| V3
|
Cruising Formation 3
|
|
91/181
405/810
|
Cruising Formation 3
(Final)
|
|
96/191
429/858
|
| #
|
Formation
|
Boss Battle Node
|
AD/AP
AS/AS+
|

| Type | Ships |
|---|
| DD |  |
|---|
| Type | Ships |
|---|
| DD |  |
|---|
| Type | Ships |
|---|
| CL |  |
|---|
| Type | Ships |
|---|
| DD |  |
|---|
E-1 Medium A
| #
|
Empty Node
|
| A
|
気のせいだった。
Must be my imagination.
|
| #
|
Empty Node
|
E-1 Medium B: 深海潜水艦隊 先遣哨戒 I群 (
PoiDB)
| #
|
Formation
|
Normal Battle Node
|
AD/AP
AS/AS+
|
| B
|
Echelon
Line Abreast
|
|
0/0
0/0
|
Echelon
Line Abreast
|
|
0/0
0/0
|
Echelon
Line Abreast
|
|
0/0
0/0
|
| #
|
Formation
|
Normal Battle Node
|
AD/AP
AS/AS+
|
E-1 Medium C: 深海偵察任務群 先遣哨戒戦隊 (
PoiDB)
| #
|
Formation
|
Normal Battle Node
|
AD/AP
AS/AS+
|
| C
|
Line Ahead
Double Line
|
|
0/0
0/0
|
| Line Ahead
|
|
0/0
0/0
|
| #
|
Formation
|
Normal Battle Node
|
AD/AP
AS/AS+
|
E-1 Medium D: 深海潜水艦隊 先遣哨戒 II群 (
PoiDB)
| #
|
Formation
|
Normal Battle Node
|
AD/AP
AS/AS+
|
| D
|
Echelon
Line Abreast
|
|
0/0
0/0
|
Echelon
Line Abreast
|
|
0/0
0/0
|
Echelon
Line Abreast
|
|
0/0
0/0
|
| #
|
Formation
|
Normal Battle Node
|
AD/AP
AS/AS+
|
E-1 Medium E: 深海偵察任務群 空母艦載機群 (
PoiDB)
| #
|
Formation
|
Air Defense Node
|
AD/AP
AS/AS+
|
| E
|
Diamond
|
|
26/52
116/231
|
| Diamond
|
|
32/63
140/279
|
| #
|
Formation
|
Air Defense Node
|
AD/AP
AS/AS+
|
E-1 Medium F
| #
|
Selection Node
|
| F
|
艦隊の針路を選択できます。提督、どちらの針路をとられますか?
You can decide the fleet's course. Admiral, which heading should we take?
|
| #
|
Selection Node
|
E-1 Medium G
| #
|
Selection Node
|
| G
|
艦隊の針路を選択できます。提督、どちらの針路をとられますか?
You can decide the fleet's course. Admiral, which heading should we take?
|
| #
|
Selection Node
|
E-1 Medium H: 深海偵察任務群 突撃水雷戦隊 (
PoiDB)
| #
|
Formation
|
Normal Battle Node
|
AD/AP
AS/AS+
|
| H
|
Line Ahead
Vanguard
|
|
0/0
0/0
|
| Line Ahead
|
|
0/0
0/0
|
| #
|
Formation
|
Normal Battle Node
|
AD/AP
AS/AS+
|
E-1 Medium H1: 深海潜水艦隊 群狼北部集団 (
PoiDB)
| #
|
Formation
|
Normal Battle Node
|
AD/AP
AS/AS+
|
| H1
|
Echelon
Line Abreast
|
|
0/0
0/0
|
Echelon
Line Abreast
|
|
0/0
0/0
|
Echelon
Line Abreast
|
|
0/0
0/0
|
| #
|
Formation
|
Normal Battle Node
|
AD/AP
AS/AS+
|
E-1 Medium H2: 深海偵察任務群 護衛空母D群 (
PoiDB)
| #
|
Formation
|
Normal Battle Node
|
AD/AP
AS/AS+
|
| H2
|
Diamond
|
|
24/47
104/207
|
| Diamond
|
|
24/47
104/207
|
| Diamond
|
|
24/47
104/207
|
| Diamond
|
|
26/52
116/231
|
| #
|
Formation
|
Normal Battle Node
|
AD/AP
AS/AS+
|
E-1 Medium I: 深海偵察任務群 随伴巡洋艦戦隊 (
PoiDB)
| #
|
Formation
|
Normal Battle Node
|
AD/AP
AS/AS+
|
| I
|
Line Ahead
Double Line
Vanguard
|
|
0/0
0/0
|
| #
|
Formation
|
Normal Battle Node
|
AD/AP
AS/AS+
|
E-1 Medium J: 深海偵察任務群 空母艦載機群 (
PoiDB)
| #
|
Formation
|
Air Defense Node
|
AD/AP
AS/AS+
|
| J
|
Diamond
|
|
26/52
116/231
|
| Diamond
|
|
32/63
140/279
|
| Diamond
|
|
47/93
207/414
|
| #
|
Formation
|
Air Defense Node
|
AD/AP
AS/AS+
|
E-1 Medium K: 深海偵察任務群 護衛空母B群 (
PoiDB)
| #
|
Formation
|
Normal Battle Node
|
AD/AP
AS/AS+
|
| K
|
Diamond
|
|
26/52
116/231
|
| Diamond
|
|
32/63
140/279
|
| Diamond
|
|
47/93
207/414
|
| #
|
Formation
|
Normal Battle Node
|
AD/AP
AS/AS+
|
E-1 Medium L
| #
|
Empty Node
|
| L
|
気のせいだった。
Must be my imagination.
|
| #
|
Empty Node
|
E-1 Medium M: 深海潜水艦隊 群狼南部集団 (
PoiDB)
| #
|
Formation
|
Normal Battle Node
|
AD/AP
AS/AS+
|
| M
|
Echelon
Line Abreast
|
|
0/0
0/0
|
Echelon
Line Abreast
|
|
0/0
0/0
|
Echelon
Line Abreast
|
|
0/0
0/0
|
| #
|
Formation
|
Normal Battle Node
|
AD/AP
AS/AS+
|
E-1 Medium N: 深海偵察任務群 前衛哨戒戦隊 (
PoiDB)
| #
|
Formation
|
Normal Battle Node
|
AD/AP
AS/AS+
|
| N
|
Line Ahead
Vanguard
|
|
0/0
0/0
|
| Vanguard
|
|
0/0
0/0
|
| #
|
Formation
|
Normal Battle Node
|
AD/AP
AS/AS+
|
E-1 Medium O
| #
|
Selection Node
|
| O
|
艦隊の針路を選択できます。提督、どちらの針路をとられますか?
You can decide the fleet's course. Admiral, which heading should we take?
|
| #
|
Selection Node
|
E-1 Medium O1
| #
|
Resource Node
|
| #
|
Resource Node
|
E-1 Medium O2: 深海侵攻任務群 低速戦艦戦隊 (
PoiDB)
| #
|
Formation
|
Normal Battle Node
|
AD/AP
AS/AS+
|
| O2
|
Line Ahead
Double Line
Echelon
|
|
0/0
0/0
|
| #
|
Formation
|
Normal Battle Node
|
AD/AP
AS/AS+
|
E-1 Medium O3: 深海任務群主力 空母艦載機群 (
PoiDB)
| #
|
Formation
|
Air Defense Node
|
AD/AP
AS/AS+
|
| O3
|
Diamond
|
|
51/101
227/453
|
| Diamond
|
|
66/131
294/588
|
| Diamond
|
|
81/161
362/723
|
| #
|
Formation
|
Air Defense Node
|
AD/AP
AS/AS+
|
E-1 Medium O4: 深海潜水艦隊 群狼中央集団 (
PoiDB)
| #
|
Formation
|
Normal Battle Node
|
AD/AP
AS/AS+
|
| O4
|
Echelon
Line Abreast
|
|
0/0
0/0
|
Echelon
Line Abreast
|
|
0/0
0/0
|
Echelon
Line Abreast
|
|
0/0
0/0
|
| #
|
Formation
|
Normal Battle Node
|
AD/AP
AS/AS+
|
E-1 Medium O5: 深海偵察任務群 護衛空母C群 (
PoiDB)
| #
|
Formation
|
Normal Battle Node
|
AD/AP
AS/AS+
|
| O5
|
Diamond
|
|
24/47
104/207
|
| Diamond
|
|
24/47
104/207
|
| Diamond
|
|
24/47
104/207
|
| Diamond
|
|
26/52
116/231
|
| #
|
Formation
|
Normal Battle Node
|
AD/AP
AS/AS+
|
E-1 Medium P
| #
|
Selection Node
|
| P
|
艦隊の針路を選択できます。提督、どちらの針路をとられますか?
You can decide the fleet's course. Admiral, which heading should we take?
|
| #
|
Selection Node
|
E-1 Medium Q: 深海侵攻任務群 突撃水雷戦隊 (
PoiDB)
| #
|
Formation
|
Normal Battle Node
|
AD/AP
AS/AS+
|
| Q
|
Line Ahead
Vanguard
|
|
0/0
0/0
|
| Line Ahead
|
|
0/0
0/0
|
| #
|
Formation
|
Normal Battle Node
|
AD/AP
AS/AS+
|
E-1 Medium Q1: 深海侵攻任務群 巡洋艦戦隊 (
PoiDB)
| #
|
Formation
|
Normal Battle Node
|
AD/AP
AS/AS+
|
| Q1
|
Line Ahead
Double Line
Vanguard
|
|
0/0
0/0
|
| #
|
Formation
|
Normal Battle Node
|
AD/AP
AS/AS+
|
E-1 Medium Q2: 深海任務群主力 空母艦載機群 (
PoiDB)
| #
|
Formation
|
Air Defense Node
|
AD/AP
AS/AS+
|
| Q2
|
Diamond
|
|
51/101
227/453
|
| Diamond
|
|
66/131
294/588
|
| #
|
Formation
|
Air Defense Node
|
AD/AP
AS/AS+
|
E-1 Medium Q3
| #
|
Resource Node
|
| #
|
Resource Node
|
E-1 Medium R: 深海任務群主力 空母艦載機群 (
PoiDB)
| #
|
Formation
|
Air Defense Node
|
AD/AP
AS/AS+
|
| R
|
Diamond
|
|
51/101
227/453
|
| Diamond
|
|
66/131
294/588
|
| Diamond
|
|
81/161
362/723
|
| #
|
Formation
|
Air Defense Node
|
AD/AP
AS/AS+
|
E-1 Medium S
| #
|
Selection Node
|
| S
|
艦隊の針路を選択できます。提督、どちらの針路をとられますか?
You can decide the fleet's course. Admiral, which heading should we take?
|
| #
|
Selection Node
|
E-1 Medium T
| #
|
Empty Node
|
| T
|
気のせいだった。
Must be my imagination.
|
| #
|
Empty Node
|
E-1 Medium U
| #
|
Empty Node
|
| U
|
気のせいだった。
Must be my imagination.
|
| #
|
Empty Node
|
E-1 Medium V: 深海偵察任務群 護衛空母A群 (
PoiDB)
| #
|
Formation
|
Normal Battle Node
|
AD/AP
AS/AS+
|
| V
|
Diamond
|
|
26/52
116/231
|
| Diamond
|
|
32/63
140/279
|
| #
|
Formation
|
Normal Battle Node
|
AD/AP
AS/AS+
|
E-1 Medium V1: 深海任務群主力 空母艦載機群 (
PoiDB)
| #
|
Formation
|
Air Defense Node
|
AD/AP
AS/AS+
|
| V1
|
Diamond
|
|
51/101
227/453
|
| Diamond
|
|
66/131
294/588
|
| Diamond
|
|
81/161
362/723
|
| #
|
Formation
|
Air Defense Node
|
AD/AP
AS/AS+
|
E-1 Medium V2
| #
|
Empty Node
|
| V2
|
敵影を見ず。
No enemy spotted.
|
| #
|
Empty Node
|
E-1 Medium V3: 深海侵攻任務部隊 主力機動部隊 (
PoiDB)
| #
|
Formation
|
Boss Battle Node
|
AD/AP
AS/AS+
|
| V3
|
Cruising Formation 3
|
|
51/101
227/453
|
Cruising Formation 3
(Final)
|
|
81/161
362/723
|
| #
|
Formation
|
Boss Battle Node
|
AD/AP
AS/AS+
|
| Type | Ships |
|---|
| DD | |
|---|
| Type | Ships |
|---|
| DD | |
|---|
| AO |  |
|---|
| Type | Ships |
|---|
| DD | |
|---|
E-1 Easy A
| #
|
Empty Node
|
| A
|
気のせいだった。
Must be my imagination.
|
| #
|
Empty Node
|
E-1 Easy B: 深海潜水艦隊 先遣哨戒 I群 (
PoiDB)
| #
|
Formation
|
Normal Battle Node
|
AD/AP
AS/AS+
|
| B
|
Echelon
Line Abreast
|
|
0/0
0/0
|
Echelon
Line Abreast
|
|
0/0
0/0
|
Echelon
Line Abreast
|
|
0/0
0/0
|
| #
|
Formation
|
Normal Battle Node
|
AD/AP
AS/AS+
|
E-1 Easy C: 深海偵察任務群 先遣哨戒戦隊 (
PoiDB)
| #
|
Formation
|
Normal Battle Node
|
AD/AP
AS/AS+
|
| C
|
Line Ahead
Double Line
|
|
0/0
0/0
|
| Line Ahead
|
|
0/0
0/0
|
| #
|
Formation
|
Normal Battle Node
|
AD/AP
AS/AS+
|
E-1 Easy D: 深海潜水艦隊 先遣哨戒 II群 (
PoiDB)
| #
|
Formation
|
Normal Battle Node
|
AD/AP
AS/AS+
|
| D
|
Echelon
Line Abreast
|
|
0/0
0/0
|
Echelon
Line Abreast
|
|
0/0
0/0
|
Echelon
Line Abreast
|
|
0/0
0/0
|
| #
|
Formation
|
Normal Battle Node
|
AD/AP
AS/AS+
|
E-1 Easy E: 深海偵察任務群 空母艦載機群 (
PoiDB)
| #
|
Formation
|
Air Defense Node
|
AD/AP
AS/AS+
|
| E
|
Diamond
|
|
24/47
104/207
|
| Diamond
|
|
26/52
116/231
|
| #
|
Formation
|
Air Defense Node
|
AD/AP
AS/AS+
|
E-1 Easy F
| #
|
Selection Node
|
| F
|
艦隊の針路を選択できます。提督、どちらの針路をとられますか?
You can decide the fleet's course. Admiral, which heading should we take?
|
| #
|
Selection Node
|
E-1 Easy G
| #
|
Selection Node
|
| G
|
艦隊の針路を選択できます。提督、どちらの針路をとられますか?
You can decide the fleet's course. Admiral, which heading should we take?
|
| #
|
Selection Node
|
E-1 Easy H: 深海偵察任務群 突撃水雷戦隊 (
PoiDB)
| #
|
Formation
|
Normal Battle Node
|
AD/AP
AS/AS+
|
| H
|
Line Ahead
Vanguard
|
|
0/0
0/0
|
| Line Ahead
|
|
0/0
0/0
|
| #
|
Formation
|
Normal Battle Node
|
AD/AP
AS/AS+
|
E-1 Easy H1: 深海潜水艦隊 群狼北部集団 (
PoiDB)
| #
|
Formation
|
Normal Battle Node
|
AD/AP
AS/AS+
|
| H1
|
Echelon
Line Abreast
|
|
0/0
0/0
|
Echelon
Line Abreast
|
|
0/0
0/0
|
Echelon
Line Abreast
|
|
0/0
0/0
|
| #
|
Formation
|
Normal Battle Node
|
AD/AP
AS/AS+
|
E-1 Easy H2: 深海偵察任務群 護衛空母D群 (
PoiDB)
| #
|
Formation
|
Normal Battle Node
|
AD/AP
AS/AS+
|
| H2
|
Diamond
|
|
24/47
104/207
|
| Diamond
|
|
24/47
104/207
|
| Diamond
|
|
24/47
104/207
|
| Diamond
|
|
24/47
104/207
|
| #
|
Formation
|
Normal Battle Node
|
AD/AP
AS/AS+
|
E-1 Easy I: 深海偵察任務群 随伴巡洋艦戦隊 (
PoiDB)
| #
|
Formation
|
Normal Battle Node
|
AD/AP
AS/AS+
|
| I
|
Line Ahead
Double Line
Vanguard
|
|
0/0
0/0
|
| #
|
Formation
|
Normal Battle Node
|
AD/AP
AS/AS+
|
E-1 Easy J: 深海偵察任務群 空母艦載機群 (
PoiDB)
| #
|
Formation
|
Air Defense Node
|
AD/AP
AS/AS+
|
| J
|
Diamond
|
|
24/47
104/207
|
| Diamond
|
|
26/52
116/231
|
| Diamond
|
|
32/63
140/279
|
| #
|
Formation
|
Air Defense Node
|
AD/AP
AS/AS+
|
E-1 Easy K: 深海偵察任務群 護衛空母B群 (
PoiDB)
| #
|
Formation
|
Normal Battle Node
|
AD/AP
AS/AS+
|
| K
|
Diamond
|
|
24/47
104/207
|
| Diamond
|
|
26/52
116/231
|
| Diamond
|
|
32/63
140/279
|
| #
|
Formation
|
Normal Battle Node
|
AD/AP
AS/AS+
|
E-1 Easy L
| #
|
Empty Node
|
| L
|
気のせいだった。
Must be my imagination.
|
| #
|
Empty Node
|
E-1 Easy M: 深海潜水艦隊 群狼南部集団 (
PoiDB)
| #
|
Formation
|
Normal Battle Node
|
AD/AP
AS/AS+
|
| M
|
Echelon
Line Abreast
|
|
0/0
0/0
|
Echelon
Line Abreast
|
|
0/0
0/0
|
| #
|
Formation
|
Normal Battle Node
|
AD/AP
AS/AS+
|
E-1 Easy N: 深海偵察任務群 前衛哨戒戦隊 (
PoiDB)
| #
|
Formation
|
Normal Battle Node
|
AD/AP
AS/AS+
|
| N
|
Line Ahead
Vanguard
|
|
0/0
0/0
|
| Vanguard
|
|
0/0
0/0
|
| #
|
Formation
|
Normal Battle Node
|
AD/AP
AS/AS+
|
E-1 Easy O
| #
|
Selection Node
|
| O
|
艦隊の針路を選択できます。提督、どちらの針路をとられますか?
You can decide the fleet's course. Admiral, which heading should we take?
|
| #
|
Selection Node
|
E-1 Easy O1
| #
|
Resource Node
|
| #
|
Resource Node
|
E-1 Easy O2: 深海侵攻任務群 低速戦艦戦隊 (
PoiDB)
| #
|
Formation
|
Normal Battle Node
|
AD/AP
AS/AS+
|
| O2
|
Line Ahead
Double Line
Echelon
|
|
0/0
0/0
|
| #
|
Formation
|
Normal Battle Node
|
AD/AP
AS/AS+
|
E-1 Easy O3: 深海任務群主力 空母艦載機群 (
PoiDB)
| #
|
Formation
|
Air Defense Node
|
AD/AP
AS/AS+
|
| O3
|
Diamond
|
|
42/83
186/372
|
| Diamond
|
|
50/99
222/444
|
| Diamond
|
|
65/129
290/579
|
| #
|
Formation
|
Air Defense Node
|
AD/AP
AS/AS+
|
E-1 Easy O4: 深海潜水艦隊 群狼中央集団 (
PoiDB)
| #
|
Formation
|
Normal Battle Node
|
AD/AP
AS/AS+
|
| O4
|
Echelon
Line Abreast
|
|
0/0
0/0
|
Echelon
Line Abreast
|
|
0/0
0/0
|
Echelon
Line Abreast
|
|
0/0
0/0
|
| #
|
Formation
|
Normal Battle Node
|
AD/AP
AS/AS+
|
E-1 Easy O5: 深海偵察任務群 護衛空母C群 (
PoiDB)
| #
|
Formation
|
Normal Battle Node
|
AD/AP
AS/AS+
|
| O5
|
Diamond
|
|
24/47
104/207
|
| Diamond
|
|
24/47
104/207
|
| Diamond
|
|
24/47
104/207
|
| Diamond
|
|
24/47
104/207
|
| #
|
Formation
|
Normal Battle Node
|
AD/AP
AS/AS+
|
E-1 Easy P
| #
|
Selection Node
|
| P
|
艦隊の針路を選択できます。提督、どちらの針路をとられますか?
You can decide the fleet's course. Admiral, which heading should we take?
|
| #
|
Selection Node
|
E-1 Easy Q: 深海侵攻任務群 突撃水雷戦隊 (
PoiDB)
| #
|
Formation
|
Normal Battle Node
|
AD/AP
AS/AS+
|
| Q
|
Line Ahead
Vanguard
|
|
0/0
0/0
|
| Line Ahead
|
|
0/0
0/0
|
| #
|
Formation
|
Normal Battle Node
|
AD/AP
AS/AS+
|
E-1 Easy Q1: 深海侵攻任務群 巡洋艦戦隊 (
PoiDB)
| #
|
Formation
|
Normal Battle Node
|
AD/AP
AS/AS+
|
| Q1
|
Line Ahead
Double Line
Vanguard
|
|
0/0
0/0
|
| #
|
Formation
|
Normal Battle Node
|
AD/AP
AS/AS+
|
E-1 Easy Q2: 深海任務群主力 空母艦載機群 (
PoiDB)
| #
|
Formation
|
Air Defense Node
|
AD/AP
AS/AS+
|
| Q2
|
Diamond
|
|
42/83
186/372
|
| Diamond
|
|
50/99
222/444
|
| #
|
Formation
|
Air Defense Node
|
AD/AP
AS/AS+
|
E-1 Easy Q3
| #
|
Resource Node
|
| #
|
Resource Node
|
E-1 Easy R: 深海任務群主力 空母艦載機群 (
PoiDB)
| #
|
Formation
|
Air Defense Node
|
AD/AP
AS/AS+
|
| R
|
Diamond
|
|
42/83
186/372
|
| Diamond
|
|
50/99
222/444
|
| Diamond
|
|
65/129
290/579
|
| #
|
Formation
|
Air Defense Node
|
AD/AP
AS/AS+
|
E-1 Easy S
| #
|
Selection Node
|
| S
|
艦隊の針路を選択できます。提督、どちらの針路をとられますか?
You can decide the fleet's course. Admiral, which heading should we take?
|
| #
|
Selection Node
|
E-1 Easy T
| #
|
Empty Node
|
| T
|
気のせいだった。
Must be my imagination.
|
| #
|
Empty Node
|
E-1 Easy U
| #
|
Empty Node
|
| U
|
気のせいだった。
Must be my imagination.
|
| #
|
Empty Node
|
E-1 Easy V: 深海偵察任務群 護衛空母A群 (
PoiDB)
| #
|
Formation
|
Normal Battle Node
|
AD/AP
AS/AS+
|
| V
|
Diamond
|
|
24/47
104/207
|
| Diamond
|
|
26/52
116/231
|
| Diamond
|
|
32/63
140/279
|
| #
|
Formation
|
Normal Battle Node
|
AD/AP
AS/AS+
|
E-1 Easy V1: 深海任務群主力 空母艦載機群 (
PoiDB)
| #
|
Formation
|
Air Defense Node
|
AD/AP
AS/AS+
|
| V1
|
Diamond
|
|
42/83
186/372
|
| Diamond
|
|
50/99
222/444
|
| Diamond
|
|
65/129
290/579
|
| #
|
Formation
|
Air Defense Node
|
AD/AP
AS/AS+
|
E-1 Easy V2
| #
|
Empty Node
|
| V2
|
敵影を見ず。
No enemy spotted.
|
| #
|
Empty Node
|
E-1 Easy V3: 深海侵攻任務部隊 主力機動部隊 (
PoiDB)
| #
|
Formation
|
Boss Battle Node
|
AD/AP
AS/AS+
|
| V3
|
Cruising Formation 3
|
|
42/83
186/372
|
Cruising Formation 3
(Final)
|
|
57/113
254/507
|
| #
|
Formation
|
Boss Battle Node
|
AD/AP
AS/AS+
|
E-1 Casual A
| #
|
Empty Node
|
| A
|
気のせいだった。
Must be my imagination.
|
| #
|
Empty Node
|
E-1 Casual B: 深海潜水艦隊 先遣哨戒 I群 (
PoiDB)
| #
|
Formation
|
Normal Battle Node
|
AD/AP
AS/AS+
|
| B
|
Echelon
Line Abreast
|
|
0/0
0/0
|
Echelon
Line Abreast
|
|
0/0
0/0
|
| #
|
Formation
|
Normal Battle Node
|
AD/AP
AS/AS+
|
E-1 Casual C: 深海偵察任務群 先遣哨戒戦隊 (
PoiDB)
| #
|
Formation
|
Normal Battle Node
|
AD/AP
AS/AS+
|
| C
|
Line Ahead
Double Line
|
|
0/0
0/0
|
| Line Ahead
|
|
0/0
0/0
|
| #
|
Formation
|
Normal Battle Node
|
AD/AP
AS/AS+
|
E-1 Casual D: 深海潜水艦隊 先遣哨戒 II群 (
PoiDB)
| #
|
Formation
|
Normal Battle Node
|
AD/AP
AS/AS+
|
| D
|
Echelon
Line Abreast
|
|
0/0
0/0
|
Echelon
Line Abreast
|
|
0/0
0/0
|
| #
|
Formation
|
Normal Battle Node
|
AD/AP
AS/AS+
|
E-1 Casual E: 深海偵察任務群 空母艦載機群 (
PoiDB)
| #
|
Formation
|
Air Defense Node
|
AD/AP
AS/AS+
|
| E
|
Diamond
|
|
9/17
36/72
|
| Diamond
|
|
11/22
48/96
|
| #
|
Formation
|
Air Defense Node
|
AD/AP
AS/AS+
|
E-1 Casual F
| #
|
Selection Node
|
| F
|
艦隊の針路を選択できます。提督、どちらの針路をとられますか?
You can decide the fleet's course. Admiral, which heading should we take?
|
| #
|
Selection Node
|
E-1 Casual G
| #
|
Selection Node
|
| G
|
艦隊の針路を選択できます。提督、どちらの針路をとられますか?
You can decide the fleet's course. Admiral, which heading should we take?
|
| #
|
Selection Node
|
E-1 Casual H: 深海偵察任務群 突撃水雷戦隊 (
PoiDB)
| #
|
Formation
|
Normal Battle Node
|
AD/AP
AS/AS+
|
| H
|
Line Ahead
Vanguard
|
|
0/0
0/0
|
| Line Ahead
|
|
0/0
0/0
|
| #
|
Formation
|
Normal Battle Node
|
AD/AP
AS/AS+
|
E-1 Casual H1: 深海潜水艦隊 群狼北部集団 (
PoiDB)
| #
|
Formation
|
Normal Battle Node
|
AD/AP
AS/AS+
|
| H1
|
Echelon
Line Abreast
|
|
0/0
0/0
|
Echelon
Line Abreast
|
|
0/0
0/0
|
| #
|
Formation
|
Normal Battle Node
|
AD/AP
AS/AS+
|
E-1 Casual H2: 深海偵察任務群 護衛空母D群 (
PoiDB)
| #
|
Formation
|
Normal Battle Node
|
AD/AP
AS/AS+
|
| H2
|
Diamond
|
|
9/17
36/72
|
| Diamond
|
|
9/17
36/72
|
| Diamond
|
|
24/47
104/207
|
| Diamond
|
|
24/47
104/207
|
| #
|
Formation
|
Normal Battle Node
|
AD/AP
AS/AS+
|
E-1 Casual I: 深海偵察任務群 随伴巡洋艦戦隊 (
PoiDB)
| #
|
Formation
|
Normal Battle Node
|
AD/AP
AS/AS+
|
| I
|
Line Ahead
Double Line
Vanguard
|
|
0/0
0/0
|
| #
|
Formation
|
Normal Battle Node
|
AD/AP
AS/AS+
|
E-1 Casual J: 深海偵察任務群 空母艦載機群 (
PoiDB)
| #
|
Formation
|
Air Defense Node
|
AD/AP
AS/AS+
|
| J
|
Diamond
|
|
9/17
36/72
|
| Diamond
|
|
11/22
48/96
|
| Diamond
|
|
26/52
116/231
|
| #
|
Formation
|
Air Defense Node
|
AD/AP
AS/AS+
|
E-1 Casual K: 深海偵察任務群 護衛空母B群 (
PoiDB)
| #
|
Formation
|
Normal Battle Node
|
AD/AP
AS/AS+
|
| K
|
Diamond
|
|
9/17
36/72
|
| Diamond
|
|
11/22
48/96
|
| Diamond
|
|
26/52
116/231
|
| #
|
Formation
|
Normal Battle Node
|
AD/AP
AS/AS+
|
E-1 Casual L
| #
|
Empty Node
|
| L
|
気のせいだった。
Must be my imagination.
|
| #
|
Empty Node
|
E-1 Casual M: 深海潜水艦隊 群狼南部集団 (
PoiDB)
| #
|
Formation
|
Normal Battle Node
|
AD/AP
AS/AS+
|
| M
|
Echelon
Line Abreast
|
|
0/0
0/0
|
Echelon
Line Abreast
|
|
0/0
0/0
|
| #
|
Formation
|
Normal Battle Node
|
AD/AP
AS/AS+
|
E-1 Casual N: 深海偵察任務群 前衛哨戒戦隊 (
PoiDB)
| #
|
Formation
|
Normal Battle Node
|
AD/AP
AS/AS+
|
| N
|
Line Ahead
Vanguard
|
|
0/0
0/0
|
| Vanguard
|
|
0/0
0/0
|
| #
|
Formation
|
Normal Battle Node
|
AD/AP
AS/AS+
|
E-1 Casual O
| #
|
Selection Node
|
| O
|
艦隊の針路を選択できます。提督、どちらの針路をとられますか?
You can decide the fleet's course. Admiral, which heading should we take?
|
| #
|
Selection Node
|
E-1 Casual O1
| #
|
Resource Node
|
| #
|
Resource Node
|
E-1 Casual O2: 深海侵攻任務群 低速戦艦戦隊 (
PoiDB)
| #
|
Formation
|
Normal Battle Node
|
AD/AP
AS/AS+
|
| O2
|
Line Ahead
Double Line
Echelon
|
|
0/0
0/0
|
| #
|
Formation
|
Normal Battle Node
|
AD/AP
AS/AS+
|
E-1 Casual O3: 深海任務群主力 空母艦載機群 (
PoiDB)
| #
|
Formation
|
Air Defense Node
|
AD/AP
AS/AS+
|
| O3
|
Diamond
|
|
34/67
150/300
|
| Diamond
|
|
37/73
162/324
|
| Diamond
|
|
42/83
186/372
|
| #
|
Formation
|
Air Defense Node
|
AD/AP
AS/AS+
|
E-1 Casual O4: 深海潜水艦隊 群狼中央集団 (
PoiDB)
| #
|
Formation
|
Normal Battle Node
|
AD/AP
AS/AS+
|
| O4
|
Echelon
Line Abreast
|
|
0/0
0/0
|
Echelon
Line Abreast
|
|
0/0
0/0
|
| #
|
Formation
|
Normal Battle Node
|
AD/AP
AS/AS+
|
E-1 Casual O5: 深海偵察任務群 護衛空母C群 (
PoiDB)
| #
|
Formation
|
Normal Battle Node
|
AD/AP
AS/AS+
|
| O5
|
Diamond
|
|
9/17
36/72
|
| Diamond
|
|
9/17
36/72
|
| Diamond
|
|
24/47
104/207
|
| Diamond
|
|
24/47
104/207
|
| #
|
Formation
|
Normal Battle Node
|
AD/AP
AS/AS+
|
E-1 Casual P
| #
|
Selection Node
|
| P
|
艦隊の針路を選択できます。提督、どちらの針路をとられますか?
You can decide the fleet's course. Admiral, which heading should we take?
|
| #
|
Selection Node
|
E-1 Casual Q: 深海侵攻任務群 突撃水雷戦隊 (
PoiDB)
| #
|
Formation
|
Normal Battle Node
|
AD/AP
AS/AS+
|
| Q
|
Line Ahead
Vanguard
|
|
0/0
0/0
|
| Line Ahead
|
|
0/0
0/0
|
| #
|
Formation
|
Normal Battle Node
|
AD/AP
AS/AS+
|
E-1 Casual Q1: 深海侵攻任務群 巡洋艦戦隊 (
PoiDB)
| #
|
Formation
|
Normal Battle Node
|
AD/AP
AS/AS+
|
| Q1
|
Line Ahead
Double Line
Vanguard
|
|
0/0
0/0
|
| #
|
Formation
|
Normal Battle Node
|
AD/AP
AS/AS+
|
E-1 Casual Q2: 深海任務群主力 空母艦載機群 (
PoiDB)
| #
|
Formation
|
Air Defense Node
|
AD/AP
AS/AS+
|
| Q2
|
Diamond
|
|
34/67
150/300
|
| Diamond
|
|
37/73
162/324
|
| #
|
Formation
|
Air Defense Node
|
AD/AP
AS/AS+
|
E-1 Casual Q3
| #
|
Resource Node
|
| #
|
Resource Node
|
E-1 Casual R: 深海任務群主力 空母艦載機群 (
PoiDB)
| #
|
Formation
|
Air Defense Node
|
AD/AP
AS/AS+
|
| R
|
Diamond
|
|
34/67
150/300
|
| Diamond
|
|
37/73
162/324
|
| Diamond
|
|
42/83
186/372
|
| #
|
Formation
|
Air Defense Node
|
AD/AP
AS/AS+
|
E-1 Casual S
| #
|
Selection Node
|
| S
|
艦隊の針路を選択できます。提督、どちらの針路をとられますか?
You can decide the fleet's course. Admiral, which heading should we take?
|
| #
|
Selection Node
|
E-1 Casual T
| #
|
Empty Node
|
| T
|
気のせいだった。
Must be my imagination.
|
| #
|
Empty Node
|
E-1 Casual U
| #
|
Empty Node
|
| U
|
気のせいだった。
Must be my imagination.
|
| #
|
Empty Node
|
E-1 Casual V: 深海偵察任務群 護衛空母A群 (
PoiDB)
| #
|
Formation
|
Normal Battle Node
|
AD/AP
AS/AS+
|
| V
|
Diamond
|
|
9/17
36/72
|
| Diamond
|
|
11/22
48/96
|
| Diamond
|
|
26/52
116/231
|
| #
|
Formation
|
Normal Battle Node
|
AD/AP
AS/AS+
|
E-1 Casual V1: 深海任務群主力 空母艦載機群 (
PoiDB)
| #
|
Formation
|
Air Defense Node
|
AD/AP
AS/AS+
|
| V1
|
Diamond
|
|
34/67
150/300
|
| Diamond
|
|
37/73
162/324
|
| Diamond
|
|
42/83
186/372
|
| #
|
Formation
|
Air Defense Node
|
AD/AP
AS/AS+
|
E-1 Casual V2
| #
|
Empty Node
|
| V2
|
敵影を見ず。
No enemy spotted.
|
| #
|
Empty Node
|
E-1 Casual V3: 深海侵攻任務部隊 主力機動部隊 (
PoiDB)
| #
|
Formation
|
Boss Battle Node
|
AD/AP
AS/AS+
|
| V3
|
Cruising Formation 3
|
|
34/67
150/300
|
Cruising Formation 3
(Final)
|
|
42/83
186/372
|
| #
|
Formation
|
Boss Battle Node
|
AD/AP
AS/AS+
|
Ship Drops
| Ship drops
|
| Type
|
Ship?
|
H
|
H2
|
I
|
K
|
N
|
O2
|
O5
|
Q
|
Q1
|
V
|
V3
|
| DE
|
Hachijou
|
|
|
|
|
|
|
|
|
Easy+
|
|
|
| DE
|
Ishigaki
|
|
|
|
|
|
|
|
|
|
|
Casual+
|
| DE
|
Etorofu
|
|
|
|
|
|
|
|
|
|
|
Casual+
|
| DE
|
Tsushima
|
|
Hard+
|
|
|
|
|
|
Hard+
|
Casual+
|
|
|
| DD
|
Minazuki
|
|
Casual+
|
Hard+
|
Casual+
|
Casual+
|
Casual+
|
Casual+
|
Casual+
|
Casual+
|
|
|
| DD
|
Amagiri
|
Hard+
|
Easy+
|
Medium+
|
Casual+
|
Casual+
|
Casual+
|
|
Casual+
|
Casual+
|
Casual+
|
|
| DD
|
Sagiri
|
Medium+
|
Casual+
|
Easy+
|
Casual+
|
Casual+
|
Casual+
|
Hard+
|
Casual+
|
Casual+
|
Casual+
|
|
| DD
|
Isokaze
|
|
Easy+
|
|
|
|
Casual+
|
Casual+
|
Casual+
|
Casual+
|
Casual+
|
|
| DD
|
Asashimo
|
|
Medium+
|
|
|
|
Hard+
|
|
Medium+
|
Casual+
|
Easy+
|
|
| DD
|
Suzutsuki
|
|
|
|
|
|
|
|
|
|
|
Casual+
|
| DD
|
Momo
|
|
|
|
|
|
|
|
|
|
|
Casual+
|
| CL
|
Yahagi
|
|
Easy+
|
|
|
|
Casual+
|
Casual+
|
Casual+
|
Casual+
|
Casual+
|
Casual+
|
| CL
|
Sakawa
|
|
|
|
|
|
|
|
|
|
|
Casual+
|
| CVL
|
Shinyou
|
|
|
|
|
|
|
|
|
|
|
Casual+
|
| BB
|
Yamato
|
|
|
|
|
|
|
|
|
|
|
Casual+
|
| CV
|
Unryuu
|
|
|
|
|
|
|
|
|
Easy+
|
|
|
| SS
|
I-47
|
|
|
|
|
|
|
|
|
|
|
Casual+
|
| SS
|
I-203
|
|
|
|
|
|
|
|
|
|
|
Casual+
|
| AR
|
Akashi
|
|
|
|
|
|
|
|
|
|
|
Casual+
|
| AS
|
Jingei
|
|
|
|
|
|
|
|
|
Medium+
|
|
|
| AS
|
Chougei
|
|
|
|
|
|
|
Hard+
|
|
Casual+
|
|
|
| AO
|
Kamoi
|
|
Medium+
|
|
|
|
|
|
Easy+
|
Casual+
|
|
|
| DD
|
Yukikaze
|
|
|
|
|
|
|
|
|
|
|
Casual+
|
| DD
|
Urakaze
|
|
Casual+
|
|
Hard+
|
Hard+
|
Easy+
|
Casual+
|
Casual+
|
Casual+
|
Casual+
|
Casual+
|
| DD
|
Hamakaze
|
|
Casual+
|
|
|
|
Casual+
|
Casual+
|
|
Casual+
|
Casual+
|
Casual+
|
| CL
|
Kitakami
|
Easy+
|
Casual+
|
Casual+
|
Casual+
|
Casual+
|
Casual+
|
Casual+
|
Casual+
|
Casual+
|
Casual+
|
Casual+
|
| CL
|
Ooi
|
|
Easy+
|
|
Casual+
|
Casual+
|
Casual+
|
|
Medium+
|
Casual+
|
|
Casual+
|
| CL
|
Nagara
|
Casual+
|
Easy+
|
Casual+
|
Casual+
|
Casual+
|
Casual+
|
Hard+
|
Casual+
|
Casual+
|
Casual+
|
Casual+
|
| CL
|
Kinu
|
|
Medium+
|
|
Easy+
|
Easy+
|
Casual+
|
Casual+
|
Medium+
|
Casual+
|
Casual+
|
|
| CL
|
Abukuma
|
|
Easy+
|
|
Medium+
|
Medium+
|
Casual+
|
Casual+
|
Medium+
|
Casual+
|
Casual+
|
|
| CL
|
Sendai
|
Casual+
|
Easy+
|
Casual+
|
Casual+
|
Casual+
|
Casual+
|
Casual+
|
Medium+
|
Casual+
|
|
Casual+
|
| CA
|
Myoukou
|
|
|
|
|
|
|
|
|
|
|
Casual+
|
| CA
|
Atago
|
|
|
|
|
|
|
|
|
|
|
Casual+
|
| CA
|
Mogami
|
|
|
|
|
|
|
|
|
|
|
Casual+
|
| CA
|
Suzuya
|
|
|
|
|
|
|
|
|
|
|
Casual+
|
| CA
|
Kumano
|
|
|
|
|
|
|
|
|
|
|
Casual+
|
| CVL
|
Hiyou
|
|
|
|
|
|
|
|
|
|
|
Casual+
|
| CVL
|
Junyou
|
|
|
|
|
|
|
|
|
|
|
Casual+
|
| FBB
|
Kongou
|
|
Casual+
|
|
|
|
Casual+
|
Easy+
|
Hard+
|
Casual+
|
Casual+
|
Casual+
|
| FBB
|
Hiei
|
|
|
|
|
|
|
|
|
|
|
Casual+
|
| FBB
|
Haruna
|
|
|
|
|
|
|
|
|
|
|
Casual+
|
| FBB
|
Kirishima
|
|
|
|
|
|
|
|
|
|
|
Casual+
|
| BB
|
Fusou
|
|
|
|
|
|
|
|
|
|
|
Casual+
|
| BB
|
Yamashiro
|
|
|
|
|
|
|
|
|
|
|
Casual+
|
| BB
|
Ise
|
|
|
|
|
|
|
|
|
|
|
Casual+
|
| BB
|
Hyuuga
|
|
|
|
|
|
|
|
|
|
|
Casual+
|
| BB
|
Nagato
|
|
|
|
|
|
|
|
|
|
|
Casual+
|
| BB
|
Mutsu
|
|
|
|
|
|
|
|
|
|
|
Casual+
|
E-2
Aparri Defense Transport
アパリ防衛輸送
| Rewards
|
| All
|
|
|
| Equipment/Item
|
丁
Casual
|
丙
Easy
|
乙
Medium
|
甲
Hard
|
 Medal |
|
|
|
1
|
 Reinforcement Expansion |
|
1
|
1
|
1
|
 Submarine Supply Material |
1
|
1
|
1
|
2
|
 Improvement Material |
|
|
|
5
|
 Action Report |
|
|
1
|
1
|
 New Model Aerial Armament Material |
1
|
1
|
1
|
2
|
 Type 3 Fighter Hien |
1 (★2)
|
|
|
|
 Type 3 Fighter Hien Model 1D |
|
1 (★2)
|
|
|
 Type 3 Fighter Hien (244th Air Combat Group) |
|
|
1 (★1)
|
1 (★2)
|
 Ki-96 |
|
|
1
|
1 (★2)
|
|
|
|
|
|
|
Branching Table
| E-2 Branching Rules - From Point 1
|
| Nodes |
Rules
|
| Start
|
|
- Starting point 2 is not unlocked
- 31st Squadron fleet
|
|
|
|
|
|
|
- Meet ANY of the following requirements:
- Amount of (F)BB(V) ≥ 2
- Fleet contains CV(B)
- Fleet contains SS(V) and number of ships = 6
|
|
|
- Does not meet the requirements to go to B
|
|
|
|
Fixed routing
|
|
|
|
- Force A, if fleet contains SS(V)
- Does not meet the requirements to go to C
|
|
|
- Meet ALL of the following requirements:
- Amount of (F)BB(V) ≤ 1
- Amount of CV(B) ≤ 1
- At least 1CL 2DD or 3DD
- Fast Fleet, if fleet contains AV
|
|
|
|
- Does not meet the requirements to go to G
|
|
|
- Meet ANY of the following requirements:
- Amount of CVL ≥ 2
- Amount of DD + DE ≥ 5
- Amount of CL ≥ 2 and amount of DD + DE ≥ 3
- Amount of DD + DE ≥ 3 and number of ships ≤ 5
- Fleet contains SS(V)
|
|
|
|
- Does not meet the requirements to go to H
|
|
|
- Meet ANY of the following requirements:
- Fleet contains (F)BB(V) and number of ships = 6
- Fleet contains CVL or SS(V)
|
|
|
|
- Does not meet the requirements to go to X when routing from C
|
|
|
- Node X is not unlocked
- Fail the LOS check
|
|
|
- If routing from C, meet ALL of the following requirements:
- Fast Fleet
- Amount of (F)BB(V) + CV(B/L) ≤ 2
- Amount of DD ≥ 2
- Pass the LOS check
- Otherwise,
- Node X is unlocked
- Pass the LOS check
|
|
|
|
???
|
|
|
???
|
|
|
|
- Meet ALL of the following requirements:
- Amount of CVL ≤ 1
- Amount of DD ≥ 2
- If fleet is slow and contains (F)BB(V), number of ships ≤ 5
|
|
|
- Force I, if fleet contains SS(V)
- Does not meet the requirements to go to F
|
|
|
|
Fixed routing
|
|
|
|
|
|
|
|
| E-2 Branching Rules - From Point 2
|
| Nodes |
Rules
|
| Start
|
|
- Starting point 2 is not unlocked
- 31st Squadron fleet
|
|
|
|
|
|
|
Fixed routing
|
|
|
|
Fixed routing
|
|
|
|
- Meet ALL of the following requirements:
- Amount of DD + DE ≤ 1
- Pass the LOS check
|
|
|
Fail the LOS check
|
|
|
- Meet ALL of the following requirements:
- Amount of DD + DE ≥ 2
- Pass the LOS check
|
|
|
|
Choose your own adventure!
|
|
|
|
|
|
Choose your own adventure!
|
|
|
|
|
|
- Meet ALL of the following requirements:
- Amount of DD ≤ 1
- Pass the LOS check
|
|
|
- Meet ALL of the following requirements:
- Amount of DD ≥ 2
- Pass the LOS check
|
|
|
Fail the LOS check
|
Branching compositions were reported over the course of the event. (NGA and KCNav)
The event guides are to be constructed through the respective Event map page guide and reviewed by editors before being approved here.
Do not under any circumstance update the guides through this page or attempt to fix them through this page.
Please only update guides through their respective sandbox pages.
Ship Bonuses
DISCLAIMER: This information is based on user submitted data and is subject to revisions as more data is gathered. Any version of the ship receives the bonus regardless of remodel.
Ship Bonuses
| Ships
|
Map-wide
|
Accuracy / Evasion
|

|
 (?) (?)
|
 (?) (?)
|
1.1x
|
|

|

|
 (?) (?)
|
 (?) (?)
|
 (?) (?)
|

|

|

|
 (?) (?)
|
 (?) (?)
|

|
 (?) (?)
|

|

|

|
1.15x
|
1.03x
|

|
 (?) (?)
|

|

|

|
 (?) (?)
|

|
-
|
-
|
| Coastal Defense Ships (DE)
|
1.35x
|
|
Map Overview
- 1 LBAS is available to sortie, a second base is only able to be used in defense.
- Air raids will occure on this map.
- There is an optional debuff phase on the last boss.
- To start at 1, the fleet will need at least one ship with
 tag.
tag.
- Having all ships with will force 2 starting point.
- This map utilizes the South-Western fleet and 31st Squadron locks.
Phase 1: Deplete the TP Gauge at J2
31st Squadron
- LoS (Cn3) = Casual: 29.9, Easy: 31.00, Medium: 37.0, Hard: 47.0
- Node J2 contains Battleship Princess
 and Enemy Destroyers escorting her.
- It is recommended to use 2-3 DDs capable of carrying
 Landing Craft to deplete the TP Gauge quickly.
- Make sure the fleet can consistently A rank the boss while having 3 DDs carrying Landing Craft
- 1AV, 1CL, 4DD
- Route: 1 D E F J J2
- Use Vanguard Formation to pass through the nodes before the boss.
- Cheaper, but might have trouble killing the boss
- 1FBB, 1CVL 1CL, 3DD (Fast)
- Route: 1 D E H F J J2
- Stronger surface firepower at the cost of one additional node and reduced transport capacity
Phase 1.5: Unlock the Boss Node at X
- There are up to 7 requirements to unlock Plum Princess at X for Phase 2:
|
|
I
|
O
|
T
|
U
|
B
|
N
|
LBAS
|
| Hard
|
A+
|
S
|
A+
|
A+
|
AS
|
AS
|
AS
|
| Medium
|
A+
|
S
|
A+
|
A+
|
AS
|
| Easy
|
A+
|
S
|
A+
|
A+
|
| Casual
|
A+
|
S
|
A+
|
A+
|
- 1(F)BB(V), 1AV, 1CL, 3DD (SLOW) 31st Squadron
- Route = 1 D E H I
- A Slow Fleet will route to I. Bringing anti-PT-Imp Setups to secure the A rank is recommended.
- LBAS Range = 5
- FBB, CV, CVL, CL, 2 DD (FAST) South-Western fleet
- Route: 2 K M N Q P O
- 1FBB, 1CV, 1CVL, 1CL, 2DD (FAST) South-Western fleet
- Route: 2 K M N Q C F S T
- T is an Installation node. Bringing anti-installation ships and equipment to help secure the A rank is recommended.
- Having 1 AA and 1 ASW Ship to help pass through the nodes before reaching T is recommended.
- Using Vanguard Formation on all node before T except for N is recommended.
- 1FBB, 1CV, 1CVL, 1CL, 2DD (FAST) South-Western fleet
- Route: 2 K M N Q C F S V U
- Having 1-2 OASW to kill the New Submarine Princess at U is recommended.
- The use of Support Expeditions is highly recommended.
- Sending ASW LBAS to U to help achieving the required A rank is recommended.
- LBAS Range = 5
- 1CV, 1AV 31st Squadron
- Route = 1 B
- Fighter mulling the CV and AV to gain AS at the node is recommended. Failing that, LBAS can fighter sweep the node to help lower the air power requirement.
- LBAS Range = 1
| Node B
|
AP
|
AS
|
AS+
|
| Hard
|
142
|
318
|
636
|
| Medium
|
123
|
276
|
552
|
| Easy
|
100
|
225
|
450
|
| Casual
|
55
|
123
|
246
|
- Refer to Node O, T, or U for compositions as those steps all pass through N.
- LBAS Range to N = 4
| Node N
|
AP
|
AS
|
AS+
|
| Hard
|
123
|
276
|
552
|
| Medium
|
98
|
219
|
438
|
| Easy
|
92
|
207
|
414
|
| Casual
|
46
|
104
|
207
|
Phase 2: Defeat Plum Princess at X
- LoS (Cn3) = Casual: 30.0, Easy: 35.0, Medium: 37.0, Hard: 45.0
- Use of Vanguard Formation is highly recommended to reach the boss safely.
- Having at least 1 OASW to pass through D and/or H depending on the composition choice is recommended.
- LBAS Range = 3
- The Node has access to significant anti-air. Bombers without AA Resistance will be prone to wipe.
- Bring 1-2 Historical relevant ships to the fight to help make the boss easier to kill.
| Node X Air
|
AP
|
AS
|
AS+
|
| Hard
|
72
|
161
|
321
|
| Medium
|
52
|
116
|
231
|
| Easy
|
46
|
104
|
207
|
| Casual
|
46
|
104
|
207
|
31st Squadron
- 1FBB, 1CVL, 1CL, 1CLT, 2DD (FAST)
- Route = 1 D E H F X
- Takes an additional node compared to the lighter composition.
- The fleet will be able to engage in second shelling with a FBB in the fleet.
- 1CAV, 2CLT, 1CL, 2DD (FAST)
- Route: 1 D E F X
- The heaviest composition possible in the light category, taking the shortest route to the boss.
- This composition focuses primarly on opening torpedos and night battle capabilities.
Optional Debuff Phase
- There are 5 requirements needed to debuff the boss once she reaches Last Dance
| Node
|
LBAS
|
C
|
I
|
O
|
T
|
| Hard
|
AS
|
A+
|
S
|
A+
|
A+
|
| Medium
|
-
|
A+
|
S
|
A+
|
A+
|
| Easy
|
?
|
?
|
?
|
?
|
?
|
| Casual
|
?
|
?
|
?
|
?
|
?
|
- This can be done along with any of the other phases.
- The LBAS should be set up with Interceptors for this purpose. If one base is not sufficient to meet the requirement, the second one should be set to defend as well.
| LBAS
|
AP
|
AS
|
AS+
|
| Hard
|
125
|
281
|
561
|
| Medium
|
100
|
224
|
447
|
| Easy
|
93
|
209
|
417
|
| Casual
|
63
|
141
|
282
|
- FBB, CV, CVL, CL, 2 DD (FAST) South-Western fleet
- Route: 2 K M N Q C
- LBAS with bombers should be sent to C to help secure the A rank
- Having DDs geared up with AA and ASW-Equipment for on-route threats is recommended.
- Refer to the composition for Phase 1.5
- Refer to the composition for Phase 1.5
- Refer to the composition for Phase 1.5
- Once all the requirements are completed, go back to X and eliminate the boss.
- Use Support Expedition to guarantee the final kill.
Enemy Compositions
E-2 Hard AB
| #
|
Formation
|
Air Raids
|
AD/AP
AS/AS+
|
| AB
|
Diamond
|
|
50/100
224/447
|
| Diamond
|
|
53/105
236/471
|
| Diamond
|
|
63/125
281/561
|
| #
|
Formation
|
Air Raids
|
AD/AP
AS/AS+
|
E-2 Hard A: 深海潜水艦隊 バシー海峡哨戒 (
PoiDB)
| #
|
Formation
|
Normal Battle Node
|
AD/AP
AS/AS+
|
| A
|
Echelon
Line Abreast
Phases: 2
|
|
0/0
0/0
|
Echelon
Line Abreast
Phases: 2
|
|
0/0
0/0
|
Echelon
Line Abreast
Phases: 1, 2
|
|
0/0
0/0
|
| #
|
Formation
|
Normal Battle Node
|
AD/AP
AS/AS+
|
E-2 Hard B: 深海ルソン島方面 基地航空隊 (
PoiDB)
| #
|
Formation
|
Air Defense Node
|
AD/AP
AS/AS+
|
| B
|
Diamond
Phases: 1, 2
|
|
55/110
246/492
|
Diamond
Phases: 1, 2
|
|
62/123
276/552
|
Diamond
Phases: 2
|
|
67/133
297/594
|
Diamond
Phases: 2
|
|
71/142
318/636
|
| #
|
Formation
|
Air Defense Node
|
AD/AP
AS/AS+
|
E-2 Hard C: 深海任務群 エンガノ沖強襲戦隊 (
PoiDB)
| #
|
Formation
|
Normal Battle Node
|
AD/AP
AS/AS+
|
| C
|
Echelon
Phases: 2
|
|
36/72
161/321
|
Echelon
Phases: 1, 2
|
|
36/72
161/321
|
Echelon
Phases: 2
|
|
72/143
321/642
|
| #
|
Formation
|
Normal Battle Node
|
AD/AP
AS/AS+
|
E-2 Hard D: 深海潜水艦隊 高雄沖前衛哨戒 (
PoiDB)
| #
|
Formation
|
Normal Battle Node
|
AD/AP
AS/AS+
|
| D
|
Echelon
Line Abreast
Phases: 1, 2
|
|
0/0
0/0
|
Echelon
Line Abreast
Phases: 1, 2
|
|
0/0
0/0
|
Echelon
Line Abreast
Phases: 1, 2
|
|
0/0
0/0
|
| #
|
Formation
|
Normal Battle Node
|
AD/AP
AS/AS+
|
E-2 Hard E: 深海偵察任務群 先遣哨戒戦隊 (
PoiDB)
| #
|
Formation
|
Normal Battle Node
|
AD/AP
AS/AS+
|
| E
|
Line Ahead
Double Line
Phases: 1, 2
|
|
0/0
0/0
|
Line Ahead
Phases: 2
|
|
0/0
0/0
|
| #
|
Formation
|
Normal Battle Node
|
AD/AP
AS/AS+
|
E-2 Hard F: 深海任務群 増援輸送阻止線 (
PoiDB)
| #
|
Formation
|
Normal Battle Node
|
AD/AP
AS/AS+
|
| F
|
Line Ahead
Double Line
Phases: 1, 2
|
|
0/0
0/0
|
Line Ahead
Phases: 2
|
|
0/0
0/0
|
| #
|
Formation
|
Normal Battle Node
|
AD/AP
AS/AS+
|
E-2 Hard G: 深海ルソン島方面 基地航空隊 (
PoiDB)
| #
|
Formation
|
Air Defense Node
|
AD/AP
AS/AS+
|
| G
|
Diamond
Phases: 1, 2
|
|
55/110
246/492
|
Diamond
Phases: 1, 2
|
|
62/123
276/552
|
Diamond
Phases: 1, 2
|
|
67/133
297/594
|
Diamond
Phases: 1, 2
|
|
71/142
318/636
|
| #
|
Formation
|
Air Defense Node
|
AD/AP
AS/AS+
|
E-2 Hard H: 深海潜水艦隊 ルソン北部哨戒 (
PoiDB)
| #
|
Formation
|
Normal Battle Node
|
AD/AP
AS/AS+
|
| H
|
Echelon
Phases: 1, 2
|
|
0/0
0/0
|
Echelon
Phases: 1, 2
|
|
0/0
0/0
|
Echelon
Phases: 1, 2
|
|
0/0
0/0
|
Echelon
Phases: 1, 2
|
|
0/0
0/0
|
Echelon
Phases: 1, 2
|
|
0/0
0/0
|
Echelon
Phases: 1, 2
|
|
0/0
0/0
|
| #
|
Formation
|
Normal Battle Node
|
AD/AP
AS/AS+
|
E-2 Hard I: 深海高速魚雷艇部隊 (
PoiDB)
| #
|
Formation
|
Normal Battle Node
|
AD/AP
AS/AS+
|
| I
|
Echelon
Phases: 2
|
|
0/0
0/0
|
Echelon
Phases: 2
|
|
0/0
0/0
|
Echelon
Phases: 1, 2
|
|
0/0
0/0
|
| #
|
Formation
|
Normal Battle Node
|
AD/AP
AS/AS+
|
E-2 Hard J
| #
|
Landing Node
|
| #
|
Landing Node
|
E-2 Hard J1
| #
|
Empty Node
|
| J1
|
敵影を見ず。
No enemy spotted.
|
| #
|
Empty Node
|
E-2 Hard J2: 深海任務群 増援地点強襲部隊 (
PoiDB)
| #
|
Formation
|
Boss Battle Node
|
AD/AP
AS/AS+
|
| J2
|
Line Ahead
Phases: 1, 2
|
|
0/0
0/0
|
Vanguard
Phases: 1, 2
|
|
0/0
0/0
|
Vanguard
Phases: 1
(Final)
|
|
0/0
0/0
|
| #
|
Formation
|
Boss Battle Node
|
AD/AP
AS/AS+
|
E-2 Hard K
| #
|
Empty Node
|
| K
|
気のせいだった。
Must be my imagination.
|
| #
|
Empty Node
|
E-2 Hard L
| #
|
Empty Node
|
| L
|
敵影を見ず。
No enemy spotted.
|
| #
|
Empty Node
|
E-2 Hard M: 深海潜水艦隊 エンガノ沖哨戒 (
PoiDB)
| #
|
Formation
|
Normal Battle Node
|
AD/AP
AS/AS+
|
| M
|
Echelon
Line Abreast
Phases: 2
|
|
0/0
0/0
|
Echelon
Line Abreast
Phases: 2
|
|
0/0
0/0
|
Echelon
Line Abreast
Phases: 2
|
|
0/0
0/0
|
| #
|
Formation
|
Normal Battle Node
|
AD/AP
AS/AS+
|
E-2 Hard N: 深海任務群 空母艦載機 (
PoiDB)
| #
|
Formation
|
Air Defense Node
|
AD/AP
AS/AS+
|
| N
|
Diamond
Phases: 2
|
|
49/98
219/438
|
Diamond
Phases: 2
|
|
52/103
231/462
|
Diamond
Phases: 2
|
|
62/123
276/552
|
| #
|
Formation
|
Air Defense Node
|
AD/AP
AS/AS+
|
E-2 Hard O: 深海任務群 護衛空母集団 (
PoiDB)
| #
|
Formation
|
Normal Battle Node
|
AD/AP
AS/AS+
|
| O
|
Diamond
Phases: 2
|
|
49/98
219/438
|
Diamond
Phases: 2
|
|
52/103
231/462
|
Diamond
Phases: 2
|
|
62/123
276/552
|
| #
|
Formation
|
Normal Battle Node
|
AD/AP
AS/AS+
|
E-2 Hard P: 深海任務群 前衛巡洋艦戦隊 (
PoiDB)
| #
|
Formation
|
Normal Battle Node
|
AD/AP
AS/AS+
|
| P
|
Line Ahead
Double Line
Vanguard
Phases: 2
|
|
0/0
0/0
|
| #
|
Formation
|
Normal Battle Node
|
AD/AP
AS/AS+
|
E-2 Hard Q
| #
|
Selection Node
|
| Q
|
艦隊の針路を選択できます。提督、どちらの針路をとられますか?
You can decide the fleet's course. Admiral, which heading should we take?
|
| #
|
Selection Node
|
E-2 Hard R: 深海潜水艦隊 支援水上部隊 (
PoiDB)
| #
|
Formation
|
Normal Battle Node
|
AD/AP
AS/AS+
|
| R
|
Double Line
Diamond
Phases: 2
|
|
0/0
0/0
|
| #
|
Formation
|
Normal Battle Node
|
AD/AP
AS/AS+
|
E-2 Hard S
| #
|
Selection Node
|
| S
|
艦隊の針路を選択できます。提督、どちらの針路をとられますか?
You can decide the fleet's course. Admiral, which heading should we take?
|
| #
|
Selection Node
|
E-2 Hard T: 深海侵攻部隊 攻撃物資集積地 (
PoiDB)
| #
|
Formation
|
Normal Battle Node
|
AD/AP
AS/AS+
|
| T
|
Double Line
Phases: 2
|
|
50/99
222/444
|
Double Line
Phases: 2
|
|
50/99
222/444
|
| #
|
Formation
|
Normal Battle Node
|
AD/AP
AS/AS+
|
E-2 Hard U: 深海潜水艦隊 司令潜水艦 (
PoiDB)
| #
|
Formation
|
Normal Battle Node
|
AD/AP
AS/AS+
|
| U
|
Echelon
Phases: 2
|
|
0/0
0/0
|
Echelon
Phases: 2
|
|
0/0
0/0
|
Echelon
Phases: 2
|
|
0/0
0/0
|
| #
|
Formation
|
Normal Battle Node
|
AD/AP
AS/AS+
|
E-2 Hard V: 深海ルソン島方面 基地航空隊 (
PoiDB)
| #
|
Formation
|
Air Defense Node
|
AD/AP
AS/AS+
|
| V
|
Diamond
Phases: 2
|
|
55/110
246/492
|
Diamond
Phases: 2
|
|
62/123
276/552
|
Diamond
Phases: 2
|
|
67/133
297/594
|
Diamond
Phases: 2
|
|
71/142
318/636
|
| #
|
Formation
|
Air Defense Node
|
AD/AP
AS/AS+
|
E-2 Hard W
| #
|
Empty Node
|
| W
|
敵影を見ず。
No enemy spotted.
|
| #
|
Empty Node
|
E-2 Hard X: バシー海峡輸送任務深海駆逐艦 (
PoiDB)
| #
|
Formation
|
Boss Battle Node
|
AD/AP
AS/AS+
|
| X
|
Vanguard
Phases: 2
|
|
24/47
104/207
|
Line Ahead
Phases: 2
|
|
26/52
116/231
|
Line Ahead
Phases: 2
(Final)
|
|
36/72
161/321
|
| #
|
Formation
|
Boss Battle Node
|
AD/AP
AS/AS+
|
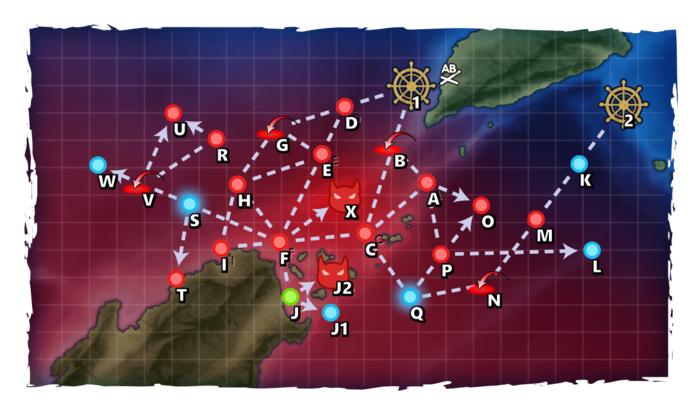
| Type | Ships |
|---|
| DD |  |
|---|
E-2 Medium AB
| #
|
Formation
|
Air Raids
|
AD/AP
AS/AS+
|
| AB
|
Diamond
|
|
33/65
144/288
|
| Diamond
|
|
48/95
212/423
|
| Diamond
|
|
50/100
224/447
|
| #
|
Formation
|
Air Raids
|
AD/AP
AS/AS+
|
E-2 Medium A: 深海潜水艦隊 バシー海峡哨戒 (
PoiDB)
| #
|
Formation
|
Normal Battle Node
|
AD/AP
AS/AS+
|
| A
|
Echelon
Line Abreast
Phases: 2
|
|
0/0
0/0
|
Echelon
Line Abreast
Phases: 1
|
|
0/0
0/0
|
Echelon
Line Abreast
Phases: 2
|
|
0/0
0/0
|
| #
|
Formation
|
Normal Battle Node
|
AD/AP
AS/AS+
|
E-2 Medium B: 深海ルソン島方面 基地航空隊 (
PoiDB)
| #
|
Formation
|
Air Defense Node
|
AD/AP
AS/AS+
|
| B
|
Diamond
Phases: 1, 2
|
|
39/78
174/348
|
Diamond
Phases: 1, 2
|
|
44/87
195/390
|
Diamond
Phases: 1, 2
|
|
51/101
225/450
|
Diamond
Phases: 1, 2
|
|
55/110
246/492
|
Diamond
Phases: 1, 2
|
|
62/123
276/552
|
| #
|
Formation
|
Air Defense Node
|
AD/AP
AS/AS+
|
E-2 Medium C: 深海任務群 エンガノ沖強襲戦隊 (
PoiDB)
| #
|
Formation
|
Normal Battle Node
|
AD/AP
AS/AS+
|
| C
|
Echelon
Phases: 1, 2
|
|
32/63
141/282
|
Echelon
Phases: 1, 2
|
|
32/63
141/282
|
Echelon
Phases: 2
|
|
63/126
282/564
|
| #
|
Formation
|
Normal Battle Node
|
AD/AP
AS/AS+
|
E-2 Medium D: 深海潜水艦隊 高雄沖前衛哨戒 (
PoiDB)
| #
|
Formation
|
Normal Battle Node
|
AD/AP
AS/AS+
|
| D
|
Echelon
Line Abreast
Phases: 1, 2
|
|
0/0
0/0
|
Echelon
Line Abreast
Phases: 1, 2
|
|
0/0
0/0
|
Echelon
Line Abreast
Phases: 1, 2
|
|
0/0
0/0
|
| #
|
Formation
|
Normal Battle Node
|
AD/AP
AS/AS+
|
E-2 Medium E: 深海偵察任務群 先遣哨戒戦隊 (
PoiDB)
| #
|
Formation
|
Normal Battle Node
|
AD/AP
AS/AS+
|
| E
|
Line Ahead
Double Line
Phases: 1, 2
|
|
0/0
0/0
|
Line Ahead
Phases: 2
|
|
0/0
0/0
|
| #
|
Formation
|
Normal Battle Node
|
AD/AP
AS/AS+
|
E-2 Medium F: 深海任務群 増援輸送阻止線 (
PoiDB)
| #
|
Formation
|
Normal Battle Node
|
AD/AP
AS/AS+
|
| F
|
Line Ahead
Double Line
Phases: 1, 2
|
|
0/0
0/0
|
Line Ahead
Phases: 2
|
|
0/0
0/0
|
| #
|
Formation
|
Normal Battle Node
|
AD/AP
AS/AS+
|
E-2 Medium G: 深海ルソン島方面 基地航空隊 (
PoiDB)
| #
|
Formation
|
Air Defense Node
|
AD/AP
AS/AS+
|
| G
|
Diamond
Phases: 1
|
|
39/78
174/348
|
Diamond
Phases: 1, 2
|
|
44/87
195/390
|
Diamond
Phases: 1, 2
|
|
51/101
225/450
|
Diamond
Phases: 1
|
|
55/110
246/492
|
Diamond
Phases: 1, 2
|
|
62/123
276/552
|
| #
|
Formation
|
Air Defense Node
|
AD/AP
AS/AS+
|
E-2 Medium H: 深海潜水艦隊 ルソン北部哨戒 (
PoiDB)
| #
|
Formation
|
Normal Battle Node
|
AD/AP
AS/AS+
|
| H
|
Echelon
Phases: 1, 2
|
|
0/0
0/0
|
Echelon
Phases: 1, 2
|
|
0/0
0/0
|
Echelon
Phases: 1, 2
|
|
0/0
0/0
|
Echelon
Phases: 1, 2
|
|
0/0
0/0
|
| #
|
Formation
|
Normal Battle Node
|
AD/AP
AS/AS+
|
E-2 Medium I: 深海高速魚雷艇部隊 (
PoiDB)
| #
|
Formation
|
Normal Battle Node
|
AD/AP
AS/AS+
|
| I
|
Echelon
Phases: 2
|
|
0/0
0/0
|
Echelon
Phases: 1, 2
|
|
0/0
0/0
|
Echelon
Phases: 1, 2
|
|
0/0
0/0
|
| #
|
Formation
|
Normal Battle Node
|
AD/AP
AS/AS+
|
E-2 Medium J
| #
|
Landing Node
|
| #
|
Landing Node
|
E-2 Medium J1
| #
|
Empty Node
|
| J1
|
敵影を見ず。
No enemy spotted.
|
| #
|
Empty Node
|
E-2 Medium J2: 深海任務群 増援地点強襲部隊 (
PoiDB)
| #
|
Formation
|
Boss Battle Node
|
AD/AP
AS/AS+
|
| J2
|
Line Ahead
Phases: 1, 2
|
|
0/0
0/0
|
Vanguard
Phases: 1, 2
|
|
0/0
0/0
|
Vanguard
Phases: 1
(Final)
|
|
0/0
0/0
|
| #
|
Formation
|
Boss Battle Node
|
AD/AP
AS/AS+
|
E-2 Medium K
| #
|
Empty Node
|
| K
|
気のせいだった。
Must be my imagination.
|
| #
|
Empty Node
|
E-2 Medium L
| #
|
Empty Node
|
| L
|
敵影を見ず。
No enemy spotted.
|
| #
|
Empty Node
|
E-2 Medium M: 深海潜水艦隊 エンガノ沖哨戒 (
PoiDB)
| #
|
Formation
|
Normal Battle Node
|
AD/AP
AS/AS+
|
| M
|
Echelon
Line Abreast
Phases: 2
|
|
0/0
0/0
|
Echelon
Line Abreast
Phases: 2
|
|
0/0
0/0
|
Echelon
Line Abreast
Phases: 2
|
|
0/0
0/0
|
| #
|
Formation
|
Normal Battle Node
|
AD/AP
AS/AS+
|
E-2 Medium N: 深海任務群 空母艦載機 (
PoiDB)
| #
|
Formation
|
Air Defense Node
|
AD/AP
AS/AS+
|
| N
|
Diamond
Phases: 2
|
|
32/63
140/279
|
Diamond
Phases: 2
|
|
47/93
207/414
|
Diamond
Phases: 2
|
|
49/98
219/438
|
| #
|
Formation
|
Air Defense Node
|
AD/AP
AS/AS+
|
E-2 Medium O: 深海任務群 護衛空母集団 (
PoiDB)
| #
|
Formation
|
Normal Battle Node
|
AD/AP
AS/AS+
|
| O
|
Diamond
Phases: 2
|
|
32/63
140/279
|
Diamond
Phases: 2
|
|
47/93
207/414
|
Diamond
Phases: 2
|
|
49/98
219/438
|
| #
|
Formation
|
Normal Battle Node
|
AD/AP
AS/AS+
|
E-2 Medium P: 深海任務群 前衛巡洋艦戦隊 (
PoiDB)
| #
|
Formation
|
Normal Battle Node
|
AD/AP
AS/AS+
|
| P
|
Line Ahead
Double Line
Vanguard
Phases: 2
|
|
0/0
0/0
|
| #
|
Formation
|
Normal Battle Node
|
AD/AP
AS/AS+
|
E-2 Medium Q
| #
|
Selection Node
|
| Q
|
艦隊の針路を選択できます。提督、どちらの針路をとられますか?
You can decide the fleet's course. Admiral, which heading should we take?
|
| #
|
Selection Node
|
E-2 Medium R: 深海潜水艦隊 支援水上部隊 (
PoiDB)
| #
|
Formation
|
Normal Battle Node
|
AD/AP
AS/AS+
|
| R
|
Double Line
Diamond
|
|
0/0
0/0
|
| #
|
Formation
|
Normal Battle Node
|
AD/AP
AS/AS+
|
E-2 Medium S
| #
|
Selection Node
|
| S
|
艦隊の針路を選択できます。提督、どちらの針路をとられますか?
You can decide the fleet's course. Admiral, which heading should we take?
|
| #
|
Selection Node
|
E-2 Medium T: 深海侵攻部隊 攻撃物資集積地 (
PoiDB)
| #
|
Formation
|
Normal Battle Node
|
AD/AP
AS/AS+
|
| T
|
Double Line
Phases: 2
|
|
32/63
141/282
|
Double Line
Phases: 2
|
|
32/63
141/282
|
| #
|
Formation
|
Normal Battle Node
|
AD/AP
AS/AS+
|
E-2 Medium U: 深海潜水艦隊 司令潜水艦 (
PoiDB)
| #
|
Formation
|
Normal Battle Node
|
AD/AP
AS/AS+
|
| U
|
Echelon
Phases: 2
|
|
0/0
0/0
|
Echelon
Phases: 2
|
|
0/0
0/0
|
Echelon
Phases: 2
|
|
0/0
0/0
|
| #
|
Formation
|
Normal Battle Node
|
AD/AP
AS/AS+
|
E-2 Medium V: 深海ルソン島方面 基地航空隊 (
PoiDB)
| #
|
Formation
|
Air Defense Node
|
AD/AP
AS/AS+
|
| V
|
Diamond
Phases: 2
|
|
39/78
174/348
|
Diamond
Phases: 2
|
|
44/87
195/390
|
Diamond
Phases: 2
|
|
51/101
225/450
|
Diamond
Phases: 2
|
|
55/110
246/492
|
Diamond
Phases: 2
|
|
62/123
276/552
|
| #
|
Formation
|
Air Defense Node
|
AD/AP
AS/AS+
|
E-2 Medium W
| #
|
Empty Node
|
| W
|
敵影を見ず。
No enemy spotted.
|
| #
|
Empty Node
|
E-2 Medium X: バシー海峡輸送任務深海駆逐艦 (
PoiDB)
| #
|
Formation
|
Boss Battle Node
|
AD/AP
AS/AS+
|
| X
|
Vanguard
Phases: 2
|
|
24/47
104/207
|
Line Ahead
Phases: 2
|
|
24/47
104/207
|
Line Ahead
Phases: 2
(Final)
|
|
26/52
116/231
|
| #
|
Formation
|
Boss Battle Node
|
AD/AP
AS/AS+
|
E-2 Easy AB
| #
|
Formation
|
Air Raids
|
AD/AP
AS/AS+
|
| AB
|
Diamond
|
|
26/52
116/231
|
| Diamond
|
|
32/63
141/282
|
| Diamond
|
|
47/93
209/417
|
| #
|
Formation
|
Air Raids
|
AD/AP
AS/AS+
|
E-2 Easy A: 深海潜水艦隊 バシー海峡哨戒 (
PoiDB)
| #
|
Formation
|
Normal Battle Node
|
AD/AP
AS/AS+
|
| A
|
Echelon
Phases: 2
|
|
0/0
0/0
|
Echelon
Phases: 2
|
|
0/0
0/0
|
Echelon
Line Abreast
Phases: 2
|
|
0/0
0/0
|
Echelon
Line Abreast
Phases: 2
|
|
0/0
0/0
|
| #
|
Formation
|
Normal Battle Node
|
AD/AP
AS/AS+
|
E-2 Easy B: 深海ルソン島方面 基地航空隊 (
PoiDB)
| #
|
Formation
|
Air Defense Node
|
AD/AP
AS/AS+
|
| B
|
Diamond
Phases: 1, 2
|
|
28/55
123/246
|
Diamond
Phases: 1, 2
|
|
39/78
174/348
|
Diamond
Phases: 1, 2
|
|
44/87
195/390
|
Diamond
Phases: 1, 2
|
|
51/101
225/450
|
| #
|
Formation
|
Air Defense Node
|
AD/AP
AS/AS+
|
E-2 Easy C: 深海任務群 エンガノ沖強襲戦隊 (
PoiDB)
| #
|
Formation
|
Normal Battle Node
|
AD/AP
AS/AS+
|
| C
|
Echelon
Phases: 1, 2
|
|
32/63
141/282
|
Echelon
Phases: 1, 2
|
|
32/63
141/282
|
Echelon
Phases: 2
|
|
32/63
141/282
|
| #
|
Formation
|
Normal Battle Node
|
AD/AP
AS/AS+
|
E-2 Easy D: 深海潜水艦隊 高雄沖前衛哨戒 (
PoiDB)
| #
|
Formation
|
Normal Battle Node
|
AD/AP
AS/AS+
|
| D
|
Echelon
Phases: 1, 2
|
|
0/0
0/0
|
Echelon
Phases: 1, 2
|
|
0/0
0/0
|
Echelon
Line Abreast
Phases: 1, 2
|
|
0/0
0/0
|
Echelon
Line Abreast
Phases: 1, 2
|
|
0/0
0/0
|
| #
|
Formation
|
Normal Battle Node
|
AD/AP
AS/AS+
|
E-2 Easy E: 深海偵察任務群 先遣哨戒戦隊 (
PoiDB)
| #
|
Formation
|
Normal Battle Node
|
AD/AP
AS/AS+
|
| E
|
Line Ahead
Double Line
Phases: 1, 2
|
|
0/0
0/0
|
Line Ahead
Phases: 2
|
|
0/0
0/0
|
| #
|
Formation
|
Normal Battle Node
|
AD/AP
AS/AS+
|
E-2 Easy F: 深海任務群 増援輸送阻止線 (
PoiDB)
| #
|
Formation
|
Normal Battle Node
|
AD/AP
AS/AS+
|
| F
|
Line Ahead
Double Line
Phases: 1, 2
|
|
0/0
0/0
|
Line Ahead
Phases: 2
|
|
0/0
0/0
|
| #
|
Formation
|
Normal Battle Node
|
AD/AP
AS/AS+
|
E-2 Easy G: 深海ルソン島方面 基地航空隊 (
PoiDB)
| #
|
Formation
|
Air Defense Node
|
AD/AP
AS/AS+
|
| G
|
Diamond
Phases: 1, 2
|
|
28/55
123/246
|
Diamond
Phases: 1, 2
|
|
39/78
174/348
|
Diamond
Phases: 1
|
|
44/87
195/390
|
Diamond
Phases: 1, 2
|
|
51/101
225/450
|
| #
|
Formation
|
Air Defense Node
|
AD/AP
AS/AS+
|
E-2 Easy H: 深海潜水艦隊 ルソン北部哨戒 (
PoiDB)
| #
|
Formation
|
Normal Battle Node
|
AD/AP
AS/AS+
|
| H
|
Echelon
Phases: 1, 2
|
|
0/0
0/0
|
Echelon
Phases: 1, 2
|
|
0/0
0/0
|
Echelon
Phases: 1, 2
|
|
0/0
0/0
|
Echelon
Phases: 1, 2
|
|
0/0
0/0
|
Echelon
Phases: 1, 2
|
|
0/0
0/0
|
| #
|
Formation
|
Normal Battle Node
|
AD/AP
AS/AS+
|
E-2 Easy I: 深海高速魚雷艇部隊 (
PoiDB)
| #
|
Formation
|
Normal Battle Node
|
AD/AP
AS/AS+
|
| I
|
Echelon
Phases: 2
|
|
0/0
0/0
|
Echelon
Phases: 1, 2
|
|
0/0
0/0
|
Echelon
Phases: 1, 2
|
|
0/0
0/0
|
| #
|
Formation
|
Normal Battle Node
|
AD/AP
AS/AS+
|
E-2 Easy J
| #
|
Landing Node
|
| #
|
Landing Node
|
E-2 Easy J1
| #
|
Empty Node
|
| J1
|
敵影を見ず。
No enemy spotted.
|
| #
|
Empty Node
|
E-2 Easy J2: 深海任務群 増援地点強襲部隊 (
PoiDB)
| #
|
Formation
|
Boss Battle Node
|
AD/AP
AS/AS+
|
| J2
|
Line Ahead
Phases: 1, 2
|
|
0/0
0/0
|
Vanguard
Phases: 1, 2
|
|
0/0
0/0
|
Vanguard
Phases: 1
(Final)
|
|
0/0
0/0
|
| #
|
Formation
|
Boss Battle Node
|
AD/AP
AS/AS+
|
E-2 Easy K
| #
|
Empty Node
|
| K
|
気のせいだった。
Must be my imagination.
|
| #
|
Empty Node
|
E-2 Easy L
| #
|
Empty Node
|
| L
|
敵影を見ず。
No enemy spotted.
|
| #
|
Empty Node
|
E-2 Easy M: 深海潜水艦隊 エンガノ沖哨戒 (
PoiDB)
| #
|
Formation
|
Normal Battle Node
|
AD/AP
AS/AS+
|
| M
|
Echelon
Phases: 2
|
|
0/0
0/0
|
Echelon
Phases: 2
|
|
0/0
0/0
|
Echelon
Line Abreast
Phases: 2
|
|
0/0
0/0
|
Echelon
Line Abreast
Phases: 2
|
|
0/0
0/0
|
| #
|
Formation
|
Normal Battle Node
|
AD/AP
AS/AS+
|
E-2 Easy N: 深海任務群 空母艦載機 (
PoiDB)
| #
|
Formation
|
Air Defense Node
|
AD/AP
AS/AS+
|
| N
|
Diamond
Phases: 2
|
|
26/52
116/231
|
Diamond
Phases: 2
|
|
32/63
140/279
|
Diamond
Phases: 2
|
|
47/93
207/414
|
| #
|
Formation
|
Air Defense Node
|
AD/AP
AS/AS+
|
E-2 Easy O: 深海任務群 護衛空母集団 (
PoiDB)
| #
|
Formation
|
Normal Battle Node
|
AD/AP
AS/AS+
|
| O
|
Diamond
Phases: 2
|
|
32/63
140/279
|
Diamond
Phases: 2
|
|
32/63
140/279
|
Diamond
Phases: 2
|
|
47/93
207/414
|
| #
|
Formation
|
Normal Battle Node
|
AD/AP
AS/AS+
|
E-2 Easy P: 深海任務群 前衛巡洋艦戦隊 (
PoiDB)
| #
|
Formation
|
Normal Battle Node
|
AD/AP
AS/AS+
|
| P
|
Line Ahead
Double Line
Vanguard
Phases: 2
|
|
0/0
0/0
|
| #
|
Formation
|
Normal Battle Node
|
AD/AP
AS/AS+
|
E-2 Easy Q
| #
|
Selection Node
|
| Q
|
艦隊の針路を選択できます。提督、どちらの針路をとられますか?
You can decide the fleet's course. Admiral, which heading should we take?
|
| #
|
Selection Node
|
E-2 Easy R: 深海潜水艦隊 支援水上部隊 (
PoiDB)
| #
|
Formation
|
Normal Battle Node
|
AD/AP
AS/AS+
|
| R
|
Double Line
Echelon
|
|
0/0
0/0
|
| #
|
Formation
|
Normal Battle Node
|
AD/AP
AS/AS+
|
E-2 Easy S
| #
|
Selection Node
|
| S
|
艦隊の針路を選択できます。提督、どちらの針路をとられますか?
You can decide the fleet's course. Admiral, which heading should we take?
|
| #
|
Selection Node
|
E-2 Easy T: 深海侵攻部隊 攻撃物資集積地 (
PoiDB)
| #
|
Formation
|
Normal Battle Node
|
AD/AP
AS/AS+
|
| T
|
Double Line
Phases: 2
|
|
25/49
108/216
|
Double Line
Phases: 2
|
|
25/49
108/216
|
| #
|
Formation
|
Normal Battle Node
|
AD/AP
AS/AS+
|
E-2 Easy U: 深海潜水艦隊 司令潜水艦 (
PoiDB)
| #
|
Formation
|
Normal Battle Node
|
AD/AP
AS/AS+
|
| U
|
Echelon
Phases: 2
|
|
0/0
0/0
|
Echelon
Phases: 2
|
|
0/0
0/0
|
Echelon
Phases: 2
|
|
0/0
0/0
|
| #
|
Formation
|
Normal Battle Node
|
AD/AP
AS/AS+
|
E-2 Easy V: 深海ルソン島方面 基地航空隊 (
PoiDB)
| #
|
Formation
|
Air Defense Node
|
AD/AP
AS/AS+
|
| V
|
Diamond
Phases: 2
|
|
28/55
123/246
|
Diamond
Phases: 2
|
|
39/78
174/348
|
Diamond
Phases: 2
|
|
44/87
195/390
|
Diamond
Phases: 2
|
|
51/101
225/450
|
| #
|
Formation
|
Air Defense Node
|
AD/AP
AS/AS+
|
E-2 Easy W
| #
|
Empty Node
|
| W
|
敵影を見ず。
No enemy spotted.
|
| #
|
Empty Node
|
E-2 Easy X: バシー海峡輸送任務深海駆逐艦 (
PoiDB)
| #
|
Formation
|
Boss Battle Node
|
AD/AP
AS/AS+
|
| X
|
Vanguard
Phases: 2
|
|
9/17
36/72
|
Line Ahead
Phases: 2
|
|
24/47
104/207
|
Line Ahead
Phases: 2
(Final)
|
|
24/47
104/207
|
| #
|
Formation
|
Boss Battle Node
|
AD/AP
AS/AS+
|
E-2 Casual AB
| #
|
Formation
|
Air Raids
|
AD/AP
AS/AS+
|
| AB
|
Diamond
|
|
24/47
105/210
|
| Diamond
|
|
27/53
117/234
|
| Diamond
|
|
32/63
141/282
|
| #
|
Formation
|
Air Raids
|
AD/AP
AS/AS+
|
E-2 Casual A: 深海潜水艦隊 バシー海峡哨戒 (
PoiDB)
| #
|
Formation
|
Normal Battle Node
|
AD/AP
AS/AS+
|
| A
|
Echelon
Phases: 2
|
|
0/0
0/0
|
Echelon
Phases: 2
|
|
0/0
0/0
|
Echelon
Line Abreast
|
|
0/0
0/0
|
| #
|
Formation
|
Normal Battle Node
|
AD/AP
AS/AS+
|
E-2 Casual B: 深海ルソン島方面 基地航空隊 (
PoiDB)
| #
|
Formation
|
Air Defense Node
|
AD/AP
AS/AS+
|
| B
|
Diamond
Phases: 2
|
|
17/33
72/144
|
Diamond
Phases: 2
|
|
28/55
123/246
|
Diamond
Phases: 2
|
|
39/78
174/348
|
| #
|
Formation
|
Air Defense Node
|
AD/AP
AS/AS+
|
E-2 Casual C: 深海任務群 エンガノ沖強襲戦隊 (
PoiDB)
| #
|
Formation
|
Normal Battle Node
|
AD/AP
AS/AS+
|
| C
|
Echelon
Phases: 2
|
|
32/63
141/282
|
Echelon
Phases: 2
|
|
32/63
141/282
|
Echelon
Phases: 2
|
|
32/63
141/282
|
| #
|
Formation
|
Normal Battle Node
|
AD/AP
AS/AS+
|
E-2 Casual D: 深海潜水艦隊 高雄沖前衛哨戒 (
PoiDB)
| #
|
Formation
|
Normal Battle Node
|
AD/AP
AS/AS+
|
| D
|
Echelon
Phases: 1, 2
|
|
0/0
0/0
|
Echelon
Phases: 1, 2
|
|
0/0
0/0
|
Echelon
Line Abreast
Phases: 1, 2
|
|
0/0
0/0
|
| #
|
Formation
|
Normal Battle Node
|
AD/AP
AS/AS+
|
E-2 Casual E: 深海偵察任務群 先遣哨戒戦隊 (
PoiDB)
| #
|
Formation
|
Normal Battle Node
|
AD/AP
AS/AS+
|
| E
|
Line Ahead
Double Line
Phases: 1, 2
|
|
0/0
0/0
|
Line Ahead
Phases: 2
|
|
0/0
0/0
|
| #
|
Formation
|
Normal Battle Node
|
AD/AP
AS/AS+
|
E-2 Casual F: 深海任務群 増援輸送阻止線 (
PoiDB)
| #
|
Formation
|
Normal Battle Node
|
AD/AP
AS/AS+
|
| F
|
Line Ahead
Double Line
Phases: 1, 2
|
|
0/0
0/0
|
Line Ahead
Phases: 2
|
|
0/0
0/0
|
| #
|
Formation
|
Normal Battle Node
|
AD/AP
AS/AS+
|
E-2 Casual G: 深海ルソン島方面 基地航空隊 (
PoiDB)
| #
|
Formation
|
Air Defense Node
|
AD/AP
AS/AS+
|
| G
|
Diamond
Phases: 1, 2
|
|
17/33
72/144
|
Diamond
Phases: 1
|
|
28/55
123/246
|
Diamond
Phases: 1
|
|
39/78
174/348
|
| #
|
Formation
|
Air Defense Node
|
AD/AP
AS/AS+
|
E-2 Casual H: 深海潜水艦隊 ルソン北部哨戒 (
PoiDB)
| #
|
Formation
|
Normal Battle Node
|
AD/AP
AS/AS+
|
| H
|
Echelon
Phases: 1, 2
|
|
0/0
0/0
|
Echelon
Phases: 1, 2
|
|
0/0
0/0
|
Echelon
Phases: 1, 2
|
|
0/0
0/0
|
Echelon
Phases: 1, 2
|
|
0/0
0/0
|
| #
|
Formation
|
Normal Battle Node
|
AD/AP
AS/AS+
|
E-2 Casual I: 深海高速魚雷艇部隊 (
PoiDB)
| #
|
Formation
|
Normal Battle Node
|
AD/AP
AS/AS+
|
| I
|
Echelon
Phases: 2
|
|
0/0
0/0
|
Echelon
Phases: 2
|
|
0/0
0/0
|
Echelon
Phases: 2
|
|
0/0
0/0
|
| #
|
Formation
|
Normal Battle Node
|
AD/AP
AS/AS+
|
E-2 Casual J
| #
|
Landing Node
|
| #
|
Landing Node
|
E-2 Casual J1
| #
|
Empty Node
|
| J1
|
敵影を見ず。
No enemy spotted.
|
| #
|
Empty Node
|
E-2 Casual J2: 深海任務群 増援地点強襲部隊 (
PoiDB)
| #
|
Formation
|
Boss Battle Node
|
AD/AP
AS/AS+
|
| J2
|
Line Ahead
Phases: 1, 2
|
|
0/0
0/0
|
Vanguard
Phases: 1, 2
|
|
0/0
0/0
|
Vanguard
Phases: 1
(Final)
|
|
0/0
0/0
|
| #
|
Formation
|
Boss Battle Node
|
AD/AP
AS/AS+
|
E-2 Casual K
| #
|
Empty Node
|
| K
|
気のせいだった。
Must be my imagination.
|
| #
|
Empty Node
|
E-2 Casual L
| #
|
Empty Node
|
| L
|
敵影を見ず。
No enemy spotted.
|
| #
|
Empty Node
|
E-2 Casual M: 深海潜水艦隊 エンガノ沖哨戒 (
PoiDB)
| #
|
Formation
|
Normal Battle Node
|
AD/AP
AS/AS+
|
| M
|
Echelon
Phases: 2
|
|
0/0
0/0
|
Echelon
Phases: 2
|
|
0/0
0/0
|
Echelon
Line Abreast
Phases: 2
|
|
0/0
0/0
|
| #
|
Formation
|
Normal Battle Node
|
AD/AP
AS/AS+
|
E-2 Casual N: 深海任務群 空母艦載機 (
PoiDB)
| #
|
Formation
|
Air Defense Node
|
AD/AP
AS/AS+
|
| N
|
Diamond
Phases: 2
|
|
24/47
104/207
|
Diamond
Phases: 2
|
|
26/52
116/231
|
Diamond
Phases: 2
|
|
32/63
140/279
|
| #
|
Formation
|
Air Defense Node
|
AD/AP
AS/AS+
|
E-2 Casual O: 深海任務群 護衛空母集団 (
PoiDB)
| #
|
Formation
|
Normal Battle Node
|
AD/AP
AS/AS+
|
| O
|
Diamond
Phases: 2
|
|
24/47
104/207
|
Diamond
Phases: 2
|
|
26/52
116/231
|
Diamond
Phases: 2
|
|
32/63
140/279
|
| #
|
Formation
|
Normal Battle Node
|
AD/AP
AS/AS+
|
E-2 Casual P: 深海任務群 前衛巡洋艦戦隊 (
PoiDB)
| #
|
Formation
|
Normal Battle Node
|
AD/AP
AS/AS+
|
| P
|
Line Ahead
Double Line
Vanguard
Phases: 2
|
|
0/0
0/0
|
| #
|
Formation
|
Normal Battle Node
|
AD/AP
AS/AS+
|
E-2 Casual Q
| #
|
Selection Node
|
| Q
|
艦隊の針路を選択できます。提督、どちらの針路をとられますか?
You can decide the fleet's course. Admiral, which heading should we take?
|
| #
|
Selection Node
|
E-2 Casual R: 深海潜水艦隊 支援水上部隊 (
PoiDB)
| #
|
Formation
|
Normal Battle Node
|
AD/AP
AS/AS+
|
| R
|
Double Line
Diamond
Echelon
Phases: 2
|
|
0/0
0/0
|
| #
|
Formation
|
Normal Battle Node
|
AD/AP
AS/AS+
|
E-2 Casual S
| #
|
Selection Node
|
| S
|
艦隊の針路を選択できます。提督、どちらの針路をとられますか?
You can decide the fleet's course. Admiral, which heading should we take?
|
| #
|
Selection Node
|
E-2 Casual T: 深海侵攻部隊 攻撃物資集積地 (
PoiDB)
| #
|
Formation
|
Normal Battle Node
|
AD/AP
AS/AS+
|
| T
|
Double Line
Phases: 2
|
|
22/43
96/192
|
Double Line
Phases: 2
|
|
22/43
96/192
|
| #
|
Formation
|
Normal Battle Node
|
AD/AP
AS/AS+
|
E-2 Casual U: 深海潜水艦隊 司令潜水艦 (
PoiDB)
| #
|
Formation
|
Normal Battle Node
|
AD/AP
AS/AS+
|
| U
|
Echelon
Phases: 2
|
|
0/0
0/0
|
Echelon
Phases: 2
|
|
0/0
0/0
|
Echelon
Phases: 2
|
|
0/0
0/0
|
| #
|
Formation
|
Normal Battle Node
|
AD/AP
AS/AS+
|
E-2 Casual V: 深海ルソン島方面 基地航空隊 (
PoiDB)
| #
|
Formation
|
Air Defense Node
|
AD/AP
AS/AS+
|
| V
|
Diamond
Phases: 2
|
|
17/33
72/144
|
Diamond
Phases: 2
|
|
28/55
123/246
|
Diamond
Phases: 2
|
|
39/78
174/348
|
| #
|
Formation
|
Air Defense Node
|
AD/AP
AS/AS+
|
E-2 Casual W
| #
|
Empty Node
|
| W
|
敵影を見ず。
No enemy spotted.
|
| #
|
Empty Node
|
E-2 Casual X: バシー海峡輸送任務深海駆逐艦 (
PoiDB)
| #
|
Formation
|
Boss Battle Node
|
AD/AP
AS/AS+
|
| X
|
Vanguard
Phases: 2
|
|
3/6
12/24
|
Line Ahead
Phases: 2
|
|
9/17
36/72
|
Line Ahead
Phases: 2
(Final)
|
|
24/47
104/207
|
| #
|
Formation
|
Boss Battle Node
|
AD/AP
AS/AS+
|
Ship Drops
E-3
Commence! Operation Sho-Go 3
発令!「捷三号作戦警戒」
| Rewards
|
| All
|
 Yamashio Maru |
| Equipment/Item
|
丁
Casual
|
丙
Easy
|
乙
Medium
|
甲
Hard
|
Medal |
|
|
1
|
2
|
 Emergency Repair Material |
|
|
2
|
3
|
 New Model Gun Mount Improvement Material |
|
|
|
2
|
Improvement Material |
|
4
|
5
|
6
|
 SK + SG Radar |
|
|
|
1 (★3)
|
 Type 3 Command Liaison Aircraft Kai |
|
1
|
1 (★2)
|
1 (★3)
|
|
|
|
|
|
|
|
|
|
|
|
|
|
|
|
|
|
|
|
|
|
|
|
|
|
|
|
|
|
|
Branching Table
| E-3 Branching Rules
|
| Nodes |
Rules
|
Branching compositions were reported over the course of the event. (NGA and KCNav)
The event guides are to be constructed through the respective Event map page guide and reviewed by editors before being approved here.
Do not under any circumstance update the guides through this page or attempt to fix them through this page.
Please only update guides through their respective sandbox pages.
Ship Bonuses
DISCLAIMER: This information is based on user submitted data and is subject to revisions as more data is gathered. Any version of the ship receives the bonus regardless of remodel.
Ship Bonuses
| Ships
|
Map-wide
|
Part 1
(G, I, J, L)
|
Part 3
(X, V2, Z)
|
Acccuracy / Evasion
|
|
|

|

|
1.26x
|
|
|
1.05x
|

|

|

|

|

|

|
1.1x
|
|
|

|

|

|
|
|
-
|
-
|

|

|

|
1.26x
|
|

|

|
 (?) (?)
|

|

|

|
 (?) (?)
|

|

|
|
|

|
-
|

|

|
|
|
1.26x
|

|

|

|

|

|

|

|

|

|

|

|

|

|

|
-
|
| Coastal Defense Ships (DE)
|
|
|
Map Overview
- This map uses two locks:
 "Combined Fleet" is used for Surface Task Force and Carrier Task Force.
 "Transport Unit" is used for Transport Combined Fleet once the transport phase is open.
- 2 LBASs are available to sortie, a third base is only able to be used in defense.
- Air raids will occur on this map.
Phase 1: Defeat the Enemy Carrier Task Force at L
- STF = 2(F)BB(V), 1CV, 2CA(V), 1CL + 0-2CLT, 0-1CA(V), 1CL, 2-4DD
- Route: 1 A D F I J L
- LBAS: 137/274 AD/AP on Hard Mode (7 Range). It is recommended to send both bases to L.
- Strong AACI as well as some ASW is recommended to be taken on a support ship (Fletcher/Akizuki-Class).
- Offloading Fighter Power to SPF-Muling CAV to enable stronger daytime shelling by the (F)BB(V) as well as CV is recommended especially for last dance.
Phase 2: Deplete the TP Gauge at S
- TCF = 1AV, 4DD, 1XX + 1CL, 1-2XX, 3-4DD
- Main fleet XX can be CL, CAV, or DD; escort fleet XX can be CL, CA(V), or DD.
- Route: 1 A B C M P S
- LoS (Cn1) = 20.0 (on Hard)
- LBAS: 72/161 AP/AS on Hard Mode (6 Range). It is recommended to send both bases to S. One base with high accuracy Bombers could be sent to M (3 Range) to help increase the pass rate.
- One or two strong ASW ships are recommended for C.
- One AACI is recommended for B.
- Due to the boss node containing up to two Ne-Class Kai it is recommended to forgo trying to S-Rank the boss and load out the Escort Fleet for more reliable A-Ranks instead.
Phase 2.5: Unlock the Final Boss at Z
- There are up to 5 requirements to unlock Yokohama Wharf Princess at Z for Phase 3:
| Node
|
L
|
LBAS
|
U
|
V1
|
V2
|
| Hard
|
A+
|
AS
|
AS
|
AS
|
S
|
| Medium
|
-
|
?
|
AS(?)
|
AS
|
S
|
| Easy
|
-
|
?
|
-
|
AS
|
S
|
| Casual
|
-
|
?
|
-
|
AS
|
S
|
- Refer to the composition for Phase 1
- This can be done along with any of the other phases.
| LBAS
|
AP
|
AS
|
AS+
|
| Hard
|
269
|
603
|
1206
|
| Medium
|
223
|
500
|
999
|
| Easy
|
193
|
432
|
864
|
| Casual
|
142
|
318
|
636
|
- STF: 2(F)BB, 1CV(B), 2CA(V), 1CL + 1-2CLT, 0-1CA(V), 1CL, 2-3DD
- Route: 1 A B C T U
- This can be the same fleet as used in Phase 1.
| LBAS
|
AP
|
AS
|
AS+
|
| Hard
|
328
|
737
|
1473
|
| Medium
|
245
|
551
|
1101
|
| Easy
|
220
|
494
|
987
|
| Casual
|
174
|
390
|
780
|
- CTF: 2(F)BB, 3CV(L/B), 1CA(V) + 1-2CLT, 0-1CA(V), 0-1FBB, 1CL, 2-3DD
- Route: 1 A B C R V V1
- This can be the same fleet as used in Phase 3.
| LBAS
|
AP
|
AS
|
AS+
|
| Hard
|
213
|
477
|
954
|
| Medium
|
161
|
362
|
723
|
| Easy
|
159
|
357
|
714
|
| Casual
|
83
|
186
|
372
|
- Refer to the composition for V1 but route to V2 at choice node V.
- Route: 1 A B C R V V2
- Fleet will fight a carrier fleet.
Phase 3: Defeat Yokohama Wharf Princess at Z
- 2(F)BB, 3-4CV(L/B), 0-1CA(V), 0-1SS(V) + 1-2CLT, 0-1CA(V), 0-1FBB, 1CL, 2-3DD
- Route: 1 A B C R V V2 Z
- LBAS: 133/266 AD/AP on Hard (Range 8). It is recommended to send both bases to the Boss.
- This fleet has very high firepower against the boss, but has several shortcomings:
- Carrier Task Force Shelling order may lead to problems on-route with nodes R and V2 as the escort engages first. Sending an LBAS Base to V2 might help alleviate that problem.
- Node R has a torpedo squadron fleet that will be forced on vanguard in last-dance.
- High AA at the Boss and the Route may lead to deplaning of slots.
- A submarine may be used to tank enemy fire on the route and at the boss. This is not recommended on Last Dance and if you want to use special attacks.
- The same AACI/ASW DD as used in Phase 1 may be recycled here.
- 2(F)BB, 2CVL, 2CA(V) + 1-2CLT, 0-1CA(V), 1CL, 2-3DD
- Route: 1 A B C T U X Z
- LBAS: 133/266 AD/AP on Hard (Range 8). It is recommended to send both bases to the Boss.
- This fleet will have lower opening power than the Carrier Task Fleet due to decreased air presence.
Debuff Phase
- It is highly recommended to debuff the boss.
- There are up to 5 requirements needed to debuff the boss once she reaches Last Dance.
| Node
|
B
|
E
|
LBAS
|
S
|
Y
|
| Hard
|
AS
|
AS
|
AS x2
|
A+
|
S
|
| Medium
|
|
AS
|
AS
|
A+
|
S(?)
|
| Easy
|
?
|
?
|
?
|
?
|
?
|
| Casual
|
?
|
?
|
?
|
?
|
?
|
- Most compositions that pass through B can be used.
| LBAS
|
AP
|
AS
|
AS+
|
| Hard
|
134
|
300
|
600
|
| Medium
|
98
|
219
|
438
|
| Easy
|
93
|
207
|
414
|
| Casual
|
63
|
140
|
279
|
- CTF:2(F)BB, 2-4CV(B), 0-2CA(V) + 1-2CLT, 0-1CA(V), 0-1DE, 1CL, 2-3DD (SLOW)
- Route: 1 A D E
- Bringing at least 4 at least (F)BB/CV along with a slow ship in the fleet is recommend for routing to E.
- Fighter muling carriers to help gain AS on E is recommended.
- 1 LBAS Fighter sweep if necessary.
| LBAS
|
AP
|
AS
|
AS+
|
| Hard
|
275
|
617
|
1233
|
| Medium
|
138
|
419
|
637
|
| Easy
|
191
|
429
|
858
|
| Casual
|
145
|
326
|
651
|
- This can be done along with any of the other phases.
| LBAS
|
AP
|
AS
|
AS+
|
| Hard
|
269
|
603
|
1206
|
| Medium
|
223
|
500
|
999
|
| Easy
|
193
|
432
|
864
|
| Casual
|
142
|
318
|
636
|
- Refer to the composition for Phase 2
- CTF: 2(F)BB, 2-4CV(B) 0-2 CA(V)+ 1-2CLT, 0-1CA(V), 0-1FBB, 0-1 DE, 1CL, 2-3DD
- Route: 1 A B C R V V2 Y
- The Fleet used here can be either be a fast or slow fleet:
- A Slow STF with 4+ BB/CV can reach Y.
- A Fast CTF with 6+ BB/CV and 2 DD or less can reach Y
Enemy Compositions
E-3 Hard AB
| #
|
Formation
|
Air Raids
|
AD/AP
AS/AS+
|
| AB
|
Diamond
|
|
130/259
582/1164
|
| Diamond
|
|
100/199
446/891
|
| Diamond
|
|
135/269
603/1206
|
| #
|
Formation
|
Air Raids
|
AD/AP
AS/AS+
|
E-3 Hard A
| #
|
Selection Node
|
| A
|
艦隊の針路を選択できます。提督、どちらの針路をとられますか?
You can decide the fleet's course. Admiral, which heading should we take?
|
| #
|
Selection Node
|
E-3 Hard B: 深海任務部隊 空母艦載機群 (
PoiDB)
| #
|
Formation
|
Air Defense Node
|
AD/AP
AS/AS+
|
| B
|
Diamond
Phases: 2, 3
|
|
55/109
243/486
|
Diamond
Phases: 2, 3
|
|
59/118
264/528
|
Diamond
Phases: 2, 3
|
|
67/134
300/600
|
| #
|
Formation
|
Air Defense Node
|
AD/AP
AS/AS+
|
E-3 Hard C: 深海潜水艦隊 東部群狼集団 (
PoiDB)
| #
|
Formation
|
Normal Battle Node
|
AD/AP
AS/AS+
|
| C
|
Echelon
Line Abreast
Phases: 2, 3
|
|
0/0
0/0
|
Echelon
Line Abreast
Phases: 2, 3
|
|
0/0
0/0
|
Echelon
Line Abreast
Phases: 2, 3
|
|
0/0
0/0
|
| #
|
Formation
|
Normal Battle Node
|
AD/AP
AS/AS+
|
E-3 Hard D: 深海潜水艦隊 西部群狼集団 (
PoiDB)
| #
|
Formation
|
Normal Battle Node
|
AD/AP
AS/AS+
|
| D
|
Echelon
Line Abreast
Phases: 1, 3
|
|
0/0
0/0
|
Echelon
Line Abreast
Phases: 1, 3
|
|
0/0
0/0
|
Echelon
Line Abreast
Phases: 1, 2, 3
|
|
0/0
0/0
|
| #
|
Formation
|
Normal Battle Node
|
AD/AP
AS/AS+
|
E-3 Hard E: 深海任務部隊 空母艦載機群 (
PoiDB)
| #
|
Formation
|
Air Defense Node
|
AD/AP
AS/AS+
|
| E
|
Diamond
Phases: 1, 3
|
|
118/235
527/1053
|
Diamond
Phases: 1, 3
|
|
128/256
575/1149
|
Diamond
Phases: 1
|
|
138/275
617/1233
|
| #
|
Formation
|
Air Defense Node
|
AD/AP
AS/AS+
|
E-3 Hard F
| #
|
Selection Node
|
| F
|
艦隊の針路を選択できます。提督、どちらの針路をとられますか?
You can decide the fleet's course. Admiral, which heading should we take?
|
| #
|
Selection Node
|
E-3 Hard G: 深海任務部隊 前衛巡洋艦戦隊 (
PoiDB)
| #
|
Formation
|
Normal Battle Node
|
AD/AP
AS/AS+
|
| G
|
Line Ahead
Double Line
Vanguard
Phases: 1, 3
|
|
0/0
0/0
|
| #
|
Formation
|
Normal Battle Node
|
AD/AP
AS/AS+
|
E-3 Hard H: 深海任務部隊 空母艦載機群 (
PoiDB)
| #
|
Formation
|
Air Defense Node
|
AD/AP
AS/AS+
|
| H
|
Diamond
Phases: 1, 3
|
|
118/235
527/1053
|
Diamond
Phases: 1, 3
|
|
128/256
575/1149
|
Diamond
Phases: 1
|
|
138/275
617/1233
|
| #
|
Formation
|
Air Defense Node
|
AD/AP
AS/AS+
|
E-3 Hard I: 深海任務部隊 高速戦艦戦隊 (
PoiDB)
| #
|
Formation
|
Normal Battle Node
|
AD/AP
AS/AS+
|
| I
|
Line Ahead
Double Line
Phases: 1, 2, 3
|
|
0/0
0/0
|
Line Ahead
Phases: 1
|
|
0/0
0/0
|
| #
|
Formation
|
Normal Battle Node
|
AD/AP
AS/AS+
|
E-3 Hard J: 深海任務部隊 支援艦隊 (
PoiDB)
| #
|
Formation
|
Normal Battle Node
|
AD/AP
AS/AS+
|
| J
|
Line Ahead
Diamond
Phases: 1, 2, 3
|
|
32/63
140/279
|
Line Ahead
Phases: 1
|
|
36/72
161/321
|
| #
|
Formation
|
Normal Battle Node
|
AD/AP
AS/AS+
|
E-3 Hard K
| #
|
Empty Node
|
| K
|
敵影を見ず。
No enemy spotted.
|
| #
|
Empty Node
|
E-3 Hard L: 深海任務部隊 先鋒空母集団 (
PoiDB)
| #
|
Formation
|
Boss Battle Node
|
AD/AP
AS/AS+
|
| L
|
Cruising Formation 3
Phases: 1, 2, 3
|
|
128/256
575/1149
|
Cruising Formation 3
Phases: 1
(Final)
|
|
138/275
617/1233
|
| #
|
Formation
|
Boss Battle Node
|
AD/AP
AS/AS+
|
E-3 Hard M: 深海任務部隊 中央前衛水雷戦隊 (
PoiDB)
| #
|
Formation
|
Normal Battle Node
|
AD/AP
AS/AS+
|
| M
|
Line Ahead
Double Line
Vanguard
Phases: 2, 3
|
|
0/0
0/0
|
| #
|
Formation
|
Normal Battle Node
|
AD/AP
AS/AS+
|
E-3 Hard N: 深海任務部隊 中央前衛支援集団 (
PoiDB)
| #
|
Formation
|
Normal Battle Node
|
AD/AP
AS/AS+
|
| N
|
Vanguard
Phases: 2
|
|
0/0
0/0
|
| Diamond
|
|
26/52
116/231
|
Double Line
Phases: 2
|
|
0/0
0/0
|
| #
|
Formation
|
Normal Battle Node
|
AD/AP
AS/AS+
|
E-3 Hard O: 深海任務部隊 中央集団補給船団 (
PoiDB)
| #
|
Formation
|
Normal Battle Node
|
AD/AP
AS/AS+
|
| O
|
Vanguard
Phases: 2
|
|
26/52
116/231
|
| #
|
Formation
|
Normal Battle Node
|
AD/AP
AS/AS+
|
E-3 Hard P
| #
|
Landing Node
|
| #
|
Landing Node
|
E-3 Hard Q
| #
|
Empty Node
|
| Q
|
敵影を見ず。
No enemy spotted.
|
| #
|
Empty Node
|
E-3 Hard R: 深海任務部隊 本隊ピケット艦隊 (
PoiDB)
| #
|
Formation
|
Normal Battle Node
|
AD/AP
AS/AS+
|
| R
|
Echelon
Vanguard
Phases: 3
|
|
0/0
0/0
|
Vanguard
Phases: 3
|
|
0/0
0/0
|
| #
|
Formation
|
Normal Battle Node
|
AD/AP
AS/AS+
|
E-3 Hard S: 深海任務部隊 中央集団旗艦艦隊 (
PoiDB)
| #
|
Formation
|
Boss Battle Node
|
AD/AP
AS/AS+
|
| S
|
Line Ahead
Phases: 2, 3
|
|
32/63
140/279
|
Line Ahead
Phases: 2, 3
|
|
36/72
161/321
|
Line Ahead
Phases: 2, 3
(Final)
|
|
36/72
161/321
|
| #
|
Formation
|
Boss Battle Node
|
AD/AP
AS/AS+
|
E-3 Hard T: 深海任務部隊 水上打撃部隊 (
PoiDB)
| #
|
Formation
|
Normal Battle Node
|
AD/AP
AS/AS+
|
| T
|
Line Ahead
Double Line
Phases: 3
|
|
0/0
0/0
|
Line Ahead
Phases: 3
|
|
0/0
0/0
|
| #
|
Formation
|
Normal Battle Node
|
AD/AP
AS/AS+
|
E-3 Hard U: 深海任務部隊 空母艦載機群 (
PoiDB)
| #
|
Formation
|
Air Defense Node
|
AD/AP
AS/AS+
|
| U
|
Diamond
Phases: 3
|
|
123/245
551/1101
|
Diamond
Phases: 3
|
|
126/251
563/1125
|
Diamond
Phases: 3
|
|
164/328
737/1473
|
| #
|
Formation
|
Air Defense Node
|
AD/AP
AS/AS+
|
E-3 Hard V
| #
|
Selection Node
|
| V
|
艦隊の針路を選択できます。提督、どちらの針路をとられますか?
You can decide the fleet's course. Admiral, which heading should we take?
|
| #
|
Selection Node
|
E-3 Hard V1: 深海任務部隊 空母艦載機群 (
PoiDB)
| #
|
Formation
|
Air Defense Node
|
AD/AP
AS/AS+
|
| V1
|
Diamond
Phases: 3
|
|
99/197
441/882
|
Diamond
Phases: 3
|
|
107/213
477/954
|
Diamond
Phases: 3
|
|
111/222
498/996
|
| #
|
Formation
|
Air Defense Node
|
AD/AP
AS/AS+
|
E-3 Hard V2: 深海任務部隊 空母打撃群C集団 (
PoiDB)
| #
|
Formation
|
Normal Battle Node
|
AD/AP
AS/AS+
|
| V2
|
Diamond
Phases: 3
|
|
99/197
441/882
|
Diamond
Phases: 3
|
|
107/213
477/954
|
Diamond
Phases: 3
|
|
111/222
498/996
|
| #
|
Formation
|
Normal Battle Node
|
AD/AP
AS/AS+
|
E-3 Hard W
| #
|
Empty Node
|
| W
|
敵影を見ず。
No enemy spotted.
|
| #
|
Empty Node
|
E-3 Hard X: 深海任務部隊 空母打撃群B集団 (
PoiDB)
| #
|
Formation
|
Normal Battle Node
|
AD/AP
AS/AS+
|
| X
|
Diamond
Phases: 3
|
|
99/197
441/882
|
Diamond
Phases: 3
|
|
107/213
477/954
|
Diamond
Phases: 3
|
|
111/222
498/996
|
| #
|
Formation
|
Normal Battle Node
|
AD/AP
AS/AS+
|
E-3 Hard Y: 深海任務部隊 空母打撃群A集団 (
PoiDB)
| #
|
Formation
|
Normal Battle Node
|
AD/AP
AS/AS+
|
| Y
|
Diamond
Phases: 3
|
|
92/183
411/822
|
Diamond
Phases: 3
|
|
97/194
435/870
|
Diamond
Phases: 3
|
|
102/203
456/912
|
| #
|
Formation
|
Normal Battle Node
|
AD/AP
AS/AS+
|
E-3 Hard Z: 深海任務部隊 主力空母打撃群 (
PoiDB)
| #
|
Formation
|
Boss Battle Node
|
AD/AP
AS/AS+
|
| Z
|
Cruising Formation 3
Phases: 3
|
|
100/199
447/894
|
Cruising Formation 3
Phases: 3
(Final)
|
|
139/277
621/1242
|
| #
|
Formation
|
Boss Battle Node
|
AD/AP
AS/AS+
|
E-3 Medium AB
| #
|
Formation
|
Air Raids
|
AD/AP
AS/AS+
|
| AB
|
Diamond
|
|
110/219
491/981
|
| Diamond
|
|
87/173
387/774
|
| Diamond
|
|
112/223
500/999
|
| #
|
Formation
|
Air Raids
|
AD/AP
AS/AS+
|
E-3 Medium A
| #
|
Selection Node
|
| A
|
艦隊の針路を選択できます。提督、どちらの針路をとられますか?
You can decide the fleet's course. Admiral, which heading should we take?
|
| #
|
Selection Node
|
E-3 Medium B: 深海任務部隊 空母艦載機群 (
PoiDB)
| #
|
Formation
|
Air Defense Node
|
AD/AP
AS/AS+
|
| B
|
Diamond
Phases: 2, 3
|
|
32/63
140/279
|
Diamond
Phases: 2, 3
|
|
47/93
207/414
|
Diamond
Phases: 2, 3
|
|
49/98
219/438
|
| #
|
Formation
|
Air Defense Node
|
AD/AP
AS/AS+
|
E-3 Medium C: 深海潜水艦隊 東部群狼集団 (
PoiDB)
| #
|
Formation
|
Normal Battle Node
|
AD/AP
AS/AS+
|
| C
|
Echelon
Line Abreast
Phases: 2, 3
|
|
0/0
0/0
|
Echelon
Line Abreast
Phases: 2, 3
|
|
0/0
0/0
|
Echelon
Line Abreast
Phases: 2, 3
|
|
0/0
0/0
|
| #
|
Formation
|
Normal Battle Node
|
AD/AP
AS/AS+
|
E-3 Medium D: 深海潜水艦隊 西部群狼集団 (
PoiDB)
| #
|
Formation
|
Normal Battle Node
|
AD/AP
AS/AS+
|
| D
|
Echelon
Line Abreast
Phases: 1, 3
|
|
0/0
0/0
|
Echelon
Line Abreast
Phases: 1, 3
|
|
0/0
0/0
|
Echelon
Line Abreast
Phases: 1, 3
|
|
0/0
0/0
|
| #
|
Formation
|
Normal Battle Node
|
AD/AP
AS/AS+
|
E-3 Medium E: 深海任務部隊 空母艦載機群 (
PoiDB)
| #
|
Formation
|
Air Defense Node
|
AD/AP
AS/AS+
|
| E
|
Diamond
Phases: 1, 3
|
|
94/187
419/837
|
Diamond
Phases: 1
|
|
109/217
486/972
|
| #
|
Formation
|
Air Defense Node
|
AD/AP
AS/AS+
|
E-3 Medium F
| #
|
Selection Node
|
| F
|
艦隊の針路を選択できます。提督、どちらの針路をとられますか?
You can decide the fleet's course. Admiral, which heading should we take?
|
| #
|
Selection Node
|
E-3 Medium G: 深海任務部隊 前衛巡洋艦戦隊 (
PoiDB)
| #
|
Formation
|
Normal Battle Node
|
AD/AP
AS/AS+
|
| G
|
Line Ahead
Double Line
Vanguard
|
|
0/0
0/0
|
| #
|
Formation
|
Normal Battle Node
|
AD/AP
AS/AS+
|
E-3 Medium H: 深海任務部隊 空母艦載機群 (
PoiDB)
| #
|
Formation
|
Air Defense Node
|
AD/AP
AS/AS+
|
| H
|
Diamond
Phases: 3
|
|
94/187
419/837
|
Diamond
Phases: 1
|
|
109/217
486/972
|
| Diamond
|
|
114/227
510/1020
|
| #
|
Formation
|
Air Defense Node
|
AD/AP
AS/AS+
|
E-3 Medium I: 深海任務部隊 高速戦艦戦隊 (
PoiDB)
| #
|
Formation
|
Normal Battle Node
|
AD/AP
AS/AS+
|
| I
|
Line Ahead
Double Line
Phases: 1, 3
|
|
0/0
0/0
|
Line Ahead
Phases: 1
|
|
0/0
0/0
|
| #
|
Formation
|
Normal Battle Node
|
AD/AP
AS/AS+
|
E-3 Medium J: 深海任務部隊 支援艦隊 (
PoiDB)
| #
|
Formation
|
Normal Battle Node
|
AD/AP
AS/AS+
|
| J
|
Line Ahead
Diamond
Phases: 1, 3
|
|
24/47
104/207
|
Line Ahead
Phases: 1
|
|
26/52
116/231
|
| #
|
Formation
|
Normal Battle Node
|
AD/AP
AS/AS+
|
E-3 Medium K
| #
|
Empty Node
|
| K
|
敵影を見ず。
No enemy spotted.
|
| #
|
Empty Node
|
E-3 Medium L: 深海任務部隊 先鋒空母集団 (
PoiDB)
| #
|
Formation
|
Boss Battle Node
|
AD/AP
AS/AS+
|
| L
|
Cruising Formation 3
Phases: 1, 3
|
|
109/217
486/972
|
Cruising Formation 3
Phases: 1
(Final)
|
|
114/227
510/1020
|
| #
|
Formation
|
Boss Battle Node
|
AD/AP
AS/AS+
|
E-3 Medium M: 深海任務部隊 中央前衛水雷戦隊 (
PoiDB)
| #
|
Formation
|
Normal Battle Node
|
AD/AP
AS/AS+
|
| M
|
Line Ahead
Double Line
Vanguard
Phases: 2, 3
|
|
0/0
0/0
|
| #
|
Formation
|
Normal Battle Node
|
AD/AP
AS/AS+
|
E-3 Medium N: 深海任務部隊 中央前衛支援集団 (
PoiDB)
| #
|
Formation
|
Normal Battle Node
|
AD/AP
AS/AS+
|
| N
|
Vanguard
|
|
0/0
0/0
|
| Diamond
|
|
24/47
104/207
|
| Double Line
|
|
0/0
0/0
|
| #
|
Formation
|
Normal Battle Node
|
AD/AP
AS/AS+
|
E-3 Medium O: 深海任務部隊 中央集団補給船団 (
PoiDB)
| #
|
Formation
|
Normal Battle Node
|
AD/AP
AS/AS+
|
| O
|
Vanguard
|
|
24/47
104/207
|
| #
|
Formation
|
Normal Battle Node
|
AD/AP
AS/AS+
|
E-3 Medium P
| #
|
Landing Node
|
| #
|
Landing Node
|
E-3 Medium Q
| #
|
Empty Node
|
| Q
|
敵影を見ず。
No enemy spotted.
|
| #
|
Empty Node
|
E-3 Medium R: 深海任務部隊 本隊ピケット艦隊 (
PoiDB)
| #
|
Formation
|
Normal Battle Node
|
AD/AP
AS/AS+
|
| R
|
Echelon
Vanguard
Phases: 3
|
|
0/0
0/0
|
Vanguard
Phases: 3
|
|
0/0
0/0
|
| #
|
Formation
|
Normal Battle Node
|
AD/AP
AS/AS+
|
E-3 Medium S: 深海任務部隊 中央集団旗艦艦隊 (
PoiDB)
| #
|
Formation
|
Boss Battle Node
|
AD/AP
AS/AS+
|
| S
|
Line Ahead
Phases: 2
|
|
24/47
104/207
|
Line Ahead
Phases: 2, 3
|
|
24/47
104/207
|
Line Ahead
Phases: 2, 3
(Final)
|
|
24/47
104/207
|
| #
|
Formation
|
Boss Battle Node
|
AD/AP
AS/AS+
|
E-3 Medium T: 深海任務部隊 水上打撃部隊 (
PoiDB)
| #
|
Formation
|
Normal Battle Node
|
AD/AP
AS/AS+
|
| T
|
Line Ahead
Double Line
Phases: 3
|
|
0/0
0/0
|
Line Ahead
Phases: 3
|
|
0/0
0/0
|
| #
|
Formation
|
Normal Battle Node
|
AD/AP
AS/AS+
|
E-3 Medium U: 深海任務部隊 空母艦載機群 (
PoiDB)
| #
|
Formation
|
Air Defense Node
|
AD/AP
AS/AS+
|
| U
|
Diamond
Phases: 3
|
|
105/210
471/942
|
Diamond
Phases: 3
|
|
108/215
483/966
|
Diamond
Phases: 3
|
|
123/245
551/1101
|
| #
|
Formation
|
Air Defense Node
|
AD/AP
AS/AS+
|
E-3 Medium V
| #
|
Selection Node
|
| V
|
艦隊の針路を選択できます。提督、どちらの針路をとられますか?
You can decide the fleet's course. Admiral, which heading should we take?
|
| #
|
Selection Node
|
E-3 Medium V1: 深海任務部隊 空母艦載機群 (
PoiDB)
| #
|
Formation
|
Air Defense Node
|
AD/AP
AS/AS+
|
| V1
|
Diamond
Phases: 3
|
|
66/131
294/588
|
Diamond
Phases: 3
|
|
81/161
362/723
|
| #
|
Formation
|
Air Defense Node
|
AD/AP
AS/AS+
|
E-3 Medium V2: 深海任務部隊 空母打撃群C集団 (
PoiDB)
| #
|
Formation
|
Normal Battle Node
|
AD/AP
AS/AS+
|
| V2
|
Diamond
Phases: 3
|
|
66/131
294/588
|
Diamond
Phases: 3
|
|
81/161
362/723
|
Diamond
Phases: 3
|
|
89/177
398/795
|
| #
|
Formation
|
Normal Battle Node
|
AD/AP
AS/AS+
|
E-3 Medium W
| #
|
Empty Node
|
| W
|
敵影を見ず。
No enemy spotted.
|
| #
|
Empty Node
|
E-3 Medium X: 深海任務部隊 空母打撃群B集団 (
PoiDB)
| #
|
Formation
|
Normal Battle Node
|
AD/AP
AS/AS+
|
| X
|
Diamond
Phases: 3
|
|
66/131
294/588
|
Diamond
Phases: 3
|
|
81/161
362/723
|
Diamond
Phases: 3
|
|
89/177
398/795
|
| #
|
Formation
|
Normal Battle Node
|
AD/AP
AS/AS+
|
E-3 Medium Y: 深海任務部隊 空母打撃群A集団 (
PoiDB)
| #
|
Formation
|
Normal Battle Node
|
AD/AP
AS/AS+
|
| Y
|
Diamond
Phases: 3
|
|
71/141
315/630
|
Diamond
Phases: 3
|
|
86/171
383/765
|
| Diamond
|
|
88/176
395/789
|
| #
|
Formation
|
Normal Battle Node
|
AD/AP
AS/AS+
|
E-3 Medium Z: 深海任務部隊 主力空母打撃群 (
PoiDB)
| #
|
Formation
|
Boss Battle Node
|
AD/AP
AS/AS+
|
| Z
|
Cruising Formation 3
Phases: 3
|
|
85/169
380/759
|
Cruising Formation 3
Phases: 3
(Final)
|
|
100/199
447/894
|
| #
|
Formation
|
Boss Battle Node
|
AD/AP
AS/AS+
|
E-3 Easy AB
| #
|
Formation
|
Air Raids
|
AD/AP
AS/AS+
|
| AB
|
Diamond
|
|
74/147
329/657
|
| Diamond
|
|
82/163
365/729
|
| Diamond
|
|
97/193
432/864
|
| #
|
Formation
|
Air Raids
|
AD/AP
AS/AS+
|
E-3 Easy A
| #
|
Selection Node
|
| A
|
艦隊の針路を選択できます。提督、どちらの針路をとられますか?
You can decide the fleet's course. Admiral, which heading should we take?
|
| #
|
Selection Node
|
E-3 Easy B: 深海任務部隊 空母艦載機群 (
PoiDB)
| #
|
Formation
|
Air Defense Node
|
AD/AP
AS/AS+
|
| B
|
Diamond
Phases: 1, 2, 3
|
|
26/52
116/231
|
Diamond
Phases: 2, 3
|
|
32/63
140/279
|
Diamond
Phases: 2, 3
|
|
47/93
207/414
|
| #
|
Formation
|
Air Defense Node
|
AD/AP
AS/AS+
|
E-3 Easy C: 深海潜水艦隊 東部群狼集団 (
PoiDB)
| #
|
Formation
|
Normal Battle Node
|
AD/AP
AS/AS+
|
| C
|
Echelon
Line Abreast
Phases: 1, 2, 3
|
|
0/0
0/0
|
Echelon
Line Abreast
Phases: 2, 3
|
|
0/0
0/0
|
Echelon
Line Abreast
Phases: 2, 3
|
|
0/0
0/0
|
| #
|
Formation
|
Normal Battle Node
|
AD/AP
AS/AS+
|
E-3 Easy D: 深海潜水艦隊 西部群狼集団 (
PoiDB)
| #
|
Formation
|
Normal Battle Node
|
AD/AP
AS/AS+
|
| D
|
Echelon
Line Abreast
Phases: 1, 2, 3
|
|
0/0
0/0
|
Echelon
Line Abreast
Phases: 1, 2, 3
|
|
0/0
0/0
|
Echelon
Line Abreast
Phases: 1, 2, 3
|
|
0/0
0/0
|
| #
|
Formation
|
Normal Battle Node
|
AD/AP
AS/AS+
|
E-3 Easy E: 深海任務部隊 空母艦載機群 (
PoiDB)
| #
|
Formation
|
Air Defense Node
|
AD/AP
AS/AS+
|
| E
|
Diamond
Phases: 1, 3
|
|
76/151
338/675
|
Diamond
Phases: 1, 3
|
|
81/161
362/723
|
Diamond
Phases: 1, 3
|
|
96/191
429/858
|
| #
|
Formation
|
Air Defense Node
|
AD/AP
AS/AS+
|
E-3 Easy F
| #
|
Selection Node
|
| F
|
艦隊の針路を選択できます。提督、どちらの針路をとられますか?
You can decide the fleet's course. Admiral, which heading should we take?
|
| #
|
Selection Node
|
E-3 Easy G: 深海任務部隊 前衛巡洋艦戦隊 (
PoiDB)
| #
|
Formation
|
Normal Battle Node
|
AD/AP
AS/AS+
|
| G
|
Line Ahead
Double Line
Vanguard
Phases: 1
|
|
0/0
0/0
|
| #
|
Formation
|
Normal Battle Node
|
AD/AP
AS/AS+
|
E-3 Easy H: 深海任務部隊 空母艦載機群 (
PoiDB)
| #
|
Formation
|
Air Defense Node
|
AD/AP
AS/AS+
|
| H
|
Diamond
Phases: 1, 3
|
|
76/151
338/675
|
Diamond
Phases: 1
|
|
81/161
362/723
|
Diamond
Phases: 1
|
|
96/191
429/858
|
| #
|
Formation
|
Air Defense Node
|
AD/AP
AS/AS+
|
E-3 Easy I: 深海任務部隊 高速戦艦戦隊 (
PoiDB)
| #
|
Formation
|
Normal Battle Node
|
AD/AP
AS/AS+
|
| I
|
Line Ahead
Double Line
Phases: 1, 2, 3
|
|
0/0
0/0
|
Line Ahead
Phases: 1
|
|
0/0
0/0
|
| #
|
Formation
|
Normal Battle Node
|
AD/AP
AS/AS+
|
E-3 Easy J: 深海任務部隊 支援艦隊 (
PoiDB)
| #
|
Formation
|
Normal Battle Node
|
AD/AP
AS/AS+
|
| J
|
Line Ahead
Diamond
Phases: 1, 2, 3
|
|
24/47
104/207
|
Line Ahead
Phases: 1
|
|
24/47
104/207
|
| #
|
Formation
|
Normal Battle Node
|
AD/AP
AS/AS+
|
E-3 Easy K
| #
|
Empty Node
|
| K
|
敵影を見ず。
No enemy spotted.
|
| #
|
Empty Node
|
E-3 Easy L: 深海任務部隊 先鋒空母集団 (
PoiDB)
| #
|
Formation
|
Boss Battle Node
|
AD/AP
AS/AS+
|
| L
|
Cruising Formation 3
Phases: 1, 2, 3
|
|
81/161
362/723
|
Cruising Formation 3
Phases: 1
(Final)
|
|
96/191
429/858
|
| #
|
Formation
|
Boss Battle Node
|
AD/AP
AS/AS+
|
E-3 Easy M: 深海任務部隊 中央前衛水雷戦隊 (
PoiDB)
| #
|
Formation
|
Normal Battle Node
|
AD/AP
AS/AS+
|
| M
|
Line Ahead
Double Line
Vanguard
Phases: 2, 3
|
|
0/0
0/0
|
| #
|
Formation
|
Normal Battle Node
|
AD/AP
AS/AS+
|
E-3 Easy N: 深海任務部隊 中央前衛支援集団 (
PoiDB)
| #
|
Formation
|
Normal Battle Node
|
AD/AP
AS/AS+
|
| N
|
Vanguard
Phases: 2
|
|
0/0
0/0
|
| Diamond
|
|
9/17
36/72
|
Double Line
Phases: 2
|
|
0/0
0/0
|
| #
|
Formation
|
Normal Battle Node
|
AD/AP
AS/AS+
|
| #
|
Formation
|
Normal Battle Node
|
AD/AP
AS/AS+
|
| #
|
Formation
|
Normal Battle Node
|
AD/AP
AS/AS+
|
E-3 Easy P
| #
|
Landing Node
|
| #
|
Landing Node
|
E-3 Easy Q
| #
|
Empty Node
|
| Q
|
敵影を見ず。
No enemy spotted.
|
| #
|
Empty Node
|
E-3 Easy R: 深海任務部隊 本隊ピケット艦隊 (
PoiDB)
| #
|
Formation
|
Normal Battle Node
|
AD/AP
AS/AS+
|
| R
|
Echelon
Vanguard
Phases: 3
|
|
0/0
0/0
|
Vanguard
Phases: 3
|
|
0/0
0/0
|
| #
|
Formation
|
Normal Battle Node
|
AD/AP
AS/AS+
|
E-3 Easy S: 深海任務部隊 中央集団旗艦艦隊 (
PoiDB)
| #
|
Formation
|
Boss Battle Node
|
AD/AP
AS/AS+
|
| S
|
Line Ahead
Phases: 2, 3
|
|
9/17
36/72
|
Line Ahead
Phases: 2, 3
|
|
24/47
104/207
|
Line Ahead
Phases: 2, 3
(Final)
|
|
24/47
104/207
|
| #
|
Formation
|
Boss Battle Node
|
AD/AP
AS/AS+
|
E-3 Easy T: 深海任務部隊 水上打撃部隊 (
PoiDB)
| #
|
Formation
|
Normal Battle Node
|
AD/AP
AS/AS+
|
| T
|
Line Ahead
Double Line
Phases: 3
|
|
0/0
0/0
|
Line Ahead
Phases: 3
|
|
0/0
0/0
|
| #
|
Formation
|
Normal Battle Node
|
AD/AP
AS/AS+
|
E-3 Easy U: 深海任務部隊 空母艦載機群 (
PoiDB)
| #
|
Formation
|
Air Defense Node
|
AD/AP
AS/AS+
|
| U
|
Diamond
Phases: 3
|
|
85/169
380/759
|
Diamond
Phases: 3
|
|
90/180
404/807
|
Diamond
Phases: 3
|
|
110/220
494/987
|
| #
|
Formation
|
Air Defense Node
|
AD/AP
AS/AS+
|
E-3 Easy V
| #
|
Selection Node
|
| V
|
艦隊の針路を選択できます。提督、どちらの針路をとられますか?
You can decide the fleet's course. Admiral, which heading should we take?
|
| #
|
Selection Node
|
E-3 Easy V1: 深海任務部隊 空母艦載機群 (
PoiDB)
| #
|
Formation
|
Air Defense Node
|
AD/AP
AS/AS+
|
| V1
|
Diamond
Phases: 3
|
|
50/99
222/444
|
Diamond
Phases: 3
|
|
65/129
290/579
|
| Diamond
|
|
80/159
357/714
|
| #
|
Formation
|
Air Defense Node
|
AD/AP
AS/AS+
|
E-3 Easy V2: 深海任務部隊 空母打撃群C集団 (
PoiDB)
| #
|
Formation
|
Normal Battle Node
|
AD/AP
AS/AS+
|
| V2
|
Diamond
Phases: 3
|
|
50/99
222/444
|
Diamond
Phases: 3
|
|
65/129
290/579
|
Diamond
Phases: 3
|
|
80/159
357/714
|
| #
|
Formation
|
Normal Battle Node
|
AD/AP
AS/AS+
|
E-3 Easy W
| #
|
Empty Node
|
| W
|
敵影を見ず。
No enemy spotted.
|
| #
|
Empty Node
|
E-3 Easy X: 深海任務部隊 空母打撃群B集団 (
PoiDB)
| #
|
Formation
|
Normal Battle Node
|
AD/AP
AS/AS+
|
| X
|
Diamond
Phases: 3
|
|
50/99
222/444
|
Diamond
Phases: 3
|
|
65/129
290/579
|
Diamond
Phases: 3
|
|
80/159
357/714
|
| #
|
Formation
|
Normal Battle Node
|
AD/AP
AS/AS+
|
E-3 Easy Y: 深海任務部隊 空母打撃群A集団 (
PoiDB)
| #
|
Formation
|
Normal Battle Node
|
AD/AP
AS/AS+
|
| Y
|
Diamond
Phases: 3
|
|
50/99
222/444
|
Diamond
Phases: 3
|
|
58/115
258/516
|
Diamond
Phases: 3
|
|
73/145
326/651
|
| #
|
Formation
|
Normal Battle Node
|
AD/AP
AS/AS+
|
E-3 Easy Z: 深海任務部隊 主力空母打撃群 (
PoiDB)
| #
|
Formation
|
Boss Battle Node
|
AD/AP
AS/AS+
|
| Z
|
Cruising Formation 3
Phases: 3
|
|
82/164
368/735
|
Cruising Formation 3
Phases: 3
(Final)
|
|
87/174
390/780
|
| #
|
Formation
|
Boss Battle Node
|
AD/AP
AS/AS+
|
E-3 Casual AB
| #
|
Formation
|
Air Raids
|
AD/AP
AS/AS+
|
| AB
|
Diamond
|
|
48/96
215/429
|
| Diamond
|
|
56/112
251/501
|
| Diamond
|
|
71/142
318/636
|
| #
|
Formation
|
Air Raids
|
AD/AP
AS/AS+
|
E-3 Casual A
| #
|
Selection Node
|
| A
|
艦隊の針路を選択できます。提督、どちらの針路をとられますか?
You can decide the fleet's course. Admiral, which heading should we take?
|
| #
|
Selection Node
|
E-3 Casual B: 深海任務部隊 空母艦載機群 (
PoiDB)
| #
|
Formation
|
Air Defense Node
|
AD/AP
AS/AS+
|
| B
|
Diamond
Phases: 2, 3
|
|
24/47
104/207
|
Diamond
Phases: 2, 3
|
|
26/52
116/231
|
Diamond
Phases: 2, 3
|
|
32/63
140/279
|
| #
|
Formation
|
Air Defense Node
|
AD/AP
AS/AS+
|
E-3 Casual C: 深海潜水艦隊 東部群狼集団 (
PoiDB)
| #
|
Formation
|
Normal Battle Node
|
AD/AP
AS/AS+
|
| C
|
Echelon
Line Abreast
Phases: 2, 3
|
|
0/0
0/0
|
Echelon
Line Abreast
Phases: 2, 3
|
|
0/0
0/0
|
| #
|
Formation
|
Normal Battle Node
|
AD/AP
AS/AS+
|
E-3 Casual D: 深海潜水艦隊 西部群狼集団 (
PoiDB)
| #
|
Formation
|
Normal Battle Node
|
AD/AP
AS/AS+
|
| D
|
Echelon
Line Abreast
Phases: 1
|
|
0/0
0/0
|
Echelon
Line Abreast
Phases: 1, 3
|
|
0/0
0/0
|
| #
|
Formation
|
Normal Battle Node
|
AD/AP
AS/AS+
|
E-3 Casual E: 深海任務部隊 空母艦載機群 (
PoiDB)
| #
|
Formation
|
Air Defense Node
|
AD/AP
AS/AS+
|
| E
|
Diamond
Phases: 1
|
|
58/115
258/516
|
Diamond
Phases: 1
|
|
73/145
326/651
|
Diamond
Phases: 1
|
|
76/151
338/675
|
| #
|
Formation
|
Air Defense Node
|
AD/AP
AS/AS+
|
E-3 Casual F
| #
|
Selection Node
|
| F
|
艦隊の針路を選択できます。提督、どちらの針路をとられますか?
You can decide the fleet's course. Admiral, which heading should we take?
|
| #
|
Selection Node
|
E-3 Casual G: 深海任務部隊 前衛巡洋艦戦隊 (
PoiDB)
| #
|
Formation
|
Normal Battle Node
|
AD/AP
AS/AS+
|
| G
|
Line Ahead
Double Line
Vanguard
|
|
0/0
0/0
|
| #
|
Formation
|
Normal Battle Node
|
AD/AP
AS/AS+
|
E-3 Casual H: 深海任務部隊 空母艦載機群 (
PoiDB)
| #
|
Formation
|
Air Defense Node
|
AD/AP
AS/AS+
|
| H
|
Diamond
Phases: 1
|
|
58/115
258/516
|
Diamond
Phases: 1
|
|
73/145
326/651
|
| Diamond
|
|
76/151
338/675
|
| #
|
Formation
|
Air Defense Node
|
AD/AP
AS/AS+
|
E-3 Casual I: 深海任務部隊 高速戦艦戦隊 (
PoiDB)
| #
|
Formation
|
Normal Battle Node
|
AD/AP
AS/AS+
|
| I
|
Line Ahead
Double Line
Phases: 1, 3
|
|
0/0
0/0
|
Line Ahead
Phases: 1
|
|
0/0
0/0
|
| #
|
Formation
|
Normal Battle Node
|
AD/AP
AS/AS+
|
E-3 Casual J: 深海任務部隊 支援艦隊 (
PoiDB)
| #
|
Formation
|
Normal Battle Node
|
AD/AP
AS/AS+
|
| J
|
Line Ahead
Diamond
Phases: 1, 3
|
|
9/17
36/72
|
Line Ahead
Phases: 1
|
|
24/47
104/207
|
| #
|
Formation
|
Normal Battle Node
|
AD/AP
AS/AS+
|
E-3 Casual K
| #
|
Empty Node
|
| K
|
敵影を見ず。
No enemy spotted.
|
| #
|
Empty Node
|
E-3 Casual L: 深海任務部隊 先鋒空母集団 (
PoiDB)
| #
|
Formation
|
Boss Battle Node
|
AD/AP
AS/AS+
|
| L
|
Cruising Formation 3
Phases: 1, 3
|
|
58/115
258/516
|
Cruising Formation 3
Phases: 1
(Final)
|
|
73/145
326/651
|
| #
|
Formation
|
Boss Battle Node
|
AD/AP
AS/AS+
|
E-3 Casual M: 深海任務部隊 中央前衛水雷戦隊 (
PoiDB)
| #
|
Formation
|
Normal Battle Node
|
AD/AP
AS/AS+
|
| M
|
Line Ahead
Double Line
Vanguard
Phases: 2, 3
|
|
0/0
0/0
|
| #
|
Formation
|
Normal Battle Node
|
AD/AP
AS/AS+
|
E-3 Casual N: 深海任務部隊 中央前衛支援集団 (
PoiDB)
| #
|
Formation
|
Normal Battle Node
|
AD/AP
AS/AS+
|
| N
|
Vanguard
Phases: 2, 3
|
|
0/0
0/0
|
Diamond
Phases: 2, 3
|
|
3/6
12/24
|
Double Line
Phases: 2, 3
|
|
0/0
0/0
|
| #
|
Formation
|
Normal Battle Node
|
AD/AP
AS/AS+
|
E-3 Casual O: 深海任務部隊 中央集団補給船団 (
PoiDB)
| #
|
Formation
|
Normal Battle Node
|
AD/AP
AS/AS+
|
| O
|
Double Line
|
|
3/6
12/24
|
| #
|
Formation
|
Normal Battle Node
|
AD/AP
AS/AS+
|
E-3 Casual P
| #
|
Landing Node
|
| #
|
Landing Node
|
E-3 Casual Q
| #
|
Empty Node
|
| Q
|
敵影を見ず。
No enemy spotted.
|
| #
|
Empty Node
|
E-3 Casual R: 深海任務部隊 本隊ピケット艦隊 (
PoiDB)
| #
|
Formation
|
Normal Battle Node
|
AD/AP
AS/AS+
|
| R
|
Echelon
Vanguard
Phases: 3
|
|
0/0
0/0
|
Vanguard
Phases: 3
|
|
0/0
0/0
|
| #
|
Formation
|
Normal Battle Node
|
AD/AP
AS/AS+
|
E-3 Casual S: 深海任務部隊 中央集団旗艦艦隊 (
PoiDB)
| #
|
Formation
|
Boss Battle Node
|
AD/AP
AS/AS+
|
| S
|
Line Ahead
Phases: 2, 3
|
|
3/6
12/24
|
Line Ahead
Phases: 2, 3
|
|
9/17
36/72
|
Line Ahead
Phases: 2, 3
(Final)
|
|
24/47
104/207
|
| #
|
Formation
|
Boss Battle Node
|
AD/AP
AS/AS+
|
E-3 Casual T: 深海任務部隊 水上打撃部隊 (
PoiDB)
| #
|
Formation
|
Normal Battle Node
|
AD/AP
AS/AS+
|
| T
|
Line Ahead
Double Line
Phases: 3
|
|
0/0
0/0
|
| Line Ahead
|
|
0/0
0/0
|
| #
|
Formation
|
Normal Battle Node
|
AD/AP
AS/AS+
|
E-3 Casual U: 深海任務部隊 空母艦載機群 (
PoiDB)
| #
|
Formation
|
Air Defense Node
|
AD/AP
AS/AS+
|
| U
|
Diamond
Phases: 3
|
|
62/123
276/552
|
Diamond
Phases: 3
|
|
67/134
300/600
|
| Diamond
|
|
87/174
390/780
|
| #
|
Formation
|
Air Defense Node
|
AD/AP
AS/AS+
|
E-3 Casual V
| #
|
Selection Node
|
| V
|
艦隊の針路を選択できます。提督、どちらの針路をとられますか?
You can decide the fleet's course. Admiral, which heading should we take?
|
| #
|
Selection Node
|
E-3 Casual V1: 深海任務部隊 空母艦載機群 (
PoiDB)
| #
|
Formation
|
Air Defense Node
|
AD/AP
AS/AS+
|
| V1
|
Diamond
Phases: 3
|
|
37/73
162/324
|
Diamond
Phases: 3
|
|
42/83
186/372
|
| #
|
Formation
|
Air Defense Node
|
AD/AP
AS/AS+
|
E-3 Casual V2: 深海任務部隊 空母打撃群C集団 (
PoiDB)
| #
|
Formation
|
Normal Battle Node
|
AD/AP
AS/AS+
|
| V2
|
Diamond
Phases: 3
|
|
37/73
162/324
|
Diamond
Phases: 3
|
|
42/83
186/372
|
Diamond
Phases: 3
|
|
57/113
254/507
|
| #
|
Formation
|
Normal Battle Node
|
AD/AP
AS/AS+
|
E-3 Casual W
| #
|
Empty Node
|
| W
|
敵影を見ず。
No enemy spotted.
|
| #
|
Empty Node
|
E-3 Casual X: 深海任務部隊 空母打撃群B集団 (
PoiDB)
| #
|
Formation
|
Normal Battle Node
|
AD/AP
AS/AS+
|
| X
|
Diamond
|
|
37/73
162/324
|
| Diamond
|
|
42/83
186/372
|
| Diamond
|
|
57/113
254/507
|
| #
|
Formation
|
Normal Battle Node
|
AD/AP
AS/AS+
|
E-3 Casual Y: 深海任務部隊 空母打撃群A集団 (
PoiDB)
| #
|
Formation
|
Normal Battle Node
|
AD/AP
AS/AS+
|
| Y
|
Diamond
|
|
47/94
210/420
|
| Diamond
|
|
55/110
246/492
|
| #
|
Formation
|
Normal Battle Node
|
AD/AP
AS/AS+
|
E-3 Casual Z: 深海任務部隊 主力空母打撃群 (
PoiDB)
| #
|
Formation
|
Boss Battle Node
|
AD/AP
AS/AS+
|
| Z
|
Cruising Formation 3
Phases: 3
|
|
62/123
276/552
|
Cruising Formation 3
Phases: 3
(Final)
|
|
87/174
390/780
|
| #
|
Formation
|
Boss Battle Node
|
AD/AP
AS/AS+
|
Ship Drops