E-3
Reinforcement Transport! Operation Pedestal
増援輸送!ペデスタル作戦
| Rewards
|
| All
|

|
| Equipment/Item
|
丁
Casual
|
丙
Easy
|
乙
Medium
|
甲
Hard
|
 SM.79 bis |
|
1
|
1 (★1)
|
|
 SM.79 bis (Skilled) |
|
|
|
1
|
 Medal |
|
1
|
2
|
2
|
 Prototype Jinpuu |
|
|
|
1
|
 New Model Aerial Armament Material |
|
1
|
2
|
2
|
 Barracuda Mk.II |
|
1
|
1 (★1)
|
|
 Barracuda Mk.III |
|
|
|
1 (★2)
|
 Corsair Mk.II (Ace) |
|
|
1
|
1 (★2)
|
 First Class Medal |
|
|
|
1
|
|
|
|
|
|
|
|
|
|
|
|
|
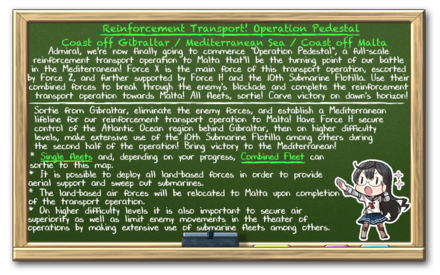
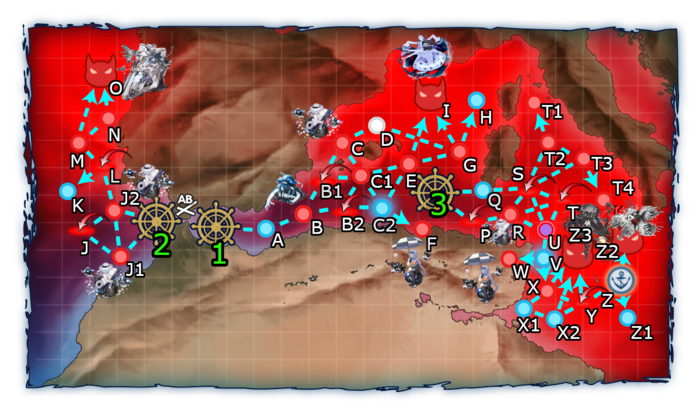
| E-3 Starting Point 1
|
| Nodes |
Rules
|
| Start
|
|
- Meet ALL of the following requirements:
- Do not meet the requirements to start at either 2 or 3.
- Single Fleet or Strike Force
|
|
|
- Meet ALL of the following requirements:
- Starting point 2 is unlocked.
- Do not meet the requirements to start at 3.
- Combined Fleet
|
|
|
- Meet ANY of the following requirements after unlocking starting point 3:
- Combined Fleet AND fleet does not contain ships tagged with Force H.
- Single Fleet (NOT Strike Force) AND fleet only contains SS(V).
- Amount of AS ≥ 1 AND amount of SS(V) ≥ 3
|
|
|
|
- Do not meet the requirements to go to B2.
|
|
|
- Meet ALL of the following requirements:
- Fast Fleet
- Amount of CL ≥ 1
- Amount of DD ≥ 5
- Alternatively, use a Fast+ Fleet.
|
|
|
|
- Do not meet the requirements to go to C1.
|
|
|
- Meet ALL of the following requirements:
- Not a Fast+ Fleet
- Amount of DD ≥ 2
- Amount of (F)BB(V) ≤ 2
- Amount of CV(B) ≤ 2
- Amount of (F)BB(V)+CV(B) ≤ 3
- If amount of (F)BB(V)+CV(L/B) ≥ 2, fleet must be Fast OR fleet must contain a CL.
- Alternatively, fleet only contains SS(V).
|
|
|
|
|
|
|
|
|
|
|
- Do not meet the requirements to go to D.
|
|
|
- Meet ALL of the following requirements:
- Fast+ Fleet
- Amount of DD ≥ 2
- Amount of CV(B) ≤ 2
- Amount of (F)BB(V) ≤ 2
|
|
|
|
- Meet ALL of the following requirements:
- Amount of DD ≥ 2
- Amount of CV(B) ≤ 2
- Amount of (F)BB(V)+CV(L/B) ≤ 3
- Alternatively, fleet only contains SS(V).
|
|
|
- Do not meet the requirements to go to C2.
|
|
|
|
- Choose your own adventure!
|
|
|
|
|
|
- Do not meet the requirements to go to I.
|
|
|
- Meet ALL of the following requirements:
- Amount of CL+DD ≥ 3
- Amount of DD ≥ 2
- Amount of (F)BB(V) ≤ 2
- Amount of CV(B) ≤ 2
- Pass the LoS check (Cn2 ≥ 39).
|
|
|
|
|
|
|
|
| E-3 Starting Point 2
|
| Nodes |
Rules
|
| Start
|
|
- Meet ALL of the following requirements:
- Do not meet the requirements to start at either 2 or 3.
- Single Fleet or Strike Force
|
|
|
- Meet ALL of the following requirements:
- Starting point 2 is unlocked.
- Do not meet the requirements to start at 3.
- Combined Fleet
|
|
|
- Meet ANY of the following requirements after unlocking starting point 3:
- Combined Fleet AND fleet does not contain ships tagged with Force H.
- Single Fleet (NOT Strike Force) AND fleet only contains SS(V).
- Amount of AS ≥ 1 AND amount of SS(V) ≥ 3
|
|
|
|
- Do not meet the requirements to go to J2.
|
|
|
- Meet ALL of the following requirements:
- Amount of (F)BB(V)+CV(L/B) ≤ 6
- If Slow fleet, amount of (F)BB(V)+CV(L/B) ≤ 5
|
|
|
|
|
|
|
|
|
|
|
|
|
|
- Pass the LoS check (Cn1 ≥ 30).
|
|
|
|
- Do not meet the requirements to go to O.
|
|
|
- Meet ALL of the following requirements:
- Amount of (F)BB(V) ≤ 4
- Amount of (F)BB(V)+CV(B) ≤ 6
- If Slow fleet, meet ALL of the following as well:
- Amount of CV(B) ≤ 3
- Amount of (F)BB(V)+CV(B) ≤ 4
|
| E-3 Starting Point 3
|
| Nodes |
Rules
|
| Start
|
|
- Meet ALL of the following requirements:
- Do not meet the requirements to start at either 2 or 3.
- Single Fleet or Strike Force
|
|
|
- Meet ALL of the following requirements:
- Starting point 2 is unlocked.
- Do not meet the requirements to start at 3.
- Combined Fleet
|
|
|
- Meet ANY of the following requirements after unlocking starting point 3:
- Combined Fleet AND fleet does not contain ships tagged with Force H.
- Single Fleet (NOT Strike Force) AND fleet only contains SS(V).
- Amount of AS ≥ 1 AND amount of SS(V) ≥ 3
|
|
|
|
|
|
|
- Single Fleet/Strike Force
|
|
|
|
- Meet ALL of the following requirements:
- Route to node S is unlocked.
- Surface/Carrier Task Force
|
|
|
- Do not meet the requirements to go to either S or U.
|
|
|
- Meet ALL of the following requirements:
- Before unlocking the route to node S:
- Amount of (F)BB(V)+CV(L/B) ≤ 5
- If Slow fleet, amount of (F)BB(V)+CV(L/B) ≤ 4
- After unlocking the route to node S:
- Use a Transport Combined Fleet
|
|
|
|
- If Strike Force, go to T2.
- Else, if amount of ships ≤ 6, random routing between T2 and T3.
|
|
|
|
|
- Combined Fleet, but do not meet the requirements to go to U.
|
|
|
- Meet ALL of the following requirements:
- Combined Fleet
- If Slow fleet, amount of (F)BB(V)+CV(B) ≤ 4
- Amount of CV(B) ≤ 3
- Amount of CV(L/B) ≤ 4
|
|
|
|
From top to bottom:
- If fleet contains CL, go to T1.
- If fleet contains CV(L/B), go to T3.
- If fleet contains neither CL or CV(L/B), random routing.
|
|
|
|
|
|
- Choose your own adventure!
|
|
|
|
|
|
- Meet ALL of the following requirements:
- Node X1 is unlocked.
- Fleet contains either Akitsushima Kai or Akashi Kai.
|
|
|
- Do not meet the requirements to go to either X1 or Z3.
|
|
|
- Meet ALL of the following requirements:
- Node Z3 is unlocked.
- Do not meet the requirements to go to X1.
- Fast Fleet
- Amount of DD ≥ 3
- If Carrier Task Force, amount of (F)BB(V)+CV(B) ≤ 4
- Amount of (F)BB(V)+CV(L/B) ≤ 6
|
|
|
|
- Do not meet the requirements to go to Z3.
|
|
|
- Meet ALL of the following requirements:
- Pass the LoS check.
- Amount of (F)BB(V)+CV(B)+CA(V) ≤ 6
- Amount of (F)BB(V)+CV(L/B) ≤ 4
- Amount of Drum Canister equipped on ships ≤ 2
|
|
|
|
Do not meet the requirements to go to Z3.
|
|
|
- Amount of (F)BB(V)+CV(L/B) > 6
- Otherwise, meet ALL of the following requirements:
- Pass the LoS check.
- Amount of Drum Canister equipped on ships ≤ 2
- Alternatively, amount of (F)BB(V)+CV(L/B) ≥ 6
|
|
|
|
|
|
|
|
Branching compositions were reported over the course of the event. (NGA and KCNav)
The event guides are to be constructed through the respective Event map page guide and reviewed by editor staff / collaboration committee before being approved here. Do not under any circumstance update the guides through this page or attempt to fix them through this page. Please only update guides through their respective sandbox pages.
Ship Bonuses (Tentative)
DISCLAIMER: This information is based on user submitted data and is subject to revisions as more data is gathered. Any version of the ship receives the bonus regardless of remodel.
Ship Bonuses
| Ships
|
Node I
|
Node O
|
Node Z2
|
Node Z3
|

|

|
-
|
1.15x
|
1.15x
|
1.2x
|
1.57x
|

|

|
-
|
1.4x
|

|
-
|
-
|
|
|
|
|

|

|
-
|
1.1x
|
1.05x
|
1.15x
|
1.4x
|

|
-
|
-
|
1.26x
|

|
-
|
-
|
|

|

|
-
|
1.25x
|
1.43x
|

|
-
|
-
|
|

|

|

|
|

|

|
-
|

|
-
|
-
|
1.28x
|

|

|
-
|
1.15x
|

|
-
|
-
|
|

|
-
|
-
|
|
|
|

|
-
|
-
|
|
1.21x
|
|
|

|

|

|
1.05x
|
1.1x
|
1.18x
|

|
-
|
-
|
1.1x
|

|
-
|
-
|
1.34x
|

|
-
|
-
|
|
|
|
|
|

|
-
|
-
|
|
|
1.1x
|
|

|

|

|
1.2x
|
1.34x
|

|
-
|
-
|
|
|
|
Yuugumo-class 


  (?) (?)
|
|
1.15x
|
1.28x
|
Mogami-class


|
|
1.1x
|
| All Non-Historical
|
|
1.05x
|
1.15x
|
| Node Z2 Bonuses (Stacks with above)
|
Multiplier [Total]
|
| Ships
|
Post Phase 3
|
Post Phase 3 (Hard)
|
| Battleships
|
1.1x
|
|
|
|
-
|
-
|
1.1x [1.21x]
|
|
|
|
|
-
|
1.15x [1.39x]
|
|
|
-
|
-
|
1.15x [1.32x]
|

|

|
|
1.1x [1.45x]
|
1.2x [1.74x]
|
|
|
|
|
|
| Non-Historicals
|
1.1x
|
1.25x (??)
|
| Node Z3 Bonuses (Stacks with above)
|
Multiplier [Total]
|
| Ships
|
Debuff Bonuses
|
Boss Debuff (Against
Enemy Flagship Only) Only)
|
|
|
|
-
|
1.1x [1.3x]
|
|
|
|
|
-
|
1.1x [1.38x]
|
|
|
|
-
|
1.15x [1.47x]
|
1.2x [1.76x]
|
|
|
-
|
-
|
1.1x [1.61x]
|
|
|
|
(?)
|
1.15x [1.53x]
|
1.15x [1.75x]
|
|
|
-
|
-
|
|
|
|
-
|
1.15x [1.61x]
|
|
|
|
|
-
|
1.1x [1.77x]
|
|
|
|
|
1.15x [1.64x]
|
|
|
|
|
-
|
1.2x [1.88x]
|
1.1x [2.06x]
|
Yuugumo-class
(?)
|
1.1x [1.41x]
|
1.1x(??) [1.55x]
|
Mogami-class
(?)
|
| Non-Historicals
|
1.1x [1.26x]
|
1.1x [1.38x]
|
Equipment Bonuses
| Historical Aircraft Bonuses
|
?????
|
Land-based
|
 SM.79 SM.79 bis  Do 217 E-5 + Hs293 Initial Model  Do 217 K-2 + Fritz-X |
| Historical Aircraft Bonuses
|
|
|
Aircraft Groups
|
Bonuses
|
| A
|
B
|
C
|
Map-wide
|
Nodes
I/O/Z2
|
Node Z3
|
Aircraft Groups
|
1
|
|
 Skua  Re.2001 CB Kai  Ju 87C Kai  Ju 87C Kai Ni (w/ KMX)  Ju 87C Kai Ni (w/ KMX/Skilled) |
|
1x
|
1x
|
1x
|
| 2
|
 Swordfish  TBF  TBM-3D  FM-2  F4U-1D  F4F-3  F4F-4  F6F-3  F6F-3N  F6F-5 |
 Bf 109T Kai  Fw 190T Kai  Fw 190 A-5 Kai (Skilled) |
|
1.05x
|
1.1x
|
1.1x
|
| 3
|
 Re.2001 G Kai  Swordfish Mk.II (Skilled)  FR-1 Fireball |
 Re.2001 OR Kai  Fulmar |
|
1.08x
|
1.12x
|
1.15x
|
| 4
|
 Swordfish Mk.III (Skilled) Barracuda Mk.II Barracuda Mk.III |
 Re.2005 Kai |
 Corsair Mk.II Corsair Mk.II (Ace)  Seafire Mk.III Kai  Fulmar (Reconnaissance Fighter/Skilled) |
1.08x
|
1.12x
|
1.15x
|
Bonuses
|
Map-wide
|
1x
|
1.08x
|
1.15x
|
|
Nodes
I/O/Z2
|
1x
|
1.08x
|
1.15x
|
Node Z2
(Post
Phase 3)
|
1x
|
1.4x
|
1.15x
|
| Node Z3
|
1x
|
1.1x
|
1.18x
|
tl;dr
For max bonus, take one plane from C4 + one plane each from B3 and A2/B2 or B2 and A3/B3
e.g. C4 + B3 + B2 or C4 + B3 + A2 or C4 + B2 + A3
How to calculate bonus
Multiply all eligible letters together, then multiply all eligible numbers together
e.g.
A1 + A1 = A * 1
A1 + B1 = A * B * 1
A1 + B2 = A * B * 1 * 2
|
| Historical Aircraft Bonuses
|
| Group
|
Map-wide
|
Nodes
I/O/Z2
|
Node Z2
(Post
Phase 3)
|
Node Z3
|
| A
|
1x
|
1x
|
1x
|
1x
|
| B
|
1.08x
|
1.08x
|
1.4x
|
1.1x
|
| C
|
1.15x
|
1.15x
|
1.15x
|
1.18x
|
| 1
|
1x
|
1x
|
1x
|
1x
|
| 2
|
1.05x
|
1.1x
|
1.1x
|
1.1x
|
| 3
|
1.08x
|
1.12x
|
1.12x
|
1.15x
|
| 4
|
1.08x
|
1.12x
|
1.12x
|
1.15x
|
Overview
- This map contains 4 phases.
- Three Land-Based Air Squadrons are available for sortie.
- The air base is relocated once you've reached Phase 4.
- There are 2 event quests linked to this map.
- This map has 4 shiplock tags. The shiplock tags are applied on all difficulties, but they are only enforced on Hard.
- The shiplock restrictions are lifted once the map is cleared. This makes it easier for admirals to farm specific nodes or to clear quests.
The following tags are used in this map:
 Force Z
 Force H
 10th Submarine Fleet
  Force X
Warning: Ships tagged with Force H will force a certain routing, effectively preventing their use in Phase 3 & 4. This applies on all difficulties and also applies post-clear.
Quests
| Quest info
|
Rewards
|
2108 LB3 【地中海拡張作戦】第10潜水戦隊作戦
10th Submarine Squadron Operation
|

0
|

0
|

0
|

700
|
| A Rank nodes T1 and T4 on E-3 twice each.
|
Choose between:
 Type 3 Depth Charge Projector 3x  Type 2 Depth Charge 3x  Type124 ASDIC 2x
Then choose between:
 Action Report 2x  Remodel Blueprint |
| Notes
|
Requires: 2108 LB2
- This quest is not available if E-3 is done on Casual difficulty.
- The 3rd starting point of E-3 must be unlocked first.
- For more info on how to clear T1 and T4, check out Phase 2.5B
- Warning: Changing the difficulty of E-3 will reset the progress of this quest!
|
|
|
2108 LB4 【地中海拡張作戦】北アフリカ作戦
North Africa Operation
|
1000
|
0
|
0
|
0
|
| S Rank nodes F and W on E-3 twice each.
|
 Daihatsu Landing Craft (Panzer II/North African Specification)
Then choose between:
 25mm Single Autocannon Mount 4x  Improvement Material 4x  Development Material 10x |
| Notes
|
Requires: 2108 LB3
- This quest is not available if E-3 is done on either Casual or Easy difficulty.
- For more info on how to clear F and W, check out the following sections:
- For node F, check out Phase 2.5A
- For node W, check out Phase 2.5B
- Warning: Changing the difficulty of E-3 will reset the progress of this quest!
|
|
|
Phase 1: Defeat the Abyssal Mediterranean Princess
The boss is a combined fleet located at node I
- This phase uses a Single Fleet/Strike Force.
- There is air resistance en route to the boss, but the boss itself has no air power.
- The LBAS range to the boss is 6.
- ASW gear should be ignored in favor of using the Vanguard formation to evade the enemy submarines.
- Clearing this phase will automatically unlock the 2nd starting point.
This phase uses the following tag:
Keep in mind that Force Z is also featured in Phase 4, so plan accordingly.
Composition: 1CL 5DD 1XX Fast
- Route: 1 A B B2 C2 E I
- Guarantees the shortest route, but may not be able to defeat the boss.
- Consistent for chipping, but a heavier fleet is desired during Last Dance.
Composition: 2CV(B) 2CVL 1CL 2DD
- Route: 1 A B B1 C1 E I
- A heavier fleet at the cost of having to fight one more battle at C1
- Carriers can make use of the historical bonuses provided by foreign bombers to kill the boss.
Phase 2: Defeat the European Princess
The boss is a combined fleet located at node O
- This phase uses a Combined Fleet.
- The LBAS range to the boss at O is 5.
- Node J2 features the highly dangerous New Submarine Princess.
- Bringing 2 OASW capable ships and/or a LBAS full of ASW aircraft in order to neutralize her is recommended in order to minimize early retreats.
- The LBAS range for node J2 is 1.
- Node M features Heavy Cruiser Ne-Class that are capable of firing opening torpedoes on Hard.
- The formation of this node will be locked at Line Ahead during Last Dance.
- People are encouraged to either use Repair Team or Repair Goddess as part of the strategy. Implementing kuso strategies is also possible. There is simply no good method around this.
This phase uses the following tag:
Warning: Any Combined Fleet containing a ship tagged with Force H will be forced to start at point 2, regardless of difficulty. This effectively means that any ships tagged with Force H cannot be used for phases that involves either Force Z or Force X.
Composition: 4CV(B) 1CAV 1SS(V) + 1CL 2DD 1CA 1FBB 1XX ~Fast~
- Route: 2 J2 L M O
- XX should either be FBB, CVL, CAV or CLT.
- Just like Phase 1, carriers can make use of historical bonuses provided by foreign aircraft in order to deal as much damage as possible during daytime.
- This is important because carriers with the necessary aircraft are capable of defeating the boss at daytime. There are not that many ships capable of dealing decent damage during the night, assuming that the escort fleet is still alive at that point.
- The submarine can help tank some of the incoming shots and improve the survival of the main fleet.
Composition: 4(F)BB(V) 1CV(B) 1XX + 1CL 2DD 1CVL 2CA(V) ~Fast~
- Route: 2 J2 L M O
- XX should either be SS(V) or CA(V).
- An alternative option that doesn't capitalize on the use of historical aircraft, but chooses to conserve bauxite instead.
- Due to the lack of air power, air sweeping the boss to get a favorable air state is recommended.
- Among the fast battleships, only Bismarck
 and Richelieu
 have a decent historical bonus. Using STF on Hard might not be desirable due to the lack of historical bonuses.
Warning: Friendly ships will be sunk intentionally using this strategy.
- This is done by putting fodder destroyers that were intended for modernization/scrapping in the escort in order to tank all the torpedo attacks.
- This strategy is not meant for players who do not want to sink ships for whatever moral reasons.
Option 1: Surface Task Force
Composition: 3(F)BB(V) 1CV(B) 2XX + 1CL 5DD fodders
- Route: 2 J2 L M O
- XX cannot be (F)BB(V) or CV(L/B).
- Damage output from the fleet is limited. Instead, the main source of damage comes boss support and LBAS.
- This option is purely intended for chipping, so it is very unlikely that a clear will occur on harder difficulties.
Option 2: Carrier Task Force
Composition: 4CV(B) 2XX + 1CL 5DD fodders ~Fast~
- Route: 2 J2 L M O
- XX can be anything, but ships that can contribute to air power is recommended.
- Similarly to option 1, but with the huge difference that this is actually capable of killing the boss.
- The effectiveness of this strategy heavily depends on the amount of historical aircraft available.
- This also means that using carriers isn't feasible if the player lacks the historical aircraft.
- This is the recommended strategy in order to defeat the boss if the player has the required aircraft. Using a traditional fleet is simply not as effective on Hard.
Phase 2.5A: Unlock the 3rd starting point
After defeating the European Princess, the 3rd starting point needs to be unlocked in order to continue.
- To unlock the 3rd starting point, it is necessary to meet the requirements as listed below in the table.
All unlock requirements during this phase uses the following tag:
| Node
|
LBAS
|
F
|
G
|
| Hard
|
AS
|
A+
|
S
|
| Medium
|
AS
|
A+
|
-
|
| Easy
|
??
|
??
|
-
|
| Casual
|
-
|
-
|
-
|
Node F features enemy installations and PT-imps.
- Regardless of difficulty, only an A-rank is required to meet this requirement.
- The LBAS range to node F is 5.
- Capitalize on the enemy weaknesses by bringing anti-installation and anti-PT Imps equipment.
- The fleets used to clear node F can also be used to clear node G
Option 1
Composition: 1CV(B) 1CL 5DD Fast
- Route: 1 A B B2 C2 F
- Guarantees the shortest route to the boss.
- With the right equipment, this fleet should be sufficient for an A-rank.
Option 2
Composition: 1(F)BB(V) 2CV(B) 1CA(V) 1CL 2DD
- Route: 1 A B B1 C1 C2 F
- A slightly heavier fleet that allows you to use more capital ships, at the cost of having to fight an extra battle at C1
Node G mainly consists of enemy destroyers, light cruisers and transport ships.
- Getting an S-rank on node G should not be a problem for any decently equipped fleet.
- The LBAS range to node G is 6
- The enemies at node G are weak, thus it is recommended to use the LBAS for other purposes instead, like LBAS defense.
Option 1
Composition: 1CV(B) 1CL 5DD Fast
- Route: 1 A B B2 C2 E G
- LoS Cn2 ≤ 40.
- Guarantees the shortest route to the boss, but it is required to FAIL the LoS check at node E.
Option 2
Composition: 1(F)BB(V) 2CV(B) 1CA(V) 1CL 2DD
- Route: 1 A B B1 C1 C2 E G
- A slightly heavier fleet that allows you to use more capital ships, at the cost of having to fight an extra battle at C1
- Similar to option 1, it is required to FAIL the LoS check at node E.
Option 3
Composition: 1(F)BB(V) 2CV(B) 1CA(V)/CVL 2DD Fast
- Route: 1 A B B1 C1 C2 E G
- A variant of option 2 that uses a Single Fleet instead.
- With the absence of a CL, it is no longer necessary to resort to failing the LoS at node E in order to route to G
Phase 2.5B: Find the New Mediterranean Dreadnought Water Princess
The boss is still missing after unlocking the 3rd starting point. More steps are required in order to reveal node Z2.
- This step is lenghtier than the previous step and involves the use of multiple shiplock tags.
- Warning: Do not use Force H tagged ships in Combined Fleets, as that will force the fleet to start at point 2.
- The results can be inconvenient due to more ships being tagged with Force H.
This phase uses the following tags:
Note: Only ships tagged with Force Z can be used for the final phase on Hard.
|
|
B2
|
T1
|
T2
|
T3
|
T4
|
P
|
U
|
W
|
X
|
| Hard
|
AS
|
S
|
A+
|
A+
|
S
|
AS
|
A+
|
A+
|
S
|
| Medium
|
AS
|
S
|
A+
|
A+
|
S
|
-
|
A+
|
A+
|
A+
|
| Easy
|
??
|
??
|
??
|
??
|
??
|
??
|
A+
|
A+
|
A+
|
| Casual
|
-
|
-
|
-
|
-
|
-
|
-
|
A+
|
-
|
A+
|
Composition: 1CV(L/B) 1CL 5DD Fast
- Route: 1 A B B2
- All CL and DDs are to be equipped with ASW equipment, as this route only features submarines.
- The CV(L/B) should only be equipped with fighters.
- The LBAS range to node B2 is 3.
- Due to the strict requirements of the routing, it might be desirable to air sweep node B2 in order to further lower the required air power.
Node T1 features enemy destroyers, light cruisers and transport ships.
- While node T1 should be trivial for any decent fleet, getting there might be hard due to the strict requirements.
- Admirals who do not have a Submarine Tender (AS) will have to resort to random routing in order to reach T1
- The LBAS range to node T1 is 9.
Option 1
Composition: 1AS 1CL 2CVL 3SS(V)
- Route: 3 Q S T2 T1
- Guarantees routing to T1
Option 2
Composition: 6SS(V)
- Route: 3 Q S T2 T1
- Random routing at nodes S and T2
- This option is reserved for admirals without Submarine Tenders.
Node T4 is a surface battle involving an enemy carrier.
- Admirals who do not have a Submarine Tender (AS) will have to resort to random routing in order to reach T4
- The LBAS range to nodes T3 and T4 is 10.
Option 1
Composition: 1AS 2CVL 3SS(V)
- Routes:
- 3 Q S T3 T4
- 3 Q S T2 T3 T4
- Guarantees routing to T4, but the route it takes is random.
Option 2
Composition: 6SS(V)
- Routes:
- 3 Q S T3 T4
- 3 Q S T2 T3 T4
- Random routing at nodes S and T2
- This option is reserved for admirals without Submarine Tenders.
Nodes P U W X can all be reached using the same fleet.
- Any ships used in this phase will be tagged with Force X
- The Combined Fleet used for this phase will also be used to clear Phase 3.
- Keep in mind that on Hard, you cannot use any ships tagged with Force X for the final boss of this map.
- Avoid bringing Akitsushima Kai
 on Hard, as she will be useful for routing purposes during the final phase.
- Node R features the highly dangerous New Submarine Princess.
- Bringing 2 OASW capable ships and/or a LBAS full of ASW aircraft in order to neutralize her is recommended in order to minimize early retreats.
- Regardless of the chosen fleet, the fleet will always go through nodes P and U
- A node support fleet is recommended in order to improve the passing rate of node U
- Node W features enemy installations and PT imps.
- The LBAS range for this node is 7.
- Only an A-rank is sufficient, regardless of difficulty.
- Keep in mind of the combat flow in a Combined Fleet vs Combined Fleet. The escort fleet will never attack the enemy main fleet during daytime.
- Node X is a straightforward surface battle featuring multiple Re-class battleships.
- The LBAS range for this node is 9.
Surface Task Force
Composition: 2(F)BB(V) 2CVL 2CA(V)/AV + 1CL 3DD 2XX
- Routes:
- XX should either be CA(V), CLT or up to 1 SS(V).
- An all purpose STF that can be outfitted depending on what is required.
Carrier Task Force
Composition: 3CV(L/B) 1(F)BB(V) 2XX + 1CL 3DD 2XX
- Routes:
- XX can't be a (F)BB(V) or CV(L/B).
- The use of CTF allows for more air power, but they are also in a disadvantage when fighting enemy single fleets.
- Unlike STF, the escort fleet attacks first in a CTF. This can be a problem at node X
Phase 3: Clear the TP Phase
Now that node Z2 is unlocked, it is time to clear the TP phase.
- This phase uses a Combined Fleet. The same fleets used in Phase 2.5B can be used to clear this phase.
- The LBAS range to node Z2 is 11.
- The trip to the boss is filled with dangers including a night battle at node U, the New Submarine Princess at node R and Re-class battleships at node X
- Due to all the dangers, using a Fleet Command Facility is highly recommended.
- Using node support can improve the pass rate at U
- The boss is very difficult to defeat on Hard. Expect the majority of the runs to end with A-ranks.
This phase uses the following tag:
Composition: 2(F)BB(V) 2CVL 2CA(V)/AV + 1CL 3DD 2XX
- Route: 3 P R U V X Y Z Z2
- XX should either be CA(V), CLT or up to 1 SS(V).
- An all purpose STF that can be outfitted depending on what is required.
Composition: 3CV(L/B) 1(F)BB(V) or CV(L/B) 2XX + 1CL 3DD 2XX
- Route: 3 P R U V X Y Z Z2
- XX can't be a (F)BB(V) or CV(L/B).
- A carrier fleet that fully makes use of the historical bonuses that are provided by foreign aircraft in order deal high amount of damage during daytime.
- The use of CTF allows for more air power, but they are also in a disadvantage when fighting the fleet at X
- This issue more relevant now that node X is not the final destination. Keep in mind that a STF does not suffer from this problem.
- This option is heavily reliant on foreign aircraft that provides the relevant bonuses. This option is thus not recommended if the player lacks the aircraft to outfit multiple carriers with the historical bonuses.
Phase 4: Defeat the European Armored Carrier Princess
Once the TP phase is cleared, the boss at node Z3 will automatically be unlocked.
- Once LD is reached, head over to Phase 4.5 to further debuff the boss.
- Upon reaching Phase 4, the following shiplock tagging rules are in effect:
- STF/CTF will now be tagged with Force Z. This means that ships tagged with Force X are now unusable in this phase.
- As shiplock tags are only enforced on Hard, admirals on lower difficulties can disregard this.
- Warning: As usual, Combined Fleets that contains Force H tagged ships will be forced to starting point 2, regardless of difficulty.
- The LBAS is relocated to the eastern portion of the map. This will change the LBAS range of all nodes.
- The LBAS range for the boss at node Z3 is 1.
- As the routing barely changes, the strategy largely remains the same as in Phase 3.
- Use OASW/ASW aircraft to deal with the New Submarine Princess at R
- Using Fleet Command Facility is encouraged for chipping the boss.
- A repair node is now available at node X1
- Using Nelson
 in STF is recommended for her touch attack.
- CTF is potentially more potent than STF, but it is also more heavier on bauxite.
This phase uses the following tag:
Option 1
Composition: 3(F)BB(V) 1CV(B) 1CA(V) 1 Akitsushima Kai + 1CL 2-3DD 2-3XX
- Route: 3 P R S U V X X1 X2 Z3
- XX should either be CLT, up to 1 SS(V) or up to 1 CA(V).
- Having Akitsushima Kai skips an additional air node while allowing repairs if damage was sustained.
Option 2
Composition: 4(F)BB(V) 2CVL + 1CL 2-3DD 2-3XX
- Route: 3 P R S U V X Y Z3
- XX should either be CA(V), CLT or up to 1 SS(V).
- This fleet does not rely on Akitsushima Kai.
- This fleet will go through an extra air node, but in return, a heavier fleet can be used against the boss.
Option 1
Composition: 3CV(B) 1CVL 2XX + 1CL 3DD 2XX Fast
- Route: 3 P R S U V X Z3
- XX can't be a (F)BB(V) or CV(L/B).
- A carrier fleet that fully makes use of the historical bonuses that are provided by foreign aircraft in order deal high amount of damage during daytime.
- The use of CTF allows for more air power, but they are also in a disadvantage when fighting the fleet at X
- This issue more relevant now that node X is not the final destination. Keep in mind that a STF does not suffer from this problem.
- This option is heavily reliant on foreign aircraft that provides the relevant bonuses. This option is thus not recommended if the player lacks the aircraft to outfit multiple carriers with the historical bonuses.
Option 2
Composition: 3CV(B) 1CVL 2XX + 1CL 3DD 2FBB Fast
- Route: 3 P R S U V X Y Z3
- Similar to option 1, but now better equipped to deal with node X at the cost of going through an extra air node.
- This option is heavily reliant on foreign aircraft that provides the relevant bonuses. This option is thus not recommended if the player lacks the aircraft to outfit multiple carriers with the historical bonuses.
Phase 4.5: Debuff the boss and finish her off
Once LD is reached against the European Armored Carrier Princess, it is now possible to start debuffing the boss.
- All steps can be done with Force Z tagged ships.
|
|
LBAS
|
I
|
T
|
X
|
Y
|
Z2
|
| Hard
|
AS
|
A+
|
AS
|
S
|
AS
|
S
|
| Medium
|
AS
|
-
|
AS
|
A+
|
AS?
|
A+
|
| Easy
|
AS
|
-
|
-
|
A+
|
AS?
|
A+
|
| Casual
|
AS
|
-
|
-
|
A+
|
-
|
A+
|
Option 1
Composition: 1CL 5DD 1XX Fast
- Route: 1 A B B2 C2 E I
- Guarantees the shortest route and should be sufficient for an A-rank.
Option 2
Composition: 1(F)BB(V) 2CV(B) 1CVL 1CL 2DD
- Route: 1 A B B1 C1 E I
- A heavier fleet at the cost of having to fight one more battle at C1
- Carriers can make use of the historical bonuses provided by foreign bombers to kill the boss.
Carrier Task Force
Composition: 4CV(L/B) 1(F)BB(V) 1XX + 1CL 2DD 3XX
- Route: 3 P R S T
- XX can be anything inside the rules of a Carrier Task Force formation.
Surface Task Force
Composition: 2CA(V) 2CVL 2XX + 1CL 2DD 3XX
- Route: 3 P R S T
- XX should be anything that can contribute to the air power, like AV, CAV and BBV.
- Albeit difficult without the use of LBAS, it is not impossible to clear node T using a STF instead.
Surface Task Force
Composition: 4(F)BB(V) 1CVL 1CVL or Akitsushima Kai + 1CL 2-3DD 2-3XX
- Route: 3 P R S U V X Y Z Z2
- XX should either be CA(V), CLT or up to 1 SS(V).
- Equip at least 3 Drum Canisters. It is not required to equip drums across 3 ships.
- Equip enough fighters on the carriers to ensure AS is achieved on node Y.
Enemy Compositions
E-3 Hard AB
| #
|
Formation
|
Air Raids
|
AD/AP
AS/AS+
|
| AB
|
Diamond
|
|
55/110
246/492
|
| Diamond
|
|
62/123
276/552
|
| Diamond
|
|
67/133
297/594
|
| Diamond
|
|
71/142
318/636
|
| #
|
Formation
|
Air Raids
|
AD/AP
AS/AS+
|
E-3 Hard A
| #
|
Empty Node
|
| A
|
気のせいだった。
「ペデスタル作戦」発動!艦隊、前進!対潜、対空、対水上見張りを厳とせよ!
Must be my imagination.
Begin "Operation Pedestal"! Fleet, advance! Be on high anti-sub, anti-air and anti-surface alert!
|
| #
|
Empty Node
|
E-3 Hard B: 深海潜水艦隊 ジブラルタル警戒線 (
PoiDB)
| #
|
Formation
|
Normal Battle Node
|
AD/AP
AS/AS+
|
| B
|
Echelon
Line Abreast
Phases: 1, 2, 3, 4
|
|
0/0
0/0
|
Echelon
Line Abreast
Phases: 1, 2, 3, 4
|
|
0/0
0/0
|
Echelon
Line Abreast
Phases: 1, 2, 3, 4
|
|
0/0
0/0
|
| #
|
Formation
|
Normal Battle Node
|
AD/AP
AS/AS+
|
E-3 Hard B1: 深海地中海方面 基地航空隊 (
PoiDB)
| #
|
Formation
|
Air Defense Node
|
AD/AP
AS/AS+
|
| B1
|
Diamond
Phases: 1, 2, 3, 4
|
|
55/110
246/492
|
Diamond
Phases: 1, 2, 3, 4
|
|
62/123
276/552
|
Diamond
Phases: 1, 2, 3, 4
|
|
67/133
297/594
|
Diamond
Phases: 1
|
|
71/142
318/636
|
| #
|
Formation
|
Air Defense Node
|
AD/AP
AS/AS+
|
E-3 Hard B2: 深海地中海方面 基地航空隊 (
PoiDB)
| #
|
Formation
|
Air Defense Node
|
AD/AP
AS/AS+
|
| B2
|
Diamond
Phases: 1, 2, 3, 4
|
|
55/110
246/492
|
Diamond
Phases: 1, 2, 3, 4
|
|
62/123
276/552
|
Diamond
Phases: 1, 2, 3, 4
|
|
67/133
297/594
|
Diamond
Phases: 1, 3
|
|
71/142
318/636
|
| #
|
Formation
|
Air Defense Node
|
AD/AP
AS/AS+
|
E-3 Hard C: 深海潜水艦隊 バレアレス海部隊 (
PoiDB)
| #
|
Formation
|
Normal Battle Node
|
AD/AP
AS/AS+
|
| C
|
Echelon
Line Abreast
Phases: 1, 2, 3
|
|
0/0
0/0
|
Echelon
Line Abreast
Phases: 1, 2, 3
|
|
0/0
0/0
|
Echelon
Line Abreast
Phases: 1, 3
|
|
0/0
0/0
|
| #
|
Formation
|
Normal Battle Node
|
AD/AP
AS/AS+
|
E-3 Hard C1: 深海地中海艦隊 前衛警戒部隊 (
PoiDB)
| #
|
Formation
|
Normal Battle Node
|
AD/AP
AS/AS+
|
| C1
|
Line Ahead
Vanguard
Phases: 1, 2, 3, 4
|
|
0/0
0/0
|
Line Ahead
Phases: 1, 4
|
|
0/0
0/0
|
| #
|
Formation
|
Normal Battle Node
|
AD/AP
AS/AS+
|
E-3 Hard C2
| #
|
Selection Node
|
| C2
|
「ペデスタル作戦」発動!艦隊、前進!対潜、対空、対水上見張りを厳とせよ!
Begin "Operation Pedestal"! Fleet, advance! Be on high anti-sub, anti-air and anti-surface alert!
|
| #
|
Selection Node
|
E-3 Hard D: 深海地中海艦隊 高速遊撃戦隊 (
PoiDB)
| #
|
Formation
|
Normal Battle Node
|
AD/AP
AS/AS+
|
| D
|
Line Ahead
Vanguard
Phases: 1, 2, 3
|
|
0/0
0/0
|
Line Ahead
Phases: 1
|
|
0/0
0/0
|
| #
|
Formation
|
Normal Battle Node
|
AD/AP
AS/AS+
|
E-3 Hard E: 深海地中海艦隊 前衛軽空母部隊 (
PoiDB)
| #
|
Formation
|
Normal Battle Node
|
AD/AP
AS/AS+
|
| E
|
Line Ahead
Double Line
Diamond
Phases: 1, 2, 3, 4
|
|
51/101
225/450
|
| #
|
Formation
|
Normal Battle Node
|
AD/AP
AS/AS+
|
E-3 Hard F: 深海北アフリカ集団 兵站西拠点 (
PoiDB)
| #
|
Formation
|
Normal Battle Node
|
AD/AP
AS/AS+
|
| F
|
Cruising Formation 4
Phases: 1, 2
|
|
49/98
219/438
|
Cruising Formation 4
Phases: 3, 4
|
|
0/0
0/0
|
| #
|
Formation
|
Normal Battle Node
|
AD/AP
AS/AS+
|
E-3 Hard G: 深海地中海艦隊 前衛集団補給隊 (
PoiDB)
| #
|
Formation
|
Normal Battle Node
|
AD/AP
AS/AS+
|
| G
|
Diamond
Phases: 1, 2, 3
|
|
0/0
0/0
|
Diamond
Phases: 1, 2, 3
|
|
0/0
0/0
|
Diamond
Phases: 1, 2, 3, 4
|
|
0/0
0/0
|
| #
|
Formation
|
Normal Battle Node
|
AD/AP
AS/AS+
|
E-3 Hard H
| #
|
Empty Node
|
| H
|
敵影を見ず。
「ペデスタル作戦」発動!艦隊、前進!対潜、対空、対水上見張りを厳とせよ!
No enemy spotted.
Begin "Operation Pedestal"! Fleet, advance! Be on high anti-sub, anti-air and anti-surface alert!
|
| #
|
Empty Node
|
E-3 Hard I: 深海地中海艦隊 前衛集団旗艦 (
PoiDB)
| #
|
Formation
|
Boss Battle Node
|
AD/AP
AS/AS+
|
| I
|
Cruising Formation 4
Phases: 1, 2, 3, 4
|
|
0/0
0/0
|
Cruising Formation 4
Phases: 1
(Final)
|
|
0/0
0/0
|
| #
|
Formation
|
Boss Battle Node
|
AD/AP
AS/AS+
|
E-3 Hard J: 深海大西洋方面 基地航空隊 (
PoiDB)
| #
|
Formation
|
Air Defense Node
|
AD/AP
AS/AS+
|
| J
|
Diamond
|
|
55/110
246/492
|
| Diamond
|
|
67/133
297/594
|
Diamond
Phases: 2
|
|
71/142
318/636
|
| #
|
Formation
|
Air Defense Node
|
AD/AP
AS/AS+
|
E-3 Hard J1: 深海潜水艦隊 大西洋群狼部隊II群 (
PoiDB)
| #
|
Formation
|
Normal Battle Node
|
AD/AP
AS/AS+
|
| J1
|
Echelon
Phases: 2
|
|
0/0
0/0
|
Echelon
Line Abreast
Phases: 2
|
|
0/0
0/0
|
Echelon
Line Abreast
Phases: 2
|
|
0/0
0/0
|
| #
|
Formation
|
Normal Battle Node
|
AD/AP
AS/AS+
|
E-3 Hard J2: 深海潜水艦隊 大西洋群狼部隊I群 (
PoiDB)
| #
|
Formation
|
Normal Battle Node
|
AD/AP
AS/AS+
|
| J2
|
Echelon
Line Abreast
Phases: 2
|
|
0/0
0/0
|
Echelon
Line Abreast
Phases: 2
|
|
0/0
0/0
|
Echelon
Line Abreast
Phases: 2, 4
|
|
0/0
0/0
|
| #
|
Formation
|
Normal Battle Node
|
AD/AP
AS/AS+
|
E-3 Hard K
| #
|
Empty Node
|
| K
|
敵影を見ず。
No enemy spotted.
|
| #
|
Empty Node
|
E-3 Hard L: 深海大西洋方面 基地航空隊 (
PoiDB)
| #
|
Formation
|
Air Defense Node
|
AD/AP
AS/AS+
|
| L
|
Diamond
Phases: 2
|
|
55/110
246/492
|
Diamond
Phases: 2
|
|
62/123
276/552
|
Diamond
Phases: 2
|
|
67/133
297/594
|
Diamond
Phases: 2
|
|
71/142
318/636
|
| #
|
Formation
|
Air Defense Node
|
AD/AP
AS/AS+
|
E-3 Hard M: 深海大西洋艦隊 空母打撃群eins (
PoiDB)
| #
|
Formation
|
Normal Battle Node
|
AD/AP
AS/AS+
|
| M
|
Line Ahead
Diamond
Phases: 2
|
|
45/89
198/396
|
Line Ahead
Phases: 2
|
|
45/89
198/396
|
| #
|
Formation
|
Normal Battle Node
|
AD/AP
AS/AS+
|
E-3 Hard N: 深海大西洋艦隊 空母打撃群zwei (
PoiDB)
| #
|
Formation
|
Normal Battle Node
|
AD/AP
AS/AS+
|
| N
|
Diamond
|
|
89/177
396/792
|
Diamond
Phases: 2
|
|
95/189
423/846
|
| Diamond
|
|
95/189
423/846
|
| #
|
Formation
|
Normal Battle Node
|
AD/AP
AS/AS+
|
E-3 Hard O: 深海大西洋艦隊 空母打撃群主力 (
PoiDB)
| #
|
Formation
|
Boss Battle Node
|
AD/AP
AS/AS+
|
| O
|
Cruising Formation 3
Phases: 2
|
|
86/172
386/771
|
Cruising Formation 3
Phases: 2
(Final)
|
|
138/275
618/1236
|
| #
|
Formation
|
Boss Battle Node
|
AD/AP
AS/AS+
|
E-3 Hard P: 深海地中海方面 基地航空隊 (
PoiDB)
| #
|
Formation
|
Air Defense Node
|
AD/AP
AS/AS+
|
| P
|
Diamond
Phases: 3, 4
|
|
55/110
246/492
|
Diamond
Phases: 3, 4
|
|
62/123
276/552
|
Diamond
Phases: 3, 4
|
|
67/133
297/594
|
Diamond
Phases: 4
|
|
71/142
318/636
|
| #
|
Formation
|
Air Defense Node
|
AD/AP
AS/AS+
|
E-3 Hard Q
| #
|
Empty Node
|
| Q
|
気のせいだった。
第10潜水戦隊、出撃!敵水上艦隊を洋上で捕捉、これを撃滅せよ!
Must be my imagination.
10th Submarine Squadron, sortie! Corner the enemy surface fleet and destroy it!
|
| #
|
Empty Node
|
E-3 Hard R: 深海潜水艦隊 地中海潜水戦隊 (
PoiDB)
| #
|
Formation
|
Normal Battle Node
|
AD/AP
AS/AS+
|
| R
|
Echelon
Line Abreast
Phases: 3, 4
|
|
0/0
0/0
|
Echelon
Line Abreast
Phases: 3, 4
|
|
0/0
0/0
|
Echelon
Line Abreast
Phases: 4
|
|
0/0
0/0
|
| #
|
Formation
|
Normal Battle Node
|
AD/AP
AS/AS+
|
E-3 Hard S: 深海地中海方面 航空哨戒部隊 (
PoiDB)
| #
|
Formation
|
Air Defense Node
|
AD/AP
AS/AS+
|
| S
|
Diamond
Phases: 3, 4
|
|
119/238
534/1068
|
Diamond
Phases: 3, 4
|
|
130/259
581/1161
|
Diamond
Phases: 3, 4
|
|
136/272
611/1221
|
Diamond
Phases: 3
|
|
147/293
657/1314
|
| #
|
Formation
|
Air Defense Node
|
AD/AP
AS/AS+
|
E-3 Hard T: 深海地中海方面 航空哨戒部隊 (
PoiDB)
| #
|
Formation
|
Air Defense Node
|
AD/AP
AS/AS+
|
| T
|
Diamond
Phases: 4
|
|
119/238
534/1068
|
Diamond
Phases: 4
|
|
130/259
581/1161
|
Diamond
Phases: 4
|
|
136/272
611/1221
|
| Diamond
|
|
147/293
657/1314
|
| #
|
Formation
|
Air Defense Node
|
AD/AP
AS/AS+
|
E-3 Hard T1: 深海地中海艦隊 予備兵力補給隊 (
PoiDB)
| #
|
Formation
|
Normal Battle Node
|
AD/AP
AS/AS+
|
| T1
|
Double Line
Phases: 3, 4
|
|
0/0
0/0
|
Double Line
Phases: 3, 4
|
|
0/0
0/0
|
Double Line
Phases: 3, 4
|
|
0/0
0/0
|
| #
|
Formation
|
Normal Battle Node
|
AD/AP
AS/AS+
|
E-3 Hard T2: 深海地中海艦隊 予備兵力 III群 (
PoiDB)
| #
|
Formation
|
Normal Battle Node
|
AD/AP
AS/AS+
|
| T2
|
Line Abreast
Phases: 3, 4
|
|
0/0
0/0
|
Line Abreast
Phases: 3, 4
|
|
0/0
0/0
|
Line Abreast
Phases: 3, 4
|
|
0/0
0/0
|
| #
|
Formation
|
Normal Battle Node
|
AD/AP
AS/AS+
|
E-3 Hard T3: 深海地中海艦隊 予備兵力 II群 (
PoiDB)
| #
|
Formation
|
Normal Battle Node
|
AD/AP
AS/AS+
|
| T3
|
Diamond
Phases: 3, 4
|
|
0/0
0/0
|
Diamond
Phases: 3, 4
|
|
0/0
0/0
|
Diamond
Phases: 3, 4
|
|
0/0
0/0
|
| #
|
Formation
|
Normal Battle Node
|
AD/AP
AS/AS+
|
E-3 Hard T4: 深海地中海艦隊 予備兵力 I群 (
PoiDB)
| #
|
Formation
|
Normal Battle Node
|
AD/AP
AS/AS+
|
| T4
|
Diamond
Phases: 3, 4
|
|
45/89
198/396
|
Diamond
Phases: 3, 4
|
|
45/89
198/396
|
Diamond
Phases: 3
|
|
45/89
198/396
|
| #
|
Formation
|
Normal Battle Node
|
AD/AP
AS/AS+
|
E-3 Hard U: 深海地中海 シチリア海峡阻止線 (
PoiDB)
| #
|
Formation
|
Night Battle Node
|
AD/AP
AS/AS+
|
| U
|
Vanguard
Phases: 4
|
|
0/0
0/0
|
Vanguard
Phases: 3, 4
|
|
0/0
0/0
|
Vanguard
Phases: 3, 4
|
|
0/0
0/0
|
| #
|
Formation
|
Night Battle Node
|
AD/AP
AS/AS+
|
E-3 Hard V
| #
|
Selection Node
|
| V
|
艦隊の針路を選択できます。提督、どちらの針路をとられますか?
You can decide the fleet's course. Admiral, which heading should we take?
|
| #
|
Selection Node
|
E-3 Hard W: 深海北アフリカ集団 兵站東拠点 (
PoiDB)
| #
|
Formation
|
Normal Battle Node
|
AD/AP
AS/AS+
|
| W
|
Cruising Formation 4
Phases: 3
|
|
49/98
219/438
|
Cruising Formation 4
Phases: 4
|
|
0/0
0/0
|
| #
|
Formation
|
Normal Battle Node
|
AD/AP
AS/AS+
|
E-3 Hard X: 深海地中海 マルタ阻止限界線 (
PoiDB)
| #
|
Formation
|
Normal Battle Node
|
AD/AP
AS/AS+
|
| X
|
Diamond
Phases: 3, 4
|
|
116/231
519/1038
|
Diamond
Phases: 3, 4
|
|
116/231
519/1038
|
Diamond
Phases: 4
|
|
116/231
519/1038
|
| #
|
Formation
|
Normal Battle Node
|
AD/AP
AS/AS+
|
E-3 Hard X1
| #
|
Repair Node
|
| #
|
Repair Node
|
E-3 Hard X2
| #
|
Empty Node
|
| X2
|
気のせいだった。
艦隊、決戦準備、よし!地中海の水平線に……勝利を刻め!
Must be my imagination.
Fleet is ready for battle! We'll carve victory... on the Mediterranean's dawn's horizon!
|
| #
|
Empty Node
|
E-3 Hard Y: 深海地中海方面 基地航空中央隊 (
PoiDB)
| #
|
Formation
|
Air Defense Node
|
AD/AP
AS/AS+
|
| Y
|
Diamond
Phases: 3, 4
|
|
55/110
246/492
|
Diamond
Phases: 3, 4
|
|
62/123
276/552
|
Diamond
Phases: 3, 4
|
|
67/133
297/594
|
Diamond
Phases: 4
|
|
71/142
318/636
|
| #
|
Formation
|
Air Defense Node
|
AD/AP
AS/AS+
|
E-3 Hard Z
| #
|
Empty Node
|
| Z
|
気のせいだった。
マルタ島への増援輸送作戦は成功です!
Must be my imagination.
The reinforcement transport to Malta is a success!
|
| #
|
Empty Node
|
E-3 Hard Z1
| #
|
Empty Node
|
| Z1
|
敵影を見ず。
マルタ島への増援輸送作戦は成功です!
No enemy spotted.
The reinforcement transport to Malta is a success!
|
| #
|
Empty Node
|
E-3 Hard Z2: 深海地中海 揚陸阻止突撃集団 (
PoiDB)
| #
|
Formation
|
Boss Battle Node
|
AD/AP
AS/AS+
|
| Z2
|
Cruising Formation 4
Phases: 3, 4
|
|
89/177
396/792
|
Cruising Formation 4
Phases: 3, 4
(Final)
|
|
45/89
198/396
|
| #
|
Formation
|
Boss Battle Node
|
AD/AP
AS/AS+
|
E-3 Hard Z3: 深海地中海 空母機動部隊総旗艦 (
PoiDB)
| #
|
Formation
|
Boss Battle Node
|
AD/AP
AS/AS+
|
| Z3
|
Cruising Formation 3
Phases: 4
|
|
91/181
407/813
|
Cruising Formation 3
Phases: 4
(Final)
|
|
96/191
428/855
|
| #
|
Formation
|
Boss Battle Node
|
AD/AP
AS/AS+
|
E-3 Medium AB
| #
|
Formation
|
Air Raids
|
AD/AP
AS/AS+
|
| AB
|
Diamond
|
|
39/78
174/348
|
| Diamond
|
|
44/87
195/390
|
| Diamond
|
|
51/101
225/450
|
| Diamond
|
|
55/110
246/492
|
| #
|
Formation
|
Air Raids
|
AD/AP
AS/AS+
|
E-3 Medium A
| #
|
Empty Node
|
| A
|
気のせいだった。
「ペデスタル作戦」発動!艦隊、前進!対潜、対空、対水上見張りを厳とせよ!
Must be my imagination.
Begin "Operation Pedestal"! Fleet, advance! Be on high anti-sub, anti-air and anti-surface alert!
|
| #
|
Empty Node
|
E-3 Medium B: 深海潜水艦隊 ジブラルタル警戒線 (
PoiDB)
| #
|
Formation
|
Normal Battle Node
|
AD/AP
AS/AS+
|
| B
|
Echelon
Line Abreast
Phases: 1, 2, 3, 4
|
|
0/0
0/0
|
Echelon
Line Abreast
Phases: 1, 2, 3, 4
|
|
0/0
0/0
|
Echelon
Line Abreast
Phases: 1, 2, 3, 4
|
|
0/0
0/0
|
| #
|
Formation
|
Normal Battle Node
|
AD/AP
AS/AS+
|
E-3 Medium B1: 深海地中海方面 基地航空隊 (
PoiDB)
| #
|
Formation
|
Air Defense Node
|
AD/AP
AS/AS+
|
| B1
|
Diamond
Phases: 1, 3, 4
|
|
39/78
174/348
|
Diamond
Phases: 1, 2, 3, 4
|
|
44/87
195/390
|
Diamond
Phases: 1, 2, 3, 4
|
|
51/101
225/450
|
Diamond
Phases: 1, 3, 4
|
|
55/110
246/492
|
| #
|
Formation
|
Air Defense Node
|
AD/AP
AS/AS+
|
E-3 Medium B2: 深海地中海方面 基地航空隊 (
PoiDB)
| #
|
Formation
|
Air Defense Node
|
AD/AP
AS/AS+
|
| B2
|
Diamond
Phases: 1, 2, 3, 4
|
|
39/78
174/348
|
Diamond
Phases: 1, 2, 3, 4
|
|
44/87
195/390
|
Diamond
Phases: 1, 2, 3, 4
|
|
51/101
225/450
|
Diamond
Phases: 1, 2, 3, 4
|
|
55/110
246/492
|
| #
|
Formation
|
Air Defense Node
|
AD/AP
AS/AS+
|
E-3 Medium C: 深海潜水艦隊 バレアレス海部隊 (
PoiDB)
| #
|
Formation
|
Normal Battle Node
|
AD/AP
AS/AS+
|
| C
|
Echelon
Line Abreast
Phases: 1, 3
|
|
0/0
0/0
|
Echelon
Line Abreast
Phases: 1, 3
|
|
0/0
0/0
|
Echelon
Line Abreast
Phases: 1, 3
|
|
0/0
0/0
|
| #
|
Formation
|
Normal Battle Node
|
AD/AP
AS/AS+
|
E-3 Medium C1: 深海地中海艦隊 前衛警戒部隊 (
PoiDB)
| #
|
Formation
|
Normal Battle Node
|
AD/AP
AS/AS+
|
| C1
|
Line Ahead
Vanguard
Phases: 1, 2, 3, 4
|
|
0/0
0/0
|
Line Ahead
Phases: 1, 4
|
|
0/0
0/0
|
| #
|
Formation
|
Normal Battle Node
|
AD/AP
AS/AS+
|
E-3 Medium C2
| #
|
Selection Node
|
| C2
|
「ペデスタル作戦」発動!艦隊、前進!対潜、対空、対水上見張りを厳とせよ!
Begin "Operation Pedestal"! Fleet, advance! Be on high anti-sub, anti-air and anti-surface alert!
|
| #
|
Selection Node
|
| #
|
Formation
|
Normal Battle Node
|
AD/AP
AS/AS+
|
| #
|
Formation
|
Normal Battle Node
|
AD/AP
AS/AS+
|
E-3 Medium E: 深海地中海艦隊 前衛軽空母部隊 (
PoiDB)
| #
|
Formation
|
Normal Battle Node
|
AD/AP
AS/AS+
|
| E
|
Line Ahead
Double Line
Diamond
Phases: 1, 2, 3, 4
|
|
45/89
198/396
|
| #
|
Formation
|
Normal Battle Node
|
AD/AP
AS/AS+
|
E-3 Medium F: 深海北アフリカ集団 兵站西拠点 (
PoiDB)
| #
|
Formation
|
Normal Battle Node
|
AD/AP
AS/AS+
|
| F
|
Cruising Formation 4
Phases: 2
|
|
43/85
189/378
|
Cruising Formation 4
Phases: 3, 4
|
|
0/0
0/0
|
| #
|
Formation
|
Normal Battle Node
|
AD/AP
AS/AS+
|
E-3 Medium G: 深海地中海艦隊 前衛集団補給隊 (
PoiDB)
| #
|
Formation
|
Normal Battle Node
|
AD/AP
AS/AS+
|
| G
|
Diamond
Phases: 1, 2, 3
|
|
0/0
0/0
|
Diamond
Phases: 1, 2, 3
|
|
0/0
0/0
|
Diamond
Phases: 1, 3
|
|
0/0
0/0
|
| #
|
Formation
|
Normal Battle Node
|
AD/AP
AS/AS+
|
E-3 Medium H
| #
|
Empty Node
|
| H
|
敵影を見ず。
「ペデスタル作戦」発動!艦隊、前進!対潜、対空、対水上見張りを厳とせよ!
No enemy spotted.
Begin "Operation Pedestal"! Fleet, advance! Be on high anti-sub, anti-air and anti-surface alert!
|
| #
|
Empty Node
|
E-3 Medium I: 深海地中海艦隊 前衛集団旗艦 (
PoiDB)
| #
|
Formation
|
Boss Battle Node
|
AD/AP
AS/AS+
|
| I
|
Cruising Formation 4
Phases: 1, 2, 3, 4
|
|
0/0
0/0
|
Cruising Formation 4
Phases: 1
(Final)
|
|
0/0
0/0
|
| #
|
Formation
|
Boss Battle Node
|
AD/AP
AS/AS+
|
E-3 Medium J: 深海大西洋方面 基地航空隊 (
PoiDB)
| #
|
Formation
|
Air Defense Node
|
AD/AP
AS/AS+
|
| J
|
Diamond
Phases: 2
|
|
39/78
174/348
|
Diamond
Phases: 2
|
|
44/87
195/390
|
| Diamond
|
|
51/101
225/450
|
Diamond
Phases: 2
|
|
55/110
246/492
|
| #
|
Formation
|
Air Defense Node
|
AD/AP
AS/AS+
|
E-3 Medium J1: 深海潜水艦隊 大西洋群狼部隊II群 (
PoiDB)
| #
|
Formation
|
Normal Battle Node
|
AD/AP
AS/AS+
|
| J1
|
Echelon
Line Abreast
|
|
0/0
0/0
|
Line Abreast
Phases: 2
|
|
0/0
0/0
|
Echelon
Line Abreast
Phases: 2
|
|
0/0
0/0
|
| #
|
Formation
|
Normal Battle Node
|
AD/AP
AS/AS+
|
E-3 Medium J2: 深海潜水艦隊 大西洋群狼部隊I群 (
PoiDB)
| #
|
Formation
|
Normal Battle Node
|
AD/AP
AS/AS+
|
| J2
|
Echelon
Line Abreast
Phases: 2, 3
|
|
0/0
0/0
|
Echelon
Line Abreast
Phases: 2, 3
|
|
0/0
0/0
|
Echelon
Line Abreast
Phases: 2, 3
|
|
0/0
0/0
|
| #
|
Formation
|
Normal Battle Node
|
AD/AP
AS/AS+
|
E-3 Medium K
| #
|
Empty Node
|
| K
|
敵影を見ず。
No enemy spotted.
|
| #
|
Empty Node
|
E-3 Medium L: 深海大西洋方面 基地航空隊 (
PoiDB)
| #
|
Formation
|
Air Defense Node
|
AD/AP
AS/AS+
|
| L
|
Diamond
Phases: 2
|
|
39/78
174/348
|
Diamond
Phases: 2
|
|
44/87
195/390
|
Diamond
Phases: 2
|
|
51/101
225/450
|
Diamond
Phases: 2
|
|
55/110
246/492
|
| #
|
Formation
|
Air Defense Node
|
AD/AP
AS/AS+
|
E-3 Medium M: 深海大西洋艦隊 空母打撃群eins (
PoiDB)
| #
|
Formation
|
Normal Battle Node
|
AD/AP
AS/AS+
|
| M
|
Line Ahead
Diamond
Phases: 2
|
|
43/85
189/378
|
Line Ahead
Phases: 2
|
|
43/85
189/378
|
| #
|
Formation
|
Normal Battle Node
|
AD/AP
AS/AS+
|
E-3 Medium N: 深海大西洋艦隊 空母打撃群zwei (
PoiDB)
| #
|
Formation
|
Normal Battle Node
|
AD/AP
AS/AS+
|
| N
|
Diamond
Phases: 2
|
|
78/156
350/699
|
Diamond
Phases: 2
|
|
87/173
387/774
|
Diamond
Phases: 2
|
|
87/173
387/774
|
| #
|
Formation
|
Normal Battle Node
|
AD/AP
AS/AS+
|
E-3 Medium O: 深海大西洋艦隊 空母打撃群主力 (
PoiDB)
| #
|
Formation
|
Boss Battle Node
|
AD/AP
AS/AS+
|
| O
|
Cruising Formation 3
Phases: 2
|
|
101/201
452/903
|
Cruising Formation 3
Phases: 2
(Final)
|
|
116/231
519/1038
|
| #
|
Formation
|
Boss Battle Node
|
AD/AP
AS/AS+
|
E-3 Medium P: 深海地中海方面 基地航空隊 (
PoiDB)
| #
|
Formation
|
Air Defense Node
|
AD/AP
AS/AS+
|
| P
|
Diamond
Phases: 3, 4
|
|
39/78
174/348
|
Diamond
Phases: 3, 4
|
|
44/87
195/390
|
Diamond
Phases: 3, 4
|
|
51/101
225/450
|
Diamond
Phases: 3, 4
|
|
55/110
246/492
|
| #
|
Formation
|
Air Defense Node
|
AD/AP
AS/AS+
|
E-3 Medium Q
| #
|
Empty Node
|
| Q
|
気のせいだった。
第10潜水戦隊、出撃!敵水上艦隊を洋上で捕捉、これを撃滅せよ!
Must be my imagination.
10th Submarine Squadron, sortie! Corner the enemy surface fleet and destroy it!
|
| #
|
Empty Node
|
E-3 Medium R: 深海潜水艦隊 地中海潜水戦隊 (
PoiDB)
| #
|
Formation
|
Normal Battle Node
|
AD/AP
AS/AS+
|
| R
|
Echelon
Line Abreast
Phases: 3, 4
|
|
0/0
0/0
|
Echelon
Line Abreast
Phases: 3, 4
|
|
0/0
0/0
|
Echelon
Line Abreast
Phases: 3, 4
|
|
0/0
0/0
|
| #
|
Formation
|
Normal Battle Node
|
AD/AP
AS/AS+
|
E-3 Medium S: 深海地中海方面 航空哨戒部隊 (
PoiDB)
| #
|
Formation
|
Air Defense Node
|
AD/AP
AS/AS+
|
| S
|
Diamond
Phases: 3, 4
|
|
103/206
462/924
|
Diamond
Phases: 3, 4
|
|
108/215
483/966
|
Diamond
Phases: 3, 4
|
|
115/229
513/1026
|
Diamond
Phases: 3, 4
|
|
119/238
534/1068
|
| #
|
Formation
|
Air Defense Node
|
AD/AP
AS/AS+
|
E-3 Medium T: 深海地中海方面 航空哨戒部隊 (
PoiDB)
| #
|
Formation
|
Air Defense Node
|
AD/AP
AS/AS+
|
| T
|
Diamond
Phases: 4
|
|
103/206
462/924
|
Diamond
Phases: 3, 4
|
|
108/215
483/966
|
Diamond
Phases: 3, 4
|
|
115/229
513/1026
|
Diamond
Phases: 3, 4
|
|
119/238
534/1068
|
| #
|
Formation
|
Air Defense Node
|
AD/AP
AS/AS+
|
E-3 Medium T1: 深海地中海艦隊 予備兵力補給隊 (
PoiDB)
| #
|
Formation
|
Normal Battle Node
|
AD/AP
AS/AS+
|
| T1
|
Double Line
Phases: 3, 4
|
|
0/0
0/0
|
Double Line
Phases: 3
|
|
0/0
0/0
|
Double Line
Phases: 3
|
|
0/0
0/0
|
| #
|
Formation
|
Normal Battle Node
|
AD/AP
AS/AS+
|
E-3 Medium T2: 深海地中海艦隊 予備兵力 III群 (
PoiDB)
| #
|
Formation
|
Normal Battle Node
|
AD/AP
AS/AS+
|
| T2
|
Line Abreast
Phases: 3
|
|
0/0
0/0
|
Line Abreast
Phases: 3, 4
|
|
0/0
0/0
|
Line Abreast
Phases: 3, 4
|
|
0/0
0/0
|
| #
|
Formation
|
Normal Battle Node
|
AD/AP
AS/AS+
|
E-3 Medium T3: 深海地中海艦隊 予備兵力 II群 (
PoiDB)
| #
|
Formation
|
Normal Battle Node
|
AD/AP
AS/AS+
|
| T3
|
Diamond
Phases: 3, 4
|
|
0/0
0/0
|
Diamond
Phases: 3, 4
|
|
0/0
0/0
|
Diamond
Phases: 3, 4
|
|
0/0
0/0
|
| #
|
Formation
|
Normal Battle Node
|
AD/AP
AS/AS+
|
E-3 Medium T4: 深海地中海艦隊 予備兵力 I群 (
PoiDB)
| #
|
Formation
|
Normal Battle Node
|
AD/AP
AS/AS+
|
| T4
|
Diamond
Phases: 3, 4
|
|
36/71
159/318
|
Diamond
Phases: 3, 4
|
|
36/71
159/318
|
Diamond
Phases: 3, 4
|
|
36/71
159/318
|
| #
|
Formation
|
Normal Battle Node
|
AD/AP
AS/AS+
|
E-3 Medium U: 深海地中海 シチリア海峡阻止線 (
PoiDB)
| #
|
Formation
|
Night Battle Node
|
AD/AP
AS/AS+
|
| U
|
Vanguard
Phases: 4
|
|
0/0
0/0
|
Vanguard
Phases: 3, 4
|
|
0/0
0/0
|
Vanguard
Phases: 3, 4
|
|
0/0
0/0
|
| #
|
Formation
|
Night Battle Node
|
AD/AP
AS/AS+
|
E-3 Medium V
| #
|
Selection Node
|
| V
|
艦隊の針路を選択できます。提督、どちらの針路をとられますか?
You can decide the fleet's course. Admiral, which heading should we take?
|
| #
|
Selection Node
|
E-3 Medium W: 深海北アフリカ集団 兵站東拠点 (
PoiDB)
| #
|
Formation
|
Normal Battle Node
|
AD/AP
AS/AS+
|
| W
|
Cruising Formation 4
Phases: 3
|
|
43/85
189/378
|
Cruising Formation 4
Phases: 4
|
|
0/0
0/0
|
| #
|
Formation
|
Normal Battle Node
|
AD/AP
AS/AS+
|
E-3 Medium X: 深海地中海 マルタ阻止限界線 (
PoiDB)
| #
|
Formation
|
Normal Battle Node
|
AD/AP
AS/AS+
|
| X
|
Diamond
Phases: 3, 4
|
|
105/210
471/942
|
Diamond
Phases: 3, 4
|
|
105/210
471/942
|
Diamond
Phases: 4
|
|
110/219
491/981
|
| #
|
Formation
|
Normal Battle Node
|
AD/AP
AS/AS+
|
E-3 Medium X1
| #
|
Repair Node
|
| #
|
Repair Node
|
E-3 Medium X2
| #
|
Empty Node
|
| X2
|
気のせいだった。
艦隊、決戦準備、よし!地中海の水平線に……勝利を刻め!
Must be my imagination.
Fleet is ready for battle! We'll carve victory... on the Mediterranean's dawn's horizon!
|
| #
|
Empty Node
|
E-3 Medium Y: 深海地中海方面 基地航空中央隊 (
PoiDB)
| #
|
Formation
|
Air Defense Node
|
AD/AP
AS/AS+
|
| Y
|
Diamond
Phases: 3, 4
|
|
39/78
174/348
|
Diamond
Phases: 3, 4
|
|
44/87
195/390
|
Diamond
Phases: 3, 4
|
|
51/101
225/450
|
Diamond
Phases: 3, 4
|
|
55/110
246/492
|
| #
|
Formation
|
Air Defense Node
|
AD/AP
AS/AS+
|
E-3 Medium Z
| #
|
Empty Node
|
| Z
|
気のせいだった。
マルタ島への増援輸送作戦は成功です!
Must be my imagination.
The reinforcement transport to Malta is a success!
|
| #
|
Empty Node
|
E-3 Medium Z1
| #
|
Empty Node
|
| Z1
|
敵影を見ず。
マルタ島への増援輸送作戦は成功です!
No enemy spotted.
The reinforcement transport to Malta is a success!
|
| #
|
Empty Node
|
E-3 Medium Z2: 深海地中海 揚陸阻止突撃集団 (
PoiDB)
| #
|
Formation
|
Boss Battle Node
|
AD/AP
AS/AS+
|
| Z2
|
Cruising Formation 4
Phases: 3, 4
|
|
71/142
318/636
|
Cruising Formation 4
Phases: 3, 4
(Final)
|
|
36/71
159/318
|
| #
|
Formation
|
Boss Battle Node
|
AD/AP
AS/AS+
|
E-3 Medium Z3: 深海地中海 空母機動部隊総旗艦 (
PoiDB)
| #
|
Formation
|
Boss Battle Node
|
AD/AP
AS/AS+
|
| Z3
|
Cruising Formation 3
Phases: 4
|
|
80/159
357/714
|
Cruising Formation 3
Phases: 4
(Final)
|
|
85/169
378/756
|
| #
|
Formation
|
Boss Battle Node
|
AD/AP
AS/AS+
|
E-3 Easy AB
| #
|
Formation
|
Air Raids
|
AD/AP
AS/AS+
|
| AB
|
Diamond
|
|
28/55
123/246
|
| Diamond
|
|
39/78
174/348
|
| Diamond
|
|
44/87
195/390
|
| #
|
Formation
|
Air Raids
|
AD/AP
AS/AS+
|
E-3 Easy A
| #
|
Empty Node
|
| A
|
気のせいだった。
「ペデスタル作戦」発動!艦隊、前進!対潜、対空、対水上見張りを厳とせよ!
Must be my imagination.
Begin "Operation Pedestal"! Fleet, advance! Be on high anti-sub, anti-air and anti-surface alert!
|
| #
|
Empty Node
|
E-3 Easy B: 深海潜水艦隊 ジブラルタル警戒線 (
PoiDB)
| #
|
Formation
|
Normal Battle Node
|
AD/AP
AS/AS+
|
| B
|
Echelon
Line Abreast
Phases: 1, 2, 3, 4
|
|
0/0
0/0
|
Echelon
Line Abreast
Phases: 1, 2, 3, 4
|
|
0/0
0/0
|
Echelon
Line Abreast
Phases: 1, 2, 3, 4
|
|
0/0
0/0
|
| #
|
Formation
|
Normal Battle Node
|
AD/AP
AS/AS+
|
E-3 Easy B1: 深海地中海方面 基地航空隊 (
PoiDB)
| #
|
Formation
|
Air Defense Node
|
AD/AP
AS/AS+
|
| B1
|
Diamond
Phases: 1, 2, 3, 4
|
|
28/55
123/246
|
Diamond
Phases: 1, 2, 3, 4
|
|
39/78
174/348
|
Diamond
Phases: 1, 2, 3, 4
|
|
44/87
195/390
|
| #
|
Formation
|
Air Defense Node
|
AD/AP
AS/AS+
|
E-3 Easy B2: 深海地中海方面 基地航空隊 (
PoiDB)
| #
|
Formation
|
Air Defense Node
|
AD/AP
AS/AS+
|
| B2
|
Diamond
Phases: 1, 3, 4
|
|
28/55
123/246
|
Diamond
Phases: 1, 3, 4
|
|
39/78
174/348
|
Diamond
Phases: 1, 3, 4
|
|
44/87
195/390
|
| #
|
Formation
|
Air Defense Node
|
AD/AP
AS/AS+
|
E-3 Easy C: 深海潜水艦隊 バレアレス海部隊 (
PoiDB)
| #
|
Formation
|
Normal Battle Node
|
AD/AP
AS/AS+
|
| C
|
Echelon
Line Abreast
Phases: 1, 3
|
|
0/0
0/0
|
Echelon
Line Abreast
Phases: 1, 3
|
|
0/0
0/0
|
Echelon
Line Abreast
Phases: 1
|
|
0/0
0/0
|
| #
|
Formation
|
Normal Battle Node
|
AD/AP
AS/AS+
|
E-3 Easy C1: 深海地中海艦隊 前衛警戒部隊 (
PoiDB)
| #
|
Formation
|
Normal Battle Node
|
AD/AP
AS/AS+
|
| C1
|
Line Ahead
Vanguard
Phases: 1, 2, 3, 4
|
|
0/0
0/0
|
Line Ahead
Phases: 1
|
|
0/0
0/0
|
| #
|
Formation
|
Normal Battle Node
|
AD/AP
AS/AS+
|
E-3 Easy C2
| #
|
Selection Node
|
| C2
|
「ペデスタル作戦」発動!艦隊、前進!対潜、対空、対水上見張りを厳とせよ!
Begin "Operation Pedestal"! Fleet, advance! Be on high anti-sub, anti-air and anti-surface alert!
|
| #
|
Selection Node
|
E-3 Easy D: 深海地中海艦隊 高速遊撃戦隊 (
PoiDB)
| #
|
Formation
|
Normal Battle Node
|
AD/AP
AS/AS+
|
| D
|
Line Ahead
Vanguard
|
|
0/0
0/0
|
| #
|
Formation
|
Normal Battle Node
|
AD/AP
AS/AS+
|
E-3 Easy E: 深海地中海艦隊 前衛軽空母部隊 (
PoiDB)
| #
|
Formation
|
Normal Battle Node
|
AD/AP
AS/AS+
|
| E
|
Line Ahead
Double Line
Diamond
Phases: 1, 2, 3, 4
|
|
45/89
198/396
|
| #
|
Formation
|
Normal Battle Node
|
AD/AP
AS/AS+
|
E-3 Easy F: 深海北アフリカ集団 兵站西拠点 (
PoiDB)
| #
|
Formation
|
Normal Battle Node
|
AD/AP
AS/AS+
|
| F
|
Cruising Formation 4
Phases: 1
|
|
39/77
171/342
|
Cruising Formation 4
Phases: 3
|
|
0/0
0/0
|
| #
|
Formation
|
Normal Battle Node
|
AD/AP
AS/AS+
|
E-3 Easy G: 深海地中海艦隊 前衛集団補給隊 (
PoiDB)
| #
|
Formation
|
Normal Battle Node
|
AD/AP
AS/AS+
|
| G
|
Diamond
Phases: 1, 3
|
|
0/0
0/0
|
Diamond
Phases: 1, 2, 3
|
|
0/0
0/0
|
Diamond
Phases: 1
|
|
0/0
0/0
|
Diamond
Phases: 1, 2
|
|
0/0
0/0
|
| #
|
Formation
|
Normal Battle Node
|
AD/AP
AS/AS+
|
E-3 Easy H
| #
|
Empty Node
|
| H
|
敵影を見ず。
「ペデスタル作戦」発動!艦隊、前進!対潜、対空、対水上見張りを厳とせよ!
No enemy spotted.
Begin "Operation Pedestal"! Fleet, advance! Be on high anti-sub, anti-air and anti-surface alert!
|
| #
|
Empty Node
|
E-3 Easy I: 深海地中海艦隊 前衛集団旗艦 (
PoiDB)
| #
|
Formation
|
Boss Battle Node
|
AD/AP
AS/AS+
|
| I
|
Cruising Formation 4
Phases: 1, 2, 3, 4
|
|
0/0
0/0
|
Cruising Formation 4
Phases: 1
(Final)
|
|
0/0
0/0
|
| #
|
Formation
|
Boss Battle Node
|
AD/AP
AS/AS+
|
E-3 Easy J: 深海大西洋方面 基地航空隊 (
PoiDB)
| #
|
Formation
|
Air Defense Node
|
AD/AP
AS/AS+
|
| J
|
Diamond
Phases: 2
|
|
28/55
123/246
|
Diamond
Phases: 2
|
|
39/78
174/348
|
Diamond
Phases: 2
|
|
44/87
195/390
|
| #
|
Formation
|
Air Defense Node
|
AD/AP
AS/AS+
|
E-3 Easy J1: 深海潜水艦隊 大西洋群狼部隊II群 (
PoiDB)
| #
|
Formation
|
Normal Battle Node
|
AD/AP
AS/AS+
|
| J1
|
Echelon
Line Abreast
Phases: 2
|
|
0/0
0/0
|
Echelon
Line Abreast
Phases: 2
|
|
0/0
0/0
|
Echelon
Line Abreast
Phases: 2
|
|
0/0
0/0
|
| #
|
Formation
|
Normal Battle Node
|
AD/AP
AS/AS+
|
E-3 Easy J2: 深海潜水艦隊 大西洋群狼部隊I群 (
PoiDB)
| #
|
Formation
|
Normal Battle Node
|
AD/AP
AS/AS+
|
| J2
|
Echelon
Line Abreast
Phases: 2, 3, 4
|
|
0/0
0/0
|
Echelon
Line Abreast
Phases: 2, 3, 4
|
|
0/0
0/0
|
Echelon
Line Abreast
Phases: 2, 3, 4
|
|
0/0
0/0
|
| #
|
Formation
|
Normal Battle Node
|
AD/AP
AS/AS+
|
E-3 Easy K
| #
|
Empty Node
|
| K
|
敵影を見ず。
No enemy spotted.
|
| #
|
Empty Node
|
E-3 Easy L: 深海大西洋方面 基地航空隊 (
PoiDB)
| #
|
Formation
|
Air Defense Node
|
AD/AP
AS/AS+
|
| L
|
Diamond
Phases: 2, 4
|
|
28/55
123/246
|
Diamond
Phases: 2, 4
|
|
39/78
174/348
|
Diamond
Phases: 2, 3, 4
|
|
44/87
195/390
|
| #
|
Formation
|
Air Defense Node
|
AD/AP
AS/AS+
|
E-3 Easy M: 深海大西洋艦隊 空母打撃群eins (
PoiDB)
| #
|
Formation
|
Normal Battle Node
|
AD/AP
AS/AS+
|
| M
|
Line Ahead
Diamond
Phases: 2, 3, 4
|
|
37/73
162/324
|
Line Ahead
Phases: 2, 4
|
|
37/73
162/324
|
| #
|
Formation
|
Normal Battle Node
|
AD/AP
AS/AS+
|
E-3 Easy N: 深海大西洋艦隊 空母打撃群zwei (
PoiDB)
| #
|
Formation
|
Normal Battle Node
|
AD/AP
AS/AS+
|
| N
|
Diamond
Phases: 2
|
|
45/89
198/396
|
Diamond
Phases: 2
|
|
72/144
323/645
|
Diamond
Phases: 2
|
|
72/144
323/645
|
| #
|
Formation
|
Normal Battle Node
|
AD/AP
AS/AS+
|
E-3 Easy O: 深海大西洋艦隊 空母打撃群主力 (
PoiDB)
| #
|
Formation
|
Boss Battle Node
|
AD/AP
AS/AS+
|
| O
|
Cruising Formation 3
Phases: 2, 4
|
|
65/129
288/576
|
Cruising Formation 3
Phases: 2
(Final)
|
|
101/201
452/903
|
| #
|
Formation
|
Boss Battle Node
|
AD/AP
AS/AS+
|
E-3 Easy P: 深海地中海方面 基地航空隊 (
PoiDB)
| #
|
Formation
|
Air Defense Node
|
AD/AP
AS/AS+
|
| P
|
Diamond
Phases: 3, 4
|
|
28/55
123/246
|
Diamond
Phases: 3, 4
|
|
39/78
174/348
|
Diamond
Phases: 3, 4
|
|
44/87
195/390
|
| #
|
Formation
|
Air Defense Node
|
AD/AP
AS/AS+
|
E-3 Easy Q
| #
|
Empty Node
|
| Q
|
気のせいだった。
第10潜水戦隊、出撃!敵水上艦隊を洋上で捕捉、これを撃滅せよ!
Must be my imagination.
10th Submarine Squadron, sortie! Corner the enemy surface fleet and destroy it!
|
| #
|
Empty Node
|
E-3 Easy R: 深海潜水艦隊 地中海潜水戦隊 (
PoiDB)
| #
|
Formation
|
Normal Battle Node
|
AD/AP
AS/AS+
|
| R
|
Echelon
Line Abreast
Phases: 3, 4
|
|
0/0
0/0
|
Echelon
Line Abreast
Phases: 3, 4
|
|
0/0
0/0
|
Echelon
Line Abreast
Phases: 3, 4
|
|
0/0
0/0
|
| #
|
Formation
|
Normal Battle Node
|
AD/AP
AS/AS+
|
E-3 Easy S: 深海地中海方面 航空哨戒部隊 (
PoiDB)
| #
|
Formation
|
Air Defense Node
|
AD/AP
AS/AS+
|
| S
|
Diamond
Phases: 3, 4
|
|
58/115
257/513
|
Diamond
Phases: 3, 4
|
|
103/206
462/924
|
Diamond
Phases: 3, 4
|
|
108/215
483/966
|
| #
|
Formation
|
Air Defense Node
|
AD/AP
AS/AS+
|
E-3 Easy T: 深海地中海方面 航空哨戒部隊 (
PoiDB)
| #
|
Formation
|
Air Defense Node
|
AD/AP
AS/AS+
|
| T
|
Diamond
Phases: 3
|
|
58/115
257/513
|
Diamond
Phases: 3, 4
|
|
103/206
462/924
|
Diamond
Phases: 3, 4
|
|
108/215
483/966
|
| #
|
Formation
|
Air Defense Node
|
AD/AP
AS/AS+
|
E-3 Easy T1: 深海地中海艦隊 予備兵力補給隊 (
PoiDB)
| #
|
Formation
|
Normal Battle Node
|
AD/AP
AS/AS+
|
| T1
|
Double Line
Phases: 3, 4
|
|
0/0
0/0
|
Double Line
Phases: 3, 4
|
|
0/0
0/0
|
Double Line
Phases: 3, 4
|
|
0/0
0/0
|
| #
|
Formation
|
Normal Battle Node
|
AD/AP
AS/AS+
|
E-3 Easy T2: 深海地中海艦隊 予備兵力 III群 (
PoiDB)
| #
|
Formation
|
Normal Battle Node
|
AD/AP
AS/AS+
|
| T2
|
Line Abreast
Phases: 3, 4
|
|
0/0
0/0
|
Line Abreast
Phases: 3, 4
|
|
0/0
0/0
|
Line Abreast
Phases: 3, 4
|
|
0/0
0/0
|
| #
|
Formation
|
Normal Battle Node
|
AD/AP
AS/AS+
|
E-3 Easy T3: 深海地中海艦隊 予備兵力 II群 (
PoiDB)
| #
|
Formation
|
Normal Battle Node
|
AD/AP
AS/AS+
|
| T3
|
Diamond
Phases: 3
|
|
0/0
0/0
|
Diamond
Phases: 3
|
|
0/0
0/0
|
Diamond
Phases: 3, 4
|
|
0/0
0/0
|
| #
|
Formation
|
Normal Battle Node
|
AD/AP
AS/AS+
|
E-3 Easy T4: 深海地中海艦隊 予備兵力 I群 (
PoiDB)
| #
|
Formation
|
Normal Battle Node
|
AD/AP
AS/AS+
|
| T4
|
Diamond
Phases: 3
|
|
43/85
189/378
|
Diamond
Phases: 3, 4
|
|
43/85
189/378
|
Diamond
Phases: 3
|
|
43/85
189/378
|
| #
|
Formation
|
Normal Battle Node
|
AD/AP
AS/AS+
|
E-3 Easy U: 深海地中海 シチリア海峡阻止線 (
PoiDB)
| #
|
Formation
|
Night Battle Node
|
AD/AP
AS/AS+
|
| U
|
Vanguard
Phases: 3, 4
|
|
0/0
0/0
|
Vanguard
Phases: 3, 4
|
|
0/0
0/0
|
Vanguard
Phases: 4
|
|
0/0
0/0
|
| #
|
Formation
|
Night Battle Node
|
AD/AP
AS/AS+
|
E-3 Easy V
| #
|
Selection Node
|
| V
|
艦隊の針路を選択できます。提督、どちらの針路をとられますか?
You can decide the fleet's course. Admiral, which heading should we take?
|
| #
|
Selection Node
|
E-3 Easy W: 深海北アフリカ集団 兵站東拠点 (
PoiDB)
| #
|
Formation
|
Normal Battle Node
|
AD/AP
AS/AS+
|
| W
|
Cruising Formation 4
Phases: 3
|
|
39/77
171/342
|
| Cruising Formation 4
|
|
0/0
0/0
|
| #
|
Formation
|
Normal Battle Node
|
AD/AP
AS/AS+
|
E-3 Easy X: 深海地中海 マルタ阻止限界線 (
PoiDB)
| #
|
Formation
|
Normal Battle Node
|
AD/AP
AS/AS+
|
| X
|
Diamond
Phases: 3, 4
|
|
68/135
303/606
|
Diamond
Phases: 3, 4
|
|
68/135
303/606
|
Diamond
Phases: 4
|
|
99/198
444/888
|
| #
|
Formation
|
Normal Battle Node
|
AD/AP
AS/AS+
|
E-3 Easy X1
| #
|
Repair Node
|
| #
|
Repair Node
|
E-3 Easy X2
| #
|
Empty Node
|
| X2
|
気のせいだった。
艦隊、決戦準備、よし!地中海の水平線に……勝利を刻め!
Must be my imagination.
Fleet is ready for battle! We'll carve victory... on the Mediterranean's dawn's horizon!
|
| #
|
Empty Node
|
E-3 Easy Y: 深海地中海方面 基地航空中央隊 (
PoiDB)
| #
|
Formation
|
Air Defense Node
|
AD/AP
AS/AS+
|
| Y
|
Diamond
Phases: 3, 4
|
|
28/55
123/246
|
Diamond
Phases: 3, 4
|
|
39/78
174/348
|
Diamond
Phases: 3, 4
|
|
44/87
195/390
|
| #
|
Formation
|
Air Defense Node
|
AD/AP
AS/AS+
|
E-3 Easy Z
| #
|
Empty Node
|
| Z
|
気のせいだった。
マルタ島への増援輸送作戦は成功です!
Must be my imagination.
The reinforcement transport to Malta is a success!
|
| #
|
Empty Node
|
E-3 Easy Z1
| #
|
Empty Node
|
| Z1
|
敵影を見ず。
マルタ島への増援輸送作戦は成功です!
No enemy spotted.
The reinforcement transport to Malta is a success!
|
| #
|
Empty Node
|
E-3 Easy Z2: 深海地中海 揚陸阻止突撃集団 (
PoiDB)
| #
|
Formation
|
Boss Battle Node
|
AD/AP
AS/AS+
|
| Z2
|
Cruising Formation 4
Phases: 3, 4
|
|
43/85
189/378
|
Cruising Formation 4
Phases: 3
(Final)
|
|
85/169
378/756
|
| #
|
Formation
|
Boss Battle Node
|
AD/AP
AS/AS+
|
E-3 Easy Z3: 深海地中海 空母機動部隊総旗艦 (
PoiDB)
| #
|
Formation
|
Boss Battle Node
|
AD/AP
AS/AS+
|
| Z3
|
Cruising Formation 3
Phases: 4
|
|
77/153
342/684
|
Cruising Formation 3
Phases: 4
(Final)
|
|
80/159
357/714
|
| #
|
Formation
|
Boss Battle Node
|
AD/AP
AS/AS+
|
E-3 Casual AB
| #
|
Formation
|
Air Raids
|
AD/AP
AS/AS+
|
| AB
|
Diamond
|
|
17/33
72/144
|
| Diamond
|
|
28/55
123/246
|
| Diamond
|
|
39/78
174/348
|
| #
|
Formation
|
Air Raids
|
AD/AP
AS/AS+
|
E-3 Casual A
| #
|
Empty Node
|
| A
|
気のせいだった。
「ペデスタル作戦」発動!艦隊、前進!対潜、対空、対水上見張りを厳とせよ!
Must be my imagination.
Begin "Operation Pedestal"! Fleet, advance! Be on high anti-sub, anti-air and anti-surface alert!
|
| #
|
Empty Node
|
E-3 Casual B: 深海潜水艦隊 ジブラルタル警戒線 (
PoiDB)
| #
|
Formation
|
Normal Battle Node
|
AD/AP
AS/AS+
|
| B
|
Echelon
Line Abreast
Phases: 1, 2, 3, 4
|
|
0/0
0/0
|
Echelon
Line Abreast
Phases: 1, 2, 3, 4
|
|
0/0
0/0
|
| #
|
Formation
|
Normal Battle Node
|
AD/AP
AS/AS+
|
E-3 Casual B1: 深海地中海方面 基地航空隊 (
PoiDB)
| #
|
Formation
|
Air Defense Node
|
AD/AP
AS/AS+
|
| B1
|
Diamond
Phases: 1, 2, 3, 4
|
|
17/33
72/144
|
Diamond
Phases: 1, 2, 3, 4
|
|
28/55
123/246
|
Diamond
Phases: 1, 2, 3, 4
|
|
39/78
174/348
|
| #
|
Formation
|
Air Defense Node
|
AD/AP
AS/AS+
|
E-3 Casual B2: 深海地中海方面 基地航空隊 (
PoiDB)
| #
|
Formation
|
Air Defense Node
|
AD/AP
AS/AS+
|
| B2
|
Diamond
Phases: 1, 2, 3, 4
|
|
17/33
72/144
|
Diamond
Phases: 1, 2, 3, 4
|
|
28/55
123/246
|
Diamond
Phases: 1, 2, 3, 4
|
|
39/78
174/348
|
| #
|
Formation
|
Air Defense Node
|
AD/AP
AS/AS+
|
E-3 Casual C: 深海潜水艦隊 バレアレス海部隊 (
PoiDB)
| #
|
Formation
|
Normal Battle Node
|
AD/AP
AS/AS+
|
| C
|
Echelon
Line Abreast
Phases: 1, 3
|
|
0/0
0/0
|
Echelon
Line Abreast
Phases: 1
|
|
0/0
0/0
|
| #
|
Formation
|
Normal Battle Node
|
AD/AP
AS/AS+
|
E-3 Casual C1: 深海地中海艦隊 前衛警戒部隊 (
PoiDB)
| #
|
Formation
|
Normal Battle Node
|
AD/AP
AS/AS+
|
| C1
|
Line Ahead
Vanguard
Phases: 1, 2, 3, 4
|
|
0/0
0/0
|
Line Ahead
Phases: 1
|
|
0/0
0/0
|
| #
|
Formation
|
Normal Battle Node
|
AD/AP
AS/AS+
|
E-3 Casual C2
| #
|
Selection Node
|
| C2
|
「ペデスタル作戦」発動!艦隊、前進!対潜、対空、対水上見張りを厳とせよ!
Begin "Operation Pedestal"! Fleet, advance! Be on high anti-sub, anti-air and anti-surface alert!
|
| #
|
Selection Node
|
E-3 Casual D: 深海地中海艦隊 高速遊撃戦隊 (
PoiDB)
| #
|
Formation
|
Normal Battle Node
|
AD/AP
AS/AS+
|
| D
|
Line Ahead
Vanguard
Phases: 1
|
|
0/0
0/0
|
| #
|
Formation
|
Normal Battle Node
|
AD/AP
AS/AS+
|
E-3 Casual E: 深海地中海艦隊 前衛軽空母部隊 (
PoiDB)
| #
|
Formation
|
Normal Battle Node
|
AD/AP
AS/AS+
|
| E
|
Line Ahead
Double Line
Diamond
Phases: 1, 2, 3, 4
|
|
36/72
161/321
|
| #
|
Formation
|
Normal Battle Node
|
AD/AP
AS/AS+
|
E-3 Casual F: 深海北アフリカ集団 兵站西拠点 (
PoiDB)
| #
|
Formation
|
Normal Battle Node
|
AD/AP
AS/AS+
|
| F
|
Cruising Formation 4
|
|
17/34
75/150
|
Cruising Formation 4
Phases: 3
|
|
0/0
0/0
|
| #
|
Formation
|
Normal Battle Node
|
AD/AP
AS/AS+
|
E-3 Casual G: 深海地中海艦隊 前衛集団補給隊 (
PoiDB)
| #
|
Formation
|
Normal Battle Node
|
AD/AP
AS/AS+
|
| G
|
Diamond
Phases: 1, 3
|
|
0/0
0/0
|
Diamond
Phases: 1
|
|
0/0
0/0
|
Diamond
Phases: 1, 3
|
|
0/0
0/0
|
Diamond
Phases: 1
|
|
0/0
0/0
|
| #
|
Formation
|
Normal Battle Node
|
AD/AP
AS/AS+
|
E-3 Casual H
| #
|
Empty Node
|
| H
|
敵影を見ず。
「ペデスタル作戦」発動!艦隊、前進!対潜、対空、対水上見張りを厳とせよ!
No enemy spotted.
Begin "Operation Pedestal"! Fleet, advance! Be on high anti-sub, anti-air and anti-surface alert!
|
| #
|
Empty Node
|
E-3 Casual I: 深海地中海艦隊 前衛集団旗艦 (
PoiDB)
| #
|
Formation
|
Boss Battle Node
|
AD/AP
AS/AS+
|
| I
|
Cruising Formation 4
Phases: 1, 2, 3, 4
|
|
0/0
0/0
|
Cruising Formation 4
Phases: 1
(Final)
|
|
0/0
0/0
|
| #
|
Formation
|
Boss Battle Node
|
AD/AP
AS/AS+
|
E-3 Casual J: 深海大西洋方面 基地航空隊 (
PoiDB)
| #
|
Formation
|
Air Defense Node
|
AD/AP
AS/AS+
|
| J
|
Diamond
Phases: 2
|
|
17/33
72/144
|
Diamond
Phases: 2
|
|
28/55
123/246
|
| Diamond
|
|
39/78
174/348
|
| #
|
Formation
|
Air Defense Node
|
AD/AP
AS/AS+
|
E-3 Casual J1: 深海潜水艦隊 大西洋群狼部隊II群 (
PoiDB)
| #
|
Formation
|
Normal Battle Node
|
AD/AP
AS/AS+
|
| J1
|
Echelon
Line Abreast
Phases: 2
|
|
0/0
0/0
|
Echelon
Line Abreast
Phases: 2
|
|
0/0
0/0
|
| #
|
Formation
|
Normal Battle Node
|
AD/AP
AS/AS+
|
E-3 Casual J2: 深海潜水艦隊 大西洋群狼部隊I群 (
PoiDB)
| #
|
Formation
|
Normal Battle Node
|
AD/AP
AS/AS+
|
| J2
|
Echelon
Line Abreast
Phases: 2, 3, 4
|
|
0/0
0/0
|
Echelon
Line Abreast
Phases: 2, 3
|
|
0/0
0/0
|
| #
|
Formation
|
Normal Battle Node
|
AD/AP
AS/AS+
|
E-3 Casual K
| #
|
Empty Node
|
| K
|
敵影を見ず。
No enemy spotted.
|
| #
|
Empty Node
|
E-3 Casual L: 深海大西洋方面 基地航空隊 (
PoiDB)
| #
|
Formation
|
Air Defense Node
|
AD/AP
AS/AS+
|
| L
|
Diamond
Phases: 2, 3
|
|
17/33
72/144
|
Diamond
Phases: 2, 3
|
|
28/55
123/246
|
Diamond
Phases: 2, 3
|
|
39/78
174/348
|
| #
|
Formation
|
Air Defense Node
|
AD/AP
AS/AS+
|
E-3 Casual M: 深海大西洋艦隊 空母打撃群eins (
PoiDB)
| #
|
Formation
|
Normal Battle Node
|
AD/AP
AS/AS+
|
| M
|
Line Ahead
Diamond
Phases: 2, 3
|
|
35/69
155/309
|
Line Ahead
Phases: 2
|
|
35/69
155/309
|
| #
|
Formation
|
Normal Battle Node
|
AD/AP
AS/AS+
|
E-3 Casual N: 深海大西洋艦隊 空母打撃群zwei (
PoiDB)
| #
|
Formation
|
Normal Battle Node
|
AD/AP
AS/AS+
|
| N
|
Diamond
Phases: 2
|
|
43/85
191/381
|
Diamond
Phases: 2
|
|
43/85
191/381
|
| Diamond
|
|
43/85
191/381
|
| #
|
Formation
|
Normal Battle Node
|
AD/AP
AS/AS+
|
E-3 Casual O: 深海大西洋艦隊 空母打撃群主力 (
PoiDB)
| #
|
Formation
|
Boss Battle Node
|
AD/AP
AS/AS+
|
| O
|
Cruising Formation 3
Phases: 2, 3
|
|
24/47
104/207
|
Cruising Formation 3
Phases: 2
(Final)
|
|
35/69
155/309
|
| #
|
Formation
|
Boss Battle Node
|
AD/AP
AS/AS+
|
E-3 Casual P: 深海地中海方面 基地航空隊 (
PoiDB)
| #
|
Formation
|
Air Defense Node
|
AD/AP
AS/AS+
|
| P
|
Diamond
Phases: 3, 4
|
|
17/33
72/144
|
Diamond
Phases: 3, 4
|
|
28/55
123/246
|
Diamond
Phases: 3, 4
|
|
39/78
174/348
|
| #
|
Formation
|
Air Defense Node
|
AD/AP
AS/AS+
|
E-3 Casual Q
| #
|
Empty Node
|
| Q
|
気のせいだった。
第10潜水戦隊、出撃!敵水上艦隊を洋上で捕捉、これを撃滅せよ!
Must be my imagination.
10th Submarine Squadron, sortie! Corner the enemy surface fleet and destroy it!
|
| #
|
Empty Node
|
E-3 Casual R: 深海潜水艦隊 地中海潜水戦隊 (
PoiDB)
| #
|
Formation
|
Normal Battle Node
|
AD/AP
AS/AS+
|
| R
|
Echelon
Line Abreast
Phases: 3, 4
|
|
0/0
0/0
|
Echelon
Line Abreast
Phases: 3, 4
|
|
0/0
0/0
|
| #
|
Formation
|
Normal Battle Node
|
AD/AP
AS/AS+
|
E-3 Casual S: 深海地中海方面 航空哨戒部隊 (
PoiDB)
| #
|
Formation
|
Air Defense Node
|
AD/AP
AS/AS+
|
| S
|
Diamond
Phases: 3, 4
|
|
46/92
206/411
|
Diamond
Phases: 3, 4
|
|
58/115
257/513
|
Diamond
Phases: 3, 4
|
|
103/206
462/924
|
| #
|
Formation
|
Air Defense Node
|
AD/AP
AS/AS+
|
E-3 Casual T: 深海地中海方面 航空哨戒部隊 (
PoiDB)
| #
|
Formation
|
Air Defense Node
|
AD/AP
AS/AS+
|
| T
|
Diamond
Phases: 3, 4
|
|
46/92
206/411
|
Diamond
Phases: 3, 4
|
|
58/115
257/513
|
Diamond
Phases: 3, 4
|
|
103/206
462/924
|
| #
|
Formation
|
Air Defense Node
|
AD/AP
AS/AS+
|
E-3 Casual T1: 深海地中海艦隊 予備兵力補給隊 (
PoiDB)
| #
|
Formation
|
Normal Battle Node
|
AD/AP
AS/AS+
|
| T1
|
Double Line
Phases: 3
|
|
0/0
0/0
|
Double Line
Phases: 3
|
|
0/0
0/0
|
Double Line
Phases: 3
|
|
0/0
0/0
|
| #
|
Formation
|
Normal Battle Node
|
AD/AP
AS/AS+
|
E-3 Casual T2: 深海地中海艦隊 予備兵力 III群 (
PoiDB)
| #
|
Formation
|
Normal Battle Node
|
AD/AP
AS/AS+
|
| T2
|
Line Abreast
Phases: 3
|
|
0/0
0/0
|
Line Abreast
Phases: 3
|
|
0/0
0/0
|
Line Abreast
Phases: 3, 4
|
|
0/0
0/0
|
| #
|
Formation
|
Normal Battle Node
|
AD/AP
AS/AS+
|
E-3 Casual T3: 深海地中海艦隊 予備兵力 II群 (
PoiDB)
| #
|
Formation
|
Normal Battle Node
|
AD/AP
AS/AS+
|
| T3
|
Diamond
Phases: 3, 4
|
|
0/0
0/0
|
Diamond
Phases: 3, 4
|
|
0/0
0/0
|
Diamond
Phases: 3
|
|
0/0
0/0
|
| #
|
Formation
|
Normal Battle Node
|
AD/AP
AS/AS+
|
E-3 Casual T4: 深海地中海艦隊 予備兵力 I群 (
PoiDB)
| #
|
Formation
|
Normal Battle Node
|
AD/AP
AS/AS+
|
| T4
|
Diamond
Phases: 3, 4
|
|
9/17
36/72
|
Diamond
Phases: 3
|
|
9/17
36/72
|
Diamond
Phases: 3, 4
|
|
9/17
36/72
|
| #
|
Formation
|
Normal Battle Node
|
AD/AP
AS/AS+
|
E-3 Casual U: 深海地中海 シチリア海峡阻止線 (
PoiDB)
| #
|
Formation
|
Night Battle Node
|
AD/AP
AS/AS+
|
| U
|
Vanguard
Phases: 4
|
|
0/0
0/0
|
Vanguard
Phases: 3, 4
|
|
0/0
0/0
|
Vanguard
Phases: 3, 4
|
|
0/0
0/0
|
| #
|
Formation
|
Night Battle Node
|
AD/AP
AS/AS+
|
E-3 Casual V
| #
|
Selection Node
|
| V
|
艦隊の針路を選択できます。提督、どちらの針路をとられますか?
You can decide the fleet's course. Admiral, which heading should we take?
|
| #
|
Selection Node
|
E-3 Casual W: 深海北アフリカ集団 兵站東拠点 (
PoiDB)
| #
|
Formation
|
Normal Battle Node
|
AD/AP
AS/AS+
|
| W
|
Cruising Formation 4
Phases: 3
|
|
17/34
75/150
|
| #
|
Formation
|
Normal Battle Node
|
AD/AP
AS/AS+
|
E-3 Casual X: 深海地中海 マルタ阻止限界線 (
PoiDB)
| #
|
Formation
|
Normal Battle Node
|
AD/AP
AS/AS+
|
| X
|
Diamond
Phases: 3, 4
|
|
66/132
296/591
|
Diamond
Phases: 3, 4
|
|
66/132
296/591
|
Diamond
Phases: 4
|
|
66/132
296/591
|
| #
|
Formation
|
Normal Battle Node
|
AD/AP
AS/AS+
|
E-3 Casual X1
| #
|
Repair Node
|
| #
|
Repair Node
|
E-3 Casual X2
| #
|
Empty Node
|
| X2
|
気のせいだった。
艦隊、決戦準備、よし!地中海の水平線に……勝利を刻め!
Must be my imagination.
Fleet is ready for battle! We'll carve victory... on the Mediterranean's dawn's horizon!
|
| #
|
Empty Node
|
E-3 Casual Y: 深海地中海方面 基地航空中央隊 (
PoiDB)
| #
|
Formation
|
Air Defense Node
|
AD/AP
AS/AS+
|
| Y
|
Diamond
Phases: 3, 4
|
|
17/33
72/144
|
Diamond
Phases: 3, 4
|
|
28/55
123/246
|
Diamond
Phases: 3, 4
|
|
39/78
174/348
|
| #
|
Formation
|
Air Defense Node
|
AD/AP
AS/AS+
|
E-3 Casual Z
| #
|
Empty Node
|
| Z
|
気のせいだった。
マルタ島への増援輸送作戦は成功です!
Must be my imagination.
The reinforcement transport to Malta is a success!
|
| #
|
Empty Node
|
E-3 Casual Z1
| #
|
Empty Node
|
| Z1
|
敵影を見ず。
マルタ島への増援輸送作戦は成功です!
No enemy spotted.
The reinforcement transport to Malta is a success!
|
| #
|
Empty Node
|
E-3 Casual Z2: 深海地中海 揚陸阻止突撃集団 (
PoiDB)
| #
|
Formation
|
Boss Battle Node
|
AD/AP
AS/AS+
|
| Z2
|
Cruising Formation 4
Phases: 3, 4
|
|
0/0
0/0
|
Cruising Formation 4
Phases: 3, 4
(Final)
|
|
43/85
189/378
|
| #
|
Formation
|
Boss Battle Node
|
AD/AP
AS/AS+
|
E-3 Casual Z3: 深海地中海 空母機動部隊総旗艦 (
PoiDB)
| #
|
Formation
|
Boss Battle Node
|
AD/AP
AS/AS+
|
| Z3
|
Cruising Formation 3
Phases: 4
|
|
74/148
332/663
|
Cruising Formation 3
Phases: 4
(Final)
|
|
79/157
353/705
|
| #
|
Formation
|
Boss Battle Node
|
AD/AP
AS/AS+
|
Ship Drops
| Ship drops
|
| Type
|
Ship?
|
E
|
G
|
I
|
M
|
N
|
O
|
T1
|
T3
|
T4
|
U
|
W
|
X
|
Z2
|
Z3
|
| DE
|
Kaiboukan No.4
|
|
|
Easy+
|
|
|
Casual+
|
|
|
|
|
|
|
Easy+
|
Casual+
|
| DE
|
Kaiboukan No.30
|
|
|
|
|
|
|
|
|
|
|
|
|
Casual+
|
Casual+
|
| DD
|
Uranami
|
|
|
|
|
|
|
|
|
|
|
|
|
Casual+
|
Casual+
|
| DD
|
Harusame
|
|
|
|
|
|
|
|
|
|
|
|
|
Easy+
|
Casual+
|
| DD
|
Umikaze
|
|
|
|
|
|
|
|
|
|
|
|
|
Casual+
|
Casual+
|
| DD
|
Yamakaze
|
|
|
|
|
|
|
|
|
|
|
|
|
Casual+
|
Casual+
|
| DD
|
Kawakaze
|
|
|
|
|
|
|
|
|
|
|
|
|
Casual+
|
Casual+
|
| DD
|
Suzunami
|
|
|
Medium+
|
|
|
Easy+
|
|
|
|
|
|
|
Medium+
|
Casual+
|
| DD
|
Fujinami
|
|
Medium+
|
Casual+
|
Casual+
|
|
Casual+
|
Easy+
|
Easy+
|
Casual+
|
|
Casual+
|
Casual+
|
|
|
| DD
|
Hayanami
|
|
|
Medium+
|
|
|
Easy+
|
|
|
|
|
|
|
Medium+
|
Casual+
|
| DD
|
Hamanami
|
Hard+
|
Casual+
|
Casual+
|
Casual+
|
Medium+
|
Casual+
|
Casual+
|
Easy+
|
Casual+
|
Casual+
|
Casual+
|
Casual+
|
|
|
| DD
|
Z1
|
|
Hard+
|
Casual+
|
Easy+
|
Easy+
|
Casual+
|
|
|
Easy+
|
Casual+
|
|
Casual+
|
|
|
| DD
|
Z3
|
|
|
Casual+
|
Medium+
|
|
Casual+
|
|
|
Medium+
|
|
|
Casual+
|
|
|
| DD
|
Grecale
|
|
|
|
|
|
|
|
|
|
|
|
|
Casual+
|
Casual+
|
| DD
|
Jervis
|
|
|
|
|
|
|
|
|
|
|
|
|
Casual+
|
Casual+
|
| CL
|
Ooyodo
|
|
Hard+
|
Casual+
|
Casual+
|
Easy+
|
Casual+
|
Medium+
|
|
Casual+
|
|
Hard+
|
Casual+
|
|
|
| CL
|
Giuseppe Garibaldi
|
|
|
|
|
|
|
|
|
|
|
|
|
Casual+
|
Casual+
|
| CA
|
Mikuma
|
|
Medium+
|
Casual+
|
Casual+
|
|
Casual+
|
Medium+
|
Medium+
|
Casual+
|
Casual+
|
Medium+
|
Casual+
|
|
|
| CA
|
Prinz Eugen
|
|
|
Casual+
|
|
|
Casual+
|
|
|
|
|
|
|
|
|
| CA
|
Zara
|
|
|
|
|
|
|
|
|
|
|
|
|
Casual+
|
Casual+
|
| CA
|
Pola
|
|
|
|
|
|
|
|
|
|
|
|
|
Casual+
|
Casual+
|
| CVL
|
Shinyou
|
|
|
Casual+
|
|
|
Casual+
|
|
|
|
|
|
Hard+
|
|
|
| FBB
|
Washington
|
|
|
|
|
|
|
|
|
|
|
|
|
Casual+
|
Casual+
|
| BB
|
Nelson
|
|
|
|
|
|
Medium+
|
|
|
|
|
|
|
Easy+
|
Casual+
|
| CV
|
Graf Zeppelin
|
|
|
Casual+
|
|
|
Casual+
|
|
|
|
|
|
Medium+
|
|
|
| CV
|
Ark Royal
|
|
|
Casual+
|
|
|
Casual+
|
|
|
|
|
|
Easy+
|
|
|
| SS
|
Maruyu
|
|
|
Medium+
|
|
|
Casual+
|
|
|
|
|
|
|
Medium+
|
Casual+
|
| SS
|
Luigi Torelli
|
|
|
|
|
|
|
|
|
|
|
|
|
Casual+
|
Casual+
|
| CL
|
Kitakami
|
|
|
|
|
|
|
|
|
|
|
|
|
Casual+
|
Casual+
|
| CL
|
Ooi
|
|
|
|
|
|
|
|
|
|
|
|
|
Casual+
|
Casual+
|
| CL
|
Nagara
|
Casual+
|
Medium+
|
Casual+
|
Casual+
|
|
Casual+
|
Easy+
|
Easy+
|
Casual+
|
|
Casual+
|
Casual+
|
|
|
| CL
|
Sendai
|
Casual+
|
Casual+
|
Casual+
|
Casual+
|
|
Casual+
|
Casual+
|
Casual+
|
Easy+
|
Casual+
|
Casual+
|
Casual+
|
Casual+
|
Casual+
|
| CL
|
Yuubari
|
|
|
|
|
|
|
|
|
|
|
|
|
Casual+
|
Casual+
|
| CA
|
Kinugasa
|
Medium+
|
Casual+
|
Casual+
|
Casual+
|
Easy+
|
Casual+
|
Easy+
|
Easy+
|
Casual+
|
|
Casual+
|
Casual+
|
|
|
| CA
|
Myoukou
|
|
|
|
|
|
|
|
|
|
|
|
|
Casual+
|
Casual+
|
| CA
|
Atago
|
|
|
|
|
|
|
|
|
|
|
|
|
Casual+
|
Casual+
|
| CA
|
Mogami
|
|
Hard+
|
Casual+
|
Casual+
|
|
Casual+
|
Easy+
|
Medium+
|
Casual+
|
Casual+
|
Medium+
|
Casual+
|
Casual+
|
Casual+
|
| CA
|
Suzuya
|
|
|
|
|
|
|
|
|
|
|
|
|
Casual+
|
Casual+
|
| CA
|
Kumano
|
|
|
|
|
|
|
|
|
|
|
|
|
Casual+
|
Casual+
|
| CA
|
Tone
|
Easy+
|
Casual+
|
Casual+
|
Casual+
|
|
Casual+
|
Easy+
|
Casual+
|
Casual+
|
|
Easy+
|
Casual+
|
Casual+
|
Casual+
|
| CA
|
Chikuma
|
Casual+
|
Casual+
|
Casual+
|
Casual+
|
Easy+
|
Casual+
|
Casual+
|
Casual+
|
Casual+
|
|
Casual+
|
Casual+
|
Easy+
|
Casual+
|
| CVL
|
Shouhou
|
|
Easy+
|
Casual+
|
Casual+
|
|
Casual+
|
Easy+
|
Easy+
|
Casual+
|
Casual+
|
Easy+
|
Casual+
|
|
|
| FBB
|
Kongou
|
|
|
Easy+
|
|
|
Casual+
|
|
|
|
|
|
|
Casual+
|
Casual+
|
| FBB
|
Hiei
|
|
Hard+
|
Casual+
|
Casual+
|
Casual+
|
Casual+
|
Hard+
|
|
Casual+
|
|
|
Casual+
|
Casual+
|
Casual+
|
| FBB
|
Haruna
|
|
|
Casual+
|
|
|
Casual+
|
|
|
|
|
|
Easy+
|
Casual+
|
Casual+
|
| FBB
|
Kirishima
|
|
|
Casual+
|
|
|
Casual+
|
|
|
|
|
|
|
Casual+
|
Casual+
|
| BB
|
Ise
|
|
|
|
|
|
|
|
|
|
|
|
|
|
Casual+
|
| BB
|
Hyuuga
|
|
|
|
|
|
|
|
|
|
|
|
|
|
Casual+
|
| BB
|
Nagato
|
|
|
|
|
|
|
|
|
|
|
|
|
|
Casual+
|
| BB
|
Mutsu
|
|
|
|
|
|
|
|
|
|
|
|
|
|
Casual+
|
| CV
|
Akagi
|
|
|
Casual+
|
|
|
Casual+
|
|
|
|
|
|
Medium+
|
|
|
| CV
|
Kaga
|
|
|
Casual+
|
|
Easy+
|
Casual+
|
|
|
|
|
|
Casual+
|
|
|
| CV
|
Souryuu
|
|
|
Casual+
|
Hard+
|
Easy+
|
Casual+
|
|
|
Hard+
|
|
|
Casual+
|
|
|
| CV
|
Hiryuu
|
|
|
Casual+
|
|
|
Casual+
|
|
|
|
|
|
Casual+
|
|
|
| SS
|
I-8
|
|
|
Medium+
|
|
|
Casual+
|
|
|
|
|
|
|
Medium+
|
Casual+
|