- Welcome to the Kancolle Wiki!
- If you have any questions regarding site content, account registration, etc., please visit the KanColle Wiki Discord
Early Spring 2024 Event/E-4
 
| |||||||||
|---|---|---|---|---|---|---|---|---|---|
|
Time until event's end:
The event has ended
| |||||||||
|
|
Due to some recent game code changes, game viewers like KC3 & Poi predictions are inaccurate if not up-to-date, and may result in you sinking ships! Please make sure your viewer is up-to-date. |
新Z作戦改


![]()


| Information | ||||
|---|---|---|---|---|
| Event Tag | ||||
| Boss Gauges | Hard (甲): 5880 HP + 900 TP + 4000 HP + 4200 HP | |||
| Medium (乙): 4800 HP + 800 TP + 3600 HP + 2900 HP | ||||
| Easy (丙): 4800 HP + 700 TP + 3600 HP + 2880 HP | ||||
| Casual (丁): 3600 HP + 600 TP + 2800 HP + 1600 HP | ||||
| Map Bosses | New Mass-Produced Aircraft Carrier Princess
| |||
Battleship Ru-Class Flagship
| ||||
Atoll Aircraft Carrier Anchorage Princess
| ||||
Abyssal I-go Water Princess
| ||||
| Rewards[edit] | ||||
|---|---|---|---|---|
| Ship |  I-41 | |||
| Choice | 丁 Casual |
丙 Easy |
乙 Medium |
甲 Hard |
Action Report |
1 | 2 | ||
| OR | ||||
Ne Type Engine |
1 | 2 | ||
| THEN | ||||
Prototype Flight Deck Catapult |
1 | 1 | ||
| OR | ||||
 F4U-4 |
1 (★3) | 1 (★6) | ||
| Reward | 丁 Casual |
丙 Easy |
乙 Medium |
甲 Hard |
|---|---|---|---|---|
Improvement Material |
6 | 8 | 10 | |
Medal |
1 | 2 | 3 | |
First Class Medal |
1 | |||
 Type 0 Small Reconnaissance Seaplane (Skilled) |
1 | 1 (★2) | 1 (★4) | |
 Prototype Jinpuu |
1 (★1) |

The event guides are to be constructed through the respective Event map page guide sandbox and reviewed by editors before being approved here.
- Do not update the guides through this page unless it is a minor fix. Please only update guides through their respective sandbox pages.
Branching Table
| E-4 Branching Rules (Start Points) ▼/▲ |
|---|
| E-4 Branching Rules (Start Point 1) ▼/▲ |
|---|
| E-4 Branching Rules (Start Point 2) ▼/▲ |
|---|
| E-4 Branching Rules (Start Point 3) ▼/▲ |
|---|
* = Rule under review
? = Ship type/amount under review
Branching compositions are reported over the course of the event.
- Please refer to KCNav for up to date map content (fleets used, LoS/speed requirements/drops/LBAS ranges, ...)
Historical Bonuses
DISCLAIMER: This information is based on user submitted data and is subject to revisions as more data is gathered. Any version of the ship receives the bonus regardless of remodel.
Ship Bonuses
| Ships [6] [Toggle Names] |
Map-wide (stacks with nodes) |
Node F | Node J1 | Node R | Node V | |||
|---|---|---|---|---|---|---|---|---|
| Damage | Damage | Damage | Damage | Damage | Damage | Damage | Damage | |
| Coastal Defense Ships (DE) | 1.12x | - | 1.05x | - | - | - | - | 1.06x |
| Destroyers (DD) | 1.04x | |||||||
| Light Cruisers (CL) NOT CLT Training Cruisers (CT) |
1.08x | |||||||
| Seaplane Tenders (AV) | - | 1.16x? | ||||||
| Light Carriers (CVL) | 1.11x | 1.05x | - | |||||
| Submarines (SS(V)) | 1.04x | - | ||||||
| Submarine Tenders (AS) | 1.08x | - | ||||||
| Heavy Cruisers (CA(V)) | - | 1.05x | 1.16x | |||||
| Aircraft Carriers (CV(B)) | - | |||||||
| Torpedo Cruisers (CLT) | - | 1.16x | ||||||
|
- | 1.08x | - | 1.08x | 1.12x | 1.14x | ||
| 1.2744xBoth Group A and B 1.08 x 1.18 |
1.18x | |||||||
|
1.18x | - | - | - | ||||
|
1.18x | - | 1.18x | 1.18x | 1.26x | |||
| 1.27x | 1.27x | 1.27x | 1.43x | |||||
Equipment Bonuses
| Ships | Equipment [7] | Map-wide Damage (except Z?) |
Node S Damage | |
|---|---|---|---|---|
| SS(V) |  
|
- | 1.95x | |
|
|
- | 1.35x [2.6325x][1] | ||
| - | 1.25x | |||
|
- | 1.2x[2] | ||
|
|
- | 1.45x | ||
| AS/LHA/AR/CT/AO[3] | 
|
x1 | 1.15x | - |
| x2 | ? | - | ||
| Planes | Map-wide Damage |
Node C/O/V Damage |
Node S/Z Damage |
Node G Damage |
|---|---|---|---|---|
|
~1.166x | ~1.25x | ~1.3x | ~1.35x |
| ||||
| ||||
| ||||
| ||||
|
??x | ??x | ~1.56x | ~1.65x |
| ||||
- Note
- It is unknown if the two LBAS bonus stacks.
- The LBAS bonus of the same group do not stack.
Debuff
?
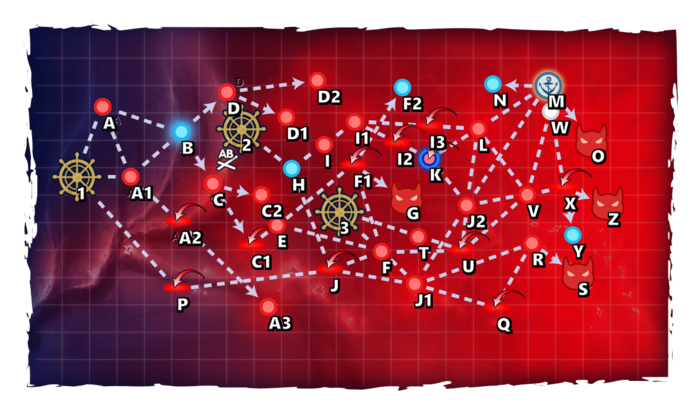
Map Overview
E4 is a Combined fleet four-phase map consisting of one transport phase and three boss phases.
- 3 LBAS are available to sortie on this map.
- This map uses 4 locks:
 3rd Fleet (phase 1, combined),
 Wake Island Transport Unit (phase 2, combined),
 The New Tatsumaki Fleet (phase 3, striking force),
 Op. Z Decisive Battle Fleet (phase 4, combined).
- An Emergency Anchorage Repair node is present on W,
- An "Airstrike Supported Battle" node is present on K,
- Node S is an "atoll node", where the new
 Ka-Tsu tanks' opening can be deployed.
Phase 0.3: Gimmick 1
The following steps have to be performed to unlock the next phase.
| A3 | C | D | |
|---|---|---|---|
| Hard | Sx2 | Sx2 | Sx2 |
| Medium | Sx2 | Sx2 | Sx2 |
| Easy | S? | S? | S? |
| Casual | A | S? | S? |
- Single/SF: 0-2 (F)BB(V)/CVL, 0-1 CA(V)/CLT, 1 CL, 3-4 DD
- Route: 1 A1 A2 A3
- LBAS range: 4
Phase 0.7: Gimmick 2
The following steps have to be performed to unlock the next phase.
| C1 | C2 | D1 | D2 | |
|---|---|---|---|---|
| Hard | AS | S | S | S |
| Medium | AS | S? | A+ | S? |
| Easy | AS | S? | A+ | S? |
| Casual | AS | S? | A+ | S? |
Refer to #Phase 1: Boss 1's fleet for composition and routing.
- STF/CTF
- Route: 1 A B C C1
- LBAS range: 3
| AS | |
|---|---|
| Hard | 486 |
| Medium | 431 |
| Easy | 378 |
| Casual | 254 |
Phase 1: Boss 1
The boss is the new New Mass-Produced Aircraft Carrier Princess, with up to 3 of them in Hard LD.
- CTF/STF: 2 (F)BB(V), 2-3 CV(B/L), 1-2 CAV/CL/DD + 0-2 CA(V)/CLT, 1 CL, 3-5 DD, Fast
- Route: 1 A1 B C C1 E F1 G
- This is the most advised fleet, as it brings the best balance of power.
- 4 DD are needed when using a Yamato-class, and 5 DD with both.
- LoS check: ??
- LBAS range: 5
- AP/AS:
- 307/690 (Hard pre-LD)
- 449/1008 (Hard LD)
- Bringing an AACI and several OASW is recommended.
- With air power that high, it is most likely that the boss will be fought under AD in last dance, requiring appropriate setups.
- All LBAS should be sent to the boss
- Using both an ASW node support expedition and a boss support expedition is recommended.
- The use of Special Attacks is recommended, especially the Yamato touch, as this can be a fast fleet touch.
- Using
 Smokes can help a little, to pass through node C only.
Phase 2: TP
Phase 1 is a "Transport Operation".
- TCF: 1-2 AV, 0-1 CVE/CL, 4-5 DD + 1-2 CL, 4-5 DD, Fast
- Route: 2 H J J1 J2 M O
- LoS check: 75~80 (Cn3, Hard)
- LBAS range: 9
- As many
 Landing Craft,
  Drum Canisters, and Amphibious Vehicles as possible should be utilized in the fleet.
 - Bringing an AACI and several OASW is recommended.
Phase 3: Boss 3
The boss node is an "atoll node", meaning that it is possible to deploy the new ![]() Ka-Tsu tanks' opening.
Ka-Tsu tanks' opening.
- The new Atoll Aircraft Carrier Anchorage Princess is not an "Installation".
- Striking Force: 1 AS, 4-5 SS(V), 0-1 AV, 1-2 DD
- Route: 1 P J J1 R S
- This fleet can utilize the "Submarine Touch", a Special Attack involving a Submarine Tender leading a fleet of at least two submarines.
- The flagship must be a Submarine Tender (AS) at Lv 30+,
- She must not be more than moderately damaged (中破).
- The 2nd and 3rd ships must be Submarines (SS) or Aircraft Carrying Submarines (SSV) and not evacuated via
 SFFCF
SFFCF ,
,
- The 4th ship may optionally be a SS(V), but does not affect the above requirement,
- At least two SS(V) among the 2nd, 3rd, and 4th ships must not be more than lightly damaged (小破),
- If all 3 ships are SS(V), the 2nd and 4th ones will attack; if one of the two is moderately damaged (中破), the 3rd one will attack instead.[1]
- The fleet must be a single fleet or a Striking Force Fleet,
- The formation needs to be either Echelon
 or Line Abreast
 ,
, - At least one Submarine Supply Material
 must be available in the inventory.


- LBAS range: 9
- Having an AACI is recommended.
- The use of the Smoke is discouraged as it does not protect the subs.
- PT boats are present in the boss comp:
| ExpandAnti-PT boat |
|---|


Using the Ka-Tsu tanks attacks is mandatory in higher difficulties:
| Ka-Tsu Animation | |||
|---|---|---|---|
| Ka-Tsu: | |||
| Ka-Tsu Kai: | |||
Uniquely on "Atoll Nodes", it is possible to deploy the ![]() Ka-Tsu tanks to trigger a special Opening Torpedo Salvo.
Ka-Tsu tanks to trigger a special Opening Torpedo Salvo.
- On those nodes, regular oTorp will not work,
- This can only be deployed by SS, SSV, and the AV Mikuma Kai Ni Toku, Nisshin A, and Mizuho Kai fast,
- They must carry at least one Ka-Tsu tank,
- On the "atoll node", ships meeting those requirements will carry out a special opening torpedo attack,
- In night battle, those ships will additionally trigger the same attack as a cutin,
- This attack overrides regular Night Cut-ins attacks (e.g. if a ship is setuped for a TCI, it will still trigger the Ka-Tsu attack).
- Using several Ka-Tsu tanks on a same ship will make it carry out several of those attacks in a row (day and night),
- It capped at 2 attacks per ship at night.
- This attack utilizes a new special animation, with the tank climbing the atoll's soil.
When using it, it is better to have pairs of Ka-Tsu on the historical ships, and normal Night Cut-ins for the other ones.
Phase 4: Boss 4
The boss is the new Abyssal I-go Water Princess submarine.
- STF: 1-2 BBV/CV(E), 0-1 CAV, 3-5 CL, 0-1 DD/DE + 1 CL, 3-5 DD, 0-2 DE
- Route: 3 T U V X Z
- LoS check: 45 (Cn1 Hard)
- LBAS range: 10
- As the flagship boss is a submarine, it is possible and heavily advised to focus the fleet on ASW only and snipe the boss.
- As many OASW as possible ships should be utilized in the escort fleet.
- The flagship should then be Hyuuga Kai Ni, Kaga Kai Ni Go, or any CVE Kai Ni, as they have good ASW stat in addition of being able to equip fighters.
- The main fleet should maintain high ASW, with additional roles such as:
- The LBAS can be either:
- Surface focused to clear the boss escort or the pre-boss nodes (recommended),
- ASW focused to damage the boss (not recommended).
- As it is a combined fleet, it is possible to kill the submarine boss even on night battle.

Phase 4.5: Debuff
Once LD has been reached, the following steps have to be performed to debuff the boss.
- Debuff might be optional for most players, as the boss ASW snipe is generally enough to kill the boss.
| A3 | C2 | D2 | F1 | O | S | X | LBAS | |
|---|---|---|---|---|---|---|---|---|
| Hard | S | S | S | AS | A+ x2 | A+ x2 | AS | AS |
| Medium | ? | ? | ? | ? | ? | ? | ? | ? |
| Easy | ? | ? | ? | ? | ? | ? | ? | ? |
| Casual | ? | ? | ? | ? | ? | ? | ? | ? |
Refer to #Phase 0.3: Gimmick 1's fleet for composition and routing.
Once Debuff is complete the CG will change to the following:
| Abyssal I-go Water Princess |
|---|
|


Enemy Compositions
| Type | Ships |
|---|---|
| DD |
| Type | Ships |
|---|---|
| DD | |
| SS |
| Type | Ships |
|---|---|
| DD |
| Type | Ships |
|---|---|
| DD |
| Type | Ships |
|---|---|
| DD |
| Type | Ships |
|---|---|
| DD | |
| SS |
| Type | Ships |
|---|---|
| DD | |
| CV | |
| SS | |
| SSV | |
| AV | |
| LHA | |
| CVB | |
| CT | |
| AO |
| Type | Ships |
|---|---|
| DD | |
| SS |
| Type | Ships |
|---|---|
| DD |
| Type | Ships |
|---|---|
| DD | |
| SS | |
| AV | |
| AO |
| Type | Ships |
|---|---|
| DD | |
| SS |
| Type | Ships |
|---|---|
| DD | |
| CL | |
| CA | |
| BB | |
| CV | |
| SS | |
| CVB |
| # | Formation | Normal Battle Node | AD/AP AS/AS+ |
|---|---|---|---|
| A | Echelon Line Abreast |
0/0 0/0 | |
| Echelon Line Abreast |
0/0 0/0 | ||
| Echelon Line Abreast |
0/0 0/0 | ||
| # | Formation | Normal Battle Node | AD/AP AS/AS+ |
| # | Formation | Normal Battle Node | AD/AP AS/AS+ |
|---|---|---|---|
| A1 | Echelon Line Abreast |
0/0 0/0 | |
| Echelon Line Abreast |
0/0 0/0 | ||
| Echelon Line Abreast |
0/0 0/0 | ||
| # | Formation | Normal Battle Node | AD/AP AS/AS+ |
| # | Formation | Air Defense Node | AD/AP AS/AS+ |
|---|---|---|---|
| A2 | Diamond | 52/104 233/465 | |
| Diamond | 102/204 458/915 | ||
| Diamond | 110/219 491/981 | ||
| # | Formation | Air Defense Node | AD/AP AS/AS+ |
| # | Formation | Normal Battle Node | AD/AP AS/AS+ |
|---|---|---|---|
| A3 | Line Ahead Double Line |
45/89 198/396 | |
| # | Formation | Normal Battle Node | AD/AP AS/AS+ |
| # | Selection Node | ||
|---|---|---|---|
| B | 艦隊の針路を選択できます。提督、どちらの針路をとられますか? You can decide the fleet's course. Admiral, which heading should we take? | ||
| # | Selection Node | ||
| # | Formation | Normal Battle Node | AD/AP AS/AS+ |
|---|---|---|---|
| C | Line Ahead Double Line |
45/89 198/396 | |
| Line Ahead | 45/89 198/396 | ||
| # | Formation | Normal Battle Node | AD/AP AS/AS+ |
| # | Formation | Air Defense Node | AD/AP AS/AS+ |
|---|---|---|---|
| C1 | Diamond | 52/104 233/465 | |
| Diamond | 102/204 458/915 | ||
| Diamond | 110/219 491/981 | ||
| # | Formation | Air Defense Node | AD/AP AS/AS+ |
| # | Formation | Normal Battle Node | AD/AP AS/AS+ |
|---|---|---|---|
| C2 | Line Ahead Double Line Vanguard |
51/101 225/450 | |
| # | Formation | Normal Battle Node | AD/AP AS/AS+ |
| # | Formation | Normal Battle Node | AD/AP AS/AS+ |
|---|---|---|---|
| D | Line Ahead Double Line |
45/89 198/396 | |
| Line Ahead | 45/89 198/396 | ||
| # | Formation | Normal Battle Node | AD/AP AS/AS+ |
| # | Formation | Normal Battle Node | AD/AP AS/AS+ |
|---|---|---|---|
| D1 | Echelon Line Abreast |
0/0 0/0 | |
| Echelon Line Abreast |
0/0 0/0 | ||
| # | Formation | Normal Battle Node | AD/AP AS/AS+ |
| # | Formation | Normal Battle Node | AD/AP AS/AS+ |
|---|---|---|---|
| D2 | Line Ahead Double Line Vanguard |
51/101 225/450 | |
| # | Formation | Normal Battle Node | AD/AP AS/AS+ |
| # | Formation | Normal Battle Node | AD/AP AS/AS+ |
|---|---|---|---|
| E | Echelon Line Abreast |
0/0 0/0 | |
| Echelon Line Abreast |
0/0 0/0 | ||
| Echelon Line Abreast |
0/0 0/0 | ||
| # | Formation | Normal Battle Node | AD/AP AS/AS+ |
| # | Formation | Normal Battle Node | AD/AP AS/AS+ |
|---|---|---|---|
| F | Double Line Vanguard |
45/89 198/396 | |
| Line Ahead | 45/89 198/396 | ||
| # | Formation | Normal Battle Node | AD/AP AS/AS+ |
| # | Formation | Air Defense Node | AD/AP AS/AS+ |
|---|---|---|---|
| F1 | Diamond | 52/104 233/465 | |
| Diamond | 102/204 458/915 | ||
| Diamond | 154/307 689/1377 | ||
| # | Formation | Air Defense Node | AD/AP AS/AS+ |
| # | Formation | Boss Battle Node | AD/AP AS/AS+ |
|---|---|---|---|
| G | Cruising Formation 3 | 154/307 690/1380 | |
| Cruising Formation 3 (Final)
|
228/455 1022/2043 | ||
| # | Formation | Boss Battle Node | AD/AP AS/AS+ |
| # | Empty Node | ||
|---|---|---|---|
| H | 気のせいだった。 ウェーキ島への補給輸送作戦を実施するッ!敵勢力圏内だ…対空対水上対潜警戒を厳に! Must be my imagination. Conduct supply and transport operations to Wake Island! We're in enemy territory... maintain strict all-around vigilance! | ||
| # | Empty Node | ||
| # | Formation | Normal Battle Node | AD/AP AS/AS+ |
|---|---|---|---|
| I | Echelon Line Abreast |
0/0 0/0 | |
| Echelon Line Abreast |
0/0 0/0 | ||
| # | Formation | Normal Battle Node | AD/AP AS/AS+ |
| # | Formation | Normal Battle Node | AD/AP AS/AS+ |
|---|---|---|---|
| I1 | Line Ahead Diamond Vanguard |
38/75 167/333 | |
| # | Formation | Normal Battle Node | AD/AP AS/AS+ |
| # | Formation | Unknown | AD/AP AS/AS+ |
|---|---|---|---|
| I2 | Diamond | 129/257 578/1155 | |
| Diamond | 181/361 810/1620 | ||
| # | Formation | Unknown | AD/AP AS/AS+ |
| # | Formation | Unknown | AD/AP AS/AS+ |
|---|---|---|---|
| I3 | Diamond | 129/257 578/1155 | |
| Diamond | 181/361 810/1620 | ||
| # | Formation | Unknown | AD/AP AS/AS+ |
| # | Formation | Air Defense Node | AD/AP AS/AS+ |
|---|---|---|---|
| J | Diamond | 144/288 647/1293 | |
| Diamond | 52/104 233/465 | ||
| Diamond | 102/204 458/915 | ||
| # | Formation | Air Defense Node | AD/AP AS/AS+ |
| # | Formation | Normal Battle Node | AD/AP AS/AS+ |
|---|---|---|---|
| J1 | Double Line Diamond Line Abreast |
38/75 167/333 | |
| # | Formation | Normal Battle Node | AD/AP AS/AS+ |
| # | Formation | Normal Battle Node | AD/AP AS/AS+ |
|---|---|---|---|
| J2 | Echelon Line Abreast |
0/0 0/0 | |
| Echelon Line Abreast |
0/0 0/0 | ||
| Echelon Line Abreast |
0/0 0/0 | ||
| Echelon Line Abreast |
0/0 0/0 | ||
| # | Formation | Normal Battle Node | AD/AP AS/AS+ |
| # | Formation | Unknown | AD/AP AS/AS+ |
|---|---|---|---|
| K | Line Abreast | 43/85 189/378 | |
| Echelon | 43/85 189/378 | ||
| Line Abreast | 43/85 189/378 | ||
| # | Formation | Unknown | AD/AP AS/AS+ |
| # | Formation | Normal Battle Node | AD/AP AS/AS+ |
|---|---|---|---|
| L | Line Ahead Vanguard |
0/0 0/0 | |
| Line Ahead Vanguard |
0/0 0/0 | ||
| # | Formation | Normal Battle Node | AD/AP AS/AS+ |
| # | Landing Node | ||
|---|---|---|---|
| M | 輸送物資の揚陸地点に到達しました。本海域の輸送作戦は無事完了しています。 The landing point of the convoy has been reached. The transport operation here has already been completed successfully. | ||
| # | Landing Node | ||
| # | Empty Node | ||
|---|---|---|---|
| N | 敵影を見ず。 ウェーキ島への補給輸送作戦を実施するッ!敵勢力圏内だ…対空対水上対潜警戒を厳に! No enemy spotted. Conduct supply and transport operations to Wake Island! We're in enemy territory... maintain strict all-around vigilance! | ||
| # | Empty Node | ||
| # | Formation | Boss Battle Node | AD/AP AS/AS+ |
|---|---|---|---|
| O | Line Ahead Double Line |
0/0 0/0 | |
| Line Ahead (Final)
|
0/0 0/0 | ||
| # | Formation | Boss Battle Node | AD/AP AS/AS+ |
| # | Formation | Air Defense Node | AD/AP AS/AS+ |
|---|---|---|---|
| P | Diamond | 52/104 233/465 | |
| Diamond | 102/204 458/915 | ||
| Diamond | 104/207 465/930 | ||
| # | Formation | Air Defense Node | AD/AP AS/AS+ |
| # | Formation | Air Defense Node | AD/AP AS/AS+ |
|---|---|---|---|
| Q | Diamond | 52/104 233/465 | |
| Diamond | 129/257 578/1155 | ||
| Diamond | 181/361 810/1620 | ||
| # | Formation | Air Defense Node | AD/AP AS/AS+ |
| # | Formation | Normal Battle Node | AD/AP AS/AS+ |
|---|---|---|---|
| R | Double Line Echelon Line Abreast |
0/0 0/0 | |
| # | Formation | Normal Battle Node | AD/AP AS/AS+ |
| # | Formation | Boss Battle Node | AD/AP AS/AS+ |
|---|---|---|---|
| S | Cruising Formation 1 | 0/0 0/0 | |
| Cruising Formation 1 (Final)
|
0/0 0/0 | ||
| # | Formation | Boss Battle Node | AD/AP AS/AS+ |
| # | Formation | Normal Battle Node | AD/AP AS/AS+ |
|---|---|---|---|
| T | Echelon Line Abreast |
0/0 0/0 | |
| Echelon Line Abreast |
0/0 0/0 | ||
| Echelon Line Abreast |
0/0 0/0 | ||
| # | Formation | Normal Battle Node | AD/AP AS/AS+ |
| # | Formation | Air Defense Node | AD/AP AS/AS+ |
|---|---|---|---|
| U | Diamond | 129/257 578/1155 | |
| Diamond | 181/361 810/1620 | ||
| Diamond | 195/390 876/1752 | ||
| # | Formation | Air Defense Node | AD/AP AS/AS+ |
| # | Formation | Normal Battle Node | AD/AP AS/AS+ |
|---|---|---|---|
| V | Line Ahead Diamond |
77/154 345/690 | |
| Line Ahead | 77/154 345/690 | ||
| # | Formation | Normal Battle Node | AD/AP AS/AS+ |
| # | Repair Node | ||
|---|---|---|---|
| # | Repair Node | ||
| # | Formation | Air Defense Node | AD/AP AS/AS+ |
|---|---|---|---|
| X | Diamond | 129/257 578/1155 | |
| Diamond | 181/361 810/1620 | ||
| Diamond | 195/390 876/1752 | ||
| # | Formation | Air Defense Node | AD/AP AS/AS+ |
| # | Empty Node | ||
|---|---|---|---|
| Y | 敵影を見ず。 No enemy spotted. | ||
| # | Empty Node | ||
| # | Formation | Boss Battle Node | AD/AP AS/AS+ |
|---|---|---|---|
| Z | Cruising Formation 4 | 186/372 836/1671 | |
| Cruising Formation 4 (Final)
|
203/406 912/1824 | ||
| # | Formation | Boss Battle Node | AD/AP AS/AS+ |
Ship Drops
| ExpandShip drops |
|---|
|
| |||||||||
|---|---|---|---|---|---|---|---|---|---|
|
Time until event's end:
The event has ended
| |||||||||
|
|
Due to some recent game code changes, game viewers like KC3 & Poi predictions are inaccurate if not up-to-date, and may result in you sinking ships! Please make sure your viewer is up-to-date. |
Trivia
Soon™