• Welcome to the Kancolle Wiki!
  • If you have any questions regarding site content, account registration, etc., please visit the KanColle Wiki Discord

Difference between revisions of "Spring 2019 Event"

From Kancolle Wiki
Jump to navigation Jump to search
Line 169: Line 169:
 
|scenario = [[Akebono]]
 
|scenario = [[Akebono]]
 
|origin = クソ提督、よく見てなさい。
 
|origin = クソ提督、よく見てなさい。
|translation = You shitty Admiral, look closely.
+
|translation = You shitty Admiral, watch closely.
 
|audio = AkebonoKai-Friend_Fleet_1.mp3
 
|audio = AkebonoKai-Friend_Fleet_1.mp3
 
|notes =  
 
|notes =  
Line 217: Line 217:
 
{{SeasonalQuote
 
{{SeasonalQuote
 
|scenario = [[Shiranui]]
 
|scenario = [[Shiranui]]
|origin = いいでしょう、沈みなさい。沈む!
+
|origin = いいでしょう、沈みなさい。沈め!
 
|translation = Alright then, sink. Sink!
 
|translation = Alright then, sink. Sink!
 
|audio = ShiranuiKai2-Friend_Fleet_1.mp3
 
|audio = ShiranuiKai2-Friend_Fleet_1.mp3

Revision as of 23:06, 6 June 2019

The "Spring 2019 Event", Commence Allied Relief! "The 2nd Hawaii Operation" is scheduled to begin on May 20th, 2019. The current scale of the event will be Medium Scale consisting of 5 maps (3 Main Operations and 2 Extra Operations).

The theme of the event will be based on a "what-if" presentation of Pearl Harbor. The Main Operation will be using your fleet's force to gather and assemble thier force in the Northern Waters while the Extra Operation will have you fleet conduct a long distance expedition with your carrier forces into Enemy Territory. Admirals have been advised to prepare thier ASW, Air Forces, and Surface Fleet for the upcoming event.

It's been noted players who managed to complete all of the event maps will earn a new Battleship Class upon completion.

A total of 5 ships will be released with the event.

For additional information regarding event-related subjects and content, please refer to the following links:

Historical Background

Disclaimer: The following information is based upon a summary of World War II history and may not have any influence on the game itself. This is for historical reference only.

The Attack on Pearl Harbor

On December 7th, 1941, the Japanese would commence with a full carrier attack against the United State's naval forces stationed at Pearl Harbor with the intent and goal to knock out many of the main ships and forces located in the area and to attempt to delay the Americans from launching a possible counter attack while they attempted to gain control of the Philippines later on in hopes of maintaining a route to transport oil back to thier country. On this day, the Kido Butai would launch massive air strike damaging many facilities in the Pearl Harbor front and incapacitating and sink many large ships include a large number of battleships, and various cruisers. This would would mark the beginning of Japan's War against the United States and would be known as the "date that would live on in infamy".

Kito Butai
This was the fleet that mainly conducted the attack on Pearl Harbor.
Historical Ships:

Carriers: Akagi, Kaga, Souryuu, Hiryuu, Shoukaku, Zuikaku
Battleships: Hiei, Kirishima
Heavy Cruisers: Tone, Chikuma
Light Cruiser: Abukuma
Destroyers: Arare, Kasumi, Kagerou, Shiranui, Urakaze, Tanikaze, Hamakaze, Isokaze, Akigumo

Main Support Forces
This fleet was here to provide support to the Kito Butai if any problems rose out from thier attack. They did not participate in the main battle.

Battleships: Nagato, Mutsu, Ise, Hyuuga, Fusou, Yamashiro
Carriers: Zuihou, Houshou
Heavy Cruisers: Atago
Destroyers: Mikazuki, Hatsuharu, Wakaba, Nenohi, Hatsushimo, Shiratsuyu, Shigure

Submarine Forces
Mainly served in the same forces as the support Forces, but were mainly there for lookout duty.

I-8, I-19

Information

New Ships

A total of 5 ships have been confrimed for the event

Escorts

  • A Shimushu-class DE Hachijou will be an E-2 Reward
  • A Shimushu-class DE Ishigaki will be an MO Drop
    • The recent Reppu Paradise live event confirmed one will be a reward for E-2 while the other will be a drop.

Light Cruiser

  • The recent Reppu Paradise live event confirmed that one ship that will appear as an E-3 Reward will be a CL of unknown origin.

Destroyer

  • A Destroyer that is a member of the Fletcher-class will appear in EO operations.

Battleship

  • A brand new Battleship class will be introduced in this event as the final reward.
  • The BB will be a member of the American Big Seven.

Remodel

  • Akagi will be getting her Kai Ni remodel in conjunction to the event.

Returning Ships

Tashkent has reported to return as a drop on the e-3 MO map.

New Equipment

  • The Carrier version of the Reppu Kai and the Land Base Version of the Reppu Kai will be released with this event along with Akagi Kai Ni.
  • Exact requirement to obtaining said gear is unknown.

New Enemy Vessels

New Enemy Equipment

Friend Fleet

Friend Fleet Voice Lines

Ship Japanese/English Notes
Destroyers
Akebono
Play
You shitty Admiral, watch closely.
クソ提督、よく見てなさい。
Hibiki
Play
Full speed ahead... Hurrah!
両舷いっぱい…Ура!
Hatsushimo
Play
I won't let them do any more. I'll be your shield!
これ以上はやらせません。初霜が、盾になります!
Kasumi
Play
I've steeled myself. All that's left... is to do it! Let's go!
覚悟は完了してる。あとは…いくだけ!やるわ!
Kasumi
Play
Asashio-class destroyer, Kasumi, charging in!
朝潮型駆逐艦、霞、突入する!
Kagerou
Play
Combat speed! Now, let's go!
機関戦闘!さあ、いくはよ!
Kagerou
Play
Kagerou, starting the assault!
陽炎、突撃入ります!
Shiranui
Play
Alright then, sink. Sink!
いいでしょう、沈みなさい。沈め!
Yukikaze
Play
Member of the 2nd Torpedo Squadron, Kagerou-class destroyer Yukikaze, charging in!
第二水雷戦隊所属、陽炎型駆逐艦雪風、突撃します!
Hamakaze
Play
Hamakaze, acknowledging. There are no problems. I'm fully equipped and trained for this.
浜風、了解。問題ありません。そのための装備、そのための練度です。
Tashkent
Play
Great! Our fleet has broken into the operational area. Now we'll support the allied forces. Hurrah!
Хорошо!我が艦隊は戦場海域に突入した。これより友軍を援護する!Ура!
Tashkent
Play
Alriiight, good. We'll now support the Northern Combined Fleet. Comrades, are you ready?
よーし、いいね。北方連合艦隊、これより援護する。同志諸君、準備はいいかい?
Tashkent
Play
Alright! Hurrah!
よし!Ура!
Johnston
Play
We're here! Target in sight. Have all of you prepared yourselves? Then, let's get started. Go!
来たわ!Target in sight. みんな覚悟はいい?さあ、始めましょうか?Go!
Light Cruisers
Tama
Play
You need me to lend a hand? I'll help you.
多摩の手も借りたいにゃ?お助けするにゃ。
Tama
Play
I'll attack too.
多摩も突撃にゃ。
Kitakami
Play
Squadron flagship, Kitakami. Now, beware of air raids, everyone. Shall we get going then?
戦隊旗艦、北上様。さあ、みんな、空襲にも気をつけつつ。じゃあ、行きますか?
Ooi
Play
A-are you ready?
じゅ、準備はいいですか?
Kiso
Play
Kiso Squad, we're charging in now. Let's go!
木曽隊、これより突入する。行くぜ!
Kiso
Play
Kiso, charging in. Come on, come on, make way!
木曽、突入する。おら、おら、道を開けろ!
Abukuma
Play
Everyone, please get ready!
みんなさん、どぞお支度お願いします!
Abukuma
Play
If there's an operation in the North, it's my turn to shine right?
北方での作戦といえば、私、阿武隈の出番ね?
Yahagi
Play
Fleet, line ahead. Let's go. Yahagi Torpedo Squadron, setting forth!
艦隊、単縦陣。行くぞ。矢矧水雷戦隊、推して参る!
Sakawa
Play
I've practiced too. I think I can do this... Yahagi, Nagato, just watch. I'm sure I can do this!
酒匂も演習してたし。やれるはず…矢矧ちゃん、長門さん、見てて。きっと、やれる!
Gotland
Play
It's fine, let's work hard together.
大丈夫、一緒に頑張りましょう。
Battleships
Kongou
Play
Hey, Admiral! Make sure you pay close attention to our efforts please!
Hey, 提督!私達の活躍、ぜったい見ていてくださいねー!
Hiei
Play
11th Squadron, flagship Hiei, we've reached the operational area. We'll now support the allied forces. Kirishima, let's go!
第十一戦隊、旗艦比叡、戦場海域に到達する。これより友軍を援護する。霧島、行くよ!
Kirishima
Play
11th Squadron, battleship Kirishima, has broken through to the battlefield. We'll now support the allied forces. FIRE!
第十一戦隊、戦艦霧島、戦場に突入する。これより友軍を援護する。うってー!
Kirishima
Play
Kirishima, acknowledging. Main guns, make ready! FIRE!
霧島、了解。主砲、撃ち方始め!うってー!
Iowa
Play
The battleships from your country have come too... Aha, OK, I like interesting things. Let's get along.
あなたの国のbattleshipまで来てるなんて…あはぁ、OK、楽しいのは好きよ。仲良くしましょう。
Iowa
Play
Aha, so that's it. OK.
ははん、そういうこと。OK。
Gangut
Play
Great! Now it's time for me to crush them!
よろし!わが全力を叩きつけるのわ今だ!
Light Carriers
Gambier Bay
Play
Task Force 77 has arrived at the operational area. We'll now support the allied forces.
Task Force 77、戦場海域に到達。これより友軍を援護します。
Gambier Bay
Play
Uhmmm, sorry!
えっと、すみません!
Auxiliaries
Kashima
Play
Yes! Kashima, charging in!
はい!鹿島、突撃します!

Mechanics

Participation requirements

  • Must have a 75% sortie win ratio.
  • Must have 5 empty ship slots for new ships.
  • Must have 20 free equipment slots.

Special Mechanics

  1. The difficulty system first used in Spring 2015 Event returns: you can choose between Operation A (, Hard), Operation B (, Medium), Operation C (, Easy) or Operation D (, Very Easy) .
    • Choosing A or B requires certain HQ Level (HQ Lv 35 for B / 80 for A in Spring 2015 Event).
    • An important note to all Admirals intending to clear the event on Hard difficulty - further (new) conditions now apply:
      • When switching difficulty from any other difficulty to Hard, the map's debuff mechanism (where applicable) will be reset.
        • Switching between any other difficulties will not reset the debuff mechanism.
  2. The debuff system from Summer 2015 Event's final map, where certain nodes had to be killed to reduce boss armor will return.
  3. It might be possible, that they will allow a fleet with seven ships (Striking Force Fleet) to sortie to certain event maps that allow single fleet operations starting from E-2, and also includes the final map of the event.
    • The Striking Force cannot be sortied during exercises or sent on expeditions while it contains seven ships.
    • The Striking Force can only be created and used in the third fleet in the menu (out of a total of four fleets).
    • A Striking Force with a flagship that carries a new piece of equipment, the Striking Force Fleet Command Facility, will be able to make use of the new Single Ship Evacuation mechanic.
      • The new Single Ship Evacuation mechanic that will become available for the Striking Force as of E-4 allowing a single ship in the fleet to retreat from the battlefield after an enemy engagement if she suffered heavy damage.
        • It is possible for the damage to become even worse during a Single Ship Evacuation.
        • Unlike the Combined Fleet's evacuation mechanic, it does not require an escort destroyer.
      • The new Striking Force Fleet Command Facility will become obtainable and useable via the old Fleet Command Facility and the Action Report that can be earned in the upcoming Fall Event. The Fleet Command Facility, as well as the new Action Report item, will be obtainable on all difficulty levels, including Medium and Easy Mode.
      • Supplementary information regarding the new Striking Force Fleet Command Facility and the Single Ship Evacuation it allows when carried by the striking force's flagship:
        • The evacuation does not require an escort destroyer.
        • The evacuation consumes the ship's entire fuel & ammo reserves.
        • Only one ship can be evacuated per battle.
        • The damage the ship suffered may become worse during the evacuation, but she will never sink.
  4. Returning this event, the Vanguard Formation can be used .
    • This formation will organize the fleet such that the 3rd-6th/7th ships protect the Flagship and 2nd Ship of the Fleet.
      • In addition, the formation allows for ships to become more evasive in combat situations, especially with well-trained Destroyer.
      • This formation is also available only during the duration of the event.
      • The formation will be usable by both normal fleets as well as the Striking Force Fleet.
  5. New: NPC Friend Fleets have been introduced into the game.
    • Friend Fleets act as another unit that appears in particular battles to help aid your fleet when attacking the enemy at the start of night battle.
      • NPC Friend Fleets are selected from a randomized preset list of ship.
      • Depending on who you have in your fleet can also influence who will be arrive to aid you in battle.
  6. New: Enemy Radar Ambush Nodes is introduced into the game.
    • Entering this node will result in your fleet facing off against an enemy fleet that will ambush and attack your fleet
      • Your Fleet will not be able to fight against the enemy Fleet.
      • By meeting certain conditions, you can evade these nodes.

Quick Info Table

Classification Map Name Fleet Type? Land-Based Air Squadron? Friendly Fleet? Color of Tag Tag Condition & Deployment Restriction Difficulty Restrictions Notes
Main Operation
E-1 Fleet Gathering Area Partol! To Hitokappu Anchorage! Single Yes No GreySpring2019Tag.png Tagging:
Ships not already color-tagged will be tagged with the color associated with the map when deployed. This tag exists on all difficulties and is not reset on remodel, etc.
Deployment Restriction:
Normal or Hard: Must have either the same-colored tag or no tag.
No restrictions. All difficulties OK
E-2 Defense Expansion! The Nansei Island Defense Operation! Single Yes Yes YellowSpring2019Tag.png In order to play these maps on hard, you must complete the previous map* on either normal or hard.
(e.g., to do E-2 on hard, you must complete E-1 on normal or hard.)
E-3 Divert the Enemy Forces! The 2nd AL Operation Combined Fleet Yes Yes BlueSpring2019Tag.png
Final Operation
E-4 The 2nd Hawaii Operation Combined Fleet Yes Yes GreenTagSpring2019.png YellowTagSpring2019.png
E-5 Beyond the Surging Sea... Combined Fleet Yes No (Coming Soon) LimeTagSpring2019.png

Event Maps

E-1

OoyodoE-1Spring2019.png

Fleet Gathering Area Patrol! To Hitokappu Anchorage!
艦隊集結地哨戒! 単冠湾泊地

Information

  • Event Tag: GreySpring2019Tag.png 104th Division Tag

(Phase 1 - Boss):

  • Hard ():
  • Medium ():
  • Easy ():
  • Casual ():

Key Rewards:

  • Clearing on Hard (): Mamiya x3, Furniture Fairy x1, Reinforcement Expansion x2, Reppuu Kai x1, Action Report x1, New Type Aviation Armament Materials x1
  • Clearing on Medium (): Mamiya x3, Furniture Fairy x1, Reinforcement Expansion x1, Reppuu Kai x1, Action Report x1
  • Clearing on Easy (): Mamiya x2, Furniture Fairy x1, Reinforcement Expansion x1, Reppuu Kai x1
  • Clearing on Casual (): Mamiya x1, Furniture Fairy x1, Reinforcement Expansion x1
Spring2019E-1Banner.png
Spring2019E-1Map.png

Branching rules

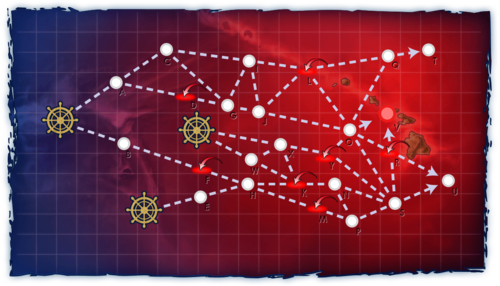
E-1 Branching Rules
Nodes Rules
D
B
  • Active branching
H
B
A
  • Do not meet the requirements to go to C.
C
  • Meet ALL of the following requirements:
    • Amount of DE+DD ≥ 2
    • Amount of CA(V) ≤ 1
    • Amount of CL ≤ 2
C
E
  • Do not meet the requirements to go to F.
F
  • Meet ALL of the following requirements:
    • Amount of DE+DD ≥ 2
    • Amount of CT+CA(V) ≤ 3
I
J
  • Do not meet the requirements to go to either K or L.
K
  • Meet ANY of the following requirements:
    • Fleet contains SS(V).
    • Amount of ships ≤ 3
L
  • Meet ALL of the following requirements:
    • No CA(V) (Easy+)
    • No SS(V)
    • Amount of ships ≥ 4
    • If Slow fleet:
      • Amount of ships = 6
      • CL+CT = 1
      • No CLT
    • If Fast fleet:
      • Amount of DD ≥ 4
      • Amount of ships ≤ 6 OR Fleet contains CL.
L
O
  • Active branching
Q
Q
P
  • Meet ALL of the following requirements:
    • Amount of ships = 6
    • Amount of CL+CT = 1
    • If fleet contains CLT, fleet must also contain CA.
    • No AV
T
  • Do not meet the requirements to go to P.
P
N
  • Fail the LoS check.
S
  • Pass the LoS check.
O
R
  • Fail the LoS check.
V
  • Pass the LoS check, but fail to meet the requirements to go to W.
W
  • Meet ALL of the following requirements:
    • Pass the LoS check.
    • Amount of DD ≥ 2
    • Amount of ships equipped with Surface Radars ≥ 3 (Medium+)
    • Amount of CA(V) ≤ 1 (Hard)


Branching compositions were reported over the course of the event.

Tips
Note: This guide is an finalized release guide for E-1 that has been released. The information present here is as complete as it will possibly get. If you have any questions and or wish to make further suggestions, please consult in the sandbox page you suggestions.

E-1 is relatively simple to do on this event even on hard difficulty with a moderately trained fleet. As most of the map will require you to engage against simple surface fleets and submarines.

A good general recommendation for who to choose for this map if you play on normal or hard difficulty is avoid using fleets affiliated with Pearl Harbor, the 2nd Fleet and Operation Ten-Go Members, and fleets that made up Operation AL and Northern Forces. Most other standard ships that are not key ships and are average in combat are suitable for this map.

If you are a newer player who only just recently started playing KanColle, playing on Easy or Casual difficulty omits Ship Locks. This allows you lots of flexibility as you can use your best ships while attempting to clear the map without heavy resource depletion.

Node Summary

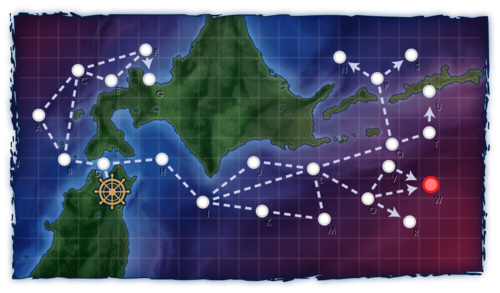
  • Nodes D & L are choice nodes.
  • Nodes S & W (boss node) have LoS checks (see boss node details below).
  • Nodes C, O, Q, S, and W are surface nodes. Most other nodes are sub nodes, choice nodes, or blue nodes.

Objective

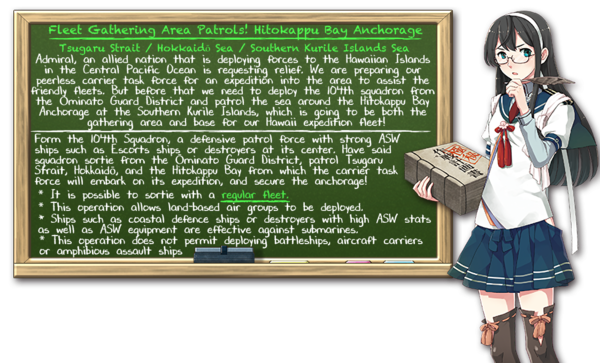
Over the course of this map you will need to complete a patrolling operation around 4 major key points:

  • Patrol around the Stugaru Strait and reach the base in Northern Hokkaidou (Node G)
  • Patrol and take out all enemy forces (S Rank) in the outer Hokkaidou Sea (Node O)
  • Patrol and take out all enemy forces (S Rank) near Hitokappu Bay (Node S)
  • Patrol and reach Hitokappu Bay (Node U)

Note that all condition as of current are based on Hard Difficulty and can vary in lower difficulty. Most of these nodes can be done without the assistance of LBAS at this point unless you need assistance.

Patrol around the Stugaru Strait and reach the base in Northern Hokkaidou (Node G) and take out all enemy forces (S Rank) in the Outer Hokkaidou Sea (Node O) and Hitokappu Bay (Node S)

Recommended Fleet
1CL, 4DD, 1DE

Path: D-B-C-F-G
Path: D-H-I-L-O-R
Path: D-H-I-L-Q-P-S LoS of 27 (Cn2)[1] needed

  • Bring a fleet with a mix of combat and ASW for Node G.
  • Use Line Abreast against subs and use Vangard against surface fleets
  • Your fleet should eventually reach G with little to no difficulty.
  • For Node O and Node S fleet will need to be more armed for Surface combat.
  • Use Line Abreast against subs and use Vanguard against surface fleets while making your trip to the nodes you need to target.
  • Use Line Ahead on both node to ensure you can eliminate the enemy fleet in the area and get an S rank.
  • Be sure to bring enough Radars and Seaplane Scouts to meet the requirements to go to node S

Patrol and reach Hitokappu Bay (Node U)

Recommended Fleet
1CL, 3-4DD, 0-1DE (5 ships only) 4-6 DD, 0-2 DE

Path: D-H-I-J-L-Q-T-U

  • Bring a Fleet with a mix of combat and ASW for Node G.
  • Use Line Abreast against subs and use Vanguard against surface fleets.
  • Your fleet should eventually reach Node U with little to no difficulty.

Once all conditions are met the path to Node W will be revealed.

From there all you need to do is defeat the main enemy fleet led by the new Tsu-class Flagship.

Recommended Fleet
0-1 CAV, 1-2 CL, 4DD
1 CL, 5 DD

Path: D-H-I-J-L-O-W LoS of 50 (Cn3)[2] needed

  • Bring a surface combat focused fleet to help provide a chance to stand up against the enemy fleets in boss node.
  • It's optional to begin a CAV (which can provide an edge in both Node O and W) or use 2 CL to conserve CAVs for possible later operations.
  • You will need a relatively good LoS (about 50 (CN 3)(verification required)) to avoid hitting node V and go straight to W.
  • Node O may present the only problem with your fleet at Node O due to it's strong torpedo squadron. Using an LBAS on this can be considered if necessary.
  • On Medium Difficulty or higher, you'll need to bring 3 or more Surface Radars.

The boss will be a Tsu-class Flagship which has HP on par to a Flagship Transport, and the combat strength similar to a battleship along with a much higher AA which will give it's fleet stronger AA in general. The Tsu-class will have several other CLs and DD in tow (and more elite Tsu-classes on higher difficulty).

Bringing an LBAS to the boss may present some risks for you planes as they may get shot down and possibly lose rank but otherwise should help you clear out most of the enemy ships easily. If you bring name squadron planes like the Nonaka Squadron and other various named or skilled planes, it'll be more likely to survive the surface AA attacks.

If your LBAS clear out enough enemy ships it should result in an easy fight where you wipe out almost everyone and finish off the Tsu-class in night battle. Repeat until the operation is complete. Alternatively, you can target Node O if it provides difficulty or if you're concerned about plane ranks and would prefer to use a support fleet on the boss.

Support Fleets

  • Using a Support fleet at the boss node is not entirely necessary as the boss is easy enough to defeat without it, but if for some reason you experience problems setting up a support fleet can be considered with a fleet consisting of 3BB, 1 CV, 2DD and having your BBs with Guns/radar, CV with your Dive Bombers and Radars and DDs with Radars.
  • Alternatively you can also consider 4 CA, 2 DD in support fleet in a similar set up since it'll be cheaper and can kill most of the lighter enemy ships.

LBAS Recommendation

4 Ryuusei or 4 Land Base Bombers (Range 5)

  • Everything on this map will have no air power, so bringing only bombers here is a good way to take out any problems that may appear and due to how easy the map is, it's possible to use this place to rank up planes as well.

Farming DEs for Luck, ASW, and HP

  • Node S, Node O, and Node Wcontain drops for various DEs (which include Shimushu, Kunashiri, and Etorofu
  • Collecting them and using them torward modernization may be helpful in boosting you Luck, ASW or in some cases your ship HP (a pair of 2 different ships from the same class are needed)
  • Most comps used for clearing are effective enough for farming

The event guides are to be constructed through the respective Event map page guide and reviewed by editor staff / collaboration committee before being approved here. Do not under any circumstance update the guides through this page or attempt to fix them through this page. Please only update guides through their respective sandbox pages.

Show/Hide Nodes and Enemy Encounters
Nodes and Enemy Encounters
NodePatternXpNode InfoFormAir
A
浸透深海潜水艦隊 IV群
Pattern 1 Submarine Ka-Class eliteSubmarine Ka-ClassSubmarine Ka-ClassSubmarine Ka-Class
Formation 3: Diamond
Formation 5: Line Abreast
Pattern 2 Submarine Ka-Class eliteSubmarine Ka-Class eliteSubmarine Ka-ClassSubmarine Ka-Class
Formation 3: Diamond
Pattern 3 Submarine Ka-Class eliteSubmarine Ka-ClassSubmarine Ka-Class
Formation 3: Diamond
Formation 5: Line Abreast
B
Battle Avoided
Pattern 1"Must be my imagination" (battle avoided)
C
浸透潜水艦隊 支援群
Pattern 1 Light Cruiser Ho-Class flagshipDestroyer I-Class Late ModelDestroyer I-Class Late ModelDestroyer I-Class Late Model
Formation 1: Line Ahead
Formation 3: Diamond
Pattern 2 Light Cruiser Ho-Class flagshipDestroyer I-Class Late ModelDestroyer I-Class Late ModelDestroyer I-Class
Formation 1: Line Ahead
Formation 3: Diamond
D
Pattern 1Choose your route
E
浸透潜水艦隊 支援群本体
Pattern 1 Light Cruiser Ho-Class flagshipDestroyer I-Class Late ModelDestroyer I-Class Late ModelSubmarine Ka-Class elite
Formation 2: Double Line
Formation 3: Diamond
Pattern 2 Light Cruiser Ho-Class flagshipDestroyer I-Class Late ModelDestroyer I-Class Late ModelDestroyer I-Class Late ModelSubmarine Ka-Class elite
Formation 2: Double Line
Formation 3: Diamond
F
浸透深海潜水艦隊 I群
Pattern 1 Submarine Ka-Class eliteSubmarine Ka-Class eliteSubmarine Ka-Class elite
Formation 3: Diamond
Formation 5: Line Abreast
Pattern 2 Submarine Ka-Class flagshipSubmarine Ka-Class eliteSubmarine Ka-Class eliteSubmarine Ka-Class elite
Formation 3: Diamond
Pattern 3 Submarine Ka-Class flagshipSubmarine Ka-ClassSubmarine Ka-Class
Formation 3: Diamond
Formation 5: Line Abreast
G
Transport Drop-Off Node
Pattern 1 Transport drop-off
H
Battle Avoided
Pattern 1"Must be my imagination" (battle avoided)
J
浸透深海潜水艦隊 II群
Pattern 1 Submarine Ka-Class eliteSubmarine Ka-Class eliteSubmarine Ka-Class
Formation 3: Diamond
Formation 5: Line Abreast
Pattern 2 Submarine Ka-Class eliteSubmarine Ka-Class eliteSubmarine Ka-Class elite
Formation 3: Diamond
Pattern 3 Submarine Ka-Class eliteSubmarine Ka-ClassSubmarine Ka-Class
Formation 3: Diamond
Formation 5: Line Abreast
K
強行偵察水雷戦隊 C群
Pattern 1 Light Cruiser Ho-Class flagshipDestroyer I-Class Late ModelDestroyer I-Class Late ModelDestroyer I-Class Late ModelDestroyer I-Class Late Model
Formation 1: Line Ahead
Formation 3: Diamond
Pattern 2 Light Cruiser Ho-Class flagshipDestroyer I-Class Late ModelDestroyer I-Class Late ModelDestroyer I-ClassDestroyer I-Class
Formation 1: Line Ahead
Formation 3: Diamond
L
Pattern 1Choose your route
M
浸透深海潜水艦隊 II群
Pattern 1 Submarine Ka-Class eliteSubmarine Ka-Class eliteSubmarine Ka-Class
Formation 3: Diamond
Formation 5: Line Abreast
Pattern 2 Submarine Ka-Class eliteSubmarine Ka-Class eliteSubmarine Ka-Class elite
Formation 3: Diamond
Pattern 3 Submarine Ka-Class eliteSubmarine Ka-ClassSubmarine Ka-Class
Formation 3: Diamond
Formation 5: Line Abreast
N
Battle Avoided
Pattern 1"Must be my imagination" (battle avoided)
O
深海高速浸透任務部隊 前衛群
Pattern 1 Light Cruiser He-Class flagshipTorpedo Cruiser Chi-Class eliteTorpedo Cruiser Chi-Class eliteDestroyer I-Class Late Model eliteDestroyer I-Class Late ModelDestroyer I-Class Late Model
Formation 1: Line Ahead
Formation 2: Double Line
Formation 3: Diamond
P
浸透深海潜水艦隊 I群
Pattern 1 Submarine Ka-Class eliteSubmarine Ka-Class eliteSubmarine Ka-Class elite
Formation 3: Diamond
Formation 5: Line Abreast
Pattern 2 Submarine Ka-Class flagshipSubmarine Ka-Class eliteSubmarine Ka-Class elite
Formation 3: Diamond
Pattern 3 Submarine Ka-Class eliteSubmarine Ka-Class eliteSubmarine Ka-Class
Formation 3: Diamond
Formation 5: Line Abreast
Q
強行偵察水雷戦隊 B群
Pattern 1 Light Cruiser Ho-Class flagshipDestroyer I-Class Late ModelDestroyer I-Class Late ModelDestroyer I-Class Late ModelDestroyer I-ClassDestroyer I-Class
Formation 1: Line Ahead
Formation 3: Diamond
Pattern 2 Light Cruiser Ho-Class flagshipDestroyer I-Class Late ModelDestroyer I-Class Late ModelDestroyer I-ClassDestroyer I-ClassDestroyer I-Class
Formation 1: Line Ahead
Formation 3: Diamond
R
Battle Avoided
Pattern 1"Must be my imagination" (battle avoided)
S
強行偵察水雷戦隊 A群
Pattern 1 Light Cruiser He-Class flagshipDestroyer I-Class Late ModelDestroyer I-Class Late ModelDestroyer I-Class Late ModelDestroyer I-ClassDestroyer I-Class
Formation 1: Line Ahead
Formation 3: Diamond
Pattern 2 Light Cruiser He-Class flagshipDestroyer I-Class Late Model eliteDestroyer I-Class Late ModelDestroyer I-Class Late ModelDestroyer I-ClassDestroyer I-Class
Formation 1: Line Ahead
Formation 3: Diamond
T
浸透深海潜水艦隊 泊地封鎖部隊
Pattern 1 Submarine Ka-Class eliteSubmarine Ka-Class eliteSubmarine Ka-Class elite
Formation 3: Diamond
Formation 5: Line Abreast
Pattern 2 Submarine Ka-Class flagshipSubmarine Ka-Class eliteSubmarine Ka-Class elite
Formation 3: Diamond
Pattern 3 Submarine Ka-Class eliteSubmarine Ka-Class eliteSubmarine Ka-Class
Formation 3: Diamond
Formation 5: Line Abreast
U
Transport Drop-Off Node
Pattern 1 Transport drop-off
V
深海高速浸透任務部隊 支援隊
Pattern 1 Light Cruiser He-Class flagshipDestroyer I-Class Late ModelDestroyer I-Class Late ModelSubmarine Ka-Class eliteTransport Ship Wa-Class eliteTransport Ship Wa-Class elite
Formation 2: Double Line
Formation 3: Diamond
Pattern 2 Light Cruiser He-Class flagshipDestroyer I-Class Late ModelDestroyer I-Class Late ModelSubmarine Ka-Class eliteTransport Ship Wa-ClassTransport Ship Wa-Class
Formation 2: Double Line
Formation 3: Diamond
W
深海水雷戦隊 前衛警戒隊
Pattern 1 Light Cruiser Tsu-Class flagshipLight Cruiser Tsu-Class eliteLight Cruiser Tsu-Class eliteLight Cruiser He-Class flagshipDestroyer I-Class Late ModelDestroyer I-Class Late Model
Formation 1: Line Ahead
Pattern 2 Light Cruiser Tsu-Class flagshipLight Cruiser Tsu-Class eliteLight Cruiser He-Class flagshipDestroyer I-Class Late ModelDestroyer I-Class Late ModelDestroyer I-Class Late Model
Formation 3: Diamond

Show/Hide Nodes and Enemy Encounters
Nodes and Enemy Encounters
NodePatternXpNode InfoFormAir
A
浸透深海潜水艦隊 IV群
Pattern 1 Submarine Ka-Class eliteSubmarine Ka-ClassSubmarine Ka-ClassSubmarine Ka-Class
Formation 3: Diamond
Formation 5: Line Abreast
Pattern 2 Submarine Ka-Class eliteSubmarine Ka-ClassSubmarine Ka-Class
Formation 5: Line Abreast
B
Battle Avoided
Pattern 1"Must be my imagination" (battle avoided)
C
浸透潜水艦隊 支援群
Pattern 1 Light Cruiser Ho-Class flagshipDestroyer I-Class Late ModelDestroyer I-ClassDestroyer I-Class
Formation 1: Line Ahead
Formation 3: Diamond
Pattern 2 Light Cruiser Ho-Class flagshipDestroyer I-Class Late ModelDestroyer I-Class Late ModelDestroyer I-Class
Formation 1: Line Ahead
Formation 3: Diamond
D
Pattern 1Choose your route
E
浸透潜水艦隊 支援群本体
Pattern 1 Light Cruiser Ho-Class flagshipDestroyer I-Class Late ModelDestroyer I-Class Late ModelSubmarine Ka-Class
Formation 2: Double Line
Formation 3: Diamond
Pattern 2 Light Cruiser Ho-Class flagshipDestroyer I-Class Late ModelDestroyer I-Class Late ModelSubmarine Ka-Class elite
Formation 2: Double Line
F
浸透深海潜水艦隊 I群
Pattern 1 Submarine Ka-Class flagshipSubmarine Ka-ClassSubmarine Ka-Class
Formation 3: Diamond
Formation 5: Line Abreast
Pattern 2 Submarine Ka-Class eliteSubmarine Ka-ClassSubmarine Ka-Class
Formation 3: Diamond
Formation 5: Line Abreast
Pattern 3 Submarine Ka-Class eliteSubmarine Ka-Class eliteSubmarine Ka-Class elite
Formation 3: Diamond
Formation 5: Line Abreast
G
Transport Drop-Off Node
Pattern 1 Transport drop-off
H
Battle Avoided
Pattern 1"Must be my imagination" (battle avoided)
I
浸透深海潜水艦隊 III群
Pattern 1 Submarine Ka-Class eliteSubmarine Ka-ClassSubmarine Ka-Class
Formation 3: Diamond
Formation 5: Line Abreast
Pattern 2 Submarine Ka-ClassSubmarine Ka-ClassSubmarine Ka-Class
Formation 3: Diamond
Formation 5: Line Abreast
Pattern 3 Submarine Ka-Class eliteSubmarine Ka-ClassSubmarine Ka-ClassSubmarine Ka-Class
Formation 3: Diamond
Formation 5: Line Abreast
J
浸透深海潜水艦隊 II群
Pattern 1 Submarine Ka-Class eliteSubmarine Ka-ClassSubmarine Ka-Class
Formation 3: Diamond
Formation 5: Line Abreast
Pattern 2 Submarine Ka-ClassSubmarine Ka-ClassSubmarine Ka-Class
Formation 3: Diamond
Formation 5: Line Abreast
Pattern 3 Submarine Ka-Class eliteSubmarine Ka-Class eliteSubmarine Ka-Class
Formation 3: Diamond
Formation 5: Line Abreast
K
強行偵察水雷戦隊 C群
Pattern 1 Light Cruiser Ho-Class flagshipDestroyer I-Class Late ModelDestroyer I-ClassDestroyer I-ClassDestroyer I-Class
Formation 1: Line Ahead
Formation 3: Diamond
Pattern 2 Light Cruiser Ho-Class flagshipDestroyer I-Class Late ModelDestroyer I-Class Late ModelDestroyer I-ClassDestroyer I-Class
Formation 1: Line Ahead
Formation 3: Diamond
L
Pattern 1Choose your route
M
浸透深海潜水艦隊 II群
Pattern 1 Submarine Ka-Class eliteSubmarine Ka-ClassSubmarine Ka-Class
Formation 3: Diamond
Formation 5: Line Abreast
Pattern 2 Submarine Ka-ClassSubmarine Ka-ClassSubmarine Ka-Class
Formation 3: Diamond
Formation 5: Line Abreast
Pattern 3 Submarine Ka-Class eliteSubmarine Ka-Class eliteSubmarine Ka-Class
Formation 3: Diamond
Formation 5: Line Abreast
N
Battle Avoided
Pattern 1"Must be my imagination" (battle avoided)
O
深海高速浸透任務部隊 前衛群
Pattern 1 Light Cruiser He-Class flagshipTorpedo Cruiser Chi-Class eliteTorpedo Cruiser Chi-Class eliteDestroyer I-Class Late ModelDestroyer I-ClassDestroyer I-Class
Formation 1: Line Ahead
Formation 2: Double Line
Formation 3: Diamond
P
浸透深海潜水艦隊 I群
Pattern 1 Submarine Ka-Class eliteSubmarine Ka-Class eliteSubmarine Ka-Class
Formation 3: Diamond
Formation 5: Line Abreast
Pattern 2 Submarine Ka-Class eliteSubmarine Ka-ClassSubmarine Ka-Class
Formation 3: Diamond
Formation 5: Line Abreast
Pattern 3 Submarine Ka-Class eliteSubmarine Ka-Class eliteSubmarine Ka-Class elite
Formation 3: Diamond
Formation 5: Line Abreast
Q
強行偵察水雷戦隊 B群
Pattern 1 Light Cruiser Ho-Class flagshipDestroyer I-Class Late ModelDestroyer I-ClassDestroyer I-ClassDestroyer I-ClassDestroyer I-Class
Formation 1: Line Ahead
Formation 3: Diamond
Pattern 2 Light Cruiser Ho-Class flagshipDestroyer I-Class Late ModelDestroyer I-Class Late ModelDestroyer I-ClassDestroyer I-ClassDestroyer I-Class
Formation 1: Line Ahead
Formation 3: Diamond
R
Battle Avoided
Pattern 1"Must be my imagination" (battle avoided)
S
強行偵察水雷戦隊 A群
Pattern 1 Light Cruiser He-Class flagshipDestroyer I-Class Late ModelDestroyer I-Class Late ModelDestroyer I-Class Late ModelDestroyer I-ClassDestroyer I-Class
Formation 1: Line Ahead
Formation 3: Diamond
Pattern 2 Light Cruiser He-Class flagshipDestroyer I-Class Late ModelDestroyer I-Class Late ModelDestroyer I-ClassDestroyer I-ClassDestroyer I-Class
Formation 1: Line Ahead
Formation 3: Diamond
T
浸透深海潜水艦隊 泊地封鎖部隊
Pattern 1 Submarine Ka-Class eliteSubmarine Ka-Class eliteSubmarine Ka-Class
Formation 3: Diamond
Formation 5: Line Abreast
Pattern 2 Submarine Ka-Class eliteSubmarine Ka-ClassSubmarine Ka-Class
Formation 3: Diamond
Formation 5: Line Abreast
Pattern 3 Submarine Ka-Class eliteSubmarine Ka-Class eliteSubmarine Ka-Class elite
Formation 3: Diamond
Formation 5: Line Abreast
U
Transport Drop-Off Node
Pattern 1 Transport drop-off
V
深海高速浸透任務部隊 支援隊
Pattern 1 Light Cruiser He-Class flagshipDestroyer I-Class Late ModelDestroyer I-Class Late ModelSubmarine Ka-Class eliteTransport Ship Wa-ClassTransport Ship Wa-Class
Formation 2: Double Line
Formation 3: Diamond
Pattern 2 Destroyer I-Class Late ModelDestroyer I-Class Late ModelSubmarine Ka-ClassTransport Ship Wa-ClassTransport Ship Wa-Class
Formation 2: Double Line
Pattern 3 Destroyer I-Class Late ModelDestroyer I-ClassSubmarine Ka-ClassTransport Ship Wa-ClassTransport Ship Wa-Class
Formation 2: Double Line
Pattern 4 Light Cruiser He-Class flagshipDestroyer I-Class Late ModelDestroyer I-Class Late ModelSubmarine Ka-ClassTransport Ship Wa-ClassTransport Ship Wa-Class
Formation 2: Double Line
W
深海水雷戦隊 前衛警戒隊
Pattern 1 Light Cruiser Tsu-Class eliteLight Cruiser He-Class flagshipDestroyer I-Class Late ModelDestroyer I-Class Late ModelDestroyer I-Class Late ModelDestroyer I-Class Late Model
Formation 1: Line Ahead
Formation 3: Diamond
Pattern 2 Light Cruiser Tsu-Class eliteLight Cruiser He-Class flagshipDestroyer I-Class Late ModelDestroyer I-Class Late ModelDestroyer I-ClassDestroyer I-Class
Formation 1: Line Ahead
Formation 3: Diamond

Show/Hide Nodes and Enemy Encounters
Nodes and Enemy Encounters
NodePatternXpNode InfoFormAir
A
浸透深海潜水艦隊 IV群
Pattern 1 Submarine Ka-ClassSubmarine Ka-ClassSubmarine Ka-Class
Formation 3: Diamond
Formation 5: Line Abreast
Pattern 2 Submarine Ka-ClassSubmarine Ka-Class
Formation 3: Diamond
Formation 5: Line Abreast
Pattern 3 Submarine Ka-Class eliteSubmarine Ka-ClassSubmarine Ka-Class
Formation 3: Diamond
B
Battle Avoided
Pattern 1"Must be my imagination" (battle avoided)
C
浸透潜水艦隊 支援群
Pattern 1 Light Cruiser Ho-Class flagshipDestroyer I-Class Late ModelDestroyer I-ClassDestroyer I-Class
Formation 1: Line Ahead
Formation 3: Diamond
Pattern 2 Light Cruiser Ho-Class flagshipDestroyer I-ClassDestroyer I-ClassDestroyer I-Class
Formation 1: Line Ahead
Formation 3: Diamond
D
Pattern 1Choose your route
E
浸透潜水艦隊 支援群本体
Pattern 1 Light Cruiser Ho-Class flagshipDestroyer I-ClassDestroyer I-ClassSubmarine Ka-Class
Formation 2: Double Line
Formation 3: Diamond
Pattern 2 Light Cruiser Ho-Class flagshipDestroyer I-Class Late ModelDestroyer I-Class Late ModelSubmarine Ka-Class
Formation 2: Double Line
Formation 3: Diamond
F
浸透深海潜水艦隊 I群
Pattern 1 Submarine Ka-Class eliteSubmarine Ka-ClassSubmarine Ka-Class
Formation 3: Diamond
Formation 5: Line Abreast
Pattern 2 Submarine Ka-ClassSubmarine Ka-ClassSubmarine Ka-Class
Formation 3: Diamond
Formation 5: Line Abreast
Pattern 3 Submarine Ka-Class flagshipSubmarine Ka-ClassSubmarine Ka-Class
Formation 3: Diamond
Formation 5: Line Abreast
G
Transport Drop-Off Node
Pattern 1 Transport drop-off
H
Battle Avoided
Pattern 1"Must be my imagination" (battle avoided)
I
浸透深海潜水艦隊 III群
Pattern 1 Submarine Ka-ClassSubmarine Ka-ClassSubmarine Ka-Class
Formation 3: Diamond
Formation 5: Line Abreast
Pattern 2 Submarine Ka-ClassSubmarine Ka-Class
Formation 3: Diamond
Formation 5: Line Abreast
Pattern 3 Submarine Ka-Class eliteSubmarine Ka-ClassSubmarine Ka-Class
Formation 3: Diamond
Formation 5: Line Abreast
J
浸透深海潜水艦隊 II群
Pattern 1 Submarine Ka-ClassSubmarine Ka-ClassSubmarine Ka-Class
Formation 3: Diamond
Formation 5: Line Abreast
Pattern 2 Submarine Ka-ClassSubmarine Ka-Class
Formation 3: Diamond
Formation 5: Line Abreast
Pattern 3 Submarine Ka-Class eliteSubmarine Ka-ClassSubmarine Ka-Class
Formation 3: Diamond
Formation 5: Line Abreast
K
強行偵察水雷戦隊 C群
Pattern 1 Light Cruiser Ho-Class flagshipDestroyer I-Class Late ModelDestroyer I-ClassDestroyer I-ClassDestroyer I-Class
Formation 1: Line Ahead
Formation 3: Diamond
Pattern 2 Light Cruiser Ho-Class flagshipDestroyer I-ClassDestroyer I-ClassDestroyer I-ClassDestroyer I-Class
Formation 1: Line Ahead
Formation 3: Diamond
L
Pattern 1Choose your route
M
浸透深海潜水艦隊 II群
Pattern 1 Submarine Ka-ClassSubmarine Ka-ClassSubmarine Ka-Class
Formation 3: Diamond
Formation 5: Line Abreast
Pattern 2 Submarine Ka-ClassSubmarine Ka-Class
Formation 3: Diamond
Formation 5: Line Abreast
Pattern 3 Submarine Ka-Class eliteSubmarine Ka-ClassSubmarine Ka-Class
Formation 3: Diamond
Formation 5: Line Abreast
N
Battle Avoided
Pattern 1"Must be my imagination" (battle avoided)
O
深海高速浸透任務部隊 前衛群
Pattern 1 Torpedo Cruiser Chi-Class eliteTorpedo Cruiser Chi-Class eliteDestroyer I-ClassDestroyer I-ClassDestroyer I-ClassDestroyer I-Class
Formation 1: Line Ahead
Formation 2: Double Line
Formation 3: Diamond
Pattern 2 Light Cruiser He-Class flagshipTorpedo Cruiser Chi-Class eliteTorpedo Cruiser Chi-Class eliteDestroyer I-Class Late ModelDestroyer I-ClassDestroyer I-Class
Formation 2: Double Line
Formation 3: Diamond
P
浸透深海潜水艦隊 I群
Pattern 1 Submarine Ka-Class eliteSubmarine Ka-ClassSubmarine Ka-Class
Formation 3: Diamond
Formation 5: Line Abreast
Pattern 2 Submarine Ka-ClassSubmarine Ka-ClassSubmarine Ka-Class
Formation 3: Diamond
Formation 5: Line Abreast
Pattern 3 Submarine Ka-Class eliteSubmarine Ka-Class eliteSubmarine Ka-Class
Formation 3: Diamond
Formation 5: Line Abreast
Q
強行偵察水雷戦隊 B群
Pattern 1 Light Cruiser Ho-Class flagshipDestroyer I-ClassDestroyer I-ClassDestroyer I-ClassDestroyer I-ClassDestroyer I-Class
Formation 1: Line Ahead
Formation 3: Diamond
Pattern 2 Light Cruiser Ho-Class flagshipDestroyer I-Class Late ModelDestroyer I-ClassDestroyer I-ClassDestroyer I-ClassDestroyer I-Class
Formation 1: Line Ahead
Formation 3: Diamond
R
Battle Avoided
Pattern 1"Must be my imagination" (battle avoided)
S
強行偵察水雷戦隊 A群
Pattern 1 Light Cruiser He-Class flagshipDestroyer I-Class Late ModelDestroyer I-Class Late ModelDestroyer I-ClassDestroyer I-ClassDestroyer I-Class
Formation 1: Line Ahead
Formation 3: Diamond
Pattern 2 Light Cruiser He-Class flagshipDestroyer I-ClassDestroyer I-ClassDestroyer I-ClassDestroyer I-ClassDestroyer I-Class
Formation 1: Line Ahead
Formation 3: Diamond
T
浸透深海潜水艦隊 泊地封鎖部隊
Pattern 1 Submarine Ka-Class eliteSubmarine Ka-ClassSubmarine Ka-Class
Formation 3: Diamond
Formation 5: Line Abreast
Pattern 2 Submarine Ka-ClassSubmarine Ka-ClassSubmarine Ka-Class
Formation 3: Diamond
Formation 5: Line Abreast
Pattern 3 Submarine Ka-Class eliteSubmarine Ka-Class eliteSubmarine Ka-Class
Formation 3: Diamond
Formation 5: Line Abreast
U
Transport Drop-Off Node
Pattern 1 Transport drop-off
V
深海高速浸透任務部隊 支援隊
Pattern 1 Destroyer I-ClassDestroyer I-ClassSubmarine Ka-ClassTransport Ship Wa-ClassTransport Ship Wa-Class
Formation 2: Double Line
Pattern 2 Destroyer I-Class Late ModelDestroyer I-ClassSubmarine Ka-ClassTransport Ship Wa-ClassTransport Ship Wa-Class
Formation 2: Double Line
Pattern 3 Destroyer I-ClassDestroyer I-ClassSubmarine Ka-ClassTransport Ship Wa-Class
Formation 2: Double Line
Pattern 4 Destroyer I-Class Late ModelDestroyer I-Class Late ModelSubmarine Ka-ClassTransport Ship Wa-ClassTransport Ship Wa-Class
Formation 2: Double Line
Pattern 5 Light Cruiser He-Class flagshipDestroyer I-Class Late ModelDestroyer I-Class Late ModelSubmarine Ka-ClassTransport Ship Wa-ClassTransport Ship Wa-Class
Formation 2: Double Line
W
深海水雷戦隊 前衛警戒隊
Pattern 1 Light Cruiser Tsu-ClassLight Cruiser He-Class flagshipDestroyer I-Class Late ModelDestroyer I-Class Late ModelDestroyer I-ClassDestroyer I-Class
Formation 1: Line Ahead
Formation 3: Diamond
Pattern 2 Light Cruiser Tsu-ClassLight Cruiser He-Class flagshipDestroyer I-Class Late ModelDestroyer I-ClassDestroyer I-ClassDestroyer I-Class
Formation 3: Diamond

Show/Hide Nodes and Enemy Encounters
Nodes and Enemy Encounters
NodePatternXpNode InfoFormAir
A
浸透深海潜水艦隊 IV群
Pattern 1 Submarine Ka-ClassSubmarine Ka-Class
Formation 3: Diamond
Formation 5: Line Abreast
Pattern 2 Submarine Ka-ClassSubmarine Ka-ClassSubmarine Ka-Class
Formation 3: Diamond
Formation 5: Line Abreast
B
Battle Avoided
Pattern 1"Must be my imagination" (battle avoided)
C
浸透潜水艦隊 支援群
Pattern 1 Destroyer I-Class Late ModelDestroyer I-ClassDestroyer I-ClassDestroyer I-Class
Formation 3: Diamond
Pattern 2 Light Cruiser Ho-Class flagshipDestroyer I-ClassDestroyer I-ClassDestroyer I-Class
Formation 1: Line Ahead
Formation 3: Diamond
D
Pattern 1Choose your route
E
浸透潜水艦隊 支援群本体
Pattern 1 Light Cruiser Ho-Class flagshipDestroyer I-ClassDestroyer I-ClassSubmarine Ka-Class
Formation 2: Double Line
Formation 3: Diamond
Pattern 2 Destroyer I-Class Late ModelDestroyer I-ClassDestroyer I-ClassSubmarine Ka-Class
Formation 2: Double Line
F
浸透深海潜水艦隊 I群
Pattern 1 Submarine Ka-ClassSubmarine Ka-ClassSubmarine Ka-Class
Formation 3: Diamond
Formation 5: Line Abreast
Pattern 2 Submarine Ka-Class eliteSubmarine Ka-ClassSubmarine Ka-Class
Formation 3: Diamond
Formation 5: Line Abreast
G
Transport Drop-Off Node
Pattern 1 Transport drop-off
H
Battle Avoided
Pattern 1"Must be my imagination" (battle avoided)
I
浸透深海潜水艦隊 III群
Pattern 1 Submarine Ka-ClassSubmarine Ka-Class
Formation 3: Diamond
Formation 5: Line Abreast
Pattern 2 Submarine Ka-ClassSubmarine Ka-ClassSubmarine Ka-Class
Formation 3: Diamond
Formation 5: Line Abreast
L
Pattern 1Choose your route
N
Battle Avoided
Pattern 1"Must be my imagination" (battle avoided)
O
深海高速浸透任務部隊 前衛群
Pattern 1 Torpedo Cruiser Chi-Class eliteTorpedo Cruiser Chi-Class eliteDestroyer I-ClassDestroyer I-ClassDestroyer I-ClassDestroyer I-Class
Formation 1: Line Ahead
Formation 2: Double Line
Formation 3: Diamond
P
浸透深海潜水艦隊 I群
Pattern 1 Submarine Ka-ClassSubmarine Ka-ClassSubmarine Ka-Class
Formation 3: Diamond
Formation 5: Line Abreast
Pattern 2 Submarine Ka-Class eliteSubmarine Ka-ClassSubmarine Ka-Class
Formation 3: Diamond
Formation 5: Line Abreast
Q
強行偵察水雷戦隊 B群
Pattern 1 Destroyer I-ClassDestroyer I-ClassDestroyer I-ClassDestroyer I-ClassDestroyer I-ClassDestroyer I-Class
Formation 3: Diamond
Pattern 2 Light Cruiser Ho-Class flagshipDestroyer I-ClassDestroyer I-ClassDestroyer I-ClassDestroyer I-ClassDestroyer I-Class
Formation 1: Line Ahead
Formation 3: Diamond
R
Battle Avoided
Pattern 1"Must be my imagination" (battle avoided)
S
強行偵察水雷戦隊 A群
Pattern 1 Light Cruiser He-Class flagshipDestroyer I-ClassDestroyer I-ClassDestroyer I-ClassDestroyer I-ClassDestroyer I-Class
Formation 1: Line Ahead
Formation 3: Diamond
Pattern 2 Destroyer I-Class Late ModelDestroyer I-ClassDestroyer I-ClassDestroyer I-ClassDestroyer I-ClassDestroyer I-Class
Formation 3: Diamond
T
浸透深海潜水艦隊 泊地封鎖部隊
Pattern 1 Submarine Ka-ClassSubmarine Ka-ClassSubmarine Ka-Class
Formation 3: Diamond
Formation 5: Line Abreast
Pattern 2 Submarine Ka-Class eliteSubmarine Ka-ClassSubmarine Ka-Class
Formation 3: Diamond
Formation 5: Line Abreast
U
Transport Drop-Off Node
Pattern 1 Transport drop-off
V
深海高速浸透任務部隊 支援隊
Pattern 1 Destroyer I-Class Late ModelDestroyer I-ClassSubmarine Ka-ClassTransport Ship Wa-ClassTransport Ship Wa-Class
Formation 2: Double Line
Pattern 2 Destroyer I-ClassDestroyer I-ClassSubmarine Ka-ClassTransport Ship Wa-ClassTransport Ship Wa-Class
Formation 2: Double Line
Pattern 3 Destroyer I-ClassDestroyer I-ClassSubmarine Ka-ClassTransport Ship Wa-Class
Formation 2: Double Line
W
深海水雷戦隊 前衛警戒隊
Pattern 1 Light Cruiser Tsu-ClassLight Cruiser He-Class flagshipDestroyer I-Class Late ModelDestroyer I-Class Late ModelDestroyer I-ClassDestroyer I-Class
Formation 1: Line Ahead
Formation 3: Diamond
Pattern 2 Light Cruiser Tsu-ClassLight Cruiser He-Class flagshipDestroyer I-Class Late ModelDestroyer I-ClassDestroyer I-ClassDestroyer I-Class
Formation 3: Diamond

Ship drops

NodeShip List
CDestroyers
EDestroyer Escorts
Destroyers
Light Cruisers
Light Aircraft Carriers
Seaplane Tenders
GDestroyer Escorts
Destroyers
Light Cruisers
Light Aircraft Carriers[
Seaplane Tenders
Auxiliary Ships
HDestroyers
LDestroyer Escorts
Destroyers
Light Cruisers
Heavy Cruisers
Battleships
Light Aircraft Carriers
Seaplane Tenders
Auxiliary Ships


E-2

OoyodoE-2Spring2019.png

Defense Expansion! The Nansei Island Defense Operation!
防備拡充! 南西諸島防衛作戦

Information

  • Event Tag: YellowSpring2019Tag.png 2nd Fleet Tag

(Phase 1 - Transport Phase):

  • Hard ():
  • Medium ():
  • Easy ():
  • Casual ():

(Phase 2 - Boss:

  • Hard ():
  • Medium ():
  • Easy ():
  • Casual ():

Key Rewards:

Spring2019E-2Banner.png
Spring2019E-2Map.png

Branching rules

E-2 Branching Rules Phase 1
Nodes Rules
A
B
  • Active branching
C
C
D
  • Meet ALL of the following requirements:
    • Do not meet the requirements to go to F.
    • Amount of (F)BB(V)+CV(L/B)+CA(V) ≤ 3
E
  • Do not meet the requirements to go to either E or F.
F
  • Meet ALL of the following requirements:
    • Amount of CL ≥ 1
    • No (F)BB(V) or CV(B)
    • Amount of LHA+CVL+CA(V) ≤ 1
D
G
  • Amount of DD ≤ 2
I
  • Amount of DD ≥ 3
F
I
  • Slow Fleet
J
  • Fast Fleet
K
L
  • Meet ALL of the following requirements:
    • Pass the LoS check.
    • Amount of ships equipped with Surface Radars ≥ 1/2 on Medium/Hard
M
  • Do not meet the requirements to go to L.


E-2 Branching Rules Phase 2
Nodes Rules
Start
1
  • Do not meet the requirements to start at 2.
2
  • Meet ALL of the following requirements:
    • Starting point 2 is unlocked.
    • No SS(V)
    • Fleet contains (F)BB(V)
    • Amount of CVL ≤ 2
O1
O2
  • Active branching
P1
O2
O3
  • Do not meet the requirements to go to P2.
P2
  • Meet ALL of the following requirements:
    • Amount of CL ≥ 1
    • No CVL
Q1
E
  • Meet ALL of the following requirements:
    • Amount of CL = 1
    • Amount of (F)BB(V) ≤ 1
    • No CVL, CA(V) or CLT
Q2
  • Do not meet the requirements to go to E.
Q3
R
  • Amount of DD ≤ 4
S
  • Amount of DD ≥ 5
R
E
  • Do not meet the requirements to go to either H or S.
H
  • Meet ANY of the following requirements:
    • Do not meet the requirements to go to S.
    • Amount of (F)BB(V)+CVL+CA(V) ≤ 2
S
  • Meet ALL of the following requirements:
    • No CVL (Easy+)
    • Fleet contains CL
    • Amount of (F)BB(V)+CVL+CA(V) ≤ 3/1 on Casual/Easy+
H
J
  • Fleet started at 1.
T
  • Fleet started at 2.
T
U
  • Meet ALL of the following requirements:
    • Pass the LoS check. (Estimated around 35 Cn2)
    • Amount of ships equipped with Surface Radars ≥ 1 (Hard)
V
  • Do not meet the requirements to go to U.


Branching compositions were reported over the course of the event.

Tips
The following guide was created based upon notes provided before EO release. This guide may be subject for change in the future:

Regarding the 2nd Fleet

In this operation you will be using the 2nd Fleet which are considered important of operation as they will all have special buffs on this map since it takes place in Okinawa. As such, most of the ships that have benifits are from the 2nd Fleet from April 1st, 1945 that were still alive during Operation Ten-Go and they are follows:

Both Node L and U

Yamato, Yahagi, Yukikaze, Hatsushimo, Asashimo, Suzutsuki, Isokaze, Hamakaze - 1.15x
Kasumi - 1.1x

Node L Only

Ryuuhou, Junyou, Sakawa, Hibiki, Ushio - 1.1x

Most fleets here are not entirely tied to Pearl Harbor except for Hamakaze, Isokaze, Hatsushimo, and Kasumi. So you decide to choose among members of Ten-Go for this operation, please consider the fact that these ships along with other key TCI ships Yukikaze may also become more vital for later EO operations.

Objective

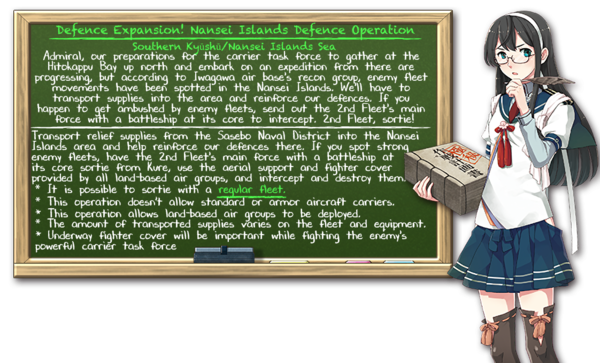
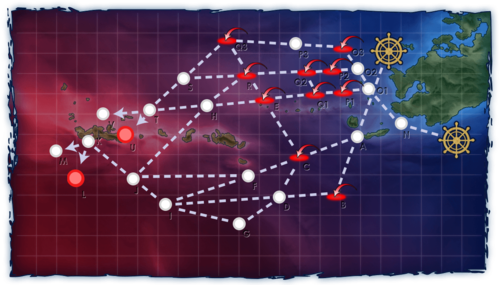
In this map, your objective will be to provide reinforcement in the Nansei Island area by completing a transport operation to Node L before later engaging against a Carrier force in the western part of the waters. Overall you mission will consist of the following:

  • Transport Supplies to Nansei Islands (Node U)
  • Clear the air attack nodes from carriers attacks by gaining AS (Nodes B and C)
  • Eliminate the Aircraft Carrier Princess and her Carrier Task Force Fleet.

As noted in Ooyodo's chalkboard, CVs and CVB are not allowed in this operation.


Transport Supplies to Nansei Islands (Node U)

Recommended Fleet

1 CVL or CAV, 1 CL, 4 DD (Fast Fleet recommended)

Path

A-C-F-J-K-L
A-C-F-I-J-K-L (if fleet is slow)

Summary

  • It's possible to use a CAV instead of a CVL, but it is probably preferable to save them for EOs considering how few of them there are in the game at the moment. (Note: Written prior to release of EO maps.)
    • CAVs contribute TP points, while CVLs do not.
  • At least 1-2 DD capable of carrying Daihatsu will help to clear the TP gauge more quickly.
  • If you use a CVL you should brin mostly fighters and at least one bombrt (On Casual and Easy) or all fighters (on Medium / Hard difficulty)
  • Suzutsuki with an AACI set-up is an ideal choice to help deal with the air raid node.
  • An All Fast Fleet is recommended to go the fastest route
  • Depending on the difficulty you will need approximately 0/0/1/2 Surface Radars.
  • Support expeditions are optional, but may help.
    • Route support may help with survivability, although Vanguard will also help.
    • Boss support may help to achieve more consistent S-Ranks, but isn't strictly necessary.
  • Your fleet will have limited combat capability as most DDs will likely be carrying Daihatsu and/or drums.
  • Most surface battles will pit you against CLs and DDs, Use Vanguard on the surface nodes.
  • Both LBAS with 4 LBAA should be sent to the boss node.
    • BB Himes take additional postcap damage from LBAA.
    • Alternatively, 1 LBAS can be sent to sweep the air raid node. This means one less LBAS at the boss node (potentially less A/S-Ranks), but also better pass rate (for the air raid node).

Along with all the detailed noted above, once you reach the boss node you'll face against a Battleship Princess (which you may face up to 2 of them in harder difficulties) along with some other CLs and DDs Since the boss lacks in air power, you can consider using a full bombing LBAS unit for this node. Repeat until TP gauge has been depleted.

Once the TP gauge is depleted the a new boss gauge will appear but before you can use go further you'll need to complete to unlock the path to the new boss.

Recommended LBAS

Bringing additional Land Base Air Power for Node C

LBAS 1

4 Fighters/Land Base Fighters (Range 4 needed)

  • Along with a fighter mule CVL this combination is likely to survive the map in question with little difficulty.

Bombing the Battleships Princess at Node L

LBAS 1 and/or 2

4 Land Base Bombers (Range 7 needed)

As the boss has no air power, you can use this fleet to help clear out most of the enemies without trouble. If you are feel like taking a risk with Node C and going all out, you can use both LBAS on this node for an effective result.

Unlocking the Path: Clear the air attack nodes from carriers attacks by gaining AS (Nodes B and C)

Recommended Fleet

2 CVL

Path

A-B
A-C

LBAS 1 and/or 2

4 Fighters/Land Base Fighters (Range 4 needed)

In this phase, simply arm your two CVL with fighters and use your Land Base to engage the air nodes on each node, use your 1-2 LABS with only fighters and have them target these nodes. The rest should come easily as you gain AS from these node and once done, the path to the new boss node will be open.

Eliminate the Aircraft Carrier Princess and her Carrier Task Force Fleet.

Once you enter this part of the operation, you will be facing a large series of attacks from submarines, along with a large amount of air stirkes that you'll need to pass and then finally facing a tough surface fleet before fighting the Aircraft Carrier Princess. You will need to bring a considerable amount of AA defenses, along with combat, and LoS (with a flagship that has a Surface Radar as part of the LoS requirement) Because of the difficulty this map presents there are only several ways people can consider playing this map, all which present thier own risks.

Here are a Summary of the possible compositions that the player can consider:

  1. Ten-Gou, with possible variants:
    • 1BB 1CL 4DD
    • 1BB 5DD
    • 1BB 4DD 1CVL / 1BB 3DD 1CL 1CVL
    • 1BB 4DD 1 Ise/Hyuuga? 4DD 1 Ise 1 Hyuuga? (Comment: Depends on whether Ise & Hyuuga are needed for E-4 & E-5, pending release of EOs)
  2. Heavy Fleet, with possible variants:
    • 1DD 4(F)BB(V) 1CVL
    • 1DD 3(F)BB(V) 2CVL

Below is a more detailed explanation of some of the fleets which have been commonly used by players:

Ten-Go Fleet Overview:

Ten-Gou style fleets (preferably using actual Ten-Gou members for the damage bonuses) have a shorter route to the boss, but are vulnerable and will struggle to deal damage prior to the night battle phase.

  • They will also have to fight under AI conditions unless a CVL is used (which leads to additional node(s), depending on which route is used).
  • Note that fighting under AI (or AD) conditions means that the Abyssal fleet will be capable of using artillery spotting and CVCIs against your fleet.
  • AACI is effectively mandatory, ideally equipped on Suzutsuki.
  • Vanguard formation at the preboss (node T) is recommended.
  • Both support expeditions are recommended.
  • LBAS will help with clearing the preboss and/or boss nodes. See under Heavy Fleets for suggested LBAS comp and main fleet FP.
    • (Depending on the fleet used, AS may not be of much use at the boss node anyway, given the number of of DDs in the fleet that are incapable of artillery spotting.)
    • A fleet with 1CL (ideally Yahagi) and 1BB (ideally Yamato) will need AS for artillery spotting, of course.
  • The optimal route for Ten-Gou comps is probably N-O1-O2-O3-P3-Q3-S-T-U (requires 5DD), or N-O1-O2-O3-P3-Q3-R-H-T-U (with ≤4DD and/or 1CVL).
    • 1BB 1CL 4DD will route N-O1-O2-P2-Q2-R-S-T-U.

Recommended Fleet

1 BB, 5 DD (Yamato + 3-5 Ten-Go DDs recommended)

Path

2-N-O1-O2-O3-P3-Q3-S-T-U

Strengths

  • Will allow you to go through the least amount of air attack nodes (Only 2)
  • Will conserve more resources compared to other comps

Weaknesses

  • Will leave you vulnerable to air nodes and boss as you face themAir Incapability
  • Leaves you with a relatively weak fleet to engage the boss
  • Will be bucket intensive

This comp ensure you a relatively safer path away from most air node but in return you are bound to have to hope you can dodge the bombing attacks as both air strikes and boss fleet will have AS+ and contact on thier side over the course of the attack. Arming your DDs fleet with HA guns is recommended along 2 members that can AACI. You will need to fully entrust in a support fleet both in-route and at boss node to ensure your chances at survival.

BB, CVL, CL, 3 DD (Yamato + Yahagi + 3 Ten-Go DDs recommended)

Path

2-N-O1-O2-O3-P3-Q3-R-H-T-U

Strengths

  • Will be able to bring some air power to for both air nodes and boss
  • Will provide some additional combat strength from with most Ten-Go members

Weaknesses

  • Will have to fight through 3 Air Attack Nodes
  • Will be bucket intensive
  • Can leave you one member short to fight at boss since CVL will need to be a fighter mule

This comp is more of a middle of the road composition which will give you some air power, but in return you'll need to have go through more air battles, so having 2 AACI members ready along with Yahagi and Yamato being more combat ready can help. Also if you have an expansion slot on your CVL and have a Rocket Launcher Kai 2 consider equipping it to her to negate any damage she might receive during the air attack nodes. This comp can also be decent for handling the boss node if you bring enough air power to support it from both your LBAS. Like the previous comp, in-route and boss support is recommended.

Heavy Fleet Summary:

Heavy Fleets (using Ten-Gou members where possible for the damage bonuses) have a longer route to the boss that goes through more air raid nodes, but have better survivability and damage output at the boss node.

  • If the notion of committing so many heavies to an early map is disconcerting, wait for information on EOs to be released before committing to any one fleet for E2 P2.
  • Use of multiple 12cm 30 Tube Rocket Launcher Kai 2 on relevant ships (like CVL and BBV) will help with surviving air raid nodes.
  • AACI is effectively mandatory, ideally equipped on Suzutsuki.
  • Both in-route and Boss support expeditions are recommended.
  • Line Ahead is more likely to help with clearing out the preboss node as quickly as possible. Vanguard may be viable, but your mileage may vary (especially since only 1 ship in the fleet is a DD).
  • Send both LBAS to the boss equipped for Air Parity (2-3 fighters and 1-2 LBAA each), and have about 330 FP on your main fleet, if you want to achieve AS at the boss node.
    • Unlike the Ten-Gou comp, AS is much more helpful here as your BBs will be able to use artillery spotting to clear out the enemy fleet more quickly before the night battle phase.
    • For reference, 3xT21(Skilled+Max) + 1x T1 M34 LBAA has the same FP as (64th/54th/T1 M34 LBAA/T1 M34 LBAA).
    • Use an FP calculator to determine what you need to meet the sample FPs listed above with your available equipment.
    • Note that without 4 waves of LBAS at Air Parity (e.g. if you split LBAS to pre-boss and boss), you will need higher FP on your main fleet in order to achieve AS at the boss node. Make the calculations and plan accordingly.
    • Also remember that your starting FP of ≈330 or higher will be whittled down continuously by the numerous air battles along the way.

Recommended Fleet

4 (F)BB(V), 2 CVL
3 (F)BB(V), 1 DD, 2 CVL

Path

2-N-O1-P1-Q1-Q2-R-E-H-T-U

Strengths

  • Allow you to use the strongest fleet you can possibly use to fight through and defend yourself along the way to the boss
  • Will be able to fight the boss node more efficiently
  • Will have considerable air power to fight against the air nodes and the boss
  • Can use Rocket Launcher Kai 2 on BBV and CVL to negate possible damaged received

Weaknesses

  • Will have to fight through 4 Air Attack Nodes
  • Will force you to lock away 3 other Battleships that may be relevant/useful to later operations (Normal and Hard Mode difficulty only)

This come can indeed be probably one of the more easier ways to successfully clear the map, but it will present a possible issue in later event maps as Nagato, Mutsu, Ise, Hyuuga, Fusou and Yamashiro are all relevant to Pearl Harbor if possible, you can consider using foreign battleships if you have any. But keep in mind that some of them such as Gangut, and Nelson will have importance in later maps as well. Locking your BBs here can mean the difference between running a fleet for EO or being forced to possibly reduce the difficulty. Like the previous comp, in-route and boss support is recommended.

If you are uncertain, avoid using this composition until more information is updated regarding this comp once EO maps are released.

Offensive Assault against the Carrier Princess (Pre-kill and Final Kill) LBAS 1 - 2

2-3 Land Bases Fighters/ Carrier Fighters, 1-2 Land Base Bombers (Range 7 needed)

You will need considerable a means to protect your land base bombers to a degree, but due to the amount of air power + Tsu-class (especially flagship on hard) there will always be a chance your bombers will be shot down and loose rank. Because of this, you need to be ready to deal with this factor and accept that you'll need to retrain your planes.

For final kill, it's especially recommended to have your bombers at top rank to ensure the best chances at taking out the boss fleet. Otherwise overall, can be effective at providing some air power and wiping out the boss's fleet to a degree.

The boss node will consist of Aircraft Carrier Princess (with a possibility of a 2nd one on Hard) and some CVL, CLs and DDs. Air power will be intense on this node and may not be easy to gain AS. Overall though if you use both LBAS at the boss node, your goal will be to shut down as many of the enemy units as you can over day battle so you can pave way for Yamato and her Ten-go members (if you bring them) to take out the Aircraft Carrier Princess. Outside of this though, chance of survival will depend on if your LBAS manages to take down as many of thier core enemy units as they can and also how much damage your support fleet delivers on the enemy fleet. The rest will ride on if you fleet manage to live through without most of them getting heavily damaged.

No matter what comp you use, there will be difficulty completing this map, keep trying until you succeed and once the boss is successfully killed on her last bit of HP the map is considered complete.

The event guides are to be constructed through the respective Event map page guide and reviewed by editor staff / collaboration committee before being approved here. Do not under any circumstance update the guides through this page or attempt to fix them through this page. Please only update guides through their respective sandbox pages.

Show/Hide Nodes and Enemy Encounters
Nodes and Enemy Encounters
NodePatternXpNode InfoFormAir
A
Pattern 1Choose your route
B
任務部隊 艦載機群
Air Battle Node
Pattern 1 Standard Carrier Wo-Class Kai flagshipLight Carrier Nu-Class flagshipLight Carrier Nu-Class flagshipLight Cruiser Tsu-Class eliteDestroyer I-Class Late ModelDestroyer I-Class Late Model
Formation 4: Echelon
AP:231
AS:519
AS+:1038
Pattern 2 Standard Carrier Wo-Class Kai flagshipStandard Carrier Wo-Class Kai flagshipLight Carrier Nu-Class flagshipLight Cruiser Tsu-Class eliteDestroyer I-Class Late ModelDestroyer I-Class Late Model
Formation 4: Echelon
AP:248
AS:557
AS+:1113
Pattern 3 Standard Carrier Wo-Class Kai flagshipLight Carrier Nu-Class flagshipHeavy Cruiser Ri-Class flagshipLight Cruiser Tsu-Class eliteDestroyer I-Class Late ModelDestroyer I-Class Late Model
Formation 4: Echelon
AP:160
AS:359
AS+:717
C
任務部隊 艦載機群
Air Battle Node
Pattern 1 Standard Carrier Wo-Class Kai flagshipStandard Carrier Wo-Class Kai flagshipLight Carrier Nu-Class flagshipLight Cruiser Tsu-Class eliteDestroyer I-Class Late ModelDestroyer I-Class Late Model
Formation 4: Echelon
AP:248
AS:557
AS+:1113
Pattern 2 Standard Carrier Wo-Class Kai flagshipLight Carrier Nu-Class flagshipLight Carrier Nu-Class flagshipLight Cruiser Tsu-Class eliteDestroyer I-Class Late ModelDestroyer I-Class Late Model
Formation 4: Echelon
AP:231
AS:519
AS+:1038
Pattern 3 Standard Carrier Wo-Class Kai flagshipLight Carrier Nu-Class flagshipHeavy Cruiser Ri-Class flagshipLight Cruiser Tsu-Class eliteDestroyer I-Class Late ModelDestroyer I-Class Late Model
Formation 4: Echelon
AP:160
AS:359
AS+:717
D
任務部隊 外周ピケット艦隊 A群
Pattern 1 Light Cruiser Ho-Class flagshipDestroyer I-Class Late ModelDestroyer I-Class Late ModelDestroyer I-Class Late ModelDestroyer I-ClassDestroyer I-Class
Formation 1: Line Ahead
Formation 3: Diamond
Pattern 2 Light Cruiser Ho-Class flagshipDestroyer I-Class Late ModelDestroyer I-Class Late ModelDestroyer I-ClassDestroyer I-ClassDestroyer I-Class
Formation 1: Line Ahead
Formation 3: Diamond
E
任務部隊 艦載機群
Air Battle Node
Pattern 1 Aircraft Carrier PrincessLight Carrier Nu-Class flagshipLight Carrier Nu-Class flagshipLight Cruiser Tsu-Class eliteDestroyer Ro-Class Late ModelDestroyer Ro-Class Late Model
Formation 4: Echelon
AP:196
AS:441
AS+:882
Pattern 2 Aircraft Carrier PrincessAircraft Carrier PrincessLight Carrier Nu-Class flagshipLight Carrier Nu-Class eliteDestroyer Na-Class Late Model eliteDestroyer Na-Class Late Model elite
Formation 4: Echelon
AP:259
AS:582
AS+:1164
Pattern 3 Aircraft Carrier PrincessLight Carrier Nu-Class flagshipLight Carrier Nu-Class flagshipLight Cruiser Tsu-Class eliteDestroyer Ro-Class Late ModelDestroyer Ro-Class Late Model
Formation 4: Echelon
AP:214
AS:480
AS+:960
F
任務部隊 外周ピケット艦隊 B群
Pattern 1 Light Cruiser Ho-Class flagshipDestroyer I-Class Late ModelDestroyer I-Class Late ModelDestroyer I-Class Late ModelDestroyer I-ClassDestroyer I-Class
Formation 1: Line Ahead
Formation 3: Diamond
Pattern 2 Light Cruiser Ho-Class flagshipDestroyer I-Class Late ModelDestroyer I-Class Late ModelDestroyer I-ClassDestroyer I-ClassDestroyer I-Class
Formation 1: Line Ahead
Formation 3: Diamond
G
深海任務部隊 別働群
Pattern 1 Standard Carrier Wo-Class Kai flagshipLight Carrier Nu-Class flagshipLight Carrier Nu-Class flagshipLight Cruiser Tsu-Class eliteDestroyer I-Class Late ModelDestroyer I-Class Late Model
Formation 4: Echelon
AP:231
AS:519
AS+:1038
Pattern 2 Standard Carrier Wo-Class Kai flagshipLight Carrier Nu-Class flagshipHeavy Cruiser Ri-Class flagshipLight Cruiser Tsu-Class eliteDestroyer I-Class Late ModelDestroyer I-Class Late Model
Formation 4: Echelon
AP:160
AS:359
AS+:717
Pattern 3 Standard Carrier Wo-Class Kai flagshipStandard Carrier Wo-Class Kai flagshipLight Carrier Nu-Class flagshipLight Cruiser Tsu-Class eliteDestroyer I-Class Late ModelDestroyer I-Class Late Model
Formation 4: Echelon
AP:248
AS:557
AS+:1113
H
深海任務部隊 護衛集団II群
Pattern 1 Heavy Cruiser Ri-Class flagshipHeavy Cruiser Ri-Class flagshipLight Cruiser He-Class flagshipDestroyer I-Class Late Model eliteDestroyer I-Class Late ModelDestroyer I-Class Late Model
Formation 1: Line Ahead
Formation 3: Diamond
Pattern 2 Heavy Cruiser Ri-Class flagshipHeavy Cruiser Ri-Class flagshipLight Cruiser He-Class flagshipDestroyer I-Class Late ModelDestroyer I-ClassDestroyer I-Class
Formation 1: Line Ahead
Formation 3: Diamond
I
深海潜水艦隊 通商破壊集団
Pattern 1 Submarine Ka-Class eliteSubmarine Ka-Class eliteSubmarine Ka-ClassSubmarine Ka-Class
Formation 5: Line Abreast
Pattern 2 Submarine Ka-Class eliteSubmarine Ka-Class eliteSubmarine Ka-Class eliteSubmarine Ka-Class elite
Formation 3: Diamond
Pattern 3 Submarine Ka-Class eliteSubmarine Ka-Class eliteSubmarine Ka-Class
Formation 3: Diamond
Formation 5: Line Abreast
J
攻略部隊 前衛護衛水雷戦隊
Pattern 1 Light Cruiser He-Class flagshipDestroyer I-Class Late ModelDestroyer I-Class Late ModelDestroyer I-Class Late ModelDestroyer I-ClassDestroyer I-Class
Formation 1: Line Ahead
Formation 3: Diamond
Pattern 2 Light Cruiser He-Class flagshipDestroyer I-Class Late Model eliteDestroyer I-Class Late ModelDestroyer I-Class Late ModelDestroyer I-ClassDestroyer I-Class
Formation 1: Line Ahead
Formation 3: Diamond
K
Resource Node
Pattern 1?
L
深海攻略部隊 主力集団
Pattern 1 Battleship PrincessBattleship PrincessLight Cruiser Tsu-Class eliteTransport Ship Wa-Class eliteDestroyer Ro-Class Late ModelDestroyer Ro-Class Late Model
Formation 1: Line Ahead
Formation 2: Double Line
Pattern 2 Battleship PrincessBattleship PrincessLight Cruiser Tsu-ClassTransport Ship Wa-ClassDestroyer Ro-Class Late ModelDestroyer Ro-Class Late Model
Formation 1: Line Ahead
Formation 2: Double Line
M
Battle Avoided
Pattern 1"Must be my imagination" (battle avoided)
N
深海潜水艦隊 前進哨戒線
Pattern 1 Submarine Ka-Class eliteSubmarine Ka-Class eliteSubmarine Ka-Class
Formation 3: Diamond
Formation 5: Line Abreast
Pattern 2 Submarine Ka-Class eliteSubmarine Ka-Class eliteSubmarine Ka-Class elite
Formation 3: Diamond
Pattern 3 Submarine Ka-Class eliteSubmarine Ka-ClassSubmarine Ka-Class
Formation 3: Diamond
Formation 5: Line Abreast
O1
Pattern 1Choose your route
O2
Battle Avoided
Pattern 1"Must be my imagination" (battle avoided)
O3
任務部隊 艦載機群
Air Battle Node
Pattern 1 Standard Carrier Wo-Class Kai flagshipLight Carrier Nu-Class flagshipHeavy Cruiser Ri-Class flagshipLight Cruiser Tsu-Class eliteDestroyer I-Class Late ModelDestroyer I-Class Late Model
Formation 4: Echelon
AP:160
AS:359
AS+:717
Pattern 2 Standard Carrier Wo-Class Kai flagshipLight Carrier Nu-Class flagshipLight Carrier Nu-Class flagshipLight Cruiser Tsu-Class eliteDestroyer I-Class Late ModelDestroyer I-Class Late Model
Formation 4: Echelon
AP:231
AS:519
AS+:1038
Pattern 3 Standard Carrier Wo-Class Kai flagshipStandard Carrier Wo-Class Kai flagshipLight Carrier Nu-Class flagshipLight Carrier Nu-Class flagshipDestroyer I-Class Late ModelDestroyer I-Class Late Model
Formation 4: Echelon
AP:319
AS:717
AS+:1434
P1
任務部隊 艦載機群
Air Battle Node
Pattern 1 Standard Carrier Wo-Class Kai flagshipLight Carrier Nu-Class flagshipHeavy Cruiser Ri-Class flagshipLight Cruiser Tsu-Class eliteDestroyer I-Class Late ModelDestroyer I-Class Late Model
Formation 4: Echelon
AP:160
AS:359
AS+:717
Pattern 2 Standard Carrier Wo-Class Kai flagshipLight Carrier Nu-Class flagshipLight Carrier Nu-Class flagshipLight Cruiser Tsu-Class eliteDestroyer I-Class Late ModelDestroyer I-Class Late Model
Formation 4: Echelon
AP:231
AS:519
AS+:1038
Pattern 3 Standard Carrier Wo-Class Kai flagshipStandard Carrier Wo-Class Kai flagshipLight Carrier Nu-Class flagshipLight Cruiser Tsu-Class eliteDestroyer I-Class Late ModelDestroyer I-Class Late Model
Formation 4: Echelon
AP:248
AS:557
AS+:1113
P2
任務部隊 艦載機群
Air Battle Node
Pattern 1 Standard Carrier Wo-Class Kai flagshipStandard Carrier Wo-Class Kai flagshipLight Carrier Nu-Class flagshipLight Cruiser Tsu-Class eliteDestroyer I-Class Late ModelDestroyer I-Class Late Model
Formation 4: Echelon
AP:248
AS:557
AS+:1113
Pattern 2 Standard Carrier Wo-Class Kai flagshipLight Carrier Nu-Class flagshipLight Carrier Nu-Class flagshipLight Cruiser Tsu-Class eliteDestroyer I-Class Late ModelDestroyer I-Class Late Model
Formation 4: Echelon
AP:231
AS:519
AS+:1038
Pattern 3 Standard Carrier Wo-Class Kai flagshipLight Carrier Nu-Class flagshipHeavy Cruiser Ri-Class flagshipLight Cruiser Tsu-Class eliteDestroyer I-Class Late ModelDestroyer I-Class Late Model
Formation 4: Echelon
AP:160
AS:359
AS+:717
P3
深海潜水艦隊 精鋭部隊
Pattern 1 Submarine Ka-Class flagshipSubmarine Ka-Class eliteSubmarine Ka-Class elite
Formation 3: Diamond
Formation 5: Line Abreast
Pattern 2 Submarine Ka-Class flagshipSubmarine Ka-Class eliteSubmarine Ka-Class eliteSubmarine Ka-Class elite
Formation 3: Diamond
Pattern 3 Submarine Ka-Class eliteSubmarine Ka-Class eliteSubmarine Ka-Class elite
Formation 3: Diamond
Formation 5: Line Abreast
Q1
任務部隊 艦載機群
Air Battle Node
Pattern 1 Standard Carrier Wo-Class Kai flagshipLight Carrier Nu-Class flagshipLight Carrier Nu-Class flagshipLight Cruiser Tsu-Class eliteDestroyer I-Class Late ModelDestroyer I-Class Late Model
Formation 4: Echelon
AP:231
AS:519
AS+:1038
Pattern 2 Standard Carrier Wo-Class Kai flagshipLight Carrier Nu-Class flagshipLight Carrier Nu-Class flagshipLight Carrier Nu-Class flagshipDestroyer I-Class Late ModelDestroyer I-Class Late Model
Formation 4: Echelon
AP:302
AS:680
AS+:1359
Pattern 3 Standard Carrier Wo-Class Kai flagshipStandard Carrier Wo-Class Kai flagshipLight Carrier Nu-Class flagshipLight Carrier Nu-Class flagshipDestroyer I-Class Late ModelDestroyer I-Class Late Model
Formation 4: Echelon
AP:319
AS:717
AS+:1434
Q2
任務部隊 艦載機群
Air Battle Node
Pattern 1 Standard Carrier Wo-Class Kai flagshipLight Carrier Nu-Class flagshipLight Carrier Nu-Class flagshipLight Carrier Nu-Class flagshipDestroyer I-Class Late ModelDestroyer I-Class Late Model
Formation 4: Echelon
AP:302
AS:680
AS+:1359
Pattern 2 Standard Carrier Wo-Class Kai flagshipStandard Carrier Wo-Class Kai flagshipLight Carrier Nu-Class flagshipLight Carrier Nu-Class flagshipDestroyer I-Class Late ModelDestroyer I-Class Late Model
Formation 4: Echelon
AP:319
AS:717
AS+:1434
Pattern 3 Standard Carrier Wo-Class Kai flagshipLight Carrier Nu-Class flagshipLight Carrier Nu-Class flagshipLight Cruiser Tsu-Class eliteDestroyer I-Class Late ModelDestroyer I-Class Late Model
Formation 4: Echelon
AP:231
AS:519
AS+:1038
Q3
任務部隊 艦載機群
Air Battle Node
Pattern 1 Aircraft Carrier PrincessAircraft Carrier PrincessLight Carrier Nu-Class flagshipLight Carrier Nu-Class eliteDestroyer Na-Class Late Model eliteDestroyer Na-Class Late Model elite
Formation 4: Echelon
AP:259
AS:582
AS+:1164
Pattern 2 Aircraft Carrier PrincessLight Carrier Nu-Class flagshipLight Carrier Nu-Class flagshipLight Cruiser Tsu-Class eliteDestroyer Ro-Class Late ModelDestroyer Ro-Class Late Model
Formation 4: Echelon
AP:196
AS:441
AS+:882
Pattern 3 Aircraft Carrier PrincessLight Carrier Nu-Class flagshipLight Carrier Nu-Class flagshipLight Cruiser Tsu-Class eliteDestroyer Ro-Class Late ModelDestroyer Ro-Class Late Model
Formation 4: Echelon
AP:214
AS:480
AS+:960
R
任務部隊 艦載機群
Air Battle Node
Pattern 1 Aircraft Carrier PrincessAircraft Carrier PrincessLight Carrier Nu-Class flagshipLight Carrier Nu-Class eliteDestroyer Na-Class Late Model eliteDestroyer Na-Class Late Model elite
Formation 4: Echelon
AP:259
AS:582
AS+:1164
Pattern 2 Aircraft Carrier PrincessLight Carrier Nu-Class flagshipLight Carrier Nu-Class flagshipLight Cruiser Tsu-Class eliteDestroyer Ro-Class Late ModelDestroyer Ro-Class Late Model
Formation 4: Echelon
AP:196
AS:441
AS+:882
Pattern 3 Aircraft Carrier PrincessLight Carrier Nu-Class flagshipLight Carrier Nu-Class flagshipLight Cruiser Tsu-Class eliteDestroyer Ro-Class Late ModelDestroyer Ro-Class Late Model
Formation 4: Echelon
AP:214
AS:480
AS+:960
S
深海任務部隊 護衛集団II群
Pattern 1 Heavy Cruiser Ri-Class flagshipHeavy Cruiser Ri-Class flagshipLight Cruiser He-Class flagshipDestroyer I-Class Late Model eliteDestroyer I-Class Late ModelDestroyer I-Class Late Model
Formation 1: Line Ahead
Formation 3: Diamond
Pattern 2 Heavy Cruiser Ri-Class flagshipHeavy Cruiser Ri-Class flagshipLight Cruiser He-Class flagshipDestroyer I-Class Late ModelDestroyer I-ClassDestroyer I-Class
Formation 1: Line Ahead
Formation 3: Diamond
T
深海任務部隊 戦艦戦隊
Pattern 1 Battleship Ru-Class flagshipBattleship Ru-Class flagshipBattleship Ru-Class flagshipLight Cruiser Ho-Class flagshipDestroyer Ro-Class Late ModelDestroyer Ro-Class Late Model
Formation 1: Line Ahead
Formation 5: Line Abreast
U
深海任務部隊 侵攻旗艦艦隊
Pattern 1 Aircraft Carrier PrincessAircraft Carrier PrincessLight Carrier Nu-Class flagshipLight Cruiser Tsu-Class flagshipDestroyer Na-Class Late Model eliteDestroyer Na-Class Late Model elite
Formation 4: Echelon
AP:213
AS:479
AS+:957
Pattern 2 Aircraft Carrier PrincessLight Carrier Nu-Class flagshipLight Carrier Nu-Class flagshipLight Cruiser Tsu-Class eliteDestroyer Ro-Class Late ModelDestroyer Ro-Class Late Model
Formation 4: Echelon
AP:196
AS:441
AS+:882
Pattern 3 Aircraft Carrier PrincessLight Carrier Nu-Class flagshipLight Carrier Nu-Class flagshipLight Cruiser Tsu-Class eliteDestroyer Ro-Class Late ModelDestroyer Ro-Class Late Model
Formation 4: Echelon
AP:214
AS:480
AS+:960
V
Battle Avoided
Pattern 1"Must be my imagination" (battle avoided)

Show/Hide Nodes and Enemy Encounters
Nodes and Enemy Encounters
NodePatternXpNode InfoFormAir
A
Pattern 1Choose your route
B
任務部隊 艦載機群
Air Battle Node
Pattern 1 Standard Carrier Wo-Class flagshipLight Carrier Nu-Class flagshipLight Carrier Nu-Class flagshipLight Cruiser Tsu-ClassDestroyer I-Class Late ModelDestroyer I-Class Late Model
Formation 4: Echelon
AP:172
AS:386
AS+:771
Pattern 2 Standard Carrier Wo-Class flagshipStandard Carrier Wo-Class flagshipLight Carrier Nu-Class flagshipLight Cruiser Tsu-ClassDestroyer I-Class Late ModelDestroyer I-Class Late Model
Formation 4: Echelon
AP:189
AS:425
AS+:849
Pattern 3 Standard Carrier Wo-Class flagshipLight Carrier Nu-Class flagshipHeavy Cruiser Ri-Class eliteLight Cruiser Tsu-ClassDestroyer I-Class Late ModelDestroyer I-Class Late Model
Formation 4: Echelon
AP:120
AS:270
AS+:540
C
任務部隊 艦載機群
Air Battle Node
Pattern 1 Standard Carrier Wo-Class flagshipLight Carrier Nu-Class flagshipLight Carrier Nu-Class flagshipLight Cruiser Tsu-ClassDestroyer I-Class Late ModelDestroyer I-Class Late Model
Formation 4: Echelon
AP:172
AS:386
AS+:771
Pattern 2 Standard Carrier Wo-Class flagshipStandard Carrier Wo-Class flagshipLight Carrier Nu-Class flagshipLight Cruiser Tsu-ClassDestroyer I-Class Late ModelDestroyer I-Class Late Model
Formation 4: Echelon
AP:189
AS:425
AS+:849
Pattern 3 Standard Carrier Wo-Class flagshipLight Carrier Nu-Class flagshipHeavy Cruiser Ri-Class eliteLight Cruiser Tsu-ClassDestroyer I-Class Late ModelDestroyer I-Class Late Model
Formation 4: Echelon
AP:120
AS:270
AS+:540
D
任務部隊 外周ピケット艦隊 A群
Pattern 1 Light Cruiser Ho-Class flagshipDestroyer I-Class Late ModelDestroyer I-ClassDestroyer I-ClassDestroyer I-ClassDestroyer I-Class
Formation 1: Line Ahead
Formation 3: Diamond
Pattern 2 Light Cruiser Ho-Class flagshipDestroyer I-Class Late ModelDestroyer I-Class Late ModelDestroyer I-ClassDestroyer I-ClassDestroyer I-Class
Formation 1: Line Ahead
Formation 3: Diamond
E
任務部隊 艦載機群
Air Battle Node
Pattern 1 Aircraft Carrier PrincessLight Carrier Nu-Class eliteLight Cruiser Tsu-ClassDestroyer Ro-Class Late ModelDestroyer I-ClassDestroyer I-Class
Formation 4: Echelon
AP:117
AS:263
AS+:525
Pattern 2 Aircraft Carrier PrincessLight Carrier Nu-Class eliteLight Carrier Nu-Class eliteLight Cruiser Tsu-ClassDestroyer Ro-Class Late ModelDestroyer Ro-Class Late Model
Formation 4: Echelon
AP:163
AS:366
AS+:732
Pattern 3 Aircraft Carrier PrincessLight Carrier Nu-Class eliteLight Carrier Nu-Class eliteLight Cruiser Tsu-ClassDestroyer I-ClassDestroyer I-Class
Formation 4: Echelon
AP:163
AS:366
AS+:732
Pattern 4 Aircraft Carrier PrincessLight Carrier Nu-Class flagshipLight Carrier Nu-Class eliteLight Cruiser Tsu-Class eliteDestroyer Ro-Class Late ModelDestroyer Ro-Class Late Model
Formation 4: Echelon
AP:180
AS:404
AS+:807
F
任務部隊 外周ピケット艦隊 B群
Pattern 1 Light Cruiser Ho-Class flagshipDestroyer I-Class Late ModelDestroyer I-Class Late ModelDestroyer I-ClassDestroyer I-ClassDestroyer I-Class
Formation 1: Line Ahead
Formation 3: Diamond
Pattern 2 Light Cruiser Ho-Class flagshipDestroyer I-Class Late ModelDestroyer I-ClassDestroyer I-ClassDestroyer I-ClassDestroyer I-Class
Formation 1: Line Ahead
Formation 3: Diamond
G
深海任務部隊 別働群
Pattern 1 Standard Carrier Wo-Class flagshipLight Carrier Nu-Class flagshipHeavy Cruiser Ri-Class eliteLight Cruiser Tsu-ClassDestroyer I-Class Late ModelDestroyer I-Class Late Model
Formation 4: Echelon
AP:120
AS:270
AS+:540
Pattern 2 Standard Carrier Wo-Class flagshipLight Carrier Nu-Class eliteLight Carrier Nu-Class eliteLight Cruiser Tsu-ClassDestroyer I-ClassDestroyer I-Class
Formation 4: Echelon
AP:161
AS:362
AS+:723
Pattern 3 Standard Carrier Wo-Class flagshipLight Carrier Nu-Class flagshipLight Carrier Nu-Class flagshipLight Cruiser Tsu-ClassDestroyer I-Class Late ModelDestroyer I-Class Late Model
Formation 4: Echelon
AP:172
AS:386
AS+:771
Pattern 4 Standard Carrier Wo-Class flagshipStandard Carrier Wo-Class flagshipLight Carrier Nu-Class flagshipLight Cruiser Tsu-ClassDestroyer I-Class Late ModelDestroyer I-Class Late Model
Formation 4: Echelon
AP:189
AS:425
AS+:849
H
深海任務部隊 護衛集団II群
Pattern 1 Heavy Cruiser Ri-Class flagshipHeavy Cruiser Ri-Class eliteLight Cruiser Ho-Class eliteDestroyer I-Class Late ModelDestroyer I-ClassDestroyer I-Class
Formation 1: Line Ahead
Formation 3: Diamond
Pattern 2 Heavy Cruiser Ri-Class flagshipHeavy Cruiser Ri-Class flagshipLight Cruiser He-Class flagshipDestroyer I-Class Late ModelDestroyer I-ClassDestroyer I-Class
Formation 1: Line Ahead
Formation 3: Diamond
I
深海潜水艦隊 通商破壊集団
Pattern 1 Submarine Ka-Class eliteSubmarine Ka-Class eliteSubmarine Ka-Class
Formation 3: Diamond
Formation 5: Line Abreast
Pattern 2 Submarine Ka-Class eliteSubmarine Ka-ClassSubmarine Ka-Class
Formation 3: Diamond
Formation 5: Line Abreast
Pattern 3 Submarine Ka-Class eliteSubmarine Ka-Class eliteSubmarine Ka-ClassSubmarine Ka-Class
Formation 5: Line Abreast
J
攻略部隊 前衛護衛水雷戦隊
Pattern 1 Light Cruiser He-Class flagshipDestroyer I-Class Late ModelDestroyer I-Class Late ModelDestroyer I-Class Late ModelDestroyer I-ClassDestroyer I-Class
Formation 1: Line Ahead
Formation 3: Diamond
Pattern 2 Light Cruiser He-Class flagshipDestroyer I-Class Late ModelDestroyer I-Class Late ModelDestroyer I-ClassDestroyer I-ClassDestroyer I-Class
Formation 1: Line Ahead
Formation 3: Diamond
K
Resource Node
Pattern 1?
L
深海攻略部隊 主力集団
Pattern 1 Battleship PrincessBattleship PrincessLight Cruiser Tsu-ClassTransport Ship Wa-ClassDestroyer Ro-Class Late ModelDestroyer Ro-Class Late Model
Formation 1: Line Ahead
Formation 2: Double Line
Pattern 2 Battleship PrincessLight Cruiser Tsu-ClassTransport Ship Wa-ClassDestroyer Ro-Class Late ModelDestroyer I-ClassDestroyer I-Class
Formation 1: Line Ahead
Formation 2: Double Line
M
Battle Avoided
Pattern 1"Must be my imagination" (battle avoided)
N
深海潜水艦隊 前進哨戒線
Pattern 1 Submarine Ka-Class eliteSubmarine Ka-ClassSubmarine Ka-Class
Formation 3: Diamond
Formation 5: Line Abreast
Pattern 2 Submarine Ka-ClassSubmarine Ka-ClassSubmarine Ka-Class
Formation 3: Diamond
Formation 5: Line Abreast
Pattern 3 Submarine Ka-Class eliteSubmarine Ka-Class eliteSubmarine Ka-Class
Formation 3: Diamond
Formation 5: Line Abreast
O1
Pattern 1Choose your route
O2
Battle Avoided
Pattern 1"Must be my imagination" (battle avoided)
O3
任務部隊 艦載機群
Air Battle Node
Pattern 1 Standard Carrier Wo-Class flagshipLight Carrier Nu-Class flagshipHeavy Cruiser Ri-Class eliteLight Cruiser Tsu-ClassDestroyer I-Class Late ModelDestroyer I-Class Late Model
Formation 4: Echelon
AP:120
AS:270
AS+:540
Pattern 2 Standard Carrier Wo-Class flagshipLight Carrier Nu-Class flagshipLight Carrier Nu-Class flagshipLight Cruiser Tsu-ClassDestroyer I-Class Late ModelDestroyer I-Class Late Model
Formation 4: Echelon
AP:172
AS:386
AS+:771
Pattern 3 Standard Carrier Wo-Class flagshipStandard Carrier Wo-Class flagshipLight Carrier Nu-Class flagshipLight Cruiser Tsu-ClassDestroyer I-Class Late ModelDestroyer I-Class Late Model
Formation 4: Echelon
AP:189
AS:425
AS+:849
P1
任務部隊 艦載機群
Air Battle Node
Pattern 1 Standard Carrier Wo-Class flagshipLight Carrier Nu-Class flagshipHeavy Cruiser Ri-Class eliteLight Cruiser Tsu-ClassDestroyer I-Class Late ModelDestroyer I-Class Late Model
Formation 4: Echelon
AP:120
AS:270
AS+:540
Pattern 2 Standard Carrier Wo-Class flagshipStandard Carrier Wo-Class flagshipLight Carrier Nu-Class flagshipLight Cruiser Tsu-ClassDestroyer I-Class Late ModelDestroyer I-Class Late Model
Formation 4: Echelon
AP:189
AS:425
AS+:849
Pattern 3 Standard Carrier Wo-Class flagshipLight Carrier Nu-Class flagshipLight Carrier Nu-Class flagshipLight Cruiser Tsu-ClassDestroyer I-Class Late ModelDestroyer I-Class Late Model
Formation 4: Echelon
AP:172
AS:386
AS+:771
P2
任務部隊 艦載機群
Air Battle Node
Pattern 1 Standard Carrier Wo-Class flagshipStandard Carrier Wo-Class flagshipLight Carrier Nu-Class flagshipLight Cruiser Tsu-ClassDestroyer I-Class Late ModelDestroyer I-Class Late Model
Formation 4: Echelon
AP:189
AS:425
AS+:849
Pattern 2 Standard Carrier Wo-Class flagshipLight Carrier Nu-Class flagshipLight Carrier Nu-Class flagshipLight Cruiser Tsu-ClassDestroyer I-Class Late ModelDestroyer I-Class Late Model
Formation 4: Echelon
AP:172
AS:386
AS+:771
Pattern 3 Standard Carrier Wo-Class flagshipLight Carrier Nu-Class flagshipHeavy Cruiser Ri-Class eliteLight Cruiser Tsu-ClassDestroyer I-Class Late ModelDestroyer I-Class Late Model
Formation 4: Echelon
AP:120
AS:270
AS+:540
P3
深海潜水艦隊 精鋭部隊
Pattern 1 Submarine Ka-Class eliteSubmarine Ka-Class eliteSubmarine Ka-Class elite
Formation 3: Diamond
Formation 5: Line Abreast
Pattern 2 Submarine Ka-Class flagshipSubmarine Ka-ClassSubmarine Ka-Class
Formation 3: Diamond
Formation 5: Line Abreast
Pattern 3 Submarine Ka-Class flagshipSubmarine Ka-Class eliteSubmarine Ka-Class elite
Formation 3: Diamond
Formation 5: Line Abreast
Q1
任務部隊 艦載機群
Air Battle Node
Pattern 1 Standard Carrier Wo-Class flagshipLight Carrier Nu-Class flagshipLight Carrier Nu-Class eliteLight Cruiser Tsu-ClassDestroyer I-Class Late ModelDestroyer I-Class Late Model
Formation 4: Echelon
AP:166
AS:374
AS+:747
Pattern 2 Standard Carrier Wo-Class flagshipLight Carrier Nu-Class flagshipLight Carrier Nu-Class eliteLight Carrier Nu-Class eliteDestroyer I-Class Late ModelDestroyer I-Class Late Model
Formation 4: Echelon
AP:212
AS:477
AS+:954
Pattern 3 Standard Carrier Wo-Class flagshipLight Carrier Nu-Class flagshipLight Carrier Nu-Class flagshipLight Carrier Nu-Class eliteDestroyer I-Class Late ModelDestroyer I-Class Late Model
Formation 4: Echelon
AP:218
AS:489
AS+:978
Q2
任務部隊 艦載機群
Air Battle Node
Pattern 1 Standard Carrier Wo-Class flagshipLight Carrier Nu-Class flagshipLight Carrier Nu-Class flagshipLight Carrier Nu-Class eliteDestroyer I-Class Late ModelDestroyer I-Class Late Model
Formation 4: Echelon
AP:218
AS:489
AS+:978
Pattern 2 Standard Carrier Wo-Class flagshipLight Carrier Nu-Class flagshipLight Carrier Nu-Class eliteLight Carrier Nu-Class eliteDestroyer I-Class Late ModelDestroyer I-Class Late Model
Formation 4: Echelon
AP:212
AS:477
AS+:954
Pattern 3 Standard Carrier Wo-Class flagshipLight Carrier Nu-Class flagshipLight Carrier Nu-Class eliteLight Cruiser Tsu-ClassDestroyer I-Class Late ModelDestroyer I-Class Late Model
Formation 4: Echelon
AP:166
AS:374
AS+:747
Q3
任務部隊 艦載機群
Air Battle Node
Pattern 1 Aircraft Carrier PrincessLight Carrier Nu-Class flagshipLight Carrier Nu-Class eliteLight Cruiser Tsu-Class eliteDestroyer Ro-Class Late ModelDestroyer Ro-Class Late Model
Formation 4: Echelon
AP:180
AS:404
AS+:807
Pattern 2 Aircraft Carrier PrincessLight Carrier Nu-Class eliteLight Cruiser Tsu-ClassDestroyer Ro-Class Late ModelDestroyer I-ClassDestroyer I-Class
Formation 4: Echelon
AP:117
AS:263
AS+:525
Pattern 3 Aircraft Carrier PrincessLight Carrier Nu-Class eliteLight Carrier Nu-Class eliteLight Cruiser Tsu-ClassDestroyer Ro-Class Late ModelDestroyer Ro-Class Late Model
Formation 4: Echelon
AP:163
AS:366
AS+:732
Pattern 4 Aircraft Carrier PrincessLight Carrier Nu-Class eliteLight Carrier Nu-Class eliteLight Cruiser Tsu-ClassDestroyer I-ClassDestroyer I-Class
Formation 4: Echelon
AP:163
AS:366
AS+:732
R
任務部隊 艦載機群
Air Battle Node
Pattern 1 Aircraft Carrier PrincessLight Carrier Nu-Class flagshipLight Carrier Nu-Class eliteLight Cruiser Tsu-Class eliteDestroyer Ro-Class Late ModelDestroyer Ro-Class Late Model
Formation 4: Echelon
AP:180
AS:404
AS+:807
Pattern 2 Aircraft Carrier PrincessLight Carrier Nu-Class eliteLight Carrier Nu-Class eliteLight Cruiser Tsu-ClassDestroyer Ro-Class Late ModelDestroyer Ro-Class Late Model
Formation 4: Echelon
AP:163
AS:366
AS+:732
Pattern 3 Aircraft Carrier PrincessLight Carrier Nu-Class eliteLight Cruiser Tsu-ClassDestroyer Ro-Class Late ModelDestroyer I-ClassDestroyer I-Class
Formation 4: Echelon
AP:117
AS:263
AS+:525
Pattern 4 Aircraft Carrier PrincessLight Carrier Nu-Class eliteLight Carrier Nu-Class eliteLight Cruiser Tsu-ClassDestroyer I-ClassDestroyer I-Class
Formation 4: Echelon
AP:163
AS:366
AS+:732
S
深海任務部隊 護衛集団II群
Pattern 1 Heavy Cruiser Ri-Class flagshipHeavy Cruiser Ri-Class eliteLight Cruiser Ho-Class eliteDestroyer I-Class Late ModelDestroyer I-ClassDestroyer I-Class
Formation 1: Line Ahead
Formation 3: Diamond
Pattern 2 Heavy Cruiser Ri-Class flagshipHeavy Cruiser Ri-Class flagshipLight Cruiser He-Class flagshipDestroyer I-Class Late ModelDestroyer I-ClassDestroyer I-Class
Formation 1: Line Ahead
Formation 3: Diamond
T
深海任務部隊 戦艦戦隊
Pattern 1 Battleship Ru-Class flagshipBattleship Ru-Class flagshipBattleship Ru-Class flagshipLight Cruiser Ho-Class eliteDestroyer Ro-Class Late ModelDestroyer Ro-Class Late Model
Formation 1: Line Ahead
Formation 5: Line Abreast
Pattern 2 Battleship Ru-Class flagshipBattleship Ru-Class flagshipBattleship Ru-Class flagshipDestroyer Ro-Class Late ModelDestroyer I-ClassDestroyer I-Class
Formation 1: Line Ahead
Formation 5: Line Abreast
U
深海任務部隊 侵攻旗艦艦隊
Pattern 1 Aircraft Carrier PrincessLight Carrier Nu-Class eliteLight Carrier Nu-Class eliteLight Cruiser Tsu-ClassDestroyer Ro-Class Late ModelDestroyer Ro-Class Late Model
Formation 4: Echelon
AP:163
AS:366
AS+:732
Pattern 2 Aircraft Carrier PrincessLight Carrier Nu-Class eliteLight Carrier Nu-Class eliteLight Cruiser Tsu-Class eliteDestroyer Ro-Class Late ModelDestroyer Ro-Class Late Model
Formation 4: Echelon
AP:163
AS:366
AS+:732
Pattern 3 Aircraft Carrier PrincessLight Carrier Nu-Class eliteLight Carrier Nu-Class eliteLight Cruiser Tsu-ClassDestroyer Ro-Class Late ModelDestroyer I-Class
Formation 4: Echelon
AP:163
AS:366
AS+:732
Pattern 4 Aircraft Carrier PrincessLight Carrier Nu-Class eliteLight Carrier Nu-Class eliteLight Cruiser Tsu-ClassDestroyer I-ClassDestroyer I-Class
Formation 4: Echelon
AP:163
AS:366
AS+:732
V
Battle Avoided
Pattern 1"Must be my imagination" (battle avoided)

Show/Hide Nodes and Enemy Encounters
Nodes and Enemy Encounters
NodePatternXpNode InfoFormAir
A
Pattern 1Choose your route
B
任務部隊 艦載機群
Air Battle Node
Pattern 1 Standard Carrier Wo-Class flagshipLight Carrier Nu-Class eliteHeavy Cruiser Ri-Class eliteLight Cruiser Tsu-ClassDestroyer I-ClassDestroyer I-Class
Formation 4: Echelon
AP:85
AS:191
AS+:381
Pattern 2 Standard Carrier Wo-Class flagshipLight Carrier Nu-Class eliteLight Carrier Nu-Class eliteLight Cruiser Tsu-ClassDestroyer I-ClassDestroyer I-Class
Formation 4: Echelon
AP:161
AS:362
AS+:723
Pattern 3 Standard Carrier Wo-Class flagshipLight Carrier Nu-Class eliteLight Carrier Nu-Class eliteLight Cruiser Tsu-ClassDestroyer I-ClassDestroyer I-Class
Formation 4: Echelon
AP:131
AS:294
AS+:588
Pattern 4 Standard Carrier Wo-Class flagshipLight Carrier Nu-Class flagshipHeavy Cruiser Ri-Class eliteLight Cruiser Tsu-ClassDestroyer I-Class Late ModelDestroyer I-Class Late Model
Formation 4: Echelon
AP:120
AS:270
AS+:540
C
任務部隊 艦載機群
Air Battle Node
Pattern 1 Standard Carrier Wo-Class flagshipLight Carrier Nu-Class eliteLight Carrier Nu-Class eliteLight Cruiser Tsu-ClassDestroyer I-ClassDestroyer I-Class
Formation 4: Echelon
AP:131
AS:294
AS+:588
Pattern 2 Standard Carrier Wo-Class flagshipLight Carrier Nu-Class eliteLight Carrier Nu-Class eliteLight Cruiser Tsu-ClassDestroyer I-ClassDestroyer I-Class
Formation 4: Echelon
AP:161
AS:362
AS+:723
Pattern 3 Standard Carrier Wo-Class flagshipLight Carrier Nu-Class eliteHeavy Cruiser Ri-Class eliteLight Cruiser Tsu-ClassDestroyer I-ClassDestroyer I-Class
Formation 4: Echelon
AP:85
AS:191
AS+:381
Pattern 4 Standard Carrier Wo-Class flagshipLight Carrier Nu-Class flagshipHeavy Cruiser Ri-Class eliteLight Cruiser Tsu-ClassDestroyer I-Class Late ModelDestroyer I-Class Late Model
Formation 4: Echelon
AP:120
AS:270
AS+:540
D
任務部隊 外周ピケット艦隊 A群
Pattern 1 Light Cruiser Ho-Class flagshipDestroyer I-Class Late ModelDestroyer I-ClassDestroyer I-ClassDestroyer I-ClassDestroyer I-Class
Formation 1: Line Ahead
Formation 3: Diamond
Pattern 2 Light Cruiser Ho-Class flagshipDestroyer I-ClassDestroyer I-ClassDestroyer I-ClassDestroyer I-ClassDestroyer I-Class
Formation 1: Line Ahead
Formation 3: Diamond
E
任務部隊 艦載機群
Air Battle Node
Pattern 1 Aircraft Carrier PrincessLight Carrier Nu-Class eliteLight Carrier Nu-Class eliteLight Cruiser Tsu-ClassDestroyer I-ClassDestroyer I-Class
Formation 4: Echelon
AP:163
AS:366
AS+:732
Pattern 2 Aircraft Carrier PrincessLight Carrier Nu-Class eliteLight Carrier Nu-Class eliteLight Cruiser Tsu-ClassDestroyer Ro-Class Late ModelDestroyer Ro-Class Late Model
Formation 4: Echelon
AP:163
AS:366
AS+:732
Pattern 3 Aircraft Carrier PrincessLight Carrier Nu-Class eliteLight Cruiser Tsu-ClassDestroyer Ro-Class Late ModelDestroyer I-ClassDestroyer I-Class
Formation 4: Echelon
AP:117
AS:263
AS+:525
Pattern 4 Aircraft Carrier PrincessLight Carrier Nu-Class eliteDestroyer I-ClassDestroyer I-ClassDestroyer I-Class
Formation 4: Echelon
AP:117
AS:263
AS+:525
Pattern 5 Aircraft Carrier PrincessDestroyer I-ClassDestroyer I-ClassDestroyer I-Class
Formation 4: Echelon
AP:71
AS:159
AS+:318
F
任務部隊 外周ピケット艦隊 B群
Pattern 1 Light Cruiser Ho-Class flagshipDestroyer I-Class Late ModelDestroyer I-ClassDestroyer I-ClassDestroyer I-ClassDestroyer I-Class
Formation 1: Line Ahead
Formation 3: Diamond
Pattern 2 Light Cruiser Ho-Class flagshipDestroyer I-ClassDestroyer I-ClassDestroyer I-ClassDestroyer I-ClassDestroyer I-Class
Formation 1: Line Ahead
Formation 3: Diamond
G
深海任務部隊 別働群
Pattern 1 Standard Carrier Wo-Class flagshipLight Carrier Nu-Class eliteLight Carrier Nu-Class eliteLight Cruiser Tsu-ClassDestroyer I-ClassDestroyer I-Class
Formation 4: Echelon
AP:131
AS:294
AS+:588
Pattern 2 Standard Carrier Wo-Class flagshipLight Carrier Nu-Class eliteLight Carrier Nu-Class eliteLight Cruiser Tsu-ClassDestroyer I-ClassDestroyer I-Class
Formation 4: Echelon
AP:161
AS:362
AS+:723
Pattern 3 Standard Carrier Wo-Class flagshipLight Carrier Nu-Class flagshipHeavy Cruiser Ri-Class eliteLight Cruiser Tsu-ClassDestroyer I-Class Late ModelDestroyer I-Class Late Model
Formation 4: Echelon
AP:120
AS:270
AS+:540
Pattern 4 Standard Carrier Wo-Class flagshipLight Carrier Nu-Class eliteHeavy Cruiser Ri-Class eliteLight Cruiser Tsu-ClassDestroyer I-ClassDestroyer I-Class
Formation 4: Echelon
AP:85
AS:191
AS+:381
H
深海任務部隊 護衛集団II群
Pattern 1 Heavy Cruiser Ri-Class eliteHeavy Cruiser Ri-Class eliteLight Cruiser Ho-Class eliteDestroyer I-Class Late ModelDestroyer I-ClassDestroyer I-Class
Formation 1: Line Ahead
Formation 3: Diamond
Pattern 2 Heavy Cruiser Ri-Class flagshipHeavy Cruiser Ri-Class eliteLight Cruiser Ho-Class eliteDestroyer I-Class Late ModelDestroyer I-ClassDestroyer I-Class
Formation 1: Line Ahead
Formation 3: Diamond
I
深海潜水艦隊 通商破壊集団
Pattern 1 Submarine Ka-Class eliteSubmarine Ka-ClassSubmarine Ka-Class
Formation 3: Diamond
Formation 5: Line Abreast
Pattern 2 Submarine Ka-ClassSubmarine Ka-ClassSubmarine Ka-Class
Formation 3: Diamond
Formation 5: Line Abreast
Pattern 3 Submarine Ka-Class eliteSubmarine Ka-Class eliteSubmarine Ka-Class
Formation 3: Diamond
Formation 5: Line Abreast
J
攻略部隊 前衛護衛水雷戦隊
Pattern 1 Light Cruiser He-Class flagshipDestroyer I-ClassDestroyer I-ClassDestroyer I-ClassDestroyer I-ClassDestroyer I-Class
Formation 1: Line Ahead
Formation 3: Diamond
Pattern 2 Light Cruiser He-Class flagshipDestroyer I-Class Late ModelDestroyer I-Class Late ModelDestroyer I-ClassDestroyer I-ClassDestroyer I-Class
Formation 1: Line Ahead
Formation 3: Diamond
K
Resource Node
Pattern 1?
L
深海攻略部隊 主力集団
Pattern 1 Battleship PrincessLight Cruiser Tsu-ClassTransport Ship Wa-ClassDestroyer Ro-Class Late ModelDestroyer I-ClassDestroyer I-Class
Formation 1: Line Ahead
Formation 2: Double Line
Pattern 2 Battleship PrincessTransport Ship Wa-ClassTransport Ship Wa-ClassDestroyer I-ClassDestroyer I-Class
Formation 1: Line Ahead
Formation 2: Double Line
Pattern 3 Battleship PrincessTransport Ship Wa-ClassDestroyer I-ClassDestroyer I-Class
Formation 2: Double Line
M
Battle Avoided
Pattern 1"Must be my imagination" (battle avoided)
N
深海潜水艦隊 前進哨戒線
Pattern 1 Submarine Ka-ClassSubmarine Ka-ClassSubmarine Ka-Class
Formation 3: Diamond
Formation 5: Line Abreast
Pattern 2 Submarine Ka-ClassSubmarine Ka-Class
Formation 3: Diamond
Formation 5: Line Abreast
Pattern 3 Submarine Ka-Class eliteSubmarine Ka-ClassSubmarine Ka-Class
Formation 3: Diamond
Formation 5: Line Abreast
O1
Pattern 1Choose your route
O2
Battle Avoided
Pattern 1"Must be my imagination" (battle avoided)
O3
任務部隊 艦載機群
Air Battle Node
Pattern 1 Standard Carrier Wo-Class flagshipLight Carrier Nu-Class eliteHeavy Cruiser Ri-Class eliteLight Cruiser Tsu-ClassDestroyer I-ClassDestroyer I-Class
Formation 4: Echelon
AP:85
AS:191
AS+:381
Pattern 2 Standard Carrier Wo-Class flagshipLight Carrier Nu-Class eliteLight Carrier Nu-Class eliteLight Cruiser Tsu-ClassDestroyer I-ClassDestroyer I-Class
Formation 4: Echelon
AP:161
AS:362
AS+:723
Pattern 3 Standard Carrier Wo-Class flagshipLight Carrier Nu-Class flagshipHeavy Cruiser Ri-Class eliteLight Cruiser Tsu-ClassDestroyer I-Class Late ModelDestroyer I-Class Late Model
Formation 4: Echelon
AP:120
AS:270
AS+:540
Pattern 4 Standard Carrier Wo-Class flagshipLight Carrier Nu-Class eliteLight Carrier Nu-Class eliteLight Cruiser Tsu-ClassDestroyer I-ClassDestroyer I-Class
Formation 4: Echelon
AP:131
AS:294
AS+:588
P1
任務部隊 艦載機群
Air Battle Node
Pattern 1 Standard Carrier Wo-Class flagshipLight Carrier Nu-Class eliteLight Carrier Nu-Class eliteLight Cruiser Tsu-ClassDestroyer I-ClassDestroyer I-Class
Formation 4: Echelon
AP:131
AS:294
AS+:588
Pattern 2 Standard Carrier Wo-Class flagshipLight Carrier Nu-Class eliteLight Carrier Nu-Class eliteLight Cruiser Tsu-ClassDestroyer I-ClassDestroyer I-Class
Formation 4: Echelon
AP:161
AS:362
AS+:723
Pattern 3 Standard Carrier Wo-Class flagshipLight Carrier Nu-Class eliteHeavy Cruiser Ri-Class eliteLight Cruiser Tsu-ClassDestroyer I-ClassDestroyer I-Class
Formation 4: Echelon
AP:85
AS:191
AS+:381
Pattern 4 Standard Carrier Wo-Class flagshipLight Carrier Nu-Class flagshipHeavy Cruiser Ri-Class eliteLight Cruiser Tsu-ClassDestroyer I-Class Late ModelDestroyer I-Class Late Model
Formation 4: Echelon
AP:120
AS:270
AS+:540
P2
任務部隊 艦載機群
Air Battle Node
Pattern 1 Standard Carrier Wo-Class flagshipLight Carrier Nu-Class eliteLight Carrier Nu-Class eliteLight Cruiser Tsu-ClassDestroyer I-ClassDestroyer I-Class
Formation 4: Echelon
AP:161
AS:362
AS+:723
Pattern 2 Standard Carrier Wo-Class flagshipLight Carrier Nu-Class eliteHeavy Cruiser Ri-Class eliteLight Cruiser Tsu-ClassDestroyer I-ClassDestroyer I-Class
Formation 4: Echelon
AP:85
AS:191
AS+:381
Pattern 3 Standard Carrier Wo-Class flagshipLight Carrier Nu-Class eliteLight Carrier Nu-Class eliteLight Cruiser Tsu-ClassDestroyer I-ClassDestroyer I-Class
Formation 4: Echelon
AP:131
AS:294
AS+:588
Pattern 4 Standard Carrier Wo-Class flagshipLight Carrier Nu-Class flagshipHeavy Cruiser Ri-Class eliteLight Cruiser Tsu-ClassDestroyer I-Class Late ModelDestroyer I-Class Late Model
Formation 4: Echelon
AP:120
AS:270
AS+:540
P3
深海潜水艦隊 精鋭部隊
Pattern 1 Submarine Ka-Class flagshipSubmarine Ka-ClassSubmarine Ka-Class
Formation 3: Diamond
Formation 5: Line Abreast
Pattern 2 Submarine Ka-Class eliteSubmarine Ka-Class eliteSubmarine Ka-Class elite
Formation 3: Diamond
Formation 5: Line Abreast
Pattern 3 Submarine Ka-Class eliteSubmarine Ka-ClassSubmarine Ka-Class
Formation 3: Diamond
Pattern 4 Submarine Ka-ClassSubmarine Ka-ClassSubmarine Ka-Class
Formation 3: Diamond
Q1
任務部隊 艦載機群
Air Battle Node
Pattern 1 Standard Carrier Wo-Class flagshipLight Carrier Nu-Class eliteLight Carrier Nu-Class eliteLight Cruiser Tsu-ClassDestroyer I-ClassDestroyer I-Class
Formation 4: Echelon
AP:101
AS:227
AS+:453
Pattern 2 Standard Carrier Wo-Class flagshipLight Carrier Nu-Class eliteLight Carrier Nu-Class eliteLight Cruiser Tsu-ClassDestroyer I-ClassDestroyer I-Class
Formation 4: Echelon
AP:131
AS:294
AS+:588
Pattern 3 Standard Carrier Wo-Class flagshipLight Carrier Nu-Class eliteLight Carrier Nu-Class eliteLight Carrier Nu-Class eliteDestroyer I-ClassDestroyer I-Class
Formation 4: Echelon
AP:147
AS:330
AS+:660
Pattern 4 Standard Carrier Wo-Class flagshipLight Carrier Nu-Class flagshipLight Carrier Nu-Class eliteLight Cruiser Tsu-ClassDestroyer I-Class Late ModelDestroyer I-Class Late Model
Formation 4: Echelon
AP:166
AS:374
AS+:747
Q2
任務部隊 艦載機群
Air Battle Node
Pattern 1 Standard Carrier Wo-Class flagshipLight Carrier Nu-Class flagshipLight Carrier Nu-Class eliteLight Cruiser Tsu-ClassDestroyer I-Class Late ModelDestroyer I-Class Late Model
Formation 4: Echelon
AP:166
AS:374
AS+:747
Pattern 2 Standard Carrier Wo-Class flagshipLight Carrier Nu-Class eliteLight Carrier Nu-Class eliteLight Cruiser Tsu-ClassDestroyer I-ClassDestroyer I-Class
Formation 4: Echelon
AP:101
AS:227
AS+:453
Pattern 3 Standard Carrier Wo-Class flagshipLight Carrier Nu-Class eliteLight Carrier Nu-Class eliteLight Cruiser Tsu-ClassDestroyer I-ClassDestroyer I-Class
Formation 4: Echelon
AP:131
AS:294
AS+:588
Pattern 4 Standard Carrier Wo-Class flagshipLight Carrier Nu-Class eliteLight Carrier Nu-Class eliteLight Carrier Nu-Class eliteDestroyer I-ClassDestroyer I-Class
Formation 4: Echelon
AP:147
AS:330
AS+:660
Q3
任務部隊 艦載機群
Air Battle Node
Pattern 1 Aircraft Carrier PrincessLight Carrier Nu-Class eliteLight Carrier Nu-Class eliteLight Cruiser Tsu-ClassDestroyer Ro-Class Late ModelDestroyer Ro-Class Late Model
Formation 4: Echelon
AP:163
AS:366
AS+:732
Pattern 2 Aircraft Carrier PrincessLight Carrier Nu-Class eliteLight Carrier Nu-Class eliteLight Cruiser Tsu-ClassDestroyer I-ClassDestroyer I-Class
Formation 4: Echelon
AP:163
AS:366
AS+:732
Pattern 3 Aircraft Carrier PrincessDestroyer I-ClassDestroyer I-ClassDestroyer I-Class
Formation 4: Echelon
AP:71
AS:159
AS+:318
Pattern 4 Aircraft Carrier PrincessLight Carrier Nu-Class eliteLight Cruiser Tsu-ClassDestroyer Ro-Class Late ModelDestroyer I-ClassDestroyer I-Class
Formation 4: Echelon
AP:117
AS:263
AS+:525
Pattern 5 Aircraft Carrier PrincessLight Carrier Nu-Class eliteDestroyer I-ClassDestroyer I-ClassDestroyer I-Class
Formation 4: Echelon
AP:117
AS:263
AS+:525
R
任務部隊 艦載機群
Air Battle Node
Pattern 1 Aircraft Carrier PrincessLight Carrier Nu-Class eliteLight Carrier Nu-Class eliteLight Cruiser Tsu-ClassDestroyer Ro-Class Late ModelDestroyer Ro-Class Late Model
Formation 4: Echelon
AP:163
AS:366
AS+:732
Pattern 2 Aircraft Carrier PrincessLight Carrier Nu-Class eliteLight Carrier Nu-Class eliteLight Cruiser Tsu-ClassDestroyer I-ClassDestroyer I-Class
Formation 4: Echelon
AP:163
AS:366
AS+:732
Pattern 3 Aircraft Carrier PrincessDestroyer I-ClassDestroyer I-ClassDestroyer I-Class
Formation 4: Echelon
AP:71
AS:159
AS+:318
Pattern 4 Aircraft Carrier PrincessLight Carrier Nu-Class eliteDestroyer I-ClassDestroyer I-ClassDestroyer I-Class
Formation 4: Echelon
AP:117
AS:263
AS+:525
Pattern 5 Aircraft Carrier PrincessLight Carrier Nu-Class eliteLight Cruiser Tsu-ClassDestroyer Ro-Class Late ModelDestroyer I-ClassDestroyer I-Class
Formation 4: Echelon
AP:117
AS:263
AS+:525
S
深海任務部隊 護衛集団II群
Pattern 1 Heavy Cruiser Ri-Class eliteHeavy Cruiser Ri-Class eliteLight Cruiser Ho-Class eliteDestroyer I-Class Late ModelDestroyer I-ClassDestroyer I-Class
Formation 1: Line Ahead
Formation 3: Diamond
Pattern 2 Heavy Cruiser Ri-Class flagshipHeavy Cruiser Ri-Class eliteLight Cruiser Ho-Class eliteDestroyer I-Class Late ModelDestroyer I-ClassDestroyer I-Class
Formation 1: Line Ahead
Formation 3: Diamond
T
深海任務部隊 戦艦戦隊
Pattern 1 Battleship Ru-Class flagshipBattleship Ru-Class eliteBattleship Ru-Class eliteDestroyer Ro-Class Late ModelDestroyer I-ClassDestroyer I-Class
Formation 1: Line Ahead
Formation 5: Line Abreast
Pattern 2 Battleship Ru-Class flagshipBattleship Ru-Class flagshipBattleship Ru-Class flagshipDestroyer Ro-Class Late ModelDestroyer I-ClassDestroyer I-Class
Formation 1: Line Ahead
Formation 5: Line Abreast
U
深海任務部隊 侵攻旗艦艦隊
Pattern 1 Aircraft Carrier PrincessLight Carrier Nu-Class eliteLight Carrier Nu-Class eliteLight Cruiser Tsu-ClassDestroyer Ro-Class Late ModelDestroyer Ro-Class Late Model
Formation 4: Echelon
AP:163
AS:366
AS+:732
Pattern 2 Aircraft Carrier PrincessLight Carrier Nu-Class eliteLight Carrier Nu-Class eliteLight Cruiser Tsu-ClassDestroyer I-ClassDestroyer I-Class
Formation 4: Echelon
AP:163
AS:366
AS+:732
Pattern 3 Aircraft Carrier PrincessDestroyer I-ClassDestroyer I-ClassDestroyer I-Class
Formation 4: Echelon
AP:71
AS:159
AS+:318
Pattern 4 Aircraft Carrier PrincessLight Carrier Nu-Class eliteLight Carrier Nu-Class eliteLight Cruiser Tsu-ClassDestroyer Ro-Class Late ModelDestroyer I-Class
Formation 4: Echelon
AP:163
AS:366
AS+:732
Pattern 5 Aircraft Carrier PrincessLight Carrier Nu-Class eliteLight Carrier Nu-Class eliteDestroyer I-ClassDestroyer I-Class
Formation 4: Echelon
AP:163
AS:366
AS+:732
V
Battle Avoided
Pattern 1"Must be my imagination" (battle avoided)

Show/Hide Nodes and Enemy Encounters
Nodes and Enemy Encounters
NodePatternXpNode InfoFormAir
A
Pattern 1Choose your route
B

Air Battle Node
Pattern 1 Standard Carrier Wo-Class flagshipLight Carrier Nu-Class eliteHeavy Cruiser Ri-Class eliteLight Cruiser Tsu-ClassDestroyer I-ClassDestroyer I-Class
Formation 4: Echelon
AP:85
AS:191
AS+:381
Pattern 2 Standard Carrier Wo-Class flagshipLight Carrier Nu-Class eliteLight Carrier Nu-Class eliteLight Cruiser Tsu-ClassDestroyer I-ClassDestroyer I-Class
Formation 4: Echelon
AP:131
AS:294
AS+:588
Pattern 3 Standard Carrier Wo-Class flagshipLight Carrier Nu-Class eliteLight Carrier Nu-Class eliteLight Cruiser Tsu-ClassDestroyer I-ClassDestroyer I-Class
Formation 4: Echelon
AP:161
AS:362
AS+:723
C

Air Battle Node
Pattern 1 Standard Carrier Wo-Class flagshipLight Carrier Nu-Class eliteHeavy Cruiser Ri-Class eliteLight Cruiser Tsu-ClassDestroyer I-ClassDestroyer I-Class
Formation 4: Echelon
AP:85
AS:191
AS+:381
Pattern 2 Standard Carrier Wo-Class flagshipLight Carrier Nu-Class eliteLight Carrier Nu-Class eliteLight Cruiser Tsu-ClassDestroyer I-ClassDestroyer I-Class
Formation 4: Echelon
AP:131
AS:294
AS+:588
Pattern 3 Standard Carrier Wo-Class flagshipLight Carrier Nu-Class eliteLight Carrier Nu-Class eliteLight Cruiser Tsu-ClassDestroyer I-ClassDestroyer I-Class
Formation 4: Echelon
AP:161
AS:362
AS+:723
D
Pattern 1 Light Cruiser Ho-Class flagshipDestroyer I-ClassDestroyer I-ClassDestroyer I-ClassDestroyer I-ClassDestroyer I-Class
Formation 1: Line Ahead
Formation 3: Diamond
Pattern 2 Destroyer I-ClassDestroyer I-ClassDestroyer I-ClassDestroyer I-ClassDestroyer I-ClassDestroyer I-Class
Formation 3: Diamond
E

Air Battle Node
Pattern 1 Aircraft Carrier PrincessDestroyer I-ClassDestroyer I-ClassDestroyer I-Class
Formation 4: Echelon
AP:71
AS:159
AS+:318
Pattern 2 Aircraft Carrier PrincessLight Carrier Nu-Class eliteDestroyer I-ClassDestroyer I-ClassDestroyer I-Class
Formation 4: Echelon
AP:117
AS:263
AS+:525
Pattern 3 Aircraft Carrier PrincessLight Carrier Nu-Class eliteLight Carrier Nu-Class eliteLight Cruiser Tsu-ClassDestroyer I-ClassDestroyer I-Class
Formation 4: Echelon
AP:163
AS:366
AS+:732
F
Pattern 1 Light Cruiser Ho-Class flagshipDestroyer I-ClassDestroyer I-ClassDestroyer I-ClassDestroyer I-ClassDestroyer I-Class
Formation 1: Line Ahead
Formation 3: Diamond
Pattern 2 Destroyer I-ClassDestroyer I-ClassDestroyer I-ClassDestroyer I-ClassDestroyer I-ClassDestroyer I-Class
Formation 3: Diamond
G
Pattern 1 Standard Carrier Wo-Class flagshipLight Carrier Nu-Class eliteHeavy Cruiser Ri-Class eliteLight Cruiser Tsu-ClassDestroyer I-ClassDestroyer I-Class
Formation 4: Echelon
AP:85
AS:191
AS+:381
Pattern 2 Standard Carrier Wo-Class flagshipLight Carrier Nu-Class eliteLight Carrier Nu-Class eliteLight Cruiser Tsu-ClassDestroyer I-ClassDestroyer I-Class
Formation 4: Echelon
AP:131
AS:294
AS+:588
Pattern 3 Standard Carrier Wo-Class flagshipLight Carrier Nu-Class eliteLight Carrier Nu-Class eliteLight Cruiser Tsu-ClassDestroyer I-ClassDestroyer I-Class
Formation 4: Echelon
AP:161
AS:362
AS+:723
H
Pattern 1 Heavy Cruiser Ri-Class eliteHeavy Cruiser Ri-Class eliteLight Cruiser Ho-Class eliteDestroyer I-Class Late ModelDestroyer I-ClassDestroyer I-Class
Formation 1: Line Ahead
Formation 3: Diamond
Pattern 2 Heavy Cruiser Ri-Class eliteHeavy Cruiser Ri-Class eliteLight Cruiser Ho-Class eliteDestroyer I-ClassDestroyer I-ClassDestroyer I-Class
Formation 3: Diamond
I
Pattern 1 Submarine Ka-ClassSubmarine Ka-ClassSubmarine Ka-Class
Formation 3: Diamond
Formation 5: Line Abreast
Pattern 2 Submarine Ka-Class eliteSubmarine Ka-ClassSubmarine Ka-Class
Formation 3: Diamond
Formation 5: Line Abreast
J
Pattern 1 Destroyer I-Class Late ModelDestroyer I-ClassDestroyer I-ClassDestroyer I-ClassDestroyer I-ClassDestroyer I-Class
Formation 3: Diamond
Pattern 2 Light Cruiser He-Class flagshipDestroyer I-ClassDestroyer I-ClassDestroyer I-ClassDestroyer I-ClassDestroyer I-Class
Formation 1: Line Ahead
Formation 3: Diamond
K
Resource Node
Pattern 1?
L
Pattern 1 Battleship PrincessTransport Ship Wa-ClassTransport Ship Wa-ClassDestroyer I-ClassDestroyer I-Class
Formation 1: Line Ahead
Formation 2: Double Line
Pattern 2 Battleship PrincessTransport Ship Wa-ClassDestroyer I-ClassDestroyer I-Class
Formation 2: Double Line
M
Battle Avoided
Pattern 1"Must be my imagination" (battle avoided)
N
Pattern 1 Submarine Ka-ClassSubmarine Ka-Class
Formation 3: Diamond
Formation 5: Line Abreast
Pattern 2 Submarine Ka-ClassSubmarine Ka-ClassSubmarine Ka-Class
Formation 3: Diamond
Formation 5: Line Abreast
O1
Pattern 1Choose your route
O2
Battle Avoided
Pattern 1"Must be my imagination" (battle avoided)
O3

Air Battle Node
Pattern 1 Standard Carrier Wo-Class flagshipLight Carrier Nu-Class eliteHeavy Cruiser Ri-Class eliteLight Cruiser Tsu-ClassDestroyer I-ClassDestroyer I-Class
Formation 4: Echelon
AP:85
AS:191
AS+:381
Pattern 2 Standard Carrier Wo-Class flagshipLight Carrier Nu-Class eliteLight Carrier Nu-Class eliteLight Cruiser Tsu-ClassDestroyer I-ClassDestroyer I-Class
Formation 4: Echelon
AP:131
AS:294
AS+:588
Pattern 3 Standard Carrier Wo-Class flagshipLight Carrier Nu-Class eliteLight Carrier Nu-Class eliteLight Cruiser Tsu-ClassDestroyer I-ClassDestroyer I-Class
Formation 4: Echelon
AP:161
AS:362
AS+:723
P1

Air Battle Node
Pattern 1 Standard Carrier Wo-Class flagshipLight Carrier Nu-Class eliteHeavy Cruiser Ri-Class eliteLight Cruiser Tsu-ClassDestroyer I-ClassDestroyer I-Class
Formation 4: Echelon
AP:85
AS:191
AS+:381
Pattern 2 Standard Carrier Wo-Class flagshipLight Carrier Nu-Class eliteLight Carrier Nu-Class eliteLight Cruiser Tsu-ClassDestroyer I-ClassDestroyer I-Class
Formation 4: Echelon
AP:131
AS:294
AS+:588
Pattern 3 Standard Carrier Wo-Class flagshipLight Carrier Nu-Class eliteLight Carrier Nu-Class eliteLight Cruiser Tsu-ClassDestroyer I-ClassDestroyer I-Class
Formation 4: Echelon
AP:161
AS:362
AS+:723
P2

Air Battle Node
Pattern 1 Standard Carrier Wo-Class flagshipLight Carrier Nu-Class eliteHeavy Cruiser Ri-Class eliteLight Cruiser Tsu-ClassDestroyer I-ClassDestroyer I-Class
Formation 4: Echelon
AP:85
AS:191
AS+:381
Pattern 2 Standard Carrier Wo-Class flagshipLight Carrier Nu-Class eliteLight Carrier Nu-Class eliteLight Cruiser Tsu-ClassDestroyer I-ClassDestroyer I-Class
Formation 4: Echelon
AP:131
AS:294
AS+:588
Pattern 3 Standard Carrier Wo-Class flagshipLight Carrier Nu-Class eliteLight Carrier Nu-Class eliteLight Cruiser Tsu-ClassDestroyer I-ClassDestroyer I-Class
Formation 4: Echelon
AP:161
AS:362
AS+:723
P3
深海潜水艦隊 精鋭部隊
Pattern 1 Submarine Ka-ClassSubmarine Ka-ClassSubmarine Ka-Class
Formation 3: Diamond
Pattern 2 Submarine Ka-Class eliteSubmarine Ka-ClassSubmarine Ka-Class
Formation 3: Diamond
Pattern 3 Submarine Ka-Class flagshipSubmarine Ka-ClassSubmarine Ka-Class
Formation 3: Diamond
Formation 5: Line Abreast
Q1

Air Battle Node
Pattern 1 Standard Carrier Wo-Class flagshipLight Carrier Nu-Class eliteLight Carrier Nu-Class eliteLight Cruiser Tsu-ClassDestroyer I-ClassDestroyer I-Class
Formation 4: Echelon
AP:131
AS:294
AS+:588
Pattern 2 Standard Carrier Wo-Class flagshipLight Carrier Nu-Class eliteLight Carrier Nu-Class eliteLight Carrier Nu-Class eliteDestroyer I-ClassDestroyer I-Class
Formation 4: Echelon
AP:147
AS:330
AS+:660
Pattern 3 Standard Carrier Wo-Class flagshipLight Carrier Nu-Class eliteLight Carrier Nu-Class eliteLight Cruiser Tsu-ClassDestroyer I-ClassDestroyer I-Class
Formation 4: Echelon
AP:101
AS:227
AS+:453
Q2

Air Battle Node
Pattern 1 Standard Carrier Wo-Class flagshipLight Carrier Nu-Class eliteLight Carrier Nu-Class eliteLight Cruiser Tsu-ClassDestroyer I-ClassDestroyer I-Class
Formation 4: Echelon
AP:101
AS:227
AS+:453
Pattern 2 Standard Carrier Wo-Class flagshipLight Carrier Nu-Class eliteLight Carrier Nu-Class eliteLight Cruiser Tsu-ClassDestroyer I-ClassDestroyer I-Class
Formation 4: Echelon
AP:131
AS:294
AS+:588
Pattern 3 Standard Carrier Wo-Class flagshipLight Carrier Nu-Class eliteLight Carrier Nu-Class eliteLight Carrier Nu-Class eliteDestroyer I-ClassDestroyer I-Class
Formation 4: Echelon
AP:147
AS:330
AS+:660
Q3

Air Battle Node
Pattern 1 Aircraft Carrier PrincessDestroyer I-ClassDestroyer I-ClassDestroyer I-Class
Formation 4: Echelon
AP:71
AS:159
AS+:318
Pattern 2 Aircraft Carrier PrincessLight Carrier Nu-Class eliteDestroyer I-ClassDestroyer I-ClassDestroyer I-Class
Formation 4: Echelon
AP:117
AS:263
AS+:525
Pattern 3 Aircraft Carrier PrincessLight Carrier Nu-Class eliteLight Carrier Nu-Class eliteLight Cruiser Tsu-ClassDestroyer I-ClassDestroyer I-Class
Formation 4: Echelon
AP:163
AS:366
AS+:732
R

Air Battle Node
Pattern 1 Aircraft Carrier PrincessDestroyer I-ClassDestroyer I-ClassDestroyer I-Class
Formation 4: Echelon
AP:71
AS:159
AS+:318
Pattern 2 Aircraft Carrier PrincessLight Carrier Nu-Class eliteDestroyer I-ClassDestroyer I-ClassDestroyer I-Class
Formation 4: Echelon
AP:117
AS:263
AS+:525
Pattern 3 Aircraft Carrier PrincessLight Carrier Nu-Class eliteLight Carrier Nu-Class eliteLight Cruiser Tsu-ClassDestroyer I-ClassDestroyer I-Class
Formation 4: Echelon
AP:163
AS:366
AS+:732
S
Pattern 1 Heavy Cruiser Ri-Class eliteHeavy Cruiser Ri-Class eliteLight Cruiser Ho-Class eliteDestroyer I-ClassDestroyer I-ClassDestroyer I-Class
Formation 3: Diamond
Pattern 2 Heavy Cruiser Ri-Class eliteHeavy Cruiser Ri-Class eliteLight Cruiser Ho-Class eliteDestroyer I-Class Late ModelDestroyer I-ClassDestroyer I-Class
Formation 1: Line Ahead
Formation 3: Diamond
T
Pattern 1 Battleship Ru-Class eliteBattleship Ru-Class eliteBattleship Ru-Class eliteDestroyer I-ClassDestroyer I-ClassDestroyer I-Class
Formation 5: Line Abreast
Pattern 2 Battleship Ru-Class flagshipBattleship Ru-Class eliteBattleship Ru-Class eliteDestroyer Ro-Class Late ModelDestroyer I-ClassDestroyer I-Class
Formation 1: Line Ahead
Formation 5: Line Abreast
U
Pattern 1 Aircraft Carrier PrincessDestroyer I-ClassDestroyer I-ClassDestroyer I-Class
Formation 4: Echelon
AP:71
AS:159
AS+:318
Pattern 2 Aircraft Carrier PrincessLight Carrier Nu-Class eliteLight Carrier Nu-Class eliteDestroyer I-ClassDestroyer I-Class
Formation 4: Echelon
AP:163
AS:366
AS+:732
Pattern 3 Aircraft Carrier PrincessLight Carrier Nu-Class eliteLight Carrier Nu-Class eliteLight Cruiser Tsu-ClassDestroyer I-ClassDestroyer I-Class
Formation 4: Echelon
AP:163
AS:366
AS+:732
V
Battle Avoided
Pattern 1"Must be my imagination" (battle avoided)

Ship drops

NodeShip List
CDestroyers
EDestroyer Escorts
Destroyers
Light Cruisers
Light Aircraft Carriers
Seaplane Tenders
GDestroyer Escorts
Destroyers
Light Cruisers
Light Aircraft Carriers[
Seaplane Tenders
Auxiliary Ships
HDestroyers
LDestroyer Escorts
Destroyers
Light Cruisers
Heavy Cruisers
Battleships
Light Aircraft Carriers
Seaplane Tenders
Auxiliary Ships


E-3

OoyodoE-3Spring2019.png

Divert the Enemy Forces! The 2nd AL Operation
敵戦力牽制! 第二次AL作戦

Information

  • Event Tag: BlueSpring2019Tag.png Northern Forces Tag

(Phase 1 - Boss): Heavy Cruiser Princess

  • Hard ():
  • Medium ():
  • Easy ():
  • Casual ():

(Phase 2 - Boss:) Little Northern Princess

  • Hard ():
  • Medium ():
  • Easy ():
  • Casual ():

Key Rewards:

  • Clearing on Hard ():
  • Clearing on Medium ():
  • Clearing on Easy ():
  • Clearing on Casual ():
Spring2019E-3Banner.png
Spring2019E-3Map.png

Branching rules

E-3 Branching Rules
Nodes Rules
Start
1
  • Do not meet the requirements to start at 2.
2
  • Meet ANY of the following requirements:
    • If Carrier Task Force, fleet must contain AO.
    • If Surface Task Force, fleet may not contain CV(B)
    • Transport Escort Fleets always start at 2.
1
A
  • Carrier Task Force
B
  • Surface Task Force
B
C
  • Do not meet the requirements to go to F.
F
  • Meet ALL of the following requirements:
    • Fast Fleet
    • Amount of (F)BB(V) ≤ 2
D
E
  • Do not meet the requirements to go to H.
H
  • Meet ALL of the following requirements:
    • Fast Fleet
    • Amount of (F)BB(V)+CV(L/B) ≤ 2
E
G
  • Meet ALL of the following requirements to go to H:
    • Fast Fleet
    • Amount of (F)BB(V)+CV(L/B) ≤ 3
  • For every requirement that is not met, increase the chance of offrouting to G.
H
F
I
  • Active branching
K
H
I
  • Active branching
J
I
K
  • Meet ALL of the following requirements to go to L:
    • Fast Fleet
    • Amount of (F)BB(V)+CV(L/B) ≤ 3
    • If fleet started from 1, amount of CV(L/B) ≤ 2
  • For every requirement that is not met, increase the chance of offrouting to K.
L
J
L
  • Do not meet the requirements to go to either O or P.
P
  • Meet ALL of the following requirements:
    • Do not meet the requirements to go to O.
    • Node is unlocked.
    • Amount of (F)BB(V)+CV(L/B) = 4
O
  • Meet ALL of the following requirements:
    • Node is unlocked
    • Carrier Task Force
    • Amount of (F)BB(V)+CV(L/B) ≤ 3
L
M
  • Fail the LoS check.
N
  • Meet ALL of the following requirements:
    • Pass the LoS check.
    • Surface Task Force.
P
  • Meet ALL of the following requirements:
    • Node P is unlocked.
    • Pass the LoS check.
    • Carrier Task Force.
P
O
  • Do not meet the requirements to go to R.
R
  • Meet ALL of the following requirements:
    • Carrier Task Force
    • Fast Fleet
    • Fleet contains AO (Medium+)
    • Amount of (F)BB(V)+CV(L/B) ≤ 4
  • Alternatively, use a Transport Combined Fleet to go directly to R.
O
Q
  • Fail the LoS check.
R
  • Pass the LoS check.


Branching compositions were reported over the course of the event.

Tips
Note: The following guide is an early version of the guide for E-3. Some information may be incomplete, please carefully consider the information within until further update.

Regarding the Northern Forces and 5th Fleet

In this operation you will be using the 5th Fleet along with the northern forces which are considered important for the operation as they will all have special buffs on this map since it takes place in the Northern Pacific. As such, most of the ships that have benefits are from the members of the 5th fleet and Russians as they are as follows:

5th Fleet - Northern Division

Nachi, Ashigara, Kiso , Tama , Abukuma, Kasumi - 1.1x

Russians

Verniy, Tashkent, Gangut - 1.15x

The Majority of this fleet is considered fine to use here if necessary, but some ships like Kasumi and Abukuma are considered more vital for the Pearl Harbor Operation so please consider who you bring before you go into this map as they can be more helpful in the later operations.

Objective

In this operation, you will be conducting the 2nd AL operation and will be deployed to conduct a distraction up in the North. In order to successfully complete this operation, you will need to complete the following tasks:

Defeat the Heavy Cruiser Princess and her Fleet.

Recommended Fleet

Surface Task Force
2(F)BB, 2 CA, 2 CVL + 1 CL, 2 CA, 1 CLT, 2DD (5th Fleet and Russian members recommended)

Path

(Slow Fleet method)
B-C-F-I-L-M
B-C-F-I-K-L-M
B-C-F-K-L-M

(Fast Fleet method)
B-F-I-L-M
B-F-I-K-L-M
B-F-K-L-M

Recommended LBAS

Boss LBAS Run
LBAS 1 and 2

1 Fighter / 3 Land Base Bomber Distance of 7 needed

In this operation phase, you'll be facing off against mostly enemy fleets with some light carriers in tow. So bringing sufficient fighter power will be needed to ensure your survival.

  • For higher difficulties, you may need to use either equipment consisting of 1 Torpedo bomber, 1 Fighter bomber, 2 Fighters or have one of you CVLs be a complete fighter mule depending on how you approach the map.

Most of the ships that are considered important for this operation will also be slow ships which will affect your routing making you run into addition nodes along the trip. So in order to successfully complete this map, additional measure may need to be taken such as:

  • Using Boilers and Turbines, to help with Improving Ship Speed and make everyone go fast
  • Use Fast only ships
  • Simply accept the slow path and fight along the way.

You will also get to choose a path along the way where you'll get to face off an against air node featuring the Little Northern Princess and her land base group attacking your fleet from the distance (Node I) or go up against a surface fleet (Node K). Keep in mind that on this path there will be a risk and reward depending on the approach you take:

  • Node I have a 50% chance of routing to K or L
  • Going from I to L will only consume 5% fuel and ammo
  • Going from I to K to L will consume 25% of your fuel and ammo
  • Going from K to L will consume 20% of your fuel and ammo

Each route has it's own risk and reward to how well you survive, but otherwise, going through node I in hope of bypassing K may be worth the risk to save on extra fuel and ammo to get the best out of your fleet by the time your reach the boss node.

Node L will be a fight against some Ta-class Battleships along with a Nu-class Light Carrier which your fleet will need to overcome prior to fighting the boss fleet.

Once you reach the boss fleet you'll fight off against the Heavy Cruiser Princess who will be in a combined fleet. Most of her combined fleet will have some simple light weight ships along with a CVL in tow. Since the air power won't be too significant, you can use an LBAS consisting of mostly Land Base Bombers (see recommended LBAS). Also bring Boss support is recommended.

Keep in mind however that on Hard Mode you will face a vastly improved version of the Heavy Cruiser Princess which will have much higher combat capabilities and higher armor to making successfully defeating her much harder to do. Having someone that can hit close to 300 cap and likely do crits will be the key to successfully defeating her on hard if you get her HP low enough.


Once defeated, the path to the Little Northern Princess will open.

Opening up the passage from near Kiska to allow for a Shortcut (Starting Point 2)

To get the best possible way to reach the Little Northern Princess your fleet will need to be able to complete a few objectives to get gain access to the 2nd Starting point which includes:

  • Successfully Intercept the Base Air Raid
  • Gain AS+ at Node E
  • Gain AS+ at Node I
  • S Rank Node O

Successfully Intercept the Base Air Raid

LBAS 3

4 Interceptors / Fighters (Air Defense)

If you have enough good interceptors this can be done easily on it's own especially while you clear the first part as it will count to the requirements

Gain AS+ at Node I

Surface Task Force
2(F)BB, 2 CA, 2 CVL + 1 CL, 2 CA, 1 CLT, 2DD

Recommended LBAS

LBAS 1

4 Fighters (Distance of 5 needed)


Path

A-F-I

Arm your CVLs with your best fighters and use an LBAS with fighters along with an AACI DD to get an easy AS+ thus completing the requirement.

Gain AS+ at Node E

Carrier Task Force
(F)BB, 2 CA, 1 CV 2 CVL + 1 CL, 2 CA, 1 CLT, 2DD

Recommended LBAS

LBAS 1

4 Fighters (Distance of 5 needed)


Path

A-D-E

Process is the same as prior method, should be completed the same way.

S Rank Node O

Carrier Task Force
(F)BB, 2 CA, 1 CV 2 CVL + 1 CL, 2 CA, 3DD

LBAS 1-2

4 Torpedo Bomber / Land Base Bombers (Distance of 6 needed)

Path

A-D-E-H-J-P-O

This will require your fleet to travel through several battles and will require a considerable amount of effort to complete due to the air raid nodes and node that contain carriers. If needed, be sure to bring a In-Route support fleet to help you successfully get to the node more safely. Once you reach node, the fleet will consist of some Ru-classes along with a CVL and some DDs. All which should be easily killable with the support of an LBAS.

Once you complete all the requirements, the 2nd starting point and the short cut will be open.

Attack and defeat the Little Northern Princess

For this segment, you will need to consider what kind of fleet you will use for this phase. As there will be several ways you can approach tackling the boss in question. How you approach it and what you bring can be a decisive factor on how well the battle goes for you.

Below are 2 of the most used methods:

Surface Task Force Method

Surface Task Force
1(F)BB,1 AV, 1 CL 1 CA, 2 CVL + 1 CL, 2 CA, 1 FBB, 2DD

Path

S-H-J-P-O-R

Strengths

  • Can reliably use their combat capability to knock out installations efficiently with proper equipment setups.
  • Can bring many members of the 5th Fleet and Russians to further buff your combat performance.

Weakness

  • Node J and O can present possible issues since your fleet will mainly be anti-installation geared (In-Route support recommended to counter this problem)

While this fleet will be strong against the boss fleet, getting to the boss may present a serious issue. Bring in-route support to help your fleet survive the trip against the carriers and battleships you'll face along the ways.


Carrier Task Force Method

Carrier Task Force
1 AO, 1 CL 1 CA, 1CV, 2 CVL + 1 CL, 2 CA, 1 FBB, 2DD (Fast Fleet)
1 AO, 1 CL 1 CA, 2CV, 2 CVL + 1 CL, 2 CA, 3DD (Fast Fleet)

Path

S-H-J-P-R

Strengths

  • Will bring more Air power to the boss node
  • Will have more Fuel and ammo at the boss node (if you can make the whole fleet fast)
  • Will allow for Carriers (with proper equipment) to attack installations
  • May be a good alternative if you lack enough anti-installation gear.

Weaknesses

  • Without an all fast fleet this composition is less effective compared to STF.
  • Carriers may not deliver nearly as effective damage against some installation types (and will be rendered useless without the proper plane set ups)
  • May not have an overall hard hitting anti-installation unit

If you can make your oiler and other slow ships faster with turbines and boilers, it'll make it possible for your fleet to go the fastest possible route to the boss node allowing for a harder hitting crew to be available. This can be a good alternative to the other composition if you lack in enough anti-installation gear. As it can bring a capable fleet to the boss.

Dealing with the Little Northern Princess

Recommended LBAS

LBAS 1-2

1 Land Base Fighter/Carrier Fighter + 3 Land Base Bombers (Distance of 7 needed)

This fight will have you (depending on the difficulty) be pitted against an entire land base enemy unit in which the main group will consist of almost entirely of installations consisting of Artillery Imps, Supply Depot Princesses, and an Airfield Princess. While the escort fleet will have smaller ships and possibly PT Imp Groups.

Use an LBAS consisting of mainly bombers and a little bit of Fighter power to clear out as many of the installations and other smaller units you can. As taking them out will help with making it more possible to concentrate your attacks on the installations.

In addition, in-route and boss support is highly recommended to ensure your safety to the boss and to further knock down the boss's units.

A key thing to remember about this battle will be to ensure your chances of success are great, a couple of things should be considered when arming your ships:

By keeping these factors all in mind you can organize a fleet of ships that can be balanced out to help assist with taking out installations some note worthy ones to consider for this map can be:

Using members like these here and having the appropriate gear the key to victory as it will otherwise hard to take out most of the installations in battle without the right equipment. Other things to note regarding the fight includes:

  • Players on lower difficulties will likely have easier installations and less of them to take down along with less demanding restrictions.
  • If you use a Carrier fleet, you will need to bring Torpedo bobmers and/or specific dive bombers that can work against installations such as Ju87C Kai, F4U-1D, Prototype Nanzan and Suisei Model 12 (634 Air Group w/ Type 3 Cluster Bombs)
  • Using certain key ships like Gangut or Tashkent, who has a higher damage modifiers toward the bottom of your escort fleet, may also be key to your victory

Repeat until the Little Northern Princess has been fully defeated on final kill to complete the operation.

The event guides are to be constructed through the respective Event map page guide and reviewed by editor staff / collaboration committee before being approved here. Do not under any circumstance update the guides through this page or attempt to fix them through this page. Please only update guides through their respective sandbox pages.

Show/Hide Nodes and Enemy Encounters
Nodes and Enemy Encounters
NodePatternXpNode InfoFormAir
A
深海北方潜水艦隊 前方展開A群
Pattern 1 Submarine Yo-Class flagshipSubmarine Yo-Class eliteSubmarine Yo-Class elite
Formation 3: Diamond
Formation 5: Line Abreast
Pattern 2 Submarine Yo-Class eliteSubmarine Yo-Class eliteSubmarine Yo-Class elite
Formation 3: Diamond
Formation 5: Line Abreast
Pattern 3 Submarine Yo-Class eliteSubmarine Yo-ClassSubmarine Yo-Class
Formation 3: Diamond
B
深海北方艦隊 警戒部隊I群
Pattern 1 Heavy Cruiser Ri-Class flagshipLight Carrier Nu-Class flagshipLight Cruiser Ho-Class flagshipDestroyer I-Class Late ModelDestroyer I-Class Late ModelDestroyer I-Class Late Model
Formation 1: Line Ahead
AP:100
AS:225
AS+:450
Pattern 2 Light Carrier Nu-Class flagshipHeavy Cruiser Ri-Class flagshipLight Cruiser Ho-Class flagshipDestroyer I-Class Late ModelDestroyer I-Class Late ModelDestroyer I-Class Late Model
Formation 4: Echelon
AP:100
AS:225
AS+:450
Pattern 3 Heavy Cruiser Ri-Class flagshipLight Carrier Nu-Class flagshipLight Carrier Nu-Class flagshipDestroyer I-Class Late ModelDestroyer I-Class Late ModelDestroyer I-Class Late Model
Formation 6: Vanguard
AP:200
AS:450
AS+:900
C
深海北方潜水艦隊 前方展開B群
Pattern 1 Submarine Yo-Class flagshipSubmarine Yo-Class eliteSubmarine Ka-Class eliteSubmarine Ka-Class elite
Formation 3: Diamond
Formation 5: Line Abreast
Pattern 2 Submarine Yo-Class flagshipSubmarine Ka-Class eliteSubmarine Ka-Class elite
Formation 3: Diamond
Formation 5: Line Abreast
D
深海北方艦隊 警戒部隊II群
Pattern 1 Heavy Cruiser Ri-Class flagshipLight Carrier Nu-Class flagshipLight Cruiser Ho-Class flagshipDestroyer I-Class Late ModelDestroyer I-Class Late ModelDestroyer I-Class Late Model
Formation 1: Line Ahead
AP:100
AS:225
AS+:450
Pattern 2 Heavy Cruiser Ri-Class flagshipLight Cruiser Ho-Class flagshipLight Carrier Nu-Class flagshipDestroyer I-Class Late ModelDestroyer I-Class Late ModelDestroyer I-Class Late Model
Formation 6: Vanguard
AP:100
AS:225
AS+:450
Pattern 3 Light Carrier Nu-Class flagshipHeavy Cruiser Ri-Class flagshipLight Cruiser Ho-Class flagshipDestroyer I-Class Late ModelDestroyer I-Class Late ModelDestroyer I-Class Late Model
Formation 4: Echelon
AP:100
AS:225
AS+:450
E
深海北方基地 航空隊
Air Battle Node
Pattern 1 Nothern Little SisterArtillery ImpArtillery ImpAirfield PrincessAirfield PrincessSupply Depot Princess
Formation 4: Echelon
AP:154
AS:347
AS+:693
Pattern 2 Nothern Little SisterArtillery ImpArtillery ImpAirfield PrincessAirfield PrincessSupply Depot Princess
Formation 4: Echelon
AP:141
AS:317
AS+:633
Pattern 3 Nothern Little Sister - DamagedArtillery ImpArtillery ImpAirfield PrincessAirfield PrincessSupply Depot Princess Damage Form
Formation 4: Echelon
AP:186
AS:417
AS+:834
F

Choose route
Pattern 1Choose your route
G
深海北方基地 航空隊
Air Battle Node
Pattern 1 Nothern Little SisterArtillery ImpArtillery ImpAirfield PrincessAirfield PrincessSupply Depot Princess
Formation 4: Echelon
AP:154
AS:347
AS+:693
Pattern 2 Nothern Little SisterArtillery ImpArtillery ImpAirfield PrincessAirfield PrincessSupply Depot Princess
Formation 4: Echelon
AP:141
AS:317
AS+:633
Pattern 3 Nothern Little Sister - DamagedArtillery ImpArtillery ImpAirfield PrincessAirfield PrincessSupply Depot Princess Damage Form
Formation 4: Echelon
AP:186
AS:417
AS+:834
H

Choose route
Pattern 1Choose your route
I
深海北方基地 航空隊
Air Battle Node
Pattern 1 Nothern Little SisterArtillery ImpArtillery ImpAirfield PrincessAirfield PrincessSupply Depot Princess
Formation 4: Echelon
AP:154
AS:347
AS+:693
Pattern 2 Nothern Little Sister - DamagedArtillery ImpArtillery ImpAirfield PrincessAirfield PrincessSupply Depot Princess Damage Form
Formation 4: Echelon
AP:186
AS:417
AS+:834
Pattern 3 Nothern Little SisterArtillery ImpArtillery ImpAirfield PrincessAirfield PrincessSupply Depot Princess
Formation 4: Echelon
AP:141
AS:317
AS+:633
J
深海北方艦隊 機動部隊
Pattern 1 Standard Carrier Wo-Class Kai flagshipStandard Carrier Wo-Class Kai flagshipLight Carrier Nu-Class flagshipLight Cruiser Tsu-Class eliteDestroyer Ro-Class Late ModelDestroyer Ro-Class Late Model
Formation 4: Echelon
AP:248
AS:557
AS+:1113
Pattern 2 Standard Carrier Wo-Class Kai flagshipLight Carrier Nu-Class flagshipLight Carrier Nu-Class flagshipLight Cruiser Tsu-Class eliteDestroyer Ro-Class Late ModelDestroyer Ro-Class Late Model
Formation 4: Echelon
AP:231
AS:519
AS+:1038
Pattern 3 Standard Carrier Wo-Class Kai flagshipLight Carrier Nu-Class flagshipHeavy Cruiser Ri-Class flagshipLight Cruiser Tsu-Class eliteDestroyer Ro-Class Late ModelDestroyer Ro-Class Late Model
Formation 4: Echelon
AP:160
AS:359
AS+:717
K
深海北方艦隊 巡洋艦戦隊
Pattern 1 Heavy Cruiser Ri-Class flagshipHeavy Cruiser Ri-Class flagshipLight Cruiser He-Class flagshipDestroyer I-Class Late Model eliteDestroyer I-Class Late ModelDestroyer I-Class Late Model
Formation 1: Line Ahead
Formation 6: Vanguard
Pattern 2 Heavy Cruiser Ri-Class flagshipHeavy Cruiser Ri-Class flagshipLight Cruiser He-Class flagshipDestroyer I-Class Late ModelDestroyer I-ClassDestroyer I-Class
Formation 1: Line Ahead
Formation 6: Vanguard
L
深海北方艦隊 高速戦艦戦隊
Pattern 1 Battleship Ta-Class flagshipBattleship Ta-Class flagshipLight Carrier Nu-Class flagshipLight Cruiser Tsu-Class eliteDestroyer Ro-Class Late ModelDestroyer Ro-Class Late Model
Formation 1: Line Ahead
Formation 2: Double Line
AP:100
AS:225
AS+:450
Pattern 2 Battleship Ta-Class flagshipBattleship Ta-Class flagshipLight Carrier Nu-Class eliteLight Cruiser Tsu-Class eliteDestroyer Ro-Class Late ModelDestroyer Ro-Class Late Model
Formation 1: Line Ahead
Formation 2: Double Line
AP:88
AS:198
AS+:396
M
Battle Avoided
Pattern 1"Must be my imagination" (battle avoided)
N
深海北方艦隊 遊撃部隊主力
Enemy Combined Fleet
Pattern 1 Heavy Cruiser PrincessBattleship Ta-Class flagshipLight Carrier Nu-Class flagshipLight Cruiser Tsu-Class eliteDestroyer Ro-Class Late ModelDestroyer Ro-Class Late Model
Light Cruiser Ho-Class flagshipDestroyer Ro-Class Late ModelDestroyer Ro-Class Late ModelDestroyer Ro-Class Late ModelDestroyer I-Class Late ModelDestroyer I-Class Late Model
Cruising Formation 4: Battle Formation
AP:88
AS:198
AS+:396
Pattern 2 Heavy Cruiser PrincessBattleship Ta-Class flagshipLight Carrier Nu-Class flagshipHeavy Cruiser Ne-Class eliteHeavy Cruiser Ne-Class eliteLight Cruiser Tsu-Class elite
Light Cruiser Ho-Class flagshipLight Cruiser Tsu-Class eliteDestroyer Na-Class Late Model eliteDestroyer Na-Class Late Model eliteDestroyer Ro-Class Late ModelDestroyer Ro-Class Late Model
Cruising Formation 4: Battle Formation
AP:88
AS:198
AS+:396
O
深海北方艦隊 拠点防衛部隊
Pattern 1 Battleship Ru-Class flagshipBattleship Ru-Class flagshipLight Carrier Nu-Class flagshipLight Cruiser He-Class flagshipDestroyer Ro-Class Late ModelDestroyer Ro-Class Late Model
Formation 1: Line Ahead
Formation 2: Double Line
AP:100
AS:225
AS+:450
P
深海北方基地 航空隊
Air Battle Node
Pattern 1 Nothern Little Sister - DamagedArtillery ImpArtillery ImpAirfield PrincessAirfield PrincessSupply Depot Princess Damage Form
Formation 4: Echelon
AP:186
AS:417
AS+:834
Pattern 2 Nothern Little SisterArtillery ImpArtillery ImpAirfield PrincessAirfield PrincessSupply Depot Princess
Formation 4: Echelon
AP:154
AS:347
AS+:693
Pattern 3 Nothern Little SisterArtillery ImpArtillery ImpAirfield PrincessAirfield PrincessSupply Depot Princess
Formation 4: Echelon
AP:141
AS:317
AS+:633
Q
Battle Avoided
Pattern 1"Must be my imagination" (battle avoided)
R
深海北方艦隊 拠点基地
Enemy Combined Fleet
Pattern 1 Nothern Little SisterArtillery ImpAirfield PrincessSupply Depot PrincessSupply Depot PrincessTransport Ship Wa-Class elite
Light Cruiser Ho-Class flagshipDestroyer Na-Class Late Model eliteDestroyer Na-Class Late Model elitePT Imp GroupPT Imp GroupTransport Ship Wa-Class elite
Cruising Formation 4: Battle Formation
AP:168
AS:377
AS+:753
Pattern 2 Nothern Little Sister - DamagedArtillery ImpArtillery ImpAirfield PrincessSupply Depot Princess Damage FormTransport Ship Wa-Class flagship
Light Cruiser Ho-Class flagshipLight Cruiser Tsu-Class eliteDestroyer Na-Class Late Model eliteDestroyer Na-Class Late Model elitePT Imp GroupPT Imp Group
Cruising Formation 4: Battle Formation
AP:140
AS:315
AS+:630
S
深海北方潜水艦隊 緊急展開部隊
Pattern 1 Submarine Yo-Class eliteSubmarine Yo-Class eliteSubmarine Yo-Class elite
Formation 3: Diamond
Pattern 2 Submarine Yo-Class flagshipSubmarine Yo-Class eliteSubmarine Yo-Class eliteSubmarine Yo-Class elite
Formation 3: Diamond
Pattern 3 Submarine Yo-Class flagshipSubmarine Yo-Class eliteSubmarine Yo-Class elite
Formation 3: Diamond
Pattern 4 Submarine Yo-Class flagshipSubmarine Yo-Class flagshipSubmarine Yo-Class eliteSubmarine Yo-Class elite
Formation 3: Diamond

Show/Hide Nodes and Enemy Encounters
Nodes and Enemy Encounters
NodePatternXpNode InfoFormAir
A
深海北方潜水艦隊 前方展開A群
Pattern 1 Submarine Yo-Class eliteSubmarine Yo-ClassSubmarine Yo-Class
Formation 3: Diamond
Formation 5: Line Abreast
Pattern 2 Submarine Yo-Class eliteSubmarine Yo-Class eliteSubmarine Yo-Class elite
Formation 3: Diamond
Formation 5: Line Abreast
Pattern 3 Submarine Yo-Class eliteSubmarine Ka-ClassSubmarine Ka-Class
Formation 3: Diamond
Pattern 4 Submarine Yo-Class flagshipSubmarine Yo-Class eliteSubmarine Yo-Class elite
Formation 5: Line Abreast
B
深海北方艦隊 警戒部隊I群
Pattern 1 Heavy Cruiser Ri-Class flagshipLight Carrier Nu-Class eliteLight Cruiser Ho-Class flagshipDestroyer I-Class Late ModelDestroyer I-ClassDestroyer I-Class
Formation 1: Line Ahead
Formation 6: Vanguard
AP:88
AS:198
AS+:396
Pattern 2 Light Carrier Nu-Class eliteLight Carrier Nu-Class eliteLight Cruiser Ho-Class flagshipDestroyer I-Class Late ModelDestroyer I-ClassDestroyer I-Class
Formation 4: Echelon
AP:176
AS:396
AS+:792
C
深海北方潜水艦隊 前方展開B群
Pattern 1 Submarine Yo-Class eliteSubmarine Yo-ClassSubmarine Ka-ClassSubmarine Ka-Class
Formation 3: Diamond
Formation 5: Line Abreast
Pattern 2 Submarine Yo-Class flagshipSubmarine Ka-Class eliteSubmarine Ka-Class elite
Formation 3: Diamond
Formation 5: Line Abreast
Pattern 3 Submarine Yo-Class eliteSubmarine Yo-Class eliteSubmarine Ka-ClassSubmarine Ka-Class
Formation 3: Diamond
Formation 5: Line Abreast
D
深海北方艦隊 警戒部隊II群
Pattern 1 Heavy Cruiser Ri-Class flagshipLight Carrier Nu-Class eliteLight Cruiser Ho-Class flagshipDestroyer I-Class Late ModelDestroyer I-ClassDestroyer I-Class
Formation 1: Line Ahead
Formation 4: Echelon
Formation 6: Vanguard
AP:88
AS:198
AS+:396
E
深海北方基地 航空隊
Air Battle Node
Pattern 1 Nothern Little SisterArtillery ImpArtillery ImpAirfield PrincessAirfield PrincessSupply Depot Princess
Formation 4: Echelon
AP:128
AS:287
AS+:573
Pattern 2 Nothern Little SisterArtillery ImpArtillery ImpAirfield PrincessAirfield PrincessSupply Depot Princess
Formation 4: Echelon
AP:118
AS:266
AS+:531
Pattern 3 Nothern Little Sister - DamagedArtillery ImpArtillery ImpAirfield PrincessAirfield PrincessSupply Depot Princess Damage Form
Formation 4: Echelon
AP:156
AS:351
AS+:702
F

Choose route
Pattern 1Choose your route
G
深海北方基地 航空隊
Air Battle Node
Pattern 1 Nothern Little SisterArtillery ImpArtillery ImpAirfield PrincessAirfield PrincessSupply Depot Princess
Formation 4: Echelon
AP:128
AS:287
AS+:573
Pattern 2 Nothern Little SisterArtillery ImpArtillery ImpAirfield PrincessAirfield PrincessSupply Depot Princess
Formation 4: Echelon
AP:118
AS:266
AS+:531
Pattern 3 Nothern Little Sister - DamagedArtillery ImpArtillery ImpAirfield PrincessAirfield PrincessSupply Depot Princess Damage Form
Formation 4: Echelon
AP:156
AS:351
AS+:702
H

Choose route
Pattern 1Choose your route
I
深海北方基地 航空隊
Air Battle Node
Pattern 1 Nothern Little SisterArtillery ImpArtillery ImpAirfield PrincessAirfield PrincessSupply Depot Princess
Formation 4: Echelon
AP:128
AS:287
AS+:573
Pattern 2 Nothern Little SisterArtillery ImpArtillery ImpAirfield PrincessAirfield PrincessSupply Depot Princess
Formation 4: Echelon
AP:118
AS:266
AS+:531
Pattern 3 Nothern Little Sister - DamagedArtillery ImpArtillery ImpAirfield PrincessAirfield PrincessSupply Depot Princess Damage Form
Formation 4: Echelon
AP:156
AS:351
AS+:702
J
深海北方艦隊 機動部隊
Pattern 1 Standard Carrier Wo-Class flagshipLight Carrier Nu-Class flagshipHeavy Cruiser Ri-Class eliteLight Cruiser Tsu-ClassDestroyer I-Class Late ModelDestroyer I-Class Late Model
Formation 4: Echelon
AP:120
AS:270
AS+:540
Pattern 2 Standard Carrier Wo-Class flagshipStandard Carrier Wo-Class flagshipLight Carrier Nu-Class flagshipLight Cruiser Tsu-ClassDestroyer I-Class Late ModelDestroyer I-Class Late Model
Formation 4: Echelon
AP:189
AS:425
AS+:849
Pattern 3 Standard Carrier Wo-Class flagshipLight Carrier Nu-Class flagshipLight Carrier Nu-Class flagshipLight Cruiser Tsu-ClassDestroyer I-Class Late ModelDestroyer I-Class Late Model
Formation 4: Echelon
AP:172
AS:386
AS+:771
Pattern 4 Standard Carrier Wo-Class flagshipLight Carrier Nu-Class eliteLight Carrier Nu-Class eliteLight Cruiser Tsu-ClassDestroyer I-ClassDestroyer I-Class
Formation 4: Echelon
AP:161
AS:362
AS+:723
K
深海北方艦隊 巡洋艦戦隊
Pattern 1 Heavy Cruiser Ri-Class flagshipHeavy Cruiser Ri-Class flagshipLight Cruiser He-Class flagshipDestroyer I-Class Late ModelDestroyer I-ClassDestroyer I-Class
Formation 1: Line Ahead
Formation 6: Vanguard
Pattern 2 Heavy Cruiser Ri-Class flagshipHeavy Cruiser Ri-Class eliteLight Cruiser Ho-Class eliteDestroyer I-Class Late ModelDestroyer I-ClassDestroyer I-Class
Formation 1: Line Ahead
Formation 6: Vanguard
L
深海北方艦隊 高速戦艦戦隊
Pattern 1 Battleship Ta-Class flagshipBattleship Ta-Class flagshipLight Carrier Nu-Class eliteLight Cruiser Tsu-ClassDestroyer I-Class Late ModelDestroyer I-Class Late Model
Formation 1: Line Ahead
Formation 2: Double Line
AP:88
AS:198
AS+:396
Pattern 2 Battleship Ta-Class eliteBattleship Ta-Class eliteLight Carrier Nu-Class eliteLight Cruiser Tsu-ClassDestroyer I-Class Late ModelDestroyer I-Class Late Model
Formation 1: Line Ahead
Formation 2: Double Line
AP:88
AS:198
AS+:396
M
Battle Avoided
Pattern 1"Must be my imagination" (battle avoided)
N
深海北方艦隊 遊撃部隊主力
Enemy Combined Fleet
Pattern 1 Heavy Cruiser PrincessBattleship Ta-Class eliteLight Carrier Nu-Class eliteLight Cruiser Tsu-ClassDestroyer Ro-Class Late ModelDestroyer Ro-Class Late Model
Light Cruiser Ho-Class flagshipDestroyer Ro-Class Late ModelDestroyer Ro-Class Late ModelDestroyer I-ClassDestroyer I-ClassDestroyer I-Class
Cruising Formation 4: Battle Formation
AP:71
AS:159
AS+:318
Pattern 2 Heavy Cruiser Princess Final FormBattleship Ta-Class eliteLight Carrier Nu-Class eliteLight Cruiser Tsu-Class eliteHeavy Cruiser Ne-ClassHeavy Cruiser Ne-Class
Light Cruiser Ho-Class flagshipDestroyer Na-Class Late Model eliteDestroyer Ro-Class Late ModelDestroyer Ro-Class Late ModelDestroyer I-ClassDestroyer I-Class
Cruising Formation 4: Battle Formation
AP:71
AS:159
AS+:318
O
深海北方艦隊 拠点防衛部隊
Pattern 1 Battleship Ru-Class flagshipBattleship Ru-Class flagshipLight Carrier Nu-Class eliteLight Cruiser He-Class flagshipDestroyer Ro-Class Late ModelDestroyer Ro-Class Late Model
Formation 1: Line Ahead
Formation 2: Double Line
AP:88
AS:198
AS+:396
Pattern 2 Battleship Ru-Class eliteBattleship Ru-Class eliteLight Carrier Nu-Class eliteLight Cruiser He-Class flagshipDestroyer Ro-Class Late ModelDestroyer Ro-Class Late Model
Formation 1: Line Ahead
Formation 2: Double Line
AP:88
AS:198
AS+:396
P
深海北方基地 航空隊
Air Battle Node
Pattern 1 Nothern Little Sister - DamagedArtillery ImpArtillery ImpAirfield PrincessAirfield PrincessSupply Depot Princess Damage Form
Formation 4: Echelon
AP:156
AS:351
AS+:702
Pattern 2 Nothern Little SisterArtillery ImpArtillery ImpAirfield PrincessAirfield PrincessSupply Depot Princess
Formation 4: Echelon
AP:128
AS:287
AS+:573
Pattern 3 Nothern Little SisterArtillery ImpArtillery ImpAirfield PrincessAirfield PrincessSupply Depot Princess
Formation 4: Echelon
AP:118
AS:266
AS+:531
Q
Battle Avoided
Pattern 1"Must be my imagination" (battle avoided)
R
深海北方艦隊 拠点基地
Enemy Combined Fleet
Pattern 1 Nothern Little SisterArtillery ImpAirfield PrincessSupply Depot PrincessTransport Ship Wa-Class eliteTransport Ship Wa-Class elite
Light Cruiser Ho-Class flagshipDestroyer Na-Class Late ModelDestroyer Na-Class Late ModelPT Imp GroupPT Imp GroupTransport Ship Wa-Class
Cruising Formation 4: Battle Formation
AP:105
AS:236
AS+:471
Pattern 2 Nothern Little Sister - DamagedArtillery ImpArtillery ImpAirfield PrincessSupply Depot Princess Damage FormTransport Ship Wa-Class elite
Light Cruiser Ho-Class flagshipLight Cruiser Tsu-ClassDestroyer Na-Class Late Model eliteDestroyer Na-Class Late Model elitePT Imp GroupPT Imp Group
Cruising Formation 4: Battle Formation
AP:111
AS:249
AS+:498
S
深海北方潜水艦隊 緊急展開部隊
Pattern 1 Submarine Yo-Class eliteSubmarine Yo-Class eliteSubmarine Yo-Class
Formation 3: Diamond
Formation 5: Line Abreast
Pattern 2 Submarine Yo-Class eliteSubmarine Yo-ClassSubmarine Yo-Class
Formation 3: Diamond
Formation 5: Line Abreast
Pattern 3 Submarine Yo-Class eliteSubmarine Yo-Class eliteSubmarine Yo-Class elite
Formation 3: Diamond
Pattern 4 Submarine Yo-Class flagshipSubmarine Yo-Class eliteSubmarine Yo-Class elite
Formation 3: Diamond

Show/Hide Nodes and Enemy Encounters
Nodes and Enemy Encounters
NodePatternXpNode InfoFormAir
A
深海北方潜水艦隊 前方展開A群
Pattern 1 Submarine Yo-Class eliteSubmarine Ka-ClassSubmarine Ka-Class
Formation 3: Diamond
Formation 5: Line Abreast
Pattern 2 Submarine Yo-Class eliteSubmarine Yo-ClassSubmarine Yo-Class
Formation 3: Diamond
Formation 5: Line Abreast
Pattern 3 Submarine Yo-ClassSubmarine Ka-ClassSubmarine Ka-Class
Formation 3: Diamond
Pattern 4 Submarine Yo-Class eliteSubmarine Yo-Class eliteSubmarine Yo-Class elite
Formation 5: Line Abreast
B
深海北方艦隊 警戒部隊I群
Pattern 1 Light Cruiser Ho-Class flagshipDestroyer I-Class Late ModelDestroyer I-Class Late ModelDestroyer I-ClassDestroyer I-ClassDestroyer I-Class
Formation 1: Line Ahead
Formation 6: Vanguard
Pattern 2 Heavy Cruiser Ri-Class flagshipLight Carrier Nu-Class eliteLight Cruiser Ho-Class flagshipDestroyer I-Class Late ModelDestroyer I-ClassDestroyer I-Class
Formation 6: Vanguard
AP:88
AS:198
AS+:396
C
深海北方潜水艦隊 前方展開B群
Pattern 1 Submarine Yo-Class eliteSubmarine Yo-ClassSubmarine Ka-ClassSubmarine Ka-Class
Formation 3: Diamond
Formation 5: Line Abreast
Pattern 2 Submarine Yo-ClassSubmarine Yo-ClassSubmarine Ka-Class
Formation 3: Diamond
Pattern 3 Submarine Yo-Class eliteSubmarine Yo-Class eliteSubmarine Ka-ClassSubmarine Ka-Class
Formation 3: Diamond
Formation 5: Line Abreast
D
深海北方艦隊 警戒部隊II群
Pattern 1 Light Cruiser Ho-Class flagshipDestroyer I-Class Late ModelDestroyer I-Class Late ModelDestroyer I-ClassDestroyer I-ClassDestroyer I-Class
Formation 1: Line Ahead
Formation 6: Vanguard
Pattern 2 Heavy Cruiser Ri-Class flagshipLight Carrier Nu-Class eliteLight Cruiser Ho-Class flagshipDestroyer I-Class Late ModelDestroyer I-ClassDestroyer I-Class
Formation 6: Vanguard
AP:88
AS:198
AS+:396
E
深海北方基地 航空隊
Air Battle Node
Pattern 1 Nothern Little Sister - DamagedArtillery ImpArtillery ImpAirfield PrincessAirfield PrincessSupply Depot Princess Damage Form
Formation 4: Echelon
AP:134
AS:300
AS+:600
Pattern 2 Nothern Little Sister - DamagedArtillery ImpArtillery ImpAirfield PrincessSupply Depot PrincessTransport Ship Wa-Class
Formation 4: Echelon
AP:98
AS:219
AS+:438
Pattern 3 Nothern Little Sister - DamagedArtillery ImpArtillery ImpAirfield PrincessSupply Depot Princess Damage FormTransport Ship Wa-Class
Formation 4: Echelon
AP:120
AS:270
AS+:540
F

Choose route
Pattern 1Choose your route
G
深海北方基地 航空隊
Air Battle Node
Pattern 1 Nothern Little Sister - DamagedArtillery ImpArtillery ImpAirfield PrincessAirfield PrincessSupply Depot Princess Damage Form
Formation 4: Echelon
AP:134
AS:300
AS+:600
Pattern 2 Nothern Little Sister - DamagedArtillery ImpArtillery ImpAirfield PrincessSupply Depot Princess Damage FormTransport Ship Wa-Class
Formation 4: Echelon
AP:120
AS:270
AS+:540
Pattern 3 Nothern Little Sister - DamagedArtillery ImpArtillery ImpAirfield PrincessSupply Depot PrincessTransport Ship Wa-Class
Formation 4: Echelon
AP:98
AS:219
AS+:438
H

Choose route
Pattern 1Choose your route
I
深海北方基地 航空隊
Air Battle Node
Pattern 1 Nothern Little Sister - DamagedArtillery ImpArtillery ImpAirfield PrincessAirfield PrincessSupply Depot Princess Damage Form
Formation 4: Echelon
AP:134
AS:300
AS+:600
Pattern 2 Nothern Little Sister - DamagedArtillery ImpArtillery ImpAirfield PrincessSupply Depot PrincessTransport Ship Wa-Class
Formation 4: Echelon
AP:98
AS:219
AS+:438
Pattern 3 Nothern Little Sister - DamagedArtillery ImpArtillery ImpAirfield PrincessSupply Depot Princess Damage FormTransport Ship Wa-Class
Formation 4: Echelon
AP:120
AS:270
AS+:540
J
深海北方艦隊 機動部隊
Pattern 1 Standard Carrier Wo-Class flagshipLight Carrier Nu-Class eliteLight Carrier Nu-Class eliteLight Cruiser Tsu-ClassDestroyer I-ClassDestroyer I-Class
Formation 4: Echelon
AP:131
AS:294
AS+:588
Pattern 2 Standard Carrier Wo-Class flagshipLight Carrier Nu-Class eliteLight Carrier Nu-Class eliteLight Cruiser Tsu-ClassDestroyer I-ClassDestroyer I-Class
Formation 4: Echelon
AP:161
AS:362
AS+:723
Pattern 3 Standard Carrier Wo-Class flagshipLight Carrier Nu-Class flagshipHeavy Cruiser Ri-Class eliteLight Cruiser Tsu-ClassDestroyer I-Class Late ModelDestroyer I-Class Late Model
Formation 4: Echelon
AP:120
AS:270
AS+:540
Pattern 4 Standard Carrier Wo-Class flagshipLight Carrier Nu-Class eliteHeavy Cruiser Ri-Class eliteLight Cruiser Tsu-ClassDestroyer I-ClassDestroyer I-Class
Formation 4: Echelon
AP:85
AS:191
AS+:381
K
深海北方艦隊 巡洋艦戦隊
Pattern 1 Heavy Cruiser Ri-Class flagshipHeavy Cruiser Ri-Class eliteLight Cruiser Ho-Class eliteDestroyer I-Class Late ModelDestroyer I-ClassDestroyer I-Class
Formation 1: Line Ahead
Formation 6: Vanguard
Pattern 2 Heavy Cruiser Ri-Class eliteHeavy Cruiser Ri-Class eliteLight Cruiser Ho-Class eliteDestroyer I-Class Late ModelDestroyer I-ClassDestroyer I-Class
Formation 1: Line Ahead
Formation 6: Vanguard
L
深海北方艦隊 高速戦艦戦隊
Pattern 1 Battleship Ta-Class eliteBattleship Ta-Class eliteLight Carrier Nu-Class eliteLight Cruiser Tsu-ClassDestroyer I-Class Late ModelDestroyer I-Class Late Model
Formation 1: Line Ahead
Formation 2: Double Line
AP:88
AS:198
AS+:396
Pattern 2 Battleship Ta-ClassBattleship Ta-ClassLight Carrier Nu-Class eliteLight Cruiser Tsu-ClassDestroyer I-Class Late ModelDestroyer I-Class Late Model
Formation 2: Double Line
AP:16
AS:36
AS+:72
Pattern 3 Battleship Ta-Class flagshipBattleship Ta-Class flagshipLight Carrier Nu-Class eliteLight Cruiser Tsu-ClassDestroyer I-Class Late ModelDestroyer I-Class Late Model
Formation 2: Double Line
AP:88
AS:198
AS+:396
M
Battle Avoided
Pattern 1"Must be my imagination" (battle avoided)
N
深海北方艦隊 遊撃部隊主力
Enemy Combined Fleet
Pattern 1 Heavy Cruiser PrincessBattleship Ta-Class eliteLight Carrier Nu-Class eliteLight Cruiser Tsu-ClassDestroyer I-ClassDestroyer I-Class
Light Cruiser Ho-Class flagshipDestroyer Ro-Class Late ModelDestroyer I-ClassDestroyer I-ClassDestroyer I-ClassDestroyer I-Class
Cruising Formation 4: Battle Formation
AP:84
AS:189
AS+:378
Pattern 2 Heavy Cruiser Princess Final FormBattleship Ta-Class eliteLight Carrier Nu-Class eliteLight Cruiser Tsu-ClassHeavy Cruiser Ne-ClassDestroyer I-Class
Light Cruiser Ho-Class flagshipDestroyer Ro-Class Late ModelDestroyer Ro-Class Late ModelDestroyer I-ClassDestroyer I-ClassDestroyer I-Class
Cruising Formation 4: Battle Formation
AP:71
AS:159
AS+:318
O
深海北方艦隊 拠点防衛部隊
Pattern 1 Battleship Ru-Class eliteBattleship Ru-Class eliteLight Carrier Nu-Class eliteDestroyer Ro-Class Late ModelDestroyer I-ClassDestroyer I-Class
Formation 1: Line Ahead
Formation 2: Double Line
AP:88
AS:198
AS+:396
Pattern 2 Battleship Ru-Class eliteBattleship Ru-Class eliteLight Carrier Nu-Class eliteLight Cruiser He-Class flagshipDestroyer Ro-Class Late ModelDestroyer Ro-Class Late Model
Formation 1: Line Ahead
Formation 2: Double Line
AP:88
AS:198
AS+:396
P
深海北方基地 航空隊
Air Battle Node
Pattern 1 Nothern Little Sister - DamagedArtillery ImpArtillery ImpAirfield PrincessAirfield PrincessSupply Depot Princess Damage Form
Formation 4: Echelon
AP:134
AS:300
AS+:600
Pattern 2 Nothern Little Sister - DamagedArtillery ImpArtillery ImpAirfield PrincessSupply Depot Princess Damage FormTransport Ship Wa-Class
Formation 4: Echelon
AP:120
AS:270
AS+:540
Pattern 3 Nothern Little Sister - DamagedArtillery ImpArtillery ImpAirfield PrincessSupply Depot PrincessTransport Ship Wa-Class
Formation 4: Echelon
AP:98
AS:219
AS+:438
Q
Battle Avoided
Pattern 1"Must be my imagination" (battle avoided)
R
深海北方艦隊 拠点基地
Enemy Combined Fleet
Pattern 1 Nothern Little SisterArtillery ImpSupply Depot PrincessTransport Ship Wa-Class eliteTransport Ship Wa-ClassTransport Ship Wa-Class
Destroyer Na-Class Late ModelPT Imp GroupPT Imp GroupDestroyer I-ClassTransport Ship Wa-ClassTransport Ship Wa-Class
Cruising Formation 4: Battle Formation
AP:46
AS:104
AS+:207
Pattern 2 Nothern Little Sister - DamagedArtillery ImpAirfield PrincessSupply Depot Princess Damage FormTransport Ship Wa-Class eliteTransport Ship Wa-Class elite
Light Cruiser Ho-Class flagshipDestroyer Na-Class Late ModelPT Imp GroupPT Imp GroupTransport Ship Wa-ClassTransport Ship Wa-Class
Cruising Formation 4: Battle Formation
AP:94
AS:210
AS+:420
S
深海北方潜水艦隊 緊急展開部隊
Pattern 1 Submarine Yo-Class eliteSubmarine Yo-Class eliteSubmarine Yo-Class
Formation 3: Diamond
Formation 5: Line Abreast
Pattern 2 Submarine Yo-Class eliteSubmarine Yo-ClassSubmarine Yo-Class
Formation 3: Diamond
Formation 5: Line Abreast
Pattern 3 Submarine Yo-ClassSubmarine Yo-ClassSubmarine Yo-Class
Formation 5: Line Abreast

Show/Hide Nodes and Enemy Encounters
Nodes and Enemy Encounters
NodePatternXpNode InfoFormAir
A
深海北方潜水艦隊 前方展開A群
Pattern 1 Submarine Yo-Class eliteSubmarine Ka-ClassSubmarine Ka-Class
Formation 3: Diamond
Formation 5: Line Abreast
Pattern 2 Submarine Yo-ClassSubmarine Ka-ClassSubmarine Ka-Class
Formation 3: Diamond
Pattern 3 Submarine Yo-Class eliteSubmarine Yo-ClassSubmarine Yo-Class
Formation 5: Line Abreast
B
深海北方艦隊 警戒部隊I群
Pattern 1 Light Cruiser Ho-Class flagshipDestroyer I-Class Late ModelDestroyer I-Class Late ModelDestroyer I-ClassDestroyer I-ClassDestroyer I-Class
Formation 1: Line Ahead
Formation 6: Vanguard
Pattern 2 Destroyer I-Class Late ModelDestroyer I-Class Late ModelDestroyer I-ClassDestroyer I-ClassDestroyer I-ClassDestroyer I-Class
Formation 6: Vanguard
C
深海北方潜水艦隊 前方展開B群
Pattern 1 Submarine Yo-Class eliteSubmarine Yo-ClassSubmarine Ka-ClassSubmarine Ka-Class
Formation 3: Diamond
Formation 5: Line Abreast
Pattern 2 Submarine Yo-ClassSubmarine Yo-ClassSubmarine Ka-Class
Formation 3: Diamond
D
深海北方艦隊 警戒部隊II群
Pattern 1 Light Cruiser Ho-Class flagshipDestroyer I-Class Late ModelDestroyer I-Class Late ModelDestroyer I-ClassDestroyer I-ClassDestroyer I-Class
Formation 1: Line Ahead
Formation 6: Vanguard
Pattern 2 Destroyer I-Class Late ModelDestroyer I-Class Late ModelDestroyer I-ClassDestroyer I-ClassDestroyer I-ClassDestroyer I-Class
Formation 6: Vanguard
E
深海北方基地 航空隊
Air Battle Node
Pattern 1 Nothern Little Sister - DamagedArtillery ImpArtillery ImpAirfield PrincessSupply Depot PrincessTransport Ship Wa-Class
Formation 4: Echelon
AP:98
AS:219
AS+:438
Pattern 2 Nothern Little Sister - DamagedArtillery ImpArtillery ImpAirfield PrincessSupply Depot Princess Damage FormTransport Ship Wa-Class
Formation 4: Echelon
AP:120
AS:270
AS+:540
F

Choose route
Pattern 1Choose your route
G
深海北方基地 航空隊
Air Battle Node
Pattern 1 Nothern Little Sister - DamagedArtillery ImpArtillery ImpAirfield PrincessSupply Depot PrincessTransport Ship Wa-Class
Formation 4: Echelon
AP:98
AS:219
AS+:438
Pattern 2 Nothern Little Sister - DamagedArtillery ImpArtillery ImpAirfield PrincessSupply Depot Princess Damage FormTransport Ship Wa-Class
Formation 4: Echelon
AP:120
AS:270
AS+:540
H

Choose route
Pattern 1Choose your route
I
深海北方基地 航空隊
Air Battle Node
Pattern 1 Nothern Little Sister - DamagedArtillery ImpArtillery ImpAirfield PrincessSupply Depot PrincessTransport Ship Wa-Class
Formation 4: Echelon
AP:98
AS:219
AS+:438
Pattern 2 Nothern Little Sister - DamagedArtillery ImpArtillery ImpAirfield PrincessSupply Depot Princess Damage FormTransport Ship Wa-Class
Formation 4: Echelon
AP:120
AS:270
AS+:540
J
深海北方艦隊 機動部隊
Pattern 1 Standard Carrier Wo-Class flagshipLight Carrier Nu-Class eliteHeavy Cruiser Ri-Class eliteLight Cruiser Tsu-ClassDestroyer I-ClassDestroyer I-Class
Formation 4: Echelon
AP:85
AS:191
AS+:381
Pattern 2 Standard Carrier Wo-Class flagshipLight Carrier Nu-Class eliteLight Carrier Nu-Class eliteLight Cruiser Tsu-ClassDestroyer I-ClassDestroyer I-Class
Formation 4: Echelon
AP:131
AS:294
AS+:588
Pattern 3 Standard Carrier Wo-Class flagshipLight Carrier Nu-Class eliteLight Carrier Nu-Class eliteLight Cruiser Tsu-ClassDestroyer I-ClassDestroyer I-Class
Formation 4: Echelon
AP:161
AS:362
AS+:723
K
深海北方艦隊 巡洋艦戦隊
Pattern 1 Heavy Cruiser Ri-Class eliteHeavy Cruiser Ri-Class eliteLight Cruiser Ho-Class eliteDestroyer I-Class Late ModelDestroyer I-ClassDestroyer I-Class
Formation 1: Line Ahead
Formation 6: Vanguard
Pattern 2 Heavy Cruiser Ri-Class eliteHeavy Cruiser Ri-Class eliteLight Cruiser Ho-Class eliteDestroyer I-ClassDestroyer I-ClassDestroyer I-Class
Formation 6: Vanguard
L
深海北方艦隊 高速戦艦戦隊
Pattern 1 Battleship Ta-ClassBattleship Ta-ClassLight Carrier Nu-Class eliteLight Cruiser Tsu-ClassDestroyer I-Class Late ModelDestroyer I-Class Late Model
Formation 2: Double Line
AP:16
AS:36
AS+:72
Pattern 2 Battleship Ta-Class eliteBattleship Ta-Class eliteLight Carrier Nu-Class eliteLight Cruiser Tsu-ClassDestroyer I-Class Late ModelDestroyer I-Class Late Model
Formation 1: Line Ahead
Formation 2: Double Line
AP:88
AS:198
AS+:396
M
Battle Avoided
Pattern 1"Must be my imagination" (battle avoided)
N
深海北方艦隊 遊撃部隊主力
Enemy Combined Fleet
Pattern 1 Heavy Cruiser PrincessBattleship Ta-ClassLight Carrier Nu-ClassLight Cruiser Tsu-ClassDestroyer I-ClassDestroyer I-Class
Destroyer Ro-Class Late ModelDestroyer I-ClassDestroyer I-ClassDestroyer I-ClassDestroyer I-ClassDestroyer I-Class
Cruising Formation 4: Battle Formation
AP:6
AS:12
AS+:24
Pattern 2 Heavy Cruiser Princess Final FormBattleship Ta-ClassLight Carrier Nu-Class eliteLight Cruiser Tsu-ClassDestroyer I-ClassDestroyer I-Class
Destroyer Ro-Class Late ModelDestroyer Ro-Class Late ModelDestroyer I-ClassDestroyer I-ClassDestroyer I-ClassDestroyer I-Class
Cruising Formation 4: Battle Formation
AP:84
AS:189
AS+:378
O
深海北方艦隊 拠点防衛部隊
Pattern 1 Battleship Ru-Class eliteBattleship Ru-Class eliteLight Carrier Nu-Class eliteDestroyer Ro-Class Late ModelDestroyer I-ClassDestroyer I-Class
Formation 2: Double Line
AP:72
AS:162
AS+:324
Pattern 2 Battleship Ru-Class eliteBattleship Ru-Class eliteLight Carrier Nu-Class eliteDestroyer Ro-Class Late ModelDestroyer I-ClassDestroyer I-Class
Formation 1: Line Ahead
Formation 2: Double Line
AP:88
AS:198
AS+:396
P
深海北方基地 航空隊
Air Battle Node
Pattern 1 Nothern Little Sister - DamagedArtillery ImpArtillery ImpAirfield PrincessSupply Depot Princess Damage FormTransport Ship Wa-Class
Formation 4: Echelon
AP:120
AS:270
AS+:540
Pattern 2 Nothern Little Sister - DamagedArtillery ImpArtillery ImpAirfield PrincessSupply Depot PrincessTransport Ship Wa-Class
Formation 4: Echelon
AP:98
AS:219
AS+:438
Q
Battle Avoided
Pattern 1"Must be my imagination" (battle avoided)
R
深海北方艦隊 拠点基地
Enemy Combined Fleet
Pattern 1 Nothern Little SisterSupply Depot PrincessTransport Ship Wa-Class eliteTransport Ship Wa-Class eliteTransport Ship Wa-ClassTransport Ship Wa-Class
Destroyer Na-Class Late ModelPT Imp GroupDestroyer I-ClassTransport Ship Wa-ClassTransport Ship Wa-ClassTransport Ship Wa-Class
Cruising Formation 4: Battle Formation
AP:46
AS:104
AS+:207
Pattern 2 Nothern Little Sister - DamagedArtillery ImpSupply Depot Princess Damage FormTransport Ship Wa-Class eliteTransport Ship Wa-ClassTransport Ship Wa-Class
Destroyer Na-Class Late ModelPT Imp GroupPT Imp GroupDestroyer I-ClassTransport Ship Wa-ClassTransport Ship Wa-Class
Cruising Formation 4: Battle Formation
AP:62
AS:138
AS+:276
S
深海北方潜水艦隊 緊急展開部隊
Pattern 1 Submarine Yo-ClassSubmarine Yo-ClassSubmarine Yo-Class
Formation 5: Line Abreast
Pattern 2 Submarine Yo-Class eliteSubmarine Yo-ClassSubmarine Yo-Class
Formation 3: Diamond
Formation 5: Line Abreast

Ship drops

NodeShip List
CDestroyers
EDestroyer Escorts
Destroyers
Light Cruisers
Light Aircraft Carriers
Seaplane Tenders
GDestroyer Escorts
Destroyers
Light Cruisers
Light Aircraft Carriers[
Seaplane Tenders
Auxiliary Ships
HDestroyers
LDestroyer Escorts
Destroyers
Light Cruisers
Heavy Cruisers
Battleships
Light Aircraft Carriers
Seaplane Tenders
Auxiliary Ships


E-4

OoyodoE-4Spring2019.png

The 2nd Hawaii Operation
第二次ハワイ作戦

Information

  • Event Tag: GreenTagSpring2019.png Kidou Butai Tag (CTF)
    YellowTagSpring2019.png Occupation Forces (STF and TCF)

(Phase 1 - Boss): Central Princess

  • Hard ():
  • Medium ():
  • Easy ():
  • Casual ():
  • Clearing on Hard ():
  • Clearing on Medium ():
  • Clearing on Easy ():
  • Clearing on Casual ():
Spring2019E-4Banner.png
Spring2019E-4Map.png

Branching rules

E-4 Branching Rules
Nodes Rules
Start
1
  • Do not meet the requirements to start at either 2 or 3.
2
  • Transport Combined Fleet
3
  • Meet ALL of the following requirements:
    • Starting point 3 is unlocked.
    • Surface Task Force
1
A
  • Carrier Task Force
B
  • Surface Task Force
A
C
  • Active branching
D
C
G
  • Do not meet the requirements to go to I.
I
  • Meet ALL of the following requirements:
    • Fast+ Fleet
    • Amount of (F)BB(V)+CV(L/B) ≤ 3
    • Amount of CV(L/B) ≤ 2
G
I
  • Do not meet the requirements to go to J.
J
  • Meet ALL of the following requirements:
    • Fast Fleet
    • Amount of (F)BB(V) ≤ 2
    • Amount of CV(B) ≤ 3
  • Alternatively, use a Fast+ Fleet to go straight to J.
I
J
  • Do not meet the requirements to go to L.
L
  • Fast+ Fleet
J
L
  • Do not meet the requirements to go to O.
O
  • Meet ALL of the following requirements:
    • Fast Fleet
    • Amount of (F)BB(V)+CV(L/B) ≤ 4
    • Amount of CV(L/B) ≤ 3
L
Q
  • Meet ANY of the following requirements:
  • Slow Fleet
  • Fast+ Fleet AND fleet contains AV.
O
  • Do not meet the requirements to go to Q.
Q
O
  • Do not meet the requirements to go to T.
T
  • Meet ALL of the following requirements:
    • Fleet contains AV.
    • Pass the LoS check.
H
K
  • Do not meet the requirements to go to M.
M
  • No (F)BB(V)
N
P
  • Do not meet the requirements to go to S.
S
  • Meet ALL of the following requirements:
    • Amount of (F)BB(V)+CV(B) ≤ 3
    • Amount of (F)BB(V)+CV(L/B) ≤ 4
S
O
  • Meet ANY of the following requirements:
    • Transport Combined Fleet
    • Starting point 3 is not unlocked yet.
R
  • Meet ALL of the following requirements:
    • Do not meet the requirements to go to O.
    • Surface Task Force
    • Starting point 3 is unlocked.
U
  • Do not meet the requirements to go to either O or R.
3
W

Do not meet the requirements to go to X.

X
  • Meet ALL of the following requirements:
    • Amount of (F)BB(V)+CV(L/B) ≤ 3
    • Amount of Slow (F)BB(V) ≤ 1 (Engines irrelevant)
W
K
  • Do not meet the requirements to go to X.
X
  • Meet ALL of the following requirements:
    • Amount of (F)BB(V)+CV(B) ≤ 3
    • Amount of Slow (F)BB(V) ≤ 2 (Engines irrelevant)
X
K
  • Do not meet the requirements to go to Y.
Y
  • Meet ALL of the following requirements:
    • If amount of (F)BB(V)+CV(B) ≥ 3, no Slow (F)BB(V) allowed (Engines irrelevant)
    • Amount of CV(L/B) ≤ 1
Y
S
  • Slow Fleet
O
  • Fast Fleet
O
R
  • Do not meet the requirements to go to V.
V
  • Meet ALL of the following requirements:
    • Pass the LoS check.
    • Amount of ships equipped with Surface Radars ≥ 4
R
U
  • Do not meet the requirements to go to V.
V
  • Meet ALL of the following requirements:
    • Pass the LoS check.
    • Amount of ships equipped with Surface Radars ≥ 3


Branching compositions were reported over the course of the event.

Tips

The event guides are to be constructed through the respective Event map page guide and reviewed by editor staff / collaboration committee before being approved here. Do not under any circumstance update the guides through this page or attempt to fix them through this page. Please only update guides through their respective sandbox pages.

Show/Hide Nodes and Enemy Encounters
Nodes and Enemy Encounters
NodePatternXpNode InfoFormAir
A
Maelstrom Node
Pattern 1
B
Pattern 1
Pattern 2
C
Pattern 1
D
Pattern 1
Pattern 2
Pattern 3
Pattern 4
E
Pattern 1
Pattern 2
F
Pattern 1
G
Pattern 1
Pattern 2
Pattern 3
Pattern 4
Pattern 5
H
Pattern 1
I
Pattern 1
Pattern 2
J
Pattern 1
Pattern 2
K
Pattern 1
L
Pattern 1
Pattern 2

Ship drops

NodeShip List
CDestroyers
EDestroyer Escorts
Destroyers
Light Cruisers
Light Aircraft Carriers
Seaplane Tenders
GDestroyer Escorts
Destroyers
Light Cruisers
Light Aircraft Carriers[
Seaplane Tenders
Auxiliary Ships
HDestroyers
LDestroyer Escorts
Destroyers
Light Cruisers
Heavy Cruisers
Battleships
Light Aircraft Carriers
Seaplane Tenders
Auxiliary Ships


E-5

OoyodoE-5Spring2019.png

Beyond the Surging Sea...
波濤の先に――――

Information

  • Event Tag: LimeTagSpring2019.png Hawaii Dispatch Fleet

(Phase 1 - Boss): Abyssal Jellyfish Princess

  • Hard ():
  • Medium ():
  • Easy ():
  • Casual ():

(Phase 1 - Boss): Abyssal Pacific Princess

  • Hard ():
  • Medium ():
  • Easy ():
  • Casual ():
  • Clearing on Hard ():
  • Clearing on Medium ():
  • Clearing on Easy ():
  • Clearing on Casual ():
Spring2019E-5Banner.png
Spring2019E-5Map.png

Branching rules

E-5 Branching Rules
Nodes Rules
Start
A
  • Carrier Task Force, but the requirements to go to C is not met.
B
  • Surface Task Force OR Transport Combined Fleet, but the requirements to go to C is not met.
C
  • Meet ALL of the following requirements:
    • Carrier Task Force
    • Amount of CV(L/B) ≤ 3 OR unlock shortcut to node D.
D
  • Meet ALL of the following requirements:
    • Surface Task Force OR Transport Combined Fleet
    • Unlock shortcut to node D.
C
F
  • Do not meet the requirements to go to either G or H.
G
  • Fleet contains AV
H
  • Meet ALL of the following requirements:
    • Fast Fleet
    • Amount of (F)BB(V)+CV(L/B) ≤ 3
    • Amount of CV(B) ≤ 2
    • No AV
D
E
  • Active branching
H
F
H
  • If amount of (F)BB(V)+CV(L/B) ≤ 3, go to H.
  • Else, random routing between H and I.
I
G
I
  • ???
J2
  • ???
H
J
  • Fixed route
I
J
  • Meet ALL of the following requirements to go to J:
    • Amount of AV+AO ≥ 1 (Medium+)
    • Fast Fleet (Medium+)
    • No slow AV (engines irrelevant)
  • If a slow ship with engines is used in a Fast Fleet, random routing.
  • If on Casual or Easy and you do not meet the above requirements, random routing.
  • Else, go to K.
K
J
K
  • Active branching
L
J2
K
  • Active branching
M
J3
J
  • Active branching
N
K
M
  • Pass the LoS check.
Q
  • Fail the LoS check.
L
N
  • Do not meet the requirements to go to Q.
Q
  • Meet ALL of the following requirements:
    • Pass the LoS check.
    • Fleet contains AV or AO.
    • Amount of (F)BB(V)+CV(L/B) ≤ ?

Note: Requirements might change, depending on the phase you're in.

M
O
  • Nodes R and W not unlocked yet?
R
  • Amount of CV(B) ≥ 4
W
  • Amount of CV(B) ≤ 3
N
P
  • Do not meet the requirement to go to S.
S
  • Node S is unlocked?
S
T
  • Do not meet the requirements to go to V.
V
  • Transport Combined Fleet
T
U
  • Do not meet the requirements to go to X.
X
  • Amount of ships with Surface radars ≥ 1?/2/4/6 on Casual/Easy/Medium/Hard
V
Z
  • Meet ALL of the following requirements:
    • Pass the LoS check.

Amount of ships with Surface radars ≥ 4/5 on Medium/Hard

Z1
  • Do not meet the requirements to go to Z.
W
X
  • Amount of ships with Surface radars ≥ 1?/2/4/6 on Casual/Easy/Medium/Hard
Y
  • Do not meet the requirements to go to X.
X
Z
  • Meet ALL of the following requirements:
    • Pass the LoS check.
    • Amount of ships with Surface radars ≥ 4/5 on Medium/Hard
Z2
  • Do not meet the requirements to go to Z.


Branching compositions were reported over the course of the event.

Tips

The event guides are to be constructed through the respective Event map page guide and reviewed by editor staff / collaboration committee before being approved here. Do not under any circumstance update the guides through this page or attempt to fix them through this page. Please only update guides through their respective sandbox pages.

Show/Hide Nodes and Enemy Encounters
Nodes and Enemy Encounters
NodePatternXpNode InfoFormAir
A
Maelstrom Node
Pattern 1
B
Pattern 1
Pattern 2
C
Pattern 1
D
Pattern 1
Pattern 2
Pattern 3
Pattern 4
E
Pattern 1
Pattern 2
F
Pattern 1
G
Pattern 1
Pattern 2
Pattern 3
Pattern 4
Pattern 5
H
Pattern 1
I
Pattern 1
Pattern 2
J
Pattern 1
Pattern 2
K
Pattern 1
L
Pattern 1
Pattern 2

Show/Hide Nodes and Enemy Encounters
Nodes and Enemy Encounters
NodePatternXpNode InfoFormAir
A
Maelstrom Node
Pattern 1
B
Pattern 1
Pattern 2
C
Pattern 1
D
Pattern 1
Pattern 2
Pattern 3
Pattern 4
E
Pattern 1
Pattern 2
F
Pattern 1
G
Pattern 1
Pattern 2
Pattern 3
Pattern 4
Pattern 5
H
Pattern 1
I
Pattern 1
Pattern 2
J
Pattern 1
Pattern 2
K
Pattern 1
L
Pattern 1
Pattern 2

Show/Hide Nodes and Enemy Encounters
Nodes and Enemy Encounters
NodePatternXpNode InfoFormAir
A
Maelstrom Node
Pattern 1
B
Pattern 1
Pattern 2
C
Pattern 1
D
Pattern 1
Pattern 2
Pattern 3
Pattern 4
E
Pattern 1
Pattern 2
F
Pattern 1
G
Pattern 1
Pattern 2
Pattern 3
Pattern 4
Pattern 5
H
Pattern 1
I
Pattern 1
Pattern 2
J
Pattern 1
Pattern 2
K
Pattern 1
L
Pattern 1
Pattern 2

Show/Hide Nodes and Enemy Encounters
Nodes and Enemy Encounters
NodePatternXpNode InfoFormAir
A
Maelstrom Node
Pattern 1
B
Pattern 1
Pattern 2
C
Pattern 1
D
Pattern 1
Pattern 2
Pattern 3
Pattern 4
E
Pattern 1
Pattern 2
F
Pattern 1
G
Pattern 1
Pattern 2
Pattern 3
Pattern 4
Pattern 5
H
Pattern 1
I
Pattern 1
Pattern 2
J
Pattern 1
Pattern 2
K
Pattern 1
L
Pattern 1
Pattern 2

Ship drops

NodeShip List
CDestroyers
EDestroyer Escorts
Destroyers
Light Cruisers
Light Aircraft Carriers
Seaplane Tenders
GDestroyer Escorts
Destroyers
Light Cruisers
Light Aircraft Carriers[
Seaplane Tenders
Auxiliary Ships
HDestroyers
LDestroyer Escorts
Destroyers
Light Cruisers
Heavy Cruisers
Battleships
Light Aircraft Carriers
Seaplane Tenders
Auxiliary Ships