Mortal Combat! Eastern New Guinea Area Convoy
死闘!東部ニューギニア方面護衛隊
| Rewards
|
| All
|

|
| Equipment/Item
|
丁
Casual
|
丙
Easy
|
乙
Medium
|
甲
Hard
|
|
|
|
|
|
|
|
|
|
|
|
|
|
|
|
|
|
|
|
|
|
|
|
|
|
|
|
|
|
|
|
|
|
|
|
|
|
|
|
|
|
|
|
|
|
|
|
|
|
|
|
|
|
|
|
|
|
|
|
|
|
|
|
|
|
|
Branching Table
| E-3 Start Point
|
| Nodes |
Rules
|
| Start
|
|
Single Fleet / Striking Force Fleet
|
|
|
- If Start Point 3 is Locked
- If Start Point 3 is Unlocked
|
|
|
Surface Task Force / Transport Combined Fleet
|
| E-3 Branching Rules (Start Point 1 & 3)
|
| Nodes |
Rules
|
|
|
|
- Does not meet the requirements to go to C
|
|
|
- Meet ANY of the following requirements:
- Fleet is Slow
- Amount of CV(B) ≥ 1
- Amount of (F)BB(V)+CVL ≥ 2
- Amount of DD+DE ≤ 2
|
|
|
|
- Does not meet the requirements to go to G or H
|
|
|
- Meet ANY of the following requirements:
- Fleet is Slow STF and CL ≥ 2
- Fleet is Fast STF
|
|
|
- Meet ANY of the following requirements:
- Transport Combined Fleet and CL ≥ 2
- Fleet is Fast STF and (F)BB(V) ≤ 1 and CL ≥ 2
|
|
|
|
- Meet ANY of the following requirements:
- Amount of (F)BB(V)+CVL ≥ 1
- Amount of CA(V) ≥ 3
- Amount of CL+DD+DE ≤ 3
|
|
|
- Does not meet the requirements to go to B
|
|
|
|
- Path to H is Unlocked
- For Single Fleet / Striking Force Fleet, meet ALL of the following requirements:
- Amount of (F)BB(V) ≤ 2
- If slow fleet, amount of (F)BB(V) ≤ 1
- Amount of CV(B) = 0
- Amount of CVL ≤ 1
- Amount of DD ≥ 3
- CL = 1 and pass the LoS check (Cn1 = 14(?) on Hard)
- For Combined Fleet, amount of ships ≤ ???
|
|
|
- Does not meet the requirements to go to H or J
|
|
|
- For Single Fleet / Striking Force Fleet, meet ALL of the following requirements:
- Amount of (F)BB(V) ≤ 1
- Amount of CV(B) = 0
- Amount of CVL ≤ 1
- Amount of DD ≥ 3
- (AV + AO ≥ 2) or (CL ≥ 2) or (CL = 1 and fail the LoS check)
- For Combined Fleet, meet ALL of the following requirements:
- Amount of (F)BB(V) ≤ 1
- if amount of AV + AO ≥ 2, amount of (F)BB(V) ≤ 2
- Amount of (F)BB(V) + CVL ≤ 3
- Amount of CV(B) = 0
- Amount of CL ≥ 2
- Amount of DD ≥ 3
|
|
|
|
- Meet ANY of the following requirements:
- Route to R is Locked
- Fleet is Slow
|
|
|
- Does not meet the requirements to go to J
|
|
|
|
- Route to V/W is Locked
- Single Fleet / Striking Force Fleet
- For combined fleets, meet ANY of the following requirements:
- If Fast, Amount of CVL ≥ 2
- Amount of CV(B) ≥ 1
- Amount of (F)BB(V)+CVL ≥ 5 (?)
|
|
|
- Does not meet the requirements to go to S or W
|
|
|
- Meet ALL of the following requirements:
- Akitsushima + Akashi + AO + (?) ≥ 1
- Amount of CL ≥ 2 and DD ≥ 3 or Fleet is Slow
|
|
|
|
- Single Fleet / Striking Force Fleet
|
|
|
|
|
|
|
Pass the LoS check (Cn4 = 66 on Hard)
|
|
|
Fail the LoS check
|
|
|
|
Pass the LoS check (Cn4 = 175(?) on Hard)
|
|
|
Fail the LoS check
|
| E-3 Branching Rules (Start Point 2)
|
| Nodes |
Rules
|
|
|
|
- Does not meet the requirements to go to N
|
|
|
- Meet ALL of the following requirements:
- Fleet is Fast
- Amount of CV(B) ≤ 2
- Amount of CL ≥ 3
|
|
|
|
- Does not meet the requirements to go to N
|
|
|
- Meet ALL of the folowing requirements:
- Fleet is Fast
- Amount of CV(B) ≤3
- Amount of (F)BB(V) ≤ 2 (?)
|
|
|
|
Pass the LoS check (Cn4 = 170(?) on Hard)
|
|
|
Fail the LoS check
|
Branching compositions were reported over the course of the event. (NGA and KCNav)
The event guides are to be constructed through the respective Event map page guide sandbox and reviewed by editors before being approved here.
Do not under any circumstance update the guides through this page or attempt to fix them through this page.
Please only update guides through their respective sandbox pages.
Ship Bonuses
DISCLAIMER: This information is based on user submitted data and is subject to revisions as more data is gathered. Any version of the ship receives the bonus regardless of remodel.
Ship Bonuses
| Ships
|
Part 1
(Q)
|
Part 2/3
(U, Y)
|

|

|

|
1.1x
|
|

|

|

|

|

|

|

|

|

|

|

|

|

|
-
|
-
|
1.23x
|

|
 (?) (?)
|
-
|
|

|

|

|
|
1.1x
|

|

|

|

|

|

|

|

|

|
1.18x
|

|

|

|

|

|
-
|
Node Y Bonuses
(Stacks with above)
|
Multiplier
|
| Ships
|
Boss Debuff (Against
Enemy Flagship Only) Only)
|
| All Ships
|
1.09x ~ 1.14x
|
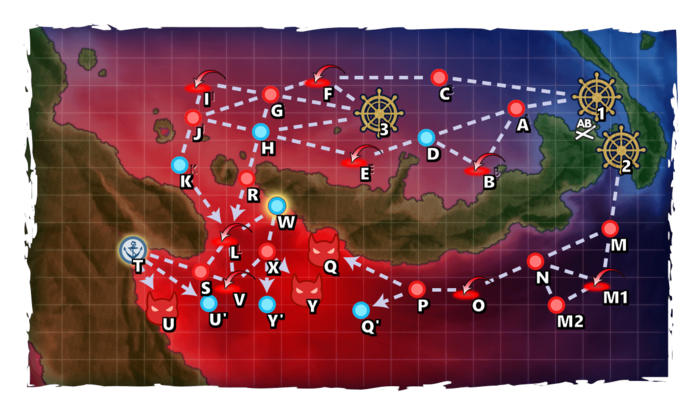
Map Overview
E3 is a three-phase map using Striking Force Fleets (7 ship fleet) and Combined Fleets.
- This map utilizes three locks:
 Carrier Task Force Tag is applied to Carrier Task Forces sortied to this map and will start at point 2.
 Area Escort Force Tag is applied to Striking Force Fleet or Surface Task Forces sortied to this map and will start at point 1 and point 3 respectively.
 R-Area Defense Unit is a recycled lock from E1.
- R-Area Defense Unit ships can be mixed with the Area Escort Force Fleet Tag for E3 Phase 3
- 2 LBAS are available for sortie, the third base is only to be used in defense
- High Altitude Air-Raids will occur on Medium and Hard difficulty.
Phase 0.5: Scout the Enemy Mobile Task Force!
There are a total of 2 requirements needed to locate the fleet guarding Murcadha Bay. The requirements are the same across all difficulties.
- L AS x2 & E AS x1
- It is possible to reach both nodes using a fleet in a single sortie.
- SF: 1CVL, 2CA(V), 1CL, 3DD, (FAST)
- Route: 1 A B D E H J K L
- LBAS: Fightersweep L (Range 6) and E (Range 3)
- Fighter muling CVL a to reach AS for the required nodes is recommended.
- J contains a light submarine squadron.
- The heavier fleet takes a longer route than the light one.
- SF: 1AV, 2CA(V), 1CL, 3DD (FAST)
- Route: 1 A D E H J K L
- LBAS: Fightersweep L (Range 6) and E (Range 3)
- J contains a light submarine squadron.
- A lighter fleet which forgoes the use of CVL. CAV should be Seaplane Fighter muled.
- AACI is highly recommended.
- Securing AS on L a third time in this phase counts towards the progress of unlocking the 2nd Phase of this Map (see Phase 1.5). Therefore it is recommended to make the extra sortie now, so the TP Boss unlocks as soon as Phase 1 is finished.
Phase 1: Intercept the Fleet Guarding Murcadha Bay
- CTF: 0-2FBB, 2CV(B), 0-1CVL, 0-2CA(V), 2CL + 1CL, 0-2CA(V), 0-2CLT, 2-4DD (FAST)
- Route: 2 M N O P Q
- LBAS: Range 5 to Q, 74/167 AP/AS
- There is an LoS check at P.
- Using one strong AACI ship such as the Akizuki-class, Fletcher-class DD is highly recommended.
- Having 1-2 OASW ships to increase the passing rate to the boss is recommended.
Phase 1.5: Push Towards the Vitiaz Strait
There is 1 requirement to unlock the Phase 2 boss which is the same across all difficulties: AS L.
- Refer to Node L in Phase 0.5 of the guide.
Phase 2: Carry out the Lae Transport Operation
This is a TP Phase utilizing the Striking Force Fleet.
- SF: 0-1AV, 1-2CA(V), 1-2CL, 3-4DD (FAST)
- Route: 1 A D E H R L S T U
- LBAS: U (Range 8, 44/88 AD/AP on 甲), L (Range 6)
- There is an LoS Check at T (Cn3):
- Casu = 26.0 / Easy = ?? / Med = 40.0 / Hard = 48.0
- SF: 1CVL, 1-2CA(V), 1-2CL, 3-4DD (FAST)
- Route: 1 A B D E H R L S T U
- LBAS: U (Range 8, 44/88 AD/AP on 甲), L (Range 6)
- There is an LoS Check at T (Cn3):
- Casu = 26.0 / Easy = ?? / Med = 40.0 / Hard = 48.0
- Will go through one extra node (B) but in exchange will bring more air power to the boss allowing for easy AS.
- Make the CVL into a fighter mule to pass by most of the air nodes more easily.
- Using Vanguard Formation for all nodes except for air nodes and Boss Node is recommended.
- Having at least 1 strong AACI for the air nodes on the route is highly recommended.
- 1 OASW capable ship in the first three slots of the fleet is recommended due to the submarine on Node S.
- Aiming for A rank on the boss is recommended.
- Sending LBAS to the boss to assist acquiring the A rank to deplete the TP Gauge is recommended.
- 1 LBAS can be sent to L to help with passing through the node.
- Boss support is recommended if only 1 LBAS gets sent to the boss node.
- It is possible to use the
 Striking Force Fleet Command Facility
 .
.
- Be warned about the drop in LoS which could prevent routing to the boss.
Phase 3: Final Battle! Breach the Solomon Sea!
- Locking Note: It is possible to mix the along with the to do this Phase.
- STF: 2(F)BB(V), 1CVL, 0-1AV, 1-2CL, 1AO Kai/Akashi Kai/Akitsushima Kai + 1CL, 0-2CA(V), 0-2CLT, 3DD
- Route: 3 G J K L W X Y
- LBAS: Y (Range 6, 44/88 AD/AP on Hard, 96/191 AD/AP on Hard LD)
- This is the heaviest fleet possible for the shortest route.
- BB in the fleet should be Nagato, and/or Mutsu to utilize their Special Attacks mechanics.
- STF: 2-3(F)BB(V), 1-2CVL, 1CL, 1AO Kai/Akashi Kai/Akitsushima Kai + 1CL, 0-2CA(V), 0-2CLT, 2-3DD
- Route: 3 G I J K L W X Y
- LBAS: Y (Range 6, 44/88 AD/AP on Hard, 96/191 AD/AP on Hard LD)
- STF: 1-2(F)BB(V) 2CVL 0-1SS(V), 1CL, 1AO Kai/Akashi Kai/Akitsushima Kai + 1CL, 0-2CA(V), 1SS(V), 0-1CLT, 2-4DD
- Route: 3 G I J K L W X Y
- LBAS: Y (Range 6, 44/88 AD/AP on Hard, 96/191 AD/AP on Hard LD)
- Only recommended to a particular group of ships that are almost all historical and can forgo using Touch-based attacks.
- CVLs and FBB are recommended to be historical ships.
- Escorts should be composed of mostly historical ships.
- Using SS(V) in both main and escort can minimize the damage taken from the boss fleet from almost all enemy ships as the majority of ships are destroyers and ASW attacking ships.
- While beatable without debuff, debuffing the boss may yield faster results.
- There is a LoS check at X.
- W is an Emergency Anchorage Repairs node.
- Having at least 1 strong AACI is recommended.
- Boss Support Expedition is recommended for LD.
- DDs in the escort fleet should be set up for high night battle damage.
Phase 4: Debuff Phase
Once Last Dance is reached, the following steps can be performed to debuff the boss.
- The following requirements are needed to complete the debuffing process.
|
|
LBAS
|
E
|
L
|
Q
|
R
|
U
|
| Hard
|
AS x2
|
AS
|
AS
|
A
|
S
|
S
|
| Medium
|
?
|
AS
|
?
|
A
|
S
|
S
|
| Easy
|
AS x2?
|
AS
|
-
|
A
|
S
|
-
|
| Casual
|
?
|
?
|
-
|
?
|
S
|
-
|
- LBAS: Air Defense
- This can be done passively since getting AS on the air raid requires an LBAS set on "defense" with a strong enough air-defense
The process is the same as it was during phase 1:
- CTF: 0-2FBB, 2CV(B), 0-1CVL, 0-2CA(V), 2CL + 1CL, 0-2CA(V), 0-2CLT, 2-4DD (FAST)
- Route: 2 M N O P Q
- LBAS: Range 5 to Q, 74/167 AP/AS
- There is an LoS check at P.
- Using one strong AACI ship such as the Akizuki-class, Fletcher-class DD is highly recommended.
- Having 1-2 OASW ships to increase the passing rate to the boss is recommended.
A similar approach to phase 0.5, however, this will go through Node R in this step.
- 1CVL 2CA(V) 1CL 3DD (FAST)
- Route: 1 A B D E H R L
- LBAS: Fightersweep L (Range 6) and E (Range 3)
- Fighter muling a CVL to reach AS for the required nodes is recommended.
- AACI is highly recommended.
- Make sure ships are equipped with an Anti-PT set up to eliminate all the PT Imp Pack on node R.
| ExpandAnti-PT boat
|
Unlike most standard Abyssals, "PT boats" (PT Imp Pack & Schnellboot Imp Pack & Schnellboot Imp Pack ) are "very small and fast". ) are "very small and fast".
- All ship types suffer a severe
 accuracy and accuracy and  firepower penalty against PT boats. firepower penalty against PT boats.
- Attacking them with larger guns is not very effective, smaller guns being recommended instead.
- Support Expeditions are not affect by any of the following[1].
| ExpandAccuracy formula against PT boats
|
The Accuracy formula against PT boats:[5][6][7][8]
- With
- the standard accuracy described here
- PT boats are "DDs" in the game, so the for vanguard is 1.1 during shelling, and 1.2 during the torpedo phase.
- Historical accuracy bonuses during Events are included in the Standard Accuracy Term, i.e. it is affected by the modifier.
- the PT estimated evasion
 described bellow, described bellow,
- The main Accuracy modifiers are
- being include in :
- the bonus given by ship types, described below,
- the bonuses given by equipment, described below,
- being 0.7 during night battle, 1 during day battle.
|
Amagiri Kai Ni/D
 has the ability to prioritize focusing on attacking PT imps with significantly increased accuracy if any are present. has the ability to prioritize focusing on attacking PT imps with significantly increased accuracy if any are present.
- DD placed in the composition slots above and below her will gain a noticeable accuracy boost and will prioritize attacking PT boats if any are present.
- The PT boat targeting rate is 100% for all affected ships [9].
During Events, some special bonuses may be added, with "historical" ships and equipment gaining some accuracy bonuses[10].
| Ship Type |
|
| DD & DE |
1.0
|
| CL, CLT, & CT |
0.82
|
| All other types |
0.7
|
- Notes
- It is recommended to use anti-PT setups on DDs only, such setups compromising overall combat effectiveness.
- Having a Reinforcement Expansion is important because it can save a ship slot by containing a machine gun or skilled lookouts.
- Combining equipment is recommended to see significant boosts to accuracy.
- The
 Ka-Tsu Tanks Ka-Tsu Tanks
 bonus does not stack with the bonus does not stack with the  Armed Boats Armed Boats
 ones. ones.
- Using other setups improving accuracy is also advisable:
|
|
|
| [edit]
|
Similar to phase 2, this is regarded as the hardest step to clear in the debuff.
- 1CVL 2CA(V) 1CL 3DD (FAST)
- Route: 1 A B D E H R L S T U
- LBAS: U (Range 8, 44/88 AD/AP on 甲), L (Range 6)
- There is an LoS Check at T (Cn3):
- Casu = 26.0 / Easy = ?? / Med = 40.0 / Hard = 48.0
- It's recommended to use historical ships to maximize damage output against the boss
- Land base can either concentrate on the boss or be split to defend against air nodes like Node L.
- CVL should be a fighter mule.
- The main objective at the boss should be to:
- Eliminate the smaller enemy ships and whittle down the boss to a decent degree during day battle.
- Use mainly TCI / GTRL units to maximize your chances of defeating the boss in night battle.
Enemy Compositions
| Type | Ships |
|---|
| DE |   |
|---|
| DD |   
  
 |
|---|
| CL |   |
|---|
| CA |   |
|---|
| CVL |  |
|---|
| BB |  |
|---|
| SSV |  |
|---|
| CT |  |
|---|
| Type | Ships |
|---|
| DE | |
|---|
| DD |
|
|---|
| CL | |
|---|
| CA | |
|---|
| CVL | |
|---|
| BB | |
|---|
| SSV | |
|---|
| CT | |
|---|
E-3 Hard AB
| #
|
Formation
|
Air Raids
|
AD/AP
AS/AS+
|
| AB
|
Diamond
|
   
|
39/78
174/348
|
| Diamond
|
|
51/101
225/450
|
| Diamond
|
|
57/114
255/510
|
| Diamond
|
|
62/123
276/552
|
| Diamond
|
|
69/137
306/612
|
| #
|
Formation
|
Air Raids
|
AD/AP
AS/AS+
|
E-3 Hard A: 深海潜水艦隊 偵察前衛哨戒 I線 (
PoiDB)
| #
|
Formation
|
Normal Battle Node
|
AD/AP
AS/AS+
|
| A
|
Echelon
Line Abreast
Phases: 1, 2, 3
|
 
|
0/0
0/0
|
Echelon
Line Abreast
Phases: 1, 2, 3
|
|
0/0
0/0
|
Echelon
Line Abreast
Phases: 1, 2, 3
|
|
0/0
0/0
|
| #
|
Formation
|
Normal Battle Node
|
AD/AP
AS/AS+
|
E-3 Hard B: 深海空母機動部隊 艦載機群 (
PoiDB)
| #
|
Formation
|
Air Defense Node
|
AD/AP
AS/AS+
|
| B
|
Diamond
Phases: 1, 2, 3
|
     
|
100/199
446/891
|
Diamond
Phases: 2
|
 
|
104/208
467/933
|
Diamond
Phases: 1, 2, 3
|
|
69/137
306/612
|
| #
|
Formation
|
Air Defense Node
|
AD/AP
AS/AS+
|
E-3 Hard C: 深海潜水艦隊 偵察前衛哨戒 II線 (
PoiDB)
| #
|
Formation
|
Normal Battle Node
|
AD/AP
AS/AS+
|
| C
|
Echelon
Line Abreast
Phases: 1, 2, 3
|
|
0/0
0/0
|
Echelon
Line Abreast
Phases: 1, 2, 3
|
|
0/0
0/0
|
Echelon
Line Abreast
Phases: 1, 2, 3
|
|
0/0
0/0
|
| #
|
Formation
|
Normal Battle Node
|
AD/AP
AS/AS+
|
E-3 Hard D
| #
|
Empty Node
|
| D
|
気のせいだった。
上空敵機触接あり。対空警戒を厳に!
Must be my imagination.
Enemy aircraft in contact overhead. Keep a strict anti-aircraft vigilance!
|
| #
|
Empty Node
|
E-3 Hard E: 深海基地航空隊 (
PoiDB)
| #
|
Formation
|
Air Defense Node
|
AD/AP
AS/AS+
|
| E
|
Diamond
Phases: 1, 2, 3
|
|
43/86
192/384
|
Diamond
Phases: 1, 2, 3
|
|
48/95
213/426
|
Diamond
Phases: 1, 2, 3
|
|
55/109
243/486
|
Diamond
Phases: 1, 2, 3
|
|
60/119
267/534
|
Diamond
Phases: 2
|
|
65/129
288/576
|
Diamond
Phases: 2
|
|
71/142
318/636
|
| #
|
Formation
|
Air Defense Node
|
AD/AP
AS/AS+
|
E-3 Hard F: 深海基地航空隊 (
PoiDB)
| #
|
Formation
|
Air Defense Node
|
AD/AP
AS/AS+
|
| F
|
Diamond
Phases: 1, 2, 3
|
|
43/86
192/384
|
Diamond
Phases: 1, 2, 3
|
|
48/95
213/426
|
Diamond
Phases: 1, 2, 3
|
|
55/109
243/486
|
Diamond
Phases: 1, 2, 3
|
|
60/119
267/534
|
Diamond
Phases: 2, 3
|
|
65/129
288/576
|
Diamond
Phases: 2, 3
|
|
71/142
318/636
|
| #
|
Formation
|
Air Defense Node
|
AD/AP
AS/AS+
|
E-3 Hard G: 深海潜水艦隊 偵察前衛哨戒 III線 (
PoiDB)
| #
|
Formation
|
Normal Battle Node
|
AD/AP
AS/AS+
|
| G
|
Echelon
Line Abreast
Phases: 1, 2, 3
|
|
0/0
0/0
|
Echelon
Line Abreast
Phases: 1, 2, 3
|
|
0/0
0/0
|
Echelon
Line Abreast
Phases: 1, 2, 3
|
|
0/0
0/0
|
| #
|
Formation
|
Normal Battle Node
|
AD/AP
AS/AS+
|
E-3 Hard H
| #
|
Empty Node
|
| H
|
気のせいだった。
左舷にダンピール海峡!警戒を厳に!
Must be my imagination.
Dampier Strait to port! Hold your fire!
|
| #
|
Empty Node
|
E-3 Hard I: 深海基地航空隊 (
PoiDB)
| #
|
Formation
|
Air Defense Node
|
AD/AP
AS/AS+
|
| I
|
Diamond
Phases: 1, 2, 3
|
|
43/86
192/384
|
Diamond
Phases: 1, 2, 3
|
|
48/95
213/426
|
Diamond
Phases: 1, 2, 3
|
|
55/109
243/486
|
Diamond
Phases: 1, 2, 3
|
|
60/119
267/534
|
Diamond
Phases: 2, 3
|
|
65/129
288/576
|
Diamond
Phases: 2, 3
|
|
71/142
318/636
|
| #
|
Formation
|
Air Defense Node
|
AD/AP
AS/AS+
|
E-3 Hard J: 深海潜水艦隊 遊撃群狼A集団 (
PoiDB)
| #
|
Formation
|
Normal Battle Node
|
AD/AP
AS/AS+
|
| J
|
Echelon
Line Abreast
Phases: 1, 2, 3
|
 
|
0/0
0/0
|
Echelon
Line Abreast
Phases: 1, 2, 3
|
|
0/0
0/0
|
Echelon
Line Abreast
Phases: 1, 2, 3
|
|
0/0
0/0
|
| #
|
Formation
|
Normal Battle Node
|
AD/AP
AS/AS+
|
E-3 Hard K
| #
|
Empty Node
|
| K
|
気のせいだった。
これよりラエ沖に突入する!上空監視!対空警戒を厳とせよ!
Must be my imagination.
We are now entering the waters off Lae! Eyes overhead! Maintain strict anti-aircraft vigilance!
|
| #
|
Empty Node
|
E-3 Hard L: 深海基地航空隊 (主力部隊A編隊) (
PoiDB)
| #
|
Formation
|
Air Defense Node
|
AD/AP
AS/AS+
|
| L
|
Diamond
Phases: 1, 2, 3
|
|
49/97
216/432
|
Diamond
Phases: 1, 2, 3
|
|
58/115
258/516
|
Diamond
Phases: 1, 2, 3
|
|
65/129
288/576
|
Diamond
Phases: 1, 2, 3
|
|
70/139
312/624
|
Diamond
Phases: 1, 2, 3
|
|
79/158
354/708
|
Diamond
Phases: 3
|
|
85/169
378/756
|
| #
|
Formation
|
Air Defense Node
|
AD/AP
AS/AS+
|
E-3 Hard M: 深海潜水艦隊 偵察前衛哨戒 IV線 (
PoiDB)
| #
|
Formation
|
Normal Battle Node
|
AD/AP
AS/AS+
|
| M
|
Echelon
Line Abreast
Phases: 1, 2, 3
|
|
0/0
0/0
|
Echelon
Line Abreast
Phases: 1, 2, 3
|
|
0/0
0/0
|
Echelon
Line Abreast
Phases: 1, 2, 3
|
|
0/0
0/0
|
| #
|
Formation
|
Normal Battle Node
|
AD/AP
AS/AS+
|
E-3 Hard M1: 深海空母機動部隊 艦載機群 (
PoiDB)
| #
|
Formation
|
Air Defense Node
|
AD/AP
AS/AS+
|
| M1
|
Diamond
Phases: 1, 3
|
|
100/199
446/891
|
Diamond
Phases: 1
|
|
104/208
467/933
|
Diamond
Phases: 1, 3
|
|
69/137
306/612
|
| #
|
Formation
|
Air Defense Node
|
AD/AP
AS/AS+
|
E-3 Hard M2: 深海潜水艦隊 遊撃群狼B集団 (
PoiDB)
| #
|
Formation
|
Normal Battle Node
|
AD/AP
AS/AS+
|
| M2
|
Echelon
Line Abreast
Phases: 1, 3
|
|
0/0
0/0
|
Echelon
Line Abreast
Phases: 1, 3
|
|
0/0
0/0
|
Echelon
Line Abreast
Phases: 1, 3
|
|
0/0
0/0
|
| #
|
Formation
|
Normal Battle Node
|
AD/AP
AS/AS+
|
E-3 Hard N: 深海急派増援群 前衛偵察部隊 (
PoiDB)
| #
|
Formation
|
Normal Battle Node
|
AD/AP
AS/AS+
|
| N
|
Line Ahead
Echelon
Line Abreast
Phases: 1, 2, 3
|
   
|
0/0
0/0
|
| #
|
Formation
|
Normal Battle Node
|
AD/AP
AS/AS+
|
E-3 Hard O: 深海基地航空隊 (主力部隊B編隊) (
PoiDB)
| #
|
Formation
|
Air Defense Node
|
AD/AP
AS/AS+
|
| O
|
Diamond
Phases: 1, 2, 3
|

|
74/147
330/660
|
Diamond
Phases: 1, 2, 3
|
|
81/161
360/720
|
Diamond
Phases: 1, 2, 3
|
|
90/179
402/804
|
Diamond
Phases: 1, 2, 3
|
|
99/198
444/888
|
Diamond
Phases: 1
|
|
105/209
468/936
|
| #
|
Formation
|
Air Defense Node
|
AD/AP
AS/AS+
|
E-3 Hard P: 深海急派増援群 先遣機動部隊 (
PoiDB)
| #
|
Formation
|
Normal Battle Node
|
AD/AP
AS/AS+
|
| P
|
Diamond
Phases: 1, 2, 3
|
 
|
52/103
231/462
|
Diamond
Phases: 1, 2, 3
|
|
63/125
279/558
|
Diamond
Phases: 1, 2, 3
|
|
67/134
300/600
|
| #
|
Formation
|
Normal Battle Node
|
AD/AP
AS/AS+
|
E-3 Hard Q: 深海急派増援群 空母機動部隊 (
PoiDB)
E-3 Hard Q'
| #
|
Empty Node
|
| Q'
|
敵影を見ず。
No enemy spotted.
|
| #
|
Empty Node
|
E-3 Hard R: 海峡配備 深海魚雷艇部隊 (
PoiDB)
| #
|
Formation
|
Normal Battle Node
|
AD/AP
AS/AS+
|
| R
|
Diamond
Phases: 1, 2, 3
|
 
|
0/0
0/0
|
Diamond
Phases: 1, 2, 3
|
|
0/0
0/0
|
Echelon
Phases: 2, 3
|

|
0/0
0/0
|
| #
|
Formation
|
Normal Battle Node
|
AD/AP
AS/AS+
|
E-3 Hard S: 深海任務部隊 ラエ輸送阻止線 (
PoiDB)
| #
|
Formation
|
Normal Battle Node
|
AD/AP
AS/AS+
|
| S
|
Line Ahead
Double Line
Echelon
Phases: 2, 3
|
|
0/0
0/0
|
| #
|
Formation
|
Normal Battle Node
|
AD/AP
AS/AS+
|
E-3 Hard T
| #
|
Landing Node
|
| T
|
ラエに無事到着しました。
We've arrived safely at Lae.
|
| #
|
Landing Node
|
E-3 Hard U: 深海任務部隊 輸送阻止強襲群 (
PoiDB)
E-3 Hard U'
| #
|
Empty Node
|
| U'
|
敵影を見ず。
左舷にダンピール海峡!警戒を厳に!
No enemy spotted.
Dampier Strait to port! Hold your fire!
|
| #
|
Empty Node
|
E-3 Hard V: 深海基地航空隊 (主力部隊C編隊) (
PoiDB)
| #
|
Formation
|
Air Defense Node
|
AD/AP
AS/AS+
|
| V
|
Diamond
Phases: 3
|
|
81/161
360/720
|
Diamond
Phases: 3
|
|
90/179
402/804
|
Diamond
Phases: 3
|
|
99/198
444/888
|
Diamond
Phases: 3
|
|
105/209
468/936
|
| #
|
Formation
|
Air Defense Node
|
AD/AP
AS/AS+
|
E-3 Hard W
| #
|
Repair Node
|
| #
|
Repair Node
|
E-3 Hard X: 深海急派増援群 残存再編部隊 (
PoiDB)
| #
|
Formation
|
Normal Battle Node
|
AD/AP
AS/AS+
|
| X
|
Line Ahead
Double Line
Vanguard
Phases: 3
|
 
|
45/89
198/396
|
| #
|
Formation
|
Normal Battle Node
|
AD/AP
AS/AS+
|
E-3 Hard Y: 深海任務部隊 沈没輸送船団 (
PoiDB)
E-3 Hard Y'
| #
|
Empty Node
|
| Y'
|
敵影を見ず。
左舷にダンピール海峡!警戒を厳に!
No enemy spotted.
Dampier Strait to port! Hold your fire!
|
| #
|
Empty Node
|
| Type | Ships |
|---|
| DE | |
|---|
| DD |
|
|---|
| CL | |
|---|
| CVL | |
|---|
| BB | |
|---|
| SSV | |
|---|
| CT | |
|---|
| Type | Ships |
|---|
| DE | |
|---|
| DD |
|
|---|
| CL | |
|---|
| CA | |
|---|
| CVL | |
|---|
| BB | |
|---|
| SSV | |
|---|
| CT | |
|---|
E-3 Medium AB
| #
|
Formation
|
Air Raids
|
AD/AP
AS/AS+
|
| AB
|
Diamond
|
|
28/55
123/246
|
| Diamond
|
|
33/65
144/288
|
| Diamond
|
|
39/78
174/348
|
| Diamond
|
|
44/87
195/390
|
| #
|
Formation
|
Air Raids
|
AD/AP
AS/AS+
|
E-3 Medium A: 深海潜水艦隊 偵察前衛哨戒 I線 (
PoiDB)
| #
|
Formation
|
Normal Battle Node
|
AD/AP
AS/AS+
|
| A
|
Echelon
Line Abreast
Phases: 1, 2, 3
|

|
0/0
0/0
|
Echelon
Line Abreast
Phases: 1, 2, 3
|
|
0/0
0/0
|
Echelon
Line Abreast
Phases: 1, 2, 3
|
|
0/0
0/0
|
| #
|
Formation
|
Normal Battle Node
|
AD/AP
AS/AS+
|
E-3 Medium B: 深海空母機動部隊 艦載機群 (
PoiDB)
| #
|
Formation
|
Air Defense Node
|
AD/AP
AS/AS+
|
| B
|
Diamond
Phases: 2
|
  
|
89/177
398/795
|
Diamond
Phases: 1, 2, 3
|
 
|
86/172
386/771
|
Diamond
Phases: 1, 2, 3
|
|
63/126
282/564
|
| #
|
Formation
|
Air Defense Node
|
AD/AP
AS/AS+
|
E-3 Medium C: 深海潜水艦隊 偵察前衛哨戒 II線 (
PoiDB)
| #
|
Formation
|
Normal Battle Node
|
AD/AP
AS/AS+
|
| C
|
Echelon
Line Abreast
Phases: 1, 2, 3
|
|
0/0
0/0
|
Echelon
Line Abreast
Phases: 1, 2, 3
|
|
0/0
0/0
|
Echelon
Line Abreast
Phases: 1, 2, 3
|
|
0/0
0/0
|
| #
|
Formation
|
Normal Battle Node
|
AD/AP
AS/AS+
|
E-3 Medium D
| #
|
Empty Node
|
| D
|
気のせいだった。
上空敵機触接あり。対空警戒を厳に!
Must be my imagination.
Enemy aircraft in contact overhead. Keep a strict anti-aircraft vigilance!
|
| #
|
Empty Node
|
E-3 Medium E: 深海基地航空隊 (
PoiDB)
| #
|
Formation
|
Air Defense Node
|
AD/AP
AS/AS+
|
| E
|
Diamond
Phases: 2
|
|
43/86
192/384
|
Diamond
Phases: 1, 2, 3
|
|
23/45
99/198
|
Diamond
Phases: 1, 2, 3
|
|
27/54
120/240
|
Diamond
Phases: 1, 2, 3
|
|
39/77
171/342
|
Diamond
Phases: 1, 2, 3
|
|
48/95
213/426
|
| #
|
Formation
|
Air Defense Node
|
AD/AP
AS/AS+
|
E-3 Medium F: 深海基地航空隊 (
PoiDB)
| #
|
Formation
|
Air Defense Node
|
AD/AP
AS/AS+
|
| F
|
Diamond
Phases: 2, 3
|
|
43/86
192/384
|
Diamond
Phases: 1, 2, 3
|
|
23/45
99/198
|
Diamond
Phases: 1, 2, 3
|
|
27/54
120/240
|
Diamond
Phases: 1, 2, 3
|
|
39/77
171/342
|
Diamond
Phases: 1, 2, 3
|
|
48/95
213/426
|
| #
|
Formation
|
Air Defense Node
|
AD/AP
AS/AS+
|
E-3 Medium G: 深海潜水艦隊 偵察前衛哨戒 III線 (
PoiDB)
| #
|
Formation
|
Normal Battle Node
|
AD/AP
AS/AS+
|
| G
|
Echelon
Line Abreast
Phases: 1, 2, 3
|
|
0/0
0/0
|
Echelon
Line Abreast
Phases: 1, 2, 3
|
|
0/0
0/0
|
Echelon
Line Abreast
Phases: 1, 2, 3
|
|
0/0
0/0
|
| #
|
Formation
|
Normal Battle Node
|
AD/AP
AS/AS+
|
E-3 Medium H
| #
|
Empty Node
|
| H
|
気のせいだった。
左舷にダンピール海峡!警戒を厳に!
Must be my imagination.
Dampier Strait to port! Hold your fire!
|
| #
|
Empty Node
|
E-3 Medium I: 深海基地航空隊 (
PoiDB)
| #
|
Formation
|
Air Defense Node
|
AD/AP
AS/AS+
|
| I
|
Diamond
Phases: 2, 3
|
|
43/86
192/384
|
Diamond
Phases: 1, 2, 3
|
|
23/45
99/198
|
Diamond
Phases: 1, 2, 3
|
|
27/54
120/240
|
Diamond
Phases: 1, 2, 3
|
|
39/77
171/342
|
Diamond
Phases: 1, 2, 3
|
|
48/95
213/426
|
| #
|
Formation
|
Air Defense Node
|
AD/AP
AS/AS+
|
E-3 Medium J: 深海潜水艦隊 遊撃群狼A集団 (
PoiDB)
| #
|
Formation
|
Normal Battle Node
|
AD/AP
AS/AS+
|
| J
|
Echelon
Line Abreast
Phases: 1, 2, 3
|

|
0/0
0/0
|
Echelon
Line Abreast
Phases: 1, 2, 3
|
|
0/0
0/0
|
Echelon
Line Abreast
Phases: 1, 2, 3
|
|
0/0
0/0
|
| #
|
Formation
|
Normal Battle Node
|
AD/AP
AS/AS+
|
E-3 Medium K
| #
|
Empty Node
|
| K
|
気のせいだった。
これよりラエ沖に突入する!上空監視!対空警戒を厳とせよ!
Must be my imagination.
We are now entering the waters off Lae! Eyes overhead! Maintain strict anti-aircraft vigilance!
|
| #
|
Empty Node
|
E-3 Medium L: 深海基地航空隊 (主力部隊A編隊) (
PoiDB)
| #
|
Formation
|
Air Defense Node
|
AD/AP
AS/AS+
|
| L
|
Diamond
Phases: 1, 2, 3
|
|
33/66
147/294
|
Diamond
Phases: 1, 2, 3
|
|
43/85
189/378
|
Diamond
Phases: 1, 2, 3
|
|
47/94
210/420
|
Diamond
Phases: 1, 2, 3
|
|
49/97
216/432
|
Diamond
Phases: 3
|
|
58/115
258/516
|
| #
|
Formation
|
Air Defense Node
|
AD/AP
AS/AS+
|
E-3 Medium M: 深海潜水艦隊 偵察前衛哨戒 IV線 (
PoiDB)
| #
|
Formation
|
Normal Battle Node
|
AD/AP
AS/AS+
|
| M
|
Echelon
Line Abreast
Phases: 1, 2, 3
|
|
0/0
0/0
|
Echelon
Line Abreast
Phases: 1, 2, 3
|
|
0/0
0/0
|
Echelon
Line Abreast
Phases: 1, 2, 3
|
|
0/0
0/0
|
| #
|
Formation
|
Normal Battle Node
|
AD/AP
AS/AS+
|
E-3 Medium M1: 深海空母機動部隊 艦載機群 (
PoiDB)
| #
|
Formation
|
Air Defense Node
|
AD/AP
AS/AS+
|
| M1
|
Diamond
Phases: 1
|
|
89/177
398/795
|
Diamond
Phases: 1, 3
|
|
86/172
386/771
|
Diamond
Phases: 1, 3
|
|
63/126
282/564
|
| #
|
Formation
|
Air Defense Node
|
AD/AP
AS/AS+
|
E-3 Medium M2: 深海潜水艦隊 遊撃群狼B集団 (
PoiDB)
| #
|
Formation
|
Normal Battle Node
|
AD/AP
AS/AS+
|
| M2
|
Echelon
Line Abreast
Phases: 1
|
|
0/0
0/0
|
Echelon
Line Abreast
Phases: 1, 3
|
|
0/0
0/0
|
Echelon
Line Abreast
Phases: 1, 3
|
|
0/0
0/0
|
| #
|
Formation
|
Normal Battle Node
|
AD/AP
AS/AS+
|
E-3 Medium N: 深海急派増援群 前衛偵察部隊 (
PoiDB)
| #
|
Formation
|
Normal Battle Node
|
AD/AP
AS/AS+
|
| N
|
Line Ahead
Echelon
Line Abreast
Phases: 1, 2, 3
|

|
0/0
0/0
|
| #
|
Formation
|
Normal Battle Node
|
AD/AP
AS/AS+
|
E-3 Medium O: 深海基地航空隊 (主力部隊B編隊) (
PoiDB)
| #
|
Formation
|
Air Defense Node
|
AD/AP
AS/AS+
|
| O
|
Diamond
Phases: 1, 2, 3
|
|
55/110
246/492
|
Diamond
Phases: 1, 2, 3
|
|
60/119
267/534
|
Diamond
Phases: 1, 2, 3
|
|
74/147
330/660
|
Diamond
Phases: 1, 2, 3
|
|
61/122
273/546
|
Diamond
Phases: 1
|
|
81/161
360/720
|
| #
|
Formation
|
Air Defense Node
|
AD/AP
AS/AS+
|
E-3 Medium P: 深海急派増援群 先遣機動部隊 (
PoiDB)
| #
|
Formation
|
Normal Battle Node
|
AD/AP
AS/AS+
|
| P
|
Diamond
Phases: 1, 2, 3
|

|
47/93
207/414
|
Diamond
Phases: 1, 2, 3
|
|
49/98
219/438
|
Diamond
Phases: 1, 2, 3
|
|
52/103
231/462
|
| #
|
Formation
|
Normal Battle Node
|
AD/AP
AS/AS+
|
E-3 Medium Q: 深海急派増援群 空母機動部隊 (
PoiDB)
E-3 Medium Q'
| #
|
Empty Node
|
| Q'
|
敵影を見ず。
No enemy spotted.
|
| #
|
Empty Node
|
E-3 Medium R: 海峡配備 深海魚雷艇部隊 (
PoiDB)
| #
|
Formation
|
Normal Battle Node
|
AD/AP
AS/AS+
|
| R
|
Diamond
Phases: 1, 2, 3
|
|
0/0
0/0
|
Diamond
Phases: 1, 2, 3
|
|
0/0
0/0
|
Echelon
Phases: 3
|
|
0/0
0/0
|
| #
|
Formation
|
Normal Battle Node
|
AD/AP
AS/AS+
|
E-3 Medium S: 深海任務部隊 ラエ輸送阻止線 (
PoiDB)
| #
|
Formation
|
Normal Battle Node
|
AD/AP
AS/AS+
|
| S
|
Line Ahead
Double Line
Echelon
Phases: 2, 3
|
|
0/0
0/0
|
| #
|
Formation
|
Normal Battle Node
|
AD/AP
AS/AS+
|
E-3 Medium T
| #
|
Landing Node
|
| T
|
ラエに無事到着しました。
We've arrived safely at Lae.
|
| #
|
Landing Node
|
E-3 Medium U: 深海任務部隊 輸送阻止強襲群 (
PoiDB)
E-3 Medium U'
| #
|
Empty Node
|
| U'
|
敵影を見ず。
左舷にダンピール海峡!警戒を厳に!
No enemy spotted.
Dampier Strait to port! Hold your fire!
|
| #
|
Empty Node
|
E-3 Medium V: 深海基地航空隊 (主力部隊C編隊) (
PoiDB)
| #
|
Formation
|
Air Defense Node
|
AD/AP
AS/AS+
|
| V
|
Diamond
Phases: 3
|
|
55/110
246/492
|
Diamond
Phases: 3
|
|
60/119
267/534
|
Diamond
Phases: 3
|
|
74/147
330/660
|
Diamond
Phases: 3
|
|
61/122
273/546
|
Diamond
Phases: 3
|
|
81/161
360/720
|
| #
|
Formation
|
Air Defense Node
|
AD/AP
AS/AS+
|
E-3 Medium W
| #
|
Repair Node
|
| #
|
Repair Node
|
E-3 Medium X: 深海急派増援群 残存再編部隊 (
PoiDB)
| #
|
Formation
|
Normal Battle Node
|
AD/AP
AS/AS+
|
| X
|
Line Ahead
Double Line
Vanguard
Phases: 3
|

|
36/71
159/318
|
| #
|
Formation
|
Normal Battle Node
|
AD/AP
AS/AS+
|
E-3 Medium Y: 深海任務部隊 沈没輸送船団 (
PoiDB)
E-3 Medium Y'
| #
|
Empty Node
|
| Y'
|
敵影を見ず。
左舷にダンピール海峡!警戒を厳に!
No enemy spotted.
Dampier Strait to port! Hold your fire!
|
| #
|
Empty Node
|
| Type | Ships |
|---|
| DE | |
|---|
| DD |
|
|---|
| CL | |
|---|
| CVL | |
|---|
| BB | |
|---|
| SSV | |
|---|
| CT | |
|---|
| Type | Ships |
|---|
| DD |  |
|---|
| Type | Ships |
|---|
| DE | |
|---|
| DD |
|
|---|
| CL | |
|---|
| CA | |
|---|
| CVL | |
|---|
| BB | |
|---|
| SSV | |
|---|
| CT | |
|---|
E-3 Easy AB
| #
|
Formation
|
Air Raids
|
AD/AP
AS/AS+
|
| AB
|
Diamond
|
|
17/33
72/144
|
| Diamond
|
|
23/46
102/204
|
| Diamond
|
|
28/55
123/246
|
| #
|
Formation
|
Air Raids
|
AD/AP
AS/AS+
|
E-3 Easy A: 深海潜水艦隊 偵察前衛哨戒 I線 (
PoiDB)
| #
|
Formation
|
Normal Battle Node
|
AD/AP
AS/AS+
|
| A
|
Echelon
Line Abreast
Phases: 1, 2, 3
|
|
0/0
0/0
|
Echelon
Line Abreast
Phases: 1, 2, 3
|
|
0/0
0/0
|
Echelon
Line Abreast
Phases: 1, 2, 3
|
|
0/0
0/0
|
| #
|
Formation
|
Normal Battle Node
|
AD/AP
AS/AS+
|
E-3 Easy B: 深海空母機動部隊 艦載機群 (
PoiDB)
| #
|
Formation
|
Air Defense Node
|
AD/AP
AS/AS+
|
| B
|
Diamond
Phases: 1, 2, 3
|
|
61/121
270/540
|
Diamond
Phases: 2
|
|
86/172
386/771
|
Diamond
Phases: 1, 2, 3
|
|
84/167
374/747
|
| #
|
Formation
|
Air Defense Node
|
AD/AP
AS/AS+
|
E-3 Easy C: 深海潜水艦隊 偵察前衛哨戒 II線 (
PoiDB)
| #
|
Formation
|
Normal Battle Node
|
AD/AP
AS/AS+
|
| C
|
Echelon
Line Abreast
Phases: 1, 2, 3
|
|
0/0
0/0
|
Echelon
Line Abreast
Phases: 1, 2, 3
|
|
0/0
0/0
|
Echelon
Line Abreast
Phases: 1, 2, 3
|
|
0/0
0/0
|
| #
|
Formation
|
Normal Battle Node
|
AD/AP
AS/AS+
|
E-3 Easy D
| #
|
Empty Node
|
| D
|
気のせいだった。
上空敵機触接あり。対空警戒を厳に!
Must be my imagination.
Enemy aircraft in contact overhead. Keep a strict anti-aircraft vigilance!
|
| #
|
Empty Node
|
E-3 Easy E: 深海基地航空隊 (
PoiDB)
| #
|
Formation
|
Air Defense Node
|
AD/AP
AS/AS+
|
| E
|
Diamond
Phases: 1, 2, 3
|
|
12/23
51/102
|
Diamond
Phases: 1, 2, 3
|
|
11/22
48/96
|
Diamond
Phases: 1, 2, 3
|
|
23/46
102/204
|
Diamond
Phases: 1, 2, 3
|
|
23/45
99/198
|
Diamond
Phases: 1, 2, 3
|
|
27/54
120/240
|
| #
|
Formation
|
Air Defense Node
|
AD/AP
AS/AS+
|
E-3 Easy F: 深海基地航空隊 (
PoiDB)
| #
|
Formation
|
Air Defense Node
|
AD/AP
AS/AS+
|
| F
|
Diamond
Phases: 1, 2, 3
|
|
12/23
51/102
|
Diamond
Phases: 1, 2, 3
|
|
11/22
48/96
|
Diamond
Phases: 1, 2, 3
|
|
23/46
102/204
|
Diamond
Phases: 1, 2, 3
|
|
23/45
99/198
|
Diamond
Phases: 1, 2, 3
|
|
27/54
120/240
|
| #
|
Formation
|
Air Defense Node
|
AD/AP
AS/AS+
|
E-3 Easy G: 深海潜水艦隊 偵察前衛哨戒 III線 (
PoiDB)
| #
|
Formation
|
Normal Battle Node
|
AD/AP
AS/AS+
|
| G
|
Echelon
Line Abreast
Phases: 1, 2, 3
|
|
0/0
0/0
|
Echelon
Line Abreast
Phases: 1, 2, 3
|
|
0/0
0/0
|
Echelon
Line Abreast
Phases: 1, 2, 3
|
|
0/0
0/0
|
| #
|
Formation
|
Normal Battle Node
|
AD/AP
AS/AS+
|
E-3 Easy H
| #
|
Empty Node
|
| H
|
気のせいだった。
左舷にダンピール海峡!警戒を厳に!
Must be my imagination.
Dampier Strait to port! Hold your fire!
|
| #
|
Empty Node
|
E-3 Easy I: 深海基地航空隊 (
PoiDB)
| #
|
Formation
|
Air Defense Node
|
AD/AP
AS/AS+
|
| I
|
Diamond
Phases: 1, 2, 3
|
|
12/23
51/102
|
Diamond
Phases: 1, 2, 3
|
|
11/22
48/96
|
Diamond
Phases: 1, 2, 3
|
|
23/46
102/204
|
Diamond
Phases: 1, 2, 3
|
|
23/45
99/198
|
Diamond
Phases: 1, 2, 3
|
|
27/54
120/240
|
| #
|
Formation
|
Air Defense Node
|
AD/AP
AS/AS+
|
E-3 Easy J: 深海潜水艦隊 遊撃群狼A集団 (
PoiDB)
| #
|
Formation
|
Normal Battle Node
|
AD/AP
AS/AS+
|
| J
|
Echelon
Line Abreast
Phases: 1, 2, 3
|
|
0/0
0/0
|
Echelon
Line Abreast
Phases: 1, 2, 3
|
|
0/0
0/0
|
Echelon
Line Abreast
Phases: 1, 2, 3
|
|
0/0
0/0
|
| #
|
Formation
|
Normal Battle Node
|
AD/AP
AS/AS+
|
E-3 Easy K
| #
|
Empty Node
|
| K
|
気のせいだった。
これよりラエ沖に突入する!上空監視!対空警戒を厳とせよ!
Must be my imagination.
We are now entering the waters off Lae! Eyes overhead! Maintain strict anti-aircraft vigilance!
|
| #
|
Empty Node
|
E-3 Easy L: 深海基地航空隊 (主力部隊A編隊) (
PoiDB)
| #
|
Formation
|
Air Defense Node
|
AD/AP
AS/AS+
|
| L
|
Diamond
Phases: 1, 2, 3
|
|
22/43
96/192
|
Diamond
Phases: 1, 2, 3
|
|
33/66
147/294
|
Diamond
Phases: 1, 2, 3
|
|
43/85
189/378
|
| #
|
Formation
|
Air Defense Node
|
AD/AP
AS/AS+
|
E-3 Easy M: 深海潜水艦隊 偵察前衛哨戒 IV線 (
PoiDB)
| #
|
Formation
|
Normal Battle Node
|
AD/AP
AS/AS+
|
| M
|
Echelon
Line Abreast
Phases: 1, 2, 3
|
|
0/0
0/0
|
Echelon
Line Abreast
Phases: 1, 2, 3
|
|
0/0
0/0
|
Echelon
Line Abreast
Phases: 1, 2, 3
|
|
0/0
0/0
|
| #
|
Formation
|
Normal Battle Node
|
AD/AP
AS/AS+
|
E-3 Easy M1: 深海空母機動部隊 艦載機群 (
PoiDB)
| #
|
Formation
|
Air Defense Node
|
AD/AP
AS/AS+
|
| M1
|
Diamond
Phases: 1, 2, 3
|
|
61/121
270/540
|
Diamond
Phases: 1
|
|
86/172
386/771
|
Diamond
Phases: 1, 2, 3
|
|
84/167
374/747
|
| #
|
Formation
|
Air Defense Node
|
AD/AP
AS/AS+
|
E-3 Easy M2: 深海潜水艦隊 遊撃群狼B集団 (
PoiDB)
| #
|
Formation
|
Normal Battle Node
|
AD/AP
AS/AS+
|
| M2
|
Echelon
Phases: 1, 3
|
|
0/0
0/0
|
Echelon
Line Abreast
Phases: 1, 3
|
|
0/0
0/0
|
Echelon
Line Abreast
Phases: 1, 3
|
|
0/0
0/0
|
| #
|
Formation
|
Normal Battle Node
|
AD/AP
AS/AS+
|
E-3 Easy N: 深海急派増援群 前衛偵察部隊 (
PoiDB)
| #
|
Formation
|
Normal Battle Node
|
AD/AP
AS/AS+
|
| N
|
Line Ahead
Echelon
Line Abreast
Phases: 1, 2, 3
|

|
0/0
0/0
|
| #
|
Formation
|
Normal Battle Node
|
AD/AP
AS/AS+
|
E-3 Easy O: 深海基地航空隊 (主力部隊B編隊) (
PoiDB)
| #
|
Formation
|
Air Defense Node
|
AD/AP
AS/AS+
|
| O
|
Diamond
Phases: 1, 2, 3
|
|
35/69
153/306
|
Diamond
Phases: 1, 2, 3
|
|
44/87
195/390
|
Diamond
Phases: 1, 2, 3
|
|
46/91
204/408
|
Diamond
Phases: 1, 2, 3
|
|
55/110
246/492
|
Diamond
Phases: 1
|
|
60/119
267/534
|
| #
|
Formation
|
Air Defense Node
|
AD/AP
AS/AS+
|
E-3 Easy P: 深海急派増援群 先遣機動部隊 (
PoiDB)
| #
|
Formation
|
Normal Battle Node
|
AD/AP
AS/AS+
|
| P
|
Diamond
Phases: 1, 2, 3
|
|
32/63
140/279
|
Diamond
Phases: 1, 2, 3
|
|
47/93
207/414
|
Diamond
Phases: 1, 2, 3
|
|
49/98
219/438
|
| #
|
Formation
|
Normal Battle Node
|
AD/AP
AS/AS+
|
E-3 Easy Q: 深海急派増援群 空母機動部隊 (
PoiDB)
E-3 Easy Q'
| #
|
Empty Node
|
| Q'
|
敵影を見ず。
No enemy spotted.
|
| #
|
Empty Node
|
E-3 Easy R: 海峡配備 深海魚雷艇部隊 (
PoiDB)
| #
|
Formation
|
Normal Battle Node
|
AD/AP
AS/AS+
|
| R
|
Diamond
Phases: 1, 2, 3
|
|
0/0
0/0
|
Diamond
Phases: 1, 2, 3
|
|
0/0
0/0
|
Diamond
Phases: 1, 2, 3
|
|
0/0
0/0
|
| #
|
Formation
|
Normal Battle Node
|
AD/AP
AS/AS+
|
E-3 Easy S: 深海任務部隊 ラエ輸送阻止線 (
PoiDB)
| #
|
Formation
|
Normal Battle Node
|
AD/AP
AS/AS+
|
| S
|
Line Ahead
Double Line
Echelon
Phases: 2, 3
|
|
0/0
0/0
|
| #
|
Formation
|
Normal Battle Node
|
AD/AP
AS/AS+
|
E-3 Easy T
| #
|
Landing Node
|
| T
|
ラエに無事到着しました。
We've arrived safely at Lae.
|
| #
|
Landing Node
|
E-3 Easy U: 深海任務部隊 輸送阻止強襲群 (
PoiDB)
E-3 Easy U'
| #
|
Empty Node
|
| U'
|
敵影を見ず。
左舷にダンピール海峡!警戒を厳に!
No enemy spotted.
Dampier Strait to port! Hold your fire!
|
| #
|
Empty Node
|
E-3 Easy V: 深海基地航空隊 (主力部隊C編隊) (
PoiDB)
| #
|
Formation
|
Air Defense Node
|
AD/AP
AS/AS+
|
| V
|
Diamond
Phases: 3
|
|
35/69
153/306
|
Diamond
Phases: 3
|
|
44/87
195/390
|
Diamond
Phases: 3
|
|
46/91
204/408
|
Diamond
Phases: 3
|
|
55/110
246/492
|
Diamond
Phases: 3
|
|
60/119
267/534
|
| #
|
Formation
|
Air Defense Node
|
AD/AP
AS/AS+
|
E-3 Easy W
| #
|
Repair Node
|
| #
|
Repair Node
|
E-3 Easy X: 深海急派増援群 残存再編部隊 (
PoiDB)
| #
|
Formation
|
Normal Battle Node
|
AD/AP
AS/AS+
|
| X
|
Line Ahead
Double Line
Vanguard
Phases: 3
|
|
43/85
189/378
|
| #
|
Formation
|
Normal Battle Node
|
AD/AP
AS/AS+
|
E-3 Easy Y: 深海任務部隊 沈没輸送船団 (
PoiDB)
E-3 Easy Y'
| #
|
Empty Node
|
| Y'
|
敵影を見ず。
左舷にダンピール海峡!警戒を厳に!
No enemy spotted.
Dampier Strait to port! Hold your fire!
|
| #
|
Empty Node
|
| Type | Ships |
|---|
| DE | |
|---|
| DD |
|
|---|
| CL | |
|---|
| CVL | |
|---|
| BB | |
|---|
| SSV | |
|---|
| CT | |
|---|
| Type | Ships |
|---|
| DD | |
|---|
| Type | Ships |
|---|
| DE | |
|---|
| DD |
|
|---|
| CL | |
|---|
| CA | |
|---|
| CVL | |
|---|
| BB | |
|---|
| SSV | |
|---|
| CT | |
|---|
E-3 Casual AB
| #
|
Formation
|
Air Raids
|
AD/AP
AS/AS+
|
| AB
|
Diamond
|
|
12/23
51/102
|
| Diamond
|
|
17/33
72/144
|
| Diamond
|
|
23/46
102/204
|
| #
|
Formation
|
Air Raids
|
AD/AP
AS/AS+
|
E-3 Casual A: 深海潜水艦隊 偵察前衛哨戒 I線 (
PoiDB)
| #
|
Formation
|
Normal Battle Node
|
AD/AP
AS/AS+
|
| A
|
Echelon
Line Abreast
Phases: 1, 2, 3
|
|
0/0
0/0
|
Echelon
Line Abreast
Phases: 1, 2, 3
|
|
0/0
0/0
|
| #
|
Formation
|
Normal Battle Node
|
AD/AP
AS/AS+
|
E-3 Casual B: 深海空母機動部隊 艦載機群 (
PoiDB)
| #
|
Formation
|
Air Defense Node
|
AD/AP
AS/AS+
|
| B
|
Diamond
Phases: 1, 2, 3
|
  
|
38/75
167/333
|
Diamond
Phases: 1, 2, 3
|
|
61/121
270/540
|
Diamond
Phases: 2
|
|
84/167
374/747
|
| #
|
Formation
|
Air Defense Node
|
AD/AP
AS/AS+
|
E-3 Casual C: 深海潜水艦隊 偵察前衛哨戒 II線 (
PoiDB)
| #
|
Formation
|
Normal Battle Node
|
AD/AP
AS/AS+
|
| C
|
Echelon
Line Abreast
Phases: 1, 2, 3
|
|
0/0
0/0
|
Echelon
Line Abreast
Phases: 1, 2, 3
|
|
0/0
0/0
|
| #
|
Formation
|
Normal Battle Node
|
AD/AP
AS/AS+
|
E-3 Casual D
| #
|
Empty Node
|
| D
|
気のせいだった。
上空敵機触接あり。対空警戒を厳に!
Must be my imagination.
Enemy aircraft in contact overhead. Keep a strict anti-aircraft vigilance!
|
| #
|
Empty Node
|
E-3 Casual E: 深海基地航空隊 (
PoiDB)
| #
|
Formation
|
Air Defense Node
|
AD/AP
AS/AS+
|
| E
|
Diamond
Phases: 1, 2, 3
|
|
12/23
51/102
|
Diamond
Phases: 1, 2, 3
|
|
11/22
48/96
|
Diamond
Phases: 1, 2, 3
|
|
23/46
102/204
|
| #
|
Formation
|
Air Defense Node
|
AD/AP
AS/AS+
|
E-3 Casual F: 深海基地航空隊 (
PoiDB)
| #
|
Formation
|
Air Defense Node
|
AD/AP
AS/AS+
|
| F
|
Diamond
Phases: 1, 2, 3
|
|
12/23
51/102
|
Diamond
Phases: 1, 2, 3
|
|
11/22
48/96
|
Diamond
Phases: 1, 2, 3
|
|
23/46
102/204
|
| #
|
Formation
|
Air Defense Node
|
AD/AP
AS/AS+
|
E-3 Casual G: 深海潜水艦隊 偵察前衛哨戒 III線 (
PoiDB)
| #
|
Formation
|
Normal Battle Node
|
AD/AP
AS/AS+
|
| G
|
Echelon
Line Abreast
Phases: 1, 2, 3
|
|
0/0
0/0
|
Echelon
Line Abreast
Phases: 1, 2, 3
|
|
0/0
0/0
|
| #
|
Formation
|
Normal Battle Node
|
AD/AP
AS/AS+
|
E-3 Casual H
| #
|
Empty Node
|
| H
|
気のせいだった。
左舷にダンピール海峡!警戒を厳に!
Must be my imagination.
Dampier Strait to port! Hold your fire!
|
| #
|
Empty Node
|
E-3 Casual I: 深海基地航空隊 (
PoiDB)
| #
|
Formation
|
Air Defense Node
|
AD/AP
AS/AS+
|
| I
|
Diamond
Phases: 1, 2, 3
|
|
12/23
51/102
|
Diamond
Phases: 1, 2, 3
|
|
11/22
48/96
|
Diamond
Phases: 1, 2, 3
|
|
23/46
102/204
|
| #
|
Formation
|
Air Defense Node
|
AD/AP
AS/AS+
|
E-3 Casual J: 深海潜水艦隊 遊撃群狼A集団 (
PoiDB)
| #
|
Formation
|
Normal Battle Node
|
AD/AP
AS/AS+
|
| J
|
Echelon
Line Abreast
Phases: 1, 2, 3
|
|
0/0
0/0
|
Echelon
Line Abreast
Phases: 1, 2, 3
|
|
0/0
0/0
|
| #
|
Formation
|
Normal Battle Node
|
AD/AP
AS/AS+
|
E-3 Casual K
| #
|
Empty Node
|
| K
|
気のせいだった。
これよりラエ沖に突入する!上空監視!対空警戒を厳とせよ!
Must be my imagination.
We are now entering the waters off Lae! Eyes overhead! Maintain strict anti-aircraft vigilance!
|
| #
|
Empty Node
|
E-3 Casual L: 深海基地航空隊 (主力部隊A編隊) (
PoiDB)
| #
|
Formation
|
Air Defense Node
|
AD/AP
AS/AS+
|
| L
|
Diamond
Phases: 1, 2, 3
|
|
11/22
48/96
|
Diamond
Phases: 1, 2, 3
|
|
21/41
90/180
|
Diamond
Phases: 1, 2, 3
|
|
22/43
96/192
|
Diamond
Phases: 1, 2, 3
|
|
33/66
147/294
|
| #
|
Formation
|
Air Defense Node
|
AD/AP
AS/AS+
|
E-3 Casual M: 深海潜水艦隊 偵察前衛哨戒 IV線 (
PoiDB)
| #
|
Formation
|
Normal Battle Node
|
AD/AP
AS/AS+
|
| M
|
Echelon
Line Abreast
Phases: 1, 2, 3
|
|
0/0
0/0
|
Echelon
Line Abreast
Phases: 1, 2, 3
|
|
0/0
0/0
|
| #
|
Formation
|
Normal Battle Node
|
AD/AP
AS/AS+
|
E-3 Casual M1: 深海空母機動部隊 艦載機群 (
PoiDB)
| #
|
Formation
|
Air Defense Node
|
AD/AP
AS/AS+
|
| M1
|
Diamond
Phases: 1, 2, 3
|
|
38/75
167/333
|
Diamond
Phases: 1, 2, 3
|
|
61/121
270/540
|
Diamond
Phases: 1
|
|
84/167
374/747
|
| #
|
Formation
|
Air Defense Node
|
AD/AP
AS/AS+
|
E-3 Casual M2: 深海潜水艦隊 遊撃群狼B集団 (
PoiDB)
| #
|
Formation
|
Normal Battle Node
|
AD/AP
AS/AS+
|
| M2
|
Echelon
Line Abreast
Phases: 1, 2, 3
|
|
0/0
0/0
|
Echelon
Line Abreast
Phases: 1, 2
|
|
0/0
0/0
|
| #
|
Formation
|
Normal Battle Node
|
AD/AP
AS/AS+
|
E-3 Casual N: 深海急派増援群 前衛偵察部隊 (
PoiDB)
| #
|
Formation
|
Normal Battle Node
|
AD/AP
AS/AS+
|
| N
|
Line Ahead
Echelon
Line Abreast
Phases: 1, 2, 3
|

|
0/0
0/0
|
| #
|
Formation
|
Normal Battle Node
|
AD/AP
AS/AS+
|
E-3 Casual O: 深海基地航空隊 (主力部隊B編隊) (
PoiDB)
| #
|
Formation
|
Air Defense Node
|
AD/AP
AS/AS+
|
| O
|
Diamond
Phases: 1, 2, 3
|
|
24/47
105/210
|
Diamond
Phases: 1, 2, 3
|
|
35/69
153/306
|
Diamond
Phases: 1, 2, 3
|
|
44/87
195/390
|
Diamond
Phases: 1
|
|
46/91
204/408
|
| #
|
Formation
|
Air Defense Node
|
AD/AP
AS/AS+
|
E-3 Casual P: 深海急派増援群 先遣機動部隊 (
PoiDB)
| #
|
Formation
|
Normal Battle Node
|
AD/AP
AS/AS+
|
| P
|
Diamond
Phases: 1, 2, 3
|
|
24/47
104/207
|
Diamond
Phases: 1, 2, 3
|

|
26/52
116/231
|
Diamond
Phases: 1, 2, 3
|
|
32/63
140/279
|
| #
|
Formation
|
Normal Battle Node
|
AD/AP
AS/AS+
|
E-3 Casual Q: 深海急派増援群 空母機動部隊 (
PoiDB)
E-3 Casual Q'
| #
|
Empty Node
|
| Q'
|
敵影を見ず。
No enemy spotted.
|
| #
|
Empty Node
|
E-3 Casual R: 海峡配備 深海魚雷艇部隊 (
PoiDB)
| #
|
Formation
|
Normal Battle Node
|
AD/AP
AS/AS+
|
| R
|
Diamond
Phases: 1, 2, 3
|
|
0/0
0/0
|
Diamond
Phases: 1, 2, 3
|
|
0/0
0/0
|
Diamond
Phases: 1, 2, 3
|
|
0/0
0/0
|
| #
|
Formation
|
Normal Battle Node
|
AD/AP
AS/AS+
|
E-3 Casual S: 深海任務部隊 ラエ輸送阻止線 (
PoiDB)
| #
|
Formation
|
Normal Battle Node
|
AD/AP
AS/AS+
|
| S
|
Line Ahead
Double Line
Echelon
Phases: 2, 3
|
|
0/0
0/0
|
| #
|
Formation
|
Normal Battle Node
|
AD/AP
AS/AS+
|
E-3 Casual T
| #
|
Landing Node
|
| T
|
ラエに無事到着しました。
We've arrived safely at Lae.
|
| #
|
Landing Node
|
E-3 Casual U: 深海任務部隊 輸送阻止強襲群 (
PoiDB)
E-3 Casual U'
| #
|
Empty Node
|
| U'
|
敵影を見ず。
左舷にダンピール海峡!警戒を厳に!
No enemy spotted.
Dampier Strait to port! Hold your fire!
|
| #
|
Empty Node
|
E-3 Casual V: 深海基地航空隊 (主力部隊C編隊) (
PoiDB)
| #
|
Formation
|
Air Defense Node
|
AD/AP
AS/AS+
|
| V
|
Diamond
Phases: 3
|
|
24/47
105/210
|
Diamond
Phases: 3
|
|
35/69
153/306
|
Diamond
Phases: 3
|
|
44/87
195/390
|
| #
|
Formation
|
Air Defense Node
|
AD/AP
AS/AS+
|
E-3 Casual W
| #
|
Repair Node
|
| #
|
Repair Node
|
E-3 Casual X: 深海急派増援群 残存再編部隊 (
PoiDB)
| #
|
Formation
|
Normal Battle Node
|
AD/AP
AS/AS+
|
| X
|
Line Ahead
Double Line
Vanguard
Phases: 3
|
|
3/6
12/24
|
| #
|
Formation
|
Normal Battle Node
|
AD/AP
AS/AS+
|
E-3 Casual Y: 深海任務部隊 沈没輸送船団 (
PoiDB)
E-3 Casual Y'
| #
|
Empty Node
|
| Y'
|
敵影を見ず。
左舷にダンピール海峡!警戒を厳に!
No enemy spotted.
Dampier Strait to port! Hold your fire!
|
| #
|
Empty Node
|
Ship Drops