- Welcome to the Kancolle Wiki!
- If you have any questions regarding site content, account registration, etc., please visit the KanColle Wiki Discord
Difference between revisions of "User:Chrno98/Sandbox"
| Line 1: | Line 1: | ||
| − | |||
| − | |||
| − | |||
| − | |||
| − | |||
| − | |||
| − | |||
| − | |||
| − | |||
| − | |||
| − | |||
| − | == | + | {| style="border-spacing: 0; margin: 1em auto;" |
| − | + | |- | |
| − | + | ! colspan="2" style="border: 0px | | |
| + | <table style="margin-left: auto; margin-right: auto;"> | ||
| + | <tr> | ||
| + | <td class="eventBanner30">[[File:Spring2021EventBannerAlt.png|Spring 2021 Event|link=Spring 2021 Event|class=fadein]]</td> | ||
| + | </tr> | ||
| + | </table> | ||
| + | {| class="wikitable" align="center" | ||
| + | |- | ||
| + | !style= "text-align: center; border-radius: 5px 5px 0 0; border-style: solid; width: 750px; border-width: 1px; background-color:#99CCFF;color:black" colspan="3" | Spring 2021 Event Hub Overview | ||
| + | |- | ||
| + | | style="width:50%;"|'''[[Spring 2021 Event|Introduction & Overview]]''' | ||
| + | | style="width:50%;"| '''[[Spring 2021_Event/Event Maps#E-1|E-1]] | [[Spring 2021_Event/Event Maps#E-2|E-2]] | [[Spring 2021_Event/Event Maps#E-3|E-3]] | [[Spring 2021_Event/Event Maps#E-4|E-4]] | [[Spring 2021_Event/Event Maps#E-5|E-5]]''' | ||
| + | |} | ||
| + | |} | ||
| − | == | + | ==Spring 2021 Event Maps== |
| − | |||
| − | |||
| − | |||
| − | == | + | <div id="world-select" style="float: right; position: relative; display: flex; bottom: -11px;"> |
| − | + | <div class="faux-tabber" style="width: 103px; padding: 3px .5em; margin-left: 3px; border: 1px solid #CCC; border-bottom: none; background: white; text-decoration: none; white-space: pre; font: bold 12px Verdana,sans-serif; height: 16px; margin-bottom: -1px;">Main Operation</div> | |
| − | + | <div class="faux-tabber" style="width: 107px; padding: 3px .5em; margin-left: 3px; border: 1px solid #CCC; border-bottom: none; background: #F2F7FF; text-decoration: none; white-space: pre; font: bold 12px Verdana,sans-serif">Extra Operation</div> | |
| − | + | </div> | |
| − | + | <tabber> | |
| − | + | |-|E-1 = | |
| − | + | {{:Spring_2021_Event/E-1}} | |
| − | + | |-|E-2= | |
| − | {{ | + | {{:Spring_2021_Event/E-2}} |
| − | + | |-|E-3= | |
| − | {{ | + | {{:Spring_2021_Event/E-3}} |
| − | + | </tabber> | |
| − | {{ | ||
| − | |||
| − | |||
| − | |||
| − | |||
Revision as of 13:45, 22 May 2021
| |||||||
|---|---|---|---|---|---|---|---|
Spring 2021 Event Maps
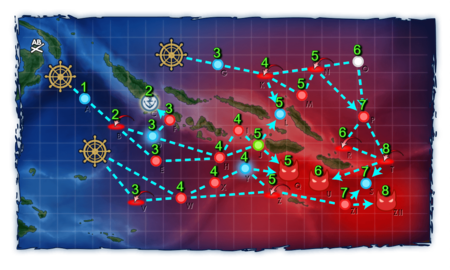
E-1
| Information | ||||
|---|---|---|---|---|
| Event Tag | 31st Squadron | |||
| Boss Gauges | Hard (甲): 520 HP, 3960 HP, 1950 HP | |||
| Medium (乙): 392 HP, 2640 HP, 950 HP | ||||
| Easy (丙): 360 HP, 1800 HP, 545 HP | ||||
| Casual (丁): 360 HP, 1800 HP, 395 HP | ||||
| Map Bosses | ||||
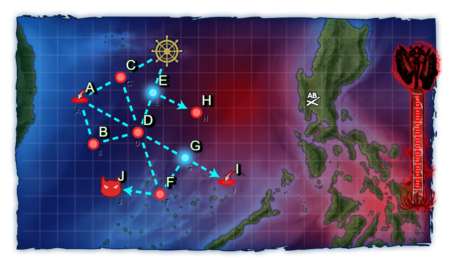
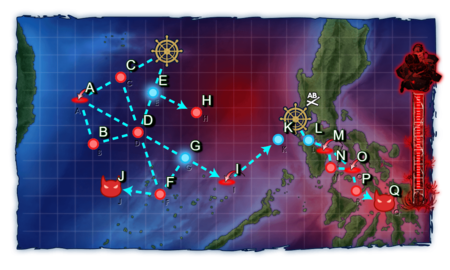
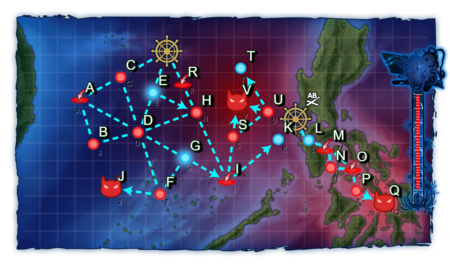
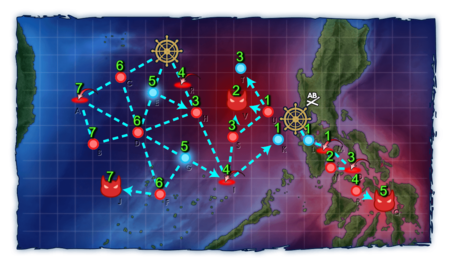
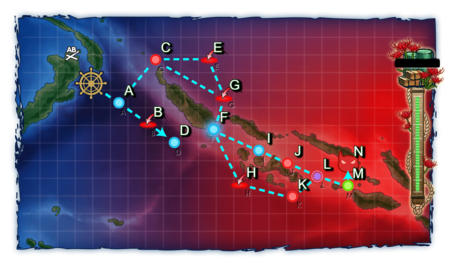
| E-1 Branching Rules | ||
|---|---|---|
| Nodes | Rules | |
| Start | 1 |
|
2 |
Does not meet the requirements for start point 1 | |
1 |
C |
|
E |
||
R |
| |
C |
A |
|
D |
| |
E |
D |
|
H | ||
A |
B |
|
D |
| |
D |
F |
|
G |
| |
G |
F |
|
I | ||
H |
D |
|
I |
| |
I |
K |
|
S |
| |
M |
N |
|
O |
| |
S |
U |
|
V |
| |
U |
T |
|
V |
| |
Branching compositions were reported over the course of the event. (NGA and Piro)
The event guides are to be constructed through the respective Event map page guide and reviewed by editor staff / collaboration committee before being approved here. Do not under any circumstance update the guides through this page or attempt to fix them through this page. Please only update guides through their respective sandbox pages.
Ship Bonuses (Tentative)
General Guidelines
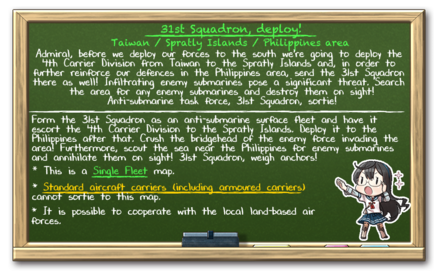
E-1 is a 3.5 Phase Map with the 31st Squadron Lock Tag (Green) consisting of three HP Phases and a minimal Unlock. One base of Land Based Aerial Support (LBAS) is available to sortie on this Map. Due to the span of different combat types on this map (Surface, ASW, Anti-Installation) it is recommended to take ships that are good at multiple of these categories to avoid locking too many ships to this map.
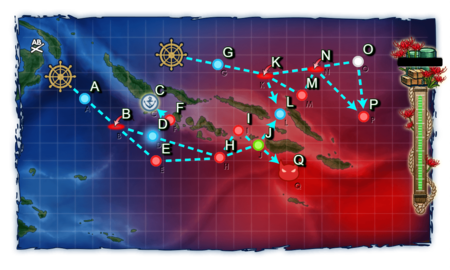
Phase 1: Defeat the Ru-Class Patrol at Node J
The goal of this phase is to deplete the HP Bar and defeat the Ru Class Battleship at J. There is a submarine node and light surface squadron on the way, while the boss itself consists of only surface ships.
- Recommended Fleet: 1CL 0-1AV 4-5DD (Fast Fleet)
- Route: E D G F J
- LBAS: Range 7, no Airpower
- Additional Notes: Vanguard Formation can be utilized to help with preboss sub node. Support Expeditions are not needed
Phase 1.5: Unlocking the Path to the Second Boss
To unlock the path to the second Boss, you simply have to reach K once.
- Recommended Fleet: 1CL 0-1AV 4-5DD (Fast Fleet)
- Route: E D G I K
- LBAS: Range 7, no Airpower
- Additional Notes: There is no surface combat on route, only ASW and Anti-Air Combat. If you get critically damaged at I you can still proceed the sortie as the Route to the non-combat node K is fixed.
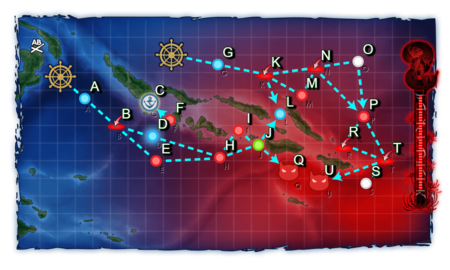
Phase 2: The Benchmarkening (Defeat Supply Depot Hime)
To complete this Phase, you need to deplete the HP Bar of the Second Boss Q, consisting of a mix of Installations and PT Boats. Set up your Ships with the according equipment to deal with them as outlined here. PT Imps are weak to AA Guns + Skilled Lookouts on your DDs. There are PT Imps and two pretty powerful airstrike on the way.
| Ships that can equip Landing Craft / Amphibious Vehicles | |||||
|---|---|---|---|---|---|
| Type | Landing Craft |
Both |
Amphibious Vehicle | ||
| DD | |||||
| CL | |||||
| CAV | |||||
| (F)BB(V) | |||||
| CVL | |||||
| AV | |||||
| AO | |||||
| LHA | |||||
| SS(V) | All | ||||
| RE |
| ||||
| [edit] | |||||
| Anti-PT boat | |||||||||||||||||||||||||||||||||||||||||||||||||||||||||||||||||||||||||||||||||||||||||||||||||||||||||||||||||||||||||||||||||||||||||||
|---|---|---|---|---|---|---|---|---|---|---|---|---|---|---|---|---|---|---|---|---|---|---|---|---|---|---|---|---|---|---|---|---|---|---|---|---|---|---|---|---|---|---|---|---|---|---|---|---|---|---|---|---|---|---|---|---|---|---|---|---|---|---|---|---|---|---|---|---|---|---|---|---|---|---|---|---|---|---|---|---|---|---|---|---|---|---|---|---|---|---|---|---|---|---|---|---|---|---|---|---|---|---|---|---|---|---|---|---|---|---|---|---|---|---|---|---|---|---|---|---|---|---|---|---|---|---|---|---|---|---|---|---|---|---|---|---|---|---|---|
Unlike most standard Abyssals, "PT boats" (PT Imp Pack & Schnellboot Imp Pack & Schnellboot Imp Pack ) are "very small and fast". ) are "very small and fast".
During Events, some special bonuses may be added, with "historical" ships and equipment gaining some accuracy bonuses[10].
| |||||||||||||||||||||||||||||||||||||||||||||||||||||||||||||||||||||||||||||||||||||||||||||||||||||||||||||||||||||||||||||||||||||||||||
| [edit] | |||||||||||||||||||||||||||||||||||||||||||||||||||||||||||||||||||||||||||||||||||||||||||||||||||||||||||||||||||||||||||||||||||||||||||
- Recommended Fleet: 1AV/CL 4-5DD (Fast Fleet) (On Hard, only a 5 ship fleet takes the shortest route)
- Route: L M O P Q
- LBAS: Range 5, (29/69/79/121) Airpower for AP at Last Dance (C/E/M/H)
- Additional Notes: Support fleets can be taken due to the presence of PT Imps.
Phase 3: Defeat the Enemy Submarine Force!
The goal of this phase is to sink the New Old Submarine Princess found at V to deplete the HP Bar and clear the map. There is a surface engagement S, a Submarine Node H and high airpower air raid I on route, but the Boss itself is an Anti-Submarine operation. AACI is highly recommended for this route, the surface Nodes can be passed using Vanguard formation as to not sacrifice too many equipment slots that should be occupied with ASW equipment.
- Recommended Fleet: 0-1 AV 0-1CLT 1-2CL 4DD (Fast Fleet)
- Route: E H I S V
- LBAS: Range 2, no Airpower present at the Boss. I has (138/144/149/229) AP for (C/E/M/H)
- Additional Notes:
- 1 Regular CL is required within the fleet composition
- LBAS can be Toukai sent to the Boss, Bombers to the Preboss Surface Nodes or a fighter sweep to Node I, depending on your surface fleet setup.
- The required LoS to reach the boss is Cn3 48+/38+/29+/29+ on Hard/Medium/Easy/Casual
- 3/2/1/1 historical ships are required on Hard/Medium/Easy/Casual
Enemy Compositions
Ship Drops:
Chrno98/E-1/Ship drops
| E-1 Clear Message |
|---|
E-2
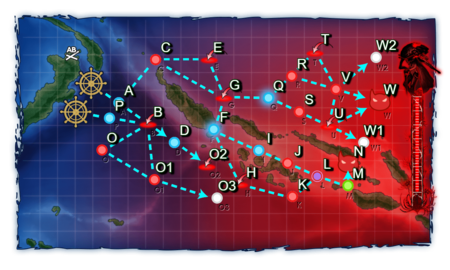
| E-2 Branching Rules | ||
|---|---|---|
| Nodes | Rules | |
| Start | 1 |
|
2 |
| |
3 |
| |
3 |
V |
|
W |
| |
B |
D |
|
E |
| |
D |
F |
|
H | ||
H |
I |
|
J | ||
J |
L |
|
Q |
| |
K |
L |
|
M | ||
N | ||
N |
O |
|
P |
| |
P |
R |
|
T |
| |
T |
S |
|
U |
| |
W |
X |
|
Z |
| |
Y |
Q |
|
Z | ||
ZI |
S |
|
ZII |
| |
Branching compositions were reported over the course of the event.
The event guides are to be constructed through the respective Event map page guide and reviewed by editor staff / collaboration committee before being approved here. Do not under any circumstance update the guides through this page or attempt to fix them through this page. Please only update guides through their respective sandbox pages.
Ship Bonuses (Tentative)
General Information
- There is 2 Land Bases available for you to use within the map.
- There are 2 different tags for this map:
Phase 1: TP Phase
This phase will require you to run a Single Fleet to deplete the TP bar at Q, consisting of a Ne-Class Kai and light escorts There are currently two known compositions to complete this phase:
- Recommended Fleet:
 [Purple Tag]6th Fleet 1 CL 1 CAV/AV 4 DD (FAST)
 - Route: A B E H J Q
- LBAS: Q 5 Range (no Airpower)
- Notes: Support expeditions are optional. You can use vanguard formation to pass the surface nodes
- LoS: About 44+/34+/27+/23+ Cn3 on Hard/Medium/Easy/Casual is required to route from J to Q with this comp.
- Will deplete the TP Gauge fast compared to the Submarine Composition.
- May result in extra bucket being spent while doing the runs.
- Will also result in additional ship being locked the map.
- Recommended Fleet:
 [Purple Tag]6th Fleet 6SS(V)
 - Route: A B D H J Q
- LBAS: H 4 Range (no Airpower), Q 5 Range (no Airpower)
- Notes: Only recommended if you have some Type 2 Ka-Mi Tanks and Drum Canister carrying Subs (Luigi Torelli Kai or higher).
- Sub Fleet will be almost safe from any harm through the map as long as a land base is placed in Node H and Q.
- However, the amount of TP drain per run will be very low, requiring more runs to be taken (Around 40-50 runs depending on the equipment you have).
- This can be ideal if you plan to conserve ships for tagging in later sections of the event.
- This can also be helpful in conserving buckets that would otherwise be spent in this map using a surface related composition.
- LoS: The LoS check from J to Q is ignored if using a full fleet of 6 SS(V).
- Based on current data, using less than 3-4 SS(V) in a fleet may result in off-routing to L regardless.
Phase 1.5: Unlock the route to Node U
Unlocking U has two requirements:
| Node | C | P |
|---|---|---|
| Hard | Reach | S x2 |
| Medium | Reach | S |
| Easy | Reach | - |
| Casual | - | - |
Phase 2: Defeat CA Hime at Node U
You can use the same fleet you used in the previous unlocking phase
- Composition:
 [Blue Tag]3rd Fleet Carrier Task Force (CTF): 2 FBB 2 CV 2 CA + 1 CL 5 DD (Fast)
 - Route: G K M N P T U
- Alternatively, you can use a single fleet comprised of 3 CV(L), 2 (FBB or CA(V)), and a DD with a maximum of 2 CV to route G K N P T U
- LBAS: Range 6, no Air Power
- Notes: AACI is heavily recommended due to three airstrikes on route. Support Expeditions are optional
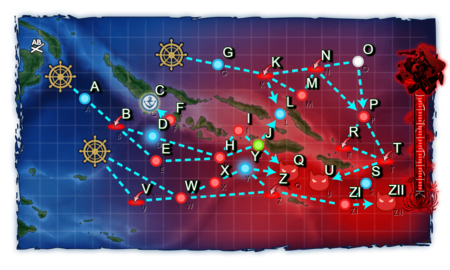
Phase 3: Defeat CV Hime at Node ZII
In this phase, you will need to take out an Aircraft Carrier Princess. There are several compositions availabe depending on selected difficulty:
- Composition:
 [Purple Tag]6th Fleet 6 SS(V)
- The recommended composition for all difficulties
- Route: W Z ZI ZII
- LBAS Range: 8 Range, AP/AS on Hard 103/231
- Notes: Node Support is recommended to help you pass through the 2 surface battle nodes. Boss Support Expedition is optional if you send LBAS to the Boss.
- LoS: 29+/23+/21+/18+ Cn3 on Hard/Medium/Easy/Casual is required to route from ZI to ZII.
- Composition:
 [Purple Tag]6th Fleet CL, AV/CAV, DD, 3 SS(V)
- Only should be considered if you lack submarines
- Route: V W X Y Z ZI ZII
- LBAS Range: 8 Range, AP/AS on Hard 103/231
- Notes: Node Support is recommended. Boss Support is also recommended.
- LoS: 29+/23+/21+/18+ Cn3 on Hard/Medium/Easy/Casual is required to route from ZI to ZII.
- Composition:
 [Purple Tag]6th Fleet AS, BBV, 2CLT, 2 SS(V)
- Easy and Casual Difficulty Only (Use this Composition in case of a lack of Submarines)
- Route: V W X Y Z ZI ZII
- LBAS Range: 8 Range, AP/AS on Easy/Casual 88/197
- Notes: Node Support is recommended. Boss Support is also recommended.
- LoS: 29+/23+/21+/18+ Cn3 on Hard/Medium/Easy/Casual is required to route from ZI to ZII.
- Composition:
 [Purple Tag]6th Fleet 2CL, 4DD
- Casual Only (Use this Composition in case of a lack of Submarines)
- Route: W X Y Z ZI ZII
- LBAS Range: 8 Range, AP/AS on Easy 88/197
- Notes: Vanguard formation can be utilized to help with passing rate. Boss Support is optional but recommended.
- LoS: 29+/23+/21+/18+ Cn3 on Hard/Medium/Easy/Casual is required to route from ZI to ZII.
Enemy Compositions
Ship Drops:
Chrno98/E-2/Ship drops
| E-2 Clear Message |
|---|
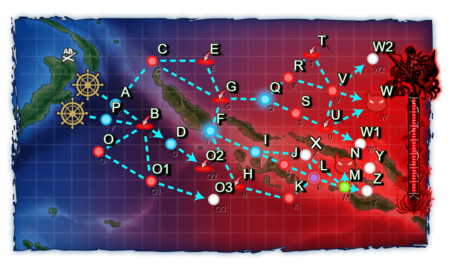
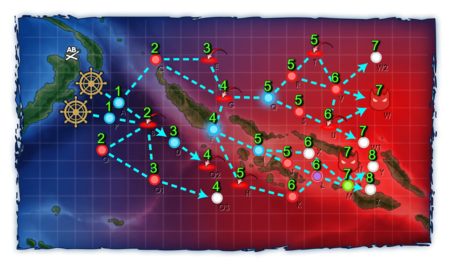
E-3
| E-3 Branching Rules | ||
|---|---|---|
| Nodes | Rules | |
| Start | 1 |
|
2 |
| |
A |
B |
|
C | ||
B |
D |
|
O | ||
O1 | ||
C |
E |
|
G |
| |
F |
H |
|
I | ||
G |
F |
|
Q |
| |
I |
J |
|
X |
| |
M |
N |
|
Y |
| |
Z |
| |
Q |
R |
|
S | ||
R |
T |
|
V |
| |
U |
V |
|
W |
| |
W1 |
| |
V |
W |
|
W2 |
| |
X |
L |
|
M |
| |
Branching compositions were reported over the course of the event.
The event guides are to be constructed through the respective Event map page guide and reviewed by editor staff / collaboration committee before being approved here. Do not under any circumstance update the guides through this page or attempt to fix them through this page. Please only update guides through their respective sandbox pages.
Ship Bonuses (Tentative)
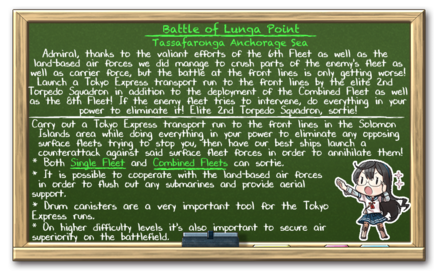
General Information
This map has three ship locks:
 Orange Tag: 2nd Torpedo Squadron (Single Fleet)
 Grey Tag: 8th Fleet (Single Fleet, with CA(V) flagship)
- Starting point unlocks after Phase 1 is cleared
- Only really used for one unlocking gimmick
 Yellow Tag: Combined Fleet (Combined Fleet)
- Same starting point as Orange Tag, but tagged with Combined Fleet Tag when sortied as a Combined Fleet (STF or CTF)
- There are three LBAS Bases available to you, with 2 for offensive operations and one for base defense
Phase 1: TP Phase
Phase 1 is a TP Phase, with 350/350/500/750 points required on Casual/Easy/Medium/Hard at HQ 120
- Composition:
 [Orange Tag]2nd Torpedo Squadron 0-1 CL, 5-6 DD
- A fleet with CL will off-route to E
- Route: A C G F I J L M N with 0 CL
- A C E G F I J L M N with 1 CL
- A total of 0/2/3/4 drum-equipped ships are required on Casual/Easy/Medium/Hard for this route.
- LBAS:
- 2 LBAS with 4x LBAA each to boss (7 Range); OR
- 1 LBAS with 4x Toukai/ASW to C (2 Range), 1 LBAS with 4x LBAA to Boss; OR
- Fighter sweep E G
- Notes:
- Support expeditions are optional, vanguard formation can be used to increase passing rate. Generic AACI is sufficient for the Air Raids.
- S-Ranking the boss is not strictly necessary, but if desired, the new Torpedo/SLO+/Torpedo and/or Torpedo/SLO+/Drum cut-ins may be useful.
- With a Reinforcement Expansion unlocked, a Torpedo/Torpedo/Drum/[SLO+] set-up may be utilized.
- SLO+ refers to Torpedo Squadron Skilled Lookouts.
- This phase has no LoS check.
Phase 1.5: Unlock the 2nd Boss Node
Unlocking W has 4 total requirements. The dabber will show you a composition that you can use to complete multiple nodes in a single sortie.
| Node | B | O1 | O2 | O3 |
|---|---|---|---|---|
| Hard | AS | S | AS | S |
| Medium | AS | A+ | - | A+ |
| Easy | - | A+ | - | A+ |
| Casual | - | B+ | - | - |
- Required for all difficulties
- Composition:
 [Grey Tag]8th Fleet Single Fleet: 1-2 CA(V), 1-2 CL, 2-3 DD
 - A CA(V) must be flagship.
- Route: P B O1 O3
- LBAS: Range 3, no airpower O1; Range 4, no air power O3
- Note: O1 contains a New Submarine Princess along with 2 other submarines. Bring Toukai/ASW Aircraft as well as OASW. O3 is a surface combat node.
- Fleet must be FAST to avoid routing to the extra node: O
Phase 2: Defeat the Enemy Combined Fleet
The objective here is to take down the enemy combined fleet at Node W
Goes Q S instead of Q R
- Composition:
 [Yellow Tag]Combined Fleet Carrier Task Force (CTF): 2 CV, 2 CVL, 1 CAV, 1 CL + 1 CA, 1 CL, 4 DD
- Speed does not matter for this composition and route (i.e. use of Slow CVLs is acceptable).
- Route: A C E G Q R V W
- LBAS: Range 6 V & 7 W.
- AD/AP/AS for V Hard: 62/124/279.
- AD/AP/AS for W Hard: 90/180/405. LD: 96/191/429.
Phase 2.5: Unlock the Route to Node Z
To unlock Z, you will need to do the following requirements depending on your difficulty with the map.
| Node | E | G | H |
|---|---|---|---|
| Hard | AS | AS | AS |
| Medium | AS | AS | - |
| Easy | - | - | - |
| Casual | - | - | - |
- Composition:
 [Yellow Tag]Combined Fleet Transport Combined Fleet (TCF): 0-1 CVE, 1CAV/AV, 4-5 DD + 1 CL, 3 DD
 - Route: A C E G F H
- Alternatively you can run
 [Orange Tag]2nd Torpedo Squadron 1 AV 5 DD in order to save locks as the fleet is similar to Phase 1 and 3.
- If using the single fleet method, you need to use a 4-slot AV like Commandant Teste or Nisshin. 3-slot girls will struggle to take AS against all but the weakest enemy composition.
- Route: A C E G F H
- LBAS: Range 5, AP/AS for Hard: 160/359
- Note: Set up your LBAS with fighters only and send them to Node H to help secure AS.
- 1 CVE and 1 CAV with full fighter & SPF set-ups can almost certainly attain AS without the need for LBAS swapping.
- Note: EASY/CASUAL will have node Z unlocked as soon as you beat phase 2 without doing these steps
Phase 3: Defeat Lunga Hime
This is the final phase for this map and the MO. The objective is to sink the Lunga princess at Z. There is a boss debuff available for unlocking once LD is reached, if so desired.
- Composition:
 [Orange Tag]2nd Torpedo Squadron Single Fleet: 6 DD OR 1 CL 5 DD (EASY AND CASUAL ONLY)
- A fleet with CL will off-route to E
- Route: A C G F I X M Z with 0 CL
- A C E G F I X M Z with 1 CL
- LBAS: Range 8, no Airpower
- Note: Fleet must have 0/3/4/5 drum-equipped ships on Casual/Easy/Medium/Hard.
- LoS Requirement: About Cn3 48+/38+/29+/23+ is required on Hard/Medium/Easy/Casual to route from M to Z.
Lunga Hime Debuff Phase
You can do all these steps in any order. There are 6 requirements that must be met once Last Dance threshold has been reached:
- LBAS raid - AS x1
- O3 - S rank x1
- E - AS x1
- W - S rank x1
- K - S rank x1
- N - S rank x1 (use TCF to reach)
Enemy Compositions
Ship Drops:
Chrno98/E-3/Ship drops
| E-3 Clear Message |
|---|


