- Welcome to the Kancolle Wiki!
- If you have any questions regarding site content, account registration, etc., please visit the KanColle Wiki Discord
World 4/4-3
< World 4
Jump to navigation
Jump to search
World 4-3: リランカ島 - Ri-Lanka Island
| Strategy Name | リランカ島空襲 Ri Lanka Air Raid |
|---|---|
| Difficulty | ☆ ☆ ☆ ☆ ☆ ☆ |
| Item | |
| Strategy Content | 空母を伴った艦隊を編成し、リランカ島の敵母港に展開する敵艦隊への攻撃を行う。艦隊、出撃! Organize a fleet being attended by aircraft carriers and attack an enemy fleet deploying on its home port in Ri-Lanka Island. Fleet, sortie! |
| Boss Air Control | |||
|---|---|---|---|
| AD | AP | AS | AS+ |
| 46 | 69 | 155 | 310 |
| Boss Route Air Control | |||
| AD | AP | AS | AS+ |
| 24 | 35 | 78 | 156 |
| 4-3 Unlocking & Progression | ||||
|---|---|---|---|---|
| Unlock conditions | 4-3 is unlocked after clearing 4-2 | |||
| Clear conditions | To clear the map: the boss's flagship must be sunk once | |||
Stage Guide
| 4-3 Branching Rules |
|---|
Tips
This map will serve as a first introduction to Installation type Abyssal, which is different from all other abyssal types as they tend to have higher armor, stronger attack power and, can't be hit by torpedoes.
- Killing the installation is optional for clearing the map. However, having a fleet that is capable of killing an installation is encouraged especially for first-time users of anti-installation gear to get a feel for fighting these kinds of bosses.
- As such, the following equipment should be considered to fight the Harbor Princess, the following gear are effective at penetrating the Soft-Skinned Installation's armor:
For beginners: ![]() AA Shells (for BB/CA).
AA Shells (for BB/CA).
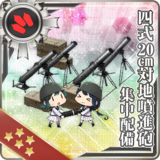
For more advanced players: ![]() Anti-ground Rocket Launchers
Anti-ground Rocket Launchers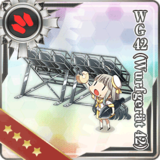

 and
and ![]() "Landing tanks".
Aircraft carriers CANNOT attack installations if they have a
"Landing tanks".
Aircraft carriers CANNOT attack installations if they have a ![]() equipped UNLESS its one of the dive-bombers from the following list:
equipped UNLESS its one of the dive-bombers from the following list:
| Expand |
|---|


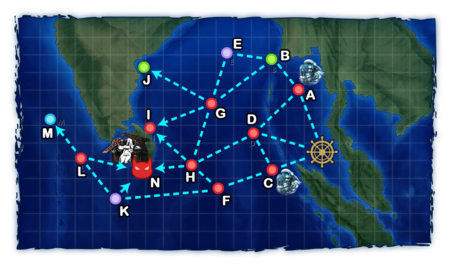
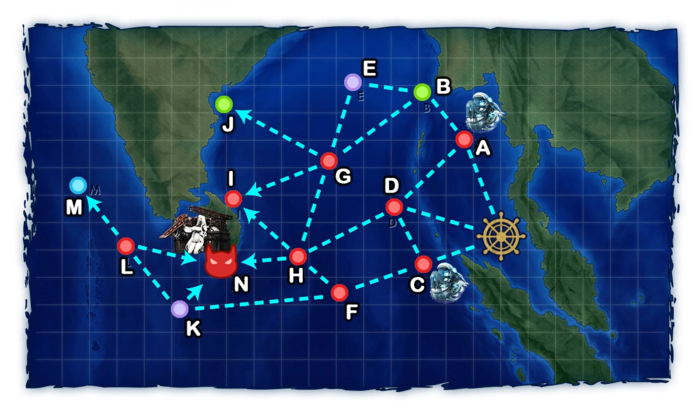
- Node notes
- Node C only contains submarines but is treated as a surface node for
 /
/ consumption.
 - Node A contains a mix of submarines and surface ships.
- Most fleets have a chance to off-route from H to I.
Recommended Fleets
| ExpandMedium Fleet |
|---|
| Expand"Backdoor" Heavy Fleet |
|---|
| ExpandLightest Fleet |
|---|
| ExpandLight Fleet |
|---|
| ExpandHeaviest Fleet |
|---|
Resource Nodes
B J are "Normal Resource Nodes" rewarding respectively fuel ![]() , and bauxite
, and bauxite ![]() .
.
- See here for more details.
It is possible to use this map to farm both fuel and bauxite. This requires the use of either an AV/AO and will go through 2 combat nodes:
| ExpandFuel & Bauxite Farming |
|---|
Enemy CompositionsCollapse
4-3 A: 敵東方潜水艦隊 哨戒分遣集団 (PoiDB)
| # | Enemy Form. |
Base EXP | Normal Battle Node | AD/AP AS/AS+ |
|---|---|---|---|---|
| A | Echelon Line Abreast |
150 | 0/0 0/0 | |
| Echelon Line Abreast |
170 | 0/0 0/0 | ||
| Echelon Line Abreast |
190 | 0/0 0/0 | ||
| # | Enemy Form. |
Base EXP | Normal Battle Node | AD/AP AS/AS+ |
4-3 B
| # | Resource Node | ||
|---|---|---|---|
| B | Gained 30~90 | ||
| # | Resource Node | ||
4-3 C: 敵東方潜水艦隊 哨戒主力集団 (PoiDB)
| # | Enemy Form. |
Base EXP | Normal Battle Node | AD/AP AS/AS+ |
|---|---|---|---|---|
| C | Echelon Line Abreast |
160 | 0/0 0/0 | |
| Echelon Line Abreast |
180 | 0/0 0/0 | ||
| Echelon Line Abreast |
200 | 0/0 0/0 | ||
| # | Enemy Form. |
Base EXP | Normal Battle Node | AD/AP AS/AS+ |
4-3 D: 敵東方哨戒艦隊 B群 (PoiDB)
| # | Enemy Form. |
Base EXP | Normal Battle Node | AD/AP AS/AS+ |
|---|---|---|---|---|
| D | Line Ahead Double Line |
160 | 0/0 0/0 | |
| Line Ahead Double Line |
180 | 0/0 0/0 | ||
| Line Ahead Double Line |
180 | 0/0 0/0 | ||
| # | Enemy Form. |
Base EXP | Normal Battle Node | AD/AP AS/AS+ |
4-3 E
| # | Maelstrom Node | ||
|---|---|---|---|
| E | Lost Normal | ||
| # | Maelstrom Node | ||
4-3 F: 敵東方空母機動部隊 (PoiDB)
| # | Enemy Form. |
Base EXP | Normal Battle Node | AD/AP AS/AS+ |
|---|---|---|---|---|
| F | Diamond | 260 | 16/32 71/141 | |
| Diamond | 280 | 18/35 78/156 | ||
| Diamond | 300 | 18/35 78/156 | ||
| Diamond | 310 | 18/35 77/153 | ||
| # | Enemy Form. |
Base EXP | Normal Battle Node | AD/AP AS/AS+ |
4-3 G: 敵東方哨戒艦隊 A群 (PoiDB)
| # | Enemy Form. |
Base EXP | Normal Battle Node | AD/AP AS/AS+ |
|---|---|---|---|---|
| G | Line Ahead Double Line |
170 | 0/0 0/0 | |
| Line Ahead Double Line |
190 | 0/0 0/0 | ||
| Line Ahead Double Line |
210 | 0/0 0/0 | ||
| # | Enemy Form. |
Base EXP | Normal Battle Node | AD/AP AS/AS+ |
4-3 H: 敵東方空母機動部隊 分遣群 (PoiDB)
| # | Enemy Form. |
Base EXP | Normal Battle Node | AD/AP AS/AS+ |
|---|---|---|---|---|
| H | Diamond | 260 | 9/17 36/72 | |
| Diamond | 270 | 8/16 35/69 | ||
| Diamond | 280 | 8/16 35/69 | ||
| Diamond | 290 | 8/16 35/69 | ||
| Diamond | 300 | 8/16 35/69 | ||
| # | Enemy Form. |
Base EXP | Normal Battle Node | AD/AP AS/AS+ |
4-3 I: 敵東方艦隊 増援戦艦部隊 (PoiDB)
| # | Enemy Form. |
Base EXP | Normal Battle Node | AD/AP AS/AS+ |
|---|---|---|---|---|
| I | Double Line | 330 | 9/17 36/72 | |
| Line Ahead | 340 | 9/17 36/72 | ||
| Line Ahead | 350 | 8/16 35/69 | ||
| Line Ahead | 360 | 8/16 35/69 | ||
| # | Enemy Form. |
Base EXP | Normal Battle Node | AD/AP AS/AS+ |
4-3 J
| # | Resource Node | ||
|---|---|---|---|
| J | Gained 50~100 | ||
| # | Resource Node | ||
4-3 K
| # | Maelstrom Node | ||
|---|---|---|---|
| K | Lost Normal | ||
| # | Maelstrom Node | ||
4-3 L: 敵哨戒艦隊 (PoiDB)
| # | Enemy Form. |
Base EXP | Normal Battle Node | AD/AP AS/AS+ |
|---|---|---|---|---|
| L | Line Ahead Double Line |
150 | 0/0 0/0 | |
| Line Ahead Double Line |
170 | 0/0 0/0 | ||
| Line Ahead Double Line |
180 | 0/0 0/0 | ||
| # | Enemy Form. |
Base EXP | Normal Battle Node | AD/AP AS/AS+ |
4-3 M
| # | Empty Node | ||
|---|---|---|---|
| M | 気のせいだった。/敵影を見ず。/穏やかな海です。/穏やかな海峡です。/警戒が必要です。/静かな海です。 Must be my imagination./No enemy spotted./Calm seas./Calm straits./Be alert./Peaceful seas. | ||
| # | Empty Node | ||
4-3 N: 敵東方港湾基地 (PoiDB)
| # | Enemy Form. |
Base EXP | Boss Battle Node | AD/AP AS/AS+ |
|---|---|---|---|---|
| N | Diamond | 350 | 27/54 120/240 | |
| Diamond | 360 | 27/54 120/240 | ||
| Diamond | 370 | 27/54 120/240 | ||
| Diamond | 380 | 27/54 120/240 | ||
| Diamond | 390 | 27/54 120/240 | ||
| Diamond | 400 | 35/69 155/309 | ||
| # | Enemy Form. |
Base EXP | Boss Battle Node | AD/AP AS/AS+ |
Ship Drops
☒ All drops (disabled, only rare drops)
| ExpandShip drops |
|---|
| ||
