- Welcome to the Kancolle Wiki!
- If you have any questions regarding site content, account registration, etc., please visit the KanColle Wiki Discord
World 4/4-1
< World 4
Jump to navigation
Jump to search
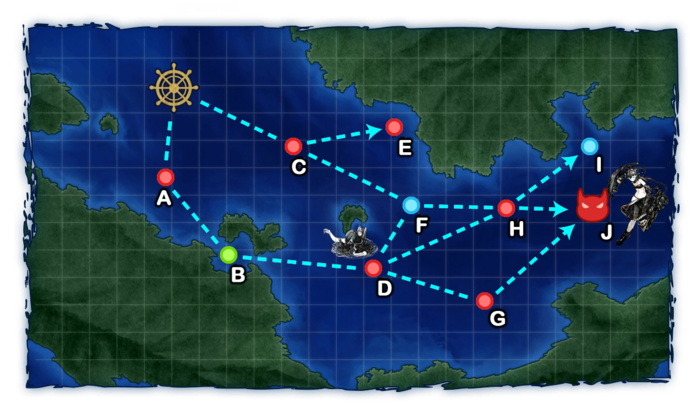
World 4-1: ジャム島沖 - Jam Island

| Strategy Name | ジャム島攻略作戦 Jam Island Capture Tactics |
|---|---|
| Difficulty | ☆ ☆ ☆ ☆ ☆ |
| Item | |
| Strategy Content | 西方作戦の第一段階として艦隊をジャム島攻略に展開!作戦を実施せよ! (対潜警戒も厳とせよ) As the first phase of Western operation, you are going to deploy your fleet on the Jam Island. Conduct this operation! (Lookout for enemy submarines strictly too.) |
| Boss Air Control | |||
|---|---|---|---|
| AD | AP | AS | AS+ |
| 11 | 16 | 36 | 72 |
| 4-1 Unlocking & Progression | ||||
|---|---|---|---|---|
| Unlock conditions | 4-1 is unlocked after clearing 3-1 | |||
| Clear conditions | To clear the map: the boss's flagship must be sunk once | |||
Stage Guide
| 4-1 Branching Rules |
|---|
Tips
This map is mostly randomized on the path taken, with few notable exceptions that should be considered:
- Avoid bringing too many (F)BB(V) and CV(B/L).
- A well-balanced fleet is recommended for tackling this map.
- While dedicated ASW setups are not necessary, mixed ASW set-ups can be considered for DDs.
Recommended Fleets
| ExpandMedium Fleet |
|---|
| ExpandLight Fleet |
|---|
| ExpandHeavy Fleet |
|---|
Resource Nodes
B is a "Normal Resource Node" rewarding fuel ![]() .
.
- See here for more details.
Enemy CompositionsCollapse
4-1 A: 敵水雷戦隊 (PoiDB)
| # | Enemy Form. |
Base EXP | Normal Battle Node | AD/AP AS/AS+ |
|---|---|---|---|---|
| A | Line Ahead Double Line |
140 | 0/0 0/0 | |
| Line Ahead Double Line |
150 | 0/0 0/0 | ||
| Line Ahead Double Line |
160 | 0/0 0/0 | ||
| # | Enemy Form. |
Base EXP | Normal Battle Node | AD/AP AS/AS+ |
4-1 B
| # | Resource Node | ||
|---|---|---|---|
| B | Gained 40~120 | ||
| # | Resource Node | ||
4-1 C: 敵哨戒艦隊 (PoiDB)
| # | Enemy Form. |
Base EXP | Normal Battle Node | AD/AP AS/AS+ |
|---|---|---|---|---|
| C | Line Ahead Double Line |
150 | 0/0 0/0 | |
| Line Ahead Double Line |
170 | 0/0 0/0 | ||
| Line Ahead Double Line |
180 | 0/0 0/0 | ||
| # | Enemy Form. |
Base EXP | Normal Battle Node | AD/AP AS/AS+ |
4-1 D: 敵東方潜水艦隊 警戒隊 (PoiDB)
| # | Enemy Form. |
Base EXP | Normal Battle Node | AD/AP AS/AS+ |
|---|---|---|---|---|
| D | Echelon | 160 | 0/0 0/0 | |
| Echelon | 170 | 0/0 0/0 | ||
| Echelon | 180 | 0/0 0/0 | ||
| Echelon | 190 | 0/0 0/0 | ||
| Echelon | 190 | 0/0 0/0 | ||
| Echelon | 190 | 0/0 0/0 | ||
| # | Enemy Form. |
Base EXP | Normal Battle Node | AD/AP AS/AS+ |
4-1 E: 敵増援強襲輸送船団 (PoiDB)
| # | Enemy Form. |
Base EXP | Normal Battle Node | AD/AP AS/AS+ |
|---|---|---|---|---|
| E | Double Line | 300 | 0/0 0/0 | |
| Double Line | 300 | 0/0 0/0 | ||
| Double Line | 310 | 0/0 0/0 | ||
| Double Line | 320 | 0/0 0/0 | ||
| Double Line | 330 | 0/0 0/0 | ||
| # | Enemy Form. |
Base EXP | Normal Battle Node | AD/AP AS/AS+ |
4-1 F
| # | Empty Node | ||
|---|---|---|---|
| F | 気のせいだった。/敵影を見ず。/穏やかな海です。/穏やかな海峡です。/警戒が必要です。/静かな海です。 Must be my imagination./No enemy spotted./Calm seas./Calm straits./Be alert./Peaceful seas. | ||
| # | Empty Node | ||
4-1 G: 東方艦隊 先遣戦艦部隊 (PoiDB)
| # | Enemy Form. |
Base EXP | Normal Battle Node | AD/AP AS/AS+ |
|---|---|---|---|---|
| G | Line Ahead Double Line |
250 | 0/0 0/0 | |
| Line Ahead Double Line |
280 | 0/0 0/0 | ||
| Line Ahead Double Line |
300 | 0/0 0/0 | ||
| # | Enemy Form. |
Base EXP | Normal Battle Node | AD/AP AS/AS+ |
4-1 H: 敵深海連合巡洋艦戦隊 (PoiDB)
| # | Enemy Form. |
Base EXP | Normal Battle Node | AD/AP AS/AS+ |
|---|---|---|---|---|
| H | Line Ahead Double Line |
200 | 0/0 0/0 | |
| Line Ahead Double Line |
210 | 0/0 0/0 | ||
| Line Ahead Double Line |
220 | 0/0 0/0 | ||
| Line Ahead Double Line |
230 | 0/0 0/0 | ||
| # | Enemy Form. |
Base EXP | Normal Battle Node | AD/AP AS/AS+ |
4-1 I
| # | Empty Node | ||
|---|---|---|---|
| I | 気のせいだった。/敵影を見ず。/穏やかな海です。/穏やかな海峡です。/警戒が必要です。/静かな海です。 Must be my imagination./No enemy spotted./Calm seas./Calm straits./Be alert./Peaceful seas. | ||
| # | Empty Node | ||
4-1 J: 敵深海連合部隊 司令部艦隊 (PoiDB)
| # | Enemy Form. |
Base EXP | Boss Battle Node | AD/AP AS/AS+ |
|---|---|---|---|---|
| J | Line Ahead | 330 | 0/0 0/0 | |
| Line Ahead | 340 | 0/0 0/0 | ||
| Line Ahead | 350 | 0/0 0/0 | ||
| Line Ahead | 360 | 9/17 36/72 | ||
| Line Ahead | 370 | 9/17 36/72 | ||
| Line Ahead | 380 | 8/16 35/69 | ||
| # | Enemy Form. |
Base EXP | Boss Battle Node | AD/AP AS/AS+ |
Ship Drops
☒ All drops (disabled, only rare drops)
| ExpandShip drops |
|---|
| ||
