• Welcome to the Kancolle Wiki!
  • If you have any questions regarding site content, account registration, etc., please visit the KanColle Wiki Discord

Difference between revisions of "Docking"

From Kancolle Wiki
Jump to navigation Jump to search
 
(18 intermediate revisions by 7 users not shown)
Line 1: Line 1:
The '''Docking (repair)''' menu is where you take your kanmusu to be repaired after they have taken damaged. Repairing a kanmusu will restore your ships to full health, at the expense of time, fuel and steel.
+
{{HomePortPortal}}
  
==Repair time==
 
[[File:Kagaheal.png|right|thumb|404px|Confirmation window for repairs]]
 
  
<math>\text {Total repair time} = \text {HP loss} \times \text {base repair time} \times \text {ship type multiplier} + \text {30 seconds}</math>
+
'''Docking (入渠)''' is a [[Home Port|main menu]] function that lets repair damaged girls.
<math>\text {Base repair time} = \text {Level} \times 10 \text {(if Level } \le \text {11); }  \text {Level} \times 5 + floor (\sqrt {Level - 11}) \times 10 + 50 \text { (if Level } \ge \text {12)}</math>
+
*An alternate method is to use [[Repairs#Anchorage Repairs|Anchorage Repairs]], or to remodel a girl.
 +
*''This page provides information about the menu. Please see [[Repairs]] for details on repairing ship girls.''
 +
 
 +
=Menu Functions=
 +
[[File:Repair-menu.png|thumb|right|Repair Menu and all the available options]]
  
{| class="wikitable"
+
The following functions appear in the Repair menu:
!Ship Type
+
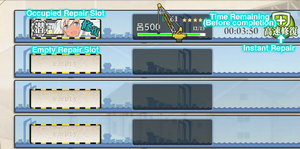
* '''Occupied Slot''' - Displays girls currently being repaired. Girl banners are marked with '''Repair (修復)'''. Her name and HP she had when she was put into the docks will be displayed beside her.
! style="text-align: center;"|Multiplier
+
* '''Empty Slot''' - Displays available repair slots.
|-
+
* '''Time Remaining''' - Displays how long until repairs are complete.
|Battleships, Aviation Battleships, Aircraft Carriers, Repair Ships
+
* '''Instant Repair''' - Allows to complete repairs instantly.
| style="text-align: center;"|2
 
|-
 
|Heavy Cruisers, Aviation Cruisers, Fast Battleships, Light Aircraft Carriers, Submarine Tenders
 
| style="text-align: center;"|1.5
 
|-
 
|Light Cruisers, Destroyers, Submarine Aircraft Carriers, Seaplane Tenders, Amphibious Assault Ships, Torpedo Cruisers
 
| style="text-align: center;"|1
 
|-
 
|Submarines
 
| style="text-align: center;"|0.5
 
|}
 
  
==Repair cost==
+
=Repairing Girls=
<math>\text {Fuel cost} = floor(\text {Base fuel cost} \times \text {HP loss} \times 0.032)</math><br />
+
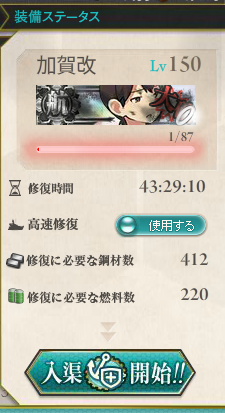
[[File:Kagaheal.png|right|thumb|404px|Confirmation window for repairs]]
<math>\text {Steel cost} = floor\text {Base fuel cost} \times \text {HP loss} \times 0.06),</math>
+
Repairing a girl costs fuel and steel. It will also take time unless an instant repair {{IR}} is used.  
where base fuel cost is the amount of fuel needed to resupply that ship from 0 to full.<br>
+
* Every player starts off with only '''2 dock slots'''. Up to 2 more slots can be unlocked by using a '''[[Dock Opening Key]]''' each time.  
The cost is rounded down when using dry docks, so most destroyers and submarines with only 1 HP loss can be repaired for free.<br>
 
The cost is '''not''' affected by the level of the ship.
 
  
{| class="mw-collapsible mw-collapsed wikitable"
+
To repair a ship:
! colspan="4" | Ship Repair Cost per HP<br>(assuming max remodel level)
+
# Click on any empty slot to bring up a list of girls. It will be sorted by damage as default.
|-
+
# Click on the girl to repair. This brings up the information menu.
| rowspan="2" style="background-color:rgb(135,206,250);text-align:center;" |'''Type'''
+
#* The toggle is for using instant repairs. It is set at '''Do Not Use (使用しない)''' by default. It can be toggled to '''Use (使用する)''' if wished.
| rowspan="2" style="background-color:rgb(135,206,250);text-align:center;" |'''Class'''
+
# Clicking on the '''Begin Repairs! (修復開始!)''' button will bring up the confirmation screen. It shows all the resource costs again.
| colspan="2" style="background-color:rgb(135,206,250);text-align:center;" |'''Cost'''
+
# Clicking on '''Yes (はい)''' starts the repair. Clicking on '''No (いいえ)''' takes back to the girl selection menu.
|-
 
| style="background-color:rgb(135,206,250);text-align:center;" |{{Fuel}}
 
| style="background-color:rgb(135,206,250);text-align:center;" |{{Steel}}
 
|-
 
| rowspan="2" style="text-align:center;" |Destroyers
 
| style="text-align:center;" |Shimakaze<br>Amatsukaze<br>Akitsuki<br>Z1-class
 
| style="text-align:center;" |0.64
 
| style="text-align:center;" |1.2
 
|-
 
| style="text-align:center;" |Others
 
| style="text-align:center;" |0.48
 
| style="text-align:center;" |0.9
 
|-
 
| rowspan="3" style="text-align:center;" |Light Cruisers
 
| style="text-align:center;" |Ooyodo
 
| style="text-align:center;" |1.12
 
| style="text-align:center;" |2.1
 
|-
 
| style="text-align:center;" |Agano-class
 
| style="text-align:center;" |0.96
 
| style="text-align:center;" |1.8
 
|-
 
| style="text-align:center;" |Others
 
| style="text-align:center;" |0.8
 
| style="text-align:center;" |1.5
 
|-
 
| style="text-align:center;" |Torpedo Cruisers
 
| style="text-align:center;" |(all)
 
| style="text-align:center;" |0.8
 
| style="text-align:center;" |1.5
 
|-
 
| rowspan="4" style="text-align:center;" |Heavy Cruisers
 
| style="text-align:center;" |Furutaka-class<br>Aoba-class
 
| style="text-align:center;" |1.12
 
| style="text-align:center;" |2.1
 
|-
 
| style="text-align:center;" |Tone-class Kai<br>Myoukou-class Kai Ni
 
| style="text-align:center;" |1.44
 
| style="text-align:center;" |2.7
 
|-
 
| style="text-align:center;" |Prinz Eugen
 
| style="text-align:center;" |1.76
 
| style="text-align:center;" |3.3
 
|-
 
| style="text-align:center;" |Others
 
| style="text-align:center;" |1.28
 
| style="text-align:center;" |2.4
 
|-
 
| style="text-align:center;" |Aviation Cruisers
 
| style="text-align:center;" |(all)
 
| style="text-align:center;" |1.6
 
| style="text-align:center;" |3
 
|-
 
| rowspan="6" style="text-align:center;" |Battleships
 
| style="text-align:center;" |Ise-class<br>Fusou-class
 
| style="text-align:center;" |2.72
 
| style="text-align:center;" |5.1
 
|-
 
| style="text-align:center;" |Nagato-class<br>Kongou-class
 
| style="text-align:center;" |3.2
 
| style="text-align:center;" |6
 
|-
 
| style="text-align:center;" |Bismarck zwei
 
| style="text-align:center;" |3.36
 
| style="text-align:center;" |6.3
 
|-
 
| style="text-align:center;" |Bismarck drei
 
| style="text-align:center;" |3.52
 
| style="text-align:center;" |6.6
 
|-
 
| style="text-align:center;" |Vittorio Veneto-class
 
| style="text-align:center;" |4.16
 
| style="text-align:center;" |7.8
 
|-
 
| style="text-align:center;" |Yamato-class
 
| style="text-align:center;" |8
 
| style="text-align:center;" |15
 
|-
 
| rowspan="2" style="text-align:center;" |Aviation Battleships
 
| style="text-align:center;" |Ise-class Kai
 
| style="text-align:center;" |3.04
 
| style="text-align:center;" |5.7
 
|-
 
| style="text-align:center;" |Fusou-class Kai Ni
 
| style="text-align:center;" |3.36
 
| style="text-align:center;" |6.3
 
|-
 
| style="text-align:center;" |Submarines
 
| style="text-align:center;" |(all)
 
| style="text-align:center;" |0.3
 
| style="text-align:center;" |0.8
 
|-
 
| rowspan="2" style="text-align:center;" |Submarine Aircraft Carriers
 
| style="text-align:center;" |I-401
 
| style="text-align:center;" |0.8
 
| style="text-align:center;" |1.5
 
|-
 
| style="text-align:center;" |Others
 
| style="text-align:center;" |0.32
 
| style="text-align:center;" |0.6
 
|-
 
| rowspan="2" style="text-align:center;" |Seaplane Tenders
 
| style="text-align:center;" |Chitose-class
 
| style="text-align:center;" |1.12
 
| style="text-align:center;" |2.1
 
|-
 
| style="text-align:center;" |Akitsushima
 
| style="text-align:center;" |1.6
 
| style="text-align:center;" |3
 
|-
 
| rowspan="4" style="text-align:center;" |Light Aircraft Carriers
 
| style="text-align:center;" |Houshou
 
| style="text-align:center;" |0.96
 
| style="text-align:center;" |1.8
 
|-
 
| style="text-align:center;" |Ryuuhou
 
| style="text-align:center;" |1.12
 
| style="text-align:center;" |2.1
 
|-
 
| style="text-align:center;" |Shouhou-class<br>Ryuujou
 
| style="text-align:center;" |1.28
 
| style="text-align:center;" |2.4
 
|-
 
| style="text-align:center;" |Chitose-class Carrier<br>Hiyou-class
 
| style="text-align:center;" |1.44
 
| style="text-align:center;" |2.7
 
|-
 
| rowspan="6" style="text-align:center;" |Aircraft Carriers
 
| style="text-align:center;" |Unryuu-class
 
| style="text-align:center;" |1.6
 
| style="text-align:center;" |3
 
|-
 
| style="text-align:center;" |Shoukaku-class
 
| style="text-align:center;" |2.08
 
| style="text-align:center;" |3.9
 
|-
 
| style="text-align:center;" |Hiryuu<br>Souryuu
 
| style="text-align:center;" |2.24
 
| style="text-align:center;" |4.2
 
|-
 
| style="text-align:center;" |Akagi
 
| style="text-align:center;" |2.4
 
| style="text-align:center;" |4.5
 
|-
 
| style="text-align:center;" |Kaga
 
| style="text-align:center;" |2.56
 
| style="text-align:center;" |4.8
 
|-
 
| style="text-align:center;" |Taihou
 
| style="text-align:center;" |2.88
 
| style="text-align:center;" |5.4
 
|-
 
| style="text-align:center;" |Submarine Tenders
 
| style="text-align:center;" |Taigei
 
| style="text-align:center;" |1.12
 
| style="text-align:center;" |2.1
 
|-
 
| style="text-align:center;" |Amphibious Assault Ships
 
| style="text-align:center;" |Akitsumaru
 
| style="text-align:center;" |1.44
 
| style="text-align:center;" |2.7
 
|-
 
| style="text-align:center;" |Repair Ships
 
| style="text-align:center;" |Akashi
 
| style="text-align:center;" |1.7
 
| style="text-align:center;" |3.3
 
|-
 
| style="text-align:center;" |Training Cruisers
 
| style="text-align:center;" |Katori
 
| style="text-align:center;" |1.12
 
| style="text-align:center;" |2.1
 
|-
 
| rowspan="3" style="text-align:center;" |Collaboration Ships
 
| style="background-color:rgb(127,127,127);text-align:center;" |SS Iona
 
| style="background-color:rgb(127,127,127);text-align:center;" |4.8
 
| style="background-color:rgb(127,127,127);text-align:center;" |9
 
|-
 
| style="background-color:rgb(127,127,127);text-align:center;" |CA Takao
 
| style="background-color:rgb(127,127,127);text-align:center;" |5.6
 
| style="background-color:rgb(127,127,127);text-align:center;" |10.5
 
|-
 
| style="background-color:rgb(127,127,127);text-align:center;" |BB Haruna
 
| style="background-color:rgb(127,127,127);text-align:center;" |6.4
 
| style="background-color:rgb(127,127,127);text-align:center;" |12
 
|-
 
| rowspan="2" style="background-color:rgb(135,206,250);text-align:center;" |'''Type'''
 
| rowspan="2" style="background-color:rgb(135,206,250);text-align:center;" |'''Class'''
 
| style="background-color:rgb(135,206,250);text-align:center;" |{{Fuel}}
 
| style="background-color:rgb(135,206,250);text-align:center;" |{{Steel}}
 
|}
 
Full list of rounded ship class cost: [http://wikiwiki.jp/kancolle/?%C6%FE%B5%F4#p65108a1 Wikiwiki]
 
  
==Examples==
+
'''Notes'''
Example 1: Level 67 [[Kongou|Kongou Kai]] with 41/75 HP (34 damage):
+
While a ship is being repaired in the docks:
* Base repair time:
+
* That repair cannot be canceled unless using the '''Instant Repair (高速修復)''' button.
**<math>67 \times 5 + floor(\sqrt {67 - 11}) \times 10 + 50 = 335 + 7 \times 10 + 50 = \text {455 seconds}</math>
+
* The girl cannot be modernized, remodeled, or have her equipment modified.
* Repair time:
+
** It is possible to take her equipment by selecting them on other girls using the swap function.
**<math>34 \times \text{455 seconds} \times 1.5 + \text{30 seconds} = \text{23235 seconds or 6:27:15}</math>
+
If a ship ends repair with 39 morale or less, it will be set to 40. This includes repairs ended by using Instant Repair.
* Resource costs:
+
* The last minute of repair time can be shaved off by switching to the docking screen when a ship has less than one minute of repair time to go.
**<math>floor(90 \times 34 \times 0.06) = \text{183 steel}</math>
 
**<math>floor(90 \times 34 \times 0.032) = \text{97 fuel}</math>
 
Example 2: Level 150 [[Musashi|Musashi Kai]] with 1/106 HP (105 damage):
 
* Base repair time:
 
**<math>150 \times 5 + floor(\sqrt {150 - 11}) \times 10 + 50 = 750 + 11 \times 10 + 50 = \text {910 seconds}</math>
 
* Repair time:
 
** <math>105 \times \text{910 seconds} \times 2.0 + \text{30 seconds} = \text{191130 seconds or 53:05:30}</math>
 
* Resource costs:
 
** <math>floor(250 \times 105 \times 0.06) = \text{1575 steel}</math>
 
** <math>floor(250 \times 105 \times 0.032) = \text{840 fuel}</math>
 
* This is the highest in the game currently.
 
  
==Notes==
+
=See Also=
[[File:Bucketheal.png|right|thumb|56px|Bucket icon]]
+
[[Repairs]]
*While a ship is being repaired in the docks:
 
** You cannot cancel that repair (you must wait the full duration or use an Instant Repair to vacate that dock slot)
 
** You cannot modify equipments, modernize the ship, or remodel the ship.
 
* If a ship ends repair with 39 morale or less, it will be set to 40. This includes repairs ended by using Instant Repair.
 
* You can shave off the last minute of repair time by switching to the docking screen when a ship has less than one minute of repair time to go.
 
* You start the game with two repair dock slots—you can pay money (DMM points) to buy keys in the shop and expand to 3 or 4 slots. (The key is also used to unlock [[Construction|construction dock slots]].)
 
* To use buckets to instantly finish repairs use the green button (shown to the right) or activate the slider on the repair confirmation window.
 
* If the player has [[Akashi]], she can also repair ships (subject to limitations). See [[Akashi#Anchorage_Repair_.28.E6.B3.8A.E5.9C.B0.E4.BF.AE.E7.90.86.29|here]] for details.
 
<br>
 
 
{{Mechanics}}
 
{{Mechanics}}

Latest revision as of 11:22, 15 December 2022

Home Port Portal
Military Record · Friendly Fleet · Library · Inventory · Furniture · Quests · Shop
SortieButton.png ExercicesButton.png ExpeditionButton.png

Port ringmenu Fleet.png · Port ringmenu Supply.png · Port ringmenu Refit.png · Port ringmenu Docks On.png · Port ringmenu Build.png · Port ringmenu Improve.png


Docking (入渠) is a main menu function that lets repair damaged girls.

  • An alternate method is to use Anchorage Repairs, or to remodel a girl.
  • This page provides information about the menu. Please see Repairs for details on repairing ship girls.

Menu Functions

Repair Menu and all the available options

The following functions appear in the Repair menu:

  • Occupied Slot - Displays girls currently being repaired. Girl banners are marked with Repair (修復). Her name and HP she had when she was put into the docks will be displayed beside her.
  • Empty Slot - Displays available repair slots.
  • Time Remaining - Displays how long until repairs are complete.
  • Instant Repair - Allows to complete repairs instantly.

Repairing Girls

Confirmation window for repairs

Repairing a girl costs fuel and steel. It will also take time unless an instant repair Instant repair is used.

  • Every player starts off with only 2 dock slots. Up to 2 more slots can be unlocked by using a Dock Opening Key each time.

To repair a ship:

  1. Click on any empty slot to bring up a list of girls. It will be sorted by damage as default.
  2. Click on the girl to repair. This brings up the information menu.
    • The toggle is for using instant repairs. It is set at Do Not Use (使用しない) by default. It can be toggled to Use (使用する) if wished.
  3. Clicking on the Begin Repairs! (修復開始!) button will bring up the confirmation screen. It shows all the resource costs again.
  4. Clicking on Yes (はい) starts the repair. Clicking on No (いいえ) takes back to the girl selection menu.

Notes While a ship is being repaired in the docks:

  • That repair cannot be canceled unless using the Instant Repair (高速修復) button.
  • The girl cannot be modernized, remodeled, or have her equipment modified.
    • It is possible to take her equipment by selecting them on other girls using the swap function.

If a ship ends repair with 39 morale or less, it will be set to 40. This includes repairs ended by using Instant Repair.

  • The last minute of repair time can be shaved off by switching to the docking screen when a ship has less than one minute of repair time to go.

See Also

Repairs