- Welcome to the Kancolle Wiki!
- If you have any questions regarding site content, account registration, etc., please visit the KanColle Wiki Discord
World 7
Contents
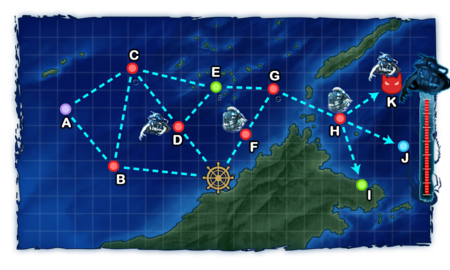
World 7-1: ブルネイ泊地沖 - Brunei Anchorage Sea
| Strategy Name | ブルネイ泊地沖哨戒 Brunei Anchorage Sea Patrol |
|---|---|
| Difficulty | ☆ ☆ ☆ ☆ ☆ |
| Item | |
| Strategy Content | 燃料の豊かなブルネイ泊地近海に敵潜水艦の跳梁が見られる。これを捜索制圧し、重要拠点である同泊地周辺の安全を図れ! Enemy submarines have been sighted near Brunei Anchorage where fuel reserves are aplenty. Search for and suppress them in order to secure the area surrounding the anchorage, an important stronghold! |
| World 7 Unlocking & Progression | ||||
|---|---|---|---|---|
| Unlock conditions | World 7 is unlocked after clearing 2-4 | |||
| Clear conditions | To clear the map: the boss's flagship must be sunk 3 times | |||
Stage Guide
| 7-1 Branching Rules | ||
|---|---|---|
| Nodes | Rules | |
| Start | B |
|
D | ||
F | ||
B |
A |
|
C |
| |
D |
C |
|
E | ||
H |
I |
|
J | ||
K | ||
Tips
This is an anti-submarine operation, requiring heavy ASW capabilities.
- Node G however, is a surface battle against an enemy torpedo squadron.
Use of CL/CLT/DD capable of OASW, either from reaching high enough ASW stat or from having innate OASW capabilities, is required.
- Use of DE is an option as well, but due to their poor firepower and defensive stats, they may have trouble surviving Node G.
Using 6 ships will cause fleets to route to Node B.
As this map is very cheap and quick to run, it is the prime location for Ranking.
Recommended Fleets
| Expand5 Ships Fleet | ||||
|---|---|---|---|---|
| Fleet | 1 CL, 1 DD, 3 DD/DE | |||
| LoS | Speed | |||
| Any | Any | |||
| RouteNode Types: BLUE: Empty/Choice RED: Battle GREEN: Resource/TP VIOLET: Maelstrom PURPLE: Night Battle PINK: Air Raid/Battle ORANGE: Enemy Ambush/ASS |
D E G H K | |||
| Fleet Notes | Use of a CL capable of opening attacks against surface ships is advised for Node G (Opening Torpedo Salvo and airstrike via Seaplane Bombers).
Bringing OASW capable DD/DE is required.
| |||
| Air State | AD | AP | AS | AS+ |
| 0 | 0 | 0 | 0 | |
| Expand4 Ships Fleets | ||||
|---|---|---|---|---|
| Fleet | 4 XX 1-2 CL, 2-3 CLT 4 DD/DE | |||
| LoS | Speed | |||
| Any | Any | |||
| RouteNode Types: BLUE: Empty/Choice RED: Battle GREEN: Resource/TP VIOLET: Maelstrom PURPLE: Night Battle PINK: Air Raid/Battle ORANGE: Enemy Ambush/ASS |
Random:
| |||
| Fleet Notes | Can also reach the Boss Node, but have a small chance to off-route into dead-ends instead (I or J).
Do not bring AO as it off-routes to node I instead of the boss node. | |||
| Air State | AD | AP | AS | AS+ |
| 0 | 0 | 0 | 0 | |
Resource Nodes
E I are "Normal Resource Nodes" rewarding both fuel ![]() .
.
- See here for more details.
Enemy Compositions
| # | Maelstrom Node | ||
|---|---|---|---|
| A | Lost Normal | ||
| # | Maelstrom Node | ||
| # | Enemy Form. |
Base EXP | Normal Battle Node | AD/AP AS/AS+ |
|---|---|---|---|---|
| B | Line Ahead Line Abreast |
200 | 0/0 0/0 | |
| Double Line Diamond |
200 | 8/16 35/69 | ||
| Double Line Diamond |
210 | 8/16 35/69 | ||
| # | Enemy Form. |
Base EXP | Normal Battle Node | AD/AP AS/AS+ |
| # | Enemy Form. |
Base EXP | Normal Battle Node | AD/AP AS/AS+ |
|---|---|---|---|---|
| C | Double Line Diamond |
230 | 29/57 126/252 | |
| Double Line Diamond |
250 | 29/57 126/252 | ||
| Double Line Diamond |
270 | 29/57 126/252 | ||
| # | Enemy Form. |
Base EXP | Normal Battle Node | AD/AP AS/AS+ |
| # | Enemy Form. |
Base EXP | Normal Battle Node | AD/AP AS/AS+ |
|---|---|---|---|---|
| D | Line Abreast Echelon |
150 | 0/0 0/0 | |
| Line Abreast Echelon |
170 | 0/0 0/0 | ||
| Line Abreast Echelon |
190 | 0/0 0/0 | ||
| Echelon | 200 | 0/0 0/0 | ||
| # | Enemy Form. |
Base EXP | Normal Battle Node | AD/AP AS/AS+ |
| # | Resource Node | ||
|---|---|---|---|
| E | Gained 10~20 | ||
| # | Resource Node | ||
| # | Enemy Form. |
Base EXP | Normal Battle Node | AD/AP AS/AS+ |
|---|---|---|---|---|
| F | Line Abreast Echelon |
120 | 0/0 0/0 | |
| Line Abreast Echelon |
150 | 0/0 0/0 | ||
| Line Abreast Echelon |
170 | 0/0 0/0 | ||
| Line Abreast Echelon |
180 | 0/0 0/0 | ||
| Echelon | 190 | 0/0 0/0 | ||
| # | Enemy Form. |
Base EXP | Normal Battle Node | AD/AP AS/AS+ |
| # | Enemy Form. |
Base EXP | Normal Battle Node | AD/AP AS/AS+ |
|---|---|---|---|---|
| G | Line Ahead Line Abreast |
150 | 0/0 0/0 | |
| Line Ahead Double Line |
170 | 0/0 0/0 | ||
| Line Ahead Double Line |
190 | 0/0 0/0 | ||
| # | Enemy Form. |
Base EXP | Normal Battle Node | AD/AP AS/AS+ |
| # | Enemy Form. |
Base EXP | Normal Battle Node | AD/AP AS/AS+ |
|---|---|---|---|---|
| H | Line Abreast Echelon |
150 | 0/0 0/0 | |
| Line Abreast Echelon |
160 | 0/0 0/0 | ||
| Line Abreast Echelon |
170 | 0/0 0/0 | ||
| Line Abreast Echelon |
190 | 0/0 0/0 | ||
| Echelon | 200 | 0/0 0/0 | ||
| # | Enemy Form. |
Base EXP | Normal Battle Node | AD/AP AS/AS+ |
| # | Resource Node | ||
|---|---|---|---|
| I | Gained 30~50 | ||
| # | Resource Node | ||
| # | Empty Node | ||
|---|---|---|---|
| J | 気のせいだった。/敵影を見ず。/穏やかな海です。/穏やかな海峡です。/警戒が必要です。/静かな海です。 Must be my imagination./No enemy spotted./Calm seas./Calm straits./Be alert./Peaceful seas. | ||
| # | Empty Node | ||
| # | Enemy Form. |
Base EXP | Boss Battle Node | AD/AP AS/AS+ |
|---|---|---|---|---|
| K | Echelon | 330 | 0/0 0/0 | |
| Echelon | 360 | 0/0 0/0 | ||
| Echelon | 390 | 0/0 0/0 | ||
| # | Enemy Form. |
Base EXP | Boss Battle Node | AD/AP AS/AS+ |
Ship Drops
| ExpandShip drops | |||||||||||||||||||||||||||||||||||||||||||||||||||||||||||||||||||||||||||||||||||||||||||||||||||
|---|---|---|---|---|---|---|---|---|---|---|---|---|---|---|---|---|---|---|---|---|---|---|---|---|---|---|---|---|---|---|---|---|---|---|---|---|---|---|---|---|---|---|---|---|---|---|---|---|---|---|---|---|---|---|---|---|---|---|---|---|---|---|---|---|---|---|---|---|---|---|---|---|---|---|---|---|---|---|---|---|---|---|---|---|---|---|---|---|---|---|---|---|---|---|---|---|---|---|---|
| Type | Ship? | B | C | G | K | ||||||||||||||||||||||||||||||||||||||||||||||||||||||||||||||||||||||||||||||||||||||||||||||
| DD | Sagiri | ✔️ | |||||||||||||||||||||||||||||||||||||||||||||||||||||||||||||||||||||||||||||||||||||||||||||||||
| DD | Oyashio | ✔️ | |||||||||||||||||||||||||||||||||||||||||||||||||||||||||||||||||||||||||||||||||||||||||||||||||
| DD | Arashi | ✔️ | |||||||||||||||||||||||||||||||||||||||||||||||||||||||||||||||||||||||||||||||||||||||||||||||||
| DD | Hagikaze | ✔️ | |||||||||||||||||||||||||||||||||||||||||||||||||||||||||||||||||||||||||||||||||||||||||||||||||
| CA | Mikuma | ✔️ | |||||||||||||||||||||||||||||||||||||||||||||||||||||||||||||||||||||||||||||||||||||||||||||||||
| AS | Taigei | ✔️ | |||||||||||||||||||||||||||||||||||||||||||||||||||||||||||||||||||||||||||||||||||||||||||||||||
| CL | Kitakami | ✔️ | ✔️ | ||||||||||||||||||||||||||||||||||||||||||||||||||||||||||||||||||||||||||||||||||||||||||||||||
| CL | Ooi | ✔️ | ✔️ | ||||||||||||||||||||||||||||||||||||||||||||||||||||||||||||||||||||||||||||||||||||||||||||||||
| CL | Nagara | ✔️ | ✔️ | ✔️ | ✔️ | ||||||||||||||||||||||||||||||||||||||||||||||||||||||||||||||||||||||||||||||||||||||||||||||
| CL | Kinu | ✔️ | ✔️ | ||||||||||||||||||||||||||||||||||||||||||||||||||||||||||||||||||||||||||||||||||||||||||||||||
| CL | Abukuma | ✔️ | ✔️ | ||||||||||||||||||||||||||||||||||||||||||||||||||||||||||||||||||||||||||||||||||||||||||||||||
| CL | Sendai | ✔️ | ✔️ | ✔️ | ✔️ | ||||||||||||||||||||||||||||||||||||||||||||||||||||||||||||||||||||||||||||||||||||||||||||||
| CL | Yuubari | ✔️ | ✔️ | ✔️ | |||||||||||||||||||||||||||||||||||||||||||||||||||||||||||||||||||||||||||||||||||||||||||||||
| CA | Kinugasa | ✔️ | |||||||||||||||||||||||||||||||||||||||||||||||||||||||||||||||||||||||||||||||||||||||||||||||||
| CA | Myoukou | ✔️ | |||||||||||||||||||||||||||||||||||||||||||||||||||||||||||||||||||||||||||||||||||||||||||||||||
| CA | Takao | ✔️ | |||||||||||||||||||||||||||||||||||||||||||||||||||||||||||||||||||||||||||||||||||||||||||||||||
| CA | Atago | ✔️ | |||||||||||||||||||||||||||||||||||||||||||||||||||||||||||||||||||||||||||||||||||||||||||||||||
| CA | Mogami | ✔️ | ✔️ | ✔️ | |||||||||||||||||||||||||||||||||||||||||||||||||||||||||||||||||||||||||||||||||||||||||||||||
| CA | Suzuya | ✔️ | |||||||||||||||||||||||||||||||||||||||||||||||||||||||||||||||||||||||||||||||||||||||||||||||||
| CA | Kumano | ✔️ | |||||||||||||||||||||||||||||||||||||||||||||||||||||||||||||||||||||||||||||||||||||||||||||||||
| CA | Tone | ✔️ | |||||||||||||||||||||||||||||||||||||||||||||||||||||||||||||||||||||||||||||||||||||||||||||||||
| CA | Chikuma | ✔️ | |||||||||||||||||||||||||||||||||||||||||||||||||||||||||||||||||||||||||||||||||||||||||||||||||
| CVL | Ryuujou | ✔️ | ✔️ | ✔️ | |||||||||||||||||||||||||||||||||||||||||||||||||||||||||||||||||||||||||||||||||||||||||||||||
| CVL | Shouhou | ✔️ | ✔️ | ✔️ | ✔️ | ||||||||||||||||||||||||||||||||||||||||||||||||||||||||||||||||||||||||||||||||||||||||||||||
| CVL | Zuihou | ✔️ | |||||||||||||||||||||||||||||||||||||||||||||||||||||||||||||||||||||||||||||||||||||||||||||||||
| FBB | Kongou | ✔️ | |||||||||||||||||||||||||||||||||||||||||||||||||||||||||||||||||||||||||||||||||||||||||||||||||
| FBB | Hiei | ✔️ | |||||||||||||||||||||||||||||||||||||||||||||||||||||||||||||||||||||||||||||||||||||||||||||||||
| FBB | Haruna | ✔️ | |||||||||||||||||||||||||||||||||||||||||||||||||||||||||||||||||||||||||||||||||||||||||||||||||
| FBB | Kirishima | ✔️ | |||||||||||||||||||||||||||||||||||||||||||||||||||||||||||||||||||||||||||||||||||||||||||||||||
| SS | I-8 | ✔️ | |||||||||||||||||||||||||||||||||||||||||||||||||||||||||||||||||||||||||||||||||||||||||||||||||
| SS | I-19 | ✔️ | ✔️ | ✔️ | |||||||||||||||||||||||||||||||||||||||||||||||||||||||||||||||||||||||||||||||||||||||||||||||
| SS | I-58 | ✔️ | ✔️ | ✔️ | |||||||||||||||||||||||||||||||||||||||||||||||||||||||||||||||||||||||||||||||||||||||||||||||
| DD | Mutsuki | ✔️ | ✔️ | ✔️ | ✔️ | ||||||||||||||||||||||||||||||||||||||||||||||||||||||||||||||||||||||||||||||||||||||||||||||
| DD | Kisaragi | ✔️ | ✔️ | ✔️ | ✔️ | ||||||||||||||||||||||||||||||||||||||||||||||||||||||||||||||||||||||||||||||||||||||||||||||
| DD | Satsuki | ✔️ | ✔️ | ✔️ | ✔️ | ||||||||||||||||||||||||||||||||||||||||||||||||||||||||||||||||||||||||||||||||||||||||||||||
| DD | Fumizuki | ✔️ | ✔️ | ✔️ | ✔️ | ||||||||||||||||||||||||||||||||||||||||||||||||||||||||||||||||||||||||||||||||||||||||||||||
| DD | Nagatsuki | ✔️ | ✔️ | ✔️ | ✔️ | ||||||||||||||||||||||||||||||||||||||||||||||||||||||||||||||||||||||||||||||||||||||||||||||
| DD | Kikuzuki | ✔️ | ✔️ | ✔️ | ✔️ | ||||||||||||||||||||||||||||||||||||||||||||||||||||||||||||||||||||||||||||||||||||||||||||||
| DD | Mikazuki | ✔️ | ✔️ | ✔️ | ✔️ | ||||||||||||||||||||||||||||||||||||||||||||||||||||||||||||||||||||||||||||||||||||||||||||||
| DD | Mochizuki | ✔️ | ✔️ | ✔️ | ✔️ | ||||||||||||||||||||||||||||||||||||||||||||||||||||||||||||||||||||||||||||||||||||||||||||||
| DD | Fubuki | ✔️ | ✔️ | ✔️ | ✔️ | ||||||||||||||||||||||||||||||||||||||||||||||||||||||||||||||||||||||||||||||||||||||||||||||
| DD | Shirayuki | ✔️ | ✔️ | ✔️ | ✔️ | ||||||||||||||||||||||||||||||||||||||||||||||||||||||||||||||||||||||||||||||||||||||||||||||
| DD | Hatsuyuki | ✔️ | ✔️ | ✔️ | ✔️ | ||||||||||||||||||||||||||||||||||||||||||||||||||||||||||||||||||||||||||||||||||||||||||||||
| DD | Miyuki | ✔️ | ✔️ | ✔️ | ✔️ | ||||||||||||||||||||||||||||||||||||||||||||||||||||||||||||||||||||||||||||||||||||||||||||||
| DD | Murakumo | ✔️ | ✔️ | ✔️ | ✔️ | ||||||||||||||||||||||||||||||||||||||||||||||||||||||||||||||||||||||||||||||||||||||||||||||
| DD | Isonami | ✔️ | ✔️ | ✔️ | ✔️ | ||||||||||||||||||||||||||||||||||||||||||||||||||||||||||||||||||||||||||||||||||||||||||||||
| DD | Ayanami | ✔️ | ✔️ | ✔️ | ✔️ | ||||||||||||||||||||||||||||||||||||||||||||||||||||||||||||||||||||||||||||||||||||||||||||||
| DD | Shikinami | ✔️ | ✔️ | ✔️ | ✔️ | ||||||||||||||||||||||||||||||||||||||||||||||||||||||||||||||||||||||||||||||||||||||||||||||
| DD | Oboro | ✔️ | ✔️ | ✔️ | ✔️ | ||||||||||||||||||||||||||||||||||||||||||||||||||||||||||||||||||||||||||||||||||||||||||||||
| DD | Akebono | ✔️ | ✔️ | ✔️ | ✔️ | ||||||||||||||||||||||||||||||||||||||||||||||||||||||||||||||||||||||||||||||||||||||||||||||
| DD | Sazanami | ✔️ | ✔️ | ✔️ | ✔️ | ||||||||||||||||||||||||||||||||||||||||||||||||||||||||||||||||||||||||||||||||||||||||||||||
| DD | Ushio | ✔️ | ✔️ | ✔️ | ✔️ | ||||||||||||||||||||||||||||||||||||||||||||||||||||||||||||||||||||||||||||||||||||||||||||||
| DD | Akatsuki | ✔️ | |||||||||||||||||||||||||||||||||||||||||||||||||||||||||||||||||||||||||||||||||||||||||||||||||
| DD | Hibiki | ✔️ | |||||||||||||||||||||||||||||||||||||||||||||||||||||||||||||||||||||||||||||||||||||||||||||||||
| DD | Ikazuchi | ✔️ | |||||||||||||||||||||||||||||||||||||||||||||||||||||||||||||||||||||||||||||||||||||||||||||||||
| DD | Inazuma | ✔️ | |||||||||||||||||||||||||||||||||||||||||||||||||||||||||||||||||||||||||||||||||||||||||||||||||
| DD | Hatsuharu | ✔️ | |||||||||||||||||||||||||||||||||||||||||||||||||||||||||||||||||||||||||||||||||||||||||||||||||
| DD | Nenohi | ✔️ | |||||||||||||||||||||||||||||||||||||||||||||||||||||||||||||||||||||||||||||||||||||||||||||||||
| DD | Wakaba | ✔️ | |||||||||||||||||||||||||||||||||||||||||||||||||||||||||||||||||||||||||||||||||||||||||||||||||
| DD | Hatsushimo | ✔️ | |||||||||||||||||||||||||||||||||||||||||||||||||||||||||||||||||||||||||||||||||||||||||||||||||
| DD | Shiratsuyu | ✔️ | |||||||||||||||||||||||||||||||||||||||||||||||||||||||||||||||||||||||||||||||||||||||||||||||||
| DD | Shigure | ✔️ | |||||||||||||||||||||||||||||||||||||||||||||||||||||||||||||||||||||||||||||||||||||||||||||||||
| DD | Murasame | ✔️ | |||||||||||||||||||||||||||||||||||||||||||||||||||||||||||||||||||||||||||||||||||||||||||||||||
| DD | Yuudachi | ✔️ | |||||||||||||||||||||||||||||||||||||||||||||||||||||||||||||||||||||||||||||||||||||||||||||||||
| DD | Samidare | ✔️ | |||||||||||||||||||||||||||||||||||||||||||||||||||||||||||||||||||||||||||||||||||||||||||||||||
| DD | Suzukaze | ✔️ | |||||||||||||||||||||||||||||||||||||||||||||||||||||||||||||||||||||||||||||||||||||||||||||||||
| DD | Asashio | ✔️ | |||||||||||||||||||||||||||||||||||||||||||||||||||||||||||||||||||||||||||||||||||||||||||||||||
| DD | Ooshio | ✔️ | |||||||||||||||||||||||||||||||||||||||||||||||||||||||||||||||||||||||||||||||||||||||||||||||||
| DD | Michishio | ✔️ | |||||||||||||||||||||||||||||||||||||||||||||||||||||||||||||||||||||||||||||||||||||||||||||||||
| DD | Arashio | ✔️ | |||||||||||||||||||||||||||||||||||||||||||||||||||||||||||||||||||||||||||||||||||||||||||||||||
| DD | Arare | ✔️ | |||||||||||||||||||||||||||||||||||||||||||||||||||||||||||||||||||||||||||||||||||||||||||||||||
| DD | Kasumi | ✔️ | |||||||||||||||||||||||||||||||||||||||||||||||||||||||||||||||||||||||||||||||||||||||||||||||||
| DD | Kagerou | ✔️ | ✔️ | ✔️ | ✔️ | ||||||||||||||||||||||||||||||||||||||||||||||||||||||||||||||||||||||||||||||||||||||||||||||
| DD | Shiranui | ✔️ | ✔️ | ✔️ | ✔️ | ||||||||||||||||||||||||||||||||||||||||||||||||||||||||||||||||||||||||||||||||||||||||||||||
| DD | Kuroshio | ✔️ | ✔️ | ✔️ | ✔️ | ||||||||||||||||||||||||||||||||||||||||||||||||||||||||||||||||||||||||||||||||||||||||||||||
| CL | Tenryuu | ✔️ | |||||||||||||||||||||||||||||||||||||||||||||||||||||||||||||||||||||||||||||||||||||||||||||||||
| CL | Tatsuta | ✔️ | |||||||||||||||||||||||||||||||||||||||||||||||||||||||||||||||||||||||||||||||||||||||||||||||||
| CL | Kuma | ✔️ | ✔️ | ✔️ | ✔️ | ||||||||||||||||||||||||||||||||||||||||||||||||||||||||||||||||||||||||||||||||||||||||||||||
| CL | Tama | ✔️ | ✔️ | ✔️ | ✔️ | ||||||||||||||||||||||||||||||||||||||||||||||||||||||||||||||||||||||||||||||||||||||||||||||
| CL | Kiso | ✔️ | ✔️ | ✔️ | ✔️ | ||||||||||||||||||||||||||||||||||||||||||||||||||||||||||||||||||||||||||||||||||||||||||||||
| CL | Isuzu | ✔️ | ✔️ | ✔️ | ✔️ | ||||||||||||||||||||||||||||||||||||||||||||||||||||||||||||||||||||||||||||||||||||||||||||||
| CL | Natori | ✔️ | ✔️ | ✔️ | ✔️ | ||||||||||||||||||||||||||||||||||||||||||||||||||||||||||||||||||||||||||||||||||||||||||||||
| CL | Yura | ✔️ | ✔️ | ✔️ | ✔️ | ||||||||||||||||||||||||||||||||||||||||||||||||||||||||||||||||||||||||||||||||||||||||||||||
| CL | Jintsuu | ✔️ | ✔️ | ✔️ | ✔️ | ||||||||||||||||||||||||||||||||||||||||||||||||||||||||||||||||||||||||||||||||||||||||||||||
| CL | Naka | ✔️ | ✔️ | ✔️ | ✔️ | ||||||||||||||||||||||||||||||||||||||||||||||||||||||||||||||||||||||||||||||||||||||||||||||
| CA | Furutaka | ✔️ | |||||||||||||||||||||||||||||||||||||||||||||||||||||||||||||||||||||||||||||||||||||||||||||||||
| CA | Kako | ✔️ | |||||||||||||||||||||||||||||||||||||||||||||||||||||||||||||||||||||||||||||||||||||||||||||||||
| CA | Aoba | ✔️ | |||||||||||||||||||||||||||||||||||||||||||||||||||||||||||||||||||||||||||||||||||||||||||||||||
| CA | Nachi | ✔️ | |||||||||||||||||||||||||||||||||||||||||||||||||||||||||||||||||||||||||||||||||||||||||||||||||
| CA | Ashigara | ✔️ | |||||||||||||||||||||||||||||||||||||||||||||||||||||||||||||||||||||||||||||||||||||||||||||||||
| CA | Haguro | ✔️ | |||||||||||||||||||||||||||||||||||||||||||||||||||||||||||||||||||||||||||||||||||||||||||||||||
| CA | Maya | ✔️ | |||||||||||||||||||||||||||||||||||||||||||||||||||||||||||||||||||||||||||||||||||||||||||||||||
| CA | Choukai | ✔️ | |||||||||||||||||||||||||||||||||||||||||||||||||||||||||||||||||||||||||||||||||||||||||||||||||
| CVL | Houshou | ✔️ | ✔️ | ✔️ | |||||||||||||||||||||||||||||||||||||||||||||||||||||||||||||||||||||||||||||||||||||||||||||||
| SS | I-168 | ✔️ | ✔️ | ||||||||||||||||||||||||||||||||||||||||||||||||||||||||||||||||||||||||||||||||||||||||||||||||
| AV | Chitose | ✔️ | |||||||||||||||||||||||||||||||||||||||||||||||||||||||||||||||||||||||||||||||||||||||||||||||||
| AV | Chiyoda | ✔️ | |||||||||||||||||||||||||||||||||||||||||||||||||||||||||||||||||||||||||||||||||||||||||||||||||
Contents
World 7-2: タウイタウイ泊地沖 - Tawi-Tawi Anchorage Sea


| World 7 Unlocking & Progression | ||||
|---|---|---|---|---|
| Unlock conditions | World 7 is unlocked after clearing 7-1 HP bar | |||
| Clear conditions | To clear the map: both phases must be cleared:
| |||
| Map reset | Resets at midnight JST at the beginning of every month | |||
Stage Guide
| 7-2 Branching Rules Phase 1 | ||
|---|---|---|
| Nodes | Rules | |
| Start | A |
|
B |
| |
C |
| |
C |
D |
|
E | ||
E |
F |
|
G | ||
| 7-2 Branching Rules Phase 2 | ||
|---|---|---|
| Nodes | Rules | |
D |
H |
|
I | ||
I |
J |
|
L |
| |
M |
| |
Tips
The 1st normal map to feature 2 phases.
- The 1st phase is ASW focused, similarly to 1-5 or 7-1.
- The 2nd phase is more standard, featuring submarine, surface, and aerial warfare.
On post-clear, the enemy composition for the Boss Node M will be locked to the easiest comp (Formation 1), which contains Nu-class elite, Ne-class base, and Tsu-class base, until the next reset.
Phase 1 - Eliminate the Submarine Fleet
The submarine boss fleet will usually consist of 3 SS, 1 Transport, and 2 DDs.
- A ranks are enough to clear this phase, as only the flagship has to be sunk.
Recommended Fleets
| ExpandShort Route | ||||
|---|---|---|---|---|
| Fleet | 4 DD/DE 1 CVL, 3 DD 1 CL, 3 DD 2 CVL, 3 DE | |||
| LoS | Speed | |||
| Any | Any | |||
| RouteNode Types: BLUE: Empty/Choice RED: Battle GREEN: Resource/TP VIOLET: Maelstrom PURPLE: Night Battle PINK: Air Raid/Battle ORANGE: Enemy Ambush/ASS |
C E G | |||
| Fleet Notes | Any CVL should be preferably a CVE.
Fleet will need to be ASW-focused, however, if requiring S ranks, using 1-2 ships with ASW/combat hybrid set-ups is required.
It may be advantageous to utilize the unique targeting of Suzuya Kou Kai Ni and Kumano Kou Kai Ni (focusing surface ships instead of SS). | |||
| Quests | Bq8 | |||
| Air State | AD | AP | AS | AS+ |
| 0 | 0 | 0 | 0 | |
Phase 2 - Eliminate the Carrier Fleet
Boss Fleet consists of a Wo Flagship Kai along with a Nu-class Elite, Flagship or Flagship Kai variant, a Ne-class elite CA, a Tsu-class, and some DD.
- Carefully managing the fleet's air power with strong planes can help either achieve AS or AP.
- Using an AACI DD might be helpful for minimizing possible damage taken.
Recommended Fleets
| ExpandShort Route | ||||
|---|---|---|---|---|
| Fleet | 1 FBB, 1 CV(B), 1 CVL, 1 CAV, 2 DD | |||
| LoS | Speed | |||
| Cn4: 69 | Fast | |||
| RouteNode Types: BLUE: Empty/Choice RED: Battle GREEN: Resource/TP VIOLET: Maelstrom PURPLE: Night Battle PINK: Air Raid/Battle ORANGE: Enemy Ambush/ASS |
B C D I M | |||
| Fleet Notes | Having a slow fleet will add an extra battle on Node H.
Most battles will involve surface fleets including DD, CL, and some CA.
Using an FBB can make getting up to the boss node relatively easier, but the fleet will need to be all fast to reach the boss node. | |||
| Quests | Bq8 | |||
| Air State | AD | AP | AS | AS+ |
| 107 | 160 | 359 | 718 | |
| ExpandLonger Route | ||||
|---|---|---|---|---|
| Fleet | 1 (F)BB(V)/CV(B), 1 CV(B), 1 CVL/CLT, 1 CAV, 2 DD | |||
| LoS | Speed | |||
| Cn4: 69 | ||||
| RouteNode Types: BLUE: Empty/Choice RED: Battle GREEN: Resource/TP VIOLET: Maelstrom PURPLE: Night Battle PINK: Air Raid/Battle ORANGE: Enemy Ambush/ASS |
A B C D I M | |||
| Fleet Notes | A stronger fleet that just pass through 1 extra storm node.
| |||
| Air State | AD | AP | AS | AS+ |
| 107 | 160 | 359 | 718 | |
Resource Nodes
K is a "Normal Resource Node" rewarding fuel ![]() .
.
- See here for more details.
Enemy Compositions
| # | Maelstrom Node | ||
|---|---|---|---|
| A | Lost Normal | ||
| # | Maelstrom Node | ||
| # | Enemy Form. |
Base EXP | Normal Battle Node | AD/AP AS/AS+ |
|---|---|---|---|---|
| B | Line Ahead Double Line Echelon |
130 | 0/0 0/0 | |
| Line Ahead Double Line Echelon |
150 | 0/0 0/0 | ||
| Line Ahead Double Line Echelon |
200 | 0/0 0/0 | ||
| # | Enemy Form. |
Base EXP | Normal Battle Node | AD/AP AS/AS+ |
| # | Enemy Form. |
Base EXP | Normal Battle Node | AD/AP AS/AS+ |
|---|---|---|---|---|
| C | Line Abreast Echelon |
130 | 0/0 0/0 | |
| Line Abreast Echelon |
150 | 0/0 0/0 | ||
| Line Abreast Echelon |
150 | 0/0 0/0 | ||
| Line Abreast Echelon |
170 | 0/0 0/0 | ||
| # | Enemy Form. |
Base EXP | Normal Battle Node | AD/AP AS/AS+ |
| # | Empty Node | ||
|---|---|---|---|
| D | 気のせいだった。/敵影を見ず。/穏やかな海です。/穏やかな海峡です。/警戒が必要です。/静かな海です。 Must be my imagination./No enemy spotted./Calm seas./Calm straits./Be alert./Peaceful seas. | ||
| # | Empty Node | ||
| # | Enemy Form. |
Base EXP | Normal Battle Node | AD/AP AS/AS+ |
|---|---|---|---|---|
| E | Line Abreast Echelon |
100 | 0/0 0/0 | |
| Line Abreast Echelon |
120 | 0/0 0/0 | ||
| Line Abreast Echelon |
140 | 0/0 0/0 | ||
| Line Abreast Echelon |
160 | 0/0 0/0 | ||
| # | Enemy Form. |
Base EXP | Normal Battle Node | AD/AP AS/AS+ |
| # | Empty Node | ||
|---|---|---|---|
| F | 気のせいだった。/敵影を見ず。/穏やかな海です。/穏やかな海峡です。/警戒が必要です。/静かな海です。 Must be my imagination./No enemy spotted./Calm seas./Calm straits./Be alert./Peaceful seas. | ||
| # | Empty Node | ||
| # | Enemy Form. |
Base EXP | Boss Battle Node | AD/AP AS/AS+ |
|---|---|---|---|---|
| G | Echelon | 300 | 0/0 0/0 | |
| Echelon | 320 | 0/0 0/0 | ||
| Echelon | 340 | 0/0 0/0 | ||
| Echelon | 330 | 0/0 0/0 | ||
| Echelon | 350 | 0/0 0/0 | ||
| Echelon | 370 | 0/0 0/0 | ||
| # | Enemy Form. |
Base EXP | Boss Battle Node | AD/AP AS/AS+ |
| # | Enemy Form. |
Base EXP | Air Defense Node | AD/AP AS/AS+ |
|---|---|---|---|---|
| H | Diamond | 150 | 60/119 266/531 | |
| Diamond | 160 | 62/124 278/555 | ||
| Diamond | 170 | 62/124 278/555 | ||
| Diamond | 180 | 74/147 329/657 | ||
| Diamond | 190 | 76/152 341/681 | ||
| Diamond | 200 | 78/156 350/699 | ||
| Diamond | 210 | 84/167 374/747 | ||
| Diamond | 220 | 88/176 395/789 | ||
| # | Enemy Form. |
Base EXP | Air Defense Node | AD/AP AS/AS+ |
| # | Enemy Form. |
Base EXP | Normal Battle Node | AD/AP AS/AS+ |
|---|---|---|---|---|
| I | Line Ahead Echelon |
160 | 0/0 0/0 | |
| Line Ahead Echelon |
200 | 0/0 0/0 | ||
| Line Ahead Echelon |
220 | 0/0 0/0 | ||
| Line Ahead Echelon |
250 | 0/0 0/0 | ||
| # | Enemy Form. |
Base EXP | Normal Battle Node | AD/AP AS/AS+ |
| # | Enemy Form. |
Base EXP | Normal Battle Node | AD/AP AS/AS+ |
|---|---|---|---|---|
| J | Line Ahead Double Line |
340 | 0/0 0/0 | |
| Line Ahead Double Line |
360 | 0/0 0/0 | ||
| Line Ahead | 380 | 0/0 0/0 | ||
| Double Line | 360 | 0/0 0/0 | ||
| Double Line | 380 | 0/0 0/0 | ||
| # | Enemy Form. |
Base EXP | Normal Battle Node | AD/AP AS/AS+ |
| # | Resource Node | ||
|---|---|---|---|
| K | Gained 25~40 | ||
| # | Resource Node | ||
| # | Empty Node | ||
|---|---|---|---|
| L | 気のせいだった。/敵影を見ず。/穏やかな海です。/穏やかな海峡です。/警戒が必要です。/静かな海です。 Must be my imagination./No enemy spotted./Calm seas./Calm straits./Be alert./Peaceful seas. | ||
| # | Empty Node | ||
| # | Enemy Form. |
Base EXP | Boss Battle Node | AD/AP AS/AS+ |
|---|---|---|---|---|
| M | Diamond | 500 | 60/119 266/531 | |
| Diamond | 510 | 60/119 266/531 | ||
| Diamond | 520 | 60/119 266/531 | ||
| Diamond | 530 | 66/131 293/585 | ||
| Diamond | 540 | 68/136 305/609 | ||
| Diamond | 550 | 70/140 314/627 | ||
| Diamond | 550 | 76/151 338/675 | ||
| Diamond | 580 | 80/160 359/717 | ||
| # | Enemy Form. |
Base EXP | Boss Battle Node | AD/AP AS/AS+ |
Ship Drops
- The below table contains limited-time drop data and may not be up to date.
| ExpandShip drops | |||||||||||||||||||||||||||||||||||||||||||||||||||||||||||||||||||||||||||||||||||||||||||||||||||
|---|---|---|---|---|---|---|---|---|---|---|---|---|---|---|---|---|---|---|---|---|---|---|---|---|---|---|---|---|---|---|---|---|---|---|---|---|---|---|---|---|---|---|---|---|---|---|---|---|---|---|---|---|---|---|---|---|---|---|---|---|---|---|---|---|---|---|---|---|---|---|---|---|---|---|---|---|---|---|---|---|---|---|---|---|---|---|---|---|---|---|---|---|---|---|---|---|---|---|---|
| Type | Ship? | B | G | I | M | ||||||||||||||||||||||||||||||||||||||||||||||||||||||||||||||||||||||||||||||||||||||||||||||
| DD | Minazuki | ✔️ | |||||||||||||||||||||||||||||||||||||||||||||||||||||||||||||||||||||||||||||||||||||||||||||||||
| DD | Amagiri | ✔️ | |||||||||||||||||||||||||||||||||||||||||||||||||||||||||||||||||||||||||||||||||||||||||||||||||
| DD | Tanikaze | ✔️ | ✔️ | ||||||||||||||||||||||||||||||||||||||||||||||||||||||||||||||||||||||||||||||||||||||||||||||||
| DD | Kazagumo | ✔️ | |||||||||||||||||||||||||||||||||||||||||||||||||||||||||||||||||||||||||||||||||||||||||||||||||
| AV | Mizuho | ✔️ | |||||||||||||||||||||||||||||||||||||||||||||||||||||||||||||||||||||||||||||||||||||||||||||||||
| DD | Akigumo | ✔️ | ✔️ | ✔️ | |||||||||||||||||||||||||||||||||||||||||||||||||||||||||||||||||||||||||||||||||||||||||||||||
| CL | Kitakami | ✔️ | |||||||||||||||||||||||||||||||||||||||||||||||||||||||||||||||||||||||||||||||||||||||||||||||||
| CL | Ooi | ✔️ | |||||||||||||||||||||||||||||||||||||||||||||||||||||||||||||||||||||||||||||||||||||||||||||||||
| CL | Nagara | ✔️ | ✔️ | ✔️ | |||||||||||||||||||||||||||||||||||||||||||||||||||||||||||||||||||||||||||||||||||||||||||||||
| CL | Abukuma | ✔️ | ✔️ | ✔️ | |||||||||||||||||||||||||||||||||||||||||||||||||||||||||||||||||||||||||||||||||||||||||||||||
| CL | Sendai | ✔️ | ✔️ | ✔️ | |||||||||||||||||||||||||||||||||||||||||||||||||||||||||||||||||||||||||||||||||||||||||||||||
| CL | Yuubari | ✔️ | ✔️ | ✔️ | |||||||||||||||||||||||||||||||||||||||||||||||||||||||||||||||||||||||||||||||||||||||||||||||
| CA | Kinugasa | ✔️ | |||||||||||||||||||||||||||||||||||||||||||||||||||||||||||||||||||||||||||||||||||||||||||||||||
| CA | Myoukou | ✔️ | |||||||||||||||||||||||||||||||||||||||||||||||||||||||||||||||||||||||||||||||||||||||||||||||||
| CA | Takao | ✔️ | |||||||||||||||||||||||||||||||||||||||||||||||||||||||||||||||||||||||||||||||||||||||||||||||||
| CA | Atago | ✔️ | |||||||||||||||||||||||||||||||||||||||||||||||||||||||||||||||||||||||||||||||||||||||||||||||||
| CA | Mogami | ✔️ | ✔️ | ✔️ | |||||||||||||||||||||||||||||||||||||||||||||||||||||||||||||||||||||||||||||||||||||||||||||||
| CA | Suzuya | ✔️ | |||||||||||||||||||||||||||||||||||||||||||||||||||||||||||||||||||||||||||||||||||||||||||||||||
| CA | Kumano | ✔️ | |||||||||||||||||||||||||||||||||||||||||||||||||||||||||||||||||||||||||||||||||||||||||||||||||
| CA | Tone | ✔️ | |||||||||||||||||||||||||||||||||||||||||||||||||||||||||||||||||||||||||||||||||||||||||||||||||
| CA | Chikuma | ✔️ | |||||||||||||||||||||||||||||||||||||||||||||||||||||||||||||||||||||||||||||||||||||||||||||||||
| FBB | Kongou | ✔️ | |||||||||||||||||||||||||||||||||||||||||||||||||||||||||||||||||||||||||||||||||||||||||||||||||
| FBB | Hiei | ✔️ | |||||||||||||||||||||||||||||||||||||||||||||||||||||||||||||||||||||||||||||||||||||||||||||||||
| FBB | Haruna | ✔️ | |||||||||||||||||||||||||||||||||||||||||||||||||||||||||||||||||||||||||||||||||||||||||||||||||
| FBB | Kirishima | ✔️ | |||||||||||||||||||||||||||||||||||||||||||||||||||||||||||||||||||||||||||||||||||||||||||||||||
| BB | Fusou | ✔️ | |||||||||||||||||||||||||||||||||||||||||||||||||||||||||||||||||||||||||||||||||||||||||||||||||
| BB | Yamashiro | ✔️ | |||||||||||||||||||||||||||||||||||||||||||||||||||||||||||||||||||||||||||||||||||||||||||||||||
| BB | Ise | ✔️ | |||||||||||||||||||||||||||||||||||||||||||||||||||||||||||||||||||||||||||||||||||||||||||||||||
| BB | Hyuuga | ✔️ | |||||||||||||||||||||||||||||||||||||||||||||||||||||||||||||||||||||||||||||||||||||||||||||||||
| CV | Shoukaku | ✔️ | |||||||||||||||||||||||||||||||||||||||||||||||||||||||||||||||||||||||||||||||||||||||||||||||||
| CV | Zuikaku | ✔️ | |||||||||||||||||||||||||||||||||||||||||||||||||||||||||||||||||||||||||||||||||||||||||||||||||
| SS | I-8 | ✔️ | |||||||||||||||||||||||||||||||||||||||||||||||||||||||||||||||||||||||||||||||||||||||||||||||||
| SS | I-19 | ✔️ | |||||||||||||||||||||||||||||||||||||||||||||||||||||||||||||||||||||||||||||||||||||||||||||||||
| SS | I-58 | ✔️ | |||||||||||||||||||||||||||||||||||||||||||||||||||||||||||||||||||||||||||||||||||||||||||||||||
| DD | Mutsuki | ✔️ | ✔️ | ✔️ | ✔️ | ||||||||||||||||||||||||||||||||||||||||||||||||||||||||||||||||||||||||||||||||||||||||||||||
| DD | Kisaragi | ✔️ | ✔️ | ✔️ | ✔️ | ||||||||||||||||||||||||||||||||||||||||||||||||||||||||||||||||||||||||||||||||||||||||||||||
| DD | Satsuki | ✔️ | ✔️ | ✔️ | ✔️ | ||||||||||||||||||||||||||||||||||||||||||||||||||||||||||||||||||||||||||||||||||||||||||||||
| DD | Fumizuki | ✔️ | ✔️ | ✔️ | |||||||||||||||||||||||||||||||||||||||||||||||||||||||||||||||||||||||||||||||||||||||||||||||
| DD | Nagatsuki | ✔️ | ✔️ | ✔️ | |||||||||||||||||||||||||||||||||||||||||||||||||||||||||||||||||||||||||||||||||||||||||||||||
| DD | Kikuzuki | ✔️ | ✔️ | ✔️ | |||||||||||||||||||||||||||||||||||||||||||||||||||||||||||||||||||||||||||||||||||||||||||||||
| DD | Mikazuki | ✔️ | ✔️ | ✔️ | |||||||||||||||||||||||||||||||||||||||||||||||||||||||||||||||||||||||||||||||||||||||||||||||
| DD | Mochizuki | ✔️ | ✔️ | ✔️ | |||||||||||||||||||||||||||||||||||||||||||||||||||||||||||||||||||||||||||||||||||||||||||||||
| DD | Fubuki | ✔️ | |||||||||||||||||||||||||||||||||||||||||||||||||||||||||||||||||||||||||||||||||||||||||||||||||
| DD | Shirayuki | ✔️ | |||||||||||||||||||||||||||||||||||||||||||||||||||||||||||||||||||||||||||||||||||||||||||||||||
| DD | Hatsuyuki | ✔️ | |||||||||||||||||||||||||||||||||||||||||||||||||||||||||||||||||||||||||||||||||||||||||||||||||
| DD | Miyuki | ✔️ | |||||||||||||||||||||||||||||||||||||||||||||||||||||||||||||||||||||||||||||||||||||||||||||||||
| DD | Murakumo | ✔️ | |||||||||||||||||||||||||||||||||||||||||||||||||||||||||||||||||||||||||||||||||||||||||||||||||
| DD | Isonami | ✔️ | |||||||||||||||||||||||||||||||||||||||||||||||||||||||||||||||||||||||||||||||||||||||||||||||||
| DD | Ayanami | ✔️ | ✔️ | ✔️ | ✔️ | ||||||||||||||||||||||||||||||||||||||||||||||||||||||||||||||||||||||||||||||||||||||||||||||
| DD | Shikinami | ✔️ | ✔️ | ✔️ | ✔️ | ||||||||||||||||||||||||||||||||||||||||||||||||||||||||||||||||||||||||||||||||||||||||||||||
| DD | Oboro | ✔️ | ✔️ | ✔️ | |||||||||||||||||||||||||||||||||||||||||||||||||||||||||||||||||||||||||||||||||||||||||||||||
| DD | Akebono | ✔️ | ✔️ | ✔️ | |||||||||||||||||||||||||||||||||||||||||||||||||||||||||||||||||||||||||||||||||||||||||||||||
| DD | Sazanami | ✔️ | ✔️ | ✔️ | |||||||||||||||||||||||||||||||||||||||||||||||||||||||||||||||||||||||||||||||||||||||||||||||
| DD | Ushio | ✔️ | ✔️ | ✔️ | |||||||||||||||||||||||||||||||||||||||||||||||||||||||||||||||||||||||||||||||||||||||||||||||
| DD | Akatsuki | ✔️ | ✔️ | ✔️ | ✔️ | ||||||||||||||||||||||||||||||||||||||||||||||||||||||||||||||||||||||||||||||||||||||||||||||
| DD | Hibiki | ✔️ | ✔️ | ✔️ | |||||||||||||||||||||||||||||||||||||||||||||||||||||||||||||||||||||||||||||||||||||||||||||||
| DD | Ikazuchi | ✔️ | ✔️ | ✔️ | |||||||||||||||||||||||||||||||||||||||||||||||||||||||||||||||||||||||||||||||||||||||||||||||
| DD | Inazuma | ✔️ | ✔️ | ✔️ | ✔️ | ||||||||||||||||||||||||||||||||||||||||||||||||||||||||||||||||||||||||||||||||||||||||||||||
| DD | Hatsuharu | ✔️ | |||||||||||||||||||||||||||||||||||||||||||||||||||||||||||||||||||||||||||||||||||||||||||||||||
| DD | Shiratsuyu | ✔️ | ✔️ | ✔️ | ✔️ | ||||||||||||||||||||||||||||||||||||||||||||||||||||||||||||||||||||||||||||||||||||||||||||||
| DD | Shigure | ✔️ | ✔️ | ✔️ | |||||||||||||||||||||||||||||||||||||||||||||||||||||||||||||||||||||||||||||||||||||||||||||||
| DD | Murasame | ✔️ | ✔️ | ✔️ | |||||||||||||||||||||||||||||||||||||||||||||||||||||||||||||||||||||||||||||||||||||||||||||||
| DD | Yuudachi | ✔️ | ✔️ | ✔️ | |||||||||||||||||||||||||||||||||||||||||||||||||||||||||||||||||||||||||||||||||||||||||||||||
| DD | Suzukaze | ✔️ | |||||||||||||||||||||||||||||||||||||||||||||||||||||||||||||||||||||||||||||||||||||||||||||||||
| DD | Asashio | ✔️ | |||||||||||||||||||||||||||||||||||||||||||||||||||||||||||||||||||||||||||||||||||||||||||||||||
| DD | Kagerou | ✔️ | |||||||||||||||||||||||||||||||||||||||||||||||||||||||||||||||||||||||||||||||||||||||||||||||||
| CL | Kuma | ✔️ | ✔️ | ✔️ | |||||||||||||||||||||||||||||||||||||||||||||||||||||||||||||||||||||||||||||||||||||||||||||||
| CL | Tama | ✔️ | ✔️ | ✔️ | ✔️ | ||||||||||||||||||||||||||||||||||||||||||||||||||||||||||||||||||||||||||||||||||||||||||||||
| CL | Kiso | ✔️ | ✔️ | ✔️ | ✔️ | ||||||||||||||||||||||||||||||||||||||||||||||||||||||||||||||||||||||||||||||||||||||||||||||
| CL | Isuzu | ✔️ | ✔️ | ✔️ | ✔️ | ||||||||||||||||||||||||||||||||||||||||||||||||||||||||||||||||||||||||||||||||||||||||||||||
| CL | Natori | ✔️ | ✔️ | ✔️ | ✔️ | ||||||||||||||||||||||||||||||||||||||||||||||||||||||||||||||||||||||||||||||||||||||||||||||
| CL | Yura | ✔️ | ✔️ | ✔️ | ✔️ | ||||||||||||||||||||||||||||||||||||||||||||||||||||||||||||||||||||||||||||||||||||||||||||||
| CL | Jintsuu | ✔️ | ✔️ | ✔️ | ✔️ | ||||||||||||||||||||||||||||||||||||||||||||||||||||||||||||||||||||||||||||||||||||||||||||||
| CL | Naka | ✔️ | ✔️ | ✔️ | ✔️ | ||||||||||||||||||||||||||||||||||||||||||||||||||||||||||||||||||||||||||||||||||||||||||||||
| CA | Furutaka | ✔️ | |||||||||||||||||||||||||||||||||||||||||||||||||||||||||||||||||||||||||||||||||||||||||||||||||
| CA | Kako | ✔️ | |||||||||||||||||||||||||||||||||||||||||||||||||||||||||||||||||||||||||||||||||||||||||||||||||
| CA | Aoba | ✔️ | |||||||||||||||||||||||||||||||||||||||||||||||||||||||||||||||||||||||||||||||||||||||||||||||||
| CA | Nachi | ✔️ | |||||||||||||||||||||||||||||||||||||||||||||||||||||||||||||||||||||||||||||||||||||||||||||||||
| CA | Ashigara | ✔️ | |||||||||||||||||||||||||||||||||||||||||||||||||||||||||||||||||||||||||||||||||||||||||||||||||
| CA | Haguro | ✔️ | |||||||||||||||||||||||||||||||||||||||||||||||||||||||||||||||||||||||||||||||||||||||||||||||||
| CA | Maya | ✔️ | |||||||||||||||||||||||||||||||||||||||||||||||||||||||||||||||||||||||||||||||||||||||||||||||||
| CA | Choukai | ✔️ | |||||||||||||||||||||||||||||||||||||||||||||||||||||||||||||||||||||||||||||||||||||||||||||||||
| SS | I-168 | ✔️ | |||||||||||||||||||||||||||||||||||||||||||||||||||||||||||||||||||||||||||||||||||||||||||||||||
| |||||||||||||||||||||||||||||||||||||||||||||||||||||||||||||||||||||||||||||||||||||||||||||||||||||||||||||||||||||||||||||||||||||||||||||||||||||||||||||||||||||||||||||||||||||||||||||||||||||||||||||||||||||||||||||||||||||||||||||||||||||||||||||||||||||||||||||||||||||||||||||||||||||||||||
Contents
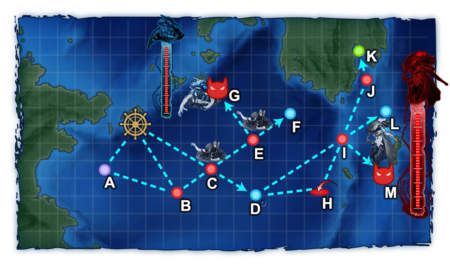
World 7-3: ペナン島沖 - Penang Island Sea


| Strategy Name | マラッカ海峡を抜けて Breaking Through Malacca Strait |
|---|---|
| Difficulty | ☆☆☆☆☆☆☆☆ |
| Item | |
| Strategy Content | 精強な重巡及び駆逐艦を中核とする小艦隊でマラッカ海峡を突破する。ペナン島沖の敵戦力を撃破して前進せよ! Break through the Malacca Strait using a powerful heavy cruiser and a small fleet centered around destroyers. Defeat the enemy forces in the Penang Island Sea and advance forward! |
| World 7 Unlocking & Progression | ||||
|---|---|---|---|---|
| Unlock conditions | World 7 is unlocked after clearing 7-2 HP bar once | |||
| Clear conditions | To clear the map: both phases must be cleared:
| |||
| Map reset | Resets at midnight JST at the beginning of every month | |||
Stage Guide
| 7-3 Branching Rules Part 1 | ||
|---|---|---|
| Nodes | Rules | |
A |
B |
|
C | ||
C |
D |
|
E | ||
D |
E |
|
F | ||
| 7-3 Branching Rules Part 2 | ||
|---|---|---|
| Nodes | Rules | |
A |
B |
|
C | ||
C |
D |
|
E | ||
I | ||
D |
F |
|
G | ||
G |
H |
|
I | ||
J | ||
K | ||
P | ||
I |
J |
|
L | ||
M | ||
J |
M |
|
P | ||
M |
N |
|
O | ||
P | ||
Historical Routing
Tips
This map featured historical routings. It is key in order to avoid node M which features CA Ri-Class that can potentially harm "lighter ships".
- The number of historical ships being presented in the fleet heavily affects the routing taken.
- Fast+ comps bypass most of the historical ship requirements (see below).
- Those historicals are notably droppable here.
Phase 1
This is a light fleet phase where the boss fleet has 5 enemy destroyers. The boss in this phase is DD Ro-Class Late Model, who will turn into Late Model Elite form in Last Dance (reverted to Late Model form post-clear).
Recommended Fleets
| Expand | ||||
|---|---|---|---|---|
| Fleet | Haguro, 3 DD | |||
| LoS | Speed | |||
| Any | Any | |||
| RouteNode Types: BLUE: Empty/Choice RED: Battle GREEN: Resource/TP VIOLET: Maelstrom PURPLE: Night Battle PINK: Air Raid/Battle ORANGE: Enemy Ambush/ASS |
A C E | |||
| Fleet Notes | Not having Haguro may add extra nodes.
Having Kamikaze in addition to Haguro permits heavier ships to replace the other DD.
| |||
| Air State | AD | AP | AS | AS+ |
| 0 | 0 | 0 | 0 | |
Phase 2
This phase requires to kill a much heavier enemy fleet, featuring CA Ne-Class Elite as the boss. In Last Dance, the boss comp will feature 6 enemies in total, and will revert back to 5-enemy comp in post-clear.
- It is possible to clear this phase by either using a fleet of 5 ships or 6 ships depending on what the comp.
- All the compositions suggested below require at least a Fast fleet.
Recommended Fleets
| ExpandHistorical Short Route | ||||
|---|---|---|---|---|
| Fleet | Haguro, Ashigara, Kamikaze, 1 CL(T)/AV, 2 DD | |||
| LoS | Speed | |||
| Any | Fast (Fast+ for 2 historicals fleets) | |||
| RouteNode Types: BLUE: Empty/Choice RED: Battle GREEN: Resource/TP VIOLET: Maelstrom PURPLE: Night Battle PINK: Air Raid/Battle ORANGE: Enemy Ambush/ASS |
A C D G P | |||
| Fleet Notes | The standard fleets to clear the map, utilizing the historical routing. | |||
| Quests | By5 | |||
| Air State | AD | AP | AS | AS+ |
| 0 | 0 | 0 | 0 | |
| ExpandHistorical Shortest Route | ||||
|---|---|---|---|---|
| Fleet | Haguro, Ashigara, Kamikaze, 1 CA(V), 1 DD (5 ships) | |||
| LoS | Speed | |||
| Any | Fast (Fast+ for 2 historicals fleets) | |||
| RouteNode Types: BLUE: Empty/Choice RED: Battle GREEN: Resource/TP VIOLET: Maelstrom PURPLE: Night Battle PINK: Air Raid/Battle ORANGE: Enemy Ambush/ASS |
A C I J P | |||
| Fleet Notes | Good fleets to clear the map, utilizing the historical routing on a weak fleet to get the shortest rout | |||
| Air State | AD | AP | AS | AS+ |
| 0 | 0 | 0 | 0 | |
| ExpandHistorical Long Route | ||||
|---|---|---|---|---|
| Fleet | Haguro, Ashigara, Kamikaze, 1 CL(T), 1 DD, 1 AV | |||
| LoS | Speed | |||
| Any | Fast | |||
| RouteNode Types: BLUE: Empty/Choice RED: Battle GREEN: Resource/TP VIOLET: Maelstrom PURPLE: Night Battle PINK: Air Raid/Battle ORANGE: Enemy Ambush/ASS |
A C D G J P | |||
| Fleet Notes | Both comps are equivalent depending on the situation:
| |||
| Air State | AD | AP | AS | AS+ |
| 0 | 0 | 0 | 0 | |
| ExpandHistorical Kamikaze-less | ||||
|---|---|---|---|---|
| Fleet | Haguro, Ashigara, 1 CLT/AV, 3 DD | |||
| LoS | Speed | |||
| Any | Fast | |||
| RouteNode Types: BLUE: Empty/Choice RED: Battle GREEN: Resource/TP VIOLET: Maelstrom PURPLE: Night Battle PINK: Air Raid/Battle ORANGE: Enemy Ambush/ASS |
A C D G I M P | |||
| Fleet Notes | Not recommended as there is an ammo penalty at the boss node.
Only use this comp if not having Kamikaze. | |||
| Air State | AD | AP | AS | AS+ |
| 0 | 0 | 0 | 0 | |
| ExpandNon-historical Fast+ | ||||
|---|---|---|---|---|
| Fleet | 1 CA(V), 1 CA, 1 CL, 3 DD | |||
| LoS | Speed | |||
| Any | Fast+ | |||
| RouteNode Types: BLUE: Empty/Choice RED: Battle GREEN: Resource/TP VIOLET: Maelstrom PURPLE: Night Battle PINK: Air Raid/Battle ORANGE: Enemy Ambush/ASS |
A C I L M P | |||
| Fleet Notes | A good fleet when lacking historical ships, at the cost of being fast+ | |||
| Air State | AD | AP | AS | AS+ |
| 0 | 0 | 0 | 0 | |
| ExpandNon-historical Fastest | ||||
|---|---|---|---|---|
| Fleet | 1 CA(V), 1 CA, 1 CL, 3 DD | |||
| LoS | Speed | |||
| Any | Fastest | |||
| RouteNode Types: BLUE: Empty/Choice RED: Battle GREEN: Resource/TP VIOLET: Maelstrom PURPLE: Night Battle PINK: Air Raid/Battle ORANGE: Enemy Ambush/ASS |
A C I J P | |||
| Fleet Notes | A good fleet when lacking historical ships with a short route, at the cost of being fast++ | |||
| Air State | AD | AP | AS | AS+ |
| 0 | 0 | 0 | 0 | |
Resource Nodes
H O are "Normal Resource Nodes" rewarding respectively fuel ![]() and bauxite
and bauxite ![]() .
.
- See here for more details.
Enemy Compositions
| # | Empty Node | ||
|---|---|---|---|
| A | 気のせいだった。 Must be my imagination. | ||
| # | Empty Node | ||
| # | Formation | Normal Battle Node | AD/AP AS/AS+ |
|---|---|---|---|
| B | Echelon Line Abreast |
0/0 0/0 | |
| Echelon Line Abreast |
0/0 0/0 | ||
| Echelon Line Abreast |
0/0 0/0 | ||
| # | Formation | Normal Battle Node | AD/AP AS/AS+ |
| # | Formation | Normal Battle Node | AD/AP AS/AS+ |
|---|---|---|---|
| C | Line Ahead Echelon |
0/0 0/0 | |
| Line Ahead Echelon |
0/0 0/0 | ||
| Line Ahead Echelon |
0/0 0/0 | ||
| # | Formation | Normal Battle Node | AD/AP AS/AS+ |
| # | Formation | Normal Battle Node | AD/AP AS/AS+ |
|---|---|---|---|
| D | Line Ahead Echelon |
0/0 0/0 | |
| Line Ahead Echelon |
0/0 0/0 | ||
| Line Ahead Echelon |
0/0 0/0 | ||
| # | Formation | Normal Battle Node | AD/AP AS/AS+ |
| # | Formation | Boss Battle Node | AD/AP AS/AS+ |
|---|---|---|---|
| E | Line Ahead Echelon |
0/0 0/0 | |
| Line Ahead Echelon |
0/0 0/0 | ||
| Line Ahead Echelon (Final)
|
0/0 0/0 | ||
| # | Formation | Boss Battle Node | AD/AP AS/AS+ |
| # | Empty Node | ||
|---|---|---|---|
| F | 敵影を見ず。 No enemy spotted. | ||
| # | Empty Node | ||
| # | Empty Node | ||
|---|---|---|---|
| G | 気のせいだった。 Must be my imagination. | ||
| # | Empty Node | ||
| # | Resource Node | ||
|---|---|---|---|
| H | Gained 30~50 | ||
| # | Resource Node | ||
| # | Empty Node | ||
|---|---|---|---|
| I | 気のせいだった。 Must be my imagination. | ||
| # | Empty Node | ||
| # | Formation | Normal Battle Node | AD/AP AS/AS+ |
|---|---|---|---|
| J | Echelon Line Abreast |
0/0 0/0 | |
| Echelon Line Abreast |
0/0 0/0 | ||
| Echelon Line Abreast |
0/0 0/0 | ||
| # | Formation | Normal Battle Node | AD/AP AS/AS+ |
| # | Maelstrom Node | ||
|---|---|---|---|
| K | Lost Normal | ||
| # | Maelstrom Node | ||
| # | Maelstrom Node | ||
|---|---|---|---|
| L | Lost Normal | ||
| # | Maelstrom Node | ||
| # | Formation | Normal Battle Node | AD/AP AS/AS+ |
|---|---|---|---|
| M | Line Ahead Double Line |
0/0 0/0 | |
| Line Ahead Double Line |
0/0 0/0 | ||
| Line Ahead Double Line |
0/0 0/0 | ||
| # | Formation | Normal Battle Node | AD/AP AS/AS+ |
| # | Formation | Normal Battle Node | AD/AP AS/AS+ |
|---|---|---|---|
| N | Diamond | 71/142 318/636 | |
| Double Line Diamond |
80/159 357/714 | ||
| # | Formation | Normal Battle Node | AD/AP AS/AS+ |
| # | Resource Node | ||
|---|---|---|---|
| O | Gained 40~60 | ||
| # | Resource Node | ||
| # | Formation | Boss Battle Node | AD/AP AS/AS+ |
|---|---|---|---|
| P | Line Ahead Echelon |
0/0 0/0 | |
| Line Ahead Echelon |
0/0 0/0 | ||
| Line Ahead Echelon (Final)
|
0/0 0/0 | ||
| # | Formation | Boss Battle Node | AD/AP AS/AS+ |
Ship Drops
- The below table contains limited-time drop data and may not be up to date.
| ExpandShip drops | |||||||||||||||||||||||||||||||||||||||||||||||||||||||||||||||||||||||||||||||||||||||||||||||||||
|---|---|---|---|---|---|---|---|---|---|---|---|---|---|---|---|---|---|---|---|---|---|---|---|---|---|---|---|---|---|---|---|---|---|---|---|---|---|---|---|---|---|---|---|---|---|---|---|---|---|---|---|---|---|---|---|---|---|---|---|---|---|---|---|---|---|---|---|---|---|---|---|---|---|---|---|---|---|---|---|---|---|---|---|---|---|---|---|---|---|---|---|---|---|---|---|---|---|---|---|
| Type | Ship? | C | D | E | M | P | |||||||||||||||||||||||||||||||||||||||||||||||||||||||||||||||||||||||||||||||||||||||||||||
| DE | Hirato | ✔️ | ✔️ | ||||||||||||||||||||||||||||||||||||||||||||||||||||||||||||||||||||||||||||||||||||||||||||||||
| DE | Fukae | ✔️ | ✔️ | ||||||||||||||||||||||||||||||||||||||||||||||||||||||||||||||||||||||||||||||||||||||||||||||||
| DD | Kamikaze | ✔️ | ✔️ | ✔️ | |||||||||||||||||||||||||||||||||||||||||||||||||||||||||||||||||||||||||||||||||||||||||||||||
| DD | Asakaze | ✔️ | |||||||||||||||||||||||||||||||||||||||||||||||||||||||||||||||||||||||||||||||||||||||||||||||||
| DD | Yamakaze | ✔️ | ✔️ | ||||||||||||||||||||||||||||||||||||||||||||||||||||||||||||||||||||||||||||||||||||||||||||||||
| DD | Fujinami | ✔️ | ✔️ | ||||||||||||||||||||||||||||||||||||||||||||||||||||||||||||||||||||||||||||||||||||||||||||||||
| DD | Kishinami | ✔️ | ✔️ | ||||||||||||||||||||||||||||||||||||||||||||||||||||||||||||||||||||||||||||||||||||||||||||||||
| CL | Agano | ✔️ | ✔️ | ||||||||||||||||||||||||||||||||||||||||||||||||||||||||||||||||||||||||||||||||||||||||||||||||
| CA | Pola | ✔️ | |||||||||||||||||||||||||||||||||||||||||||||||||||||||||||||||||||||||||||||||||||||||||||||||||
| CVL | Gambier Bay | ✔️ | |||||||||||||||||||||||||||||||||||||||||||||||||||||||||||||||||||||||||||||||||||||||||||||||||
| SS | Luigi Torelli | ✔️ | |||||||||||||||||||||||||||||||||||||||||||||||||||||||||||||||||||||||||||||||||||||||||||||||||
| CL | Kitakami | ✔️ | ✔️ | ||||||||||||||||||||||||||||||||||||||||||||||||||||||||||||||||||||||||||||||||||||||||||||||||
| CL | Ooi | ✔️ | ✔️ | ||||||||||||||||||||||||||||||||||||||||||||||||||||||||||||||||||||||||||||||||||||||||||||||||
| CL | Nagara | ✔️ | ✔️ | ✔️ | ✔️ | ||||||||||||||||||||||||||||||||||||||||||||||||||||||||||||||||||||||||||||||||||||||||||||||
| CL | Sendai | ✔️ | ✔️ | ✔️ | ✔️ | ||||||||||||||||||||||||||||||||||||||||||||||||||||||||||||||||||||||||||||||||||||||||||||||
| CA | Kinugasa | ✔️ | ✔️ | ||||||||||||||||||||||||||||||||||||||||||||||||||||||||||||||||||||||||||||||||||||||||||||||||
| CA | Myoukou | ✔️ | ✔️ | ||||||||||||||||||||||||||||||||||||||||||||||||||||||||||||||||||||||||||||||||||||||||||||||||
| CA | Takao | ✔️ | ✔️ | ||||||||||||||||||||||||||||||||||||||||||||||||||||||||||||||||||||||||||||||||||||||||||||||||
| CA | Atago | ✔️ | ✔️ | ||||||||||||||||||||||||||||||||||||||||||||||||||||||||||||||||||||||||||||||||||||||||||||||||
| CA | Mogami | ✔️ | ✔️ | ✔️ | ✔️ | ||||||||||||||||||||||||||||||||||||||||||||||||||||||||||||||||||||||||||||||||||||||||||||||
| CA | Suzuya | ✔️ | ✔️ | ||||||||||||||||||||||||||||||||||||||||||||||||||||||||||||||||||||||||||||||||||||||||||||||||
| CA | Kumano | ✔️ | ✔️ | ||||||||||||||||||||||||||||||||||||||||||||||||||||||||||||||||||||||||||||||||||||||||||||||||
| CA | Tone | ✔️ | ✔️ | ||||||||||||||||||||||||||||||||||||||||||||||||||||||||||||||||||||||||||||||||||||||||||||||||
| CA | Chikuma | ✔️ | ✔️ | ||||||||||||||||||||||||||||||||||||||||||||||||||||||||||||||||||||||||||||||||||||||||||||||||
| FBB | Kongou | ✔️ | ✔️ | ||||||||||||||||||||||||||||||||||||||||||||||||||||||||||||||||||||||||||||||||||||||||||||||||
| FBB | Hiei | ✔️ | ✔️ | ||||||||||||||||||||||||||||||||||||||||||||||||||||||||||||||||||||||||||||||||||||||||||||||||
| FBB | Haruna | ✔️ | ✔️ | ||||||||||||||||||||||||||||||||||||||||||||||||||||||||||||||||||||||||||||||||||||||||||||||||
| FBB | Kirishima | ✔️ | ✔️ | ||||||||||||||||||||||||||||||||||||||||||||||||||||||||||||||||||||||||||||||||||||||||||||||||
| BB | Ise | ✔️ | ✔️ | ||||||||||||||||||||||||||||||||||||||||||||||||||||||||||||||||||||||||||||||||||||||||||||||||
| BB | Hyuuga | ✔️ | ✔️ | ||||||||||||||||||||||||||||||||||||||||||||||||||||||||||||||||||||||||||||||||||||||||||||||||
| DD | Mutsuki | ✔️ | ✔️ | ||||||||||||||||||||||||||||||||||||||||||||||||||||||||||||||||||||||||||||||||||||||||||||||||
| DD | Kisaragi | ✔️ | |||||||||||||||||||||||||||||||||||||||||||||||||||||||||||||||||||||||||||||||||||||||||||||||||
| DD | Satsuki | ✔️ | |||||||||||||||||||||||||||||||||||||||||||||||||||||||||||||||||||||||||||||||||||||||||||||||||
| DD | Fumizuki | ✔️ | |||||||||||||||||||||||||||||||||||||||||||||||||||||||||||||||||||||||||||||||||||||||||||||||||
| DD | Nagatsuki | ✔️ | |||||||||||||||||||||||||||||||||||||||||||||||||||||||||||||||||||||||||||||||||||||||||||||||||
| DD | Kikuzuki | ✔️ | |||||||||||||||||||||||||||||||||||||||||||||||||||||||||||||||||||||||||||||||||||||||||||||||||
| DD | Mikazuki | ✔️ | |||||||||||||||||||||||||||||||||||||||||||||||||||||||||||||||||||||||||||||||||||||||||||||||||
| DD | Mochizuki | ✔️ | |||||||||||||||||||||||||||||||||||||||||||||||||||||||||||||||||||||||||||||||||||||||||||||||||
| DD | Fubuki | ✔️ | ✔️ | ✔️ | ✔️ | ✔️ | |||||||||||||||||||||||||||||||||||||||||||||||||||||||||||||||||||||||||||||||||||||||||||||
| DD | Shirayuki | ✔️ | ✔️ | ✔️ | ✔️ | ✔️ | |||||||||||||||||||||||||||||||||||||||||||||||||||||||||||||||||||||||||||||||||||||||||||||
| DD | Hatsuyuki | ✔️ | ✔️ | ✔️ | ✔️ | ✔️ | |||||||||||||||||||||||||||||||||||||||||||||||||||||||||||||||||||||||||||||||||||||||||||||
| DD | Miyuki | ✔️ | ✔️ | ✔️ | ✔️ | ✔️ | |||||||||||||||||||||||||||||||||||||||||||||||||||||||||||||||||||||||||||||||||||||||||||||
| DD | Murakumo | ✔️ | ✔️ | ✔️ | ✔️ | ✔️ | |||||||||||||||||||||||||||||||||||||||||||||||||||||||||||||||||||||||||||||||||||||||||||||
| DD | Isonami | ✔️ | ✔️ | ✔️ | ✔️ | ✔️ | |||||||||||||||||||||||||||||||||||||||||||||||||||||||||||||||||||||||||||||||||||||||||||||
| DD | Ayanami | ✔️ | ✔️ | ✔️ | ✔️ | ✔️ | |||||||||||||||||||||||||||||||||||||||||||||||||||||||||||||||||||||||||||||||||||||||||||||
| DD | Shikinami | ✔️ | ✔️ | ✔️ | ✔️ | ||||||||||||||||||||||||||||||||||||||||||||||||||||||||||||||||||||||||||||||||||||||||||||||
| DD | Oboro | ✔️ | ✔️ | ✔️ | |||||||||||||||||||||||||||||||||||||||||||||||||||||||||||||||||||||||||||||||||||||||||||||||
| DD | Akebono | ✔️ | ✔️ | ✔️ | |||||||||||||||||||||||||||||||||||||||||||||||||||||||||||||||||||||||||||||||||||||||||||||||
| DD | Sazanami | ✔️ | ✔️ | ✔️ | |||||||||||||||||||||||||||||||||||||||||||||||||||||||||||||||||||||||||||||||||||||||||||||||
| DD | Ushio | ✔️ | ✔️ | ✔️ | |||||||||||||||||||||||||||||||||||||||||||||||||||||||||||||||||||||||||||||||||||||||||||||||
| DD | Akatsuki | ✔️ | ✔️ | ||||||||||||||||||||||||||||||||||||||||||||||||||||||||||||||||||||||||||||||||||||||||||||||||
| DD | Hatsuharu | ✔️ | ✔️ | ||||||||||||||||||||||||||||||||||||||||||||||||||||||||||||||||||||||||||||||||||||||||||||||||
| DD | Shiratsuyu | ✔️ | ✔️ | ||||||||||||||||||||||||||||||||||||||||||||||||||||||||||||||||||||||||||||||||||||||||||||||||
| DD | Suzukaze | ✔️ | ✔️ | ||||||||||||||||||||||||||||||||||||||||||||||||||||||||||||||||||||||||||||||||||||||||||||||||
| DD | Asashio | ✔️ | ✔️ | ||||||||||||||||||||||||||||||||||||||||||||||||||||||||||||||||||||||||||||||||||||||||||||||||
| DD | Kagerou | ✔️ | ✔️ | ||||||||||||||||||||||||||||||||||||||||||||||||||||||||||||||||||||||||||||||||||||||||||||||||
| DD | Shiranui | ✔️ | |||||||||||||||||||||||||||||||||||||||||||||||||||||||||||||||||||||||||||||||||||||||||||||||||
| CL | Kuma | ✔️ | ✔️ | ✔️ | ✔️ | ||||||||||||||||||||||||||||||||||||||||||||||||||||||||||||||||||||||||||||||||||||||||||||||
| CL | Tama | ✔️ | ✔️ | ✔️ | ✔️ | ||||||||||||||||||||||||||||||||||||||||||||||||||||||||||||||||||||||||||||||||||||||||||||||
| CL | Kiso | ✔️ | ✔️ | ✔️ | ✔️ | ||||||||||||||||||||||||||||||||||||||||||||||||||||||||||||||||||||||||||||||||||||||||||||||
| CL | Isuzu | ✔️ | ✔️ | ✔️ | ✔️ | ✔️ | |||||||||||||||||||||||||||||||||||||||||||||||||||||||||||||||||||||||||||||||||||||||||||||
| CL | Natori | ✔️ | ✔️ | ✔️ | ✔️ | ✔️ | |||||||||||||||||||||||||||||||||||||||||||||||||||||||||||||||||||||||||||||||||||||||||||||
| CL | Yura | ✔️ | ✔️ | ✔️ | ✔️ | ||||||||||||||||||||||||||||||||||||||||||||||||||||||||||||||||||||||||||||||||||||||||||||||
| CL | Jintsuu | ✔️ | ✔️ | ✔️ | ✔️ | ✔️ | |||||||||||||||||||||||||||||||||||||||||||||||||||||||||||||||||||||||||||||||||||||||||||||
| CL | Naka | ✔️ | ✔️ | ✔️ | ✔️ | ✔️ | |||||||||||||||||||||||||||||||||||||||||||||||||||||||||||||||||||||||||||||||||||||||||||||
| CA | Furutaka | ✔️ | ✔️ | ||||||||||||||||||||||||||||||||||||||||||||||||||||||||||||||||||||||||||||||||||||||||||||||||
| CA | Kako | ✔️ | ✔️ | ||||||||||||||||||||||||||||||||||||||||||||||||||||||||||||||||||||||||||||||||||||||||||||||||
| CA | Aoba | ✔️ | ✔️ | ||||||||||||||||||||||||||||||||||||||||||||||||||||||||||||||||||||||||||||||||||||||||||||||||
| CA | Nachi | ✔️ | ✔️ | ||||||||||||||||||||||||||||||||||||||||||||||||||||||||||||||||||||||||||||||||||||||||||||||||
| CA | Ashigara | ✔️ | ✔️ | ✔️ | ✔️ | ✔️ | |||||||||||||||||||||||||||||||||||||||||||||||||||||||||||||||||||||||||||||||||||||||||||||
| CA | Haguro | ✔️ | ✔️ | ✔️ | ✔️ | ✔️ | |||||||||||||||||||||||||||||||||||||||||||||||||||||||||||||||||||||||||||||||||||||||||||||
| CA | Maya | ✔️ | ✔️ | ||||||||||||||||||||||||||||||||||||||||||||||||||||||||||||||||||||||||||||||||||||||||||||||||
| CA | Choukai | ✔️ | ✔️ | ||||||||||||||||||||||||||||||||||||||||||||||||||||||||||||||||||||||||||||||||||||||||||||||||
| |||||||||||||||||||||||||||||||||||||||||||||||||||||||||||||||||||||||||||||||||||||||||||||||||||||||||||||||||||||||||||||||||||||||||||||||||||||||||||||||||||||||||||||||||||||||||||||||||||||||||||||||||||||||||||||||||||||||||||||||||||||||||||||||||||||||||||||||||||||||||||||||||||||||||||
| |||||||||||||||||||||||||||||||||||||||||||||||||||||||||||||||||||||||||||||||||||||||||||||||||||||||||||||||||||||||||||||||||||||||||||||||||||||||||||||||||||||||||||||||||||||||||||||||||||||||||||||||||||||||||||||||||||||||||||||||||||||||||||||||||||||||||||||||||||||||||||||||||||||||||||