- Welcome to the Kancolle Wiki!
- If you have any questions regarding site content, account registration, etc., please visit the KanColle Wiki Discord
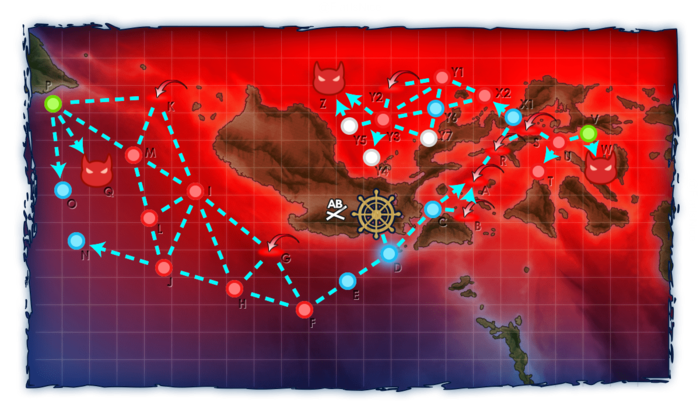
Fall 2020 Event/E-4
E-4
竹の輝き
![]()


| Information | ||||
|---|---|---|---|---|
| Event Tag | Southwest Area Fleet | |||
| Boss Gauges | Hard (甲): 600 TP + 900 TP + 5700 HP | |||
| Medium (乙): 500 TP + 700 TP + 5000 HP | ||||
| Easy (丙): 400 TP + 500 TP + 4500 HP | ||||
| Casual (丁): 400 TP + 500 TP + 4500 HP | ||||
| Map Bosses | Submarine Princess Kai B Flagship
| |||
Destroyer Forest Princess
| ||||
Abyssal Bamboo Princess
| ||||
| Rewards | ||||
|---|---|---|---|---|
| All | ||||

| ||||
| Equipment/Item | 丁 Casual |
丙 Easy |
乙 Medium |
甲 Hard |
Medal |
1 | 2 | 3 | |
Improvement Material |
5 | 8 | 10 | |
 Shinzan |
1 (★3) | 1 (★4) | ||
 Shinzan Kai |
1 (★2) | |||
First Class Medal |
1 | |||

| E-4 Branching Rules Part 1 | ||
|---|---|---|
| Nodes | Rules | |
D |
C |
|
E | ||
F |
G |
|
H |
| |
G |
H |
|
I |
| |
H |
I |
|
J |
| |
I |
J |
|
K |
| |
L |
| |
M |
| |
J |
L |
|
N |
| |
M |
K |
|
P |
| |
P |
O |
|
Q |
| |
| E-4 Branching Rules Part 2 | ||
|---|---|---|
| Nodes | Rules | |
D |
C |
|
E | ||
C |
A |
|
B |
| |
R |
S |
|
X1 |
| |
U |
T |
|
V |
| |
X2 |
Y1 |
|
Y6 |
| |
Y1 |
Y2 |
|
Y6 |
| |
Y3 |
| |
Y6 |
Y3 |
|
Y7 |
| |
Y3 |
Y4 |
|
Y5 |
| |
Z |
| |


Branching compositions were reported over the course of the event.
Disclaimer: The following guide is a preliminary release for this event map, it contains information from early tests, do note that some things are subject to change as more information is gathered over the event and thus the guide is subject to change.
The event guides are to be constructed through the respective Event map page guide and reviewed by editor staff / collaboration committee before being approved here. Do not under any circumstance update the guides through this page or attempt to fix them through this page. Please only update guides through their respective sandbox pages.
General Guidelines
- E4 is a multi-phase map consisting of, in order:
- 2 TP Phases
- 3 Unlock Phase (After TP phase 1, TP Phase 2, and shortcut
- 1 HP Phase.
- 3 Bases of LBAS Support are available to you on this map.
Ship Bonuses (Not Exhaustive)
DISCLAIMER: This information is based on user submitted data and is subject to revisions as more data is gathered. Any version of the ship receives the bonus regardless of remodel.
| Phase 1 BonusesNodes F H I J L M Q | ||||
|---|---|---|---|---|
| 1.5x | ||||
| Destroyer Escorts (DE) | 1.25 | |||
| If Harukaze is the Flagship | 1.15x (Applies to entire fleet) | |||
| Phase 2 BonusesNodes X2 W |
Nodes X2/T | Boss W | ||
|---|---|---|---|---|
| 1.375x | 1.475x | |||
| 1.25x | 1.437x | |||
| 1.3x | ||||
| American Ships | 1x | 1.12x | ||
| Phase 3 BonusesNodes Y1 Y3 Z | ||||
|---|---|---|---|---|
| Ships | Nodes Y1/Y3 | Boss Z | ||
| 1.25x | 1.68x1.25 * 1.12 * 1.2 | |||
| 1.61x1.25 * 1.12 * 1.15 | ||||
| 1.75x1.25 * 1.12 * 1.25 | ||||
| 1.2x | 1.575x1.2 * 1.05 * 1.25 | |||
| 1.15x | 1.628x1.15 * 1.18 * 1.2 | |||
| 1.561x1.15 * 1.18 * 1.15 | ||||
| 1.696x1.15 * 1.18 * 1.25 | ||||
| Other Bonuses | ||||
| All Other DD/CL | 1.25x | |||
| All Other FBB/BB | 1.2x | |||
| All Other BBV/CV(B)/CVL/CLT/CA(V) | 1.15x | |||
| If Submarine Tender(AS) is Main Flagship | All Submarines: 1.7x | |||
| Debuff Modifier (Only against Abyssal Bamboo Princess) |
1.07~1.15x | |||
Step 1: Spring Breeze Convoy (1st TP Phase)
In this phase you'll be performing a transport operation while also protecting your fleet from some air strikes that will occur along the way. As long as you have a fleet with good ASW, AACI, capable of transporting supplies and a land base that can support your while taking out the enemy ships and subs, the phase should be simple to complete.
The boss will mainly include a Submarine princess accompanied by other subs or sub princesses, and other small surface ships. A simple method of following some of the methods in composition requirements and notes should defeat the boss easily.
Below are the following comps you can consider for clearing this:
- Recommended Fleet: 1BBV/CVL/AV, 1CL/CAV/LHA, 4DD + 1 CL, 2-5DD, 0-3 DE)
- Route: D E F G I K P Q
- LBAS: All Land Base Bombers/ ASW Bombers in Land Base 1-3
- LBAS: All fighters / interceptors on Land base 3 (Optional, but recommended)
- Range: 6 (Node: Q), No Airpower on boss Node
- Notes:
- Bringing a BBV instead of CVL will give you a second shelling phase, which may be desired to deal with the high HP on the submarines.
- Bringing Harukaze as flagship in the main fleet will give your entire fleet a 1.15x bonus to damage against enemy fleets. If you have her, consider using her in that position.
- DEs and American DDs are effective due to their bonus and can be considered for this phase.
- If aiming for S-Rank victories, you may need to balance your ASW gear and Transport Equipment between the Main and Escort fleet. The Main Fleet will get a second Shelling phase, but the escort may have to attack at night and can damage submarines at night in a Combined Fleet.
- Alternatively you use a CVL, your main ship, you will likely have your main fleet focus on transport while escort will concentrate ASW with possibly one ship focusing on combat in hopes of scoring an S rank.
- AACI to deal with the Airstrike is recommended.
- OASW is strongly recommended, there is the potential for 3 submarines princess at the boss and 2 sub-nodes enroute.
- There is no Airpower on the Boss, but 2 Air Raid nodes enroute.
- LoS requirement is around ~23 for guaranteed routing. Random between 16-23.
- Recommended Fleet: 0-1AV 0-1CL 5-6DD
- Route: D E F H I M P Q
- LBAS: All Land Base Bombers/ ASW Bombers in Land Base 1-2
- LBAS: All fighters / interceptors on Land base 3 (Optional, but recommended)
- Range: 6 (Node: Q), No Airpower on boss Node
- Range: 5 (Node: M), No Airpower on boss Node
- Notes:
- Fleet may only contain DE, DD, CL and AV.
- Faces 3 sub-nodes and 1 surface battle enroute
- Avoids any Air Raids so you can equip purely for ASW and Surface Combat
- Sending 1 base of bombers to M should let you pass the surface battle more consistently with more ASW gear
- Alternatively Vanguard can be considered for Node M to attempt to pass while conserving LBAS support for the boss node.
- Limited number of attacks on the boss and will likely struggle to reach S-Ranks
- OASW is extremely recommended
- There is no Airpower on the Boss, a single Seaplane-Fighter is sufficient to acquire AS
- LoS requirement is around ~16.
Once this TP gauge is completed, the next phase will commence and you will need to unlock the path to the next area.
Step 2: Unlocking the path to Ormoc Bay
In this phase you will need to complete two requirements (or less depending on the difficulty). Unlocking is only required for Hard and Normal. Any player playing on a difficulty lower than this can skip this step all together. Below are the listed requirements:
- Score AS on Node K (Hard Only)
- Score AS on Node A (2x on Hard, 1x on Normal)
Below will be a simple guide for each node:
- Recommended Fleet: Transport Combined Fleet -1BBV/CVL, 1CL/CAV/AV/LHA, 4DD + 1 CL, 2-5DD, 0-3 DE
- Route: D E F G I K
- LBAS: Range 5 (K), 166 AD/ 331 AP /744 AS under hardest composition
- All Land Fighters in Land Base 1-2 (3rd LB with same set up optional)
- Notes:
- BBV/CVL and CL/CAV/AV/LHA should be all fighters, preferably the strongest you have
- All methods to reach the node are similar to phase 1.
- Under weaker comps it can be done with mainly two land bases
- Recommended Fleet: Single Fleet 4CV
- Route: C B A
- LBAS: Range 3 (A) 166 AD/ 331 AP/ 744 AS under hardest composition
- All Land Fighters in Land Base 1-3 (Optional)
- Notes:
- This phase is one of the few times it might be good to organize your carrier fleet you'll be using for the later phases.
- Load all fighters on Carriers
- This should be achievable without using a Land base, so you can opt to put your land base on rest
Once all conditions are met the path to the 2nd TP area will be unlocked.
Step 3: Operation Ta-Go (2nd TP Phase)
In this phase, you will be using your Transport Combined fleet once more to complete another transport operation going to Node W. This phase will put you against lots of air raids which you must successfully pass in order to reach & battle surface ships before arriving at the transport drop off point.
For this phase members of the Operation Ta-Go fleet will be useful in helping you complete this phase and can help you clear the phase quickly (See historical ships for details)
Currently, no LoS is known for the path to the boss and appear to be linked to ship types.
The boss will consist of a Destroyer Forest Princess that will be accompanied by 2 Tsu-class and 3 Na-class DDs of which two are capable of opening torpedo attacks on Hard. Usage of land base bombers and TCI can help with securing victory here in later phases.
Currently, the following composition is known:
- Recommended Fleet: Transport Combined fleet 0-1 CAV/LHA(Shinshuu Maru), 0-2 AV/CL, 4DD + 1-2 CL, 0-1 CA, 4-5 DD
- Route: D C B A R S U V W
- LBAS: All Land Base Bombers on Land Base 1-3 (Land Base Recon Optional)
- LBAS: All Fighters / Interceptors on Land Base 3 (Optional, but recommended)
- Range: 5 (Node U Land Base 1)
- Range: 6: (Node W Land Base 2-3)
- Notes:
- Bringing any (F)BB(V) or CV(L/B) will off-route you
- You will be limited to 1 CA(V) in your entire fleet, any more will off-route.
- There are 4 Air Raids and 1 Surface Battle en route to the boss.
- AACI is crucial to surviving the air nodes, bring Atlanta or 1-2 AACI ships to ensure that AACI will proc to improve you chances of survival.
- Main Fleet DDs should focus mainly on transporting supplies
- It's possible to achieve AD on the Air Raids with enough Seaplane-Fighters (~200 Air Power)
- Node U will consist of Light cruisers and DDs that may pose a problem with passing depending on the formation.
- Send a single base of bombers to U to help pass to the boss.
- Sending LBAS to the Boss will likely result in them being shot down & de-ranked.
- The boss has a ~1/3 chance of Vanguard formation, likely forcing a night battle to obtain even A-Rank victories.
- Boss Support is recommended to increase chances of A ranks and S ranks.
- Organizing some ships in escort for TCI may help with obtaining S ranks.
Once you complete the TP phase, you will then unlock the final boss phase and then proceed to look into unlocking the path.
Step 4: Unlocking the path to the last boss
In this phase you will be completing a few task to unlock the way to the final boss. They will consist of the following steps:
- Get AS on Land Base Defense Twice on Hard, Once on Normal
- S Rank Node X2 (Hard - Easy, Casual rank unconfirmed)
The process to doing this step can be done as followed:
Recommended Land Base: 2-3 Land Base with Fighters / Interceptors and Rocket Interceptors
- You can run a single sub on the map until a land base air raid triggers
- If you're on Hard mode, the air raid will be given the High Altitude Bomber buff making it hard to take down without rocket interceptors.
- If required on lower difficulties, you will not need rocket interceptors as much to clear.
- Recommended Fleet: STF or CTF
- LBAS: Set on Rest unless set on Air Defense
- Path: D C B A R X1 X2
- Notes:
- You're free to bring whatever you want, as long as it is either a STF or CTF. You will always get the same routing regardless.
- Arm fleet with Anti air guns or Skilled Lookouts to take out PT Imps.
- LBAS and support ignores the high evasion PT Imps have, use them if you have trouble taking them out.
- Bring strong Air power and perform AACI to make passing the air nodes easier.
X2 is just 3 PT Imps, a CL and 2 DD. All which can be passable, as long as you have a way to dispatch Imps, getting S ranks easily.
Once all conditions are met, the path to the boss will be unlocked.
Step 5: Unlocking the shortcut (Nodes Y6 and Y7)
In this phase, your fleet will need to complete a list of tasks in order to unlock the shortcut that will allow you to go to Node Y6.
These tasks will include the following:
- S Rank Node Q
- S Rank Node W (A Rank for Normal Mode)
- AS Node Y2 (Hard Mode Only)
- S Rank Node Y3
- A Rank Node Y5
- Land Base Air Defense once (Hard Mode Only)
Below will be the a guide on how to complete each task:
- Recommendation: Refer to Phase 1 TCF Fleet Comp and Land base recommendation.
In this phase you can focus more heavily on trying to S rank the boss node by bringing a balance of OASW and surface combat ships. Since you'll likely kill the subs before taking out the surface ships.
The hardest ship to eliminate will be the Tsu-class flag, which may last to night battle. The best you can do is hope you can successfully take out the ship and then achieve an S rank.
- Recommendation: Refer to Phase 3 TCF Fleet Comp and Land base recommendation.
In this phase you can focus more heavily on trying to S rank the boss node by bringing both strong historicals and historical TCI .
As before, bring Land Base Bombing to Node U and Node W and boss support to make it easier to secure the S rank. Be warned however that if the enemy composition appears in Vanguard formation unless you are able to successfully take out the DD with land base bombing and boss support, you may need to redo until you are successful.
- Recommended Fleet: CTF - 2(F)BB(V), 4CV(B) + 1CL, 1CLT, 4DD (Fast optional)
- LBAS: 1-2 Land Base set to Node Y2 (Range 3)
- Path:D C B A R X1 X2 Y1 Y2 (Can bypass B with Fast Fleet)
- Air power needed is around 868 to achive AS
- Node Y2 will consist of strong air power, bring enough air power, the following LBAS air sweeps so that you can achive AS.
- Can be done in conjunction with Y3 and Y5.
- Recommended Fleet: CTF - 2(F)BB(V), 4CV(B) + 1CL, 1CLT, 4DD (Fast Fleet)
- LBAS: 1-2 Land Base set to Node Y3 (Range 3)
- Path: D C B A R X1 X2 Y1 Y2 Y3 (Can bypass B with Fast Fleet)
- Land base should consist of Fighters and one Land Base Bomber
- Enemy fleet will consist of a combined fleet that will have mostly Light Carriers, light cruisers and destroyers
- Fleet should be overall beatable if you bring good airpower and a good combat fleet
- Speed modding will be important to conserve on resource spent trying to reach here and especially Y5.
- Can be done in conjunction with Y2 and Y5.
- In route support is highly recommended to pass to complete the requirement.
- Recommended Fleet: CTF - 2(F)BB(V), 4CV(B) + 1CL, 1CLT, 4DD (Fast Fleet)
- LBAS: 1-2 Land Base set to Node Y5 (Range 2)
- Path: D C B A R X1 X2 Y1 Y2 Y3 Y5 (Can bypass B with Fast Fleet)
- Medium and below require you to have 7 heavy ships (CV(B/L) and (F)BB(V)) to route here
- Land base should consist of Fighters and one Land Base Bomber
- Enemy fleet will consist of a beefed up combined fleet that will have a Standard Carrier, some Light Carriers, light cruisers and destroyers, some of which will have opening torpedo capabilities.
- Fleet will require some effort to beat, be sure you bring good air power and a good combat fleet
- Speed modding will be important to conserve on resource to have the ability to fight the fleet here.
- Can be done in conjunction with Y2 and Y3.
- In route support is highly recommended to pass to complete the requirement.
- A rank minimum is required for this segment
Recommendation: Refer to Phase 4 Air Defense
Process to get AS should be the same as previous phase.
Once all the conditions are met, you will then be able to unlock the shortcut to take a faster route to the boss.
Step 6: Fighting the Abyssal Bamboo Princess
In this phase, you will need to organize a powerful fleet to attack the main abyssal forces. This will require you to carefully construct a fleet that, with help from the land base can successfully fight the main fleet while also achieving AS against the enemy fleet. For now the most efficient way to do this is through chipping away at the Abyssal Bamboo Princess until she is at the final kill.
On Hard mode, the Abyssal Bamboo Princess will have a fleet that will be strong and mainly consist of 2 CV Princess Kai, 1 BB Water Oni, 2 Ne Elites along with a Tsu-class a Ne-class, 4 Na-class DD, two of which are capable of opening torpedo strikes. This boss fight will be notably hard. But if you have Touch based attacks, crits, a good land base and the ability to get AS, you should be able to successfully have a chance at doing damage to the boss let alone possibly sink her.
There are several methods to do this, but one method can be considered effective for chipping.
- Recommended Fleet: STF - 3(F)BB(V), 1CV, 1CAV/AV, 1CL + 1CL, 1CLT, 4DD
- Path: D C B A R X1 X2 Y6 Y3 Z
- LBAS All 3 LBAS using fighters and Land Base Bombers
- LBAS 1 - Node Y3 (Air Power: 174 AD / 347 AP / 780 AS)
- LBAS 2-3 - Node Z (Air Power: 132 AD / 263 AP / 591 AS)
- Notes:
- Using the mentioned composition will ignore fast requirements, allowing more flexibility for your ships.
- Airpower is still notably heavy, consider bring an AV/CAV as a fighter mule.
- AACI is important for passing the nodes along the way
- In route Support may be suitable for helping you pass Y3 since that node may pose a potential problem.
- Boss support is highly recommended.
- Historical Japanese and American ships are needed along with ship types to maximize the damage bonus that can be done at the boss node.
- Use special attack battleships like Nagato or Nelson which are considered vital to helping you wipe out some of the powerful main fleet ships.
- Do what you can to clear out as many opening torpedo DDs before the start of the fight.
- No matter what, the Abyssal Bamboo Princess will always have the ability to launch an opening torpedo strike from the main fleet. Meaning as the fight begins, it's almost certain one ship will be damaged at the start.
- Organizing TCI ships in escort can help you do serious damage of successfully eliminating the princess if you're lucky enough to aim for her.
Once you reach LD, read the next phase to help you prepare do what you can to deliver the final blow.
Step 7: Debuffing the Abyssal Bamboo Princess on Last Dance
With your fleet now entering the LD Phase, enemy comps will become increasingly difficult across the map. You will need to adjust accordingly to make it easy to clear the requirements but on the most part, the process is the same.
These tasks will include the following:
- AS Node K Once (Hard Mode only)
- S Rank Node W Twice (A Rank Twice for Normal Mode)
- AS Node Y2
- S Rank Node Y3
- S Rank Node Y5 (A Rank for Normal Mode)
- Land Base Air Defense once
Below will be the guide on how to complete each task:
- Recommendation: Refer to Phase 2 TCF Fleet Comp and Land Base Recommendation
Pretty much the same method as before hand, may need an additional land base if too difficult to AS.
- Recommendation: Refer to Phase 3 TCF Fleet Comp and Land base recommendation.
In this phase you can focus more heavily on trying to S ranking the boss node by bringing both strong historicals and TCI historical.
As before bring Land Base Bombing to Node U and Node W and boss support to make it easier to secure an S rank. Be warned however that if the enemy composition appears in Vanguard formation unless you are able to successfully take out the DD with land base bombing and boss support, you may need to redo until you are successful.
- Recommendation: Same Fleet composition and land base requirement as phase 5
Should be mainly the same so it should be easy to AS.
- Recommendation: Same Fleet compositin and land base requirement as phase 5
- Use your 3rd base if necessary with a similar composition as mentioned in phase 5.
- In route support is highly recommended to pass to complete the requirement.
- Recommendation: Same Fleet composition and land base requirement as phase 5
- Use your 3rd base if necessary with a similar composition as mentioned in phase 5.
- In route support is highly recommended to pass to complete the requirement.
Recommendation: Refer to Phase 4 Air Defense
Process to get AS should be the same as the previous phase.
Once all the conditions are met, the princess will now become weaker to all attacks targeting her (1.07 -1.15x bonus).
Step 8: Finishing the Abyssal Bamboo Princess
For the final sequence, the Abyssal Bamboo Princess will become harder due to the fact she will now have more Princess types in her fleet and may include stronger variants which on Hard includes a Ne Kai and 4 Na-class Flagships with opening torpedo capabilities. For this sequence you'll need to pull out all the stops to ensure that the boss can be taken down.
As of current, the tactics used to beat her involve using either Surface Task Force or Carrier Task Force. Careful planning must be taken to make the most out of the fight.
- Recommended Fleet: 3(F)BB(V), 1CV, 1CAV, 1CL/AO + 1CL, 1CLT/CAV, 4DD
- Path: D C B A R X1 X2 Y6 Y3 Z
- LBAS: Land Base Fighters and Bombers 1-3
- LBAS Distribution: Land Base 1 Node Y3 (Range: 2) 174 AD /347 AP/ 780 AS (Optional)
- LBAS Distribution: 1-3 Node Z (Range: 3) 132 AD /263 AP/ 591 AS (Preffered)
- If the comp uses 2CL and 4DD in the combined fleet, you will not need a fast fleet
- Y3 might be hard to pass without the use of a land base.
- If possible, send all land bases to the boss node (Z) to maximize your chances of taking out the boss.
- AS will require a set of fighter mules among your CV and seaplane carrying ship
- Using Ise Kai Ni and Hyuuga Kai Ni can allow you to opt to bringing in more fighter power to free up your carrier so they can perform attacks.
- Special attacks can be more wildly among Nagato, Nelson and Colorado.
- Due to the difficulty of this map, using Colorado's special attack can be effective, but difficulty to pull off due to it's strict conditions. Use at your own discretion.
- Nagato and Nelson are preferred due to their flexibility and ease of access.
- Units used to accompany the attacks should be American BBs and/or Ise Kai Ni, Hyuuga Kai Ni , and/or Haruna.
- Escort fleet should be TCI focused as you will need to hope they will score a lucky shot at the boss in order to kill her.
- Use star shells, searchlights and a night plane to maximize your chances at scoring the kill on the boss
- As before, historical ships tied to Americans, Ormoc Bay and such are the key to success
- AO is also optional to consider if you want to bring extra fuel and ammo to the boss node as it may turn the tide of battle. Be aware of their brittle armor, damecon/goddess may be needed to ensure they make the journey.
- Boss and in route support is highly recommended
- Recommended Fleet: (0-2BB, 2-4CV, 1-2CAV/AV, 0-1CL) + (1CL, 1-2CA(V), 0-1CLT, 3-4DD) (Fast)
- Path: D C A R X1 X2 Y6 Y3 Z
- LBAS Land Base Fighters and Bombers 1-3
- LBAS Distribution: 1-3 Node Z (Range: 3) 132 AD /263 AP/ 591 AS
- Send all land bases to the boss node (Z) to maximize your chances of taking out the boss.
- AS will be easy to achieve across the key areas of the map (Y3 and Z)
- Special attack will be limited to using Nagato/Mutsu
- Nagato / Mutsu will need to be speed modded to take the most efficient route.
- Equipment setup for them should be Main gun, Surface Radar, and AP shell along with the boiler and turbine.
- Units used to accompany the attacks should be American BBs or Mutsu Kai Ni.
- Escort fleet should be TCI focused as you will need to hope they will score a lucky shot at the boss in order to kill her.
- Use star shells, searchlights and a night plane to maximize your chances at scoring the kill on the boss
- As before, historical ships tied to Americans, Ormoc Bay and such are the key to success
- Boss and in route support is highly recommended
With an enemy fleet composed of now all heavily armored units and up to 5 opening torpedo units (one of which is not killable at the start of battle), your fleet will need to put everything they got into this section to pull out victorious. Hope that all your main attacks, special attack, land bases and support fleet hit accordingly as you will need to get access to the boss fleet in night battle in hopes of successfully scoring a kill against the boss. TCI CL's and DD's will be your main hope for success on this map. If all goes well, there will be a chance you'll be able to finish off the boss ending the battle.
Once you are able to successfully kill the Abyssal Bamboo Princess, the event will be considered complete.
Regarding Friend Fleets
Using Friend Fleets in this boss is recommended for both Node W and Z.
Using them can help you easily gain the edge needed in node W and most fleet will work for this group. Although, if possible, avoid using American DDs to max out your chances of the stronger friend fleets to appear.
On Node Z', the most important ships to consider bringing is Yura and either Washington or Ark Royal to block out the weaker friend fleets. This should allow you to successfully call in almost all possible stronger friend fleets. Although the most recommenced ones are Jingei and her sub fleet, or any friend fleet that contains Take in the fleet. Both fleets can help clear out enemy units and Take has a huge enough bonus to one shot the Abyssal Bamboo Princess in most occasions.
Keep in mind, due to the difficulty of the boss, it will still be difficult, but more likely that you'll succeed.
Friend Fleets
| E-4 W | ||||||||||
|---|---|---|---|---|---|---|---|---|---|---|
| E-4 W : Matsu FS (Variant 1, 2020-12-31~) Powerful Play Play | ||||||||||
| Ship | Lv. | Equipment | ||||||||
Matsu Kai |
88 |  |
~/27 | 42 | 72 | 74 | 55 | |||
Take Kai |
91 | |
~/26 | 42 | 98 | 71 | 54 | |||
| E-4 W : Sendai FS (Variant 1, 2020-12-31~) Powerful Play Play | ||||||||||
| Ship | Lv. | Equipment | ||||||||
Sendai Kai Ni |
94 | |
~/49 | 68 | 89 | 70 | 69 | |||
Ashigara Kai Ni |
93 |    |
~/56 | 83 | 84 | 74 | 79 | |||
Haguro Kai Ni |
93 |  |
~/57 | 84 | 84 | 72 | 77 | |||
Shimakaze Kai |
88 |  |
~/36 | 59 | 99 | 59 | 59 | |||
Take Kai |
91 | |
~/26 | 42 | 98 | 71 | 54 | |||
| E-4 W : Sendai FS (Variant 2, 2020-12-31~) Powerful Play Play | ||||||||||
| Ship | Lv. | Equipment | ||||||||
Sendai Kai Ni |
94 | |
~/49 | 68 | 89 | 70 | 69 | |||
Ashigara Kai Ni |
93 | |
~/56 | 83 | 84 | 74 | 79 | |||
Haguro Kai Ni |
93 | |
~/57 | 84 | 84 | 72 | 77 | |||
Take Kai |
91 | |
~/26 | 42 | 98 | 71 | 54 | |||
| E-4 W : Sendai FS (Variant 3, 2020-12-31~) Powerful Play Play | ||||||||||
| Ship | Lv. | Equipment | ||||||||
Sendai Kai Ni |
94 |  |
~/49 | 68 | 89 | 70 | 69 | |||
Johnston Kai |
79 |  |
~/34 | 55 | 72 | 86 | 52 | |||
Fletcher Mk.II |
91 | |
~/38 | 62 | 79 | 95 | 56 | |||
Take Kai |
91 | |
~/26 | 42 | 98 | 71 | 54 | |||
| E-4 W : Take FS (Variant 1, 2020-12-31~) Powerful Play Play | ||||||||||
| Ship | Lv. | Equipment | ||||||||
Take Kai |
91 | |
~/26 | 42 | 90 | 71 | 54 | |||
Matsu Kai |
88 | |
~/27 | 42 | 72 | 74 | 55 | |||
Asashimo Kai Ni |
90 | |
~/33 | 68 | 88 | 72 | 53 | |||
| E-4 W : Take FS (Variant 2, 2020-12-31~) Powerful Play Play | ||||||||||
| Ship | Lv. | Equipment | ||||||||
Take Kai |
91 | |
~/26 | 42 | 98 | 71 | 54 | |||
Matsu Kai |
88 | |
~/27 | 42 | 72 | 74 | 55 | |||
Hatsushimo Kai Ni |
92 | |
~/32 | 59 | 85 | 81 | 55 | |||
| E-4 W : Take FS (Variant 3, 2020-12-31~) Powerful Play Play Play | ||||||||||
| Ship | Lv. | Equipment | ||||||||
Take Kai |
91 | |
~/26 | 42 | 98 | 71 | 54 | |||
Matsu Kai |
88 | |
~/27 | 42 | 72 | 74 | 55 | |||
Okinami Kai Ni |
88 |  |
~/33 | 65 | 87 | 71 | 53 | |||
Hamanami Kai |
87 | |
~/32 | 52 | 76 | 59 | 49 | |||
Johnston Kai |
79 | |
~/34 | 51 | 72 | 90 | 52 | |||
Fletcher Mk.II |
91 | |
~/38 | 62 | 76 | 95 | 56 | |||
| E-4 W : Take FS (Variant 4, 2020-12-31~) Powerful Play | ||||||||||
| Ship | Lv. | Equipment | ||||||||
Take Kai |
91 | |
~/26 | 42 | 94 | 71 | 54 | |||
Naganami Kai Ni |
93 | |
~/33 | 69 | 89 | 64 | 53 | |||
Okinami Kai Ni |
88 | |
~/33 | 65 | 87 | 71 | 53 | |||
Hamanami Kai |
87 | |
~/32 | 52 | 78 | 59 | 49 | |||
| E-4 Z | ||||||||||
|---|---|---|---|---|---|---|---|---|---|---|
| E-4 Z : Akagi FS (Variant 1, 2020-12-31~) Powerful Play Play Play | ||||||||||
| Ship | Lv. | Equipment | ||||||||
Akagi Kai Ni E |
97 |     |
~/81 | 67 | 0 | 84 | 81 | |||
Kaga Kai Ni E |
96 |  |
~/84 | 62 | 0 | 84 | 80 | |||
Haruna Kai Ni |
92 |   |
~/81 | 96 | 0 | 92 | 93 | |||
Ooyodo Kai |
88 |   |
~/47 | 70 | 49 | 74 | 68 | |||
Akebono Kai |
86 |  |
~/30 | 49 | 79 | 49 | 49 | |||
Take Kai |
91 | |
~/26 | 42 | 98 | 71 | 54 | |||
| E-4 Z : Akagi FS (Variant 2, 2020-12-31~) Powerful Play Play Play | ||||||||||
| Ship | Lv. | Equipment | ||||||||
Akagi Kai Ni E |
97 | |
~/81 | 67 | 0 | 84 | 81 | |||
Kaga Kai Ni E |
96 | |
~/84 | 62 | 0 | 84 | 80 | |||
Intrepid Kai |
77 |   |
~/69 | 57 | 0 | 95 | 90 | |||
Saratoga Mk.II |
90 | |
~/89 | 68 | 0 | 94 | 85 | |||
Johnston Kai |
79 | |
~/34 | 55 | 72 | 90 | 52 | |||
Fletcher Mk.II |
91 | |
~/38 | 62 | 74 | 95 | 56 | |||
| E-4 Z : Gotland FS (Variant 1, 2020-12-19~) Regular Play | ||||||||||
| Ship | Lv. | Equipment | ||||||||
Gotland Andra |
89 |  |
47 | 60 | 73 | 90 | 67 | |||
Oyashio Kai |
84 |  |
32 | 50 | 78 | 48 | 49 | |||
Tanikaze D Kai |
87 | |
33 | 59 | 84 | 80 | 51 | |||
| E-4 Z : Jingei FS (Variant 1, 2020-12-31~) Powerful Play Play Play | ||||||||||
| Ship | Lv. | Equipment | ||||||||
Jingei Kai |
92 |  |
38 | 40 | 0 | 34 | 34 | |||
I-47 Kai |
77 |   |
18 | 12 | 88 | 0 | 21 | |||
I-13 Kai |
58 |  |
21 | 16 | 66 | 0 | 22 | |||
I-14 Kai |
57 | |
22 | 12 | 68 | 0 | 23 | |||
Ashigara Kai Ni |
93 | |
~/56 | 83 | 84 | 74 | 79 | |||
Take Kai |
91 | |
~/26 | 42 | 98 | 71 | 54 | |||
| E-4 Z : Jingei FS (Variant 2, 2020-12-18~) Powerful Play Play | ||||||||||
| Ship | Lv. | Equipment | ||||||||
Jingei Kai |
88 | |
38 | 40 | 0 | 34 | 34 | |||
I-47 Kai |
66 | |
18 | 12 | 87 | 0 | 21 | |||
I-13 Kai |
48 | |
21 | 16 | 65 | 0 | 22 | |||
I-14 Kai |
47 | |
22 | 12 | 60 | 0 | 23 | |||
I-400 Kai |
40 | |
24 | 20 | 70 | 0 | 24 | |||
I-401 Kai |
41 | |
24 | 19 | 70 | 0 | 24 | |||
| E-4 Z : Jingei FS (Variant 3, 2020-12-31~) Powerful Play Play | ||||||||||
| Ship | Lv. | Equipment | ||||||||
Jingei Kai |
88 | |
38 | 40 | 0 | 34 | 34 | |||
I-47 Kai |
66 | |
18 | 12 | 87 | 0 | 21 | |||
I-13 Kai |
48 | |
21 | 16 | 63 | 0 | 22 | |||
I-14 Kai |
47 | |
22 | 12 | 67 | 0 | 23 | |||
I-400 Kai |
40 | |
24 | 20 | 70 | 0 | 20 | |||
I-401 Kai |
41 | |
24 | 19 | 70 | 0 | 24 | |||
| E-4 Z : Ryuuhou FS (Variant 1, 2020-12-18~) Regular Play Play | ||||||||||
| Ship | Lv. | Equipment | ||||||||
Ryuuhou |
80 |   |
~/39 | 20 | 0 | 48 | 38 | |||
Akizuki Kai |
72 |  |
~/37 | 57 | 54 | 116 | 53 | |||
Murasame Kai Ni |
85 | |
~/31 | 68 | 88 | 70 | 51 | |||
Yuudachi Kai Ni |
84 | |
~/31 | 72 | 93 | 59 | 52 | |||
| E-4 Z : Ryuuhou FS (Variant 2, 2020-12-18~) Regular Play Play | ||||||||||
| Ship | Lv. | Equipment | ||||||||
Ryuuhou |
80 | |
~/39 | 20 | 0 | 48 | 38 | |||
Yura Kai Ni |
88 |  |
~/45 | 56 | 80 | 88 | 67 | |||
Akizuki Kai |
72 | |
~/37 | 57 | 54 | 116 | 53 | |||
Murasame Kai Ni |
85 | |
~/31 | 67 | 88 | 70 | 51 | |||
Yuudachi Kai Ni |
84 | |
~/31 | 73 | 91 | 59 | 52 | |||
| E-4 Z : Ryuuhou FS (Variant 3, 2020-12-18~) Powerful Play Play Play | ||||||||||
| Ship | Lv. | Equipment | ||||||||
Ryuuhou |
80 | |
~/39 | 20 | 0 | 48 | 38 | |||
Zuihou Kai Ni B |
81 | |
~/59 | 48 | 0 | 88 | 72 | |||
Yura Kai Ni |
88 | |
~/45 | 56 | 80 | 88 | 67 | |||
Akizuki Kai |
72 | |
~/37 | 57 | 54 | 116 | 51 | |||
Murasame Kai Ni |
85 | |
~/31 | 68 | 88 | 70 | 51 | |||
Yuudachi Kai Ni |
84 | |
~/31 | 73 | 91 | 59 | 52 | |||
| E-4 Z : Ryuuhou FS (Variant 4, 2020-12-31~) Regular Play Play | ||||||||||
| Ship | Lv. | Equipment | ||||||||
Ryuuhou Kai |
83 | |
46/48 | 32 | 0 | 62 | 57 | |||
Yura Kai Ni |
88 | |
~/45 | 56 | 80 | 88 | 67 | |||
Akizuki Kai |
72 | |
~/37 | 57 | 54 | 116 | 53 | |||
Murasame Kai Ni |
85 | |
~/31 | 67 | 88 | 70 | 51 | |||
Yuudachi Kai Ni |
84 | |
~/31 | 73 | 93 | 59 | 52 | |||
| E-4 Z : Ryuuhou FS (Variant 5, 2020-12-31~) Powerful Play Play Play | ||||||||||
| Ship | Lv. | Equipment | ||||||||
Ryuuhou Kai |
83 | |
~/48 | 32 | 0 | 62 | 57 | |||
Zuihou Kai Ni B |
81 | |
~/59 | 48 | 0 | 88 | 72 | |||
Yura Kai Ni |
88 | |
~/45 | 56 | 80 | 88 | 67 | |||
Akizuki Kai |
72 | |
~/37 | 57 | 54 | 116 | 53 | |||
Murasame Kai Ni |
85 | |
~/31 | 68 | 88 | 70 | 51 | |||
Yuudachi Kai Ni |
84 | |
~/31 | 73 | 93 | 59 | 52 | |||
| E-4 Z : Taigei FS (Variant 1, 2020-12-18~) Regular Play Play | ||||||||||
| Ship | Lv. | Equipment | ||||||||
Taigei |
70 |  |
39 | 15 | 0 | 36 | 37 | |||
I-19 Kai |
85 | |
18 | 12 | 89 | 0 | 19 | |||
I-168 Kai |
83 | |
15 | 11 | 69 | 0 | 18 | |||
I-58 Kai |
88 |  |
18 | 12 | 84 | 0 | 19 | |||
| E-4 Z : Taigei FS (Variant 2, 2020-12-18~) Regular Play Play | ||||||||||
| Ship | Lv. | Equipment | ||||||||
Taigei |
70 | |
39 | 15 | 0 | 36 | 37 | |||
I-8 Kai |
80 | |
19 | 14 | 84 | 0 | 19 | |||
I-19 Kai |
85 | |
18 | 12 | 89 | 0 | 19 | |||
I-168 Kai |
83 | |
15 | 11 | 69 | 0 | 18 | |||
I-58 Kai |
88 | |
18 | 12 | 84 | 0 | 19 | |||
| E-4 Z : Washington FS (Variant 1, 2020-12-18~) Powerful Play Play | ||||||||||
| Ship | Lv. | Equipment | ||||||||
Washington Kai |
82 |  |
93 | 107 | 0 | 106 | 104 | |||
Ark Royal Kai |
86 |   |
~/71 | 50 | 0 | 82 | 70 | |||
Sheffield Kai |
85 |  |
~/52 | 74 | 68 | 78 | 68 | |||
Janus Kai |
84 |   |
~/31 | 53 | 90 | 72 | 50 | |||
Jervis Kai |
88 | |
31 | 52 | 90 | 70 | 50 | |||
| E-4 Z : Washington FS (Variant 2, 2020-12-31~) Powerful Play Play | ||||||||||
| Ship | Lv. | Equipment | ||||||||
Washington Kai |
82 | |
93 | 107 | 0 | 106 | 104 | |||
Houston Kai |
84 |   |
~/54 | 76 | 60 | 75 | 73 | |||
Ark Royal Kai |
86 | |
~/71 | 50 | 0 | 82 | 70 | |||
Sheffield Kai |
85 | |
~/52 | 74 | 68 | 78 | 68 | |||
Janus Kai |
84 | |
~/31 | 53 | 90 | 72 | 50 | |||
Jervis Kai |
88 | |
31 | 52 | 90 | 70 | 50 | |||
| E-4 Z : Washington FS (Variant 3, 2020-12-18~) Regular Play Play | ||||||||||
| Ship | Lv. | Equipment | ||||||||
Washington Kai |
82 | |
93 | 107 | 0 | 106 | 104 | |||
Sheffield Kai |
85 | |
~/52 | 74 | 68 | 78 | 68 | |||
Janus Kai |
84 | |
~/31 | 53 | 90 | 72 | 50 | |||
Jervis Kai |
88 | |
31 | 52 | 90 | 70 | 50 | |||
| E-4 Z : Washington FS (Variant 4, 2020-12-31~) Powerful Play Play Play | ||||||||||
| Ship | Lv. | Equipment | ||||||||
Washington Kai |
82 | |
93 | 107 | 0 | 106 | 104 | |||
South Dakota Kai |
80 | |
~/91 | 109 | 0 | 108 | 108 | |||
Ark Royal Kai |
86 | |
~/71 | 50 | 0 | 82 | 70 | |||
Sheffield Kai |
85 | |
~/52 | 74 | 68 | 78 | 68 | |||
Janus Kai |
84 | |
~/31 | 53 | 90 | 72 | 50 | |||
Jervis Kai |
88 | |
31 | 52 | 90 | 70 | 50 | |||
| E-4 Z : Washington FS (Variant 5, 2020-12-18~) Powerful Play Play Play | ||||||||||
| Ship | Lv. | Equipment | ||||||||
Washington Kai |
82 | |
93 | 107 | 0 | 102 | 104 | |||
South Dakota Kai |
80 | |
~/91 | 109 | 0 | 108 | 108 | |||
Ark Royal Kai |
86 | |
~/71 | 50 | 0 | 82 | 70 | |||
Sheffield Kai |
85 | |
~/52 | 74 | 68 | 78 | 68 | |||
Janus Kai |
84 | |
~/31 | 53 | 90 | 72 | 50 | |||
Jervis Kai |
88 | |
31 | 52 | 90 | 70 | 50 | |||
Enemy Compositions
| # | Formation | Air Raids | AD/AP AS/AS+ |
|---|---|---|---|
| AB | Diamond | 118/235 527/1053 | |
| Diamond | 124/247 554/1107 | ||
| Diamond | 128/256 575/1149 | ||
| Diamond | 130/260 584/1167 | ||
| Diamond | 166/331 744/1488 | ||
| # | Formation | Air Raids | AD/AP AS/AS+ |
| # | Formation | Air Defense Node | AD/AP AS/AS+ |
|---|---|---|---|
| A | Diamond | 124/247 554/1107 | |
| Diamond | 128/256 575/1149 | ||
| Diamond | 130/260 584/1167 | ||
| Diamond | 166/331 744/1488 | ||
| # | Formation | Air Defense Node | AD/AP AS/AS+ |
| # | Formation | Air Defense Node | AD/AP AS/AS+ |
|---|---|---|---|
| B | Diamond | 124/247 554/1107 | |
| Diamond | 128/256 575/1149 | ||
| Diamond | 130/260 584/1167 | ||
| Diamond | 166/331 744/1488 | ||
| # | Formation | Air Defense Node | AD/AP AS/AS+ |
| # | Empty Node | ||
|---|---|---|---|
| C | 気のせいだった。 多号作戦部隊、出撃!対空警戒を厳に! Must be my imagination. Operation Ta Force, sortie! Maintain strict anti-aircraft alert! | ||
| # | Empty Node | ||
| # | Selection Node | ||
|---|---|---|---|
| D | 艦隊の針路を選択できます。提督、どちらの針路をとられますか? You can decide the fleet's course. Admiral, which heading should we take? | ||
| # | Selection Node | ||
| # | Empty Node | ||
|---|---|---|---|
| E | 気のせいだった。 春風船団、抜錨!対潜警戒を厳とせよ! Must be my imagination. Harukaze Convoy, weigh anchor! Maintain strict anti-submarine alert! | ||
| # | Empty Node | ||
| # | Formation | Normal Battle Node | AD/AP AS/AS+ |
|---|---|---|---|
| F | Echelon Line Abreast |
0/0 0/0 | |
| Echelon Line Abreast |
0/0 0/0 | ||
| # | Formation | Normal Battle Node | AD/AP AS/AS+ |
| # | Formation | Air Defense Node | AD/AP AS/AS+ |
|---|---|---|---|
| G | Diamond | 124/247 554/1107 | |
| Diamond | 128/256 575/1149 | ||
| Diamond | 130/260 584/1167 | ||
| Diamond | 166/331 744/1488 | ||
| # | Formation | Air Defense Node | AD/AP AS/AS+ |
| # | Formation | Normal Battle Node | AD/AP AS/AS+ |
|---|---|---|---|
| H | Echelon Line Abreast |
0/0 0/0 | |
| Echelon Line Abreast |
0/0 0/0 | ||
| # | Formation | Normal Battle Node | AD/AP AS/AS+ |
| # | Formation | Normal Battle Node | AD/AP AS/AS+ |
|---|---|---|---|
| I | Echelon Line Abreast |
0/0 0/0 | |
| Echelon Line Abreast |
0/0 0/0 | ||
| # | Formation | Normal Battle Node | AD/AP AS/AS+ |
| # | Formation | Normal Battle Node | AD/AP AS/AS+ |
|---|---|---|---|
| J | Echelon Line Abreast |
0/0 0/0 | |
| Echelon Line Abreast |
0/0 0/0 | ||
| # | Formation | Normal Battle Node | AD/AP AS/AS+ |
| # | Formation | Air Defense Node | AD/AP AS/AS+ |
|---|---|---|---|
| K | Diamond | 118/235 527/1053 | |
| Diamond | 124/247 554/1107 | ||
| Diamond | 128/256 575/1149 | ||
| Diamond | 130/260 584/1167 | ||
| Diamond | 166/331 744/1488 | ||
| # | Formation | Air Defense Node | AD/AP AS/AS+ |
| # | Formation | Normal Battle Node | AD/AP AS/AS+ |
|---|---|---|---|
| L | Echelon Line Abreast |
0/0 0/0 | |
| Echelon Line Abreast |
0/0 0/0 | ||
| # | Formation | Normal Battle Node | AD/AP AS/AS+ |
| # | Formation | Normal Battle Node | AD/AP AS/AS+ |
|---|---|---|---|
| M | Line Ahead Double Line Vanguard |
0/0 0/0 | |
| # | Formation | Normal Battle Node | AD/AP AS/AS+ |
| # | Empty Node | ||
|---|---|---|---|
| N | 敵影を見ず。 春風船団、抜錨!対潜警戒を厳とせよ! No enemy spotted. Harukaze Convoy, weigh anchor! Maintain strict anti-submarine alert! | ||
| # | Empty Node | ||
| # | Empty Node | ||
|---|---|---|---|
| O | 敵影を見ず。 春風船団、抜錨!対潜警戒を厳とせよ! No enemy spotted. Harukaze Convoy, weigh anchor! Maintain strict anti-submarine alert! | ||
| # | Empty Node | ||
| # | Landing Node | ||
|---|---|---|---|
| # | Landing Node | ||
| # | Formation | Boss Battle Node | AD/AP AS/AS+ |
|---|---|---|---|
| Q | Line Ahead Echelon |
0/0 0/0 | |
| Echelon (Final)
|
0/0 0/0 | ||
| # | Formation | Boss Battle Node | AD/AP AS/AS+ |
| # | Formation | Air Defense Node | AD/AP AS/AS+ |
|---|---|---|---|
| R | Diamond | 172/344 773/1545 | |
| Diamond | 174/347 780/1560 | ||
| Diamond | 181/361 810/1620 | ||
| Diamond | 180/359 807/1614 | ||
| # | Formation | Air Defense Node | AD/AP AS/AS+ |
| # | Formation | Air Defense Node | AD/AP AS/AS+ |
|---|---|---|---|
| S | Diamond | 172/344 773/1545 | |
| Diamond | 174/347 780/1560 | ||
| Diamond | 181/361 810/1620 | ||
| Diamond | 180/359 807/1614 | ||
| # | Formation | Air Defense Node | AD/AP AS/AS+ |
| # | Formation | Normal Battle Node | AD/AP AS/AS+ |
|---|---|---|---|
| T | Line Ahead Echelon Vanguard |
0/0 0/0 | |
| # | Formation | Normal Battle Node | AD/AP AS/AS+ |
| # | Formation | Normal Battle Node | AD/AP AS/AS+ |
|---|---|---|---|
| U | Line Ahead Echelon Vanguard |
0/0 0/0 | |
| # | Formation | Normal Battle Node | AD/AP AS/AS+ |
| # | Landing Node | ||
|---|---|---|---|
| # | Landing Node | ||
| # | Formation | Boss Battle Node | AD/AP AS/AS+ |
|---|---|---|---|
| W | Line Ahead Echelon Vanguard |
0/0 0/0 | |
| # | Formation | Boss Battle Node | AD/AP AS/AS+ |
| # | Empty Node | ||
|---|---|---|---|
| X1 | 気のせいだった。 海峡突入!対水上見張り、厳とせよ!戦闘用意ッ! Must be my imagination. Entering the strait! Keep a sharp lookout for enemy ships! Battle stations! | ||
| # | Empty Node | ||
| # | Formation | Normal Battle Node | AD/AP AS/AS+ |
|---|---|---|---|
| X2 | Line Ahead Echelon Line Abreast |
0/0 0/0 | |
| # | Formation | Normal Battle Node | AD/AP AS/AS+ |
| # | Formation | Normal Battle Node | AD/AP AS/AS+ |
|---|---|---|---|
| Y1 | Line Ahead Double Line Vanguard |
0/0 0/0 | |
| # | Formation | Normal Battle Node | AD/AP AS/AS+ |
| # | Formation | Air Defense Node | AD/AP AS/AS+ |
|---|---|---|---|
| Y2 | Diamond | 168/335 752/1503 | |
| Diamond | 182/363 816/1632 | ||
| Diamond | 182/363 816/1632 | ||
| # | Formation | Air Defense Node | AD/AP AS/AS+ |
| # | Formation | Normal Battle Node | AD/AP AS/AS+ |
|---|---|---|---|
| Y3 | Cruising Formation 4 | 172/344 773/1545 | |
| Cruising Formation 4 | 174/347 780/1560 | ||
| # | Formation | Normal Battle Node | AD/AP AS/AS+ |
| # | Empty Node | ||
|---|---|---|---|
| Y4 | 敵影を見ず。 海峡突入!対水上見張り、厳とせよ!戦闘用意ッ! No enemy spotted. Entering the strait! Keep a sharp lookout for enemy ships! Battle stations! | ||
| # | Empty Node | ||
| # | Formation | Normal Battle Node | AD/AP AS/AS+ |
|---|---|---|---|
| Y5 | Cruising Formation 4 | 166/332 746/1491 | |
| Cruising Formation 4 | 166/331 744/1488 | ||
| # | Formation | Normal Battle Node | AD/AP AS/AS+ |
| # | Empty Node | ||
|---|---|---|---|
| Y6 | 気のせいだった。 反撃開始!各艦、突入用意――。 Must be my imagination. Commence counterattack! All ships, get ready to move in――. | ||
| # | Empty Node | ||
| # | Repair Node | ||
|---|---|---|---|
| # | Repair Node | ||
| # | Formation | Boss Battle Node | AD/AP AS/AS+ |
|---|---|---|---|
| Z | Cruising Formation 4 | 132/263 591/1182 | |
| Cruising Formation 4 (Final)
|
132/263 591/1182 | ||
| # | Formation | Boss Battle Node | AD/AP AS/AS+ |
| # | Formation | Air Raids | AD/AP AS/AS+ |
|---|---|---|---|
| AB | Diamond | 95/190 426/852 | |
| Diamond | 106/212 476/951 | ||
| Diamond | 118/235 527/1053 | ||
| Diamond | 124/247 554/1107 | ||
| Diamond | 128/256 575/1149 | ||
| # | Formation | Air Raids | AD/AP AS/AS+ |
| # | Formation | Air Defense Node | AD/AP AS/AS+ |
|---|---|---|---|
| A | Diamond | 106/212 476/951 | |
| Diamond | 118/235 527/1053 | ||
| Diamond | 124/247 554/1107 | ||
| Diamond | 128/256 575/1149 | ||
| # | Formation | Air Defense Node | AD/AP AS/AS+ |
| # | Formation | Air Defense Node | AD/AP AS/AS+ |
|---|---|---|---|
| B | Diamond | 106/212 476/951 | |
| Diamond | 118/235 527/1053 | ||
| Diamond | 124/247 554/1107 | ||
| Diamond | 128/256 575/1149 | ||
| # | Formation | Air Defense Node | AD/AP AS/AS+ |
| # | Empty Node | ||
|---|---|---|---|
| C | 気のせいだった。 多号作戦部隊、出撃!対空警戒を厳に! Must be my imagination. Operation Ta Force, sortie! Maintain strict anti-aircraft alert! | ||
| # | Empty Node | ||
| # | Selection Node | ||
|---|---|---|---|
| D | 艦隊の針路を選択できます。提督、どちらの針路をとられますか? You can decide the fleet's course. Admiral, which heading should we take? | ||
| # | Selection Node | ||
| # | Empty Node | ||
|---|---|---|---|
| E | 気のせいだった。 春風船団、抜錨!対潜警戒を厳とせよ! Must be my imagination. Harukaze Convoy, weigh anchor! Maintain strict anti-submarine alert! | ||
| # | Empty Node | ||
| # | Formation | Normal Battle Node | AD/AP AS/AS+ |
|---|---|---|---|
| F | Echelon Line Abreast |
0/0 0/0 | |
| Echelon Line Abreast |
0/0 0/0 | ||
| Echelon Line Abreast |
0/0 0/0 | ||
| Echelon Line Abreast |
0/0 0/0 | ||
| # | Formation | Normal Battle Node | AD/AP AS/AS+ |
| # | Formation | Air Defense Node | AD/AP AS/AS+ |
|---|---|---|---|
| G | Diamond | 106/212 476/951 | |
| Diamond | 118/235 527/1053 | ||
| Diamond | 124/247 554/1107 | ||
| Diamond | 128/256 575/1149 | ||
| # | Formation | Air Defense Node | AD/AP AS/AS+ |
| # | Formation | Normal Battle Node | AD/AP AS/AS+ |
|---|---|---|---|
| H | Echelon Line Abreast |
0/0 0/0 | |
| Echelon Line Abreast |
0/0 0/0 | ||
| Echelon Line Abreast |
0/0 0/0 | ||
| Echelon Line Abreast |
0/0 0/0 | ||
| # | Formation | Normal Battle Node | AD/AP AS/AS+ |
| # | Formation | Normal Battle Node | AD/AP AS/AS+ |
|---|---|---|---|
| I | Echelon Line Abreast |
0/0 0/0 | |
| Echelon Line Abreast |
0/0 0/0 | ||
| Echelon Line Abreast |
0/0 0/0 | ||
| Echelon Line Abreast |
0/0 0/0 | ||
| # | Formation | Normal Battle Node | AD/AP AS/AS+ |
| # | Formation | Normal Battle Node | AD/AP AS/AS+ |
|---|---|---|---|
| J | Echelon Line Abreast |
0/0 0/0 | |
| Echelon Line Abreast |
0/0 0/0 | ||
| Echelon Line Abreast |
0/0 0/0 | ||
| Echelon Line Abreast |
0/0 0/0 | ||
| # | Formation | Normal Battle Node | AD/AP AS/AS+ |
| # | Formation | Air Defense Node | AD/AP AS/AS+ |
|---|---|---|---|
| K | Diamond | 95/190 426/852 | |
| Diamond | 106/212 476/951 | ||
| Diamond | 118/235 527/1053 | ||
| Diamond | 124/247 554/1107 | ||
| Diamond | 128/256 575/1149 | ||
| # | Formation | Air Defense Node | AD/AP AS/AS+ |
| # | Formation | Normal Battle Node | AD/AP AS/AS+ |
|---|---|---|---|
| L | Echelon Line Abreast |
0/0 0/0 | |
| Echelon | 0/0 0/0 | ||
| Echelon Line Abreast |
0/0 0/0 | ||
| Echelon Line Abreast |
0/0 0/0 | ||
| # | Formation | Normal Battle Node | AD/AP AS/AS+ |
| # | Formation | Normal Battle Node | AD/AP AS/AS+ |
|---|---|---|---|
| M | Line Ahead Double Line Vanguard |
0/0 0/0 | |
| # | Formation | Normal Battle Node | AD/AP AS/AS+ |
| # | Empty Node | ||
|---|---|---|---|
| N | 敵影を見ず。 春風船団、抜錨!対潜警戒を厳とせよ! No enemy spotted. Harukaze Convoy, weigh anchor! Maintain strict anti-submarine alert! | ||
| # | Empty Node | ||
| # | Empty Node | ||
|---|---|---|---|
| O | 敵影を見ず。 春風船団、抜錨!対潜警戒を厳とせよ! No enemy spotted. Harukaze Convoy, weigh anchor! Maintain strict anti-submarine alert! | ||
| # | Empty Node | ||
| # | Landing Node | ||
|---|---|---|---|
| # | Landing Node | ||
| # | Formation | Boss Battle Node | AD/AP AS/AS+ |
|---|---|---|---|
| Q | Line Ahead Echelon |
0/0 0/0 | |
| # | Formation | Boss Battle Node | AD/AP AS/AS+ |
| # | Formation | Air Defense Node | AD/AP AS/AS+ |
|---|---|---|---|
| R | Diamond | 128/256 575/1149 | |
| Diamond | 164/327 735/1470 | ||
| Diamond | 172/344 773/1545 | ||
| Diamond | 181/361 810/1620 | ||
| # | Formation | Air Defense Node | AD/AP AS/AS+ |
| # | Formation | Air Defense Node | AD/AP AS/AS+ |
|---|---|---|---|
| S | Diamond | 128/256 575/1149 | |
| Diamond | 164/327 735/1470 | ||
| Diamond | 172/344 773/1545 | ||
| Diamond | 181/361 810/1620 | ||
| # | Formation | Air Defense Node | AD/AP AS/AS+ |
| # | Formation | Normal Battle Node | AD/AP AS/AS+ |
|---|---|---|---|
| T | Line Ahead Echelon Vanguard |
0/0 0/0 | |
| # | Formation | Normal Battle Node | AD/AP AS/AS+ |
| # | Formation | Normal Battle Node | AD/AP AS/AS+ |
|---|---|---|---|
| U | Line Ahead Echelon Vanguard |
0/0 0/0 | |
| # | Formation | Normal Battle Node | AD/AP AS/AS+ |
| # | Landing Node | ||
|---|---|---|---|
| # | Landing Node | ||
| # | Formation | Boss Battle Node | AD/AP AS/AS+ |
|---|---|---|---|
| W | Line Ahead Echelon Vanguard |
0/0 0/0 | |
| # | Formation | Boss Battle Node | AD/AP AS/AS+ |
| # | Empty Node | ||
|---|---|---|---|
| X1 | 気のせいだった。 海峡突入!対水上見張り、厳とせよ!戦闘用意ッ! Must be my imagination. Entering the strait! Keep a sharp lookout for enemy ships! Battle stations! | ||
| # | Empty Node | ||
| # | Formation | Normal Battle Node | AD/AP AS/AS+ |
|---|---|---|---|
| X2 | Line Ahead Echelon Line Abreast |
0/0 0/0 | |
| # | Formation | Normal Battle Node | AD/AP AS/AS+ |
| # | Formation | Normal Battle Node | AD/AP AS/AS+ |
|---|---|---|---|
| Y1 | Line Ahead Double Line Vanguard |
0/0 0/0 | |
| # | Formation | Normal Battle Node | AD/AP AS/AS+ |
| # | Formation | Air Defense Node | AD/AP AS/AS+ |
|---|---|---|---|
| Y2 | Diamond | 98/196 440/879 | |
| Diamond | 134/267 600/1200 | ||
| Diamond | 160/320 719/1437 | ||
| # | Formation | Air Defense Node | AD/AP AS/AS+ |
| # | Formation | Normal Battle Node | AD/AP AS/AS+ |
|---|---|---|---|
| Y3 | Cruising Formation 4 | 128/256 575/1149 | |
| Cruising Formation 4 | 164/327 735/1470 | ||
| # | Formation | Normal Battle Node | AD/AP AS/AS+ |
| # | Empty Node | ||
|---|---|---|---|
| Y4 | 敵影を見ず。 海峡突入!対水上見張り、厳とせよ!戦闘用意ッ! No enemy spotted. Entering the strait! Keep a sharp lookout for enemy ships! Battle stations! | ||
| # | Empty Node | ||
| # | Formation | Normal Battle Node | AD/AP AS/AS+ |
|---|---|---|---|
| Y5 | Cruising Formation 4 | 143/286 642/1284 | |
| Cruising Formation 4 | 151/302 678/1356 | ||
| # | Formation | Normal Battle Node | AD/AP AS/AS+ |
| # | Empty Node | ||
|---|---|---|---|
| Y6 | 気のせいだった。 反撃開始!各艦、突入用意――。 Must be my imagination. Commence counterattack! All ships, get ready to move in――. | ||
| # | Empty Node | ||
| # | Repair Node | ||
|---|---|---|---|
| # | Repair Node | ||
| # | Formation | Boss Battle Node | AD/AP AS/AS+ |
|---|---|---|---|
| Z | Cruising Formation 4 | 125/249 558/1116 | |
| Cruising Formation 4 (Final)
|
125/249 558/1116 | ||
| # | Formation | Boss Battle Node | AD/AP AS/AS+ |
| # | Formation | Air Raids | AD/AP AS/AS+ |
|---|---|---|---|
| AB | Diamond | 37/73 162/324 | |
| Diamond | 60/119 266/531 | ||
| Diamond | 95/190 426/852 | ||
| Diamond | 106/212 476/951 | ||
| # | Formation | Air Raids | AD/AP AS/AS+ |
| # | Formation | Air Defense Node | AD/AP AS/AS+ |
|---|---|---|---|
| A | Diamond | 37/73 162/324 | |
| Diamond | 60/119 266/531 | ||
| Diamond | 95/190 426/852 | ||
| Diamond | 106/212 476/951 | ||
| # | Formation | Air Defense Node | AD/AP AS/AS+ |
| # | Formation | Air Defense Node | AD/AP AS/AS+ |
|---|---|---|---|
| B | Diamond | 37/73 162/324 | |
| Diamond | 60/119 266/531 | ||
| Diamond | 95/190 426/852 | ||
| Diamond | 106/212 476/951 | ||
| # | Formation | Air Defense Node | AD/AP AS/AS+ |
| # | Empty Node | ||
|---|---|---|---|
| C | 気のせいだった。 多号作戦部隊、出撃!対空警戒を厳に! Must be my imagination. Operation Ta Force, sortie! Maintain strict anti-aircraft alert! | ||
| # | Empty Node | ||
| # | Selection Node | ||
|---|---|---|---|
| D | 艦隊の針路を選択できます。提督、どちらの針路をとられますか? You can decide the fleet's course. Admiral, which heading should we take? | ||
| # | Selection Node | ||
| # | Empty Node | ||
|---|---|---|---|
| E | 気のせいだった。 春風船団、抜錨!対潜警戒を厳とせよ! Must be my imagination. Harukaze Convoy, weigh anchor! Maintain strict anti-submarine alert! | ||
| # | Empty Node | ||
| # | Formation | Normal Battle Node | AD/AP AS/AS+ |
|---|---|---|---|
| F | Echelon Line Abreast |
0/0 0/0 | |
| Echelon Line Abreast |
0/0 0/0 | ||
| Echelon Line Abreast |
0/0 0/0 | ||
| Echelon Line Abreast |
0/0 0/0 | ||
| # | Formation | Normal Battle Node | AD/AP AS/AS+ |
| # | Formation | Air Defense Node | AD/AP AS/AS+ |
|---|---|---|---|
| G | Diamond | 37/73 162/324 | |
| Diamond | 60/119 266/531 | ||
| Diamond | 95/190 426/852 | ||
| Diamond | 106/212 476/951 | ||
| # | Formation | Air Defense Node | AD/AP AS/AS+ |
| # | Formation | Normal Battle Node | AD/AP AS/AS+ |
|---|---|---|---|
| H | Echelon Line Abreast |
0/0 0/0 | |
| Echelon Line Abreast |
0/0 0/0 | ||
| Echelon Line Abreast |
0/0 0/0 | ||
| Echelon Line Abreast |
0/0 0/0 | ||
| # | Formation | Normal Battle Node | AD/AP AS/AS+ |
| # | Formation | Normal Battle Node | AD/AP AS/AS+ |
|---|---|---|---|
| I | Echelon Line Abreast |
0/0 0/0 | |
| Echelon Line Abreast |
0/0 0/0 | ||
| Echelon Line Abreast |
0/0 0/0 | ||
| Echelon Line Abreast |
0/0 0/0 | ||
| # | Formation | Normal Battle Node | AD/AP AS/AS+ |
| # | Formation | Normal Battle Node | AD/AP AS/AS+ |
|---|---|---|---|
| J | Echelon Line Abreast |
0/0 0/0 | |
| Echelon | 0/0 0/0 | ||
| # | Formation | Normal Battle Node | AD/AP AS/AS+ |
| # | Formation | Air Defense Node | AD/AP AS/AS+ |
|---|---|---|---|
| K | Diamond | 37/73 162/324 | |
| Diamond | 60/119 266/531 | ||
| Diamond | 95/190 426/852 | ||
| Diamond | 106/212 476/951 | ||
| # | Formation | Air Defense Node | AD/AP AS/AS+ |
| # | Formation | Normal Battle Node | AD/AP AS/AS+ |
|---|---|---|---|
| L | Echelon Line Abreast |
0/0 0/0 | |
| Echelon Line Abreast |
0/0 0/0 | ||
| # | Formation | Normal Battle Node | AD/AP AS/AS+ |
| # | Formation | Normal Battle Node | AD/AP AS/AS+ |
|---|---|---|---|
| M | Line Ahead Double Line Vanguard |
0/0 0/0 | |
| # | Formation | Normal Battle Node | AD/AP AS/AS+ |
| # | Empty Node | ||
|---|---|---|---|
| N | 敵影を見ず。 春風船団、抜錨!対潜警戒を厳とせよ! No enemy spotted. Harukaze Convoy, weigh anchor! Maintain strict anti-submarine alert! | ||
| # | Empty Node | ||
| # | Empty Node | ||
|---|---|---|---|
| O | 敵影を見ず。 春風船団、抜錨!対潜警戒を厳とせよ! No enemy spotted. Harukaze Convoy, weigh anchor! Maintain strict anti-submarine alert! | ||
| # | Empty Node | ||
| # | Landing Node | ||
|---|---|---|---|
| # | Landing Node | ||
| # | Formation | Boss Battle Node | AD/AP AS/AS+ |
|---|---|---|---|
| Q | Echelon | 0/0 0/0 | |
| Line Ahead Echelon (Final)
|
0/0 0/0 | ||
| # | Formation | Boss Battle Node | AD/AP AS/AS+ |
| # | Formation | Air Defense Node | AD/AP AS/AS+ |
|---|---|---|---|
| R | Diamond | 78/156 350/699 | |
| Diamond | 87/173 387/774 | ||
| Diamond | 122/244 548/1095 | ||
| Diamond | 128/256 575/1149 | ||
| # | Formation | Air Defense Node | AD/AP AS/AS+ |
| # | Formation | Air Defense Node | AD/AP AS/AS+ |
|---|---|---|---|
| S | Diamond | 78/156 350/699 | |
| Diamond | 87/173 387/774 | ||
| Diamond | 122/244 548/1095 | ||
| Diamond | 128/256 575/1149 | ||
| # | Formation | Air Defense Node | AD/AP AS/AS+ |
| # | Formation | Normal Battle Node | AD/AP AS/AS+ |
|---|---|---|---|
| T | Line Ahead Echelon Vanguard |
0/0 0/0 | |
| # | Formation | Normal Battle Node | AD/AP AS/AS+ |
| # | Formation | Normal Battle Node | AD/AP AS/AS+ |
|---|---|---|---|
| U | Line Ahead Echelon Vanguard |
0/0 0/0 | |
| # | Formation | Normal Battle Node | AD/AP AS/AS+ |
| # | Landing Node | ||
|---|---|---|---|
| # | Landing Node | ||
| # | Formation | Boss Battle Node | AD/AP AS/AS+ |
|---|---|---|---|
| W | Line Ahead Echelon Vanguard |
0/0 0/0 | |
| # | Formation | Boss Battle Node | AD/AP AS/AS+ |
| # | Empty Node | ||
|---|---|---|---|
| X1 | 気のせいだった。 海峡突入!対水上見張り、厳とせよ!戦闘用意ッ! Must be my imagination. Entering the strait! Keep a sharp lookout for enemy ships! Battle stations! | ||
| # | Empty Node | ||
| # | Formation | Normal Battle Node | AD/AP AS/AS+ |
|---|---|---|---|
| X2 | Line Ahead Echelon Line Abreast |
0/0 0/0 | |
| # | Formation | Normal Battle Node | AD/AP AS/AS+ |
| # | Formation | Normal Battle Node | AD/AP AS/AS+ |
|---|---|---|---|
| Y1 | Line Ahead Double Line Vanguard |
0/0 0/0 | |
| # | Formation | Normal Battle Node | AD/AP AS/AS+ |
| # | Formation | Air Defense Node | AD/AP AS/AS+ |
|---|---|---|---|
| Y2 | Diamond | 98/196 440/879 | |
| Diamond | 134/267 600/1200 | ||
| Diamond | 160/320 719/1437 | ||
| # | Formation | Air Defense Node | AD/AP AS/AS+ |
| # | Formation | Normal Battle Node | AD/AP AS/AS+ |
|---|---|---|---|
| Y3 | Cruising Formation 4 | 122/244 548/1095 | |
| Cruising Formation 4 | 130/260 584/1167 | ||
| # | Formation | Normal Battle Node | AD/AP AS/AS+ |
| # | Empty Node | ||
|---|---|---|---|
| Y4 | 敵影を見ず。 海峡突入!対水上見張り、厳とせよ!戦闘用意ッ! No enemy spotted. Entering the strait! Keep a sharp lookout for enemy ships! Battle stations! | ||
| # | Empty Node | ||
| # | Formation | Normal Battle Node | AD/AP AS/AS+ |
|---|---|---|---|
| Y5 | Cruising Formation 4 | 114/228 512/1023 | |
| Cruising Formation 4 | 103/206 462/924 | ||
| # | Formation | Normal Battle Node | AD/AP AS/AS+ |
| # | Empty Node | ||
|---|---|---|---|
| Y6 | 気のせいだった。 反撃開始!各艦、突入用意――。 Must be my imagination. Commence counterattack! All ships, get ready to move in――. | ||
| # | Empty Node | ||
| # | Repair Node | ||
|---|---|---|---|
| # | Repair Node | ||
| # | Formation | Boss Battle Node | AD/AP AS/AS+ |
|---|---|---|---|
| Z | Cruising Formation 4 | 50/99 222/444 | |
| Cruising Formation 4 (Final)
|
63/125 279/558 | ||
| # | Formation | Boss Battle Node | AD/AP AS/AS+ |
| # | Formation | Air Raids | AD/AP AS/AS+ |
|---|---|---|---|
| AB | Diamond | 37/73 162/324 | |
| Diamond | 60/119 266/531 | ||
| Diamond | 95/190 426/852 | ||
| # | Formation | Air Raids | AD/AP AS/AS+ |
| # | Formation | Air Defense Node | AD/AP AS/AS+ |
|---|---|---|---|
| A | Diamond | 37/73 162/324 | |
| Diamond | 60/119 266/531 | ||
| Diamond | 95/190 426/852 | ||
| # | Formation | Air Defense Node | AD/AP AS/AS+ |
| # | Formation | Air Defense Node | AD/AP AS/AS+ |
|---|---|---|---|
| B | Diamond | 37/73 162/324 | |
| Diamond | 60/119 266/531 | ||
| Diamond | 95/190 426/852 | ||
| # | Formation | Air Defense Node | AD/AP AS/AS+ |
| # | Empty Node | ||
|---|---|---|---|
| C | 気のせいだった。 多号作戦部隊、出撃!対空警戒を厳に! Must be my imagination. Operation Ta Force, sortie! Maintain strict anti-aircraft alert! | ||
| # | Empty Node | ||
| # | Selection Node | ||
|---|---|---|---|
| D | 艦隊の針路を選択できます。提督、どちらの針路をとられますか? You can decide the fleet's course. Admiral, which heading should we take? | ||
| # | Selection Node | ||
| # | Empty Node | ||
|---|---|---|---|
| E | 気のせいだった。 春風船団、抜錨!対潜警戒を厳とせよ! Must be my imagination. Harukaze Convoy, weigh anchor! Maintain strict anti-submarine alert! | ||
| # | Empty Node | ||
| # | Formation | Normal Battle Node | AD/AP AS/AS+ |
|---|---|---|---|
| F | Echelon Line Abreast |
0/0 0/0 | |
| Echelon Line Abreast |
0/0 0/0 | ||
| # | Formation | Normal Battle Node | AD/AP AS/AS+ |
| # | Formation | Air Defense Node | AD/AP AS/AS+ |
|---|---|---|---|
| G | Diamond | 37/73 162/324 | |
| Diamond | 60/119 266/531 | ||
| Diamond | 95/190 426/852 | ||
| # | Formation | Air Defense Node | AD/AP AS/AS+ |
| # | Formation | Normal Battle Node | AD/AP AS/AS+ |
|---|---|---|---|
| H | Echelon Line Abreast |
0/0 0/0 | |
| Echelon Line Abreast |
0/0 0/0 | ||
| # | Formation | Normal Battle Node | AD/AP AS/AS+ |
| # | Formation | Normal Battle Node | AD/AP AS/AS+ |
|---|---|---|---|
| I | Echelon Line Abreast |
0/0 0/0 | |
| Echelon Line Abreast |
0/0 0/0 | ||
| # | Formation | Normal Battle Node | AD/AP AS/AS+ |
| # | Formation | Normal Battle Node | AD/AP AS/AS+ |
|---|---|---|---|
| J | Echelon Line Abreast |
0/0 0/0 | |
| Echelon Line Abreast |
0/0 0/0 | ||
| # | Formation | Normal Battle Node | AD/AP AS/AS+ |
| # | Formation | Air Defense Node | AD/AP AS/AS+ |
|---|---|---|---|
| K | Diamond | 37/73 162/324 | |
| Diamond | 60/119 266/531 | ||
| Diamond | 95/190 426/852 | ||
| # | Formation | Air Defense Node | AD/AP AS/AS+ |
| # | Formation | Normal Battle Node | AD/AP AS/AS+ |
|---|---|---|---|
| L | Echelon Line Abreast |
0/0 0/0 | |
| Echelon Line Abreast |
0/0 0/0 | ||
| # | Formation | Normal Battle Node | AD/AP AS/AS+ |
| # | Formation | Normal Battle Node | AD/AP AS/AS+ |
|---|---|---|---|
| M | Line Ahead Double Line Vanguard |
0/0 0/0 | |
| # | Formation | Normal Battle Node | AD/AP AS/AS+ |
| # | Empty Node | ||
|---|---|---|---|
| N | 敵影を見ず。 春風船団、抜錨!対潜警戒を厳とせよ! No enemy spotted. Harukaze Convoy, weigh anchor! Maintain strict anti-submarine alert! | ||
| # | Empty Node | ||
| # | Empty Node | ||
|---|---|---|---|
| O | 敵影を見ず。 春風船団、抜錨!対潜警戒を厳とせよ! No enemy spotted. Harukaze Convoy, weigh anchor! Maintain strict anti-submarine alert! | ||
| # | Empty Node | ||
| # | Landing Node | ||
|---|---|---|---|
| # | Landing Node | ||
| # | Formation | Boss Battle Node | AD/AP AS/AS+ |
|---|---|---|---|
| Q | Line Ahead Echelon |
0/0 0/0 | |
| Echelon (Final)
|
0/0 0/0 | ||
| # | Formation | Boss Battle Node | AD/AP AS/AS+ |
| # | Formation | Air Defense Node | AD/AP AS/AS+ |
|---|---|---|---|
| R | Diamond | 78/156 350/699 | |
| Diamond | 87/173 387/774 | ||
| Diamond | 122/244 548/1095 | ||
| # | Formation | Air Defense Node | AD/AP AS/AS+ |
| # | Formation | Air Defense Node | AD/AP AS/AS+ |
|---|---|---|---|
| S | Diamond | 78/156 350/699 | |
| Diamond | 87/173 387/774 | ||
| Diamond | 122/244 548/1095 | ||
| # | Formation | Air Defense Node | AD/AP AS/AS+ |
| # | Formation | Normal Battle Node | AD/AP AS/AS+ |
|---|---|---|---|
| T | Line Ahead Echelon Vanguard |
0/0 0/0 | |
| # | Formation | Normal Battle Node | AD/AP AS/AS+ |
| # | Formation | Normal Battle Node | AD/AP AS/AS+ |
|---|---|---|---|
| U | Line Ahead Echelon Vanguard |
0/0 0/0 | |
| # | Formation | Normal Battle Node | AD/AP AS/AS+ |
| # | Landing Node | ||
|---|---|---|---|
| # | Landing Node | ||
| # | Formation | Boss Battle Node | AD/AP AS/AS+ |
|---|---|---|---|
| W | Line Ahead Echelon Vanguard |
0/0 0/0 | |
| # | Formation | Boss Battle Node | AD/AP AS/AS+ |
| # | Empty Node | ||
|---|---|---|---|
| X1 | 気のせいだった。 海峡突入!対水上見張り、厳とせよ!戦闘用意ッ! Must be my imagination. Entering the strait! Keep a sharp lookout for enemy ships! Battle stations! | ||
| # | Empty Node | ||
| # | Formation | Normal Battle Node | AD/AP AS/AS+ |
|---|---|---|---|
| X2 | Line Ahead Echelon Line Abreast |
0/0 0/0 | |
| # | Formation | Normal Battle Node | AD/AP AS/AS+ |
| # | Formation | Normal Battle Node | AD/AP AS/AS+ |
|---|---|---|---|
| Y1 | Line Ahead Double Line Vanguard |
0/0 0/0 | |
| # | Formation | Normal Battle Node | AD/AP AS/AS+ |
| # | Formation | Air Defense Node | AD/AP AS/AS+ |
|---|---|---|---|
| Y2 | Diamond | 50/99 222/444 | |
| Diamond | 86/171 383/765 | ||
| Diamond | 86/171 383/765 | ||
| # | Formation | Air Defense Node | AD/AP AS/AS+ |
| # | Formation | Normal Battle Node | AD/AP AS/AS+ |
|---|---|---|---|
| Y3 | Cruising Formation 4 | 78/156 350/699 | |
| Cruising Formation 4 | 86/172 386/771 | ||
| # | Formation | Normal Battle Node | AD/AP AS/AS+ |
| # | Empty Node | ||
|---|---|---|---|
| Y4 | 敵影を見ず。 海峡突入!対水上見張り、厳とせよ!戦闘用意ッ! No enemy spotted. Entering the strait! Keep a sharp lookout for enemy ships! Battle stations! | ||
| # | Empty Node | ||
| # | Formation | Normal Battle Node | AD/AP AS/AS+ |
|---|---|---|---|
| Y5 | Cruising Formation 4 | 45/89 198/396 | |
| Cruising Formation 4 | 80/160 359/717 | ||
| # | Formation | Normal Battle Node | AD/AP AS/AS+ |
| # | Empty Node | ||
|---|---|---|---|
| Y6 | 気のせいだった。 反撃開始!各艦、突入用意――。 Must be my imagination. Commence counterattack! All ships, get ready to move in――. | ||
| # | Empty Node | ||
| # | Repair Node | ||
|---|---|---|---|
| # | Repair Node | ||
| # | Formation | Boss Battle Node | AD/AP AS/AS+ |
|---|---|---|---|
| Z | Cruising Formation 4 | 50/99 222/444 | |
| Cruising Formation 4 (Final)
|
50/99 222/444 | ||
| # | Formation | Boss Battle Node | AD/AP AS/AS+ |
Ship Drops:
| Ship drops | |||||||||||||||||||||||||||||||||||||||||||||||||||||||||||||||||||||||||||||||||||||||||||||||||||
|---|---|---|---|---|---|---|---|---|---|---|---|---|---|---|---|---|---|---|---|---|---|---|---|---|---|---|---|---|---|---|---|---|---|---|---|---|---|---|---|---|---|---|---|---|---|---|---|---|---|---|---|---|---|---|---|---|---|---|---|---|---|---|---|---|---|---|---|---|---|---|---|---|---|---|---|---|---|---|---|---|---|---|---|---|---|---|---|---|---|---|---|---|---|---|---|---|---|---|---|
| Type | Ship | Q | U | W | Y1 | Y3 | Y5 | Z | |||||||||||||||||||||||||||||||||||||||||||||||||||||||||||||||||||||||||||||||||||||||||||
| DE | Daitou | Hard+ | Casual+ | ||||||||||||||||||||||||||||||||||||||||||||||||||||||||||||||||||||||||||||||||||||||||||||||||
| DE | Hiburi | Casual+ | |||||||||||||||||||||||||||||||||||||||||||||||||||||||||||||||||||||||||||||||||||||||||||||||||
| DE | Kaiboukan No.4 | Casual+ | |||||||||||||||||||||||||||||||||||||||||||||||||||||||||||||||||||||||||||||||||||||||||||||||||
| DE | Matsuwa | Casual+ | Hard+ | Hard+ | |||||||||||||||||||||||||||||||||||||||||||||||||||||||||||||||||||||||||||||||||||||||||||||||
| DE | Sado | Casual+ | |||||||||||||||||||||||||||||||||||||||||||||||||||||||||||||||||||||||||||||||||||||||||||||||||
| DE | Shimushu | Medium+ | Casual+ | ||||||||||||||||||||||||||||||||||||||||||||||||||||||||||||||||||||||||||||||||||||||||||||||||
| DE | Tsushima | Casual+ | Easy+ | Medium+ | |||||||||||||||||||||||||||||||||||||||||||||||||||||||||||||||||||||||||||||||||||||||||||||||
| DD | Asakaze | Casual+ | |||||||||||||||||||||||||||||||||||||||||||||||||||||||||||||||||||||||||||||||||||||||||||||||||
| DD | Asashimo | Casual+ | Hard+ | Hard+ | |||||||||||||||||||||||||||||||||||||||||||||||||||||||||||||||||||||||||||||||||||||||||||||||
| DD | Fujinami | Casual+ | Casual+ | ||||||||||||||||||||||||||||||||||||||||||||||||||||||||||||||||||||||||||||||||||||||||||||||||
| DD | Hamanami | Casual+ | Casual+ | Easy+ | Medium+ | Casual+ | |||||||||||||||||||||||||||||||||||||||||||||||||||||||||||||||||||||||||||||||||||||||||||||
| DD | Harukaze | Casual+ | Medium+ | Medium+ | |||||||||||||||||||||||||||||||||||||||||||||||||||||||||||||||||||||||||||||||||||||||||||||||
| DD | Hatakaze | Easy+ | |||||||||||||||||||||||||||||||||||||||||||||||||||||||||||||||||||||||||||||||||||||||||||||||||
| DD | Hatsuzuki | Easy+ | Casual+ | ||||||||||||||||||||||||||||||||||||||||||||||||||||||||||||||||||||||||||||||||||||||||||||||||
| DD | Hayanami | Casual+ | Casual+ | ||||||||||||||||||||||||||||||||||||||||||||||||||||||||||||||||||||||||||||||||||||||||||||||||
| DD | Hayashimo | Casual+ | Hard+ | Medium+ | Casual+ | Medium+ | |||||||||||||||||||||||||||||||||||||||||||||||||||||||||||||||||||||||||||||||||||||||||||||
| DD | Kamikaze | Hard+ | |||||||||||||||||||||||||||||||||||||||||||||||||||||||||||||||||||||||||||||||||||||||||||||||||
| DD | Kiyoshimo | Casual+ | Medium+ | Casual+ | Casual+ | Medium+ | |||||||||||||||||||||||||||||||||||||||||||||||||||||||||||||||||||||||||||||||||||||||||||||
| DD | Matsukaze | Casual+ | Hard+ | ||||||||||||||||||||||||||||||||||||||||||||||||||||||||||||||||||||||||||||||||||||||||||||||||
| DD | Okinami | Casual+ | Hard+ | Casual+ | Medium+ | ||||||||||||||||||||||||||||||||||||||||||||||||||||||||||||||||||||||||||||||||||||||||||||||
| DD | Uranami | Casual+ | Casual+ | Casual+ | Casual+ | Easy+ | |||||||||||||||||||||||||||||||||||||||||||||||||||||||||||||||||||||||||||||||||||||||||||||
| DD | Uzuki | Medium+ | |||||||||||||||||||||||||||||||||||||||||||||||||||||||||||||||||||||||||||||||||||||||||||||||||
| CL | Noshiro | Easy+ | Casual+ | ||||||||||||||||||||||||||||||||||||||||||||||||||||||||||||||||||||||||||||||||||||||||||||||||
| CL | Ooyodo | Casual+ | Easy+ | Casual+ | Casual+ | Medium+ | |||||||||||||||||||||||||||||||||||||||||||||||||||||||||||||||||||||||||||||||||||||||||||||
| CL | Perth | Casual+ | Casual+ | ||||||||||||||||||||||||||||||||||||||||||||||||||||||||||||||||||||||||||||||||||||||||||||||||
| CL | Sakawa | Medium+ | |||||||||||||||||||||||||||||||||||||||||||||||||||||||||||||||||||||||||||||||||||||||||||||||||
| CVL | Gambier Bay | Casual+ | Casual+ | ||||||||||||||||||||||||||||||||||||||||||||||||||||||||||||||||||||||||||||||||||||||||||||||||
| CVL | Kasuga Maru | Medium+ | |||||||||||||||||||||||||||||||||||||||||||||||||||||||||||||||||||||||||||||||||||||||||||||||||
| BB | Colorado | Casual+ | |||||||||||||||||||||||||||||||||||||||||||||||||||||||||||||||||||||||||||||||||||||||||||||||||
| BB | Musashi | Hard+ | |||||||||||||||||||||||||||||||||||||||||||||||||||||||||||||||||||||||||||||||||||||||||||||||||
| SS | Maruyu | Medium+ | |||||||||||||||||||||||||||||||||||||||||||||||||||||||||||||||||||||||||||||||||||||||||||||||||
| LHA | Shinshuu Maru | Casual+ | |||||||||||||||||||||||||||||||||||||||||||||||||||||||||||||||||||||||||||||||||||||||||||||||||
| AS | Taigei | Casual+ | |||||||||||||||||||||||||||||||||||||||||||||||||||||||||||||||||||||||||||||||||||||||||||||||||
| DD | Naganami | Casual+ | Casual+ | Medium+ | Casual+ | Hard+ | Casual+ | ||||||||||||||||||||||||||||||||||||||||||||||||||||||||||||||||||||||||||||||||||||||||||||
| DD | Shimakaze | Medium+ | Casual+ | ||||||||||||||||||||||||||||||||||||||||||||||||||||||||||||||||||||||||||||||||||||||||||||||||
| DD | Yayoi | Casual+ | Hard+ | ||||||||||||||||||||||||||||||||||||||||||||||||||||||||||||||||||||||||||||||||||||||||||||||||
| CL | Abukuma | Casual+ | Medium+ | Medium+ | |||||||||||||||||||||||||||||||||||||||||||||||||||||||||||||||||||||||||||||||||||||||||||||||
| CL | Kinu | Casual+ | Casual+ | Casual+ | Casual+ | Medium+ | |||||||||||||||||||||||||||||||||||||||||||||||||||||||||||||||||||||||||||||||||||||||||||||
| CL | Nagara | Casual+ | Casual+ | Casual+ | Casual+ | Casual+ | Medium+ | Casual+ | |||||||||||||||||||||||||||||||||||||||||||||||||||||||||||||||||||||||||||||||||||||||||||
| CL | Ooi | Casual+ | Casual+ | Casual+ | Casual+ | Medium+ | |||||||||||||||||||||||||||||||||||||||||||||||||||||||||||||||||||||||||||||||||||||||||||||
| CL | Sendai | Casual+ | Casual+ | Casual+ | Casual+ | Casual+ | Medium+ | Casual+ | |||||||||||||||||||||||||||||||||||||||||||||||||||||||||||||||||||||||||||||||||||||||||||
| CA | Atago | Casual+ | Casual+ | ||||||||||||||||||||||||||||||||||||||||||||||||||||||||||||||||||||||||||||||||||||||||||||||||
| CA | Chikuma | Casual+ | Casual+ | ||||||||||||||||||||||||||||||||||||||||||||||||||||||||||||||||||||||||||||||||||||||||||||||||
| CA | Kumano | Casual+ | Casual+ | ||||||||||||||||||||||||||||||||||||||||||||||||||||||||||||||||||||||||||||||||||||||||||||||||
| CA | Myoukou | Casual+ | Casual+ | Casual+ | |||||||||||||||||||||||||||||||||||||||||||||||||||||||||||||||||||||||||||||||||||||||||||||||
| CA | Suzuya | Casual+ | Casual+ | ||||||||||||||||||||||||||||||||||||||||||||||||||||||||||||||||||||||||||||||||||||||||||||||||
| CA | Tone | Medium+ | |||||||||||||||||||||||||||||||||||||||||||||||||||||||||||||||||||||||||||||||||||||||||||||||||
| FBB | Haruna | Casual+ | |||||||||||||||||||||||||||||||||||||||||||||||||||||||||||||||||||||||||||||||||||||||||||||||||
| FBB | Hiei | Casual+ | |||||||||||||||||||||||||||||||||||||||||||||||||||||||||||||||||||||||||||||||||||||||||||||||||
| FBB | Kirishima | Casual+ | |||||||||||||||||||||||||||||||||||||||||||||||||||||||||||||||||||||||||||||||||||||||||||||||||
| FBB | Kongou | Casual+ | |||||||||||||||||||||||||||||||||||||||||||||||||||||||||||||||||||||||||||||||||||||||||||||||||
| BB | Fusou | Casual+ | Casual+ | ||||||||||||||||||||||||||||||||||||||||||||||||||||||||||||||||||||||||||||||||||||||||||||||||
| BB | Hyuuga | Casual+ | |||||||||||||||||||||||||||||||||||||||||||||||||||||||||||||||||||||||||||||||||||||||||||||||||
| BB | Ise | Casual+ | |||||||||||||||||||||||||||||||||||||||||||||||||||||||||||||||||||||||||||||||||||||||||||||||||
| BB | Yamashiro | Casual+ | Casual+ | ||||||||||||||||||||||||||||||||||||||||||||||||||||||||||||||||||||||||||||||||||||||||||||||||
| CV | Shoukaku | Casual+ | Casual+ | ||||||||||||||||||||||||||||||||||||||||||||||||||||||||||||||||||||||||||||||||||||||||||||||||
| CV | Zuikaku | Casual+ | |||||||||||||||||||||||||||||||||||||||||||||||||||||||||||||||||||||||||||||||||||||||||||||||||
| E-4 Clear Message |
|---|