- Welcome to the Kancolle Wiki!
- If you have any questions regarding site content, account registration, etc., please visit the KanColle Wiki Discord
Spring 2022 Event/Main Operation
 
| |||||||||
|---|---|---|---|---|---|---|---|---|---|
 
Time remaining until Spring 2022 Event Ends:
| |||||||||
Spring 2022 Main Operation Maps
|
| |||||||||
|---|---|---|---|---|---|---|---|---|---|
|
Time remaining until Spring 2022 Event Ends:
| |||||||||
ラバウル基地への進出
![]()


| Information | ||||
|---|---|---|---|---|
| Event Tag | ||||
| Boss Gauges | Hard (甲): 1950 HP | |||
| Medium (乙): 1850 HP | ||||
| Easy (丙): 1750 HP | ||||
| Casual (丁): 1750 HP | ||||
| Map Bosses | Heavy Cruiser Princess
| |||
| Rewards[edit] |
|---|
| Reward | 丁 Casual |
丙 Easy |
乙 Medium |
甲 Hard |
|---|---|---|---|---|
Food Supply Ship Irako |
1 | 1 | 1 | 2 |
Emergency Repair Goddess |
1 | 1 | 1 | 1 |
Food Supply Ship Mamiya |
1 | 2 | 2 | |
New Model Gun Mount Improvement Material |
1 | 1 | 1 | |
Reinforcement Expansion |
1 | |||
 Type 2 Depth Charge |
1 (★1) | 1 (★2) | 1 (★3) | 1 (★4) |
 Late Model Bow Torpedo Mount (4 tubes) |
1 |

Branching Table
| E-1 Branching Rules | ||
|---|---|---|
| Nodes | Rules | |
1 |
A |
|
F |
| |
A |
B |
Choose your own adventure! |
F | ||
B |
C |
|
D |
| |
D |
E |
Fixed routing |
F |
G |
|
H |
| |
G |
H |
|
I |
| |
H |
I |
|
J |
| |
I |
K |
Fixed routing |
J |
L |
|
N |
| |
O |
| |
L |
M |
|
N |
| |
N |
O |
Fixed routing |
O |
P |
Does not meet the requirements to go to Q |
Q |
Pass the LoS check (Cn2 = 32 on Hard) | |
Branching compositions were reported over the course of the event. (NGA and KCNav)
The event guides are to be constructed through the respective Event map page guide sandbox and reviewed by editors before being approved here. Do not under any circumstance update the guides through this page or attempt to fix them through this page. Please only update guides through their respective sandbox pages.
Ship Bonuses
DISCLAIMER: This information is based on user submitted data and is subject to revisions as more data is gathered. Any version of the ship receives the bonus regardless of remodel.
Ship Bonuses
| Ships | Map-wide | ||
|---|---|---|---|
| Coastal Defense Ships (DE) | 1.1x | ||
Map overview
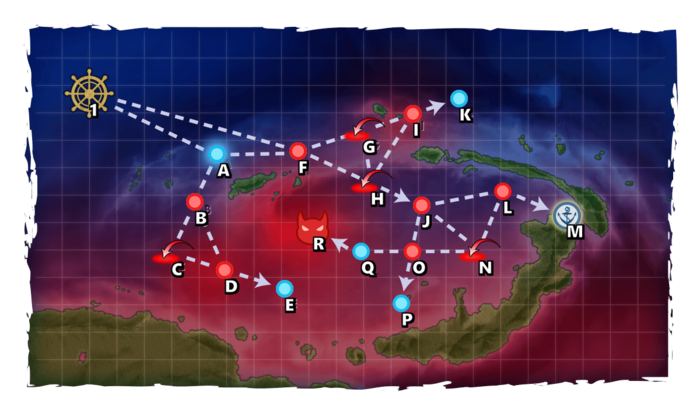
E1 is a single-fleet three-phase map consisting of one two-part unlocking Phase and one Boss Phase.
- No LBAS is available to sortie.
- This map utilizes
 R-Area Defense Unit lock.
Phase 1: Unlocking the Route to Rabaul
In this phase, there are three requirements to unlock the path to Rabaul :
- Reach Node E
- Reach Node K
- S rank Node J
- 1SS
- Route: A B C D E
- Only D is capable of damaging the submarine, but as it is right in front of an empty end node the submarine can be equipped with a
 Damage control
 and continue the sortie after D without consuming said item.
- Only D is capable of damaging the submarine, but as it is right in front of an empty end node the submarine can be equipped with a
- 1SS
- Route: A F G H I K
- Only I is capable of damaging the submarine, but as it is right in front of an empty end node the submarine can be equipped with a Damage control and continue the sortie after I without consuming said item.
- Only I is capable of damaging the submarine, but as it is right in front of an empty end node the submarine can be equipped with a
- 1FBB, 1CVL, 0-1CL, 3-4DD
- Route: A F H J
- J contains a light torpedo squadron.
- Setting up the fleet with AA and ASW to deal with Nodes F and J is recommended.
Phase 2: Making contact with Rabaul Base
This phase requires the fleet to attempt to reach Rabaul base on Node M. 3 visits are required to complete this phase on all difficulties.
- 1FBB, 1CVL, 0-1CL, 3-4DD
- Route: A F H J L M
- Setting up the fleet with AA and ASW to deal with Nodes F, J and L is recommended.
Phase 3: Defeating the Heavy Cruiser Princess
The Boss Node R features a Heavy Cruiser Princess accompanied by up to two submarines.
- 1FBB, 1CVL, 1CL, 3DD
- Route: F H J L N O Q R
- Using a fast fleet with 4DD skips L.
- Since the enemy fleet also contains submarines, it is recommended to set up the fleet for Vanguard Formation with ASW Elements in the upper half of the fleet and utilize that formation at the boss (for example: CL/DD, DD, CVL, FBB, DD, DD).
- Boss Support is not recommended due to Vanguard Formation nerfing its damage.
- It is recommended to set up one ship with TCI and/or other high damage Yasen Attacks
- 2BB, 1CVL, 3DD
- Route: F H J L N O Q R
- 2+ OASW ships are highly recommended
- It is possible to use Nagato/Mutsu Special Attack here
- The E1 Tag can be sortied to E3P3, therefore it is possible to use the ships planned for that phase here already
- Boss support is recommended, but not mandatory (especially when using Nagato/Mutsu Touch)
- There is an LoS check at O Cn3:.
- Cas = 31, Easy = 31, Med = 38, Hard = 48.
- AACI for the 2 air nodes on Route is highly recommended.
Enemy Compositions
| # | Selection Node | ||
|---|---|---|---|
| A | 艦隊の針路を選択できます。提督、どちらの針路をとられますか? You can decide the fleet's course. Admiral, which heading should we take? | ||
| # | Selection Node | ||
| # | Formation | Normal Battle Node | AD/AP AS/AS+ |
|---|---|---|---|
| B | Echelon Line Abreast Phases: 1 |
0/0 0/0 | |
| Echelon Line Abreast Phases: 1 |
0/0 0/0 | ||
| Echelon Line Abreast Phases: 1 |
0/0 0/0 | ||
| # | Formation | Normal Battle Node | AD/AP AS/AS+ |
| # | Formation | Air Defense Node | AD/AP AS/AS+ |
|---|---|---|---|
| C | Diamond Phases: 1 |
39/78 174/348 | |
| Diamond Phases: 1 |
44/87 195/390 | ||
| Diamond Phases: 1 |
51/101 225/450 | ||
| Diamond Phases: 1 |
57/114 255/510 | ||
| # | Formation | Air Defense Node | AD/AP AS/AS+ |
| # | Formation | Normal Battle Node | AD/AP AS/AS+ |
|---|---|---|---|
| D | Line Ahead Double Line Echelon Phases: 1 |
0/0 0/0 | |
| # | Formation | Normal Battle Node | AD/AP AS/AS+ |
| # | Empty Node | ||
|---|---|---|---|
| E | 気のせいだった。 Must be my imagination. | ||
| # | Empty Node | ||
| # | Formation | Normal Battle Node | AD/AP AS/AS+ |
|---|---|---|---|
| F | Echelon Line Abreast Phases: 1 |
0/0 0/0 | |
| Echelon Line Abreast Phases: 1 |
0/0 0/0 | ||
| Echelon Line Abreast Phases: 1 |
0/0 0/0 | ||
| # | Formation | Normal Battle Node | AD/AP AS/AS+ |
| # | Formation | Air Defense Node | AD/AP AS/AS+ |
|---|---|---|---|
| G | Diamond Phases: 1 |
47/93 207/414 | |
| Diamond Phases: 1 |
49/98 219/438 | ||
| Diamond Phases: 1 |
52/103 231/462 | ||
| # | Formation | Air Defense Node | AD/AP AS/AS+ |
| # | Formation | Air Defense Node | AD/AP AS/AS+ |
|---|---|---|---|
| H | Diamond Phases: 1 |
47/93 207/414 | |
| Diamond Phases: 1 |
49/98 219/438 | ||
| Diamond Phases: 1 |
52/103 231/462 | ||
| # | Formation | Air Defense Node | AD/AP AS/AS+ |
| # | Formation | Normal Battle Node | AD/AP AS/AS+ |
|---|---|---|---|
| I | Diamond Phases: 1 |
47/93 207/414 | |
| Diamond Phases: 1 |
49/98 219/438 | ||
| Diamond Phases: 1 |
52/103 231/462 | ||
| # | Formation | Normal Battle Node | AD/AP AS/AS+ |
| # | Formation | Normal Battle Node | AD/AP AS/AS+ |
|---|---|---|---|
| J | Line Ahead Double Line Echelon Phases: 1 |
0/0 0/0 | |
| # | Formation | Normal Battle Node | AD/AP AS/AS+ |
| # | Empty Node | ||
|---|---|---|---|
| K | 気のせいだった。 Must be my imagination. | ||
| # | Empty Node | ||
| # | Formation | Normal Battle Node | AD/AP AS/AS+ |
|---|---|---|---|
| L | Echelon Line Abreast Phases: 1 |
0/0 0/0 | |
| Echelon Line Abreast Phases: 1 |
0/0 0/0 | ||
| Echelon Line Abreast Phases: 1 |
0/0 0/0 | ||
| # | Formation | Normal Battle Node | AD/AP AS/AS+ |
| # | Resource Node | ||
|---|---|---|---|
| # | Resource Node | ||
| # | Formation | Air Defense Node | AD/AP AS/AS+ |
|---|---|---|---|
| N | Diamond Phases: 1 |
39/78 174/348 | |
| Diamond Phases: 1 |
44/87 195/390 | ||
| Diamond Phases: 1 |
51/101 225/450 | ||
| Diamond Phases: 1 |
57/114 255/510 | ||
| Diamond Phases: 1 |
62/123 276/552 | ||
| Diamond Phases: 1 |
69/137 306/612 | ||
| # | Formation | Air Defense Node | AD/AP AS/AS+ |
| # | Formation | Normal Battle Node | AD/AP AS/AS+ |
|---|---|---|---|
| O | Line Ahead Vanguard Phases: 1 |
0/0 0/0 | |
| Line Ahead Phases: 1 |
0/0 0/0 | ||
| # | Formation | Normal Battle Node | AD/AP AS/AS+ |
| # | Empty Node | ||
|---|---|---|---|
| P | 敵影を見ず。 No enemy spotted. | ||
| # | Empty Node | ||
| # | Empty Node | ||
|---|---|---|---|
| Q | 気のせいだった。 Must be my imagination. | ||
| # | Empty Node | ||
| # | Formation | Boss Battle Node | AD/AP AS/AS+ |
|---|---|---|---|
| R | Line Ahead Phases: 1 |
0/0 0/0 | |
| Line Ahead Phases: 1 |
26/52 116/231 | ||
| Line Ahead Phases: 1 (Final)
|
36/72 161/321 | ||
| # | Formation | Boss Battle Node | AD/AP AS/AS+ |
| # | Selection Node | ||
|---|---|---|---|
| A | 艦隊の針路を選択できます。提督、どちらの針路をとられますか? You can decide the fleet's course. Admiral, which heading should we take? | ||
| # | Selection Node | ||
| # | Formation | Normal Battle Node | AD/AP AS/AS+ |
|---|---|---|---|
| B | Echelon Line Abreast Phases: 1 |
0/0 0/0 | |
| Echelon Line Abreast Phases: 1 |
0/0 0/0 | ||
| Echelon Line Abreast Phases: 1 |
0/0 0/0 | ||
| # | Formation | Normal Battle Node | AD/AP AS/AS+ |
| # | Formation | Air Defense Node | AD/AP AS/AS+ |
|---|---|---|---|
| C | Diamond Phases: 1 |
28/55 123/246 | |
| Diamond Phases: 1 |
33/65 144/288 | ||
| Diamond Phases: 1 |
39/78 174/348 | ||
| Diamond Phases: 1 |
44/87 195/390 | ||
| # | Formation | Air Defense Node | AD/AP AS/AS+ |
| # | Formation | Normal Battle Node | AD/AP AS/AS+ |
|---|---|---|---|
| D | Line Ahead Double Line Echelon Phases: 1 |
0/0 0/0 | |
| # | Formation | Normal Battle Node | AD/AP AS/AS+ |
| # | Empty Node | ||
|---|---|---|---|
| E | 気のせいだった。 Must be my imagination. | ||
| # | Empty Node | ||
| # | Formation | Normal Battle Node | AD/AP AS/AS+ |
|---|---|---|---|
| F | Echelon Line Abreast Phases: 1 |
0/0 0/0 | |
| Echelon Line Abreast Phases: 1 |
0/0 0/0 | ||
| Echelon Line Abreast Phases: 1 |
0/0 0/0 | ||
| # | Formation | Normal Battle Node | AD/AP AS/AS+ |
| # | Formation | Air Defense Node | AD/AP AS/AS+ |
|---|---|---|---|
| G | Diamond Phases: 1 |
26/52 116/231 | |
| Diamond Phases: 1 |
32/63 140/279 | ||
| Diamond Phases: 1 |
47/93 207/414 | ||
| # | Formation | Air Defense Node | AD/AP AS/AS+ |
| # | Formation | Air Defense Node | AD/AP AS/AS+ |
|---|---|---|---|
| H | Diamond Phases: 1 |
26/52 116/231 | |
| Diamond Phases: 1 |
32/63 140/279 | ||
| Diamond Phases: 1 |
47/93 207/414 | ||
| # | Formation | Air Defense Node | AD/AP AS/AS+ |
| # | Formation | Normal Battle Node | AD/AP AS/AS+ |
|---|---|---|---|
| I | Diamond Phases: 1 |
26/52 116/231 | |
| Diamond Phases: 1 |
32/63 140/279 | ||
| Diamond Phases: 1 |
47/93 207/414 | ||
| # | Formation | Normal Battle Node | AD/AP AS/AS+ |
| # | Formation | Normal Battle Node | AD/AP AS/AS+ |
|---|---|---|---|
| J | Line Ahead Double Line Echelon Phases: 1 |
0/0 0/0 | |
| # | Formation | Normal Battle Node | AD/AP AS/AS+ |
| # | Empty Node | ||
|---|---|---|---|
| K | 気のせいだった。 Must be my imagination. | ||
| # | Empty Node | ||
| # | Formation | Normal Battle Node | AD/AP AS/AS+ |
|---|---|---|---|
| L | Echelon Line Abreast Phases: 1 |
0/0 0/0 | |
| Echelon Line Abreast Phases: 1 |
0/0 0/0 | ||
| Echelon Line Abreast Phases: 1 |
0/0 0/0 | ||
| # | Formation | Normal Battle Node | AD/AP AS/AS+ |
| # | Resource Node | ||
|---|---|---|---|
| # | Resource Node | ||
| # | Formation | Air Defense Node | AD/AP AS/AS+ |
|---|---|---|---|
| N | Diamond Phases: 1 |
28/55 123/246 | |
| Diamond Phases: 1 |
33/65 144/288 | ||
| Diamond Phases: 1 |
39/78 174/348 | ||
| Diamond Phases: 1 |
39/78 174/348 | ||
| Diamond Phases: 1 |
44/87 195/390 | ||
| # | Formation | Air Defense Node | AD/AP AS/AS+ |
| # | Formation | Normal Battle Node | AD/AP AS/AS+ |
|---|---|---|---|
| O | Line Ahead Vanguard Phases: 1 |
0/0 0/0 | |
| Line Ahead Phases: 1 |
0/0 0/0 | ||
| # | Formation | Normal Battle Node | AD/AP AS/AS+ |
| # | Empty Node | ||
|---|---|---|---|
| P | 敵影を見ず。 No enemy spotted. | ||
| # | Empty Node | ||
| # | Empty Node | ||
|---|---|---|---|
| Q | 気のせいだった。 Must be my imagination. | ||
| # | Empty Node | ||
| # | Formation | Boss Battle Node | AD/AP AS/AS+ |
|---|---|---|---|
| R | Line Ahead Phases: 1 |
0/0 0/0 | |
| Line Ahead Phases: 1 |
24/47 104/207 | ||
| Line Ahead Phases: 1 (Final)
|
24/47 104/207 | ||
| # | Formation | Boss Battle Node | AD/AP AS/AS+ |
| # | Selection Node | ||
|---|---|---|---|
| A | 艦隊の針路を選択できます。提督、どちらの針路をとられますか? You can decide the fleet's course. Admiral, which heading should we take? | ||
| # | Selection Node | ||
| # | Formation | Normal Battle Node | AD/AP AS/AS+ |
|---|---|---|---|
| B | Echelon Line Abreast Phases: 1 |
0/0 0/0 | |
| Echelon Line Abreast Phases: 1 |
0/0 0/0 | ||
| Echelon Line Abreast Phases: 1 |
0/0 0/0 | ||
| # | Formation | Normal Battle Node | AD/AP AS/AS+ |
| # | Formation | Air Defense Node | AD/AP AS/AS+ |
|---|---|---|---|
| C | Diamond Phases: 1 |
12/23 51/102 | |
| Diamond Phases: 1 |
17/33 72/144 | ||
| Diamond Phases: 1 |
23/46 102/204 | ||
| Diamond Phases: 1 |
28/55 123/246 | ||
| Diamond Phases: 1 |
33/65 144/288 | ||
| # | Formation | Air Defense Node | AD/AP AS/AS+ |
| # | Formation | Normal Battle Node | AD/AP AS/AS+ |
|---|---|---|---|
| D | Line Ahead Double Line Echelon Phases: 1 |
0/0 0/0 | |
| # | Formation | Normal Battle Node | AD/AP AS/AS+ |
| # | Empty Node | ||
|---|---|---|---|
| E | 気のせいだった。 Must be my imagination. | ||
| # | Empty Node | ||
| # | Formation | Normal Battle Node | AD/AP AS/AS+ |
|---|---|---|---|
| F | Echelon Line Abreast Phases: 1 |
0/0 0/0 | |
| Echelon Line Abreast Phases: 1 |
0/0 0/0 | ||
| Echelon Line Abreast Phases: 1 |
0/0 0/0 | ||
| # | Formation | Normal Battle Node | AD/AP AS/AS+ |
| # | Formation | Air Defense Node | AD/AP AS/AS+ |
|---|---|---|---|
| G | Diamond Phases: 1 |
24/47 104/207 | |
| Diamond Phases: 1 |
26/52 116/231 | ||
| Diamond Phases: 1 |
32/63 140/279 | ||
| # | Formation | Air Defense Node | AD/AP AS/AS+ |
| # | Formation | Air Defense Node | AD/AP AS/AS+ |
|---|---|---|---|
| H | Diamond Phases: 1 |
24/47 104/207 | |
| Diamond Phases: 1 |
26/52 116/231 | ||
| Diamond Phases: 1 |
32/63 140/279 | ||
| # | Formation | Air Defense Node | AD/AP AS/AS+ |
| # | Formation | Normal Battle Node | AD/AP AS/AS+ |
|---|---|---|---|
| I | Diamond Phases: 1 |
24/47 104/207 | |
| Diamond Phases: 1 |
26/52 116/231 | ||
| Diamond Phases: 1 |
32/63 140/279 | ||
| # | Formation | Normal Battle Node | AD/AP AS/AS+ |
| # | Formation | Normal Battle Node | AD/AP AS/AS+ |
|---|---|---|---|
| J | Line Ahead Double Line Echelon Phases: 1 |
0/0 0/0 | |
| # | Formation | Normal Battle Node | AD/AP AS/AS+ |
| # | Empty Node | ||
|---|---|---|---|
| K | 気のせいだった。 Must be my imagination. | ||
| # | Empty Node | ||
| # | Formation | Normal Battle Node | AD/AP AS/AS+ |
|---|---|---|---|
| L | Echelon Line Abreast Phases: 1 |
0/0 0/0 | |
| Echelon Line Abreast Phases: 1 |
0/0 0/0 | ||
| Echelon Line Abreast Phases: 1 |
0/0 0/0 | ||
| # | Formation | Normal Battle Node | AD/AP AS/AS+ |
| # | Resource Node | ||
|---|---|---|---|
| # | Resource Node | ||
| # | Formation | Air Defense Node | AD/AP AS/AS+ |
|---|---|---|---|
| N | Diamond Phases: 1 |
12/23 51/102 | |
| Diamond Phases: 1 |
17/33 72/144 | ||
| Diamond Phases: 1 |
23/46 102/204 | ||
| Diamond Phases: 1 |
28/55 123/246 | ||
| Diamond Phases: 1 |
33/65 144/288 | ||
| # | Formation | Air Defense Node | AD/AP AS/AS+ |
| # | Formation | Normal Battle Node | AD/AP AS/AS+ |
|---|---|---|---|
| O | Line Ahead Vanguard Phases: 1 |
0/0 0/0 | |
| Line Ahead Phases: 1 |
0/0 0/0 | ||
| # | Formation | Normal Battle Node | AD/AP AS/AS+ |
| # | Empty Node | ||
|---|---|---|---|
| P | 敵影を見ず。 No enemy spotted. | ||
| # | Empty Node | ||
| # | Empty Node | ||
|---|---|---|---|
| Q | 気のせいだった。 Must be my imagination. | ||
| # | Empty Node | ||
| # | Formation | Boss Battle Node | AD/AP AS/AS+ |
|---|---|---|---|
| R | Line Ahead Phases: 1 |
0/0 0/0 | |
| Line Ahead Phases: 1 |
24/47 104/207 | ||
| Line Ahead Phases: 1 (Final)
|
24/47 104/207 | ||
| # | Formation | Boss Battle Node | AD/AP AS/AS+ |
| # | Selection Node | ||
|---|---|---|---|
| A | 艦隊の針路を選択できます。提督、どちらの針路をとられますか? You can decide the fleet's course. Admiral, which heading should we take? | ||
| # | Selection Node | ||
| # | Formation | Normal Battle Node | AD/AP AS/AS+ |
|---|---|---|---|
| B | Echelon Line Abreast Phases: 1 |
0/0 0/0 | |
| Echelon Line Abreast Phases: 1 |
0/0 0/0 | ||
| # | Formation | Normal Battle Node | AD/AP AS/AS+ |
| # | Formation | Air Defense Node | AD/AP AS/AS+ |
|---|---|---|---|
| C | Diamond Phases: 1 |
12/23 51/102 | |
| Diamond Phases: 1 |
17/33 72/144 | ||
| Diamond Phases: 1 |
23/46 102/204 | ||
| # | Formation | Air Defense Node | AD/AP AS/AS+ |
| # | Formation | Normal Battle Node | AD/AP AS/AS+ |
|---|---|---|---|
| D | Line Ahead Double Line Echelon Phases: 1 |
0/0 0/0 | |
| # | Formation | Normal Battle Node | AD/AP AS/AS+ |
| # | Empty Node | ||
|---|---|---|---|
| E | 気のせいだった。 Must be my imagination. | ||
| # | Empty Node | ||
| # | Formation | Normal Battle Node | AD/AP AS/AS+ |
|---|---|---|---|
| F | Echelon Line Abreast Phases: 1 |
0/0 0/0 | |
| Echelon Line Abreast Phases: 1 |
0/0 0/0 | ||
| # | Formation | Normal Battle Node | AD/AP AS/AS+ |
| # | Formation | Air Defense Node | AD/AP AS/AS+ |
|---|---|---|---|
| G | Diamond Phases: 1 |
9/17 36/72 | |
| Diamond Phases: 1 |
11/22 48/96 | ||
| Diamond Phases: 1 |
26/52 116/231 | ||
| # | Formation | Air Defense Node | AD/AP AS/AS+ |
| # | Formation | Air Defense Node | AD/AP AS/AS+ |
|---|---|---|---|
| H | Diamond Phases: 1 |
9/17 36/72 | |
| Diamond Phases: 1 |
11/22 48/96 | ||
| Diamond Phases: 1 |
26/52 116/231 | ||
| # | Formation | Air Defense Node | AD/AP AS/AS+ |
| # | Formation | Normal Battle Node | AD/AP AS/AS+ |
|---|---|---|---|
| I | Diamond Phases: 1 |
9/17 36/72 | |
| Diamond Phases: 1 |
11/22 48/96 | ||
| Diamond Phases: 1 |
26/52 116/231 | ||
| # | Formation | Normal Battle Node | AD/AP AS/AS+ |
| # | Formation | Normal Battle Node | AD/AP AS/AS+ |
|---|---|---|---|
| J | Line Ahead Double Line Echelon Phases: 1 |
0/0 0/0 | |
| # | Formation | Normal Battle Node | AD/AP AS/AS+ |
| # | Empty Node | ||
|---|---|---|---|
| K | 気のせいだった。 Must be my imagination. | ||
| # | Empty Node | ||
| # | Formation | Normal Battle Node | AD/AP AS/AS+ |
|---|---|---|---|
| L | Echelon Line Abreast Phases: 1 |
0/0 0/0 | |
| Echelon Line Abreast Phases: 1 |
0/0 0/0 | ||
| # | Formation | Normal Battle Node | AD/AP AS/AS+ |
| # | Resource Node | ||
|---|---|---|---|
| # | Resource Node | ||
| # | Formation | Air Defense Node | AD/AP AS/AS+ |
|---|---|---|---|
| N | Diamond Phases: 1 |
12/23 51/102 | |
| Diamond Phases: 1 |
17/33 72/144 | ||
| Diamond Phases: 1 |
23/46 102/204 | ||
| # | Formation | Air Defense Node | AD/AP AS/AS+ |
| # | Formation | Normal Battle Node | AD/AP AS/AS+ |
|---|---|---|---|
| O | Line Ahead Vanguard Phases: 1 |
0/0 0/0 | |
| Line Ahead Phases: 1 |
0/0 0/0 | ||
| # | Formation | Normal Battle Node | AD/AP AS/AS+ |
| # | Empty Node | ||
|---|---|---|---|
| P | 敵影を見ず。 No enemy spotted. | ||
| # | Empty Node | ||
| # | Empty Node | ||
|---|---|---|---|
| Q | 気のせいだった。 Must be my imagination. | ||
| # | Empty Node | ||
| # | Formation | Boss Battle Node | AD/AP AS/AS+ |
|---|---|---|---|
| R | Line Ahead Phases: 1 |
0/0 0/0 | |
| Line Ahead Phases: 1 |
9/17 36/72 | ||
| Line Ahead Phases: 1 (Final)
|
9/17 36/72 | ||
| # | Formation | Boss Battle Node | AD/AP AS/AS+ |
Ship Drops
| Ship drops | |||||||||||||||||||||||||||||||||||||||||||||||||||||||||||||||||||||||||||||||||||||||||||||||||||
|---|---|---|---|---|---|---|---|---|---|---|---|---|---|---|---|---|---|---|---|---|---|---|---|---|---|---|---|---|---|---|---|---|---|---|---|---|---|---|---|---|---|---|---|---|---|---|---|---|---|---|---|---|---|---|---|---|---|---|---|---|---|---|---|---|---|---|---|---|---|---|---|---|---|---|---|---|---|---|---|---|---|---|---|---|---|---|---|---|---|---|---|---|---|---|---|---|---|---|---|
| Type | Ship? | D | I | J | O | R | |||||||||||||||||||||||||||||||||||||||||||||||||||||||||||||||||||||||||||||||||||||||||||||
| DE | Hachijou | Casual+ | |||||||||||||||||||||||||||||||||||||||||||||||||||||||||||||||||||||||||||||||||||||||||||||||||
| DE | Sado | Casual+ | |||||||||||||||||||||||||||||||||||||||||||||||||||||||||||||||||||||||||||||||||||||||||||||||||
| DD | Kamikaze | Casual+ | |||||||||||||||||||||||||||||||||||||||||||||||||||||||||||||||||||||||||||||||||||||||||||||||||
| DD | Asakaze | Casual+ | Medium+ | ||||||||||||||||||||||||||||||||||||||||||||||||||||||||||||||||||||||||||||||||||||||||||||||||
| DD | Harukaze | Casual+ | |||||||||||||||||||||||||||||||||||||||||||||||||||||||||||||||||||||||||||||||||||||||||||||||||
| DD | Matsukaze | Medium+ | Casual+ | Easy+ | |||||||||||||||||||||||||||||||||||||||||||||||||||||||||||||||||||||||||||||||||||||||||||||||
| DD | Hatakaze | Casual+ | |||||||||||||||||||||||||||||||||||||||||||||||||||||||||||||||||||||||||||||||||||||||||||||||||
| DD | Uzuki | Easy+ | Casual+ | Casual+ | Casual+ | ||||||||||||||||||||||||||||||||||||||||||||||||||||||||||||||||||||||||||||||||||||||||||||||
| DD | Minazuki | Casual+ | Casual+ | Casual+ | Casual+ | ||||||||||||||||||||||||||||||||||||||||||||||||||||||||||||||||||||||||||||||||||||||||||||||
| DD | Uranami | Casual+ | Casual+ | Easy+ | Casual+ | ||||||||||||||||||||||||||||||||||||||||||||||||||||||||||||||||||||||||||||||||||||||||||||||
| DD | Asagumo | Medium+ | Casual+ | Casual+ | |||||||||||||||||||||||||||||||||||||||||||||||||||||||||||||||||||||||||||||||||||||||||||||||
| DD | Minegumo | Casual+ | Casual+ | Casual+ | |||||||||||||||||||||||||||||||||||||||||||||||||||||||||||||||||||||||||||||||||||||||||||||||
| DD | Hatsukaze | Easy+ | Casual+ | Easy+ | Casual+ | ||||||||||||||||||||||||||||||||||||||||||||||||||||||||||||||||||||||||||||||||||||||||||||||
| DD | Arashi | Casual+ | |||||||||||||||||||||||||||||||||||||||||||||||||||||||||||||||||||||||||||||||||||||||||||||||||
| DD | Hagikaze | Casual+ | |||||||||||||||||||||||||||||||||||||||||||||||||||||||||||||||||||||||||||||||||||||||||||||||||
| DD | Maikaze | Casual+ | Casual+ | Casual+ | |||||||||||||||||||||||||||||||||||||||||||||||||||||||||||||||||||||||||||||||||||||||||||||||
| DD | Suzunami | Casual+ | |||||||||||||||||||||||||||||||||||||||||||||||||||||||||||||||||||||||||||||||||||||||||||||||||
| DD | Akizuki | Hard+ | Casual+ | Medium+ | |||||||||||||||||||||||||||||||||||||||||||||||||||||||||||||||||||||||||||||||||||||||||||||||
| CL | Agano | Casual+ | |||||||||||||||||||||||||||||||||||||||||||||||||||||||||||||||||||||||||||||||||||||||||||||||||
| CL | Noshiro | Casual+ | |||||||||||||||||||||||||||||||||||||||||||||||||||||||||||||||||||||||||||||||||||||||||||||||||
| CV | Saratoga | Easy+ | |||||||||||||||||||||||||||||||||||||||||||||||||||||||||||||||||||||||||||||||||||||||||||||||||
| SS | I-201 | Casual+ | |||||||||||||||||||||||||||||||||||||||||||||||||||||||||||||||||||||||||||||||||||||||||||||||||
| SS | I-47 | Casual+ | Hard+ | ||||||||||||||||||||||||||||||||||||||||||||||||||||||||||||||||||||||||||||||||||||||||||||||||
| SS | I-203 | Casual+ | |||||||||||||||||||||||||||||||||||||||||||||||||||||||||||||||||||||||||||||||||||||||||||||||||
| CVB | Taihou | Easy+ | |||||||||||||||||||||||||||||||||||||||||||||||||||||||||||||||||||||||||||||||||||||||||||||||||
| AO | Kamoi | Easy+ | |||||||||||||||||||||||||||||||||||||||||||||||||||||||||||||||||||||||||||||||||||||||||||||||||
| DD | Yayoi | Casual+ | Casual+ | Casual+ | Casual+ | ||||||||||||||||||||||||||||||||||||||||||||||||||||||||||||||||||||||||||||||||||||||||||||||
| DD | Yamagumo | Easy+ | Casual+ | Hard+ | Casual+ | ||||||||||||||||||||||||||||||||||||||||||||||||||||||||||||||||||||||||||||||||||||||||||||||
| CL | Kitakami | Casual+ | |||||||||||||||||||||||||||||||||||||||||||||||||||||||||||||||||||||||||||||||||||||||||||||||||
| CL | Ooi | Casual+ | |||||||||||||||||||||||||||||||||||||||||||||||||||||||||||||||||||||||||||||||||||||||||||||||||
| CL | Nagara | Casual+ | Casual+ | Casual+ | Casual+ | Casual+ | |||||||||||||||||||||||||||||||||||||||||||||||||||||||||||||||||||||||||||||||||||||||||||||
| CL | Kinu | Casual+ | Casual+ | Medium+ | Casual+ | ||||||||||||||||||||||||||||||||||||||||||||||||||||||||||||||||||||||||||||||||||||||||||||||
| CL | Sendai | Casual+ | Casual+ | Casual+ | Casual+ | ||||||||||||||||||||||||||||||||||||||||||||||||||||||||||||||||||||||||||||||||||||||||||||||
| CL | Yuubari | Casual+ | |||||||||||||||||||||||||||||||||||||||||||||||||||||||||||||||||||||||||||||||||||||||||||||||||
| CA | Kinugasa | Casual+ | |||||||||||||||||||||||||||||||||||||||||||||||||||||||||||||||||||||||||||||||||||||||||||||||||
| CA | Tone | Casual+ | |||||||||||||||||||||||||||||||||||||||||||||||||||||||||||||||||||||||||||||||||||||||||||||||||
| CA | Chikuma | Casual+ | |||||||||||||||||||||||||||||||||||||||||||||||||||||||||||||||||||||||||||||||||||||||||||||||||
| CVL | Ryuujou | Easy+ | Casual+ | ||||||||||||||||||||||||||||||||||||||||||||||||||||||||||||||||||||||||||||||||||||||||||||||||
| CVL | Hiyou | Casual+ | |||||||||||||||||||||||||||||||||||||||||||||||||||||||||||||||||||||||||||||||||||||||||||||||||
| CVL | Junyou | Casual+ | |||||||||||||||||||||||||||||||||||||||||||||||||||||||||||||||||||||||||||||||||||||||||||||||||
| FBB | Kongou | Casual+ | |||||||||||||||||||||||||||||||||||||||||||||||||||||||||||||||||||||||||||||||||||||||||||||||||
| FBB | Hiei | Casual+ | Casual+ | Casual+ | Casual+ | ||||||||||||||||||||||||||||||||||||||||||||||||||||||||||||||||||||||||||||||||||||||||||||||
| FBB | Haruna | Casual+ | |||||||||||||||||||||||||||||||||||||||||||||||||||||||||||||||||||||||||||||||||||||||||||||||||
| FBB | Kirishima | Medium+ | Casual+ | Casual+ | Casual+ | ||||||||||||||||||||||||||||||||||||||||||||||||||||||||||||||||||||||||||||||||||||||||||||||
| BB | Fusou | Casual+ | |||||||||||||||||||||||||||||||||||||||||||||||||||||||||||||||||||||||||||||||||||||||||||||||||
| BB | Yamashiro | Casual+ | |||||||||||||||||||||||||||||||||||||||||||||||||||||||||||||||||||||||||||||||||||||||||||||||||
| BB | Nagato | Casual+ | |||||||||||||||||||||||||||||||||||||||||||||||||||||||||||||||||||||||||||||||||||||||||||||||||
| BB | Mutsu | Casual+ | |||||||||||||||||||||||||||||||||||||||||||||||||||||||||||||||||||||||||||||||||||||||||||||||||
| CV | Shoukaku | Casual+ | |||||||||||||||||||||||||||||||||||||||||||||||||||||||||||||||||||||||||||||||||||||||||||||||||
| CV | Zuikaku | Casual+ | |||||||||||||||||||||||||||||||||||||||||||||||||||||||||||||||||||||||||||||||||||||||||||||||||
|
| |||||||||
|---|---|---|---|---|---|---|---|---|---|
|
Time remaining until Spring 2022 Event Ends:
| |||||||||
|
| |||||||||
|---|---|---|---|---|---|---|---|---|---|
|
Time remaining until Spring 2022 Event Ends:
| |||||||||
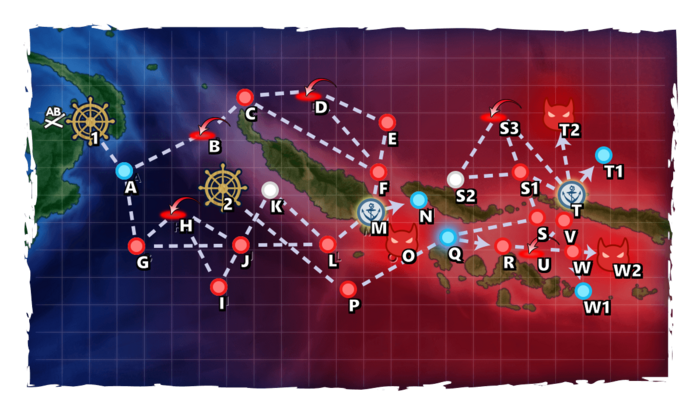
進出!R方面航空部隊
![]()
![]()


| Information | ||||
|---|---|---|---|---|
| Event Tag | ||||
| Boss Gauges | Hard (甲): 500 TP + 600 TP + 5500 HP | |||
| Medium (乙): 400 TP + 500 TP + 4900 HP | ||||
| Easy (丙): 300 TP + 350 TP + 4900 HP | ||||
| Casual (丁): 300 TP + 300 TP + 4900 HP | ||||
| Map Bosses | Anti-Air Cruiser Princess
| |||
Seaplane Tender Princess
| ||||
New Battleship Princess
| ||||
| Rewards[edit] |
|---|
| Reward | 丁 Casual |
丙 Easy |
乙 Medium |
甲 Hard |
|---|---|---|---|---|
Improvement Material |
2 | 3 | 4 | 5 |
Emergency Repair Material |
1 | 2 | 3 | 3 |
New Model Gun Mount Improvement Material |
1 | 1 | 1 | |
Medal |
1 | 1 | ||
Late Model Bow Torpedo Mount (4 tubes) |
1 | 1 | 1 | 1 (★2) |
 Late Model Radar & Passive Radiolocator + Snorkel Equipment |
1 | 1 | ||
 B-25 |
1 |

Branching Table
| E-2 Branching Rules Phase 1 | ||
|---|---|---|
| Nodes | Rules | |
| Start | 1 |
Single Fleet |
2 |
Striking Force Fleet | |
A |
B |
|
G |
| |
C |
D |
|
F |
| |
D |
E |
|
F |
| |
G |
H |
|
J |
| |
H |
I |
|
J |
| |
J |
K |
|
L |
| |
M |
N |
Fail the LoS check to go to O |
O |
Pass the LoS check (Cn4 = 64 on Hard) | |
| E-2 Branching Rules Phase 3 | ||
|---|---|---|
| Nodes | Rules | |
| Start | 1 |
Single Fleet |
2 |
Striking Force Fleet | |
Q |
R |
Choose your own adventure! |
S | ||
S1 |
S2 |
|
S3 |
| |
T |
| |
T |
T1 |
Fail the LoS check to go to T2 |
T2 |
Pass the LoS check (Cn4 = 68 on Hard) | |
U |
V |
|
W |
| |
W |
W1 |
Fail the LoS check to go to W2 |
W2 |
Pass the LoS check (Cn4 = 75 on Hard) | |
Branching compositions were reported over the course of the event. (NGA and KCNav)
The event guides are to be constructed through the respective Event map page guide sandbox and reviewed by editors before being approved here. Do not under any circumstance update the guides through this page or attempt to fix them through this page. Please only update guides through their respective sandbox pages.
Ship Bonuses
DISCLAIMER: This information is based on user submitted data and is subject to revisions as more data is gathered. Any version of the ship receives the bonus regardless of remodel.
Ship Bonuses
| Ships | Map-wide | Node W2 Boss Debuff (Stacked with Map-wide) Against Enemy Flagship  only only
|
|---|---|---|
| Light Cruiser (CL) | 1.05x | 1.2x ~ 1.26x |
| Seaplane Tender (AV) | 1.17x | 1.35x ~ 1.4x |
| All other ships | - | 1.15x ~ 1.2x |
Equipment Bonuses
| Equipment (Stacks with above and each other) |
Number of Equipped Items | |||
|---|---|---|---|---|
| x1 | x2 | x3 | x4 | |
| 1.05x | 1.11x | 1.16x | 1.21x | |
|
1.075x (1.13) | 1.155x (1.28) | ||
| 1.03x (1.08) | 1.06x (1.18) | |||
- ↑
 Flying boats
 not confirmed yet.
Map Overview
E2 is a three-phase map using both Single Fleets and Striking Force Fleets (7 ships fleet).
- This map uses two locks:
 Advance 1st Batch Tag is applied to single fleets sorteing to this map from starting point 1.
 Advance 2nd Batch Tag is applied to Strike Forces sorteing to this map from starting point 2.
- 1 LBAS is available to sortie, a second base is only able to be used in defense.
- Air raids will occur on this map.
CV(L/B) cannot be sortied on this map.
Phase 1: Transporting Supplies to Shortland
- 0-1AV, 5-6DD (FAST)
- Route: 1 A B C F M O
- LBAS: Range 5 to O, 0 Airpower.
- There is an LoS-Check at M Cn3:
- Cas = 27 / Easy = 31 / Med = 38 / Hard = 47
- Going for S ranks on this Boss Node is not recommended as the Boss is very tanky, but the escorts are rather fragile and can be dispatched by two ships with Night Battle DA
- Sending LBAS to the preboss node or airstrike node and relying on Boss Support is an option
- A 6DD Fleet forgoes Air Power for the possibility of utilizing the
 Elite Torpedo Squadron Command Facility
 .
. - Using AACI is highly recommended.
- There is an LoS-Check at M Cn3:
Phase 2: Transporting Supplies to Rekata
- 1AV, 1CL, 0-1FBB, 4-5DD, (FAST Strike Force)
- Route: 2 P Q S S1 T T2
- LBAS: Range 6 to T2, 68/136 AD/AP on Hard.
- There is an LoS-Check at T (Cn1):
- Casu = ?? / Easy = 14.0 / Med = 14.0 / Hard = 22.0
- A slow fleet would take an additional Air Node at S3
Phase 2.5: Unlocking the Boss Node
To unlock the Path to the Boss, Node R has to be S-Ranked. For the fleet used refer to Phase 3 below as it is the same fleet.
Phase 3: Fight against the New Battleship Princess
- 2FBB, 1CL, 3DD, 1XX (FAST Strike Force)
- XX may be a CA(V), AV, or CLT.
- Route: 2 P Q R U W W2
- LBAS: Range 8 to W2, 71/159 AP/AS on Hard.
- It may be preferrable to equip a second Type 0 Observation Seaplane instead of an AP shell on the Battleships.
- Kongou-Class Touch (in this case Hiei Kai Ni C + Kirishima) may be used here to great effect.
- Boss support is recommended.
- Depending on the CL/AV/CAV choice, one of them should be fighter muled.
- Debuffing this boss is optional.
- It may be preferrable to equip a second Type 0 Observation Seaplane
Phase 4: Debuff Phase
Once Last Dance is reached, the following steps can be performed to debuff the boss on Hard mode:
| LBAS | B | H | O | T2 | |
|---|---|---|---|---|---|
| Hard | AS | AS | AS | S | S |
| Medium | AS | AS | - | A? | S? |
| Easy | AS | AS | - | A? | S? |
| Casual | AS | ? | - | A? | S? |
- Note: W2 on LD (A rank) OR W (S rank)
Enemy Compositions
| Type | Ships |
|---|---|
| DE | |
| DD |
| Type | Ships |
|---|---|
| DE | |
| DD |
| Type | Ships |
|---|---|
| DE | |
| DD | |
| SSV | |
| AV | |
| AS |
| Type | Ships |
|---|---|
| DE | |
| DD |
| Type | Ships |
|---|---|
| DE | |
| DD |
| Type | Ships |
|---|---|
| DE | |
| DD |
| Type | Ships |
|---|---|
| DE | |
| DD | |
| CV | |
| SSV | |
| AV | |
| AS |
| Type | Ships |
|---|---|
| DE | |
| DD | |
| SS | |
| AV | |
| AS |
| Type | Ships |
|---|---|
| DE | |
| DD | |
| CV | |
| SSV | |
| AV | |
| AS |
| # | Formation | Air Raids | AD/AP AS/AS+ |
|---|---|---|---|
| AB | Diamond | 39/78 174/348 | |
| Diamond | 51/101 225/450 | ||
| Diamond | 57/114 255/510 | ||
| Diamond | 62/123 276/552 | ||
| Diamond | 69/137 306/612 | ||
| # | Formation | Air Raids | AD/AP AS/AS+ |
| # | Empty Node | ||
|---|---|---|---|
| A | 気のせいだった。 Must be my imagination. | ||
| # | Empty Node | ||
| # | Formation | Air Defense Node | AD/AP AS/AS+ |
|---|---|---|---|
| B | Diamond Phases: 1, 2, 3 |
39/78 174/348 | |
| Diamond Phases: 1, 2, 3 |
44/87 195/390 | ||
| Diamond Phases: 1, 2, 3 |
51/101 225/450 | ||
| Diamond Phases: 1, 2, 3 |
57/114 255/510 | ||
| Diamond Phases: 1 |
62/123 276/552 | ||
| Diamond Phases: 1 |
69/137 306/612 | ||
| # | Formation | Air Defense Node | AD/AP AS/AS+ |
| # | Formation | Normal Battle Node | AD/AP AS/AS+ |
|---|---|---|---|
| C | Echelon Line Abreast Phases: 1, 2, 3 |
0/0 0/0 | |
| Echelon Line Abreast Phases: 1, 2, 3 |
0/0 0/0 | ||
| Echelon Line Abreast Phases: 1, 2, 3 |
0/0 0/0 | ||
| # | Formation | Normal Battle Node | AD/AP AS/AS+ |
| # | Formation | Air Defense Node | AD/AP AS/AS+ |
|---|---|---|---|
| D | Diamond Phases: 1, 3 |
39/78 174/348 | |
| Diamond Phases: 1, 3 |
44/87 195/390 | ||
| Diamond Phases: 1, 3 |
51/101 225/450 | ||
| Diamond Phases: 1, 2, 3 |
57/114 255/510 | ||
| Diamond Phases: 1, 3 |
62/123 276/552 | ||
| Diamond Phases: 1, 3 |
69/137 306/612 | ||
| # | Formation | Air Defense Node | AD/AP AS/AS+ |
| # | Formation | Normal Battle Node | AD/AP AS/AS+ |
|---|---|---|---|
| E | Line Ahead Double Line Echelon Phases: 1, 3 |
0/0 0/0 | |
| # | Formation | Normal Battle Node | AD/AP AS/AS+ |
| # | Formation | Normal Battle Node | AD/AP AS/AS+ |
|---|---|---|---|
| F | Line Ahead Double Line Vanguard Phases: 1, 3 |
0/0 0/0 | |
| # | Formation | Normal Battle Node | AD/AP AS/AS+ |
| # | Formation | Normal Battle Node | AD/AP AS/AS+ |
|---|---|---|---|
| G | Echelon Line Abreast Phases: 1, 2, 3 |
0/0 0/0 | |
| Echelon Line Abreast Phases: 1, 3 |
0/0 0/0 | ||
| Echelon Line Abreast Phases: 1, 2, 3 |
0/0 0/0 | ||
| # | Formation | Normal Battle Node | AD/AP AS/AS+ |
| # | Formation | Air Defense Node | AD/AP AS/AS+ |
|---|---|---|---|
| H | Diamond Phases: 1, 3 |
39/78 174/348 | |
| Diamond Phases: 1, 2, 3 |
44/87 195/390 | ||
| Diamond Phases: 1, 3 |
51/101 225/450 | ||
| Diamond Phases: 1, 3 |
57/114 255/510 | ||
| Diamond | 62/123 276/552 | ||
| Diamond | 69/137 306/612 | ||
| # | Formation | Air Defense Node | AD/AP AS/AS+ |
| # | Formation | Normal Battle Node | AD/AP AS/AS+ |
|---|---|---|---|
| I | Echelon Line Abreast Phases: 3 |
0/0 0/0 | |
| Line Abreast Phases: 1, 2 |
0/0 0/0 | ||
| Echelon | 0/0 0/0 | ||
| # | Formation | Normal Battle Node | AD/AP AS/AS+ |
| # | Formation | Normal Battle Node | AD/AP AS/AS+ |
|---|---|---|---|
| J | Line Ahead Double Line Echelon Phases: 1, 2, 3 |
0/0 0/0 | |
| # | Formation | Normal Battle Node | AD/AP AS/AS+ |
| # | Formation | Air Defense Node | AD/AP AS/AS+ |
|---|---|---|---|
| K | Diamond Phases: 1, 3 |
39/78 174/348 | |
| Diamond Phases: 1, 3 |
44/87 195/390 | ||
| Diamond Phases: 1, 3 |
51/101 225/450 | ||
| Diamond Phases: 1, 3 |
57/114 255/510 | ||
| Diamond Phases: 1, 3 |
62/123 276/552 | ||
| Diamond Phases: 3 |
69/137 306/612 | ||
| # | Formation | Air Defense Node | AD/AP AS/AS+ |
| # | Formation | Normal Battle Node | AD/AP AS/AS+ |
|---|---|---|---|
| L | Line Ahead Double Line Phases: 1, 2, 3 |
0/0 0/0 | |
| Line Ahead Phases: 1, 3 |
36/72 161/321 | ||
| # | Formation | Normal Battle Node | AD/AP AS/AS+ |
| # | Landing Node | ||
|---|---|---|---|
| M | 輸送物資の揚陸地点に到達しました。本海域の輸送作戦は無事完了しています。 The landing point of the convoy has been reached. The transport operation here has already been completed successfully. | ||
| # | Landing Node | ||
| # | Empty Node | ||
|---|---|---|---|
| N | 敵影を見ず。 No enemy spotted. | ||
| # | Empty Node | ||
| # | Formation | Boss Battle Node | AD/AP AS/AS+ |
|---|---|---|---|
| O | Line Ahead Double Line Phases: 1, 2, 3 |
0/0 0/0 | |
| Line Ahead Phases: 1 (Final)
|
0/0 0/0 | ||
| # | Formation | Boss Battle Node | AD/AP AS/AS+ |
| # | Formation | Normal Battle Node | AD/AP AS/AS+ |
|---|---|---|---|
| P | Echelon Line Abreast Phases: 2, 3 |
0/0 0/0 | |
| Echelon Line Abreast Phases: 2, 3 |
0/0 0/0 | ||
| Echelon Line Abreast Phases: 2, 3 |
0/0 0/0 | ||
| # | Formation | Normal Battle Node | AD/AP AS/AS+ |
| # | Selection Node | ||
|---|---|---|---|
| Q | 艦隊の針路を選択できます。提督、どちらの針路をとられますか? You can decide the fleet's course. Admiral, which heading should we take? | ||
| # | Selection Node | ||
| # | Formation | Normal Battle Node | AD/AP AS/AS+ |
|---|---|---|---|
| R | Line Ahead Double Line Vanguard Phases: 2, 3 |
0/0 0/0 | |
| # | Formation | Normal Battle Node | AD/AP AS/AS+ |
| # | Formation | Normal Battle Node | AD/AP AS/AS+ |
|---|---|---|---|
| S | Line Ahead Double Line Vanguard Phases: 2, 3 |
0/0 0/0 | |
| # | Formation | Normal Battle Node | AD/AP AS/AS+ |
| # | Formation | Normal Battle Node | AD/AP AS/AS+ |
|---|---|---|---|
| S1 | Line Ahead Double Line Phases: 2, 3 |
0/0 0/0 | |
| Line Ahead Phases: 2, 3 |
0/0 0/0 | ||
| # | Formation | Normal Battle Node | AD/AP AS/AS+ |
| # | Formation | Normal Battle Node | AD/AP AS/AS+ |
|---|---|---|---|
| S2 | Echelon Line Abreast Phases: 2, 3 |
0/0 0/0 | |
| Echelon Line Abreast Phases: 2 |
0/0 0/0 | ||
| Echelon Line Abreast Phases: 2 |
0/0 0/0 | ||
| # | Formation | Normal Battle Node | AD/AP AS/AS+ |
| # | Formation | Air Defense Node | AD/AP AS/AS+ |
|---|---|---|---|
| S3 | Diamond Phases: 2, 3 |
67/133 297/594 | |
| Diamond Phases: 2, 3 |
111/221 495/990 | ||
| Diamond Phases: 2, 3 |
109/217 486/972 | ||
| # | Formation | Air Defense Node | AD/AP AS/AS+ |
| # | Landing Node | ||
|---|---|---|---|
| T | 輸送物資の揚陸地点に到達しました。本海域の輸送作戦は無事完了しています。 The landing point of the convoy has been reached. The transport operation here has already been completed successfully. | ||
| # | Landing Node | ||
| # | Empty Node | ||
|---|---|---|---|
| T1 | 敵影を見ず。 No enemy spotted. | ||
| # | Empty Node | ||
| # | Formation | Boss Battle Node | AD/AP AS/AS+ |
|---|---|---|---|
| T2 | Diamond Phases: 2, 3 |
69/137 306/612 | |
| Diamond Phases: 2, 3 |
67/133 297/594 | ||
| Diamond Phases: 2, 3 (Final)
|
69/137 306/612 | ||
| # | Formation | Boss Battle Node | AD/AP AS/AS+ |
| # | Formation | Air Defense Node | AD/AP AS/AS+ |
|---|---|---|---|
| U | Diamond Phases: 3 |
109/217 486/972 | |
| Diamond Phases: 3 |
121/242 543/1086 | ||
| Diamond Phases: 3 |
131/261 585/1170 | ||
| # | Formation | Air Defense Node | AD/AP AS/AS+ |
| # | Formation | Normal Battle Node | AD/AP AS/AS+ |
|---|---|---|---|
| V | Line Ahead Double Line Echelon Phases: 3 |
0/0 0/0 | |
| # | Formation | Normal Battle Node | AD/AP AS/AS+ |
| # | Formation | Normal Battle Node | AD/AP AS/AS+ |
|---|---|---|---|
| W | Line Ahead Double Line Vanguard Phases: 3 |
0/0 0/0 | |
| # | Formation | Normal Battle Node | AD/AP AS/AS+ |
| # | Empty Node | ||
|---|---|---|---|
| W1 | 敵影を見ず。 No enemy spotted. | ||
| # | Empty Node | ||
| # | Formation | Boss Battle Node | AD/AP AS/AS+ |
|---|---|---|---|
| W2 | Line Ahead Phases: 3 |
0/0 0/0 | |
| Line Ahead Phases: 3 |
36/71 159/318 | ||
| Line Ahead Phases: 3 (Final)
|
36/71 159/318 | ||
| # | Formation | Boss Battle Node | AD/AP AS/AS+ |
| Type | Ships |
|---|---|
| DE | |
| DD |
| Type | Ships |
|---|---|
| DD |
| Type | Ships |
|---|---|
| DE | |
| DD | |
| SSV | |
| AV |
| Type | Ships |
|---|---|
| DE | |
| DD |
| Type | Ships |
|---|---|
| DE | |
| DD |
| Type | Ships |
|---|---|
| DD |
| Type | Ships |
|---|---|
| DE | |
| DD | |
| CV | |
| SSV | |
| AV | |
| AS |
| Type | Ships |
|---|---|
| DE | |
| DD | |
| SS | |
| AV | |
| AS |
| Type | Ships |
|---|---|
| DE | |
| DD | |
| SSV | |
| AV | |
| AS |
| # | Formation | Air Raids | AD/AP AS/AS+ |
|---|---|---|---|
| AB | Diamond | 28/55 123/246 | |
| Diamond | 33/65 144/288 | ||
| Diamond | 39/78 174/348 | ||
| Diamond | 44/87 195/390 | ||
| # | Formation | Air Raids | AD/AP AS/AS+ |
| # | Empty Node | ||
|---|---|---|---|
| A | 気のせいだった。 Must be my imagination. | ||
| # | Empty Node | ||
| # | Formation | Air Defense Node | AD/AP AS/AS+ |
|---|---|---|---|
| B | Diamond Phases: 1, 2, 3 |
28/55 123/246 | |
| Diamond Phases: 1, 2, 3 |
33/65 144/288 | ||
| Diamond Phases: 1 |
39/78 174/348 | ||
| Diamond Phases: 1, 2, 3 |
39/78 174/348 | ||
| Diamond Phases: 1, 3 |
44/87 195/390 | ||
| # | Formation | Air Defense Node | AD/AP AS/AS+ |
| # | Formation | Normal Battle Node | AD/AP AS/AS+ |
|---|---|---|---|
| C | Echelon Line Abreast Phases: 1, 3 |
0/0 0/0 | |
| Echelon Line Abreast Phases: 1, 2, 3 |
0/0 0/0 | ||
| Echelon Line Abreast Phases: 1, 2, 3 |
0/0 0/0 | ||
| # | Formation | Normal Battle Node | AD/AP AS/AS+ |
| # | Formation | Air Defense Node | AD/AP AS/AS+ |
|---|---|---|---|
| D | Diamond Phases: 1, 3 |
28/55 123/246 | |
| Diamond Phases: 1, 3 |
33/65 144/288 | ||
| Diamond Phases: 1, 3 |
39/78 174/348 | ||
| Diamond Phases: 1, 3 |
39/78 174/348 | ||
| Diamond Phases: 1, 3 |
44/87 195/390 | ||
| # | Formation | Air Defense Node | AD/AP AS/AS+ |
| # | Formation | Normal Battle Node | AD/AP AS/AS+ |
|---|---|---|---|
| E | Line Ahead Double Line Echelon Phases: 1 |
0/0 0/0 | |
| # | Formation | Normal Battle Node | AD/AP AS/AS+ |
| # | Formation | Normal Battle Node | AD/AP AS/AS+ |
|---|---|---|---|
| F | Line Ahead Double Line Vanguard Phases: 1, 2, 3 |
0/0 0/0 | |
| # | Formation | Normal Battle Node | AD/AP AS/AS+ |
| # | Formation | Normal Battle Node | AD/AP AS/AS+ |
|---|---|---|---|
| G | Echelon Line Abreast Phases: 1, 2, 3 |
0/0 0/0 | |
| Echelon Line Abreast Phases: 1, 2, 3 |
0/0 0/0 | ||
| Echelon Line Abreast Phases: 1, 2, 3 |
0/0 0/0 | ||
| # | Formation | Normal Battle Node | AD/AP AS/AS+ |
| # | Formation | Air Defense Node | AD/AP AS/AS+ |
|---|---|---|---|
| H | Diamond Phases: 1, 3 |
28/55 123/246 | |
| Diamond Phases: 1, 3 |
33/65 144/288 | ||
| Diamond Phases: 1, 3 |
39/78 174/348 | ||
| Diamond Phases: 1, 3 |
44/87 195/390 | ||
| # | Formation | Air Defense Node | AD/AP AS/AS+ |
| # | Formation | Normal Battle Node | AD/AP AS/AS+ |
|---|---|---|---|
| I | Echelon Phases: 1 |
0/0 0/0 | |
| # | Formation | Normal Battle Node | AD/AP AS/AS+ |
| # | Formation | Normal Battle Node | AD/AP AS/AS+ |
|---|---|---|---|
| J | Line Ahead Double Line Echelon Phases: 1, 2, 3 |
0/0 0/0 | |
| # | Formation | Normal Battle Node | AD/AP AS/AS+ |
| # | Formation | Air Defense Node | AD/AP AS/AS+ |
|---|---|---|---|
| K | Diamond Phases: 1, 3 |
28/55 123/246 | |
| Diamond Phases: 1, 3 |
33/65 144/288 | ||
| Diamond Phases: 1 |
39/78 174/348 | ||
| Diamond Phases: 1, 3 |
39/78 174/348 | ||
| Diamond Phases: 1, 3 |
44/87 195/390 | ||
| # | Formation | Air Defense Node | AD/AP AS/AS+ |
| # | Formation | Normal Battle Node | AD/AP AS/AS+ |
|---|---|---|---|
| L | Line Ahead Double Line Phases: 1, 2, 3 |
0/0 0/0 | |
| Line Ahead Phases: 1, 3 |
24/47 104/207 | ||
| # | Formation | Normal Battle Node | AD/AP AS/AS+ |
| # | Landing Node | ||
|---|---|---|---|
| M | 輸送物資の揚陸地点に到達しました。本海域の輸送作戦は無事完了しています。 The landing point of the convoy has been reached. The transport operation here has already been completed successfully. | ||
| # | Landing Node | ||
| # | Empty Node | ||
|---|---|---|---|
| N | 敵影を見ず。 No enemy spotted. | ||
| # | Empty Node | ||
| # | Formation | Boss Battle Node | AD/AP AS/AS+ |
|---|---|---|---|
| O | Line Ahead Double Line Phases: 1, 2, 3 |
0/0 0/0 | |
| Line Ahead Phases: 1 (Final)
|
0/0 0/0 | ||
| # | Formation | Boss Battle Node | AD/AP AS/AS+ |
| # | Formation | Normal Battle Node | AD/AP AS/AS+ |
|---|---|---|---|
| P | Echelon Line Abreast Phases: 2, 3 |
0/0 0/0 | |
| Echelon Line Abreast Phases: 2, 3 |
0/0 0/0 | ||
| Echelon Line Abreast Phases: 2, 3 |
0/0 0/0 | ||
| # | Formation | Normal Battle Node | AD/AP AS/AS+ |
| # | Selection Node | ||
|---|---|---|---|
| Q | 艦隊の針路を選択できます。提督、どちらの針路をとられますか? You can decide the fleet's course. Admiral, which heading should we take? | ||
| # | Selection Node | ||
| # | Formation | Normal Battle Node | AD/AP AS/AS+ |
|---|---|---|---|
| R | Line Ahead Double Line Vanguard Phases: 2, 3 |
0/0 0/0 | |
| # | Formation | Normal Battle Node | AD/AP AS/AS+ |
| # | Formation | Normal Battle Node | AD/AP AS/AS+ |
|---|---|---|---|
| S | Line Ahead Double Line Vanguard Phases: 2, 3 |
0/0 0/0 | |
| # | Formation | Normal Battle Node | AD/AP AS/AS+ |
| # | Formation | Normal Battle Node | AD/AP AS/AS+ |
|---|---|---|---|
| S1 | Line Ahead Double Line Phases: 2, 3 |
0/0 0/0 | |
| Line Ahead Phases: 2, 3 |
0/0 0/0 | ||
| # | Formation | Normal Battle Node | AD/AP AS/AS+ |
| # | Formation | Normal Battle Node | AD/AP AS/AS+ |
|---|---|---|---|
| S2 | Echelon Line Abreast Phases: 2 |
0/0 0/0 | |
| Echelon Line Abreast Phases: 2, 3 |
0/0 0/0 | ||
| Echelon Line Abreast Phases: 2 |
0/0 0/0 | ||
| # | Formation | Normal Battle Node | AD/AP AS/AS+ |
| # | Formation | Air Defense Node | AD/AP AS/AS+ |
|---|---|---|---|
| S3 | Diamond Phases: 2, 3 |
50/99 222/444 | |
| Diamond Phases: 2, 3 |
60/119 267/534 | ||
| Diamond Phases: 2, 3 |
58/115 258/516 | ||
| # | Formation | Air Defense Node | AD/AP AS/AS+ |
| # | Landing Node | ||
|---|---|---|---|
| T | 輸送物資の揚陸地点に到達しました。本海域の輸送作戦は無事完了しています。 The landing point of the convoy has been reached. The transport operation here has already been completed successfully. | ||
| # | Landing Node | ||
| # | Empty Node | ||
|---|---|---|---|
| T1 | 敵影を見ず。 No enemy spotted. | ||
| # | Empty Node | ||
| # | Formation | Boss Battle Node | AD/AP AS/AS+ |
|---|---|---|---|
| T2 | Diamond Phases: 2, 3 |
52/103 231/462 | |
| Diamond Phases: 2, 3 |
50/99 222/444 | ||
| Diamond Phases: 2, 3 (Final)
|
50/99 222/444 | ||
| # | Formation | Boss Battle Node | AD/AP AS/AS+ |
| # | Formation | Air Defense Node | AD/AP AS/AS+ |
|---|---|---|---|
| U | Diamond Phases: 3 |
82/163 366/732 | |
| Diamond Phases: 3 |
95/189 423/846 | ||
| Diamond Phases: 3 |
107/214 480/960 | ||
| # | Formation | Air Defense Node | AD/AP AS/AS+ |
| # | Formation | Normal Battle Node | AD/AP AS/AS+ |
|---|---|---|---|
| V | Line Ahead Double Line Echelon Phases: 3 |
0/0 0/0 | |
| # | Formation | Normal Battle Node | AD/AP AS/AS+ |
| # | Formation | Normal Battle Node | AD/AP AS/AS+ |
|---|---|---|---|
| W | Line Ahead Double Line Vanguard Phases: 3 |
0/0 0/0 | |
| # | Formation | Normal Battle Node | AD/AP AS/AS+ |
| # | Empty Node | ||
|---|---|---|---|
| W1 | 敵影を見ず。 No enemy spotted. | ||
| # | Empty Node | ||
| # | Formation | Boss Battle Node | AD/AP AS/AS+ |
|---|---|---|---|
| W2 | Line Ahead Phases: 3 |
0/0 0/0 | |
| Line Ahead Phases: 3 |
43/85 189/378 | ||
| Line Ahead Phases: 3 (Final)
|
43/85 189/378 | ||
| # | Formation | Boss Battle Node | AD/AP AS/AS+ |
| Type | Ships |
|---|---|
| DE | |
| DD |
| Type | Ships |
|---|---|
| DE | |
| DD |
| Type | Ships |
|---|---|
| DE | |
| DD | |
| SSV | |
| AV | |
| AS |
| Type | Ships |
|---|---|
| DE | |
| DD |
| Type | Ships |
|---|---|
| DE | |
| DD |
| Type | Ships |
|---|---|
| DD |
| Type | Ships |
|---|---|
| DE | |
| DD | |
| CV | |
| SSV | |
| AV | |
| AS |
| Type | Ships |
|---|---|
| DE | |
| DD | |
| SS | |
| AV | |
| AS |
| Type | Ships |
|---|---|
| DE | |
| DD | |
| SSV | |
| AV | |
| AS |
| # | Formation | Air Raids | AD/AP AS/AS+ |
|---|---|---|---|
| AB | Diamond | 17/33 72/144 | |
| Diamond | 23/46 102/204 | ||
| Diamond | 28/55 123/246 | ||
| # | Formation | Air Raids | AD/AP AS/AS+ |
| # | Empty Node | ||
|---|---|---|---|
| A | 気のせいだった。 Must be my imagination. | ||
| # | Empty Node | ||
| # | Formation | Air Defense Node | AD/AP AS/AS+ |
|---|---|---|---|
| B | Diamond Phases: 1, 3 |
12/23 51/102 | |
| Diamond Phases: 1, 2, 3 |
17/33 72/144 | ||
| Diamond Phases: 1, 2, 3 |
23/46 102/204 | ||
| Diamond Phases: 1, 2, 3 |
28/55 123/246 | ||
| Diamond Phases: 1, 2, 3 |
33/65 144/288 | ||
| # | Formation | Air Defense Node | AD/AP AS/AS+ |
| # | Formation | Normal Battle Node | AD/AP AS/AS+ |
|---|---|---|---|
| C | Echelon Line Abreast Phases: 1, 3 |
0/0 0/0 | |
| Echelon Line Abreast Phases: 1, 2, 3 |
0/0 0/0 | ||
| Echelon Line Abreast Phases: 1, 2, 3 |
0/0 0/0 | ||
| # | Formation | Normal Battle Node | AD/AP AS/AS+ |
| # | Formation | Air Defense Node | AD/AP AS/AS+ |
|---|---|---|---|
| D | Diamond Phases: 1, 3 |
12/23 51/102 | |
| Diamond Phases: 1, 3 |
17/33 72/144 | ||
| Diamond Phases: 1, 3 |
23/46 102/204 | ||
| Diamond Phases: 1, 3 |
28/55 123/246 | ||
| Diamond Phases: 1, 2, 3 |
33/65 144/288 | ||
| # | Formation | Air Defense Node | AD/AP AS/AS+ |
| # | Formation | Normal Battle Node | AD/AP AS/AS+ |
|---|---|---|---|
| E | Line Ahead Double Line Echelon Phases: 1 |
0/0 0/0 | |
| # | Formation | Normal Battle Node | AD/AP AS/AS+ |
| # | Formation | Normal Battle Node | AD/AP AS/AS+ |
|---|---|---|---|
| F | Line Ahead Double Line Vanguard Phases: 1, 3 |
0/0 0/0 | |
| # | Formation | Normal Battle Node | AD/AP AS/AS+ |
| # | Formation | Normal Battle Node | AD/AP AS/AS+ |
|---|---|---|---|
| G | Echelon Line Abreast Phases: 1, 2, 3 |
0/0 0/0 | |
| Echelon Line Abreast Phases: 1, 2, 3 |
0/0 0/0 | ||
| Echelon Line Abreast Phases: 1, 2, 3 |
0/0 0/0 | ||
| # | Formation | Normal Battle Node | AD/AP AS/AS+ |
| # | Formation | Air Defense Node | AD/AP AS/AS+ |
|---|---|---|---|
| H | Diamond Phases: 1, 3 |
12/23 51/102 | |
| Diamond Phases: 1, 3 |
17/33 72/144 | ||
| Diamond Phases: 1, 2, 3 |
23/46 102/204 | ||
| Diamond Phases: 1, 2, 3 |
28/55 123/246 | ||
| Diamond Phases: 1, 3 |
33/65 144/288 | ||
| # | Formation | Air Defense Node | AD/AP AS/AS+ |
| # | Formation | Normal Battle Node | AD/AP AS/AS+ |
|---|---|---|---|
| I | Echelon | 0/0 0/0 | |
| # | Formation | Normal Battle Node | AD/AP AS/AS+ |
| # | Formation | Normal Battle Node | AD/AP AS/AS+ |
|---|---|---|---|
| J | Line Ahead Double Line Echelon Phases: 1, 2, 3 |
0/0 0/0 | |
| # | Formation | Normal Battle Node | AD/AP AS/AS+ |
| # | Formation | Air Defense Node | AD/AP AS/AS+ |
|---|---|---|---|
| K | Diamond Phases: 3 |
12/23 51/102 | |
| Diamond Phases: 3 |
17/33 72/144 | ||
| Diamond Phases: 3 |
23/46 102/204 | ||
| Diamond Phases: 3 |
28/55 123/246 | ||
| Diamond Phases: 1 |
33/65 144/288 | ||
| # | Formation | Air Defense Node | AD/AP AS/AS+ |
| # | Formation | Normal Battle Node | AD/AP AS/AS+ |
|---|---|---|---|
| L | Line Ahead Double Line Phases: 1, 2, 3 |
0/0 0/0 | |
| Line Ahead Phases: 1, 2, 3 |
9/17 36/72 | ||
| # | Formation | Normal Battle Node | AD/AP AS/AS+ |
| # | Landing Node | ||
|---|---|---|---|
| M | 輸送物資の揚陸地点に到達しました。本海域の輸送作戦は無事完了しています。 The landing point of the convoy has been reached. The transport operation here has already been completed successfully. | ||
| # | Landing Node | ||
| # | Empty Node | ||
|---|---|---|---|
| N | 敵影を見ず。 No enemy spotted. | ||
| # | Empty Node | ||
| # | Formation | Boss Battle Node | AD/AP AS/AS+ |
|---|---|---|---|
| O | Line Ahead Double Line Phases: 1, 2, 3 |
0/0 0/0 | |
| Line Ahead Phases: 1 (Final)
|
0/0 0/0 | ||
| # | Formation | Boss Battle Node | AD/AP AS/AS+ |
| # | Formation | Normal Battle Node | AD/AP AS/AS+ |
|---|---|---|---|
| P | Echelon Line Abreast Phases: 2, 3 |
0/0 0/0 | |
| Echelon Line Abreast Phases: 2, 3 |
0/0 0/0 | ||
| Echelon Line Abreast Phases: 2, 3 |
0/0 0/0 | ||
| # | Formation | Normal Battle Node | AD/AP AS/AS+ |
| # | Selection Node | ||
|---|---|---|---|
| Q | 艦隊の針路を選択できます。提督、どちらの針路をとられますか? You can decide the fleet's course. Admiral, which heading should we take? | ||
| # | Selection Node | ||
| # | Formation | Normal Battle Node | AD/AP AS/AS+ |
|---|---|---|---|
| R | Line Ahead Double Line Vanguard Phases: 2, 3 |
0/0 0/0 | |
| # | Formation | Normal Battle Node | AD/AP AS/AS+ |
| # | Formation | Normal Battle Node | AD/AP AS/AS+ |
|---|---|---|---|
| S | Line Ahead Double Line Vanguard Phases: 2, 3 |
0/0 0/0 | |
| # | Formation | Normal Battle Node | AD/AP AS/AS+ |
| # | Formation | Normal Battle Node | AD/AP AS/AS+ |
|---|---|---|---|
| S1 | Line Ahead Double Line Phases: 2, 3 |
0/0 0/0 | |
| Line Ahead Phases: 2, 3 |
0/0 0/0 | ||
| # | Formation | Normal Battle Node | AD/AP AS/AS+ |
| # | Formation | Normal Battle Node | AD/AP AS/AS+ |
|---|---|---|---|
| S2 | Echelon Line Abreast Phases: 2 |
0/0 0/0 | |
| Echelon Line Abreast Phases: 2 |
0/0 0/0 | ||
| Echelon Line Abreast Phases: 2 |
0/0 0/0 | ||
| # | Formation | Normal Battle Node | AD/AP AS/AS+ |
| # | Formation | Air Defense Node | AD/AP AS/AS+ |
|---|---|---|---|
| S3 | Diamond Phases: 2, 3 |
16/31 69/138 | |
| Diamond Phases: 2, 3 |
50/99 222/444 | ||
| Diamond Phases: 2, 3 |
58/115 258/516 | ||
| # | Formation | Air Defense Node | AD/AP AS/AS+ |
| # | Landing Node | ||
|---|---|---|---|
| T | 輸送物資の揚陸地点に到達しました。本海域の輸送作戦は無事完了しています。 The landing point of the convoy has been reached. The transport operation here has already been completed successfully. | ||
| # | Landing Node | ||
| # | Empty Node | ||
|---|---|---|---|
| T1 | 敵影を見ず。 No enemy spotted. | ||
| # | Empty Node | ||
| # | Formation | Boss Battle Node | AD/AP AS/AS+ |
|---|---|---|---|
| T2 | Diamond Phases: 2, 3 |
16/31 69/138 | |
| Diamond Phases: 2, 3 |
50/99 222/444 | ||
| Diamond Phases: 2, 3 (Final)
|
50/99 222/444 | ||
| # | Formation | Boss Battle Node | AD/AP AS/AS+ |
| # | Formation | Air Defense Node | AD/AP AS/AS+ |
|---|---|---|---|
| U | Diamond Phases: 3 |
47/94 210/420 | |
| Diamond Phases: 3 |
59/117 261/522 | ||
| Diamond Phases: 3 |
71/142 318/636 | ||
| # | Formation | Air Defense Node | AD/AP AS/AS+ |
| # | Formation | Normal Battle Node | AD/AP AS/AS+ |
|---|---|---|---|
| V | Line Ahead Double Line Echelon Phases: 3 |
0/0 0/0 | |
| # | Formation | Normal Battle Node | AD/AP AS/AS+ |
| # | Formation | Normal Battle Node | AD/AP AS/AS+ |
|---|---|---|---|
| W | Line Ahead Double Line Vanguard Phases: 3 |
0/0 0/0 | |
| # | Formation | Normal Battle Node | AD/AP AS/AS+ |
| # | Empty Node | ||
|---|---|---|---|
| W1 | 敵影を見ず。 No enemy spotted. | ||
| # | Empty Node | ||
| # | Formation | Boss Battle Node | AD/AP AS/AS+ |
|---|---|---|---|
| W2 | Line Ahead Phases: 3 |
0/0 0/0 | |
| Line Ahead Phases: 3 |
43/85 189/378 | ||
| Line Ahead Phases: 3 (Final)
|
43/85 189/378 | ||
| # | Formation | Boss Battle Node | AD/AP AS/AS+ |
| Type | Ships |
|---|---|
| DE | |
| DD |
| Type | Ships |
|---|---|
| DD |
| Type | Ships |
|---|---|
| DE | |
| DD | |
| SSV | |
| AS |
| Type | Ships |
|---|---|
| DD |
| Type | Ships |
|---|---|
| DE | |
| DD |
| Type | Ships |
|---|---|
| DE | |
| DD | |
| CV | |
| SSV | |
| AV | |
| AS |
| Type | Ships |
|---|---|
| DE | |
| DD | |
| SS | |
| AV | |
| AS |
| Type | Ships |
|---|---|
| DE | |
| DD | |
| SSV | |
| AV | |
| AS |
| # | Formation | Air Raids | AD/AP AS/AS+ |
|---|---|---|---|
| AB | Diamond | 12/23 51/102 | |
| Diamond | 17/33 72/144 | ||
| Diamond | 23/46 102/204 | ||
| # | Formation | Air Raids | AD/AP AS/AS+ |
| # | Empty Node | ||
|---|---|---|---|
| A | 気のせいだった。 Must be my imagination. | ||
| # | Empty Node | ||
| # | Formation | Air Defense Node | AD/AP AS/AS+ |
|---|---|---|---|
| B | Diamond Phases: 1, 2, 3 |
12/23 51/102 | |
| Diamond Phases: 1, 2, 3 |
17/33 72/144 | ||
| Diamond Phases: 1, 2, 3 |
23/46 102/204 | ||
| # | Formation | Air Defense Node | AD/AP AS/AS+ |
| # | Formation | Normal Battle Node | AD/AP AS/AS+ |
|---|---|---|---|
| C | Echelon Line Abreast Phases: 1, 2, 3 |
0/0 0/0 | |
| Echelon Line Abreast Phases: 1, 2, 3 |
0/0 0/0 | ||
| # | Formation | Normal Battle Node | AD/AP AS/AS+ |
| # | Formation | Air Defense Node | AD/AP AS/AS+ |
|---|---|---|---|
| D | Diamond Phases: 1, 2, 3 |
12/23 51/102 | |
| Diamond Phases: 1, 2, 3 |
17/33 72/144 | ||
| Diamond Phases: 1, 2, 3 |
23/46 102/204 | ||
| # | Formation | Air Defense Node | AD/AP AS/AS+ |
| # | Formation | Normal Battle Node | AD/AP AS/AS+ |
|---|---|---|---|
| E | Line Ahead Double Line Echelon Phases: 1, 2 |
0/0 0/0 | |
| # | Formation | Normal Battle Node | AD/AP AS/AS+ |
| # | Formation | Normal Battle Node | AD/AP AS/AS+ |
|---|---|---|---|
| F | Line Ahead Double Line Vanguard Phases: 1, 2, 3 |
0/0 0/0 | |
| # | Formation | Normal Battle Node | AD/AP AS/AS+ |
| # | Formation | Normal Battle Node | AD/AP AS/AS+ |
|---|---|---|---|
| G | Echelon Line Abreast Phases: 1, 2, 3 |
0/0 0/0 | |
| Echelon Line Abreast Phases: 1, 2, 3 |
0/0 0/0 | ||
| # | Formation | Normal Battle Node | AD/AP AS/AS+ |
| # | Formation | Air Defense Node | AD/AP AS/AS+ |
|---|---|---|---|
| H | Diamond Phases: 1, 2, 3 |
12/23 51/102 | |
| Diamond Phases: 1, 2, 3 |
17/33 72/144 | ||
| Diamond Phases: 1, 2, 3 |
23/46 102/204 | ||
| # | Formation | Air Defense Node | AD/AP AS/AS+ |
| # | Formation | Normal Battle Node | AD/AP AS/AS+ |
|---|---|---|---|
| I | Echelon Phases: 3 |
0/0 0/0 | |
| # | Formation | Normal Battle Node | AD/AP AS/AS+ |
| # | Formation | Normal Battle Node | AD/AP AS/AS+ |
|---|---|---|---|
| J | Line Ahead Double Line Echelon Phases: 1, 2, 3 |
0/0 0/0 | |
| # | Formation | Normal Battle Node | AD/AP AS/AS+ |
| # | Formation | Air Defense Node | AD/AP AS/AS+ |
|---|---|---|---|
| K | Diamond Phases: 2, 3 |
12/23 51/102 | |
| Diamond Phases: 1, 2, 3 |
17/33 72/144 | ||
| Diamond Phases: 1, 3 |
23/46 102/204 | ||
| # | Formation | Air Defense Node | AD/AP AS/AS+ |
| # | Formation | Normal Battle Node | AD/AP AS/AS+ |
|---|---|---|---|
| L | Line Ahead Double Line Phases: 1, 2, 3 |
0/0 0/0 | |
| Line Ahead Phases: 1, 2, 3 |
0/0 0/0 | ||
| # | Formation | Normal Battle Node | AD/AP AS/AS+ |
| # | Landing Node | ||
|---|---|---|---|
| M | 輸送物資の揚陸地点に到達しました。本海域の輸送作戦は無事完了しています。 The landing point of the convoy has been reached. The transport operation here has already been completed successfully. | ||
| # | Landing Node | ||
| # | Empty Node | ||
|---|---|---|---|
| N | 敵影を見ず。 No enemy spotted. | ||
| # | Empty Node | ||
| # | Formation | Boss Battle Node | AD/AP AS/AS+ |
|---|---|---|---|
| O | Line Ahead Double Line Phases: 1, 2, 3 |
0/0 0/0 | |
| Line Ahead Phases: 1 (Final)
|
0/0 0/0 | ||
| # | Formation | Boss Battle Node | AD/AP AS/AS+ |
| # | Formation | Normal Battle Node | AD/AP AS/AS+ |
|---|---|---|---|
| P | Echelon Line Abreast Phases: 2, 3 |
0/0 0/0 | |
| Echelon Line Abreast Phases: 2, 3 |
0/0 0/0 | ||
| # | Formation | Normal Battle Node | AD/AP AS/AS+ |
| # | Selection Node | ||
|---|---|---|---|
| Q | 艦隊の針路を選択できます。提督、どちらの針路をとられますか? You can decide the fleet's course. Admiral, which heading should we take? | ||
| # | Selection Node | ||
| # | Formation | Normal Battle Node | AD/AP AS/AS+ |
|---|---|---|---|
| R | Line Ahead Double Line Vanguard Phases: 2, 3 |
0/0 0/0 | |
| # | Formation | Normal Battle Node | AD/AP AS/AS+ |
| # | Formation | Normal Battle Node | AD/AP AS/AS+ |
|---|---|---|---|
| S | Line Ahead Double Line Vanguard Phases: 2, 3 |
0/0 0/0 | |
| # | Formation | Normal Battle Node | AD/AP AS/AS+ |
| # | Formation | Normal Battle Node | AD/AP AS/AS+ |
|---|---|---|---|
| S1 | Line Ahead Double Line Phases: 2, 3 |
0/0 0/0 | |
| Line Ahead Phases: 2, 3 |
0/0 0/0 | ||
| # | Formation | Normal Battle Node | AD/AP AS/AS+ |
| # | Formation | Normal Battle Node | AD/AP AS/AS+ |
|---|---|---|---|
| S2 | Echelon Line Abreast Phases: 2 |
0/0 0/0 | |
| Line Abreast | 0/0 0/0 | ||
| # | Formation | Normal Battle Node | AD/AP AS/AS+ |
| # | Formation | Air Defense Node | AD/AP AS/AS+ |
|---|---|---|---|
| S3 | Diamond Phases: 2, 3 |
16/31 69/138 | |
| Diamond Phases: 2, 3 |
50/99 222/444 | ||
| Diamond Phases: 2, 3 |
53/105 234/468 | ||
| # | Formation | Air Defense Node | AD/AP AS/AS+ |
| # | Landing Node | ||
|---|---|---|---|
| T | 輸送物資の揚陸地点に到達しました。本海域の輸送作戦は無事完了しています。 The landing point of the convoy has been reached. The transport operation here has already been completed successfully. | ||
| # | Landing Node | ||
| # | Empty Node | ||
|---|---|---|---|
| T1 | 敵影を見ず。 No enemy spotted. | ||
| # | Empty Node | ||
| # | Formation | Boss Battle Node | AD/AP AS/AS+ |
|---|---|---|---|
| T2 | Diamond Phases: 2, 3 |
16/31 69/138 | |
| Diamond Phases: 2, 3 |
16/31 69/138 | ||
| Diamond Phases: 2, 3 (Final)
|
50/99 222/444 | ||
| # | Formation | Boss Battle Node | AD/AP AS/AS+ |
| # | Formation | Air Defense Node | AD/AP AS/AS+ |
|---|---|---|---|
| U | Diamond Phases: 3 |
24/47 105/210 | |
| Diamond Phases: 3 |
35/70 156/312 | ||
| Diamond Phases: 3 |
48/95 213/426 | ||
| # | Formation | Air Defense Node | AD/AP AS/AS+ |
| # | Formation | Normal Battle Node | AD/AP AS/AS+ |
|---|---|---|---|
| V | Line Ahead Double Line Echelon Phases: 3 |
0/0 0/0 | |
| # | Formation | Normal Battle Node | AD/AP AS/AS+ |
| # | Formation | Normal Battle Node | AD/AP AS/AS+ |
|---|---|---|---|
| W | Line Ahead Double Line Vanguard Phases: 3 |
0/0 0/0 | |
| # | Formation | Normal Battle Node | AD/AP AS/AS+ |
| # | Empty Node | ||
|---|---|---|---|
| W1 | 敵影を見ず。 No enemy spotted. | ||
| # | Empty Node | ||
| # | Formation | Boss Battle Node | AD/AP AS/AS+ |
|---|---|---|---|
| W2 | Line Ahead Phases: 3 |
0/0 0/0 | |
| Line Ahead Phases: 3 |
9/17 36/72 | ||
| Line Ahead Phases: 3 (Final)
|
9/17 36/72 | ||
| # | Formation | Boss Battle Node | AD/AP AS/AS+ |
Ship Drops
| Ship drops | |||||||||||||||||||||||||||||||||||||||||||||||||||||||||||||||||||||||||||||||||||||||||||||||||||
|---|---|---|---|---|---|---|---|---|---|---|---|---|---|---|---|---|---|---|---|---|---|---|---|---|---|---|---|---|---|---|---|---|---|---|---|---|---|---|---|---|---|---|---|---|---|---|---|---|---|---|---|---|---|---|---|---|---|---|---|---|---|---|---|---|---|---|---|---|---|---|---|---|---|---|---|---|---|---|---|---|---|---|---|---|---|---|---|---|---|---|---|---|---|---|---|---|---|---|---|
| Type | Ship? | F | L | O | R | S | S1 | T2 | W | W2 | |||||||||||||||||||||||||||||||||||||||||||||||||||||||||||||||||||||||||||||||||||||||||
| DE | Tsushima | Casual+ | |||||||||||||||||||||||||||||||||||||||||||||||||||||||||||||||||||||||||||||||||||||||||||||||||
| DE | Hirato | Easy+ | Easy+ | Casual+ | Medium+ | Casual+ | Casual+ | Casual+ | |||||||||||||||||||||||||||||||||||||||||||||||||||||||||||||||||||||||||||||||||||||||||||
| DE | Mikura | Casual+ | Easy+ | Casual+ | Easy+ | Hard+ | Casual+ | Casual+ | Casual+ | ||||||||||||||||||||||||||||||||||||||||||||||||||||||||||||||||||||||||||||||||||||||||||
| DE | Yashiro | Casual+ | |||||||||||||||||||||||||||||||||||||||||||||||||||||||||||||||||||||||||||||||||||||||||||||||||
| DD | Usugumo | Easy+ | Casual+ | Easy+ | |||||||||||||||||||||||||||||||||||||||||||||||||||||||||||||||||||||||||||||||||||||||||||||||
| DD | Uranami | Casual+ | Casual+ | Medium+ | Casual+ | Medium+ | Casual+ | Casual+ | Casual+ | ||||||||||||||||||||||||||||||||||||||||||||||||||||||||||||||||||||||||||||||||||||||||||
| DD | Amagiri | Easy+ | Casual+ | Casual+ | |||||||||||||||||||||||||||||||||||||||||||||||||||||||||||||||||||||||||||||||||||||||||||||||
| DD | Sagiri | Hard+ | Easy+ | Casual+ | Casual+ | Casual+ | |||||||||||||||||||||||||||||||||||||||||||||||||||||||||||||||||||||||||||||||||||||||||||||
| DD | Harusame | Casual+ | Casual+ | Casual+ | Casual+ | Easy+ | Casual+ | Casual+ | Casual+ | ||||||||||||||||||||||||||||||||||||||||||||||||||||||||||||||||||||||||||||||||||||||||||
| DD | Umikaze | Hard+ | Hard+ | Casual+ | Casual+ | ||||||||||||||||||||||||||||||||||||||||||||||||||||||||||||||||||||||||||||||||||||||||||||||
| DD | Yamakaze | Hard+ | Easy+ | Casual+ | Casual+ | Casual+ | |||||||||||||||||||||||||||||||||||||||||||||||||||||||||||||||||||||||||||||||||||||||||||||
| DD | Kawakaze | Hard+ | Hard+ | Easy+ | Casual+ | Casual+ | Casual+ | ||||||||||||||||||||||||||||||||||||||||||||||||||||||||||||||||||||||||||||||||||||||||||||
| DD | Tokitsukaze | Easy+ | Casual+ | Casual+ | |||||||||||||||||||||||||||||||||||||||||||||||||||||||||||||||||||||||||||||||||||||||||||||||
| DD | Arashi | Casual+ | Easy+ | Casual+ | Casual+ | ||||||||||||||||||||||||||||||||||||||||||||||||||||||||||||||||||||||||||||||||||||||||||||||
| DD | Hagikaze | Casual+ | Medium+ | Casual+ | Casual+ | ||||||||||||||||||||||||||||||||||||||||||||||||||||||||||||||||||||||||||||||||||||||||||||||
| DD | Makinami | Casual+ | |||||||||||||||||||||||||||||||||||||||||||||||||||||||||||||||||||||||||||||||||||||||||||||||||
| DD | Teruzuki | Casual+ | |||||||||||||||||||||||||||||||||||||||||||||||||||||||||||||||||||||||||||||||||||||||||||||||||
| CV | Hornet | Casual+ | Hard+ | ||||||||||||||||||||||||||||||||||||||||||||||||||||||||||||||||||||||||||||||||||||||||||||||||
| SS | I-201 | Casual+ | |||||||||||||||||||||||||||||||||||||||||||||||||||||||||||||||||||||||||||||||||||||||||||||||||
| SS | I-203 | Casual+ | |||||||||||||||||||||||||||||||||||||||||||||||||||||||||||||||||||||||||||||||||||||||||||||||||
| SSV | I-400 | Easy+ | Casual+ | Medium+ | |||||||||||||||||||||||||||||||||||||||||||||||||||||||||||||||||||||||||||||||||||||||||||||||
| SSV | I-401 | Casual+ | Casual+ | Casual+ | |||||||||||||||||||||||||||||||||||||||||||||||||||||||||||||||||||||||||||||||||||||||||||||||
| AV | Mizuho | Hard+ | Casual+ | Casual+ | Casual+ | ||||||||||||||||||||||||||||||||||||||||||||||||||||||||||||||||||||||||||||||||||||||||||||||
| AV | Nisshin | Casual+ | |||||||||||||||||||||||||||||||||||||||||||||||||||||||||||||||||||||||||||||||||||||||||||||||||
| AV | Akitsushima | Casual+ | |||||||||||||||||||||||||||||||||||||||||||||||||||||||||||||||||||||||||||||||||||||||||||||||||
| AV | Commandant Teste | Easy+ | Casual+ | Hard+ | |||||||||||||||||||||||||||||||||||||||||||||||||||||||||||||||||||||||||||||||||||||||||||||||
| AS | Jingei | Casual+ | Casual+ | Casual+ | |||||||||||||||||||||||||||||||||||||||||||||||||||||||||||||||||||||||||||||||||||||||||||||||
| AS | Chougei | Casual+ | |||||||||||||||||||||||||||||||||||||||||||||||||||||||||||||||||||||||||||||||||||||||||||||||||
| CL | Kinu | Casual+ | |||||||||||||||||||||||||||||||||||||||||||||||||||||||||||||||||||||||||||||||||||||||||||||||||
| CL | Abukuma | Medium+ | Hard+ | Easy+ | Hard+ | Casual+ | Casual+ | Casual+ | Casual+ | ||||||||||||||||||||||||||||||||||||||||||||||||||||||||||||||||||||||||||||||||||||||||||
| CA | Kinugasa | Casual+ | |||||||||||||||||||||||||||||||||||||||||||||||||||||||||||||||||||||||||||||||||||||||||||||||||
| CA | Myoukou | Casual+ | |||||||||||||||||||||||||||||||||||||||||||||||||||||||||||||||||||||||||||||||||||||||||||||||||
| CA | Takao | Casual+ | |||||||||||||||||||||||||||||||||||||||||||||||||||||||||||||||||||||||||||||||||||||||||||||||||
| CA | Mogami | Casual+ | |||||||||||||||||||||||||||||||||||||||||||||||||||||||||||||||||||||||||||||||||||||||||||||||||
| CA | Suzuya | Casual+ | |||||||||||||||||||||||||||||||||||||||||||||||||||||||||||||||||||||||||||||||||||||||||||||||||
| CA | Kumano | Casual+ | |||||||||||||||||||||||||||||||||||||||||||||||||||||||||||||||||||||||||||||||||||||||||||||||||
| CVL | Ryuujou | Casual+ | Casual+ | Casual+ | Casual+ | Casual+ | Casual+ | Casual+ | Casual+ | Casual+ | |||||||||||||||||||||||||||||||||||||||||||||||||||||||||||||||||||||||||||||||||||||||||
| FBB | Kongou | Casual+ | |||||||||||||||||||||||||||||||||||||||||||||||||||||||||||||||||||||||||||||||||||||||||||||||||
| FBB | Hiei | Easy+ | Casual+ | Casual+ | Casual+ | ||||||||||||||||||||||||||||||||||||||||||||||||||||||||||||||||||||||||||||||||||||||||||||||
| FBB | Haruna | Casual+ | |||||||||||||||||||||||||||||||||||||||||||||||||||||||||||||||||||||||||||||||||||||||||||||||||
| FBB | Kirishima | Casual+ | Casual+ | Casual+ | Casual+ | ||||||||||||||||||||||||||||||||||||||||||||||||||||||||||||||||||||||||||||||||||||||||||||||
| BB | Fusou | Casual+ | |||||||||||||||||||||||||||||||||||||||||||||||||||||||||||||||||||||||||||||||||||||||||||||||||
| BB | Yamashiro | Casual+ | |||||||||||||||||||||||||||||||||||||||||||||||||||||||||||||||||||||||||||||||||||||||||||||||||
| BB | Ise | Casual+ | |||||||||||||||||||||||||||||||||||||||||||||||||||||||||||||||||||||||||||||||||||||||||||||||||
| BB | Hyuuga | Casual+ | |||||||||||||||||||||||||||||||||||||||||||||||||||||||||||||||||||||||||||||||||||||||||||||||||
| BB | Nagato | Casual+ | |||||||||||||||||||||||||||||||||||||||||||||||||||||||||||||||||||||||||||||||||||||||||||||||||
| BB | Mutsu | Casual+ | |||||||||||||||||||||||||||||||||||||||||||||||||||||||||||||||||||||||||||||||||||||||||||||||||
| CV | Shoukaku | Casual+ | |||||||||||||||||||||||||||||||||||||||||||||||||||||||||||||||||||||||||||||||||||||||||||||||||
| CV | Zuikaku | Casual+ | |||||||||||||||||||||||||||||||||||||||||||||||||||||||||||||||||||||||||||||||||||||||||||||||||
|
| |||||||||
|---|---|---|---|---|---|---|---|---|---|
|
Time remaining until Spring 2022 Event Ends:
| |||||||||
{{:ROOTPAGENAME/Hub}}
Template:EventsPortal