- Welcome to the Kancolle Wiki!
- If you have any questions regarding site content, account registration, etc., please visit the KanColle Wiki Discord
Difference between revisions of "World 3/3-5"
Minhfongboy (talk | contribs) (→Tips) |
Jigaraphale (talk | contribs) |
||
| (34 intermediate revisions by 7 users not shown) | |||
| Line 1: | Line 1: | ||
| − | + | {{World/Hub}} | |
| + | =World 3-5 Extra Operation: 北方AL海域 - [[wikipedia:en:Aleutian Islands Campaign|AL Area in Northern Sea]]= | ||
{{LabSortieworld | {{LabSortieworld | ||
| − | | | + | | page = World 3/3-5 |
| difficulty = ☆ ☆ ☆ ☆ ☆ ☆ ☆ ☆ ☆ | | difficulty = ☆ ☆ ☆ ☆ ☆ ☆ ☆ ☆ ☆ | ||
| item = {{Ammo}} | | item = {{Ammo}} | ||
| exp = 400 | | exp = 400 | ||
| − | | code = 北方海域戦闘哨戒 | + | | code = 北方海域戦闘哨戒<br>Northern Sea Combat Patrol |
| jptext =北方海域に敵増援の動きがある。中規模の水上打撃部隊を派遣し、敵増援を捕捉、これを撃破せよ! | | jptext =北方海域に敵増援の動きがある。中規模の水上打撃部隊を派遣し、敵増援を捕捉、これを撃破せよ! | ||
| − | | entext = There is a movement of enemy reinforcements to the northern sea. Dispatch a medium size fleet, intercept the enemy reinforcements and destroy it! | + | | entext = There is a movement of enemy reinforcements to the northern sea. Dispatch a medium size fleet, intercept the enemy reinforcements, and destroy it! |
| − | |||
| − | |||
| − | |||
| − | |||
| − | |||
| − | |||
| − | |||
| − | |||
| − | |||
| − | |||
| − | |||
| − | |||
| − | |||
| − | |||
| − | |||
| − | |||
| − | |||
| − | |||
| − | |||
| − | |||
}} | }} | ||
| + | |||
| + | {{MapUnlock | ||
| + | | unlock= [[3-4]] | ||
| + | | clear= the boss's flagship must be sunk 4 times | ||
| + | | reward= '''150 {{Item/Icon|Ranking Point Reward|size=25px}} [[Ranking Point]]s''' and '''1 {{Medal}} [[Medal]]''' | ||
| + | | reset= Resets at midnight JST at the beginning of every month | ||
}} | }} | ||
| Line 34: | Line 21: | ||
{{MapBranchingTable | {{MapBranchingTable | ||
|title = 3-5 Branching Rules | |title = 3-5 Branching Rules | ||
| − | |||
|id = 3-5 | |id = 3-5 | ||
|0 -> B = | |0 -> B = | ||
* Guaranteed if one of the following requirements are met: | * Guaranteed if one of the following requirements are met: | ||
| − | ** Amount of SS(V) | + | ** Amount of SS(V) ≥ 3 |
| − | ** Amount of (F)BB(V) | + | ** Amount of (F)BB(V) ≥ 2 |
| − | ** Amount of (F)BB(V) + CA(V) | + | ** Amount of (F)BB(V) + CA(V) ≥ 3 |
** Fleet contains CV(L) | ** Fleet contains CV(L) | ||
** Fleet contains CLT | ** Fleet contains CLT | ||
| − | * 25% chance of B when amount of DD = 4 | + | * 25 % chance of B when amount of DD = 4 |
| − | * 50% chance of B when amount of DD | + | * 50 % chance of B when amount of DD ≤ 3 |
|0 -> F = | |0 -> F = | ||
* Does not meet the requirements to go to B | * Does not meet the requirements to go to B | ||
| − | * Guaranteed if the amount of DD | + | * Guaranteed if the amount of DD ≥ 5 |
| − | * 75% chance of F when amount of DD = 4 | + | * 75 % chance of F when amount of DD = 4 |
| − | * 50% chance of F when amount of DD | + | * 50 % chance of F when amount of DD ≤ 3 |
|B -> A/empty = | |B -> A/empty = | ||
* Meet '''ANY''' of the following requirements: | * Meet '''ANY''' of the following requirements: | ||
| − | ** Amount of SS(V) | + | ** Amount of SS(V) ≥ 4 |
| − | ** Amount of CV(L | + | ** Amount of CV(B/L) ≥ 4 |
| − | ** Amount of CV(L | + | ** Amount of CV(B/L) + (F)BB(V) ≥ 5 |
|B -> C/empty = * Does not meet the requirement to go to any other nodes | |B -> C/empty = * Does not meet the requirement to go to any other nodes | ||
| Line 62: | Line 48: | ||
|B -> D = | |B -> D = | ||
* Meet '''ANY''' of the following requirements: | * Meet '''ANY''' of the following requirements: | ||
| − | ** Amount of CLT | + | ** Amount of CLT ≥ 2 |
| − | ** Amount of CV(L) | + | ** Amount of CV(L) ≥ 2 |
| − | ** Amount of (F)BB(V) | + | ** Amount of (F)BB(V) ≥ 3 ('''Overrides E node branching''') |
| − | ** Amount of CA(V) | + | ** Amount of CA(V) ≥ 2 and use neither a DD / CL |
|B -> E = | |B -> E = | ||
* Meet '''ALL''' of the following requirements: | * Meet '''ALL''' of the following requirements: | ||
| − | ** Amount of DD | + | ** Amount of DD ≥ 2 |
** Amount of CL = 1 | ** Amount of CL = 1 | ||
| − | ** Fleet contains no CV(L | + | ** Fleet contains no CV(B/L) |
|E -> H = *Fixed Route | |E -> H = *Fixed Route | ||
| Line 77: | Line 63: | ||
|F -> E = | |F -> E = | ||
* Guaranteed if one of the following requirements are met: | * Guaranteed if one of the following requirements are met: | ||
| − | ** Fleet contains CV(L | + | ** Fleet contains CV(B/L), (F)BB(V) or LHA |
* 25% chance of E if none of the requirements are met | * 25% chance of E if none of the requirements are met | ||
|F -> G = | |F -> G = | ||
* Guaranteed if '''ALL''' of the following requirements are met: | * Guaranteed if '''ALL''' of the following requirements are met: | ||
| − | ** Amount of CL | + | ** Amount of CL ≤ 2 |
| − | ** Fleet contains no LHA, CA(V), (F)BB(V) or CV(L | + | ** Fleet contains no LHA, CA(V), (F)BB(V) or CV(B/L) |
| − | * 75% chance of G if none of the requirements are | + | * 75% chance of G if none of the requirements are met |
| − | |||
| − | |||
| − | |||
| − | |||
| − | |G -> K = | + | |G -> I/empty,K = |
| − | * | + | *LoS check: |
| − | * Random routing if | + | **Go to I if LoS < 23 (Cn4) |
| + | **Go to K if LoS > 28 (Cn4) | ||
| + | **Random routing if 23 ≤ LoS ≤ 28 (Cn4) | ||
|H -> J/resource = | |H -> J/resource = | ||
* Meet '''ANY''' of the following requirements (LoS check pass is ignored): | * Meet '''ANY''' of the following requirements (LoS check pass is ignored): | ||
| − | ** Amount of (F)BB(V) + CV(B/L) | + | ** Amount of (F)BB(V) + CV(B/L) ≥ 2 '''AND''' LHA ≥ 1 |
| − | ** Amount of (F)BB(V) + CV(B/L) | + | ** Amount of (F)BB(V) + CV(B/L) ≥ 4 |
| − | * | + | * Have LoS < 40 (Cn4) |
| − | |H -> K = | + | |H -> K = Have LoS > 40 (Cn4) '''AND''' do not meet the requirements to go to node J |
}} | }} | ||
===Tips=== | ===Tips=== | ||
| − | + | The map will stay in '''Last Dance''' once cleared, until the next month's reset. Therefore, it is recommended to do quests during pre-clear for an easier time, as doing them post-clear can make the job harder. | |
| − | + | ||
| − | + | Node {{MapRoute|H|red}} is an installation node, where {{Balloon}} [[Balloon]]s can be deployed. | |
| − | + | ||
| − | + | Routes passing through node {{MapRoute|E|red}} are not recommended, as they require awkward compositions (either 1 CL, 2 DD in a heavy fleet or 1 BB/CV in a light one), the node has two Ru-Flags that can potentially damage any of the ships. | |
| − | + | ||
| − | + | This map is the best spot to farm [[Maruyu]] drops (''see [[Help:Ship Farming|here]]''). | |
| − | + | ||
| − | + | ===Recommended Fleets=== | |
| − | + | {{FleetGuide | |
| − | + | | Map = True-South route | |
| − | + | | Fleet = '''1 CL/AV, 5 DD | |
| − | + | | LOS = Cn4: 28 | |
| − | + | | Route = {{MapRoute|F|red|G|red|K|red}} | |
| − | * | + | | AS = 35 |
| − | ** | + | | Note = This is the strongest possible composition that is guaranteed to reach the boss via this route, assuming LoS requirements are met. It is recommended to try the south route with this composition first. |
| − | + | *Sparkling can help for lower-level DDs as it is unlikely to kill or disable all enemies in preboss nodes, which can lead to the closing torpedo salvo critically damaging low-armored DDs. | |
| − | + | *Using {{Smoke}} [[Smoke]]s at node G ({{color|red|'''Last Dance'''}} or '''post-clear''' only) is also a viable substitute when lacking the ETSCF. | |
| − | + | | Quest = | |
| − | + | }} | |
| − | * | + | |
| − | + | {{FleetGuide | |
| − | + | | Map = Torpedo Squadron | |
| + | | Fleet = '''{{color|red|"Torpedo Squadron"}}: 1 CL (flagship), 5 DD | ||
| + | | LOS = Cn4: 28 | ||
| + | | Route = {{MapRoute|F|red|G|red|K|red}} | ||
| + | | AS = 35 | ||
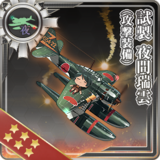
| + | | Note = This solution requires more advanced gears, and might be out of reach of new players. {{color|red|'''It is required to bring'''}} an {{CommandFacility}} FCF capable CL as flagship, preferably an {{Class|Agano|Kai+}}, equipped with: | ||
| + | *2 {{Med Gun}} [[Main Gun]]s, | ||
| + | *1 {{Night SPB}} {{EquipmentLink|Prototype Night Zuiun (Attack Equipment)}}, | ||
| + | *'''And''' the {{IconText|{{CommandFacility}}|ETSCF}} {{EquipmentLink|Elite Torpedo Squadron Command Facility}} (preferably in the [[RE]]). | ||
| + | The best comp for farming boss node, having the highest pass rate thanks to the usage of [[ETSCF]] in case a ship got heavily damaged. | ||
| + | |||
| + | The [[Evacuation]] mechanic of the ETSCF should be used if needed, with no risk on the routing outside of LoS. | ||
| + | | Quest = | ||
| + | }} | ||
| + | |||
| + | {{FleetGuide | ||
| + | | Map = North Route | ||
| + | | Fleet = '''3 BB(V)/CV(B/L), 3 CA(V)/CLT/SS(V) | ||
| + | | LOS = Cn4: 40 | ||
| + | | Route = {{MapRoute|B|red|D|red|H|red|K|red}} | ||
| + | | AS = 381 | ||
| + | | Note = Ships that can activate [[Anti-Air Rocket Barrage]] or are specialized in [[AACI]] can be used to reduce enemy airstrike damage on the way to the boss node. | ||
| + | *CV(B) & BBV are recommended against CVLs or BBs, so AS is more achievable on all the map. | ||
| + | *[[Northern Princess]] is an [[Installation]] that can be neutralized by deplaning her or bringing an SS(V) and force her to attack it with her weak ASW attack. | ||
| + | | Quest = | ||
| + | }} | ||
| + | |||
| + | {{FleetGuide | ||
| + | | Map = South Route | ||
| + | | Fleet = 1 CL, 4 DD, 1 AV<br>2 CL, 2 DD, 2 AV<br>2-3 CL, 3-4 AV | ||
| + | | LOS = Cn4: 28 | ||
| + | | Route = Random (based on the number of DD): | ||
| + | *{{MapRoute|F|red|G|red|K|red}} | ||
| + | *{{MapRoute|B|red|C|blue|F|red|G|red|K|red}} | ||
| + | | AS = 35 | ||
| + | | Note = Sacrifices guaranteed routing, but in exchange for opening strikes, and the possibility of AP/AS at Node {{MapRoute|G|red}} on the final clear. | ||
| + | *There is a risk of getting sent off-course to node {{MapRoute|B|red}}. It is advised to refresh the game in this case. | ||
| + | | Quest = | ||
| + | }} | ||
| + | |||
| + | {{FleetGuide | ||
| + | | Map = Light AO Fleet | ||
| + | | Fleet = '''2 CL, 1 CLT, 2 AV, 1 AO | ||
| + | | LOS = Cn4: 28 | ||
| + | | Route = {{MapRoute|B|red|C|blue|F|red|G|red|K|red}} | ||
| + | | AS = 35 | ||
| + | | Note = Using AOs like [[Hayasui]] or [[Yamashio Maru]], with a {{AviationPersonnel}} {{EquipmentLink|Skilled Carrier-based Aircraft Maintenance Personnel|text=SCAMP}} and Bombers may help them deal more damage | ||
| + | *AV should be armed with either [[SPB]] or [[SPF]]. | ||
| + | *CLT and CL capable of carrying {{EquipmentLink|Type A Kouhyouteki|Type C Kouhyouteki|Type D Kouhyouteki Kai (Kouryuu Kai)|text=Midget Submarine}} are preferred as they grant additional opening attacks | ||
| + | *While more expensive in comparison to other compositions, this is also more likely to reach the boss node. | ||
| + | | Quest = | ||
| + | }} | ||
| − | + | {{FleetGuide | |
| − | {{ | + | | Map = Medium AO Fleet |
| − | + | | Fleet = '''2 CL, 1 DD/AV, 2 AV, 1 AO | |
| − | + | | LOS = Cn4: 28 | |
| − | + | | Route = Random: | |
| − | + | *{{MapRoute|F|red|G|red|K|red}} | |
| − | + | *{{MapRoute|B|red|C|blue|F|red|G|red|K|red}} | |
| − | + | | AS = 35 | |
| − | + | | Note = Using AOs like [[Hayasui]] or [[Yamashio Maru]], with a {{AviationPersonnel}} {{EquipmentLink|Skilled Carrier-based Aircraft Maintenance Personnel|text=SCAMP}} and Bombers may help them deal more damage | |
| − | + | *AV should be armed with either [[SPB]] or [[SPF]]. | |
| − | + | *While more expensive in comparison to other compositions, this is also more likely to reach the boss node. | |
| − | + | | Quest = | |
| − | | | ||
| − | | | ||
| − | |||
| − | |||
| − | |||
| − | |||
| − | |||
| − | |||
| − | | | ||
| − | |||
| − | | | ||
| − | |||
| − | |||
| − | |||
| − | |||
| − | |||
| − | |||
| − | |||
| − | |||
| − | |||
| − | |||
| − | |||
| − | |||
| − | |||
| − | |||
| − | |||
| − | |||
| − | |||
| − | |||
| − | |||
| − | |||
| − | |||
| − | |||
| − | |||
| − | |||
| − | |||
| − | |||
| − | |||
| − | |||
| − | |||
| − | |||
| − | |||
| − | |||
| − | |||
| − | |||
| − | |||
| − | |||
| − | |F | ||
| − | | | ||
| − | | | ||
| − | | | ||
| − | | | ||
| − | | | ||
| − | | | ||
| − | | | ||
| − | | | ||
| − | | | ||
| − | |F | ||
| − | |||
| − | |||
| − | | | ||
| − | |||
| − | |||
| − | |||
| − | |||
| − | |G | ||
| − | | | ||
| − | | | ||
| − | | | ||
| − | | | ||
| − | | | ||
| − | | | ||
| − | | | ||
| − | |||
| − | |||
| − | |||
| − | |||
| − | |||
| − | |||
| − | |||
| − | |||
| − | |||
| − | |||
| − | |||
| − | |||
| − | |||
| − | |||
| − | |||
| − | |||
| − | |||
| − | |||
| − | |||
| − | |||
| − | |||
| − | |||
| − | |||
| − | |||
| − | |||
| − | |||
| − | |||
| − | |||
| − | |||
| − | |||
| − | |||
| − | |||
| − | |||
| − | |||
| − | |||
| − | |||
| − | |||
| − | |||
| − | |||
| − | |||
| − | |||
| − | |||
| − | |||
| − | |||
| − | |||
| − | |||
| − | |||
| − | |||
| − | |||
| − | |||
| − | |||
| − | |||
| − | | | ||
| − | |||
| − | |||
| − | |||
| − | |||
| − | |||
| − | |||
| − | |||
| − | |||
| − | |||
| − | |||
| − | |||
| − | |||
}} | }} | ||
| − | {{ | + | ===Resource Nodes=== |
| + | {{MapRoute|J|green}} is a "Special Resource Node" rewarding ammo {{Ammo}}. | ||
| + | *''See [[Resource Node|here]] for more details. | ||
| + | |||
| + | {{Map/Footer|3-5| | ||
| + | |||
| + | |enemycompsnotes= | ||
| + | |||
| + | |shipdropnotes= | ||
| + | |||
| + | }} | ||
Latest revision as of 09:00, 8 February 2025
World 3-5 Extra Operation: 北方AL海域 - AL Area in Northern Sea

| Strategy Name | 北方海域戦闘哨戒 Northern Sea Combat Patrol |
|---|---|
| Difficulty | ☆ ☆ ☆ ☆ ☆ ☆ ☆ ☆ ☆ |
| Item | |
| Strategy Content | 北方海域に敵増援の動きがある。中規模の水上打撃部隊を派遣し、敵増援を捕捉、これを撃破せよ! There is a movement of enemy reinforcements to the northern sea. Dispatch a medium size fleet, intercept the enemy reinforcements, and destroy it! |
| 3-5 Unlocking & Progression | ||||
|---|---|---|---|---|
| Unlock conditions | 3-5 is unlocked after clearing 3-4 | |||
| Clear conditions | To clear the map: the boss's flagship must be sunk 4 times | |||
| Clearing rewards | 150 | |||
| Map reset | Resets at midnight JST at the beginning of every month | |||
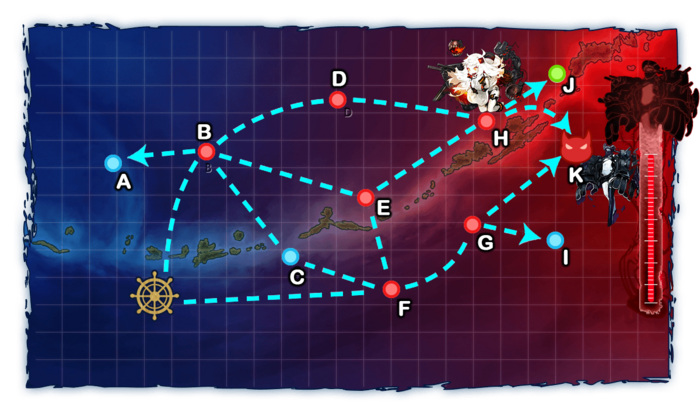
Stage Guide
| 3-5 Branching Rules | ||
|---|---|---|
| Nodes | Rules | |
| Start | B |
|
F |
| |
B |
A |
|
C |
| |
D |
| |
E |
| |
E |
H |
|
F |
E |
|
G |
| |
G |
I |
|
K | ||
H |
J |
|
K |
Have LoS > 40 (Cn4) AND do not meet the requirements to go to node J | |
Tips
The map will stay in Last Dance once cleared, until the next month's reset. Therefore, it is recommended to do quests during pre-clear for an easier time, as doing them post-clear can make the job harder.
Node H is an installation node, where ![]() Balloons can be deployed.
Balloons can be deployed.
Routes passing through node E are not recommended, as they require awkward compositions (either 1 CL, 2 DD in a heavy fleet or 1 BB/CV in a light one), the node has two Ru-Flags that can potentially damage any of the ships.
This map is the best spot to farm Maruyu drops (see here).
Recommended Fleets
| True-South route | ||||
|---|---|---|---|---|
| Fleet | 1 CL/AV, 5 DD | |||
| LoS | Speed | |||
| Cn4: 28 | Any | |||
| RouteNode Types: BLUE: Empty/Choice RED: Battle GREEN: Resource/TP VIOLET: Maelstrom PURPLE: Night Battle PINK: Air Raid/Battle ORANGE: Enemy Ambush/ASS |
F G K | |||
| Fleet Notes | This is the strongest possible composition that is guaranteed to reach the boss via this route, assuming LoS requirements are met. It is recommended to try the south route with this composition first.
| |||
| Air State | AD | AP | AS | AS+ |
| 11 | 16 | 35 | 70 | |
| Torpedo Squadron | ||||
|---|---|---|---|---|
| Fleet | "Torpedo Squadron": 1 CL (flagship), 5 DD | |||
| LoS | Speed | |||
| Cn4: 28 | Any | |||
| RouteNode Types: BLUE: Empty/Choice RED: Battle GREEN: Resource/TP VIOLET: Maelstrom PURPLE: Night Battle PINK: Air Raid/Battle ORANGE: Enemy Ambush/ASS |
F G K | |||
| Fleet Notes | This solution requires more advanced gears, and might be out of reach of new players. It is required to bring an
The best comp for farming boss node, having the highest pass rate thanks to the usage of ETSCF in case a ship got heavily damaged. The Evacuation mechanic of the ETSCF should be used if needed, with no risk on the routing outside of LoS. | |||
| Air State | AD | AP | AS | AS+ |
| 11 | 16 | 35 | 70 | |

| North Route | ||||
|---|---|---|---|---|
| Fleet | 3 BB(V)/CV(B/L), 3 CA(V)/CLT/SS(V) | |||
| LoS | Speed | |||
| Cn4: 40 | Any | |||
| RouteNode Types: BLUE: Empty/Choice RED: Battle GREEN: Resource/TP VIOLET: Maelstrom PURPLE: Night Battle PINK: Air Raid/Battle ORANGE: Enemy Ambush/ASS |
B D H K | |||
| Fleet Notes | Ships that can activate Anti-Air Rocket Barrage or are specialized in AACI can be used to reduce enemy airstrike damage on the way to the boss node.
| |||
| Air State | AD | AP | AS | AS+ |
| 113 | 170 | 381 | 762 | |
| South Route | ||||
|---|---|---|---|---|
| Fleet | 1 CL, 4 DD, 1 AV 2 CL, 2 DD, 2 AV 2-3 CL, 3-4 AV | |||
| LoS | Speed | |||
| Cn4: 28 | Any | |||
| RouteNode Types: BLUE: Empty/Choice RED: Battle GREEN: Resource/TP VIOLET: Maelstrom PURPLE: Night Battle PINK: Air Raid/Battle ORANGE: Enemy Ambush/ASS |
Random (based on the number of DD):
| |||
| Fleet Notes | Sacrifices guaranteed routing, but in exchange for opening strikes, and the possibility of AP/AS at Node G on the final clear.
| |||
| Air State | AD | AP | AS | AS+ |
| 11 | 16 | 35 | 70 | |
| Light AO Fleet | ||||
|---|---|---|---|---|
| Fleet | 2 CL, 1 CLT, 2 AV, 1 AO | |||
| LoS | Speed | |||
| Cn4: 28 | Any | |||
| RouteNode Types: BLUE: Empty/Choice RED: Battle GREEN: Resource/TP VIOLET: Maelstrom PURPLE: Night Battle PINK: Air Raid/Battle ORANGE: Enemy Ambush/ASS |
B C F G K | |||
| Fleet Notes | Using AOs like Hayasui or Yamashio Maru, with a 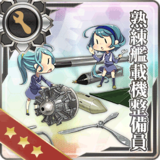 and Bombers may help them deal more damage and Bombers may help them deal more damage
| |||
| Air State | AD | AP | AS | AS+ |
| 11 | 16 | 35 | 70 | |

| Medium AO Fleet | ||||
|---|---|---|---|---|
| Fleet | 2 CL, 1 DD/AV, 2 AV, 1 AO | |||
| LoS | Speed | |||
| Cn4: 28 | Any | |||
| RouteNode Types: BLUE: Empty/Choice RED: Battle GREEN: Resource/TP VIOLET: Maelstrom PURPLE: Night Battle PINK: Air Raid/Battle ORANGE: Enemy Ambush/ASS |
Random:
| |||
| Fleet Notes | Using AOs like Hayasui or Yamashio Maru, with a and Bombers may help them deal more damage
| |||
| Air State | AD | AP | AS | AS+ |
| 11 | 16 | 35 | 70 | |
Resource Nodes
J is a "Special Resource Node" rewarding ammo ![]() .
.
- See here for more details.
Enemy Compositions
| # | Empty Node | ||
|---|---|---|---|
| A | 気のせいだった。/敵影を見ず。/穏やかな海です。/穏やかな海峡です。/警戒が必要です。/静かな海です。 Must be my imagination./No enemy spotted./Calm seas./Calm straits./Be alert./Peaceful seas. | ||
| # | Empty Node | ||
| # | Enemy Form. |
Base EXP | Normal Battle Node | AD/AP AS/AS+ |
|---|---|---|---|---|
| B | Line Ahead HQ Lvl 100 - 120 |
300 | 0/0 0/0 | |
| Line Ahead HQ Lvl 1 - 99 |
300 | 0/0 0/0 | ||
| Line Ahead Double Line HQ Lvl 1-120 |
300 | 0/0 0/0 | ||
| # | Enemy Form. |
Base EXP | Normal Battle Node | AD/AP AS/AS+ |
| # | Empty Node | ||
|---|---|---|---|
| C | 気のせいだった。/敵影を見ず。/穏やかな海です。/穏やかな海峡です。/警戒が必要です。/静かな海です。 Must be my imagination./No enemy spotted./Calm seas./Calm straits./Be alert./Peaceful seas. | ||
| # | Empty Node | ||
| # | Enemy Form. |
Base EXP | Normal Battle Node | AD/AP AS/AS+ |
|---|---|---|---|---|
| D | Diamond HQ Lvl 90 - 120 |
430 | 38/75 168/336 | |
| Diamond HQ Lvl 90 - 120 |
450 | 72/143 321/642 | ||
| Diamond HQ Lvl 1 - 89 |
400 | 38/75 168/336 | ||
| Diamond HQ Lvl 1 - 89 |
430 | 63/125 279/558 | ||
| Diamond HQ Lvl 1 - 120 |
410 | 38/75 168/336 | ||
| # | Enemy Form. |
Base EXP | Normal Battle Node | AD/AP AS/AS+ |
| # | Enemy Form. |
Base EXP | Normal Battle Node | AD/AP AS/AS+ |
|---|---|---|---|---|
| E | Double Line HQ Lvl 85 - 120 |
400 | 0/0 0/0 | |
| Double Line HQ Lvl 85 - 120 (Final)
|
400 | 8/16 35/69 | ||
| Double Line HQ Lvl 1 - 84 (Final)
|
400 | 8/16 35/69 | ||
| Double Line HQ Lvl 1 - 120 |
400 | 0/0 0/0 | ||
| # | Enemy Form. |
Base EXP | Normal Battle Node | AD/AP AS/AS+ |
| # | Enemy Form. |
Base EXP | Normal Battle Node | AD/AP AS/AS+ |
|---|---|---|---|---|
| F | Line Ahead HQ Lvl 85 - 120 |
340 | 0/0 0/0 | |
| Line Ahead HQ Lvl 85 - 120 (Final)
|
360 | 0/0 0/0 | ||
| Line Ahead HQ Lvl 1 - 84 |
310 | 0/0 0/0 | ||
| Line Ahead HQ Lvl 1 - 120 |
320 | 0/0 0/0 | ||
| # | Enemy Form. |
Base EXP | Normal Battle Node | AD/AP AS/AS+ |
| # | Enemy Form. |
Base EXP | Normal Battle Node | AD/AP AS/AS+ |
|---|---|---|---|---|
| G | Line Ahead Double Line HQ Lvl 1 - 120 |
400 | 0/0 0/0 | |
| Diamond HQ Lvl 100 - 120 (Final)
|
420 | 8/16 35/69 | ||
| Double Line HQ Lvl 1 - 99 |
390 | 0/0 0/0 | ||
| Diamond HQ Lvl 1 - 99 (Final)
|
410 | 8/16 35/69 | ||
| # | Enemy Form. |
Base EXP | Normal Battle Node | AD/AP AS/AS+ |
| # | Enemy Form. |
Base EXP | Normal Battle Node | AD/AP AS/AS+ |
|---|---|---|---|---|
| H | Diamond HQ Lvl 85 - 120 |
600 | 45/90 201/402 | |
| Diamond HQ Lvl 85 - 120 |
600 | 74/148 332/663 | ||
| Diamond HQ Lvl 85 - 120 (Final)
|
600 | 85/170 381/762 | ||
| Diamond HQ Lvl 1 - 84 |
600 | 44/87 195/390 | ||
| Diamond HQ Lvl 1 - 84 |
600 | 73/145 326/651 | ||
| Diamond HQ Lvl 1 - 84 (Final)
|
600 | 84/167 375/750 | ||
| # | Enemy Form. |
Base EXP | Normal Battle Node | AD/AP AS/AS+ |
| # | Empty Node | ||
|---|---|---|---|
| I | 気のせいだった。/敵影を見ず。/穏やかな海です。/穏やかな海峡です。/警戒が必要です。/静かな海です。 Must be my imagination./No enemy spotted./Calm seas./Calm straits./Be alert./Peaceful seas. | ||
| # | Empty Node | ||
| # | Resource Node | ||
|---|---|---|---|
| J | Gained 50 | ||
| # | Resource Node | ||
| # | Enemy Form. |
Base EXP | Boss Battle Node | AD/AP AS/AS+ |
|---|---|---|---|---|
| K | Double Line HQ Lvl 90 - 120 |
500 | 0/0 0/0 | |
| Line Ahead HQ Lvl 90 - 120 (Final)
|
550 | 0/0 0/0 | ||
| Double Line HQ Lvl 1 - 89 |
500 | 0/0 0/0 | ||
| Line Ahead HQ Lvl 1 - 89 (Final)
|
? | 0/0 0/0 | ||
| Line Ahead HQ Lvl 1 - 120 |
520 | 0/0 0/0 | ||
| # | Enemy Form. |
Base EXP | Boss Battle Node | AD/AP AS/AS+ |
Ship Drops
| Ship drops | |||||||||||||||||||||||||||||||||||||||||||||||||||||||||||||||||||||||||||||||||||||||||||||||||||
|---|---|---|---|---|---|---|---|---|---|---|---|---|---|---|---|---|---|---|---|---|---|---|---|---|---|---|---|---|---|---|---|---|---|---|---|---|---|---|---|---|---|---|---|---|---|---|---|---|---|---|---|---|---|---|---|---|---|---|---|---|---|---|---|---|---|---|---|---|---|---|---|---|---|---|---|---|---|---|---|---|---|---|---|---|---|---|---|---|---|---|---|---|---|---|---|---|---|---|---|
| Type | Ship? | B | D | E | F | G | H | K | |||||||||||||||||||||||||||||||||||||||||||||||||||||||||||||||||||||||||||||||||||||||||||
| DD | Amatsukaze | ✔️ | |||||||||||||||||||||||||||||||||||||||||||||||||||||||||||||||||||||||||||||||||||||||||||||||||
| DD | Tanikaze | ✔️ | ✔️ | ✔️ | |||||||||||||||||||||||||||||||||||||||||||||||||||||||||||||||||||||||||||||||||||||||||||||||
| DD | Kazagumo | ✔️ | |||||||||||||||||||||||||||||||||||||||||||||||||||||||||||||||||||||||||||||||||||||||||||||||||
| SS | Maruyu | ✔️ | |||||||||||||||||||||||||||||||||||||||||||||||||||||||||||||||||||||||||||||||||||||||||||||||||
| AR | Akashi | ✔️ | ✔️ | ||||||||||||||||||||||||||||||||||||||||||||||||||||||||||||||||||||||||||||||||||||||||||||||||
| DD | Yamagumo | ✔️ | |||||||||||||||||||||||||||||||||||||||||||||||||||||||||||||||||||||||||||||||||||||||||||||||||
| DD | Akigumo | ✔️ | |||||||||||||||||||||||||||||||||||||||||||||||||||||||||||||||||||||||||||||||||||||||||||||||||
| DD | Naganami | ✔️ | |||||||||||||||||||||||||||||||||||||||||||||||||||||||||||||||||||||||||||||||||||||||||||||||||
| DD | Shimakaze | ✔️ | |||||||||||||||||||||||||||||||||||||||||||||||||||||||||||||||||||||||||||||||||||||||||||||||||
| CL | Kitakami | ✔️ | |||||||||||||||||||||||||||||||||||||||||||||||||||||||||||||||||||||||||||||||||||||||||||||||||
| CL | Ooi | ✔️ | |||||||||||||||||||||||||||||||||||||||||||||||||||||||||||||||||||||||||||||||||||||||||||||||||
| CL | Nagara | ✔️ | |||||||||||||||||||||||||||||||||||||||||||||||||||||||||||||||||||||||||||||||||||||||||||||||||
| CL | Kinu | ✔️ | ✔️ | ✔️ | ✔️ | ✔️ | ✔️ | ||||||||||||||||||||||||||||||||||||||||||||||||||||||||||||||||||||||||||||||||||||||||||||
| CL | Abukuma | ✔️ | ✔️ | ✔️ | ✔️ | ✔️ | ✔️ | ||||||||||||||||||||||||||||||||||||||||||||||||||||||||||||||||||||||||||||||||||||||||||||
| CL | Sendai | ✔️ | |||||||||||||||||||||||||||||||||||||||||||||||||||||||||||||||||||||||||||||||||||||||||||||||||
| CA | Kinugasa | ✔️ | |||||||||||||||||||||||||||||||||||||||||||||||||||||||||||||||||||||||||||||||||||||||||||||||||
| CA | Myoukou | ✔️ | |||||||||||||||||||||||||||||||||||||||||||||||||||||||||||||||||||||||||||||||||||||||||||||||||
| CA | Takao | ✔️ | ✔️ | ✔️ | ✔️ | ✔️ | ✔️ | ✔️ | |||||||||||||||||||||||||||||||||||||||||||||||||||||||||||||||||||||||||||||||||||||||||||
| CA | Atago | ✔️ | |||||||||||||||||||||||||||||||||||||||||||||||||||||||||||||||||||||||||||||||||||||||||||||||||
| CA | Mogami | ✔️ | |||||||||||||||||||||||||||||||||||||||||||||||||||||||||||||||||||||||||||||||||||||||||||||||||
| CA | Tone | ✔️ | |||||||||||||||||||||||||||||||||||||||||||||||||||||||||||||||||||||||||||||||||||||||||||||||||
| CA | Chikuma | ✔️ | |||||||||||||||||||||||||||||||||||||||||||||||||||||||||||||||||||||||||||||||||||||||||||||||||
| CVL | Ryuujou | ✔️ | ✔️ | ✔️ | ✔️ | ✔️ | ✔️ | ✔️ | |||||||||||||||||||||||||||||||||||||||||||||||||||||||||||||||||||||||||||||||||||||||||||
| CVL | Shouhou | ✔️ | |||||||||||||||||||||||||||||||||||||||||||||||||||||||||||||||||||||||||||||||||||||||||||||||||
| CVL | Hiyou | ✔️ | |||||||||||||||||||||||||||||||||||||||||||||||||||||||||||||||||||||||||||||||||||||||||||||||||
| CVL | Junyou | ✔️ | ✔️ | ✔️ | ✔️ | ✔️ | ✔️ | ✔️ | |||||||||||||||||||||||||||||||||||||||||||||||||||||||||||||||||||||||||||||||||||||||||||
| FBB | Kongou | ✔️ | |||||||||||||||||||||||||||||||||||||||||||||||||||||||||||||||||||||||||||||||||||||||||||||||||
| FBB | Hiei | ✔️ | |||||||||||||||||||||||||||||||||||||||||||||||||||||||||||||||||||||||||||||||||||||||||||||||||
| FBB | Haruna | ✔️ | |||||||||||||||||||||||||||||||||||||||||||||||||||||||||||||||||||||||||||||||||||||||||||||||||
| FBB | Kirishima | ✔️ | |||||||||||||||||||||||||||||||||||||||||||||||||||||||||||||||||||||||||||||||||||||||||||||||||
| BB | Fusou | ✔️ | |||||||||||||||||||||||||||||||||||||||||||||||||||||||||||||||||||||||||||||||||||||||||||||||||
| BB | Yamashiro | ✔️ | |||||||||||||||||||||||||||||||||||||||||||||||||||||||||||||||||||||||||||||||||||||||||||||||||
| BB | Ise | ✔️ | |||||||||||||||||||||||||||||||||||||||||||||||||||||||||||||||||||||||||||||||||||||||||||||||||
| BB | Hyuuga | ✔️ | |||||||||||||||||||||||||||||||||||||||||||||||||||||||||||||||||||||||||||||||||||||||||||||||||
| SS | I-8 | ✔️ | ✔️ | ✔️ | |||||||||||||||||||||||||||||||||||||||||||||||||||||||||||||||||||||||||||||||||||||||||||||||
| SS | I-19 | ✔️ | ✔️ | ✔️ | ✔️ | ✔️ | |||||||||||||||||||||||||||||||||||||||||||||||||||||||||||||||||||||||||||||||||||||||||||||
| SS | I-58 | ✔️ | ✔️ | ✔️ | ✔️ | ✔️ | |||||||||||||||||||||||||||||||||||||||||||||||||||||||||||||||||||||||||||||||||||||||||||||
| DD | Mutsuki | ✔️ | |||||||||||||||||||||||||||||||||||||||||||||||||||||||||||||||||||||||||||||||||||||||||||||||||
| DD | Kisaragi | ✔️ | |||||||||||||||||||||||||||||||||||||||||||||||||||||||||||||||||||||||||||||||||||||||||||||||||
| DD | Satsuki | ✔️ | |||||||||||||||||||||||||||||||||||||||||||||||||||||||||||||||||||||||||||||||||||||||||||||||||
| DD | Fumizuki | ✔️ | |||||||||||||||||||||||||||||||||||||||||||||||||||||||||||||||||||||||||||||||||||||||||||||||||
| DD | Nagatsuki | ✔️ | |||||||||||||||||||||||||||||||||||||||||||||||||||||||||||||||||||||||||||||||||||||||||||||||||
| DD | Kikuzuki | ✔️ | |||||||||||||||||||||||||||||||||||||||||||||||||||||||||||||||||||||||||||||||||||||||||||||||||
| DD | Mikazuki | ✔️ | |||||||||||||||||||||||||||||||||||||||||||||||||||||||||||||||||||||||||||||||||||||||||||||||||
| DD | Mochizuki | ✔️ | |||||||||||||||||||||||||||||||||||||||||||||||||||||||||||||||||||||||||||||||||||||||||||||||||
| DD | Fubuki | ✔️ | |||||||||||||||||||||||||||||||||||||||||||||||||||||||||||||||||||||||||||||||||||||||||||||||||
| DD | Ayanami | ✔️ | |||||||||||||||||||||||||||||||||||||||||||||||||||||||||||||||||||||||||||||||||||||||||||||||||
| DD | Oboro | ✔️ | |||||||||||||||||||||||||||||||||||||||||||||||||||||||||||||||||||||||||||||||||||||||||||||||||
| DD | Akebono | ✔️ | ✔️ | ✔️ | ✔️ | ✔️ | ✔️ | ✔️ | |||||||||||||||||||||||||||||||||||||||||||||||||||||||||||||||||||||||||||||||||||||||||||
| DD | Sazanami | ✔️ | ✔️ | ✔️ | ✔️ | ✔️ | ✔️ | ✔️ | |||||||||||||||||||||||||||||||||||||||||||||||||||||||||||||||||||||||||||||||||||||||||||
| DD | Ushio | ✔️ | ✔️ | ✔️ | ✔️ | ✔️ | ✔️ | ✔️ | |||||||||||||||||||||||||||||||||||||||||||||||||||||||||||||||||||||||||||||||||||||||||||
| DD | Akatsuki | ✔️ | ✔️ | ✔️ | ✔️ | ✔️ | ✔️ | ✔️ | |||||||||||||||||||||||||||||||||||||||||||||||||||||||||||||||||||||||||||||||||||||||||||
| DD | Hibiki | ✔️ | ✔️ | ✔️ | ✔️ | ✔️ | ✔️ | ||||||||||||||||||||||||||||||||||||||||||||||||||||||||||||||||||||||||||||||||||||||||||||
| DD | Ikazuchi | ✔️ | ✔️ | ✔️ | ✔️ | ✔️ | ✔️ | ||||||||||||||||||||||||||||||||||||||||||||||||||||||||||||||||||||||||||||||||||||||||||||
| DD | Inazuma | ✔️ | ✔️ | ✔️ | ✔️ | ✔️ | ✔️ | ||||||||||||||||||||||||||||||||||||||||||||||||||||||||||||||||||||||||||||||||||||||||||||
| DD | Hatsuharu | ✔️ | ✔️ | ✔️ | ✔️ | ✔️ | ✔️ | ||||||||||||||||||||||||||||||||||||||||||||||||||||||||||||||||||||||||||||||||||||||||||||
| DD | Nenohi | ✔️ | ✔️ | ✔️ | ✔️ | ✔️ | ✔️ | ||||||||||||||||||||||||||||||||||||||||||||||||||||||||||||||||||||||||||||||||||||||||||||
| DD | Wakaba | ✔️ | ✔️ | ✔️ | ✔️ | ✔️ | ✔️ | ||||||||||||||||||||||||||||||||||||||||||||||||||||||||||||||||||||||||||||||||||||||||||||
| DD | Hatsushimo | ✔️ | ✔️ | ✔️ | ✔️ | ✔️ | ✔️ | ||||||||||||||||||||||||||||||||||||||||||||||||||||||||||||||||||||||||||||||||||||||||||||
| CL | Tenryuu | ✔️ | |||||||||||||||||||||||||||||||||||||||||||||||||||||||||||||||||||||||||||||||||||||||||||||||||
| CL | Tatsuta | ✔️ | |||||||||||||||||||||||||||||||||||||||||||||||||||||||||||||||||||||||||||||||||||||||||||||||||
| CL | Kuma | ✔️ | |||||||||||||||||||||||||||||||||||||||||||||||||||||||||||||||||||||||||||||||||||||||||||||||||
| CL | Tama | ✔️ | ✔️ | ✔️ | ✔️ | ✔️ | ✔️ | ✔️ | |||||||||||||||||||||||||||||||||||||||||||||||||||||||||||||||||||||||||||||||||||||||||||
| CL | Kiso | ✔️ | ✔️ | ✔️ | ✔️ | ✔️ | ✔️ | ✔️ | |||||||||||||||||||||||||||||||||||||||||||||||||||||||||||||||||||||||||||||||||||||||||||
| CL | Isuzu | ✔️ | |||||||||||||||||||||||||||||||||||||||||||||||||||||||||||||||||||||||||||||||||||||||||||||||||
| CL | Natori | ✔️ | |||||||||||||||||||||||||||||||||||||||||||||||||||||||||||||||||||||||||||||||||||||||||||||||||
| CL | Yura | ✔️ | |||||||||||||||||||||||||||||||||||||||||||||||||||||||||||||||||||||||||||||||||||||||||||||||||
| CL | Jintsuu | ✔️ | |||||||||||||||||||||||||||||||||||||||||||||||||||||||||||||||||||||||||||||||||||||||||||||||||
| CL | Naka | ✔️ | |||||||||||||||||||||||||||||||||||||||||||||||||||||||||||||||||||||||||||||||||||||||||||||||||
| CA | Furutaka | ✔️ | |||||||||||||||||||||||||||||||||||||||||||||||||||||||||||||||||||||||||||||||||||||||||||||||||
| CA | Kako | ✔️ | |||||||||||||||||||||||||||||||||||||||||||||||||||||||||||||||||||||||||||||||||||||||||||||||||
| CA | Aoba | ✔️ | |||||||||||||||||||||||||||||||||||||||||||||||||||||||||||||||||||||||||||||||||||||||||||||||||
| CA | Nachi | ✔️ | ✔️ | ✔️ | ✔️ | ✔️ | ✔️ | ✔️ | |||||||||||||||||||||||||||||||||||||||||||||||||||||||||||||||||||||||||||||||||||||||||||
| CA | Ashigara | ✔️ | |||||||||||||||||||||||||||||||||||||||||||||||||||||||||||||||||||||||||||||||||||||||||||||||||
| CA | Haguro | ✔️ | |||||||||||||||||||||||||||||||||||||||||||||||||||||||||||||||||||||||||||||||||||||||||||||||||
| CA | Maya | ✔️ | ✔️ | ✔️ | ✔️ | ✔️ | ✔️ | ✔️ | |||||||||||||||||||||||||||||||||||||||||||||||||||||||||||||||||||||||||||||||||||||||||||
| CA | Choukai | ✔️ | |||||||||||||||||||||||||||||||||||||||||||||||||||||||||||||||||||||||||||||||||||||||||||||||||
| CVL | Houshou | ✔️ | |||||||||||||||||||||||||||||||||||||||||||||||||||||||||||||||||||||||||||||||||||||||||||||||||
| SS | I-168 | ✔️ | ✔️ | ✔️ | ✔️ | ✔️ | |||||||||||||||||||||||||||||||||||||||||||||||||||||||||||||||||||||||||||||||||||||||||||||