- Welcome to the Kancolle Wiki!
- If you have any questions regarding site content, account registration, etc., please visit the KanColle Wiki Discord
Difference between revisions of "World 7/7-2"
< World 7
Jump to navigation
Jump to search
Jigaraphale (talk | contribs) |
|||
| (5 intermediate revisions by the same user not shown) | |||
| Line 1: | Line 1: | ||
{{World/Hub}} | {{World/Hub}} | ||
| − | + | =World 7-2: タウイタウイ泊地沖 - Tawi-Tawi Anchorage Sea= | |
{{LabSortieworld | {{LabSortieworld | ||
| page = World 7/7-2 | | page = World 7/7-2 | ||
| Line 10: | Line 10: | ||
| item = {{fuel}} | | item = {{fuel}} | ||
| exp = varies | | exp = varies | ||
| − | | code = セレベス海戦闘哨戒 | + | | code = セレベス海戦闘哨戒<br>Celebes Sea Combat Patrol |
| jptext = 我が機動部隊の出撃拠点であるタウイタウイ泊地沖に敵戦力の跳梁が確認されている。哨戒を厳として、これらを制圧せよ! | | jptext = 我が機動部隊の出撃拠点であるタウイタウイ泊地沖に敵戦力の跳梁が確認されている。哨戒を厳として、これらを制圧せよ! | ||
| − | | entext = Our Naval Task Force has detected an enemy force closing in on Tawi-Tawi | + | | entext = Our Naval Task Force has detected an enemy force closing in on Tawi-Tawi Anchorage. Conduct a Combat patrol to take them out! |
| − | |||
| − | |||
| − | |||
| − | |||
| − | |||
| − | |||
}} | }} | ||
| − | |||
| − | |||
| − | |||
| − | |||
| − | |||
| − | |||
| − | |||
| − | |||
| − | |||
| − | |||
| − | |||
| − | |||
| − | + | {{MapUnlock | |
| + | | unlock= [[7-1]] HP bar | ||
| + | | clear= both phases must be cleared: | ||
*Phase 1: {{MapRoute|G|red}} boss requires 3 kills to clear | *Phase 1: {{MapRoute|G|red}} boss requires 3 kills to clear | ||
*Phase 2: {{MapRoute|M|red}} boss requires 4 kills to clear | *Phase 2: {{MapRoute|M|red}} boss requires 4 kills to clear | ||
| − | + | | reset= Resets at midnight JST at the beginning of every month | |
| + | }} | ||
===Stage Guide=== | ===Stage Guide=== | ||
| Line 80: | Line 65: | ||
*If the fleet contains 6 ships | *If the fleet contains 6 ships | ||
**Go to G if DE ≥ 3 | **Go to G if DE ≥ 3 | ||
| − | **Go to F if the fleet contains (F)BB(V), CV(L | + | **Go to F if the fleet contains (F)BB(V), CV(B/L), CLT or CA(V) '''AND''' Fail the LoS check ('''≤ 46 (Cn4)''') |
*Otherwise, G | *Otherwise, G | ||
}} | }} | ||
| Line 90: | Line 75: | ||
*Always node I if '''Fast+''' fleet | *Always node I if '''Fast+''' fleet | ||
*Meet '''ANY''' of the following requirements to go to H: | *Meet '''ANY''' of the following requirements to go to H: | ||
| − | ** Amount of (F)BB(V)+CV(L | + | ** Amount of (F)BB(V)+CV(B/L) ≥ 4 |
| − | ** Amount of (F)BB(V)+CV(L | + | ** Amount of (F)BB(V)+CV(B/L) ≥ 3 and fleet contains slow ship |
| − | *Random routing if Slow Fleet '''AND''' amount of (F)BB(V)+CV(L | + | *Random routing if Slow Fleet '''AND''' amount of (F)BB(V)+CV(B/L) = 2 |
* Otherwise, I. | * Otherwise, I. | ||
| Line 105: | Line 90: | ||
===Tips=== | ===Tips=== | ||
| − | + | The 1st normal map to feature 2 phases. | |
| + | *The 1st phase is [[ASW]] focused, similarly to [[1-5]] or [[7-1]]. | ||
| + | *The 2nd phase is more standard, featuring submarine, surface, and aerial warfare. | ||
| + | On post-clear, the enemy composition for the Boss Node {{MapRoute|M|red}} will be locked to the easiest comp (Formation 1), which contains Nu-class elite, Ne-class base, and Tsu-class base, until the next reset. | ||
| − | == | + | ==Phase 1 - Eliminate the Submarine Fleet== |
| − | + | The submarine boss fleet will usually consist of 3 SS, 1 Transport, and 2 DDs. | |
| − | * | + | *A ranks are enough to clear this phase, as only the flagship has to be sunk. |
| − | + | ===Recommended Fleets=== | |
| − | + | {{FleetGuide | |
| − | + | | Map = Short Route | |
| − | + | | Fleet = '''4 DD/DE<br>1 CVL, 3 DD'''<br>1 CL, 3 DD<br>2 CVL, 3 DE | |
| − | + | | Route = {{MapRoute|C|red|E|red|G|red}} | |
| − | + | | AS = 0 | |
| − | + | | Note = Any CVL should be preferably a [[CVE]]. | |
| − | + | Fleet will need to be [[ASW]]-focused, however, if requiring S ranks, using 1-2 ships with ASW/combat hybrid set-ups is required. | |
| − | + | *Having several [[OASW]] ships is strongly recommended. | |
| + | It may be advantageous to utilize the unique targeting of [[Suzuya Kou Kai Ni]] and [[Kumano Kou Kai Ni]] (focusing surface ships instead of SS). | ||
| + | | Quest = {{Q|Bq8}} | ||
| + | }} | ||
| − | == | + | ==Phase 2 - Eliminate the Carrier Fleet== |
| − | Boss Fleet consists of a Wo Flagship Kai along with a Nu-class Elite, Flagship or Flagship Kai variant, a Ne-class elite CA, a Tsu-class, and some | + | Boss Fleet consists of a Wo Flagship Kai along with a Nu-class Elite, Flagship or Flagship Kai variant, a Ne-class elite CA, a Tsu-class, and some DD. |
*Carefully managing the fleet's air power with strong planes can help either achieve AS or AP. | *Carefully managing the fleet's air power with strong planes can help either achieve AS or AP. | ||
**Using an [[AACI]] DD might be helpful for minimizing possible damage taken. | **Using an [[AACI]] DD might be helpful for minimizing possible damage taken. | ||
| − | |||
| − | + | ===Recommended Fleets=== | |
| − | ''' | + | {{FleetGuide |
| − | + | | Map = Short Route | |
| − | + | | Fleet = '''1 FBB, 1 CV(B), 1 CVL, 1 CAV, 2 DD | |
| − | + | | LOS = Cn4: 69 | |
| − | + | | Speed = Fast | |
| − | + | | Route = {{MapRoute|B|red|C|red|D|blue|I|red|M|red}} | |
| − | + | | AS = 359 | |
| + | | Note = Having a slow fleet will add an extra battle on Node {{MapRoute|H|pink}}. | ||
| + | Most battles will involve surface fleets including DD, CL, and some CA. | ||
| + | *Having some ASW capability can help on node {{MapRoute|C|red}}. | ||
| + | Using an FBB can make getting up to the boss node relatively easier, but the fleet will need to be all fast to reach the boss node. | ||
| + | | Quest = {{Q|Bq8}} | ||
| + | }} | ||
| + | |||
| + | {{FleetGuide | ||
| + | | Map = Longer Route | ||
| + | | Fleet = 1 (F)BB(V)/CV(B), 1 CV(B), 1 CVL/CLT, 1 CAV, 2 DD | ||
| + | | LOS = Cn4: 69 | ||
| + | | Speed = | ||
| + | | Route = {{MapRoute|A|violet|B|red|C|red|D|blue|I|red|M|red}} | ||
| + | | AS = 359 | ||
| + | | Note = A stronger fleet that just pass through 1 extra storm node. | ||
| + | *Having a slow fleet will add an extra battle on Node {{MapRoute|H|pink}}. | ||
| + | | Quest = | ||
| + | }} | ||
===Resource Nodes=== | ===Resource Nodes=== | ||
| Line 143: | Line 151: | ||
|enemycompsnotes= | |enemycompsnotes= | ||
| − | |||
| − | |||
}} | }} | ||
Latest revision as of 09:01, 8 February 2025
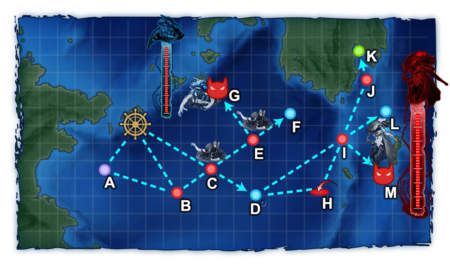
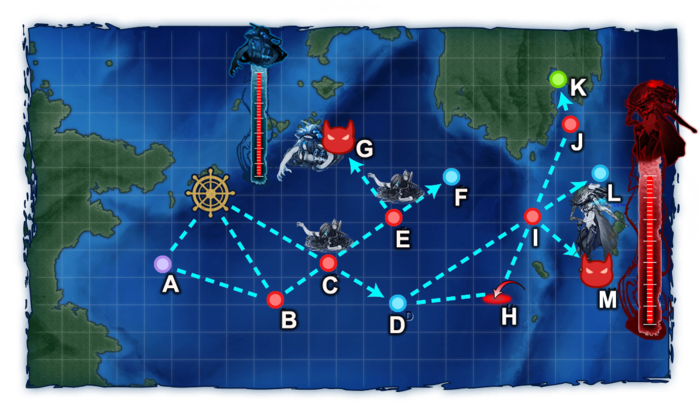
World 7-2: タウイタウイ泊地沖 - Tawi-Tawi Anchorage Sea


| 7-2 Unlocking & Progression | ||||
|---|---|---|---|---|
| Unlock conditions | 7-2 is unlocked after clearing 7-1 HP bar | |||
| Clear conditions | To clear the map: both phases must be cleared:
| |||
| Map reset | Resets at midnight JST at the beginning of every month | |||
Stage Guide
| 7-2 Branching Rules Phase 1 |
|---|
| 7-2 Branching Rules Phase 2 |
|---|
Tips
The 1st normal map to feature 2 phases.
- The 1st phase is ASW focused, similarly to 1-5 or 7-1.
- The 2nd phase is more standard, featuring submarine, surface, and aerial warfare.
On post-clear, the enemy composition for the Boss Node M will be locked to the easiest comp (Formation 1), which contains Nu-class elite, Ne-class base, and Tsu-class base, until the next reset.
Phase 1 - Eliminate the Submarine Fleet
The submarine boss fleet will usually consist of 3 SS, 1 Transport, and 2 DDs.
- A ranks are enough to clear this phase, as only the flagship has to be sunk.
Recommended Fleets
| ExpandShort Route |
|---|
Phase 2 - Eliminate the Carrier Fleet
Boss Fleet consists of a Wo Flagship Kai along with a Nu-class Elite, Flagship or Flagship Kai variant, a Ne-class elite CA, a Tsu-class, and some DD.
- Carefully managing the fleet's air power with strong planes can help either achieve AS or AP.
- Using an AACI DD might be helpful for minimizing possible damage taken.
Recommended Fleets
| ExpandShort Route |
|---|
| ExpandLonger Route |
|---|
Resource Nodes
K is a "Normal Resource Node" rewarding fuel ![]() .
.
- See here for more details.
Enemy CompositionsCollapse
7-2 A
| # | Maelstrom Node | ||
|---|---|---|---|
| A | Lost Normal | ||
| # | Maelstrom Node | ||
7-2 B: 深海任務部隊 前方侵入水雷戦隊 (PoiDB)
| # | Enemy Form. |
Base EXP | Normal Battle Node | AD/AP AS/AS+ |
|---|---|---|---|---|
| B | Line Ahead Double Line Echelon |
130 | 0/0 0/0 | |
| Line Ahead Double Line Echelon |
150 | 0/0 0/0 | ||
| Line Ahead Double Line Echelon |
200 | 0/0 0/0 | ||
| # | Enemy Form. |
Base EXP | Normal Battle Node | AD/AP AS/AS+ |
7-2 C: セレベス海方面哨戒潜水艦 I群 (PoiDB)
| # | Enemy Form. |
Base EXP | Normal Battle Node | AD/AP AS/AS+ |
|---|---|---|---|---|
| C | Line Abreast Echelon |
130 | 0/0 0/0 | |
| Line Abreast Echelon |
150 | 0/0 0/0 | ||
| Line Abreast Echelon |
150 | 0/0 0/0 | ||
| Line Abreast Echelon |
170 | 0/0 0/0 | ||
| # | Enemy Form. |
Base EXP | Normal Battle Node | AD/AP AS/AS+ |
7-2 D
| # | Empty Node | ||
|---|---|---|---|
| D | 気のせいだった。/敵影を見ず。/穏やかな海です。/穏やかな海峡です。/警戒が必要です。/静かな海です。 Must be my imagination./No enemy spotted./Calm seas./Calm straits./Be alert./Peaceful seas. | ||
| # | Empty Node | ||
7-2 E: セレベス海方面哨戒潜水艦 II群 (PoiDB)
| # | Enemy Form. |
Base EXP | Normal Battle Node | AD/AP AS/AS+ |
|---|---|---|---|---|
| E | Line Abreast Echelon |
100 | 0/0 0/0 | |
| Line Abreast Echelon |
120 | 0/0 0/0 | ||
| Line Abreast Echelon |
140 | 0/0 0/0 | ||
| Line Abreast Echelon |
160 | 0/0 0/0 | ||
| # | Enemy Form. |
Base EXP | Normal Battle Node | AD/AP AS/AS+ |
7-2 F
| # | Empty Node | ||
|---|---|---|---|
| F | 気のせいだった。/敵影を見ず。/穏やかな海です。/穏やかな海峡です。/警戒が必要です。/静かな海です。 Must be my imagination./No enemy spotted./Calm seas./Calm straits./Be alert./Peaceful seas. | ||
| # | Empty Node | ||
7-2 G: セレベス海方面 旗艦哨戒潜水艦 (PoiDB)
| # | Enemy Form. |
Base EXP | Boss Battle Node | AD/AP AS/AS+ |
|---|---|---|---|---|
| G | Echelon | 300 | 0/0 0/0 | |
| Echelon | 320 | 0/0 0/0 | ||
| Echelon | 340 | 0/0 0/0 | ||
| Echelon | 330 | 0/0 0/0 | ||
| Echelon | 350 | 0/0 0/0 | ||
| Echelon | 370 | 0/0 0/0 | ||
| # | Enemy Form. |
Base EXP | Boss Battle Node | AD/AP AS/AS+ |
7-2 H: 深海任務部隊 主力機動部隊群 (PoiDB)
| # | Enemy Form. |
Base EXP | Air Defense Node | AD/AP AS/AS+ |
|---|---|---|---|---|
| H | Diamond | 150 | 60/119 266/531 | |
| Diamond | 160 | 62/124 278/555 | ||
| Diamond | 170 | 62/124 278/555 | ||
| Diamond | 180 | 74/147 329/657 | ||
| Diamond | 190 | 76/152 341/681 | ||
| Diamond | 200 | 78/156 350/699 | ||
| Diamond | 210 | 84/167 374/747 | ||
| Diamond | 220 | 88/176 395/789 | ||
| # | Enemy Form. |
Base EXP | Air Defense Node | AD/AP AS/AS+ |
7-2 I: 深海任務部隊 前衛哨戒群 (PoiDB)
| # | Enemy Form. |
Base EXP | Normal Battle Node | AD/AP AS/AS+ |
|---|---|---|---|---|
| I | Line Ahead Echelon |
160 | 0/0 0/0 | |
| Line Ahead Echelon |
200 | 0/0 0/0 | ||
| Line Ahead Echelon |
220 | 0/0 0/0 | ||
| Line Ahead Echelon |
250 | 0/0 0/0 | ||
| # | Enemy Form. |
Base EXP | Normal Battle Node | AD/AP AS/AS+ |
7-2 J: 深海任務部隊 強襲揚陸部隊群 (PoiDB)
| # | Enemy Form. |
Base EXP | Normal Battle Node | AD/AP AS/AS+ |
|---|---|---|---|---|
| J | Line Ahead Double Line |
340 | 0/0 0/0 | |
| Line Ahead Double Line |
360 | 0/0 0/0 | ||
| Line Ahead | 380 | 0/0 0/0 | ||
| Double Line | 360 | 0/0 0/0 | ||
| Double Line | 380 | 0/0 0/0 | ||
| # | Enemy Form. |
Base EXP | Normal Battle Node | AD/AP AS/AS+ |
7-2 K
| # | Resource Node | ||
|---|---|---|---|
| K | Gained 25~40 | ||
| # | Resource Node | ||
7-2 L
| # | Empty Node | ||
|---|---|---|---|
| L | 気のせいだった。/敵影を見ず。/穏やかな海です。/穏やかな海峡です。/警戒が必要です。/静かな海です。 Must be my imagination./No enemy spotted./Calm seas./Calm straits./Be alert./Peaceful seas. | ||
| # | Empty Node | ||
7-2 M: 深海任務部隊 主力機動部隊群 (PoiDB)
| # | Enemy Form. |
Base EXP | Boss Battle Node | AD/AP AS/AS+ |
|---|---|---|---|---|
| M | Diamond | 500 | 60/119 266/531 | |
| Diamond | 510 | 60/119 266/531 | ||
| Diamond | 520 | 60/119 266/531 | ||
| Diamond | 530 | 66/131 293/585 | ||
| Diamond | 540 | 68/136 305/609 | ||
| Diamond | 550 | 70/140 314/627 | ||
| Diamond | 550 | 76/151 338/675 | ||
| Diamond | 580 | 80/160 359/717 | ||
| # | Enemy Form. |
Base EXP | Boss Battle Node | AD/AP AS/AS+ |
Ship Drops
This map currently has "limited-time" drops, see Drop List for more info.
- The below table contains limited-time drop data and may not be up to date.
☒ All drops (disabled, only rare drops)
| ExpandShip drops |
|---|
| ||