- Welcome to the Kancolle Wiki!
- If you have any questions regarding site content, account registration, etc., please visit the KanColle Wiki Discord
Difference between revisions of "World 5/5-2"
< World 5
Jump to navigation
Jump to search
Jigaraphale (talk | contribs) |
Jigaraphale (talk | contribs) |
||
| (11 intermediate revisions by 3 users not shown) | |||
| Line 1: | Line 1: | ||
{{World/Hub}} | {{World/Hub}} | ||
| − | + | =World 5-2: 珊瑚諸島沖 - The Coral Islands= | |
{{LabSortieworld | {{LabSortieworld | ||
| page = World 5/5-2 | | page = World 5/5-2 | ||
| Line 6: | Line 6: | ||
| item = {{ammo}} {{bauxite}} | | item = {{ammo}} {{bauxite}} | ||
| exp = 380 | | exp = 380 | ||
| − | | code = 珊瑚諸島沖海戦 | + | | code = 珊瑚諸島沖海戦<br>[[wikipedia:Battle_of_the_Coral_Sea|Coral Islands Naval Battle]] |
| jptext = MO作戦を実施する。空母機動部隊を展開し、南方海域に出没する敵機動部隊を叩け! | | jptext = MO作戦を実施する。空母機動部隊を展開し、南方海域に出没する敵機動部隊を叩け! | ||
| entext = We are executing Operation MO. Form a carrier battle group and crush the enemy task force! | | entext = We are executing Operation MO. Form a carrier battle group and crush the enemy task force! | ||
| − | |||
| − | |||
| − | |||
| − | |||
| − | |||
| − | |||
| − | |||
}} | }} | ||
| + | |||
| + | {{MapUnlock | ||
| + | | unlock= [[4-4]] HP bar and [[5-1]] | ||
| + | | clear= the boss's flagship must be sunk 4 times | ||
| + | | note= [[Support Expedition]]s are available on this map | ||
}} | }} | ||
| + | |||
===Stage Guide=== | ===Stage Guide=== | ||
{{MapBranchingTable | {{MapBranchingTable | ||
| Line 37: | Line 36: | ||
**'''FAST''' fleet '''AND''' one of the following conditions: | **'''FAST''' fleet '''AND''' one of the following conditions: | ||
***Fleet contains Shoukaku '''AND''' Zuikaku, 2 DD and 2 wildcards | ***Fleet contains Shoukaku '''AND''' Zuikaku, 2 DD and 2 wildcards | ||
| − | ***Fleet contains no CV(B), 2 CVL and 2 DD (''Exactly 2 CVL, no more no less, (F)BB(V) not allowed'') | + | ***Fleet contains no CV(B), 2 CVL, and 2 DD (''Exactly 2 CVL, no more no less, (F)BB(V) not allowed'') |
| − | ***Fleet contains 1 CVL, 2 DD and CA(V) | + | ***Fleet contains 1 CVL, 2 DD, and CA(V) |
|C -> E = | |C -> E = | ||
*Meet '''ANY''' of the following to '''FORCE''' E | *Meet '''ANY''' of the following to '''FORCE''' E | ||
**Fleet contains SS(V), DE and AV | **Fleet contains SS(V), DE and AV | ||
| − | **Fleet contains (F)BB(V), CV(B) or CLT ('''Ignored if the fleet contains Shoukaku, Zuikaku and 2 DDs''') | + | **Fleet contains (F)BB(V), CV(B) or CLT ('''Ignored if the fleet contains Shoukaku, Zuikaku, and 2 DDs''') |
**Fleet contains slow ship ('''Ignored if the fleet meets the historical requirement above''') | **Fleet contains slow ship ('''Ignored if the fleet meets the historical requirement above''') | ||
**Fleets that do not meet any conditions of going to D | **Fleets that do not meet any conditions of going to D | ||
| Line 51: | Line 50: | ||
**Fleet contains CL and DD only | **Fleet contains CL and DD only | ||
**Fleet contains [[Shouhou]], [[Yuubari]], DD = 2, CA+AO = 2, no CAV | **Fleet contains [[Shouhou]], [[Yuubari]], DD = 2, CA+AO = 2, no CAV | ||
| − | **Fleet contains Shouhou, 3 DD and one of the following | + | **Fleet contains Shouhou, 3 DD, and one of the following |
***AO = 2 | ***AO = 2 | ||
***CA = 1 '''and''' CL+AO = 1 | ***CA = 1 '''and''' CL+AO = 1 | ||
| − | **Fleet contains Yuubari, 2 DD and one of the following | + | **Fleet contains Yuubari, 2 DD, and one of the following |
***AO = 1 '''and''' CA+DD = 4 | ***AO = 1 '''and''' CA+DD = 4 | ||
***AO = 2 '''and''' CA+DD = 3 | ***AO = 2 '''and''' CA+DD = 3 | ||
| Line 66: | Line 65: | ||
* Meet '''ALL''' of the following requirements to guarantee routing to O: | * Meet '''ALL''' of the following requirements to guarantee routing to O: | ||
** Pass the LoS check : '''≥ 71''' (Cn2) | ** Pass the LoS check : '''≥ 71''' (Cn2) | ||
| − | ** Have ≤ 2 CV(B/L) | + | ** Have ≤ 2 CV(B/L) |
*Go to I if CV(B/L) + (F)BB(V) ≥ 5 | *Go to I if CV(B/L) + (F)BB(V) ≥ 5 | ||
| − | *Otherwise, random between I and O if | + | *Otherwise, random between I and O if LoS check is passed |
|G/resource -> J/resource, L = | |G/resource -> J/resource, L = | ||
| Line 81: | Line 80: | ||
*AO+CL+CA = 0 | *AO+CL+CA = 0 | ||
}} | }} | ||
| + | |||
| + | ===Historical Routing=== | ||
| + | {{/Historical_Ships}} | ||
===Tips=== | ===Tips=== | ||
| − | + | This map is based on the historical operation known as '''Operation MO'''. Ships that participated in this operation can be used here to obtain special routing on this map. | |
| − | |||
| − | |||
| − | |||
| − | |||
| − | |||
*Like [[5-1]], [[Standard Carrier Wo-Class]] Flagship also makes an appearance here, especially at pre-boss nodes. | *Like [[5-1]], [[Standard Carrier Wo-Class]] Flagship also makes an appearance here, especially at pre-boss nodes. | ||
**[[AACI]] is required to reach and kill the boss node consistently. | **[[AACI]] is required to reach and kill the boss node consistently. | ||
| Line 94: | Line 91: | ||
**Sinking [[Aircraft Carrier Demon]] can be a bit harder than sinking Wo Kai Flagship, therefore, do prepare good equipment and girls for better success rate. | **Sinking [[Aircraft Carrier Demon]] can be a bit harder than sinking Wo Kai Flagship, therefore, do prepare good equipment and girls for better success rate. | ||
| − | + | As every World 5 map, [[Support Expedition]]s are available to help clear the map, notably for harder quests. | |
===Recommended Fleets=== | ===Recommended Fleets=== | ||
| − | + | {{FleetGuide | |
| − | | | + | | Map = Historical Fleets |
| − | + | | Fleet = '''[[Shoukaku]], [[Zuikaku]], 2 (F)BB/CA(V), 2 DD'''<br>2 CV(B/L), 2 DD, 2 CA(V)<br>[[Yuubari]], 2 CVL, 3 CA(V) | |
| − | + | | LOS = Cn2: 71 | |
| − | + | | Speed = Fast (excepted Yuubari's comp) | |
| − | + | | Route = {{MapRoute|B|blue|C|pink|D|red|F|red|O|red}} | |
| − | + | | AS = 252 | |
| + | | Note = Heavier fleets have a chance to off-route to Node {{MapRoute|I|violet}}, which will significantly deplete your plane count due to the nature of that node. | ||
| + | | Quest = | ||
| + | }} | ||
| − | | | + | {{FleetGuide |
| − | + | | Map = Non-Historical Fleets | |
| − | + | | Fleet = 2 FBB/CA(V), 2 CV(B), 2 CA(V)/CL(T)/DD | |
| − | + | | LOS = Cn2: 71 | |
| − | + | | Route = {{MapRoute|B|blue|C|pink|E|red|F|red|O|red}} | |
| − | + | | AS = 252 | |
| + | | Note = Will pass through Node {{MapRoute|E|red}} instead of {{MapRoute|D|red}} compared to historical fleets, which is way tougher. | ||
| + | | Quest = | ||
| + | }} | ||
| + | ===Resource Nodes=== | ||
| + | {{MapRoute|G|green|J|green}} are "Normal Resource Nodes" rewarding respectively ammo {{Ammo}}, and bauxite {{Bauxite}}. | ||
| + | *''See [[Resource Node|here]] for more details. | ||
| − | ===SS and Carrier Exp | + | ====SS and Carrier Exp Farming==== |
The 1st enemy node being an Air Node, it's possible to take advantage of how it works to level up any SS(V) as well as "carriers" '''risk-free'''. | The 1st enemy node being an Air Node, it's possible to take advantage of how it works to level up any SS(V) as well as "carriers" '''risk-free'''. | ||
*All SS(V) won't take any damage on Node {{MapRoute|C|pink}}, so any SS(V) fleet can level up risk-free on this node. | *All SS(V) won't take any damage on Node {{MapRoute|C|pink}}, so any SS(V) fleet can level up risk-free on this node. | ||
| − | *If | + | *If possessing one or more {{EquipmentLink|12cm 30-tube Rocket Launcher Kai Ni}}, it is possible to take advantage of the [[AARB]] mechanic to also level up CV(B/L), BBV, CAV, and AV. |
| − | **By equipping one RLK2 on carriers, | + | **By equipping one RLK2 on carriers, passing a certain AA threshold, said carrier won't take any damage on the Air Node. |
**Having more than 1 RLK2 on the same ship decreases the AA threshold, making it possible to level up weaker carriers. | **Having more than 1 RLK2 on the same ship decreases the AA threshold, making it possible to level up weaker carriers. | ||
| − | *Once | + | *Once Node {{MapRoute|C|pink}} cleared , retreat to the base and repeat. |
*There is a random chance to off route to Node {{MapRoute|A|violet}}, losing some resources, but this is negligible. | *There is a random chance to off route to Node {{MapRoute|A|violet}}, losing some resources, but this is negligible. | ||
Latest revision as of 09:17, 8 February 2025
World 5-2: 珊瑚諸島沖 - The Coral Islands

| Strategy Name | 珊瑚諸島沖海戦 Coral Islands Naval Battle |
|---|---|
| Difficulty | ☆ ☆ ☆ ☆ ☆ ☆ ☆ ☆ ☆ |
| Item | |
| Strategy Content | MO作戦を実施する。空母機動部隊を展開し、南方海域に出没する敵機動部隊を叩け! We are executing Operation MO. Form a carrier battle group and crush the enemy task force! |
| 5-2 Unlocking & Progression | ||||
|---|---|---|---|---|
| Unlock conditions | 5-2 is unlocked after clearing 4-4 HP bar and 5-1 | |||
| Clear conditions | To clear the map: the boss's flagship must be sunk 4 times | |||
| Notes | Support Expeditions are available on this map | |||
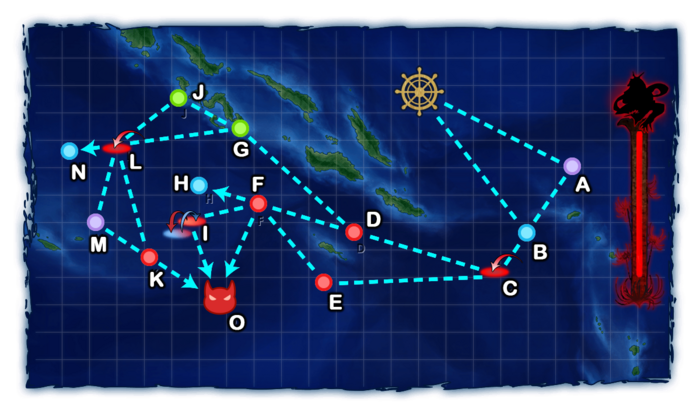
Stage Guide
| 5-2 Branching Rules | ||
|---|---|---|
| Nodes | Rules | |
| Start | A |
|
B | ||
C |
D |
|
E |
| |
D |
F |
|
G |
||
F |
H |
|
I |
| |
O | ||
G |
J |
|
L | ||
L |
K |
|
M |
| |
N |
| |
Historical Routing
Ships with special routing on the map:
| CV(B/L) | ||
|---|---|---|
| CL | ||
Tips
This map is based on the historical operation known as Operation MO. Ships that participated in this operation can be used here to obtain special routing on this map.
- Like 5-1, Standard Carrier Wo-Class Flagship also makes an appearance here, especially at pre-boss nodes.
- AACI is required to reach and kill the boss node consistently.
- The boss can be either a Wo Kai Flagship or an Aircraft Carrier Demon.
- Sinking Aircraft Carrier Demon can be a bit harder than sinking Wo Kai Flagship, therefore, do prepare good equipment and girls for better success rate.
As every World 5 map, Support Expeditions are available to help clear the map, notably for harder quests.
Recommended Fleets
| Historical Fleets | ||||
|---|---|---|---|---|
| Fleet | Shoukaku, Zuikaku, 2 (F)BB/CA(V), 2 DD 2 CV(B/L), 2 DD, 2 CA(V) Yuubari, 2 CVL, 3 CA(V) | |||
| LoS | Speed | |||
| Cn2: 71 | Fast (excepted Yuubari's comp) | |||
| RouteNode Types: BLUE: Empty/Choice RED: Battle GREEN: Resource/TP VIOLET: Maelstrom PURPLE: Night Battle PINK: Air Raid/Battle ORANGE: Enemy Ambush/ASS |
B C D F O | |||
| Fleet Notes | Heavier fleets have a chance to off-route to Node I, which will significantly deplete your plane count due to the nature of that node. | |||
| Air State | AD | AP | AS | AS+ |
| 75 | 112 | 252 | 504 | |
| Non-Historical Fleets | ||||
|---|---|---|---|---|
| Fleet | 2 FBB/CA(V), 2 CV(B), 2 CA(V)/CL(T)/DD | |||
| LoS | Speed | |||
| Cn2: 71 | Any | |||
| RouteNode Types: BLUE: Empty/Choice RED: Battle GREEN: Resource/TP VIOLET: Maelstrom PURPLE: Night Battle PINK: Air Raid/Battle ORANGE: Enemy Ambush/ASS |
B C E F O | |||
| Fleet Notes | Will pass through Node E instead of D compared to historical fleets, which is way tougher. | |||
| Air State | AD | AP | AS | AS+ |
| 75 | 112 | 252 | 504 | |
Resource Nodes
G J are "Normal Resource Nodes" rewarding respectively ammo ![]() , and bauxite
, and bauxite ![]() .
.
- See here for more details.
SS and Carrier Exp Farming
The 1st enemy node being an Air Node, it's possible to take advantage of how it works to level up any SS(V) as well as "carriers" risk-free.
- All SS(V) won't take any damage on Node C, so any SS(V) fleet can level up risk-free on this node.
- If possessing one or more 12cm 30-tube Rocket Launcher Kai Ni
 , it is possible to take advantage of the AARB mechanic to also level up CV(B/L), BBV, CAV, and AV.
- By equipping one RLK2 on carriers, passing a certain AA threshold, said carrier won't take any damage on the Air Node.
- Having more than 1 RLK2 on the same ship decreases the AA threshold, making it possible to level up weaker carriers.
- Once Node C cleared , retreat to the base and repeat.
- There is a random chance to off route to Node A, losing some resources, but this is negligible.
Enemy Compositions
5-2 A
| # | Maelstrom Node | ||
|---|---|---|---|
| A | Lost Normal | ||
| # | Maelstrom Node | ||
5-2 B
| # | Empty Node | ||
|---|---|---|---|
| B | 気のせいだった。/敵影を見ず。/穏やかな海です。/穏やかな海峡です。/警戒が必要です。/静かな海です。 Must be my imagination./No enemy spotted./Calm seas./Calm straits./Be alert./Peaceful seas. | ||
| # | Empty Node | ||
5-2 C: 敵任務部隊 機動部隊 (PoiDB)
| # | Enemy Form. |
Base EXP | Air Defense Node | AD/AP AS/AS+ |
|---|---|---|---|---|
| C | Diamond | 140 | 29/57 126/252 | |
| Double Line | 150 | 38/75 168/336 | ||
| Diamond | 160 | 57/113 252/504 | ||
| # | Enemy Form. |
Base EXP | Air Defense Node | AD/AP AS/AS+ |
5-2 D: 敵任務部隊 随伴部隊 (PoiDB)
| # | Enemy Form. |
Base EXP | Normal Battle Node | AD/AP AS/AS+ |
|---|---|---|---|---|
| D | Double Line Echelon |
200 | 0/0 0/0 | |
| Double Line Diamond |
200 | 0/0 0/0 | ||
| Double Line Diamond |
200 | 0/0 0/0 | ||
| # | Enemy Form. |
Base EXP | Normal Battle Node | AD/AP AS/AS+ |
5-2 E: 敵任務部隊 機動部隊 (PoiDB)
| # | Enemy Form. |
Base EXP | Normal Battle Node | AD/AP AS/AS+ |
|---|---|---|---|---|
| E | Double Line Diamond |
280 | 29/57 126/252 | |
| Double Line Diamond |
300 | 29/57 126/252 | ||
| Double Line Diamond |
310 | 29/57 126/252 | ||
| # | Enemy Form. |
Base EXP | Normal Battle Node | AD/AP AS/AS+ |
5-2 F: 敵任務部隊 機動部隊 (PoiDB)
| # | Enemy Form. |
Base EXP | Normal Battle Node | AD/AP AS/AS+ |
|---|---|---|---|---|
| F | Double Line Diamond |
300 | 29/57 126/252 | |
| Double Line Diamond |
310 | 29/57 126/252 | ||
| Double Line Diamond |
320 | 29/57 126/252 | ||
| # | Enemy Form. |
Base EXP | Normal Battle Node | AD/AP AS/AS+ |
5-2 G
| # | Resource Node | ||
|---|---|---|---|
| G | Gained 20~50 | ||
| # | Resource Node | ||
5-2 H
| # | Empty Node | ||
|---|---|---|---|
| H | 気のせいだった。/敵影を見ず。/穏やかな海です。/穏やかな海峡です。/警戒が必要です。/静かな海です。 Must be my imagination./No enemy spotted./Calm seas./Calm straits./Be alert./Peaceful seas. | ||
| # | Empty Node | ||
5-2 I: 敵任務部隊 機動部隊本隊 (PoiDB)
| # | Enemy Form. |
Base EXP | Aerial Battle Node | AD/AP AS/AS+ |
|---|---|---|---|---|
| I | Diamond | 200 | 69/137 306/612 | |
| Diamond | 250 | 40/79 176/351 | ||
| Diamond | 250 | 74/147 329/657 | ||
| # | Enemy Form. |
Base EXP | Aerial Battle Node | AD/AP AS/AS+ |
5-2 J
| # | Resource Node | ||
|---|---|---|---|
| J | Gained 40~80 | ||
| # | Resource Node | ||
5-2 K: 敵任務部隊 随伴護衛戦隊 (PoiDB)
| # | Enemy Form. |
Base EXP | Normal Battle Node | AD/AP AS/AS+ |
|---|---|---|---|---|
| K | Line Ahead Double Line |
220 | 0/0 0/0 | |
| Line Ahead | 240 | 0/0 0/0 | ||
| Line Ahead Double Line |
260 | 0/0 0/0 | ||
| # | Enemy Form. |
Base EXP | Normal Battle Node | AD/AP AS/AS+ |
5-2 L: 敵任務部隊 機動部隊 (PoiDB)
| # | Enemy Form. |
Base EXP | Air Defense Node | AD/AP AS/AS+ |
|---|---|---|---|---|
| L | Diamond | 140 | 29/57 126/252 | |
| Double Line | 150 | 38/75 168/336 | ||
| Diamond | 160 | 57/113 252/504 | ||
| # | Enemy Form. |
Base EXP | Air Defense Node | AD/AP AS/AS+ |
5-2 M
| # | Maelstrom Node | ||
|---|---|---|---|
| M | Lost Strong | ||
| # | Maelstrom Node | ||
5-2 N
| # | Empty Node | ||
|---|---|---|---|
| N | 気のせいだった。/敵影を見ず。/穏やかな海です。/穏やかな海峡です。/警戒が必要です。/静かな海です。 Must be my imagination./No enemy spotted./Calm seas./Calm straits./Be alert./Peaceful seas. | ||
| # | Empty Node | ||
5-2 O: 敵任務部隊 機動部隊本隊 (PoiDB)
| # | Enemy Form. |
Base EXP | Boss Battle Node | AD/AP AS/AS+ |
|---|---|---|---|---|
| O | Diamond | 400 | 35/69 153/306 | |
| Diamond | 420 | 35/69 153/306 | ||
| Diamond | 440 | 35/69 153/306 | ||
| Diamond | 460 | 35/69 153/306 | ||
| Line Ahead Diamond |
480 | 40/79 176/351 | ||
| # | Enemy Form. |
Base EXP | Boss Battle Node | AD/AP AS/AS+ |
Ship Drops
| Ship drops | |||||||||||||||||||||||||||||||||||||||||||||||||||||||||||||||||||||||||||||||||||||||||||||||||||
|---|---|---|---|---|---|---|---|---|---|---|---|---|---|---|---|---|---|---|---|---|---|---|---|---|---|---|---|---|---|---|---|---|---|---|---|---|---|---|---|---|---|---|---|---|---|---|---|---|---|---|---|---|---|---|---|---|---|---|---|---|---|---|---|---|---|---|---|---|---|---|---|---|---|---|---|---|---|---|---|---|---|---|---|---|---|---|---|---|---|---|---|---|---|---|---|---|---|---|---|
| Type | Ship? | D | E | F | K | O | |||||||||||||||||||||||||||||||||||||||||||||||||||||||||||||||||||||||||||||||||||||||||||||
| CA | Mikuma | ✔️ | |||||||||||||||||||||||||||||||||||||||||||||||||||||||||||||||||||||||||||||||||||||||||||||||||
| AS | Taigei | ✔️ | |||||||||||||||||||||||||||||||||||||||||||||||||||||||||||||||||||||||||||||||||||||||||||||||||
| DD | Yukikaze | ✔️ | |||||||||||||||||||||||||||||||||||||||||||||||||||||||||||||||||||||||||||||||||||||||||||||||||
| DD | Hamakaze | ✔️ | |||||||||||||||||||||||||||||||||||||||||||||||||||||||||||||||||||||||||||||||||||||||||||||||||
| DD | Akigumo | ✔️ | ✔️ | ||||||||||||||||||||||||||||||||||||||||||||||||||||||||||||||||||||||||||||||||||||||||||||||||
| DD | Yuugumo | ✔️ | |||||||||||||||||||||||||||||||||||||||||||||||||||||||||||||||||||||||||||||||||||||||||||||||||
| DD | Makigumo | ✔️ | |||||||||||||||||||||||||||||||||||||||||||||||||||||||||||||||||||||||||||||||||||||||||||||||||
| CL | Kitakami | ✔️ | |||||||||||||||||||||||||||||||||||||||||||||||||||||||||||||||||||||||||||||||||||||||||||||||||
| CL | Ooi | ✔️ | |||||||||||||||||||||||||||||||||||||||||||||||||||||||||||||||||||||||||||||||||||||||||||||||||
| CL | Nagara | ✔️ | |||||||||||||||||||||||||||||||||||||||||||||||||||||||||||||||||||||||||||||||||||||||||||||||||
| CL | Sendai | ✔️ | |||||||||||||||||||||||||||||||||||||||||||||||||||||||||||||||||||||||||||||||||||||||||||||||||
| CL | Yuubari | ✔️ | |||||||||||||||||||||||||||||||||||||||||||||||||||||||||||||||||||||||||||||||||||||||||||||||||
| CA | Kinugasa | ✔️ | |||||||||||||||||||||||||||||||||||||||||||||||||||||||||||||||||||||||||||||||||||||||||||||||||
| CA | Myoukou | ✔️ | ✔️ | ✔️ | |||||||||||||||||||||||||||||||||||||||||||||||||||||||||||||||||||||||||||||||||||||||||||||||
| CA | Takao | ✔️ | ✔️ | ✔️ | |||||||||||||||||||||||||||||||||||||||||||||||||||||||||||||||||||||||||||||||||||||||||||||||
| CA | Atago | ✔️ | ✔️ | ✔️ | |||||||||||||||||||||||||||||||||||||||||||||||||||||||||||||||||||||||||||||||||||||||||||||||
| CA | Mogami | ✔️ | ✔️ | ✔️ | |||||||||||||||||||||||||||||||||||||||||||||||||||||||||||||||||||||||||||||||||||||||||||||||
| CA | Tone | ✔️ | ✔️ | ✔️ | |||||||||||||||||||||||||||||||||||||||||||||||||||||||||||||||||||||||||||||||||||||||||||||||
| CA | Chikuma | ✔️ | ✔️ | ✔️ | |||||||||||||||||||||||||||||||||||||||||||||||||||||||||||||||||||||||||||||||||||||||||||||||
| CVL | Ryuujou | ✔️ | ✔️ | ✔️ | ✔️ | ||||||||||||||||||||||||||||||||||||||||||||||||||||||||||||||||||||||||||||||||||||||||||||||
| CVL | Shouhou | ✔️ | ✔️ | ✔️ | ✔️ | ||||||||||||||||||||||||||||||||||||||||||||||||||||||||||||||||||||||||||||||||||||||||||||||
| CVL | Zuihou | ✔️ | |||||||||||||||||||||||||||||||||||||||||||||||||||||||||||||||||||||||||||||||||||||||||||||||||
| CVL | Hiyou | ✔️ | ✔️ | ✔️ | ✔️ | ||||||||||||||||||||||||||||||||||||||||||||||||||||||||||||||||||||||||||||||||||||||||||||||
| CVL | Junyou | ✔️ | ✔️ | ✔️ | ✔️ | ||||||||||||||||||||||||||||||||||||||||||||||||||||||||||||||||||||||||||||||||||||||||||||||
| FBB | Kongou | ✔️ | ✔️ | ||||||||||||||||||||||||||||||||||||||||||||||||||||||||||||||||||||||||||||||||||||||||||||||||
| FBB | Hiei | ✔️ | ✔️ | ||||||||||||||||||||||||||||||||||||||||||||||||||||||||||||||||||||||||||||||||||||||||||||||||
| FBB | Haruna | ✔️ | ✔️ | ✔️ | |||||||||||||||||||||||||||||||||||||||||||||||||||||||||||||||||||||||||||||||||||||||||||||||
| FBB | Kirishima | ✔️ | ✔️ | ✔️ | |||||||||||||||||||||||||||||||||||||||||||||||||||||||||||||||||||||||||||||||||||||||||||||||
| BB | Fusou | ✔️ | ✔️ | ✔️ | |||||||||||||||||||||||||||||||||||||||||||||||||||||||||||||||||||||||||||||||||||||||||||||||
| BB | Yamashiro | ✔️ | ✔️ | ✔️ | |||||||||||||||||||||||||||||||||||||||||||||||||||||||||||||||||||||||||||||||||||||||||||||||
| BB | Ise | ✔️ | |||||||||||||||||||||||||||||||||||||||||||||||||||||||||||||||||||||||||||||||||||||||||||||||||
| BB | Hyuuga | ✔️ | |||||||||||||||||||||||||||||||||||||||||||||||||||||||||||||||||||||||||||||||||||||||||||||||||
| BB | Mutsu | ✔️ | |||||||||||||||||||||||||||||||||||||||||||||||||||||||||||||||||||||||||||||||||||||||||||||||||
| CV | Akagi | ✔️ | |||||||||||||||||||||||||||||||||||||||||||||||||||||||||||||||||||||||||||||||||||||||||||||||||
| CV | Kaga | ✔️ | |||||||||||||||||||||||||||||||||||||||||||||||||||||||||||||||||||||||||||||||||||||||||||||||||
| CV | Souryuu | ✔️ | |||||||||||||||||||||||||||||||||||||||||||||||||||||||||||||||||||||||||||||||||||||||||||||||||
| CV | Hiryuu | ✔️ | |||||||||||||||||||||||||||||||||||||||||||||||||||||||||||||||||||||||||||||||||||||||||||||||||
| CV | Zuikaku | ✔️ | |||||||||||||||||||||||||||||||||||||||||||||||||||||||||||||||||||||||||||||||||||||||||||||||||
| SS | I-58 | ✔️ | |||||||||||||||||||||||||||||||||||||||||||||||||||||||||||||||||||||||||||||||||||||||||||||||||
| DD | Akatsuki | ✔️ | ✔️ | ✔️ | |||||||||||||||||||||||||||||||||||||||||||||||||||||||||||||||||||||||||||||||||||||||||||||||
| DD | Hibiki | ✔️ | ✔️ | ✔️ | |||||||||||||||||||||||||||||||||||||||||||||||||||||||||||||||||||||||||||||||||||||||||||||||
| DD | Ikazuchi | ✔️ | ✔️ | ✔️ | |||||||||||||||||||||||||||||||||||||||||||||||||||||||||||||||||||||||||||||||||||||||||||||||
| DD | Inazuma | ✔️ | ✔️ | ✔️ | |||||||||||||||||||||||||||||||||||||||||||||||||||||||||||||||||||||||||||||||||||||||||||||||
| DD | Samidare | ✔️ | ✔️ | ✔️ | |||||||||||||||||||||||||||||||||||||||||||||||||||||||||||||||||||||||||||||||||||||||||||||||
| DD | Suzukaze | ✔️ | ✔️ | ✔️ | |||||||||||||||||||||||||||||||||||||||||||||||||||||||||||||||||||||||||||||||||||||||||||||||
| DD | Asashio | ✔️ | ✔️ | ✔️ | |||||||||||||||||||||||||||||||||||||||||||||||||||||||||||||||||||||||||||||||||||||||||||||||
| DD | Michishio | ✔️ | ✔️ | ✔️ | |||||||||||||||||||||||||||||||||||||||||||||||||||||||||||||||||||||||||||||||||||||||||||||||
| DD | Arashio | ✔️ | ✔️ | ✔️ | |||||||||||||||||||||||||||||||||||||||||||||||||||||||||||||||||||||||||||||||||||||||||||||||
| DD | Kasumi | ✔️ | ✔️ | ✔️ | |||||||||||||||||||||||||||||||||||||||||||||||||||||||||||||||||||||||||||||||||||||||||||||||
| DD | Kagerou | ✔️ | ✔️ | ✔️ | |||||||||||||||||||||||||||||||||||||||||||||||||||||||||||||||||||||||||||||||||||||||||||||||
| DD | Shiranui | ✔️ | ✔️ | ✔️ | |||||||||||||||||||||||||||||||||||||||||||||||||||||||||||||||||||||||||||||||||||||||||||||||
| DD | Kuroshio | ✔️ | ✔️ | ✔️ | |||||||||||||||||||||||||||||||||||||||||||||||||||||||||||||||||||||||||||||||||||||||||||||||
| CL | Tenryuu | ✔️ | ✔️ | ✔️ | ✔️ | ||||||||||||||||||||||||||||||||||||||||||||||||||||||||||||||||||||||||||||||||||||||||||||||
| CL | Tatsuta | ✔️ | ✔️ | ✔️ | ✔️ | ||||||||||||||||||||||||||||||||||||||||||||||||||||||||||||||||||||||||||||||||||||||||||||||
| CL | Kuma | ✔️ | ✔️ | ✔️ | ✔️ | ||||||||||||||||||||||||||||||||||||||||||||||||||||||||||||||||||||||||||||||||||||||||||||||
| CL | Tama | ✔️ | ✔️ | ✔️ | |||||||||||||||||||||||||||||||||||||||||||||||||||||||||||||||||||||||||||||||||||||||||||||||
| CL | Kiso | ✔️ | ✔️ | ✔️ | |||||||||||||||||||||||||||||||||||||||||||||||||||||||||||||||||||||||||||||||||||||||||||||||
| CL | Isuzu | ✔️ | ✔️ | ✔️ | ✔️ | ||||||||||||||||||||||||||||||||||||||||||||||||||||||||||||||||||||||||||||||||||||||||||||||
| CL | Natori | ✔️ | ✔️ | ✔️ | ✔️ | ||||||||||||||||||||||||||||||||||||||||||||||||||||||||||||||||||||||||||||||||||||||||||||||
| CL | Yura | ✔️ | ✔️ | ✔️ | ✔️ | ||||||||||||||||||||||||||||||||||||||||||||||||||||||||||||||||||||||||||||||||||||||||||||||
| CL | Jintsuu | ✔️ | ✔️ | ✔️ | |||||||||||||||||||||||||||||||||||||||||||||||||||||||||||||||||||||||||||||||||||||||||||||||
| CL | Naka | ✔️ | ✔️ | ✔️ | |||||||||||||||||||||||||||||||||||||||||||||||||||||||||||||||||||||||||||||||||||||||||||||||
| CA | Furutaka | ✔️ | ✔️ | ✔️ | ✔️ | ||||||||||||||||||||||||||||||||||||||||||||||||||||||||||||||||||||||||||||||||||||||||||||||
| CA | Kako | ✔️ | ✔️ | ✔️ | ✔️ | ||||||||||||||||||||||||||||||||||||||||||||||||||||||||||||||||||||||||||||||||||||||||||||||
| CA | Aoba | ✔️ | ✔️ | ✔️ | ✔️ | ||||||||||||||||||||||||||||||||||||||||||||||||||||||||||||||||||||||||||||||||||||||||||||||
| CA | Nachi | ✔️ | ✔️ | ✔️ | |||||||||||||||||||||||||||||||||||||||||||||||||||||||||||||||||||||||||||||||||||||||||||||||
| CA | Ashigara | ✔️ | ✔️ | ✔️ | |||||||||||||||||||||||||||||||||||||||||||||||||||||||||||||||||||||||||||||||||||||||||||||||
| CA | Haguro | ✔️ | ✔️ | ✔️ | ✔️ | ||||||||||||||||||||||||||||||||||||||||||||||||||||||||||||||||||||||||||||||||||||||||||||||
| CA | Maya | ✔️ | ✔️ | ✔️ | ✔️ | ||||||||||||||||||||||||||||||||||||||||||||||||||||||||||||||||||||||||||||||||||||||||||||||
| CA | Choukai | ✔️ | ✔️ | ✔️ | ✔️ | ||||||||||||||||||||||||||||||||||||||||||||||||||||||||||||||||||||||||||||||||||||||||||||||
| CVL | Houshou | ✔️ | |||||||||||||||||||||||||||||||||||||||||||||||||||||||||||||||||||||||||||||||||||||||||||||||||
| AV | Chitose | ✔️ | ✔️ | ✔️ | ✔️ | ||||||||||||||||||||||||||||||||||||||||||||||||||||||||||||||||||||||||||||||||||||||||||||||
| AV | Chiyoda | ✔️ | ✔️ | ✔️ | ✔️ | ||||||||||||||||||||||||||||||||||||||||||||||||||||||||||||||||||||||||||||||||||||||||||||||