- Welcome to the Kancolle Wiki!
- If you have any questions regarding site content, account registration, etc., please visit the KanColle Wiki Discord
Difference between revisions of "Summer 2023 Event/E-3"
Jigaraphale (talk | contribs) m |
(→Trivia) |
||
| (36 intermediate revisions by 8 users not shown) | |||
| Line 1: | Line 1: | ||
{{:{{ROOTPAGENAME}}/Hub}} | {{:{{ROOTPAGENAME}}/Hub}} | ||
{{EventInfoBox | {{EventInfoBox | ||
| − | |title_en= Shield | + | |title_en= Hachinohe's Shield |
|title_jp= 八戸の盾 | |title_jp= 八戸の盾 | ||
|tag= [[File:{{ROOTPAGENAME}} Tag 1.png]] | |tag= [[File:{{ROOTPAGENAME}} Tag 1.png]] | ||
| Line 14: | Line 14: | ||
|map_3=[[File:{{ROOTPAGENAME}} E-3 Map Phase 2.png|450px]] | |map_3=[[File:{{ROOTPAGENAME}} E-3 Map Phase 2.png|450px]] | ||
|map_3_text=Phase 2 | |map_3_text=Phase 2 | ||
| − | |map_4=[[File:{{ROOTPAGENAME}} E-3 Map | + | |map_4=[[File:{{ROOTPAGENAME}} E-3 Map.png|450px]] |
|map_4_text=Phase 3 | |map_4_text=Phase 3 | ||
|map_5=[[File:{{ROOTPAGENAME}} E-3 Map LBAS Range.png|450px]] | |map_5=[[File:{{ROOTPAGENAME}} E-3 Map LBAS Range.png|450px]] | ||
|map_5_text=LBAS | |map_5_text=LBAS | ||
|boss_hard= 560 TP + 900 HP + 4400 HP | |boss_hard= 560 TP + 900 HP + 4400 HP | ||
| − | |boss_medium= | + | |boss_medium= 460 TP + 490 HP + 3200 HP |
| − | |boss_easy= | + | |boss_easy= 370 TP + 490 HP + 2700 HP |
| − | |boss_casual= | + | |boss_casual= 300 TP + 490 HP + 2200 HP |
|phase_1_boss= {{EnemyLink|Heavy Cruiser Ne-Class Kai Summer Mode}} | |phase_1_boss= {{EnemyLink|Heavy Cruiser Ne-Class Kai Summer Mode}} | ||
|phase_2_boss= {{EnemyLink|Submarine Summer Princess B Flagship}} | |phase_2_boss= {{EnemyLink|Submarine Summer Princess B Flagship}} | ||
| Line 35: | Line 35: | ||
==Branching Table== | ==Branching Table== | ||
{{MapBranchingTable | {{MapBranchingTable | ||
| + | |title = E-3 Branching Rules (Start Points) ▼/▲ | ||
| + | |id = 57-3a | ||
| + | |order = 0,1,2,3,A1,B2,C2,F,I,J,O,R,T,U | ||
| + | |0 -> 1 = * Phase 1: Single Fleet | ||
| + | * Phase 2+: Meet '''ALL''' of the following requirements: | ||
| + | ** Single Fleet | ||
| + | ** If Fast fleet, then amount of CA(V) ≤ 2 | ||
| + | ** If using fleet 3, then amount of DD + DE + AS + SS(V) ≤ 4 | ||
| + | * 1st Torpedo Squadron {{Shiplock|{{ROOTPAGENAME}} Tag 4}} only ('''Normal / Hard''') | ||
| + | |0 -> 2 = * Meet '''ALL''' of the following requirements: | ||
| + | ** Striking Force Fleet | ||
| + | ** Fleet does NOT contain CV(B) | ||
| + | ** Amount of AS + AO + LHA + AV ≤ 1 | ||
| + | ** If amount of ships in fleet ≤ 6, meet '''ANY''' of the following requirements: | ||
| + | *** Fast fleet and amount of CA(V) ≥ 2 | ||
| + | *** Fleet 3 and amount of DD + DE + AS + SS(V) ≥ 5 | ||
| + | * 5th Fleet Main Force {{Shiplock|{{ROOTPAGENAME}} Tag 5}} only ('''Normal / Hard''') | ||
| + | |0 -> 3 = * Combined Fleet | ||
| + | * 2nd Fleet {{Shiplock|{{ROOTPAGENAME}} Tag 1}} only ('''Normal / Hard''') | ||
| + | }} | ||
| + | |||
| + | {{MapBranchingTable | ||
| + | |title = E-3 Branching Rules (Start Point 1) ▼/▲ | ||
| + | |id = 57-3b | ||
| + | |order = A1,B2,C2 | ||
| + | |A1/pink -> A2/battle = * Does not meet the requirements to go to B | ||
| + | |A1/pink -> B/empty = * Meet '''ALL''' of the following requirements: | ||
| + | ** Amount of CV(B) = 0 | ||
| + | ** Amount of (F)BB(V) ≤ 1 | ||
| + | ** Amount of CL/CT + DD/DE ≥ 4 | ||
| + | |B2/battle -> C/empty = * Meet '''ALL''' of the following requirements: | ||
| + | ** Amount of CV(B) = 0 | ||
| + | ** Then, meet '''ANY''' of the following requirements: | ||
| + | *** At least 1CL/CT 2DD/DE | ||
| + | *** Fast fleet with at least 3DD | ||
| + | *** Slow fleet with at least 4DD/DE | ||
| + | *** Fleet with only SS(V) | ||
| + | |B2/battle -> C1/red/darkblue = * Does not meet the requirements to go to C | ||
| + | |C2 -> D/empty = * Fail the LoS check | ||
| + | |C2 -> E/battle = * Pass the LoS check (Cn2 = 30~35 '''Hard''') | ||
| + | }} | ||
| + | |||
| + | {{MapBranchingTable | ||
| + | |title = E-3 Branching Rules (Start Point 2) ▼/▲ | ||
| + | |id = 57-3c | ||
| + | |order = F,I,J | ||
| + | |F/empty -> G = * Does not meet the requirements to go to H | ||
| + | |F/empty -> H/pink = * Meet '''ALL''' of the following requirements: | ||
| + | ** Amount of (F)BB(V) + CVL ≤ 2 | ||
| + | ** Amount of DD ≥ 2 | ||
| + | *** If slow fleet, then amount of DD + DE ≥ 3 | ||
| + | |I/battle -> J/battle = * Does not meet the requirements to go to L | ||
| + | |I/battle -> L/battle = * Meet '''ALL''' of the following requirements: | ||
| + | ** Amount of (F)BB(V) ≤ 1 | ||
| + | *** If Slow fleet, then amount of (F)BB(V) = 0 | ||
| + | ** Amount of CL ≥ 1 | ||
| + | ** Amount of DD ≥ 3 | ||
| + | *** If Slow fleet, then amount of DD + DE ≥ 4 | ||
| + | |J/battle -> K/battle = Fail the LoS check | ||
| + | |J/battle -> L/battle = Pass the LoS check | ||
| + | }} | ||
| + | |||
| + | {{MapBranchingTable | ||
| + | |title = E-3 Branching Rules (Start Point 3) ▼/▲ | ||
| + | |id = 57-3d | ||
| + | |order = 3,O,R,T,U | ||
| + | |3 -> N/pink = Does not meet the requirements to go to O | ||
| + | |3 -> O/battle = * Meet '''ALL''' of the following requirements: | ||
| + | ** CTF: Fast fleet | ||
| + | ** CTF: Amount of CV(B) ≤ 2 | ||
| + | ** STF: Amount of CV(B) = 0 | ||
| + | |O/battle -> P/red/darkblue = * Does not meet the requirements to go to Q | ||
| + | |O/battle -> Q/pink = * CTF: Amount of CV(B/L) ≤ 4 | ||
| + | * STF: If Slow fleet, then amount of CV(B) = 0 | ||
| + | * ??? | ||
| + | |R/battle -> S/empty = * Fail the LoS check | ||
| + | |R/battle -> T/battle = * Pass the LoS check | ||
| + | |T/battle -> U/battle = * Does not meet the requirements to go to W | ||
| + | |T/battle -> W/battle = * Meet '''ALL''' of the following requirements: | ||
| + | ** Fast fleet | ||
| + | ** Amount of CL ≥ 2 | ||
| + | ** Amount of DD ≥ 4 | ||
| + | ** Pass the LoS check | ||
| + | |U/battle -> V/empty = * Fail the LoS check | ||
| + | |U/battle -> W/battle = * Pass the LoS check | ||
}} | }} | ||
| Line 42: | Line 127: | ||
{{/Historical_Bonuses}} | {{/Historical_Bonuses}} | ||
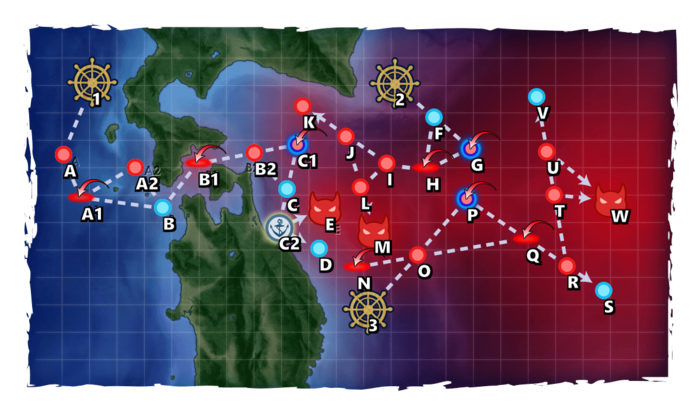
| − | ==Map | + | ==Map overview== |
| − | + | E3 is a single/Striking Force/Combined fleet three-phase map consisting of one transport and two boss phases. | |
| + | * 2 [[LBAS]] are available on this map: | ||
| + | ** Initially, no LBAS is available, | ||
| + | ** After Phase 1, only 1 can be set on '''Sortie''', the other being limited to '''Defense''', | ||
| + | |||
| + | |||
| + | *This map uses 3 locks: | ||
| + | ** [[File:{{ROOTPAGENAME}} Tag 1.png]] '''2nd Fleet''' (from E-1, reused on E-7), | ||
| + | ** [[File:{{ROOTPAGENAME}} Tag 4.png]] '''1st Torpedo Squadron''' (reused on E-4), | ||
| + | ** [[File:{{ROOTPAGENAME}} Tag 5.png]] '''5th Fleet Main Force''' (reused on E-4). | ||
| + | |||
| + | * '''[[Node|"Airstrike Supported Battle" node]]''' is present on {{MapRoute|C1|darkorange|G|darkorange|P|darkorange}} | ||
| + | |||
| + | ==Phase 1 - TP== | ||
| + | Phase 1 is a '''"[[Transport Operation]]"''': | ||
| + | |||
| + | * Single Fleet: '''0-1AV, 0-1BBV, 0-1CVL, 1CL, 3-5DD''' [[File:{{ROOTPAGENAME}} Tag 4.png|30px]] | ||
| + | * Route: {{MapRoute|1||A|red|A1|pink|B|blue|B1|pink|B2|red|C2|green|E|red}} | ||
| + | ** Bringing an [[AACI]] capable ship is recommended to pass through the air node. | ||
| + | ** Bringing some ASW power can be helpful against node {{MapRoute|A|red}}. | ||
| + | ** Both [[Node Support]] & [[Boss Support]] can be utilized to consistently reaches the boss and A-rank. | ||
| + | |||
| + | ==Phase 2 - Boss== | ||
| + | <Tabber> | ||
| + | |-|Light Fleet= | ||
| + | * [[Striking Force Fleet]]: '''1CVL, 0-1CAV/CLT, 1-2CL, 3-5DD''' [[File:{{ROOTPAGENAME}} Tag 5.png|30px]] | ||
| + | * Route: {{MapRoute|2||F|blue|H|pink|I|red|L|red|M|red}} | ||
| + | * It is possible to bring an (F)BB(V) to gain the second shelling, but this might not be needed. | ||
| + | * If the fleet is '''SLOW''', fleet requires 4 DD/DE to route | ||
| + | ** Otherwise, only 3 DD minimum is needed for a '''FAST''' Fleet. | ||
| + | |-|Heavy Fleet= | ||
| + | * [[Striking Force Fleet]]: '''0-2(F)BB(V)/CVL, 0-1CAV/CLT, 0-2CL, 2-5DD''' [[File:{{ROOTPAGENAME}} Tag 5.png|30px]] | ||
| + | * Route: {{MapRoute|2||F|blue|H|pink|I|red|J|red|L|red|M|red}} | ||
| + | * Heavier fleet that ignores speed and can enable the second shelling round | ||
| + | * Encounters an additional submarine node at {{MapRoute|J|red}} | ||
| + | </Tabber> | ||
| + | *LBAS range: 4 | ||
| + | ** Bringing an [[AACI]] capable ship is recommended to pass through the air node. | ||
| + | ** Bringing ASW power is required against the boss. | ||
| + | ***The CVL here should be a [[CVE]]. | ||
| + | ** Have an ASW LBAS send to {{MapRoute|M|red}} is recommended to help kill the boss. | ||
| + | |||
| + | ==Phase 3 - Boss== | ||
| + | <tabber> | ||
| + | |-|CTF= | ||
| + | * CTF: '''FAST [[File:{{ROOTPAGENAME}} Tag 1.png|30px]] | ||
| + | **Main: '''1(F)BB(V), 2CV(B), 2CVL, 1CL | ||
| + | **Escort: '''1CL, 1CLT, 4DD | ||
| + | * Route: {{MapRoute|3||O|red|Q|pink|R|red|T|red|W|red}} | ||
| + | |||
| + | |-|CTF/STF= | ||
| + | * CTF/STF: '''FAST [[File:{{ROOTPAGENAME}} Tag 1.png|30px]] | ||
| + | **Main: '''2(F)BB(V), 2CVL, 1CA(V), 1CL | ||
| + | **Escort: '''1CL, 1CLT, 4DD''' | ||
| + | * Route: {{MapRoute|3||O|red|Q|pink|R|red|T|red|W|red}} | ||
| + | </tabber> | ||
| + | |||
| + | *LBAS range: 7 | ||
| + | *'''AP/AS = 235/527''' on chip. '''AP/AS = 248/557''' on LD | ||
| + | ** Bringing an [[AACI]] capable ship is recommended to pass through the air node and against the boss. | ||
| + | ** Bringing some ASW power can be helpful against node {{MapRoute|R|red}} | ||
| + | ** Fleet must be Fast to route correctly. | ||
| + | |||
| + | ==Debuff== | ||
| + | Once LD has been reached, the following steps have to be performed to debuff the boss: | ||
| + | {|class="wikitable" | ||
| + | ! !! E!! M!! K!! U!! LBAS | ||
| + | |- | ||
| + | | Hard|| A+|| A+|| A+|| A+|| AS x2 | ||
| + | |- | ||
| + | | Medium||A+ || A+|| -|| ?|| AS x2 | ||
| + | |- | ||
| + | | Easy|| ?|| ?|| -|| ?|| ? | ||
| + | |- | ||
| + | | Casual|| ?|| ?|| -|| ?|| ? | ||
| + | |} | ||
| + | |||
| + | <tabber> | ||
| + | |-|Node E= | ||
| + | * Refer to [[#Phase 1 - TP]]'s fleet for composition and routing. | ||
| + | *LBAS range: 2 | ||
| + | |||
| + | |-|Node M= | ||
| + | * Refer to [[#Phase 2 - Boss]]'s fleet for composition and routing. | ||
| + | *LBAS range: 2 | ||
| + | |||
| + | |-|Node K= | ||
| + | * Striking Force: '''[[#Phase 2 - Boss]]'s fleet without CL (SLOW?)''' [[File:{{ROOTPAGENAME}} Tag 5.png|30px]] | ||
| + | * Route: {{MapRoute|2||F|blue|H|pink|I|red|J|red|K|red}} | ||
| + | *Low LoS is needed. | ||
| + | *LBAS range: 4 | ||
| + | **LoS must be relatively low to get to node {{MapRoute|K|red}} | ||
| + | ** Bringing ASW power is required. | ||
| + | |||
| + | |-|Node U= | ||
| + | * CTF/STF: '''2(F)BB(V), 2CV(L), 1CA(V), 1CL + 1CL, 2CLT/CA, 3DD''' [[File:{{ROOTPAGENAME}} Tag 1.png|30px]] | ||
| + | * Route: {{MapRoute|3||O|red|Q|pink|R|red|T|red|W|red}} | ||
| + | *LBAS range: 6 | ||
| + | |||
| + | |-|Node LBAS= | ||
| + | {|class="wikitable" | ||
| + | ! !! AS | ||
| + | |- | ||
| + | |Hard || 368 | ||
| + | |- | ||
| + | |Medium|| 282 | ||
| + | |- | ||
| + | |Easy || 279 | ||
| + | |- | ||
| + | |Casual|| 207 | ||
| + | |} | ||
| + | </tabber> | ||
| + | |||
| + | Once Debuff is complete the CG will change to the following: | ||
| + | {|class="wikitable" | ||
| + | ![[Aircraft Carrier Summer Princess]] | ||
| + | |- | ||
| + | |<gallery> | ||
| + | Enemy Full Aircraft Carrier Summer Princess.png|Regular | ||
| + | Enemy Full Aircraft Carrier Summer Princess Debuffed.png|Debuffed | ||
| + | </gallery> | ||
| + | |} | ||
==Enemy Compositions== | ==Enemy Compositions== | ||
| Line 51: | Line 257: | ||
{{clear}} | {{clear}} | ||
{{:{{ROOTPAGENAME}}/Hub}} | {{:{{ROOTPAGENAME}}/Hub}} | ||
| + | |||
| + | ==Trivia== | ||
| + | This map involves many references to The Shield of Hachinohe which is the nickname of Inagi: | ||
| + | <div class="mw-collapsible mw-collapsed"> | ||
| + | |||
| + | ;Phase 3 | ||
| + | *Is based on the final engagement and defensive actions of Inagi. Her actions here are what earned her the name 八戸の盾 or The Shield of Hachinohe. The shrine in Hachinohe also commemorates her actions and there is a service for her as well as a memorial dedicated to her in the area. | ||
| + | |||
| + | ;Node W | ||
| + | *Is the final position of Inagi after 2 hours of drawing the attention of the Allied Aircraft. According to Japanese records and American records it was the aircraft from TF 38 USS Essex and USS Randolph that sank her. There is some discrepancy as the English Wikipedia entry states it was HMS Formidable that sank her but Royal Navy Archives state that Formidable sent planes to Shiogama. Meanwhile it was HMS Indefatigable that sent planes to Kesennuma, Kakuda and Hachinohe. | ||
| + | |||
| + | </div> | ||
Latest revision as of 17:27, 10 October 2023
 
| |||||||||
|---|---|---|---|---|---|---|---|---|---|
 
Time remaining until Event ends [1]:
| |||||||||
八戸の盾
![]()
![]()


| Information | ||||
|---|---|---|---|---|
| Event Tag | ||||
| Boss Gauges | Hard (甲): 560 TP + 900 HP + 4400 HP | |||
| Medium (乙): 460 TP + 490 HP + 3200 HP | ||||
| Easy (丙): 370 TP + 490 HP + 2700 HP | ||||
| Casual (丁): 300 TP + 490 HP + 2200 HP | ||||
| Map Bosses | Heavy Cruiser Ne-Class Kai Summer Mode
| |||
Submarine Summer Princess B Flagship
| ||||
Aircraft Carrier Summer Princess
| ||||
| Rewards[edit] | ||||
|---|---|---|---|---|
| Ship |  Inagi | |||
| Choice | 丁 Casual |
丙 Easy |
乙 Medium |
甲 Hard |
 25mm Anti-aircraft Autocannon Mount & Machine Guns |
1 (★1) | 1 (★2) | ||
| OR | ||||
 25mm Triple Autocannon Mount |
2 | 3 | 4 | |
| Reward | 丁 Casual |
丙 Easy |
乙 Medium |
甲 Hard |
|---|---|---|---|---|
Medal |
1 | 1 | ||
 F6F-5 |
1 | 1 (★1) | 1 (★2) | |
 12cm Single High-angle Gun Mount Model E Kai |
1 (★1) | 1 (★2) | 1 (★3) | |
 Tenzan Model 12A |
1 | 2 | ||
 Radar Equipment Mast (Type 13 Kai + Type 22 Radar Kai 4) |
1 (★1) |

The event guides are to be constructed through the respective Event map page guide sandbox and reviewed by editors before being approved here.
- Do not update the guides through this page unless it is a minor fix. Please only update guides through their respective sandbox pages.
Branching Table
| E-3 Branching Rules (Start Points) ▼/▲ | ||
|---|---|---|
| Nodes | Rules | |
| Start | 1 |
|
2 |
| |
3 |
| |
| E-3 Branching Rules (Start Point 1) ▼/▲ | ||
|---|---|---|
| Nodes | Rules | |
A1 |
A2 |
|
B |
| |
B2 |
C |
|
C1 |
| |
C2 |
D |
|
E |
| |
| E-3 Branching Rules (Start Point 2) ▼/▲ | ||
|---|---|---|
| Nodes | Rules | |
F |
G |
|
H |
| |
I |
J |
|
L |
| |
J |
K |
Fail the LoS check |
L |
Pass the LoS check | |
| E-3 Branching Rules (Start Point 3) ▼/▲ | ||
|---|---|---|
| Nodes | Rules | |
3 |
N |
Does not meet the requirements to go to O |
O |
| |
O |
P |
|
Q |
| |
R |
S |
|
T |
| |
T |
U |
|
W |
| |
U |
V |
|
W |
| |
Branching compositions were reported over the course of the event. (NGA and KCNav)
Historical Bonuses
DISCLAIMER: This information is based on user submitted data and is subject to revisions as more data is gathered. Any version of the ship receives the bonus regardless of remodel.
Ship Bonuses
| Ships [Toggle Names] |
Mapwide | P1/P2 Stacks with Map-wide |
P3 Stacks with Map-wide | |||||||
|---|---|---|---|---|---|---|---|---|---|---|
| Dmg | Acc | Eva | Dmg | Acc | Eva | Dmg | Acc | Eva | ||
| Coastal Defense Ships (DE) | 1.12x | - | - | - | ||||||
| Destroyers (DD) | 1.03x | 1.05x | 1.07x | |||||||
| Light Cruisers (CL) NOT CLT |
1.02x | 1.05x | ||||||||
| Seaplane Tenders (AV) | 1.14x | 1.1x | ? | |||||||
| Light Carriers (CVL) | 1.11x | - | ? | |||||||
| Aviation Battleships (BBV) | - | |||||||||
Ashigara Kai Ni |
Nachi Kai Ni |
1.12x | ? | 1.13x [1.2656x] |
1.07x | - | ||||
Abukuma Kai Ni |
Kuma Kai Ni D |
1.12x [1.1424x] |
1.1x [1.155x] |
1.13x [1.2909x] |
1.07x [1.236x] | |||||
Tama Kai Ni |
- | |||||||||
Kiso Kai Ni |
- | 1.12x CL: [1.1424x] |
? CL:1.1x [1.155x] |
1.13x [1.2656x] CL: [1.2909x] |
1.07x CL: [1.236] | |||||
Akebono Kai Ni |
Asagumo Kai |
1.12x [1.1536x] |
1.1x [1.155x] |
1.1x [1.177x] |
1.13x [1.3036x] |
1.07x [1.2594x] | ||||
Hatsuharu Kai Ni |
Hatsushimo Kai Ni | |||||||||
Kasumi Kai Ni |
Shiranui Kai Ni | |||||||||
Usugumo Kai |
Wakaba Kai | |||||||||
Yamato Kai Ni Juu |
Musashi Kai Ni |
- | - | 1.13x | 1.07x(?) | 1.05x(?) | ||||
Nagato Kai Ni |
Kongou Kai Ni C | |||||||||
Haruna Kai Ni C |
Chikuma Kai Ni | |||||||||
Tone Kai Ni |
Atago Kai | |||||||||
Choukai Kai Ni |
Haguro Kai Ni | |||||||||
Myoukou Kai Ni |
Maya Kai Ni | |||||||||
Takao Kai |
- | |||||||||
Noshiro Kai Ni |
- | 1.13x [1.1526x] |
1.07x(?) [1.1235x] |
1.05x(?) [1.1025x] | ||||||
Asashimo Kai Ni |
Fujinami Kai |
1.13x [1.1639x] |
1.05x(?) [1.1235x] | |||||||
Harusame Kai |
Hayanami Kai | |||||||||
Kishinami Kai |
Naganami Kai Ni | |||||||||
Okinami Kai Ni |
Shigure Kai San | |||||||||
Shimakaze Kai |
Shiratsuyu Kai Ni | |||||||||
Kumano Kou Kai Ni |
Suzuya Kou Kai Ni |
1.13x CVL: [1.2543x] |
1.07x(?) CVL: [1.177x] |
1.05x(?) CVL: [?] | ||||||
I-201 Kai |
I-203 Kai |
1.4x | - | |||||||
Equipment Bonuses
| Equipment | Damage Map-wide | Accuracy Map-wide |
|---|---|---|
|
1.05x each (stackable) | ? |
|
1.07x each (stackable) | ? |
Debuff
| Ships | Node W |
|---|---|
| -39 | |
| -22 |
Map overview
E3 is a single/Striking Force/Combined fleet three-phase map consisting of one transport and two boss phases.
- 2 LBAS are available on this map:
- Initially, no LBAS is available,
- After Phase 1, only 1 can be set on Sortie, the other being limited to Defense,
- This map uses 3 locks:
 2nd Fleet (from E-1, reused on E-7),
 1st Torpedo Squadron (reused on E-4),
 5th Fleet Main Force (reused on E-4).
- "Airstrike Supported Battle" node is present on C1 G P
Phase 1 - TP
Phase 1 is a "Transport Operation":
- Single Fleet: 0-1AV, 0-1BBV, 0-1CVL, 1CL, 3-5DD

- Route: 1 A A1 B B1 B2 C2 E
- Bringing an AACI capable ship is recommended to pass through the air node.
- Bringing some ASW power can be helpful against node A.
- Both Node Support & Boss Support can be utilized to consistently reaches the boss and A-rank.
Phase 2 - Boss
- Striking Force Fleet: 1CVL, 0-1CAV/CLT, 1-2CL, 3-5DD

- Route: 2 F H I L M
- It is possible to bring an (F)BB(V) to gain the second shelling, but this might not be needed.
- If the fleet is SLOW, fleet requires 4 DD/DE to route
- Otherwise, only 3 DD minimum is needed for a FAST Fleet.
- Striking Force Fleet: 0-2(F)BB(V)/CVL, 0-1CAV/CLT, 0-2CL, 2-5DD
- Route: 2 F H I J L M
- Heavier fleet that ignores speed and can enable the second shelling round
- Encounters an additional submarine node at J
- LBAS range: 4
Phase 3 - Boss
- CTF: FAST

- Main: 1(F)BB(V), 2CV(B), 2CVL, 1CL
- Escort: 1CL, 1CLT, 4DD
- Route: 3 O Q R T W
- CTF/STF: FAST
- Main: 2(F)BB(V), 2CVL, 1CA(V), 1CL
- Escort: 1CL, 1CLT, 4DD
- Route: 3 O Q R T W
- LBAS range: 7
- AP/AS = 235/527 on chip. AP/AS = 248/557 on LD
- Bringing an AACI capable ship is recommended to pass through the air node and against the boss.
- Bringing some ASW power can be helpful against node R
- Fleet must be Fast to route correctly.
Debuff
Once LD has been reached, the following steps have to be performed to debuff the boss:
| E | M | K | U | LBAS | |
|---|---|---|---|---|---|
| Hard | A+ | A+ | A+ | A+ | AS x2 |
| Medium | A+ | A+ | - | ? | AS x2 |
| Easy | ? | ? | - | ? | ? |
| Casual | ? | ? | - | ? | ? |
- Refer to #Phase 1 - TP's fleet for composition and routing.
- LBAS range: 2
- Refer to #Phase 2 - Boss's fleet for composition and routing.
- LBAS range: 2
- Striking Force: #Phase 2 - Boss's fleet without CL (SLOW?)
- Route: 2 F H I J K
- Low LoS is needed.
- LBAS range: 4
- LoS must be relatively low to get to node K
- Bringing ASW power is required.
- CTF/STF: 2(F)BB(V), 2CV(L), 1CA(V), 1CL + 1CL, 2CLT/CA, 3DD
- Route: 3 O Q R T W
- LBAS range: 6
| AS | |
|---|---|
| Hard | 368 |
| Medium | 282 |
| Easy | 279 |
| Casual | 207 |
Once Debuff is complete the CG will change to the following:
| Aircraft Carrier Summer Princess |
|---|
|


Enemy Compositions
| # | Formation | Air Raids | AD/AP AS/AS+ |
|---|---|---|---|
| AB | Diamond | 70/140 314/627 | |
| Diamond | 78/156 350/699 | ||
| Diamond | 83/165 369/738 | ||
| # | Formation | Air Raids | AD/AP AS/AS+ |
| # | Formation | Normal Battle Node | AD/AP AS/AS+ |
|---|---|---|---|
| A | Echelon Line Abreast Phases: 1, 2, 3 |
0/0 0/0 | |
| Echelon Line Abreast Phases: 1, 3 |
0/0 0/0 | ||
| Echelon Line Abreast Phases: 1, 2, 3 |
0/0 0/0 | ||
| # | Formation | Normal Battle Node | AD/AP AS/AS+ |
| # | Formation | Air Defense Node | AD/AP AS/AS+ |
|---|---|---|---|
| A1 | Diamond Phases: 1, 3 |
36/72 161/321 | |
| Diamond Phases: 1, 3 |
47/93 207/414 | ||
| Diamond Phases: 1 |
59/118 264/528 | ||
| # | Formation | Air Defense Node | AD/AP AS/AS+ |
| # | Formation | Normal Battle Node | AD/AP AS/AS+ |
|---|---|---|---|
| A2 | Echelon Line Abreast Phases: 1, 3 |
0/0 0/0 | |
| Echelon Line Abreast Phases: 1 |
0/0 0/0 | ||
| # | Formation | Normal Battle Node | AD/AP AS/AS+ |
| # | Empty Node | ||
|---|---|---|---|
| B | 気のせいだった。 これより津軽海峡へ進入、太平洋側に出る。艦隊、対空警戒を厳に! Must be my imagination. We will now enter the Tsugaru Strait and exit on the Pacific side. Fleet, keep strict anti-aircraft alert! | ||
| # | Empty Node | ||
| # | Formation | Air Defense Node | AD/AP AS/AS+ |
|---|---|---|---|
| B1 | Diamond Phases: 1, 3 |
36/72 161/321 | |
| Diamond Phases: 1, 3 |
47/93 207/414 | ||
| Diamond Phases: 1, 3 |
59/118 264/528 | ||
| # | Formation | Air Defense Node | AD/AP AS/AS+ |
| # | Formation | Normal Battle Node | AD/AP AS/AS+ |
|---|---|---|---|
| B2 | Line Ahead Double Line Phases: 1, 3 |
0/0 0/0 | |
| Line Ahead Double Line Phases: 1, 3 |
0/0 0/0 | ||
| Line Ahead Double Line Phases: 1, 3 |
0/0 0/0 | ||
| # | Formation | Normal Battle Node | AD/AP AS/AS+ |
| # | Empty Node | ||
|---|---|---|---|
| C | 気のせいだった。 艦隊はこれより八戸港に入港する。入港用意! Must be my imagination. Our fleet will now enter the port of Hachinohe. Get ready to dock! | ||
| # | Empty Node | ||
| # | Formation | Supported Battle Node | AD/AP AS/AS+ |
|---|---|---|---|
| C1 | Line Abreast | 43/85 189/378 | |
| Line Abreast | 43/85 189/378 | ||
| # | Formation | Supported Battle Node | AD/AP AS/AS+ |
| # | Landing Node | ||
|---|---|---|---|
| C2 | 輸送物資の揚陸地点に到達しました。本海域の輸送作戦は無事完了しています。 The landing point of the convoy has been reached. The transport operation here has already been completed successfully. | ||
| # | Landing Node | ||
| # | Empty Node | ||
|---|---|---|---|
| D | 敵影を見ず。 艦隊はこれより八戸港に入港する。入港用意! No enemy spotted. Our fleet will now enter the port of Hachinohe. Get ready to dock! | ||
| # | Empty Node | ||
| # | Formation | Boss Battle Node | AD/AP AS/AS+ |
|---|---|---|---|
| E | Line Ahead Double Line Diamond Phases: 1, 3 |
0/0 0/0 | |
| # | Formation | Boss Battle Node | AD/AP AS/AS+ |
| # | Empty Node | ||
|---|---|---|---|
| F | 気のせいだった。 第五艦隊、前進ッ!八戸沖の敵艦隊を撃滅する。続け! Must be my imagination. 5th Fleet, advance! Destroy the enemy fleet off Hachinohe. Keep going! | ||
| # | Empty Node | ||
| # | Formation | Supported Battle Node | AD/AP AS/AS+ |
|---|---|---|---|
| G | Line Abreast | 43/85 189/378 | |
| Echelon Line Abreast |
43/85 189/378 | ||
| Echelon Line Abreast |
43/85 189/378 | ||
| # | Formation | Supported Battle Node | AD/AP AS/AS+ |
| # | Formation | Air Defense Node | AD/AP AS/AS+ |
|---|---|---|---|
| H | Diamond Phases: 2, 3 |
59/117 263/525 | |
| Diamond Phases: 2, 3 |
72/143 320/639 | ||
| Diamond Phases: 2, 3 |
66/131 293/585 | ||
| # | Formation | Air Defense Node | AD/AP AS/AS+ |
| # | Formation | Normal Battle Node | AD/AP AS/AS+ |
|---|---|---|---|
| I | Line Ahead Echelon Phases: 2, 3 |
0/0 0/0 | |
| Line Ahead Echelon Phases: 2, 3 |
0/0 0/0 | ||
| Line Ahead Echelon Phases: 2, 3 |
0/0 0/0 | ||
| # | Formation | Normal Battle Node | AD/AP AS/AS+ |
| # | Formation | Normal Battle Node | AD/AP AS/AS+ |
|---|---|---|---|
| J | Echelon Line Abreast Phases: 2, 3 |
0/0 0/0 | |
| Echelon Line Abreast Phases: 2, 3 |
0/0 0/0 | ||
| # | Formation | Normal Battle Node | AD/AP AS/AS+ |
| # | Formation | Normal Battle Node | AD/AP AS/AS+ |
|---|---|---|---|
| K | Echelon Line Abreast Phases: 3 |
0/0 0/0 | |
| Echelon Line Abreast Phases: 3 |
0/0 0/0 | ||
| # | Formation | Normal Battle Node | AD/AP AS/AS+ |
| # | Formation | Normal Battle Node | AD/AP AS/AS+ |
|---|---|---|---|
| L | Diamond Phases: 2, 3 |
59/117 263/525 | |
| Diamond Phases: 2, 3 |
72/143 320/639 | ||
| Diamond Phases: 2, 3 |
66/131 293/585 | ||
| # | Formation | Normal Battle Node | AD/AP AS/AS+ |
| # | Formation | Boss Battle Node | AD/AP AS/AS+ |
|---|---|---|---|
| M | Line Ahead Echelon Phases: 2, 3 |
0/0 0/0 | |
| Line Ahead Echelon Phases: 2, 3 (Final)
|
0/0 0/0 | ||
| # | Formation | Boss Battle Node | AD/AP AS/AS+ |
| # | Formation | Air Defense Node | AD/AP AS/AS+ |
|---|---|---|---|
| N | Diamond Phases: 3 |
89/177 396/792 | |
| Diamond Phases: 3 |
112/223 500/999 | ||
| Diamond Phases: 3 |
124/248 557/1113 | ||
| # | Formation | Air Defense Node | AD/AP AS/AS+ |
| # | Formation | Normal Battle Node | AD/AP AS/AS+ |
|---|---|---|---|
| O | Line Ahead Double Line Phases: 3 |
0/0 0/0 | |
| Line Ahead Double Line Phases: 3 |
0/0 0/0 | ||
| Line Ahead Double Line Phases: 3 |
0/0 0/0 | ||
| # | Formation | Normal Battle Node | AD/AP AS/AS+ |
| # | Formation | Supported Battle Node | AD/AP AS/AS+ |
|---|---|---|---|
| P | Line Abreast Phases: 3 |
43/85 189/378 | |
| # | Formation | Supported Battle Node | AD/AP AS/AS+ |
| # | Formation | Air Defense Node | AD/AP AS/AS+ |
|---|---|---|---|
| Q | Diamond Phases: 3 |
89/177 396/792 | |
| Diamond Phases: 3 |
112/223 500/999 | ||
| Diamond Phases: 3 |
124/248 557/1113 | ||
| # | Formation | Air Defense Node | AD/AP AS/AS+ |
| # | Formation | Normal Battle Node | AD/AP AS/AS+ |
|---|---|---|---|
| R | Echelon Line Abreast Phases: 3 |
0/0 0/0 | |
| Echelon Line Abreast Phases: 3 |
0/0 0/0 | ||
| # | Formation | Normal Battle Node | AD/AP AS/AS+ |
| # | Formation | Normal Battle Node | AD/AP AS/AS+ |
|---|---|---|---|
| T | Line Ahead Double Line Echelon Phases: 3 |
0/0 0/0 | |
| # | Formation | Normal Battle Node | AD/AP AS/AS+ |
| # | Formation | Normal Battle Node | AD/AP AS/AS+ |
|---|---|---|---|
| U | Echelon Line Abreast Phases: 3 |
0/0 0/0 | |
| Echelon Line Abreast Phases: 3 |
0/0 0/0 | ||
| # | Formation | Normal Battle Node | AD/AP AS/AS+ |
| # | Formation | Boss Battle Node | AD/AP AS/AS+ |
|---|---|---|---|
| W | Cruising Formation 3 Phases: 3 |
124/248 557/1113 | |
| Cruising Formation 3 Phases: 3 (Final)
|
118/235 527/1053 | ||
| # | Formation | Boss Battle Node | AD/AP AS/AS+ |
| # | Formation | Air Raids | AD/AP AS/AS+ |
|---|---|---|---|
| AB | Diamond | 42/83 185/369 | |
| Diamond | 50/99 221/441 | ||
| Diamond | 64/128 287/573 | ||
| # | Formation | Air Raids | AD/AP AS/AS+ |
| # | Formation | Normal Battle Node | AD/AP AS/AS+ |
|---|---|---|---|
| A | Echelon Line Abreast Phases: 1 |
0/0 0/0 | |
| Echelon Line Abreast Phases: 1, 2, 3 |
0/0 0/0 | ||
| Echelon Line Abreast Phases: 1 |
0/0 0/0 | ||
| # | Formation | Normal Battle Node | AD/AP AS/AS+ |
| # | Formation | Air Defense Node | AD/AP AS/AS+ |
|---|---|---|---|
| A1 | Diamond Phases: 1 |
26/52 116/231 | |
| Diamond Phases: 1 |
32/63 140/279 | ||
| Diamond Phases: 1 |
47/93 207/414 | ||
| # | Formation | Air Defense Node | AD/AP AS/AS+ |
| # | Formation | Normal Battle Node | AD/AP AS/AS+ |
|---|---|---|---|
| A2 | Line Abreast | 0/0 0/0 | |
| # | Formation | Normal Battle Node | AD/AP AS/AS+ |
| # | Empty Node | ||
|---|---|---|---|
| B | 気のせいだった。 これより津軽海峡へ進入、太平洋側に出る。艦隊、対空警戒を厳に! Must be my imagination. We will now enter the Tsugaru Strait and exit on the Pacific side. Fleet, keep strict anti-aircraft alert! | ||
| # | Empty Node | ||
| # | Formation | Air Defense Node | AD/AP AS/AS+ |
|---|---|---|---|
| B1 | Diamond Phases: 1 |
26/52 116/231 | |
| Diamond Phases: 1 |
32/63 140/279 | ||
| Diamond Phases: 1 |
47/93 207/414 | ||
| # | Formation | Air Defense Node | AD/AP AS/AS+ |
| # | Formation | Normal Battle Node | AD/AP AS/AS+ |
|---|---|---|---|
| B2 | Line Ahead Double Line Phases: 1 |
0/0 0/0 | |
| Line Ahead Double Line Phases: 1 |
0/0 0/0 | ||
| # | Formation | Normal Battle Node | AD/AP AS/AS+ |
| # | Empty Node | ||
|---|---|---|---|
| C | 気のせいだった。 艦隊はこれより八戸港に入港する。入港用意! Must be my imagination. Our fleet will now enter the port of Hachinohe. Get ready to dock! | ||
| # | Empty Node | ||
| # | Formation | Supported Battle Node | AD/AP AS/AS+ |
|---|---|---|---|
| C1 | Line Abreast | 43/85 189/378 | |
| # | Formation | Supported Battle Node | AD/AP AS/AS+ |
| # | Landing Node | ||
|---|---|---|---|
| C2 | 輸送物資の揚陸地点に到達しました。本海域の輸送作戦は無事完了しています。 The landing point of the convoy has been reached. The transport operation here has already been completed successfully. | ||
| # | Landing Node | ||
| # | Empty Node | ||
|---|---|---|---|
| D | 敵影を見ず。 艦隊はこれより八戸港に入港する。入港用意! No enemy spotted. Our fleet will now enter the port of Hachinohe. Get ready to dock! | ||
| # | Empty Node | ||
| # | Formation | Boss Battle Node | AD/AP AS/AS+ |
|---|---|---|---|
| E | Line Ahead Double Line Diamond Phases: 1 |
0/0 0/0 | |
| # | Formation | Boss Battle Node | AD/AP AS/AS+ |
| # | Empty Node | ||
|---|---|---|---|
| F | 気のせいだった。 第五艦隊、前進ッ!八戸沖の敵艦隊を撃滅する。続け! Must be my imagination. 5th Fleet, advance! Destroy the enemy fleet off Hachinohe. Keep going! | ||
| # | Empty Node | ||
| # | Formation | Supported Battle Node | AD/AP AS/AS+ |
|---|---|---|---|
| G | Line Abreast | 43/85 189/378 | |
| # | Formation | Supported Battle Node | AD/AP AS/AS+ |
| # | Formation | Air Defense Node | AD/AP AS/AS+ |
|---|---|---|---|
| H | Diamond Phases: 2, 3 |
45/90 201/402 | |
| Diamond Phases: 2, 3 |
51/101 225/450 | ||
| Diamond Phases: 2, 3 |
66/131 293/585 | ||
| # | Formation | Air Defense Node | AD/AP AS/AS+ |
| # | Formation | Normal Battle Node | AD/AP AS/AS+ |
|---|---|---|---|
| I | Line Ahead Echelon Phases: 2, 3 |
0/0 0/0 | |
| Line Ahead Echelon Phases: 2, 3 |
0/0 0/0 | ||
| # | Formation | Normal Battle Node | AD/AP AS/AS+ |
| # | Formation | Normal Battle Node | AD/AP AS/AS+ |
|---|---|---|---|
| J | Echelon | 0/0 0/0 | |
| Echelon Line Abreast |
0/0 0/0 | ||
| Echelon Line Abreast |
0/0 0/0 | ||
| # | Formation | Normal Battle Node | AD/AP AS/AS+ |
| # | Formation | Normal Battle Node | AD/AP AS/AS+ |
|---|---|---|---|
| K | Echelon Line Abreast |
0/0 0/0 | |
| Echelon Line Abreast |
0/0 0/0 | ||
| # | Formation | Normal Battle Node | AD/AP AS/AS+ |
| # | Formation | Normal Battle Node | AD/AP AS/AS+ |
|---|---|---|---|
| L | Diamond Phases: 2, 3 |
45/90 201/402 | |
| Diamond Phases: 2, 3 |
51/101 225/450 | ||
| Diamond Phases: 2, 3 |
66/131 293/585 | ||
| # | Formation | Normal Battle Node | AD/AP AS/AS+ |
| # | Formation | Boss Battle Node | AD/AP AS/AS+ |
|---|---|---|---|
| M | Line Ahead Echelon Phases: 2, 3 |
0/0 0/0 | |
| Line Ahead Echelon Phases: 2, 3 (Final)
|
0/0 0/0 | ||
| # | Formation | Boss Battle Node | AD/AP AS/AS+ |
| # | Formation | Air Defense Node | AD/AP AS/AS+ |
|---|---|---|---|
| N | Diamond Phases: 3 |
82/164 368/735 | |
| Diamond | 90/180 404/807 | ||
| Diamond | 105/210 471/942 | ||
| # | Formation | Air Defense Node | AD/AP AS/AS+ |
| # | Formation | Normal Battle Node | AD/AP AS/AS+ |
|---|---|---|---|
| O | Line Ahead Double Line Phases: 3 |
0/0 0/0 | |
| Line Ahead Double Line Phases: 3 |
0/0 0/0 | ||
| # | Formation | Normal Battle Node | AD/AP AS/AS+ |
| # | Formation | Supported Battle Node | AD/AP AS/AS+ |
|---|---|---|---|
| # | Formation | Supported Battle Node | AD/AP AS/AS+ |
| # | Formation | Air Defense Node | AD/AP AS/AS+ |
|---|---|---|---|
| Q | Diamond Phases: 3 |
82/164 368/735 | |
| Diamond Phases: 3 |
90/180 404/807 | ||
| Diamond Phases: 3 |
105/210 471/942 | ||
| # | Formation | Air Defense Node | AD/AP AS/AS+ |
| # | Formation | Normal Battle Node | AD/AP AS/AS+ |
|---|---|---|---|
| R | Echelon Line Abreast Phases: 3 |
0/0 0/0 | |
| Echelon Line Abreast Phases: 3 |
0/0 0/0 | ||
| Echelon Line Abreast Phases: 3 |
0/0 0/0 | ||
| # | Formation | Normal Battle Node | AD/AP AS/AS+ |
| # | Formation | Normal Battle Node | AD/AP AS/AS+ |
|---|---|---|---|
| T | Line Ahead Double Line Echelon Phases: 3 |
0/0 0/0 | |
| # | Formation | Normal Battle Node | AD/AP AS/AS+ |
| # | Formation | Normal Battle Node | AD/AP AS/AS+ |
|---|---|---|---|
| U | Echelon Line Abreast Phases: 3 |
0/0 0/0 | |
| Echelon Line Abreast Phases: 3 |
0/0 0/0 | ||
| # | Formation | Normal Battle Node | AD/AP AS/AS+ |
| # | Formation | Boss Battle Node | AD/AP AS/AS+ |
|---|---|---|---|
| W | Cruising Formation 3 Phases: 3 |
105/210 471/942 | |
| Cruising Formation 3 Phases: 3 (Final)
|
113/226 507/1014 | ||
| # | Formation | Boss Battle Node | AD/AP AS/AS+ |
| # | Formation | Air Raids | AD/AP AS/AS+ |
|---|---|---|---|
| AB | Diamond | 40/79 176/351 | |
| Diamond | 42/84 188/375 | ||
| Diamond | 64/128 287/573 | ||
| # | Formation | Air Raids | AD/AP AS/AS+ |
| # | Formation | Normal Battle Node | AD/AP AS/AS+ |
|---|---|---|---|
| A | Echelon Line Abreast Phases: 1, 2 |
0/0 0/0 | |
| Echelon Line Abreast Phases: 1, 2, 3 |
0/0 0/0 | ||
| Echelon Line Abreast Phases: 1, 2 |
0/0 0/0 | ||
| # | Formation | Normal Battle Node | AD/AP AS/AS+ |
| # | Formation | Air Defense Node | AD/AP AS/AS+ |
|---|---|---|---|
| A1 | Diamond Phases: 1, 2, 3 |
24/47 104/207 | |
| Diamond Phases: 1, 3 |
26/52 116/231 | ||
| Diamond Phases: 1 |
32/63 140/279 | ||
| # | Formation | Air Defense Node | AD/AP AS/AS+ |
| # | Formation | Normal Battle Node | AD/AP AS/AS+ |
|---|---|---|---|
| A2 | Echelon Line Abreast |
0/0 0/0 | |
| Echelon Line Abreast Phases: 1 |
0/0 0/0 | ||
| Echelon Line Abreast Phases: 1 |
0/0 0/0 | ||
| # | Formation | Normal Battle Node | AD/AP AS/AS+ |
| # | Empty Node | ||
|---|---|---|---|
| B | 気のせいだった。 これより津軽海峡へ進入、太平洋側に出る。艦隊、対空警戒を厳に! Must be my imagination. We will now enter the Tsugaru Strait and exit on the Pacific side. Fleet, keep strict anti-aircraft alert! | ||
| # | Empty Node | ||
| # | Formation | Air Defense Node | AD/AP AS/AS+ |
|---|---|---|---|
| B1 | Diamond Phases: 1, 3 |
24/47 104/207 | |
| Diamond Phases: 1 |
26/52 116/231 | ||
| Diamond Phases: 1, 3 |
32/63 140/279 | ||
| # | Formation | Air Defense Node | AD/AP AS/AS+ |
| # | Formation | Normal Battle Node | AD/AP AS/AS+ |
|---|---|---|---|
| B2 | Line Ahead Double Line Phases: 1, 3 |
0/0 0/0 | |
| Line Ahead Double Line Phases: 1, 3 |
0/0 0/0 | ||
| # | Formation | Normal Battle Node | AD/AP AS/AS+ |
| # | Empty Node | ||
|---|---|---|---|
| C | 気のせいだった。 艦隊はこれより八戸港に入港する。入港用意! Must be my imagination. Our fleet will now enter the port of Hachinohe. Get ready to dock! | ||
| # | Empty Node | ||
| # | Formation | Supported Battle Node | AD/AP AS/AS+ |
|---|---|---|---|
| C1 | Echelon Line Abreast Phases: 1 |
3/6 12/24 | |
| Echelon Line Abreast |
9/17 36/72 | ||
| Echelon Line Abreast Phases: 1 |
43/85 189/378 | ||
| # | Formation | Supported Battle Node | AD/AP AS/AS+ |
| # | Landing Node | ||
|---|---|---|---|
| C2 | 輸送物資の揚陸地点に到達しました。本海域の輸送作戦は無事完了しています。 The landing point of the convoy has been reached. The transport operation here has already been completed successfully. | ||
| # | Landing Node | ||
| # | Empty Node | ||
|---|---|---|---|
| D | 敵影を見ず。 艦隊はこれより八戸港に入港する。入港用意! No enemy spotted. Our fleet will now enter the port of Hachinohe. Get ready to dock! | ||
| # | Empty Node | ||
| # | Formation | Boss Battle Node | AD/AP AS/AS+ |
|---|---|---|---|
| E | Line Ahead Double Line Diamond Phases: 1, 3 |
0/0 0/0 | |
| # | Formation | Boss Battle Node | AD/AP AS/AS+ |
| # | Empty Node | ||
|---|---|---|---|
| F | 気のせいだった。 第五艦隊、前進ッ!八戸沖の敵艦隊を撃滅する。続け! Must be my imagination. 5th Fleet, advance! Destroy the enemy fleet off Hachinohe. Keep going! | ||
| # | Empty Node | ||
| # | Formation | Supported Battle Node | AD/AP AS/AS+ |
|---|---|---|---|
| G | Line Abreast | 9/17 36/72 | |
| # | Formation | Supported Battle Node | AD/AP AS/AS+ |
| # | Formation | Air Defense Node | AD/AP AS/AS+ |
|---|---|---|---|
| H | Diamond Phases: 2, 3 |
43/85 189/378 | |
| Diamond Phases: 2, 3 |
45/90 201/402 | ||
| Diamond Phases: 2, 3 |
51/101 225/450 | ||
| # | Formation | Air Defense Node | AD/AP AS/AS+ |
| # | Formation | Normal Battle Node | AD/AP AS/AS+ |
|---|---|---|---|
| I | Line Ahead Echelon Phases: 2, 3 |
0/0 0/0 | |
| Line Ahead Echelon Phases: 2, 3 |
0/0 0/0 | ||
| # | Formation | Normal Battle Node | AD/AP AS/AS+ |
| # | Formation | Normal Battle Node | AD/AP AS/AS+ |
|---|---|---|---|
| J | Echelon Line Abreast |
0/0 0/0 | |
| Echelon Line Abreast Phases: 3 |
0/0 0/0 | ||
| Echelon Line Abreast Phases: 2, 3 |
0/0 0/0 | ||
| # | Formation | Normal Battle Node | AD/AP AS/AS+ |
| # | Formation | Normal Battle Node | AD/AP AS/AS+ |
|---|---|---|---|
| K | Echelon Line Abreast Phases: 3 |
0/0 0/0 | |
| Echelon | 0/0 0/0 | ||
| # | Formation | Normal Battle Node | AD/AP AS/AS+ |
| # | Formation | Normal Battle Node | AD/AP AS/AS+ |
|---|---|---|---|
| L | Diamond Phases: 2, 3 |
43/85 189/378 | |
| Diamond Phases: 2, 3 |
45/90 201/402 | ||
| Diamond Phases: 2, 3 |
51/101 225/450 | ||
| # | Formation | Normal Battle Node | AD/AP AS/AS+ |
| # | Formation | Boss Battle Node | AD/AP AS/AS+ |
|---|---|---|---|
| M | Line Ahead Echelon Phases: 2, 3 |
0/0 0/0 | |
| Line Ahead Echelon Phases: 2, 3 |
0/0 0/0 | ||
| Line Ahead Echelon Phases: 2, 3 (Final)
|
0/0 0/0 | ||
| # | Formation | Boss Battle Node | AD/AP AS/AS+ |
| # | Formation | Air Defense Node | AD/AP AS/AS+ |
|---|---|---|---|
| N | Diamond Phases: 3 |
82/163 365/729 | |
| Diamond Phases: 3 |
84/168 377/753 | ||
| Diamond | 90/179 401/801 | ||
| # | Formation | Air Defense Node | AD/AP AS/AS+ |
| # | Formation | Normal Battle Node | AD/AP AS/AS+ |
|---|---|---|---|
| O | Line Ahead Double Line Phases: 3 |
0/0 0/0 | |
| Line Ahead Double Line Phases: 3 |
0/0 0/0 | ||
| # | Formation | Normal Battle Node | AD/AP AS/AS+ |
| # | Formation | Supported Battle Node | AD/AP AS/AS+ |
|---|---|---|---|
| # | Formation | Supported Battle Node | AD/AP AS/AS+ |
| # | Formation | Air Defense Node | AD/AP AS/AS+ |
|---|---|---|---|
| Q | Diamond Phases: 3 |
82/163 365/729 | |
| Diamond Phases: 3 |
84/168 377/753 | ||
| Diamond Phases: 3 |
90/179 401/801 | ||
| # | Formation | Air Defense Node | AD/AP AS/AS+ |
| # | Formation | Normal Battle Node | AD/AP AS/AS+ |
|---|---|---|---|
| R | Echelon Line Abreast Phases: 3 |
0/0 0/0 | |
| Echelon Line Abreast Phases: 3 |
0/0 0/0 | ||
| Echelon Line Abreast Phases: 3 |
0/0 0/0 | ||
| # | Formation | Normal Battle Node | AD/AP AS/AS+ |
| # | Formation | Normal Battle Node | AD/AP AS/AS+ |
|---|---|---|---|
| T | Line Ahead Double Line Echelon Phases: 3 |
0/0 0/0 | |
| # | Formation | Normal Battle Node | AD/AP AS/AS+ |
| # | Formation | Normal Battle Node | AD/AP AS/AS+ |
|---|---|---|---|
| U | Echelon Line Abreast Phases: 3 |
0/0 0/0 | |
| Echelon Line Abreast Phases: 3 |
0/0 0/0 | ||
| # | Formation | Normal Battle Node | AD/AP AS/AS+ |
| # | Formation | Boss Battle Node | AD/AP AS/AS+ |
|---|---|---|---|
| W | Cruising Formation 3 Phases: 3 |
90/179 401/801 | |
| Cruising Formation 3 Phases: 3 (Final)
|
105/209 468/936 | ||
| # | Formation | Boss Battle Node | AD/AP AS/AS+ |
| # | Formation | Air Raids | AD/AP AS/AS+ |
|---|---|---|---|
| AB | Diamond | 42/83 186/372 | |
| Diamond | 40/79 176/351 | ||
| Diamond | 47/93 209/417 | ||
| # | Formation | Air Raids | AD/AP AS/AS+ |
| # | Formation | Normal Battle Node | AD/AP AS/AS+ |
|---|---|---|---|
| A | Echelon Line Abreast Phases: 1, 2, 3 |
0/0 0/0 | |
| Echelon Line Abreast Phases: 1, 2 |
0/0 0/0 | ||
| # | Formation | Normal Battle Node | AD/AP AS/AS+ |
| # | Formation | Air Defense Node | AD/AP AS/AS+ |
|---|---|---|---|
| A1 | Diamond Phases: 1, 2 |
9/17 36/72 | |
| Diamond Phases: 1, 2 |
24/47 104/207 | ||
| Diamond Phases: 1, 2 |
26/52 116/231 | ||
| # | Formation | Air Defense Node | AD/AP AS/AS+ |
| # | Formation | Normal Battle Node | AD/AP AS/AS+ |
|---|---|---|---|
| A2 | Echelon Line Abreast Phases: 1 |
0/0 0/0 | |
| Echelon Line Abreast Phases: 1 |
0/0 0/0 | ||
| # | Formation | Normal Battle Node | AD/AP AS/AS+ |
| # | Empty Node | ||
|---|---|---|---|
| B | 気のせいだった。 これより津軽海峡へ進入、太平洋側に出る。艦隊、対空警戒を厳に! Must be my imagination. We will now enter the Tsugaru Strait and exit on the Pacific side. Fleet, keep strict anti-aircraft alert! | ||
| # | Empty Node | ||
| # | Formation | Air Defense Node | AD/AP AS/AS+ |
|---|---|---|---|
| B1 | Diamond Phases: 1, 2 |
9/17 36/72 | |
| Diamond Phases: 1, 2 |
24/47 104/207 | ||
| Diamond Phases: 1 |
26/52 116/231 | ||
| # | Formation | Air Defense Node | AD/AP AS/AS+ |
| # | Formation | Normal Battle Node | AD/AP AS/AS+ |
|---|---|---|---|
| B2 | Line Ahead Double Line Phases: 1, 2 |
0/0 0/0 | |
| Line Ahead Double Line Phases: 1 |
0/0 0/0 | ||
| # | Formation | Normal Battle Node | AD/AP AS/AS+ |
| # | Empty Node | ||
|---|---|---|---|
| C | 気のせいだった。 艦隊はこれより八戸港に入港する。入港用意! Must be my imagination. Our fleet will now enter the port of Hachinohe. Get ready to dock! | ||
| # | Empty Node | ||
| # | Formation | Supported Battle Node | AD/AP AS/AS+ |
|---|---|---|---|
| C1 | Echelon Line Abreast Phases: 1 |
3/6 12/24 | |
| Echelon Line Abreast Phases: 1 |
9/17 36/72 | ||
| # | Formation | Supported Battle Node | AD/AP AS/AS+ |
| # | Landing Node | ||
|---|---|---|---|
| C2 | 輸送物資の揚陸地点に到達しました。本海域の輸送作戦は無事完了しています。 The landing point of the convoy has been reached. The transport operation here has already been completed successfully. | ||
| # | Landing Node | ||
| # | Empty Node | ||
|---|---|---|---|
| D | 敵影を見ず。 艦隊はこれより八戸港に入港する。入港用意! No enemy spotted. Our fleet will now enter the port of Hachinohe. Get ready to dock! | ||
| # | Empty Node | ||
| # | Formation | Boss Battle Node | AD/AP AS/AS+ |
|---|---|---|---|
| E | Line Ahead Double Line Diamond Phases: 1, 2 |
0/0 0/0 | |
| # | Formation | Boss Battle Node | AD/AP AS/AS+ |
| # | Empty Node | ||
|---|---|---|---|
| F | 気のせいだった。 第五艦隊、前進ッ!八戸沖の敵艦隊を撃滅する。続け! Must be my imagination. 5th Fleet, advance! Destroy the enemy fleet off Hachinohe. Keep going! | ||
| # | Empty Node | ||
| # | Formation | Supported Battle Node | AD/AP AS/AS+ |
|---|---|---|---|
| # | Formation | Supported Battle Node | AD/AP AS/AS+ |
| # | Formation | Air Defense Node | AD/AP AS/AS+ |
|---|---|---|---|
| H | Diamond Phases: 2, 3 |
9/17 36/72 | |
| Diamond Phases: 2, 3 |
43/85 189/378 | ||
| Diamond Phases: 2, 3 |
45/90 201/402 | ||
| # | Formation | Air Defense Node | AD/AP AS/AS+ |
| # | Formation | Normal Battle Node | AD/AP AS/AS+ |
|---|---|---|---|
| I | Line Ahead Echelon Phases: 2, 3 |
0/0 0/0 | |
| Line Ahead Echelon Phases: 2, 3 |
0/0 0/0 | ||
| # | Formation | Normal Battle Node | AD/AP AS/AS+ |
| # | Formation | Normal Battle Node | AD/AP AS/AS+ |
|---|---|---|---|
| J | Echelon Line Abreast |
0/0 0/0 | |
| Echelon Line Abreast |
0/0 0/0 | ||
| # | Formation | Normal Battle Node | AD/AP AS/AS+ |
| # | Formation | Normal Battle Node | AD/AP AS/AS+ |
|---|---|---|---|
| # | Formation | Normal Battle Node | AD/AP AS/AS+ |
| # | Formation | Normal Battle Node | AD/AP AS/AS+ |
|---|---|---|---|
| L | Diamond Phases: 2, 3 |
9/17 36/72 | |
| Diamond Phases: 2, 3 |
43/85 189/378 | ||
| Diamond Phases: 2, 3 |
45/90 201/402 | ||
| # | Formation | Normal Battle Node | AD/AP AS/AS+ |
| # | Formation | Boss Battle Node | AD/AP AS/AS+ |
|---|---|---|---|
| M | Line Ahead Echelon Phases: 2, 3 |
0/0 0/0 | |
| Line Ahead Echelon Phases: 2, 3 (Final)
|
0/0 0/0 | ||
| # | Formation | Boss Battle Node | AD/AP AS/AS+ |
| # | Formation | Air Defense Node | AD/AP AS/AS+ |
|---|---|---|---|
| N | Diamond Phases: 3 |
81/161 360/720 | |
| Diamond Phases: 3 |
39/77 171/342 | ||
| Diamond Phases: 3 |
83/166 372/744 | ||
| # | Formation | Air Defense Node | AD/AP AS/AS+ |
| # | Formation | Normal Battle Node | AD/AP AS/AS+ |
|---|---|---|---|
| O | Line Ahead Double Line Phases: 3 |
0/0 0/0 | |
| Line Ahead Double Line Phases: 3 |
0/0 0/0 | ||
| # | Formation | Normal Battle Node | AD/AP AS/AS+ |
| # | Formation | Supported Battle Node | AD/AP AS/AS+ |
|---|---|---|---|
| P | Echelon | 3/6 12/24 | |
| Echelon Line Abreast |
9/17 36/72 | ||
| # | Formation | Supported Battle Node | AD/AP AS/AS+ |
| # | Formation | Air Defense Node | AD/AP AS/AS+ |
|---|---|---|---|
| Q | Diamond Phases: 3 |
81/161 360/720 | |
| Diamond Phases: 3 |
39/77 171/342 | ||
| Diamond Phases: 3 |
83/166 372/744 | ||
| # | Formation | Air Defense Node | AD/AP AS/AS+ |
| # | Formation | Normal Battle Node | AD/AP AS/AS+ |
|---|---|---|---|
| R | Echelon Line Abreast Phases: 3 |
0/0 0/0 | |
| Echelon Line Abreast Phases: 3 |
0/0 0/0 | ||
| # | Formation | Normal Battle Node | AD/AP AS/AS+ |
| # | Formation | Normal Battle Node | AD/AP AS/AS+ |
|---|---|---|---|
| T | Line Ahead Double Line Echelon Phases: 3 |
0/0 0/0 | |
| # | Formation | Normal Battle Node | AD/AP AS/AS+ |
| # | Formation | Normal Battle Node | AD/AP AS/AS+ |
|---|---|---|---|
| U | Echelon Line Abreast |
0/0 0/0 | |
| Echelon Line Abreast Phases: 3 |
0/0 0/0 | ||
| # | Formation | Normal Battle Node | AD/AP AS/AS+ |
| # | Formation | Boss Battle Node | AD/AP AS/AS+ |
|---|---|---|---|
| W | Cruising Formation 3 Phases: 3 |
39/77 171/342 | |
| Cruising Formation 3 Phases: 3 (Final)
|
81/161 360/720 | ||
| # | Formation | Boss Battle Node | AD/AP AS/AS+ |
Ship Drops
| Ship drops | |||||||||||||||||||||||||||||||||||||||||||||||||||||||||||||||||||||||||||||||||||||||||||||||||||
|---|---|---|---|---|---|---|---|---|---|---|---|---|---|---|---|---|---|---|---|---|---|---|---|---|---|---|---|---|---|---|---|---|---|---|---|---|---|---|---|---|---|---|---|---|---|---|---|---|---|---|---|---|---|---|---|---|---|---|---|---|---|---|---|---|---|---|---|---|---|---|---|---|---|---|---|---|---|---|---|---|---|---|---|---|---|---|---|---|---|---|---|---|---|---|---|---|---|---|---|
| Type | Ship? | E | L | M | T | W | |||||||||||||||||||||||||||||||||||||||||||||||||||||||||||||||||||||||||||||||||||||||||||||
| DE | Ukuru | Casual+ | |||||||||||||||||||||||||||||||||||||||||||||||||||||||||||||||||||||||||||||||||||||||||||||||||
| DE | Shimushu | Casual+ | Casual+ | Casual+ | Casual+ | ||||||||||||||||||||||||||||||||||||||||||||||||||||||||||||||||||||||||||||||||||||||||||||||
| DE | Kunashiri | Casual+ | Easy+ | Casual+ | Casual+ | ||||||||||||||||||||||||||||||||||||||||||||||||||||||||||||||||||||||||||||||||||||||||||||||
| DD | Yuugure | Casual+ | |||||||||||||||||||||||||||||||||||||||||||||||||||||||||||||||||||||||||||||||||||||||||||||||||
| DD | Usugumo | Casual+ | |||||||||||||||||||||||||||||||||||||||||||||||||||||||||||||||||||||||||||||||||||||||||||||||||
| DD | Ariake | Casual+ | Hard+ | Casual+ | Medium+ | ||||||||||||||||||||||||||||||||||||||||||||||||||||||||||||||||||||||||||||||||||||||||||||||
| DD | Asagumo | Casual+ | Casual+ | Casual+ | Casual+ | ||||||||||||||||||||||||||||||||||||||||||||||||||||||||||||||||||||||||||||||||||||||||||||||
| DD | Hatsukaze | Casual+ | Casual+ | Casual+ | Casual+ | ||||||||||||||||||||||||||||||||||||||||||||||||||||||||||||||||||||||||||||||||||||||||||||||
| DD | Amatsukaze | Casual+ | |||||||||||||||||||||||||||||||||||||||||||||||||||||||||||||||||||||||||||||||||||||||||||||||||
| DD | Tokitsukaze | Casual+ | |||||||||||||||||||||||||||||||||||||||||||||||||||||||||||||||||||||||||||||||||||||||||||||||||
| DD | Maikaze | Casual+ | Casual+ | Casual+ | Casual+ | ||||||||||||||||||||||||||||||||||||||||||||||||||||||||||||||||||||||||||||||||||||||||||||||
| CA | Mikuma | Casual+ | |||||||||||||||||||||||||||||||||||||||||||||||||||||||||||||||||||||||||||||||||||||||||||||||||
| FBB | Massachusetts | Hard+ | |||||||||||||||||||||||||||||||||||||||||||||||||||||||||||||||||||||||||||||||||||||||||||||||||
| FBB | South Dakota | Casual+ | |||||||||||||||||||||||||||||||||||||||||||||||||||||||||||||||||||||||||||||||||||||||||||||||||
| CV | Intrepid | Casual+ | |||||||||||||||||||||||||||||||||||||||||||||||||||||||||||||||||||||||||||||||||||||||||||||||||
| CV | Hornet | Casual+ | Casual+ | Casual+ | |||||||||||||||||||||||||||||||||||||||||||||||||||||||||||||||||||||||||||||||||||||||||||||||
| SS | I-201 | Casual+ | Casual+ | ||||||||||||||||||||||||||||||||||||||||||||||||||||||||||||||||||||||||||||||||||||||||||||||||
| SS | Salmon | Casual+ | |||||||||||||||||||||||||||||||||||||||||||||||||||||||||||||||||||||||||||||||||||||||||||||||||
| SS | I-203 | Casual+ | |||||||||||||||||||||||||||||||||||||||||||||||||||||||||||||||||||||||||||||||||||||||||||||||||
| AO | Yamashio Maru | Casual+ | |||||||||||||||||||||||||||||||||||||||||||||||||||||||||||||||||||||||||||||||||||||||||||||||||
| AO | Kamoi | Casual+ | Casual+ | Casual+ | Casual+ | Casual+ | |||||||||||||||||||||||||||||||||||||||||||||||||||||||||||||||||||||||||||||||||||||||||||||
| DD | Yukikaze | Casual+ | |||||||||||||||||||||||||||||||||||||||||||||||||||||||||||||||||||||||||||||||||||||||||||||||||
| DD | Shimakaze | Casual+ | |||||||||||||||||||||||||||||||||||||||||||||||||||||||||||||||||||||||||||||||||||||||||||||||||
| CL | Kitakami | Easy+ | Casual+ | Casual+ | Casual+ | Casual+ | |||||||||||||||||||||||||||||||||||||||||||||||||||||||||||||||||||||||||||||||||||||||||||||
| CL | Ooi | Easy+ | Easy+ | Casual+ | Casual+ | Casual+ | |||||||||||||||||||||||||||||||||||||||||||||||||||||||||||||||||||||||||||||||||||||||||||||
| CL | Abukuma | Casual+ | Easy+ | Casual+ | Casual+ | ||||||||||||||||||||||||||||||||||||||||||||||||||||||||||||||||||||||||||||||||||||||||||||||
| CL | Sendai | Casual+ | Casual+ | Casual+ | Casual+ | ||||||||||||||||||||||||||||||||||||||||||||||||||||||||||||||||||||||||||||||||||||||||||||||
| CL | Yuubari | Casual+ | Medium+ | Casual+ | Casual+ | Casual+ | |||||||||||||||||||||||||||||||||||||||||||||||||||||||||||||||||||||||||||||||||||||||||||||
| CA | Kinugasa | Casual+ | |||||||||||||||||||||||||||||||||||||||||||||||||||||||||||||||||||||||||||||||||||||||||||||||||
| CA | Mogami | Casual+ | |||||||||||||||||||||||||||||||||||||||||||||||||||||||||||||||||||||||||||||||||||||||||||||||||
| CA | Suzuya | Casual+ | |||||||||||||||||||||||||||||||||||||||||||||||||||||||||||||||||||||||||||||||||||||||||||||||||
| CA | Kumano | Casual+ | |||||||||||||||||||||||||||||||||||||||||||||||||||||||||||||||||||||||||||||||||||||||||||||||||
| CA | Tone | Medium+ | |||||||||||||||||||||||||||||||||||||||||||||||||||||||||||||||||||||||||||||||||||||||||||||||||
| CA | Chikuma | Medium+ | |||||||||||||||||||||||||||||||||||||||||||||||||||||||||||||||||||||||||||||||||||||||||||||||||
| FBB | Kongou | Easy+ | Casual+ | Casual+ | Casual+ | Casual+ | |||||||||||||||||||||||||||||||||||||||||||||||||||||||||||||||||||||||||||||||||||||||||||||
| FBB | Hiei | Easy+ | Casual+ | Casual+ | |||||||||||||||||||||||||||||||||||||||||||||||||||||||||||||||||||||||||||||||||||||||||||||||
| FBB | Haruna | Casual+ | Medium+ | Casual+ | Casual+ | Casual+ | |||||||||||||||||||||||||||||||||||||||||||||||||||||||||||||||||||||||||||||||||||||||||||||
| FBB | Kirishima | Hard+ | Casual+ | ||||||||||||||||||||||||||||||||||||||||||||||||||||||||||||||||||||||||||||||||||||||||||||||||
| BB | Fusou | Casual+ | |||||||||||||||||||||||||||||||||||||||||||||||||||||||||||||||||||||||||||||||||||||||||||||||||
| BB | Yamashiro | Casual+ | |||||||||||||||||||||||||||||||||||||||||||||||||||||||||||||||||||||||||||||||||||||||||||||||||
| BB | Hyuuga | Casual+ | |||||||||||||||||||||||||||||||||||||||||||||||||||||||||||||||||||||||||||||||||||||||||||||||||
| BB | Nagato | Casual+ | |||||||||||||||||||||||||||||||||||||||||||||||||||||||||||||||||||||||||||||||||||||||||||||||||
| CV | Akagi | Casual+ | |||||||||||||||||||||||||||||||||||||||||||||||||||||||||||||||||||||||||||||||||||||||||||||||||
| CV | Kaga | Casual+ | |||||||||||||||||||||||||||||||||||||||||||||||||||||||||||||||||||||||||||||||||||||||||||||||||
| CV | Souryuu | Casual+ | |||||||||||||||||||||||||||||||||||||||||||||||||||||||||||||||||||||||||||||||||||||||||||||||||
| CV | Hiryuu | Casual+ | |||||||||||||||||||||||||||||||||||||||||||||||||||||||||||||||||||||||||||||||||||||||||||||||||
| CV | Shoukaku | Easy+ | Casual+ | Casual+ | |||||||||||||||||||||||||||||||||||||||||||||||||||||||||||||||||||||||||||||||||||||||||||||||
|
| |||||||||
|---|---|---|---|---|---|---|---|---|---|
|
Time remaining until Event ends [7]:
| |||||||||
Trivia
This map involves many references to The Shield of Hachinohe which is the nickname of Inagi:
- Phase 3
- Is based on the final engagement and defensive actions of Inagi. Her actions here are what earned her the name 八戸の盾 or The Shield of Hachinohe. The shrine in Hachinohe also commemorates her actions and there is a service for her as well as a memorial dedicated to her in the area.
- Node W
- Is the final position of Inagi after 2 hours of drawing the attention of the Allied Aircraft. According to Japanese records and American records it was the aircraft from TF 38 USS Essex and USS Randolph that sank her. There is some discrepancy as the English Wikipedia entry states it was HMS Formidable that sank her but Royal Navy Archives state that Formidable sent planes to Shiogama. Meanwhile it was HMS Indefatigable that sent planes to Kesennuma, Kakuda and Hachinohe.