Introduction
The Winter 2017 Event Reconnaissance Force Emergency Deployment! Operation "Hikari" is scheduled to begin on February 11, 2017.
The theme of the event is based upon the Ogasawara Islands and "Operation Hikari", the IJN's planned reconnaissance of and raid on the USN base at Ulithi Atoll.
The upcoming event will be a "small-scale" event, and will feature 3 maps and at least 3 new ships.
Current known information from KanColle Staff's Twitterand Comptiq have revealed the event will mainly center round in the Ogasawara Islands and "Operation Hikari". And has noted there will while Operation Hikari will take place at the Ulithi atoll, the follow up operation of "Operation Arashi" will not be happening within this presentation.
For additional information regarding event-related subjects and content related to the dev tweets, please refer to the following links:
Historical Background
Disclaimer: The following information is based upon a summary of World War II history and may not have any influence with the game itself. This is for historical reference only.
Operation Hikari was a transport operation by the submarines I-13 and I-14. Their mission was to transport disassembled Saiuns to an ad hoc air base on Truk Atoll, where they would be used to scout the USN positions within Ulithi Atoll.
Operation Arashi was intended to be a follow-up air raid, where two squadrons of 6 Seiran seaplane bombers operating from the submarines I-400 and I-401 would bomb the USN positions within Ulithi Atoll.
Information
New Ships
As of this time, multiple ships have been confirmed to appear in the event which include:
- A Kamikaze-Class Destroyer that served alongside Asakaze and sank in a transport operations off of Chichijima, Ogasawara Islands after being attacked by a Submarine. (Matsukaze - E-2)
- A submarine capable of carrying seaplanes that successfully took part in Operation Hikari. (I-14- E-3 Drop?)
- Comptiq Magazine reveals that along with the above mentioned content that the Twin Sister of the sub that partook in Operation Hikari will also be avalaible in this event. (I-13 - Very likely a drop)
- A new Yuugumo-class Destroyer, Fujinami.
Event Requirements
The official Twitter account also states that two or more Saiun will be required for the second half of the event (presumably referring to the EO segment of the event). This only applies to players intending to tackle this part of the event on Normal or Hard difficulty. [1] Players on Easy difficulty only need Type 97 Torpedo Bombers for this segment of the event.[2]
The latter segment of the event will only be available starting from 12th February 2017 onwards, after 2300 JST. [3]
New Quests
| ID
|
Prereq.
|
Quest Name (Original)
Quest Name (Translated)
|
Description
|
Rewards
|
Note
|

|

|

|

|
Other
|
| SN13
|
|
【丙】作戦「彩雲」調達&輸送分解
(Easy) "Saiun" Supply & Disassembly for Transport
|
Saiun supply & disassembly mission: Scrap one "Type 0 Recon Seaplane", prepare 10 development materials and one "Type 97 Torpedo Bomber (regular version)"!
※ The prepared development materials and the required equipment (equipment with low modding levels will be prioritised) will be consumed upon clearing the mission.
|
0
|
0
|
0
|
0
|
Saiun (Disassembled for Transport)
|
Limited Time Event Quest
Easy Mode Only
10 devlopment materials, and 1 Type 97 Torpedo Bomber will be consumed upon completion of quest.
Can be done Twice before it's not accessible. (Will reappear once Saiun (Disassembled for Transport) have been consumed via E-3's Transport)
|
| SN14
|
|
「彩雲」輸送分解
Disassembling "Saiun" for Transport
|
Saiun supply & disassembly mission: Scrap one "Type 0 Recon Seaplane", prepare 20 development materials and one "Saiun"!
※ The prepared development materials and the required equipment (equipment with low modding levels will be prioritised) will be consumed upon clearing the mission.
|
0
|
0
|
0
|
0
|
Saiun (Disassembled for Transport)
|
Limited Time Event Quest
Normal and Hard Mode
20 devlopment materials, and 1 Saiun will be consumed upon completion of quest.
Can be done Twice before it's not accessible. (Will reappear once Saiun (Disassembled for Transport) have been consumed via E-3's Transport)
|
New Enemy Vessels
New Equipment
A new submarine-based piece of equipment will be given out on the last map of the event. (TBC)
Mechanics
Participation requirements
- Must have a 75% sortie win ratio.
- Must have 5 empty ship slots for new ships.
- Must have 20 free equipment slots.
Special Mechanics
- The difficulty system first used in Spring 2015 Event returns: you can choose between Operation A (甲, Hard), Operation B (乙, Medium) or Operation C (丙, Easy).
- Choosing A or B requires certain HQ Level (HQ Lv 35 for B / 80 for A in Spring 2015 Event).
- An important note to all Admirals intending to clear the event on Hard difficulty - further (new) conditions now apply:
- When switching difficulty from any other difficulty to Hard, the map's debuff mechanism (where applicable) will be reset.
- Switching between any other difficulties will not reset the debuff mechanism.
- Whether or not these conditions apply to the Winter 2017 Event (assuming a debuff mechanic exists) is currently pending confirmation.
- The armor-reducing system of the Summer 2015 Event's final map, where certain nodes had to be killed to reduce boss armor, is likely to return, but in a simplified version (see above for new changes regarding this).
- Operation A (甲, Hard) and Operation B (乙, Medium) will require you to have mutiple fleets ready, which suggests fleet locking (again, see above).
Event Map Summary
Quick Info Table
| Classification
|
Map
|
Name
|
Combined Fleet?
|
Land-Based Air Squadron?
|
Color of Tag
|
Tag Condition & Deployment Restriction
|
Difficulty Restrictions
|
Notes
|
| Main Operation
|
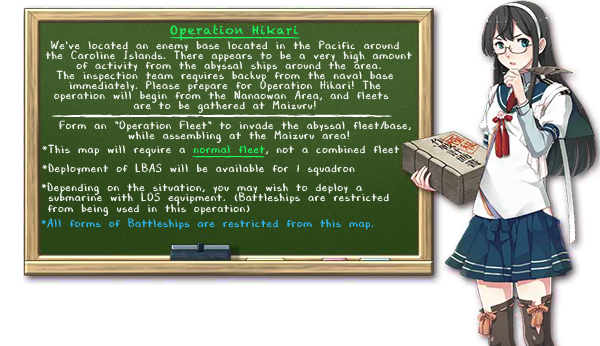
E-1
|
Preparation for Operation Hikari
|
No
|
Yes
(1 squadron only)
|

|
Tagging:
Ships not already color-tagged will be tagged with the color associated with the map when deployed. This tag exists on all difficulties and is not reset on remodel, etc.
Deployment Restriction:
Normal or Hard: Must have either the same-colored tag or no tag.
Easy: No restrictions.
|
No restrictions. All difficulties OK
|
|
| E-2
|
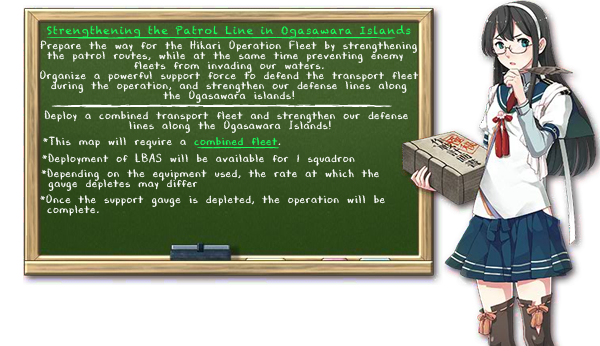
Strengthening the Patrol Line in Ogasawara Islands
|
Yes
|
Yes
(1 squadron only)
|

|
In order to play these maps on hard, you must complete the previous map* on either normal or hard.
(e.g., to do E-4 on hard, you must complete E-3 on normal or hard.)
|
|
| Extra Operation
|
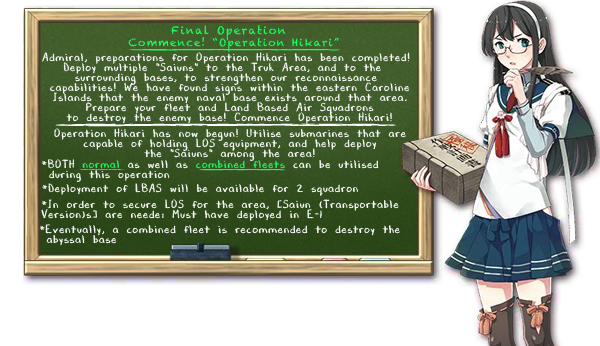
E-3
|
Commence! Operation Hikari
|
No
(TP Gauge)
Yes
(Boss HP Bar)
|
Yes
(2 squadrons)
|
|
|
Contribute Information
We would like you to contribute infromation regarding pathing, drops, enemy compositions, mechanics, etc. as you play through the event. If you happen to discover anything, be sure to contribute your information via the talk page or by a links down below.
E-1 Data Submission Forms by Tsubakura
Submit a report
View all submitted reports
E-2 Data Submission Forms by Tsubakura
Submit a report
View all submitted reports
E-3 Data Submission Forms by Tsubakura
Submit a report
View all submitted reports
Event Maps
E-1
| Preparation for Operation Hikari
|
| 「光」作戦準備
|
Information
- Event Tag:
- Boss: None
TP Gauge:
100 TP (Easy/Normal/Hard)
|
|
|
Branching rules
| E-1 Branching Rules
|
| Nodes |
Rules
|
|
|
|
- Does not meet the requirements to go to F
|
|
|
- Fleet contains a CL and no CV(L/B)
|
|
|
|
- Does not meet any requirements to go to C
|
|
|
- If the fleet contains only SS(V)
- Amount of SS(V) ≧ 1 on Easy/2 on Medium/3 on Hard
- If the difficulty is Easy, meet all of the following requirements
- Amount of DD ≧ 2
- Amount of CV(L/B) ≦ 1
- If the difficulty is Medium, meet all of the following requirements
- Amount of DD ≧ 2
- Amount of SS(V) ≧ 2
- Amount of CV(L/B) ≦ 1
- If the difficulty is Hard, meet all of the following requirements
- Amount of DD ≧ 2
- Amount of SS(V) ≧ 3
|
|
|
|
- TP gauge is ≧ 1
- The TP gauge is destroyed and the fleet contains only SS(V)
- If the TP gauge is destroyed, meet all of the following requirements
- Amount of CL ≧ 1
- Amount of DD ≧ 3
- Amount of CA(V) ≦ 1
- Fast Fleet
- Fleet contains no CV(L/B)
|
|
|
- TP gauge is 0 and the gauge isn't destroyed yet
- The gauge is destroyed and you do not meet the requirements to go to D
|
Branching compositions were reported here over the course of the event.
|
|
Tips
- Important Note: Upon completing the TP gauge, you will need to complete the map one more time to ensure a victory to complete the map
- Recommended Compositions:
- No (F)BBs are allowed on this map.
- 4-6SS(V)
- Using all submarines can make the map relatively easy and will reduce the gauge very quickly.
- On lower difficulties, 4SS can make it through the map relatively unharmed.
- LBAS strikes should be focused on node B.
- There are no LoS checks for this map.
- For people who lack the subs needed
- 0-1CAV 1-2CL, 3-4 DD 0-2 SS(V)
- Good for map clearing up till the final run
Final Run Composition:
- 1CA(V), 1CVL, CL, 3DD
- Since you're facing additional battles in Wo-class Nodes, additional air defence is required.
Post Clear Run Composition:
- 1CA(V), 2CL, 3DD
- Can be used for post-clear run and evades Node D.
- TP Guage on this map is depleted based upon the type of ships you bring (submarines seems to have the most impact) and Using Zuiun Seaplane bombers and Seiran (which also aid in depleting the TP Gauge).
- Once you reach Node I, you're safe to advance as you'll be able to complete the map regardless of how damaged you are.
On the final run, the map will change it's pathing and you'll experience more battles where you'll face more carrier battles and Air attacks unless you follow the requirements to prevent being sent to Node D.
Recommended LBAS Attack locations:
Node B and Node I
- Use All Torpedo Bombers or Land Based Attack Aircrafts
- If using an all-Submarine team, it may be advisable to deploy your LBAS to Node B.
- If you're aiming to farm Node I you may want to eliminate the surface ships so your fleet has a better chance for S-rank.
|
|
|
|
Ship drops
| Node | Ship List |
|---|
| I | Destroyers | Fubuki, Shirayuki, Hatsuyuki, Murakumo, Ayanami, Isonami, Shikinami, Uranami, Hamakaze | | Light Cruisers | | | Heavy Cruisers | | | Battleships | | | Aircraft Carriers | | | Light Aircraft Carriers | | | Submarines | I-401, U-511, I-26 | | Auxiliary Ships | Kashima |
|
E-2
| Strengthening the Patrol Line in Ogasawara Islands
|
| 小笠原諸島哨戒線強化
|
Information
Event Tag:
Normal:400
Hard:500
|
|
|
Branching rules
| E-2 Branching Rules
|
| Nodes |
Rules
|
| Start
|
|
- Does not meet the requirements to go to C
|
|
|
- Meet all of the following requirements:
- Transport Escort Combined Fleet
- Fast Fleet
- Obtain the necessary score through the following:
- Reach at least 3 on Easy / 4 on Medium / 5 on Hard.
- The score can be reached by having historic ships in your whole combined fleet.
- Kamikaze-class destroyers are 2 points each.
- Satsuki, Fumizuki, Nagatsuki, Mikazuki and Minazuki are 1 point each.
|
|
|
|
- Does not meet the requirements to go to D
|
|
|
- Meet all of the following requirements:
- Transport Escort Combined Fleet
- Fast Fleet
|
|
|
|
|
|
|
|
|
|
- Fleet contains AV
- Fleet came from node B
- The fleet is a Transport Escort Combined Fleet and Fleet Command Facility is activated.(Not equipped, but activated)
|
|
|
- Does not meet the requirements to go to G
|
|
|
|
|
|
|
|
- Amount of (F)BB(V)+CV(B) ≧ 5 (CVL does not count)
|
|
|
- The fleet is a Transport Escort Combined Fleet and Fleet Command Facility is activated.(Not equipped, but activated)
|
|
|
- Does not meet the requirements to go to either F or I
|
|
|
|
- If the TP gauge is not destroyed yet:
- TP gauge is below 25% and fleet is Transport Escort Combined Fleet (once per sortie)
|
|
|
- Fleet came from node J
- TP gauge is destroyed
|
|
|
|
|
|
|
|
|
|
|
- If the TP gauge is not destroyed yet:
- TP gauge is below 25% and fleet is Transport Escort Combined Fleet
|
|
|
- Carrier Task Force
- TP gauge is above 25% and fleet is Transport Escort Combined Fleet
- TP gauge is destroyed
|
Branching compositions were reported here over the course of the event.
|
|
Tips
- Since this map is a Transport Operation, it's recommended to bring ships that can carry drum canisters, Daihatsu, and even Kinu Kai Ni if you wish to deplete the gauge faster.
- Recommended Compositions
- Transport Escort Combined Fleet 4DD 2CAV + 1CL, 3DD, 2CA
- + Depletes TP Gauge Faster
- - Will require you to go through tough nodes to reach the boss node
- - Route change at final stretch makes completing map even more harder for this fleet.
- - May Require Boss Support to ensure A Rank.
- Fleet takes route ADEHKM up until the Boss Gauge reaches until Transport Gauge reaches 25% of TP points remaining.
- Upon the Transport Gauge reaching 25% left, the routing path will change to ADEHJHKM (Yes, you get sent to H twice)
- You can choose to change your path by going to G to avoid this problem and go via route ADGJHKM.
- It's strongly recommended to only use this up until the gauge is at 25% then switch to Carrier Task Force.
- Consider having LBAS Target Nodes H and M to ensure the safety of your fleet.
- Transport Escort Combined Fleet using Historic Fleet Setup 1-4 Mutsuki Class (consisting of Satsuki, Nagatsuki, Fumizuki and Minazuki) DD, 1-2 Kamikaze-Class DD, 0-2, 2CAV (Or BBV if equipped to Turbine/Engine combo to fast) + 1CL, 3DD, 2CA (Depends on Difficulty read below)
- + Depletes TP Gauge Faster
- + Goes Easiest Possible Routing
- - Will still face some challenges along the way (though far less painful)
- - May Require Boss Support to ensure A Rank.
- Historic Fleet Setup will allow you to above the more intense nodes in the map allowing for your fleet to improve thier chances of survival by going CFIJKM
- Upon the Transport Gauge reaching 25% left, the routing path will change to CFIJHKM.
- Depending on the Difficulty, the number of historic ships required will need to be specifce based upon a point system. Kamikaze-Class DDs count for 2 points while Mutsuki-Class Destroyer Division 22 members count for 1 point.
- 3 Points are needed for Easy, 4 Points are needed for Normal, 5 Points is needed for Hard.
- Node I consist of a torpedo squadron fleet, LBAS is recommended to minimize damage from that node.
- You can bring BBV in place of the CAVs in the main fleet if you improve thier ship speed using a turbine and Boiler combo. While this will allow for you to bring a tougher fleet, it may also handicap your BBVs unless you have an Reinforcement Expansion to allow them to be able to perform double attacks.
- It also will make you perform two shelling rounds in the main fleet which may be counter productive in certain nodes.
- LBAS is also Recommended for Boss Node.
- Boss Support Fleets are recommended as they'll help aid in making sure you'll gain more A rank wins in the fight.
- Carrier Task Force Composition 3-4 CV, 0-1 CVL, 0-2 DD, 0-2 CA + 1CL, 2-3DD, 2-3 CA
- + Stronger Fleet capable of going through most fights with less issues, and can make easy work of the boss node.
- + Makes battles with tougher nodes easier
- + Recommended to use when TP Gauge is below 25%
- + Preferred for farming the map
- - Will have to face lots of Carrier Battles
- - Will deplete TP Gauge far less
- It's recommended to not bring BBs of any form into this composition as they will throw you in into back up to the north resulting in your fuel and ammo being depleted by the time your reach the boss node.
- You can use LBAS to concentrate thier attack on the boss node.
- LBAS Recommendations
- 2-3 Torpedo Bombers/ Land Based Attackers + 1-2 Fighters
- A Distance of 6 is required to reach the boss node.
- Depending on the Combined Fleet you use you use, you may wish to need to change up the number of fighters and Torpedo bombers/ Land Based Attackers needed to minimize the loss of your plane's rank in battle.
- It's commonly recommended to use 3 Torpedo Bombers/ Land Based Attackers and 1 Fighter if you use the Historic Transport Fleet Set up.
- It's also recommended to use 2 Torpedo Bombers/ Land Based Attackers and 2 Fighter for all other set ups.
- The boss fleet will only change to its Last Dance pattern when you reach the boss node with a fleet that would completely deplete what remains of the Transport Bar with an S-Rank.
|
|
|
|
Ship drops
|
E-3
|
Information
Event Tag:
- Key Rewards:I-14
- Clearing on Hard (甲):
- Clearing on Medium (乙):
- Clearing on Easy (丙):
|
|
|
Branching rules
| E-3 Transport Phase
|
| Nodes |
Rules
|
|
|
|
|
|
|
|
|
|
|
|
|
|
|
|
|
|
|
|
|
|
|
|
|
| E-3 Boss Phase
|
| Nodes |
Rules
|
| Start
|
|
|
|
|
|
|
|
|
|
|
|
|
|
|
|
|
|
|
|
|
|
|
|
|
|
|
|
|
|
|
|
|
|
|
|
|
|
|
|
|
|
|
|
|
|
|
Branching compositions were reported here over the course of the event.
|
|
Tips
The following map will consist of two phases consisting of a Transport Phase and a Boss Kill Phase. In addition, the difficulty you play on this map will greatly effect certain factors regarding what you'll need to do for the event map.
- Transport Phase
- The Transport Phase of the Operation will consist of transporting new pieces of equipment (Saiun(Disassembled for Transport)) to the transport drop off point (Node E and then beating the boss in Node V.
- The requirements needed to make Disassembled Saiun will vary depending on the difficulty you choose as quest you'll need to do will vary.
- Please refer to the Quest area for additional information
- Before taking Disassembled Saiun it's recommended that you attempt to test the map to make sure you will be able to safely transport Disassembled Saiun without issue.
- If you fail to reach the boss node, your flagship gets heavily damaged, or you take a get off routed after you reach node E, you will loose all your Disassembled Saiun and will need to redo the Disassembled Saiun quests again to attempt to complete the TP portion.
Show/Hide Nodes and Enemy Encounters
| Nodes and Enemy Encounters |
|---|
| Node | Pattern | Xp | Node Info | Form | Air |
|---|
A
| Pattern 1 | | | | | B
| Pattern 1 | | | | | | Pattern 2 | | | | | C
| Pattern 1 | | | | | D
| Pattern 1 | | | | | E
| Pattern 1 | | | | | F
| Pattern 1 | | | | | | Pattern 2 | | | | | G
| Pattern 1 | | | | | H
| Pattern 1 | | | | | I
| Pattern 1 | | | | | J
| Pattern 1 | | | | | L
| Pattern 1 | | | | | | Pattern 2 | | | | | | Pattern 3 | | | | |
|
|
|
|
Ship drops
|
References
|
Events |
|---|
|
2013 | | |
2014 | | |
2015 | | |
2016 | | |
2017 | | |
2018 | | |
2019 | | |
2020 | | |
2021 | | |
2022 | | |
2023 | | |
2024 | | | |
|
2015 · 2016 · 2017 · 2018 · 2019(& sardine) · 2021(large) · 2022 · 2023 | | |
2015 · 2016(simple quest) · 2017(simple quest) · 2020(large) · 2021 · 2022(simple quest) | | |
2019 · 2020 · 2021 · 2022 · 2023 · 2024 | | |
2022 · 2023 | | |
2018 | | |
2014 · 2015 |
|
|


