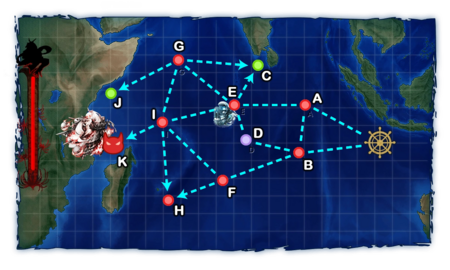
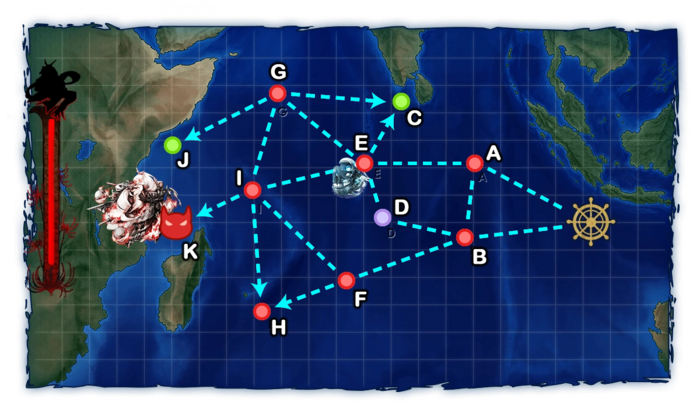
World 4-1: ジャム島沖 - Jam Island
| Strategy Name
|
ジャム島攻略作戦
Jam Island Capture Tactics
|
| Difficulty
|
☆ ☆ ☆ ☆ ☆
|
| Item
|

|
| Strategy Content
|
西方作戦の第一段階として艦隊をジャム島攻略に展開!作戦を実施せよ! (対潜警戒も厳とせよ)
As the first phase of Western operation, you are going to deploy your fleet on the Jam Island. Conduct this operation! (Lookout for enemy submarines strictly too.)
|
| World 4 Unlocking & Progression
|
| Unlock conditions
|
World 4 is unlocked after clearing 3-1
|
| Clear conditions
|
To clear the map: the boss's flagship must be sunk once
|
Stage Guide
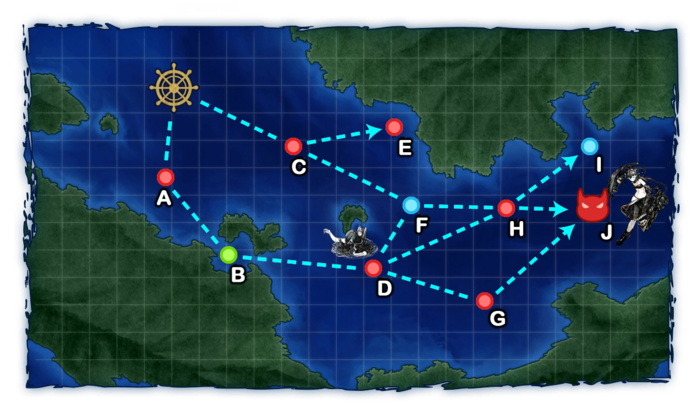
| 4-1 Branching Rules
|
| Nodes |
Rules
|
| Start
|
|
|
|
|
|
|
|
- If (F)BB(V)+CV(B/L) ≥ 5, go to E.
- If (F)BB(V)+CV(B/L) ≤ 2, go to F.
- If (F)BB(V)+CV(B/L) = 4, 30% F, 70% E
- Else, random routing (50/50)
|
|
|
|
|
|
- Random routing if fleet contains any SS(V)
- If (F)BB(V)+CV(B/L) ≥ 5, go to H.
- Otherwise
- Meeting ANY of the following to FORCE G
- DD+DE ≤ 1
- Fleet contains any (F)BB(V) or CV(B/L) AND DD = 3
- Fleet contains any (F)BB(V) or CV(B/L), CL = 0 AND DD ≤ 3
- (F)BB(V)+CV(B/L) = 4
- Meeting ANY of the following to go to H
- Fleet contains no (F)BB(V) and CV(B/L)
- DD ≥ 4
- CA(V) ≥ 1 AND CL+CA(V) ≥ 3
- Random routing if not meeting any of the above conditions
|
|
|
|
|
|
- Do not meet the requirements to go to H.
|
|
|
- Meet ALL of the following requirements:
- No (F)BB(V) or CV(B/L)
- Meet one of the following
- Amount of DD ≥ 4 and CL ≥ 1
- DD+DE = 6
|
|
|
|
- Meeting ANY of the following FORCES I:
- (F)BB(V)+CV(B/L) ≥ 5
- Fleet contains SS(V)
- Go to J if amount of (F)BB(V)+CV(B/L) ≤ 1 AND DD ≥ 2
- Else, random routing.
|
|
|
Tips
This map is mostly randomized on the path taken, with few notable exceptions that should be considered:
- Avoid bringing too many (F)BB(V) and CV(B/L).
- A well-balanced fleet is recommended for tackling this map.
- While dedicated ASW setups are not necessary, mixed ASW set-ups can be considered for DDs.
Recommended Fleets
| Medium Fleet
|
| Fleet
|
3 CA(V)/CLT/AV, 1 CL, 2 DD
1 BB(V)/CV(B/L), 2 CA(V), 1 CL, 2 DD
|
| LoS
|
Speed
|
| Any
|
Any
|
RouteNode Types:
BLUE: Empty/Choice
RED: Battle
GREEN: Resource/TP
VIOLET: Maelstrom
PURPLE: Night Battle
PINK: Air Raid/Battle
ORANGE: Enemy Ambush/ASS
|
Random:
|
| Fleet Notes
|
Always fight 3 battles pre-boss but allow stronger ships that help withstand enemy shots compared to the light comp.
|
| Air State
|
AD
|
AP
|
AS
|
AS+
|
| 11
|
16
|
36
|
72
|
| Light Fleet
|
| Fleet
|
1 CA(V), 1 CL, 4 DD
|
| LoS
|
Speed
|
| Any
|
Any
|
RouteNode Types:
BLUE: Empty/Choice
RED: Battle
GREEN: Resource/TP
VIOLET: Maelstrom
PURPLE: Night Battle
PINK: Air Raid/Battle
ORANGE: Enemy Ambush/ASS
|
Random:
|
| Fleet Notes
|
Cheapest composition, but requires high-level CL and DD as they need to dodge the closing torpedo if they didn't disable all of the enemies CA, CL, and DD in advance.
|
| Air State
|
AD
|
AP
|
AS
|
AS+
|
| 11
|
16
|
36
|
72
|
| Heavy Fleet
|
| Fleet
|
2 CV(B/L), 1 CLT, 3 XX (XX cannot be (F)BB(V)/CV(B/L))
|
| LoS
|
Speed
|
| Any
|
Any
|
RouteNode Types:
BLUE: Empty/Choice
RED: Battle
GREEN: Resource/TP
VIOLET: Maelstrom
PURPLE: Night Battle
PINK: Air Raid/Battle
ORANGE: Enemy Ambush/ASS
|
Random:
|
| Fleet Notes
|
Heaviest comp, with a slightly harder pre-boss, as you will always go to Node G where Battleship Ta-Class are awaiting, in exchange, you get to bring CV(B/L) for opening airstrikes and more firepower on the way to the boss and at the boss node itself.
|
| Air State
|
AD
|
AP
|
AS
|
AS+
|
| 11
|
16
|
36
|
72
|
Resource Nodes
B is a "Normal Resource Node" rewarding fuel .
- See here for more details.
Enemy Compositions
Ship Drops
☑ All drops (enabled)☒ All drops (disabled, only rare drops)
World 4-2: カレー洋海域 - Curry Ocean Area
| Strategy Name
|
カレー洋制圧戦
Curry Ocean Takeover Battle
|
| Difficulty
|
☆ ☆ ☆ ☆ ☆
|
| Item
|
 
|
| Strategy Content
|
カレー洋の制圧作戦を行う。同方面資源地帯を確保しつつ、カレー半島水域の敵艦隊を無力化せよ!
Gain over the Curry Ocean. Get hold of a resource zone in this direction, and neutralize enemy fleets on the Curry Peninsula sea!
|
| World 4 Unlocking & Progression
|
| Unlock conditions
|
World 4 is unlocked after clearing 4-1 and 7-1 HP bar
|
| Clear conditions
|
To clear the map: the boss's flagship must be sunk once
|
Stage Guide
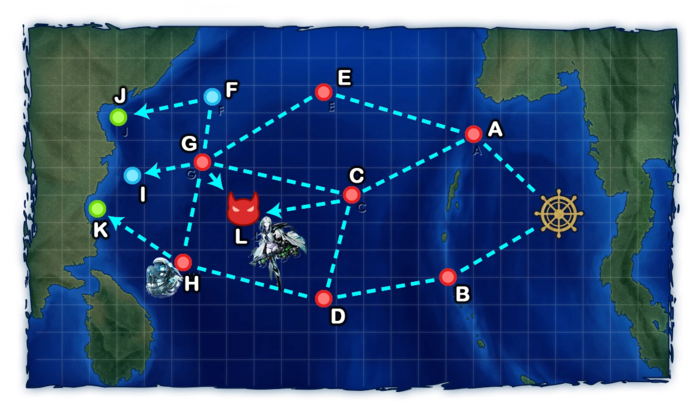
| 4-2 Branching Rules
|
| Nodes |
Rules
|
| Start
|
|
- Random routing, but the amount of DD affects the chances of going to A:
- 0 DD = 6%
- 1 DD = 11%
- 2 DD = 61%
- 3 DD = 71%
- 4 DD = 86%
- 5 DD = 91%
- 6 DD = 96%
|
|
|
|
|
|
- Meeting ALL of the following requirements to go to C
- Amount of DD ≥ 3
- CL+DD ≥ 4
- Go to E if DD+DE ≤ 1
- Otherwise, random routing
|
|
|
|
|
|
- Meeting ANY of the following requirements to FORCE L
- DD ≥ 4
- CL ≥ 1, (F)BB(V)+CV(L/B) ≤ 2 and DD ≥ 2
- Meeting ANY of the following to go to G
- DD ≤ 1
- (F)BB(V)+CV(L/B) ≥ 4
- Otherwise, random routing
|
|
|
|
|
|
- Go to H if (F)BB(V)+CV(L/B) = 6
- Random routing if fleet contains any SS(V)
- Meeting ANY of the following to go to C
- CL+DD ≥ 4
- (F)BB(V)+CV(L/B) ≤ 2 and DD ≥ 2
- Otherwise, random routing
|
|
|
|
|
|
- Go to L if DD+DE ≥ 3
- Go to L if DD+DE ≥ 2 and meet one of the following
- CL+CAV+AV ≥ 1
- (F)BB(V) ≥ 4
- Higher chance of going to I if (F)BB(V)+CV(L/B) ≥ 5
- Very high chance of going to F if fleet contains any SS(V)
- Go to F if fleet contains an AS
- Otherwise, random routing
|
|
|
|
|
|
|
|
- Go to G if amount of DD ≥ 2
- Higher chance of going to K if CV(B) ≥ 3
- Otherwise, random routing
|
|
|
Tips
This map can be taken advantage of in multiple ways as it is a location that can be considered for completing the World 4 Weekly quest Bw6 and scoring lots of transport kills for the transport daily and weekly quests.
- Node notes
- Node B is a mixed node consisting of CL and SS, counting as a standard surface battle for fuel and ammo cost.
- Node H is a pure SS node.
Recommended Fleets
| Short Route
|
| Fleet
|
2 (F)BB(V)/CV(B/L), 1 CL, 3 DD
|
| LoS
|
Speed
|
| Any
|
Any
|
RouteNode Types:
BLUE: Empty/Choice
RED: Battle
GREEN: Resource/TP
VIOLET: Maelstrom
PURPLE: Night Battle
PINK: Air Raid/Battle
ORANGE: Enemy Ambush/ASS
|
Random:
|
| Fleet Notes
|
Possible to get the shortest route to the boss node, but the bottom path may present a bigger risk for this fleet due to Ru-class and Wo-class, the upper path should be less problematic though.
Best comp for quests.
|
| Quests
|
Bd5, Bd6, Bw3, Bw4, Bw6
|
| Air State
|
AD
|
AP
|
AS
|
AS+
|
| 25
|
38
|
84
|
168
|
| Long Route
|
| Fleet
|
1 (F)BB(V), 2 BB(V)/CV(B/L), 1 CL, 2 DD
2 CV(B), 1 CVL, 1 CAV/CL/AV, 2 DD
|
| LoS
|
Speed
|
| Any
|
Any
|
RouteNode Types:
BLUE: Empty/Choice
RED: Battle
GREEN: Resource/TP
VIOLET: Maelstrom
PURPLE: Night Battle
PINK: Air Raid/Battle
ORANGE: Enemy Ambush/ASS
|
Random routing across the map, but will always reach the boss node in the end.
|
| Fleet Notes
|
Usually good enough to kill 3 to 5 AP per run while getting the boss kills on the way.
Out of all the possible paths, going B D C G L will be the most dangerous as the fleet will arrive at the boss node with only 20% fuel and ammo making them quite vulnerable to both attacks and deliver weak shelling attacks.
- Other paths will arrive with more fuel and ammo, making the boss fight much easier.
|
| Air State
|
AD
|
AP
|
AS
|
AS+
|
| 25
|
38
|
84
|
168
|
| Annual Heavy Cruiser
|
| Fleet
|
3 CA, 1 CL, 2 DD
|
| LoS
|
Speed
|
| Any
|
Any
|
RouteNode Types:
BLUE: Empty/Choice
RED: Battle
GREEN: Resource/TP
VIOLET: Maelstrom
PURPLE: Night Battle
PINK: Air Raid/Battle
ORANGE: Enemy Ambush/ASS
|
Random:
|
| Fleet Notes
|
Zara-class are good choices for extra air power.
|
| Quests
|
By4
|
| Air State
|
AD
|
AP
|
AS
|
AS+
|
| 25
|
38
|
84
|
168
|
Resource Nodes
J K are "Normal Resource Nodes" rewarding respectively bauxite and steel .
- See here for more details.
Enemy Compositions
Ship Drops
☑ All drops (enabled)☒ All drops (disabled, only rare drops)
World 4-3: リランカ島 - Ri-Lanka Island
| Strategy Name
|
リランカ島空襲
Ri Lanka Air Raid
|
| Difficulty
|
☆ ☆ ☆ ☆ ☆ ☆
|
| Item
|
|
| Strategy Content
|
空母を伴った艦隊を編成し、リランカ島の敵母港に展開する敵艦隊への攻撃を行う。艦隊、出撃!
Organize a fleet being attended by aircraft carriers and attack an enemy fleet deploying on its home port in Ri-Lanka Island. Fleet, sortie!
|
| World 4 Unlocking & Progression
|
| Unlock conditions
|
World 4 is unlocked after clearing 4-2
|
| Clear conditions
|
To clear the map: the boss's flagship must be sunk once
|
Stage Guide
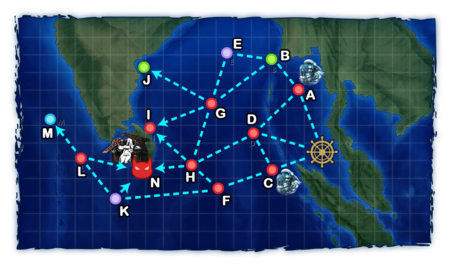
| 4-3 Branching Rules
|
| Nodes |
Rules
|
| Start
|
|
- Go to C if fleet contains CV(B)
- Meet ANY of the following to go to D
- DD+DE = 6
- DD ≥ 3, CL+DD ≥ 4 AND meet one of the following
- Fast fleet
- Fleet contains CL
- BB(V)+CV(B/L) = 0 (FBB doesn't count)
- Go to A if DD+DE ≥ 2 AND fleet contains either CL or AO
- Otherwise, random routing between A and C
|
|
|
|
|
|
|
|
- Meet ANY of the following to go to B
- Fleet contains AO or AV
- Fleet contains CVL, CL, DD ≥ 2 AND CA ≤ 1 (CAV doesn't count)
- Go to D if CA ≥ 2 (CAV doesn't count)
- Otherwise, random routing
|
|
|
|
|
|
- Go to E if (F)BB(V)+CV(B/L) ≥ 3
- Fleet containing slow ship will more likely go to E
- Otherwise, go to G
|
|
|
|
|
|
- Go to D if fleet contains CL, DD ≥ 2 AND no SS(V)
- Go to F if fleet contains (F)BB(V)+CV(B/L) ≥ 4
- Otherwise, random routing (More likely to go to F)
|
|
|
|
|
|
- Go to K if fleet contains SS(V) or no DDs
- Go to H if fleet contains DD ≥ 2, (F)BB(V)+CV(B/L) ≤ 2 AND the fleet is fast
- Otherwise, random routing
- The higher amount of DDs in the fleet, the better chance to go to H
|
|
|
|
|
|
- Go to J if fleet contains no CV(B/L)
- Otherwise, random routing between H and I
|
|
|
|
|
|
|
|
- If CV(B/L) = 2, 90% N, 10% I
- Otherwise, 75% N, 25% I
|
|
|
|
|
|
- Meet ANY of the following to go to L
- DD ≤ 1
- CV(B/L) ≥ 3
- Fleet contains SS(V)
- Otherwise, random routing
|
|
|
|
|
|
- Meet ANY of the following to go to M
- (F)BB(V)+CV(B/L) ≥ 5
- CL+DD+DE = 0
- CV(B/L) = 0
- Go to N if (F)BB(V)+CV(B/L) ≤ 2 AND no SS(V)
- Random otherwise
|
|
|
Tips
This map will serve as a first introduction to Installation type Abyssal, which is different from all other abyssal types as they tend to have higher armor, stronger attack power and, can't be hit by torpedoes.
- Killing the installation is optional for clearing the map. However, having a fleet that is capable of killing an installation is encouraged especially for first-time users of anti-installation gear to get a feel for fighting these kinds of bosses.
- As such, the following equipment should be considered to fight the Harbor Princess, the following gear are effective at penetrating the Soft-Skinned Installation's armor:
For beginners:  AA Shells (for BB/CA).
For more advanced players:  Anti-ground Rocket Launchers
 and
and  "Landing tanks".
Aircraft carriers CANNOT attack installations if they have a
"Landing tanks".
Aircraft carriers CANNOT attack installations if they have a  equipped UNLESS its one of the dive-bombers from the following list:
| Dive-Bombers that can attack installations
|
| This is a segment from a bigger article. See Combat/Anti-Installation for details on Installation mechanics.
Carriers will only attack installations in the shelling phase if equipped with Torpedo Bombers or Anti-Installation Dive Bombers.
- Additionally, carriers will attack installations if equipped with non-special dive bombers AND one of the special dive bombers below.
- Any other dive bomber will completely disable shelling against installations even if the carrier has a torpedo bomber equipped.
- This can be very useful to manipulate the targeting mechanic so the carriers attack important targets.
|
 Ju 87C Kai  Prototype Nanzan  F4U-1D  FM-2  Ju 87C Kai Ni (w/ KMX)  Ju 87C Kai Ni (w/ KMX/Skilled)
 Suisei Model 12 (634 Air Group w/ Type 3 Cluster Bombs)  Suisei Model 12 (w/ Type 31 Photoelectric Fuze Bombs)  Type 99 Dive Bomber Model 22  Type 99 Dive Bomber Model 22 (Skilled)  SB2C-3  SB2C-5  F4U-4 |
- Node notes
- Node C only contains submarines but is treated as a surface node for
 / consumption.
- Node A contains a mix of submarines and surface ships.
- Most fleets have a chance to off-route from H to I.
Recommended Fleets
| Medium Fleet
|
| Fleet
|
2 CV(B), 2 CA(V), 2 DD
|
| LoS
|
Speed
|
| Any
|
Any
|
RouteNode Types:
BLUE: Empty/Choice
RED: Battle
GREEN: Resource/TP
VIOLET: Maelstrom
PURPLE: Night Battle
PINK: Air Raid/Battle
ORANGE: Enemy Ambush/ASS
|
Random:
|
| Fleet Notes
|
A strong composition, but that will fight more pre-boss battles.
Dealing with Harbor Princess is slightly easier as CA(V) can carry AA Shells to damage her.
|
| Air State
|
AD
|
AP
|
AS
|
AS+
|
| 46
|
69
|
155
|
310
|
| "Backdoor" Heavy Fleet
|
| Fleet
|
2 CV(B), 3 CA(V), 1 DD
|
| LoS
|
Speed
|
| Any
|
Any
|
RouteNode Types:
BLUE: Empty/Choice
RED: Battle
GREEN: Resource/TP
VIOLET: Maelstrom
PURPLE: Night Battle
PINK: Air Raid/Battle
ORANGE: Enemy Ambush/ASS
|
Random:
- C D H N
- C F H N
- C F K L N
|
| Fleet Notes
|
Node L has 100% routing to boss, while H has 90%.
Dealing with Harbor Princess is slightly easier as CA(V) can carry AA Shells to damage her.
|
| Air State
|
AD
|
AP
|
AS
|
AS+
|
| 46
|
69
|
155
|
310
|
| Lightest Fleet
|
| Fleet
|
2 (F)BB/CVL/CA(V), 1 CL, 3 DD
|
| LoS
|
Speed
|
| Any
|
Any
|
RouteNode Types:
BLUE: Empty/Choice
RED: Battle
GREEN: Resource/TP
VIOLET: Maelstrom
PURPLE: Night Battle
PINK: Air Raid/Battle
ORANGE: Enemy Ambush/ASS
|
D H N
|
| Fleet Notes
|
A light fleet composition which takes the shortest path to the boss. Since it is limited to light ships, Nuke set-ups are recommended to effectively fight the installation boss. CVLs equipped with anti-installation bombers can also be used for additional assistance taking out the installation.
- Keep in mind though it is not entirely necessary to kill the boss for this map.
|
| Air State
|
AD
|
AP
|
AS
|
AS+
|
| 46
|
69
|
155
|
310
|
| Light Fleet
|
| Fleet
|
2 CVL, 1 CL, 2 DD, 1 AV
|
| LoS
|
Speed
|
| Any
|
Fast
|
RouteNode Types:
BLUE: Empty/Choice
RED: Battle
GREEN: Resource/TP
VIOLET: Maelstrom
PURPLE: Night Battle
PINK: Air Raid/Battle
ORANGE: Enemy Ambush/ASS
|
A B G H N
|
| Fleet Notes
|
Goes through the resource node that yields fuel, but there is a chance of off-routing to Node I instead of going to H.
|
| Air State
|
AD
|
AP
|
AS
|
AS+
|
| 46
|
69
|
155
|
310
|
| Heaviest Fleet
|
| Fleet
|
1 (F)BB(V), 2 CV(B), 1 CA(V), 2 DD
|
| LoS
|
Speed
|
| Any
|
Any
|
RouteNode Types:
BLUE: Empty/Choice
RED: Battle
GREEN: Resource/TP
VIOLET: Maelstrom
PURPLE: Night Battle
PINK: Air Raid/Battle
ORANGE: Enemy Ambush/ASS
|
Random:
- C D H N
- C F H N
- C F K L N
|
| Fleet Notes
|
Heaviest possible fleet, but has random routing across the map (always start at Node C).
|
| Air State
|
AD
|
AP
|
AS
|
AS+
|
| 46
|
69
|
155
|
310
|
Resource Nodes
B J are "Normal Resource Nodes" rewarding respectively fuel , and bauxite .
- See here for more details.
It is possible to use this map to farm both fuel and bauxite. This requires the use of either an AV/AO and will go through 2 combat nodes:
| Fuel & Bauxite Farming
|
| Fleet
|
1 CL, 2 CLT, 2 DD, 1 AV/AO
|
| LoS
|
Speed
|
| Any
|
Fast
|
RouteNode Types:
BLUE: Empty/Choice
RED: Battle
GREEN: Resource/TP
VIOLET: Maelstrom
PURPLE: Night Battle
PINK: Air Raid/Battle
ORANGE: Enemy Ambush/ASS
|
A B G J
|
| Fleet Notes
|
Node A should not present much difficulty, however, node G may present some challenge to pass.
- AV, CLT, and CL carrying
 Minisub Midget Submarine can be useful for taking out many of the ships in node G during the Otorp attack, to minimize damage taken. Minisub Midget Submarine can be useful for taking out many of the ships in node G during the Otorp attack, to minimize damage taken.
Slow AV/AO needs to be Fast (see Improving Ship Speed).
Due to the danger this path has, bringing to gain extra resources can be optional.
|
| Air State
|
AD
|
AP
|
AS
|
AS+
|
| 0
|
0
|
0
|
0
|
Enemy Compositions
Ship Drops
☑ All drops (enabled)☒ All drops (disabled, only rare drops)
World 4-4: カスガダマ島 - Casgadama Island
| Strategy Name
|
カスガダマ沖海戦
Casgadama Island Naval Battle
|
| Difficulty
|
☆ ☆ ☆ ☆ ☆ ☆ ☆ ☆
|
| Item
|
|
| Strategy Content
|
カレー洋西方の敵哨戒線を突破、カスガダマ島沖深く進出し、敵東方艦隊中枢部隊を捕捉撃滅せよ!
Break through enemy patrol line on western part of the Curry Ocean. After that, advance to the Casgadama Island deep area. Capture an enemy core unit of the Oriental fleet and annihilate it!
|
| World 4 Unlocking & Progression
|
| Unlock conditions
|
World 4 is unlocked after clearing 4-3
|
| Clear conditions
|
To clear the map: the boss's flagship must be sunk 4 times
|
Stage Guide
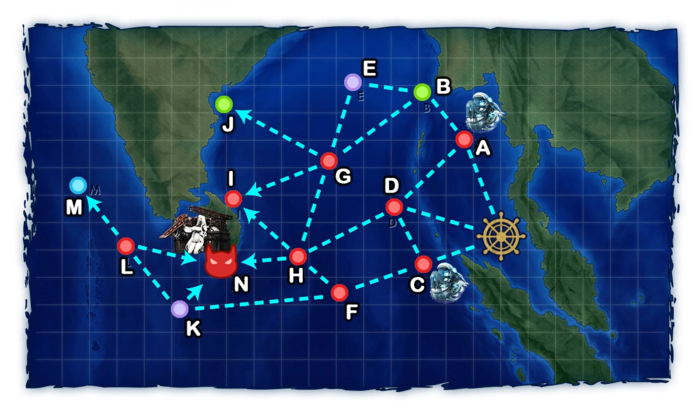
| 4-4 Branching Rules
|
| Nodes |
Rules
|
| Start
|
|
- Go to A if DD+DE ≥ 2
- Otherwise, random between A and B
|
|
|
|
|
|
|
|
|
|
- Go to A if (F)BB(V)+CV(B/L) ≥ 4
- Otherwise, random between D and F
|
|
|
|
|
|
|
|
- Go to G if (F)BB(V)+CV(B) ≥ 4
- Meet ANY of the following to go to I
- DD+DE ≥ 2 AND contain either of CA(V) or CL
- Fleet contains either of CA(V) or CL AND CA(V)+CVL ≤ 2, no CLT
- Go to C if DE ≥ 3
- Otherwise, random routing
|
|
|
|
|
|
|
|
|
|
|
|
|
|
|
|
|
|
|
|
|
|
- Meet ANY of the following to go to K
- DD+DE ≥ 2 AND CV(B) = 2
- DD+DE ≥ 2 AND CA(V) = 2
- No CV(B), fleet contains CL AND DD+DE ≥ 2
- Otherwise, random routing
|
|
|
Tips
This map is relatively strait forward, being very permissive on routing and with no heavy danger.
- It is suitable for various farmings, such as Weekly World 4 quest Bw6, leveling, and ranking.
- The boss node can also yield a lot of rare drops such as Cranes, Taigei, most BB, ...
Regarding the boss node, some compositions has a submarine present that can agro ASW capable ships.
- This submarine is relatively weak, and so should be taken out easily without the need of much ASW.
- The boss can be either a Light Carrier Nu-Class Flagship or an Armored Carrier Princess (2/3 comps).
- If rolling the latter one, the boss fight can become slightly more difficult.
Recommended Fleets
| Standard Route
|
| Fleet
|
1 (F)BB/CVL/CA(V), 2 CV(B), 1 CA(V)/CL, 2 DD/DE
3 CA, 1 CL, 2 DD
|
| LoS
|
Speed
|
| Any
|
Any
|
RouteNode Types:
BLUE: Empty/Choice
RED: Battle
GREEN: Resource/TP
VIOLET: Maelstrom
PURPLE: Night Battle
PINK: Air Raid/Battle
ORANGE: Enemy Ambush/ASS
|
A E I K
|
| Fleet Notes
|
Bringing OASW is recommended to have a better pass rate on node E, and kill the submarine on the boss node.
|
| Quests
|
Bw6, By4
|
| Air State
|
AD
|
AP
|
AS
|
AS+
|
| 22
|
32
|
72
|
144
|
Resource Nodes
C J are "Normal Resource Nodes" rewarding respectively fuel and steel .
- See here for more details.
Enemy Compositions
Ship Drops
This map currently has "limited-time" drops that don't appear in the table below, see Drop List for more info. ☑ All drops (enabled)☒ All drops (disabled, only rare drops)