|
 
Time remaining until Event ends [1]:
11 October 2023 11:00:00 +0900
The Summer 2023 Event has ended!
See 2023-10-11 patch notes.
|
A Requiem For Akkeshi
鎮魂の北海道厚岸沖
| Rewards
|
| All
|
|
|
| Equipment/Item
|
丁
Casual
|
丙
Easy
|
乙
Medium
|
甲
Hard
|
|
|
|
|
|
|
|
|
|
|
|
|
|
|
|
|
|
|
|
|
|
|
|
|
|
|
|
|
|
|
|
|
|
|
|
|
|
|
|
|
|
|
|
|
|
|
|
|
|
|
|
|
|
|
|
|
|
|
|
|
|
|
|
|
|
|
The event guides are to be constructed through the respective Event map page guide sandbox and reviewed by editors before being approved here.
- Do not update the guides through this page unless it is a minor fix. Please only update guides through their respective sandbox pages.
Branching Table
| E-4 Branching Rules (Start Points) ▼/▲
|
| Nodes |
Rules
|
| Start
|
|
- Phase 1 & 2: Single / Striking Force Fleet
- Phase 2.3+: Single fleet
- 1st Torpedo Squadron
 only (Normal / Hard) only (Normal / Hard)
|
|
|
- Phase 2: Combined Fleet
- Phase 2.7+: CTF / TCF
- 1st Fleet
 only (Normal / Hard) only (Normal / Hard)
|
|
|
- Phase 2.3+: Striking Force Fleet
- Phase 2.7+: STF
- 5th Fleet Main Force
 only (Normal / Hard) only (Normal / Hard)
|
| E-4 Branching Rules (Start Point 1) ▼/▲
|
| Nodes |
Rules
|
|
|
|
Does not meet the requirements to go to A2 or B
|
|
|
|
|
|
- Meet ALL of the following requirements:
- Single fleet
- Amount of DD + DE ≥ 4
|
|
|
|
- Does not meet the requirements to go to C1
|
|
|
- Fast+ fleet
- Otherwise, meet ALL of the following requirements:
- Amount of CL + DD ≥ 4 (1CL 3DD or 4DD only?)
- If slow fleet:
- Amount of (F)BB(V) = 0
- Amount of CL ≥ 1
- Amount of DD + DE ≥ 4
|
|
|
|
Fixed routing
|
|
|
|
|
|
|
- Pass the LoS check (Cn4 = 73~78 Hard)
|
| E-4 Branching Rules (Start Point 2) ▼/▲
|
| Nodes |
Rules
|
|
|
|
Fixed routing
|
|
|
|
Active Branching
|
|
|
|
|
|
- Does not meet the requirements to go to J
|
|
|
- Meet ANY of the following requirements:
- CTF: Fast fleet and amount of (F)BB(V) ≥ 3
- CTF: Fast fleet and amount of (F)BB(V) + CA(V) ≤ 4
- TCF
|
|
|
|
- Does not meet the requirements to go to M
|
|
|
- Meet ALL of the following requirements:
- CTF: Amount of CV(B/L) ≤ 4
- CTF: If fleet contains AV, then amount of CA(V) ≤ 2
- STF: ???
- CTF/STF: If Slow fleet, then amount of CL ≥ 2
|
|
|
|
|
|
|
|
|
|
|
|
|
|
Active Branching
|
|
|
|
|
|
|
|
|
- Does not meet the requirements to go to Q
- Pass the LoS check?
|
|
|
- Meet ALL of the following requirements:
- Amount of (F)BB(V) + CV(B) ≤ 5
- Pass the LoS check?
|
| E-4 Branching Rules (Start Point 3) ▼/▲
|
| Nodes |
Rules
|
|
|
|
- Does not meet the requirements to go to R2 or S
|
|
|
- Meet ALL of the following requirements:
- Slow fleet
- SF: Amount of (F)BB(V) ≤ 2
- SF: Amount of (F)BB(V) + CV(B) ≤ 3
- SF: Amount of SS(V) = 0
- STF: If fleet contains SS(V), then amount of AS ≥ 1
- STF: Amount of (F)BB(V) + CV(B) ≤ 2
|
|
|
- Meet ALL of the following requirements:
- Fast fleet
- SF: Amount of (F)BB(V) ≤ 2
- SF/STF: Amount of (F)BB(V) + CV(B) ≤ 3
- SF/STF: Amount of SS(V) = 0
- STF: Amount of DD ≥ 3
|
|
|
|
- Route to U locked
- Does not meet the requirements to go to U
|
|
|
- Meet ALL of the following requirements:
- Route to U unlocked
- SF: Amount of DD ≥ 3
- STF: Amount of (F)BB(V) ≤ 2
- STF: Amount of CV(B) = 0
- ???
|
|
|
|
- Route to V locked
- Does not meet the requirements to go to V
|
|
|
- Meet ALL of the following requirements:
- Route to V unlocked
- SF: Amount of DD ≥ 3
- STF: Fast fleet
- STF: Amount of (F)BB(V) ≤ 3
- STF: Amount of CV(B) = 0
- ???
|
|
|
|
|
|
|
|
Branching compositions were reported over the course of the event. (NGA and KCNav)
Historical Bonuses
DISCLAIMER: This information is based on user submitted data and is subject to revisions as more data is gathered. Any version of the ship receives the bonus regardless of remodel.
Ship Bonuses
Ships
[Toggle Names]
|
Mapwide
|
P1
Stacks with Map-wide
|
P2
Stacks with Map-wide
|
P3
Stacks with Map-wide
|
|
Map-wide
|
P1 & P3
Stacks with Map-wide
|
P2
Stacks with Map-wide
|
P3
Stacks with previous
|
| Pre-Boss
|
Q
|
U/R1/R2
|
T/V
|
X
|
| Dmg
|
Dmg
|
Dmg
|
Dmg
|
Dmg
|
Dmg
|
Dmg
|
Acc
|
Eva
|
Acc
|
Eva
|
Acc
|
Eva
|
Acc
|
Eva
|
| Coastal Defense Ships (DE)
|
1.12x
|
-
|
-
|
-
|
-
|
-
|
| Destroyers (DD)
|
1.03x
|
1.05x
|
1.1x
|
Light Cruisers (CL)
NOT CLT
|
1.02x
|
| Seaplane Tenders (AV)
|
1.14x
|
1.1x
|
-
|
| Light Carriers (CVL)
|
1.11x
|
1.07x(?)
|
 I-201 Kai |
 I-203 Kai |
1.2
|
-
|
 Ashigara Kai Ni |
 Nachi Kai Ni |
-
|
1.14x
|
1.14x
|
1.16x
|
1.08x
|
1.05x(?)
|
-
|
-
|
 Kiso Kai Ni |
-
|
1.14x
CL: [1.1628x]
|
1.14x
CL: [1.1628x]
|
1.16x
CL: [1.1832x]
|
 Abukuma Kai Ni |
 Kuma Kai Ni D |
1.14x
[1.1628x]
|
1.14x
[1.1628x]
|
1.16x
[1.1832x]
|
 Tama Kai Ni |
-
|
 Asagumo Kai |
 Kasumi Kai Ni |
1.14x
[1.1742x]
|
1.14x
[1.1742x]
|
1.311x
[1.35033x]
|
1.334x
[1.37402x]
|
1.15x
|
1.05x(?)
|
 Usugumo Kai |
-
|
 Akebono Kai Ni |
 Hatsuharu Kai Ni |
1.14x
[1.1742x]
|
1.16x
[1.1948x]
|
-
|
 Hatsushimo Kai Ni |
 Shiranui Kai Ni |
 Wakaba Kai |
-
|
 Nagato Kai Ni |
 Mutsu Kai Ni |
-
|
1.11x
|
1.15x
|
-
|
-
|
1.05x
|
1.05x(?)
|
-
|
 Fusou Kai Ni |
 Yamashiro Kai Ni |
 Hyuuga Kai Ni |
 Ise Kai Ni |
 Tatsuta Kai Ni |
-
|
1.11x
[1.1322x]
|
1.15x
[1.173x]
|
 Asashimo Kai Ni |
 Fujinami Kai |
1.11x
[1.143x]
|
1.15x
[1.1845x]
|
 Hayanami Kai |
 Ikazuchi Kai |
 Inazuma Kai |
 Kishinami Kai |
 Okinami Kai Ni |
 Suzunami Kai |
 Tamanami Kai |
 Verniy |
 Yamagumo Kai |
-
|
[2][3][4]
Equipment Bonuses
[5][6]
[7]
Map Overview
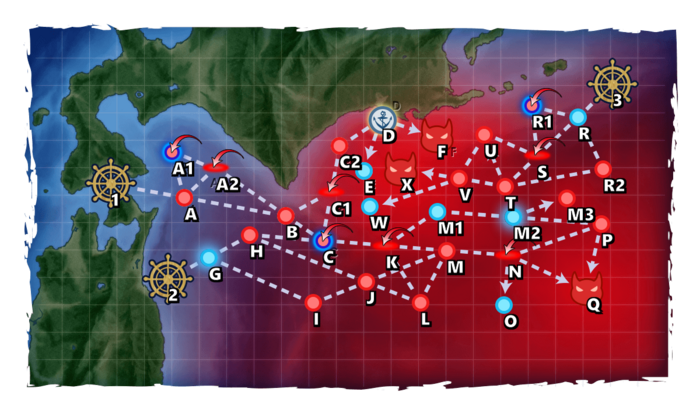
E4 is a single/Striking Force/Combined fleet three-phase map consisting of one transport and two boss phases.
- 2 LBAS are available on this map:
- Initially, only 1 can be set on Sortie, the other being limited to Defense,
- After Phase 1, both can be set on Sortie.
- This map uses 3 locks:
 1st Torpedo Squadron (from on E-3),
 5th Fleet Main Force (from on E-3),
 1st Fleet (reused on E-7).
Phase 1 - TP
Phase 1 is a "Transport Operation":
- Single Fleet: 0-1(F)BB(V), 0-1AV/CVL, 0-1CL, 4-5DD

- Route: 1 A B C1 C2 D F
- LBAS range: 5
- Bringing an AACI capable ship is recommended to pass through the air node.
- Bringing ASW power is required against the boss.
- The CVL here should be a CVE.
- It is possible to bring an (F)BB(V) to gain the second shelling, but this might not be needed.
- Must be FAST if a (F)BB(V) is used.
Phase 2 - Boss
- CTF: 4CV(B), 2CAV + 1CL, 0-2CA/CLT, 3-5DD

- A fleet mainly focusing on air power.
- CTF: 2(F)BB(V), 2-3CV(B), 1-2CAV/CL + 1CL, 0-2CA/CLT, 3-5DD
- A fleet mixing CV for air power, and 2BB that should utilize a Special Attack
- CTF: 3CV(B), 1CVL, 1CAV, 1CL + 2FBB, 1CLT, 1CL, 2DD
- A fleet mixing CV for air power, and 2FBB in the escort that should utilize a Kongou-class Touch
- CTF: 1(F)BB(V), 4CV(B), 1CL + 1CL, 0-2CA/CLT, 3-5DD
- This fleet brings 4 CV, and the BB's second shelling
- Route: 2 G I J M N Q
- LBAS range: 8
- LoS check: ?
- AP/AS: 302/678 Hard
- If the CTF is Slow, then a second CL is required to route J M. Fast CTFs need only the 1CL in the escort fleet.
- Bringing an AACI capable ship is recommended to pass through the air node and against the boss.
Phase 2.3 - Unlock the Boss Node
Once phase 2 cleared, the following steps have to be performed to unlock the Q Boss:
|
T |
U
|
| Hard |
S x2 |
A+ x3
|
| Medium |
S x2 |
A+ x2
|
| Easy |
? |
?
|
| Casual |
? |
?
|
It is possible to clear both requirements in one run, using the long route.
- Refer to #Phase 3 - Boss's Striking Force fleet for composition and routing.
- LBAS range: 7
Using a combined fleet will off route to the 2nd starting point.
- Refer to #Phase 3 - Boss's Striking Force fleet for composition and routing.
- LBAS range: 6
Using a combined fleet will off route to the 2nd starting point.
Phase 2.7 - Unlock the Shortcuts
Once the X Boss unlocked, the following steps have to be performed to unlock the shortcuts:
|
F |
Q |
M3
|
| Hard |
S |
S |
S
|
| Medium |
S |
S |
A+
|
| Easy |
S |
S |
A+
|
| Casual |
? |
? |
?
|
The following need to be completed to reach node M3:
- Assemble a CTF with 11 ships "FAST+" AND 1 ship "SLOW",
- Equip the flagship with the
 FCF FCF,
- It is possible to not use any FCF, and just let the SLOW ship sink,
- The SLOW ship should be "heavily damaged" (taiha), with 1
 Repair Personnel
 ,
,
- After reaching node C, evacuate the SLOW ship on either C or K,
- The fleet is the FAST+ and can route to M3
A possible fleet can then be:
- CTF: "#Phase 2 - Boss's fleet" at "FAST+" with 1SS(V)
- Route: 2 G H C K M1 M2 M3
- See here for more details on how to achieve FAST+.
- Trivia
This special gimmick a a reference to a real event, where a slow ship was left alone to maintain the high-speed pursuit of USS Tautog during this map's battle.
Phase 3 - Boss
- STF: 3(F)BB(V), 2CVL, 1CA(V)/CL + 1CL, 1-2CA/CLT, 3-4DD (FAST)

- Route: 3 R S T V X
- If the #Phase 2.7 - Unlock the Shortcuts is not cleared yet, the routing might be a bit longer.
- LBAS range: 5
- LoS check: ?
- AP/AS: 101/225 Hard
- Bringing an AACI capable ship is recommended to pass through the air node and against the boss.
- Using a
 Smoke on node V can help in surviving it.
- Using any CTF or TCF will off route on starting point 2.
Phase 3.5 - Debuff
Once LD has been reached, the following steps have to be performed to debuff the boss
|
F |
Q |
U |
V |
M3 |
LBAS
|
| Hard |
S |
A+ |
S |
S |
S |
AS
|
| Medium |
? |
? |
? |
? |
? |
?
|
| Easy |
? |
? |
? |
? |
? |
?
|
| Casual |
? |
? |
? |
? |
? |
?
|
- Refer to #Phase 3 - Boss's fleet for composition and routing.
- Lighter fleets better route to U.
- LBAS range: 6
- Refer to #Phase 3 - Boss's fleet for composition and routing.
- LBAS range: 6
|
AS
|
| Hard |
498
|
| Medium |
?
|
| Easy |
343
|
| Casual |
254
|
Once Debuff is complete the CG will change to the following:
Enemy Compositions
| Type | Ships |
|---|
| DE |   |
|---|
| Type | Ships |
|---|
| DE | |
|---|
| Type | Ships |
|---|
| DE | |
|---|
| DD |  |
|---|
| Type | Ships |
|---|
| DE |  |
|---|
| DD |   
|
|---|
| CA |  |
|---|
| CVL |  |
|---|
| FBB |  |
|---|
| CV |  |
|---|
| SS |  |
|---|
| AO |  |
|---|
E-4 Hard AB
| #
|
Formation
|
Air Raids
|
AD/AP
AS/AS+
|
| AB
|
Diamond
|
     
|
45/89
200/399
|
| Diamond
|
 
|
68/135
303/606
|
| Diamond
|
   
|
112/223
501/1002
|
| #
|
Formation
|
Air Raids
|
AD/AP
AS/AS+
|
E-4 Hard A: 深海潜水艦隊 津軽海峡哨戒線 (
PoiDB)
| #
|
Formation
|
Normal Battle Node
|
AD/AP
AS/AS+
|
| A
|
Echelon
Line Abreast
Phases: 1, 2, 3
|
  
|
0/0
0/0
|
Echelon
Line Abreast
Phases: 1, 2, 3
|
|
0/0
0/0
|
Echelon
Line Abreast
Phases: 1, 2, 3
|
|
0/0
0/0
|
| #
|
Formation
|
Normal Battle Node
|
AD/AP
AS/AS+
|
E-4 Hard A1: 深海潜水艦隊群・深海航空支援 (
PoiDB)
| #
|
Formation
|
Supported Battle Node
|
AD/AP
AS/AS+
|
| A1
|
Echelon
Line Abreast
Phases: 3
|
|
24/47
104/207
|
Echelon
Line Abreast
Phases: 3
|
|
24/47
104/207
|
Echelon
Line Abreast
Phases: 2, 3
|
|
26/52
116/231
|
| #
|
Formation
|
Supported Battle Node
|
AD/AP
AS/AS+
|
E-4 Hard A2: 深海空母機動部隊 艦載機群 (
PoiDB)
| #
|
Formation
|
Air Defense Node
|
AD/AP
AS/AS+
|
| A2
|
Diamond
Phases: 1, 3
|
  
|
55/109
243/486
|
Diamond
Phases: 1, 3
|
|
63/125
279/558
|
Diamond
Phases: 1, 3
|
|
67/134
300/600
|
| #
|
Formation
|
Air Defense Node
|
AD/AP
AS/AS+
|
E-4 Hard B: 深海任務部隊 津軽海峡沖哨戒線 (
PoiDB)
| #
|
Formation
|
Normal Battle Node
|
AD/AP
AS/AS+
|
| B
|
Line Ahead
Double Line
Vanguard
Phases: 1, 3
|
|
0/0
0/0
|
| #
|
Formation
|
Normal Battle Node
|
AD/AP
AS/AS+
|
E-4 Hard C: 深海潜水艦隊群・深海航空支援 (
PoiDB)
| #
|
Formation
|
Supported Battle Node
|
AD/AP
AS/AS+
|
| C
|
Echelon
Line Abreast
Phases: 1, 3
|
  
|
43/85
189/378
|
Echelon
Line Abreast
Phases: 1, 3
|

|
43/85
189/378
|
Echelon
Line Abreast
Phases: 1, 3
|
|
43/85
189/378
|
| #
|
Formation
|
Supported Battle Node
|
AD/AP
AS/AS+
|
E-4 Hard C1: 深海空母機動部隊 艦載機群 (
PoiDB)
| #
|
Formation
|
Air Defense Node
|
AD/AP
AS/AS+
|
| C1
|
Diamond
Phases: 1, 3
|

|
51/101
225/450
|
Diamond
Phases: 1, 3
|
|
78/155
348/696
|
Diamond
Phases: 1, 3
|
|
85/169
378/756
|
| #
|
Formation
|
Air Defense Node
|
AD/AP
AS/AS+
|
E-4 Hard C2: 深海任務部隊 深海水雷戦隊 (
PoiDB)
| #
|
Formation
|
Normal Battle Node
|
AD/AP
AS/AS+
|
| C2
|
Line Ahead
Double Line
Echelon
Phases: 1, 3
|

|
0/0
0/0
|
| #
|
Formation
|
Normal Battle Node
|
AD/AP
AS/AS+
|
E-4 Hard D
| #
|
Landing Node
|
| D
|
輸送物資の揚陸地点に到達しました。本海域の輸送作戦は無事完了しています。
The landing point of the convoy has been reached. The transport operation here has already been completed successfully.
|
| #
|
Landing Node
|
E-4 Hard E
| #
|
Empty Node
|
| E
|
敵影を見ず。
No enemy spotted.
|
| #
|
Empty Node
|
E-4 Hard F: 深海潜水艦隊 北海道沖哨戒線 (
PoiDB)
E-4 Hard G
| #
|
Selection Node
|
| G
|
艦隊の針路を選択できます。提督、どちらの針路をとられますか?
You can decide the fleet's course. Admiral, which heading should we take?
|
| #
|
Selection Node
|
E-4 Hard H: 深海任務部隊 前衛護衛空母群 (
PoiDB)
| #
|
Formation
|
Normal Battle Node
|
AD/AP
AS/AS+
|
| H
|
Diamond
Phases: 3
|
|
55/109
243/486
|
Diamond
Phases: 3
|
|
63/125
279/558
|
Diamond
Phases: 2, 3
|
|
67/134
300/600
|
| #
|
Formation
|
Normal Battle Node
|
AD/AP
AS/AS+
|
E-4 Hard I: 深海任務部隊 偵察巡洋艦戦隊 (
PoiDB)
| #
|
Formation
|
Normal Battle Node
|
AD/AP
AS/AS+
|
| I
|
Line Ahead
Double Line
Vanguard
Phases: 2, 3
|

|
0/0
0/0
|
| #
|
Formation
|
Normal Battle Node
|
AD/AP
AS/AS+
|
E-4 Hard J: 深海潜水艦隊 三陸沖群狼集団 (
PoiDB)
| #
|
Formation
|
Normal Battle Node
|
AD/AP
AS/AS+
|
| J
|
Echelon
Line Abreast
Phases: 2, 3
|
|
0/0
0/0
|
Echelon
Line Abreast
Phases: 2, 3
|
|
0/0
0/0
|
| #
|
Formation
|
Normal Battle Node
|
AD/AP
AS/AS+
|
E-4 Hard K: 深海空母機動部隊 艦載機群 (
PoiDB)
| #
|
Formation
|
Air Defense Node
|
AD/AP
AS/AS+
|
| K
|
Diamond
Phases: 3
|

|
82/164
368/735
|
Diamond
Phases: 3
|
|
118/235
527/1053
|
Diamond
Phases: 3
|
|
124/248
557/1113
|
| #
|
Formation
|
Air Defense Node
|
AD/AP
AS/AS+
|
E-4 Hard L: 深海潜水艦隊 機動部隊前衛集団 (
PoiDB)
| #
|
Formation
|
Normal Battle Node
|
AD/AP
AS/AS+
|
| L
|
Echelon
Phases: 2, 3
|

|
0/0
0/0
|
Echelon
Phases: 2, 3
|
|
0/0
0/0
|
Echelon
Phases: 2, 3
|
|
0/0
0/0
|
| #
|
Formation
|
Normal Battle Node
|
AD/AP
AS/AS+
|
E-4 Hard M: 深海任務部隊 強襲空母集団 (
PoiDB)
| #
|
Formation
|
Normal Battle Node
|
AD/AP
AS/AS+
|
| M
|
Diamond
Phases: 2, 3
|
|
124/248
557/1113
|
Diamond
Phases: 2, 3
|
|
118/235
527/1053
|
Diamond
Phases: 2, 3
|
|
124/248
557/1113
|
| #
|
Formation
|
Normal Battle Node
|
AD/AP
AS/AS+
|
E-4 Hard M1
| #
|
Empty Node
|
| M1
|
気のせいだった。
これより敵の背後を突く!艦隊、増速!
Must be my imagination.
|
| #
|
Empty Node
|
E-4 Hard M2
| #
|
Selection Node
|
| M2
|
これより敵の背後を突く!艦隊、増速!
|
| #
|
Selection Node
|
E-4 Hard M3: 深海任務部隊 後方支援部隊 (
PoiDB)
| #
|
Formation
|
Normal Battle Node
|
AD/AP
AS/AS+
|
| M3
|
Double Line
Diamond
Vanguard
Phases: 3
|
 
|
36/71
159/318
|
| #
|
Formation
|
Normal Battle Node
|
AD/AP
AS/AS+
|
E-4 Hard N: 深海空母機動部隊 艦載機群 (
PoiDB)
| #
|
Formation
|
Air Defense Node
|
AD/AP
AS/AS+
|
| N
|
Diamond
Phases: 2, 3
|
 
|
146/292
656/1311
|
Diamond
Phases: 2, 3
|
|
151/301
677/1353
|
Diamond
Phases: 2
|
 
|
151/301
677/1353
|
| #
|
Formation
|
Air Defense Node
|
AD/AP
AS/AS+
|
E-4 Hard P: 深海任務部隊 随伴護衛部隊 (
PoiDB)
| #
|
Formation
|
Normal Battle Node
|
AD/AP
AS/AS+
|
| P
|
Line Ahead
|
|
0/0
0/0
|
| #
|
Formation
|
Normal Battle Node
|
AD/AP
AS/AS+
|
E-4 Hard Q: 深海任務部隊 三陸沖空襲空母群 (
PoiDB)
E-4 Hard R
| #
|
Empty Node
|
| R
|
気のせいだった。
北東方面艦隊主力、第五艦隊、見参!敵を捜索撃滅する!前進ッ!
Must be my imagination.
The main northeastern fleet, the 5th Fleet, is here! We will search and destroy the enemy! Forward!
|
| #
|
Empty Node
|
E-4 Hard R1: 深海潜水艦隊群・深海航空支援 (
PoiDB)
| #
|
Formation
|
Supported Battle Node
|
AD/AP
AS/AS+
|
| R1
|
Line Abreast
Phases: 3
|
|
43/85
189/378
|
Echelon
Line Abreast
Phases: 3
|
|
43/85
189/378
|
Echelon
Line Abreast
Phases: 3
|
|
43/85
189/378
|
| #
|
Formation
|
Supported Battle Node
|
AD/AP
AS/AS+
|
E-4 Hard R2: 深海潜水艦隊 北東哨戒線 II群 (
PoiDB)
| #
|
Formation
|
Normal Battle Node
|
AD/AP
AS/AS+
|
| R2
|
Echelon
Line Abreast
Phases: 3
|
|
0/0
0/0
|
Echelon
Line Abreast
Phases: 3
|
|
0/0
0/0
|
| #
|
Formation
|
Normal Battle Node
|
AD/AP
AS/AS+
|
E-4 Hard S: 深海空母機動部隊 艦載機群 (
PoiDB)
| #
|
Formation
|
Air Defense Node
|
AD/AP
AS/AS+
|
| S
|
Diamond
Phases: 3
|

|
114/227
509/1017
|
Diamond
Phases: 3
|
|
120/240
539/1077
|
Diamond
Phases: 3
|
|
116/231
518/1035
|
| #
|
Formation
|
Air Defense Node
|
AD/AP
AS/AS+
|
E-4 Hard T: 深海任務部隊 増援阻止線前衛 (
PoiDB)
| #
|
Formation
|
Normal Battle Node
|
AD/AP
AS/AS+
|
| T
|
Line Ahead
Double Line
Echelon
Phases: 3
|
|
0/0
0/0
|
| #
|
Formation
|
Normal Battle Node
|
AD/AP
AS/AS+
|
E-4 Hard U: 深海潜水艦隊 北東哨戒線 I群 (
PoiDB)
| #
|
Formation
|
Normal Battle Node
|
AD/AP
AS/AS+
|
| U
|
Echelon
Phases: 3
|
|
0/0
0/0
|
Echelon
Phases: 3
|
|
0/0
0/0
|
Echelon
Phases: 3
|
|
0/0
0/0
|
| #
|
Formation
|
Normal Battle Node
|
AD/AP
AS/AS+
|
E-4 Hard V: 深海任務部隊 増援絶対阻止線 (
PoiDB)
| #
|
Formation
|
Normal Battle Node
|
AD/AP
AS/AS+
|
| V
|
Diamond
Phases: 3
|
|
116/231
518/1035
|
Diamond
Phases: 3
|
|
122/244
548/1095
|
Diamond
Phases: 3
|
|
116/231
518/1035
|
| #
|
Formation
|
Normal Battle Node
|
AD/AP
AS/AS+
|
E-4 Hard W
| #
|
Empty Node
|
| W
|
敵影を見ず。
No enemy spotted.
|
| #
|
Empty Node
|
E-4 Hard X: 北海道厚岸沖 沈没特型駆逐艦 (
PoiDB)
| Type | Ships |
|---|
| DE | |
|---|
| Type | Ships |
|---|
| DE | |
|---|
| DD | |
|---|
| Type | Ships |
|---|
| DE | |
|---|
| Type | Ships |
|---|
| DE | |
|---|
| Type | Ships |
|---|
| DE | |
|---|
| DD |
|
|---|
| CA | |
|---|
| CVL | |
|---|
| FBB | |
|---|
| CV | |
|---|
| SS | |
|---|
| AO | |
|---|
E-4 Easy AB
| #
|
Formation
|
Air Raids
|
AD/AP
AS/AS+
|
| AB
|
Diamond
|

|
37/73
164/327
|
| Diamond
|
|
60/119
267/534
|
| Diamond
|

|
98/195
437/873
|
| #
|
Formation
|
Air Raids
|
AD/AP
AS/AS+
|
E-4 Easy A: 深海潜水艦隊 津軽海峡哨戒線 (
PoiDB)
| #
|
Formation
|
Normal Battle Node
|
AD/AP
AS/AS+
|
| A
|
Echelon
Line Abreast
Phases: 1, 3
|

|
0/0
0/0
|
Echelon
Line Abreast
Phases: 1, 2, 3
|
|
0/0
0/0
|
Echelon
Line Abreast
Phases: 1, 3
|
|
0/0
0/0
|
| #
|
Formation
|
Normal Battle Node
|
AD/AP
AS/AS+
|
E-4 Easy A1: 深海潜水艦隊群・深海航空支援 (
PoiDB)
| #
|
Formation
|
Supported Battle Node
|
AD/AP
AS/AS+
|
| A1
|
Echelon
|
|
9/17
36/72
|
| #
|
Formation
|
Supported Battle Node
|
AD/AP
AS/AS+
|
E-4 Easy A2: 深海空母機動部隊 艦載機群 (
PoiDB)
| #
|
Formation
|
Air Defense Node
|
AD/AP
AS/AS+
|
| A2
|
Diamond
Phases: 1
|
 
|
32/63
140/279
|
Diamond
Phases: 1, 3
|
|
47/93
207/414
|
Diamond
Phases: 1
|
|
55/109
243/486
|
| #
|
Formation
|
Air Defense Node
|
AD/AP
AS/AS+
|
E-4 Easy B: 深海任務部隊 津軽海峡沖哨戒線 (
PoiDB)
| #
|
Formation
|
Normal Battle Node
|
AD/AP
AS/AS+
|
| B
|
Line Ahead
Double Line
Vanguard
Phases: 1, 3
|
 
|
0/0
0/0
|
| #
|
Formation
|
Normal Battle Node
|
AD/AP
AS/AS+
|
E-4 Easy C: 深海潜水艦隊群・深海航空支援 (
PoiDB)
| #
|
Formation
|
Supported Battle Node
|
AD/AP
AS/AS+
|
| C
|
Echelon
Line Abreast
Phases: 3
|
 
|
3/6
12/24
|
Echelon
Line Abreast
Phases: 3
|
|
9/17
36/72
|
Echelon
Line Abreast
Phases: 3
|
|
43/85
189/378
|
| #
|
Formation
|
Supported Battle Node
|
AD/AP
AS/AS+
|
E-4 Easy C1: 深海空母機動部隊 艦載機群 (
PoiDB)
| #
|
Formation
|
Air Defense Node
|
AD/AP
AS/AS+
|
| C1
|
Diamond
Phases: 1
|
|
43/85
189/378
|
Diamond
Phases: 1, 3
|
|
45/90
201/402
|
Diamond
Phases: 1, 3
|
|
51/101
225/450
|
| #
|
Formation
|
Air Defense Node
|
AD/AP
AS/AS+
|
E-4 Easy C2: 深海任務部隊 深海水雷戦隊 (
PoiDB)
| #
|
Formation
|
Normal Battle Node
|
AD/AP
AS/AS+
|
| C2
|
Line Ahead
Double Line
Echelon
Phases: 1, 3
|

|
0/0
0/0
|
| #
|
Formation
|
Normal Battle Node
|
AD/AP
AS/AS+
|
E-4 Easy D
| #
|
Landing Node
|
| D
|
輸送物資の揚陸地点に到達しました。本海域の輸送作戦は無事完了しています。
The landing point of the convoy has been reached. The transport operation here has already been completed successfully.
|
| #
|
Landing Node
|
E-4 Easy E
| #
|
Empty Node
|
| E
|
敵影を見ず。
No enemy spotted.
|
| #
|
Empty Node
|
E-4 Easy F: 深海潜水艦隊 北海道沖哨戒線 (
PoiDB)
E-4 Easy G
| #
|
Selection Node
|
| G
|
艦隊の針路を選択できます。提督、どちらの針路をとられますか?
You can decide the fleet's course. Admiral, which heading should we take?
|
| #
|
Selection Node
|
E-4 Easy H: 深海任務部隊 前衛護衛空母群 (
PoiDB)
| #
|
Formation
|
Normal Battle Node
|
AD/AP
AS/AS+
|
| H
|
Diamond
Phases: 3
|
|
32/63
140/279
|
Diamond
Phases: 3
|
|
47/93
207/414
|
Diamond
Phases: 3
|
|
55/109
243/486
|
| #
|
Formation
|
Normal Battle Node
|
AD/AP
AS/AS+
|
E-4 Easy I: 深海任務部隊 偵察巡洋艦戦隊 (
PoiDB)
| #
|
Formation
|
Normal Battle Node
|
AD/AP
AS/AS+
|
| I
|
Line Ahead
Double Line
Vanguard
Phases: 2, 3
|
|
0/0
0/0
|
| #
|
Formation
|
Normal Battle Node
|
AD/AP
AS/AS+
|
E-4 Easy J: 深海潜水艦隊 三陸沖群狼集団 (
PoiDB)
| #
|
Formation
|
Normal Battle Node
|
AD/AP
AS/AS+
|
| J
|
Echelon
Line Abreast
Phases: 2, 3
|
|
0/0
0/0
|
Echelon
Line Abreast
Phases: 2, 3
|
|
0/0
0/0
|
| #
|
Formation
|
Normal Battle Node
|
AD/AP
AS/AS+
|
E-4 Easy K: 深海空母機動部隊 艦載機群 (
PoiDB)
| #
|
Formation
|
Air Defense Node
|
AD/AP
AS/AS+
|
| K
|
Diamond
Phases: 3
|
|
83/166
372/744
|
Diamond
Phases: 3
|
|
89/177
396/792
|
Diamond
Phases: 3
|
|
123/245
549/1098
|
| #
|
Formation
|
Air Defense Node
|
AD/AP
AS/AS+
|
E-4 Easy L: 深海潜水艦隊 機動部隊前衛集団 (
PoiDB)
| #
|
Formation
|
Normal Battle Node
|
AD/AP
AS/AS+
|
| L
|
Echelon
Phases: 2
|
|
0/0
0/0
|
Echelon
Phases: 3
|
|
0/0
0/0
|
| Echelon
|
|
0/0
0/0
|
| #
|
Formation
|
Normal Battle Node
|
AD/AP
AS/AS+
|
E-4 Easy M: 深海任務部隊 強襲空母集団 (
PoiDB)
| #
|
Formation
|
Normal Battle Node
|
AD/AP
AS/AS+
|
| M
|
Diamond
Phases: 2, 3
|
|
83/166
372/744
|
Diamond
Phases: 2, 3
|
|
89/177
396/792
|
Diamond
Phases: 2, 3
|
|
123/245
549/1098
|
| #
|
Formation
|
Normal Battle Node
|
AD/AP
AS/AS+
|
E-4 Easy M1
| #
|
Empty Node
|
| M1
|
気のせいだった。
これより敵の背後を突く!艦隊、増速!
Must be my imagination.
|
| #
|
Empty Node
|
E-4 Easy M2
| #
|
Selection Node
|
| M2
|
これより敵の背後を突く!艦隊、増速!
|
| #
|
Selection Node
|
E-4 Easy M3: 深海任務部隊 後方支援部隊 (
PoiDB)
| #
|
Formation
|
Normal Battle Node
|
AD/AP
AS/AS+
|
| M3
|
Double Line
Diamond
Vanguard
Phases: 3
|

|
43/85
189/378
|
| #
|
Formation
|
Normal Battle Node
|
AD/AP
AS/AS+
|
E-4 Easy N: 深海空母機動部隊 艦載機群 (
PoiDB)
| #
|
Formation
|
Air Defense Node
|
AD/AP
AS/AS+
|
| N
|
Diamond
Phases: 2, 3
|

|
105/210
471/942
|
Diamond
Phases: 2, 3
|
|
111/221
495/990
|
Diamond
Phases: 2
|
|
133/265
594/1188
|
| #
|
Formation
|
Air Defense Node
|
AD/AP
AS/AS+
|
E-4 Easy P: 深海任務部隊 随伴護衛部隊 (
PoiDB)
| #
|
Formation
|
Normal Battle Node
|
AD/AP
AS/AS+
|
| P
|
Line Ahead
Double Line
|
|
0/0
0/0
|
| #
|
Formation
|
Normal Battle Node
|
AD/AP
AS/AS+
|
E-4 Easy Q: 深海任務部隊 三陸沖空襲空母群 (
PoiDB)
E-4 Easy R
| #
|
Empty Node
|
| R
|
気のせいだった。
北東方面艦隊主力、第五艦隊、見参!敵を捜索撃滅する!前進ッ!
Must be my imagination.
The main northeastern fleet, the 5th Fleet, is here! We will search and destroy the enemy! Forward!
|
| #
|
Empty Node
|
E-4 Easy R1: 深海潜水艦隊群・深海航空支援 (
PoiDB)
| #
|
Formation
|
Supported Battle Node
|
AD/AP
AS/AS+
|
| R1
|
Echelon
Line Abreast
|
|
3/6
12/24
|
Echelon
Line Abreast
Phases: 3
|
|
9/17
36/72
|
Echelon
Line Abreast
Phases: 3
|
|
43/85
189/378
|
| #
|
Formation
|
Supported Battle Node
|
AD/AP
AS/AS+
|
E-4 Easy R2: 深海潜水艦隊 北東哨戒線 II群 (
PoiDB)
| #
|
Formation
|
Normal Battle Node
|
AD/AP
AS/AS+
|
| R2
|
Echelon
Line Abreast
Phases: 3
|
|
0/0
0/0
|
Echelon
Line Abreast
Phases: 3
|
|
0/0
0/0
|
Echelon
Line Abreast
Phases: 3
|
|
0/0
0/0
|
| #
|
Formation
|
Normal Battle Node
|
AD/AP
AS/AS+
|
E-4 Easy S: 深海空母機動部隊 艦載機群 (
PoiDB)
| #
|
Formation
|
Air Defense Node
|
AD/AP
AS/AS+
|
| S
|
Diamond
Phases: 3
|

|
108/216
485/969
|
Diamond
Phases: 3
|
|
110/219
492/984
|
Diamond
Phases: 3
|
|
116/231
519/1038
|
| #
|
Formation
|
Air Defense Node
|
AD/AP
AS/AS+
|
E-4 Easy T: 深海任務部隊 増援阻止線前衛 (
PoiDB)
| #
|
Formation
|
Normal Battle Node
|
AD/AP
AS/AS+
|
| T
|
Line Ahead
Double Line
Echelon
Phases: 3
|
|
0/0
0/0
|
| #
|
Formation
|
Normal Battle Node
|
AD/AP
AS/AS+
|
E-4 Easy U: 深海潜水艦隊 北東哨戒線 I群 (
PoiDB)
| #
|
Formation
|
Normal Battle Node
|
AD/AP
AS/AS+
|
| U
|
Echelon
Phases: 3
|
|
0/0
0/0
|
Echelon
Phases: 3
|
|
0/0
0/0
|
Echelon
Phases: 3
|
|
0/0
0/0
|
| #
|
Formation
|
Normal Battle Node
|
AD/AP
AS/AS+
|
E-4 Easy V: 深海任務部隊 増援絶対阻止線 (
PoiDB)
| #
|
Formation
|
Normal Battle Node
|
AD/AP
AS/AS+
|
| V
|
Diamond
Phases: 3
|
|
110/219
492/984
|
Diamond
Phases: 3
|
|
116/231
519/1038
|
Diamond
Phases: 3
|
|
116/231
519/1038
|
| #
|
Formation
|
Normal Battle Node
|
AD/AP
AS/AS+
|
E-4 Easy W
| #
|
Empty Node
|
| W
|
敵影を見ず。
No enemy spotted.
|
| #
|
Empty Node
|
E-4 Easy X: 北海道厚岸沖 沈没特型駆逐艦 (
PoiDB)
| Type | Ships |
|---|
| DE | |
|---|
| Type | Ships |
|---|
| DE | |
|---|
| Type | Ships |
|---|
| DE | |
|---|
| DD |
|
|---|
| CA | |
|---|
| CVL | |
|---|
| FBB | |
|---|
| CV | |
|---|
| SS | |
|---|
| AO | |
|---|
E-4 Casual AB
| #
|
Formation
|
Air Raids
|
AD/AP
AS/AS+
|
| AB
|
Diamond
|
|
34/68
152/303
|
| Diamond
|
|
57/114
255/510
|
| Diamond
|

|
90/179
401/801
|
| #
|
Formation
|
Air Raids
|
AD/AP
AS/AS+
|
E-4 Casual A: 深海潜水艦隊 津軽海峡哨戒線 (
PoiDB)
| #
|
Formation
|
Normal Battle Node
|
AD/AP
AS/AS+
|
| A
|
Echelon
Line Abreast
Phases: 1, 3
|
|
0/0
0/0
|
Echelon
Line Abreast
Phases: 1
|
|
0/0
0/0
|
| #
|
Formation
|
Normal Battle Node
|
AD/AP
AS/AS+
|
| #
|
Formation
|
Supported Battle Node
|
AD/AP
AS/AS+
|
| #
|
Formation
|
Supported Battle Node
|
AD/AP
AS/AS+
|
E-4 Casual A2: 深海空母機動部隊 艦載機群 (
PoiDB)
| #
|
Formation
|
Air Defense Node
|
AD/AP
AS/AS+
|
| A2
|
Diamond
|
|
11/22
48/96
|
Diamond
Phases: 1
|
|
32/63
140/279
|
Diamond
Phases: 1
|
|
47/93
207/414
|
| #
|
Formation
|
Air Defense Node
|
AD/AP
AS/AS+
|
E-4 Casual B: 深海任務部隊 津軽海峡沖哨戒線 (
PoiDB)
| #
|
Formation
|
Normal Battle Node
|
AD/AP
AS/AS+
|
| B
|
Line Ahead
Double Line
Vanguard
Phases: 1, 3
|
|
0/0
0/0
|
| #
|
Formation
|
Normal Battle Node
|
AD/AP
AS/AS+
|
E-4 Casual C: 深海潜水艦隊群・深海航空支援 (
PoiDB)
| #
|
Formation
|
Supported Battle Node
|
AD/AP
AS/AS+
|
| C
|
Echelon
Line Abreast
|
|
3/6
12/24
|
| Echelon
|
|
9/17
36/72
|
| #
|
Formation
|
Supported Battle Node
|
AD/AP
AS/AS+
|
E-4 Casual C1: 深海空母機動部隊 艦載機群 (
PoiDB)
| #
|
Formation
|
Air Defense Node
|
AD/AP
AS/AS+
|
| C1
|
Diamond
Phases: 1
|
|
9/17
36/72
|
Diamond
Phases: 1, 3
|
|
11/22
48/96
|
Diamond
Phases: 1, 3
|
|
45/90
201/402
|
| #
|
Formation
|
Air Defense Node
|
AD/AP
AS/AS+
|
E-4 Casual C2: 深海任務部隊 深海水雷戦隊 (
PoiDB)
| #
|
Formation
|
Normal Battle Node
|
AD/AP
AS/AS+
|
| C2
|
Line Ahead
Double Line
Echelon
Phases: 1, 3
|

|
0/0
0/0
|
| #
|
Formation
|
Normal Battle Node
|
AD/AP
AS/AS+
|
E-4 Casual D
| #
|
Landing Node
|
| D
|
輸送物資の揚陸地点に到達しました。本海域の輸送作戦は無事完了しています。
The landing point of the convoy has been reached. The transport operation here has already been completed successfully.
|
| #
|
Landing Node
|
E-4 Casual E
| #
|
Empty Node
|
| E
|
敵影を見ず。
No enemy spotted.
|
| #
|
Empty Node
|
E-4 Casual F: 深海潜水艦隊 北海道沖哨戒線 (
PoiDB)
E-4 Casual G
| #
|
Selection Node
|
| G
|
艦隊の針路を選択できます。提督、どちらの針路をとられますか?
You can decide the fleet's course. Admiral, which heading should we take?
|
| #
|
Selection Node
|
E-4 Casual H: 深海任務部隊 前衛護衛空母群 (
PoiDB)
| #
|
Formation
|
Normal Battle Node
|
AD/AP
AS/AS+
|
| H
|
Diamond
|
|
26/52
116/231
|
| Diamond
|
|
32/63
140/279
|
| Diamond
|
|
47/93
207/414
|
| #
|
Formation
|
Normal Battle Node
|
AD/AP
AS/AS+
|
E-4 Casual I: 深海任務部隊 偵察巡洋艦戦隊 (
PoiDB)
| #
|
Formation
|
Normal Battle Node
|
AD/AP
AS/AS+
|
| I
|
Line Ahead
Double Line
Vanguard
Phases: 2, 3
|
|
0/0
0/0
|
| #
|
Formation
|
Normal Battle Node
|
AD/AP
AS/AS+
|
E-4 Casual J: 深海潜水艦隊 三陸沖群狼集団 (
PoiDB)
| #
|
Formation
|
Normal Battle Node
|
AD/AP
AS/AS+
|
| J
|
Echelon
Line Abreast
Phases: 2, 3
|
|
0/0
0/0
|
Echelon
Line Abreast
Phases: 2, 3
|
|
0/0
0/0
|
| #
|
Formation
|
Normal Battle Node
|
AD/AP
AS/AS+
|
E-4 Casual K: 深海空母機動部隊 艦載機群 (
PoiDB)
| #
|
Formation
|
Air Defense Node
|
AD/AP
AS/AS+
|
| K
|
Diamond
|
|
47/93
207/414
|
| Diamond
|
|
81/161
360/720
|
| #
|
Formation
|
Air Defense Node
|
AD/AP
AS/AS+
|
E-4 Casual L: 深海潜水艦隊 機動部隊前衛集団 (
PoiDB)
| #
|
Formation
|
Normal Battle Node
|
AD/AP
AS/AS+
|
| L
|
Echelon
|
|
0/0
0/0
|
| Echelon
|
|
0/0
0/0
|
| Echelon
|
|
0/0
0/0
|
| #
|
Formation
|
Normal Battle Node
|
AD/AP
AS/AS+
|
E-4 Casual M: 深海任務部隊 強襲空母集団 (
PoiDB)
| #
|
Formation
|
Normal Battle Node
|
AD/AP
AS/AS+
|
| M
|
Diamond
Phases: 2, 3
|
|
47/93
207/414
|
Diamond
Phases: 2, 3
|
|
81/161
360/720
|
Diamond
Phases: 2
|
|
83/166
372/744
|
| #
|
Formation
|
Normal Battle Node
|
AD/AP
AS/AS+
|
E-4 Casual M1
| #
|
Empty Node
|
| M1
|
気のせいだった。
これより敵の背後を突く!艦隊、増速!
Must be my imagination.
|
| #
|
Empty Node
|
E-4 Casual M2
| #
|
Selection Node
|
| M2
|
これより敵の背後を突く!艦隊、増速!
|
| #
|
Selection Node
|
E-4 Casual M3: 深海任務部隊 後方支援部隊 (
PoiDB)
| #
|
Formation
|
Normal Battle Node
|
AD/AP
AS/AS+
|
| M3
|
Double Line
|
|
3/6
12/24
|
| #
|
Formation
|
Normal Battle Node
|
AD/AP
AS/AS+
|
E-4 Casual N: 深海空母機動部隊 艦載機群 (
PoiDB)
| #
|
Formation
|
Air Defense Node
|
AD/AP
AS/AS+
|
| N
|
Diamond
Phases: 2, 3
|

|
103/205
459/918
|
Diamond
Phases: 2, 3
|
|
105/210
471/942
|
Diamond
Phases: 2
|
|
118/235
527/1053
|
| #
|
Formation
|
Air Defense Node
|
AD/AP
AS/AS+
|
E-4 Casual P: 深海任務部隊 随伴護衛部隊 (
PoiDB)
| #
|
Formation
|
Normal Battle Node
|
AD/AP
AS/AS+
|
| P
|
Line Ahead
Vanguard
Phases: 2, 3
|
|
0/0
0/0
|
| #
|
Formation
|
Normal Battle Node
|
AD/AP
AS/AS+
|
E-4 Casual Q: 深海任務部隊 三陸沖空襲空母群 (
PoiDB)
E-4 Casual R
| #
|
Empty Node
|
| R
|
気のせいだった。
北東方面艦隊主力、第五艦隊、見参!敵を捜索撃滅する!前進ッ!
Must be my imagination.
The main northeastern fleet, the 5th Fleet, is here! We will search and destroy the enemy! Forward!
|
| #
|
Empty Node
|
E-4 Casual R1: 深海潜水艦隊群・深海航空支援 (
PoiDB)
| #
|
Formation
|
Supported Battle Node
|
AD/AP
AS/AS+
|
| R1
|
Echelon
Line Abreast
|
|
3/6
12/24
|
Echelon
Line Abreast
|
|
9/17
36/72
|
| #
|
Formation
|
Supported Battle Node
|
AD/AP
AS/AS+
|
E-4 Casual R2: 深海潜水艦隊 北東哨戒線 II群 (
PoiDB)
| #
|
Formation
|
Normal Battle Node
|
AD/AP
AS/AS+
|
| R2
|
Echelon
Line Abreast
Phases: 3
|
|
0/0
0/0
|
Echelon
Line Abreast
Phases: 3
|
|
0/0
0/0
|
| #
|
Formation
|
Normal Battle Node
|
AD/AP
AS/AS+
|
E-4 Casual S: 深海空母機動部隊 艦載機群 (
PoiDB)
| #
|
Formation
|
Air Defense Node
|
AD/AP
AS/AS+
|
| S
|
Diamond
Phases: 3
|
|
51/101
225/450
|
Diamond
Phases: 3
|
|
97/193
434/867
|
Diamond
Phases: 3
|
|
107/214
480/960
|
| #
|
Formation
|
Air Defense Node
|
AD/AP
AS/AS+
|
E-4 Casual T: 深海任務部隊 増援阻止線前衛 (
PoiDB)
| #
|
Formation
|
Normal Battle Node
|
AD/AP
AS/AS+
|
| T
|
Line Ahead
Double Line
Echelon
Phases: 3
|
|
0/0
0/0
|
| #
|
Formation
|
Normal Battle Node
|
AD/AP
AS/AS+
|
E-4 Casual U: 深海潜水艦隊 北東哨戒線 I群 (
PoiDB)
| #
|
Formation
|
Normal Battle Node
|
AD/AP
AS/AS+
|
| U
|
Echelon
Phases: 3
|
|
0/0
0/0
|
Echelon
Phases: 3
|
|
0/0
0/0
|
Echelon
Phases: 3
|
|
0/0
0/0
|
| #
|
Formation
|
Normal Battle Node
|
AD/AP
AS/AS+
|
E-4 Casual V: 深海任務部隊 増援絶対阻止線 (
PoiDB)
| #
|
Formation
|
Normal Battle Node
|
AD/AP
AS/AS+
|
| V
|
Diamond
Phases: 3
|
|
66/131
293/585
|
Diamond
Phases: 3
|
|
107/214
480/960
|
Diamond
Phases: 3
|
|
108/216
485/969
|
| #
|
Formation
|
Normal Battle Node
|
AD/AP
AS/AS+
|
E-4 Casual W
| #
|
Empty Node
|
| W
|
敵影を見ず。
No enemy spotted.
|
| #
|
Empty Node
|
E-4 Casual X: 北海道厚岸沖 沈没特型駆逐艦 (
PoiDB)
Ship Drops
| Ship drops
|
| Type
|
Ship?
|
C2
|
F
|
H
|
I
|
M
|
M3
|
Q
|
T
|
V
|
X
|
| DE
|
Inagi
|
|
|
|
|
|
|
Casual+
|
|
|
Casual+
|
| DE
|
Shimushu
|
|
|
|
|
|
|
|
|
|
Casual+
|
| DE
|
Kunashiri
|
Casual+
|
Easy+
|
Medium+
|
Easy+
|
Casual+
|
|
Casual+
|
Casual+
|
Casual+
|
|
| DE
|
Etorofu
|
Casual+
|
Casual+
|
Easy+
|
Medium+
|
Casual+
|
Medium+
|
Casual+
|
Casual+
|
Casual+
|
Casual+
|
| DD
|
Kamikaze
|
|
Casual+
|
|
|
Casual+
|
|
Casual+
|
|
Casual+
|
|
| DD
|
Usugumo
|
|
Hard+
|
|
|
|
|
Casual+
|
|
|
Casual+
|
| DD
|
Asagumo
|
|
Casual+
|
Easy+
|
|
Casual+
|
Medium+
|
Casual+
|
Hard+
|
Casual+
|
|
| DD
|
Hayashimo
|
|
|
|
|
|
|
|
|
|
Casual+
|
| DD
|
Kiyoshimo
|
|
|
|
|
|
|
|
|
|
Casual+
|
| CA
|
Mikuma
|
|
|
|
|
|
|
|
|
|
Casual+
|
| CVL
|
Yawata Maru
|
|
|
|
|
|
|
Medium+
|
|
|
Casual+
|
| FBB
|
South Dakota
|
|
Easy+
|
|
|
|
|
Casual+
|
|
Medium+
|
Casual+
|
| CV
|
Ranger
|
|
|
|
|
|
|
Easy+
|
|
|
Casual+
|
| SS
|
Scamp
|
|
|
|
|
|
|
|
|
|
Casual+
|
| LHA
|
Kumano Maru
|
|
|
|
|
|
|
Casual+
|
|
|
Casual+
|
| LHA
|
No.101 Transport Ship
|
|
|
|
|
|
|
|
|
|
Casual+
|
| AO
|
Souya
|
|
Casual+
|
Hard+
|
|
|
|
Casual+
|
|
Easy+
|
Casual+
|
| DD
|
Yamagumo
|
Hard+
|
Casual+
|
Medium+
|
|
Casual+
|
|
Casual+
|
Medium+
|
Casual+
|
|
| CL
|
Kitakami
|
Medium+
|
Casual+
|
Easy+
|
|
Casual+
|
Hard+
|
Casual+
|
Easy+
|
Casual+
|
Casual+
|
| CL
|
Ooi
|
|
|
|
|
|
|
|
|
|
Casual+
|
| CL
|
Kinu
|
|
|
|
|
|
|
|
|
|
Casual+
|
| CL
|
Abukuma
|
|
Casual+
|
Hard+
|
|
Medium+
|
|
Casual+
|
|
Casual+
|
Casual+
|
| CL
|
Sendai
|
Casual+
|
Easy+
|
Easy+
|
Hard+
|
Casual+
|
Easy+
|
Casual+
|
Casual+
|
Easy+
|
|
| CL
|
Yuubari
|
|
Casual+
|
Medium+
|
|
Easy+
|
|
Casual+
|
|
Casual+
|
Casual+
|
| CA
|
Kinugasa
|
|
|
|
|
|
|
|
|
|
Casual+
|
| CA
|
Mogami
|
|
|
|
|
|
|
|
|
|
Casual+
|
| CA
|
Tone
|
|
Casual+
|
Medium+
|
|
Easy+
|
Hard+
|
Casual+
|
|
Casual+
|
Casual+
|
| CA
|
Chikuma
|
|
Casual+
|
Hard+
|
|
Easy+
|
Hard+
|
Casual+
|
|
Casual+
|
Casual+
|
| CVL
|
Zuihou
|
|
|
|
|
|
|
Easy+
|
|
|
Casual+
|
| FBB
|
Kongou
|
|
Hard+
|
Hard+
|
|
|
|
Casual+
|
|
Easy+
|
Casual+
|
| FBB
|
Hiei
|
|
Casual+
|
Hard+
|
|
Hard+
|
|
Casual+
|
|
Easy+
|
Casual+
|
| FBB
|
Haruna
|
|
Casual+
|
Hard+
|
|
Hard+
|
|
Casual+
|
|
Easy+
|
Casual+
|
| FBB
|
Kirishima
|
|
Easy+
|
|
|
|
|
Casual+
|
|
Hard+
|
Casual+
|
| BB
|
Ise
|
|
|
|
|
|
|
|
|
|
Casual+
|
| BB
|
Hyuuga
|
|
|
|
|
|
|
|
|
|
Casual+
|
| BB
|
Nagato
|
|
|
|
|
|
|
|
|
|
Casual+
|
| BB
|
Mutsu
|
|
|
|
|
|
|
|
|
|
Casual+
|
| CV
|
Akagi
|
|
|
|
|
|
|
|
|
|
Casual+
|
| CV
|
Souryuu
|
|
|
|
|
|
|
|
|
|
Casual+
|
| CV
|
Hiryuu
|
|
|
|
|
|
|
|
|
|
Casual+
|
|
|
Time remaining until Event ends [8]:
11 October 2023 11:00:00 +0900
The Summer 2023 Event has ended!
See 2023-10-11 patch notes.
|