- Welcome to the Kancolle Wiki!
- If you have any questions regarding site content, account registration, etc., please visit the KanColle Wiki Discord
World 7/7-3
< World 7
Jump to navigation
Jump to search
Revision as of 12:13, 23 January 2023 by Ink20 (talk | contribs) (→Stage Guide: Speed for J->P should be Fastest)
World 7-3: ペナン島沖 Penang Island Sea
| Strategy Name | マラッカ海峡を抜けて (Breaking Through Malacca Strait) |
|---|---|
| Difficulty | ☆☆☆☆☆☆☆☆ |
| Item | |
| Strategy Content | 精強な重巡及び駆逐艦を中核とする小艦隊でマラッカ海峡を突破する。ペナン島沖の敵戦力を撃破して前進せよ! Break through the Malacca Strait using a powerful heavy cruiser and a small fleet centered around destroyers. Defeat the enemy forces in the Penang Island Sea and advance forward! |
| 7-3 Part 1 | ||
| Fleet | Haguro , 3DD , 3DD
| |
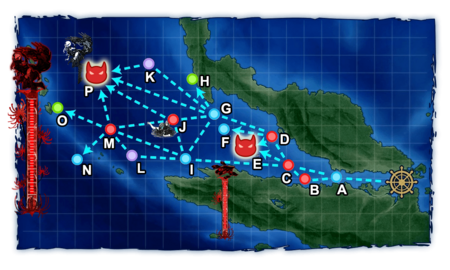
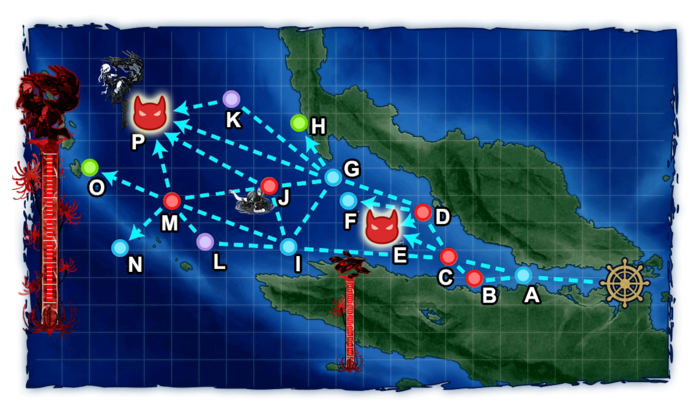
| Route | A C E | |
| Other Notes | Named ships are mandatory. | |
| AP | AS | AS+ |
| 0 | 0 | 0 |


Stage Guide
| 7-3 Branching Rules Part 1 |
|---|
| 7-3 Branching Rules Part 2 |
|---|
Tips
- The map consists of 2 Phases.
- Similar to World 7-2, this map resets at the end of each month and you will have to clear Phase 1 and 2 each month.
- Similar to World 5-2, this map featured historical routing if you use Kamikaze, Haguro, Ashigara on Phase 2.
- Kamikaze is the key historical ship for this map and required in order to avoid node M which features CA Ri-Class that can potentially harm your "light ships".
- You can drop her on this map to get better routings later.
- The number of historical ships being presented in the fleet heavily affects the routing you will take in Phase 2. Increasing the speed of the fleet to Fast+ or more can help reduce the number of historical ships required to go the shortest route (See below).
- Kamikaze is the key historical ship for this map and required in order to avoid node M which features CA Ri-Class that can potentially harm your "light ships".
Phase 1
- This is a Light Fleet phase where you go and kill a fleet of 5 enemy destroyers. The boss in this phase is DD Ro-Class Late Model, who will turn into Late Model Elite form in the Final Kill (Reverted to Late Model form again once this phase is cleared).
Recommended Fleet
Phase 2
- This phase requires you to kill a much heavier enemy fleet than Phase 1 featuring CA Ne-Class Elite as the boss. In the final kill, the boss comp will feature 6 enemies in total, and will revert back to 5-enemy comp once the map is cleared.
- It is possible to clear this phase by either using a fleet of 5 ships or 6 ships depending on what the player wants.
- All the compositions suggested below requires at least Fast fleet
- Kamikaze, Ashigara, Haguro, 1CL(T)/AV, 2DD (By5 Composition)
- Haguro, Kamikaze, 1CA(V), 1CLT/CT/AV, 2DD (Fast+)
- Route = A C D G P
- Kamikaze, Ashigara, Haguro, 1CA(V), 1DD (5 Ships)
- Haguro, Kamikaze, 1CA(V)/CLT/AV, 3DD (Fast+)
- Route = A C I J P
- Haguro, Ashigara, Kamikaze, 1AV, 1CL(T), 1DD
- Haguro, Ashigara, 1CA(V), 3DD (Fast)
- Route = A C D G J P
- The first comp is the strongest fleet possible, which helps to minimize bucket usage due to extra opening shots and fewer DDs required.
- The second comp is for fleets that are missing Kamikaze while avoiding an ammo penalty at the boss.
Enemy CompositionsCollapse
7-3 A
| # | Empty Node | ||
|---|---|---|---|
| A | 気のせいだった。 Must be my imagination. | ||
| # | Empty Node | ||
7-3 B: 深海東方部隊 魚雷艇戦隊 (PoiDB)
| # | Formation | Normal Battle Node | AD/AP AS/AS+ |
|---|---|---|---|
| B | Echelon Line Abreast |
0/0 0/0 | |
| Echelon Line Abreast |
0/0 0/0 | ||
| Echelon Line Abreast |
0/0 0/0 | ||
| # | Formation | Normal Battle Node | AD/AP AS/AS+ |
7-3 C: 深海東方部隊 前衛駆逐艦 (PoiDB)
| # | Formation | Normal Battle Node | AD/AP AS/AS+ |
|---|---|---|---|
| C | Line Ahead Echelon |
0/0 0/0 | |
| Line Ahead Echelon |
0/0 0/0 | ||
| Line Ahead Echelon |
0/0 0/0 | ||
| # | Formation | Normal Battle Node | AD/AP AS/AS+ |
7-3 D: 深海5,500t級軽巡洋艦 (PoiDB)
| # | Formation | Normal Battle Node | AD/AP AS/AS+ |
|---|---|---|---|
| D | Line Ahead Echelon |
0/0 0/0 | |
| Line Ahead Echelon |
0/0 0/0 | ||
| Line Ahead Echelon |
0/0 0/0 | ||
| # | Formation | Normal Battle Node | AD/AP AS/AS+ |
7-3 E: 深海東方部隊 精鋭駆逐隊 (PoiDB)
| # | Formation | Boss Battle Node | AD/AP AS/AS+ |
|---|---|---|---|
| E | Line Ahead Echelon |
0/0 0/0 | |
| Line Ahead Echelon |
0/0 0/0 | ||
| Line Ahead Echelon (Final)
|
0/0 0/0 | ||
| # | Formation | Boss Battle Node | AD/AP AS/AS+ |
7-3 F
| # | Empty Node | ||
|---|---|---|---|
| F | 敵影を見ず。 No enemy spotted. | ||
| # | Empty Node | ||
7-3 G
| # | Empty Node | ||
|---|---|---|---|
| G | 気のせいだった。 Must be my imagination. | ||
| # | Empty Node | ||
7-3 H
| # | Resource Node | ||
|---|---|---|---|
| H | Gained 30~50 | ||
| # | Resource Node | ||
7-3 I
| # | Empty Node | ||
|---|---|---|---|
| I | 気のせいだった。 Must be my imagination. | ||
| # | Empty Node | ||
7-3 J: 深海潜水艦隊 海峡警戒線 (PoiDB)
| # | Formation | Normal Battle Node | AD/AP AS/AS+ |
|---|---|---|---|
| J | Echelon Line Abreast |
0/0 0/0 | |
| Echelon Line Abreast |
0/0 0/0 | ||
| Echelon Line Abreast |
0/0 0/0 | ||
| # | Formation | Normal Battle Node | AD/AP AS/AS+ |
7-3 K
| # | Maelstrom Node | ||
|---|---|---|---|
| K | Lost Normal | ||
| # | Maelstrom Node | ||
7-3 L
| # | Maelstrom Node | ||
|---|---|---|---|
| L | Lost Normal | ||
| # | Maelstrom Node | ||
7-3 M: 深海東方部隊 巡洋艦戦隊 (PoiDB)
| # | Formation | Normal Battle Node | AD/AP AS/AS+ |
|---|---|---|---|
| M | Line Ahead Double Line |
0/0 0/0 | |
| Line Ahead Double Line |
0/0 0/0 | ||
| Line Ahead Double Line |
0/0 0/0 | ||
| # | Formation | Normal Battle Node | AD/AP AS/AS+ |
7-3 N: 深海東方部隊 空母機動部隊 (PoiDB)
| # | Formation | Normal Battle Node | AD/AP AS/AS+ |
|---|---|---|---|
| N | Diamond | 71/142 318/636 | |
| Double Line Diamond |
80/159 357/714 | ||
| # | Formation | Normal Battle Node | AD/AP AS/AS+ |
7-3 O
| # | Resource Node | ||
|---|---|---|---|
| O | Gained 40~60 | ||
| # | Resource Node | ||
7-3 P: 深海東方部隊 海峡封鎖部隊旗艦 (PoiDB)
| # | Formation | Boss Battle Node | AD/AP AS/AS+ |
|---|---|---|---|
| P | Line Ahead Echelon |
0/0 0/0 | |
| Line Ahead Echelon |
0/0 0/0 | ||
| Line Ahead Echelon (Final)
|
0/0 0/0 | ||
| # | Formation | Boss Battle Node | AD/AP AS/AS+ |
Ship Drops
This map currently has "limited-time" drops, see Drop List for more info.
- The below table contains limited-time drop data and may not be up to date.
☒ All drops (disabled, only rare drops)
| ExpandShip drops |
|---|
| ||