- Welcome to the Kancolle Wiki!
- If you have any questions regarding site content, account registration, etc., please visit the KanColle Wiki Discord
Difference between revisions of "World 1/1-6"
< World 1
Jump to navigation
Jump to search
Jigaraphale (talk | contribs) |
|||
| (7 intermediate revisions by the same user not shown) | |||
| Line 1: | Line 1: | ||
{{World/Hub}} | {{World/Hub}} | ||
| − | + | =World 1-6 Extra Operation: 鎮守府近海航路 - Sea Route Near Naval Base= | |
{{LabSortieworld | {{LabSortieworld | ||
| page = World 1/1-6 | | page = World 1/1-6 | ||
| Line 6: | Line 6: | ||
| item = {{Fuel}} {{Ammo}} {{Steel}} {{Bauxite}} | | item = {{Fuel}} {{Ammo}} {{Steel}} {{Bauxite}} | ||
| exp = Variable | | exp = Variable | ||
| − | | code = 輸送船団護衛作戦 | + | | code = 輸送船団護衛作戦<br>Convoy Escort Operation |
| jptext = 対潜及び防空能力に優れた艦艇を基幹戦力とした艦隊を編成、輸送船団航路の護衛にあたれ! | | jptext = 対潜及び防空能力に優れた艦艇を基幹戦力とした艦隊を編成、輸送船団航路の護衛にあたれ! | ||
| entext = Form a fleet consisting of ships with excellent anti-submarine warfare and anti-aircraft capabilities, and protect the transport ship routes! | | entext = Form a fleet consisting of ships with excellent anti-submarine warfare and anti-aircraft capabilities, and protect the transport ship routes! | ||
| − | |||
| − | |||
| − | |||
| − | |||
| − | |||
| − | |||
| − | |||
| − | |||
| − | |||
| − | |||
| − | |||
| − | |||
| − | |||
}} | }} | ||
| + | |||
| + | {{MapUnlock | ||
| + | | unlock= [[1-5]] HP bar each month | ||
| + | | clear= node {{MapRoute|N|green}} must be reached 7 times | ||
| + | | reward= '''75 {{Item/Icon|Ranking Point Reward|size=25px}} [[Ranking Point]]s''' and '''1 {{PBox}} [[Present Box]]''' | ||
| + | | reset= Resets at midnight JST at the beginning of every month | ||
}} | }} | ||
| − | |||
| − | |||
| − | |||
| − | |||
| − | |||
| − | |||
| − | |||
| − | |||
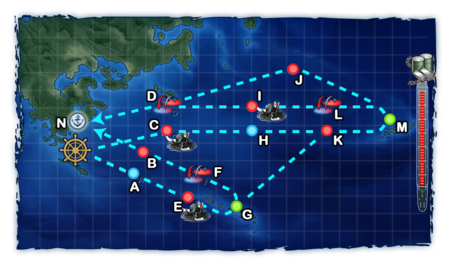
===Stage Guide=== | ===Stage Guide=== | ||
| Line 65: | Line 50: | ||
===Tips=== | ===Tips=== | ||
| − | There is no Boss node in this map. Instead, the final "Harbor Node" at {{MapRoute|N}} serves as the map's endpoint. | + | There is no Boss node in this map. Instead, the final "Harbor Node" at {{MapRoute|N|green}} serves as the map's endpoint. |
| − | *A random amount of resources of either fuel, ammo, steel, or bauxite is rewarded upon reaching node {{MapRoute|N}}. | + | *A random amount of resources of either fuel, ammo, steel, or bauxite is rewarded upon reaching node {{MapRoute|N|green}}. |
| − | **The amount of resources rewarded at node {{MapRoute|N}} is great before clearing , and modest after clearing. | + | **The amount of resources rewarded at node {{MapRoute|N|green}} is great before clearing , and modest after clearing. |
| − | ''' | + | '''Only BBV, CVL, CA(V), CL, CT, DD, DE, AV, LHA, AS, AO, and AR can be used on this map. |
| − | + | *(F)BB, CV(B), CLT, and SS(V) are not allowed. | |
| − | *Using BBV, | + | *Using BBV, CVL, or CA will route to node {{MapRoute|C|red}} which leads to a harder route. Submarine fleets with line ahead formation appear at node {{MapRoute|I|red}} (1/2 patterns). |
**This route is mostly taken if a player wishes to brute-force the map or complete specific quests. | **This route is mostly taken if a player wishes to brute-force the map or complete specific quests. | ||
| − | * | + | ;Regarding nodes |
| + | *Nodes {{MapRoute|D|pink|F|pink|L|pink}} are ''Air Battle'' nodes. | ||
**Daytime combat at these nodes has two Aerial Combat phases but no shelling. It's also possible to do night battle afterward, unlike regular Air nodes. | **Daytime combat at these nodes has two Aerial Combat phases but no shelling. It's also possible to do night battle afterward, unlike regular Air nodes. | ||
| + | **Having a ship with [[AACI]] is highly recommended to reduce damage taken here. | ||
**If the fleet has no ships that can attack during Aerial Combat, it will get a ''D rank'' (see [[Combat#Victory_Conditions|1st D rank condition]]), unless entering night combat. | **If the fleet has no ships that can attack during Aerial Combat, it will get a ''D rank'' (see [[Combat#Victory_Conditions|1st D rank condition]]), unless entering night combat. | ||
| − | *Node {{MapRoute|N}} not | + | *Node {{MapRoute|N|green}} is an "End Node" and not a boss node, thus it will not count towards certain quests (namely {{Q|Bw1}}) that require reaching a boss node. |
| − | * | + | **Therefore, it is possible to advance with a ''taiha'' ship from node {{MapRoute|B|red}} or {{MapRoute|D|pink}} without risk of sinking any ship. |
| − | **An exception is if the flagship is heavily damaged, where retreat is forced. However, if it is equipped with a {{EquipmentLink|Emergency Repair Personnel|Emergency Repair Goddess|text= | + | **An exception is if the flagship is heavily damaged, where retreat is forced. However, if it is equipped with a {{EquipmentLink|Emergency Repair Personnel|Emergency Repair Goddess|text=damage control}}, it is possible to activate it and continue (the item is '''not consumed''' here). |
| − | |||
*Node {{MapRoute|E|red}} is a submarine node with Echelon formation. Because this node is so minor in nature, bringing ASW equipment is not required. | *Node {{MapRoute|E|red}} is a submarine node with Echelon formation. Because this node is so minor in nature, bringing ASW equipment is not required. | ||
===Recommended Fleet=== | ===Recommended Fleet=== | ||
| − | + | {{FleetGuide | |
| − | | | + | | Map = Light Fleet |
| − | + | | Fleet = '''1 CL, 5 DD/DE | |
| − | + | | Route = {{MapRoute|A|blue|E|red|G|green|F|pink|B|red|N|green}} | |
| − | + | | AS = 83 | |
| − | + | | Note = The only compositions that guarantee this routing. | |
| + | Alternative fleets, able to get ''B rank'' at Node {{MapRoute|F|pink}}, but with an off-route chance from {{MapRoute|G|green}} to {{MapRoute|K|red}}, which is a harder route: | ||
| + | *0-2 CL, 4-6 DD | ||
| + | *1-2 CAV, 4 DD, 0-1 LHA | ||
| + | *4 DD, 2 AV/AO | ||
| + | | Quest = | ||
| + | }} | ||
| − | | | + | {{FleetGuide |
| − | + | | Map = Heavy Fleet | |
| − | + | | Fleet = '''2 BBV, 1 CL, 3 DD | |
| − | + | | LOS = Cn3: 30 | |
| − | + | | Route = {{MapRoute|C|red|H|blue|K|red|M|green|J|red|D|pink|N|green}} | |
| − | + | | AS = 198 | |
| − | + | | Note = Should only be used for quests. | |
| + | *Goes through a longer and more dangerous route compared to the light fleet. | ||
| + | *There is an LoS check at node {{MapRoute|M|green}}. | ||
| + | | Quest = {{Q|Bq3}} | ||
| + | }} | ||
===Resource Nodes=== | ===Resource Nodes=== | ||
{{MapRoute|G|green|M|green}} are "Special Resource Nodes" rewarding respectively ammo {{Ammo}}, and fuel {{Fuel}}. | {{MapRoute|G|green|M|green}} are "Special Resource Nodes" rewarding respectively ammo {{Ammo}}, and fuel {{Fuel}}. | ||
| − | Additionally, node {{MapRoute|N}} is a special case with its unique set of rules. | + | Additionally, node {{MapRoute|N|green}} is a special case with its unique set of rules. |
*''See [[Resource Node|here]] for more details. | *''See [[Resource Node|here]] for more details. | ||
| Line 108: | Line 104: | ||
|enemycompsnotes= | |enemycompsnotes= | ||
| − | |||
| − | |||
| − | |||
| − | |||
}} | }} | ||
Latest revision as of 10:23, 8 February 2025
| Strategy Name | 輸送船団護衛作戦 Convoy Escort Operation |
|---|---|
| Difficulty | ☆ ☆ ☆ ☆ ☆ ☆ |
| Item | |
| Strategy Content | 対潜及び防空能力に優れた艦艇を基幹戦力とした艦隊を編成、輸送船団航路の護衛にあたれ! Form a fleet consisting of ships with excellent anti-submarine warfare and anti-aircraft capabilities, and protect the transport ship routes! |
| 1-6 Unlocking & Progression | ||||
|---|---|---|---|---|
| Unlock conditions | 1-6 is unlocked after clearing 1-5 HP bar each month | |||
| Clear conditions | To clear the map: node N must be reached 7 times | |||
| Clearing rewards | 75 | |||
| Map reset | Resets at midnight JST at the beginning of every month | |||
Stage Guide
| 1-6 Branching Rules | ||
|---|---|---|
| Nodes | Rules | |
| Start | A |
|
C |
| |
G |
F |
|
K |
| |
M |
J |
|
L |
| |
Tips
There is no Boss node in this map. Instead, the final "Harbor Node" at N serves as the map's endpoint.
- A random amount of resources of either fuel, ammo, steel, or bauxite is rewarded upon reaching node N.
- The amount of resources rewarded at node N is great before clearing , and modest after clearing.
Only BBV, CVL, CA(V), CL, CT, DD, DE, AV, LHA, AS, AO, and AR can be used on this map.
- (F)BB, CV(B), CLT, and SS(V) are not allowed.
- Using BBV, CVL, or CA will route to node C which leads to a harder route. Submarine fleets with line ahead formation appear at node I (1/2 patterns).
- This route is mostly taken if a player wishes to brute-force the map or complete specific quests.
- Regarding nodes
- Nodes D F L are Air Battle nodes.
- Daytime combat at these nodes has two Aerial Combat phases but no shelling. It's also possible to do night battle afterward, unlike regular Air nodes.
- Having a ship with AACI is highly recommended to reduce damage taken here.
- If the fleet has no ships that can attack during Aerial Combat, it will get a D rank (see 1st D rank condition), unless entering night combat.
- Node N is an "End Node" and not a boss node, thus it will not count towards certain quests (namely Bw1) that require reaching a boss node.
- Therefore, it is possible to advance with a taiha ship from node B or D without risk of sinking any ship.
- An exception is if the flagship is heavily damaged, where retreat is forced. However, if it is equipped with a damage control
 , it is possible to activate it and continue (the item is not consumed here).
- Node E is a submarine node with Echelon formation. Because this node is so minor in nature, bringing ASW equipment is not required.
Recommended Fleet
| Light Fleet | ||||
|---|---|---|---|---|
| Fleet | 1 CL, 5 DD/DE | |||
| LoS | Speed | |||
| Any | Any | |||
| RouteNode Types: BLUE: Empty/Choice RED: Battle GREEN: Resource/TP VIOLET: Maelstrom PURPLE: Night Battle PINK: Air Raid/Battle ORANGE: Enemy Ambush/ASS |
A E G F B N | |||
| Fleet Notes | The only compositions that guarantee this routing.
Alternative fleets, able to get B rank at Node F, but with an off-route chance from G to K, which is a harder route:
| |||
| Air State | AD | AP | AS | AS+ |
| 25 | 37 | 83 | 166 | |
| Heavy Fleet | ||||
|---|---|---|---|---|
| Fleet | 2 BBV, 1 CL, 3 DD | |||
| LoS | Speed | |||
| Cn3: 30 | Any | |||
| RouteNode Types: BLUE: Empty/Choice RED: Battle GREEN: Resource/TP VIOLET: Maelstrom PURPLE: Night Battle PINK: Air Raid/Battle ORANGE: Enemy Ambush/ASS |
C H K M J D N | |||
| Fleet Notes | Should only be used for quests.
| |||
| Quests | Bq3 | |||
| Air State | AD | AP | AS | AS+ |
| 59 | 88 | 198 | 396 | |
Resource Nodes
G M are "Special Resource Nodes" rewarding respectively ammo ![]() , and fuel
, and fuel ![]() .
.
Additionally, node N is a special case with its unique set of rules.
- See here for more details.
Enemy Compositions

1-6 A
| # | Empty Node | ||
|---|---|---|---|
| A | 気のせいだった。/敵影を見ず。/穏やかな海です。/穏やかな海峡です。/警戒が必要です。/静かな海です。 Must be my imagination./No enemy spotted./Calm seas./Calm straits./Be alert./Peaceful seas. | ||
| # | Empty Node | ||
1-6 B: 任務部隊C群前衛部隊 (PoiDB)
| # | Enemy Form. |
Base EXP | Normal Battle Node | AD/AP AS/AS+ |
|---|---|---|---|---|
| B | Line Ahead | 100 | 0/0 0/0 | |
| Line Ahead | 120 | 0/0 0/0 | ||
| Line Ahead | 130 | 0/0 0/0 | ||
| Line Ahead | 140 | 9/17 36/72 | ||
| Line Ahead | 150 | 0/0 0/0 | ||
| # | Enemy Form. |
Base EXP | Normal Battle Node | AD/AP AS/AS+ |
1-6 C: 通商破壊潜水艦隊II群 (PoiDB)
| # | Enemy Form. |
Base EXP | Normal Battle Node | AD/AP AS/AS+ |
|---|---|---|---|---|
| C | Echelon | 20 | 0/0 0/0 | |
| Line Abreast | 20 | 0/0 0/0 | ||
| Echelon | 30 | 0/0 0/0 | ||
| Echelon | 30 | 0/0 0/0 | ||
| Line Abreast | 40 | 0/0 0/0 | ||
| Echelon | 50 | 0/0 0/0 | ||
| # | Enemy Form. |
Base EXP | Normal Battle Node | AD/AP AS/AS+ |
1-6 D: 任務部隊A群機動部隊(第二波) (PoiDB)
| # | Enemy Form. |
Base EXP | Aerial Battle Node | AD/AP AS/AS+ |
|---|---|---|---|---|
| D | Diamond | 110 | 17/33 72/144 | |
| Diamond | 110 | 17/33 72/144 | ||
| Diamond | 120 | 16/32 71/141 | ||
| Diamond | 130 | 24/48 107/213 | ||
| Diamond | 140 | 26/51 114/228 | ||
| Diamond | 150 | 45/89 198/396 | ||
| # | Enemy Form. |
Base EXP | Aerial Battle Node | AD/AP AS/AS+ |
1-6 E: 通商破壊潜水艦隊III群 (PoiDB)
| # | Enemy Form. |
Base EXP | Normal Battle Node | AD/AP AS/AS+ |
|---|---|---|---|---|
| E | Echelon | 20 | 0/0 0/0 | |
| Echelon | 20 | 0/0 0/0 | ||
| Echelon | 30 | 0/0 0/0 | ||
| Echelon | 30 | 0/0 0/0 | ||
| Echelon | 40 | 0/0 0/0 | ||
| Echelon | 50 | 0/0 0/0 | ||
| # | Enemy Form. |
Base EXP | Normal Battle Node | AD/AP AS/AS+ |
1-6 F: 任務部隊C群機動部隊 (PoiDB)
| # | Enemy Form. |
Base EXP | Aerial Battle Node | AD/AP AS/AS+ |
|---|---|---|---|---|
| F | Diamond | 50 | 10/19 41/81 | |
| Diamond | 50 | 17/33 72/144 | ||
| Diamond | 60 | 10/19 42/84 | ||
| Diamond | 60 | 16/32 71/141 | ||
| Diamond | 70 | 13/25 54/108 | ||
| Diamond | 70 | 18/35 78/156 | ||
| Diamond | 70 | 18/35 78/156 | ||
| Diamond | 80 | 19/37 83/165 | ||
| # | Enemy Form. |
Base EXP | Aerial Battle Node | AD/AP AS/AS+ |
1-6 G
| # | Resource Node | ||
|---|---|---|---|
| G | Gained 20 | ||
| # | Resource Node | ||
1-6 H
| # | Empty Node | ||
|---|---|---|---|
| H | 気のせいだった。/敵影を見ず。/穏やかな海です。/穏やかな海峡です。/警戒が必要です。/静かな海です。 Must be my imagination./No enemy spotted./Calm seas./Calm straits./Be alert./Peaceful seas. | ||
| # | Empty Node | ||
1-6 I: 通商破壊潜水艦隊I群 (PoiDB)
| # | Enemy Form. |
Base EXP | Normal Battle Node | AD/AP AS/AS+ |
|---|---|---|---|---|
| I | Line Ahead Echelon |
20 | 0/0 0/0 | |
| Line Ahead Echelon |
30 | 0/0 0/0 | ||
| Line Ahead Echelon |
40 | 0/0 0/0 | ||
| # | Enemy Form. |
Base EXP | Normal Battle Node | AD/AP AS/AS+ |
1-6 J: 任務部隊A群機動部隊本隊 (PoiDB)
| # | Enemy Form. |
Base EXP | Normal Battle Node | AD/AP AS/AS+ |
|---|---|---|---|---|
| J | Diamond | 170 | 10/19 42/84 | |
| Diamond | 170 | 15/30 66/132 | ||
| Diamond | 180 | 18/35 78/156 | ||
| Diamond | 200 | 37/73 162/324 | ||
| Diamond | 220 | 34/67 150/300 | ||
| Diamond | 220 | 40/79 177/354 | ||
| # | Enemy Form. |
Base EXP | Normal Battle Node | AD/AP AS/AS+ |
1-6 K: 任務部隊支援水上打撃部隊 (PoiDB)
| # | Enemy Form. |
Base EXP | Normal Battle Node | AD/AP AS/AS+ |
|---|---|---|---|---|
| K | Line Ahead | 70 | 0/0 0/0 | |
| Double Line | 80 | 0/0 0/0 | ||
| Line Ahead | 90 | 0/0 0/0 | ||
| Double Line | 100 | 0/0 0/0 | ||
| Line Ahead | 110 | 0/0 0/0 | ||
| # | Enemy Form. |
Base EXP | Normal Battle Node | AD/AP AS/AS+ |
1-6 L: 任務部隊A群機動部隊(第一波) (PoiDB)
| # | Enemy Form. |
Base EXP | Aerial Battle Node | AD/AP AS/AS+ |
|---|---|---|---|---|
| L | Diamond | 100 | 16/32 71/141 | |
| Diamond | 100 | 24/48 107/213 | ||
| Diamond | 110 | 26/51 114/228 | ||
| Diamond | 120 | 45/89 198/396 | ||
| Diamond | 120 | 46/91 203/405 | ||
| Diamond | 130 | 65/129 288/576 | ||
| # | Enemy Form. |
Base EXP | Aerial Battle Node | AD/AP AS/AS+ |
1-6 M
| # | Resource Node | ||
|---|---|---|---|
| M | Gained 40 | ||
| # | Resource Node | ||
1-6 N
| # | Resource Node | ||
|---|---|---|---|
| N | Gained 300-500-700-1000 | ||
| N | Gained 300-500 | ||
| N | Gained 100-300 | ||
| N | Gained 100-200 | ||
| N | Gained 30-50-70-100 | ||
| N | Gained 50-70-100 | ||
| N | Gained 50-70-100 | ||
| N | Gained 50 | ||
| # | Resource Node | ||
Ship Drops
This map currently has "limited-time" drops, see Drop List for more info.
- The below table contains limited-time drop data and may not be up to date.
| Ship drops | |||||||||||||||||||||||||||||||||||||||||||||||||||||||||||||||||||||||||||||||||||||||||||||||||||
|---|---|---|---|---|---|---|---|---|---|---|---|---|---|---|---|---|---|---|---|---|---|---|---|---|---|---|---|---|---|---|---|---|---|---|---|---|---|---|---|---|---|---|---|---|---|---|---|---|---|---|---|---|---|---|---|---|---|---|---|---|---|---|---|---|---|---|---|---|---|---|---|---|---|---|---|---|---|---|---|---|---|---|---|---|---|---|---|---|---|---|---|---|---|---|---|---|---|---|---|
| Type | Ship? | B | C | D | E | F | I | J | K | L | |||||||||||||||||||||||||||||||||||||||||||||||||||||||||||||||||||||||||||||||||||||||||
| DD | Asagumo | ✔️ | ✔️ | ||||||||||||||||||||||||||||||||||||||||||||||||||||||||||||||||||||||||||||||||||||||||||||||||
| DD | Isokaze | ✔️ | ✔️ | ✔️ | ✔️ | ||||||||||||||||||||||||||||||||||||||||||||||||||||||||||||||||||||||||||||||||||||||||||||||
| CL | Ooyodo | ✔️ | ✔️ | ||||||||||||||||||||||||||||||||||||||||||||||||||||||||||||||||||||||||||||||||||||||||||||||||
| DD | Urakaze | ✔️ | ✔️ | ✔️ | |||||||||||||||||||||||||||||||||||||||||||||||||||||||||||||||||||||||||||||||||||||||||||||||
| DD | Hamakaze | ✔️ | ✔️ | ✔️ | |||||||||||||||||||||||||||||||||||||||||||||||||||||||||||||||||||||||||||||||||||||||||||||||
| CL | Kitakami | ✔️ | ✔️ | ✔️ | |||||||||||||||||||||||||||||||||||||||||||||||||||||||||||||||||||||||||||||||||||||||||||||||
| CL | Nagara | ✔️ | ✔️ | ✔️ | ✔️ | ✔️ | |||||||||||||||||||||||||||||||||||||||||||||||||||||||||||||||||||||||||||||||||||||||||||||
| CL | Yuubari | ✔️ | ✔️ | ✔️ | |||||||||||||||||||||||||||||||||||||||||||||||||||||||||||||||||||||||||||||||||||||||||||||||
| CA | Tone | ✔️ | ✔️ | ✔️ | |||||||||||||||||||||||||||||||||||||||||||||||||||||||||||||||||||||||||||||||||||||||||||||||
| CVL | Junyou | ✔️ | ✔️ | ✔️ | |||||||||||||||||||||||||||||||||||||||||||||||||||||||||||||||||||||||||||||||||||||||||||||||
| DD | Kisaragi | ✔️ | ✔️ | ✔️ | ✔️ | ✔️ | ✔️ | ✔️ | ✔️ | ✔️ | |||||||||||||||||||||||||||||||||||||||||||||||||||||||||||||||||||||||||||||||||||||||||
| DD | Satsuki | ✔️ | ✔️ | ✔️ | ✔️ | ✔️ | ✔️ | ✔️ | ✔️ | ✔️ | |||||||||||||||||||||||||||||||||||||||||||||||||||||||||||||||||||||||||||||||||||||||||
| DD | Fumizuki | ✔️ | ✔️ | ✔️ | ✔️ | ✔️ | ✔️ | ✔️ | ✔️ | ✔️ | |||||||||||||||||||||||||||||||||||||||||||||||||||||||||||||||||||||||||||||||||||||||||
| DD | Nagatsuki | ✔️ | ✔️ | ✔️ | ✔️ | ✔️ | ✔️ | ✔️ | ✔️ | ✔️ | |||||||||||||||||||||||||||||||||||||||||||||||||||||||||||||||||||||||||||||||||||||||||
| DD | Kikuzuki | ✔️ | ✔️ | ✔️ | ✔️ | ✔️ | ✔️ | ✔️ | ✔️ | ✔️ | |||||||||||||||||||||||||||||||||||||||||||||||||||||||||||||||||||||||||||||||||||||||||
| DD | Mikazuki | ✔️ | ✔️ | ✔️ | ✔️ | ✔️ | ✔️ | ✔️ | ✔️ | ✔️ | |||||||||||||||||||||||||||||||||||||||||||||||||||||||||||||||||||||||||||||||||||||||||
| DD | Mochizuki | ✔️ | ✔️ | ✔️ | ✔️ | ✔️ | ✔️ | ✔️ | ✔️ | ✔️ | |||||||||||||||||||||||||||||||||||||||||||||||||||||||||||||||||||||||||||||||||||||||||
| DD | Shirayuki | ✔️ | ✔️ | ✔️ | ✔️ | ✔️ | ✔️ | ||||||||||||||||||||||||||||||||||||||||||||||||||||||||||||||||||||||||||||||||||||||||||||
| DD | Hatsuyuki | ✔️ | ✔️ | ✔️ | ✔️ | ✔️ | ✔️ | ||||||||||||||||||||||||||||||||||||||||||||||||||||||||||||||||||||||||||||||||||||||||||||
| DD | Miyuki | ✔️ | ✔️ | ✔️ | ✔️ | ✔️ | ✔️ | ✔️ | ✔️ | ||||||||||||||||||||||||||||||||||||||||||||||||||||||||||||||||||||||||||||||||||||||||||
| DD | Murakumo | ✔️ | ✔️ | ✔️ | ✔️ | ✔️ | ✔️ | ✔️ | ✔️ | ||||||||||||||||||||||||||||||||||||||||||||||||||||||||||||||||||||||||||||||||||||||||||
| DD | Isonami | ✔️ | ✔️ | ✔️ | ✔️ | ✔️ | ✔️ | ✔️ | |||||||||||||||||||||||||||||||||||||||||||||||||||||||||||||||||||||||||||||||||||||||||||
| DD | Shikinami | ✔️ | ✔️ | ✔️ | ✔️ | ✔️ | ✔️ | ✔️ | ✔️ | ✔️ | |||||||||||||||||||||||||||||||||||||||||||||||||||||||||||||||||||||||||||||||||||||||||
| DD | Oboro | ✔️ | ✔️ | ✔️ | ✔️ | ✔️ | ✔️ | ✔️ | ✔️ | ✔️ | |||||||||||||||||||||||||||||||||||||||||||||||||||||||||||||||||||||||||||||||||||||||||
| DD | Akebono | ✔️ | ✔️ | ✔️ | ✔️ | ✔️ | ✔️ | ✔️ | ✔️ | ✔️ | |||||||||||||||||||||||||||||||||||||||||||||||||||||||||||||||||||||||||||||||||||||||||
| DD | Sazanami | ✔️ | ✔️ | ✔️ | ✔️ | ✔️ | ✔️ | ✔️ | ✔️ | ✔️ | |||||||||||||||||||||||||||||||||||||||||||||||||||||||||||||||||||||||||||||||||||||||||
| DD | Ushio | ✔️ | ✔️ | ✔️ | ✔️ | ✔️ | ✔️ | ✔️ | ✔️ | ✔️ | |||||||||||||||||||||||||||||||||||||||||||||||||||||||||||||||||||||||||||||||||||||||||
| DD | Hibiki | ✔️ | ✔️ | ✔️ | ✔️ | ✔️ | ✔️ | ✔️ | ✔️ | ✔️ | |||||||||||||||||||||||||||||||||||||||||||||||||||||||||||||||||||||||||||||||||||||||||
| DD | Ikazuchi | ✔️ | ✔️ | ✔️ | ✔️ | ✔️ | ✔️ | ✔️ | ✔️ | ✔️ | |||||||||||||||||||||||||||||||||||||||||||||||||||||||||||||||||||||||||||||||||||||||||
| DD | Inazuma | ✔️ | ✔️ | ✔️ | ✔️ | ✔️ | ✔️ | ✔️ | ✔️ | ✔️ | |||||||||||||||||||||||||||||||||||||||||||||||||||||||||||||||||||||||||||||||||||||||||
| DD | Nenohi | ✔️ | ✔️ | ✔️ | ✔️ | ✔️ | ✔️ | ✔️ | ✔️ | ✔️ | |||||||||||||||||||||||||||||||||||||||||||||||||||||||||||||||||||||||||||||||||||||||||
| DD | Wakaba | ✔️ | ✔️ | ✔️ | ✔️ | ✔️ | ✔️ | ✔️ | ✔️ | ✔️ | |||||||||||||||||||||||||||||||||||||||||||||||||||||||||||||||||||||||||||||||||||||||||
| DD | Hatsushimo | ✔️ | ✔️ | ✔️ | ✔️ | ✔️ | ✔️ | ✔️ | ✔️ | ✔️ | |||||||||||||||||||||||||||||||||||||||||||||||||||||||||||||||||||||||||||||||||||||||||
| DD | Shigure | ✔️ | ✔️ | ✔️ | ✔️ | ✔️ | ✔️ | ✔️ | ✔️ | ✔️ | |||||||||||||||||||||||||||||||||||||||||||||||||||||||||||||||||||||||||||||||||||||||||
| DD | Murasame | ✔️ | ✔️ | ✔️ | ✔️ | ✔️ | ✔️ | ✔️ | ✔️ | ✔️ | |||||||||||||||||||||||||||||||||||||||||||||||||||||||||||||||||||||||||||||||||||||||||
| DD | Yuudachi | ✔️ | ✔️ | ✔️ | ✔️ | ✔️ | ✔️ | ✔️ | ✔️ | ✔️ | |||||||||||||||||||||||||||||||||||||||||||||||||||||||||||||||||||||||||||||||||||||||||
| DD | Samidare | ✔️ | ✔️ | ✔️ | ✔️ | ✔️ | ✔️ | ✔️ | ✔️ | ✔️ | |||||||||||||||||||||||||||||||||||||||||||||||||||||||||||||||||||||||||||||||||||||||||
| DD | Ooshio | ✔️ | ✔️ | ✔️ | ✔️ | ✔️ | ✔️ | ✔️ | ✔️ | ✔️ | |||||||||||||||||||||||||||||||||||||||||||||||||||||||||||||||||||||||||||||||||||||||||
| DD | Michishio | ✔️ | ✔️ | ✔️ | ✔️ | ✔️ | ✔️ | ✔️ | ✔️ | ✔️ | |||||||||||||||||||||||||||||||||||||||||||||||||||||||||||||||||||||||||||||||||||||||||
| DD | Arashio | ✔️ | ✔️ | ✔️ | ✔️ | ✔️ | ✔️ | ✔️ | ✔️ | ✔️ | |||||||||||||||||||||||||||||||||||||||||||||||||||||||||||||||||||||||||||||||||||||||||
| DD | Arare | ✔️ | ✔️ | ✔️ | ✔️ | ✔️ | ✔️ | ✔️ | ✔️ | ✔️ | |||||||||||||||||||||||||||||||||||||||||||||||||||||||||||||||||||||||||||||||||||||||||
| DD | Kasumi | ✔️ | ✔️ | ✔️ | ✔️ | ✔️ | ✔️ | ✔️ | ✔️ | ✔️ | |||||||||||||||||||||||||||||||||||||||||||||||||||||||||||||||||||||||||||||||||||||||||
| DD | Shiranui | ✔️ | ✔️ | ✔️ | ✔️ | ✔️ | ✔️ | ✔️ | ✔️ | ✔️ | |||||||||||||||||||||||||||||||||||||||||||||||||||||||||||||||||||||||||||||||||||||||||
| DD | Kuroshio | ✔️ | ✔️ | ✔️ | ✔️ | ✔️ | ✔️ | ✔️ | ✔️ | ✔️ | |||||||||||||||||||||||||||||||||||||||||||||||||||||||||||||||||||||||||||||||||||||||||
| CL | Tenryuu | ✔️ | ✔️ | ✔️ | ✔️ | ✔️ | |||||||||||||||||||||||||||||||||||||||||||||||||||||||||||||||||||||||||||||||||||||||||||||
| CL | Tatsuta | ✔️ | ✔️ | ✔️ | ✔️ | ✔️ | |||||||||||||||||||||||||||||||||||||||||||||||||||||||||||||||||||||||||||||||||||||||||||||
| CL | Isuzu | ✔️ | ✔️ | ✔️ | ✔️ | ✔️ | ✔️ | ||||||||||||||||||||||||||||||||||||||||||||||||||||||||||||||||||||||||||||||||||||||||||||
| CL | Natori | ✔️ | ✔️ | ✔️ | ✔️ | ✔️ | ✔️ | ||||||||||||||||||||||||||||||||||||||||||||||||||||||||||||||||||||||||||||||||||||||||||||
| CL | Yura | ✔️ | ✔️ | ✔️ | ✔️ | ✔️ | |||||||||||||||||||||||||||||||||||||||||||||||||||||||||||||||||||||||||||||||||||||||||||||
| CA | Aoba | ✔️ | ✔️ | ✔️ | ✔️ | ||||||||||||||||||||||||||||||||||||||||||||||||||||||||||||||||||||||||||||||||||||||||||||||
| CVL | Houshou | ✔️ | ✔️ | ✔️ | |||||||||||||||||||||||||||||||||||||||||||||||||||||||||||||||||||||||||||||||||||||||||||||||
| AV | Chitose | ✔️ | ✔️ | ✔️ | ✔️ | ✔️ | ✔️ | ||||||||||||||||||||||||||||||||||||||||||||||||||||||||||||||||||||||||||||||||||||||||||||
| AV | Chiyoda | ✔️ | ✔️ | ✔️ | ✔️ | ✔️ | ✔️ | ||||||||||||||||||||||||||||||||||||||||||||||||||||||||||||||||||||||||||||||||||||||||||||