- Welcome to the Kancolle Wiki!
- If you have any questions regarding site content, account registration, etc., please visit the KanColle Wiki Discord
Difference between revisions of "World 2/2-5"
< World 2
Jump to navigation
Jump to search
Jigaraphale (talk | contribs) m |
Jigaraphale (talk | contribs) |
||
| (13 intermediate revisions by 3 users not shown) | |||
| Line 1: | Line 1: | ||
{{World/Hub}} | {{World/Hub}} | ||
| − | + | =World 2-5 Extra Operation: 沖ノ島沖 - Off Okinoshima Island= | |
{{LabSortieworld | {{LabSortieworld | ||
| page = World 2/2-5 | | page = World 2/2-5 | ||
| Line 6: | Line 6: | ||
| item = {{Fuel}} {{Steel}} | | item = {{Fuel}} {{Steel}} | ||
| exp = 250 | | exp = 250 | ||
| − | | code = 沖ノ島沖戦闘哨戒 | + | | code = 沖ノ島沖戦闘哨戒<br>Combat Patrol Off Okinoshima |
| jptext = 同方面に敵反攻の兆候が報告された。巡洋艦を中心に哨戒部隊を編成、敵艦隊の動向を探れ! | | jptext = 同方面に敵反攻の兆候が報告された。巡洋艦を中心に哨戒部隊を編成、敵艦隊の動向を探れ! | ||
| entext = There are reports of an enemy counteroffensive. Form a cruiser patrol group and track their movements! | | entext = There are reports of an enemy counteroffensive. Form a cruiser patrol group and track their movements! | ||
| aircon = | | aircon = | ||
| − | {{ | + | {{AirConKai |
| − | + | |AS=42 | |
| − | | AS = 42 | + | |ASr=114 |
| − | | | + | }} |
| − | |||
| − | |||
}} | }} | ||
| + | |||
| + | {{MapUnlock | ||
| + | | unlock= [[2-4]] | ||
| + | | clear= the boss's flagship must be sunk 4 times | ||
| + | | reward= '''100 {{Item/Icon|Ranking Point Reward|size=25px}} [[Ranking Point]]s''' and '''1 {{Medal}} [[Medal]]''' | ||
| + | | reset= Resets at midnight JST at the beginning of every month | ||
}} | }} | ||
| Line 38: | Line 42: | ||
|C -> D/empty, E = | |C -> D/empty, E = | ||
| − | * Meeting '''ANY''' of the following '''FORCES''' | + | * Meeting '''ANY''' of the following '''FORCES''' to D |
| − | ** Amount of CV(L | + | ** Amount of CV(B/L) ≥ 3 |
** Amount of (F)BB(V) ≥ 3 | ** Amount of (F)BB(V) ≥ 3 | ||
* Meet '''ANY''' of the following requirements to go to E | * Meet '''ANY''' of the following requirements to go to E | ||
| Line 57: | Line 61: | ||
|F -> E, J = | |F -> E, J = | ||
| − | * Meet ''' | + | * Go to J if Slow Fleet |
| − | + | * Meet '''ANY''' of the following requirements to go to E: | |
| − | ** Fleet contains CL | + | ** Fleet contains CL. Amount of DD ≥ 2 |
| − | + | ** Amount of DD ≥ 3 | |
| − | * | + | * Otherwise, random (65% J). |
| − | * Otherwise, | ||
|G/storm -> I/empty = | |G/storm -> I/empty = | ||
* Meet '''ALL''' of the following requirements | * Meet '''ALL''' of the following requirements | ||
| − | **Fleet contains no (F)BB(V) or CV(L | + | **Fleet contains no (F)BB(V) or CV(B/L) |
**CL+DD ≥ 4 | **CL+DD ≥ 4 | ||
**CL ≤ 1 | **CL ≤ 1 | ||
| Line 97: | Line 100: | ||
===Tips=== | ===Tips=== | ||
| − | + | This map requires a relatively high [[LoS|Effective Line of Sight]] (eLoS) in order to route to the boss. | |
| − | + | ||
| − | + | There are 3 main routes: | |
| − | + | *The middle route is the preferred route used for clearing since it allows for 1 CV and 1 CVL to be brought, enabling powerful opening airstrikes. | |
| − | ** | + | *The top north route should be considered for clearing quests such as {{Q|Bm1}}, it can also be used for clearing despite the high cost. |
| − | * | + | *The north-middle route should only be used for clearing quests that banned heavy ships and only allow up to 1 CA(V) such as {{Q|Bm7}}. |
===Recommended Fleets=== | ===Recommended Fleets=== | ||
| − | + | {{FleetGuide | |
| − | + | | Map = Middle Route | |
| − | + | | Fleet = '''0-1 CV(B), 1-2 CVL, 1 CL, 3 DD | |
| − | + | | LOS = Cn1: 34 | |
| + | | Speed = Fast | ||
| + | | Route = {{MapRoute|C|red|E|red|I|blue|O|red}} | ||
| + | | AS = 42 | ||
| + | | Note = Attention should be given to fleet ordering to maximize day battle performances. | ||
| + | CV(B/L) able to perform strong opening airstrikes and [[CVCI]] should be used, to maximize accuracy and shelling power against the enemies at the boss node. | ||
| + | | Quest = | ||
| + | }} | ||
| − | + | {{FleetGuide | |
| − | | | + | | Map = North Route |
| − | + | | Fleet = '''1 BBV, 3 CA, 2 CAV/CL''', both CAV/CL need to carry 1 {{Drum}} {{EquipmentLink|Drum Canister (Transport Use)|text=Drum}} | |
| − | + | | LOS = Cn1: 49 | |
| − | + | | Route = {{MapRoute|B|red|F|red|J|red|O|red}} | |
| − | + | | AS = 42 | |
| − | + | | Note = All enemy compositions before the boss do not have any air power, making it easy to secure Air Supremacy (AS+) with just 1 bomber. | |
| − | * | + | *It is recommended to bring several [[Dive Bomber]]s and [[Seaplane Bomber]]s with AA {{AA}} to secure AS at the boss. |
| − | * | + | *'''[[Artillery Spotting]]''' should be used to increase the likelihood of reaching the boss node. |
| + | The boss formation is random between 3 Ru-class battleships, or 2 Ru-class battleships and 1 Wo-class carrier. | ||
| + | | Quest = {{Q|Bm1}} | ||
| + | }} | ||
| − | |-| | + | {{FleetGuide |
| − | + | | Map = North-Middle Route | |
| − | + | | Fleet = 1 CA(V), 1 CL, 4 DD | |
| − | + | | LOS = Cn1: 34 | |
| − | *'''[[ | + | | Speed = Fast |
| − | + | | Route = {{MapRoute|B|red|F|red|E|red|I|blue|O|red}} | |
| − | * | + | | AS = 42 |
| − | + | | Note = This route is difficult without access to ships that are able to equip [[SPF]]/[[SPB]] to gain some air power. | |
| + | *'''[[Zara Due]]''' is an ideal choice, being an SPF/SPB capable CA with a large first slot, ensuring that the SPB can survive until the boss node, potentially securing AS+. SPF may also be included to secure AS on the boss. | ||
| + | *Otherwise, any single CA or CL able to carry SPB/SPF will be sufficient to secure [[Artillery Spotting]] for the pre-boss nodes. | ||
| + | Please note that as the fleet is pretty light, there is a good chance of getting heavily damaged before reaching the boss node. Sparkling may help a bit to reach the boss node consistency. | ||
| + | | Quest = {{Q|Bm7}} | ||
| + | }} | ||
| + | |||
| + | {{FleetGuide | ||
| + | | Map = South Route | ||
| + | | Fleet = 2 (F)BB(V)/CV(B/L), 0-1 CA(V), 1 CL, 2-3 DD | ||
| + | | Route = {{MapRoute|B|red|F|red|E|red|G|violet|L|red|O|red}} | ||
| + | | AS = 114 | ||
| + | | Note = A hard route, only recommended for exautic quests. | ||
| + | It allows to bring a much heavier fleet, with no speed or LoS requirement. | ||
| + | *Node {{MapRoute|G|violet}} is a strong storm, so bringing several {{Radar}} is recommended. | ||
| + | | Quest = | ||
| + | }} | ||
| − | + | ===Resource Nodes=== | |
| − | + | {{MapRoute|M|green|N|green}} are "Special Resource Nodes" rewarding respectively fuel {{Fuel}} and ammo {{Ammo}}. | |
| − | + | *''See [[Resource Node|here]] for more details. | |
| − | |||
| − | * | ||
| − | |||
| − | |||
| − | |||
| − | |||
| − | |||
{{Map/Footer|2-5| | {{Map/Footer|2-5| | ||
Latest revision as of 08:41, 9 March 2025
World 2-5 Extra Operation: 沖ノ島沖 - Off Okinoshima Island
| Strategy Name | 沖ノ島沖戦闘哨戒 Combat Patrol Off Okinoshima |
|---|---|
| Difficulty | ☆ ☆ ☆ ☆ ☆ ☆ ☆ ☆ |
| Item | |
| Strategy Content | 同方面に敵反攻の兆候が報告された。巡洋艦を中心に哨戒部隊を編成、敵艦隊の動向を探れ! There are reports of an enemy counteroffensive. Form a cruiser patrol group and track their movements! |
| Boss Air Control | |||
|---|---|---|---|
| AD | AP | AS | AS+ |
| 13 | 19 | 42 | 84 |
| Boss Route Air Control | |||
| AD | AP | AS | AS+ |
| 34 | 51 | 114 | 228 |
| 2-5 Unlocking & Progression | ||||
|---|---|---|---|---|
| Unlock conditions | 2-5 is unlocked after clearing 2-4 | |||
| Clear conditions | To clear the map: the boss's flagship must be sunk 4 times | |||
| Clearing rewards | 100 | |||
| Map reset | Resets at midnight JST at the beginning of every month | |||
Stage Guide
| 2-5 Branching Rules |
|---|
Tips
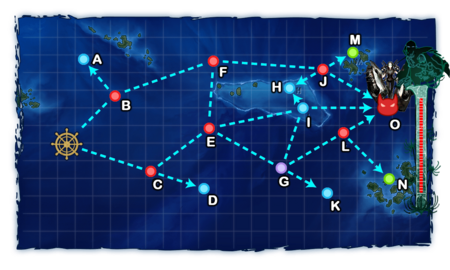
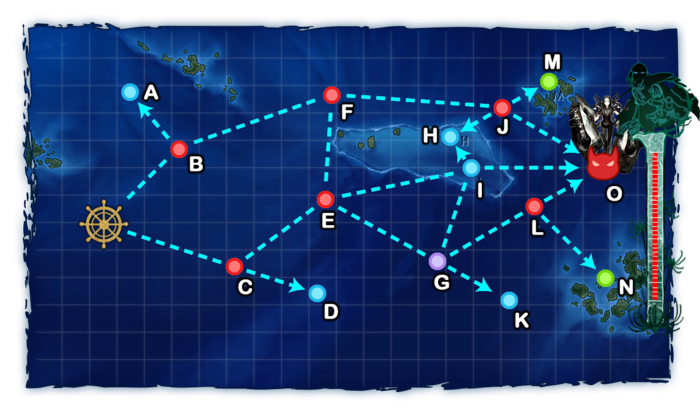
This map requires a relatively high Effective Line of Sight (eLoS) in order to route to the boss.
There are 3 main routes:
- The middle route is the preferred route used for clearing since it allows for 1 CV and 1 CVL to be brought, enabling powerful opening airstrikes.
- The top north route should be considered for clearing quests such as Bm1, it can also be used for clearing despite the high cost.
- The north-middle route should only be used for clearing quests that banned heavy ships and only allow up to 1 CA(V) such as Bm7.
Recommended Fleets
| ExpandMiddle Route |
|---|
| ExpandNorth Route |
|---|

| ExpandNorth-Middle Route |
|---|
| ExpandSouth Route |
|---|
Resource Nodes
M N are "Special Resource Nodes" rewarding respectively fuel ![]() and ammo
and ammo ![]() .
.
- See here for more details.
Enemy CompositionsCollapse
2-5 A
| # | Empty Node | ||
|---|---|---|---|
| A | 気のせいだった。/敵影を見ず。/穏やかな海です。/穏やかな海峡です。/警戒が必要です。/静かな海です。 Must be my imagination./No enemy spotted./Calm seas./Calm straits./Be alert./Peaceful seas. | ||
| # | Empty Node | ||
2-5 B: 敵前衛艦隊 (PoiDB)
| # | Enemy Form. |
Base EXP | Normal Battle Node | AD/AP AS/AS+ |
|---|---|---|---|---|
| B | Line Ahead Double Line |
160 | 0/0 0/0 | |
| Line Ahead Double Line |
170 | 0/0 0/0 | ||
| Line Ahead Double Line |
180 | 0/0 0/0 | ||
| Line Ahead | 190 | 0/0 0/0 | ||
| # | Enemy Form. |
Base EXP | Normal Battle Node | AD/AP AS/AS+ |
2-5 C: 敵侵攻前衛艦隊A群 (PoiDB)
| # | Enemy Form. |
Base EXP | Normal Battle Node | AD/AP AS/AS+ |
|---|---|---|---|---|
| C | Line Ahead Diamond |
160 | 9/17 36/72 | |
| Line Ahead Diamond |
170 | 8/16 35/69 | ||
| Line Ahead Diamond |
180 | 8/16 35/69 | ||
| Diamond | 180 | 8/16 35/69 | ||
| Line Ahead | 190 | 8/16 35/69 | ||
| Line Ahead | 200 | 8/16 35/69 | ||
| # | Enemy Form. |
Base EXP | Normal Battle Node | AD/AP AS/AS+ |
2-5 D
| # | Empty Node | ||
|---|---|---|---|
| D | 気のせいだった。/敵影を見ず。/穏やかな海です。/穏やかな海峡です。/警戒が必要です。/静かな海です。 Must be my imagination./No enemy spotted./Calm seas./Calm straits./Be alert./Peaceful seas. | ||
| # | Empty Node | ||
2-5 E: 敵侵攻重巡戦隊 (PoiDB)
| # | Enemy Form. |
Base EXP | Normal Battle Node | AD/AP AS/AS+ |
|---|---|---|---|---|
| E | Line Ahead Double Line |
180 | 0/0 0/0 | |
| Line Ahead Double Line |
190 | 0/0 0/0 | ||
| Line Ahead Double Line |
210 | 0/0 0/0 | ||
| Line Ahead | 220 | 0/0 0/0 | ||
| # | Enemy Form. |
Base EXP | Normal Battle Node | AD/AP AS/AS+ |
2-5 F: 敵侵攻水雷戦隊 (PoiDB)
| # | Enemy Form. |
Base EXP | Normal Battle Node | AD/AP AS/AS+ |
|---|---|---|---|---|
| F | Line Ahead Echelon |
120 | 0/0 0/0 | |
| Line Ahead Echelon |
130 | 0/0 0/0 | ||
| Line Ahead Echelon |
150 | 0/0 0/0 | ||
| Line Ahead Echelon |
180 | 0/0 0/0 | ||
| Line Ahead | 200 | 0/0 0/0 | ||
| # | Enemy Form. |
Base EXP | Normal Battle Node | AD/AP AS/AS+ |
2-5 G
| # | Maelstrom Node | ||
|---|---|---|---|
| G | Lost Strong | ||
| # | Maelstrom Node | ||
2-5 H
| # | Empty Node | ||
|---|---|---|---|
| H | 気のせいだった。/敵影を見ず。/穏やかな海です。/穏やかな海峡です。/警戒が必要です。/静かな海です。 Must be my imagination./No enemy spotted./Calm seas./Calm straits./Be alert./Peaceful seas. | ||
| # | Empty Node | ||
2-5 I
| # | Empty Node | ||
|---|---|---|---|
| I | 気のせいだった。/敵影を見ず。/穏やかな海です。/穏やかな海峡です。/警戒が必要です。/静かな海です。 Must be my imagination./No enemy spotted./Calm seas./Calm straits./Be alert./Peaceful seas. | ||
| # | Empty Node | ||
2-5 J: 敵侵攻水上打撃部隊 (PoiDB)
| # | Enemy Form. |
Base EXP | Normal Battle Node | AD/AP AS/AS+ |
|---|---|---|---|---|
| J | Line Ahead Double Line Echelon |
200 | 0/0 0/0 | |
| Line Ahead Double Line Echelon |
220 | 0/0 0/0 | ||
| Line Ahead Double Line Echelon |
250 | 0/0 0/0 | ||
| Line Ahead Double Line Echelon |
250 | 0/0 0/0 | ||
| # | Enemy Form. |
Base EXP | Normal Battle Node | AD/AP AS/AS+ |
2-5 K
| # | Empty Node | ||
|---|---|---|---|
| K | 気のせいだった。/敵影を見ず。/穏やかな海です。/穏やかな海峡です。/警戒が必要です。/静かな海です。 Must be my imagination./No enemy spotted./Calm seas./Calm straits./Be alert./Peaceful seas. | ||
| # | Empty Node | ||
2-5 L: 敵侵攻機動部隊 (PoiDB)
| # | Enemy Form. |
Base EXP | Normal Battle Node | AD/AP AS/AS+ |
|---|---|---|---|---|
| L | Diamond | 170 | 18/35 77/153 | |
| Diamond | 190 | 18/35 78/156 | ||
| Diamond | 200 | 18/35 78/156 | ||
| Diamond | 220 | 26/51 114/228 | ||
| Diamond | 240 | 26/51 114/228 | ||
| Diamond | 250 | 26/51 113/225 | ||
| Diamond | 270 | 25/50 111/222 | ||
| # | Enemy Form. |
Base EXP | Normal Battle Node | AD/AP AS/AS+ |
2-5 M
| # | Resource Node | ||
|---|---|---|---|
| M | Gained 50 | ||
| # | Resource Node | ||
2-5 N
| # | Resource Node | ||
|---|---|---|---|
| N | Gained 50 | ||
| # | Resource Node | ||
2-5 O: 敵侵攻中枢艦隊 (PoiDB)
| # | Enemy Form. |
Base EXP | Boss Battle Node | AD/AP AS/AS+ |
|---|---|---|---|---|
| O | Line Ahead | 330 | 0/0 0/0 | |
| Line Ahead | 360 | 0/0 0/0 | ||
| Line Ahead | 400 | 0/0 0/0 | ||
| Double Line Diamond |
330 | 10/19 42/84 | ||
| Double Line Diamond |
360 | 10/19 42/84 | ||
| Double Line Diamond |
400 | 10/19 42/84 | ||
| # | Enemy Form. |
Base EXP | Boss Battle Node | AD/AP AS/AS+ |
Ship Drops
- Akashi drops only if currently not possessed, meaning that duplicates cannot be dropped here.
This map currently has "limited-time" drops that don't appear in the table below, see Drop List for more info.
☒ All drops (disabled, only rare drops)
| ExpandShip drops |
|---|
| ||